FT 50942 SS - Deep fryer KALORIK - Free user manual and instructions
Find the device manual for free FT 50942 SS KALORIK in PDF.


| Product Type | Air Fryer |
| Brand | Kalorik |
| Model | FT 50942 SS |
| Voltage | 120 V, 60 Hz |
| Power | 1700 W |
| Capacity | 7 Qt (6.6 L) |
| Temperature Range | 82 °C – 200 °C (180 °F – 400 °F) |
| Timer | 0 to 60 minutes, auto shut-off |
| Preset Menus | 8 (chicken breast, chicken wings, steak, fish, shrimp, fries, vegetables, reheat) |
| Display | Digital touch screen |
| Exterior Material | Stainless steel |
| Basket and Trivet Coating | Non-stick |
| Cleaning Basket and Trivet | Dishwasher or warm soapy water |
| Cleaning the Interior | Damp cloth, do not immerse |
| Safety | Micro-switch auto shut-off if basket removed |
| Warranty | 1 year (USA and Canada) |
| Included Accessories | Basket, trivet, instruction manual |
Frequently Asked Questions - FT 50942 SS KALORIK
User questions about FT 50942 SS KALORIK
0 question about this device. Answer the ones you know or ask your own.
Ask a new question about this device
Download the instructions for your Deep fryer in PDF format for free! Find your manual FT 50942 SS - KALORIK and take your electronic device back in hand. On this page are published all the documents necessary for the use of your device. FT 50942 SS by KALORIK.
USER MANUAL FT 50942 SS KALORIK
natural_image
KALORIK air fryer with digital display showing 400°F temperature and control buttons (no text or symbols on device body)EN......2
ES: .....18
FR.....35
AIR FRYER PRO
FREIDORA DE AIRE PRO
FRITEUSE À AIR CHAUD PRO
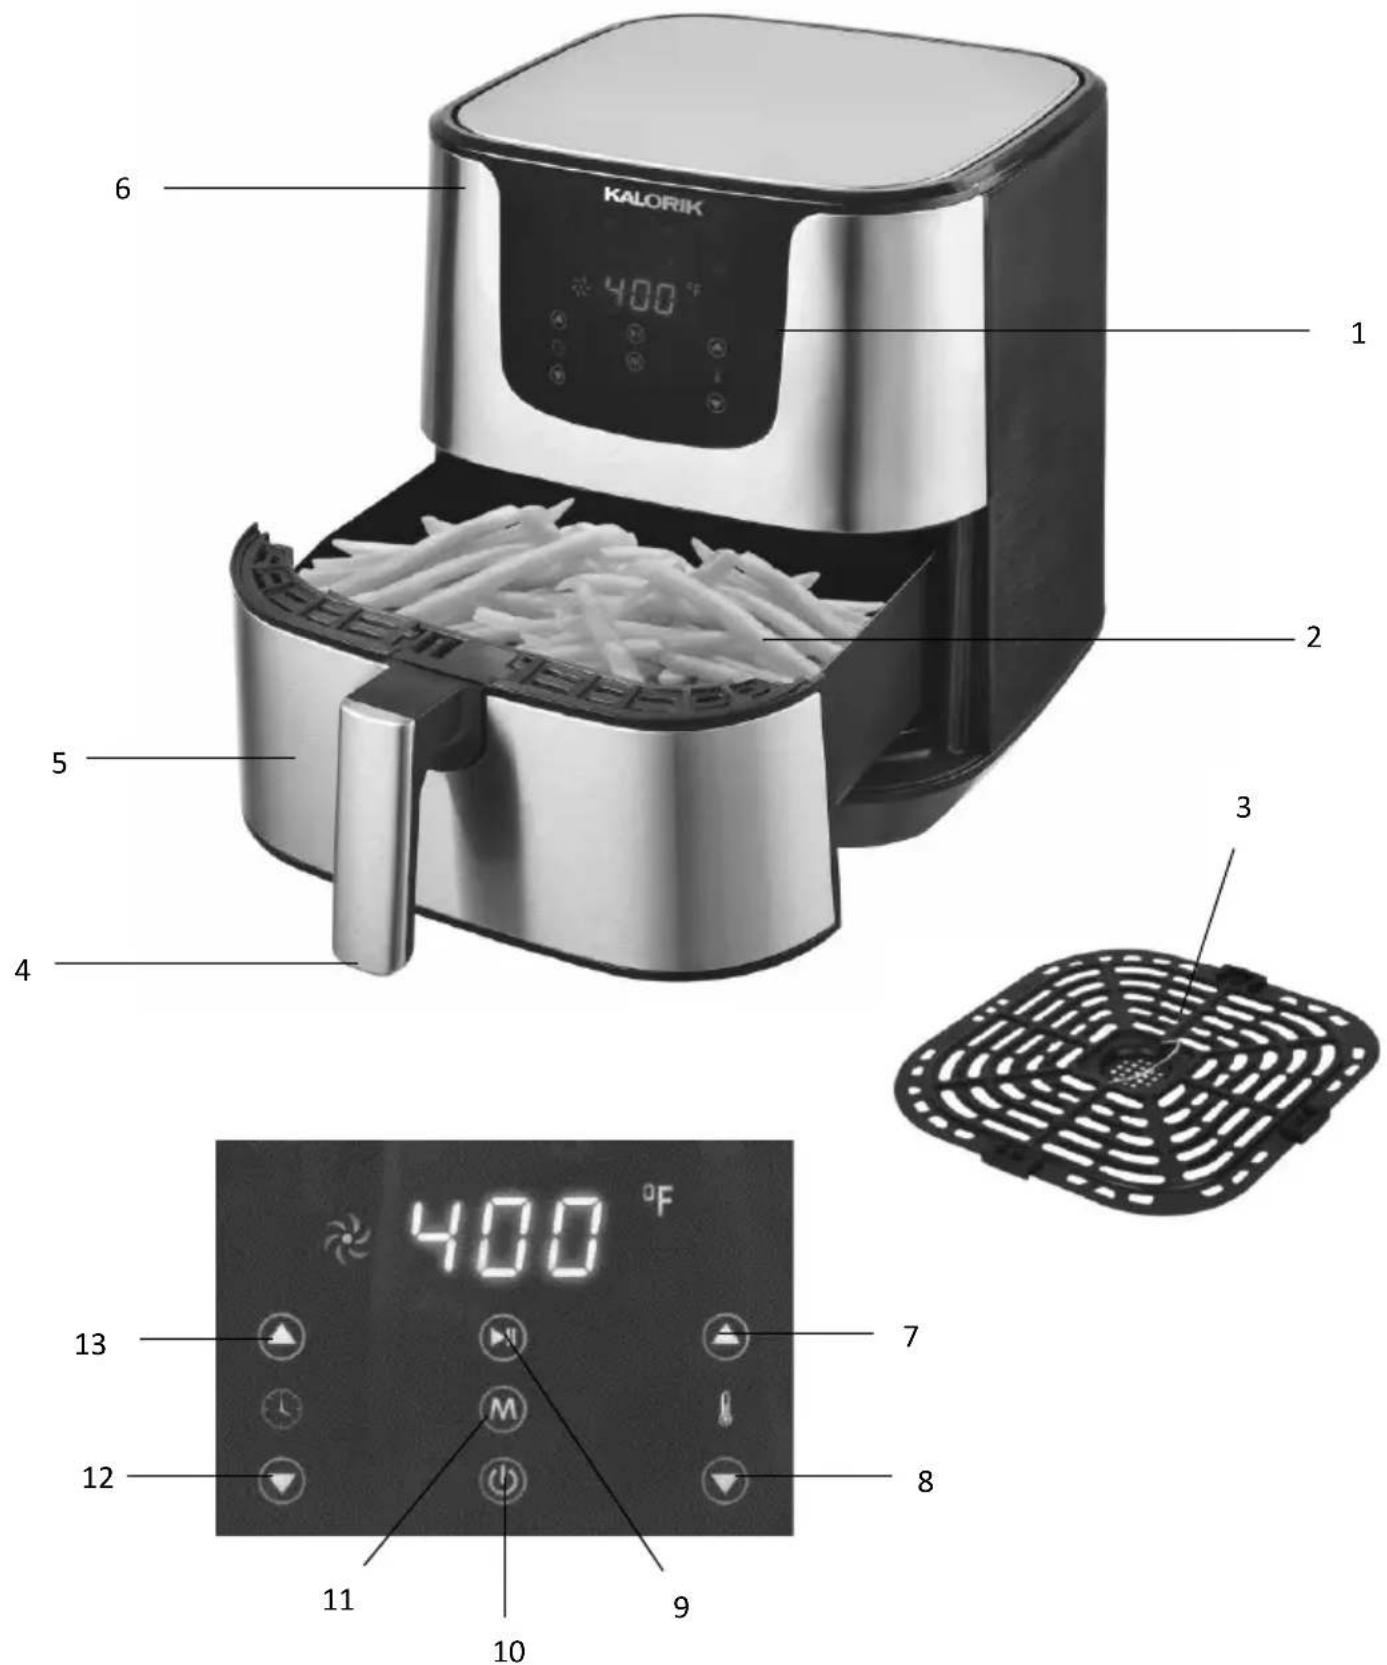
PARTS

PARTS DESCRIPTION
- Touchscreen digital control panel
- Food basket
- Trivet
- Handle
- Stainless steel finish
- Air inlet ring
- Temperature increase button
- Temperature decrease button
- Start/pause button
- Power button
- Mode selection button
- Time decrease button
- Time increase button
TECHNICAL SPECIFICATIONS
| Model | Voltage | Wattage | Capacity |
| FT 51050 SS | 120V, 60Hz | 1500W | 5 Qt / 4.73 L |
| FT 50942 SS | 120V, 60Hz | 1700W | 7 Qt / 6,6 L |
When using electrical appliances, basic safety precautions should always be followed, including the following:
1. READ ALL INSTRUCTIONS BEFORE USE!
-
Check that the voltage in your home corresponds to that stated on the appliance.
-
Do not touch hot surfaces. Use handles or knobs.
-
To protect against electrical shock, fire or personal injury, do not immerse cord, plugs, or the appliance in water or other liquid.
-
Close supervision is necessary when any appliance is used by or near children. As a rule, this appliance is not intended to be used by children.
-
Unplug from outlet when not in use and before cleaning. Allow to cool before putting on or taking off parts.
-
Do not operate any appliance with a damaged cord or plug or after the appliance malfunctions or has been damaged in any manner. Return the appliance to the nearest authorized service facility for examination, repair, or adjustment.
-
The use of accessory attachments not recommended by the appliance manufacturer may cause injuries.
-
Do not use outdoors.
-
Do not let the cord hang over the edge of a table or counter. Do not touch hot surfaces.
-
Do not place on or near a hot gas or electric burner, or in a heated oven.
-
Extreme caution must be used when moving an appliance containing hot oil or other hot liquids.
-
To disconnect, switch any control to "off" (or 0), then remove the plug from wall outlet.
-
Do not use the appliance for anything other than intended use.
-
Oversized foods or metal utensils must not be inserted in the Air Fryer as they may create a fire or risk of electric shock.
-
A fire may occur if the appliance is covered or touching flammable material, including curtains, draperies, walls, and the like, when in operation. Do not store any item on top of the appliance when in operation.
-
Do not clean with metal scouring pads. Pieces can break off the pad and touch electrical parts involving a risk of electric shock.
-
Extreme caution should be exercised when using containers constructed of other than metal or glass.
-
Do not store any materials, other than manufacturers recommended accessories, in this appliance when not in use.
-
Do not place any of the following materials in the appliance: paper, cardboard, plastic, and the like.
- Do not cover the cooking basket or any part of the Air Fryer with metal foil. This causes overheating of the Air Fryer.
- Do not leave unit unattended when in use.
- Use extreme caution when removing the basket or trivet and disposing of hot grease.
- The Air Fryer can be turned off while using any of the functions by pressing the on/off button.
- During hot air frying, hot steam is released through the air outlet openings. Keep your hands and face at a safe distance from the steam and from the air outlet openings. Also, be careful of hot steam and air when you remove the pan from the appliance.
- Immediately unplug the appliance if you see dark smoke coming out of the appliance. Wait for the smoke emission to stop before you remove the pan from the appliance.
- Do not place the appliance against a wall or against other appliances.
- Leave at least 6 inches (15 cm) of free space on the back, sides and above the appliance.
Caution!!
- Always place the appliance on a horizontal, level, heat resistant and stable surface.
- This appliance is intended for normal household use only.
• Always unplug the appliance after use. - Let the appliance cool down for at least 30 minutes before handling or cleaning it.
- The appliance is equipped with a safety micro switch inside that will shut the appliance off automatically if the basket is removed during cooking.
SAVE THESE INSTRUCTIONS HOUSEHOLD USE ONLY
POLARIZED PLUG INSTRUCTIONS
This appliance is equipped with a polarized plug (one blade is wider than the other). To reduce the risk of electric shock, this plug will fit into the polarized outlet only one way. If the plug does not properly fit into the outlet at first, reverse it. If it still does not fit, contact a competent qualified electrician. Do not attempt to modify the plug in any way.
A short power supply cord is provided to reduce the hazards resulting from becoming entangled in, or tripping over a longer cord. Extension cords may be used if care is exercised in their use.
- The electrical rating of the extension cord should be at least that of the appliance. If the electrical rating of the extension cord is too low, it could overheat and burn.
- The resulting extended cord should be arranged so that it will not drape over the counter-top or tabletop where it can be pulled on by children or tripped over.
GET TO KNOW YOUR AIR FRYER
Prepare your favorite foods and snacks in a quick, healthy, and easy way with your new Air Fryer. This Air Fryer combines heat with high-speed air circulation and a top grill to cook your ingredients from all sides, simultaneously! It also allows you to prepare a variety of tasty dishes without the addition of excess oils or fats to most ingredients. This Air Fryer features:
- A touch-sensitive control panel with 8 preset menus.
- A digital control of the cooking time and temperature.
• A temperature control range of 180irc F – 400irc F ( 82irc C – 200irc C) - A timer range from 0 to 60 minutes, which is equipped with an auto shut-off feature. Once the timer reaches “0:00”, the unit will beep five times and turn itself off.
Other great advantages provided by your Kalorik Air Fryer include:
- Fast cooking, with little to no preheating required.
- Quick and easy clean-up: the non-stick coated parts are conveniently sized to fit in the dishwasher.
- Hassle-free frying—no spatters, no mess, and no oil smell!
-
Versatility—with its frying, baking, grilling, and roasting capacities, this unit serves as a great cooking tool for a busy kitchen.
• No assembly required—very easy and safe to use! -
Unpack the appliance and its accessories (food basket, trivet). Wash the accessories in hot, soapy water and then wipe them dry. Wipe the interior of the frying cavity with a damp cloth or sponge, and then dry with a paper towel. Make sure the cavity is dry before operating the unit.
- Position the Air Fryer on a flat, level and heat-resistant surface. Make sure that it is also positioned at least 6 inches (15 cm) away from any surrounding objects.
- It is recommended to let the Air Fryer heat for about 20 minutes without any food in it. This helps to eliminate grease that may have adhered during manufacturing, and to eliminate the "new" appliance smell.
- Ventilate the room during this period. When your Air Fryer is heated for the first time, it may emit slight smoke or odor. This is normal with many heating appliances. This does not affect the safety of your appliance.
Caution: When moving the Air Fryer, make sure that you hold it securely and support the base—do not rely on the food basket handle when moving the fryer!
OPERATING INSTRUCTIONS
Preparing for use:
- Place the appliance on a stable, horizontal, and level surface. Make sure that the surface is heat resistant and that the Air Fryer is also positioned at least 6 inches (15 cm) away from any surrounding objects.
- Make sure that the trivet is securely placed inside the basket. Use the trivet handle located in the center of the trivet to easily insert or remove it from the basket.
- Insert the power plug into a wall socket. Your Air Fryer is now ready for use!
Caution!
- Do not fill the food basket with oil or any other liquid, as this may cause a fire hazard.
- Never use the Air Fryer without the food basket and trivet in place.
- Keep all ingredients in the basket to prevent any contact with the appliance's heating elements. Do not overfill the food basket.
- Do not cover the air inlet on the top or the air outlet on the back of the unit while the appliance is in use.
- Do not touch the inside of the appliance while it is operating.
- Never immerse the unit's housing in water or rinse it under the tap.
Using the appliance:
The Air Fryer can be used to prepare a large variety of foods. Please refer to the table in the “Settings” section for basic cooking times or refer to the included recipe book.
• Pull the handle to carefully remove the food basket from the Air Fryer.
• Make sure the trivet is properly placed in the bottom of the cooking basket.
- Put the ingredients that you will be air-frying into the food basket, on top of the trivet.
Note: Never fill the basket to capacity or exceed the recommended amounts (see section ‘Settings’ in this chapter), as this could affect the quality of cooking.
- Slide the basket back into the Air Fryer.
Caution! Never use the Air Fryer without the food basket and trivet in it!
Caution! Do not touch the food basket, trivet or the inside of the Air Fryer during and immediately after use, as they get very hot. Only hold the food basket by its handle. Always use oven mitts. Unit is hot!
- Determine the required preparation time and cooking temperature for the ingredients (see section 'Settings' after this chapter).
- Press the Power button to start the unit and adjust the time and temperature settings as desired.
- Press the +/- time adjustment keys to increase or decrease the cooking time. A short press will increase or decrease the cooking time by 1 minute; a long press will increase or decrease the cooking time rapidly by increments of 1 minute.
- Press the +/- temperature adjustment keys to increase or decrease the cooking temperature.
A short press will increase or decrease the cooking temperature by 5 degrees (Fahrenheit); a long press will increase or decrease the temperature rapidly by increments of 5 degrees. - To use a preset menu instead, press the M button until the desired preset is selected.
- Press the Start/Pause button to start air frying. Alternatively, selecting a time, temperature or preset will start the unit automatically after 5 seconds if no key is pressed afterwards.
- The spinning "Fan" icon will turn on and start to blink continuously indicating that the fryer is working. The timer will start counting down the set time.
- During the air frying process, the fan will continue blinking indicating that the air fryer is functioning.
A noticeable click sound indicates when the set temperature has been reached and the heating element goes off. The click sound will be heard multiple times during operation indicating that the air fryer is maintaining the set temperature.
Note: During the cooking process, the presets cannot be adjusted without pausing the process. To do this, press the Start/Pause button to pause the device. At this time, the temperature, time or preset can be changed as desired. Pressing the Start/Pause button again resumes the cooking process with the new settings. If no button is pressed for 5 seconds, the device will resume to function at the new selected settings.
- During cooking, excess oil and cooking juices from the ingredients will collect in the basket. This is to be expected.
- Some recipes require shaking the food in the basket halfway through the set time (see section 'Settings' in this chapter). To shake the ingredients, pull the basket out of the appliance using the handle. Then gently, but firmly, shake it. Slide the basket back into the Air Fryer and continue to cook.
Note: Beuse the rapid hot air technology instantly reheats the air inside of the appliance, pulling the basket briefly out of the appliance during hot air frying will not disturb the cooking process.
Tip: Sometimes, it is easier to divide cooking times into 2 phases for recipes that require the basket to be shaken mid-cooking. If you set the timer to half the required cooking time, you will hear the timer bell go off when you have to shake the ingredients.
Tip: If you set the timer to the full cooking time, the timer bell will not go off until cooking is completed. You can pull the basket out at any time to check the cooking condition of the ingredients. The power will shut down automatically and resume after you slide the basket back into the appliance. Note that the timer stops counting down automatically in this situation.
- When you hear the timer bell (5 beeps), the set preparation time has elapsed. Using oven mitts and the basket handle, pull the basket out of the appliance and place it on a heat-resistant surface.
Note: You can also switch the appliance off at any time. To do this, simply press the Power button. The unit cools down for 15 seconds while displaying 'OFF' on the screen after which the unit will beep 5 times.
- Check to see if the ingredients are ready. If they are not ready, simply slide the basket back into the appliance and set the timer for a few extra minutes.
Caution! After hot air frying, the basket, the trivet and the ingredients will be hot! Depending on the type of the ingredients in the Air Fryer, steam may escape out of the unit. Be mindful of scalding and wear kitchen gloves for safety.
- Holding the basket by the handle, empty the air-fried food into a bowl or onto a plate.
Tip: To remove large or fragile ingredients, you may use a pair of tongs to lift the ingredients out of the basket. Use tongs or utensils with heat-resistant plastic tips, as metallic tips or utensils may scratch the coating of the basket.
- When a batch of food is ready, the Air Fryer is instantly ready for preparing another batch.
IMPORTANT: If you notice the fan is not operating once the product starts cooking (no noise or airflow), please discontinue usage immediately and contact Customer Service.
Using the preset menus:
8 "short-cut" preset functions are provided: CHICKEN BREAST, WINGS, STEAK, FISH, SHRIMP, FRIES, VEGGIES and REHEAT.
To select a preset, press the M function key repeatedly until the desired icon is selected. Press the Start/Pause key to start air frying.
The time and temperature settings can be adjusted at any time when using the preset menus.
| Preset | Temperature (°F) | Time (min) |
| Default | 375°F | 15 min |
| Chicken breast | 400°F | 15 min |
| Wings | 400°F | 18 min |
| Steak | 400°F | 7 min |
| Fish | 350°F | 15 min |
| Shrimp | 325°F | 15 min |
| Fries | 400°F | 20 min |
| Veggies | 375°F | 20 min |
| Reheat | 290°F | 7 min |
The following table will help you select the basic settings for the ingredients you want to prepare.
Note: Keep in mind that these settings are suggestions.
Tips:
- Any food that can be prepared in a traditional oven can also be prepared in the Air Fryer.
- Shaking smaller ingredients halfway through the preparation time optimizes the end result and can help prevent unevenly air-fried food.
- A larger amount of ingredients only requires a slightly longer preparation time; a smaller amount of ingredients only requires a slightly shorter preparation time.
- If some foodstuffs tend to stick at the bottom of the basket, think to add some cooking oil spray in the basket prior to adding the ingredients to cook.
- Do not prepare very greasy ingredients, such as sausages, in the Air Fryer as the grease could catch fire.
- Add some oil to fresh potatoes for a crispy result. Fry your ingredients in the Air Fryer within a few minutes after you add the oil.
• The optimal amount for preparing crispy fries is 500 grams / 1.2lb
- Use pre-made dough to prepare filled snacks quickly and easily. Pre-made dough also requires a shorter preparation time than home-made dough.
- Place a baking tin or oven dish in the Air Fryer basket if you want to bake a cake or quiche or if you want to fry fragile or filled ingredients.
- You can also use the Air Fryer to reheat food. To reheat ingredients, set the temperature to 290irc F for up to 10 minutes.
* All data is indicative and will vary according to capacity
| Min-max qty (lb) | Time (min.) | Temp. (F) | Shake | Extra information | |
| Potatoes & fries | |||||
| Thin frozen fries | 0.6-1.5 | 15-20 | 400 | shake | |
| Thick frozen fries | 0.6-1.5 | 20-30 | 400 | shake | |
| Home-made fries (8×8mm) | 0.6-1.7 | 18-25 | 400 | shake | Add 1/2 tbsp. of oil |
| Home-made potato wedges | 0.6-1.7 | 18-22 | 375 | shake | Add 1/2 tbsp. of oil |
| Home-made potato cubes | 0.6-1.6 | 12-18 | 400 | shake | Add 1/2 tbsp. of oil |
| Meat & Poultry | |||||
| Steak | 0.2-1.1 | 7-12 | 400 | 7 min for rare, add time as needed | |
| Pork chops | 0.2-1.1 | 14-20 | 350 | Internal temp 165°F | |
| Hamburger | 0.2-1.1 | 8-14 | 400 | ||
| Sausage roll | 0.2-1.1 | 13-15 | 375 | ||
| Drumsticks | 0.2-1.1 | 18-22 | 350 | Internal temp 165°F | |
| Chicken breast | 0.2-1.1 | 10-15 | 400 | Butterflied | |
| Snacks | |||||
| Spring rolls | 0.2-1.0 | 8-10 | 400 | shake | Use oven-ready type |
| Frozen chicken nuggets | 0.2-1.1 | 6-10 | 400 | shake | Use oven-ready type |
| Frozen fish fingers | 0.2-1.0 | 6-10 | 400 | Flip halfway | Use oven-ready type |
| Frozen bread-crumbed cheese snacks | 0.2-1.0 | 8-10 | 375 | Use oven-ready type | |
| Frozen vegetables | 0.2-1.0 | 10 | 320 | shake | Use oven-ready type |
| Baking | |||||
| Cake | 0.7 | 20-25 | 350 | Toothpick test | |
| Quiche | 0.9 | 30-40 | 325 | ||
| Muffins | 0.7 | 20-25 | 350 | Toothpick test | |
| Sweet snacks | 0.9 | 20 | 350 | ||
- Make sure to clean the appliance after each use!
- Switch the appliance off. Before cleaning, unplug the appliance from outlet and allow it to cool down completely.
- The basket and trivet can be cleaned in hot water with mild detergent / dish soap, or in the dishwasher. Do not use metal kitchen utensils or abrasive cleaning materials to clean them, as this may damage the non-stick coating. Rinse and dry thoroughly after cleaning.
- To remove baked-on food, fill the basket = with hot, soapy water. Put the food basket in the pan and let the pan and the basket soak for about 10 minutes before cleaning in the sink.
Cleaning inside the cavity:
- Wipe the cavity with a damp cloth or sponge. Dry with a paper towel.
- Never use abrasive products in the cavity!
- Never immerse the appliance in water and make sure that no water or moisture penetrates the upper part of the Air Fryer.
- Clean the heating element inside the Air Fryer with a cleaning brush to remove any food residue.
Cleaning the exterior:
- Wipe clean with a damp sponge or cloth. Wipe dry.
- NEVER use steel wool, metal scouring pads or abrasive cleaners, as they may damage the finish.
- Do not let any liquids enter the air inlet on the top of the Air Fryer.
Any other servicing should be performed by an authorized service representative.
DO NOT IMMERSE THE FRYER IN WATER OR ANY OTHER LIQUID!
| Problem | Possible cause | Solution |
| The Air Fryer does not work | The appliance is not plugged in. | Put the main plug in an earthed wall socket. |
| You have not set the timer. | Adjust the setting to the required preparation time to switch on the appliance. | |
| The basket is not properly locked. | Push the basket back in the Air Fryer properly. | |
| The ingredients fried with the Air Fryer are not done. | There is too much food in the basket. | Put smaller batches of ingredients in the basket. Smaller batches are fried more evenly. |
| The set temperature is too low. | Adjust the setting to the required temperature setting (see section ‘Settings’) | |
| The cooking time is too short. | Adjust the setting to the required preparation time (see section ‘Settings’) | |
| Fried snacks are not crispy when they come out of the Air Fryer. | You used a type of snack meant to be prepared in a traditional deep fryer. | Use snacks made to be prepared in the oven, or lightly brush some oil onto the snacks for a crispier result. |
| I cannot slide the basket into the appliance properly. | There is too much food in the basket. | Do not fill the basket to capacity; refer to the “Setting” table above for maximum quantities. |
| White smoke comes out of the appliance. | You are preparing greasy ingredients. | When you fry greasy ingredients in the Air Fryer, a large amount of oil will leak into the pan. The oil produces white smoke and the pan may heat up more than usual. This does not affect the appliance or the end result. |
| The pan still contains grease residues from previous use. | White smoke is caused by grease heating up in the basket; make sure you clean the basket and trivet thoroughly after each use. | |
| Fresh fries are fried unevenly in the Air Fryer. | You did not use the right type of potato. | Use fresh potatoes and make sure they stay firm during frying. |
| You did not rinse the potato sticks properly before you fried them. | Rinse the potato sticks thoroughly to remove starch from the outside of the sticks. | |
| Fresh fries are not crispy when they come out of the Air Fryer. | The crispiness of the fries depends on the amount of oil and water in the fries. | Make sure you dry the potato sticks properly before you add the oil. |
| Cut the potatoes into thinner sticks for a crispier result. | ||
| Add slightly more oil for a crispier result. |
We suggest that you complete and return the enclosed Product Registration Card promptly to facilitate verification of the date of original purchase.
However, return of the Product Registration Card is not a condition of these warranties. You can also fill out this warranty card online, at the following address: www.KALORIK.com
This KALORIK product is warranted in the U.S.A. and in Canada for 1 year from the date of purchase against defects in material and workmanship. This warranty is not transferable. Keep the original sales receipt. Proof of purchase is required to obtain warranty performance.
During this period, if the KALORIK product, upon inspection by KALORIK, is proven defective, it will be repaired or replaced, at Kalorik's option, without charge to the customer. If a replacement product is sent, it will carry the remaining warranty of the original product.
This warranty does not apply to any defect arising from a buyer's or user's misuse of the product, negligence, failure to follow KALORIK instructions noted in the user's manual, use on current or voltage other than that stamped on the product, wear and tear, alteration or repair not authorized by KALORIK, or use for commercial purposes. There is no warranty for glass parts, glass containers, filter basket, blades and agitators. There is also no warranty for parts lost by the user.
ANY WARRANTY OF MERCHANTABILITY OR FITNESS WITH RESPECT TO THIS PRODUCT IS ALSO LIMITED TO THE ONE YEAR LIMITED WARRANTY PERIOD.
Some states do not allow limitation on how long an implied warranty lasts or do not allow the exclusion of incidental or consequential damages, so the above limitations may not apply to you. This warranty gives you specific legal rights, and you may also have other rights which vary from state to state.
If the appliance should become defective within the warranty period and more than 30 days after date of purchase, do not return the appliance to the store: often, our Customer Service Representatives can help solve the problem without having the product serviced. If servicing is needed, a Representative can confirm whether the product is under warranty and direct you to the nearest service location.
If this is the case, send the product via your pre-paid postage back to Kalorik, along with proof of purchase and a return authorization number indicated on
the outer package, given by our Customer Service Representatives. Send to the authorized KALORIK Service Center (please visit our website at www.KALORIK.com or call our Customer Service Department for the address of our authorized KALORIK Service Center).
When sending the product, please include a letter explaining the nature of the claimed defect.
If you have additional questions, please call our Customer Service Department (please see below for complete contact information), Monday through Thursday from 9:00am - 5:00pm (EST) and Friday from 9:00am - 4:00pm (EST). Please note hours are subject to change.
If you would like to write, please send your letter to:
KALORIK Customer Service Department
Team International Group of America Inc.
16175 NW 49th Avenue
Miami Gardens, FL 33014 USA
Or call:
Toll Free: +1 888-521-TEAM / +1 888-KALORIK
Only letters can be accepted at this address above. Shipments and packages that do not have a return authorization number will be refused.
PARTES
Team International Group of America Inc.
16175 NW 49 th Avenue
Miami Gardens, FL 33014 USA
O llame gratuitamente (U.S.A.) al +1 888-521-TEAM / +1 888-KALORIK
Team International Group of America Inc.
16175 NW 49 th Ave.
Miami Gardens, FL 33014 USA
For questions please contact:
Team International Group of America Inc.
16175 NW 49th Avenue
Miami Gardens, FL 33014 USA
User manual content and recipes courtesy of Team International Group – Do not reproduce without consent of the authors - All rights reserved.

- PARTS
- PARTS DESCRIPTION
- TECHNICAL SPECIFICATIONS
- When using electrical appliances, basic safety precautions should always be followed, including the following:
- READ ALL INSTRUCTIONS BEFORE USE!
- Caution!!
- SAVE THESE INSTRUCTIONS HOUSEHOLD USE ONLY
- POLARIZED PLUG INSTRUCTIONS
- GET TO KNOW YOUR AIR FRYER
- OPERATING INSTRUCTIONS
- Preparing for use:
- Caution!
- Using the appliance:
- Caution! Never use the Air Fryer without the food basket and trivet in it!
- Caution! Do not touch the food basket, trivet or the inside of the Air Fryer during and immediately after use, as they get very hot. Only hold the food basket by its handle. Always use oven mitts. Unit is hot!
- Using the preset menus:
- Tips:
- Cleaning inside the cavity:
- Cleaning the exterior:
- DO NOT IMMERSE THE FRYER IN WATER OR ANY OTHER LIQUID!
- KALORIK Customer Service Department
- PARTES
Brand : KALORIK
Model : FT 50942 SS
Category : Deep fryer