
49ST3TW - Car speaker KICKER - Free user manual and instructions
Find the device manual for free 49ST3TW KICKER in PDF.

| Product Type | Compression horn tweeter |
| Brand | KICKER |
| Model | 49ST3TW |
| Speaker Diameter | 25 mm (1 in) |
| Peak Power | 100 W |
| Recommended Amplifier Power (RMS) | 15-50 W |
| Sensitivity | 106 dB (1 W, 1 m) |
| Frequency Response | 3.5 kHz - 20 kHz |
| Nominal Impedance | 4 Ω |
| Coil Material | Ferrite |
| Dome Material | Aluminium |
| Tweeter Design | Dome diaphragm with horn |
| Mounting Hole Diameter | 4-5/8 x 6-9/16 in (approx. 118 x 167 mm) |
| Mounting Depth | 95 mm (3-3/8 in) |
| Mounting Type | Through-hole or surface mount |
| Included Accessories | Protection capacitor, attenuation resistor, support nuts, mounting brackets, mounting screws |
| Repairability | Replaceable diaphragm (repair kit available) |
| Use | Outdoor installation, no sealed enclosure required |
| Recommended Break-in | 2 weeks to achieve optimal performance |
Frequently Asked Questions - 49ST3TW KICKER
User questions about 49ST3TW KICKER
0 question about this device. Answer the ones you know or ask your own.
Ask a new question about this device
Download the instructions for your Car speaker in PDF format for free! Find your manual 49ST3TW - KICKER and take your electronic device back in hand. On this page are published all the documents necessary for the use of your device. 49ST3TW by KICKER.
USER MANUAL 49ST3TW KICKER
Tweeter Wiring......6
Speaker Mounting 7
Tweeter Mounting 9
Tweeter Repair 13
Warranty 62
IMPORTANT SAFETY WARNING
PROLONGED CONTINUOUS OPERATION OF AN AMPLIFIER, SPEAKER, OR SUBWOOFER IN A DISTORTED, CLIPPED OR OVER-POWERED MANNER CAN CAUSE YOUR AUDIO SYSTEM TO OVERHEAT, POSSIBLY CATCHING FIRE AND RESULTING IN SERIOUS DAMAGE TO YOUR COMPONENTS AND/OR VEHICLE. AMPLIFIERS REQUIRE UP TO 4 INCHES (10CM) OPEN VENTILATION. SUBWOOFERS SHOULD BE MOUNTED WITH AT LEAST 1 INCH (2.5CM) CLEARANCE BETWEEN THE FRONT OF THE SPEAKER AND ANY SURFACE. KICKER PRODUCTS ARE CAPABLE OF PRODUCING SOUND LEVELS THAT CAN PERMANENTLY DAMAGE YOUR HEARING! TURNING UP A SYSTEM TO A LEVEL THAT HAS AUDIBLE DISTORTION IS MORE DAMAGING TO YOUR EARS THAN LISTENING TO AN UNDISTORTED SYSTEM AT THE SAME VOLUME LEVEL. THE THRESHOLD OF PAIN IS ALWAYS AN INDICATOR THAT THE SOUND LEVEL IS TOO LOUD AND MAY PERMANENTLY DAMAGE YOUR HEARING. PLEASE USE COMMON SENSE WHEN CONTROLLING VOLUME.
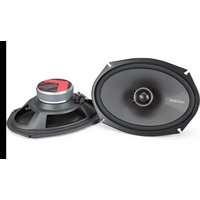
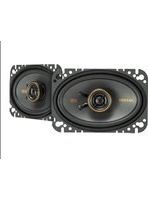
The KICKER ST Street-series speakers are the latest step forward in KICKER's innovating line of full-range PA and mobile speakers. The horn-loaded bullet tweeters and 7 and 9-inch square mid-range drivers were engineered with custom installations and tough environments in mind. The hyper-efficient square design of the speakers, and compression tweeters pushed through a horn, cut through ambient noise, crowds or anything that comes between you and the sound. Whether upgrading an existing audio system or decking out a new one, these speakers are designed to be mounted in free air locations and get LOUD! We hope you have the chance to combine these new speakers with our award-winning line of amplifiers and accessories to get the most out of your new system!
Specifications
| ST | Speakers | ST7MB | ST9MB | ST3TW | ST4TW |
| Woo'er [in, mm] | 7,18 9,23 | ||||
| Tweeler [in, mm] | 1,25 1.5,38 | ||||
| Peak Power / landing | Watts| | 500 600 100 100 | ||||
| Recommended Amplifier Power [Watts RMS] | 50-250 50-300 | 15-50 15-50 | |||
| Sensitivity [1W, 1m] | 92 | 94 | 106 | 108 | |
| Frequency Response [Hz] | 80-7.5k | 80-5.5k | 3.5k-20k | 3k-20k | |
| Mounting Hole Diameter [n, mm] | 5-7/16,139 | 6-5/8, 168 | 4-5/8 X 6-9/16 | 148 X 167 | |
| Mounting Depth [in, mm] | 3-3/6, 81 | 3-11/16, 93 | 3-5/6, 85 | ||
| Rated Impedance [Ω] | 4 or 8 | 4 or 8 | 4 | 4 | |
| Magnet Material | Fonto | Fonto | Fonto | Fonto | |
| Woo'er Cone Material | Pressd Pulp | Pressd Pulp | |||
| Woo'er Surrouro Material | Treated Cloth | Treated Cloth | |||
| Tweeler Dome Material | Aluminum | Aluminum | |||
| Tweeler Design | Bullet | Bullet | |||
Note: All specifications and performance figures are subject to change. Please visit www.kicker.com for the most current information. To get the best performance from your new KICKER speakers, we recommend using genuine KICKER accessories and wiring. Please allow two weeks of break-in time for the speakers to reach optimum performance.
Pro Tip: You're a KICKER amplifier and a few cables away from a full system upgrade that will dominate any factory system! KICKER line of amplifiers make it easy to upgrade to solid bass with your existing or stock source unit. Also, ask your dealer about KICKER Subwoofer upgrades.
Wiring Configuration
We recommend using 16 gauge (or larger) wire. The ST Mid-range speakers are rated at 4 or 8 ohms and work with any source unit or amplifier designed to operate at the respective ohm load. Make sure your source unit or amplifier is rated at the correct ohm load for operation.
Carefully run the speaker wire in a location that is clear of vehicle or other mechanisms. If factory speaker wiring is not available in your desired location, it may be necessary to run speaker wire through the door jamb. The speaker wire should be kept away from sharp edges and avoid the possibility of getting pinched by the door. An existing grommet in the door jamb is the ideal place to run the speaker wire. If the factory hole and grommet do not exist or are inaccessible, you must drill a hole to run the speaker wire through the door jamb. Be careful not to drill into other wiring or existing door mechanisms. Any time a wire is run through a hole, it is necessary to insert a rubber or plastic grommet to protect the wire from damage.
Tweeter Wiring
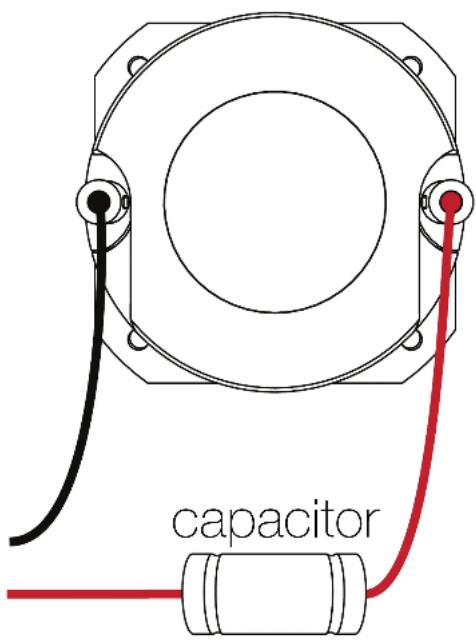
The ST-Series Tweeters include a capacitor for use as a passive high-pass crossover, protecting the tweeter from low frequencies and providing the best frequency response for the tweeter in relation to the mids.
Install the capacitor in-line with the tweeter's Positive speaker input wire as shown.
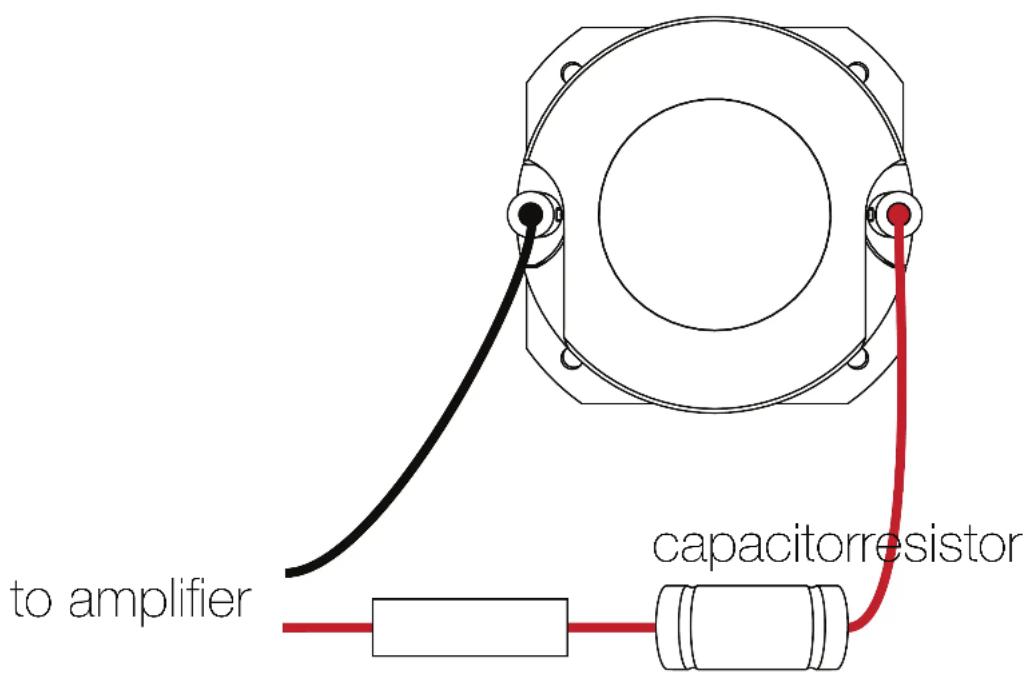
to amplifier
If the tweeter output is too loud, install the capacitor and resistor in series with the tweeter's Positive speaker input wire as shown.
Speaker Mounting
The KICKER ST Speakers are designed for free-air applications in custom installations and do not require a sealed enclosure for optimum performance. It is important to isolate the sound coming from the front of the speaker from the sound radiating from the back of the speaker. This is most easily accomplished by mounting the speakers in a vehicle's factory locations or in a location with a semi-isolated rear chamber (like the rear deck of a car behind the rear seats).
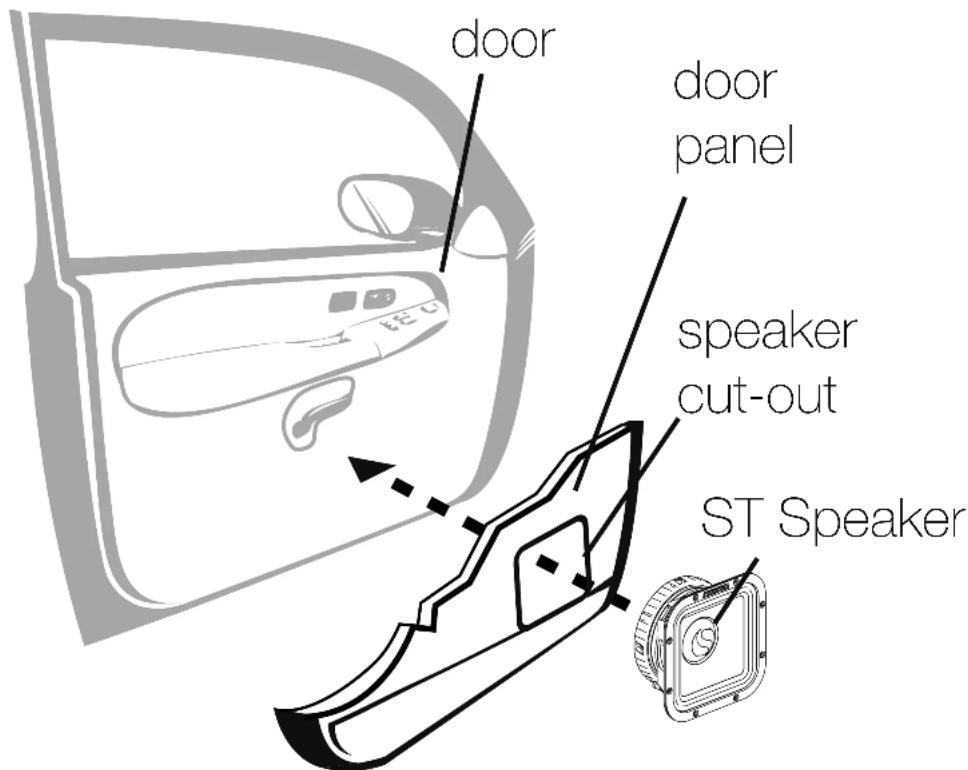
If you are replacing factory speakers in their original locations, you will likely need to modify the mounting hole as such that it will fit the speaker and required screw patterns. Use the included mounting hole cutout templates. You will need to pre-drill new screw holes using a 7/64" (2.5mm) bit. Make sure that the speaker will not interfere with trunk and door opening and closing mechanisms and that the enclosed screws will not puncture the fuel tank, puncture wiring, or interfere with any other mechanical parts on the underside of the mounting surface. Cycle the windows all the way down and up.

If the speaker cut-out locations require you to cut metal, avoid structural metal and braces. If the door body and panel cannot support the weight of the speaker, an optional reinforcing ring made of suitable material may be fastened or adhered to the door body.
Tweeter Mounting
The tweeter may be through-mounted behind the mounting surface, or surface-mounted on top.
For Through-Mounting, cut a circular hole in the mounting surface at 1.75" (45mm) for the ST3TW, and 2" (50mm) for the ST4TW.
Choose a flat location on the panel with space behind the panel to allow room for the motor structure, and tweeter. After checking the clearances, cut a mounting hole in the panel.
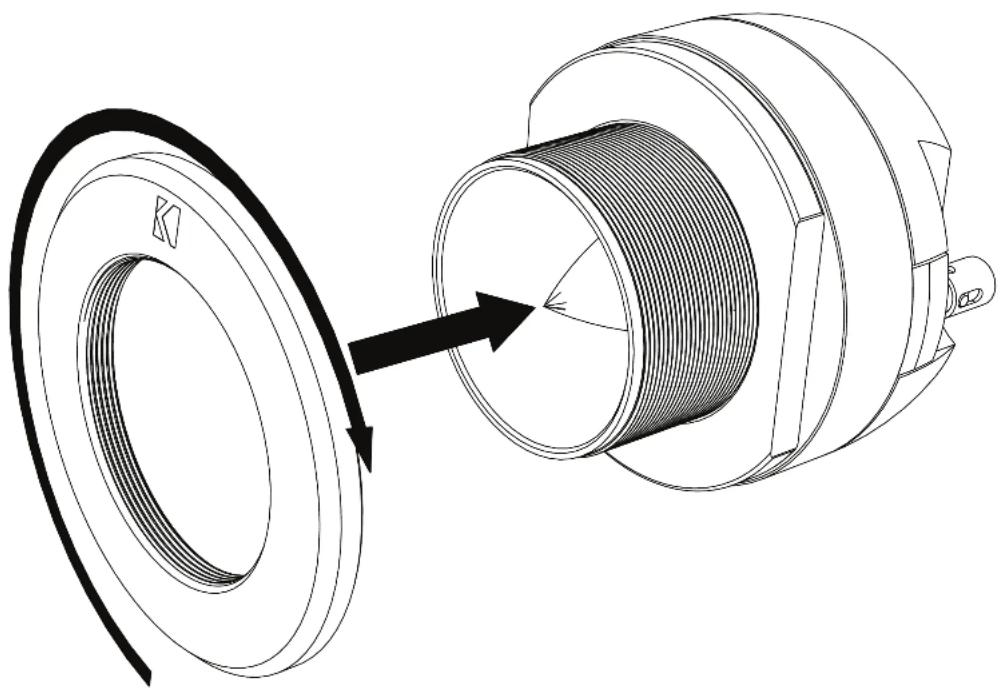
Install the Backing Nut onto the tweeter.

natural_image
Technical illustration of a mechanical component before and after assembly, showing a threaded shaft and circular end (no text or symbols)Place the tweeter in the mounting hole and install the Round or Square Mounting Flange onto the Tweeter, orienting the tweeter and flange as desired.
natural_image
Technical line drawing of a mechanical component with a coiled spring and threaded shaft (no text or symbols)Tighten the Backing Nut towards the mounting surface to secure the Tweeter.
natural_image
Technical line drawing of a mechanical component with a coiled cable and mounting holes (no text or symbols)For Surface-Mounting, cut a circular hole in the mounting surface at 2.375" (60mm) for the ST3TW, and 3" (75mm) for the ST4TW.
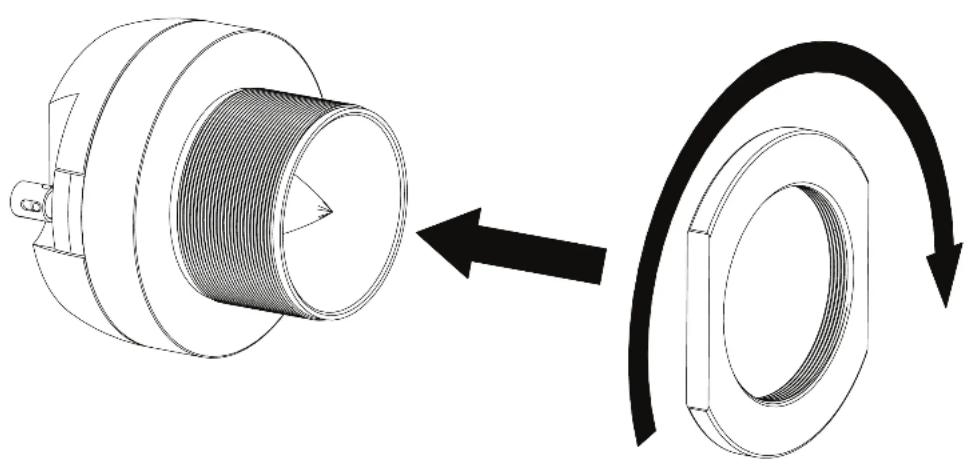
Feed the wire through the mounting hole in the panel. Install the Backing Nut onto the tweeter.
natural_image
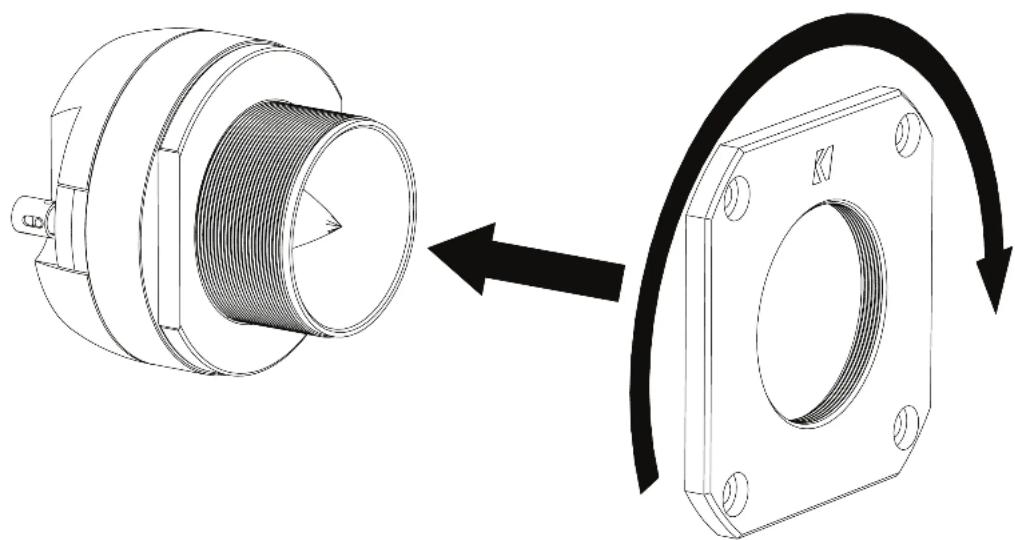
Technical illustration of a mechanical component before and after assembly, showing a threaded shaft and ring (no text or symbols)Install the Square Mounting Flange onto the Tweeter, orienting the tweeter and flange as desired.
natural_image
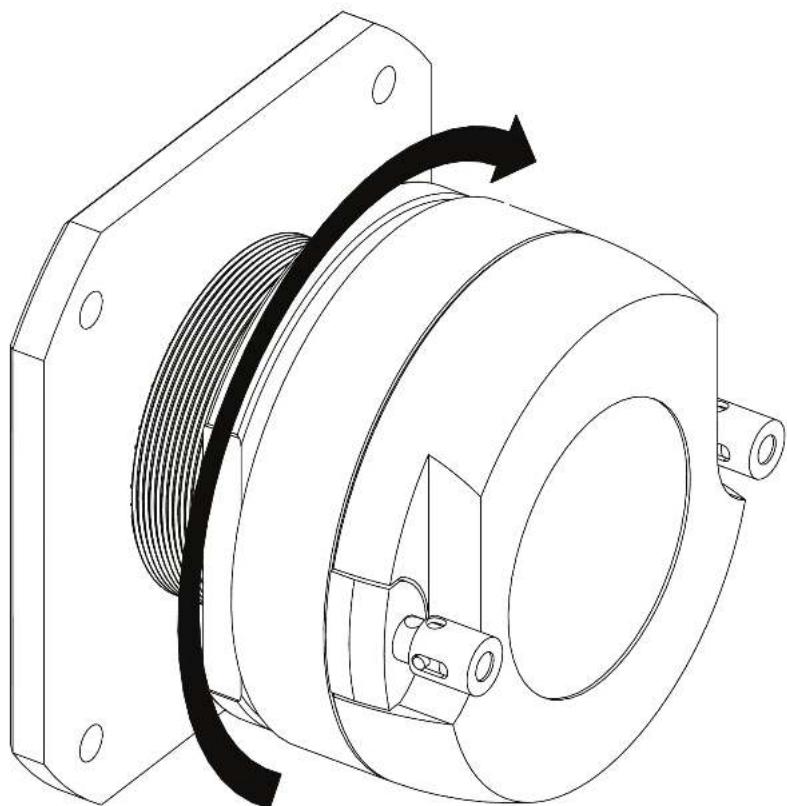
Technical illustration of a mechanical component before and after assembly, showing a threaded shaft and flange (no text or symbols)Tighten the Backing Nut to lock the Square Mounting Flange in place.
natural_image
Technical line drawing of a mechanical component with a coiled spring and mounting base (no text or symbols)Place the Tweeter in the Mounting Hole and after finding the desired orientation, mark the mounting screw holes to be drilled by a 7/64" (2.5mm) drill bit. Secure the Tweeter to the surface using the provided screws.
natural_image
Technical line drawing of a mechanical component with screw holes and mounting holes (no text or symbols)Tweeter Repair
The ST3TRK and ST4TRK can be rebuilt if failure occurs. Use the following steps to replace the diaphragm.
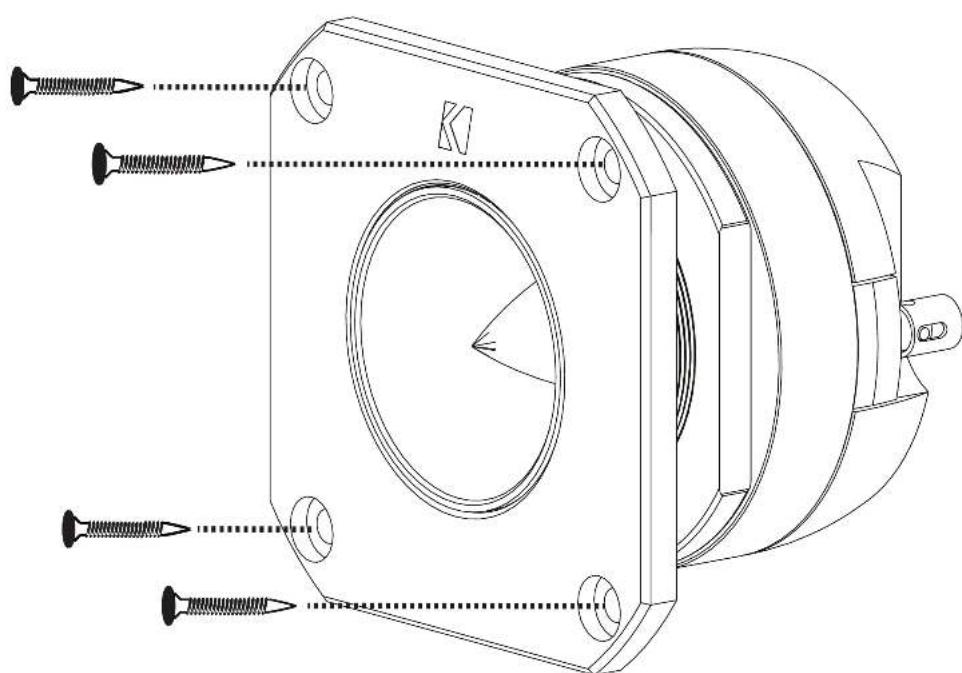
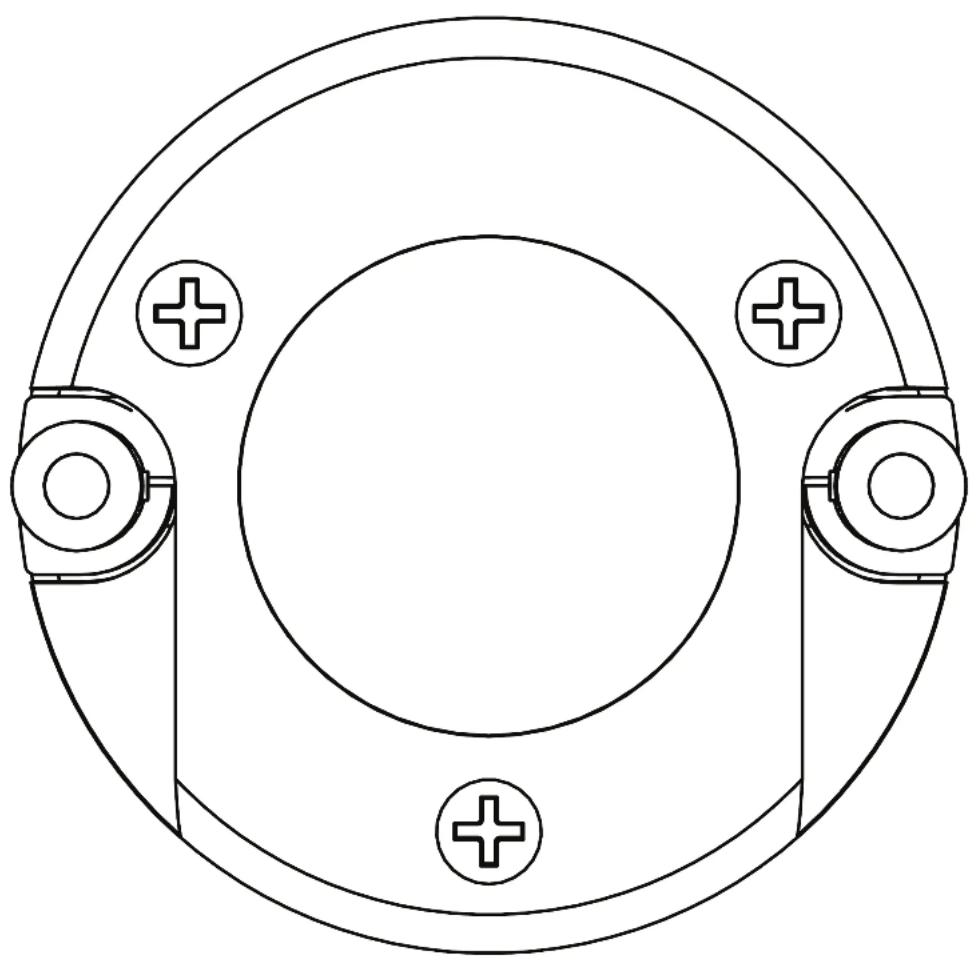
Begin by removing the three Phillips-head screws on the back of the tweeter.
Note: The ST4 uses Allen-head screws on the front of the tweeter.
natural_image
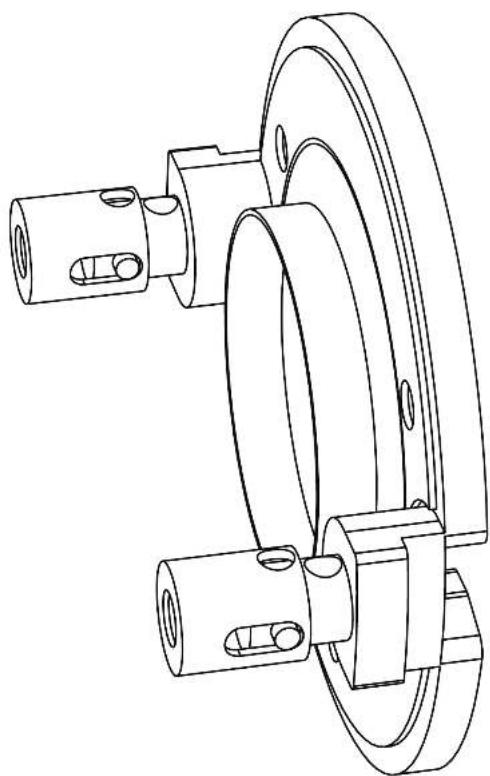
Technical line drawing of a circular mechanical component with four bolt holes and a central hole (no text or symbols)Disassemble the tweeter and discard the damaged diaphragm assembly.
natural_image
Technical line drawing of a mechanical assembly with two cylindrical components and a flanged ring (no text or symbols)Clean the motor magnet of any debris, focusing on the voice coil gap.
natural_image
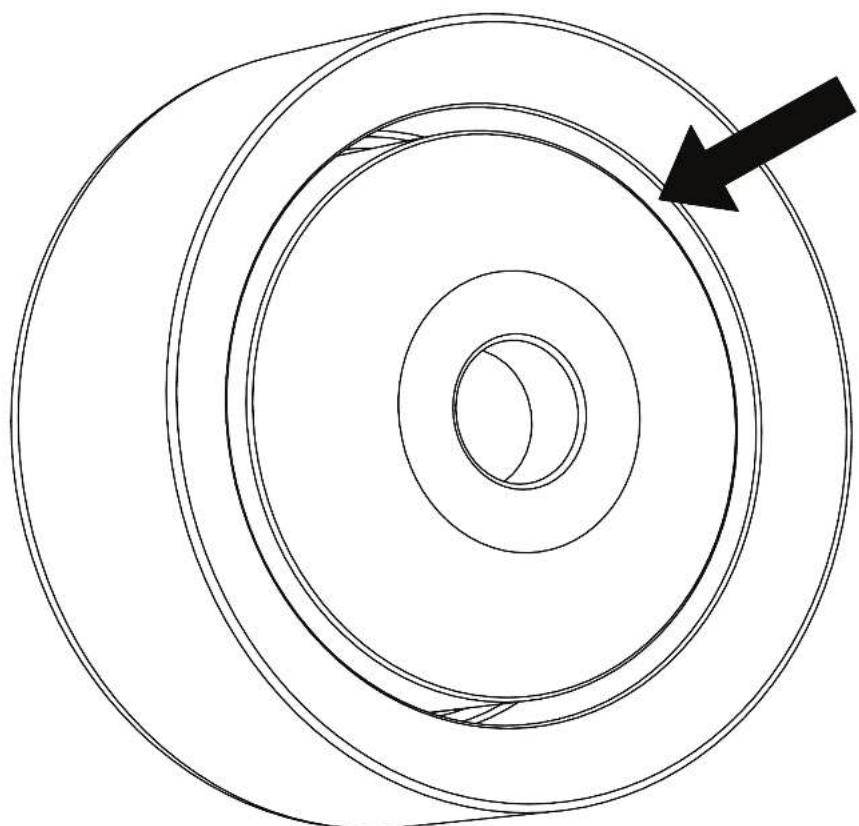
Diagram of concentric circular layers with a black arrow pointing to the outermost layer (no text or symbols)Install the back plate, washer, and motor magnet into the motor housing. Make sure the magnet is inserted with the voice coil gap out.
motor housing

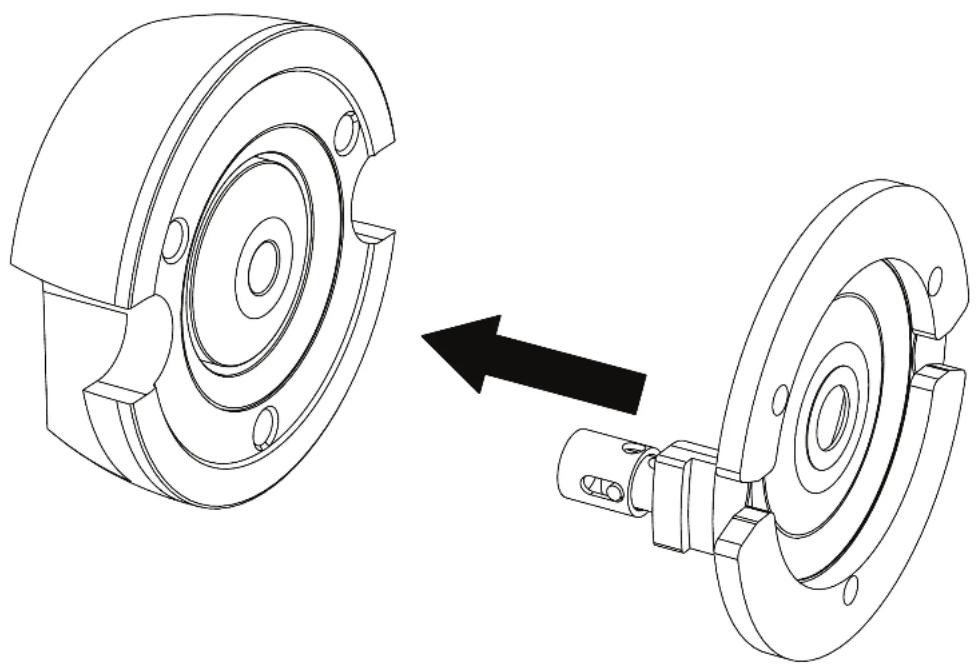
Carefully install the new diaphragm assembly into the motor housing by gently aligning the voice coil of the diaphragm with the voice coil gap of the magnet. The screw holes of the housing and diaphragm should also align.
natural_image
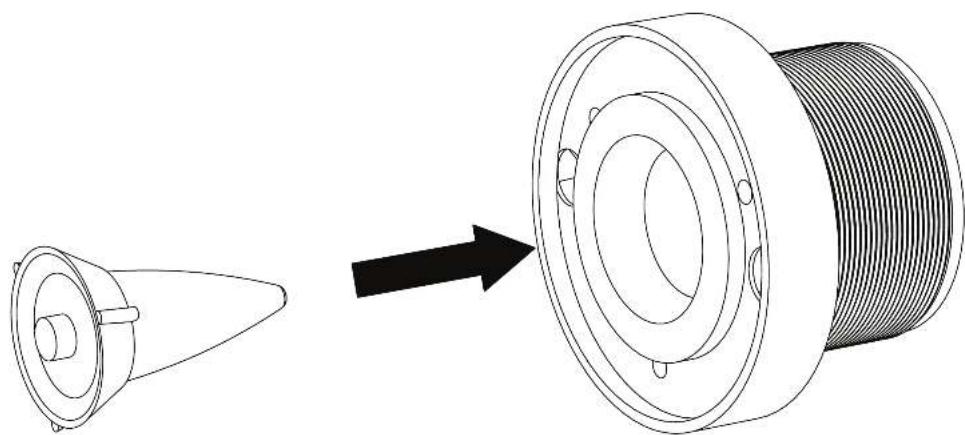
Technical line drawing of a mechanical assembly showing two views of a flanged housing with mounting holes and a separate view of a bearing assembly (no text or symbols present)Insert the phase plug into the horn.
natural_image
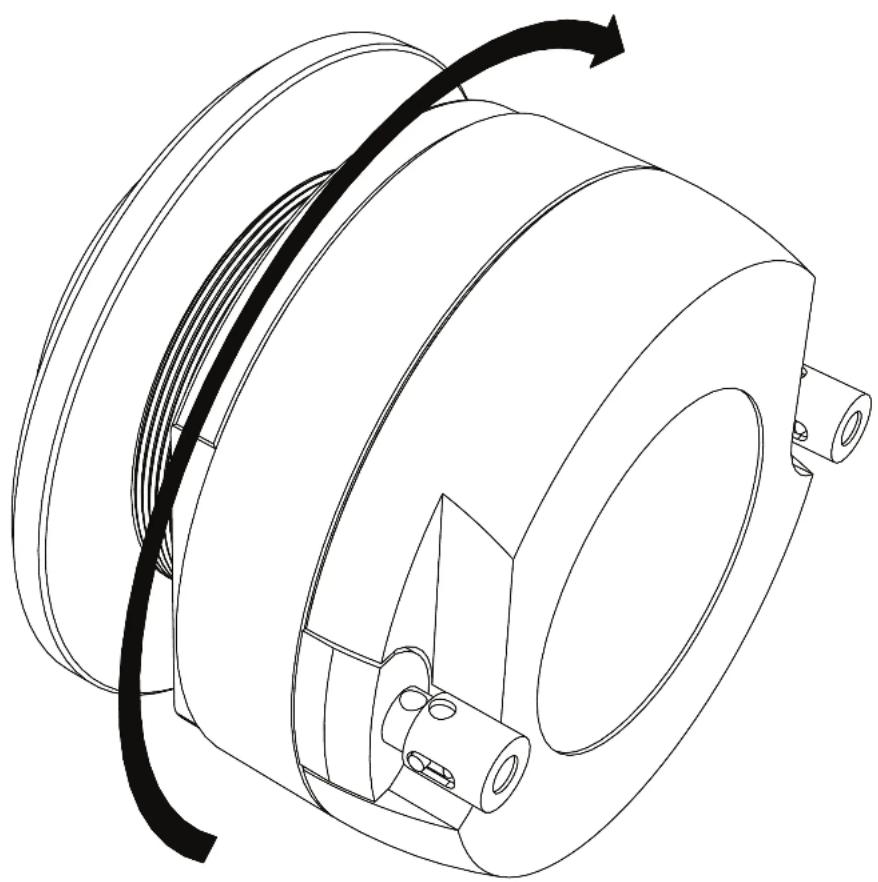
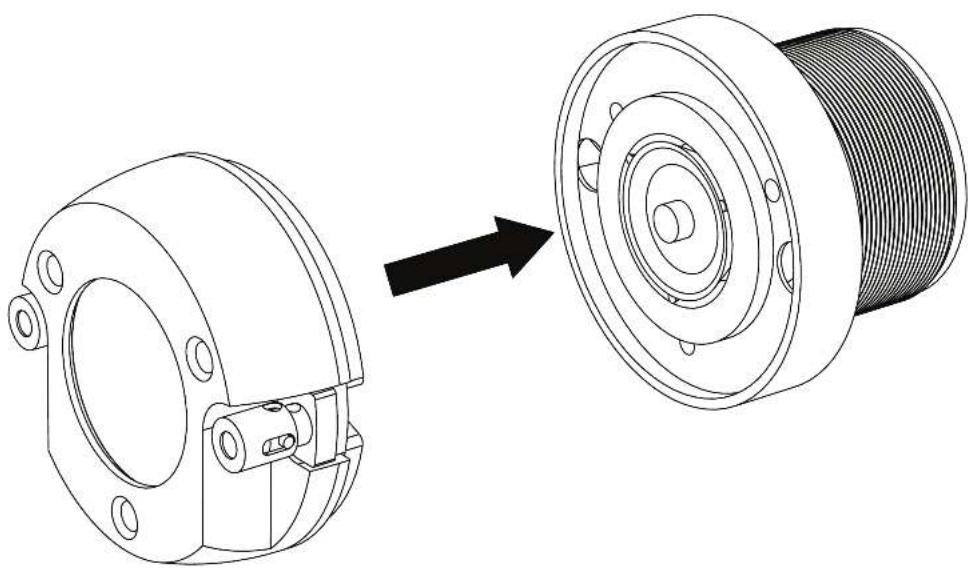
Technical line drawing of a mechanical component before and after assembly (no text or symbols)Install the motor house assembly into the horn assembly, making sure the three screw holes for both are aligned.
natural_image
Technical line drawing of a mechanical component before and after assembly, showing a disassembled part with mounting holes and a coiled spring (no text or symbols)Insert and tighten the three screws.

natural_image
Technical illustration of a mechanical assembly with three bolts and a coiled spring (no text or symbols)natural_image
Technical illustration of a mechanical component before and after assembly, showing a threaded shaft and circular housing (no text or symbols)natural_image
Technical line drawing of a mechanical component with a coiled spring and threaded shaft (no text or symbols)natural_image
Technical line drawing of a mechanical component with a coiled cable and mounting holes (no text or symbols)natural_image
Technical illustration of a mechanical component before and after assembly, showing a threaded shaft and flange (no text or symbols)natural_image
Technical illustration of a mechanical component before and after assembly, showing a threaded shaft and flange (no text or symbols)natural_image
Technical line drawing of a mechanical component with a coiled spring and mounting base (no text or symbols)natural_image
Technical line drawing of a mechanical component with screw holes and mounting holes (no text or symbols)natural_image
Technical line drawing of a circular mechanical component with four bolt holes and a central hole (no text or symbols)natural_image
Technical line drawing of a mechanical assembly with two cylindrical components and a flanged ring (no text or symbols)natural_image
Diagram of concentric circular layers with a black arrow pointing to the outermost layer (no text or symbols)natural_image
Technical line drawing of a mechanical assembly showing two views of a flange with bolt holes and a separate view of a bearing housing (no text or symbols)natural_image
Technical line drawing of a mechanical component before and after assembly (no text or symbols)natural_image
Technical line drawing of a mechanical component before and after assembly, showing a disassembled part and a coiled cable (no text or symbols present)natural_image
Technical illustration of a mechanical assembly with three threaded fasteners and a coiled spring (no text or symbols)Contenu
natural_image
Technical illustration of a mechanical component before and after assembly, showing a threaded shaft and circular housing (no text or symbols)natural_image
Technical line drawing of a mechanical component with a coiled spring and directional arrow (no text or symbols)natural_image
Technical line drawing of a mechanical component with a coiled cable and mounting holes (no text or symbols)natural_image
Technical illustration of a mechanical component before and after assembly, showing a threaded shaft and flange (no text or symbols)natural_image
Technical illustration of a mechanical component before and after assembly, showing a threaded shaft and flange (no text or symbols)natural_image
Technical line drawing of a mechanical component with a coiled spring and mounting base (no text or symbols)natural_image
Technical line drawing of a mechanical component with screw holes and mounting holes (no text or symbols)natural_image
Technical line drawing of a circular mechanical component with four bolt holes and a central hole (no text or symbols)natural_image
Technical line drawing of a mechanical assembly with two cylindrical components and a flanged ring (no text or symbols)natural_image
Diagram of concentric circular layers with a black arrow pointing to the outermost layer (no text or symbols)natural_image
Technical line drawing of a mechanical assembly showing two views of a flanged housing with mounting holes and a separate view of a bearing assembly (no text or symbols present)natural_image
Technical line drawing of a mechanical component before and after assembly (no text or symbols)natural_image
Technical line drawing of a mechanical component before and after assembly (no text or symbols)natural_image
Technical illustration of a mechanical assembly with threaded components and fasteners (no text or symbols)Inhalt
Übersicht 48
Spezifikationen 49
Installation ....50
Konfiguration der
Verkabelung 50
Hochtöner-Verkabelung ..... 51
Montage Hochtöner......54
Hochtöner-Reparatur .... 58
Warranty 62
natural_image
Technical illustration of a mechanical component before and after assembly, showing a threaded shaft and flange (no text or symbols)natural_image
Technical line drawing of a mechanical component with a coiled spring and threaded shaft (no text or symbols)natural_image
Technical line drawing of a mechanical component with a coiled cable and mounting holes (no text or symbols)natural_image
Technical illustration of a mechanical component before and after assembly, showing a threaded shaft and flange (no text or symbols)natural_image
Technical illustration of a mechanical component before and after assembly, showing a threaded shaft and flange (no text or symbols)natural_image
Technical line drawing of a mechanical component with a coiled spring and mounting base (no text or symbols)natural_image
Technical line drawing of a mechanical component with screw holes and a central circular feature (no text or symbols)Hochtöner-Reparatur
natural_image
Technical line drawing of a circular mechanical component with four bolt holes and a central hole (no text or symbols)natural_image
Technical line drawing of a mechanical assembly with two cylindrical components and a flanged ring (no text or symbols)natural_image
Diagram of concentric circular layers with a black arrow pointing to the outermost layer (no text or symbols)natural_image
Technical line drawing of a mechanical assembly showing two views of a flanged housing with a bolted joint, one being rotated (no text or symbols present)natural_image
Technical line drawing of a mechanical component before and after assembly (no text or symbols)natural_image
Technical line drawing of a mechanical component before and after assembly (no text or symbols)natural_image
Technical illustration of a mechanical assembly with three bolts and a coiled spring (no text or symbols)When purchased from an Authorized KICKER Dealer, KICKER warrants this product to be free from defects in material and workmanship under normal use for a period of TWO (2) YEARS from date of original purchase with receipt. If this product is identified as "Refurbished" or "B Goods", the warranty is limited to a period of THREE (3) MONTHS from the date of original purchase. In all cases you must have the original receipt. Should service be necessary under this warranty for any reason due to manufacturing defect or malfunction during the warranty period, KICKER will repair or replace (at its discretion) the defective merchandise with equivalent merchandise. Warranty replacements may have cosmetic scratches and blemishes. Discontinued products may be replaced with more current equivalent products. This warranty is valid only for the original purchaser and is not extended to owners of the product subsequent to the original purchaser. Any applicable implied warranties are limited in duration to a period of the express warranty as provided herein beginning with the date of the original purchase at retail, and no warranties, whether express or implied, shall apply to this product thereafter. Some states do not allow limitations on implied warranties; therefore, these exclusions may not apply to you. This warranty gives you specific legal rights; however you may have other rights that vary from state to state.
WHAT TO DO IF YOU NEED WARRANTY OR SERVICE:
Defective merchandise should be returned to your local Authorized Stillwater Designs (KICKER) Dealer for warranty service. Assistance in locating an Authorized Dealer can be found at www.KICKER.com or by contacting Stillwater Designs directly. You can confirm that a dealer is authorized by asking to see a current authorized dealer window decal.
If it becomes necessary for you to return defective merchandise directly to Stillwater Designs (KICKER), call the KICKER Customer Service Department at (405) 624-8510 for a Return Merchandise Authorization (RMA) number. Package only the defective items in a package that will prevent shipping damage, and return to:
Stillwater Designs
3100 North Husband St
Stillwater, OK 74075
The RMA number must be clearly marked on the outside of the package. Please return only defective components. The return of functioning items increases your return freight charges. Non-defective items will be returned freight collect to you. For example, if a subwoofer is defective, only return the defective subwoofer, not the entire enclosure. Include a copy of the original receipt with the purchase date clearly visible, and a “proof-of-purchase” statement listing the Customer’s name, Dealer’s name and invoice number, and product purchased. Warranty expiration on items without proof-of-purchase will be determined from the type of sale and manufacturing date code. Freight must be prepaid; items sent freight-collect, or COD, will be refused.
WHAT IS NOT COVERED?
This warranty is valid only if the product is used for the purpose for which it was designed. It does not cover:
o Damage due to improper installation
o Subsequent damage to other components
o Damage caused by exposure to moisture, excessive heat, chemical cleaners, and/or UV radiation
o Damage through negligence, misuse, accident or abuse. Repeated returns for the same damage may be considered abuse
o Any cost or expense related to the removal or reinstallation of product
o Speakers damaged due to amplifier clipping or distortion
o Items previously repaired or modified by any unauthorized repair facility
o Return shipping on non-defective items
o Products with tampered or missing barcode labels
o Products with tampered or missing serial numbers
o Products returned without a Return Merchandise Authorization (RMA) number
o Products purchased from an UNAUTHORIZED dealer
o Freight Damage
o The cost of shipping product to KICKER
o Service performed by anyone other than KICKER
HOW LONG WILL IT TAKE?
KICKER strives to maintain a goal of one-week service for all acoustics (subwoofers, midrange drivers, tweeters, crossovers, etc) returns. Delays may be incurred if lack of replacement inventory or parts is encountered. Failure to follow these steps may void your warranty. Any questions can be directed to the KICKER Customer Service Department at (405) 624-8510. Contact your International KICKER dealer or distributor concerning specific procedures for your country's warranty policies.
Contact your International KICKER dealer or distributor concerning specific procedures for your country's warranty policies.
Our goods come with guarantees that cannot be excluded under the Australian Consumer Law. You are entitled to a replacement or refund for a major failure and for compensation for any other reasonably foreseeable loss or damage. You are also entitled to have the goods repaired or replaced if the goods fail to be of acceptable quality and the failure does not amount to a major failure.
Stillwater, Oklahoma 7/076
USA
(405) 624 8510
SDstillwaterdesigns

Brand : KICKER
Model : 49ST3TW
Category : Car speaker