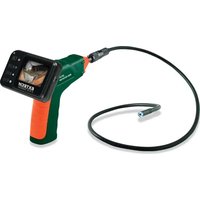
BR150 - Video camera Extech - Free user manual and instructions
Find the device manual for free BR150 Extech in PDF.


| Brand | Extech |
| Model | BR150 |
| Product Type | Video Inspection Camera (endoscope) |
| Probe Length | 1 meter (4-way articulating) |
| Probe Diameter | 8.5 mm |
| Screen Resolution | 320 × 240 pixels |
| Power Supply | 4 AA batteries (1.5 V) not included |
| Image Storage | SD card (up to 32 GB) |
| Connectivity | AV output, USB port |
| Probe Waterproof Rating | IP67 |
| Weight (main unit) | Approximately 400 g |
| Dimensions (main unit) | 150 × 100 × 50 mm |
| Warranty | 1 year (parts and labor) |
| Maintenance and Cleaning | Clean the probe with a soft, dry cloth. Do not use solvents. |
| Safety and Precautions | Do not excessively bend the probe, avoid shocks and immersion of the main unit. |
| Spare Parts and Repairability | Contact Extech customer service for repairs (repair@extech.com). |
| General Information | Manual available in multiple languages. Technical support: support@extech.com. |
Frequently Asked Questions - BR150 Extech
User questions about BR150 Extech
0 question about this device. Answer the ones you know or ask your own.
Ask a new question about this device
Download the instructions for your Video camera in PDF format for free! Find your manual BR150 - Extech and take your electronic device back in hand. On this page are published all the documents necessary for the use of your device. BR150 by Extech.
USER MANUAL BR150 Extech
natural_image
Line drawing of an endoscopic endoscope with a medical device labeled 'EXTECH' (no text or symbols on the device itself)Introduction
Congratulations on your purchase of this Extech BR150 Video Borescope. This instrument was designed for use as an inspection device. It can be used to peer into tight spots and then supply real-time video and images. Typical applications include HVAC inspection, automotive inspection, cable routing, and automotive/boat/aircraft inspection. This meter is shipped fully tested and, with proper use, will provide years of reliable service. Please visit the Extech Instruments website (www.extech.com) to check for the latest version of this User Guide.
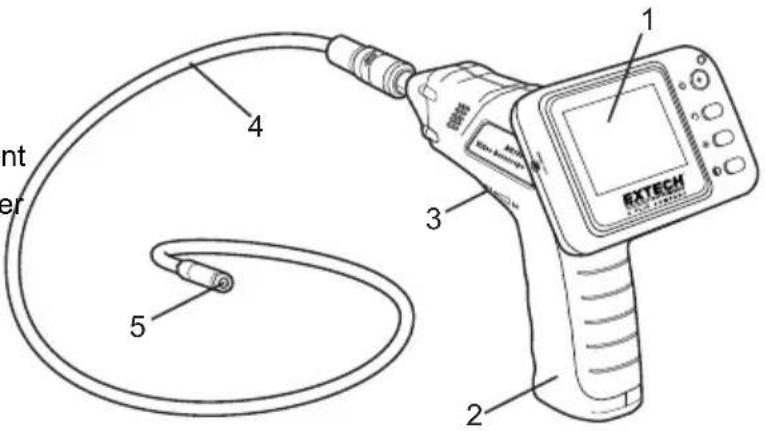
1 Display
2 Handle/Battery compartment
3 Power On/Off, Dimmer
4 Flexible tube
5 Camera head and LED's
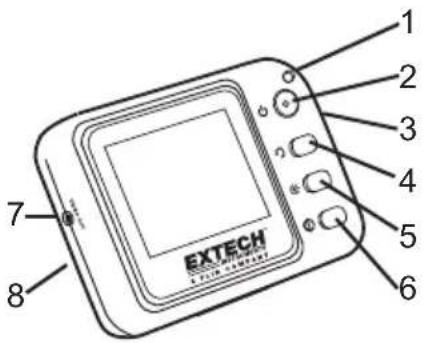
1 Power indicator
2 Display On/OFF
3 Power On/Off (side)
4 Image orientation
5 Brightness
6 Contrast
7 Video output
8 Handle connector (rear)
Safety
- Do not expose instrument to moisture
- Shut off the instrument when not in use
- Remove the batteries when cleaning the instrument
- Replace all batteries at the same time
Installation
Install the batteries into the instrument body, charge the monitor battery, connect the camera and flexible tube to the body, and install any accessory as needed.
Battery Installation
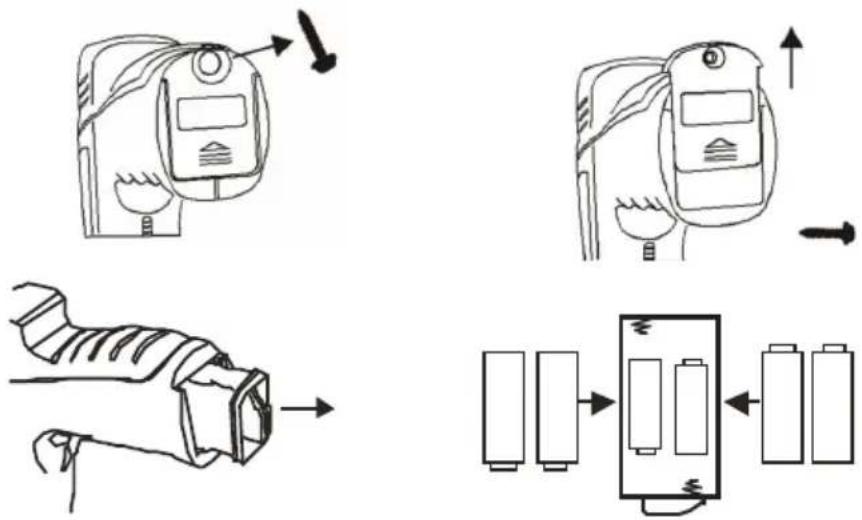
- Remove the screw and cover from the base of the handle.
- Slide out the battery compartment.
- Replace the four AA batteries observing polarity
- Reinstall the battery compartment, cover and screw.
Connect the camera and flexible tube
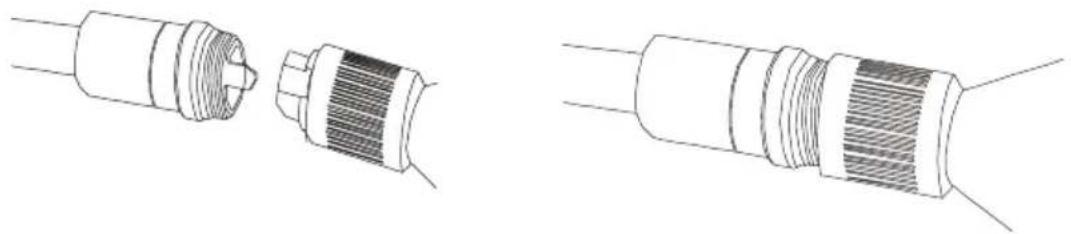
Connect the camera tube to the instrument body; ensure that the keyed ends are properly aligned. Once aligned, tighten the knurled knob to hold the connection firmly in place.
natural_image
Three technical line drawings of cylindrical electronic components with internal structures, showing different assembly states (no text or symbols)Warning. Permanent damage to the flex tube and loss of operation will occur if the flex tube is subjected to narrow radius or sharp angle bends.
Attaching the Monitor to the instrument body
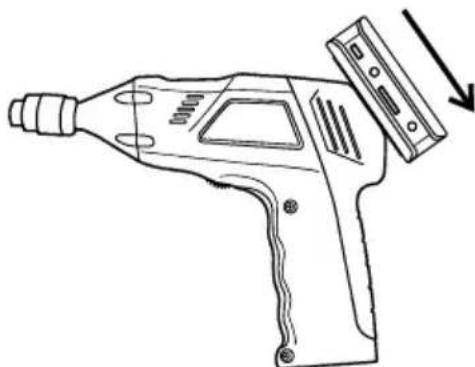
Insert the connector on the handle into the opening of the connector on the monitor and slide down until the monitor is firmly attached.
natural_image
Line drawing of a handheld electric drill with a pull-up device (no text or symbols)Installing the accessory tools
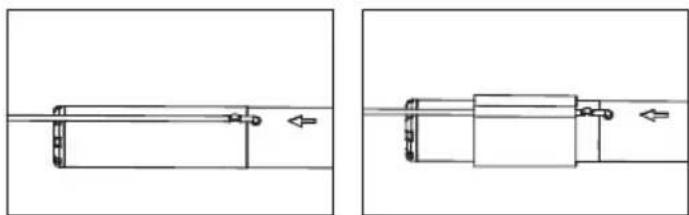
The included accessories (mirror, hook and magnet) all attach to the camera in the same manner. Refer to the diagrams below:
- Align the tool as shown in the diagram below at left.
- Wrap the rubber band ring around the shaft and tool to hold in place as shown in diagram below on right.
natural_image
Pure mechanical diagram showing two sequential assembly steps with arrows indicating motion direction (no text or symbols)Video Output
Insert the video cable into the VIDEO OUT socket on the monitor. Insert the other end of the cable into the VIDEO IN jack of a TV or other monitor. The LCD Monitor will output a high quality video image.
Battery Replacement
When the battery icon appears on the LCD, the 'AA' battery must be replaced. The battery compartment is located on the bottom of the meter.
- Press in and down on the arrow located above the tilt stand hinge.
- Replace the 9V battery.
- Replace the battery cover.
Battery Safety Reminders
- Please dispose of batteries responsibly; always observe local, state, and federal regulations with regard to battery disposal.
- Never dispose of batteries in a fire. Batteries may explode or leak.
- Never mix battery types. Always install new batteries of the same type.
Operation
- Rotate the ON/OFF dial switch to power the camera. The power indicator on the top of the handle will switch on.
- Further rotation of the switch adjusts the intensity of the two LEDs on the camera head.
- Slide the On/Off switch on the side of the monitor to the ON position
- Press the power button on the face of the monitor. The power light will turn on and the picture will appear.
- Press the orientation button on the face of the monitor to rotate the picture as needed.
- Press the brightness and contrast buttons in conjunction with the rotating the LED intensity for the best image quality.
- The tube can be easily maneuvered into position. The tube can be bent into the shape of the area to be examined.
- Use the supplied accessories to help retrieve small items.
Specifications
CAMERA
Imaging Sensor CMOS
Total Pixels 712×486 (NTSC)
Horizontal View Angle 45 degree
Transmission Frequency 2468MHz
Minimum Illumination 0 Lux
Power Supply 4 x AA batteries
LCD Screen Type 2.36" TFT-LCD
Effective Pixels 480 x 234
Video Output Level 0.9-1.3VP-P@75Ω
Receiving Sensitivity ≤-85dBm
Dimensions (Monitor) (W x D x H) 3.9 x 2.8 x 1.2" (100 x 70 x 30mm)
Operating Humidity (Max.) 15\~85%RH
Waterproof Capacity IP67 (imager head only)
Dimensions (Handle) (W x D x H) 7.3 x 5.7 x 1.6" (186 x 145 x 41mm) (Excluding Flexible Tube)
Weight (approx) 15.5 oz. (440g)
Camera head Diameter 0.35" (9mm)
Operating Temperature +14°F\~+122°F (-10°C\~+50°C)
Warranty
FLIR Systems, Inc. warrants this Extech Instruments brand device to be free of defects in parts and workmanship for one year from date of shipment (a six month limited warranty applies to sensors and cables). If it should become necessary to return the instrument for service during or beyond the warranty period, contact the Customer Service Department for authorization. Visit the website www.extech.com for contact information. A Return Authorization (RA) number must be issued before any product is returned. The sender is responsible for shipping charges, freight, insurance and proper packaging to prevent damage in transit. This warranty does not apply to defects resulting from action of the user such as misuse, improper wiring, operation outside of specification, improper maintenance or repair, or unauthorized modification. FLIR Systems, Inc. specifically disclaims any implied warranties or merchantability or fitness for a specific purpose and will not be liable for any direct, indirect, incidental or consequential damages. FLIR's total liability is limited to repair or replacement of the product. The warranty set forth above is inclusive and no other warranty, whether written or oral, is expressed or implied.
Calibration, Repair, and Customer Care Services
FLIR Systems, Inc. offers repair and calibration services for the Extech Instruments products we sell. NIST certification for most products is also provided. Call the Customer Service Department for information on calibration services available for this product. Annual calibrations should be performed to verify meter performance and accuracy. Technical support and general customer service is also provided, refer to the contact information provided below.
Support Lines: U.S. (877) 439-8324; International: +1 (603) 324-7800
Technical Support: Option 3; E-mail: support@extech.com
Repair & Returns: Option 4; E-mail: repair@extech.com
Product specifications are subject to change without notice
Please visit our website for the most up-to-date information
www.extech.com
FLIR Commercial Systems, Inc., 9 Townsend West, Nashua, NH 03063 USA
ISO 9001 Certified
Copyright © 2013-2015 FLIR Systems, Inc.
All rights reserved including the right of reproduction in whole or in part in any form
www.extech.com
Garantie
Copyright © 2013-2015 FLIR Systems, Inc.
Copyright © 2013-2015 FLIR Systems, Inc.

- Introduction
- Safety
- Installation
- Battery Installation
- Connect the camera and flexible tube
- Attaching the Monitor to the instrument body
- Installing the accessory tools
- Video Output
- Battery Replacement
- Battery Safety Reminders
- Operation
- Specifications
- CAMERA
- Warranty
- Calibration, Repair, and Customer Care Services
- Garantie
Brand : Extech
Model : BR150
Category : Video camera