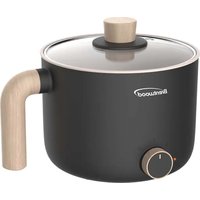
EPC-636 - Multi-cooker Brentwood - Free user manual and instructions
Find the device manual for free EPC-636 Brentwood in PDF.

User questions about EPC-636 Brentwood
0 question about this device. Answer the ones you know or ask your own.
Ask a new question about this device
Download the instructions for your Multi-cooker in PDF format for free! Find your manual EPC-636 - Brentwood and take your electronic device back in hand. On this page are published all the documents necessary for the use of your device. EPC-636 by Brentwood.
USER MANUAL EPC-636 Brentwood
text_image
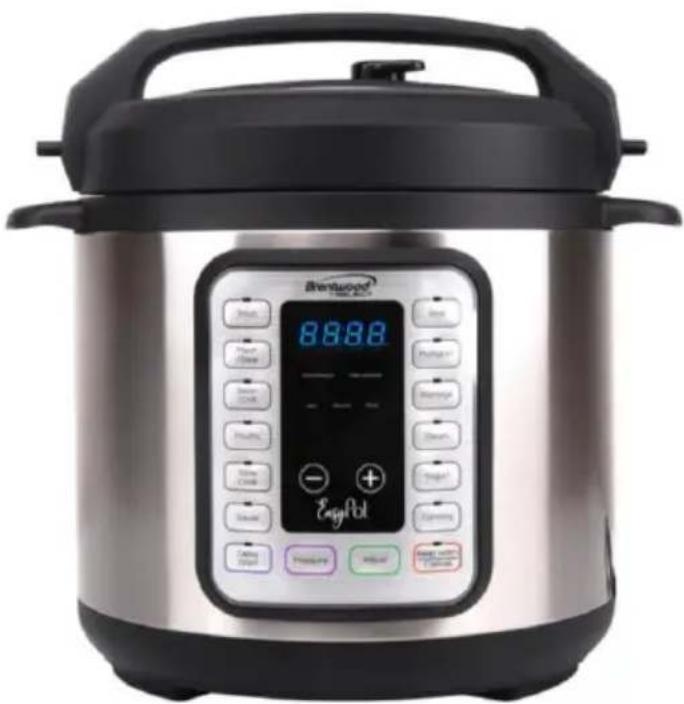
Brentwood® SELECT EasyPot© 2021 Brentwood Appliances, Inc.
8 IN 1 MULTI-COOKER 8 EN 1 OLLA DE PRESIÓN ELÉCTRICA / 8 EN 1 AUTOCUISEUR ÉLECTRIQUE
ITEM NO.: EPC-636
text_image
Brentwood EasyJet 88.88°F EasyJetWhen using this or any other electrical appliance, always follow these basic safety precautions, especially when children are present.

READ ALL INSTRUCTIONS BEFORE USE
WARNING-To reduce the risk of fire, electric shock, serious personal injury and property damage please note the following:
- Do not touch hot surfaces of pressure cooker. Use handles only.
- This appliance should not be used near children or by individuals with disabilities or limited knowledge in using pressure cookers.
- Do not place the pressure cooker in a heated oven or any hot surfaces.
- Extreme caution must be used when moving a pressure cooker containing hot liquids.
- Do not use pressure cooker for other than intended use.
- Intended for countertop use. For Household use only. Not for outdoor use if unattended.
- This appliance cooks under pressure. Always ensure there is a minimum of 1 measuring cup of liquid for the cooker to pressurize. Improper use may result in scalding injuries. Make certain the unit is properly closed before operating. Please see “Cooking Preparation”.
- For all pressure cooking programs, do not fill the unit over 2/3 full. When cooking foods that expand during cooking such as grains, beans, and dried vegetables, do not fill the unit over 1/2 full. Overfilling may cause a risk of clogging the pressure release valve and developing excess pressure. Please see “Cooking Preparation”.
- Be aware that certain foods, such as applesauce, cranberries, pearl barley, oatmeal and other cereals, split peas, noodles, macaroni, rhubarb, and spaghetti can foam, froth, sputter, and clog the pressure release. These food items should not be cooked in a pressure cooker.
- Always check the pressure release valve, float valve and anti-block shield for clogging before use.
- Make sure the pressure release handle is in the sealing position for all pressure cooking programs.
- Do not open the pressure cooker until the unit has cooled and all internal pressure has been released. If the handles are difficult to push apart, this indicates that the cooker is still pressurized – do not force it open. Any pressure in the cooker can be hazardous. Please see “Cooking Preparation”.
- Never deep fry or pressure fry in the unit with oil.
- To protect against electrical shock, do not immerse the cord, power plug, or appliance in any liquid.
- Unplug from power outlet when not in use and before cleaning. Allow the unit to cool before putting on or taking off parts, and before cleaning. To disconnect, turn any control to "off", then remove plug from the wall outlet.
- Do not operate any appliance with damaged cord or plug, or after the appliance malfunctions or has been damaged in any manner.
- Use of accessories and parts that are not recommended by WJMIA may cause damages. Cook only in the stainless steel inner cooking pot provided.
- Do not let cord hang over edge of table or counter or touch hot surfaces.
SPECIAL INSTRUCTIONS:
ITEM/MODEL: EPC-636(EasyPot®) has a 3-prong grounding plug. To reduce the risk of electric shock, plug the power cord into a grounded (earthed) electrical outlet that is easily accessible. Model EPC has a polarized plug (one blade is wider than the other). To reduce the risk of electric shock, this plug is intended to fit into a polarized outlet in only one way. If the plug does not fit into the outlet, flip the plug. Do not attempt to modify the plug in any way.
For safety reasons, the power supply cord is designed to be short to minimize the possibility of entanglement or tripping.
WARNING: Spilled food can cause serious burns. Keep appliance and cord away from children.
Never drape cord over edge of counter, never use outlet below counter, and never use with an extension cord.
Specifications:
- Working pressure: High 10.2 \~ 11.6psi (70 \~ 80kPa); Low 5.8 \~ 7.2 psi (40 \~ 50kPa)
- Pressure release limit: 16.68psi (115kPa)
- Working temperature: 239^ F \~ 244^ F ( 115^ C \~ 118^ C) at high pressure setting; 229 233^ F ( 110^ C \~ 112^ C) at low pressure setting.
- "Keep warm" function: up to 10 hours, 145 172^ F (63 \~ 78°C)
- "Slow Cook" function: 3 min \~ 10 hours, at 190 \~ 210°F (88 \~ 99°C)
- “Sauté” function: “Normal” mode: 320 \~ 349°F (160 \~ 176°C); “More” mode: 347 \~ 410°F, 175 \~ 210°F; “Less” mode: 275 \~ 302°F (135 \~ 150°C)
- “Yogurt” function: up to 12 hours. “Normal” mode for making yogurt: 96.8 \~ 109.4°F (36 \~ 43°C); “Less” mode for making Jiu Niang (fermented glutinous rice): 86 \~ 93.2°F (30 \~ 34°C); “More” for pasteurizing milk: 160\~180°F (71\~83°C).
- Please note that beeping is always ON in all error conditions.
| Model Power | Supply | Power | Volume | Weight | Dimension |
| EPC-636 | 120V~60Hz | 1000W | 6 Qt | 12 lb | 12 x 13.5 x 13.25 in |
| Accessories | Rice Paddle, Soup Spoon, Measuring Cup, Condensation Collector, and User Manual. | ||||
SAVE THESE INSTRUCTIONS FOR FUTURE REFERENCE
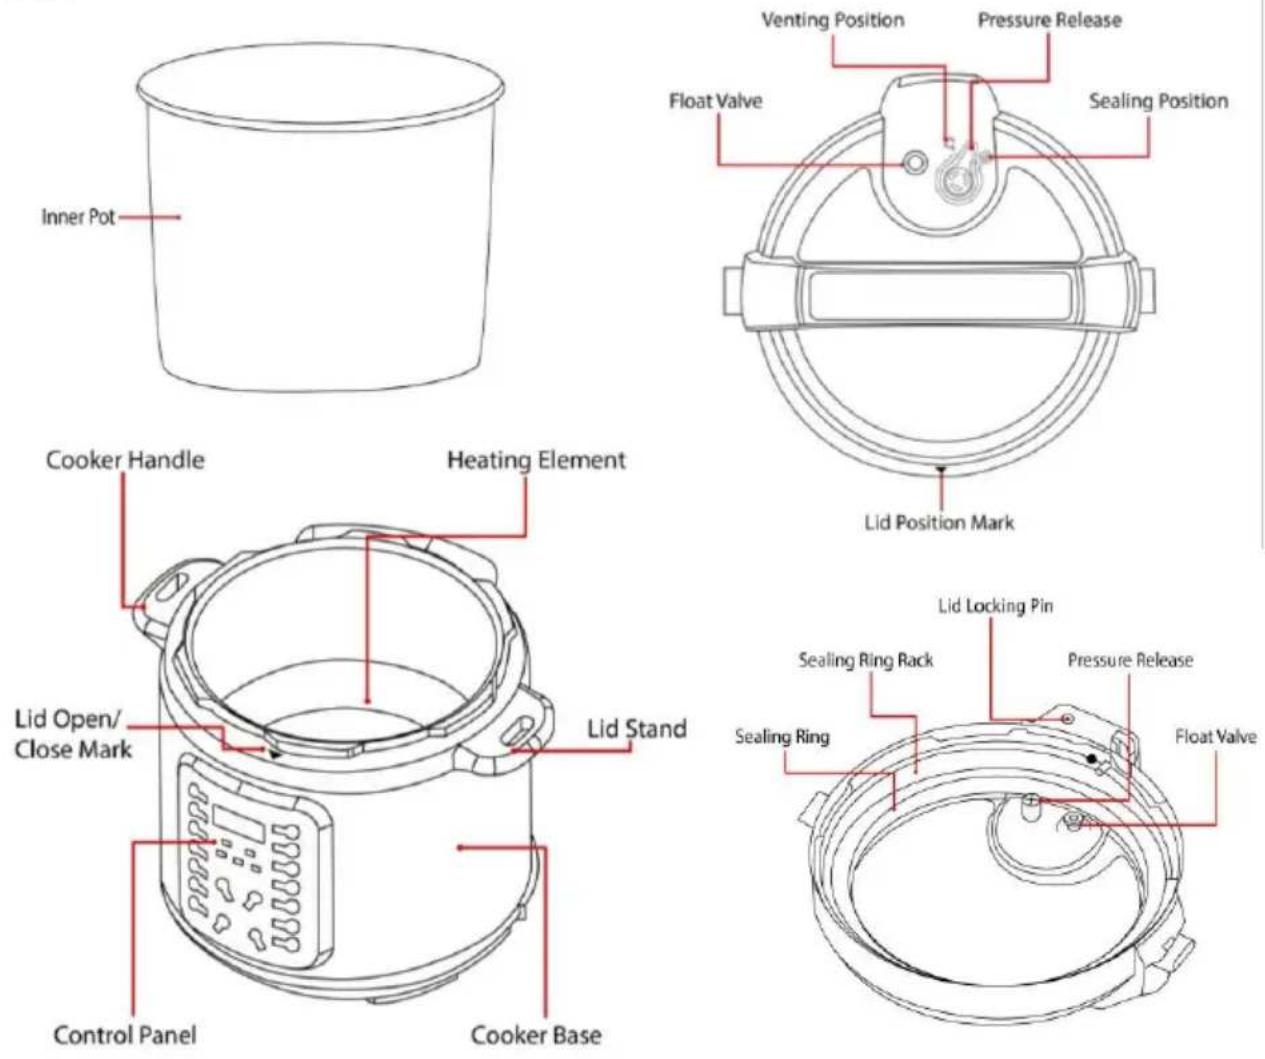
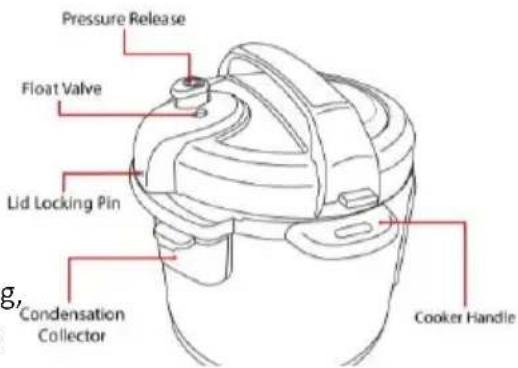
Parts:
Before the First Use
Before the first use, please take out all accessories from the package and read this manual carefully. Please wash the inside of the lid and the inner pot with warm soapy water, rinse and dry thoroughly. Clean the outside of the cooker base with a clean damp cloth.
Never immerse the cooker base in water or any other liquid. Never clean the cooker base in the dishwasher. The lid and sealing ring can be washed in the dishwasher. Make sure water is fully drained after washing. Inspect the lid to ensure that there is no food debris blocking the valves.
Installing the Condensation Collector
To install the condensation collector, slide the condensation collector into the slot on the back of the cooker base. Follow the reverse order to remove it for cleaning.
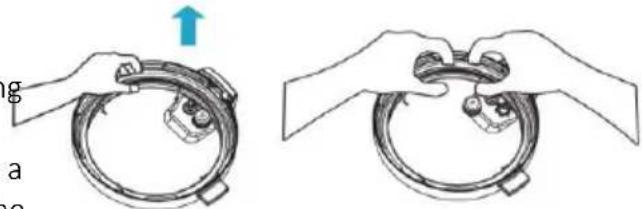
Removing and Installing the Sealing Ring The sealing ring can be removed by pulling it outward, section by section, from the sealing ring rack. To reinstall the sealing ring, press it down into the rack section by section. The sealing ring can be installed with either side facing up.
text_image
Pressure Release Float Valve Lid Locking Pin Condensation Collector Cooker HandlePlease note the following:
- Prior to each use, inspect to make sure the sealing ring is well seated in the sealing ring rack. A properly seated sealing ring can be shifted, with a bit of effort, clockwise or anti-clockwise inside the sealing ring rack.
natural_image
Illustration of hands performing a mechanical assembly or lifting operation (no text or symbols present)• After use, remove any food debris from the sealing ring.
- Keep the sealing ring clean to avoid odor. Washing the sealing ring in warm soapy water or dishwasher can remove odor. However, it is normal for the sealing ring to absorb the smell of certain acidic foods. It is recommended to have more than one sealing ring.
- Never pull the sealing ring by force, as the force may deform the sealing ring and ring rack and affect the pressure sealing function.
- A sealing ring with cracks, cuts, or other damages should be replaced immediately.
Safe Lid Opening: Make sure the pressure cooking function has ended or press "Keep-Warm/Cancel" to stop the function.
- Release pressure by one of the following approaches:
a) Natural Release: Allow the cooker to cool down naturally until the float valve drops down. This may take 10 minutes or longer, depending on the volume and type of food and liquid inside. Hint: Placing a wet towel on the lid can speed up cooling.
b) Quick Release: Turn the pressure release handle to the "Venting" position to let out steam until the float valve drops.
Caution:
- Please keep hands and face away from the opening on the top of the pressure release handle when using Quick Release. The escaping steam is hot and can cause scalds.
- Never pull out the pressure release handle when it is letting out steam.
- Please be aware that Quick Release is not suitable for food with large liquid volume or high starch content (e.g. porridge, congee, sticky liquids, soup, etc.). Food content may splatter out from the pressure release. Use Natural Release instead.
- Open the lid: Do not open the lid until pressure inside the pot is completely released. To avoid vacuum suction on the lid, turn the pressure release to "Venting" position to let in air when lifting the lid. Hold the lid handle, turn the lid counterclockwise to the open position, and lift the lid up to open. Caution: Do not open the lid until pressure inside the pot is completely released. As a safety feature, the lid will not open until the float valve drops down.
- If the float valve is stuck due to food debris or sticky liquid, you can push it down with a pen or chopstick after you are certain that the pressure has been released completely by moving the pressure release handle to the venting position.
- To avoid personal injuries, never attempt to force down the float valve to open the lid. DO NOT open the lid until after the pressure is completely released.
Cooking Preparation
-
Open the lid: Pick up the lid handle, rotate approximately 30 degrees counterclockwise until the ▼ mark on the lid is aligned with the ▲ “Open” mark on the cooker base.
-
Check whether all parts on the lid are assembled properly: Check the float valve and pressure release valve for obstructions. Make sure that the sealing ring is well seated inside its holding rack. Make sure the float valve can move up and down easily.
-
Take out the inner pot and add food and liquid: For all pressure cooking functions, the total amount of precooked food and liquid should NEVER pass 2/3 of the inner pot capacity. When cooking food that expand during cooking such as rice, beans, or dried vegetables, do not fill inner pot pass 1/2 of the inner pot capacity. Over filling may risk clogging the pressure release valve and developing excess pressure. This may also cause leakage, personal injuries, or damage to the unit. For non-pressure cooking functions, do no fill pass the MAX line.
-
Place the inner pot inside the cooker base: Be sure to remove any food debris. Wipe dry the outside of the inner pot and the heating plate inside the cooker base. After putting the inner pot inside the cooker base, rotate the inner pot slightly to ensure good contact between the inner pot and the heating element. Slide the condensation collector into the slot on the back of the cooker base.
-
Close the lid completely: Pick up the lid and put the lid on the cooker with the ▼ mark on the lid and the ▲ "Open" mark on the cooker base aligned. Rotate the lid clockwise approximately 30 degrees until the ▼ mark on the lid is aligned with the ▲ "Close" mark on the cooker base rim. When using "Rice", "Multigrain", "Porridge", "Steam", "Meat/Stew", "Soup", "Bean /Chili", "Poultry" and "Yogurt", the lid should be fully closed. The display flashes "Lid" if the lid is not positioned correctly. When using
"Sauté", the lid should be open. When using "Slow Cook", the lid can remain on or off.
Position the pressure release handle properly: Please note that it is perfectly normal and necessary for the pressure release handle to be loose. It simply on top of the pressure release outlet. It can also be removed for washing if necessary by pulling it straight out.

text_image
Seating ests g"Venting
When running any of the functions except "Keep-Warm", "Sauté" or "Slow Cook", align the pointed end of the pressure release handle to "Sealing" position, indicating that the pressure cooker is in the sealed position. The
"Sauté" function must be used without the lid. The "Slow Cook" and "Keep-Warm" functions can operate with or without the lid. When the lid is closed while initiating the "Keep Warm" or "Slow Cook" function, the pressure release valve must be in the 'Venting' position.
Control Panel:
The control panel of your EasyPot ^® consists of an LED display, 2 pressure indicators, 3 time mode indicators, 4 operation keys and 14 function keys. Each function key has a function indicator light. Operation keys do not have indicator lights.
States of the Cooker: Your EasyPot ^® has 3 states which are shown on the LED display and function indicators.
- Standby state: The LED display shows "OFF".
- Pre-heating state: The LED display shows "On" and the activated function indicator lights up.
- Program operating state: The activated function indicator lights up and the LED display shows time. For all pressure cooking, "Slow Cook" and "Delay Start" functions, the time counts down. For "Keep Warm" function, the time counts up.
Operation Keys: (The 4 operations keys include "+" and "-" )
The "Pressure" key toggles the pressure setting between "High Pressure" and "Low Pressure" for the pressure cooking functions which include "Soup", "Meat/Stew", "Bean/Chili", "Poultry", "Rice",
"Multigrain", "Porridge", "Steam", and "Canning" functions. The "Pressure" key has no effect on the following cooking functions: "Slow Cook", "Sauté", and "Yogurt".
The "Adjust" key can adjust the time from "Normal", "Less", and "More" standard times. The cooking time can also be adjusted using the "+" and "-" keys. See the Function Keys Chart below.
| Function Keys | Settings | |||
| Soup | Pressure | Low (5.8 ~7.2 psi/ 40 ~ 50kPa)High (10.2 ~ 11.6psi/ 70 ~ 80kPa) | ||
| Time Settings | Less | Normal | More | |
| Default Cooking Time | 00:10 | 00:20 | 00:30 | |
| Cooking Time Range | 00:03 - 04:00 | |||
| Meat/Stew | Pressure | Low (5.8 ~7.2 psi/ 40 ~ 50kPa)High (10.2 ~ 11.6psi/ 70 ~ 80kPa) | ||
| Time Settings | Less | Normal | More | |
| Default Cooking Time | 00:20 | 00:35 | 00:45 | |
| Cooking Time Range | 00:03 - 04:00 | |||
| Bean/Chili | Pressure | Low (5.8 ~7.2 psi/ 40 ~ 50kPa)High (10.2 ~ 11.6psi/ 70 ~ 80kPa) | ||
| Time Settings | Less | Normal | More | |
| Default Cooking Time | 00:15 | 00:25 | 00:35 | |
| Cooking Time Range | 00:03 - 04:00 | |||
| Poultry | Pressure | Low (5.8 ~7.2 psi/ 40 ~ 50kPa)High (10.2 ~ 11.6psi/ 70 ~ 80kPa) | ||
| Time Settings | Less | Normal | More | |
| Default Cooking Time | 00:10 | 00:25 | 00:35 | |
| Cooking Time Range | 00:03 - 04:00 | |||
| Slow Cook | Pressure | No Adjustable Pressure | ||
| Time Settings | Less | Normal | More | |
| Default Cooking Time | 04:00 | 06:00 | 08:00 | |
| Cooking Time Range | 01:00 - 10:00 | |||
| Saute | Pressure | No Adjustable Pressure | ||
| Time Settings | Less | Normal | More | |
| Default Cooking Time | 00:00 | 00:30 | 00:00 | |
| Cooking Time Range | No Adjustable Time | |||
| Rice | Pressure | Low (5.8 ~7.2 psi/ 40 ~ 50kPa)High (10.2 ~ 11.6psi/ 70 ~ 80kPa) | ||
| Time Settings | Less | Normal | More | |
| Default Cooking Time | 00:06 | 00:12 | 00:18 | |
| Cooking Time Range | 00:03 - 04:00 | |||
| Multigrain | Pressure | Low (5.8 ~7.2 psi/ 40 ~ 50kPa)High (10.2 ~ 11.6psi/ 70 ~ 80kPa) | ||
| Time Settings | Less | Normal | More | |
| Default Cooking Time | 00:08 | 00:15 | 00:25 | |
| Cooking Time Range | 00:03 - 04:00 | |||
| Porridge | Pressure | Low (5.8 ~7.2 psi/ 40 ~ 50kPa)High (10.2 ~ 11.6psi/ 70 ~ 80kPa) | ||
| Time Settings | Less | Normal | More | |
| Default Cooking Time | 00:05 | 00:20 | 00:30 | |
| Cooking Time Range | 00:03 - 04:00 | |||
| Steam | Pressure | Low (5.8 ~7.2 psi/ 40 ~ 50kPa)High (10.2 ~ 11.6psi/ 70 ~ 80kPa) | ||
| Time Settings | Less | Normal | More | |
| Default Cooking Time | 00:03 | 00:10 | 00:15 | |
| Cooking Time Range | 00:03 - 04:00 | |||
| Yogurt | Pressure | No Adjustable Pressure | ||
| Time Settings | Less | Normal | More | |
| Default Cooking Time | 06:00 | 08:00 | 12:00 | |
| Cooking Time Range | 00:03 - 12:00 | |||
| Canning | Pressure | Low (5.8 ~7.2 psi/ 40 ~ 50kPa)High (10.2 ~ 11.6psi/ 70 ~ 80kPa) | ||
| Time Settings | Less | Normal | More | |
| Default Cooking Time | 00:10 | 00:15 | 00:20 | |
| Cooking Time Range | 00:03 - 04:00 | |||
Pressure Cooking:
The following procedure is for "Rice", "Soup", "Poultry", "Meat/Stew", "Bean/Chili", "Multigrain", "Porridge", and "Steam" functions.
-
Follow steps in the "Cooking Preparation" section of this manual. Connect power cord.
-
Select a cooking function, e.g. "Soup". Once a function key is pressed, its indicator lights up.
- Within 10 seconds after pressing a function key, you can adjust the pressure and cooking time.
-
The built-in cooking time is suitable for most types of food. Reference the Function Keys table for cooking times.
-
Cooking starts automatically in 10 seconds after the last key press.
- The LED display shows "the time" indicating that the cooking state is in progress.
- Note: Depending on the food content, the quantity, and its temperature (frozen or not), the preheat cycle can range between 10 to 40 minutes.
- As the pressure increases inside the cooker, it is perfectly normal for traces of steam to escape from the float valve until the float valve pops up.
- The cooking time counts down to indicate the remaining time in minutes.
- At any time, you can cancel the cooking function in progress and return to standby mode by pressing the "Keep-Warm/Cancel" key.
- Pressure cooking cycle finishes, the cooker beeps and automatically goes into the Auto "Keep Warm" cycle. The LED display will "bb" to indicate the "Keep Warm" cycle in on.
- It is not recommended to leave cooked rice in "Keep-Warm" state for too long as it may affect the texture when cooking rice.
- To serve food, press "Keep-Warm/Cancel" to stop the keep-warm cycle and open the lid according to the "Safe Lid Opening" section of this manual.
Note: When opening the lid, the inner pot may appear to be stuck on the lid due to a vacuum effect. Please turn the pressure release to "Venting" position to let in air when lifting the lid.
Slow Cooking: Follow steps in the "Cooking Preparation" section of this manual. The pressure release handle should be at the "Venting" positions.
- You can choose to leave the lid on or off. If you choose to close the lid completely, set the pressure release to venting. Connect power cord.
- Select the "Slow Cook" function. Within 10 seconds after pressing the function key, you can adjust the cooking time. Reference the Function Keys table for cooking times.
- When the cooking finishes, the cooker beeps and goes into the Auto "Keep Warm" function.
Delay function: Your EasyPot ^® has a Delay function to delay the start of cooking for up to 24 hours. Delay function does not apply to the "Keep Warm", "Yogurt" and "Sauté" functions.
- Follow steps in the previous "Pressure Cooking" or "Slow Cooking" sections to set a cooking function.
- Within 10 seconds after function selection, press the "Delay" key to set the hours and minutes to be delayed. Use "+" and "-" operation keys to set the delayed time.
- 10 seconds after the last key press, the "Delay" function starts. The time on the LED display counts down, and the flashing green indicator on the "Delay" key changes to solid green.
- To cancel the Delay operation, press the "Keep-Warm/Cancel" key at any time.
- Your EasyPot® starts cooking when the delay timer counts down to 0. After cooking, the cooker will then enter the Auto “Keep Warm” function.
Sautéing: Follow steps in the "Cooking Preparation" section of this manual. Keep the lid open to avoid pressure from building.
-
Connect the cooker to the power outlet. Press the "Sauté" key. For safety reasons, the maximum operation time of one "Sauté" cycle is 30 minutes.( If you need more time, simply press the "Sauté" key again)
Caution: To avoid pressure building up, the lid cannot be closed. If you accidentally close the lid, flashing "Lid" is displayed to warn about the wrong lid position. -
Heating starts automatically in 10 seconds after the last key is pressed. The "Sauté" program can be cancelled at any time by pressing "Keep Warm/Cancel" key.
Warming: Pressing the “Keep Warm/Cancel” key in the standby state activates the “Keep Warm” function, the Led display will show “bb”, keeping the food temperature in the pot 66-75 degrees. Press the “Keep Warm/Cancel” key to cancel “Keep Warm” function.
Cleaning: Please make sure the appliance has cooled down and is unplugged before cleaning.
- Remove the lid and take out the inner pot, wash the pot with soap, rinse with water and then wipe dry with a soft cloth. The stainless steel inner pot is also dishwasher safe.
- Use water to clean the lid, including the sealing ring (which can be removed), pressure release, and wipe them clean with a soft dry cloth. Do not take apart the pressure release handle assembly.
- Clean the cooker base with a clean damp cloth. Do not immerse the cooker into water. Do not use a wet cloth to clean the pot while the power cord is plugged into the power outlet.
For a more detailed instruction manual, please email support@brentwoodus.com.
ONE YEAR LIMITED WARRANTY
Write down the following information about your appliance to better help you obtain assistance or service if you ever need it.
CUSTOMER RECORD
Date of Purchase ____ Store/Dealer ____
Model/Item No: ____
THIS WARRANTY APPLIES TO PRODUCTS PURCHASED AND USED IN THE CONTINENTAL U.S. AND CANADA ONLY. This is the only express warranty for this product and is in lieu of any other warranty or condition. This product is warranted to be free from defects in material and workmanship for a period of one (1) year from the date of original purchase. During this period, your exclusive remedy is repair or replacement of this product, at our option; however, you are responsible for all costs associated with returning the product to us and our returning a product or component under this warranty to you. If the product or component is no longer available, we will replace with a similar one of equal or greater value. This warranty does not cover glass, filters, wear from normal use, use not in conformity with the printed directions, or damage to the product resulting from accident, alteration, abuse, or misuse.
THIS WARRANTY EXTENDS ONLY TO THE ORIGINAL CONSUMER PURCHASER. KEEP THE ORIGINAL SALES RECEIPT, AS PROOF OF PURCHASE IS REQUIRED TO MAKE A WARRANTY CLAIM.
This warranty is void if the product is used for other than single-family household use or subjected to any voltage and waveform other than what is specified on the rating label (E.G., 120V\~60Hz). We exclude all claims for special, incidental, and consequential damages caused by breach of express or implied warranty. All liability is limited to the amount of the purchase price. Every implied warranty, including any statutory warranty or condition of merchantability or fitness for a particular purpose, is disclaimed except to the extent prohibited by law, in which case such warranty or condition is limited to the duration of this written warranty. This warranty gives you specific legal rights. You may have other legal rights that vary depending on where you live. Some states do not allow limitations on implied warranties or special, incidental, or consequential damages, so the foregoing limitations may not apply to you. To make a warranty claim do not return this appliance to the store.
TO OBTAIN WARRANTY SERVICE AND/OR TROUBLESHOOTING INFORMATION:
Call Customer Service at 1-888-903-0060 in the U.S.
Monday through Friday: 9:00am – 5:00pm PST.
U.S. Customers Please Email: warranty@brentwoodus.com
Canadian Customers Please Email: canada.warranty@brentwoodus.com
Go online at www.brentwoodus.com
natural_image
Two hand-drawn diagrams showing a mechanical assembly with a blue arrow indicating direction (no text or symbols)RECOMMANDATIONS ADDITIONNELLES:
natural_image
Illustration of two hands adjusting a circular mechanical component, showing a blue upward arrow (no text or symbols)text_image
cle Sealing Venting© 2021 Brentwood Appliances, Inc.