
TS-1010 - Knife Brentwood - Free user manual and instructions
Find the device manual for free TS-1010 Brentwood in PDF.

| Product Type | Electric Slicer Knife |
| Brand | Brentwood |
| Model | TS-1010 |
| Usage | Indoor household use only |
| Power Supply | 120 V AC, 60 Hz, 110 W |
| Blade Type | Stainless steel serrated blades |
| Attachment System | Rivet and keyhole with snap-lock |
| Safety | Safety button and blade ejection |
| Blade Cleaning | Dishwasher safe (top rack) or hand wash |
| Housing Cleaning | Wipe with a damp cloth |
| Cord | Short, polarized (wide prong) |
| Extension Cord Use | Not recommended; if necessary, use a grounded extension cord |
| Removable Parts | Blades and protective sheath |
| Repairability | No user-serviceable parts |
| Warranty | See warranty policy on page 7 of the manual |
| Important Precautions | Do not immerse motor housing; keep out of reach of children |
| Plug Type | Polarized plug (one wider prong) |
| Housing Material | Plastic |
| Storage | Wrap cord around housing, place blades in sheath, store in dry place |
| Activation Duration | Press and hold for continuous activation, release to stop |
Frequently Asked Questions - TS-1010 Brentwood
User questions about TS-1010 Brentwood
0 question about this device. Answer the ones you know or ask your own.
Ask a new question about this device
Download the instructions for your Knife in PDF format for free! Find your manual TS-1010 - Brentwood and take your electronic device back in hand. On this page are published all the documents necessary for the use of your device. TS-1010 by Brentwood.
USER MANUAL TS-1010 Brentwood
Brentwood® Appliances
© 2022 Brentwood Appliances, Inc.
ELECTRIC CARVING KNIFE CUCHILLO ELÉCTRICO PARA TRINCHAR COUTEAU À DÉCOUPER ÉLECTRIQUE
ITEM NO.: TS-1010

natural_image
Close-up of a pair of cleaning cutlery with a black and white lever, no visible text or symbols.Operating and Safety Instructions
FOR INDOOR HOUSEHOLD USE ONLY
When using this or any other electrical appliance, always follow these basic safety precautions, especially when children are present.

READ ALL INSTRUCTIONS BEFORE USE

WARNING- To reduce the risk of fire, electric shock, serious personal injury, and property damage please note the following:
- Keep this product out of the reach of children and pets. This product is not intended for use by children. Extra caution and close supervision are necessary when this product is used near children.
- Do not put the Motor Housing, Power Cord, or Plug in water or other liquid. Do not operate the product in water or under running water.
- Unplug the Power Cord from the electrical outlet when the product will not be in use, before putting on or taking off parts, and before relocating or cleaning it.
- Avoid contacting moving parts.
- Blades are sharp. Handle them carefully. Always handle Blades with hands away from the cutting edge. Always store Blades with the cutting edge directed away from you.
- Never place the product where it may fall into a sink or other water/liquid-filled container. If the product falls into water or other liquid, immediately unplug it from the electrical outlet. Do not touch or reach into the water/liquid.
- Do not plug or unplug the product into/from an electrical outlet with a wet hand.
- Do not operate any appliance with a damaged cord or plug or after the appliance malfunctions or has been damaged in any manner.
- Take the product to an appliance repair shop of your choice for examination, repair, or adjustment if no longer under warranty.
- Do not use attachments not recommended or sold by the product manufacturer.
- This product is intended solely for non-commercial, non-industrial, indoor household use in the cutting of cooked foods for human consumption. Do not use the product outdoors or for any other purpose.
- Do not allow the Power Cord to hang over the edge of a table or counter, where it may be tripped over or pulled, and do not allow the Power Cord to touch a hot surface, including a stove.
- This product has no user-serviceable parts. Do not attempt to examine or repair this product yourself. Please review the Warranty Policy on Page 7.
- To disconnect the product from the electrical outlet, pull directly on the Plug; do not pull on the Power Cord.
SPECIAL INSTRUCTIONS:
- To avoid a circuit overload when using this product, do not operate another high-wattage product on the same electrical circuit.
-
A short power supply cord is provided to reduce the risk of becoming entangled in or tripping over a longer cord. An extension cord is not recommended for use with this product, but if one must be used:
-
The marked electrical rating must be at least as great as that of the product.
- If the product is of a 3-prong grounding type, the extension cord must be a grounding-type 3-wire cord.
- Arrange the extension cord so that it will not drape over the countertop or tabletop where it can be tripped over or pulled.
WARNING: This product is equipped with a polarized plug (one blade is wider than the other blade) to reduce the risk of electrical shock. This is a safety feature. The plug will fit into a polarized outlet only one way. If
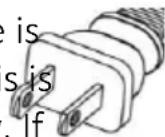
you are unable to insert the plug into the electrical outlet, try reversing the plug. If the plug still does not fit, contact a qualified electrician. Never use the plug with an extension cord unless you can fully insert the plug into the extension cord. Do not alter the plug. Do not attempt to defeat the safety purpose of the polarized plug.
SAVE THESE INSTRUCTIONS
FOR FUTURE REFERENCE
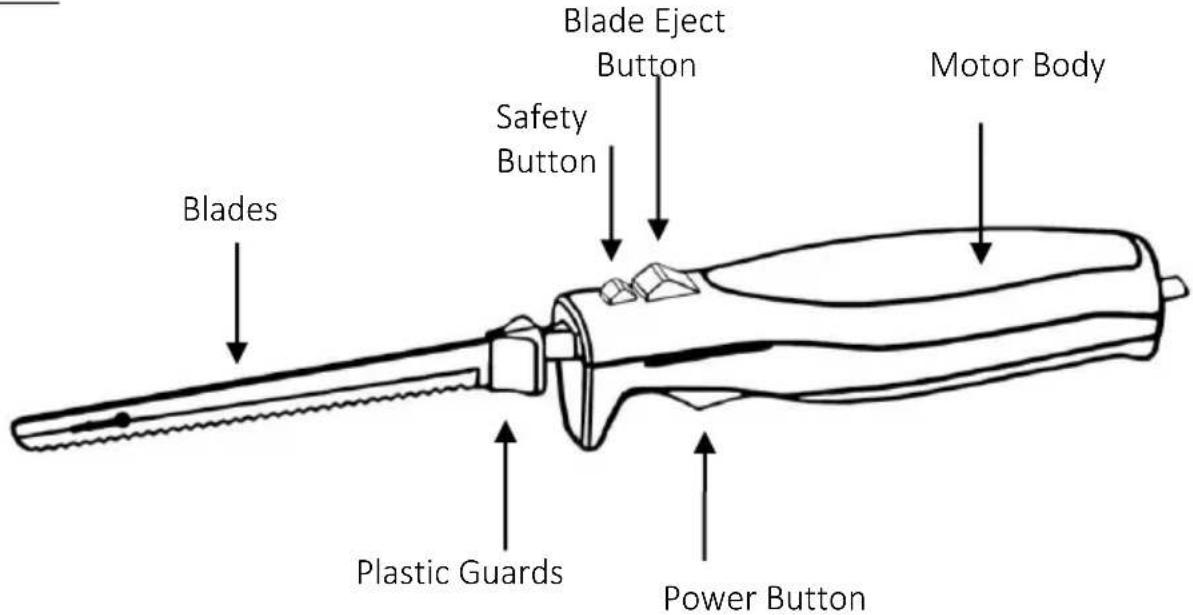
Parts
Before First Use
CAUTION: Blades are SHARP. Handle them very carefully.
- Remove the Blades from the Plastic Sheath.
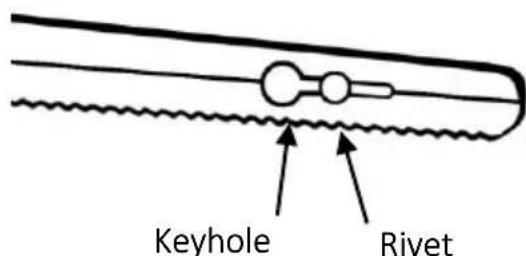
- Separate the Blades by holding them by the Plastic Guards, aligning the Rivet on one Blade with the Keyhole in the other Blade (See Fig. 1) and pull apart.
-
Wash the Blades in hot, soapy water using a soft cloth. Rinse and dry the Blades thoroughly.
NOTE: The Blades can be washed in the top rack of a dishwasher. -
Wipe the Motor Housing and Power Cord with a soft, water-dampened cloth. Dry thoroughly.
Fig. 1
To Assemble and Use
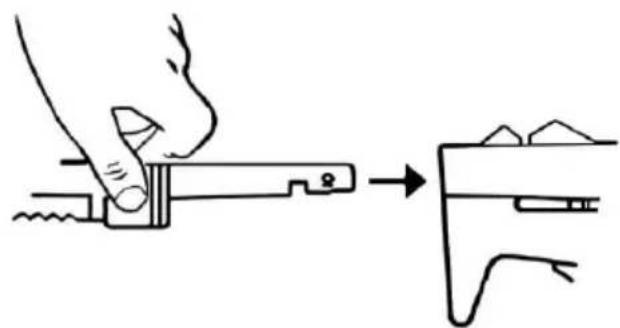
- Attach the Blades by holding them by the Plastic Guard and sliding the Rivet on one Blade into the Keyhole of the other so that the Blades are flat against each other.
- Connect the Blades to the Motor Housing by holding the Blades by the Plastic Guards (cutting edge facing down) and sliding the Blades into the Motor Housing until they securely click into place. (See Fig. 2)
-
Plug the Power Cord into a standard 120-volt AC electrical outlet.
-
To activate the Blades, press and hold the Power Button.
-
To stop the Blades, release the Power Button.
NOTE: For short bursts of activation, press and release the Power Button as necessary.
- Unplug the product from the electrical outlet when not in use and before leaving it unattended.
Fig. 2
natural_image
Illustration of a hand using a caliper to measure a surface, showing the process from left to right (no text or symbols)Hints for Better Cutting Results:
- Move the Blades through the food using a smooth, steady motion. Do not use a back-and-forth sawing motion.
- Before slicing, let food stand for about 15 minutes after cooking.
- Do not attempt to slice through a bone or frozen foods.
- Do not attempt to sharpen the serrated Blades.
Care and Maintenance
To Disassemble and Clean:
-
First, slide the Safety Button forward; press and hold the Blade Eject Button. Grasp and pull the Blades by the Plastic Guards to remove them from the Motor Housing (See Fig. 3).
-
To separate the Blades, refer to Section 'Before First Use' and follow steps 2-4 to clean and dry the product.

To Store:
- Place the Blades into the provided Plastic Sheath.
- Loosely wrap the Power Cord around the Motor Housing and store in a cool, dry location away from children and pets reach.
Electrical Specifications
| Voltage | Frequency | Wattage |
| 120VAC | 60Hz | 110W |
ONE YEAR LIMITED WARRANTY
Write down the following information about your appliance to better help you obtain assistance or service if you ever need it.
CUSTOMER RECORD
Date of Purchase ____ Store/Dealer ____
Model/Item No: ____
THIS WARRANTY APPLIES TO PRODUCTS PURCHASED AND USED IN THE CONTINENTAL U.S. AND CANADA ONLY. This is the only express warranty for this product and is in lieu of any other warranty or condition. This product is warranted to be free from defects in material and workmanship for a period of one (1) year from the date of original purchase. During this period, your exclusive remedy is repair or replacement of this product, at our option; however, you are responsible for all costs associated with returning the product to us and our returning a product or component under this warranty to you. If the product or component is no longer available, we will replace with a similar one of equal or greater value. This warranty does not cover glass, filters, wear from normal use, use not in conformity with the printed directions, or damage to the product resulting from accident, alteration, abuse, or misuse.
THIS WARRANTY EXTENDS ONLY TO THE ORIGINAL CONSUMER PURCHASER. KEEP THE ORIGINAL SALES RECEIPT, AS PROOF OF PURCHASE IS REQUIRED TO MAKE A WARRANTY CLAIM.
This warranty is void if the product is used for other than single-family household use or subjected to any voltage and waveform other than what is specified on the rating label (E.G., 120V\~60Hz). We exclude all claims for special, incidental, and consequential damages caused by breach of express or implied warranty. All liability is limited to the amount of the purchase price. Every implied warranty, including any statutory warranty or condition of merchantability or fitness for a particular purpose, is disclaimed except to the extent prohibited by law, in which case such warranty or condition is limited to the duration of this written warranty. This warranty gives you specific legal rights. You may have other legal rights that vary depending on where you live. Some states do not allow limitations on implied warranties or special, incidental, or consequential damages, so the foregoing limitations may not apply to you. To make a warranty claim do not return this appliance to the store.
TO OBTAIN WARRANTY SERVICE AND/OR TROUBLESHOOTING INFORMATION:
Call Customer Service at 1-888-903-0060 in the U.S.
Monday through Friday: 9:00 am – 5:00 pm PT
U.S.A. Customers Please Email: warranty@brentwoodus.com
Canadian Customers Please Email: Canada.warranty@brentwoodus.com
Go online at www.brentwoodus.com
natural_image
Diagram of a mechanical or fluidic device with two circular components and directional arrows indicating flow or movement (no text or symbols)Ojo de Cerradura
Remache
natural_image
Illustration showing hands using a caliper to adjust or install a mechanical component (no text or symbols present)RECOMMANDATIONS ADDITIONNELLES:
© 2022 Brentwood Appliances, Inc.
- Brentwood® Appliances
- ELECTRIC CARVING KNIFE CUCHILLO ELÉCTRICO PARA TRINCHAR COUTEAU À DÉCOUPER ÉLECTRIQUE
- READ ALL INSTRUCTIONS BEFORE USE
- SPECIAL INSTRUCTIONS:
- SAVE THESE INSTRUCTIONS
- FOR FUTURE REFERENCE
- Parts
- Before First Use
- To Assemble and Use
- Hints for Better Cutting Results:
- Care and Maintenance
- To Disassemble and Clean:
- To Store:
- ONE YEAR LIMITED WARRANTY
- CUSTOMER RECORD
- RECOMMANDATIONS ADDITIONNELLES:
Brand : Brentwood
Model : TS-1010
Category : Knife