USER MANUAL DPA120BCCWDB DANBY
This product is factory equipped with a power supply cord that has a three-pronged grounded plug. It must be plugged into a mating grounding type receptacle in accordance with the National Electrical Code and applicable local codes and ordinances. If the circuit does not have a grounding type receptacle, it is the responsibility and obligation of the customer to exchange the existing receptacle in accordance with the National Electrical Code and applicable local codes and ordinances. The third ground prong should not, under any circumstances, be cut or removed. Never use the cord, the plug or the appliance when they show any sign of damage. Do not use your appliance with an extension cord unless it has been checked and tested by a qualified electrician or electrical supplier.

IMPORTANT - GROUNDING METHOD
Owner's Use and Care Guide 1-15
- Welcome
- Important Safety Information
- Features • Installation Instructions • Operation Instructions
- Care and Maintenance
- Troubleshooting
- Warranty
PORTABLE AIR CONDITIONER
Improper connection of the grounding plug can result in risk of fire, electric shock and/or injury to persons associated with the appliance. Check with a qualified service representative if in doubt that the appliance is properly grounded.

CAUTION:
Read and follow all safety rules and operating instructions before first use of this product.

WARNING:
Welcome to the Danby family. We are proud of our quality products, and we believe in dependable service, like you will find in this Owner's Use and Care Guide, and like you will receive from our friendly customer service department. Best of all, you will experience these values each and every time you use your Danby appliance. That is important, because your new appliance will be a part of your family for a long time.
Note the information below; you will need this information to obtain service under warranty. To receive service, you must provide the original receipt.
Model Number:
Serial Number:
Date of Purchase:
NEED HELP?
Before you call for service, here are a few things you can do to help us serve you better:
Read this Owner's Use and Care Guide:
It contains instructions to help you use and maintain your appliance properly.
If you received a damaged appliance:
Immediately contact the retailer (or builder) that sold you the appliance.
Save time and money:
Check the Troubleshooting section at the end of the guide before calling. This section helps you solve common problems that may occur.
If you do need service, you can relax, knowing help is only a phone call away.

1-800-26- Danby
(1-800-263-2629)
To prevent injury to the user or other people and property damage, the following instructions must be followed. Incorrect operation resulting from ignoring these instructions may cause harm or damage.
SAFETY PRECAUTIONS
ALWAYS DO THIS
√ Your air conditioner should be used in such a way that it is protected from moisture, e.g. condensation, splashed water, etc. Do not place or store your air conditioner where it can fall or be pulled into water or any other liquid. Unplug unit immediately if this occurs. √ Always transport your air conditioner in a vertical position and place on a stable, level surface during use. If the unit is transported laying on its side it should be stood up and left unplugged for 6 hours. √ Turn off the unit when not in use. √ Always contact a qualified person to perform repairs. If the power cord is damaged it must be repaired by a qualified technician. √ Keep the unit away from walls, furniture and curtains with a clearance of at least 30 cm all around. If the air conditioner is knocked over during use, turn off the unit and unplug it immediately. √ Always use the switch on the control panel to turn the unit on or off.
NEVER DO THIS
Do not operate your air conditioner in a wet room such as a bathroom or laundry room. Do not touch the unit with wet or damp hands. Do not press the buttons on the control panel with anything other than your fingers. Do not remove any fixed components. Never use this appliance if it is not working properly, or if it has been dropped or damaged. ☒ Never use the plug to start and stop the unit. Do not cover or obstruct the inlet or outlet grilles. Do not use hazardous chemicals to clean or come into contact with the unit. Do not use the unit in the presence of inflammable substances or vapour such as alcohol, insecticides, gasoline, etc. Do not allow children to operate the unit unsupervised. Do not use this product for functions other than those described in this instruction manual.

READ AND FOLLOW ALL SAFETY INSTRUCTIONS
To prevent injury to the user or other people and property damage, the following instructions must be followed. Incorrect operation resulting from ignoring these instructions may cause harm or damage.
ENERGY SAVING TIPS
- Use the unit in the recommended room size.
- Locate the unit where furniture cannot obstruct the air flow.
- Keep blinds/curtains closed during the sunniest part of the day.
- Keep the filters clean.
- Keep doors and windows closed to keep cool air in and warm air out (cooling mode)
OPERATING CONDITIONS
The air conditioner must be operated within the temperature range indicated below:
| MODE ROOM TEMPERATURE |
| Cool 17°C (62°F) ~ 35°C (95°F) | |
| Dry 13°C (55°F) ~ 35°C (95°F) | |
Note: Performance may be reduced outside of these operating temperatures.
NOISE RATING
Under normal conditions your unit will operate at roughly 45dB.
POWER OUTAGE
In the case of a power outage, the unit will automatically re-start with the last setting after the power is restored.
Wait 3 minutes before resuming operation
After the unit has stopped, it cannot operate for the first 3 minutes. This is to protect the unit. Operation of the compressor will automatically start after 3 minutes.

Identifying Parts

WARNING
- Do not store or use gasoline or other flammable vapours and liquids in the vicinity of this or any other appliance.
- Avoid fire hazard or electric shock. Do not use an extension cord or an adaptor plug. Do not remove any prong from the power cord.

WARNING
- Be sure the electrical supply is adequate for the model you have chosen. This information can be found on the serial plate, which is located on the side of the cabinet and behind the grille.
- Be sure the air conditioner is properly grounded. To minimize shock and fire hazards, proper grounding is important. The power cord is equipped with a three-prong grounding plug for protection against shock hazards.
- Your air conditioner must be used in a properly grounded wall receptacle. If the wall receptacle you intend to use is not adequately grounded or protected by a time delay fuse or circuit breaker, have a qualified electrician install the proper receptacle.
- Ensure the receptacle remains accessible after the unit is installed.

Identifying Parts
ACCESSORIES
Ensure that all the accessories are included in the package and refer to the installation instructions for their usage.
Note: All the illustrations in this manual are for explanatory purposes only. Your air conditioner may be slightly different.
| Part | Description | Quantity |
| Unit Adaptor | 1 pc |
| Exhaust Hose | 1 pc |
| Window Slider Adaptor | 1 pc |
| Bolt | 2 pc |
 | Window Slider A | 1 pc |
| Window Slider B and C | 1 pc |
 | Foam Seal A (Adhesive) | 4 pc |
 | Foam Seal B (Adhesive) | 2 pc |
 | Foam Seal C (Non-adhesive) | 2 pc |
 | Security Bracket and 2 Screws | 1 set |
 | Drain Hose | 1 pc |
 | Power Cord Buckle | 1 pc |
 | Remote Controller and Battery(For remote control models only) | 1 set |
UNIT STRUCTURE

front

back
ELECTRONIC CONTROL INSTRUCTIONS AND OPERATING MODES
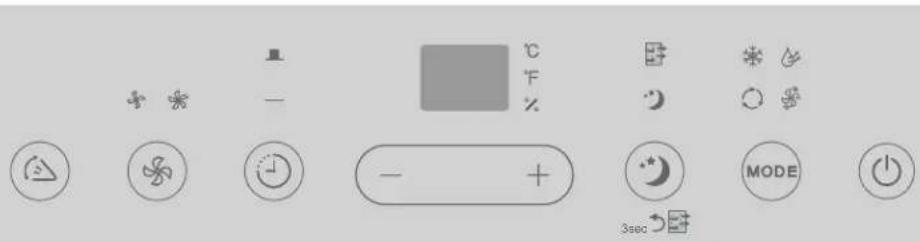

Swing Button: Press to start the auto swing feature. When auto swing is activated, press again to stop the louver at the desired angle.

Fan Button: Press to select fan speed; normal or high. Light will indicate current speed.
Timer Button: Press to start the Auto-on or Auto-off features. Light will indicate whether a timer is set.

Sleep / Filter Button: Press to start the Sleep feature. Also used to reset the filter after 250 hours of operation.
- Press the SLEEP button to begin SLEEP mode
- The temperature will increase by 2 degrees from set temperature over a 2 hour period
- The unit will hold the new temperature for 7 hours and then will return to the set temperature
- The filter light will illuminate after 250 hours of use as a reminder to clean the filter; to reset the filter after cleaning, hold the SLEEP button for 3 seconds

Mode Button: Press to select the desired mode. Modes will cycle in sequence with each press of the button; AUTO, COOL, DRY, FAN. Light will indicate current mode.
AUTO mode
- press the mode button until the AUTO icon illuminates.
- Press the UP or DOWN arrow buttons to select the desired room temperature
- The unit will automatically select cooling and fan speed based on ambient temperature.
COOL mode Note: The hose should be exhausted during COOL mode
- Press the mode button until the COOL icon illuminates
- Press the UP or DOWN arrow buttons to select the desired room temperature
- The temperature can be set within a range of 17-30°C / 62-86°F
- Press the fan button to choose the fan speed.
DRY mode
- Press the mode button until the DRY icon illuminates.
- Press the UP or DOWN buttons to select the desired room humidity.
- The humidity can be adjusted in 5% increments between 35% and 85%.
- The fan speed will remain on normal in DRY mode and cannot be adjusted.
FAN mode
- Press the mode button until the FAN icon illuminates.
- Press the fan button to choose the fan speed.

- Press and hold both Up and Down buttons for 3 seconds to change the temperature display from °C to °F.

Power Button: Press to turn the unit on or off.
LED Display: Shows the set temperature in °C or °F or the auto-timer settings. While on DRY mode shows the relative humidity. When on FAN mode shows the room temperature.
OPERATING MODES
Timer Operation
To set the Auto-off timer:
- Ensure the unit is turned on.
- Press the TIMER button and the Timer Off indicator light will illuminate.
- Press the UP or DOWN buttons to select the desired amount of hours before the unit turns off.
To set the Auto-on timer:
- Ensure the unit is turned off.
- Press the TIMER button and the Timer On indicator light will illuminate.
- Press the UP or DOWN buttons to select the desired amount of hours before the unit turns on.
Notes:
- The UP and DOWN buttons will increase or decrease the time in 0.5 hour increments up to 10 hours and then in 1 hour increments up to 24 hours.
- The display will revert back to showing the previous temperature setting if the unit does not receive a signal within a 5 second period during programming. Turning the unit ON or OFF at any time or adjusting the timer setting to 0.0 hours will cancel the Auto-timer settings.
Using the Auto-on and Auto-off feature at the same time
You can set the air conditioner to turn on and run for a set period of time and then turn off again by using the Auto-on and Auto-off features at the same time. Keep in mind that the hours displayed on the unit refer to the number of hours that will pass from the current time before the action is taken.
For example:
- First, set the Auto-off timer.
- Ensure the unit is turned on
- Press the TIMER button and the Timer Off indicator light will illuminate
- Press the UP or DOWN buttons to select the desired amount of hours before the unit turns off
- Press the Timer button again within 5 seconds and the Timer On indicator light will illuminate
- Press the UP and DOWN buttons to select the desired amount of hours before the unit turns back on

Operating Instructions
REMOTE CONTROL INSTRUCTIONS
- Use the remote control within a distance of 8 m (26 ft.) from the appliance, pointing it towards the receiver. Reception is confirmed by a beep.

SHORTCUT function (only available on remote):
- Used to save a favourite setting
- Set the unit to the temperature and fan speed that you would like to set as a favourite
- Press and hold the SHORTCUT button for 2 seconds
- Press the SHORTCUT button at any point in future to return to the favourite setting
- If no favourite is set, pressing the SHORTCUT button will cause the unit to run in AUTO mode at 29°C (79°F), with fan speed set to AUTO
| Model RG57H(B)/BGCE-M |
| Rated Voltage 3.0V (dry batteries R03/LR03x2) |
| Signal Receiving Range 8m (26 feet) |
| Environment -5°C to 60°C (23°F to 140°F) |

Operating Instructions
REPLACING THE REMOTE BATTERIES
Your air conditioning unit comes with two AAA batteries. Place the batteries in the remote control before use.
- Slide the back cover from the remote downward to expose the battery compartment.
- Insert the batteries, ensure to match the (+) and (-) symbols on the ends of the batteries with the symbols inside the battery compartment.
- Slide the battery cover back into place.
- The air conditioner will not respond if curtains, doors or other materials block the signal from the remote control to the unit.
- Prevent any liquid from contact with the remote control. Do not expose the remote control to direct sunlight or heat.
- If the infrared signal receiver on the indoor unit is exposed to direct sunlight, the air conditioner may not function properly. Use curtains to prevent the sunlight from falling on the receiver.
- Do not mix old and new batteries or batteries of different types.
- Do not leave the batteries in the remote control if it is not going to be used for more than 2 months.

IMPORTANT
Do not dispose of batteries as unsorted municipal waste. Refer to local laws for proper disposal of batteries.


NOTE: This equipment has been tested and found to comply with the limits for a Class B digital device, pursuant to Part 15 of the FCC Rules. These limits are designed to provide reasonable protection against harmful interference in a residential installation. This equipment generates, uses and can radiate radio frequency energy and, if not installed and used in accordance with the instructions, may cause harmful interference to radio communications. However, there is no guarantee that interference will not occur in a particular installation. If this equipment does cause harmful interference to radio or television reception, which can be determined by turning the equipment off and on, the user is encouraged to try to correct the interference by one or more of the following measures:
- Reorient or relocate the receiving antenna
- Increase the separation between the equipment and receiver
- Connect the equipment into an outlet on a circuit different from that to which the receiver is connected
- Consult the dealer or an experienced radio/TV technician for help
Changes or modifications not approved by the party responsible for FCC compliance could void the user's authority to operate the equipment. This appliance complies with Part 15 of the FCC Rules.
Operation is subject to the following conditions:
- This device may not cause harmful interference.
- This device must accept any interference received, including interference that may cause undesired operation.
This device complies with Canadian CAN ICES-3 (B) / NMB-3 (B)
LOCATION

- The air conditioner should be placed on a firm foundation to minimize noise and vibration. For safe and secure positioning, place the unit on a smooth, level floor strong enough to support the unit.
- The unit has casters to aid placement, but it should only be rolled on smooth, flat surfaces. Use caution when rolling on carpeted surfaces. Use caution and protect floors when rolling over wood floors. Do not attempt to roll the unit over objects.
- The unit must be placed within reach of a properly rated grounded socket.
- Never place any obstacles around the air inlet or outlet of the unit.
- Allow at least 30 cm of space away from the wall for efficient air conditioning.
WINDOW SLIDER KIT INSTALLATION
Your window slider kit has been designed to fit most standard vertical and horizontal window applications. However, it may be necessary for you to modify some aspects of the installation procedures for certain types of windows.
Visit www.danby.com for general instruction videos.
Press the exhaust hose into the window slider adapter and unit adapter. The adapters will automatically clamp to the exhaust hose using internal elastic buckles.
Insert the unit adapter into the lower groove of the air outlet on the unit. Ensure that the hook of the adapter is aligned with the hole seat of the air outlet and slide down in the direction of the arrow on the unit.
Measure the window opening where the window kit will be installed and extend the sliders to match the measurement. If the length of the window opening requires three window sliders, use the bolt to fasten the sliders at the proper length.
If the window opening is less than the minimum length of the window slider kit, use the single slider that has the hole in it and cut it to the correct size. Ensure that you do not cut the end of the slider that has the hole in it; this will be necessary to attach the exhaust hose assembly.


Installation Instructions
INSTALLATION IN A DOUBLE-HUNG SASH WINDOW

1. Cut the adhesive foam seal A and B strips to the proper lengths, and attach them to the window sash and frame as shown.

2. Insert the window slider assembly into the window opening.

3. Cut the non-adhesive foam seal C strip to match the width of the window. Insert the seal between the glass and the window frame to prevent air and insects from getting into the room.

4. If desired, install the security bracket with 2 screws as shown.

5. Insert the window slider adaptor into the hole of the window slider.

Installation Instructions
INSTALLATION IN A SLIDING SASH WINDOW

1 Cut the adhesive foam seal A and B strips to the proper lengths, and attach them to the window sash and frame as shown.
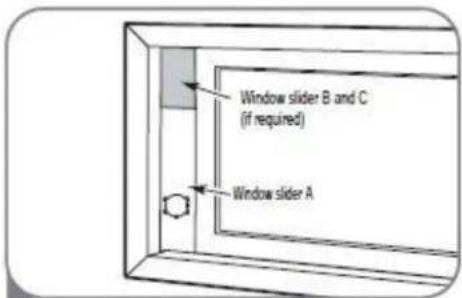
2 Insert the window slider assembly into the window opening.

3 Cut the non-adhesive foam seal C strip to match the window height. Insert the foam seal between the glass and the window frame to prevent air and insects from getting into the room.

4 If desired, install the security bracket with 2 screws as shown.

5 Insert the window slider adaptor into the hole of the window slider.

Installation Instructions
WATER DRAINAGE
When the internal drain pan becomes full the unit will beep 8 times and the digital display will show error code P1. The air conditioning or dehumidifying action will stop but the fan may continue to operate.
Turn the unit off and unplug it from the power source. Carefully move the unit to a location where the water can be drained. Remove the bottom drain plug and allow the water to completely drain. Replace the bottom drain plug, pressing firmly to ensure a tight fit and no leaks. The P1 error symbol will disappear and the unit will resume regular function once power is restored.
If the P1 error persists when the unit has been drained of water, turn the unit off and unplug it from the power source for at least 5 minutes. If the P1 error persists after plugging the unit back in, please call Danby consumer care for further troubleshooting options.

During the DRY mode, you may wish to set up the continuous drain option so that the unit will automatically drain collected water.
Remove the exhaust hose during DRY mode, it is not necessary. Ensure that the unit is turned off and unplugged from the power source before setting up the drain hose.
Remove the upper drain plug and attach the drain hose that was provided with the unit. Ensure that there are no kinks or bends in the drain hose as this can stop water from draining.
Place the open end of the drain hose over the receptacle that the unit will drain into; this could be a basement floor drain, a sink or similar.
Remember that there is no drain pump in this unit, the continuous drain is activated by gravity only. Ensure that the drain hose goes straight down toward the floor from the drain connection. If the hose is not positioned directly downwards, water will not drain correctly.


IMPORTANT
- Be sure to unplug the unit before cleaning or servicing.
- Do not use gasoline, paint thinner or other chemicals to clean the unit.
- Do not wash the unit directly under a tap or using a hose. It may cause electrical damage.
- If the power cord is damaged, contact the service depot immediately.
AIR FILTER
- Clean the air filter every two weeks to ensure optimal performance.
- In households with animals, you will need to periodically wipe down the grill to prevent blocked air flow due to animal hair.
UNIT ENCLOSURE
Use a lint-free cloth soaked with neutral detergent to clean the unit enclosure, be sure to wring the cloth of excess water. Finish by wiping with a clean dry cloth.
LONG-TERM STORAGE
- Remove the rubber plug at the back of the unit and attach a hose to the drain outlet. Place the open end of the hose directly over the drain area in your basement floor.
- Remove the plug from the bottom drain outlet, this means that all the water in the bottom drain tray will drain out.
- Keep the appliance running on FAN mode for half a day in a warm room to dry the appliance inside and prevent mold formation.
- Turn off the appliance and unplug it, wrap the cord and bundle it with tape.
- Remove the batteries from the remote control.
- Clean the air filter and reinstall it.
Occasionally, a minor problem may arise, and a service call may not be necessary - use this troubleshooting guide for a possible solution. If the unit continues to operate improperly, call an authorized service depot or Danby's Toll Free Number for assistance.
Tel: 1-800-26-Danby® (1-800-263-2629)
| PROBLEM POSSIBLE CAUSE SOLUTION |
| Unit does not start when pressing on/off button | Ft appears in the display windowRoom temperature is lower than the set temperature. (Cooling mode)Room temperature is higher than the set temperature (Heat mode) | Drain the water in the bottom trayReset the temperature |
| Not cool enough • The wind | windows or doors in the room are not closedThere are heat sources inside the roomExhaust air hose is not connected or blockedTemperature setting is too highAir fi Iter is blocked by dust | Make sure all the windows and doors are closedRemove the heat sources if possibleConnect the hose and make sure it can function properlyDecrease the set temperatureClean the air fi Iter |
| Noisy or vibration | The ground is not level or not flat enough | Place the unit on a flat, level ground if possible |
| Gurgling sound | The sound comes from the flowing of the refrigerant inside the air conditioner | It is normal |
DISPOSAL
Check for local regulatory compliance regarding the approved and safe disposal of this appliance.
ERROR CODES
E1 - room temperature sensor error E2 - evaporator temperature sensor error E3 - condenser temperature sensor error E4 - display panel communication error E7 - zero crossing malfunction P1 - water tray is full - attach drain hose and drain excess water
LIMITED IN HOME APPLIANCE WARRANTY
This quality product is warranted to be free from manufacturer's defects in material and workmanship, provided that the unit is used under the normal operating conditions intended by the manufacturer.
This warranty is available only to the person to whom the unit was originally sold by Danby Products Limited (Canada) or Danby Products Inc. (U.S.A.) (hereafter "Danby") or by an authorized distributor of Danby, and is non-transferable.
TERMS OF WARRANTY
Plastic parts are warranted for thirty (30) days only from purchase date, with no extensions provided.
First 24 months
During the first twenty-four (24) months, any functional parts of this product found to be defective will be repaired or replaced, at the warrantor's option, at no charge to the ORIGINAL purchaser.
To obtain service:
Danby reserves the right to limit the boundaries of "In Home Service" to the proximity of an Authorized Service Depot. Any appliance requiring service outside the limited boundaries of "In Home Service" will be the consumer's responsibility to transport the appliance (at their own expense) to the original retailer (point of purchase) or a service depot for repair. See "Boundaries of In Home Service" below. Contact your dealer from whom your unit was purchased, or contact your nearest authorized Danby service depot, where service must be performed by a qualified service technician. If service is performed on the units by anyone other than an authorized service depot, or the unit is used for commercial application, all obligations of Danby under this warranty shall be void.
Boundaries of in-home service:
If the appliance is installed in a location that is 100 kilometers (62 miles) or more from the nearest service center, your unit must be delivered to the nearest authorized Danby Service Depot, as service must only be performed by a technician qualified and certified for warranty service by Danby. Transportation charges to and from the service location are not protected by this warranty and are the responsibility of the purchaser.
Nothing within this warranty shall imply that Danby will be responsible or liable for any spoilage or damage to food or other contents of this appliance, whether due to any defect of the appliance, or its use, whether proper or improper.
EXCLUSIONS
Save as herein provided, by Danby, there are no other warranties, conditions, representations or guarantees, express or implied, made or intended by Danby or its authorized distributors and all other warranties, conditions, representations or guarantees, including any warranties, conditions, representations or guarantees under any Sale of Goods Act or like legislation or statute is hereby expressly excluded. Save as herein provided, Danby shall not be responsible for any damages to persons or property, including the unit itself, howsoever caused or any consequential damages arising from the malfunction of the unit and by the purchase of the unit, the purchaser does hereby agree to indemnify and hold harmless Danby from any claim for damages to persons or property caused by the unit.
GENERAL PROVISIONS
No warranty or insurance herein contained or set out shall apply when damage or repair is caused by any of the following:
1) Power failure. 2) Damage in transit or when moving the appliance. 3) Improper power supply such as low voltage, defective house wiring or inadequate fuses. 4) Accident, alteration, abuse or misuse of the appliance such as inadequate air circulation in the room or abnormal operating conditions (extremely high or low room temperature). 5) Use for commercial or industrial purposes (i.e., if the appliance is not installed in a domestic residence). 6) Fire, water damage, theft, war, riot, hostility, acts of God such as hurricanes, floods, etc. 7) Service calls resulting in customer education. 8) Improper installation (i.e., building-in of a free standing appliance or using an appliance outdoors that is not approved for outdoor application). Proof of purchase date will be required for warranty claims; so, please retain bills of sale. In the event warranty service is required, present this document to our AUTHORIZED SERVICE DEPOT.
Warranty Service
In Home
Danby Products Limited
PO Box 1778, Guelph, Ontario, Canada N1H 6Z9
Telephone: (519) 837-0920 FAX: (519) 837-0449
1-800-263-2629
07/14
Danby Products Inc.
PO Box 669, Findlay, Ohio, U.S.A. 45840
Telephone: (419) 425-8627 FAX: (419) 425-8629
Welcome
1-800-26-Danby
(1-800-263-2629)


Danby Products Limited
PO Box 1778, Guelph, Ontario, Canada N1H 6Z9
All repair parts are available for purchase or special order when you visit your nearest service depot. To request service and/or the location of the service depot nearest you, call the TOLL FREE number.
When requesting service or ordering parts, always provide the following information:
- Product Type
- Model Number
- Part Number
- Part Description
PORTABLE AIR CONDITIONER