
GSBS 23340 FX - Refrigerator GRUNDIG - Free user manual and instructions
Find the device manual for free GSBS 23340 FX GRUNDIG in PDF.

| Product Type | Fridge-Freezer Combo |
| Brand | Grundig |
| Model | GSBS 23340 FX |
| Climate Class | SN (10 °C to 32 °C), N (16 °C to 32 °C), ST (16 °C to 38 °C), T (16 °C to 43 °C) |
| Refrigerant | R600a (flammable) |
| Freezing Capacity | 4.5 kg per 100 liters of freezer compartment volume in 24 hours (per IEC 62552) |
| Main Functions | Quick Freeze, Quick Cool, Holiday Mode, Door Open Alarm, Water and Ice Dispenser, Ice Maker, Water Filter, VitaminZone Technology, Vegetable Drawer with Humidity Control, Cold Storage Zone, Wi-Fi Connectivity (HomeWhiz), Electronic Touch Control Panel |
| Water and Ice Dispenser | Yes, with water, cubes and crushed ice options |
| Water Filter | Yes, external or internal depending on model |
| VitaminZone Technology | Yes, blue, green, red LED lighting simulating day/night cycle |
| Vegetable Drawer with Humidity Control | Yes, Full Fresh function to preserve humidity |
| Cold Storage Zone | Drawer for dairy products and meats for quick consumption |
| Wi-Fi Connectivity | Yes, via HomeWhiz app (iOS and Android) |
| Control Panel | Touch electronic with digital display |
| Door Open Alarm | Yes, audible after 1 minute of opening |
| Lighting | LED, energy class G (professional replacement) |
| Recommended Cleaning | Use carbonate dissolved in water, avoid abrasive products and chlorine |
| Safety | Flammable refrigerant R600a, protection class I, do not use extension cord, child supervision |
| Spare Parts and Repairability | Availability 10 years; self-repair possible for handles, hinges, shelves, gaskets; complex repairs by authorized professional |
| Warranty | 24 months |
Frequently Asked Questions - GSBS 23340 FX GRUNDIG
User questions about GSBS 23340 FX GRUNDIG
0 question about this device. Answer the ones you know or ask your own.
Ask a new question about this device
Download the instructions for your Refrigerator in PDF format for free! Find your manual GSBS 23340 FX - GRUNDIG and take your electronic device back in hand. On this page are published all the documents necessary for the use of your device. GSBS 23340 FX by GRUNDIG.
USER MANUAL GSBS 23340 FX GRUNDIG
natural_image
Simple line drawing of a pear and a carrot (no text or symbols)GSBS 23340 FX
58 6563 0000/ EN/ FR/ DE/ AI_1/2/ 19.01.2023 17:07
7292246994
Please read this manual first!
Dear Customer
Please read this manual before using the product.
Thank you for choosing this Grundig product. We would like you to achieve the optimal efficiency from this high quality product which has been manufactured with state of the art technology. To do this, carefully read this manual and any other documentation provided before using the product and keep it as a reference.
Heed all information and warnings in the user manual. This way, you will protect yourself and your product against the dangers that may occur.
Keep the user manual. Include this manual with the unit if you hand it over to someone else.
The following symbols are used in the user manual:

Hazard that may result in death or injury.
Important information or useful tips on operation.
Read the user manual.
Combustible material, warning against fire hazard.
NOTICE A hazard that may cause material damage to the product or its surroundings

ENERG
SUPPLIER'S NAME
MODEL IDENTIFIER→(*)


The model information as stored in the product data base can be reached by entering following website and searching for your model identifier (*) found on energy label.
https://eprel.ec.europa.eu/
1 Safety Instructions...... 4
1.1 Intention of Use 4
1.2 Safety of Children, Vulnerable Persons and Pets .... 4
1.3 Electrical Safety.... 5
1.4 Handling Safety 6
1.5 Installation Safety...... 6
1.6 Operational Safety...... 8
1.7 Food Storage Safety...... 10
1.8 Maintenance and Cleaning Safety 11
1.9 Disposal of the Old Product...... 12
2 Environmental Instructions...... 12
2.1 Compliance with the WEEE Directive and Disposing of the Waste Product.... 12
3 Your Refrigerator 13
4 Installation 14
4.1 Electrical Connection .... 15
5 Preparation.... 16
5.1 What To Do For Energy Saving..... 16
5.2 First Use.... 16
5.3 Climate Class and Definitions ..... 17
6 Operating the Product...... 17
7 Control Panel of the Product ..... 17
8 Using The Product.... 19
8.1 Replacing the Illumination Lamp.. 22
8.2 Door Open Alert 22
9 Product Features 22
9.1 The ice storage area.... 22
9.2 Egg holder.... 24
9.3 Crisper 24
9.4 Crisper Technologies 24
9.5 Dairy Products Cold Storage Area 25
9.6 Humidity Controlled Crisper ..... 25
9.7 Water connection 25
10 Maintenance and Cleaning .... 30
11 Troubleshooting.... 32

1 Safety Instructions
- This section includes the safety instructions necessary to prevent the risk of personal injury or material damage.
- Our company shall not be held responsible for damages that may occur if these instructions are not observed.

Always have installation and repair operations performed by manufacturer, authorized service or a person who will be described by importer company.

Use original spare parts and accessories only.

Do not repair or replace any component of the product unless it is clearly specified in the user manual.

Do not perform any modifications on the product.

1.1 Intention of Use
- This product is not suitable for commercial use and should not be used for a purpose other than its intended use.
- This product is intended for operating interiors, such as households or similar.
For example;
In the staff kitchens of the stores, offices and other working environments, In farm houses, In the units of hotels, motels or other resting facilities that are used by the customers, In hostels, or similar environments,
In catering services and similar non-retail applications.
- This product shall not be used in open or enclosed external environments such as vessels, camper vans, balconies or terraces. Exposing the product to rain, snow, sunlight and wind may cause risk of fire.

1.2 Safety of Children, Vulnerable Persons and Pets
- This product may be used by children aged 8 years and older and persons with underdeveloped physical, sensory or mental capabilities or lack of experience and knowledge if they are being supervised or have been given instruction concerning use of the appliance in a safe way and the hazards involved.
• Children between 3 and 8 years are allowed to put and take out food into/from the cooler product.
- Electrical products are dangerous for children and pets. Children and pets must not play with, climb on, or enter the product.
- Cleaning and user maintenance should not be performed by children unless there is someone overseeing them.
- Keep the packaging materials away from children. Risk of injury and suffocation.
Before disposing of old products that shall not be used any more:
- Unplug the power cord from the mains socket.
- Cut the power cable and remove it from the appliance together with the plug.
- Do not remove the racks and drawers from the product to prevent children from getting inside the appliance.
- Remove the doors.
- Store the product so that it shall not be tipped over.
- Do not allow children to play with the scrapped product.
- Do not dispose of the product by throwing it into fire. Risk of explosion.
- If there is a lock available on the product's door, keep the key out of children's reach.
1.3 Electrical Safety
- The product shall not be plugged into the outlet during installation, maintenance, cleaning, repair, and transportation operations.
- If the power cable is damaged, it shall only be replaced by authorized service to avoid any risks that may occur.
- Do not tuck the power cable under the product or to the rear of the product. Do not put heavy items on the power cable. The power cable should not be bent, crushed, and come into contact with any heat source.
- Do not use an extension cord, multi-plug or adaptor to operate your product.
- Portable multi-plugs or portable power supplies may overheat and cause fire. Thus, do not have a multi-plug, portable power sources behind or in the vicinity of the product.
- Do not plug the product's power cord in a loose or damaged power outlet. These types of connections may overheat and cause fire.
- The plug shall be easily accessible. If this is not possible, a mechanism that meets the electrical legislation and that disconnects all terminals from the mains (fuse, switch, main switch, etc.) shall be available on the electrical installation.
- Do not touch the plug with wet hands.
- When unplugging the appliance, don't hold the power cord, but the plug.

1.4 Handling Safety
• This product is heavy, do not handle it by yourself.
- Do not hold the product from its door while handling the product.
- Be careful not to damage the cooling system and the pipes while handling the product. Do not operate the product if the pipes are damaged, and contact an authorized service.

1.5 Installation Safety
- Contact the Authorized Service for the product's installation. To prepare the product for use, see the information in the user manual and make sure the electric and water utilities are as required. If not, call a qualified electrician and plumber to
arrange the utilities as necessary. Failure to do so may result in electric shock, fire, problems with the product, or injury.
- Check for any damage on the product before installing it. Do not have the product installed if it is damaged.
- Place the product on a clean, level and hard surface and balance it with the adjustable legs. Otherwise, the refrigerator may tip over and cause injuries.
- The product shall be installed in a dry and ventilated environment. Do not keep carpets, rugs or similar covers under the product. This may cause risk of fire as a result of inadequate ventilation!
- Do not block or cover ventilation holes. Otherwise, power consumption increases and your product may be damaged.
- The product must not be connected to supply systems such as solar power supply. Otherwise, your product may be damaged due to sudden voltage changes!
- When positioning the appliance, ensure the supply cord is not trapped or damaged.
- The more refrigerant a refrigerator contains, the bigger its installation room should be. In very small rooms, a flammable gas-air mixture may occur in case of a gas leak in the cooling system. At least 1 m ^3 of volume is required for each 8 grams of refrigerant. The amount of the refrigerant available in your product is specified in the Type Label.
- The installation place of the product shall not be exposed to direct sunlight and it shall not be in the vicinity of a heat source such as stoves, radiators, etc. If you cannot prevent installation of the product in the vicinity of a heat source, use a suitable insulation plate and make sure the minimum distance to the heat source is as specified below:
- At least 30 cm away from heat sources such as stoves, ovens, heating units and heaters, etc., - And at least 5 cm away from electrical ovens.
- Your product has the protection class of I.
- Plug the product in a grounded socket that conforms with the Voltage, Current and Frequency values specified in the type label. The socket must
have a 10A – 16A fuse. Our firm will not assume responsibility for any damages due to usage without earthing and without power connection in compliance with local and national regulations.
- The product's power cable must be unplugged during installation. Otherwise, risk of electric shock and injury may occur!
- Do not plug the product's power cord in loose, dislocated, broken, dirty, oily power outlets which have a risk of water contact. These types of connections may cause overheating and fire.
- Place the power cable and hoses (if any) of the product so that they shall not cause a risk of tripping over.
- Penetration of humidity and liquid to live parts or to the power cord may cause short circuit. Thus, do not use the product in humid environments or in areas where water may splash (e.g. garage, laundry room, etc.) If the refrigerator is wet by water, unplug it and contact an authorized service.
- Do not ever connect your refrigerator to power saving devices. These systems are harmful for the product

1.6 Operational Safety
- Do not ever use chemical solvents on the product. These materials contain an explosion risk.
- In case of a failure of the product, unplug it and do not operate until it is repaired by the authorized service. There is a risk of electric shock!
- Do not place a source of flame (e.g. candles, cigarettes, etc.) on the product or in the vicinity of it.
- Do not get on the product. Risk of falling and injury!
- Do not cause damage to the pipes of the cooling system using sharp and piercing tools. The refrigerant that sprays out in case of puncturing the gas pipes, pipe extensions or upper surface coatings may cause irritation of skin and injury to the eyes.
-
Do not place and operate electrical appliances inside the refrigerator/freezer unless it is advised by the manufacturer.
-
Do not jam any parts of your hands or your body to the moving parts inside the product. Be careful to prevent jamming of your fingers between the refrigerator and its door. Be careful while opening or closing the door if there are children around.
- Do not put ice cream, ice cubes or frozen food to your mouth as soon as you take them out of the freezer. Risk of frostbite!
- Do not touch the inner walls, metal parts of the freezer or food kept inside the freezer with wet hands. Risk of frostbite!
- Do not place soda cans or cans and bottles that contain fluids that may be frozen to the freezer compartment. Cans or bottles may explode. Risk of injury and material damage!
- Do not use or place materials sensitive against temperature such as flammable sprays, flammable objects, dry ice or other chemical agents in the vicinity of the refrigerator. Risk of fire and explosion!
-
Do not store explosive materials such as aerosol cans with flammable materials inside the product.
-
Do not place cans containing fluids over the product an open state. Splashing of water on an electrical part may cause the risk of an electric shock or a fire.
- This product is not intended for storage and cooling of medicines, blood plasma, laboratory preparations or similar materials and products that are subject to the Medical Products Directive.
- If the product is used against its intended purpose, it may cause damage to or deterioration of the products kept inside.
- If your refrigerator is equipped with blue light, do not look at this light with optical devices. Do not stare directly at UV LED light for a long time. Ultraviolet rays may cause eye strain.
- Do not fill the product with more food than its capacity. Injuries or damages may occur if the contents of the refrigerator fall when the door is opened. Similar problems may also occur when an object is placed over the product.
-
Ensure that you have removed any ice or water that may have fallen to the floor to prevent injuries.
-
Change the locations of the racks/bottle racks on the door of your refrigerator only when the racks are empty. Danger of injury!
- Do not place objects that may fall/tip over on the product. These objects may fall while opening or closing the door and cause injuries and/or material damages.
- Do not hit or exert excessive pressure on glass surfaces. Broken glass may cause injuries and/or material damages.
- The cooling system in your product contains R600a refrigerant. The refrigerant type used in the product is specified in the type label. This gas is flammable. Therefore, be careful not to damage the cooling system and the pipes while operating the product. In case of damage to the pipes;
- Do not touch the product or the power cable.
- Keep the product away from potential sources of fire that may cause the product to catch fire.
- Ventilate the area where the product is placed. Do not use a fan.
-
Contact Authorized Service.
-
If the product is damaged and you observe gas leak, please stay away from the gas. Gas may cause frostbite if it contacts your skin.
For Products with Water Dispenser / Icematic
- Use only drinking water. Do not fill the water tank with fruit juice, milk, fizzy beverages, alcoholic beverages or any other liquids incompatible for use in the water dispenser. This may cause risk to your health and safety.
- Do not allow the children to play with the water dispenser or icematic to prevent accidents and injuries.
- Do not insert your hands, fingers or other objects inside the hole of the water dispenser, ice channel or inside the container of the icematic. This may cause injuries or material damages.
- The hose sets supplied with the product shall be used. Do not use the old hose sets. Do not extend the hoses!
• Always connect your product to cold water inlet. Do not perform installation on the hot water inlet. The pressure for the cold water inlet shall be 80 PSi (550 kPa) maximum. If
your water pressure exceeds 80PSi or has a water impact effect, use a pressure limiting valve on your mains system. Ask help from professional plumbers if you do not know how to control your water pressure.
- High pressure may cause damage to the hose connections and pose a risk of flooding.
• Take required precautions against the risk of freezing of hoses. The operating water temperature interval shall be 0.6^ C ( 33^ F) minimum and 38^ C ( 100^ F) maximum. There is a risk of flooding if the hose is cracked/perforated.

1.7 Food Storage Safety
Please pay attention to the following warnings to avoid food spoilage:
• Leaving the doors open for a long time may cause the temperature inside the product to rise.
- Regularly clean the accessible drainage systems in contact with food.
- Clean the water tanks that have not been used for 48 hours and mains-fed water systems that have not been used for more than 5 days.
- Store raw meat and fish products in appropriate compartments within the product. Thus, it does not drip on or come into contact with other foods.
- Two-star freezer compartments are used for storing pre-filled foods, making and storing ice and ice cream.
• One, two and three-star compartments are not appropriate for freezing fresh food. - If the cooling product has been left empty for a long time, turn off the product, defrost, clean, and dry the product in order to protect the housing of the product.

1.8 Maintenance and Cleaning Safety
- Unplug the refrigerator before cleaning it or starting to perform maintenance.
-
Do not pull by the door handle if you shall move the product for cleaning purposes. Handle may cause injuries if it is pulled too hard.
-
Do not put your hands etc. under the refrigerator. Jamming may occur or any sharp edge may cause personal injuries.
- Do not clean the product by spraying or pouring water on the product and inside the product. Risk of electric shock and fire.
- When cleaning the product, do not use sharp and abrasive tools or household cleaning agents, detergent, gas, gasoline, thinner, alcohol, varnish, and similar substances. Use only cleaning and maintenance agents that are not harmful for food inside the product.
- Do not ever use steam or steamed cleaning materials for cleaning the product and thawing the ice inside it. Steam contacts the live areas in your refrigerator and causes short circuit or electric shock.
- Do not use any mechanical tools or any other tools than the recommendations of the manufacturer to speed up the defrost operation.
• Take care to keep water away from the ventilation holes, electronic circuits or lighting of the product. - Use a clean, dry cloth to wipe the dust or foreign material on the tips of the plugs. Do not
use a wet or damp piece of cloth to clean the plug. Otherwise, risk of fire or electric shock may occur.

1.9 Disposal of the Old Product
When disposing of your old product follow the instructions below:
• To prevent children from accidentally locking themselves into the product, if there is door lock, make it deactivated.
- Splash of coolant is harmful to the eyes. Do not damage any part of the cooling system while disposing of the product.
- It may be fatal if the compressor oil is swallowed or if it penetrates the respiratory tract.
- Cooling system of your product includes R600a gas as specified in the type label. This gas is flammable. Do not dispose of the product by throwing it into fire. Risk of explosion!
2 Environmental Instructions
2.1 Compliance with the WEEE Directive and Disposing of the Waste Product
natural_image
Symbol of a trash bin crossed with a diagonal line and a horizontal bar below (no text or labels)This product complies with EU WEEE Directive (2012/19/EU). This product bears a classification symbol for waste electrical and electronic equipment (WEEE).
This symbol indicates that this product shall not be disposed with other household wastes at the end of its service life. Used device must be returned to official collection point for recycling of electrical and electronic devices. To find these collection systems please contact to your local authorities or retailer where the product was purchased. Each household performs important role in recovering and recycling of old appliance. Appropriate disposal of used appliance helps prevent potential negative consequences for the environment and human health.
Compliance with RoHS Directive
The product you have purchased complies with EU RoHS Directive (2011/65/EU). It does not contain harmful and prohibited materials specified in the Directive.

Package information Packaging materials of the product are manufactured from recyclable materials in accordance with our National Environment Regulations. Do not dispose of the packaging materials together with the domestic or other wastes. Take them to the packaging material collection points designated by the local authorities.
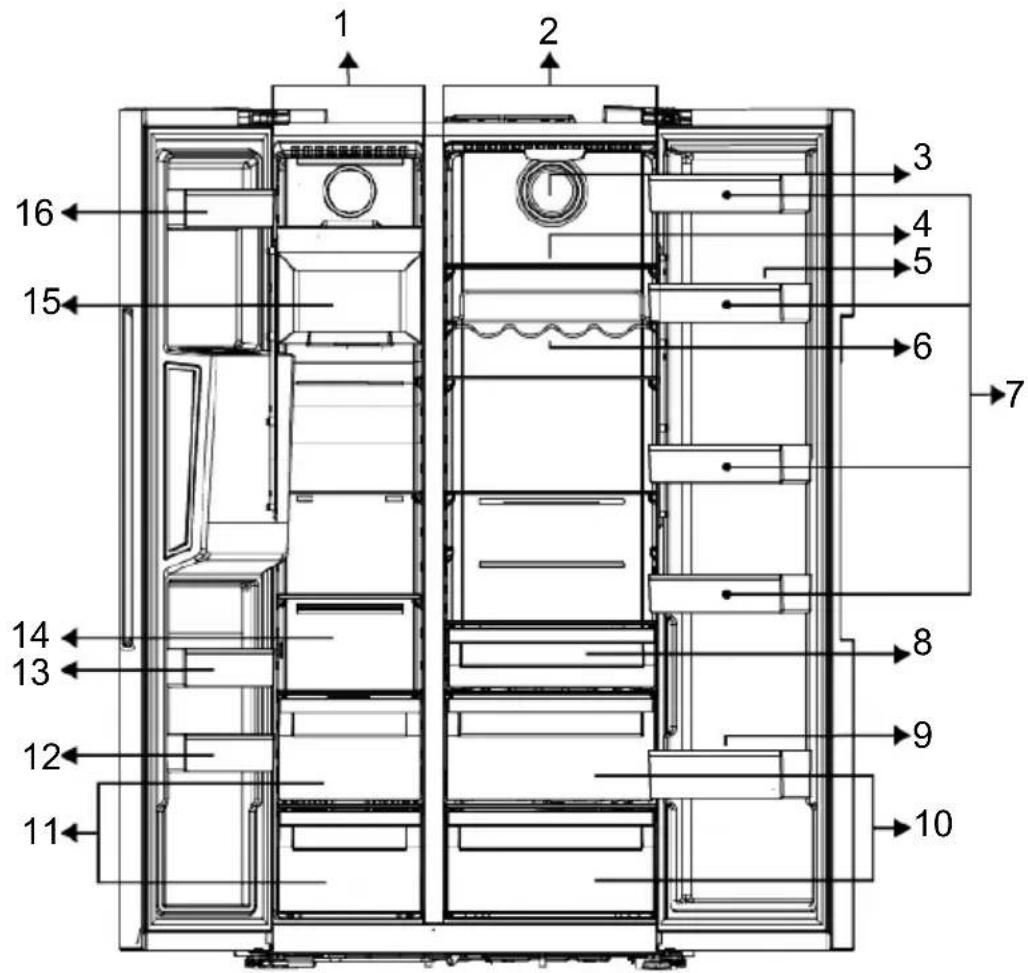
1 Freezer compartment 2 Cooler compartment
3 Fan 4 *Cooler compartment glass shelves
5 Egg holder 6 *Bottle shelf
7 *Cooler compartment door shelves 8 *Dairy (cold storage) bin
9 *Bottle shelf 10 *Crispers
11 Frozen food storing compartments 12 *Freezer compartment door shelves
13 *Freezer compartment door shelves 14 Frozen food storing compartments and glass shelf
15 *Ice machine 16 *Freezer compartment door shelves
*Optional: Figures in this user manual are schematic and may not exactly match your product. If your product does not comprise the relevant parts, the information pertains to other models.
4 Installation
Right place for installation

Read the "Safety Instructions" section first!
Your product requires adequate air circulation to function efficiently. If the product will be placed in an alcove, remember to leave at least 5 cm clearance between the product and the ceiling, rear wall and the side walls. Check if the rear wall clearance protection component is present at its location (if provided with the product). If the component is not available, or if it is lost or fallen, position the product so that at least 5 cm clearance shall be left between the rear surface of the product and the wall of the room. The clearance at the rear is important for efficient operation of the product.

Do not use extension or multi sockets in the power connection.
Attaching the plastic wedges
Use the plastic wedges provided with the product to maintain sufficient space for air circulation between the product and the wall.
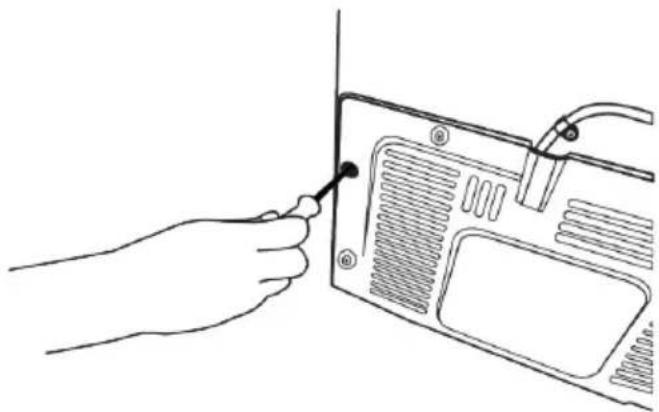
- Remove the screws on the product and mount the screws provided with the wedges.
natural_image
Line drawing of a hand inserting a cable into a device panel (no text or symbols)- Attach 2 plastic wedges on the ventilation cover as shown in the figure.

The manufacturer assumes no responsibility for any damage caused by the work carried out by unauthorized persons.

The product's power cable must be unplugged during installation. Failure to do so may result in death or serious injuries!

If the door span is too narrow for the product to pass, remove the door and turn the product sideways; if this does not work, contact the authorized service.
- Place the product on a flat surface to avoid vibration
- Place the product at least 30 cm away from the heater, stove and similar sources of heat and at least 5 cm away from electric ovens.
- Do not expose the product to direct sunlight or keep keep in damp environments.
natural_image
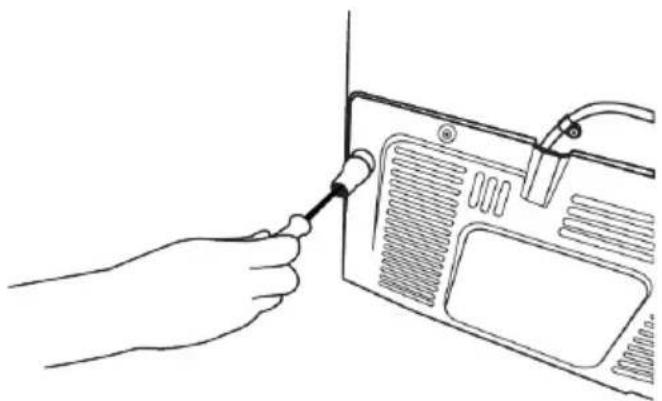
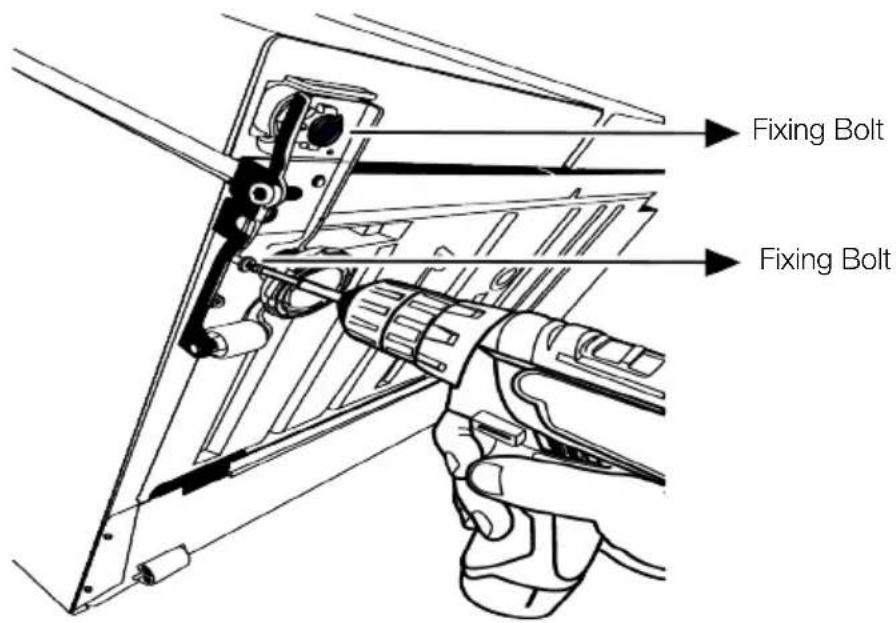
Line drawing of a hand inserting a screwdriver into a device panel (no text or symbols)Adjusting the Legs
If the product is not in a balanced position, you can adjust the balance of the product by rotating the stands on the front right or left.
natural_image
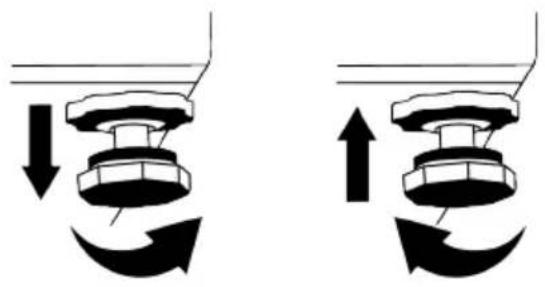
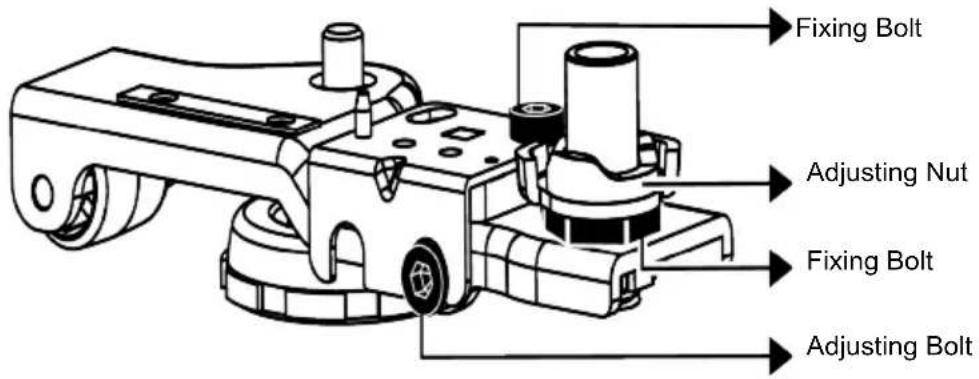
Diagram showing two mechanical components with directional arrows indicating motion or force (no text or symbols)For adjusting the doors vertically,
Loosen the fixing bolt at the bottom. Turn the adjusting bolt towards the position (clockwise/counter clockwise) of the door. Tighten the fixing bolt to immobilize the position.
For adjusting the doors horizontally,
Loosen the fixing bolt at the bottom.
Loosen the fixing bolt at the top. Turn the adjusting bolt on the side towards the posi-
tion (clockwise/counter clockwise) of the door. In order to immobilize the position, tighten the fixing bolt at the top. Tighten the fixing bolt at the bottom.
4.1 Electrical Connection

WARNING: Do not use extension or multi sockets in power connection.

WARNING: Damaged power cable must be replaced by Authorized Service.
- Our firm will not assume responsibility for any damages due to usage without earthing and power connection in compliance with national regulations.
- The power cable plug must be easily accessible after installation.

Hot surface warning! The side walls of your product are equipped with cooler pipes to enhance the cooling system. High pressure fluid may flow through these surfaces, and cause hot surfaces on the side walls. This is normal and it does not require servicing. Be careful when you contact these areas.
5 Preparation

Read the "Safety Instructions" section first!
5.1 What To Do For Energy Saving

Connecting the product to electronic energy-saving systems is harmful, as it may damage the product.
- This refrigerating appliance is not intended to be used as a built in appliance.
- Do not keep the refrigerator doors open for long periods.
- Do not place hot food or beverages into the refrigerator.
- Do not overfill the refrigerator; blocking the internal air flow will reduce cooling capacity.
- Since hot and humid air will not directly penetrate into your product when the doors are not opened, your product will optimize itself in conditions sufficient to protect your food. Under these circumstances, functions and components such as compressor, fan, heater, defrost, lighting, display and so on will operate according to the needs by consuming minimum energy.
-
In case that multiple options are present, glass shelves must be placed so that the air outlets at the rear wall are not blocked and preferably, in a way that air outlets remain below the glass shelf. This combination may help improving air distribution and energy efficiency.
-
Using the below drawer when storing is strongly recommended.
- Make sure the foods are not in contact with the cooler compartment temperature sensor described below.
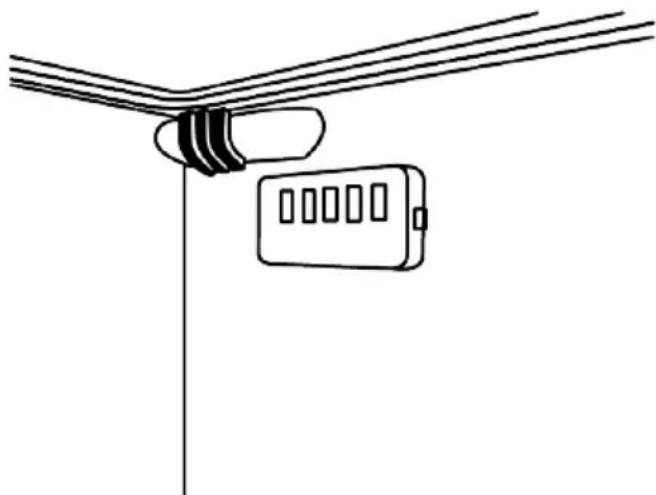
natural_image
Simple line drawing of a cable or cable connector with a rectangular device attached to a vertical pole (no text or symbols)- If they are in contact with the sensor, energy consumption of the appliance might increase
- Food shall be stored using the drawers in the cooler compartment in order to ensure energy saving and protect food in better conditions.
5.2 First Use
Before using your refrigerator, make sure the necessary preparations are made in line with the instructions in "Safety and Environmental Instructions" and "Installation" sections.
- Keep the product running without placing any food inside for 6 hours and do not open the door, unless absolutely necessary.
- The temperature change caused by opening and closing of the door while using the product may normally lead to condensation on door/body shelves and glassware placed in the product.

A sound will be heard when the compressor is engaged. It is normal for the product to make noise even if the compressor is not running, as fluid and gas may be compressed in the cooling system.
It is normal for the front edges of the refrigerator to be warm. These areas are designed to warm up in order to prevent condensation.

For some models, indicator panel turns off automatically 1 minute after the door closes. It will be re-activated when the door is opened or any button is pressed.
6 Operating the Product

Read the "Safety Instructions" section first!
- Do not use any mechanical tools or any other tools than the recommendations of the manufacturer to speed up the defrost operation.
- Do not use parts of your refrigerator such as the door or drawers as a support or a step. This may cause the product to trip over or its components to be damaged.
• The product shall be used for storing food only.
7 Control Panel of the Product
5.3 Climate Class and Definitions
Please refer to the Climate Class on the rating plate of your device. One of the following information is applicable to your device according to the Climate Class.
- SN: Long Term Temperate Climate: This cooling device is designed for use at ambient temperatures between 10 °C and 32 °C.
• N: Temperate Climate: This cooling device is designed for use at ambient temperatures between 16°C and 32°C. - ST: Subtropical Climate: This cooling device is designed for use at ambient temperatures between 16°C and 38°C.
• T: Tropical Climate: This cooling device is designed for use at ambient temperatures between 16°C and 43°C.
- Turn off the water valve if you will be away from home (e.g. at vacation) and you will not be using the Icematic or the water dispenser for a long period of time. Otherwise, water leaks may occur.
Unplugging the Product
- If you are not going to use the product for a long time, unplug the product from the socket.
- Remove the food to prevent odours,
- Wait for the ice to melt, clean the interior and let it dry, leave the doors open to avoid damaging the inner body plastics.

Read the "Safety Instructions" section first.
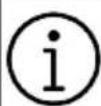
*Optional: Shown functions are optional, there may be differences of shape and location in functions found on your appliance's indicator panel.
Auditory and visual functions on the indicator panel will assist you in using the refrigerator.
Quick Freezing Key

When the quick freezing key is pressed, the LED on the key is illuminated and the quick freezing function will be activated. Freezer compartment temperature is set to -27 Celsius. Press the key again to cancel the function. The quick freezing function will be automatically cancelled after 24 hours. To freeze a large amount of fresh food, press the quick freezing key before placing the food in the freezer compartment.
Icematic On/Off Button

Pressing this key for 3 seconds activates the ice making process and the LED on the key lights up. Pressing the key for 3 seconds again cancels the ice making process and the ice cubes that have been created before can be used even though the function is cancelled.
Error Status Indicator

This indicator shall be active when your refrigerator cannot perform adequate cooling or in case of any sensor error. "E" will be displayed on the freezer compartment temperature indicator and figures such as 1,2,3... will be displayed on the cooler compartment temperature indicator.
These figures provide information to the authorized service on the error that has occurred.
Exclamation mark may be displayed when you load warm food to the freezer compartment or keep the door open for a long period of time. This is not a fault, this warning will be removed when the food is cooled down or when any key is pressed.
Cooler Compartment Off (Vacation) Function Key
To activate the vacation function, press on the key for 3 seconds.
The vacation mode will be activated and the LED on the key will be illuminated. “- -” shall be displayed on the Cooler Compartment temperature indicator and the cooler compartment does not actively perform cooling. You should not keep your food in the cooler compartment if you activate this function. The other compartments continue to cool according to temperatures set before. Press and hold the key for 3 seconds again to cancel this function.
Quick Cooling Key

When you press the quick cooling key, the LED on the key is illuminated and the quick cooling function shall be activated. Cooler compartment temperature is set to 1 Celsius. Press the key again to cancel the function. The quick freezing function will be cancelled automatically when the cooling is done.
Cooler Compartment Temperature Setting Key c
Allows setting of temperature for cooler compartment. Pressing this key will enable the cooler compartment temperature to be set at 8,7,6,5,4,3,2 and 1 Celsius.
Deodoriser Module Key 3"
Press this key for 3 seconds to activate/deactivate the deodoriser feature. When the deodoriser feature is active, the LED on the respective key is illuminated. When the feature is active, the deodoriser module will be operated periodically.
Filter Replacement Warning Key _3
The water inlet filter of the refrigerator should be changed in regular intervals. Your refrigerator automatically calculates this time. When the filter lifespan has expired, the LED on the filter replacement warning key lights up. After changing the filter, press and hold the button for 3 seconds to turn off the filter replacement warning LED.
Water, Ice Cube, Crashed Ice Selection
Key + +
This key allows you to switch between water, ice cube and crushed ice selections.
When you activate the feature, light on the key shall remain lit.
Wireless Key
This key is used to make a wireless connection with your product via HomeWhiz mobile app.
When you press the key for 3 seconds, the LED on the key flashes slowly (at intervals of 0.5 seconds). The home network is initialized on the product this way.
After achieving wireless connection with the product, the LED on the key illuminates permanently.
When the initial connection is established, you may activate/deactivate the connection with a short press on this key. The LED on the key shall flash quickly (at intervals of
0.2 seconds) till your appliance is connected. When the connection is active, LED will remain lit.
If the connection cannot be established for a long period, check your connection settings and refer to the "Troubleshooting" section provided in the user manual.
HomeWhiz application will be used for wireless connection. The installation steps are described on the application during installation. You may access the application by reading the QR code available on the HomeWhiz label on the product. Application is offered through App Store for IOS devices, and through Play Store for Android devices.
Visit https://www.homewhiz.com/ address for detailed information.
Freezer Compartment Temperature Setting Key ☐
Temperature setting is made for freezer compartment. Pressing this key will enable the freezer compartment temperature to be set at -16,-17,-18,-19,-20,-21,-22 Celsius.
8 Using The Product

Read the "Safety Instructions" section first!
Storing food in the freezer compartment
- You can activate Quick Freezing function 4-6 hours before freezing function and perform a faster cooling.
- Bring hot meals to the room temperature before placing them in the freezer compartment.
- Foods to be frozen must be divided into portions according to a size to be consumed, and frozen in separate packages.
- It is recommended to pack the foods before placing them in the freezer.
-
In order to prevent expiration of storage time, write the freezing date, time and name of the product on the package according to the storage times of different foods.
-
Consume the foods you have defrosted quickly. Defrosted foods cannot be frozen again unless they are cooked. It is not safe to consume the refrozen fresh foods without cooking after they are defrosted.
- As you freeze fresh foods, do not bring them in contact with already frozen foods. Otherwise, frozen foods will be defrosted.
Storing the foods, which are sold frozen
• Always follow the instructions of the producer in relation to the time during which you are required to store your foods. Do not excess the time specified in these instructions!
- In order to protect the quality of the food, keep the time interval between purchasing transaction and storing as short as possible.
- Buy frozen food which are stored at -18^ or lower temperatures.
- Avoid buying foods whose packages are covered with ice etc. This means that the product could be partially defrosted and refrozen. Temperature impacts the quality of the food.
-
Do not excess the storing time recommended by the food producer. Remove only the food as much as you need from the freezer.
-
Except the cases where extreme circumstances are available in the environment, if your product (on the recommended set values table) is set to the specified set values, the food keep their freshness for a longer time both in the fresh product compartment and freezer compartment.
- If fresh food compartment is set to a lower temperature, fresh fruits and vegetables may be partially frozen.
Recommended set values table
| Freezer Compartment Setting | Fridge Compartment Setting | Remarks |
| -18 °C 4 °C | This is the default, recommended setting. This setting is recommended if ambient temperature is below 30 °C. | |
| -20, -22 or -24 °C 4 °C | These settings are recommended for ambient temperatures exceeding 30 °C. | |
| Quick Freeze 4 °C | Use when you want to freeze your food in a short time. When the process ends, the product's settings will return to previous position. | |
| -18 °C or colder 2 °C | Use these settings if you believe the cooler compartment is not cold enough due to ambient temperature or frequently opening the door. |
Quick freezing
- Activate the quick freezing function 24 hours before placing your fresh foods.
- After 24 hours after pressing the button, place your food that you want to freeze in the third or fourth drawers with higher freezing capacity.
- The quick freezing function will be automatically deactivated after 24 hours.
Freezer details
As per the IEC 62552 standards, the freezer must have the capacity to freeze 4.5 kg of food items at -18 °C or lower temperatures at 25 °C room temperature in 24 hours for each 100 litres of freezer compartment volume.
Food products can only be preserved for extended periods at or below temperature of -18^ C.
You can keep the foods fresh for months (in freezer at or below temperatures of -18°C).
The food products to be frozen must not contact the already-frozen food inside to avoid partial defrosting.
Boil the vegetables and filter the water to extend the frozen storage time. Place the food in air-tight packages after filtering and place in the freezer. Bananas, tomatoes, lettuce, celery, boiled eggs, potatoes and similar food items should not be frozen. In case these foods are frozen, only nutritional values and eating qualities will be negatively affected. A rotting that would threaten human health is not in question.
Placing the food
Freezer compartment shelves: Different frozen foods like meat, fish, ice cream, vegetables etc.
Cooler compartment shelves: Food items inside pots, capped plate and capped cases, eggs (in closed case)
Cooler compartment door shelves: Small and packaged food or beverages
Crisper: Vegetables and fruits
Fresh food compartment: Delicatessen (breakfast food, meat products to be consumed in short time)
Storing food in the cooler compartment
- Compartment temperatures rise prominently if compartment door is opened and closed frequently and kept open for a long time, this can reduce the life span of the food and cause the food to spoil.
- In order not to cause odour and taste changes, the food should be stored in the closed containers.
- Do not store too much food in your refrigerator. To achieve a better and homogeneous cooling, place the food separately in a way that cold air can wander through them.
- Provide air flow by leaving a space between the food and internal wall. If you lean the food against the rear wall, the food may freeze.
- Bring cooked hot meals to the room temperature before placing them in the refrigerator. Then, you can place the tepid meal in the lower shelves of your refrigerator. Do not place the tepid meals close to the foods which may easily spoil.
- Defrost your frozen food in the fresh food compartment. Thereby, you can cool fresh food compartment by using frozen food and save energy.
-
Storing unripe tropical fruits (mango, melon varieties, papaya, banana, pineapple) in the refrigerator may speed up the ripening process This is not recommended because it will cause shorter storage time.
-
You should store onions, garlics, gingers and other root vegetables in dark and cold room conditions, not in the refrigerator.
- If you notice that a food has spoiled in the refrigerator, throw away that food and clean the accessories which have come into contact with it.
- In order to cool the meals like soups and stews, which are cooked in the large pots, quickly, you can put them in the refrigerator by separating them into their own shallow containers.
- Do not place unpackaged food close to eggs.
- Keep the fruits and vegetables separately and store each variety together (for example; apples with apples, carrots with carrots)
• Take green vegetables out of the plastic bag and place them in the refrigerator after wrapping them in a paper towel or drying cloth. If you wash this type of food before placing them in the refrigerator, remember to dry them. - You can both create a damp environment and provide an air flow by keeping fruits and vegetables, which are prone to drying, in the perforated or unsealed plastic bags.
- Except the cases where extreme circumstances are available in the environment, if your product (on the recommended set values table) is set to the specified set values, the food keep their freshness for a longer time both in the fresh product compartment and freezer compartment.
Store different food in different places according to their properties.
| Food Location | |
| Egg Door Shelf | |
| Dairy products (butter, cheese) | If available, zero degree (for breakfast food) compartment |
| Fruits, vegetables and greenery | Fruit-vegetable compartment, crisper or EverFresh+ compartment (if available) |
| Fresh meat, poultry, fish, sausage etc. Cooked foods | If available, zero degree (for breakfast food) compartment |
| Ready to serve foods, packaged products, canned foods and pickles | Top shelves or door shelf |
| Beverages, bottles, spices and snacks Door Shelf |
8.1 Replacing the Illumination Lamp
Call the Authorized Service when the Bulb/LED used for lighting in your refrigerator will be replaced.
Lamp(s) used in this appliance cannot be used for house lighting. Intended use of this lamp is to help the user place food into the refrigerator / freezer safely and comfortably.
9 Product Features
9.1 The ice storage area
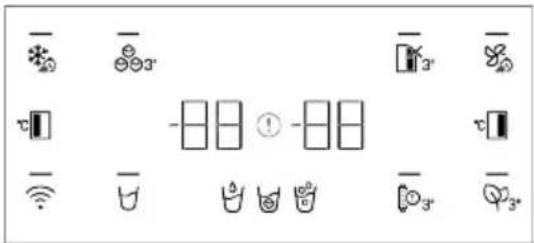
Ice/Water Taking
Select the related option by using the display in order to take water ( Ice cube crushed ice (). Push forward the trigger on the water dispenser in order to take water/ice. When you switch between ice cube ( crushed ice () options, ice type remaining from the previous selection can be given in the first few takings.
natural_image
Line drawing of a hand holding a test tube inside a container (no text or symbols)8.2 Door Open Alert
An audible alert will be heard if the product's door remains open for 1 minute. The audible alert will stop when you close the cabinet door or press any button on the display (if available).
- In order to take ice from ice / water dispenser for the first time, you have to wait approximately for 12 hours. In the event that there is not sufficient ice in the ice container, you cannot take ice from the dispenser.
- Do not consume the ice cubes (3-4 litres) after first running.
- If a power failure or temporary malfunction arises while the product is running, ices may melt a little and refreeze. In this case, ices may stick to each other. In the event that the power failure or the malfunction goes on, ices may melt and cause a water leakage. When such a problem exists, clean the ice container by pouring the ices left in the ice container.

WARNING
The water system of the product should only be connected to cold water line. It should not be connected to the hot water line.
- Water may not be taken during the first operation of the product. This is because there is air in the system. You have to discharge the air in the system. For this purpose, press on the trigger of the dispenser for 1-2 minutes until the water
comes from the water dispenser. At the beginning, the water flow may be irregular. Water flow will return to normal after the air in the system is discharged.
- A blurry water may come out when the filter is used for the first time. The first 10 glasses of water should not be consumed.
- When the product is set up for the first time, approximately 12 hours should be passed for the water to cool.
- The water system of the product has been designed in a way that it can only work with clean water. Do not use any beverage except water.
- If you will not use the product for a long time for the reasons of vacation etc., we recommend you to cancel the water connection. When the water dispenser is not used for a long time, the first 1-2 glasses of water may come out hot.
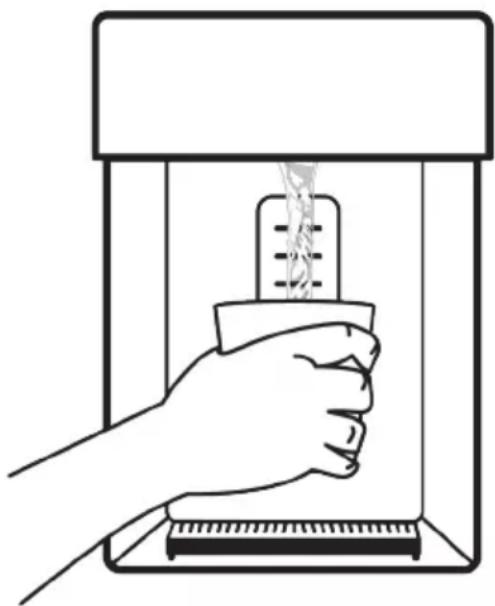
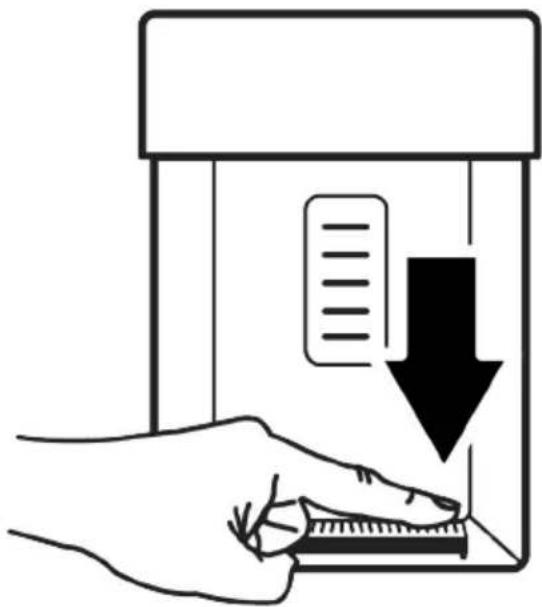
Drip tray
The water dripping from the water dispenser accumulates on the drip tray, there is not a water outlet. You can take out the drip tray by pulling it toward yourself or pressing on its edge. You can clean the water in the drip tray in this way.
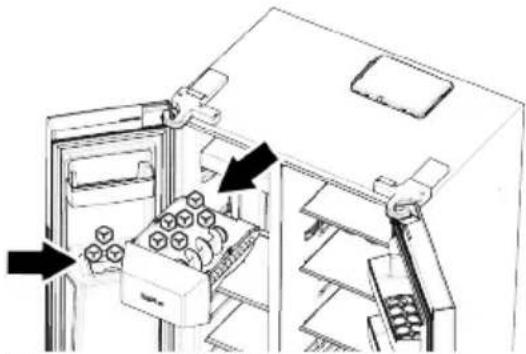
Ice Machine
Ice machine is on the upper section of the freezer body.
By grabbing the handle under the front part, pull the ice storage bin towards yourself to remove.
natural_image
Diagram of a refrigerator interior showing internal compartments and storage bins (no text or labels)To remove the ice storage bin
Grab the handle on the bottom of the bin and pull it towards yourself.
To reinstall the ice storage bin
Put the bin to its slot and push it back holding parallel to the ground. Please make sure that no space will be left between the bin and the ice maker compartment.
In case you cannot get all the ice cubes produced
Ice cubes remaining in the storage bin for a long time may stick together and form large ice blocks. In this case, remove the ice storage bin as described in the manual, separate ice cubes, remove the ones that cannot be separated from the bin and put the remaining cubes back into the bin. If the problem persists, please check the ice channel, and clear if it is blocked.
When using the ice machine for the first time or after a long period
Ice cubes may get smaller due to the residual air in the water system. The air will be automatically discharged after being used for some time.
Do not use the ice cubes produced on the first day so that you can refresh all remaining water in the system.

WARNING
Do not insert your hand or any other object into the ice channel and ice crushing blades while the refrigerator is operating.
Do not allow kids to hang onto the ice machine, ice storage bin or water/ice dispenser.
Grasp the ice storage bin firmly with both hands so as not to drop it.
When you close the door of your appliance fast, the water in the ice maker may splash into the ice storage bin.
Do not disassemble the ice storage bin unless necessary.
In case of a jam (appliance does not drop ice) while getting crushed ice, try getting ice cube.
Then you can retry getting crushed ice.
When getting crushed ice, the appliance may produce ice cubes first. It is possible for the appliance to produce ice cubes when getting crushed ice.
The freezer door of the ice machine may be covered by a light frost and a film layer.
This is normal and we recommend you to immediately clean it.
After some time, water may fill in the grid which is at the bottom of the water dispenser.
We recommend you to remove the water in the grid regularly.
It is normal to hear a sound when ice cubes are falling down from the ice storage bin.
This does not mean any malfunction.
The blade mechanism of the ice bin is sharp and may injure your hand.
If ice cubes aren't released from the ice dispenser, it means that the ice cubes may be stuck together. You need to clean the bin to continue to get ice cubes.
When the trigger is pressed to get ice (Indicator etc.), ice type cannot be changed.
You should release the trigger (Indicator etc.), change the ice type and take ice
again. For this purpose, you can take ice again after changing the ice type on the indicator.
9.2 Egg holder
You can place the egg holder on the door or body shelf you wish.
If the egg holder is to be placed on the body shelf, we recommend you to choose colder lower shelves.

Never place the egg holder on the freezer compartment
9.3 Crisper
The refrigerator's crisper is designed to keep vegetables fresh by preserving their humidity. For this purpose, the overall cold air circulation is intensified in the crisper. Keep fruits and vegetables in this compartment. Keep the green-leaved vegetables and fruits separately to prolong their life.
9.4 Crisper Technologies
Blue Light
Fruits and vegetables stored in the crispers that are illuminated with a blue light continue their photosynthesis by means of the wavelength effect of blue light and thus preserve their vitamin content.
VitaminZone
Fruits and vegetables stored in crispers illuminated with the VitaminZone technology preserve their vitamins for a longer time thanks to the blue, green, red lights and dark cycles, which simulate a day cycle.
When the door of your refrigerator is opened during the dark period of the VitaminZone technology, your refrigerator shall sense this automatically and illuminate the crisper with one of the blue, green or red lights respectively for your convenience.
After you have closed the door of the refrigerator, the dark period will continue, representing the night time in a day cycle.
9.5 Dairy Products Cold Storage Area
Cold Storage Drawer
The Cold Storage Drawer can reach lower temperatures in the cooler compartment. Use this drawer for delicatessen products (salami, sausage, etc.) and dairy products that require colder storage conditions, or for meat, chicken or fish to be consumed quickly. It is not suitable to store fruits and vegetables in this drawer.
9.6 Humidity Controlled Crisper
Full fresh
With the humidity controlled crisper feature, the humidity of vegetables and fruits is kept under control and the food is kept fresh for a longer period of time.
We recommend that you place leafy vegetables such as lettuce, spinach and similar vegetables that are sensitive to moisture loss in the crisper, not upright on their roots, but as horizontally as possible.
When placing the vegetables, place heavy and hard vegetables at the bottom and light and soft ones on the top, taking into account the specific weights of vegetables. Never leave vegetables in plastic bags in the crisper. Leaving them in plastic bags causes vegetables to rot in a short time. In situations where contact with other vegetables is not preferred, use packaging materials such as paper that has a certain level of porosity in terms of hygiene.
Do not put fruits that have a high ethylene gas production such as pear, apricot, peach and particularly apple in the same crisper with other vegetables and fruits. The ethylene gas coming out of these fruits might cause other vegetables and fruits to mature faster and rot in a shorter period of time.
9.7 Water connection
(This feature is optional)

WARNING
The product and the water pump, if any, must be unplugged during connection.
The mains, filter and carboy connections of your product must be made by an authorized service center.
Depending on the model, you can connect your product to a carboy or directly to the water network. To make this connection, you must first connect the water hose to the product.
Depending on the model of your product, check whether the following parts are included with the product:
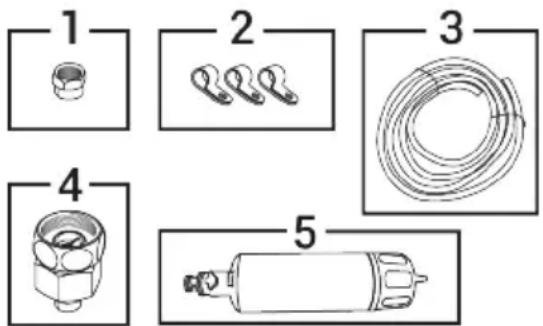
- Union (1 piece): Used for attaching the water hose to the back of the product.
- Hose clip (3 pieces): Used for fixing the water hose to the wall.
- Water hose (1 piece, 5 meters diameter 1/4 inch): Used for making water connections.
- Faucet adapter (1 piece): Used for cold water mains line connection with porous filter.
- Water filter (1 piece *Optional): It is used to connect the mains water to the product. If there is a carboy connection; there is no need to use a water filter.
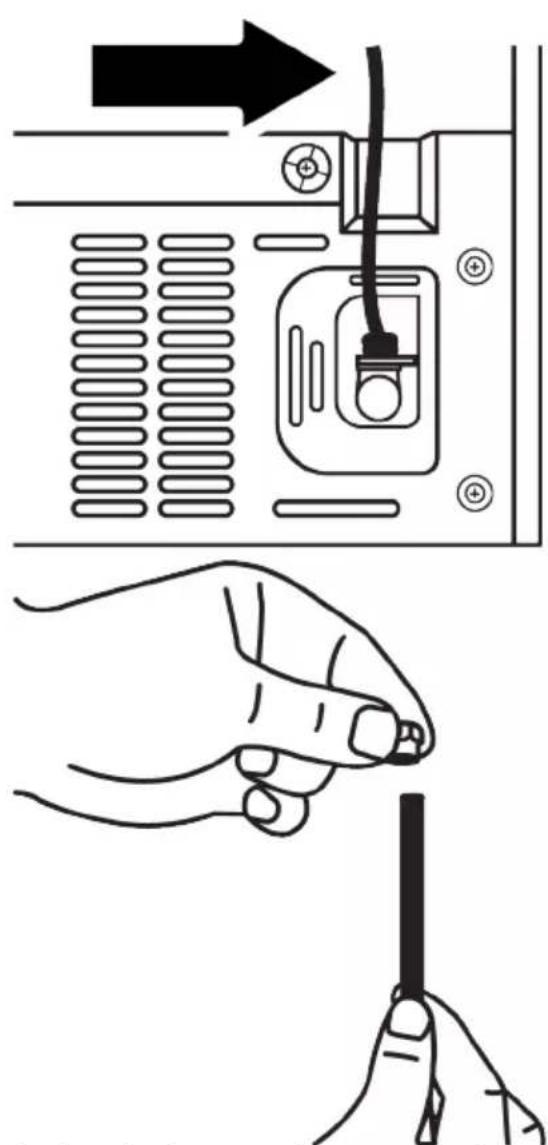
Connecting the water hose to the product
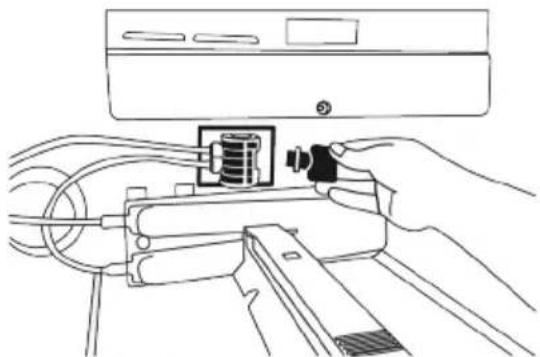
Follow the instructions below to connect the water hose to the product.
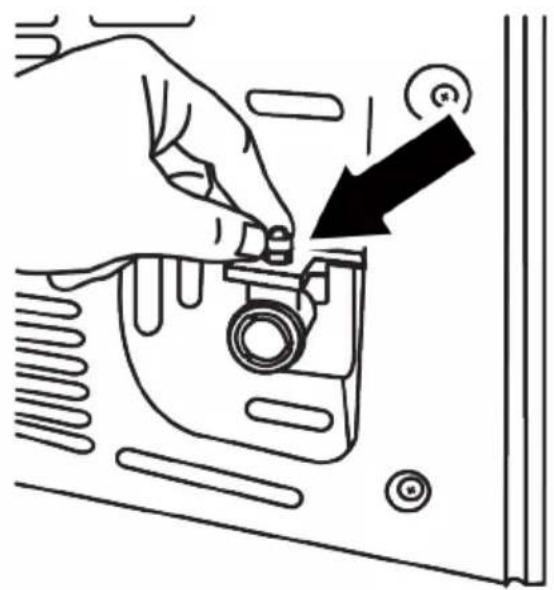
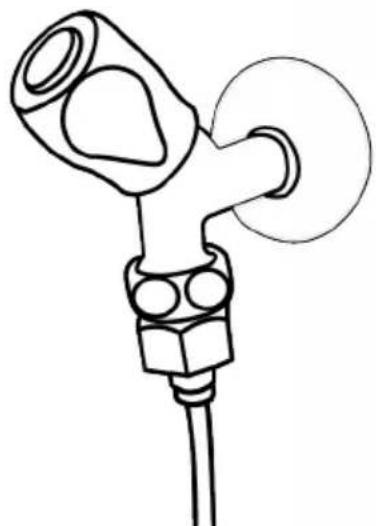
- Remove the fitting from the hose end adapter attached to the back of the product, thread the fitting onto the water hose.
natural_image
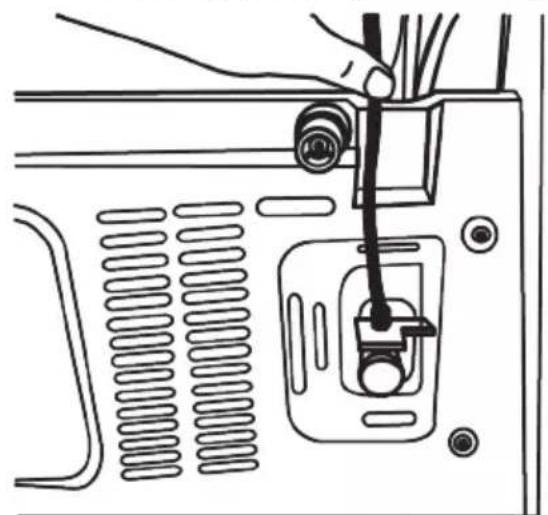
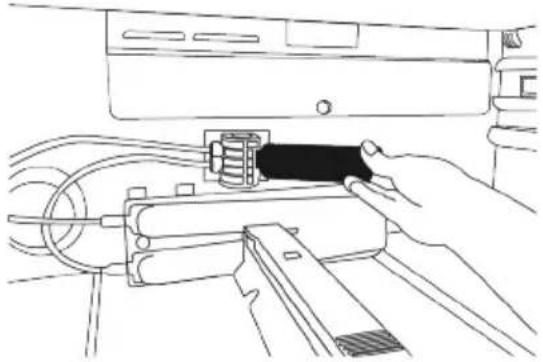
Illustration showing a hand inserting a cable into a device panel with an arrow indicating direction (no text or symbols present)- Attach the water hose to the hose-end adapter by pressing down firmly.
natural_image
Line drawing of a computer monitor with a cable inserted, showing internal components and wiring (no text or symbols)- Secure the union to the hose-end adapter by hand tightening. You can tighten the union using a pipe wrench or pliers.
natural_image
Illustration of a hand pressing down on a mechanical component with an arrow indicating motion (no text or symbols)Connecting to mains water
(This feature is optional)
If you are going to use the product by connecting it to the cold water line, you need to install a standard 1/2" valve fitting on the cold water network in your home. If this fitting is not available and you are not sure, consult a qualified plumber.
- Disconnect the union from the faucet adapter.
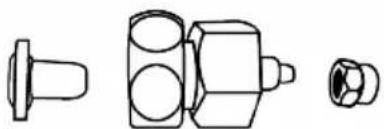
natural_image
Technical line drawings of four mechanical components (tens, bolt, nut, and housing) without any text or symbols- Connect the faucet adapter to the mains line valve.
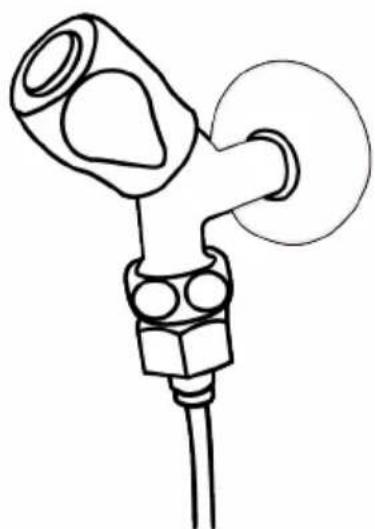
natural_image
Line drawing of a mechanical component with no visible text or symbols- Thread the union onto the water hose.
natural_image
Line drawing of a hand holding a pen, no text or symbols present- Thread the union onto the faucet adapter and tighten by hand/tool.
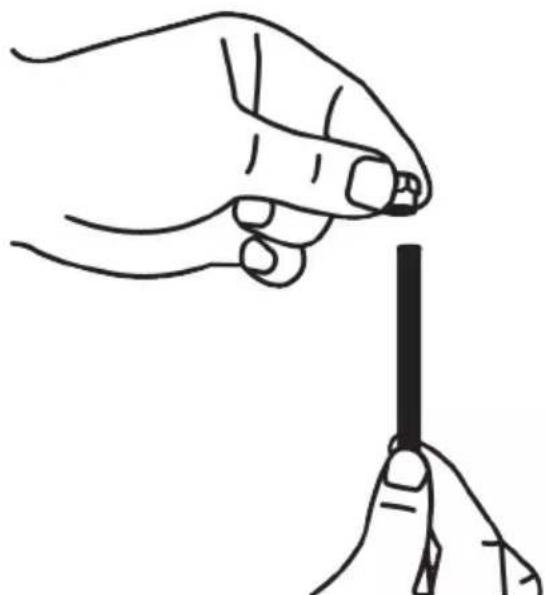
natural_image
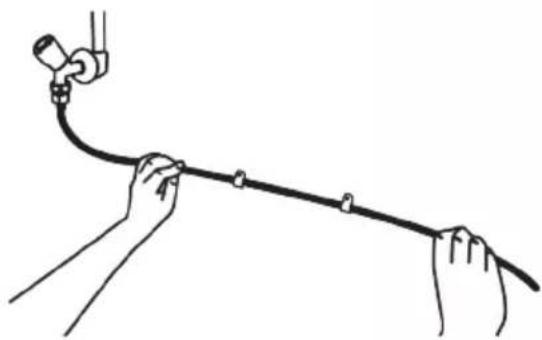
Line drawing of a mechanical component with no visible text or symbols- Secure the water hose in suitable places with the clips provided to prevent damage, slipping or accidental dislodging.
natural_image
Line drawing of hands holding a curved cable or wire with a connector attached (no text or symbols)
WARNING
After opening the faucet, make sure that there is no water leakage at both joints of the water hose. In case of leakage, close the valve immediately and tighten all joints with a pipe wrench or pliers.
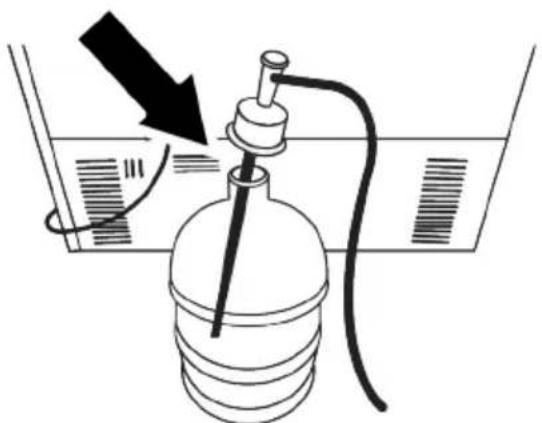
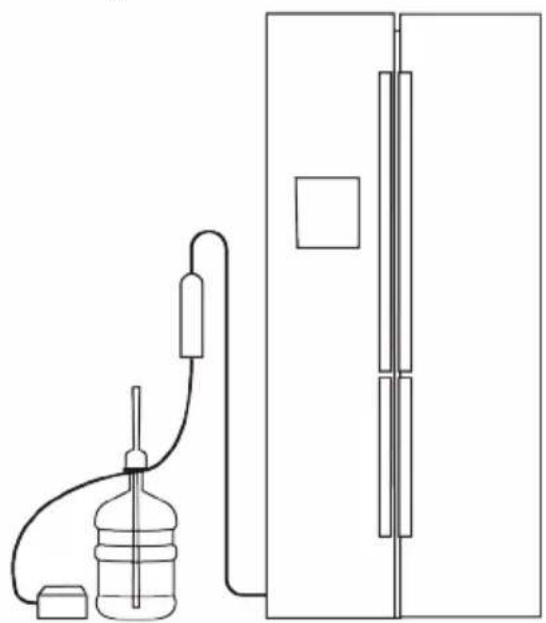
For products to be used in carboys;
(This feature is optional)
In order to connect carboy water to the product, the water pump recommended by the authorized service is required.
In order to connect carboy water to the product, the water pump recommended by the authorized service is required.
- After connecting one end of the water hose from the pump to the product, follow the instructions below.
natural_image
Line drawing of a mechanical assembly with no visible text or symbols- Make the connection by pushing the other end of the water hose into the water hose inlet of the pump.
natural_image
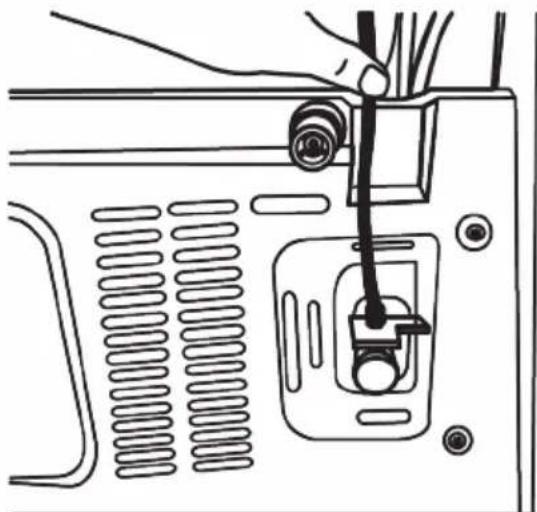
Line drawing of a hand holding a pen next to a device with a square button (no text or symbols)- Secure the pump hose by placing it into the carboy.
natural_image
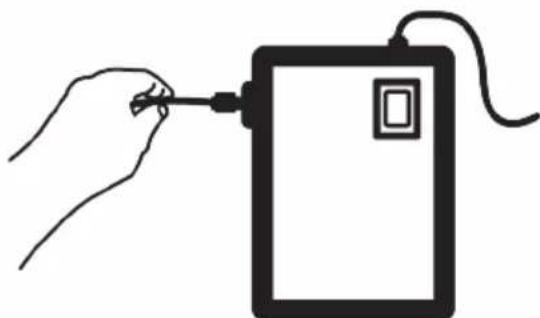
Simple line drawing of a gas cylinder connected to a piping bag and tubing, with an arrow indicating direction (no text or symbols)- After completing the connection, plug the pump into the socket and start the pump.
After starting the pump, wait 2-3 minutes for it to reach the desired efficiency.
Refer to the instruction manual of the pump while making the water connection.

If carboy will be used, there is no need to use a water filter.
Water filter
(This feature is optional)
Depending on the model, your product may have an external or internal filter. To install the water filter, follow the instructions below.
Mounting the external filter on the wall
(This feature is optional)
WARNING Do not install the filter on the product.
Depending on the model of your product, check whether the following parts are included with the product:
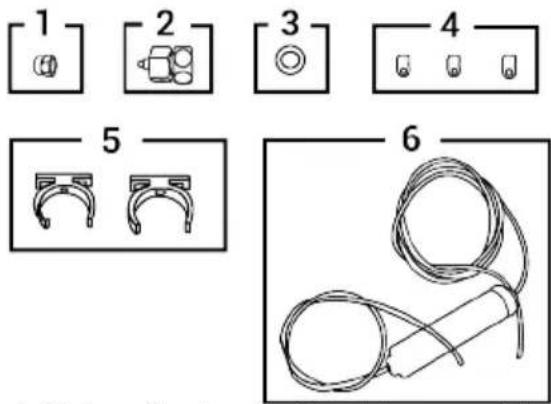
- Union (1 piece): Used for attaching the water hose to the back of the product.
- Faucet adapter (1 piece): Used for cold water mains line connection.
- Porous filter (1 piece)
- Hose clip (3 pieces): Used for fixing the water hose to the wall.
- Filter connection apparatus (2 pieces): Used for mounting the filter on the wall.
- Water filter (1 piece): It is used to connect the mains water to the product. If there is a carboy connection; there is no need to use a water filter.
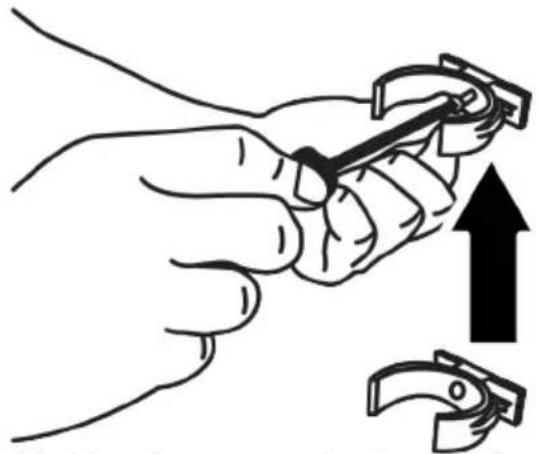
- Connect the faucet adapter to the mains line valve.
- Determine the place where the external filter will be fixed. Mount the filter connection apparatus (5) on the wall.
- Attach the filter perpendicularly to the filter bracket as indicated on the label. (6).

natural_image
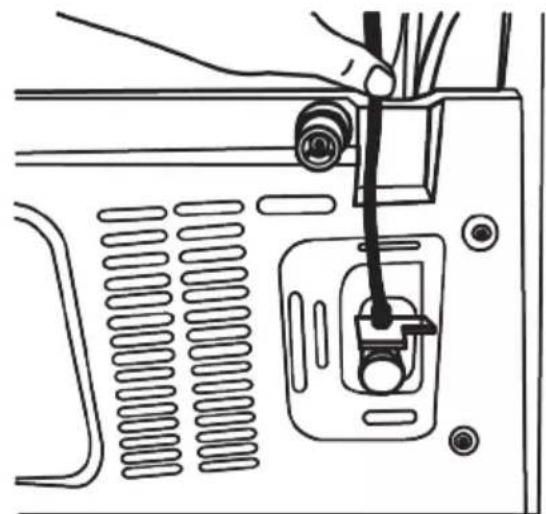
Line drawing of a mechanical component with no visible text or symbols- Connect the water hose coming out of the top of the filter to the water connection adapter of the product.
natural_image
Illustration of a hand holding a tool with an upward arrow, no text or symbols present- After the connection is completed, the image should be as shown below.
natural_image
Illustration showing a hand holding a tool with an upward arrow and a box, no text or symbols presentSince the internal filter that comes in the product does not come installed, the necessary procedures for its preparation are as follows:
natural_image
Line drawing of a computer monitor with a hand operating the cable (no text or symbols)Water line
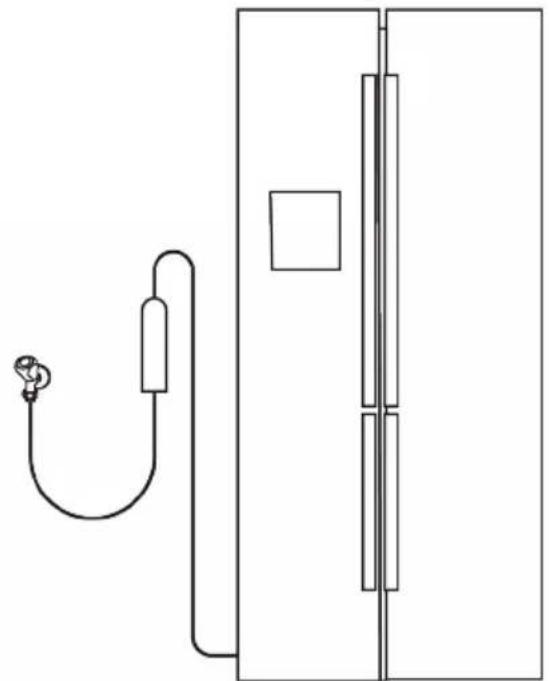
natural_image
Simple line drawing of a door with a hanging pipe and adjacent vertical panel (no text or symbols)Carboy line:
natural_image
Simple line drawing of a water pump connected to a vertical panel, with no text or symbols present.
Do not use the first 10 glasses of water after connecting the filter.
- For filter installation, the "Ice Off" indicator must be active. Switching between ON and OFF indicators on the display is done by pressing the "Ice" button.
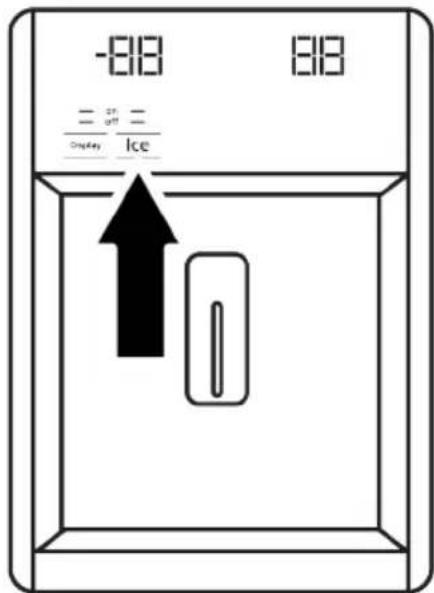
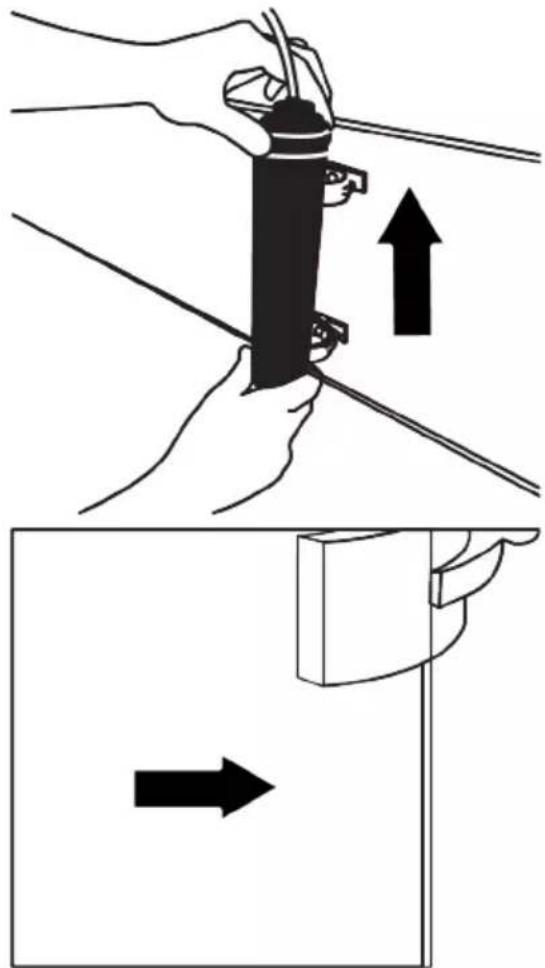
- Remove the crisper compartment to access the water filter.
- Remove the water filter by-pass cover by pulling it towards you.

It is normal for a few drops of water to come out after the cover is removed.
- Insert the water filter cover into the mechanism and push it forward to lock it in place.
10 Maintenance and Cleaning

WARNING:
Read the "Safety Instructions" section first.

WARNING:
Unplug the refrigerator before cleaning it.
natural_image
Line drawing of hands operating a device with a coiled spring and cable (no text or symbols)- Exit the "Ice Off" mode by pressing the "Ice" button on the display again.
natural_image
Line drawing of a hand inserting a cable into a device component (no text or symbols)
The water filter removes some foreign particles from the water. It does not purify the water from microorganisms.
- Do not use sharp or abrasive tools to clean the product. Do not use materials such as household cleaning agents, soap, detergents, gas, gasoline, thinner, alcohol, wax, etc.
- The dust shall be removed from the ventilation grill on the rear of the product at least once a year (without opening the cover). Clean the product with a dry cloth.
For products with Water Dispenser / Ice Maker
- If the water in the water tank has waited for 2-3 weeks, it shall be replaced.
- The water tank and the components of the water dispenser shall not be washed in dishwashers.
- Melt a teaspoonful of carbonate in the water. Moisten a piece of cloth in the water and wring out. Wipe the device with this cloth and dry off thoroughly.
• Take care to keep water away from the lamp's cover and other electrical parts. - Clean the door with a damp cloth. Remove door and body racks, as well as all contents within the refrigerator. Remove the door racks by lifting them upwards. Clean and dry the racks, then attach back in place by sliding from above.
- Do not use chlorinated water or cleaning products on the exterior surface and chromecoated parts of the product. Chlorine will cause rust on such metallic surfaces.
- Do not use sharp and abrasive tools, soap, house cleaning materials, detergents, gas, gasoline, varnish and similar substances to prevent deformation of the plastic part and removal of prints on the part. Use warm water and a soft cloth for cleaning, and then dry it.
On the products without a No-Frost feature;
- Water droplets and icing up to a thickness of a finger may occur on the rear wall of the freezer compartment. Do not clean, and never apply oils or similar materials.
- Use a mildly dampened micro-fibre cloth to clean the external surface of the product. Sponges and other types of cleaning clothes may cause scratches.
- To clean all removable components during the cleaning of the interior surface of the product, wash these components with a mild solution consisting of soap, water and carbonate. Wash and dry thor-
oughly. Prevent contact of water with illumination components and the control panel.
• Take care to keep water away from the lamp's cover and other electrical parts.
- Clean the door with a damp cloth. Remove all contents to remove the door and body racks. Remove the door racks by lifting them upwards. Clean and dry the shelves, then attach back in place by sliding from above.
- Do not use chlorinated water or cleaning products on the exterior surface and chromecoated parts of the product. Chlorine will cause rust on such metallic surfaces.
- Do not use sharp and abrasive tools, soap, house cleaning materials, detergents, gas, gasoline, varnish and similar substances to prevent deformation of the plastic part and removal of prints on the part. Use warm water and a soft cloth for cleaning, and then dry it.
- On the products without a No-Frost feature, water droplets and icing up to a thickness of a finger may occur on the rear wall of the freezer compartment. Do not clean, and never apply oils or similar materials.
- Use a mildly dampened micro-fibre cloth to clean the external surface of the product. Sponges and other types of cleaning clothes may cause scratches.
- To clean all removable components during the cleaning of the interior surface of the product, wash these components with a mild solution consisting of soap, water and carbonate. Wash and dry thoroughly. Prevent contact of water with illumination components and the control panel.

CAUTION:
Do not use vinegar, rubbing alcohol or other alcohol based cleaning agents on any interior surface.
Stainless Steel External Surfaces
Use a non-abrasive stainless steel cleaning agent and apply it with a soft lint-free cloth. To polish, gently wipe the surface with a micro-fibre cloth dampened with water and use dry polishing chamois. Always follow the veins of the stainless steel.
Preventing Odours
The product is manufactured free of any odorous materials. However, keeping the food in inappropriate sections and improper cleaning of internal surfaces may lead to odours.
11 Troubleshooting
Check this list before contacting the service. Doing so will save you time and money. This list includes frequent complaints that are not related to faulty workmanship or materials. Certain features mentioned herein may not apply to your product.
The refrigerator is not working.
- The power plug is not fully settled. >>> Plug it in to settle completely into the socket.
- The fuse connected to the socket powering the product or the main fuse is blown. >>> Check the fuse.
Condensation on the side wall of the cooler compartment (MULTI ZONE, COOL CONTROL and FLEXI ZONE).
- The door is opened too frequently. >>> Take care not to open the product's door too frequently.
- The environment is too humid. >>> Do not install the product in humid environments.
- Foods containing liquids are kept in unsealed holders. >>> Keep the foods containing liquids in sealed holders.
- The product's door is left open. >>> Do not keep the product's door open for long periods.
-
The thermostat is set to a very cool temperature. >>> Set the thermostat to an appropriate temperature.
-
To avoid this, clean the inside with carbonated water every 15 days.
- Keep the foods in sealed holders, as micro-organisms arising from foods kept in unsealed containers will cause bad odour.
- Do not keep expired and spoilt foods in the refrigerator.
Protecting Plastic Surfaces
Oil spilled on plastic surfaces may damage the surface and must be cleaned immediately with warm water.
Compressor is not working.
- In case of sudden power failure or pulling the power plug off and putting back on, the gas pressure in the product's cooling system is not balanced, which triggers the compressor thermic safeguard. The product will restart after approximately 6 minutes. If the product does not restart after this period, contact the service.
- Defrosting is active. >>> This is normal for a fully-automatic defrosting product. The defrosting is carried out periodically.
- The product is not plugged in. >>> Make sure the power cord is plugged in.
- The temperature setting is incorrect. >>> Select the appropriate temperature setting.
- The power is out. >>> The product will continue to operate normally once the power is restored.
The refrigerator's operating noise is increasing while in use.
- The product's operating performance may vary depending on the ambient temperature variations. This is normal and not a malfunction.
The refrigerator runs too often or for too long.
- The new product may be larger than the previous one. Larger products will run for longer periods.
- The room temperature may be high. >>> The product will normally run for long periods in higher room temperature.
- The product may have been recently plugged in or a new food item is placed inside. >>> The product will take longer to reach the set temperature when recently plugged in or a new food item is placed inside. This is normal.
- Large quantities of hot food may have been recently placed into the product. >>> Do not place hot food into the product.
- The doors were opened frequently or kept open for long periods. >>> The warm air moving inside will cause the product to run longer. Do not open the doors too frequently.
- The freezer or cooler door may be ajar.
Check that the doors are fully closed.
- The product may be set to a temperature that is too low. >>> Set the temperature to a higher degree and wait for the product to reach the adjusted temperature.
- The cooler or freezer door washer may be dirty, worn out, broken or not properly settled. >>> Clean or replace the gasket. Damaged / torn door washer will cause the product to run for longer periods to preserve the current temperature.
The freezer temperature is very low, but the cooler temperature is adequate.
- The freezer compartment temperature is set to a very low degree. >>> Set the freezer compartment temperature to a higher degree and check again.
The cooler temperature is very low, but the freezer temperature is adequate.
- The cooler compartment temperature is set to a very low degree. >>> Set the cooler compartment temperature to a higher degree and check again.
The food items kept in cooler compartment drawers are frozen.
- The cooler compartment temperature is set to a very low degree. >>> Set the cooler compartment temperature to a higher degree and check again.
The temperature in the cooler or the freezer is too high.
- The cooler compartment temperature is set to a very high degree. >>> Temperature setting of the cooler compartment has an effect on the temperature in the freezer compartment. Wait until the temperature of relevant parts reach the sufficient level by changing the temperature of cooler or freezer compartments.
- The doors were opened frequently or kept open for long periods. >>> Do not open the doors too frequently.
- The door may be ajar. >>> Fully close the door.
- The product may have been recently plugged in or a new food item is placed inside. >>> This is normal. The product will take longer to reach the set temperature when recently plugged in or a new food item is placed inside.
- Large quantities of hot food may have been recently placed into the product. >>> Do not place hot food into the product.
Shaking or noise.
- The surface is not flat or durable >>> If the product is shaking when moved slowly, adjust the stands to balance the product. Also make sure the ground is sufficiently durable to bear the product.
- Any items placed on the product may cause noise. >>> Remove any items placed on the product.
- The product is making noise of liquid flowing, spraying etc.
- The product's operating principles involve liquid and gas flows. >>> This is normal and not a malfunction.
There is sound of wind blowing coming from the product.
- The product uses a fan for the cooling process. This is normal and not a malfunction.
There is condensation on the product's internal walls.
- Hot or humid weather will increase icing and condensation. This is normal and not a malfunction.
- The doors were opened frequently or kept open for long periods. >>> Do not open the doors too frequently; if open, close the door.
- The door may be ajar. >>> Fully close the door.
There is condensation on the product's exterior or between the doors.
- The ambient weather may be humid, this is quite normal in humid weather. >>> The condensation will dissipate when the humidity is reduced.
The interior smells bad.
- The product is not cleaned regularly. >>> Clean the interior regularly using sponge, warm water and carbonated water.
- Certain holders and packaging materials may cause odour. >>> Use holders and packaging materials without free of odour.
- The foods were placed in unsealed holders. >>> Keep the foods in sealed holders. Microorganisms may spread out of unsealed food items and cause bad odour.
- Remove any expired or spoilt foods from the product.
DISCLAIMER / WARNING
Some (simple) failures can be adequately handled by the end-user without any safety issue or unsafe use arising, provided that they are carried out within the limits and in accordance with the following instructions (see the "Self-Repair" section).
The door is not closing.
- Food packages may be blocking the door. >>> Relocate any items blocking the doors.
- The product is not standing in full upright position on the ground. >>> Adjust the stands to balance the product.
- The surface is not flat or durable >>> Make sure the surface is flat and sufficiently durable to bear the product.
The crisper is jammed.
- The food items may be in contact with the upper section of the drawer. >>> Reorganize the food items in the drawer.
Temperature on the product surface.
- High temperature may be observed between two doors, on the side panels and on the rear grill area while your product is operated. This is normal and it does not require servicing.
Fan continues to operate when the door is opened.
- Fan may continue to operate when the freezer door is open.

WARNING: If the problem persists after following the instructions in this section, contact your vendor or an Authorized Service. Do not try to repair the product. This is normal.
Packaging sorting information
Please scan the QR code which places on the outer packaging of the product to find all the information relating to the packaging and how to manage the packaging waste.
Therefore, unless otherwise authorized in the "Self-Repair" section below, repairs shall be addressed to registered professional repairers in order to avoid safety issues. A registered Professional repairer is a professional repairer that has been granted access to the instructions and spare parts list of this product by the manufacturer ac-
cording to the methods described in legislative acts pursuant to Directive 2009/125/EC.
However, only the service agent (i.e. authorized professional repairers) that you can reach through the phone number given in the user manual/warranty card or through your authorized dealer may provide service under the guarantee terms. Therefore, please be advised that repairs by professional repairers (who are not authorized by) Grundig shall void the guarantee.
Self-Repair
Self-repair can be done by the end-user with regard to the following spare parts:door handles,door hinges, trays, baskets and door gaskets (an updated list is also available support.grundig.com as of 1st March 2021).
Moreover, to ensure product safety and to prevent risk of serious injury, the mentioned self-repair shall be done following the instructions in the user manual for selfrepair or which are available in support.grundig.com. For your safety, unplug the product before attempting any self-repair.
Repair and repair attempts by end-users for parts not included in such list and/or not following the instructions in the user manuals for self-repair or which are available in support.grundig.com, might give raise to safety issues not attributable to Grundig, and will void the warranty of the product. Therefore, it is highly recommended that end-users refrain from the attempt to carry out repairs falling outside the mentioned list of spare parts, contacting in such cases authorized professional repairers or registered professional repairers. On the contrary, such attempts by end-users may cause safety issues and damage the product and subsequently cause fire, flood, electrocution and serious personal injury to occur.
By way of example, but not limited to, the following repairs must be addressed to authorized professional repairers or re-
gistered professional repairers: compressor, cooling circuit, main board, inverter board, display board, etc.
The manufacturer/seller cannot be held liable in any case where end-users do not comply with the above.
The spare part availability of the refrigerator that you purchased is 10 years. During this period, original spare parts will be available to operate the refrigerator properly. The minimum duration of guarantee of the refrigerator that you purchased is 24 months.
This product is equipped with a lighting source of the "G" energy class.
The lighting source in this product shall only be replaced by Professional repairer.
See also
2 DISCLAIMER / WARNING [ } 35]
Cher client, chère cliente,
https://eprel.ec.europa.eu/
natural_image
Symbol of a trash bin with crossed lines indicating no waste or restriction, and a solid black rectangle below (no text or labels)natural_image
Line drawing of a hand inserting a plug into a device panel (no text or symbols)
natural_image
Line drawing of a hand inserting a screwdriver into a device panel (no text or symbols)natural_image
Simple line drawing of a cable or cable connector with a rectangular device attached (no text or symbols)
natural_image
Line drawing of a hand using a pipette to test liquid in a container (no text or symbols)Machine à glaçons
natural_image
Line drawing of an open refrigerator with shelves and a drawer, showing internal compartments and arrows indicating parts (no text or symbols)9.4 Technologies Crisper
Voyant lumineux bleu
natural_image
Diagram of a refrigerator interior with ventilation grilles and a water heater, showing no text or symbols.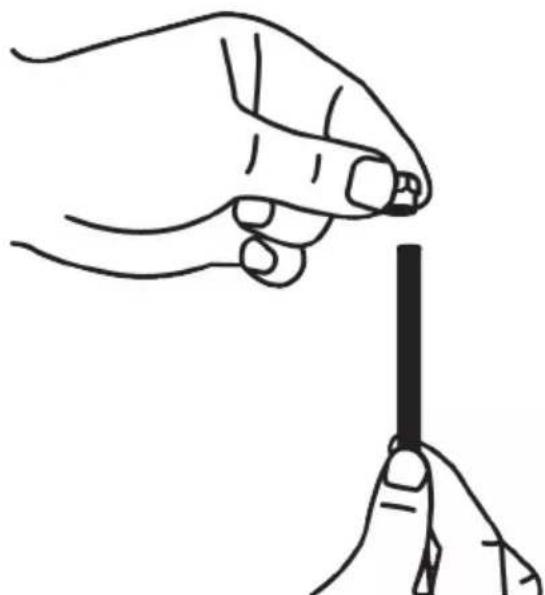
natural_image
Line drawing of a hand holding a pen, no text or symbols presentnatural_image
Line drawing of a mechanical assembly with a hand operating a component, showing internal components and wiring (no text or symbols)natural_image
Diagram of a hand inserting a component into a device with an arrow indicating the process (no text or symbols present)natural_image
Technical line drawing of four mechanical components (tens, bolt, nut, and housing) without any text or symbolsnatural_image
Line drawing of a mechanical component with no visible text or symbolsnatural_image
Line drawing of a hand holding a pen, no text or symbols presentnatural_image
Line drawing of a mechanical component with no visible text or symbolsnatural_image
Line drawing of hands holding a curved pipe or tube, no text or symbols present
AVERTISSEMENT
natural_image
Line drawing of a mechanical assembly with no visible text or symbolsnatural_image
Line drawing of a hand holding a pen next to a device with a square button (no text or symbols)natural_image
Simple line drawing of a gas cylinder connected to a tube with a piping bag, no text or symbols present.natural_image
Line drawing of a mechanical component with no visible text or symbolsnatural_image
Illustration of a hand holding a tool with an upward arrow, no text or symbols presentnatural_image
Illustration showing a hand holding a tool with an upward arrow and a close-up of the tool's handle (no text or symbols)natural_image
Line drawing of a computer monitor with a cable inserted, showing internal components and wiring (no text or symbols)Conduite d'eau

natural_image
Simple line drawing of a door with a hanging pipe and adjacent vertical panel (no text or symbols)natural_image
Simple line drawing of a water pump connected to a vertical panel, with no text or symbols present.
natural_image
Line drawing of hands operating a device with a control panel and cable (no text or symbols)natural_image
Line drawing of a hand inserting a cable into a device component (no text or symbols)
https://eprel.ec.europa.eu/
natural_image
Simple line drawing of a trash bin with crossed lines indicating no waste or restriction (no text or symbols)natural_image
Line drawing of a hand inserting a plug into a device panel (no text or symbols)natural_image
Line drawing of a hand inserting a screwdriver into a device panel (no text or symbols)Einstellen der Füße
natural_image
Pure mechanical diagram showing two configurations of a knob or knob with directional arrows indicating rotation (no text or symbols)natural_image
Simple line drawing of a cable or cable connector with a rectangular device on a vertical pole (no text or symbols)
natural_image
Line drawing of a hand using a pipette to test liquid in a container (no text or symbols)Eisbereiter
natural_image
Diagram of a refrigerator interior showing internal compartments and storage bins (no text or labels)natural_image
Diagram of a device with a cable inserted into a housing, showing internal components and a directional arrow (no text or symbols)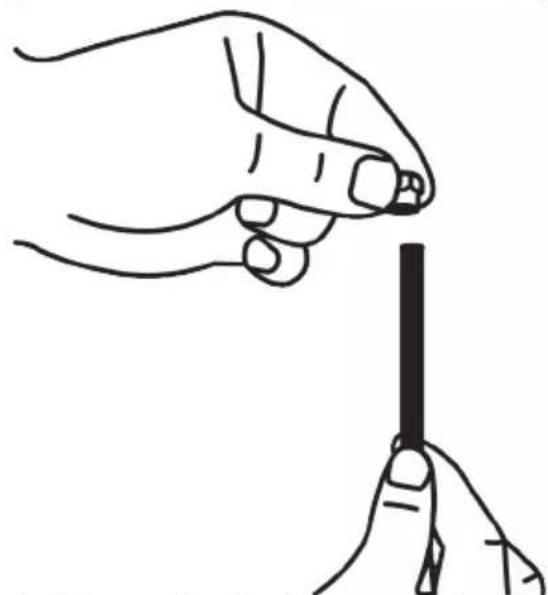
natural_image
Line drawing of a hand holding a pen, no text or symbols presentnatural_image
Technical line drawing of a mechanical assembly with no visible text or symbolsnatural_image
Hand inserting a component into a device with an arrow indicating the process (no text or symbols present)natural_image
Technical line drawings of four mechanical components (no text or symbols)natural_image
Line drawing of a mechanical component with no visible text or symbolsnatural_image
Line drawing of a hand holding a pen, no text or symbols presentnatural_image
Line drawing of a mechanical component with no visible text or symbolsnatural_image
Line drawing of hands holding a curved pipe or tube with a connector (no text or symbols)
WARNUNG
natural_image
Line drawing of a mechanical assembly with no visible text or symbolsnatural_image
Simple line drawing of a hand holding a small electronic device with a cable, no text or symbols presentnatural_image
Simple line drawing of a gas cylinder connected to a piping bag, with an arrow indicating downward motion (no text or symbols)natural_image
Simple line drawing of two coiled wires with a coiled cable, no text or symbols presentnatural_image
Line drawing of a mechanical or electrical component with no visible text or symbolsnatural_image
Illustration of a hand holding a tool with an upward arrow, no text or symbols presentnatural_image
Illustration of hands holding a tool with an upward arrow, no text or symbols present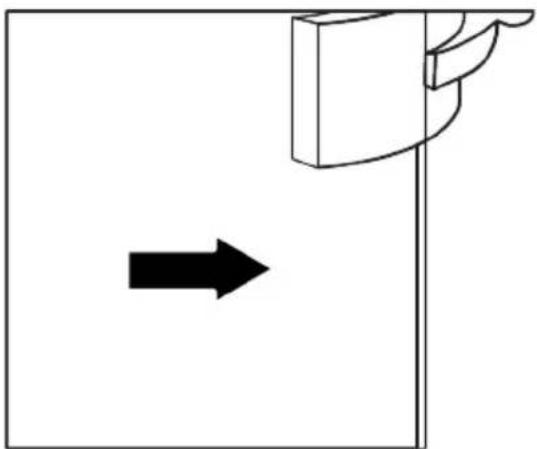
natural_image
Simple line drawing of a door handle pressing a wall with an arrow indicating direction (no text or symbols)natural_image
Technical line drawing of a mechanical assembly with no visible text or symbolsWasserleitung
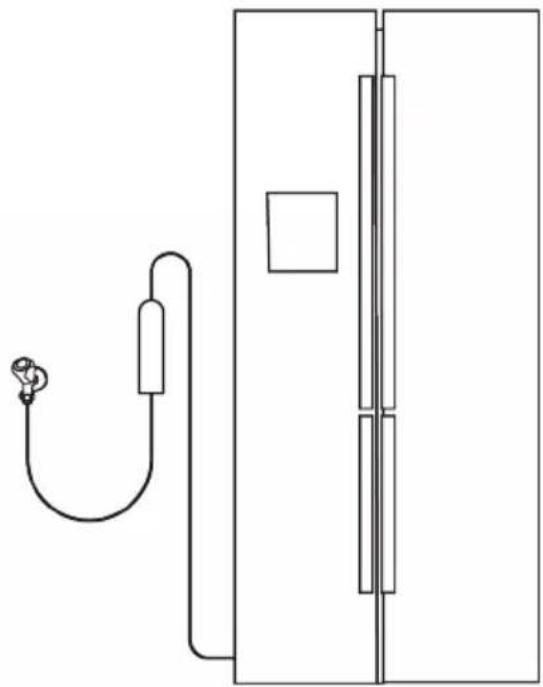
natural_image
Simple line drawing of a door with a hose and attached tubing (no text or symbols)Behälterleitung:

natural_image
Simple line drawing of a water pump connected to a vertical panel, with no text or symbols present.
natural_image
Line drawing of hands operating a device with a control panel and cable (no text or symbols)natural_image
Line drawing of a hand inserting a component into a device (no text or symbols)
- Please read this manual first!
- Dear Customer
- Please read this manual before using the product.
- The following symbols are used in the user manual:
- Safety Instructions
- Intention of Use
- Safety of Children, Vulnerable Persons and Pets
- Electrical Safety
- Handling Safety
- Installation Safety
- Operational Safety
- For Products with Water Dispenser / Icematic
- Food Storage Safety
- Maintenance and Cleaning Safety
- Disposal of the Old Product
- Environmental Instructions
- Compliance with the WEEE Directive and Disposing of the Waste Product
- Compliance with RoHS Directive
- Installation
- Right place for installation
- Attaching the plastic wedges
- Adjusting the Legs
- For adjusting the doors vertically,
- For adjusting the doors horizontally,
- Electrical Connection
- Preparation
- What To Do For Energy Saving
- First Use
- Operating the Product
- Control Panel of the Product
- Climate Class and Definitions
- Unplugging the Product
- Quick Freezing Key
- Icematic On/Off Button
- Error Status Indicator
- Cooler Compartment Off (Vacation) Function Key
- Quick Cooling Key
- Cooler Compartment Temperature Setting Key c
- Deodoriser Module Key 3"
- Filter Replacement Warning Key O_3
- Water, Ice Cube, Crashed Ice Selection
- Key + +
- Wireless Key
- Freezer Compartment Temperature Setting Key ☐
- Using The Product
- Storing food in the freezer compartment
- Storing the foods, which are sold frozen
- Quick freezing
- Freezer details
- Placing the food
- Storing food in the cooler compartment
- Replacing the Illumination Lamp
- Product Features
- The ice storage area
- Ice/Water Taking
- Door Open Alert
- WARNING
- Drip tray
- Ice Machine
- To remove the ice storage bin
- To reinstall the ice storage bin
- In case you cannot get all the ice cubes produced
- When using the ice machine for the first time or after a long period
- Egg holder
- Never place the egg holder on the freezer compartment
- Crisper
- Crisper Technologies
- Blue Light
- VitaminZone
- Dairy Products Cold Storage Area
- Cold Storage Drawer
- Humidity Controlled Crisper
- Full fresh
- Water connection
- Connecting the water hose to the product
- Connecting to mains water
- For products to be used in carboys;
- Water filter
- Mounting the external filter on the wall
- Maintenance and Cleaning
- WARNING:
- For products with Water Dispenser / Ice Maker
- On the products without a No-Frost feature;
- CAUTION:
- Stainless Steel External Surfaces
- Preventing Odours
- Troubleshooting
- The refrigerator is not working.
- Condensation on the side wall of the cooler compartment (MULTI ZONE, COOL CONTROL and FLEXI ZONE).
- Protecting Plastic Surfaces
- Compressor is not working.
- The refrigerator's operating noise is increasing while in use.
- The refrigerator runs too often or for too long.
- The freezer temperature is very low, but the cooler temperature is adequate.
- The cooler temperature is very low, but the freezer temperature is adequate.
- The food items kept in cooler compartment drawers are frozen.
- The temperature in the cooler or the freezer is too high.
- Shaking or noise.
- There is sound of wind blowing coming from the product.
- There is condensation on the product's internal walls.
- There is condensation on the product's exterior or between the doors.
- The interior smells bad.
- DISCLAIMER / WARNING
- The door is not closing.
- The crisper is jammed.
- Temperature on the product surface.
- Fan continues to operate when the door is opened.
- Packaging sorting information
- Self-Repair
- Cher client, chère cliente,
- Machine à glaçons
- Technologies Crisper
- Voyant lumineux bleu
- AVERTISSEMENT
- Einstellen der Füße
- Eisbereiter
- WARNUNG
- Behälterleitung:
Brand : GRUNDIG
Model : GSBS 23340 FX
Category : Refrigerator