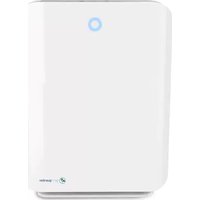
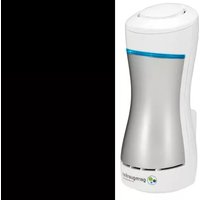
AC5900 - Air purifier Guardian - Free user manual and instructions
Find the device manual for free AC5900 Guardian in PDF.


| Brand | Guardian |
| Model | AC5900 |
| Product Type | 4-in-1 Air Purifier |
| Dimensions (W x D x H) | 24.51 x 40.51 x 53.00 cm |
| Weight | 5.9 kg |
| Power Supply | 120 V~, 60 Hz |
| Filtration Technology | Pre-filter + Activated carbon, True HEPA filter (99.97% of particles ≥0.3µm), UV-C with TiO2 photocatalysis |
| Fan Speeds | 3 speeds (low, medium, high) |
| Timer | 1, 2, 4 or 8 hours |
| Integrated Night Light | Yes, adjustable light ring |
| Filter Replacement Indicator | Yes, red LED |
| UV Lamp Replacement Indicator | Yes, red LED |
| Coverage Area (approximate) | Not specified in the manual |
| CADR | Check website for values |
| Power Consumption | Not specified |
| Noise Level | Not specified |
| Pre-filter Maintenance | Clean monthly with vacuum cleaner |
| HEPA/Carbon Filters Replacement | Every 6 months approximately |
| UV-C Lamp Replacement | Every 10 to 12 months |
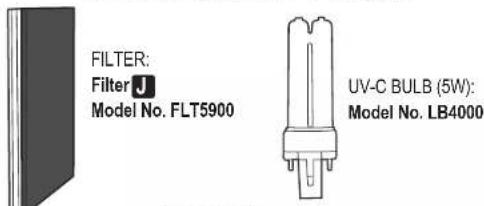
| Replacement Parts | Filter FLT5900, UV Lamp LB4000 |
| Safety | Motor protection with auto restart |
| Warranty | 3-year limited |
Frequently Asked Questions - AC5900 Guardian
User questions about AC5900 Guardian
0 question about this device. Answer the ones you know or ask your own.
Ask a new question about this device
Download the instructions for your Air purifier in PDF format for free! Find your manual AC5900 - Guardian and take your electronic device back in hand. On this page are published all the documents necessary for the use of your device. AC5900 by Guardian.
USER MANUAL AC5900 Guardian
TROUBLESHOOTING GUIDE
| PROBLEM | SOLUTION |
| Unit shuts off unexpectedly or does not operate. | Check that the unit is plugged into a working electrical outlet.Check that the filters, UV-C shield and front panel are installed correctly.Check if the motor protector is triggered. Unplug/replug into unit. Check that the front panel is latched firmly in place.Call Customer Service. |
| No air circulating from unit. | Unplug unit. Check filters. Clean Pre-filter if necessary.Replace Charcoal and HEPA filters if necessary. |
| Increase in noise level. | Make sure the filters are clean. Replace if necessary. |
| Odors and smoke are not removed. | Clean or replace the filters if they appear to be heavily soiled. |
| Discharged air has an aroma or odor. | Check to see if the filters are heavily soiled. Replace the filters. |
What is CADR?
CADR stands for "Clean Air Delivery Rate," which indicates the volume of filtered air delivered by an air purifier. CADR ratings show the effectiveness of how efficient the air purifier is at capturing fine particles from things like tobacco smoke and plant pollens from the room.
Clean Air Delivery Rate
From air cleaner to air cleaner, compare the CADR numbers. First look at suggested room size. Then refer to the Clean Air Delivery Rate (CADR) numbers. The higher the number, the faster the unit filters the air.
Refer to website for individual model CADR numbers.
LIMITED WARRANTY
To the consumer, Guardian Technologies LLC warrants this product to be free of defects in materials or workmanship commending upon the date of the original purchase. In order to be eligible for this Limited Warranty, an original sales receipt or comparable substitute proof of purchase bearing the date of original purchase is required. Refer to the original product carton or specific product/model page on the Guardian Technologies website for warranty length for your particular model. This warranty applies only to the original purchaser of this product from the original date of purchase. This warranty covers product purchased from authorized distributors only.
This warranty applies to repair or replacement of product found to be defective in materials or workmanship. This warranty does not apply to damage resulting from unusual wear, commercial, abusive, unreasonable use or supplemental damage. This warranty does not cover damage from unauthorized repairs or from any use not in accordance with the instruction manual. Defects that are the result of normal wear and tear will not be considered manufacturing defects under this warranty.
If this product should become defective within the warranty period, we will repair or replace any defective parts free of charge. All warranty repairs must be completed by Guardian Technologies LLC. This warranty gives you specific legal rights and you may also have other rights (other rights may vary from state to state in the U.S.A.)
To submit product under warranty the complete machine must be delivered pre-paid to GuardianTechnologies LLC. Please include complete information including: the problem, the model number of the product, the day of purchase, and a copy of the original sales receipt along with your name, address, and telephone (email optional). Address returns to the attention of: Customer Service, at the address below. Additional questions or comments can be made toll free to the number listed below.
USA and Canada
Guardian Technologies LLC
26251 Bluestone Blvd.
Euclid, Ohio 44132
1.866.603.5900
www.guardiantechnologies.com
Please go to www.guardiantechnologies.com to register your product. We consider the registration process important to ensuring superior service to our customers, however submitting the warranty registration is optional and does not affect your rights to utilize this warranty according to the conditions stated above.
Additional copies of the instruction manual can be obtained by accessing and printing directly from our website or calling customer service.

guardian
technologies™
USE & CARE INSTRUCTIONS
natural_image
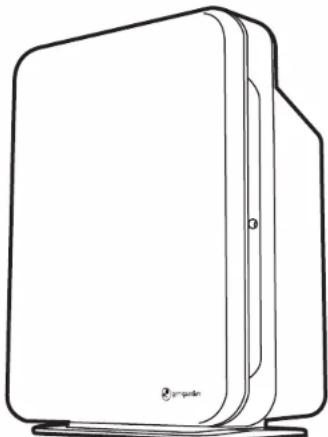
Line drawing of a rectangular electronic device with a side panel and base (no text or symbols)4-in-1
Allergen and Odor Reducing Air Cleaning System
Model No. AC5900
3-Year Limited Warranty
Customer Service
1.866.603.5900
www.guardiantechnologies.com
Date Purchased month ____ year ____
English E - 1 French F - 1 Spanish S - 1
Use GENUINE Guardian Technologies replacement parts only.
REV0920
READ AND SAVE THESE INSTRUCTIONS WARNINGS
Failure to comply with the warnings listed below may result in electric shock or serious injury.

This product should be used only in accordance with the specifications outlined in this manual. Usage other than what has been specified here may result in serious injury.
When using electrical appliances, basic precautions should always be followed to reduce the risk of fire, electric shock and injury to persons, including the following:
- Read all instructions before using appliance.
- IMPORTANT - This appliance has a polarized plug (one blade is wider than the other). To reduce the risk of electric shock, this plug is intended to fit in a polarized outlet only one way. If the plug does not fit fully in the outlet, reverse the plug. If it still does not fit, contact a qualified electrician. Do not attempt to defeat this safety feature.
- Extreme caution is necessary when any appliance is used by or near children or people with disabilities and whenever the appliance is left operating unattended.
• To avoid fire or shock hazard, plug the appliance directly into a 120V AC electrical outlet. - Keep the cord out of heavy traffic areas. To avoid fire hazard, NEVER put the cord under rugs, near heat registers, radiator, stoves or heaters.
- To protect against electrical hazards, DO NOT immerse in water or other liquids. Do not use near water.
- Extreme caution is necessary when any appliance is used by or near children or people with disabilities and whenever the appliance is left operating unattended.
- Always unplug the air purifier before moving it, opening the grill, changing filters, cleaning or whenever the air purifier is not in use. Be sure to pull by the plug and not the cord.
- NEVER drop or insert any object into any openings.
• DO NOT run cord under carpeting. - DO NOT cover cord with throw rugs, runners, or similar coverings.
- DO NOT route cord under furniture or appliances. Arrange cord away from traffic area and where it will not be tripped over.
- DO NOT operate any appliance with a damaged cord or plug, if motor fan fails to rotate, after the appliance malfunctions, or if it has been dropped or damaged in any manner. Call Customer Service for assistance.
- Use appliance only for intended household use as described in this manual. Any other use not recommended by the manufacturer may cause fire, electric shock or injury to persons.
• DO NOT use outdoors. - DO NOT place anything on top of unit.
-
NEVER block the air openings, grills/outlets or place on a soft surface such as a bed or sofa, as this could cause the unit to tip over, blocking the air intake or outtake opening.
-
DO NOT attempt to repair or adjust any electrical or mechanical functions on this unit. Doing so will void your warranty. The inside of the unit contains no user serviceable parts. All servicing should be performed by qualified personnel only.
- WARNING: To reduce the risk of fire or electric shock, do not use this fan with any solid-state speed control device.
- WARNING: Skin or eye damage may result from directly viewing the light produced by the lamp in this apparatus. Always disconnect power before replacing lamp or servicing. Replace Lamp With Lamp Model No. LB4000, Manufactured by Guardian Technologies.
• Always unplug the unit before before cleaning or servicing in any way. - CAUTION: Do NOT use gasoline, benzene, thinner, harsh cleaners, etc. on and/or in the unit while cleaning as they will damage the product. NEVER use alcohol or other solvents.
The 8 hour TWA Ozone for this product is 0.001 ppmv when tested in a 30 m3 chamber. The product complies with the maximum allowable concentration of ozone of 0.050 parts per million by volume (ppmv) in a 24-hour period. The Health Canada Guideline 2010 recommends that the maximum exposure limit, based on averaging time of 8 hours, is 0.020 ppmv or less when tested in a sealed, controlled room approximately 30 m3.

WARNING: Cancer and Reproductive Harm. For more information go to www.P65Warnings.ca.gov.

LAMP CONTAINS MERCURY

Manage in accordance with Spills, Disposal and Site Cleanup Requirements. In case of breakage, follow clean-up procedures provided by contacts below.
www.epa.gov/cflcleanup 1-866-284-4010

ENERGY STAR
This product earned the ENERGY STAR label by meeting strict energy efficiency guidelines set by the U.S. EPA. Room air cleaners have demonstrated the potential for improving air quality and providing health benefits. EPA does not endorse manufacturer claims regarding the degree to which a specific product will produce healthier indoor air. The energy efficiency of this ENERGY STAR certified model is measured based on a ratio between the model's CADR for Smoke and the electrical energy it consumes, or CADR/Watt.
PRODUCT SPECIFICATIONS AND PARTS
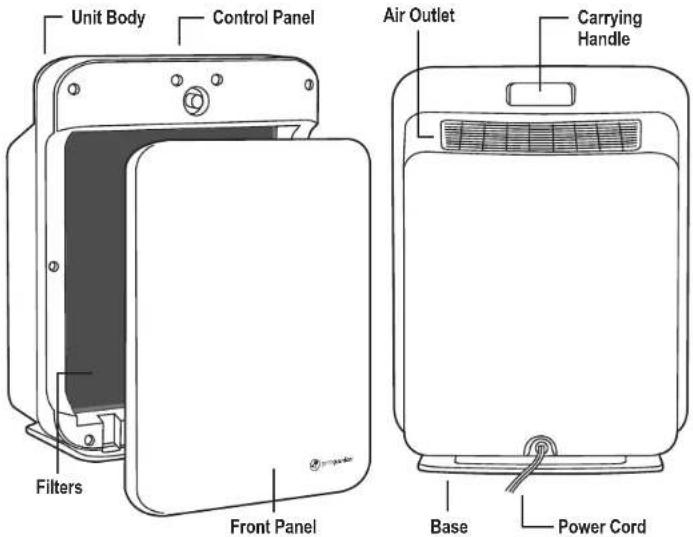
MODEL NUMBER: AC5900 DIMENSIONS: 9.65"L x 15.95"W x 20.87"H WEIGHT: 13 lbs
REPLACEMENT PARTS

Check out our
AutoShip & Save
Filter Replacement Program
www.guardiantechnologies.com
IMPORTANT: To maintain the performance of the air cleaner, use Guardian Technologies GENUINE Replacement Parts only.
To Purchase Contact Customer Service
AIR CLEANING SYSTEM
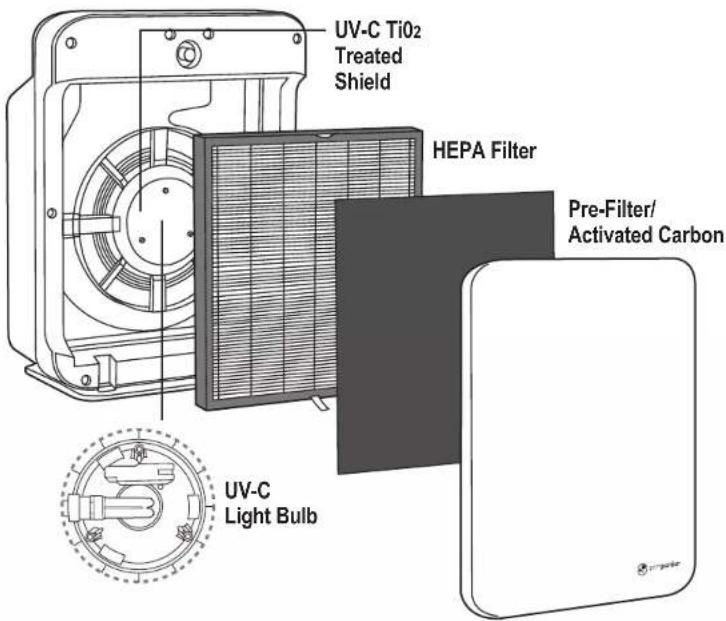
Improve your indoor air quality with your new Germguardian® Air Cleaning System. Multiple levels of cleaning include a combination True HEPA filter that captures allergens, and Charcoal filter to remove odors. UV-C Light Technology enhances germ-killing.
Pre-Filter/Activated Carbon
Helps optimize the unit performance and extends the life of the filter by capturing larger dust and allergen particles. Traps and controls household odors and harmful VOC's in the home.
True HEPA Filter
Captures 99.97% of dust and allergens down to .3 microns in size.
UV-C Light
UV-C Light Technology works with Titanium Dioxide (TiO2) to enhance the elimination of airborne germs. TiO2 is activated by the UV-C light to decompose remaining odor molecules caused by smoking, cooking and pets.
AIR CLEANING LAYERS
OPERATING INSTRUCTIONS
Note: Proper filter and front panel installation is necessary for unit to turn on.
- Select a firm, level and flat location for the air purifier.
- For proper air flow, locate the unit at least 1 foot from any wall or furniture.
• Make sure none of the grills are blocked.
-
Plug the power cord into a 120V AC outlet.
-
When moving the air purifier, always lift it by the carrying handle.
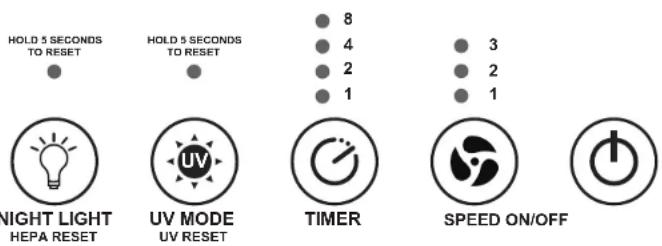
- Turn unit power ON. The control panel power lights will turn on.
Note: The corresponding control panel lights will turn on depending on features selected.
If you prefer to run the purifier for a specific number of hours,
you can select 1,2,4,8 hours by pressing the button.
- UV Mode: Turn UV light on/off.
UV Reset: The UV mode light will turn red when it's time to replace the UV bulb.
Replace the bulb according to instructions (E9). Press and hold the UV mode button for 5 seconds to reset the UV indicator light.
- Night Light: Turn night light ring on the front of the purifier on/off.
Hepa Reset: The night light indicator light will turn red when it's time to change the HEPA filter.
Replace the filter according to instructions (E8).
Press and hold the Night light button for 5 seconds to reset the HEPA filter light.
(CONTROL PANEL)
OPERATING INSTRUCTIONS
RESETTING THE AIR PURIFIER
The air purifier is equipped with a motor protection circuit. If activated, the overload warning indicator will initiate and shut off the unit power. An audible warning "ding" will sound for 60 seconds. To restart the unit, unplug the unit for 10 minutes, then plug back in and power on for normal operation.
Note: If the unit continues to shut down, there may still be an abnormal condition and the unit may need service. Call Customer Service.
CLEANING & MAINTENANCE
CLEANING
Always unplug the appliance before you clean it.
Never immerse the appliance in water or any other liquid.
Never use aggressive or flammable cleaning agents such as bleach or alcohol to clean any part of the appliance.
BODY OF THE APPLIANCE
Regularly clean the inside and outside of the body to prevent dust from collecting on the inside and outside.
- Wipe away dust with a soft dry cloth from the body of the appliance.
- Clean the air inlet and the air outlet with a soft dry cloth.
PRE-FILTER SCREEN
The pre-filter is designed to collect larger dust and debris and should be cleaned monthly or more frequently depending on use. Remove and clean regularly with the brush attachment of your vacuum cleaner. This will remove the lint and dirt and help maintain the life of the filters. (See filter replacement to locate and remove Pre-filter).
NOTE: Do NOT stick any foreign objects or your fingers inside of the unit.
CAUTION: Do NOT use gasoline, benzene, thinner, harsh cleaners, etc. on and/or in the unit while cleaning as they will damage the product.
NEVER use alcohol or other solvents.
FILTER REPLACEMENT
The "Replace Filter" indicator will turn red when it is time to replace both your HEPA and Carbon filters. Depending on usage and environmental conditions the filters will last approximately 6 months and should be replaced at the same time. The HEPA filter will turn from white to gray when it is dirty and needs replacing. It is important to maintain and change the filters to continue to optimize the performance of the air purifier.
IMPORTANT: DO NOT wash and re-use the filters. Please contact Customer Service to purchase a replacement filter.
REMOVE AND REPLACE FILTER
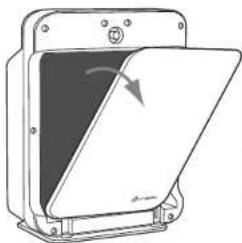
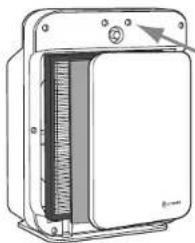
- Turn off and unplug the unit.
natural_image
Diagram of a mechanical device with an open lid and directional arrow indicating rotation (no text or symbols)- Gently pull the top of the front panel and lift from base.
natural_image
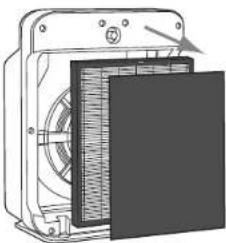
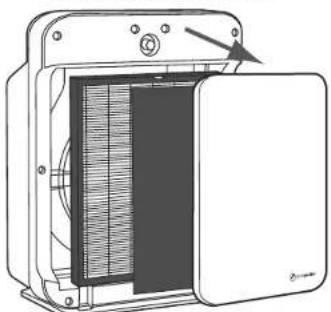
Diagram of a device with a fan and internal structure, no visible text or symbols- Remove the filters by pulling the top and bottom tabs.
natural_image
Diagram of a device with internal panel structure and mounting points (no text or symbols)-
Insert the new filters into the unit – consult the arrows on the filters for correct installation direction.
-
Return the front panel: First insert the front panel bottom hooks then close the front panel. Make sure the magnetic closure is secure.
Note: Proper filter and front panel installation is necessary for unit to turn on.
- Reset the filter indicator light by holding the Night Light/Hepa Reset button for 5 seconds.
INSTALLING & REMOVING UV-C BULB
UV Bulb Replacement Indicator: The UV light on the display will turn red when it is time to replace the UV bulb.
natural_image
Diagram of a device with a panel, lid, and heat sink (no text or symbols)- Pull and remove the front cover and filter.
natural_image
Technical line drawing of a mechanical fan or housing component with internal blades and mounting brackets (no text or symbols)-
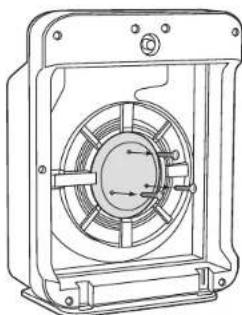
After removing the filter, use a Philips head screwdriver to remove 3 screws and detach the round UV-C Shield.
-
The UV-C Bulb is removed by carefully grasping the bulb with a clean cloth or tissue and pulling the bulb straight out of the unit.
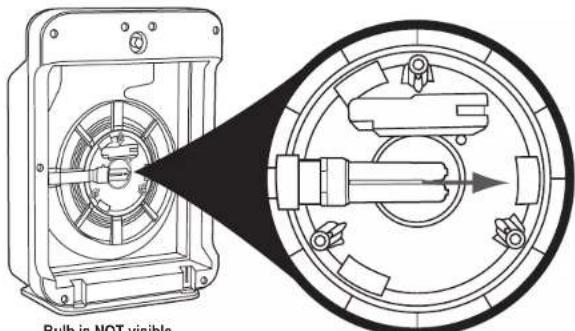
PULL UV-C BULB STRAIGHT OUT OF UNIT.
Bulb is NOT visible until the UV-C SHIELD has been removed.
- The UV-C Bulb is reinstalled by reversing the process in Step 3.
- Replace the UV-C shield making sure to line up the notch in the shield with the bracket. Re-attach with 3 screws.
- Reset the UV light by holding the "UV" button down for 5 seconds.

UV MODE
UV RESET
IMPORTANT: The UV-C Bulb should be replaced every 10 - 12 months depending on use. Please contact Customer Service to purchase a replacement bulb.
GUIDE DE DEPANNAGE
Guardian Technologies LLC
26251 Bluestone Blvd.
Euclid, Ohio 44132
1 866 603-5900
www.guardiantechnologies.com
natural_image
Line drawing of a rectangular electronic device with a side panel and base (no text or symbols)Regularly clean the inside and outside of the body to prevent dust from collecting on the inside and outside.
natural_image
Diagram of a door switch with an open lid and directional arrow indicating rotation (no text or symbols)natural_image
Diagram of a mechanical device with a fan and panel, showing internal components without any text or symbols.natural_image
Diagram of a device with internal structure and mounting bracket (no text or symbols)natural_image
Diagram of a device with a lid open, showing internal structure and a directional arrow (no text or symbols)natural_image
Technical line drawing of a mechanical fan or motor housing with internal blades and mounting brackets (no text or symbols)natural_image
Line drawing of a rectangular electronic device with a side panel and base (no text or symbols)natural_image
Diagram of a device with an open lid and directional arrow indicating rotation (no text or symbols)natural_image
Technical illustration of a mechanical device with a central panel and fan (no text or symbols visible)natural_image
Technical diagram of an electronic device with a central panel and mounting bracket (no text or symbols visible)natural_image
Diagram of a device with a lid open, showing internal structure and a directional arrow (no text or symbols)natural_image
Technical line drawing of a mechanical fan or housing component with internal blades and mounting holes (no text or symbols)
- What is CADR?
- Clean Air Delivery Rate
- LIMITED WARRANTY
- USA and Canada
- Allergen and Odor Reducing Air Cleaning System
- READ AND SAVE THESE INSTRUCTIONS WARNINGS
- LAMP CONTAINS MERCURY
- AIR CLEANING SYSTEM
- Pre-Filter/Activated Carbon
- True HEPA Filter
- UV-C Light
- OPERATING INSTRUCTIONS
- RESETTING THE AIR PURIFIER
- CLEANING & MAINTENANCE
- CLEANING
- BODY OF THE APPLIANCE
- PRE-FILTER SCREEN
- FILTER REPLACEMENT
- REMOVE AND REPLACE FILTER
- INSTALLING & REMOVING UV-C BULB
Brand : Guardian
Model : AC5900
Category : Air purifier