
Silk-épil 7881 WD - Epilator BRAUN - Free user manual and instructions
Find the device manual for free Silk-épil 7881 WD BRAUN in PDF.

User questions about Silk-épil 7881 WD BRAUN
0 question about this device. Answer the ones you know or ask your own.
Ask a new question about this device
Download the instructions for your Epilator in PDF format for free! Find your manual Silk-épil 7881 WD - BRAUN and take your electronic device back in hand. On this page are published all the documents necessary for the use of your device. Silk-épil 7881 WD by BRAUN.
USER MANUAL Silk-épil 7881 WD BRAUN
natural_image
Illustration of a Bruan Silk-épil 7 digital brush (no text or symbols on the device body)Type 5377
www.braun.com
Legs & Body
7881 WD
Braun Infolines
Deutsch 6
English 12
Français 18
Italiano 24
Nederlands 30
Dansk 36
Norsk 42
Svenska 48
Suomi 54
DE / AT 00 800 27 28 64 63 00 800 BRAUNINFOLINE
CH 08 44 - 88 40 10
UK 0800 783 7010
IE 1 800 509 448
FR 0 800 944 802
BE 0 800 14 592
IT 800 440 017
NL 0 800-445 53 88
DK 70 15 00 13
NO 22 63 00 93
SE 020 - 21 33 21
FI 020 377 877
RSA 0860 112 188
(Sharecall charged at local rates)
Braun GmbH
natural_image
Diagram of a mechanical press or valve mechanism with an upward arrow indicating motion (no text or symbols present)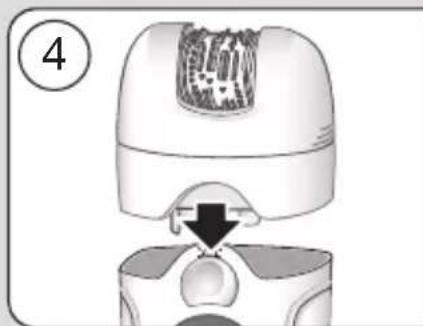
natural_image
Diagram of a medical device with a cross-sectional view showing internal tissue structure (no text or symbols)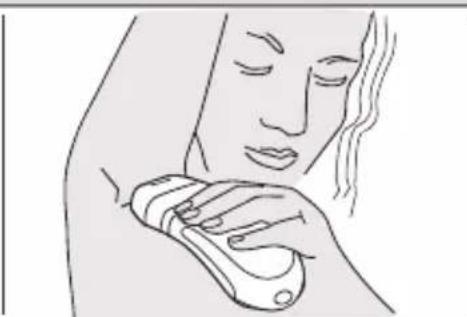
natural_image
Line drawing of a person holding a medical device (no text or symbols)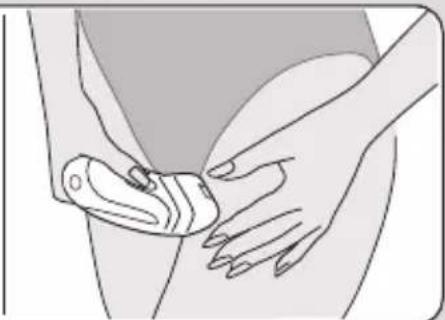
natural_image
Illustration of a person performing a medical or therapeutic procedure on a patient's abdomen (no text or symbols visible)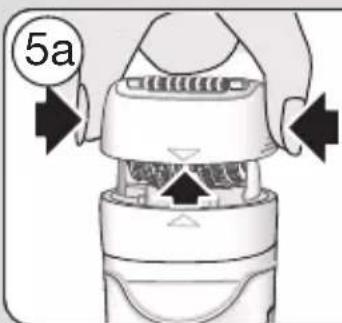
natural_image
Illustration of hands using a handheld device to interact with a textured surface (no text or symbols visible)
natural_image
Close-up illustration of a hand inserting a mechanical component into a housing (no text or symbols visible)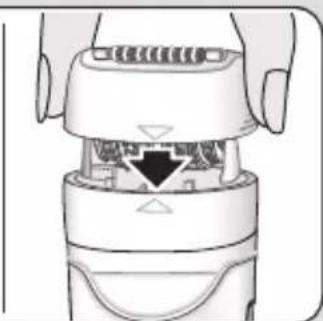
natural_image
Diagram of a hand inserting a plug into a device (no text or symbols visible)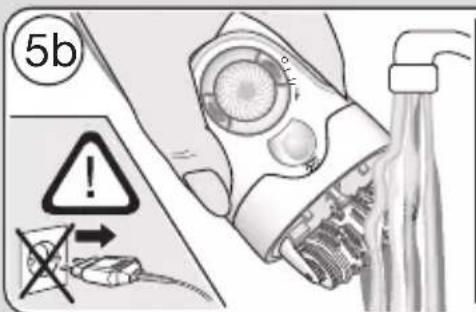
natural_image
Diagram of a mechanical device with internal components and directional arrows, no visible text or symbols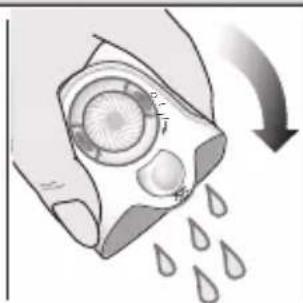
natural_image
Illustration of a hand holding a device with water droplets falling, no text or symbols present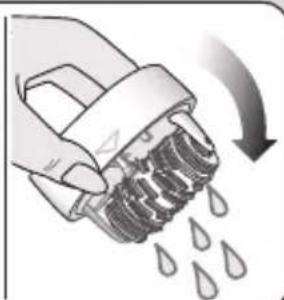
natural_image
Illustration of a hand holding a tool with liquid droplets falling, no text or symbols presentB
natural_image
Illustration of hands installing or adjusting a device component with arrows indicating motion (no text or symbols)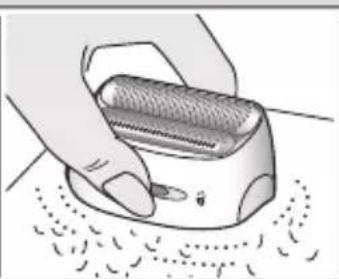
natural_image
Illustration of a hand using a handheld device to press down a surface with dots (no text or symbols)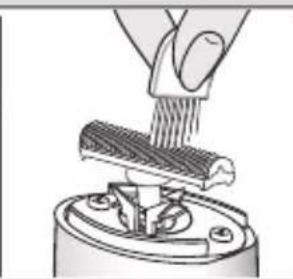
natural_image
Illustration of a hand using a tool to lift a textured material onto a mechanical component (no text or symbols visible)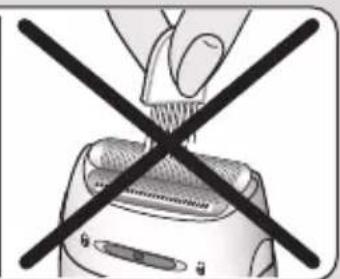
natural_image
Illustration of a hand using a tool to cut a device into a slot, crossed by black lines (no text or symbols)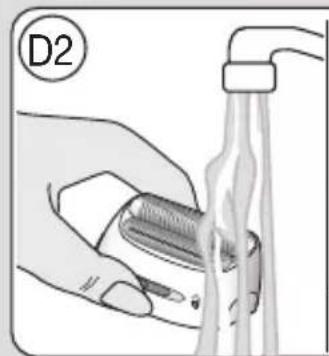
natural_image
Illustration of a hand using a tool to interact with a glass tube, no text or symbols present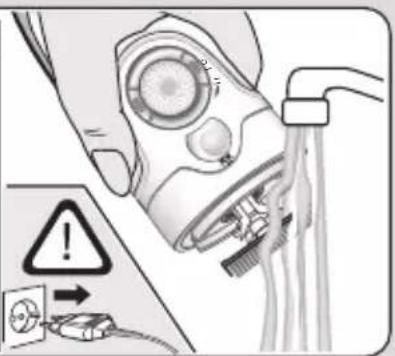

natural_image
Illustration of a hand washing machine with arrows indicating motion (no text or symbols)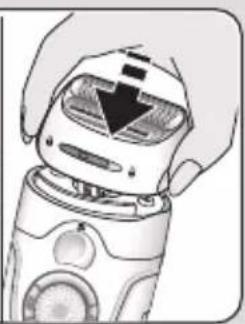
natural_image
Illustration of hands holding a robot's head with a black arrow indicating the blade (no text or symbols present)
natural_image
Diagram showing a hand holding a textured object above a mechanical component with an arrow indicating direction (no text or symbols present)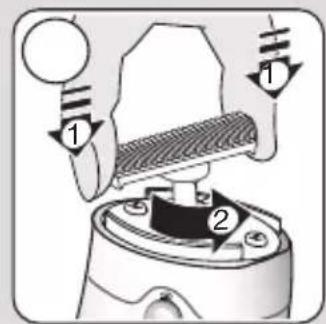
Deutsch
Our products are engineered to meet the highest standards of quality, functionality and design. We hope you thoroughly enjoy using your Braun Silk·épil 7
Please read the use instructions carefully before using the appliance and keep them for future reference.
Braun Silk-épil 7 has been designed to make the removal of unwanted hair as efficient, gentle and easy as possible. Its proven epilation system removes hair at the root, leaving your skin smooth for weeks. As the hair re-growth is fine and soft, there will be no more stubble.
Important
- For hygienic reasons, do not share this appliance with other persons.
- This appliance is provided with a special cord set with an integrated Safety Extra Low Voltage power supply. Do not exchange or manipulate any part of it. Otherwise there is risk of electric shock.
- This appliance is suitable for use in a bathtub or shower. For safety reasons, it can only be operated cordless.
- This appliance can be used by children aged from 8 years and above and persons with reduced physical, sensory or mental capabilities or lack of experience
and knowledge if they have been given super vision or instruction concerning the safe use of the appliance and understand the hazards involved. Children should not play with the appliance.
Cleaning and user maintenance should not be made by children unless they are older than 8 years and supervised.
- When switched on, the appliance must never come in contact with the hair on your head, eyelashes, ribbons, etc. to prevent any danger of injury as well as to prevent blockage or damage to the appliance.
General information on epilation
All methods of hair removal at the root can lead to in-growing hair and irritation (e.g. itching, discomfort and reddening of the skin) depending on the condition of the skin and hair. This is a normal reaction and should quickly disappear, but may be stronger when you are removing hair at the root for the first few times or if you have sensitive skin.
If, after 36 hours, the skin still shows irritation, we recommend that you contact your physician. In general, the skin reaction and the sensation of pain tend to diminish considerably with the repeated use of Silk·épil.
In some cases inflammation of the skin could occur when bacteria penetrate the skin (e.g. when sliding the appliance over the skin).
Thorough cleaning of the epilation head before each use will minimise the risk of infection.
If you have any doubts about using this appliance, please consult your physician. In the following cases, this appliance should only be used after prior consultation with a physician:
- eczema, wounds, inflamed skin reactions such as folliculitis (purulent hair follicles) and varicose veins,
- around moles,
– reduced immunity of the skin, e.g. diabetes mellitus, during pregnancy, Raynaud's disease, haemophilia, candida or immune deficiency.
Some useful tips
If you have not used an epilator before, or if you have not epilated for a longer period of time, it may take a short time for your skin to adapt to epilation. The discomfort experienced in the beginning will decrease considerably with repeated use as the skin adapts to the process.
Epilation is easier and more comfortable when the hair is at the optimum length of 2-5 mm. If hairs are longer, we recommend that you shave first and epilate the shorter, re-growing hairs after 1 or 2 weeks.
When epilating for the first time, it is advisable to epilate in the evening, so that any possible reddening can disappear overnight. To relax the skin we recommend applying a moisture cream after epilation. Fine hair which re-grows might not grow up to the skin surface. The regular use of massage sponges (e.g. after showering) or exfoliation peelings helps to prevent in-growing hair as the gentle scrubbing action removes the upper skin layer and fine hair can get through to the skin surface.
Description
1a High Frequency Massage System
1b EfficiencyPro cap
2 Epilation head
3 «smartlight»
4 Switch with lock keys (4a)
5a Charging light
5b Low charge light
6 Release button
7 Special cord set
8 Sensitive area head
9 Shaver head attachment with OptiTrim comb
Charging
- Before use, charge the appliance. For best performance, we recommend that you always use a fully charged appliance. Using the special cord set, connect the appliance to an electrical outlet with the motor switched off. Charging time is approximately 1 hour.
- The green charging light (5a) flashes to show that the epilator is being charged. When the battery is fully charged, the charging light shines permanently. Once fully charged, use the appliance without cord.
- When the red low-charge light (5b) flashes, reconnect the appliance to an electrical outlet via the special cord set to recharge.
- A full charge provides up to 40 minutes of cordless operation time.
- Wet usage might reduce the operation time. We recommend that you recharge the appliance after each use.
- The best temperature range for charging, using and storing the appliance is between 15 °C and 35 °C. In case the temperature is far beyond this range, the charging time might be longer whereas the cordless operation time might be reduced.
Getting prepared for ...
... dry usage
Your skin must be dry and free from grease or cream.
... wet usage
The appliance can be used on wet skin, even under running water. Make sure that the skin is very moist in order to achieve optimum gliding conditions for the appliance.
- After each wet usage, clean the appliance under running water.
- Before use, always make sure that epilation head (2) is clean and provided with a cap.
- To change caps, press their lateral ribs and pull off.
- To change heads, press the release button (6).
A How to epilate
The epilation head (2) features the new Close-Grip Technology to ensure extra efficiency especially with short hairs:
The 40 tweezers always keep close contact to the skin to remove hairs as short as grain of sand. Thanks to its pivoting feature, it perfectly adapts to the body contours, for maximum thoroughness.
The High-Frequency Massage System (1a) soothes your skin effectively for an ultra gentle epilation.
The EfficiencyPro cap (1b) for fast epilation ensures maximum skin contact, positioning the tweezers at the optimum position at all times.
1 Turning on
- Press one of the lock keys and turn the switch (4) clockwise to select your preferred speed setting:
«|» = extra gentle «|» = extra efficient
- The «smartlight» (3) comes on instantly and shines as long as the appliance is switched on. It reproduces an almost daylight condition, thus revealing even the finest hair and giving you a better control for improved epilation efficiency.
2 How to guide the appliance
• Always stretch your skin when epilating.
- Always make sure that the epilation area between the massaging rollers is in contact with your skin.
- The pivoting caps automatically adapt to the contour of your skin.
- Guide the appliance in a slow, continuous movement without pressure against the hair growth, in the direction of the switch. As hair can grow in different directions, it may also be helpful to guide the appliance in different directions to achieve optimum results. The pulsating movement of the massaging rollers stimulate and relax the skin for a gentler epilation.
- If you are used to the sensation of epilation and prefer a faster way of removing hair, attach the EfficiencyPro cap (1b) replacing the Massage System (1a).
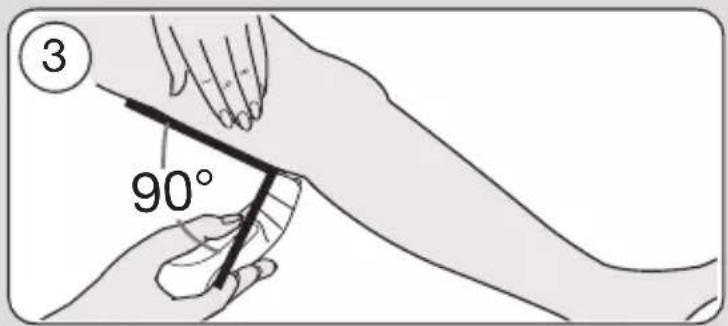
3 Leg epilation
Epilate your legs from the lower leg in an upward direction. When epilating behind the knee, keep the leg stretched out straight.
4 Underarm and bikini line epilation
For this specific epilation, the sensitive area head (8) has been developed. Thanks to its specific design adapted to the
contours of these areas, it provides a gentle and thorough epilation.
Please be aware that especially at the beginning, these areas are particularly sensitive to pain. Therefore, we recommend that you select speed setting «I» for the first few epilation processes. With repeated usage the pain sensation will diminish. For more comfort, ensure that the hair is at the optimum length of 2–5 mm.
Before epilating, thoroughly clean the respective area to remove residues (like deodorant). When epilating the underarm, keep your arm raised up so that the skin is stretched and guide the appliance in different directions. As skin may be more sensitive directly after epilation, avoid using irritating substances such as deodorants with alcohol.
Overheating protection
As a safety feature to avoid the unlikely event of the appliance overheating, it may happen that the red low charge light shines permanently for 8 seconds and then the appliance turns off automatically. In this case, turn the switch back to the position «0» and let the appliance cool down.
5 Cleaning the epilation head
Regular cleaning ensures better performance.
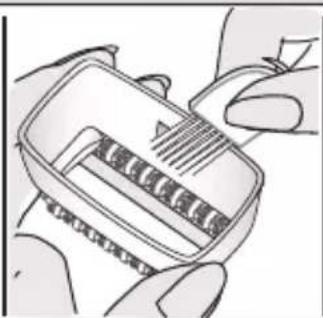
a Brush cleaning:
Remove the cap and brush it out.
Thoroughly clean the tweezers from the rear side of the epilator head with the brush dipped into alcohol. While doing so, turn the tweezer element manually. This cleaning method ensures best hygienic conditions for the epilation head.
b Cleaning under running water:
After each wet usage, clean the appliance under running water.
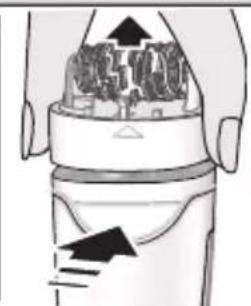
Remove the cap. Hold the appliance with the epilation head under hot running water. Then press the release button (6) to remove the epilation head.
Thoroughly shake both, the epilation head and the appliance to make sure that remaining water can drip out. Leave both parts to dry. Before reattaching, make sure that they are completely dry.
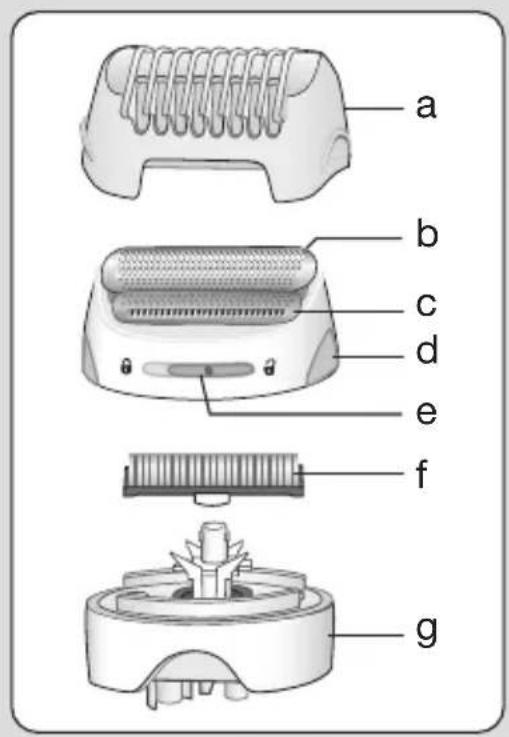
B Using the shaver head attachment
a OptiTrim comb
b Shaver foil
c Trimmer
d Release buttons
e Trim/shave selector
f Cutter block
g Shaver head base
Shaving
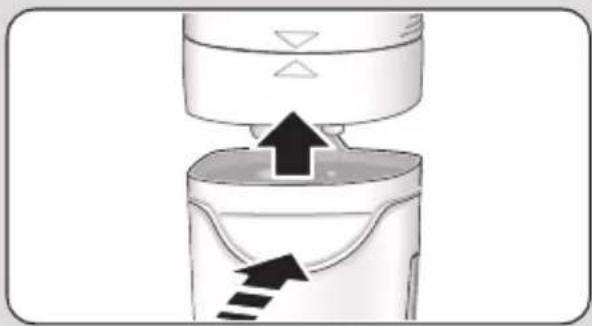
- Put on the shaver head attachment (9) by clicking it in.
- Pressing one of the lock keys, turn the switch clockwise to setting «ll».
- Make sure the trim/shave selector (e) is in the « 🔍» position.
- Use the shaver head attachment on dry skin only.
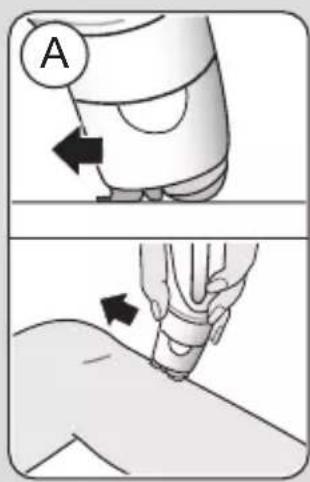
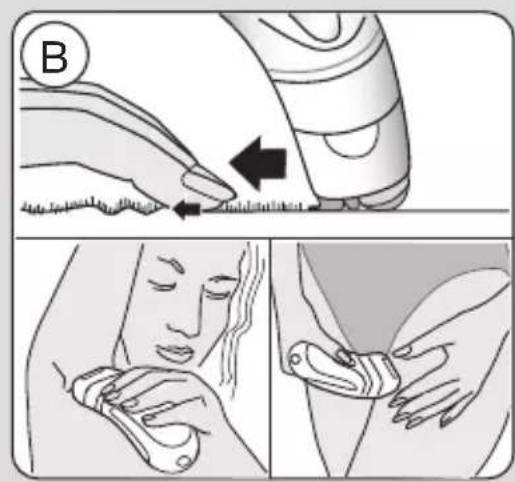
- For best results, always make sure that both, the shaver foil (b) and the trimmer (c) are in contact with the skin (A). Keeping your skin stretched (B), slowly move the appliance against the direction of hair growth. The trimmer first raises all long hairs and cuts them off. Then the flexible foil follows to smooth away any stubble.
- When shaving or trimming in sensitive areas, make sure that you always keep your skin stretched to avoid injuries.
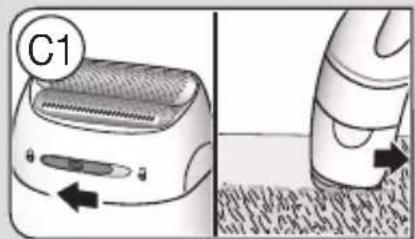
Contour trimming
For trimming precise line and contours, lock the long hair trimmer by sliding the trim/shave selector (e) to the position « Ⓞ » (C1).
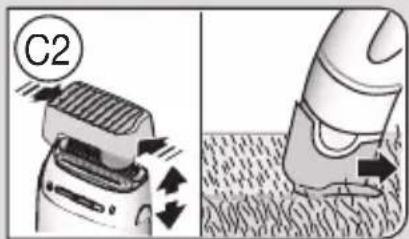
Pre-cutting hair for epilation
If you choose to pre-cut your hair to the ideal length for epilation, place the OptiTrim comb (a) onto the shaver head. Slide the trim/shave selector to the « 🔍» position.
Hold the appliance with the OptiTrim comb lying flat on the skin. Guide it with the comb tips against the hair growth as shown in illustration C2.
N.B. As hair does not always grow in the same direction, also guide the appliance slightly diagonally or in different directions in order to achieve best results.
Cleaning the shaver head
After each use, unplug the appliance.
Brush cleaning
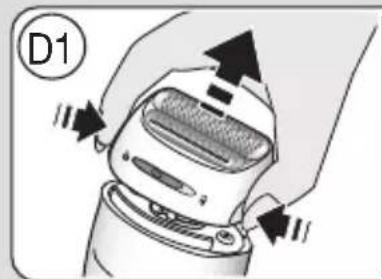
- Press the release buttons (d) to remove the shaver head (D1). Tap the bottom of the shaver head gently on a flat surface (not on the foil).
- Brush out the cutter block and the inside of the shaver head. However, do not clean the shaver foil with the brush as this may damage the foil.
Cleaning with water
Press the release buttons (d) to remove the shaver head. Rinse the shaver head and the cutter block separately under running water (D2). Leave the cutter block and the foil frame to dry separately before reattaching them.
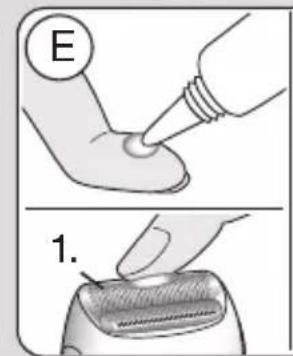
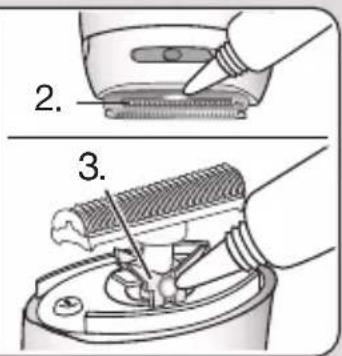
Keeping your shaver head attachment in top shape
- The shaving parts need to be lubricated regularly every 3 months (E). If you clean
the shaver head under running water, please lubricate it after every cleaning.
- Apply some light machine oil or vaseline to the shaver foil and the metal parts of the long hair trimmer. Then remove the shaver head and also apply a tiny amount of vaseline as shown in picture section (E).
- The shaver foil and the cutter block are precision parts that wear out with time. To maintain optimum shaving performance, replace your foil and cutter block when you notice a reduced shaving performance.
- Do not shave with a damaged foil or cord.
How to replace the shaving parts
Shaver foil: Press the release buttons (d) to remove the foil frame and replace it with a new one.
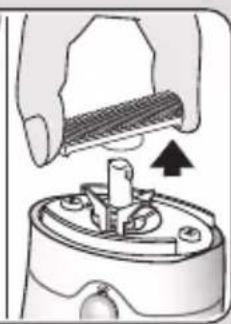
Cutter block: To remove the cutter block, press and turn it 90° (G1), then take it off. To put on a new cutter block, press it onto the cutter block holder and turn 90° (G2).
- Replacements parts (shaver foil, cutter block) can be obtained from your retailer or Braun Customer Service Centres.
For electric specifications, please see printing on the special cord set. The special cord set automatically adapts to any worldwide AC voltage.
Environmental notice
This product contains rechargeable batteries. In the interest of protecting the environment, please do not dispose of the product in the household waste at the end of its useful life

Disposal can take place at a Braun Service Centre or at appropriate collection points provided in your country.
Subject to change without notice.
Guarantee
We grant a 2 year guarantee on the product commencing on the date of purchase. Within the guarantee period we will eliminate any defects in the appliance resulting from faults in materials or workmanship, free of charge either by repairing or replacing the complete appliance at our discretion.
This guarantee extends to every country where this appliance is supplied by Braun or its appointed distributor.
This guarantee does not cover: damage due to improper use, normal wear or use as well as defects that have a negligible effect on the value or operation of the appliance. The guarantee becomes void if repairs are undertaken by unauthorised persons and if original Braun parts are not used.
To obtain service within the guarantee period, hand in or send the complete appliance with your sales receipt to an authorised Braun Customer Service Centre.
For UK only:
This guarantee in no way affects your rights under statutory law.