KD85178BF - Fridge Atag - Free user manual and instructions
Find the device manual for free KD85178BF Atag in PDF.
Download the instructions for your Fridge in PDF format for free! Find your manual KD85178BF - Atag and take your electronic device back in hand. On this page are published all the documents necessary for the use of your device. KD85178BF by Atag.
USER MANUAL KD85178BF Atag
Installation and connection Selecting the location 11 Connecting the appliance 12 Changing the side on which the door opens / building the appliance into a cupboard 13 Before using the appliance for the first time Before you use the appliance for the first time 14 Energy-saving advice 14 Description of the appliance Appliance 15 Control panel 18 DuraFresh control panel 19 Operating the appliance Switching on all compartments and setting the temperature 20 Switching off all compartments 20 Switching only the freezer compartment on 20 Switching only the refrigeration and DuraFresh compartments off 21 DuraFresh 21 Intensive cooling (SuperCool) 24 Intensive freezing (FastFreeze) 25 ECO function 26 Child Lock 26 Open door alarm 27 High temperature alarm 27 Power failure alarm 28EN 3 Storing and freezing food Recommended distribution 29 Avoid contamination of food 30 Storing fresh food in the refrigerator 30 Freezing and storing foods in the freezer 31 Thawing frozen food 32 Maintenance Defrosting the appliance 33 Cleaning the appliance 34 Faults Faults table 35 Environmental aspects Disposal of packaging and appliance 38 CONTENTS Pictograms used Important information Tip Warning; risk of fire / flammable materialsEN 4
YOUR REFRIGERATOR WITH FREEZER
Introduction Congratulations on choosing this Atag refrigerator with freezer. This product is designed with simple operation and optimum comfort in mind. These instructions for use explain how you can make best use of this appliance. These instructions contain information about the operation of the appliance and background information that may be of help to you during its use. Read the safety instructions before using the appliance! Read these instructions thoroughly before you first use the appliance, and keep the instructions for future use. A section of the installation instructions is supplied separately.EN 5 Before the installation and use of the appliance, carefully read the supplied instructions. The manufacturer is not responsible if an incorrect installation and use causes injuries and damages. Always keep the instructions with the appliance for future reference. Safety of children and vulnerable people
- The appliance is not intended for use by persons (including children) with reduced physical, sensory or mental capabilities, or lack of experience and knowledge, unless they have been given supervision or instruction concerning use of the appliance by a person responsible for their safety.
- Children should be supervised to ensure that they do not play with the appliance.
- Cleaning and user maintenance shall not be made by children without supervision.
- Keep all packaging away from children. For European markets only
- This appliance can be used by children aged from 8 years and above and persons with reduced physical, sensory or mental capabilities or lack of experience and knowledge if they have been given supervision or instruction concerning use of the appliance in a safe way and understand the hazards involved.
- Children shall not play with the appliance.
- Cleaning and user maintenance shall not be made by children without supervision.
- Children aged from 3 to 8 years are allowed to load and unload refrigerating appliances. SAFETY INSTRUCTIONS Original instructionEN 6 General safety
- The lamp in this household appliance is only suitable for illumination of this appliance. The lamp is not suitable for household room illumination.
- WARNING! This appliance is intended to be used in household and similar applications such as – staff kitchen areas in shops, offices and other working environments; – farm houses and by clients in hotels, motels and other residential type environments; – bed and breakfast type environments; – catering and similar non-retail applications.
- WARNING! Keep ventilation openings, in the appliance enclosure or in the built-in structure, clear of obstruction.
- WARNING! Do not use mechanical devices or other means to accelerate the defrosting process, other than those recommended by the manufacturer.
- WARNING! Do not damage the refrigerant circuit.
- WARNING! Do not use electrical appliances inside the food storage compartments of the appliance, unless they are of the type recommended by the manufacturer.
- WARNING! Do not use water spray and steam to clean the appliance.
- WARNING! Clean the appliance with a moist soft cloth. Only use neutral detergents. Do not use abrasive products, abrasive cleaning pads, solvents or metal objects.
- WARNING! Do not store explosive substances such as aerosol cans with a flammable propellant in this appliance.
- WARNING! If the supply cord is damaged, it must be replaced by the manufacturer, its service agent or similarly qualified persons in order to avoid a hazard. SAFETY INSTRUCTIONSEN 7 Installation
- WARNING! This appliance should only be connected by a registered installer.
- Remove all the packaging.
- Do not install or use a damaged appliance.
- Obey the installation instruction supplied with the appliance.
- Always be careful when you move the appliance because it is heavy. Always wear safety gloves.
- Make sure the air can circulate around the appliance.
- Wait at least 4 hours before connecting the appliance to the power supply. This is to allow the oil to flow back in the compressor.
- Do not install the appliance close to radiators or cookers, oven or hobs.
- Do not install the appliance where there is direct sunlight.
- Do not install this appliance in areas that are too humid or too colds, such as the construction appendices, garages or wine cellars.
- When you move the appliance, lift it by the front edge to avoid scratching the floor.
- WARNING! When positioning the appliance, ensure the supply cord is not trapped or damaged. SAFETY INSTRUCTIONSEN 8 Electrical connection
- WARNING! Risk of fire and electrical shock.
- The appliance must be earthed.
- All electrical connections should be made by a qualified electrician.
- Make sure that the electrical information on the rating plate agrees with the power supply. If not, contact an electrician.
- Always use a correctly installed shockproof socket.
- Do not use multi-plug adapters and extension cables.
- Make sure not to cause damage to the electrical components (e.g. mains plug, mains cable, compressor). Contact the Service or an electrician to change the electrical components.
The mains cable must stay below the level of the mains plug.
- Connect the mains plug to the mains socket only at the end of the installation. Make sure that there is access to the mains plug after the installation.
- Do not pull the mains cable to disconnect the appliance. Always pull the mains plug.
- WARNING! Do not locate multiple portable socket-outlets or portable power supplies at the rear of the appliance.
- If a stationary appliance is not fitted with a supply cord and a plug, or with other means for disconnection from the supply mains having a contact separation in all poles that provide full disconnection under overvoltage category III conditions, the means for disconnection must be incorporated in the fixed wiring in accordance with the wiring rules. This is also applicable for appliances with a supply cord and plug when the plug is not accessible after installing the appliance. Using an omnipolar switch with a contact separation of at least 3 mm fitted in the fixed wiring will fulfil this requirement. SAFETY INSTRUCTIONSEN 9 Use
- WARNING! Risk of injury, burns, electrical shock or fire.
- Do not change the specification of this appliance.
- Do not put electrical appliances (e.g. ice cream makers) in the appliance unless they are stated applicable by the manufacturer.
- Be careful not to cause damage to the refrigerant circuit. It contains isobutene (R600a), a natural gas with a high level of environmental compatibility. This gas is flammable.
- If damage occurs to the refrigerant circuit, make sure that there are no flames and sources of ignition in the room. Ventilate the room.
- Do not let hot items to touch the plastic parts of the appliance.
- Do not store flammable gas and liquid in the appliance.
- Do not put flammable products or items that are wet with flammable products in, near or on the appliance.
- Do not touch the compressor or the condenser. They are hot. Care and cleaning
- WARNING! Risk of injury or damage to the appliance.
- Before maintenance, deactivate the appliance and disconnect the mains plug from the mains socket.
- This appliance contains hydrocarbons in the cooling unit. Only a qualified person must do the maintenance and the recharging of the unit.
- Regularly examine the drain of the appliance and if necessary, clean it. If the drain is blocked, defrosted water collects in the bottom of the appliance. SAFETY INSTRUCTIONSEN 10 Disposal
- WARNING! Risk of injury or suffocation
- Disconnect the appliance from the mains supply.
- Cut off the mains cable and discard it.
- Remove the door to prevent children and pets to be closed inside of the appliance.
- The refrigerant circuit and the insulation materials of this appliance are ozone friendly.
- The insulation foam contains flammable gas. Contact your municipal authority for information on how to discard the appliance correctly.
- Do not cause damage to the part of the cooling unit that is near the heat exchanger. SAFETY INSTRUCTIONSEN 11 Selecting the location
- Place the appliance in a dry and well aired room. The permitted ambient temperature range for the appliance depends on the appliance's climate class, which is shown on the type plate.
- Do not place the appliance near a source of heat, such as a gas cooker, radiator or boiler, etc., and do not expose it to direct sunlight. Climate class Ambient temperature range Relative humidity SN (subnormal) +10 °C to +32 °C ≤ 75% N (normal) +16 °C to +32 °C ST (subtropical) +16 °C to +38 °C T (tropical) +16 °C to +43 °C Do not place the appliance in a room where the temperature can fall below 5 °C: the appliance may not work properly or become defective! The appliance is not suitable for outdoor use and may not be exposed to rain.
- The appliance must be placed at a distance of at least 5 cm from an electrical or gas cooker and at least 30 cm from a radiator or heater. An insulation panel must be fitted when these distances cannot be kept.
INSTALLATION AND CONNECTIONEN 12
- The appliance must be placed at a distance of about 5 cm from the wall, back and sides of a cupboard. A kitchen cupboard above the refrigerator must have a gap of at least 5 cm between the back of the cupboard and the wall. This is needed to make sure that there is sufficient cooling air for the condenser.
- The plug of the installed appliance must remain accessible! Place the appliance in a room with a sufficient volume of air. The room must have a volume of at least 1 m
of air for every 8 grams of refrigerant. The quantity of refrigerant is shown on the type plate on the inside of the appliance.
- The kitchen unit in which the appliance is to be built in must have an opening of at least 200 cm
in its base to allow sufficient air to circulate.
- The appliance's air outlet is at the top. Make sure that the outlet is not blocked. Blocking the outlet can result in damage to the appliance.
An anti-condensation accessory must be installed before built-in appliances are installed next to each other in a cupboard or surround. For safety reasons, this must be installed by a recognized installer! Connecting the appliance
- Connect the appliance to the power supply with a plug. The socket must be earthed. The nominal voltage and frequency required for the appliance are shown on the appliance's type plate/label with basic information.
- The appliance must be connected to the mains and earthed in accordance with the prevailing standards and regulations. The appliance can withstand small variations in the mains voltage to a maximum of plus or minus 6%. When you are not going to use the appliance for a longer period then switch it off with the appropriate key and disconnect it from the mains. Empty, defrost and clean the appliance, and leave the door ajar.
INSTALLATION AND CONNECTIONEN 13
Freeze burn hazard To avoid freeze burn, never put frozen food in your mouth and do not touch frozen food. In the event of a defect or power cut, do not open the freezer compartment unless the appliance has been out of operation for more than the hours indicated on the appliance’s type plate (temperature rise time). After this time, you must either use the frozen food or make sure that it is properly cooled (for example, by transferring it to another appliance). Changing the side on which the door opens / building the appliance into a cupboard Information about changing the side on which the door opens and building the appliance into a cupboard is enclosed in separate installation instructions.
INSTALLATION AND CONNECTIONEN 14
Before you use the appliance for the first time Do not connect the appliance to the mains until you have carefully read the instructions for the correct and safe use of the appliance. As these instructions are for various types and models, it is possible that the instructions for use refer to settings or parts that are not available on your appliance. We recommend that you keep these instructions for future use. If you sell the appliance, enclose them with the appliance. Inspect the appliance for damage and/or irregularities. If the appliance is damaged, contact the store that sold you the appliance. Allow the appliance to stand upright for at least 4 hours before you connect the appliance to the mains. This reduces the risk of malfunctions resulting from transport effects on the refrigerant unit. Before using the appliance for the first time, the interior and all internal accessories should be cleaned with lukewarm water and a neutral cleaning agent. Wipe the cleaned parts with a cloth with clean water and then dry them thoroughly. If you use the appliance for the first time, do not put food into the appliance until the temperature has decreased to the set temperature. Energy-saving advice
- Install the appliance as stated in the instructions for use.
- Do not open the door more than necessary.
- Never cover or obstruct the ventilation openings.
- Replace a door seal that is damaged or no longer seals properly as quickly as possible.
- Store food in well-sealed containers or suitable packaging.
- Allow food to cool to room temperature before you put it in the appliance.
- Defrost food in the refrigerator compartment.
- Defrost a conventional freezer once a layer of about 2 to 3 millimetres of frost or ice has formed on the inside.
- Space the shelves evenly in the refrigerator compartment. Place the food so that the air can circulate freely in the appliance (follow the recommendations for the location of foods enclosed in the instructions).
- When the appliance is equipped with a fan then make sure that the ventilation openings are kept clear.
- The lower the set temperature, the higher the power consumption. BEFORE USING THE APPLIANCE FOR THE FIRST TIMEEN 15
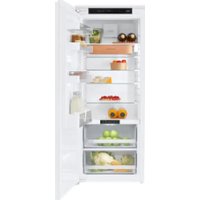
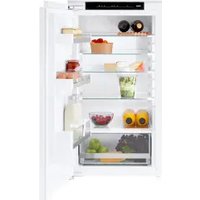
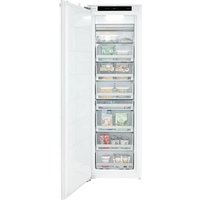
4. Wooden bottle rack (BottleTray)
5. DuraFresh control panel
6. DuraFresh drawers
7. Door compartments
Best location for freezing fresh food. CoolFlow+ This system creates optimal air circulation to keep the temperature constant throughout the entire refrigerator compartment. The openings around the fan may never be covered or obstructed. NoFrost With the NoFrost system, you no longer need to defrost the freezer. Door closure The door closes itself once the opening angle is less than 20°. The soft-close door mechanism closes the door gently. LED interior lighting The appliance has LED lighting at various locations.
Drawers A number of drawers are mounted on fully extending telescopic rails and are fitted with a soft-close system. To remove a drawer from the rails, pull the drawer fully out. Lift the back of the drawer (1). Pull the drawer to you (2) and then lift the drawer from the rails. To fit the drawer onto the rails, pull the two rails fully out. Place the drawer on the rails (3). In the front, press the drawer and the rails towards each other on the right and the left side until you hear a “click” (4). Press the back of the drawer downwards if necessary (5). Finally, slide the drawer on the rails fully in (6). Door compartments The height of the door compartments is adjustable. Lift the compartment out of the groove and fit it in the required position. Each compartment can carry a maximum weight of 5 kg. The bottom door compartment is suitable for bottles. Glass shelves The shelves are made from safety glass. To change the height of a shelf, lift the front of the shelf (1). Take hold of the back and pull the shelf slightly forwards (2). Move the shelf to a higher or lower position (3). To remove a shelf from the refrigerator, lift the front of the shelf (4). Take hold of the back and pull the shelf out of the appliance (5). click click
Wooden bottle rack (BottleTray) Lay the bottle rack on one of the glass shelves and put the bottles on the rack. The rack is shaped to stop the bottles rolling sideways. The rack holds a maximum of three bottles or six cans. Ice cube tray (IceTray) To make ice cubes, fill the tray with water and lay it horizontally in the freezer. MultiBox The MultiBox offers a handy option for storing foods with a strong odour, such as ripe or blue cheese, smoked sausages and onions, etc. The wooden lid can also be used as egg tray.EN 18
DESCRIPTION OF THE APPLIANCE
Control panel For best results, touch the keys with as much of the fingertip as possible. A HB IC GE D F
Refrigerator A. On/Off key (refrigerator compartment) ▷ Switch on the appliance (short touch); both compartments are turned on. ▷ Switch off the refrigerator compartment (touch for three seconds). B. Alarm key / WiFi key (depends on model, see also ‘Atag Connect Life’) C. SuperCool key (intensive cooling function) D. Temperature adjustment keys (refrigerator compartment) E. Display of the set temperature (refrigerator compartment) Freezer F. Temperature adjustment keys (freezer compartment) G. Display of the set temperature (freezer compartment) H. FastFreeze key (intensive freezing function)
I. ECO/Child Lock key
J. On/Off key (freezer compartment) ▷ Switch off the appliance (touch for three seconds); both compartments are turned off. ▷ Switch on the freezer compartment (short touch).EN 19 Atag Connect Life Some appliances can be controlled remotely using a smartphone or tablet. These appliances are equipped with a WiFi key. Instructions on making the connection are given in separate instructions for use (Atag Connect Life). References in these instructions to the alarm key that begins to flash are not applicable to the WiFi key. DuraFresh control panel K OL PN
DuraFresh K. –2 °C adjustment key ▷ The temperature of the top drawer is set to –2 °C. L. 0 °C adjustment key ▷ The temperature of the top drawer is set to 0 °C. M. Temperature adjustment keys (top DuraFresh drawer) N. Display of the set temperature (top DuraFresh drawer) O. 2 °C adjustment key ▷ The temperature of the top drawer is set to 2 °C. P. 5 °C adjustment key ▷ The temperature of the top drawer is set to 5 °C. The temperature of the bottom drawer is about 1 to 2 °C higher than the temperature of the top drawer.
DESCRIPTION OF THE APPLIANCEEN 20
Switching on all compartments and setting the temperature
1. Touch the On/Off key of the refrigerator compartment.
▷ All compartments turn on.
2. Use the adjustment keys to adjust the temperature of the
compartments. The temperature of the refrigerator compartment can be set to between +3 °C and +8 °C. The temperature of the top DuraFresh drawer can be set to -2, 0, 2 or 5 °C. The temperature of the freezer compartment can be set to between -24 °C and -16 °C. The recommended temperature of the refrigerator compartment is 4 °C and the recommended temperature of the freezer compartment is -18 °C (factory settings). After you have switched on the appliance it will take several hours for the temperature to decrease to the set temperature. Do not put food into the appliance until the temperature has decreased to the set temperature. The adjusted temperature flashes on the top control panel when you touch the adjustment keys. The selected temperature setting for the compartment is saved three seconds after the last key is touched. Switching off all compartments
1. Touch the On/Off key of the freezer compartment for three
seconds. ▷ All compartments turn off. Switching only the freezer compartment on The freezer compartment can be switched on alone (when the appliance is fully switched off).
1. Touch the On/Off key of the freezer compartment.
▷ Only the freezer compartment turns on.
Switching only the refrigeration and DuraFresh compartments off
1. Touch the On/Off key of the refrigerator compartment for three
seconds. ▷ The refrigerator compartment and DuraFresh compartment turn off. The freezer compartment is not turned off. DuraFresh The DuraFresh refrigeration system keeps food fresh for longer. The vitamins and minerals are preserved for longer, as are the flavour and structure. The system consists of a number of drawers with automatic humidity control. The air humidity is highest in the bottom drawer. Type of food Recommended DuraFresh drawer Meat Top Fish, molluscs and crustaceans Top Herbs / Dairy Top Vegetables / Dairy Bottom Fruit / Dairy Bottom Tropical fruit Bottom After you have switched on the appliance it will take several hours for the temperature to decrease to the set temperature. Do not put food into the appliance until the temperature has decreased to the set temperature.EN 22 Selecting the temperature in the DuraFresh drawers The temperature of the top DuraFresh drawer can be set to -2, 0, 2 or 5 °C. The temperature of the bottom drawer depends on the temperature setting of the top drawer and is about 1 to 2 °C higher. The temperature of the top DuraFresh drawer is set to 2 °C in the factory. DuraFresh key Top drawer temperature -2 °C 0 °C 2 °C 5 °C
1. Touch a DuraFresh key.
▷ The associated temperature of the top DuraFresh drawer is shown in the display.
2. Touch another DuraFresh key or the adjustment keys to change the
setting. Note! The adjusted temperatures of the refrigeration and DuraFresh compartments are linked to each other. Some combinations of settings are not possible (see table). It is also possible that the temperature setting of the refrigeration compartment is adjusted automatically. In this case a warning signal will sound. DuraFresh settings -2 °C 0 °C 2 °C 5 °C Refrigeration compart- ment settings 3 °C 4 °C 5 °C 6 °C 7 °C 8 °C Not possible Possible
OPERATING THE APPLIANCEEN 23
Storing food in the DuraFresh drawers Meat Temperature, °C Storage life Beef 0 to 4 to 3 weeks Pork -1 to 4 3 days Poultry 0 to 4 3 days Lamb 0 to 4 14 days Fish 0 to 4 3 to 10 days Fish, molluscs and crustaceans 0 to 4 2 days Vegetables Temperature, °C Storage life Beetroot 0 3 to 5 months Broccoli 0 10 to 14 days Onions, garlic 0 to 2 6 to 7 months Cabbage 0 3 to 6 weeks Carrots 0 4 to 5 months Cauliflower 0 to 2 2 to 4 weeks Lettuce, leafy vegetables 0 10 to 14 days Kohlrabi 0 2 to 3 months Fruit Temperature, °C Storage life Apples 0 to 4 1 to 12 months Blueberries 0 to 2 14 days Melons 4 15 days Cherries 0 to 2 2 to 3 weeks Grapes 0 to 2 2 to 8 weeks Strawberries 0 3 to 7 days Kiwi, ripe 0 to 2 1 to 3 months Peaches 0 to 2 2 to 4 weeks Pears -2 2 to 7 months Raspberries 0 to 2 2 to 3 days Apricots -1 1 to 3 weeks Dairy products (yoghurt, sour cream, butter, soft cheese and cheese spread, etc.) 2 to 4 7 to 10 days Times and optimum temperatures are approximate and depend on the quality of the food and its freshness.
Intensive cooling (SuperCool) This appliance has an intensive cooling function. This function decreases the temperatures in the refrigeration compartment and DuraFresh compartment as quickly as possible. This is ideal for cooling products that have just been put into the refrigerator. Use this function when you put a large quantity of food in the appliance. When the intensive cooling function is selected, the appliance works at maximum capacity. It may then make more noise for a while.
1. Touch the SuperCool key.
▷ ‘SC’ is shown in the displays to indicate that the SuperCool function is activated.
2. Touch the SuperCool key again to disable the function.
▷ The set temperature is once again shown in the displays. Adjusting the temperature of the refrigeration compartment or DuraFresh compartment while the intensive cooling function is activated will immediately disable the intensive cooling function. Selecting the ECO function while the intensive cooling function is activated will immediately disable the intensive cooling function. When the intensive cooling function is not manually disabled, the function will be automatically disabled after about twelve hours. The temperatures then return to the latest temperature settings. Should a power failure occur while the function is activated then the function will be activated again when the power is restored.EN 25
OPERATING THE APPLIANCE
Intensive freezing (FastFreeze) This appliance has an intensive freezing function. This function decreases the temperature in the freezer compartment as quickly as possible. Activate this function 24 hours before you put a large quantity of fresh food in the appliance. When the intensive freezing function is selected, the appliance works at maximum capacity. It may then make more noise for a while.
1. Touch the FastFreeze key.
▷ ‘FF’ is shown in the display to indicate that the FastFreeze function is activated.
2. Touch the FastFreeze key again to disable the function.
▷ The display once again shows the set temperature. Adjusting the temperature of the freezer compartment while the intensive freezing function is activated will immediately disable the intensive freezing function. Selecting the ECO function while the intensive freezing function is activated will immediately disable intensive freezing. When the intensive freezing function is not manually disabled then the function will be automatically disabled after about two days. The temperature then returns to the latest set temperature. Should a power failure occur while the function is activated then the function will be activated again when the power is restored.EN 26
OPERATING THE APPLIANCE
ECO function This appliance has an ECO function. When the ECO function is selected, the appliance works with the optimum settings. These settings are shown in the displays (5 °C / 2 °C / -18 °C). The ECO function has no time limit and remains activated until the function is disabled. Activating/disabling the ECO function
1. Touch the ECO/Child Lock key.
▷ The lighting of the touch key comes on: the function is activated.
2. Touch the ECO/Child Lock key again.
▷ The function is disabled. The temperature of each compartment can be adjusted when the ECO function is activated. The temperature of other compartments remains the same as the temperature in ECO mode. Note! Activating the ECO function disables the SuperCool and FastFreeze functions. Should a power failure occur while the ECO function is activated then the function will be activated again when the power is restored. Child Lock This function can be used to prevent unintended adjustments of the appliance's settings. All keys other than the ECO/Child Lock key are disabled. Switching the Child Lock on or off
1. Touch the ECO/Child Lock key for three seconds.
▷ ‘LL’ is shown in the display to indicate that the Child Lock is activated.
2. Touch the ECO/Child Lock key again for three seconds.
Open door alarm An alarm signal sounds when a compartment door is open for too long. The alarm key flashes in the display. The lighting of the relevant compartment will begin to flash after a few minutes. Stopping the alarm
▷ The alarm will stop sounding. When the door is still open after 10 minutes, the appliance will switch to safe mode. The LED lighting goes off. Error code E9 will be shown in the display (see the chapter ‘Faults’). If you only switch off the alarm by touching any key, the alarm will switch on again after some time because the door is still open. High temperature alarm A signal will sound when the temperature in the appliance is too high. The alarm key and the set temperature shown in the relevant display will flash. A high temperature can be caused for several reasons:
- The door of the relevant compartment may have been opened for too long or too frequently.
- The door does not seal properly.
- Too much fresh food has been put in at the same time. Every time the appliance is switched on again, it takes a while until the correct temperature is reached. For this reason, the alarm is disabled for the first 24 hours after the appliance is switched on to prevent the unnecessary activation of the alarm. Stopping the alarm
1. Touch any key to stop the alarm.
▷ The alarm will stop sounding. ▷ The alarm key and the set temperature shown in the relevant display continue to flash while the temperature is still too high. When the alarm is not stopped manually and the temperature remains too high, the signal will sound for the first minutes of every half hour and when the door is opened.EN 28
OPERATING THE APPLIANCE
Power failure alarm The appliance cannot cool/freeze during a power failure. Once the power has been restored, the temperature in the appliance will be measured. A signal will sound when the temperature in the appliance is too high. The alarm key will flash and ‘PF’ (Power Failure) will be shown in the relevant display. Always check the food in the appliance when ‘PF’ is shown in the display! Food can spoil at a temperature that is too high. Stopping the alarm
1. Touch any key to stop the alarm.
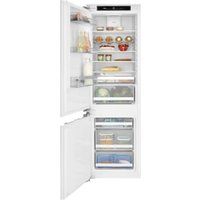
▷ The alarm will stop sounding. ▷ The temperature setting will be shown again in the relevant display. ▷ The alarm key and the set temperature shown in the relevant display continue to flash while the temperature is still too high. When the alarm is not stopped manually then the signal will sound for the first minutes of every half hour and when the door is opened.EN 29 Recommended distribution Sections of the refrigeration compartment
- Upper section: canned food, bread, wine and pastas, etc.
- Middle section: dairy products, ready-to-cook meals, desserts, soft drinks, beer and cooked food, etc.
- DuraFresh drawers: meat, meat products, dairy products, delicatessen products, fresh fruit, vegetables, root vegetables, salads, onions, garlic, cabbage and swedes/turnips, etc. (see also the table in the chapter ‘DuraFresh’). Store food that spoils rapidly at the back of a shelf or at the back of the drawer at the lowest temperature. Do not store fruit (bananas, pineapples, papaya, citrus fruits) and vegetables (courgettes, tomatoes, aubergines, cucumber, sweet peppers and potatoes) that are sensitive to low temperatures in the refrigerator. Sections of the door
- Top/middle door compartment: eggs, butter, cheese and sauces, etc.
- Bottom door compartment: drinks, cans and bottles, etc. Sections of the freezer compartment
- Top section: leftovers, ice, pizza.
- Middle section: meat, fish, bread.
- Bottom section: standard freezer, vegetables and fruit. The best location for freezing fresh food is marked with a . Do not store lettuce, eggs, apples, pears, grapes, peaches, yoghurt, buttermilk, sour cream or mayonnaise in the freezer.
Avoid contamination of food To avoid contamination of food, please respect the following instructions:
- Opening the door for long periods can cause a significant increase of the temperature in the compartments of the appliance.
- Regularly clean surfaces that can come in contact with food and accessible drainage systems.
- Store raw meat and fish in suitable containers in the refrigerator, so that it is not in contact with or drip onto other food.
- If the refrigerating appliance is left empty for long periods, switch off, defrost, clean, dry, and leave the door open to prevent mould developing within the appliance. Storing fresh food in the refrigerator Important recommendations for storing fresh food
- To ensure the quality of fresh food, it is important that: ▷ the food is well-packaged; ▷ the appliance is at the correct temperature; ▷ the appliance is clean.
- Take good note of the use-by date stated on the food packaging.
- Put food in the refrigerator in sealed containers or in suitable packaging. This will prevent the food from picking up or spreading odours and will keep it dry.
- Do not store flammable, unstable or explosive materials in the refrigerator.
- Store bottles that have been opened upright and close them tightly.
- Some organic solutions, such as essential oils, in the skin of lemons and oranges, and butyric acid, that come into long-term contact with plastics can eat into the material and cause premature ageing.
- A disagreeable odour is an indication that the appliance is not clean or that it contains food that has spoiled (see the chapter ‘Maintenance’).
- Take perishable foods out of the refrigerator when you will be away from home for a longer time.EN 31
STORING AND FREEZING FOOD
Freezing and storing foods in the freezer Important recommendations for freezing fresh food
- The maximum quantity of food that you can put in the freezer in one go is stated on the type plate. Putting more than this maximum quantity of food into the freezer will slow the freezing process and reduce the quality. Moreover, this will also harm the quality of frozen food already stored in the freezer.
- Use only good-quality fresh food that is suitable for freezing.
- Allow hot food to cool to room temperature.
- Food needs to be frozen quickly. It is recommended that you use small packs.
- Use air and watertight packaging to prevent the food from drying out and lose its vitamins.
- Note the type and quantity of the food on the packaging, together with the date on which it was frozen.
- Do not allow fresh food to come into contact with frozen food.
- You can remove all the drawers to make use of the total volume of the freezer compartment. Put the food directly on a shelf and on the base of the freezer. Freezing small quantities of fresh food/making ice cubes See the chapter ‘Recommended distribution’ for the best location for freezing fresh food (1 to 2 kilograms) and making ice cubes. Freezing large quantities of fresh food
- Activate the intensive freezing function 24 hours before you plan to freeze the food.
- Distribute the fresh food equally between all the drawers in the freezer compartment.
- After 24 hours, you can transfer the food to another compartment in the freezer and then freeze a new batch of food. Important recommendations for storing frozen food
- Follow the manufacturer’s instructions for the storage and use of frozen food. Take note of the recommended storage temperature and use-by date stated on the packaging.
- Use only food in undamaged packaging that has been stored at a temperature of -18 °C or lower.
- Do not buy food covered in frost. This indicates that the food has thawed or partially thawed several times and, as a result, is of inferior quality.
- Make sure that the food does not thaw during transport. An increase in its temperature will shorten the storage life and harm the quality of the food.EN 32
STORING AND FREEZING FOOD
Recommended storage times of frozen food in the freezer Type of food Storage life Fruit, beef 10 to 12 months Vegetables, veal, poultry 8 to 10 months Venison 6 to 8 months Pork 4 to 6 months Finely chopped or minced meat 4 months Bread, pastas, cooked dishes, whitefish 3 months Offal 2 months Smoked sausage, bluefish 1 month Thawing frozen food
- Thawing is an important step in storing food preserved by freezing. Food must be thawed in the correct way.
- Suitable methods of thawing food are: ▷ in the refrigerator; ▷ in cold water; ▷ in a microwave or conventional oven with a suitable thaw program.
- Some frozen products can be prepared without needing to thaw them first. The manufacturer will state this on the packaging.
- The food needs to be packed in small portions. In this way the food thaws faster.
- Use partially or completely thawed food as quickly as possible. The bacteria in thawed food are reactivated and the food will spoil rapidly. This applies in particular to fruit, vegetables and ready-made food.
- Do not refreeze partially or completely thawed food.EN 33 MAINTENANCE Defrosting the appliance Automatic defrost of the refrigeration compartment The refrigeration compartment defrosts automatically from time to time. Defrosting of the NoFrost freezer The NoFrost freezer defrosts automatically. Any frost deposits will then disappear. Any ice or frost deposits that nevertheless form in the freezer compartment can be caused by unusual use of the appliance (opening the door too often and too long or poorly sealing door, etc.). The freezer will then need to be defrosted manually. Manual defrosting of the NoFrost freezer
1. Simultaneously touch the adjustment key on the right and the
ECO/Child Lock key for a few seconds. ▷ ‘CL’ is shown in the display to indicate that the defrost process has begun. ▷ The temperature is shown once again in the display when the defrost process is finished. Switch off the appliance in the event of extreme ice formation. Remove the food in the freezer and protect it so that it cannot partially or completely thaw. Clean and dry the interior of the freezer. Switch on the appliance and adjust the temperature to the required setting before you put the food back into the freezer.EN 34 MAINTENANCE Cleaning the appliance Switch off the appliance and remove the plug from the socket before you start cleaning it. Do not use abrasive cleaning agents, as they can damage the surface. Activate the intensive freezing function 24 hours before you plan to clean the freezer.
- Regularly clean the interior of the appliance with lukewarm water. If so required, add a neutral cleaning agent or special refrigerator cleaner to the water. Clean all surfaces with a soft cloth. Wipe the cleaned parts with a cloth with clean water and then dry them thoroughly.
- Do not put parts of the appliance in a dishwasher: this could damage them.
- Clean wooden parts with a damp cloth. Make sure that the wood does not become too wet and allow the parts to dry thoroughly before you put them back into the refrigerator.
- Warning: Wood is a natural material. This means that it will be difficult to remove some stains (especially red wine and oil).
- Wooden accessories that have dried out will need to be treated with a wood oil. This product must be suitable for treating surfaces that come into direct contact with food. When you are not going to use the appliance for a longer period then switch it off with the appropriate key and disconnect it from the mains. Empty, defrost and clean the appliance, and leave the door ajar.EN 35 Faults table When you have any doubts about whether your appliance is working properly you should not immediately assume that it is defective. We recommend that you should in any case check the points in the following table. Problem Cause/Solution Appliance is connected to the power supply but is not working. Check that the socket is live and that the appliance is switched on. Appliance cools continuously for a long time.
The compressor is operating for a longer time at low capacity (low energy consumption / high efficiency). This is the most efficient form of operation. The following factors can also influence the appliance's operation:
- The ambient temperature is too high.
- The door has been opened for too long or too frequently.
- The door is not closed properly.
- The door does not seal properly (the seal is dirty, the door is misaligned or the seal is damaged, etc.).
- Too much fresh food has been put in at the same time.
- Insufficient air circulation around the compressor and condenser. Check that the ventilation around the appliance is sufficient (see the separate installation instructions).
- The sensor in the refrigerator is blocked by fresh food. Make sure that air can circulate freely around the sensor (not applicable to all models). Excessive ice formation in the freezer.
- The door has been opened for too long or too frequently.
- The door is not closed properly.
- The door does not seal properly (the seal is dirty, the door is misaligned or the seal is damaged, etc.). Condensation on the glass shelf above the drawers in the refrigeration compartment.
- Check that the door is closed properly and seals properly.
- This is a temporary problem that cannot be avoided entirely in periods of high ambient temperatures and high humidity. The problem disappears when the temperature and humidity return to normal levels. We recommend that you clean the drawers more frequently and occasionally wipe off any drips.
- Pack food in bags or other air-tight packaging. FAULTSEN 36 FAULTS Problem Cause/Solution Alarm key and/or temperature display flashing.
- The door has been opened for too long or too frequently.
- The door does not seal properly (the seal is dirty, the door is misaligned or the seal is damaged, etc.).
- Too much fresh food has been put in at the same time. Door does not open easily. You are trying to open the appliance's door just after you have closed the door. Then opening the door is difficult. When you open the door, cold air escapes from the appliance and is replaced by warm air from the surroundings. As this air cools a slight vacuum is created that makes it more difficult to open the door. The situation returns to normal after a few minutes, and the door opens easily again. Some or all of the LED lighting does not work. Consult a service technician about LED lighting that is not working. You may not try to repair LED lighting. Appliance makes a noise.
- The appliance is cooled by a refrigeration system with a compressor (and with some models, also a fan) that makes a noise. The noise level depends on the installation of the appliance, its correct use and its age.
- When you connect the appliance to the power supply the noise made by the compressor or flowing refrigerant may be slightly louder. This is not indicative of a defect, and has no effect on the service life of the appliance. The appliance will make less noise after a while.
- The appliance may be temporarily noisier after the door has been opened for too long or too frequently, a large quantity of fresh food has been put in the appliance or the intensive freezing or intensive cooling function has been activated. ‘LL’ code shown in the display. Child lock has been activated. See the chapter ‘Child Lock’. ‘PF’ code shown in the display. Lengthy power failure. See the chapter ‘Power failure alarm’. Error code E0 shown in the display. The touch keys do not respond. Call the service centre to make an appointment for repair work. The appliance operates in the safe mode until it has been repaired. The appliance automatically retains the most suitable temperature for each compartment.EN 37 Problem Cause/Solution Error code E1, E2 or E3 shown in the display. A temperature sensor is defective. Call the service centre to make an appointment for repair work. The appliance operates in the safe mode until it has been repaired. The appliance automatically retains the most suitable temperature for each compartment. Error code E9 shown in the display.
- A door has been open for too long: close the door.
- If the lighting in the compartment has also stopped working then the door sensor is defective. Call the service centre to make an appointment for repair work. The appliance operates in the safe mode until it has been repaired. The appliance automatically retains the most suitable temperature for each compartment. If you are unable to solve the problem then contact the service centre. When you do so, state the type, model and serial number shown on the type plate or label on the inside of the appliance. FAULTSEN 38 ENVIRONMENTAL ASPECTS Disposal of packaging and appliance This appliance is made from sustainable materials. This appliance must be disposed of in a responsible manner at the end of its service life. Contact the local authorities for information about the method. See also the chapter ‘Disposal’ in the Safety instructions. The packaging of the appliance is recyclable. The following materials may have been used:
- CFC-free polystyrene (hard PS foam). These materials must be disposed of in a responsible manner and in accordance with government regulations. The appliance is marked with a crossed out wheeled bin symbol to draw your attention to the requirement for the separate disposal of domestic electrical appliances. This means that the appliance may not be disposed of in unsorted household waste at the end of its service life. The appliance must be taken to a special municipal waste processing location for separated waste or to a dealer who provides this service. Collecting and disposing of domestic appliances separately avoids detrimental consequences for humans and the environment. This ensures that the materials used to make the appliance can be recovered and that substantial savings in the use of energy and raw materials can be achieved. Declaration of conformity We hereby declare that our products conform to the applicable European Directives, Regulations and requirements, as well as all requirements in the standards to which reference is made.EN 39600107 / VER 4 / 30-06-2019