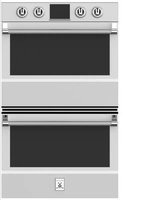
KDO30 - Oven Hestan - Free user manual and instructions
Find the device manual for free KDO30 Hestan in PDF.


| Brand | Hestan |
| Model | KDO30 |
| Product Type | Double Built-in Oven |
| Power Supply | 240 VAC or 208 VAC, single-phase, 60 Hz, dedicated 40 A circuit |
| Cooking Modes | Bake, Convection Bake, Convection Roast, Broil, Convection Broil, Pizza, Dehydrate, Proof, Thaw, Reheat |
| Cleaning | Self-cleaning (adjustable duration from 2 to 4 hours), manual cleaning |
| Safety | Automatic door lock in cleaning mode, manual lock (USER LOCK), keypad lock (KEYBD LOCK) |
| Special Functions | Sabbath mode, rapid preheat, meat probe, timer, programmed cooking |
| Lighting | 20 W, 12 V halogen bulbs, 3 per cavity |
| Racks | 6 guide levels, standard and extension racks |
| Included Accessories | Meat probe, racks, broiler pan |
| Maintenance | Clean porcelain, stainless steel, glass according to instructions |
| Repairability | Replacement parts available from Hestan customer service |
| Warranty | 3 years parts and labor, extended for certain components |
Frequently Asked Questions - KDO30 Hestan
User questions about KDO30 Hestan
0 question about this device. Answer the ones you know or ask your own.
Ask a new question about this device
Download the instructions for your Oven in PDF format for free! Find your manual KDO30 - Hestan and take your electronic device back in hand. On this page are published all the documents necessary for the use of your device. KDO30 by Hestan.
USER MANUAL KDO30 Hestan
natural_image
Close-up of a golden-brown fish fillet garnished with parsley and asparagus, served on a patterned plate (no text or symbols visible)INDOOR COOKING
Wall-Oven
KSO, KDO
Use and Care Manual
WARNING
IF THE INFORMATION IN THIS MANUAL IS NOT FOLLOWED EXACTLY, A FIRE OR EXPLOSION MAY RESULT CAUSING PROPERTY DAMAGE, PERSONAL INJURY, OR DEATH.
Do not store or use gasoline or other flammable vapors and liquids in the vicinity of this or any other appliance.
Installation and service must be performed by a qualified installer or service agency.
DO NOT REPAIR, REPLACE OR REMOVE ANY PART OF THE APPLIANCE UNLESS SPECIFICALLY RECOMMENDED IN THE MANUALS. IMPROPER INSTALLATION, SERVICE OR MAINTENANCE CAN CAUSE INJURY OR PROPERTY DAMAGE. REFER TO THIS MANUAL FOR GUIDANCE. ALL OTHER SERVICING SHOULD BE DONE BY A HESTAN AUTHORIZED SERVICE TECHNICIAN.
READ THESE INSTRUCTIONS CAREFULLY AND COMPLETELY BEFORE INSTALLING OR USING YOUR APPLIANCE TO REDUCE THE RISK OF FIRE, BURN HAZARD, OR OTHER INJURY. KEEP THIS MANUAL FOR FUTURE REFERENCE.
SAFETY DEFINITIONS
WARNING
THIS INDICATES THAT DEATH OR SERIOUS INJURY MAY OCCUR AS A RESULT OF NOT OBSERVING THIS WARNING
CAUTION
THIS INDICATES THAT MINOR OR MODERATE INJURY MAY OCCUR AS A RESULT OF NOT OBSERVING THIS WARNING.
NOTICE
THIS INDICATES THAT DAMAGE TO THE APPLIANCE OR PROPERTY MAY OCCUR AS A RESULT OF NOT OBSERVING THIS WARNING.
INSTALLER: LEAVE THIS MANUAL WITH THE OWNER OF THE APPLIANCE.
HOMEOWNER: RETAIN THIS MANUAL FOR FUTURE REFERENCE.
Message from Hestan:Message from Hestan:
Hestan's award-winning culinary innovations and purpose-built features reinvented the restaurant kitchen and redefined culinary experience in some of America's most acclaimed restaurants. Hestan now takes this performance from the back of the house and puts it front and center in yours. Thoughtfully designed and meticulously built, Hestan will serve you beautifully for years to come.
Hestan is the only residential brand born from the dreams and demands of professional chefs. From ranges to refrigeration, every detail is designed to deliver the performance and reliability expected in a restaurant – now available for you.
We appreciate you choosing Hestan, and we promise to deliver the very best to you.
Welcome to Hestan Welcome to Hestan
natural_image
Group of people sharing a meal together with wine glasses and a pie chart, surrounded by fresh dishes (no visible text or symbols)3 SAFETY PRECAUTIONS - BEFORE YOU BEGIN
6 MODEL NUMBERS
6 RATING LABEL
6 REGULATORY / CODE REQUIREMENTS
7 FEATURES AND CONTROLS
12 GENERAL OVEN INFORMATION
14 OPERATIONAL SUGGESTIONS
18 USING THE OVEN
23 BAKE TIPS AND TECHNIQUES
23 CONVECTION BAKE TIPS AND TECHNIQUES
25 CONVECTION ROAST TIPS AND TECHNIQUES
28 CONVECTION BROIL TIPS AND TECHNIQUES
29 DEHYDRATE TIPS AND TECHNIQUES
31 BROIL TIPS AND TECHNIQUES
32 FOOD SAFETY GUIDELINES
35 OVEN CARE AND CLEANING
41 SOLVING BAKING PROBLEMS
42 SOLVING OPERATIONAL PROBLEMS
43 PARTS / SERVICE
43 LIMITED WARRANTY
SAFETY PRECAUTIONS - BEFORE YOU BEGIN
When properly cared for, your Hestan appliance will provide safe, reliable service for many years. When using this appliance, basic safety practices must be followed as outlined below.
IMPORTANT: Save these instructions for the local Utility Inspector's use.
INSTALLER: Please leave these Installation Instructions with the owner.
OWNER: Please retain these Installation Instructions for future reference.
This oven is designed for residential use only. It is NOT is NOT designed for installation in manufactured (mobile) homes or recreational park trailers. Do NOT install this oven outdoors.
WARNING
ELECTRICAL SHOCK HAZARDELECTRICAL SHOCK HAZARD
Disconnect power before installing or servicing appliance. Before turning power ON, be sure all controls are in the OFF position. Failure to do so can result in death or electrical shock.
natural_image
Silhouette of a person in motion, possibly shooting or arching, with no text or symbols present.ELECTRICAL GROUNDING ELECTRICAL GROUNDING
- This appliance must be grounded. Grounding reduces the risk of electric shock in the event of a short circuit. Read the ELECTRICAL CONNECTIONS section of the Installation Manual for complete instructions..
• DO NOT ground to a gas pipe.
• DO NOT use an extension cord with this appliance.
- DO NOT have a fuse in the NEUTRAL or GROUNDING circuit. A fuse in the NEUTRAL or GROUNDING circuit could result in an electrical shock.
ELECTRICAL SUPPLY ELECTRICAL SUPPLY
This appliance must be connected to a dedicated circuit, 240 VAC or 208 VAC, Single Phase, 60 Hz, with a current rating as shown in the model number listing on page 6.
Have the installer show you where the electric circuit breaker is located so you know how to shut off the power to this appliance.
It is the responsibility of the user to have the appliance connected by a licensed electrician in accordance with all local codes, or in the absence of local codes, in accordance with the National Electrical Code. Read the ELECTRICAL CONNECTIONS section of the Installation Manual for complete details.
GENERAL APPLIANCE AND OVEN SAFETY PRECAUTIONS GENERAL APPLIANCE AND C
Please read all instructions before using this appliance.
WARNING
When properly cared for, your new oven has been designed to be a safe, reliable appliance. Read all instructions carefully before using this oven. These precautions will reduce the risk of burns, electric shock, fire, and injury to persons. When using kitchen appliances, basic safety precautions must be followed, including the following:
TECHNICAL SAFETYTECHNICAL SAFETY
Installation and service on this appliance must be performed by a qualified appliance installer, or a Hestan service technician. Do not repair or replace any part of the appliance unless specifically instructed to do so. Defective parts must only be replaced with genuine Hestan parts. Contact Hestan Customer Service for inquiries or to arrange a service call.
This appliance must be properly installed and grounded by a qualified technician. Read the ELECTRICAL CONNECTIONS section of the Installation Manual for complete details.
Locate and install this appliance only in accordance with the Installation Instructions.
Do not operate this appliance if it is not working properly or if it has been damaged, until an authorized servicer has examined it.
Use this oven only as intended by the manufacturer. If you have any questions, contact the dealer or Hestan Customer Service.
Use this appliance only for its intended use as described in this manual. Do not use corrosive chemicals, vapors, or nonfood products in this appliance. This type of oven is specifically designed to heat or cook. It is not designed for industrial or laboratory use. The use of corrosive chemicals in heating or cleaning will damage the appliance.
NOTICE
THE DOOR MUST REMAIN CLOSED WHEN POWER IS INITIALLY SUPPLIED TO THE APPLIANCE.
During initial power up, this appliance performs a self-test of the door locking mechanism. The lock symbol will flash during the test. The door must remain closed until after the symbol stops flashing. If the door is open or an attempt is made to open it during the test it may cause damage to the lock mechanism and result in an error code.
The test is performed at initial power up and subsequently any time power has been cut and resumed. (For example, after a power outage.)
If error occurs, refer to "SOLVING OPERATIONAL PROBLEMS" on page 42.
CHILD SAFETY CHILD SAFETY
CAUTION
IT IS THE RESPONSIBILITY OF THE PARENTS OR GUARDIANS TO ENSURE CHILDREN ARE INSTRUCTED IN THE SAFE USE OF THIS APPLIANCE. Do not allow children to use this appliance without adult supervision. Do not allow children to play in or around the appliance, even when not in use. Items of interest to children should not be stored in or on the appliance or in cabinets above the appliance. Children climbing on the appliance could be seriously injured.
FIRE SAFETY FIRE SAFETY
- Do not use water on a grease fire. Smother fire or use a dry chemical or foam-type extinguisher.
- It is highly recommended that a fire extinguisher be readily available and highly visible next to any cooking appliance.
- Do not overcook food. Carefully attend oven if paper, plastic or other combustible materials are placed inside the oven.
- Do not use the cavity for storage purposes. Do not leave paper products, cooking utensils or food in the cavity when not being used.
- If materials inside the oven should ignite, keep oven door closed. Turn oven off and turn the circuit breaker off.
- Do not block any openings on this appliance.
- Be sure the blower fan runs whenever the oven is in operation. If the fan does not operate, do not use the oven. Call an authorized service center.
- Never use the oven to warm or heat a room. This can damage the oven.
- For personal safety, wear proper clothing. Loose fitting or garments with hanging sleeves should never be worn while using this appliance. Tie long hair so that it does not hang loose.
- In the event that personal clothing or hair catches fire, DROP AND ROLL IMMEDIATELY to extinguish flames. Seek medical attention if necessary.
USER SAFETYUSER SAFETY
WARNING
BURN HAZARD - All parts of the oven can get very hot during operation. The oven door glass and areas surrounding the door get very hot, especially during self-cleaning operations. Do not let children touch the appliance while in operation. Failure to observe these instructions may result in severe burns or injury.
During and after use, do not touch or let clothing or other flammable materials contact the heating elements or the interior surfaces of the oven until they have had sufficient time to cool.
Use care when opening the door. Open the door slightly to let hot air or steam escape before removing or replacing food.
Do not heat unopened food containers. Build-up of pressure may cause the container to burst and cause injury.
Always place oven racks in desired location while oven is cool. If a rack must be moved while oven is hot, do not let pot holder contact the hot heating elements.
Use only dry pot holders. Moist or damp pot holders on hot surfaces may result in burns from steam. Do not let pot holder touch hot heating elements. Do not use a towel or other bulky cloth.
SAFETY PRECAUTIONS - BEFORE YOU BEGIN (CONT.)
SAFETY DURING CLEANING SAFETY DURING CLEANING
Confirm that the door locks and will not open once both knobs are in CLEAN position and the AUTO LOCK message appears. If the door does not lock, turn the cook mode knob to OFF and do not run Self-Clean. Contact Hestan Customer Service for service.
Do not clean the door gasket. It is essential for a good seal. Care should be taken not to rub, damage, move or remove the door gasket.
Do not use commercial oven cleaners or oven liner protective coatings of any kind in or around any part of the oven.
Clean only oven parts listed in this manual.
Before self-cleaning the oven, remove the broiler pan, oven racks, other utensils and excess soft spillage.
MODEL NUMBERS
| MODEL NO. | DESCRIPTION | CIRCUIT BREAKER REQ'D |
| KSO 30 30" Single Wall | Oven 20 Amp | |
| KDO 30 30" Double Wall | Oven 40 Amp |
RATING LABEL
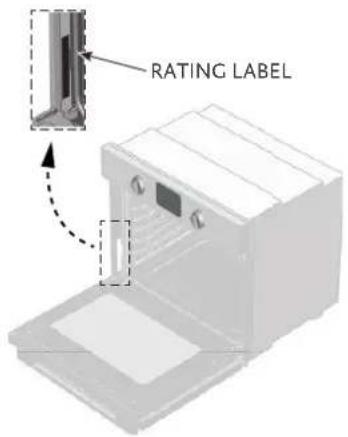
The rating label contains important information about your Hestan appliance such as the model, serial number, and electrical rating.
The rating label is located on the left side of the oven cavity opening near the door hinge.
If service is necessary, contact Hestan Customer Service with the model and serial number information shown on the label.

TYPICAL RATING LABEL
REGULATORY / CODE REQUIREMENTS
Installation of this cooking appliance must be made in accordance with local codes. In the absence of local codes, this unit should be installed in accordance with the National Electrical Code.
This appliance must be electrically grounded in accordance with local codes or in the absence of local codes with the National Electrical Code ANSI/NFPA 70, or Canadian Electrical code CSA C22.1.
CALIFORNIA PROPOSITION 65 - WARNING CALIFORNIA PROPOSITION 65 - WARNING

WARNING This product can expose you to chemicals including carbon monoxide, which is known to the State of California to cause birth defects or other reproductive harm. For more information, go to www.P65Warnings.ca.gov.
COOKING WITH THE CONVECTION OVENCOOKING WITH THE CONVECTION OVEN
In a conventional oven, the heat sources cycle on and off to maintain an average temperature in the oven cavity. Temperature differences within the oven create gentle air currents in the oven. This natural convection tends to be inefficient because the currents are irregular and slow. In this convection system, the heat is distributed by a fan that provides continuous circulation of the hot air.
This European Convection system provides state-of-the-art engineering and advanced design to create the finest convection oven. In standard convection ovens, a fan simply circulates the hot air around the food. The KSO/KDO system has an additional heating element located around the convection fan and the venting panel that distributes heated air in three dimensions: along the sides, the top and the full depth of the oven cavity. This European Convection system maintains a more even oven temperature throughout the oven cavity.
The circulating air speeds up the baking process and cooks the food more evenly. By controlling the movement of heated air, convection cooking produces evenly browned foods that are crispy on the outside yet moist inside. Convection cooking works best for breads and pastries as well as meats and poultry. Air-leavened foods like angel food cakes, soufflés and cream puffs rise higher than in a conventional oven. Meats stay juicy and tender while the outside is flavorful and crisp. By using European Convection, foods can be cooked at a lower temperature and cooking times can be shorter. When using this mode, the standard oven temperature should be lowered by 25^ F [ 15^ C].
Foods requiring less cooking time should be checked slightly earlier than normal. For best results, foods should be cooked uncovered, in low-sided pans to take advantage of the forced air circulation. When using the Convection Roast mode, the standard oven temperature does not need to be reduced.
ADVANTAGES OF CONVECTION COOKING ADVANTAGES OF CONVECTION COOKING
• Even baking, browning and crisping are achieved.
- During roasting, juices and flavors are sealed in while the exterior is crisp.
- Yeast breads are lighter, more evenly textured, more golden and crustier.
• Air-leavened foods such as cream puffs, soufflés and meringues are higher and lighter.
- Baking on multiple racks at the same time is possible with even results.
• Multiple-rack baking saves time.
- Prepare whole meals at once with no flavor transfer.
- Dehydrates herbs, fruits and vegetables.
- Requires no specialized bake ware.
- Saves time and energy.
- Convection broiling allows for extraordinary grilling with thicker cuts of food.
OVEN FEATURESOVEN FEATURES
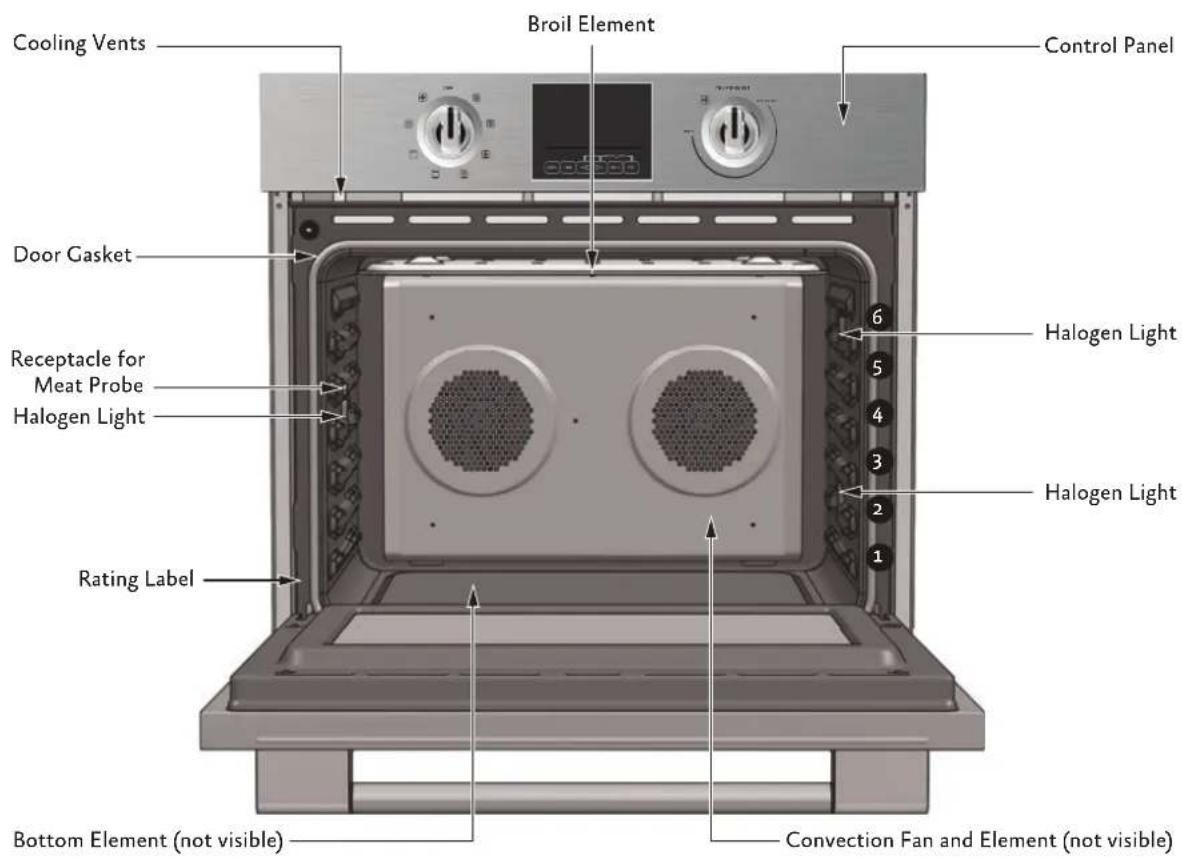
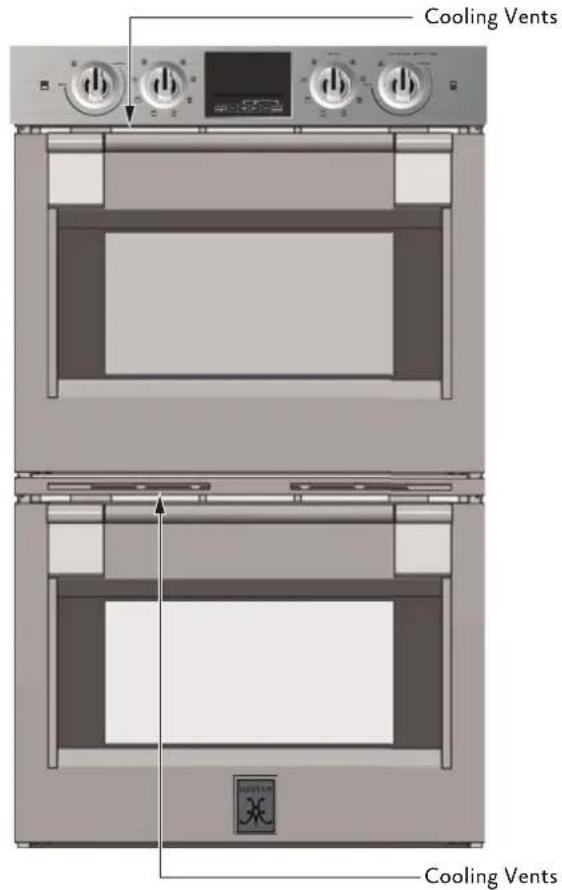

SINGLE OVEN

natural_image
Front panel of a washing machine control panel with rotary buttons and a digital display (no visible text or symbols)DOUBLE OVEN
DISPLAY AND CONTROLS DISPLAY AND CONTROLS
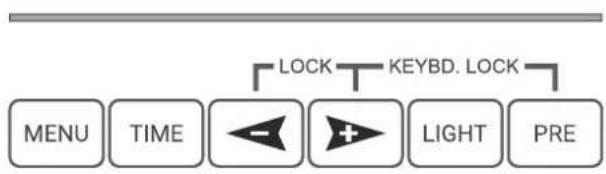
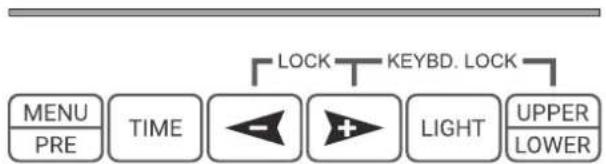
The knobs provide mode and temperature settings for each oven cavity. The central display shows information about temperature, mode, and timer information. It provides keys to set timers and select various oven functions
flowchart
graph TD
    A["MENU"] --> B["TIME"]
    B --> C["←"]
    C --> D["+"]
    D --> E["LIGHT"]
    E --> F["PRE"]
    G["LOCK"] --> H["KEYBD. LOCK"]
SINGLE OVEN
flowchart
graph TD
    A["MENU"] --> B["TIME"]
    B --> C["LOCK"]
    C --> D["KEYBD. LOCK"]
    D --> E["LIGHT"]
    E --> F["UPPER"]
    F --> G["LOWER"]
DOUBLE OVEN
COMMAND KEYS
The MENU key is used to switch between the low temperature modes and for the Special Functions menu.
MENU (Dual oven) The MENU PRE key is used to switch between the low temperature modes and for the Special Functions menu. Also enables Fast Preheat mode. (Below)
TIME The TIME key is used to set time and timer functions, including start and stop times.
LESS key - decrease the displayed value.
MORE key - increase the displayed value.
LIGHT Touch to switch the oven lights on/off.
PRE When a cooking function has been selected, the PRE key enables "fast preheat" mode. Fast preheat is not available for all functions.
UPPER (Dual Oven) The UPPER LOWER key
LOWER selects oven cavity for display and control functions.

CENTRAL DISPLAY FOR TIME AND STATUS: CENTRAL DISPLAY FOR TIME AND STATUS:
AM/PM indication present for time of day, minute minder, and automatic cooking.
Status indications show which cavity is currently selected and whether any door has been locked, automatically for self-clean or manually by the user.
TEMPERATURE DISPLAY TEMPERATURE DISPLAY
Shows the temperature setpoint for the current cooking mode, in the selected cavity. Indicates temperature units (°C or °F).
COOKING MODES DISPLAY: COOKING MODES DISPLAY:
Displays the name of the selected function.
KNOBSKNOBS
Cooking mode selector (multifunction), with seven cooking modes + CLEAN and OFF positions.
Temperature selector with PRESET and CLEAN positions + continuous range between MIN and MAX values. See "SETTING COOKING MODE AND TEMPERATURE" on page 18 for more information.
OVERVIEW OF COOKING MODES OVERVIEW OF COOKING MODES
The following illustrations give an overview of what happens in the oven with each mode setting. The name of each mode is shown, with the text shown on the oven display in brackets [ ]. The arrows represent the location of the heat sources during specific modes. The lower element is concealed under the oven floor.
For usage instructions, see "SETTING COOKING MODE AND TEMPERATURE" on page 18.
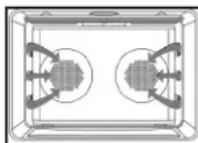
Convection Bake [CONV BAKE]:
Set temperature from 170^ F [ 75^ C] to 550^ F [ 290^ C]
Preset position 325^ F [165° C]
Convection Bake cooks with heat from a ring element behind the back wall of the oven. The heat is circulated throughout the oven by the convection fan.
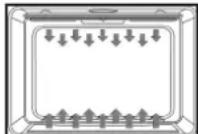
Bake [BAKE]:
Set temperature from 170^ F [75°C] to 550^ F [290°C]
Preset position 350^ F [175° C]
Bake cooks with heated air. Both the upper and lower elements cycle to maintain the oven temperature.
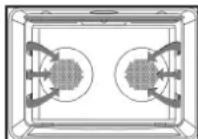
Dehydrate* [CONV DEHY]:
Set temperature from 120^ F [ 50^ C] to 160^ F [ 70^ C]
Preset position 140° F [60° C]
* Dehydrate, Proof, Defrost, and Warming are Low Temp functions. The Low Temp icon is used for all of them.
Dehydrating is similar to convection cooking but holds an optimum low temperature while circulating the heated air to remove moisture slowly for food preservation.
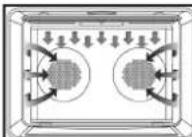
Convection Broil [CONV BROIL]: Set temperature from 170^ F [ 75^ C] to 550^ F [ 290^ C] Preset position 450^ F [ 230^ C]
Convection Broil combines the intense heat from the upper element with the heat circulated by the convection fan.
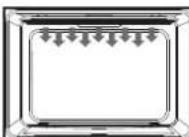
Broil [BROIL]: Set power from L1 to L5 Preset position L3
Broiling uses intense heat radiated from the upper element.
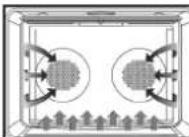
Pizza [PIZZA]: Set temperature from 170^ F [ 75^ C] to 550^ F [ 290^ C] Preset position 450^ F [ 232^ C]
Pizza is a special cooking mode using heated air and the lower elements to cook pizza.
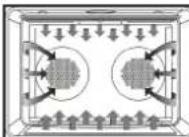
Convection Roast [CONV ROAST]: Set temperature from 170^ F [ 75^ C] to 550^ F [ 290^ C] Preset position 325^ F [ 165^ C]
Convection Roast uses the upper and lower elements and convection fan.
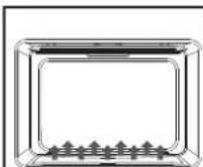
Proof [WARM]:* Set temperature from 80° F [25° C] to 120° F [50° C] Preset position 100° F [35° C]
Warming (WARM PLUS):* Set temperature from 130° F [55° C] to 210° F [100° C] Preset position 170° F [75° C]
* Dehydrate, Proof, Defrost, and Warming are Low Temp functions. The Low Temp icon used for all of them.
Proof and Warming use the lower elements to keep foods warm.
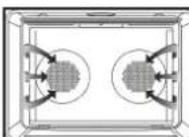
Defrost [CONV]:* No temperature setting required. * Dehydrate, Proof, Defrost, and Warming are Low Temp functions. The Low Temp icon is used for all of them.
Defrost does not use any heating element, only the convection fan is used to defrost foods.
GENERAL OVEN TIPS GENERAL OVEN TIPS
Before using your oven for the first time remove all packing and foreign materials from the appliance. Any material of this sort left inside may melt or burn when the appliance is used.
FLASHING SYMBOLS OR NUMBERS FLASHING SYMBOLS OR NUMBERS
Signals an incomplete action that is in progress (locking the door, preheat, etc.) or an incomplete setting that calls for another input.
BEEPSBEEPS
Signals that more information must be entered or confirms the receipt of an entry. Beeps also signal the end of a function or an oven fault.
DOOR LOCKDOOR LOCK
"AUTO LOCK" appears when the door has been locked automatically due to self-clean mode. AUTO LOCK flashes when the latch is moving in order to lock or unlock the door. Do not attempt to open the door at this time. Door can be opened when the symbol no longer appears.
“USER LOCK” is displayed when the door has been locked manually by the user, for example to prevent children from having free access to the oven cavity. Hold both the + and - keys for 3 seconds. The latch will lock the door. Repeat the same operation to unlock.
LOCKING THE KEYBOARDLOCKING THE KEYBOARD
Hold both the keys indicated by “KEYBD. LOCK” legend for 3 seconds. Commands are now locked and “SENS LOCK” will be displayed every time you touch any keys. Repeat the same operation for 3 seconds to unlock the keyboard.
POWER FAILURE POWER FAILURE
After power returns to the oven, the clock displays the time 12.00 AM.
NOTICE
THE DOOR MUST REMAIN CLOSED WHEN POWER IS SUPPLIED TO THE APPLIANCE.
Whenever the appliance is powered up, either at installation or after a power failure, it performs a self-test of the door locking mechanism. The lock symbol will flash during the test. The door must remain closed until after the symbol stops flashing. If the door is open or an attempt is made to open it during the test it may cause damage to the lock mechanism and result in an error code.
DEFAULT SETTINGS DEFAULT SETTINGS
Each cooking mode has a default temperature, used when the knob is in the PRESET position. The Special Features menu lets you adjust the presets for each mode. You can also set the oven to save the last used temperature for each cooking mode as a new default. See “SPECIAL FEATURES MENU” on page 33.
FAILURE NUMBER CODES FAILURE NUMBER CODES
These codes are displayed when the electronic control detects a problem in the oven or in the electronics. See “SOLVING OPERATIONAL PROBLEMS” on page 42.
CONVECTION FAN CONVECTION FAN
The convection fan operates during any convection mode. When the oven is operating in the convection mode, the fan will turn off automatically when the door is opened. The convection fan always runs during the preheat time.
COMPONENT COOLING FANCOMPONENT COOLING FAN
Activates during any cooking or self-cleaning mode to cool inner components and outer door surfaces. This air is exhausted through the vent located above the oven door. It continues to run until components have cooled sufficiently. The cooling fan operates at double speed in self-clean and whenever the internal components temperature becomes high.
PREHEATING THE OVEN PREHEATING THE OVEN
The oven preheats automatically when using the Bake, Convection Bake and Convection Roast modes.
While it is preheating, "PREHEAT" appears in the temperature display: the vertical bar indicates, in four steps, when the oven reaches the 25% , 50% , 75% , 100% of the set-point temperature. As soon as the 100% is reached, the control sounds an "end of preheat" tone and "PREHEAT" disappears.
You can use Fast Preheat mode (see below) to preheat the oven more quickly.
▶ Selecting a higher temperature does not shorten the preheat time.
Preheating is necessary for good results when baking cakes, cookies, pastry and breads.
Place oven racks in their proper position before preheating.
During preheating, the selected cooking temperature is always displayed.
A beep will confirm that the oven is preheated and the "PREHEAT" message will turn off.
PAST PREHEATFAST PREHEAT
When one of the above cooking modes is set and "PREHEAT" appears in the temperature display, a Fast Preheat mode is available: it uses the heating elements and the convection fan to reduce the heating time to a minimum.
After having set one of the cooking functions for which the fast preheat is available, touch the PRE or MENU/PRE key, "FAST" is shown in addition to "PREHEAT".
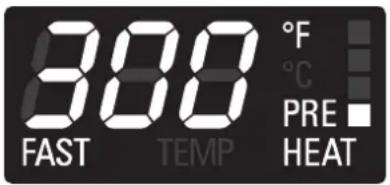
As soon as the set-point temperature is reached, the control sounds an “end of preheat” tone and both “FAST” and “PREHEAT” disappear. The oven switches to the cooking mode set: put the food inside now.
GENERALGENERAL
Use the cooking charts as a guide.
Do not set pans on the open oven door.
Use the interior oven lights to view the food through the oven door window rather than opening the door frequently.
UTENSILSUTENSILS
Glass baking dishes absorb heat. Reduce oven temperature 25^ F ( 15^ C) when baking in glass.
Use pans that give the desired browning. The type of finish on the pan will help determine the amount of browning that will occur.
- Shiny, smooth metal or light non-stick / anodized pans reflect heat, resulting in lighter, more delicate browning. Cakes and cookies require this type of utensil.
- Dark, rough or dull pans will absorb heat resulting in a browner, crisper crust. Use this type for pies.
For brown, crisp crusts, use dark non-stick / anodized or dark, dull metal utensils or glass bake ware. Insulated baking pans may increase the length of cooking time.
Do not cook with the empty broiler pan in the oven, as this could change cooking performance. Store the broiler pan outside of the oven.
OVEN CONDENSATION AND TEMPERATUREOVEN CONDENSATION AND TEMPERAT
It is normal for a certain amount of moisture to evaporate from the food during any cooking process. The amount depends on the moisture content of the food. The moisture may condense on any surface cooler than the inside of the oven, such as the control panel.
Your new oven has an electronic temperature sensor that allows maintaining an accurate temperature. Your previous oven may have had a mechanical thermostat that drifted gradually over time to a higher temperature. It is normal that you may need to adjust your favorite recipes when cooking in a new oven.
HIGH ALTITUDE BAKING HIGH ALTITUDE BAKING
When cooking at high altitude, recipes and cooking time will vary from the standard.
120/240 VS. 120/208 VOLT CONNECTION120/240 VS. 120/208 VOLT CONNECTION
Most oven installations will have a 120/240 voltage connection.
If your oven is installed with 120/208 voltage, the preheat time may be slightly longer than with 120/240 voltage.
The oven is designed to assure the same self-clean time at 208V.
OVEN RACKSOVEN RACKS
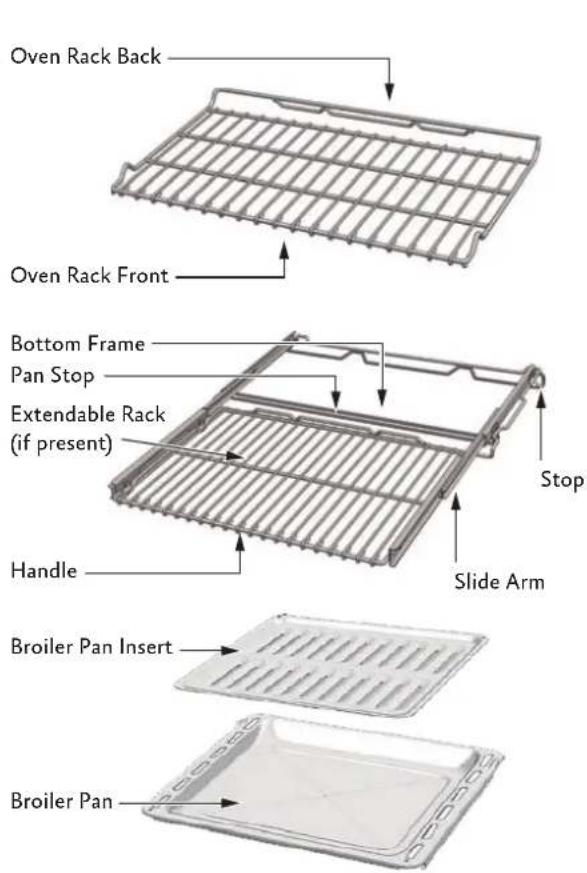
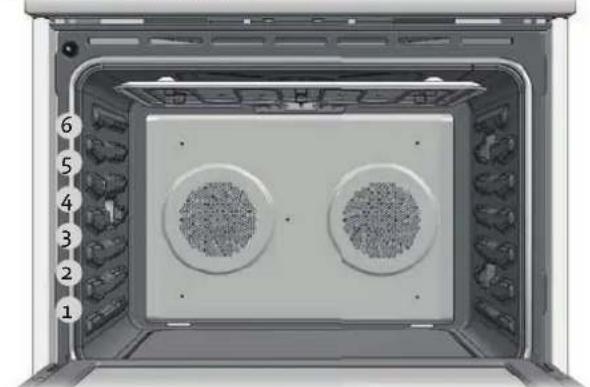
The oven has rack guides at six levels as shown in the illustration on page 8.
Rack positions are numbered from the bottom rack guide (#1) to the top (#6).
Check cooking charts for best rack positions to use when cooking.
Each level guide consists of paired supports formed in the walls on each side of the oven cavity.
Always be sure to position the oven racks before turning on the oven. Make sure that the racks are level once they are in position.
Please refer to illustration on page 8 if there is any question as to which side is the front of the rack.
The racks are designed to stop when pulled forward to their limit.
Never use aluminum foil to cover the oven racks or to line the oven. It can cause damage to the oven interior if heat is trapped under the foil.
NOTICENOTICE
Make sure you do not force the rack to avoid damage to the enamel oven interior.
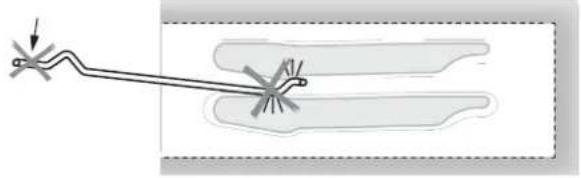
natural_image
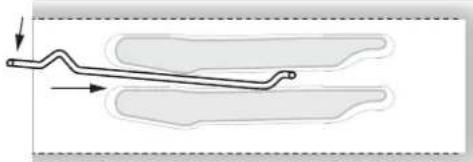
Pure diagram of a tool interacting with a surface, no text or symbols presentTo remove oven rack from the oven:
- Pull rack forward
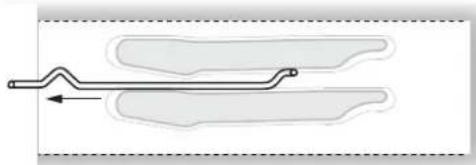
natural_image
Pure diagram of a pipe or tube with internal flow lines and an arrow, no text or symbols present- Lift rack up at front and then remove it
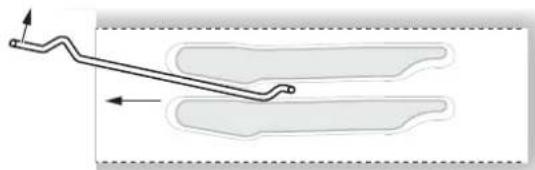
natural_image
Diagram showing a mechanical or fluidic component with directional arrows, enclosed in a dashed rectangular boundary (no text or symbols)To replace an oven rack:
- Place rear of rack between rack level guides
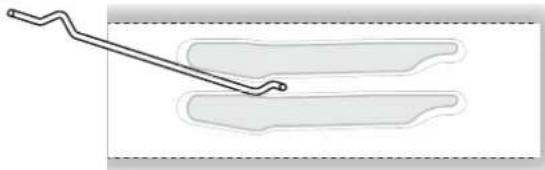
natural_image
Pure diagram of a tool interacting with two rectangular objects, no text or symbols present- While lifting front of rack, slide rack in all the way while lowering the front
natural_image
Pure diagram of a pipe or channel with directional arrows indicating flow, no text or symbols presentEXTENDABLE RACKSEXTENDABLE RACKS
The extendable rack allows for easier access to cooking. It extends beyond the standard flat rack bringing the food closer to the user.
NOTE: Always remove the extendable rack before self-cleaning the oven.
CAUTION
When the rack is removed from the oven, slide arms do not not lock. They could unexpectedly extend if the rack is carried incorrectly. Extending slide arms could cause injury. Rack should only be held or carried by grasping the sides.
To avoid burns, pull rack all the way out and lift pan clear of rack when transferring food to and from oven.
Please refer to illustration on page 8 if there is any question as to which side is the front of the rack.
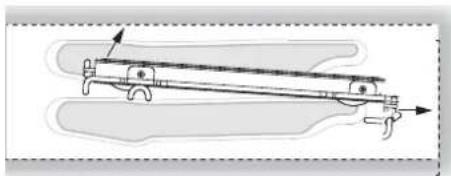
To remove extendable rack from the oven:
- Lift rack slightly and push it towards the back of the oven until the stop releases.
natural_image
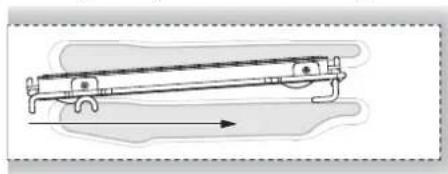
Pure mechanical diagram of a lever system without any text, numbers, or symbolsTo replace an extendable rack:
- Grasp rack firmly on both sides. Place rack (including frame) above desired rack guide
natural_image
Pure mechanical diagram showing a lever mechanism with no text or symbols- Raise back of rack until frame and stop clear rack guide

natural_image
Diagram of a mechanical lever system with arrows indicating motion direction (no text or labels)- Push all the way in until the back of the rack drops into place
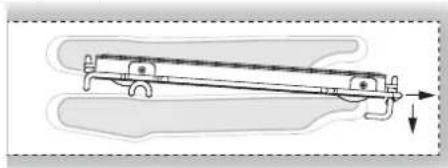
natural_image
Diagram of a mechanical component with a downward arrow indicating force or direction (no text or symbols present)- Pull rack down and out
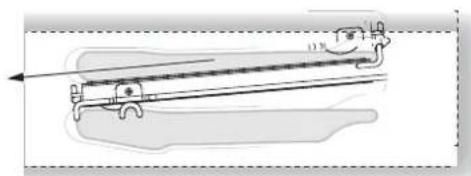
natural_image
Diagram of a mechanical device with a lever and shaft, showing internal components and motion lines (no text or symbols)- Pull both sections forward until stops activate. Rack should be straight and flat, not crooked.
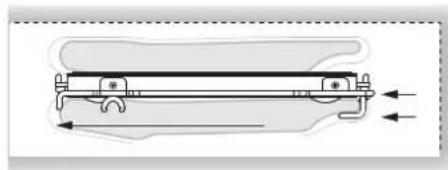
natural_image
Pure mechanical diagram showing a lever mechanism with arrows indicating direction (no text or symbols)SETTING THE CLOCK AND TIMER SETTING THE CLOCK AND TIMER
The time of day is displayed in hours and minutes.
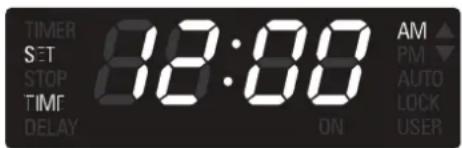
Always set the clock immediately after installation or after a power failure. Once power returns to the oven, the clock displays the time 12:00 ^AM .
The clock time will appear during all oven operations except when there is the timer or any timed cooking operations running.
The oven is preset to a 12-hour clock and indicates ^AM and ^PM . It may be set to 24 hour if desired. "SPECIAL FEATURES MENU" on page 33.
TO SET THE TIME OF DAY TO SET THE TIME OF DAY
- Touch TIME until the display shows "SET TIME".
- Touch + or -, the hours will begin flashing: continue until the correct hour value and ^AM or ^PM indication is shown.
- Touch TIME again to confirm the hour and minutes will start flashing.
- Touch + or - to set the desired minutes value or hold the key to change by 10 minute steps.
- Touch TIME again or wait for 5 seconds in order to confirm the time.
NOTE: The Time of Day can't be set if any timer function is already set: first cancel all the active timer functions.
TO SET THE TIMER TO SET THE TIMER
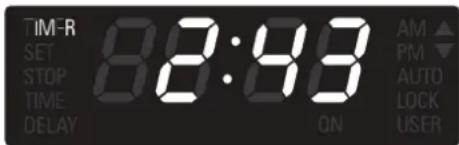
- Touch TIME until the display shows "TIMER".
- Touch + or - to set the desired timer value, the hours will begin flashing: continue until the desired value is set.
- Touch TIME again to confirm the hour and minutes will start flashing.
- Touch + or - to set the desired minutes value or hold the key to change by 10 minute steps.
- Touch TIME again or wait for 5 seconds in order to confirm the time. "TIMER" will be steadily displayed.
- When the time ends, reminder beeps will sound for 15 minutes or until the TIME key is pressed.
Timer format is HR:MIN until the last minute, then it switches to MIN:SEC.
The displayed value is always rounded to the lower minute.
To cancel a time or timer function, use the TIME key to select the function, and the + or - keys to set the minutes and seconds to zero.
The TIMER does not affect oven operation, it is only a reminder.
SETTING COOKING MODE AND TEMPERATURE SETTING COOKING MODE AND TEMPE
For a description of available cooking modes, see "OVERVIEW OF COOKING MODES" on page 10.
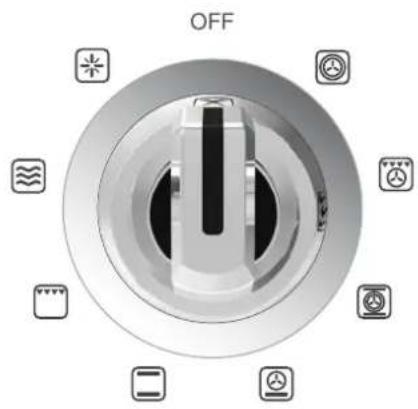
COOKING MODE SELECTOR
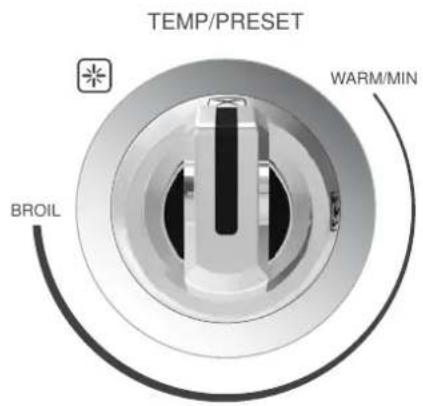
TEMPERATURE SELECTOR
The following modes can be selected by turning the cooking mode knob to the desired position. To select Clean, the temperature knob must be moved into the Clean position too.
Observe the displayed temperature setting, and adjust the temperature knob if needed. The temperature can be changed by 5^ F or 5^ C steps.
As soon as one of the knobs is moved, the control displays information for the corresponding cavity. The corresponding message "UPPER" or "LOWER" appears.
Cavity will begin to heat, "ON" is displayed when the selected oven is active, oven lights will turn on.
"PREHEAT" message is displayed. Once the oven has preheated, it will beep and switch the message off.
To preheat the oven more quickly, touch the PREPRE (or MENU/PREMENU/PRE) key. The display will show as well as PREHEAT.
To change the temperature while cooking, simply turn the temperature knob until the display shows the desired value.
Dual Cavity models: When you adjust any of the knobs, the display will switch to the cavity you adjusted. To view without adjusting, touch UPPER/LOWERUPPER/LOWER to switch the display cavities.
| COOK MODE SELECTOR | DISPLAY VALUE | |
| OFF | OFF | |
 | CONVECTION BAKE | CONV BAKE |
 | CONVECTION BROIL | CONV BROIL |
 | CONVECTION ROAST | CONV ROAST |
 | PIZZA | MULTI PIZZA |
 | BAKE | BAKE |
 | BROIL | BROIL |
 | LOW TEMP - DEHYDRATE | CONV DEHY |
 | LOW TEMP - PROOF | WARM |
 | LOW TEMP - DEFROST | CONV |
 | LOW TEMP - WARMING | WARM PLUS |
 | CLEAN | |
between
Dual Cavity models: The triangles to the right of the time display indicate when each cavity is running.
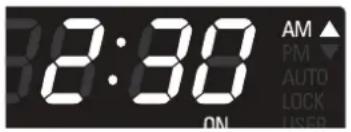
This display indicates that the upper cavity is running, and the lower cavity is not running.
TO STOP COOKING TO STOP COOKING
To stop cooking, turn the cooking mode knob to OFF.
LOW TEMPERATURE FUNCTIONS LOW TEMPERATURE FUNCTIONS:
The low temperature functions include DEHYDRATE, PROOF, DEFROST, and WARMING.
When cooking mode knob is set to Low Temp mode, the most recently used Low Temp function is displayed
To select a different function, touch the MENUMENU until the function that you want is displayed.
The last used is kept in memory for the next selection.
| A TURE FUNCTIONS : LOW TEMPERATURE MODE | DISPLAY VALUE | |
| LOW TEMP - DEHYDRATE | CONV DEHY | |
| LOW TEMP - PROOF | WARM | |
| LOW TEMP - DEFROST | CONV | |
| LOW TEMP - WARMING | WARM PLUS | |
USING OVEN LIGHTSUSING OVEN LIGHTS
A single light key activates the lights in either oven.
If LIGHT key is touched when both ovens are off, lights in both the upper and lower oven will turn on. Touch LIGHTLIGHT key again, and both oven lights will turn off.
Oven lights turn on and off automatically when the door is opened and closed.
When an oven is in use, oven lights turn on automatically when a mode is started. Oven lights will turn off automatically when the oven mode is cancelled.
The lights do not operate in the Self-Clean mode.
DUAL OVENSDUAL OVENS
Lights Control: To manually control the interior oven lights in either the upper or lower oven if one or both ovens are in use:
- Touch UPPER/LOWER to select the other oven.
-
Touch LIGHT to turn lights on or off in the desired cavity.
-
Touch UPPER/LOWER and the display will indicate which oven is selected.
Timed mode cooking lets you set the length of time the oven will cook. At the end of that time, the oven turns off. In double oven models, each oven can be set for its own cook time.
To have the oven finish at a particular time of day, use the STOP TIME feature. See "TO DELAY THE START OF A TIMED MODE" below.
- Be sure that the time-of-day clock is displaying the correct time.
- The oven will not preheat when running a timed mode.
TO SET A TIMED MODE TO SET A TIMED MODE
- Select the cooking mode and the temperature by means of the knobs. The "ON" message will appear in the display.
- Touch TIME key until "TIME" appears in the display.
- Touch + or –, the hour digits will begin flashing. Continue to set the desired cooking time. If the oven hasn't been preheated, allow extra time for the oven to reach the set temperature.
▶ You can let the oven preheat and then set a cooking period using TIME, but don't do that if using a delayed start. (See TO DELAY THE START OF A TIMED MODE, below.) - Touch TIME again, the hours will be confirmed and the minute digits will begin flashing.
- Touch + or – to change the minutes. Hold the key to change by 10 minutes steps. Continue to set the desired cooking time.
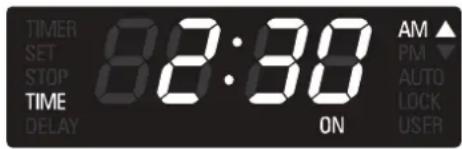
- Touch TIME once again or wait for a few seconds to confirm the cooking time value.
TO DELAY THE START OF A TIMED MODE TO DELAY THE START OF A TIMED MODE
Follow steps 1 through 6 above.
- Touch TIME key until "STOP TIME" appears in the display.
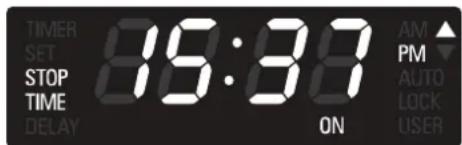
The initial value displayed will be the time of day plus the cooking time already set.
- Touch + or –, the hour digits will begin flashing. Continue to set the desired stop time.
- Touch TIME again, the hours will be confirmed and the minute digits will begin flashing.
- Touch + or - to change the minutes. Hold the key to change by 10 minutes steps. Continue to set the desired stop time.
- Touch TIME once again or wait for a few seconds to confirm the stop time value.
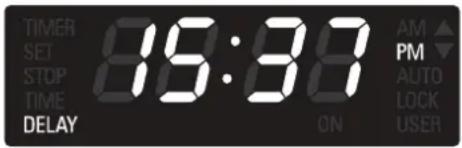
- The clock calculates the time of day to start cooking based on the selected stop time and the cooking time set. The "DELAY" message is displayed until the starting time is reached.
WHEN A TIMED MODE IS RUNNING WHEN A TIMED MODE IS RUNNING
As soon as the oven actually starts cooking, the display shows the cooking time and counts down by one minute steps. The oven will cook for the programmed time.
When the time expires, the oven automatically turns off, the "ON" and "TIME" messages start flashing and an "end of activity" beep sequence sounds. Reminder beeps will sound for up to fifteen minutes or until the MODE knob is turned off or any key is touched.
HOW TO CHECK A TIME VALUE HOW TO CHECK A TIME VALUE
To check a time value that is not currently displayed, first use the UPPER/LOWER key (if needed) to select the correct oven cavity. Then touch the TIMETIME key until the function is displayed. The selected value is displayed for 5 seconds.
Example: if the timer value is displayed and you want to check the cooking time, touch the TIMETIME key until "TIME" is displayed to view the cooking time for 5 seconds.
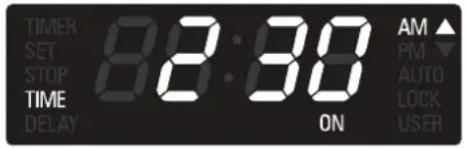
IF "TIME" AND "STOP TIME" DON'T DISPLAY IF "TIME" AND "STOP TIME" DON'T DISPLAY
Ordinarily, touching the TIME key will display TIMER, then TIME, then STOP TIME, then SET TIME.
After selecting a cooking mode, the word "MODE" may be displayed for 5-10 seconds. While MODE is displayed, the TIME key will only show TIMER and SET TIME.
Wait until MODE is no longer displayed, then TIME and STOP TIME will be available.
USING THE MEAT PROBE USING THE MEAT PROBE
This oven is provided with the meat probe feature to sense the temperature inside meat and stop cooking as soon as the set value is reached. In a double oven, it is available only in the upper cavity.
The following modes can be selected to work with the meat probe:
| COOK MODE SELECTOR D | SPLAY VALUE | |
 | CONVECTION BAKE | CONV BAKE |
 | CONVECTION ROAST | CONV ROAST |
 | BAKE | BAKE |
- Other modes will not start if the probe is inserted.
- Insert the probe into the meat and place the meat in the oven. Insert the probe connector into the receptacle. (See "OVEN FEATURES" on page 8.)
- Once the probe has been inserted in its connector and detected by the control, turn the cooking mode knob into a valid position. PROBE appears on the display with the selected function.
- The meat probe standard temperature (170° F) flashes on the display for 5 seconds.
-
To change the probe set point, use the + / - keys.
-
The standard probe temperature set-point is 170^ F.
- The allowed range is between 130^ F and 210^ F.
-
The temperature is displayed in steps of 5^ F or 2.5^ C for setting and actual values.
-
After 5 seconds the value on the display is accepted and the control starts cooking.
- The actual probe temperature is then displayed.
- Set oven temperature with the knob as usual.
- The maximum cavity temperature during cooking with meat probe is 475^ .

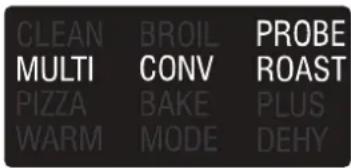
- Touch + or – once to check the probe set temperature. When the temperature flashes, touch + or – further or hold to modify the value.
- As soon as the set probe temperature is reached, the control sounds an end of cooking tone and stops the oven.
• Always turn the cooking mode to the OFF position before reusing the oven.
The PROBE message flashes when the mode is not valid for cooking with probe. If the probe is removed during cooking, or in case of a short or open circuit, a fault message will be displayed.
Automatic time functions are disabled when using the meat probe, only the timer can work.
Baking is cooking with heated air. Both upper and lower elements in the oven are used to heat the air but no fan is used to circulate the heat.
Follow the recipe or convenience food directions for baking temperature, time and rack position. Baking time will vary with the temperature of ingredients and the size, shape and finish of the baking utensil.
GENERAL GUIDELINES GENERAL GUIDELINES
- For best results, bake food on a single rack with at least 1'' - 1 12'' [2.5 - 3cm] space between utensils and oven walls.
- Use one rack when selecting the bake mode.
- Check for doneness at the minimum time.
- Use metal bake ware (with or without a non stick finish), heatproof glass, glass-ceramic, pottery or other utensils suitable for the oven.
- When using heatproof glass, reduce temperature by 25^ F [15^] from recommended temperature.
- Use baking sheets with or without sides or jelly roll pans.
- Dark metal pans or nonstick coatings will cook faster with more browning. Insulated bake ware will slightly lengthen the cooking time for most foods.
- Do not use aluminum foil or disposable aluminum trays to line any part of the oven. Foil is an excellent heat insulator and heat will be trapped beneath it. This will alter the cooking performance and can damage the finish of the oven.
- Avoid using the opened door as a shelf to place pans.
For tips, see "SOLVING BAKING PROBLEMS" on page 41.
CONVECTION BAKE TIPS AND TECHNIQUES
Reduce recipe baking temperatures by 25^ F [ 15^ C].
- For best results, foods should be cooked uncovered, in low-sided pans to take advantage of the forced air circulation. Use shiny aluminum pans for best results unless otherwise specified.
- Heatproof glass or ceramic can be used. Reduce temperature by another 25^ [15^] when using heatproof glass dishes for a total reduction of 50^ [30^] .
- Dark metal pans may be used. Note that food may brown faster when using dark metal bake ware.
- The number of racks used is determined by the height of the food to be cooked.
- Baked items, for the most part, cook extremely well in convection. Don't try to convert recipes such as custards, quiches, pumpkin pie, or cheesecakes, which do not benefit from the convection-heating process. Use the regular Bake mode for these foods.
- Multiple rack cooking for oven meals is done on rack positions 1, 2, 3, 4 and 5. All five racks can be used for cookies, biscuits and appetizers.
- Baking with two racks: Use positions 1 and 3.
- Baking with three racks: Use positions 2, 3 and 4 or 1, 3 and 5.
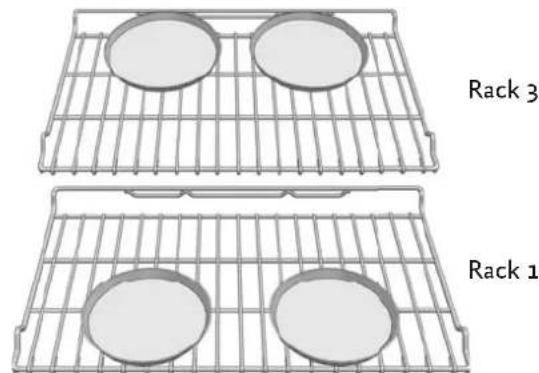
- When baking four cake layers at the same time, stagger pans so that one pan is not directly above another. For best results, place cakes on front of upper rack and back of lower rack (See graphic on following page). Allow 1" - 1 12 " [2.5 - 3cm]. air space around pans.
- Converting your own recipe can be easy. See page 24 for foods that work well in convection.
- Reduce the temperature and cooking time if necessary. It may take some trial and error to achieve a perfect result. Keep track of your technique for the next time you want to prepare the recipe using convection.
For tips, see "SOLVING BAKING PROBLEMS" on page 41.
FOODS RECOMMENDED FOR CONVECTION BAKE MODE:FOODS RECOMMENDED FO
Appetizers, Biscuits, Coffee Cakes
Cookies (2 to 4 racks), Yeast Breads
Cream Puffs
Popovers
Casseroles and One-Dish Entreés
Oven Meals (rack positions 1, 2, 3)
Air Leavened Foods (Soufflés, Meringue, Meringue-Topped Desserts, Angel Food Cakes, Chiffon Cakes)
OVEN RACK POSITIONS
The graphic shows the rack position numbering.
RACK POSITION
QUICK AND EASY RECIPE TIPS QUICK AND EASY RECIPE TIPS
Converting from standard BAKE to CONVECTION BAKE:
- Reduce the temperature by 25^ F [15°C].
- Use the same baking time as Bake mode if under 10 to 15 minutes.
- Foods with a baking time of less than 30 minutes should be checked for doneness 5 minutes earlier than in standard bake recipes.
- If food is baked for more than 40 to 45 minutes, bake time should be reduced by 25% .
natural_image
Interior view of an oven with two circular vented chambers and numbered labels (1-6) on the left side, showing no readable text or symbols.MULTIPLE RACK PAN PLACEMENT
natural_image
Two identical wire grating trays labeled Rack 1 and Rack 3, each containing four circular samples (no text or symbols on the grating itself)CONVECTION BAKE CHART CONVECTION BAKE CHART
Reduce standard recipe temperature by 25^ F [15°C] for Convection Bake. Temperatures have been reduced in this chart.
| FOOD ITEM | RACK POSITION | TEMP. °F [°C] (PREHEATED OVEN) | TIME (MIN) | TIME (MIN) | |
| Single oven | Double Oven | ||||
| CAKE Cupcakes 2 325 [160] 20 - 22 16 - 18 Bundt Cake 1 325 [160] 43 - 50 37 - 43 Angel Food 1 325 [160] 43 - 47 35 - 39 | |||||
| PIE 2 crust, fresh, 9" 2 350 - 400 [175 - 205] 2 crust, frozen fruit, 9" 2 350 [175] 68 - 78 68 - 78 | |||||
| COOKIES Sugar 2 325 - 350 [160 - 175] 9 - 12 Chocolate Chip Brownies 2 325 - 350 [160 - 175] 8 - 13 8 - 13 2 325 [160] 29 - 36 29 - 36 | |||||
| BREADS Yeast bread loaf, 9x5 Yeast rolls Biscuits Muffins 2 350 [175] 18 - 22 18 - 22 2 350 - 375 [175 - 190] 12 - 15 12 - 15 2 375 [190] 8 - 10 6 - 8 2 400 [205] 17 - 21 13 - 16 | |||||
| PIZZA Frozen Fresh 2 375 - 425 [190 - 220] 23 - 26 23 - 26 2 450 [232] 15 - 18 15 - 18 | |||||
This chart is a guide. Follow recipe or package directions and reduce temperatures appropriately.
CONVECTION ROAST TIPS AND TECHNIQUES
• Do not preheat for Convection Roast.
• Roast in a low-sided, uncovered pan.
- When roasting whole chickens or turkey, tuck wings behind back and loosely tie legs with kitchen string.
• Use the 2-piece broiler pan for roasting uncovered.
- Use the probe or a meat thermometer to determine the internal doneness on "END" temperature (see "CONVECTION ROAST CHART - SINGLE OVEN" or "CONVECTION ROAST CHART - DOUBLE OVEN" on following pages).
- Double-check the internal temperature of meat or poultry by inserting meat thermometer into another position.
- Large birds may also need to be covered with foil (and pan roasted) during a portion of the roasting time to prevent overbrowning.
• The minimum safe temperature for stuffing in poultry is 165^ F [ 75^ C].
• After removing the item from the oven, cover loosely with foil for 10 to 15 minutes before carving if necessary to increase the final foodstuff temperature by 5^ to 10^ F [ 3^ to 6^ C]
QUICK AND EASY RECIPE TIPS QUICK AND EASY RECIPE TIPS
Converting from standard BAKE to CONVECTION ROAST:
• Temperature does not have to be lowered.
- Roasts, large cuts of meat and poultry generally take 10-20% less cooking time. Check doneness early.
- Casseroles or pot roasts that are baked covered in CONVECTION ROAST will cook in about the same amount of time.
CONVECTION ROAST CHART - SINGLE OVEN CONVECTION ROAST CHART - SINGLE O
| MEATS | WEIGHT (lb) | OVENTEMP. °F [°C] | RACK POS'N | TIME (min. per lb) | INTERNAL TEMP. °F [°C] |
| BEEFRib Roast 4 - 6 325 [160] | 2 16 - 20 | 18 - 22 160 | 145 [63] medium rare[71] medium | ||
| Rib Eye Roast, (boneless) | 4 - 6 325 | [160] 2 16 - 20 | 145 [63] medium | 18 - 22 160 | rare[71] medium |
| Rump, Eye, Tip, Sirloin (boneless) | 3 - 6 325 | [160] 2 16 - 20 | 145 [63] medium | 18 - 22 160 | rare[71] medium |
| Tenderloin Roast 2 - 3 | 400 [205] 2 | 15 - 20 145 [63] | medium | rare[71] medium | |
| PORKLoin Roast (boneless or bone-in) | 5 - 8 350 | [175] 2 16 - 20 | 160 [71] medium | ||
| Shoulder | 3 - 6 350 | [175] 2 20 - 25 | 160 [71] medium | ||
| POULTRYChicken whole | 3 - 4 375 | [190] 2 18 - 21 | 180 [82] | ||
| Turkey, not stuffed | 12 - 15 | 325 [160] 1 10 | - 14 180 [82] | ||
| Turkey, not stuffed | 16 - 20 | 325 [160] | 1 | 9 - 11 | 180 [82] |
| Turkey, not stuffed | 21 - 25 | 325 [160] | 1 | 6 - 10 | 180 [82] |
| Turkey Breast | 3 - 8 325 | [160] 1 15 - 20 | 170 [77] | ||
| Cornish Hen | 1 - 112 | 350 [175] | 2 | 45 - 75 total | 180 [82] |
| LAMBHalf Leg | 3 - 4 325 | [160] 2 20 - 27 | 160 [71] medium | 28 - 33 170 | [77] well |
| Whole Leg | 6 - 8 325 | [160] 1 22 - 27 | 160 [71] medium | 28 - 33 170 | [77] well |
Cooking times are indicative and also depend on the thickness and the starting temperature of the meat before cooking.
CONVECTION ROAST CHART - DOUBLE OVENCONVECTION ROAST CHART - DOUBLE (
| MEATS | WEIGHT (lb) | OVENTEMP. °F [°C] | RACK POS'N | TIME (min. per lb) | INTERNAL TEMP. °F [°C] |
| BEEFRib Roast 4 - 6 325 [160] 2 18 - 22 | 145 [63] medium rare | ||||
| 20 - 25 160 | [71] medium | ||||
| Rib Eye Roast, (boneless) | 4 - 6 325 | [160] 2 18 - 22 | 145 [63] medium | rare | |
| 20 - 25 160 | [71] medium | ||||
| Rump, Eye, Tip, Sirloin (boneless) | 3 - 6 325 | [160] 2 18 - 22 | 145 [63] medium | rare | |
| 20 - 25 160 | [71] medium | ||||
| Tenderloin Roast 2 - 3 | 425 [220] 2 | 15 - 20 145 [63] | medium | rare | |
| PORKLoin Roast (boneless or bone-in) 5 - 8 350 [175] 2 18 - 22 | 160 [71] medium | ||||
| Shoulder 3 - 6 350 [175] 2 20 - 25 | 160 [71] medium | ||||
| POULTRYChicken whole | 3 - 4 375 | [190] 2 20 - 23 | 180 [82] | ||
| Turkey, not stuffed | 12 - 15 | 325 [160] 1 10 | - 14 180 [82] | ||
| Turkey, not stuffed | 16 - 20 | 325 [160] | 1 | 9 - 11 | 180 [82] |
| Turkey, not stuffed | 21 - 25 | 325 [160] | 1 | 6 - 10 | 180 [82] |
| Turkey Breast | 3 - 8 325 | [160] 1 15 - 20 | 170 [77] | ||
| Cornish Hen | 1 - 112 | 350 [175] | 2 | 45 - 75 total | 180 [82] |
| LAMBHalf Leg | 3 - 4 325 | [160] 2 20 - 27 | 160 [71] medium | ||
| Whole Leg | 6 - 8 325 | [160] 1 20 - 27 | 160 [71] medium | 25 - 32 170 | [77] well |
| 25 - 32 170 | [77] well | ||||
Cooking times are indicative and also depend on the thickness and the starting temperature of the meat before cooking.
EN
CONVECTION BROIL TIPS AND TECHNIQUES
- Place rack in the required position needed before turning on the oven.
- Use Convection Broil mode with the oven door closed.
- Do not preheat oven.
- Use the 2-piece broil pan.
- Turn meats once halfway through the cooking time (see convection broil charts).
CONVECTION BROIL CHART - SINGLE OVENCONVECTION BROIL CHART - SINGLE OVEN
| FOOD AND THICKNESS | RACK POSITION | BROIL SETTING °F [°C] | INTERNAL TEMP. °F [°C] | TIME SIDE 1 (MIN.)* | TIME SIDE 2 (MIN.)* |
| BEEF STEAK(1" or more) | |||||
| Medium rare 4 450 [235] | 145 [65] | 9 - 12 8 - 10 | |||
| Medium 4 450 [235] | 160 [71] | 11 - 13 10 - 12 | |||
| Well done | 4 450 [235] | 170 [77] | 18 - 20 16 - 17 | ||
| HAMBURGERS(1" or more) | |||||
| Medium 4 550 [290] | 160 [71] | 8 - 11 | 5 - 7 | ||
| Well | 4 550 [290] | 170 [77] | 11 - 13 8 - 10 | ||
| POULTRY | |||||
| Chicken Quarters | 4 450 [235] | 180 [82] | 16 - 18 10 - 13 | ||
| Chicken Halves | 3 450 [235] | 180 [82] | 25 - 27 15 - 18 | ||
| Chicken Breasts | 4 450 [235] | 170 [77] | 13 - 15 9 - 13 | ||
| PORK | |||||
| Pork Chops(1" or more) | 4 450 [235] | 160 [71] | 12 - 14 11 - 13 | ||
| Sausage - fresh | 4 450 [235] | 160 [71] | 4 - 6 | 3 - 5 |
* Broiling and convection broiling times are approximate and may vary slightly. Cooking times are indicative and also depend on the thickness and the starting temperature of the meat before cooking.
CONVECTION BROIL CHART - DOUBLE OVENCONVECTION BROIL CHART - DOUBLE O
| FOOD AND THICKNESS | RACK POSITION | BROIL SETTING °F [°C] | INTERNAL TEMP. °F [°C] | TIME SIDE 1 (MIN.)* | TIME SIDE 2 (MIN.)* |
| BEEF STEAK(1" or more)Medium rare 4 450 [235] 145 [65] Medium 4 450 [235] 160 [71] 15 - 17 Well done 4 450 [235] 170 [77] 16 - 18 | 11 - 13 10 - 1217 13 - 15 | ||||
| HAMBURGERS(1" or more)Medium 4 550 [290] 160 [71] 9 - 11 Well | 5 - 84 550 [290] 170 [77] 11 - 13 | 8 - 10 | |||
| POULTRYChicken QuartersChicken HalvesChicken Breasts | 4 450 [235] 180 [82] 18 - 20 13 - 153 450 [235] 180 [82] 25 - 27 15 - 184 450 [235] 170 [77] 14 - 16 | 10 - 14 | |||
| PORKPork Chops(1" or more)Sausage - fresh | 4 450 [235] 160 [71] 13 - 15 12 - 144 450 [235] 160 [71] | 15 12 - 14160 [71] | 4 - 6 | 3 - 5 |
* Broiling and convection broiling times are approximate and may vary slightly.
Cooking times are indicative and also depend on the thickness and the starting temperature of the meat before cooking.
DEHYDRATE TIPS AND TECHNIQUES
Dehydrating can be done using the Dehydrate mode. A lower temperature is used and the circulating heated air slowly removes the moisture for food preservation.
• The Dehydrate mode temperature is pre-programmed at 140^ F [ 60^ C].
• The Dehydrate mode temperatures available are 120^ F [ 50^ C] to 160^ F [ 70^ C].
• Multiple racks can be used simultaneously.
• Some foods require as much as 14-15 hours of time to fully dehydrate.
- Consult a food preservation book for specific times and the handling of various foods.
• This mode is suitable for a variety of fruits, vegetables, herbs and meat strips.
• Drying screens can be purchased at specialty kitchen shops.
- By using paper towels, some food moisture can be absorbed before dehydrating begins (such as with sliced tomatoes or sliced peaches).
DEHYDRATE CHARTDEHYDRATE CHART
| FOOD PREPARATION | APPROXIMATE DRYING TIME (hrs) | TEST FOR DONENESS | |
| FRUIT | |||
| Apples | Dipped in 1/4 cup lemon juice and 2 cups water, 1/4 slices | 11 - 15 | Slightly pliable |
| Bananas | Dipped in 1/4 cup lemon juice and 2 cups water, 1/4 slices | 11 - 15 | Slightly pliable |
| Cherries | Wash and towel dry. For fresh cherries, remove pits | 10 - 15 | Pliable, leathery, chewy |
| Oranges Peels and slices | 1/4 slices of orange; orange part of skin thinly peeled from oranges | Peels: 2 - 14 Slices: 12 - 16 | Orange peel: dry and brittle Orange slices: skins are dry and brittle, fruit is slightly moist |
| Pineapple rings Towel | dried | Canned: 9 - 13 Fresh: 8 - 12 | Soft and pliable |
| Strawberries | Wash and towel dry. Sliced 1/2" thick, skin (outside) down on rack | 12 - 17 | Dry, brittle |
| VEGETABLE Peppers | Wash and towel dry. Remove membrane of pepper, coarsely chopped about 1" pieces | 16 - 20 | Leathery with no moisture inside |
| Mushrooms | Wash and towel dry. Cut off stem end. Cut into 1/8" slices | 7 - 12 | Tough and leathery, dry |
| Tomatoes | Wash and towel dry. Cut this slices, 1/8" thick, dry well | 16 - 23 | Dry, brick red color |
| HERBS | |||
| Oregano, sage parsley and thyme, and fennel | Rinse and dry with paper towel | Dry at 120°F [60°C] 3 - 15 Crisp and brittle | |
| Basil | Use basil leaves 3 to 4 inches from top. Spray with water, shake off moisture and pat dry | Dry at 120°F [60°C] 3 - 15 Crisp and brittle | |
- Place rack in the required position needed before turning on the oven.
- Use Broil mode with the oven door closed.
- Preheat oven for 5 minutes before use.
- Use the 2-piece broil pan.
- Turn meats once halfway through the cooking time. (See Broil Chart below.)
BROIL CHARTBROIL CHART
| FOOD AND THICKNESS | RACK POSITION | BROIL SETTING | INTERNAL TEMP. °F [°C] | TIME SIDE 1 (MIN.)* | TIME SIDE 2 (MIN.)* | |
| BEEF | ||||||
| Steak (3/4"-1") | ||||||
| Medium rare 5 5 | 145 | [63] | 5 - 7 4 | |||
| Medium 5 5 | 160 | [71] | 6 - 8 5 - 7 | |||
| Well 5 5 | 170 | [77] | 8 - 10 7 - 9 | |||
| HAMBURGERS (3/4"-1") | ||||||
| Medium 4 5 | 160 | [71] | 8 - 11 6 - 9 | |||
| Well 4 5 | 170 | [77] | 10 - 3 | 8 - 10 | ||
| POULTRY | ||||||
| Breast (bone-in) | 4 4 | 170 | [77] | 0 - 2 8 - 10 | ||
| Thigh (very well done) | 4 3 | 180 | [82] | 28 - 30 | 13 - 15 | |
| PORK | ||||||
| Pork Chops (1") | 5 5 | 160 | [71] | 7 - 9 5 - 7 | ||
| Sausage - fresh | 5 5 | 160 | [71] | 5 - 7 3 - 5 | ||
| Ham Slice (1") | 5 5 | 160 | [71] | 4 - 6 3 - 5 | ||
| SEAFOOD | ||||||
| Fish Filets (1") | Cook until opaque & flakes easily with fork | Do not turn | ||||
| Buttered | 4 | 4 | 10 - 14 | |||
| LAMB | ||||||
| Chops (1") | ||||||
| Medium Rare | 5 5 | 145 | [63] | 5 - 7 4 - 6 | ||
| Medium 5 5 | 160 | [71] | 6 - 8 4 - 6 | |||
| Well 5 5 | 170 | [77] | 7 - 9 5 - 7 | |||
| BREAD | ||||||
| Garlic Bread, 1" slices | 4 5 | 2 - 2.30 | ||||
| Garlic Bread, 1" slices | 3 5 | 4 | ||||
* Broiling and convection broiling times are approximate and may vary slightly. Cooking times are indicative and also depend on the thickness and the starting temperature of the meat before cooking.
| FOOD ITEM SAFE MINIMUM INTERNAL TEMPERATURES * | |
| GROUND MEATS(BEEF, VEAL, LAMB, PORK) | 160°F [72°C] |
| BEEF, VEAL, LAMB ROAST,STEAKS, CHOPS | Medium Rare - 145°F [63°C]Medium - 160°F [72°C]Well Done - 170°F [77°C] |
| PORK ROAST, STEAKS,CHOPS | Medium - 160°F [72°C]Well Done - 170°F [77°C] |
| HAM | Un-cooked - 145°F [63°C]Reheat cooked hams packaged inUSDA-inspected plants to 140 °F [60°C]and all others to 165 °F [74°C] |
| GROUND CHICKEN/TURKEY 165°F [74°C] | |
| WHOLE CHICKEN/TURKEY 180°F [82°C] | |
| POULTRY BREAST, ROASTS | 165°F [74°C] |
| POULTRY THIGHS & WINGS 165°F [74°C] | |
| STUFFING (cooked alone) 165°F [74°C] | |
| EGG DISHES 160°F [72°C] | |
| FISH & SHELLFISH 145°F [63°C] | |
| LEFTOVERS 165°F [74°C] | |
| CASSEROLES 165°F [74°C] | |
* Safe minimum internal temperatures per US Dept. of Agriculture Food Safety & Inspection Services guidelines.
The Special Features menu can be used to select the following special oven features:
| PROMPT NAME PURPOSE | |
| SAB SABBATH MODE For religious faiths with “no work” requirements on the Sabbath. | |
| OFS OVEN OFFSET To calibrate the oven temperature.(Use only on advice from Hestan Service.) | |
| DEG ° UNIT Select Fahrenheit or Celsius for use. | |
| HR CLOCK FORMAT To set the time of day format as 12:00 AM/PM or 24:00. | |
| SET PRESET TEMPERATURE To save the standard preset temperature per every cooking mode or to keep the last used temperature as a new default. | |
To select special features, follow the steps below:
- Touch and hold MENU and TIME keys for at least 3 seconds. Clock time disappears and the following display is shown:

- Touch the + or the - key to show the available options described above, until the desired one is found.
- Touch MENU key to edit the selected option. The option is then shown on the left and its value is shown on the right.
- Change the value by means of the +/ - keys
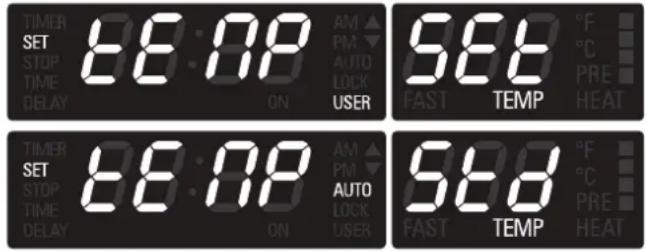
- Touch the MENU key to confirm the option and go back to the selection menu.
- Hold the MENU key for 3 second to quit the User Option Menu and go back to the clock original screen.
SABBATH MODESABBATH MODE
- Enter the user option menu holding MENU and TIME keys for 3 seconds.
- Scroll the option list (dEG, OFS, Hr, SAb), shown by the temperature module, by pressing + / -- until SAb shows.
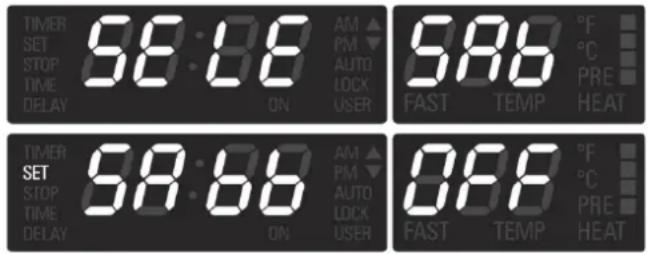
- Touch MENU to enter edit mode: SAbb is shown on the left and its status is shown in the right field, blinking.
- Touch again +/− keys to set Sabbath mode ON or OFF (Default=OFF).
- Touch MENU to confirm and come back to the option list.
- Hold MENU key for 3 seconds to quit the selection menu and go back to normal operations.
Once Sabbath mode is set, only BAKE and OFF positions are available in the cooking mode knob. Turn the knob to BAKE, then set the temperature to the desired value within 5 minutes.
After 5 minutes, the temperature cannot be shown and the display appears as below: Sabbath mode is active. In a double oven, the upper/lower cavity indications are still available. Both triangle are on if both cavities are working.

- Oven lights status cannot be changed during Sabbath time.
- Oven temperature can only be lowered, and no information can be displayed.
• The cooling fan will run in Sabbath mode. - Preheat lights are inhibited during Sabbath mode.
- The buzzer remains silent, regardless of any fault, end of activity, etc.
- The meat probe does not function in Sabbath mode.
• Maximum allowed cooking time is 72 hours. - The user can stop the oven manually by turning the cooking mode knob to OFF.
- Heating elements cycling does not depend on the door's open or closed condition.
SELF-CLEANING THE OVENSELF-CLEANING THE OVEN
This oven features a pyrolytic self-cleaning function that eliminates the difficult and time consuming manual scrubbing of the oven interior. During self-cleaning, the oven uses a very high temperature, approx. 885^ F [470°C], to burn away food soil and grease. Only one oven at a time can be set to Self-Clean.
- It is common to see smoke and/or an occasional flame-up during the Self-Clean cycle, depending on the content and amount of soil remaining in the oven. If a flame persists, turn off the oven and allow it to cool before opening the door to wipe up the excessive food soil.
- The door latch is automatically activated after selecting the Self-Clean cycle. The "AUTO LOCK" message will appear in the display. This ensures that the door cannot be opened while the oven interior is at clean temperatures.
• The oven light does not operate during this mode. - During Self-Clean, the kitchen should be well ventilated to help eliminate odors associated with Self-Clean. Odors will lessen with use.
• Three hours is the preset length of cleaning. - The mode automatically stops at the end of the clean hours. When the oven heat drops to a safe temperature, the automatic door lock will release and the door can be opened.
PREPARING THE OVEN FOR SELF-CLEAN PREPARING THE OVEN FOR SELF-CLEAN
- Remove all utensils and bake ware.
- Remove all oven racks. If racks are left in the oven during the self-clean cycle, they will permanently lose the shiny finish and change to a dull dark finish. For proper care, see "OVEN CLEANING CHART" on page 38.
- Wipe up any soft soil spills and grease with paper towels. Excess grease will cause flames and smoke inside the oven during self-cleaning.
- Review illustration below. Some areas of the oven must be cleaned by hand before the cycle begins. They do not get hot enough during the cleaning cycle for soil to burn away. Use a soapy sponge or plastic scrubber or a detergent filled S.O.S.® pad. Hand-clean the oven door edge, oven front frame and up to 1-1/2" [2-3 cm] inside the frame with detergent and hot water. Do not rub the gasket on oven. Clean by hand the oven door window. Rinse all areas thoroughly then dry.
- Be sure oven interior lights are turned off and the light bulbs and lens covers are in place. See "REPLACING AN OVEN LIGHT" on page 40.
![Hand clean frame area outside gasket DO NOT hand clean gasket Hand clean 1" [2 cm] from rack guides to frame of oven cavity Hand clean door area outside gasket Hand clean door window](/content/2026/04/645889/images/8c09039a99cc7cad80e8db4d92fffc76d024fd5425b45f35edc260780800840e.jpg)
TO SET THE SELF-CLEAN MODE TO SET THE SELF-CLEAN MODE
- Touch UPPER/LOWER key to select the cavity to be cleaned, if the oven is a double.
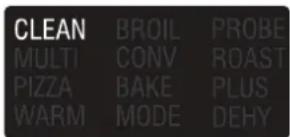
- Rotate both knobs into the clean position. - CLEAN & TIME appear. This is the clean time, its standard value is 3 hours.
- If desired, adjust the cleaning time per instructions below.
- When the cleaning time is accepted, the door will begin to lock.
- The "AUTO LOCK" message will flash until the door is locked.
- When AUTO LOCK stops flashing, check that the door has been locked and will not open.
-
If door does not lock, rotate the cooking mode knob into the OFF position and do not start self-clean; contact Hestan Customer Service for assistance.
-
Provide good ventilation to the room during and immediately after self-cleaning the oven.
- To stop the cleaning mode, turn either of the two knobs from the cleaning position.
- At the end of the programmed cleaning time, the oven will automatically turn off.
TO CHANGE THE CLEANING TIMETO CHANGE THE CLEANING TIME
Once Self-Clean is selected (steps 1, 2 above), the cleaning time can be changed from the default 3 hours to as little as 2 hours for light soil or up to 4 hours for heavy soil.
3a) To change the hours, touch the TIME key.
- The hours will flash.
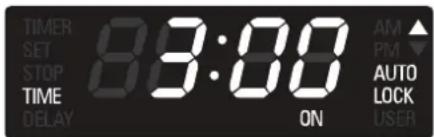
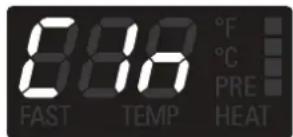
3b) Use + or - keys to change the value.
3c) To change the minutes, touch the TIME key again.
• The minutes will flash.
3d) Use + or - keys to change the value. Hold the key to change by 10 minutes steps.
3e) Touch TIME or wait a few seconds to confirm the new value.
TO DELAY THE START OF CLEANING
Follow steps 1 through 6 above.
- Touch the TIME key and verify that "STOP TIME" appears on the display. The hours will begin flashing.
- Use + or - keys to change the stop time value.
- To change the minutes, touch the TIME key, the minutes will flash.
- Use + or - keys to change the value. Hold the key to change by 10 minutes steps.
-
Touch TIME or wait a few seconds to confirm the new value.
-
The latch starts moving to lock the oven door, the display shows "DELAY".
- When the delay time expires, self-cleaning will start.
At the end of the programmed cleaning time, the oven will automatically turn off.
OVEN CARE AND CLEANING (CONT.)
"End" will appear on the temperature display, "CLEAN" on the mode display and "TIME" on the clock display will start flashing until the TIMETIME key is touched or the knob is moved to the OFF position.
- In order to check the cleaning or the stop time during a delayed clean, touch the TIME key until "TIME" or "STOP TIME" message is displayed.
EN
HOW TO USE THE OVEN CLEANING CHARTHOW TO USE THE OVEN CLEANING CHAR
- Locate the number of the part to be cleaned in the illustration on this page.
- Find the part name in the chart on the next page.
- Use the cleaning method in the left column if the oven has color panels.
- Use the cleaning method in the right column if the oven is stainless steel.
- Match the letter with the cleaning method in "OVEN FINISHES / CLEANING METHODS" on page 39.
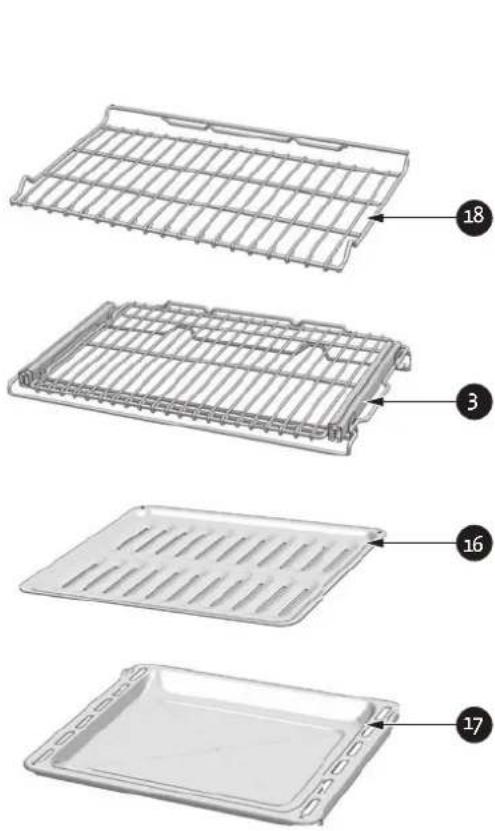
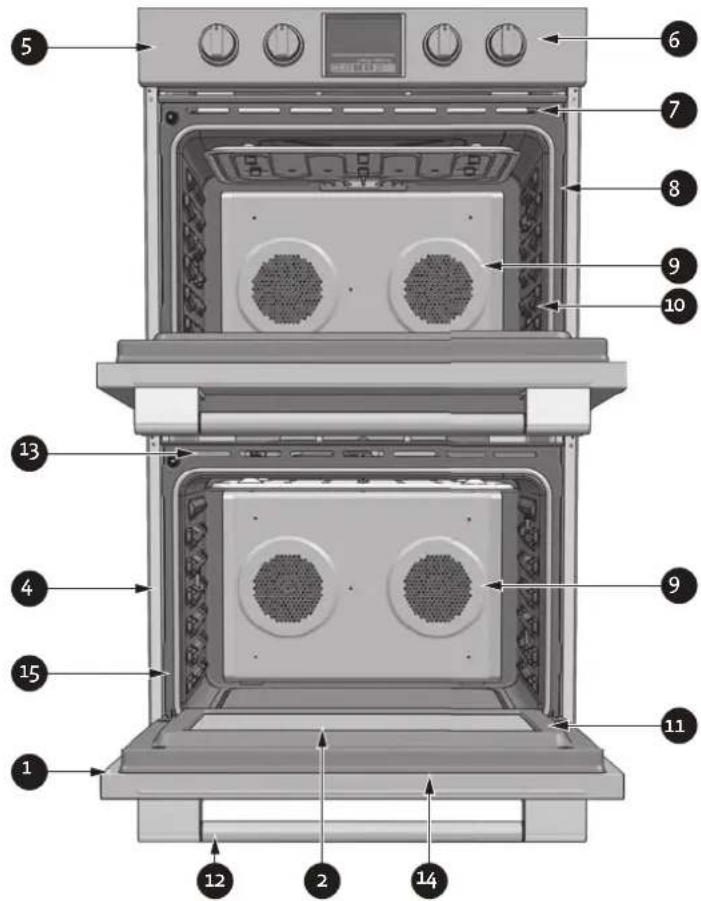
OVEN CLEANING CHARTOVEN CLEANING CHART
| PART | CLEANING METHOD | ||
| STAINLESS STEEL OVEN | OVEN WITH COLOR PANELS | ||
| 1 Door Frame E E | |||
| 2 Interior Door Windows F F | |||
| 3 Removable Oven Racks A A | |||
| 4 Side Trim D D | |||
| 5 Control Panel Trim | C | G | |
| 6 Control Panel | C C | ||
| 7 Oven Cooling Vents D D | |||
| 8 Oven Front Frame | E E | ||
| 9 Oven Cavity | E E | ||
| 10 | Mesh Gasket | B B | |
| 11 | Interior Oven Door | E E | |
| 12 | Door Handle | D D | |
| 13 | Door Cooling Vent | E E | |
| 14 | Door Front | C&D C&G | |
| 15 | Oven Trim | D D | |
| 16 | Broiler Pan Insert | E E | |
| 17 | Broiler Pan | E E | |
| 18 | Extendable Rack | A A | |
The entire oven can be safely cleaned with a soapy sponge, rinsed and dried. If stubborn soil remains, follow the recommended cleaning methods below.
Always use the mildest cleaner that will do the job.
Rub metal finishes in the direction of the grain.
OVEN FINISHES / CLEANING METHODS OVEN FINISHES / CLEANING METHODS
Use clean, soft cloths, sponges or paper towels.
Rinse thoroughly with a minimum of water so it does not drip into door slots.
Dry to avoid water marks.
The cleaners listed below indicate types of products to use and are not being endorsed. Use all products according to package directions.
| PART CLEANING METHOD | ||
| A Racks | Wash with hot sudsy water. Rinse thoroughly and dry. Or, gently rub with Soft Scrub®, Bon-Ami®, Comet®, Ajax®, Brillo® or S.O.S.® pads as directed. Easy Off® or Dow® Oven Cleaners (cold oven formula) can be used, but may cause darkening and discoloration. Racks should be removed from the oven during the self-clean mode. The self-clean process will cause racks to lose their shiny finish and permanently change to a metallic gray. | |
| B Fiberglass Knit DO | NOT HAND CLEAN GASKET. | |
| C Glass | Spray Windex® or Glass Plus® onto a cloth first then wipe to clean. Use Fantastik® or Formula 409® to remove grease spatters. | |
| D Painted | Clean with hot sudsy water or apply Fantastik® or Formula 409® first to a clean sponge or paper towel and wipe clean. Avoid using powdered cleansers and steel wool pads. | |
| E Porcelain | Immediately wipe up acidic spills like fruit juice, milk and tomatoes with a dry towel. Do not use a moistened sponge/towel on hot porcelain. When cool, clean with hot sudsy water or apply BonAmi® or Soft Scrub® to a damp sponge. Rinse and dry. For stubborn stains, gently use Brillo® or S.O.S.® pads. It is normal for porcelain to craze (fine lines) with age due to exposure from heat and food soil. | |
| F | Reflective Glass | Clean with hot sudsy water and sponge or plastic scrubber. Rub stubborn stains with vinegar, Windex®, ammonia or Bon-Ami®. DO NOT USE HARSH ABRASIVES OR METAL SCRAPERS. |
| G Stainless | Always wipe or rub with grain. Clean with a soapy sponge then rinse and dry. Or, wipe with Fantastik® or Formula 409® sprayed onto a paper towel. Protect and polish with Stainless Steel Magic® and a soft cloth. Remove water spots with a cloth dampened with white vinegar. Use Zud®, Cameo®, Bar Keeper's Friend® or RevereWare Stainless Steel Cleaner® to remove heat discoloration. | |
| H | Probe (if present) | Clean probe by hand with detergent and hot water. Then rinse and dry. Do not soak or clean in dishwasher. |
REPLACING AN OVEN LIGHTREPLACING AN OVEN LIGHT
Each oven is equipped with three halogen lights per cavity located in the side walls of the oven.
WARNING
ELECTRICAL SHOCK HAZARD - Make sure the power has been shut off to the range. The light socket is energized when the door is open. Failure to shut off the power when replacing a light bulb could result in electric shock or burns.
- The lenses must be in place when using the oven. The lenses serve to protect the light bulb from breaking.
- The lenses are made of glass. Make sure the glass lens is cool to the touch. Handle carefully to avoid breakage. Broken glass could cause an injury.
- Use only 20 watt, 12 Volt, halogen "Bi-Pin" bulbs suitable for appliance oven use. This type of bulb may be available at hardware stores & home centers, or specialty lighting stores. Contact Hestan Customer Service for more information.
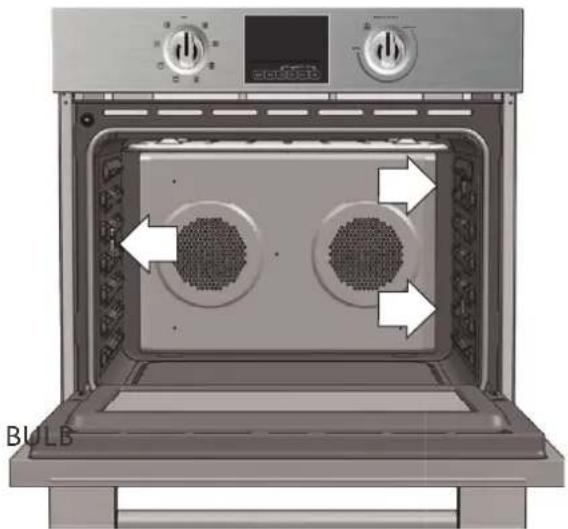
natural_image
Interior view of a BULB oven with two circular vent grilles and control knobs (no text or symbols)TO REPLACE A LIGHT BULB TO REPLACE A LIGHT BULB
- Turn off power at the main power supply (fuse or breaker box).
- Place a thick towel or cloth on the oven floor below the lamp to catch the glass lens should it fall.
- Remove the lens retaining screw using a screw driver. Then remove the lens.
- Remove the light bulb from its socket by pulling it straight out.
- Before installation, it is very important to clean the new bulb carefully with a clean, soft cloth, or tissue paper. Grease, fingerprints, or oils in your skin can leave a residue on the glass surface of the bulb which will create a hot-spot. The bulb will eventually crack at this hotspot.
- While still using a cloth or tissue paper, insert the new bulb in the lamp housing. Push the bulb fully into the socket.
- Replace the lens and screw.
Replace the rack supports if provided. Turn power back on at the main power supply (fuse or breaker box).
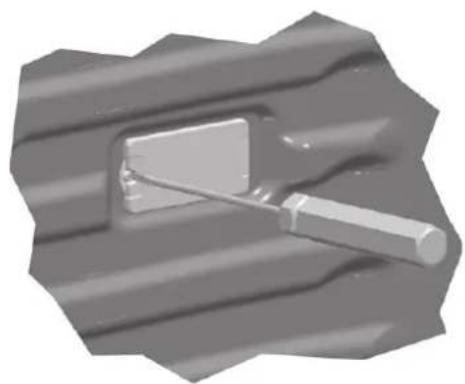
natural_image
3D rendered image of a mechanical tool with a rectangular component and a cylindrical handle, resting on a textured surface (no text or symbols visible)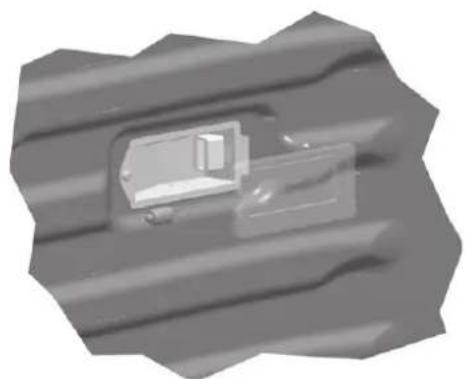
natural_image
3D rendered mechanical component with ribbed texture and central housing (no visible text or symbols)With either Bake or Convection Bake, poor results can occur for many reasons other than a malfunction of the oven. Check the chart below for causes of the most common problems. Since the size, shape and material of baking utensils directly affect the baking results, the best solution may be to replace old baking utensils that have darkened and warped with age and use. Check the Baking Charts from page 25 for the correct rack position and baking time
| BAKING PROBLEM CAUSE | |
| Food browns unevenly Oven not | preheatedAluminum foil on oven rack or oven bottomBaking utensil too large for recipePans touching each other or oven walls |
| Food too brown on bottom Oven | not preheatedUsing glass, dull or darkened metal pansIncorrect rack positionPans touching each other or oven walls |
| Food is dry or has shrunk excessively | Oven temperature too highBaking time too longOven door opened frequentlyPan size too large |
| Food is baking or roasting too slowly | Oven temperature too lowOven not preheatedOven door opened frequentlyTightly sealed with aluminum foilPan size too small |
| Pie crusts do not brown on bottom or have soggy crust | Baking time not long enoughUsing shiny steel pansIncorrect rack positionOven temperature is too low |
| Cakes pale, flat and may not be done inside | Oven temperature too lowIncorrect baking timeCake tested too soonOven door opened too oftenPan size may be too large |
| Cakes high in middle with crack on top | Baking temperature too highBaking time too longPans touching each other or oven wallsIncorrect rack positionPan size too small |
| Pie crust edges too brown | Oven temperature too highEdges of crust too thin |
Before calling for service, check the following to avoid unnecessary service charges.
| OVEN PROBLEM PROBLEM SOLVING STEPS | |
| F03 or F04 Error appears in the display window. | A problem with latch mechanism occurred. Remove power and turn it back on again after a few seconds.* The oven should run a latch auto-test. If condition persists, note the code number and call for service. |
| Other F__ Error appears in the display window. | Remove power and turn it back on again after a few seconds.* If condition persists, note the code number and call for service. |
| The oven display stays OFF | Remove power and turn it back on again after a few seconds.* If condition persists, call for service. |
| Cooling fan continues to run after oven is turned off | This is normal. The fan turns off automatically when the electronic components have cooled sufficiently. |
| Oven door is locked and will not release, even after cooling | Remove power and turn it back on again after a few seconds.* The oven should reset itself and will be operable. |
| Oven is not heating Check the circuit breaker or fuse box to your house. Make sure there is proper electrical power to the oven. Make sure the oven temperature has been selected. | |
| Oven is not cooking evenly | Refer to cook charts for recommended rack position. Always reduce recipe temperature by 25°F [15°C] when baking with Convention Bake mode. |
| Oven temperature is too hot or too cold | The oven thermostat needs adjustment. Contact Hestan Customer Service.. |
| Oven light is not working properly | Replace or reinsert the light bulb if loose or defective. See “REPLACING AN OVEN LIGHT” on page 40. Touching the bulb with fingers may cause the bulb to burn out. |
| Oven light stays on Check for obstruction in oven door. Check to see if hinge is bent or door switch broken. | |
| Cannot remove lens cover on light | There may be a soil build-up around the lens cover. Wipe lens cover area with a clean dry towel prior to attempting to remove the lens cover. |
| Oven will not Self-Clean properly | Allow the oven to cool before running Self-Clean. Always wipe out loose soils or heavy spillover before running Self-Clean. If oven is badly soiled, set oven for a four-hour Self-Clean.See “SELF-CLEANING THE OVEN” on page 35.. |
| Clock and timer are not working properly | Make sure there is proper electrical power to the oven. See the “SETTING THE CLOCK AND TIMER” on page 17.. |
| Excessive moisture When using Bake mode, preheat the oven first. Convection Bake and Convection Roast will eliminate any moisture in oven (this is one of the advantages of convection). | |
| Porcelain chips When oven racks are removed and replaced, always tilt racks upward and do not force them to avoid chipping the porcelain.. | |
| Is the control knob set to the proper heat level? | See “SETTING COOKING MODE AND TEMPERATURE” on page 18.. |
* To remove and restore power to the oven, turn its breaker OFF (at the breaker box). Wait several seconds, then turn the breaker back on.
SERVICE DATA RECORD SERVICE DATA RECORD
The location of the serial tag on the product can be seen when the oven door is opened. It is located on the left side, just inside the oven cavity. See page 6.
Now is a good time to write this information in the space below provided. Keep your invoice for warranty validation.
Model Number ____
Serial Number ____
Date of Installation or Occupancy ____
PARTS LIST
Please visit the Hestan website to access the parts list for your Hestan Indoor product: www.hestanhome.com.www.hestanhome.com.
SERVICE
All warranty and non-warranty repairs should be performed by qualified service personnel. To locate an authorized service agent in your area, contact your Hestan dealer, local representative, or Hestan Customer Service. Before you call, please have the model number and serial number information ready.
Hestan Commercial Corporation
3375 E. La Palma Avenue
Anaheim, CA 92806
(888) 905-7463
LIMITED WARRANTY
WHAT THIS LIMITED WARRANTY COVERS WHAT THIS LIMITED WARRANTY COVERS
Hestan Commercial Corporation ("HCC") warrants to the original consumer purchaser of a Hestan Indoor Cooking product (the "Product") from an HCC authorized dealer that the Product is free from defective materials or workmanship for a period of three (3) years from the date of original retail purchase or closing date for new construction, whichever period is longer ("Limited Warranty Period"). HCC agrees to repair or replace, at HCC's sole option, any part or component of the Product that fails due to defective materials or workmanship during the Limited Warranty Period. This Limited Warranty is not transferable and does not extend to anyone beyond the original consumer purchaser ("Purchaser"). This Limited Warranty is valid only on Products purchased and received from an HCC authorized dealer in the fifty United States, the District of Columbia and Canada. This Limited Warranty applies only to Products in non-commercial use and does not extend to Products used in commercial applications.
HOW TO OBTAIN WARRANTY SERVICE HOW TO OBTAIN WARRANTY SERVICE
If the Product fails during the Limited Warranty Period for reasons covered by this Limited Warranty, the Purchaser must immediately contact the dealer from whom the Product was purchased or HCC at 888.905.7463.
Purchaser is responsible for making the Product reasonably accessible for service or for paying the cost to make the Product reasonably accessible for service. Service is to be provided during normal business hours of the authorized Hestan Commercial Service Provider. To the extent Purchaser requests service outside of the normal business hours of the authorized Hestan Commercial Service Provider, Purchaser will pay the difference between regular rates and overtime or premium rates. Purchaser is required to pay all travel costs for travel beyond 50 miles (one way) from the nearest authorized Hestan Commercial Service Provider.
EXTENSIONS TO THREE YEAR LIMITED WARRANTY PERIOD:
In addition to the three-year limited warranty, the following components have extended warranty coverage as specifically set forth below:
- The Product's gas burners (excludes appearance), electric heating elements, blower motors (ventilation hoods), electronic control boards, magnetron tubes and induction generators (where applicable) are warranted to be free from defects in material and workmanship under normal non-commercial use and service for a period of five (5) years of the original Purchaser. This excludes surface corrosion, scratches, and discoloration which may occur during normal use and is limited to replacement of the defective part(s), with the Purchaser paying all other costs, including labor, shipping and handling, as applicable.
WHAT THIS LIMITED WARRANTY DOES NOT COVER WHAT THIS LIMITED WARRANTY DOES NOT COV
This Limited Warranty does not cover and HCC will not be responsible for and will not pay for: damage to or defects in any Product not purchased from an HCC authorized dealer; color variations in color finishes or other cosmetic damage; failure or damage from abuse, misuse, accident, fire, natural disaster, commercial use of the Product, or loss of electrical power or gas supply to the Product; damage from alteration, improper installation, or improper operation of the Product; damage from improper or unauthorized repair or replacement of any part or component of the Product; damage from service by someone other than an authorized agent or representative of the Hestan Commercial Service Network; normal wear and tear; damage from exposure of the Product to a corrosive atmosphere containing chlorine, fluorine, or any other damaging chemicals; damage resulting from the failure to provide normal care and maintenance to the Product; damage HCC was not notified of within the Limited Warranty Period; and incidental and consequential damages caused by any defective material or workmanship.
ARBITRATION: ARBITRATION:
This Limited Warranty is governed by the Federal Arbitration Act. Any dispute between Purchaser and HCC regarding or related to the Product or to this Limited Warranty shall be resolved by binding arbitration only on an individual basis with Purchaser. Arbitration will be conducted by the American Arbitration Association (“AAA”) in accordance with its Consumer Arbitration Rules or by JAMS. The arbitration hearing shall be before one arbitrator appointed by the AAA or JAMS. The arbitrator shall not conduct class arbitration and Purchaser shall not bring any claims against HCC in a representative capacity on behalf of others.
LIMITATION OF LIABILITY: LIMITATION OF LIABILITY:
This Limited Warranty is the final, complete and exclusive agreement between HCC and Purchaser regarding the Product.
THERE ARE NO EXPRESS WARRANTIES OTHER THAN THOSE LISTED AND DESCRIBED ABOVE. NO WARRANTIES WHETHER EXPRESS OR IMPLIED, INCLUDING, BUT NOT LIMITED TO, ANY IMPLIED WARRANTIES OF MERCHANTABILITY OR FITNESS FOR A PARTICULAR PURPOSE SHALL APPLY AFTER THE LIMITED WARRANTY PERIOD STATED ABOVE. NO OTHER EXPRESS WARRANTY OR GUARANTY GIVEN BY ANY PERSON, FIRM OR CORPORATION WITH RESPECT TO THIS PRODUCT SHALL BE BINDING ON HCC. HCC ASSUMES NO RESPONSIBILITY THAT THE PRODUCT WILL BE FIT FOR ANY PARTICULAR PURPOSE, EXCEPT AS OTHERWISE PROVIDED BY APPLICABLE LAW.
HCC SHALL NOT BE LIABLE FOR LOSS OF REVENUE OR PROFITS, FAILURE TO REALIZE SAVINGS OR OTHER BENEFITS, OR ANY OTHER SPECIAL, INCIDENTAL OR CONSEQUENTIAL DAMAGES CAUSED BY THE USE, MISUSE OR INABILITY TO USE THE PRODUCT, REGARDLESS OF THE LEGAL THEORY ON WHICH THE CLAIM IS BASED, AND EVEN IF HCC HAS BEEN ADVISED OF THE POSSIBILITY OF SUCH DAMAGES. NO RECOVERY OF ANY KIND AGAINST HCC SHALL BE GREATER IN AMOUNT THAN THE PURCHASE PRICE OF THE PRODUCT.
WITHOUT LIMITING THE FOREGOING, YOU ASSUME ALL RISK AND LIABILITY FOR LOSS, DAMAGE OR INJURY TO YOU AND YOUR PROPERTY AND TO OTHERS AND THEIR PROPERTY ARISING OUT OF THE USE, MISUSE OR INABILITY TO USE THE PRODUCT NOT CAUSED DIRECTLY BY THE NEGLIGENCE OF HCC. THIS LIMITED WARRANTY STATES YOUR EXCLUSIVE REMEDY.
No oral or written representation or commitment given by anyone, including but not limited to, an employee, representative or agent of HCC will create a warranty or in any way increase the scope of this express Limited Three Year Warranty. If there is any inconsistency between this Limited Warranty and any other agreement or statement included with or relating to the Product, this Limited Warranty shall govern. If any provision of this Limited Warranty is found invalid or unenforceable, it shall be deemed modified to the minimum extent necessary to make it enforceable and the remainder of the Limited Warranty shall remain valid and enforceable according to its terms.
INTERACTION OF LAWS WITH THIS LIMITED WARRANTY:
Some states, provinces or territories may not allow limitations on how long an implied warranty lasts or the exclusion or limitation of incidental or consequential damages, so the above limitations or exclusions may not apply to you. Some states, provinces or territories may provide for additional warranty rights and remedies, and the provisions contained in this Limited Warranty are not intended to limit, modify, take away from, disclaim or exclude any mandatory warranty requirements provided by states, provinces or territories, including certain implied warranties. This warranty gives you specific legal rights, and you may also have other rights which vary depending on location.
Any questions about this Limited Warranty may be directed to Hestan Commercial Corporation at (888) 905-7463
AVERTISSEMENT
LE NON-RESPECT À LA LETTRE DE CES INSTRUCTIONS PEUT CAUSER UN INCENDIE OU UNE EXPLOSION, QUI POURRAIT ENTRAÎNER DES DOMMAGES MATÉRIELS, DES BLESSURES OU LA MORT.
natural_image
Group of people sharing a meal together with wine glasses and a pie chart, surrounded by fresh dishes (no visible text or symbols)3 PRÉCAUTIONS DE SÉCURITÉ - AVANT DE COMMENCER
7 NUMÉROS DE MODÈLE
7 PLAQUE SIGNALÉTIQUE
7 RESPECT DE LA RÉGLEMENTATION ET DES CODES EN VIGUEUR
8 CARACTÉRISTIQUES ET CONTRÔLES
13 INFORMATIONS GÉNÉRALES DU FOUR
15 SUGGESTIONS OPÉRATIONNELLES
19 UTILISER LE FOUR
23 CONSEILS ET TECHNIQUE DE CUISSON
23 CONSEILS ET TECHNIQUES DE CUISSON PAR CONVECTION
25 CONSEILS ET TECHNIQUES DE RÔTISSAGE PAR CONVECTION
28 CONSEILS ET TECHNIQUES POUR LE GRILLAGE PAR CONVECTION
29 CONSEILS ET TECHNIQUES DE DÉSHYDRATATION
31 CONSEILS ET TECHNIQUES DE GRILLAGE
32 DIRECTIVES SUR LA SÉCURITÉ ALIMENTAIRE
33 OPTIONS SPÉCIALES
35 ENTRETIEN DU FOUR ET NETTOYAGE
42 SOLUTION POUR DES PROBLÈMES DE CUISSON
43 RÉSOLUTION DES PROBLÈMES DE FONCTIONNEMENT
44 PIÈCES / SERVICE
45 GARANTIE LIMITÉE
PRÉCAUTIONS DE SÉCURITÉ - AVANT DE COMMENCER
natural_image
Silhouette of a person in motion with a curved object above their head, labeled 'B' (no text or symbols on the figure itself)natural_image
Front panel of a control panel with rotary switches and a digital display (no readable text or symbols)FOUR DOUBLE
AFFICHAGE ET COMMANDES AFFICHAGE ET COMMANDES
Gril a convection [CONV BROIL]:
COUPURE DE COURANT COUPURE DE COURANT
natural_image
Diagram showing a tool interacting with two crossed tools, no text or symbols presentnatural_image
Pure diagram of a mechanical or fluidic component with no text, numbers, or symbolsnatural_image
Diagram of a mechanical or fluidic component with directional arrows, no text or symbols presentnatural_image
Simple line drawing of a tool interacting with two rectangular objects, no text or symbols presentnatural_image
Pure diagram of a pipe or channel with directional arrows indicating flow, no text or symbols presentGRILLE DE ROULEMENT GRILLE DE ROULEMENT
natural_image
Technical line drawing of a mechanical device with no visible text or symbolsnatural_image
Diagram of a mechanical lever system with motion arrows indicating force or movement (no text or labels)natural_image
Diagram of a mechanical device with labeled components and directional arrows, no readable text or symbols present.natural_image
Pure mechanical diagram showing a lever mechanism with no text or symbolsnatural_image
Diagram of a mechanical or electrical component with directional arrows indicating movement (no text or symbols)natural_image
Pure mechanical diagram showing a lever mechanism with arrows indicating direction (no text or symbols)FOUR DOUBLE FOUR DOUBLE
TABELAU DE NETTOYAGE DU FOUR TABELAU DE NETTOYAGE DU FOUR
natural_image
Interior view of an oven with two circular chambers and directional arrows indicating airflow or heat transfer (no text or symbols)POUR REMPLACER UNE AMPOULE POUR REMPLACER UNE AMPOULE
natural_image
3D rendered image of a mechanical tool interacting with a corrugated metal surface (no text or symbols visible)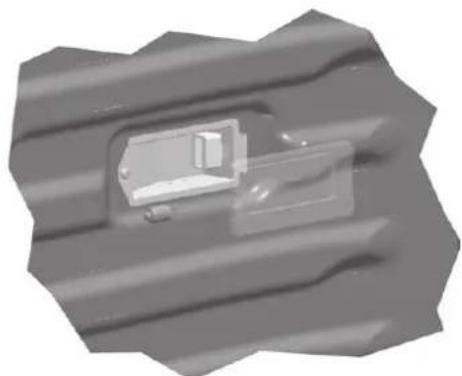
natural_image
3D rendered image of a vehicle inside a corrugated metal frame (no text or symbols visible)Hestan Commercial Corporation
3375 E. La Palma Avenue
Anaheim, CA 92806
(888) 905-7463
ÉLÉMENTS COUVERTS PAR LA PRÉSENTE GARANTIE LIMITÉE
Hestan Commercial Corporation
3375 E. La Palma Ave
Anaheim, CA 92806
(888) 905-7463
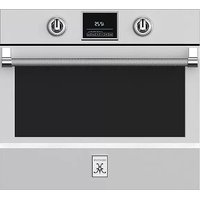
- INDOOR COOKING
- WARNING
- Message from Hestan:Message from Hestan:
- SAFETY PRECAUTIONS - BEFORE YOU BEGIN
- ELECTRICAL GROUNDING ELECTRICAL GROUNDING
- ELECTRICAL SUPPLY ELECTRICAL SUPPLY
- GENERAL APPLIANCE AND OVEN SAFETY PRECAUTIONS GENERAL APPLIANCE AND C
- TECHNICAL SAFETYTECHNICAL SAFETY
- NOTICE
- THE DOOR MUST REMAIN CLOSED WHEN POWER IS INITIALLY SUPPLIED TO THE APPLIANCE.
- CHILD SAFETY CHILD SAFETY
- CAUTION
- FIRE SAFETY FIRE SAFETY
- USER SAFETYUSER SAFETY
- SAFETY PRECAUTIONS - BEFORE YOU BEGIN (CONT.)
- SAFETY DURING CLEANING SAFETY DURING CLEANING
- MODEL NUMBERS
- RATING LABEL
- REGULATORY / CODE REQUIREMENTS
- COOKING WITH THE CONVECTION OVENCOOKING WITH THE CONVECTION OVEN
- ADVANTAGES OF CONVECTION COOKING ADVANTAGES OF CONVECTION COOKING
- OVEN FEATURESOVEN FEATURES
- DISPLAY AND CONTROLS DISPLAY AND CONTROLS
- COMMAND KEYS
- GENERAL OVEN TIPS GENERAL OVEN TIPS
- FLASHING SYMBOLS OR NUMBERS FLASHING SYMBOLS OR NUMBERS
- BEEPSBEEPS
- DOOR LOCKDOOR LOCK
- LOCKING THE KEYBOARDLOCKING THE KEYBOARD
- POWER FAILURE POWER FAILURE
- THE DOOR MUST REMAIN CLOSED WHEN POWER IS SUPPLIED TO THE APPLIANCE.
- DEFAULT SETTINGS DEFAULT SETTINGS
- FAILURE NUMBER CODES FAILURE NUMBER CODES
- CONVECTION FAN CONVECTION FAN
- COMPONENT COOLING FANCOMPONENT COOLING FAN
- PREHEATING THE OVEN PREHEATING THE OVEN
- PAST PREHEATFAST PREHEAT
- GENERALGENERAL
- UTENSILSUTENSILS
- OVEN CONDENSATION AND TEMPERATUREOVEN CONDENSATION AND TEMPERAT
- HIGH ALTITUDE BAKING HIGH ALTITUDE BAKING
- 120/240 VS. 120/208 VOLT CONNECTION120/240 VS. 120/208 VOLT CONNECTION
- OVEN RACKSOVEN RACKS
- NOTICENOTICE
- To remove oven rack from the oven:
- To replace an oven rack:
- EXTENDABLE RACKSEXTENDABLE RACKS
- To remove extendable rack from the oven:
- To replace an extendable rack:
- SETTING THE CLOCK AND TIMER SETTING THE CLOCK AND TIMER
- TO SET THE TIME OF DAY TO SET THE TIME OF DAY
- TO SET THE TIMER TO SET THE TIMER
- SETTING COOKING MODE AND TEMPERATURE SETTING COOKING MODE AND TEMPE
- TO STOP COOKING TO STOP COOKING
- LOW TEMPERATURE FUNCTIONS LOW TEMPERATURE FUNCTIONS:
- USING OVEN LIGHTSUSING OVEN LIGHTS
- DUAL OVENSDUAL OVENS
- TO SET A TIMED MODE TO SET A TIMED MODE
- TO DELAY THE START OF A TIMED MODE TO DELAY THE START OF A TIMED MODE
- WHEN A TIMED MODE IS RUNNING WHEN A TIMED MODE IS RUNNING
- HOW TO CHECK A TIME VALUE HOW TO CHECK A TIME VALUE
- IF "TIME" AND "STOP TIME" DON'T DISPLAY IF "TIME" AND "STOP TIME" DON'T DISPLAY
- USING THE MEAT PROBE USING THE MEAT PROBE
- GENERAL GUIDELINES GENERAL GUIDELINES
- CONVECTION BAKE TIPS AND TECHNIQUES
- FOODS RECOMMENDED FOR CONVECTION BAKE MODE:FOODS RECOMMENDED FO
- OVEN RACK POSITIONS
- QUICK AND EASY RECIPE TIPS QUICK AND EASY RECIPE TIPS
- CONVECTION BAKE CHART CONVECTION BAKE CHART
- CONVECTION ROAST TIPS AND TECHNIQUES
- CONVECTION BROIL TIPS AND TECHNIQUES
- DEHYDRATE TIPS AND TECHNIQUES
- SABBATH MODESABBATH MODE
- SELF-CLEANING THE OVENSELF-CLEANING THE OVEN
- PREPARING THE OVEN FOR SELF-CLEAN PREPARING THE OVEN FOR SELF-CLEAN
- TO SET THE SELF-CLEAN MODE TO SET THE SELF-CLEAN MODE
- TO CHANGE THE CLEANING TIMETO CHANGE THE CLEANING TIME
- TO DELAY THE START OF CLEANING
- OVEN CARE AND CLEANING (CONT.)
- HOW TO USE THE OVEN CLEANING CHARTHOW TO USE THE OVEN CLEANING CHAR
- OVEN FINISHES / CLEANING METHODS OVEN FINISHES / CLEANING METHODS
- REPLACING AN OVEN LIGHTREPLACING AN OVEN LIGHT
- TO REPLACE A LIGHT BULB TO REPLACE A LIGHT BULB
- SERVICE DATA RECORD SERVICE DATA RECORD
- PARTS LIST
- SERVICE
- LIMITED WARRANTY
- WHAT THIS LIMITED WARRANTY COVERS WHAT THIS LIMITED WARRANTY COVERS
- HOW TO OBTAIN WARRANTY SERVICE HOW TO OBTAIN WARRANTY SERVICE
- EXTENSIONS TO THREE YEAR LIMITED WARRANTY PERIOD:
- WHAT THIS LIMITED WARRANTY DOES NOT COVER WHAT THIS LIMITED WARRANTY DOES NOT COV
- ARBITRATION: ARBITRATION:
- LIMITATION OF LIABILITY: LIMITATION OF LIABILITY:
- INTERACTION OF LAWS WITH THIS LIMITED WARRANTY:
- AVERTISSEMENT
- PRÉCAUTIONS DE SÉCURITÉ - AVANT DE COMMENCER
- AFFICHAGE ET COMMANDES AFFICHAGE ET COMMANDES
- COUPURE DE COURANT COUPURE DE COURANT
- GRILLE DE ROULEMENT GRILLE DE ROULEMENT
- FOUR DOUBLE FOUR DOUBLE
- POUR REMPLACER UNE AMPOULE POUR REMPLACER UNE AMPOULE
- ÉLÉMENTS COUVERTS PAR LA PRÉSENTE GARANTIE LIMITÉE
Brand : Hestan
Model : KDO30
Category : Oven