
HSL220 - Food Processor Hobart - Free user manual and instructions
Find the device manual for free HSL220 Hobart in PDF.

| Product Type | Professional Spiral Mixer |
| Brand | Hobart |
| Model | HSL220 |
| Power Supply | 208 V, 60 Hz, 3 phases, 34 A |
| Main Functions | Kneading at low and high speed, manual/automatic mode, timer (30 s to 20 min), forward/rear bowl rotation |
| Flour Capacity (max) | 120 lb (54.4 kg) |
| Dough Capacity (max) | 220 lb (99.8 kg) |
| Compatible Dough Types | Bread, whole wheat, pizza, pie dough, bagel |
| Agitator Speed | 2 speeds (incorporation and development) |
| Bowl Rotation | Independent, selectable forward/rear, possible jogging |
| Controls | Push buttons, rotary selectors, main switch |
| Safety | Lockable protective grid, emergency stop button |
| Cleaning | Daily washing of bowl and agitator with hot water and mild soap, rinsing with mild vinegar |
| Maintenance | Regular inspection, contact Hobart technical service for repairs |
| Installation | Requires leveling (adjustable feet), electrical connection compliant with standards |
Frequently Asked Questions - HSL220 Hobart
User questions about HSL220 Hobart
0 question about this device. Answer the ones you know or ask your own.
Ask a new question about this device
Download the instructions for your Food Processor in PDF format for free! Find your manual HSL220 - Hobart and take your electronic device back in hand. On this page are published all the documents necessary for the use of your device. HSL220 by Hobart.
USER MANUAL HSL220 Hobart
natural_image
Industrial HOBART mixing machine with control panel and mesh fan (no visible text or symbols)701 S. RIDGE AVENUE
TROY, OHIO 45374-0001
937 332-3000
www.hobartcorp.com
TABLE OF CONTENTS
GENERAL....3
INSTALLATION 4
Unpacking 4
Location 4
Leveling....4
Electrical Connections 4
Verify Correct Rotation....4
OPERATION 5
Controls....5
Using the Mixer 6
Mixer Capacity Chart 6
CLEANING 7
MAINTENANCE....7
Service 7
TROUBLESHOOTING 8
Installation, Operation and Care of MODEL HSL & HSU SERIES SPIRAL MIXERS
SAVE THESE INSTRUCTIONS
GENERAL
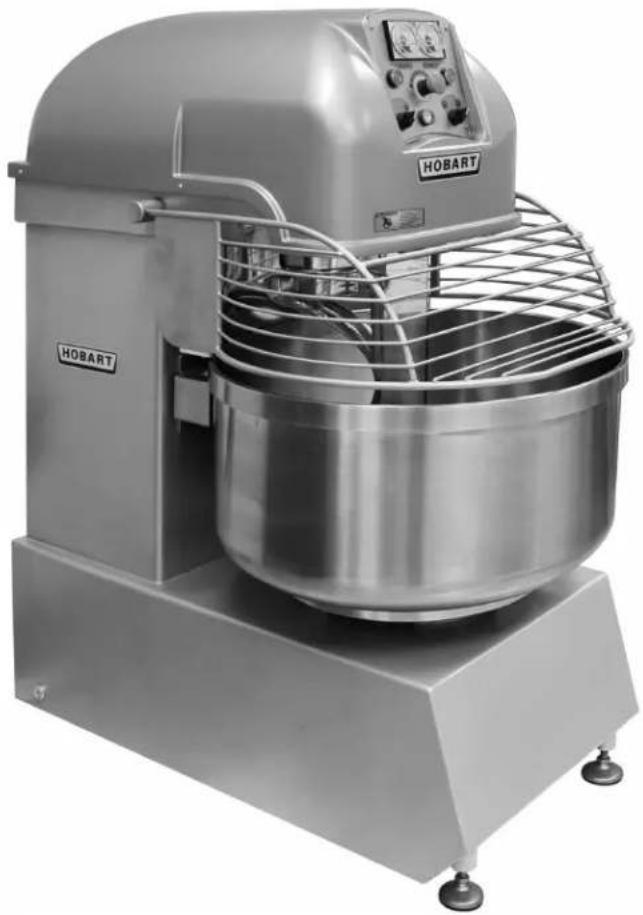
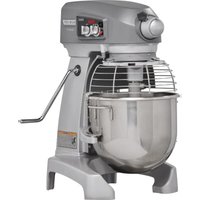
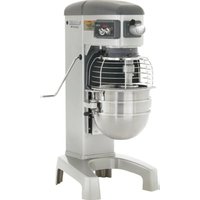
The spiral mixers are a series of high-volume dough mixers. The spiral arm rotates on a fixed, vertical axis while the bowl turns to provide the mixing action.
The spiral arm is powered by a heavy-duty two-speed motor. The bowl is powered by a separate motor. The operator controls are conveniently located on the front of the machine and provide timed mixing in two speeds. Bowl size is suitable for mixing standard quantities of flour and ensures efficient operation.
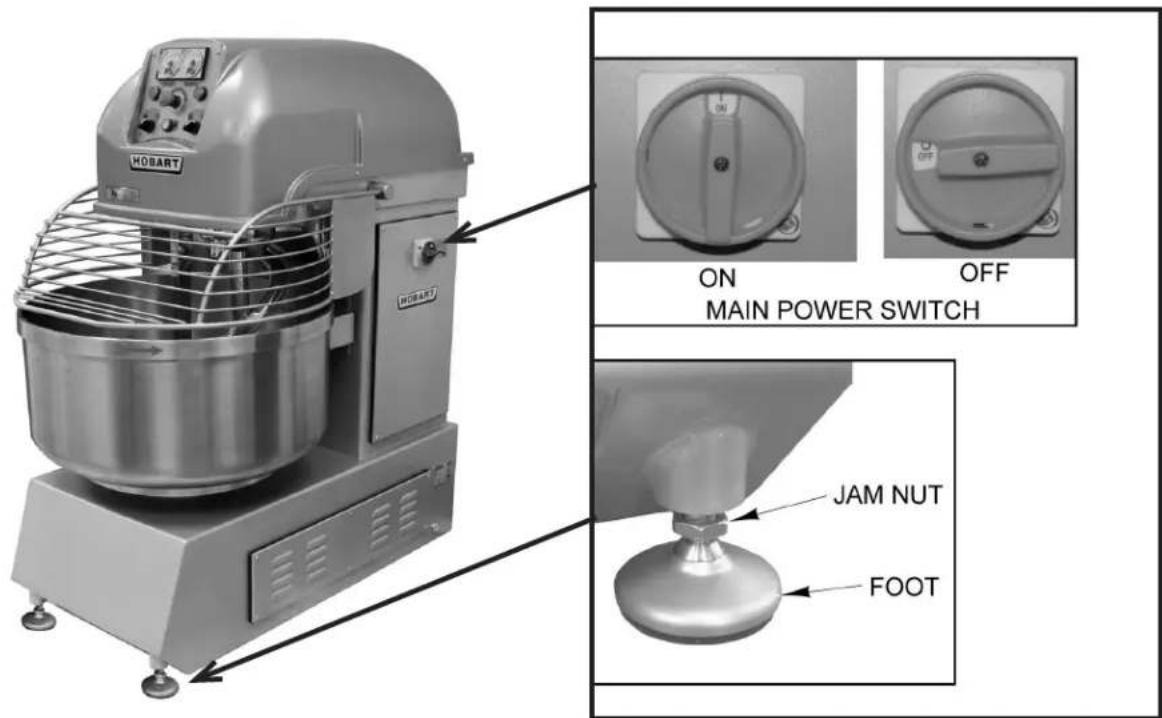
Fig. 1
INSTALLATION
UNPACKING
This mixer was inspected before leaving the factory. The carrier assumes full responsibility for the safe delivery upon acceptance of the shipment. Check for possible shipping damage immediately after receipt.
If the mixer is found to be damaged, complete the following steps:
- Carrier must be notified within 5 business days of receipt.
- Carrier's local terminal must be notified immediately upon discovery (note time, date, and who was spoken to), and follow up and confirm with written or electronic communication.
- All original packing materials must be kept for inspection purposes.
- The mixer cannot have been moved, installed, or modified.
- Notify Hobart customer care at (800) 333-7447.
Prior to installation, verify that the electrical service agrees with the specifications on the data plate located at the rear of the machine.
LOCATION
Place the mixer in its operating location. Allow adequate space around the mixer for operation of controls and to add ingredients to the bowl. The area above and beside the mixer should allow for the bowl guard to be raised above the machine and for the side service panel to be opened for servicing of the machine.
LEVELING
The spiral mixer should be positioned in a reasonably level area. After positioning, screw down the stabilizing feet (Fig. 1) on the front corners; then tighten the jam nuts before starting.
ELECTRICAL CONNECTIONS
⚠ WARNING Electrical and grounding connections must comply with the applicable portion of the National Electrical Code and/or other local electrical codes.
A thru hole for 1" trade size conduit is located on the back of the mixer. Make electrical connections per the wiring diagram located inside the electrical box on the side of the machine.
| ELECTRICAL DATA | ||||
| Model Volts | Hertz Phase Amps | |||
| HSL180 208 60 3 34 | ||||
| HSL220 208 60 3 34 | ||||
| HSL300 208 60 3 34 | ||||
| HSL350 208 60 3 42 | ||||
| HSU440 208 60 3 42 | ||||
VERIFY CORRECT ROTATION
Check the rotation of the agitator to make sure it moves in a counterclockwise direction looking down into the bowl. If the rotation is incorrect, disconnect power supply to mixer and interchange any two of the three ungrounded (hot) power supply lead wires. Then, verify that the rotation is correct.
OPERATION
⚠ WARNING Moving beater and moving bowl. Keep hands, clothing, and utensils out while in operation. Do not use without interlocked guard.
CONTROLS
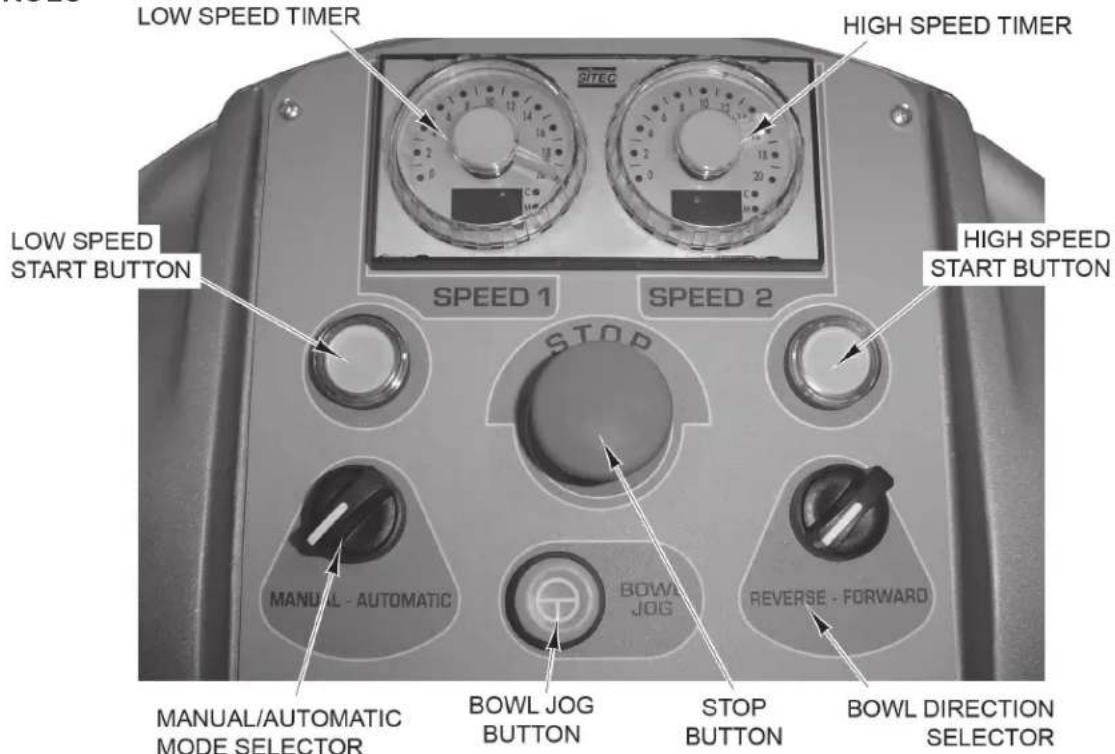
Fig. 2
| Description Functions Controlled | |
| Low Speed Timer Turn dial to | set time mixer will run on low speed. This speed is typically used to blend ingredients. Range is 30 seconds to 20 minutes. |
| High Speed Timer | Turn dial to set time mixer will run on high speed. This speed is typically used to develop the dough. Range is 30 seconds to 20 minutes. |
| Manual/Automatic Mode Selector | Turn to set the mixer to manual (continuous) or automatic (timed) mode. |
| Bowl Direction Selector Set the | direction the bowl will rotate when the mixer is running. The bowl will only run counterclockwise when on high speed. |
| Low Speed Start Button Press | to start the mixer in low speed. |
| High Speed Start Button Press | to start the mixer in high speed. |
| Bowl Jog Button Push and hold this button to rotate bowl without turning on agitator motor.The bowl guard can be down or raised to rotate the bowl. | |
| Stop Button Push this button to stop the mixer. Turn button clockwise to release. If using continuous mixing mode, mixer will stop. If using timed mixing, the timer will go back to the original starting time; to continue mixing, press the start button. | |
| Main Power Switch This switch (Fig. 1) supplies power to the control panel. | |
USING THE MIXER
Continuous Mixing Mode
- Set mixer to Continuous Mode (Fig. 2).
- With the bowl guard in the raised position, load ingredients into the mixer bowl.
- Lower the bowl guard and press the Start Button for low or high speed.
- Press the Stop Button to stop mixing.
Timed Mixing Mode
- Set mixer to Timed Mode (Fig. 2).
- Set the low speed timer. This should be set for the amount of time required to blend the ingredients.
- Set the high speed timer, if necessary. This should be set for the amount of time required to develop the dough.
- With the bowl guard in the raised position, load ingredients into the mixer bowl.
- Lower the bowl guard and press the Low Speed Start Button. The mixer automatically changes speed at the preset time and shuts off when complete.
NOTE: If you interrupt the mixing cycle by pressing the Stop Button, the timer will go back to the original starting time. If you raise the bowl guard, the mixer will restart where the timer stopped.
NOTE: Adding a small amount of oil to the dough near the end of the cycle makes it easier to unload the bowl.
MIXER CAPACITY CHART
| Capacity Chart | HSL180 | HSL220 | HSL300 | HSL350 | HSU440 | |||||
| Product | Flour | Batch | Flour | Batch | Flour | Batch | Flour | Batch | Flour | Batch |
| Bread 60% AR | 100 lb. | 180 lb.* | 120 lb. | 220 lb.* | 165 lb. | 290 lb.* | 200 lb. | 350 lb.* | 240 lb. | 440 lb.* |
| Whole Wheat | 100 lb. | 190 lb.* | 120 lb. | 232 lb.* | 150 lb. | 290 lb.* | 180 lb. | 350 lb.* | 220 lb. | 440 lb.* |
| Thin Pizza 40% AR | 62 lb. | 90 lb.* | 75 lb. | 110 lb.* | 100 lb. | 145 lb.* | 110 lb. | 175 lb.* | 140 lb. | 220 lb.* |
| Med. Pizza 50% AR | 80 lb. | 125 lb.* | 100 lb. | 155 lb.* | 130 lb. | 190 lb.* | 160 lb. | 250 lb.* | 190 lb. | 290 lb.* |
| Light Pizza 60% AR | 100 lb. | 140 lb.* | 120 lb. | 170 lb.* | 175 lb. | 250 lb.* | 200 lb. | 280 lb.* | 240 lb. | 350 lb.* |
| Pie Dough | - | 60 lb. ** | - | 75 lb. ** | - | 100 lb. ** | - | 120 lb. ** | - | 140 lb. ** |
| Bagel 50% AR | 90 lb. | 140 lb.* | 85 lb. | 130 lb.* | 100 lb. | 165 lb.* | 170 lb. | 260 lb.* | 160 lb. | 240 lb.* |
NOTE: % AR (% Absorption Ratio) - Water weight divided by flour weight. Capacity depends on moisture content of dough. Above capacities are based on 12% flour moisture content and 70°F water. Bread flour was used for bread dough capacities and high gluten flour was used for pizza and bagel doughs.
* If water temperature is under 55^ F or if 25% or more of the water is ice, reduce batch size by reducing flour by 25 lbs. and other ingredients accordingly. Cold water or ice causes dough to be stiff and hard to mix, increasing the load on the mixer transmission and motor.
** Pie dough can be successfully mixed in speed 1 with counterclockwise bowl rotation.
NOTE: 1 gallon of water weighs 8.33 lbs.
Bowl Guard
The mixer is equipped with a bowl guard. The guard must be down for the mixer to run. Lifting the guard will stop the mixer. Lower the bowl guard and press the start button to resume mixing functions.
Stop Button
The control panel has a stop button (Fig. 2). To stop the mixer, press the stop button. To release the stop button, turn the mushroom head clockwise.
Shutdown
Turn the main power switch off (Fig. 1).
CLEANING
⚠ WARNING Turn the machine off and disconnect electrical power before cleaning.
At the end of each day, wash the mixer bowl and agitator thoroughly with hot water and a mild soap solution and rinse with either a mild soda or vinegar solution. Rinse thoroughly with clear water and wipe dry with a soft clean cloth. Wipe exterior of machine with a clean damp cloth.
MAINTENANCE
⚠ WARNING Turn the machine off and disconnect electrical power supply before performing any maintenance.
Routinely inspect the machine to make sure that it is in proper working order.
SERVICE
Contact your local Hobart authorized service office for any repairs or adjustments needed on this equipment.
TROUBLESHOOTING
| SYMPTOM POSSIBLE CAUSE SUGGESTED ACTION | ||
| Mixer will not start. Bowl | guard not lowered. Lower the bowl guard. | |
| Stop button engaged. Turn stop button clockwise to release. | ||
| Main power switch turned off. Turn main power switch on. | ||
| Fuse or circuit breaker interrupting power. | Check for blown fuses or reset circuit breaker. | |
| Broken wire or connection. Disconnect power and call your local Hobart Service Office. | ||
HOBART
MODE D'EMPLOI
MODELS
HSL180 ML-134446
HSL220 ML-134447
HSL300 ML-134448
HSL350 ML-141073
HSU440 ML-141041
natural_image
Industrial HOBART mixing machine with control panel and mesh fan (no visible text or symbols)701 S. RIDGE AVENUE
TROY, OHIO 45374-0001
937 332-3000
www.hobartcorp.com
TABLE DES MATIÈRES
INFORMATIONS GÉNÉRALES....3
INSTALLATION 4


- TABLE OF CONTENTS
- Installation, Operation and Care of MODEL HSL & HSU SERIES SPIRAL MIXERS
- GENERAL
- INSTALLATION
- UNPACKING
- LOCATION
- LEVELING
- ELECTRICAL CONNECTIONS
- VERIFY CORRECT ROTATION
- OPERATION
- USING THE MIXER
- Continuous Mixing Mode
- Timed Mixing Mode
- MIXER CAPACITY CHART
- Bowl Guard
- Stop Button
- Shutdown
- CLEANING
- ⚠ WARNING Turn the machine off and disconnect electrical power before cleaning.
- MAINTENANCE
- SERVICE
- HOBART
- MODE D'EMPLOI
- TABLE DES MATIÈRES
- INFORMATIONS GÉNÉRALES....3
- INSTALLATION 4
Brand : Hobart
Model : HSL220
Category : Food Processor