USER MANUAL WWB10GC Waring Commercial
natural_image
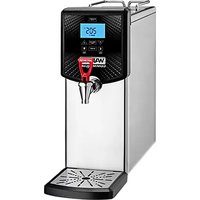
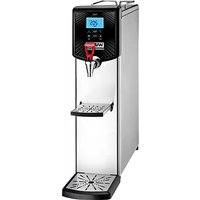
Exterior view of a Waring water heater with digital display and warning label (no text-heavy elements)
WWB10G SERIES
For your safety and continued enjoyment of this product, always read the instruction book carefully before using.
Important Safeguards ....2
Introduction 3
Parts....6
Unpacking & Installation....7
Digital Display & Controls ....7
Default Settings 9
Operating Instructions....9
Setting the clock, temperature unit & temperature .....9-10
Water source 10
Night Mode 10
Cleaning & Maintenance 12
Troubleshooting 14
Warranty 15
IMPORTANT SAFEGUARDS
When using electrical appliances, especially when children are present, basic safety precautions should always be taken, including the following:
-
READ ALL INSTRUCTIONS
-
Always unplug from outlet prior to handling or cleaning.
-
Do not touch hot surfaces. Use handles or knobs.
-
Do not move hot water dispenser when it contains hot water. Completely drain and let the exterior surface cool before moving.
-
This appliance is not intended for use by persons (including children) with reduced physical, sensory or mental capabilities, or lack of experience and knowledge, unless they are under supervision or have been given instruction concerning use of the appliance by a person responsible for their safety.
-
To protect against fire, electrical hazards, and/or personal injury, do not immerse cord, plugs or base in water or other liquids.
-
Close supervision is necessary when any appliance is used by or near children.
-
Do not operate any appliance with a damaged cord or plug or after the appliance malfunctions or has been dropped or damaged in any manner. Return appliance to the nearest
Waring Repair Center for examination, repair, and electrical or mechanical adjustment.
- The use of accessory attachments not recommended by Waring may cause injuries.
- The appliance is not intended for outdoor use.
- Do not let cord hang over edge of table or counter or touch hot surfaces.
- Do not place on or near a hot gas or electric burner, or in a heated oven.
- Do not use appliance for other than its intended use.
- Scalding may occur if the lid is removed during the filling and heating process.
- This hot water dispenser is equipped with a 3-prong grounding plug and must be plugged into a correctly polarized 3-prong grounding-type wall receptacle.
- To reduce risk of electric shock, do not remove or open cover. No user-serviceable parts inside. Repair should be done by authorized service personnel only.
- Do not clean with a water jet or use in an area where a water jet may be used.
- To reduce risk of explosion or fire, do not use near combustibles.
- Do not use extension cords.
- For safe and proper operation, the appliance must be placed in a stable, vertical position.
- To reduce risk of serious burns or scalding, do not place hand or other body parts under dispenser or container while heating.
- Always unplug unit from power supply before servicing.
- Surfaces are hot and can cause burns.
SAVE THESE INSTRUCTIONS FOR COMMERCIAL USE ONLY
INTRODUCTION
Thank you for purchasing this Waring™ Commercial Hot Water Dispenser.
Features & Benefits
- Hot water dispenser can be plumbed into a water connection or it can be manually filled for multiple location and off-site use.
- Night Mode feature conserves energy and ensures hot water is ready when you need.
- Fill rate: approximately 1 gallon per minute when unit is plumbed-in
- Initial heat-up time to full capacity: approximately 3 hours (assuming water is at 75^ (23^) to start)
- Temperature range from 150°F–205°F (65°C–96°C)
- Hot water dispenser will maintain set water temperature within +/- 5°F
- Safety Features
- Tomlinson® No-Drip® tap operation*
- Excess water drain: Easily and safely removes excess water from below spigot level.
- Knuckle guard: Protects hand from hot surface.
- Low water level sensor: In case water level gets low, an alarm will sound and the heater will automatically be shut off. This protects your machine. Once the issue is corrected/more water added, the alarm will stop.
- High-level water sensor: If water level gets too high, an alarm will sound and the heater will automatically be shut off.
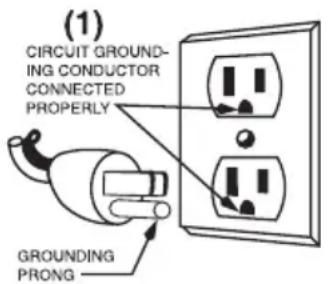
GROUNDING INSTRUCTIONS
For your protection, the Waring™ Commercial Hot Water Dispenser is equipped with a 3-conductor cord set that has a molded 3-prong grounding-type plug, and should be used in combination with a properly connected grounding-type outlet as shown in Figure 1. If a grounding-type outlet is not available, an adapter, shown in Figure 2, may be obtained so that a 2-slot wall outlet can be used with a 3-prong plug. Referring to Figure 3, the adapter must be grounded by attaching its grounding lug under the screw of the outlet cover plate.
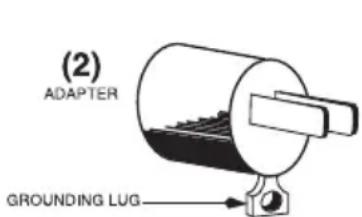
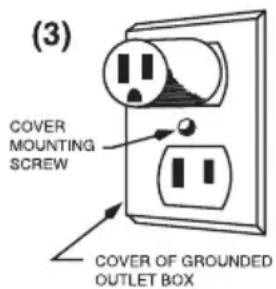
CAUTION: Before using an adapter, it must be determined that the outlet cover plate screw is properly grounded. If in doubt, consult a licensed electrician. Never use an adapter unless you are sure it is properly grounded.
NOTE: Use of an adapter is not permitted in Canada.
SHORT CORD INSTRUCTIONS
A short power-supply cord is provided to reduce the risk resulting from becoming entangled in or tripping over a longer cord.
If a longer detachable power-supply cord or extension cord is used, (1) the marked electrical rating of the extension cord should be at least as great as the electrical rating of the appliance, and (2) the longer cord should be arranged so that it will not drape over the countertop or tabletop where it can be pulled on by children or tripped over unintentionally.

The lightning flash with arrowhead symbol within an equilateral triangle is intended to alert the user to the presence of uninsulated, dangerous voltage within the product's enclosure that may be of sufficient magnitude to constitute a risk of fire or electric shock to persons.
The exclamation point within an equilateral triangle is intended to alert the user to the presence of important operating and maintenance (servicing) instructions in the literature accompanying the appliance.
| Model Electrical Plug Approval | | |
| WWB10G 120V, 1800W, 60Hz | 5-15P 📋 | TUVus |
| WWB10GC 120V, 1800W, 60Hz | 5-20P 🌐 | cTUVus |
| WWB10GB 208V, 2400W / 240V, 3200W, 60Hz | 6-15P 🌐 | TUVus |
PARTS
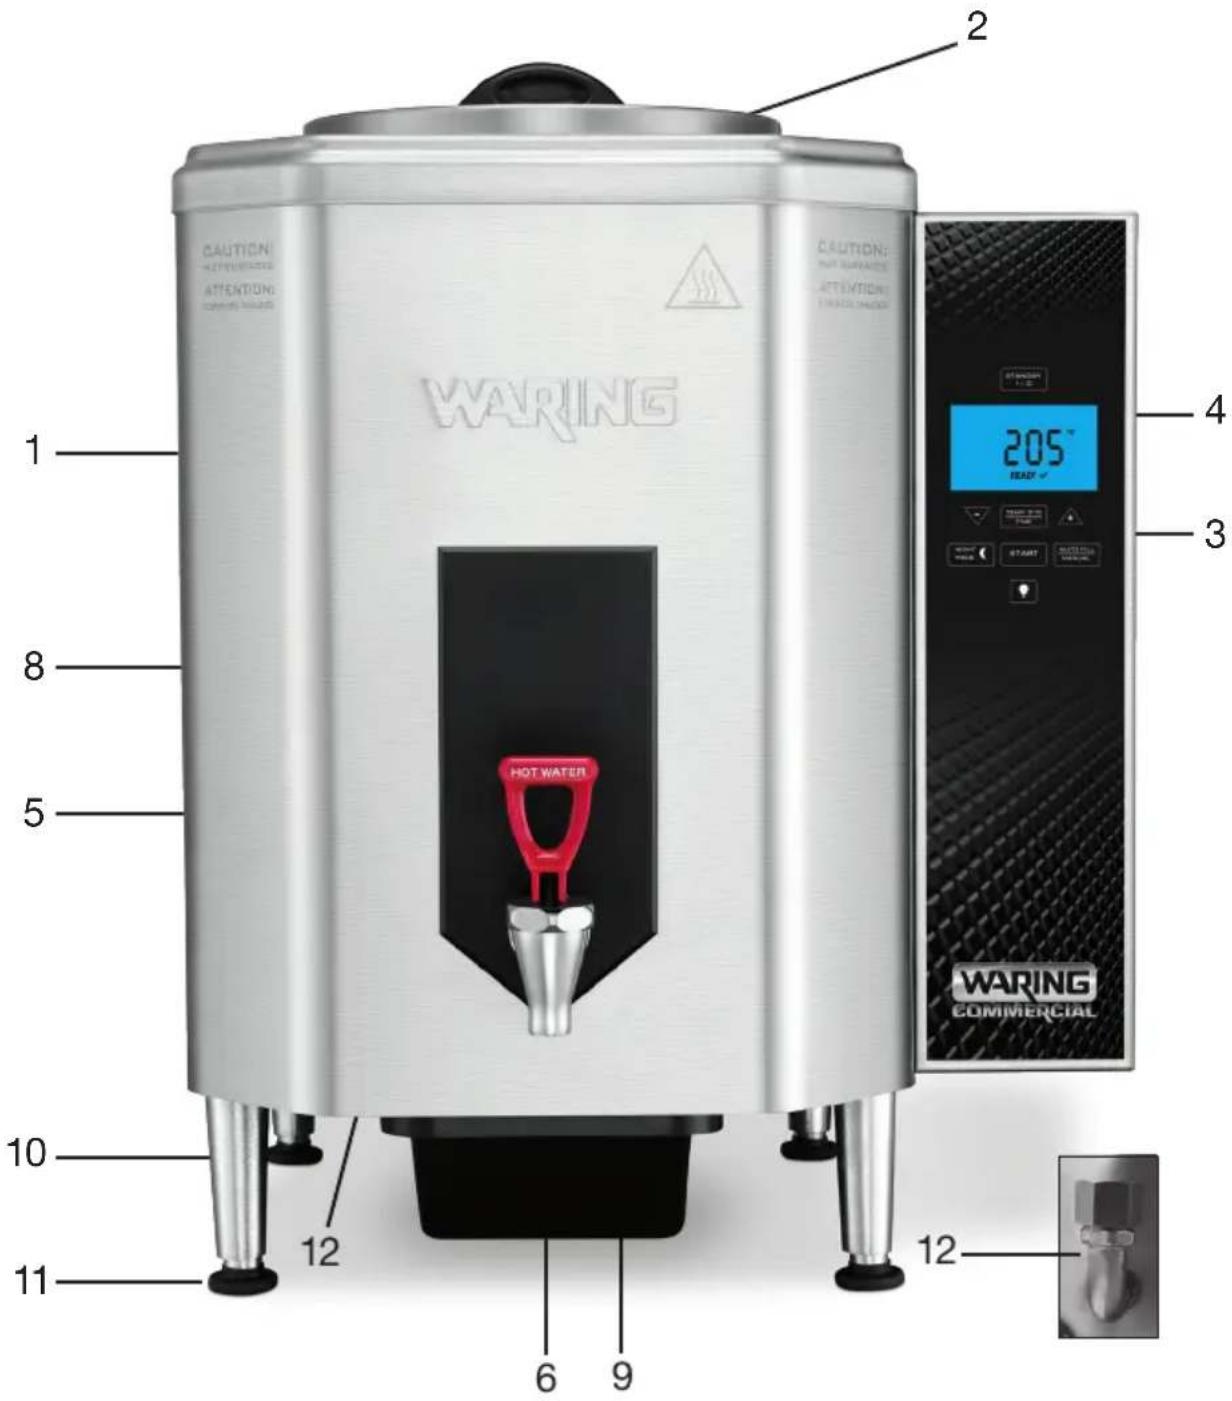
- Housing
- Lid
- Control panel
- Digital display
- Spigot (not removable)
-
Spout
-
Power cord (not shown)
- Knuckle guard
- Overflow tray
10.Legs
- Feet(adjustable)
- D rain & drain cap (underneath)
DIGITAL DISPLAY & CONTROLS
Standby – turns power on and off to the controls.
Temp/Time – Press to set the temperature. Press and hold to set time.
Arrows – use to adjust settings.

Auto Fill/Manual – toggles between auto fill/plumbed in and manual fill/pour-over.

Start – press to start the heater.

Night Mode – Press to activate night mode.

Light Bulb – Press to illuminate the display.

UNPACKING & INSTALLATION
CAUTION: This is a heavy piece of equipment. It is recommended that moving or lifting the unit be done by two people to avoid injury. Carefully unpack the machine and make sure there was no damage during shipping. Contact customer service if you notice any issues.
NOTE: The person installing the appliance is responsible for ensuring that electric and water connections meet the requirements of the national electric code, national plumbing code, and any local ordinances.
INSTALLATION
- Find a location near a water connection if the machine will be plumbed in.
- Remove the hot water dispenser from the packing material. The overflow tray and four legs are packed separately.
- Install legs by laying hot water dispenser on its side and screwing legs into leg supports until tight.
- Carefully stand up the hot water dispenser and place it on a flat,
sturdy surface where it will not be knocked into. Be sure to leave at least 6" (15 cm) on right side of hot water dispenser for proper venting. Position hot water dispenser so that the faucet can be easily accessed.
- Level the hot water dispenser by adjusting the legs to your desired height.
- Ensure the lid is on top of unit.
- Slide the overflow tray into slots underneath.
WATER HOOK UP FOR AUTO-FILL MODE
NOTE: The hot water dispenser must be installed in compliance with applicable federal, state and/or local plumbing codes having jurisdiction. This product requires an approved backflow prevention water device, such as a double check valve, to be installed between the machine and the water supply. Incoming pressure should be greater than 30 psi and not more than 70 psi.
NOTE: Connecting the hot water dispenser to a warm water supply will speed up heating and recovery times.
- Hot water dispenser is equipped with a 34 " GHT (garden hose thread) flare water inlet fitting, which is located on the back of the unit.
- Provide shutoff valve and union in supply line near hot water dispenser.
- Minimum inlet pressure at hot water dispenser should be 30 psi and maximum inlet pressure recommended at 70 psi.
- Turn on the water supply line and check for leaks.
NOTE: A filtering system is recommended to remove odors and inhibit lime and scale buildup in the unit.
NOTE: In areas with extremely hard water, a water softener must be installed in order to prevent mineral deposits that may cause malfunctioning of the equipment.
ELECTRICAL HOOK UP
NOTE: This equipment must be installed in compliance with applicable federal, state and/or local electrical codes having jurisdiction. Do not use extension cords. Make sure that the outlet is properly grounded.
-
Check rating marking on hot water dispenser nameplate to be sure electric lines match voltage, phase, and amperage requirements of hot water dispenser. Select the proper cord and cord grip for electrical rating of the hot water dispenser.
-
For U.S., 120V hot water dispensers are provided with a 120V/15A grounding plug. For Canada, 120V/20A grounding plug. Units must have a separate 120V/15A outlet. For U.S., 208/240V hot water dispensers are provided with a 240V/15A grounding plug.
TESTING THE CONNECTION/BEFORE FIRST USE
- We recommend running at least one cycle before first use.
- Open water supply line valve to hot water dispenser.
- Turn on or plug in the power supply to the hot water dispenser. The unit fills at the approximate rate of 1 gallon (3.8 L) per minute depending on water line pressure.
- Heat and discard at least one tank of water.
DEFAULT SETTINGS
• Temperature: 150°F/65°C
- Unit of measurement for temperature: Fahrenheit
• Water connection: Auto Fill/plumbed into water supply
• Night mode temperature: fixed at 158^ F ( 70^ C)
OPERATING INSTRUCTIONS
SETTING THE TEMPERATURE
- Press TEMP T/O ON once.
- Use the arrows to reach your desired temperature.
- Once desired temperature is displayed, press the ON to set or wait 10 seconds to set new temperature.
- Display will show set temperature and PRESS START blinking.
- Press START to begin filling and heating water.
CAUTION: Water is very hot. Use caution when pouring or transporting hot water. Accidental spills may result in severe burns.
SETTING °F/°C
- Press ON once.
- Once in program mode, PRESS and HOLD the ON for 2 seconds.
- Use the arrows to switch from F to C.
- Once desired unit of measure is selected, press to set.
- If neither button is pressed for 15 seconds, then the F or C displayed will be programmed.
SETTING THE CLOCK
- To set the clock, press and hold the ☐ on for 2 seconds.
- Use the arrows to scroll.
- Once the desired time is displayed, wait 10 seconds, and the time will be set. Display will show set time for 3 seconds.
WATER SOURCE
Autofill Mode
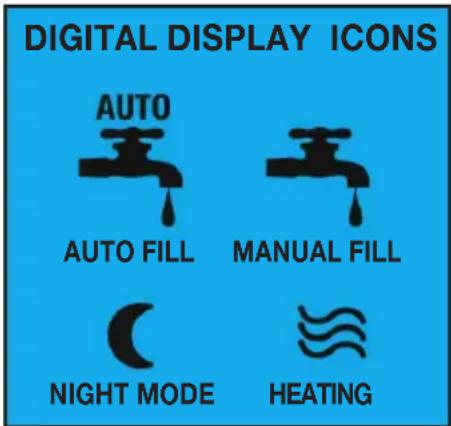
- When in autofill mode, auto fill icon flashes while unit is filling with water.
- The heater will start when water level reaches low-level sensor. Note: if water does not reach the low-level sensor within 5 minutes, error code 6 flashes on screen. See troubleshooting section for details.
- When water reaches temperature, unit will display READY along with the set temperature.
Manual Mode
You must change the setting on the hot water dispenser to manual mode if you wish to fill water manually. This will prevent the unit from thinking water will automatically fill.
Press Autofill/manual mode to toggle to manual mode.
To fill manually:
- Remove the lid and fill with water.
- While filling, the manual mode icon will flash until the minimum water level is reached. Once the max fill (10 gal) is reached, the icon will go off.
- When water reaches temperature, unit will display READY along with the set temperature.
NIGHT MODE
In Night Mode, unit will maintain water temperature at 158^ F/70°C during non-business hours to save energy and enable a quicker heat up time, so that hot water is ready when you need it. When setting the time for night mode, you will be setting the time the unit will be re-energized and will start heating the water to your pre-set temperature. (i.e. 5:00 am – unit will turn back on and starts heating to 205^ F).
1. SETTING TIME for NIGHT MODE
a. PRESS and hold
for 2 seconds:
b. Use the
to scroll to the desired time.
c. Once desired time is displayed, wait 10 seconds, and the time will be set. Display will show set time and MOON icon for 3 seconds.
2. ENTERING/EXITING NIGHT MODE
a. Pressing NIGHT MODE button once will enter into night mode/energy saving mode. Display will show the time of day and the MOON icon.
b. Unit will exit night mode and re-energize automatically at the set time.
c. To exit out of NIGHT MODE manually, press the button or hold START button for 2 seconds.
a. If b is pressed to exit night mode, you must Press Start to re-energize the unit
b. button is pressed to exit night mode, unit will automatically re-energize and start heating to set temperature
Helpful Hints
Why use Night Mode?
When you need hot water at the start of business but do not want your machine on full power during non-business hours. Utilize night mode, an energy saving feature that will maintain a water temperature of 158^ F/70°C during non-business, and heat to full set temperature at the time you set.
What time should I set Night Mode to?
Once night mode turns off and the machine is re-energized, it will take approximately 1 hour to reach 205^ (MAX), so set the time for night mode for approximately 1 hour before you will need hot water.
Can I change the temperature in Night Mode?
158^ / 70^ is the fixed temperature and cannot be adjusted.
CLEANING & MAINTENANCE
ALWAYS DISCONNECT OR UNPLUG THE HOT WATER DISPENSER BEFORE CLEANING. Allow the hot water dispenser to cool completely before handling or before cleaning.
- Dispense any remaining water from the spigot.
- After dispensing, excess water may remain under the spigot level. To empty, carefully unscrew drain cap and empty water through the drain into a container. Use a low profile container or hose. Discard.
-
Wipe exterior and control panel with a nonabrasive, damp cloth and dry.
-
DO NOT use any cleaning fluids that can be harmful to you, others around you, or to the environment.
- DO NOT hose down, immerse or pressure wash any part of the hot water dispenser.
- NEVER use steel wool or abrasive materials to clean the hot water dispenser.
- NEVER remove spigot when the hot water dispenser has water in it. Switch OFF the power to the unit at the circuit breaker. Turn off the water line running to the hot water dispenser.
NOTE: All sanitizing agents in the food zone must comply with U.S. Food & Drug Administration Code of Federal Regulations Title 21, Section 178.1010. Sanitize all food dispensing units periodically. All parts to be sanitized must be cleaned first. Cleaning and sanitizing frequency must follow state and local health department regulations.
NOTE: Do not use cleansers, bleach liquids, powders, or any other substance containing chlorine.
These products promote corrosion and will pit the stainless steel. USE OF THESE PRODUCTS WILL VOID THE WARRANTY.
Daily
Wipe the outside of the unit with a damp cloth, using soap solution or a non abrasive compound when required.
Sanitizing
- With power to the unit disconnected, fill unit to MAX fill line manually.
- Prepare a sanitizing solution in accordance with local health department regulations. You may also refer to the U.S. Food and Drug Administration Regulation 21 CFR 178.1010 “Sanitizing Solutions” and U.S. Environmental Protection Agency 40 CFR 18.940 “Tolerance
exemptions for active and inert ingredients for use in antimicrobial formulations (Food-contact surface sanitizing solutions).”
- Follow the instructions provided with the sanitizing agent.
- Drain all water from the unit slowly through the drain.
- Let all sanitized parts drain and air-dry. DO NOT WIPE THEM DRY.
- If the unit is not to be used again immediately after sanitizing, do not rinse with water. If the unit is to be used immediately after sanitizing, rinse with water before refilling the unit for further use.
DECALCIFICATION
Decalcification refers to the removal of calcium deposits that form over time on the metal parts of the machine. The frequency with which you need to decalcify will depend on the hardness of your water and how often you use the machine. To ensure optimum performance, decalcify the machine every 3 months. Periodically check for any white buildup on the internal heating element.
- Add cleaning solution to the tank and scrub inside with a soft bristle brush. Take care to avoid hitting internal water level sensors.
- Turn hot water dispenser on so that hot water dispenser can fill with water.
- Let hot water dispenser fill completely with water and let sit for 10 minutes.
- Run a couple of cycles through the hot water dispenser (no need to start the heater).
- Drain water through the drain spout into a large container. To clean the spigot/spout, dispense some of the cleaning solution from the spout.
- Run at least one clean water cycle through the machine before next use.
TROUBLESHOOTING CODES
During operation under certain conditions, your machine may display one of the following error codes. Please follow the chart below to fix.
| Error Code | Cause Solution | |
| Contact a Service Center if the following error codes appear |
| E-1 | Internal temperature control Call damage. adjustment. | a service center for repair or |
| E-2 | Machine malfunction. Call a service center for repair or adjustment. |
| E-3 | Heating element damage. Call a service center for repair or adjustment. |
| E-4 | Issue with upper water level Call sensor. adjustment. | a service center for repair or |
| E-5 | Issue with lower water level Call sensor. adjustment. | a service center for repair or |
| User Fixable |
| E-6 | Hot water dispenser does not have enough water to begin heating. | Connect to a water source or switch to manual mode and pour water into the hot water dispenser.Once water is at proper fill level, alarm will stop and the machine will begin heating.Ensure hot water dispenser is on a level surface. |
| E-7 | Water level is too low Ensure the connection to the water supply is open and water line pressure is running properly.If the problem persists, consult customer service or a local service center. |
| E-8 | Power outage or issue with Disconnect plug and reconnect power source. |
| E-9 | Water has exceeded max fill. | Shut off the water supply, drain excess water. Alarm should go off.If problem persists, contact a service center.If this Error is seen in manual mode, dispense some water from the spigot. |
If problems persist and the assigned solution does not remedy the issue, please call Waring Customer Service at 860-496-3100.
NOTE: Any other servicing should be performed by an authorized service representative.
LIMITED ONE-YEAR WARRANTY
(U.S. AND CANADA ONLY)
Waring warrants every new Waring™ Commercial Hot Water Dispenser to be free from defects in materials and workmanship for a period of one year from the date of purchase when used with foodstuffs, nonabrasive liquids (other than detergents) and nonabrasive semi-liquids, providing it has not been subject to loads in excess of the indicated rating.
Under this warranty, Waring will repair or replace any part that, upon our examination, is defective in materials or workmanship, provided the product is delivered prepaid to the Waring Service Center at
314 Ella T. Grasso Ave., Torrington, CT 06790, or any Factory Approved Service Center.
This warranty does not: a) apply to any product that has become worn, defective, damaged or broken due to use or due to repairs or servicing by other than the Waring Service Center or a Factory Approved Service Center, or due to abuse, misuse, overloading or tampering; or b) cover incidental or consequential damages of any kind. This warranty is void if appliance is used on Direct Current (DC).
WARING COMMERCIAL
314 Ella T. Grasso Ave.
Torrington, CT 06790
ÍNDICE
RISQUE D'INCENDIE OU
D'ÉLECTROCUTION—NE PAS OUVRIR
AVERTISSEMENT : AFIN DE RÉDUIRE LE RISQUE D'INCENDIE OU
D'ÉLECTROCUTION, NE PAS OUVRIR LE BOÎTIER.
CET APPAREIL NE CONTIENT AUCUNE PIÈCE POUVANT ÊTRE RÉPARÉE
PAR L'UTILISATEUR. TOUTE RÉPARATION DOIT ÊTRE EFFECTUÉE
PAR UN TECHNICIEN AUTORISÉ.
GARANTIE LIMITÉE D'UN AN
(VALABLE AUX É.-U. ET AU CANADA UNIQUEMENT)
Trademarks or service marks of third parties used herein are the trademarks or service marks of their respective owners.
©2019 Waring Commercial
314 Ella T. Grasso Avenue
Torrington, CT 06790
www.waringcommercialproducts.com
Printed in China
Impreso en China
Imprimé en Chine
WWB10G Series
19WC061971
IB-15552A