
Pure 300 - Air purifier ELECTROLUX - Free user manual and instructions
Find the device manual for free Pure 300 ELECTROLUX in PDF.
User questions about Pure 300 ELECTROLUX
0 question about this device. Answer the ones you know or ask your own.
Ask a new question about this device
Download the instructions for your Air purifier in PDF format for free! Find your manual Pure 300 - ELECTROLUX and take your electronic device back in hand. On this page are published all the documents necessary for the use of your device. Pure 300 by ELECTROLUX.
USER MANUAL Pure 300 ELECTROLUX
natural_image
Line drawing of a cylindrical electronic device with ventilation grilles and a central top component (no text or symbols)Pure 300
Pure 500
Air Purifier

SAFETY INFORMATION
WARNING! Avoid fire hazard or electric shock. Do not use an extension cord or a wall adapter other than the one provided with the product or original spare part adapter. This appliance can be used in 50Hz or 60Hz power supply without any change.
Do not store or use gasoline or other flammable vapors and liquids in the vicinity of this or any other appliance. Read product labels for flammability and other warnings.
Do not let water or any other liquid or flammable detergent enter the appliance to avoid electric shock and/or a fire hazard.
CHILDREN AND VULNERABLE PEOPLE SAFETY
WARNING! Risk of suffocation, injury or permanent disability.
This appliance can be used by children aged from 8 years and above under supervision. The appliance can be used by persons with reduced physical, sensory or mental capabilities or lack of experience and knowledge if they have been given supervision or instruction concerning use of the appliance in a safe way and understand the hazards involved. Children should be supervised to ensure that they do not play with the appliance.
Cleaning and user maintenance shall not be made by children without supervision.
Children under 3 years of age should be kept away from the appliance unless continuously supervised.
Keep all packaging away from children.
This product has a child lock function. We recommend you activate this function if there is a risk that children can come in contact with the appliance.
ELECTRICAL INFORMATION
WARNING! Avoid fire hazard or electric shock.
If you are not sure the outlet is adequately grounded or protected by a time delay fuse or circuit breaker, have a qualified electrician install the proper outlet according to the National Electrical Code and applicable local codes and ordinances.
Never unplug the unit by pulling on the wall adapter cable. Always grip the appliance connector or wall adapter firmly and pull straight out from the receptacle.
Always call an authorized Electrolux servicer for repairs.
If the adapter housing is damaged, it must be replaced with a new Electrolux spare part adapter designed for this appliance.
Be sure to unplug the unit before cleaning or maintenance to prevent shock or fire hazards.
SAFETY PRECAUTIONS
CAUTION! Avoid Serious Injury or Death.
Do not insert or place fingers or objects into the air outlet grill of the unit.
In the event of a malfunction (sparks, burning smell, etc.), immediately stop the operation, disconnect the power supply, and call an authorized Electrolux servicer.
Do not operate the unit with wet hands.
CAUTION! Avoid Injury or damage to the unit or other property.
Do not direct airflow at fireplaces or other heat related sources as this could cause flare ups.
Do not climb on or place objects on the unit.
Do not hang objects off the unit.
Do not place containers with liquids on the unit.
Turn off the unit at the power source when it will not be used for an extended period of time.
Always operate the unit with air filter in place.
Do not block or cover the intake grille or the air outlet grill.
Ensure that any electrical/electronic equipment is 30cm away from the unit.
The appliance is only to be used with the accessories provided from the manufacturer and its service agent.
DISPOSAL

This symbol on the product or on its packaging indicates that the product may not be treated as household waste.
To recycle your product, please take it to an official collection point or to an Electrolux service center that can remove and recycle electric parts in a safe and professional way. Follow your country's rules for the separate collection of electrical products.
This product is designed with the environment in mind. All plastic parts are marked for recycling purposes.
BEFORE STARTING
- Read this instruction carefully.
- Check that all parts described are included.
- Pay special attention to the safety precautions!
text_image
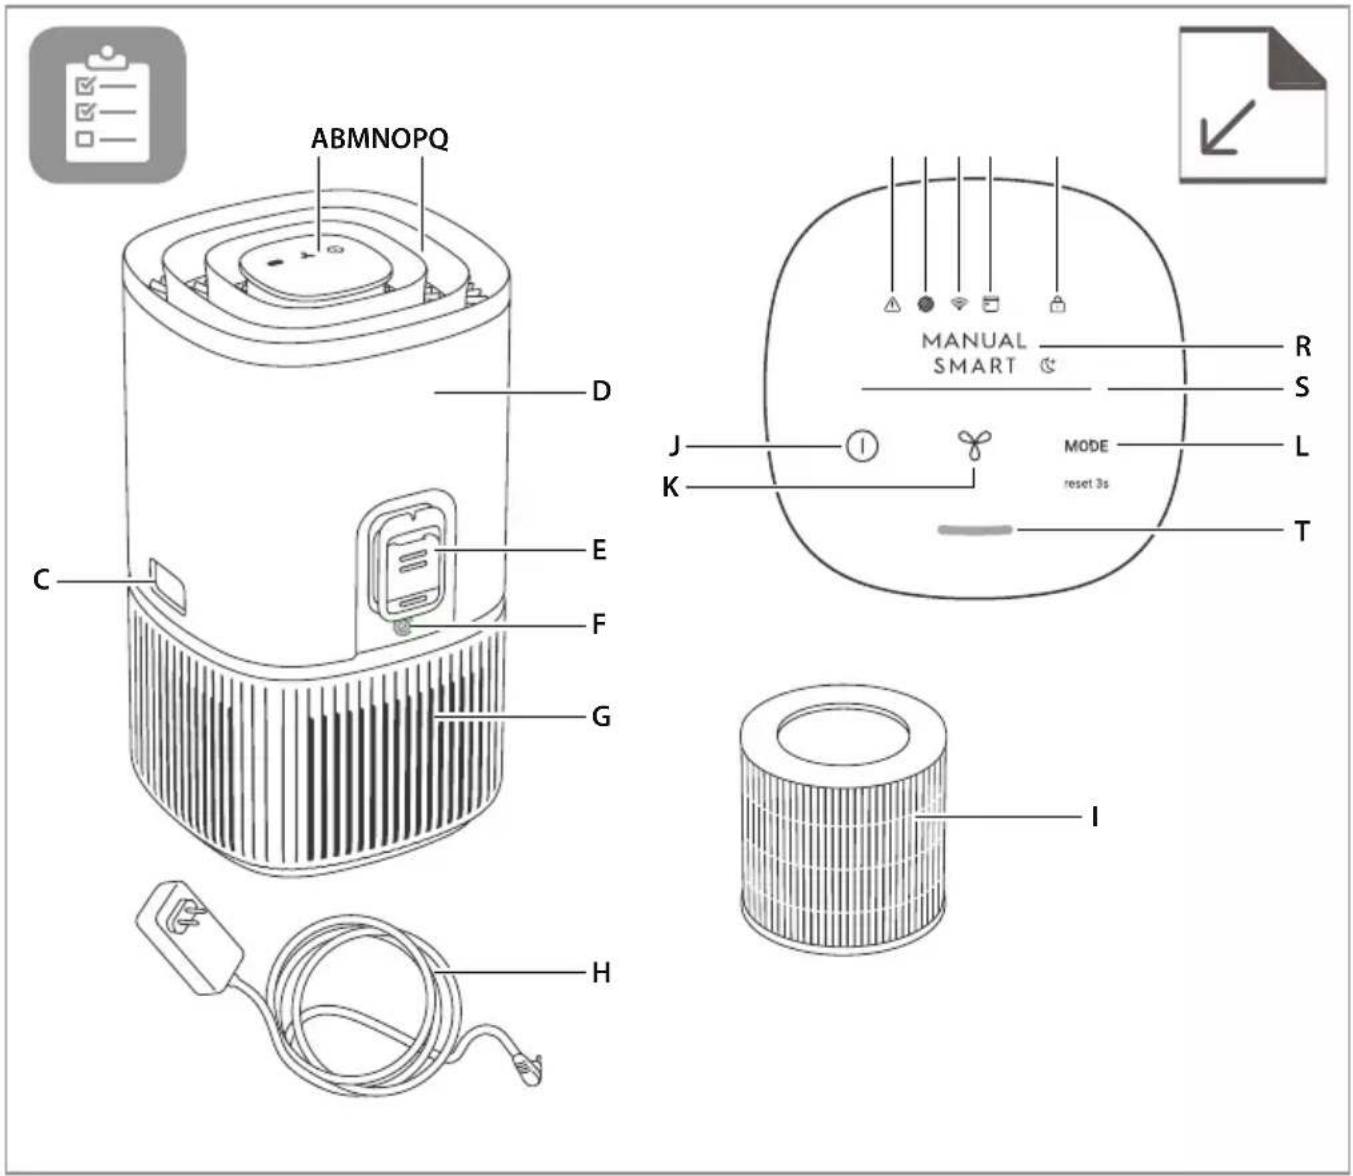
ABMNOPQ D C E F G H J K T R S MODE reset 3s IDESCRIPTION OF YOUR AIR PURIFIER
Appliance:
A. Control panel display
B. Air flow guide (Air outlet)
C. Release buttons
D. Main body (top)
E. Sensor box
F. Adapter jack
G. Main body (bottom)
H. Power cord
I. Filter (inside)
Control panel:
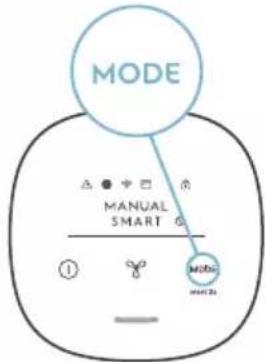
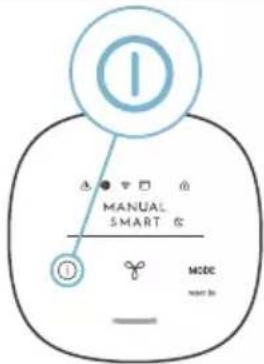
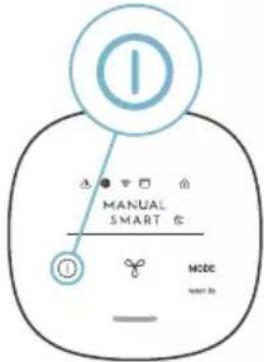
J. ON/OFF button
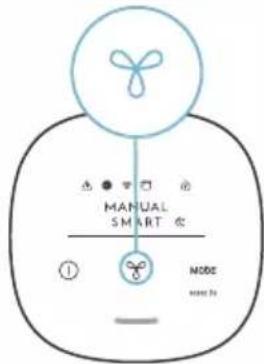
K. FAN button
L. MODE button
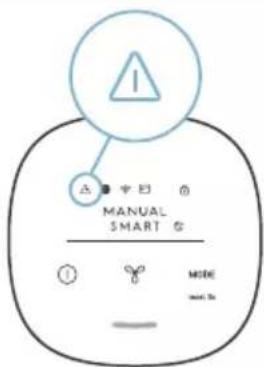
M. Warning alert icon
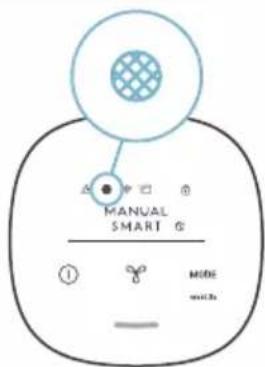
N. Filter change icon
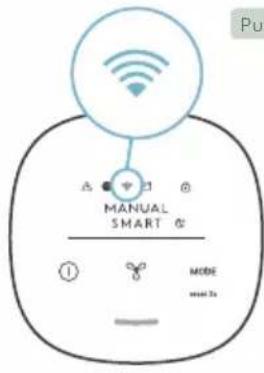
O. Wifi icon*
P. Scheduler icon*
Q. Child lock icon
R. MODE indicator
S. FAN SPEED indicator
T. Air quality indicator
* The features only available for Pure 500 series.
NOTE: Your specific model may not have all the components and features listed within this USER MANUAL. Please check the product packaging OR the product specification page on our website for exact details of your model. Electrolux reserves the right to change information contained herein without notice.
text_image
Diagram illustrating a mechanical assembly process with numbered steps and directional arrows indicating motion or movement.
text_image
Diagram of a portable air conditioner unit with labeled parts and an inset showing a plug inserted into a socket.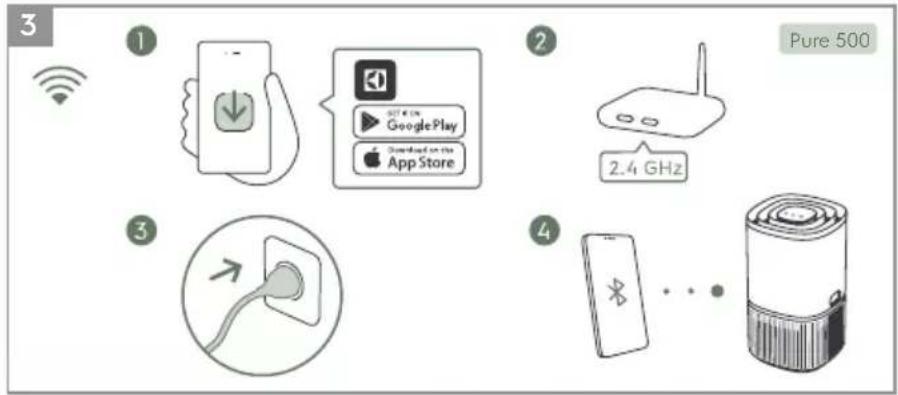
text_image
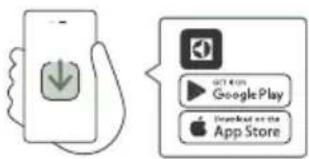
3 1 2 Pure 500 1 GooglePlay Download on the App Store 2.4 GHz 3 4
text_image
4 I TM TM TM MODE must be
text_image
MODE MANUAL SMART MOSA MAIN 10
text_image
6 MANUAL SMART ① NODE GROW BY
text_image
7 INT MANUAL SMART ① MODEout to

text_image
8 MANUAL SMART MODE +440.2x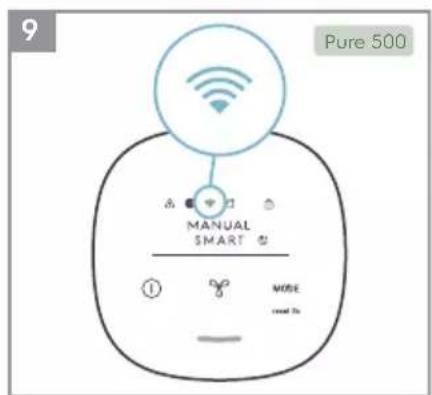
text_image
Pure 500 MANUAL SMART ① WRITE read To
text_image
10 Pure 500 MANUAL SMART ① MODE must be
text_image
11 1 + MODE 5 secs MANUAL SMART ① ② ③ ④ ⑤ ⑥ MODE next to12

flowchart
graph LR
    A["Sensor input"] --> B["OR"]
    B --> C["Device with battery icon"]
    C --> D["Device with battery icon and switch"]
    D --> E["Device with battery icon and recycling symbol"]
    E --> F["Device with battery icon and mode reset"]
    F --> G["Device with battery icon and mode reset"]
    G --> H["Reset 3s MODE"]
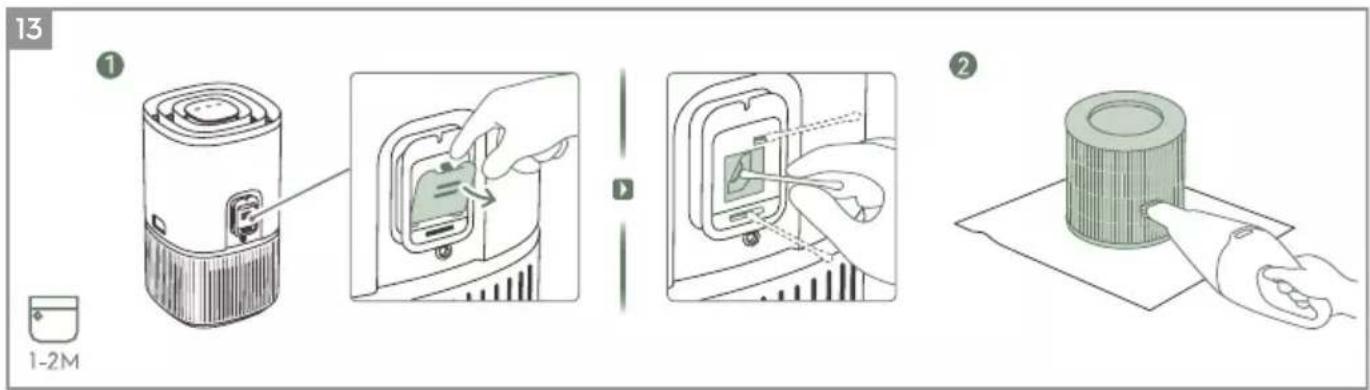
13
text_image
1-2M ① ②
natural_image
Line drawing of a cylindrical device with a handle, showing internal components and a small inset component (no text or symbols)
natural_image
Illustration of a crossed-out product with a textured sphere and a bottle labeled 'MAX' (no text or symbols on the main image)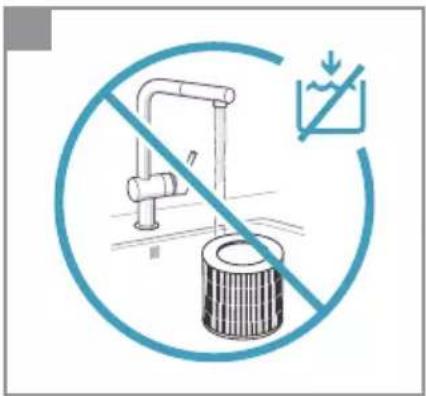
text_image
Safety warning symbol for water treatment with crossed-out pipes and a circular sign indicating no pollution.Refer to pages 7-9 for further details about the description of the images.
To enjoy peace of mind register your appliance today at www.electrolux.com.
Stay updated on better living services, safety notices and shop for accessories that match your appliance.
Features might be added or updated with new app releases.
SET UP
Note: Please remove the protective film on the control panel display for better usage.
Remove the plastic bag around the filter before using the product.
Always keep unit OFF when changing the filters.
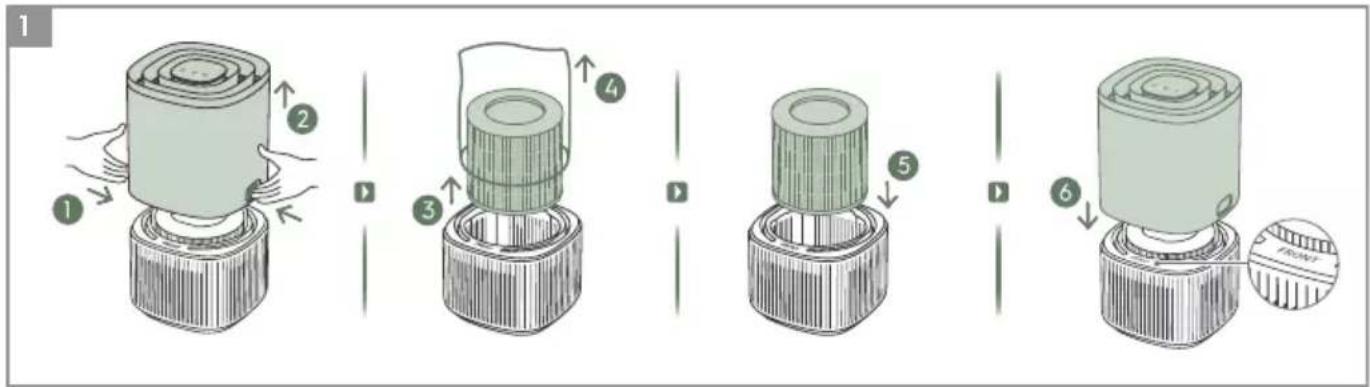
1 Open the main body of the unit
Open the product by pressing the release buttons on the sides of the unit, then lift up the top part of the main body. (ref. page 5, picture 1).
2 Take out the filter and remove the filter bag
Carefully remove the plastic bag around the filter and discard appropriately.
3 Install the filter
Carefully insert the filter back into the product (either end of the filter works). Make sure that the filter is placed in the center of the cavity.
4 Put back the top part of the main body
Put back the top part of the main body to close the product till it is securely in place. The mark "FRONT" should be facing the front side of the product.
OPERATION
Caution: After filter is installed correctly, please ensure product is placed on a leveled surface before proceeding further. Ensure there is enough free space over and around the product.
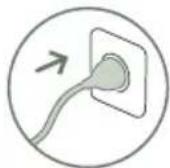
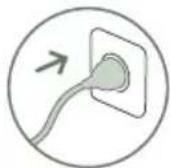
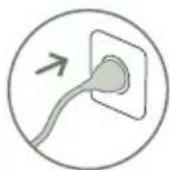
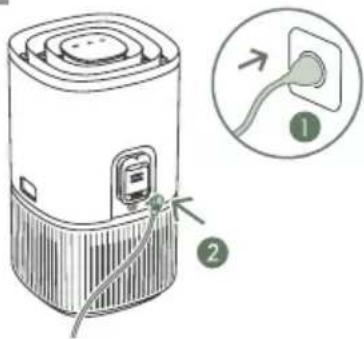
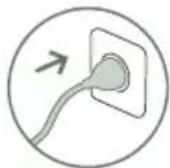
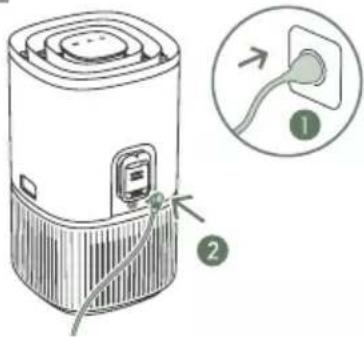
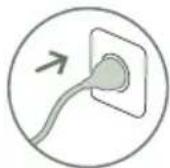
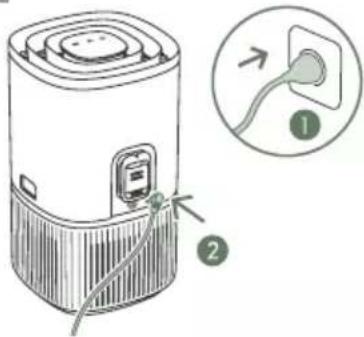
5 Connect the power plug.
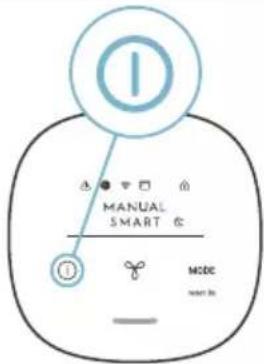
6 Power on
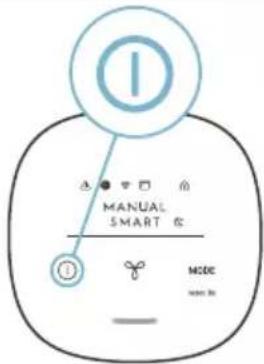
Press the ON/OFF button turn ON the air purifier, the unit will run in default setting (SMART mode) when using the product the first time. Next time you start the unit it will resume the last settings you had before turning OFF the product.
NOTE: When turning ON the air purifier, it will take about 10 seconds for the sensors to calibrate and analyze the air quality. During this time, the air quality indicator will pulsate slowly in white.
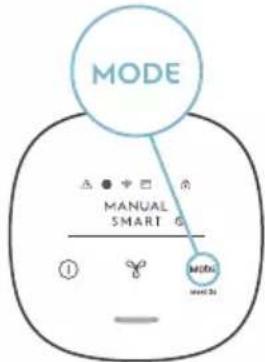
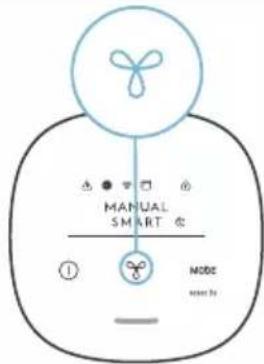
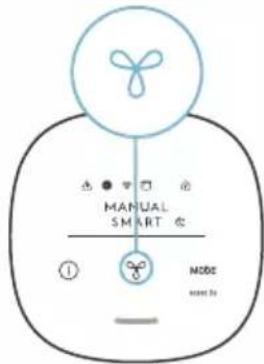
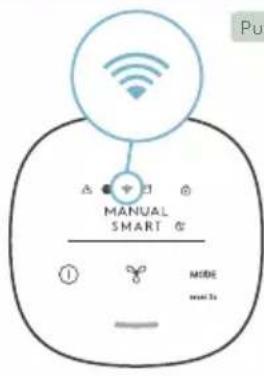
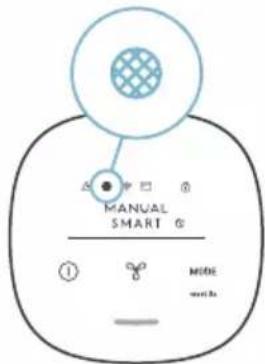
7 Mode selection
Press the MODE button once to toggle between the two modes: SMART and MANUAL
SMART: In the SMART mode, the unit will utilize the sensor data as input to decide on the appropriate fan speed, depending on the air quality in the room. The fan speed can not be adjusted by the user under this mode. Please see the AIR QUALITY INDICATOR section for more details.
SMART QUIET: In the SMART QUIET mode, the unit will run as quiet (control panel indicators dimmed & lower fan speed) as possible to allow for sleep.
MANUAL: In the MANUAL mode, the unit will utilize the sensor data as input only to show the air quality level via the air quality indicator but will not self-adjust the fan speed. This mode is best utilized for a quick burst of cleaning, especially when the user anticipates an increase in particulate matter in the room due to household chores (e.g. vacuuming).
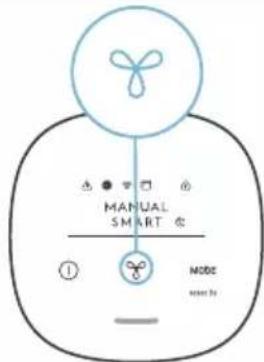
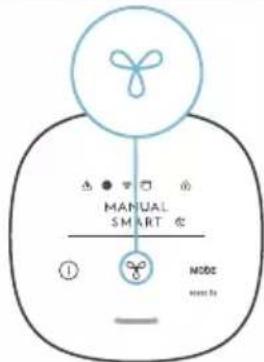
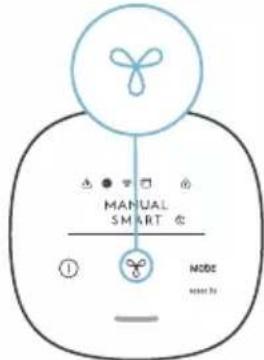
8 Air speed control
While in MANUAL mode, Press the FAN button to adjust the fan speed, the fan speed indicator will show the fan speed.
The unit has 3 levels fan speed.
NOTE: The unit will ramp up OR down to chosen speed setting gradually.
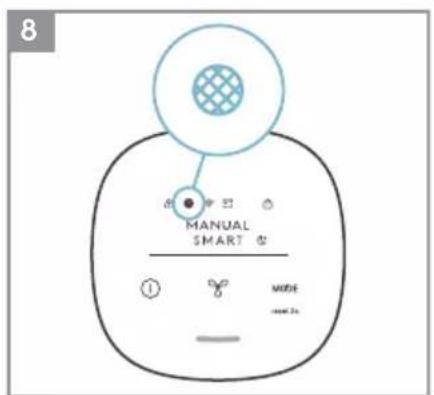
FEATURE ICONS AND INDICATORS
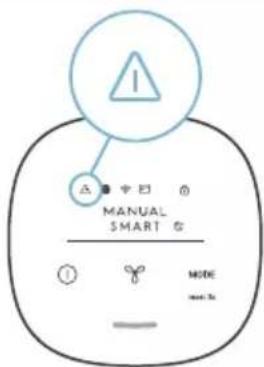
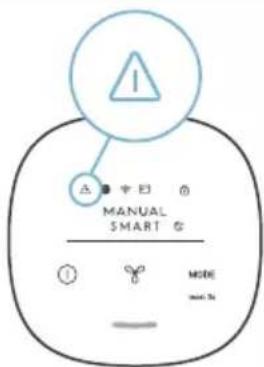
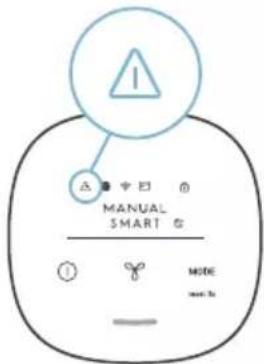
9 ALERT
The alert icon will light up to alert you of a possible electrical or electronic error with your unit. Please refer to the App for details on the error type, component details and any mitigating actions. More details can also be found in the ERRORS & TROUBLESHOOTING section below.
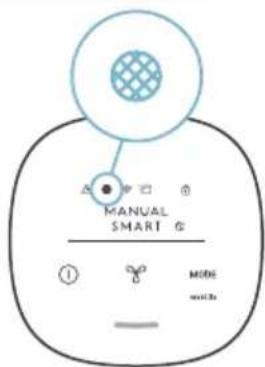
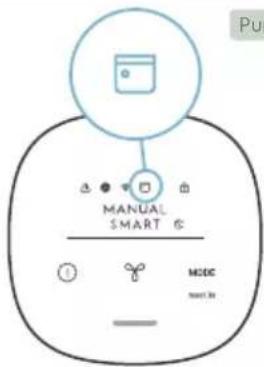
10 FILTER CHANGE and RESET
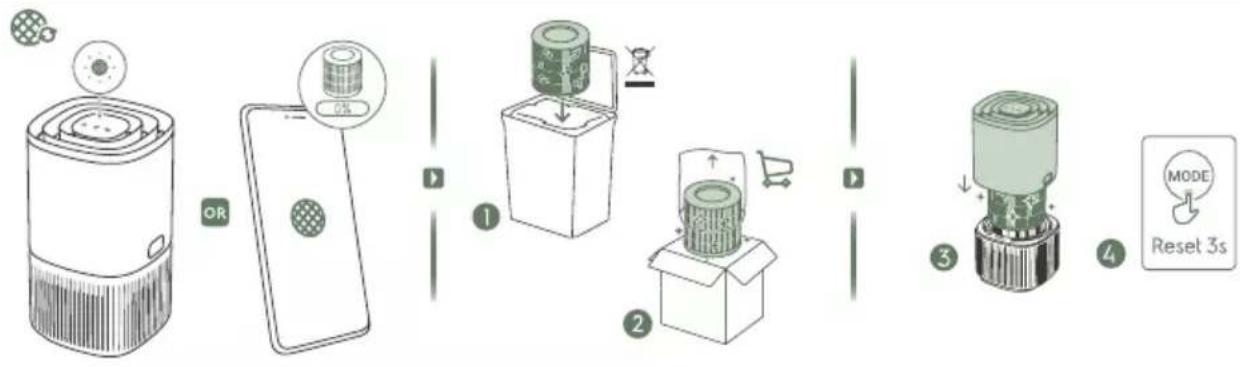
FILTER CHANGE: The filter in the unit cannot be washed, they can only be replaced. The filter change icon 📋 will light up to remind you to change your filter. Always ensure the plastic protective bag is removed before its use in the unit.
FILTER RESET: After the used filter is replaced, long press the MODE button 🖱️ for 3 seconds and filter change indicator will reset.
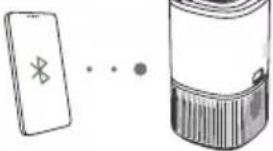
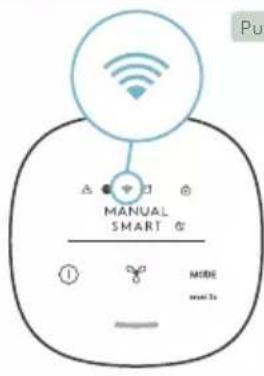
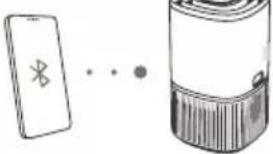
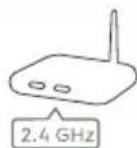
11 WIFI
The unit is equipped with a WiFi module, which enables remote control and access to many more features including time-based tracking of your indoor air quality data. When the unit is connected to the home WiFi, this icon will light up. If the icon is blinking, it indicates a temporary loss of WiFi connectivity – please refer to the Electrolux App for more details.
Long press the ON/OFF button Ⓐ for 5 seconds to activate or deactivate wireless network.
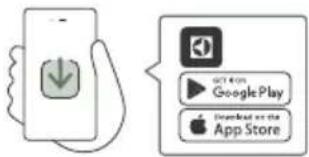
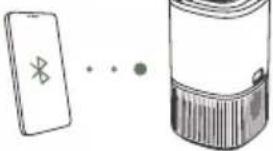
NOTE: Download our Electrolux App and follow the step-step onboarding instructions to bring the air purifier online.
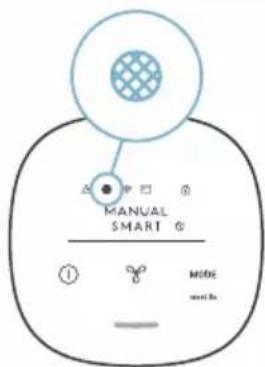
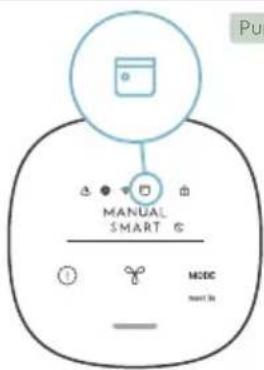
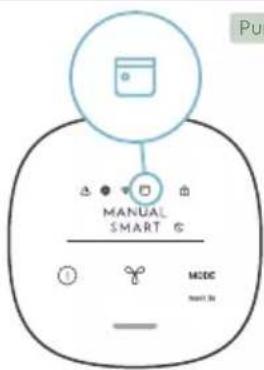
12 SCHEDULER
This icon 📋 indicates that a scheduled event from the app is running.
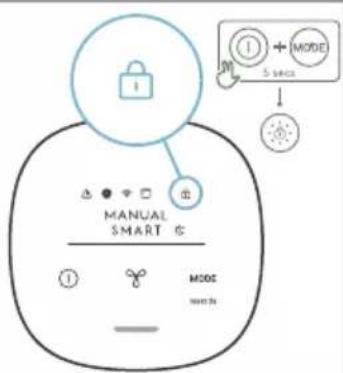
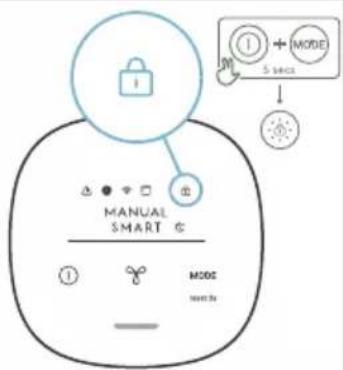
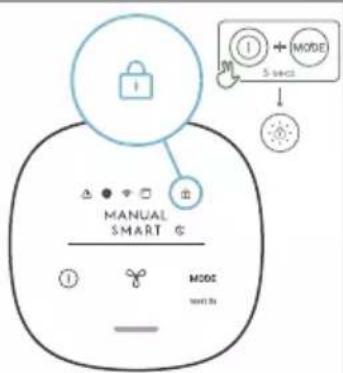
13 CHILD LOCK
The unit is equipped with a safety lock feature to disable the product control panel to avoid unintended pressing. Press and hold MODE & POWER button simultaneously for 5 seconds to activate or deactivate the child lock feature. The child lock icon 📋 will light up when the feature is activated. When the control panel is locked, you can only make changes via App.
14 AIR QUALITY INDICATOR
The appliance has an air quality sensor that analyzes the air quality.
The air quality light will show the real-time air quality through different colors of light. As shown below:
| LIGHT'S COLOR | PM 2.5 ( g/m^3 ) AIR QUALITY | |
| Green | 0-12 Good | |
| Yellow | 13-35 Average | |
| Orange | 36-55 | Poor |
| Red >56 Very Poor | ||
NOTE: Please ensure regular cleaning of the sensor window to ensure it does not get clogged with dust and sensors keep performing accurately.
ONBOARDING
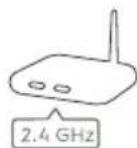
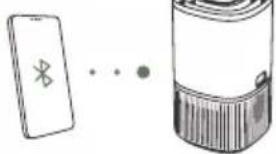
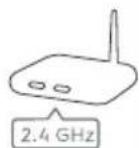
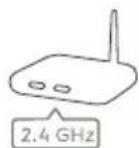
NOTE: Some steps in the onboarding flow may have changed, please follow step by step instructions in the latest version of the App as reference in case of discrepancy. Please ensure home WiFi is running on 2.4 GHz band, as the 5GHz band will not be recognized by the air purifier.
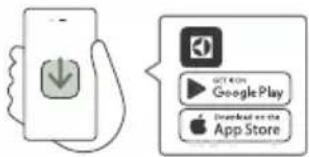
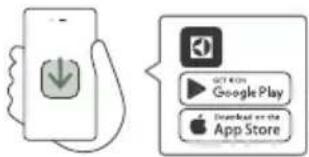
15 Please find the Electrolux App in the iOS App or Google Play store, download it, sign up and login to the App. Here you will be able to 'Add a device' in the App and follow the step by step instructions for onboarding the unit. (ref. page 5, picture 3).
REPLACING FILTER
NOTE: The filter cannot be washed and must always be replaced when at end of life. The air purifier have a variety of filters to choose from, tailored to your lifestyle needs. Head over to the App or the product information page on our website for a guide on choosing the appropriate filter for your needs. Please visit your local website to order your replacement filter.
16 For the best experience and to secure an uninterrupted use of the air purifier, please monitor the filter's remaining lifetime in the App and order a replacement filter in due time before the remaining filter lifetime reaches 0%. If you have notifications enabled, the App will inform you when the filter life is close to end of life (e.g. at 5%).
17 When the filter is at end of life, the filter change icon will light up on the product control panel to indicate the need for replacement. When filter is at end of life, the unit's fan speed may be reduced in SMART mode.
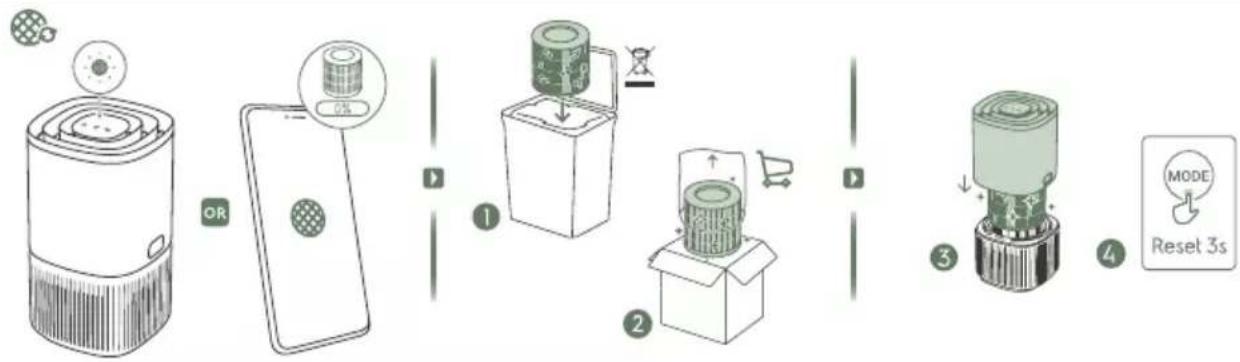
18 The used filter might be heavily coated with dust and particulate matter so before opening the main unit, please ensure a disposable bag or packaging is at hand to place the used filter in.
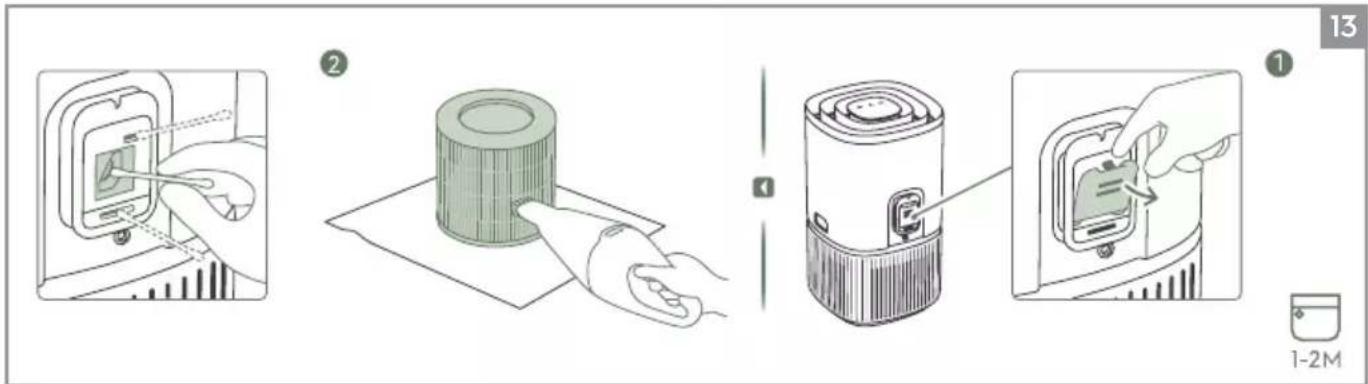
19 Turn OFF the air purifier or unplug the unit before changing the filters. Remove the top part of the main body put it aside. Next remove the filter which is at end of life and place it in a disposable bag at hand. (ref. page 6, picture 12).
20 Next, please remove the plastic bag from the replacement filter and insert the filter in to the product. Reinsert back the top part of the main body and turn ON the unit. Reset the filter change icon on the product control panel by long pressing the MODE button for 3 seconds and the App will indicate the same, with a new filter lifetime reading.
NOTE: In case the change is only reflected on the product control panel and not the App, please restart the App and the unit, before further troubleshooting.
21 Discard the used filter as well as any plastic packaging according to local recycling guidelines.
CARE AND CLEANING
NOTE: Always unplug the air purifier before cleaning to prevent shock or fire hazards. Never use abrasive, harsh detergents OR wax for cleaning the unit. The high efficiency filters cannot be washed, they must always be replaced when at the end of life.
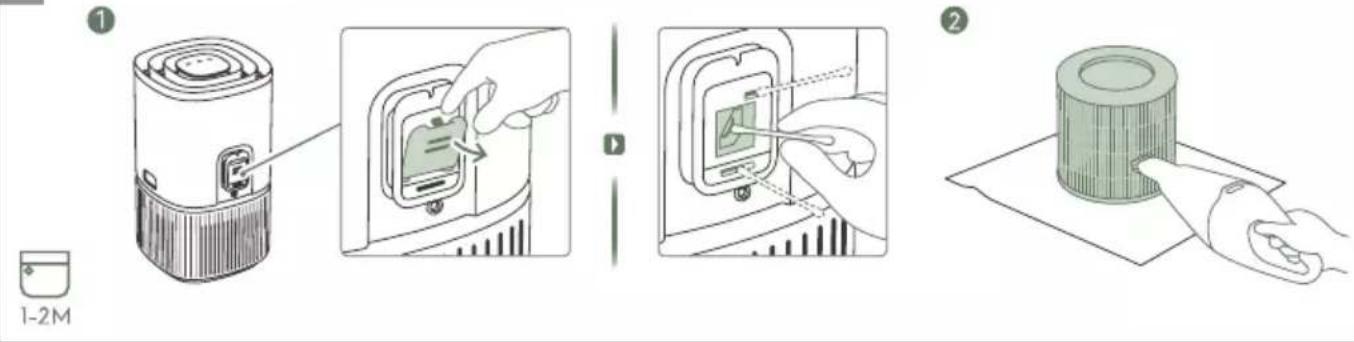
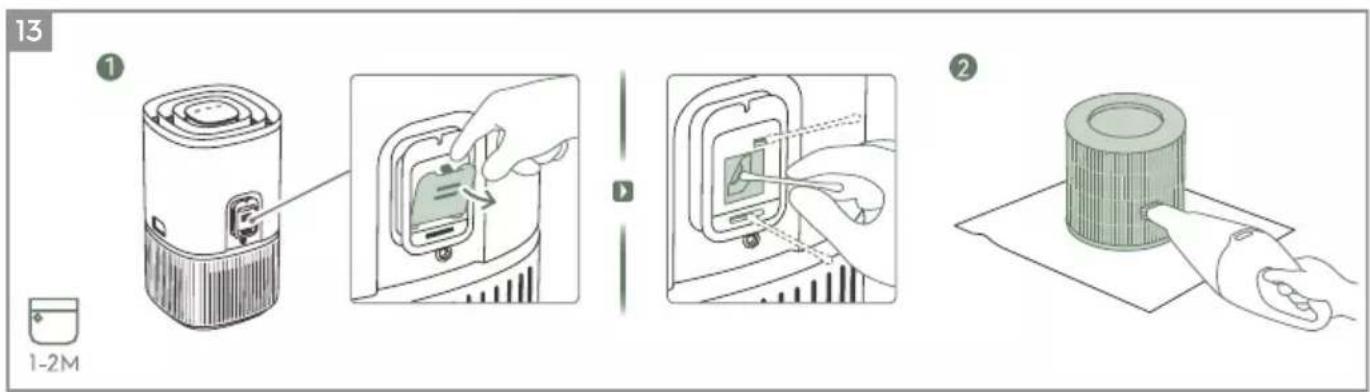
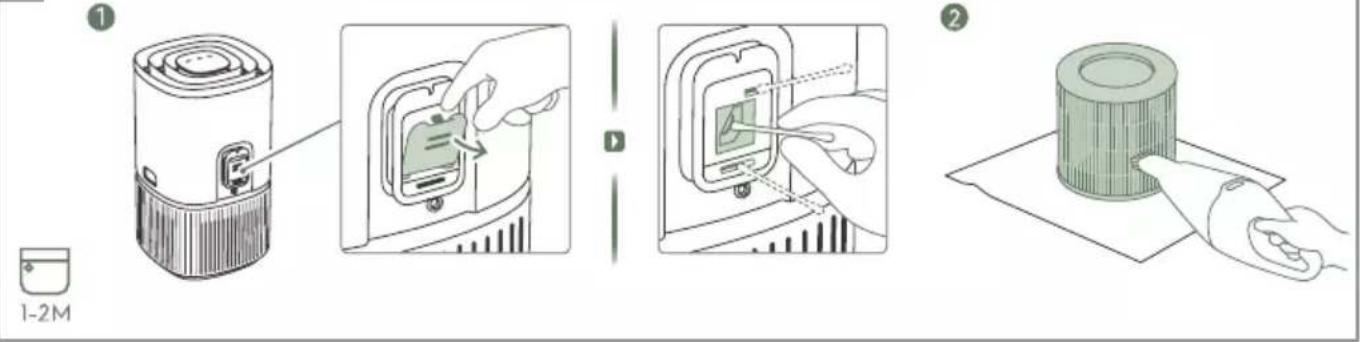
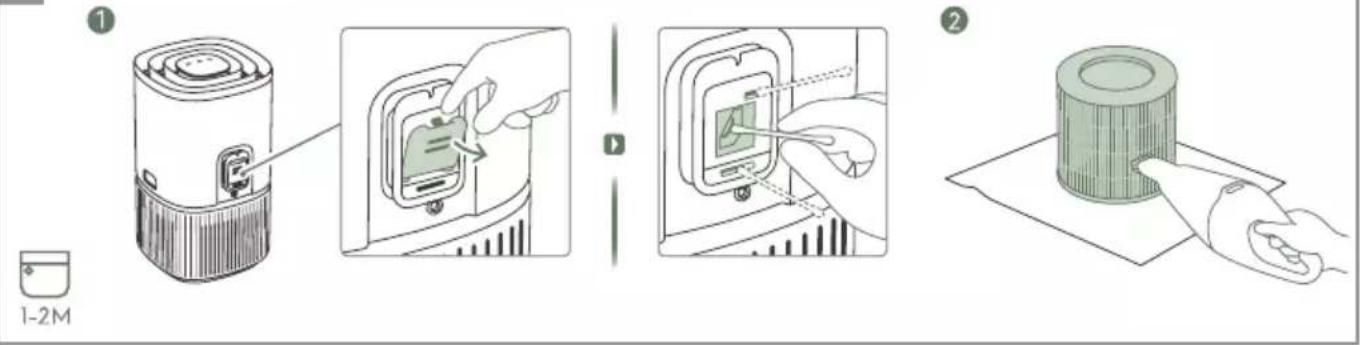
22 Cleaning the air quality sensor box and sensor (page 6, picture 13)
NOTE: Clean every 1-2 months to maintain the performance of the air quality sensor.
Ensure that the air quality sensor is kept clean and unclogged for optimal performance of the unit. It is natural for dust to accumulate in this area, vacuuming of the sensor box inlet grill with a vacuum cleaner that has a narrow nozzle/brush.
Cleaning the sensor: Open the sensor box inlet grill with finger and clean the lens, inlet and outlet with wet cotton swab. Use dry cotton swab to remove any excess water from the sensor.
After having cleaned the sensor box, we recommend to vacuum clean the filter at the same time. (ref. page 6, picture 13:2)
23 The plastic parts of the unit should be cleaned with an oil-free dry cloth. For stains on plastic parts, use a slightly damp soft microfiber cloth to gently rub against the stain. (ref. page 6, picture 14).
24 The area around the air inlet on the bottom of the unit may accumulate more dust than some other parts and hence may require more frequent cleaning to ensure optimal performance. The filter is equipped with a mesh filter and should occasionally be wiped off or cleaned with a vacuum cleaner to avoid loss of performance.
STORAGE
25 If you are not planning to use the appliance for a long time, cover it with plastic or return it to its carton.
NOTE: The multi-layer filter can not be washed, it can only be replaced.
CAUTION!
Do not touch the fan blade when removing the multi-layer filter.
TROUBLESHOOTING
When fault indicators show that the system is not operating properly, perform the following check.
The table below is only a limited list. For the latest and complete section on troubleshooting, FAQ and error guide please refer to the corresponding section on our website or the Electrolux App.
| # ISSUE TROUBLESHOOTING NOTES | |||
| 1 The air purifier's alert icon is lit. | Generally, the unit comes with a variety of sophisticated sensors, electronics and other electrical components and if one of these is malfunctioning, you will see the alert icon on the product control panel light up. For more details on steps to resolve, please head over to the Electrolux App and check for details whenever you see this icon lit. | Please have at hand the unit's PNC and SERIAL number if you need to contact Electrolux service organisation for support. | |
| 2 The air purifier is running at max fan speed all the time for extended periods | If in MANUAL mode, please check the fan speed slider on the product control panel or within Electrolux App and adjust it to desired level.If in SMART mode, please check air quality indicator on the product control panel or within Electrolux App – if all PM values are constantly showing 999-1000 without any reduction then most likely the sensor is clogged. Please clean the sensor as described under section 22 above. | The PM sensor in the unit is highly accurate and sensitive and it is normal for the purifier to react to poor air quality by ramping up the fan speed – to get your indoor air quality back to safe levels. | |
| 3 The air purifier is running at lowest fan speed all the time for extended periods | If in MANUAL mode, please check the fan speed on the product control panel display or within Electrolux App and adjust it to desired level.If in SMART mode, please check air quality indicator on the product control panel or within Electrolux App – if all PM values are constantly reading very good without any increase then this is normal behavior for the unit - your air quality is very good! If the PM2.5 value is high and the unit is still operating at lowest fan speed, then please check filter change icon on the product control panel or within Electrolux App and if lit please replace used filter with a new one, this should resolve the specific fan speed issue.If neither of the above steps OR instructions in the Electrolux App help, please refer to item 9 in the table. | The unit is designed so that when a filter is at end of life, it will discourage usage till the filter is replaced, by limiting the fan speed so as not to reintroduce the captured particulate matter back into the air. | |
| 4 The air purifier produces a loud or abnormal noise | Please ensure that the plastic bag around the filter has been removed, ensure the air inlet grill and air outlet grill (top of the unit) are unobstructed and that there is a clearance of at least 30 cm between the unit and the nearest surface.If neither of the above steps OR instructions in the Electrolux App help, please refer to item 10 in the table. | If there is an abnormal noise in your product, even after checking the steps in the trouble shoot guide, please contact an Electrolux authorized service center for further support. | |
| 5 The air purifier or fan does not operate | Ensure that the unit is receiving power. If needed, try pushing the power plug firmly into the wall socket to check if this resolves the issue. Check that the fuse of your home has not blown or that the circuit breaker has been tripped. Replace fuse or reset circuit breaker if needed.If neither of the above steps OR instructions in the Electrolux App help, please refer to item 10 in the table. | ||
| 6 The air purifier is running but the air quality does not improve | If in SMART mode, closely monitor the difference in air quality levels within the Electrolux App for next 20 minutes – if you do not see any improvement of the air quality values in the Electrolux App during this period then follow the step below.Change to MANUAL mode and adjust the fan speed to a higher level to see if this helps resolve the issue.If you still do not see any improvement. Close any open doors OR windows to the outside of the room and rerun the unit at the highest fan speed for 20 minutes. If this resolves the issue, we recommend that you operate the unit in this sealed environment as much as possible, till the air quality is also at a good level. | If the unit is placed in a room larger than the recommended size, it will take longer for the air quality to improve – please be patient and maintain the unit at the highest feasible speed. | |
| 7 The air purifier produces or emits a strange smell | The first time you run the unit, you may perceive a plastic, glue or paint smell – especially near the air outlet grill – this is unavoidable in some cases (like the ‘new car smell’) but should disappear quickly.If you perceive a burning smell, please disconnect the unit and contact Electrolux authorized service center for further support.The VOC filter is in the end of life. Please change to a new filter. | Always ensure that the filters are covered in appropriate packaging while stored away between uses, and that all parts are dry to avoid smell or mould build up. | |
| ISSUE# NOTESTROUBLESHOOTING | |||
| 8 | The filter icon is lit, even though I recently changed the filters | After having changed the filter, long press the MODE button for 3 seconds and the filter indication will be reset. | It is important to turn OFF the unit before changing the filter, in order to reset the product. |
| 9 | I am unable to connect the Air purifier to the App | If you are unable to onboard the unit and connect it to the Electrolux App after a couple of attempts, then please contact an Electrolux authorized service center for support. | The WiFi chip in the unit operates only at 2.4Ghz so please ensure your home WiFi is operating at this bandwidth. |
| 10 | I have another issue not listed here OR none of the above steps have helped resolve the issue | You can search for more troubleshooting and FAQ guides on our website OR the Electrolux App under the product information pages, or directly contact Electrolux authorized service center for support. Thank you! | Please have the unit's PNC and serial number available when contacting the Electrolux service. This information can be found on the rating label which is located on the bottom of the unit. |

BEZPEČNOSTNÍ INFORMACE
text_image
ABMNOPQ D C E F G H J K R S MODE reset 3s T IPOPIS ČISTIČKY VZDUCHU
Přístroj:
text_image
Diagram illustrating six steps of a mechanical device with labeled components and directional arrows indicating motion.2

text_image
Diagram of a cylindrical device with labeled parts and an inset showing a plug inserted into a socket, with numbered annotations.3

1
text_image
Diagram showing a hand holding a smartphone with a download icon and a notification box listing Google Play and App Store.3

2

4

text_image
Diagram showing a smartphone with Bluetooth signal and connected to a cylindrical device with a speaker grille.Pure 500
4

text_image
I MANUAL SMART © ① MODE start to5
text_image
MODE MANUAL SMART ① MOSO MOSO6

text_image
MANUAL SMART ⓤ ① NODE NOTE 107

text_image
! A ⊕ ⊕ ① MANUAL SMART ⓤ ① MODE MODE ② exit to8

text_image
MANUAL SMART © ① MODE WRITE9
text_image
Pur MANTUAL SMART ① MODE set to 3s10

text_image
Pur MANUAL SMART © MUSIC Smart 3011

text_image
MANUAL SMART © MODE with it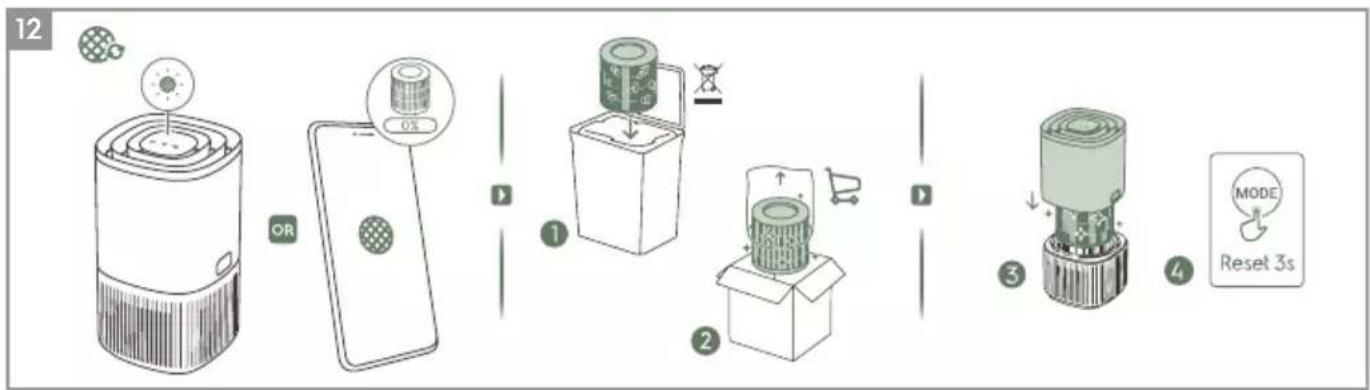
flowchart
graph LR
    A["Receipt"] --> B["OR"]
    B --> C["Cell with 0.2 charge"]
    C --> D["Recycle with battery"]
    D --> E["Recycle with 1.5L battery"]
    E --> F["Recycle with 2 L battery"]
    F --> G["Recycle with 3 L battery"]
    G --> H["Reset 3s Mode"]
text_image
13 ① 1-2M ②
text_image
Three safety symbols and a prohibition sign: a cylindrical device with a hand, a crossed-out battery labeled 'MAX', and a circular water tap with a no-smoking symbol.text_image
ABMNOPQ D C E F G H J K T R S MODE reset 3s Itext_image
Diagram illustrating a mechanical assembly process with numbered steps and directional arrows indicating motion or movement.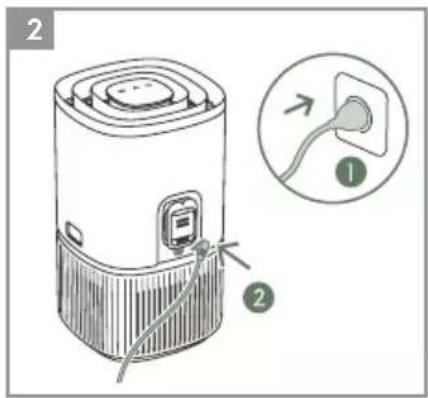
text_image
Diagram of a portable air conditioner unit with labeled parts and an inset showing a plug inserted into a socket.
text_image
3 ① Wireless ② Pure 500 ③ Mobile Phone GooglePlay Download on the App Store 2.4 GHz ④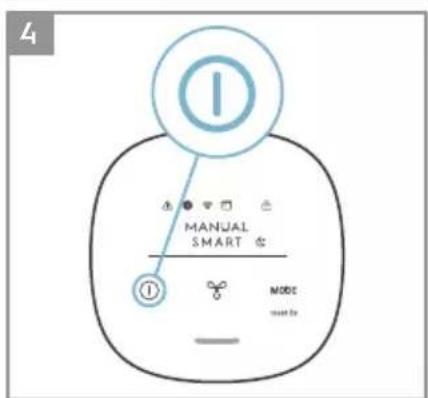
text_image
4 I TM TM TM MODE must be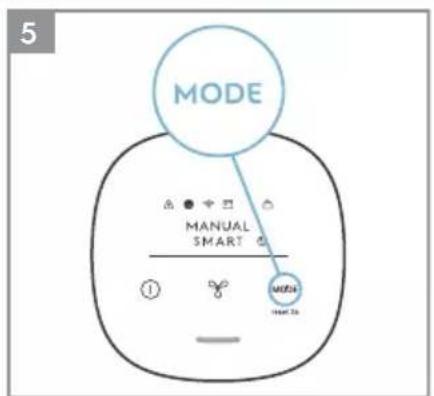
text_image
MODE MANUAL SMART MOSA MAIN 10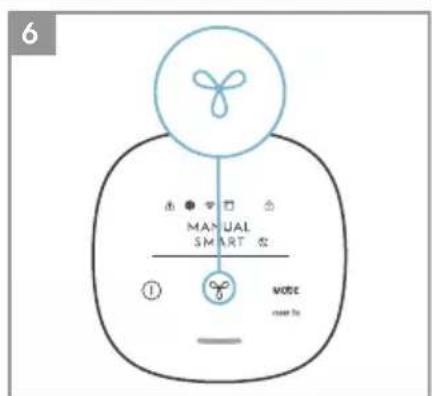
text_image
6 MANUAL SMART ① NODE GROW BY
text_image
7 INT MANUAL SMART ① MODEout to
text_image
8 MANUAL SMART MODE +440.2x
text_image
Pure 500 MANUAL SMART ① WRITE read To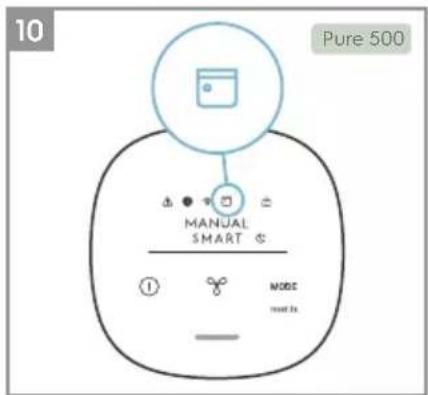
text_image
10 Pure 500 MANUAL SMART MODE must be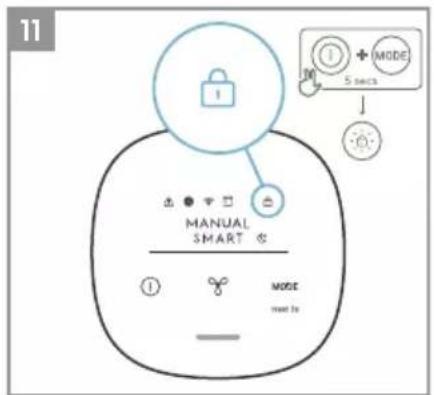
text_image
11 MANUAL SMART ⭕ ① ⚡ + MODE ⑤ 5 secs MODE next to12

flowchart
graph LR
    A["Sensor input"] --> B["OR"]
    B --> C["Device with battery icon"]
    C --> D["Device with battery icon"]
    D --> E["Device with battery icon"]
    E --> F["Device with battery icon"]
    F --> G["Device with battery icon"]
    G --> H["Reset 3s MODE"]
13

text_image
1-2M ① ②
natural_image
Line drawing of a cylindrical device with a handle, showing internal components and a small inset component (no text or symbols)
natural_image
Illustration of a battery labeled 'MAX' crossed over a grid circle and a rectangular block, with no readable text or symbols.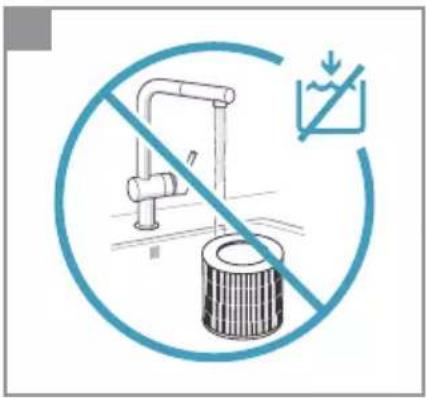
text_image
Safety warning symbol for a water tap with no protection, featuring crossed-out pipes and a circular sign with a downward arrow.text_image
ABMNOPQ D C E F G H J K T R S MODE reset 3s IILMANPUHDISTIMESI KUVAUS
Laite:
text_image
Diagram illustrating a mechanical assembly process with numbered steps and directional arrows indicating motion or movement.
text_image
Diagram of a portable air conditioner unit with labeled parts and an inset showing a plug inserted into a socket.
text_image
3 ① ② Pure 500 1 SOT € On GooglePlay Download on the App Store 2.4 GHz ③ ④ 3 4
text_image
4 I TM TM TM TM MODE MODE to
text_image
MODE MANUAL SMART MUTA 1 2 3
text_image
6 MANUAL SMART NOTE NOTE to
text_image
7 MANUAL SMART ① MODE #0013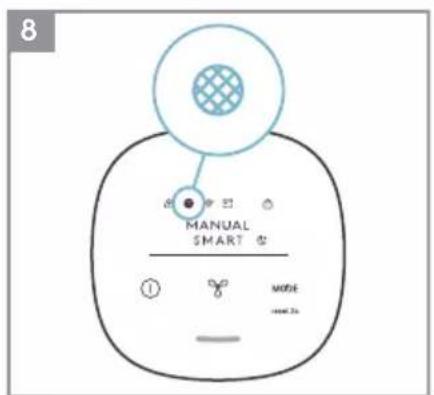
text_image
8 MANUAL SMART ① MODE +444.2s
text_image
Pure 500 MANUAL SMART ① MODE read To
text_image
10 Pure 500 MANUAL SMART ① MODE must to
text_image
11 1 + 5 secs ↓ MANUAL SMART ① ② ③ MODE next to12

flowchart
graph LR
    A["Device with fan icon"] --> B["OR"]
    B --> C["Mobile phone icon"]
    C --> D["1: Display case"]
    D --> E["2: Box with battery stack"]
    E --> F["3: Reset box with battery icon"]
    F --> G["4: MODE Reset 3s"]
13

text_image
1-2M ① ②
natural_image
Line drawing of a cylindrical device with a handle, showing internal components and a small screen (no text or symbols)
natural_image
Illustration of a crossed-out product box with a spherical object and a bottle labeled 'MAX' (no text or symbols on the main objects)
text_image
Safety warning symbol for a water tap with no protection, featuring crossed-out pipes and a circular background with a downward arrow.text_image
ABMNOPQ D C E F G H J K MANUAL SMART R S MODE reset 3s L T IDESCRIPTION DE VOTRE PURIFICATEUR D'AIR
Appareil :
text_image
Diagram illustrating six steps of a mechanical device with labeled components and directional arrows indicating motion.2

text_image
Diagram of a portable air conditioner unit with labeled parts and an inset showing a plug inserted into a socket.3

1

text_image
Diagram showing a hand holding a smartphone with a download icon and a notification box listing Google Play and App Store.3
2

4
text_image
Diagram showing a smartphone with Bluetooth signal and connected to a cylindrical device with a speaker grille.Pure 500
4

text_image
I MANUAL SMART © ① MOOE select to5

text_image
MODE MANUAL SMART ① MODE ② MODE6
text_image
MANUAL SMART ① NODE user to7

text_image
! A ⚪ E J ① MANUAL SMART Ⓞ ① MODE MODE OFF: No.8

text_image
MANUAL SMART G ① MODE well in9
text_image
Pur △ ◆ ▼ ◀ ◆ MANUAL SMART ◆ ① MODE mode 3s10
text_image
Pur MANUAL SMART © MODE Smart. No11

text_image
1 + MODE 5 secs - MANUAL SMART © ① M20E win 3s
flowchart
graph LR
    A["Sensor input"] --> B["OR"]
    B --> C["Device with OX icon"]
    C --> D["Device with battery symbol"]
    D --> E["Device with battery symbol"]
    E --> F["Device with battery symbol"]
    F --> G["Device with battery symbol"]
    G --> H["Device with battery symbol"]
    H --> I["Reset 3s MODE"]

text_image
13 ① 1-2M ②
text_image
Three safety symbols and a prohibition sign: a cylindrical device with a hand, a crossed-out battery labeled 'MAX', and a circular water tap with a no-smoking symbol.text_image
ABMNOPQ D C E F G H J K T R S MODE reset 3s IOPIS VAŠEG PROČIŠĆIVAČA ZRAKA
Uređaj:
text_image
Diagram illustrating a mechanical assembly process with numbered steps and directional arrows indicating motion or movement.
text_image
Diagram of a portable air conditioner unit with labeled parts and an inset showing a plug inserted into a socket.
text_image
3 ① ② Pure 500 1 SOT € On GooglePlay Download on the App Store 2.4 GHz ③ ④ 3 4
text_image
4 I TM TM TM TM MODE MODE to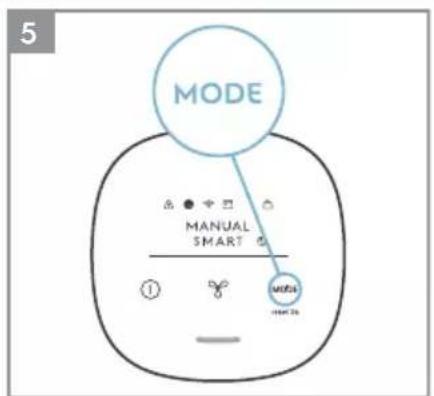
text_image
MODE MANUAL SMART MOSA 1 2 3
text_image
6 MANUAL SMART NOTE NOTE to
text_image
7 MANUAL SMART ① MODE #0013
text_image
8 MANUAL SMART ① MODE +440.2s
text_image
Pure 500 MANUAL SMART ① MODE read To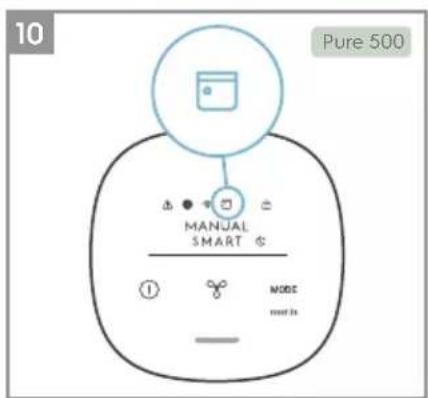
text_image
10 Pure 500 MANUAL SMART ① MODE must to
text_image
11 1 + 5 secs ↓ MANUAL SMART ① ② ③ MODE next to12

flowchart
graph LR
    A["Device with fan icon"] --> B["OR"]
    B --> C["Phone with battery icon"]
    C --> D["Step 1: Display with battery icon"]
    D --> E["Step 2: Display with battery icon"]
    E --> F["Step 3: Reset 3s Mode"]
    F --> G["Step 4: Reset 3s MODE"]
13

text_image
1-2M ① ②
natural_image
Line drawing of a cylindrical device with a handle, showing internal components and a small inset component (no text or symbols)
natural_image
Illustration of a crossed-out product box with a spherical object and a bottle labeled 'MAX' (no text or symbols on the main objects)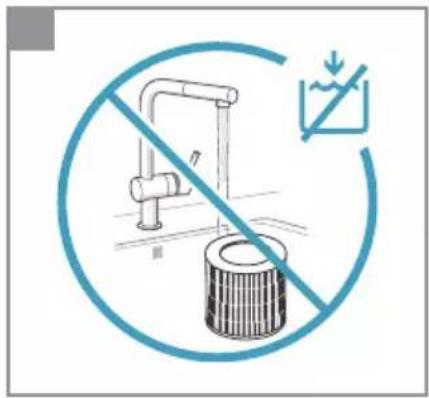
text_image
Safety warning symbol for a water tap with no protection, featuring crossed-out pipes and a circular background with a downward arrow.Za dodatne pojedinosti opisa slika pogledajte stranice 63-65.
text_image
ABMNOPQ D C E F G H J K R S MODE reset 3s T IA LÉGTISZTÍTÓ LEÍRÁSA
Készülék:
text_image
Diagram illustrating six steps of a mechanical device with labeled components and directional arrows indicating motion.2

text_image
Diagram of a portable air conditioner unit with labeled parts and an inset showing a plug inserted into a socket.3

①

text_image
GET ON Google Play Download on the App Store3
2
4

text_image
Diagram showing a smartphone connected to a cylindrical device with a logo and a heart symbol, likely illustrating wireless communication or battery usage.Pure 500
4
text_image
I MANUAL SMART & ① MEDE note 365
text_image
MODE MANUAL SMART G ① MODE most to6
text_image
MANUAL SMART ⭕ ① NODE more to7
text_image
! ▲ ⚠ ⊕ 0 MANUAL SMART G % MODE OFF: No8
text_image
MANUAL SMART G ① MODE well.9
text_image
Pur △ ◆ □ ◎ MANUAL SMART ◎ ① MODE set to 3s10
text_image
Pur MANUAL SMART 6 MODE Next. 3x11

text_image
MANUAL SMART © M20C with it
flowchart
graph LR
    A["Receipt"] --> B["Recycle with 12% charge"]
    B --> C["Cell with 10% charge"]
    C --> D["Cell with 10% charge"]
    D --> E["Cell with 10% charge"]
    E --> F["Cell with 10% charge"]
    F --> G["Cell with 10% charge"]
    G --> H["Cell with 10% charge"]
    H --> I["Mode Reset 3s"]

text_image
13 ① 1-2M ②
text_image
Three safety symbols and a prohibition sign: a cylindrical device with tape, a crossed-out battery labeled 'MAX', and a circular water tap with a 'no pollution' symbol.text_image
ABMNOPQ D C E F G H J K R S MODE reset 3s T IDESCRIZIONE DEL PURIFICATORE DELL'ARIA
Apparecchio:
J. Pulsante ACCENSIONE
K. Pulsante VENTOLA
L. Pulsante MODALITÀ
M. Icona avviso
text_image
Diagram illustrating a mechanical assembly process with numbered steps and directional arrows indicating motion or movement.
text_image
Diagram of a portable air conditioner unit with labeled parts and an inset showing a plug inserted into a socket.
text_image
3 ① ② Pure 500 1 SATE @ On GooglePlay Download on the App Store 2.4 GHz ③ ④ 3 4
text_image
4 I TM TM TM TM MODE MODE to
text_image
MODE MANUAL SMART MOSA 1 2 3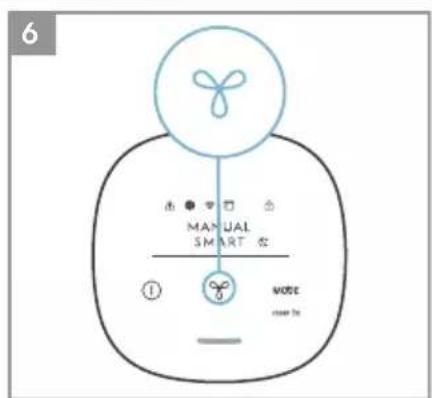
text_image
6 MANUAL SMART NOTE NOTE to
text_image
7 INT Δ + - + - MANUAL SMART ① MODE mode 1s
text_image
8 MANUAL SMART ① MODE +440.2s
text_image
Pure 500 MANUAL SMART ① MODE read To
text_image
10 Pure 500 MANUAL SMART ① MODE must to
text_image
11 1 + 5 secs ↓ MANUAL SMART ① ② ③ MODE next to12
flowchart
graph LR
    A["Device with fan icon"] --> B["OR"]
    B --> C["Phone with battery icon"]
    C --> D["Step 1: Display with battery icon"]
    D --> E["Step 2: Display with battery icon"]
    E --> F["Step 3: Reset 3s Mode"]
    F --> G["Step 4: Reset 3s MODE"]
13
text_image
1-2M ① ②
natural_image
Line drawing of a cylindrical device with a handle, showing internal components and a small inset component (no text or symbols)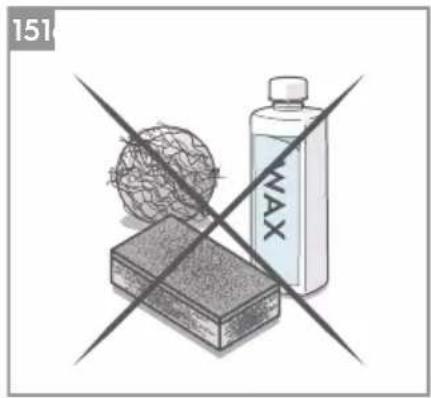
natural_image
Illustration of a crossed-out product line with a glass sphere and a bottle labeled 'MAX' (no text or symbols beyond label)
text_image
Safety warning symbol for a water tap with no protection, featuring crossed-out pipes and a circular background with a downward arrow.text_image
ABMNOPQ D C E F G H J K R S MODE reset 3s T Itext_image
Diagram illustrating six steps of a mechanical device with labeled components and directional arrows indicating motion.2

text_image
Diagram of a portable air conditioner unit with labeled parts and an inset showing a plug inserted into a socket.3

1
text_image
Diagram showing a hand holding a smartphone with a download icon and two app icons: Google Play and App Store.3
2

4
text_image
Diagram showing a smartphone with a Bluetooth symbol connected to a cylindrical device, suggesting wireless or digital connection.Pure 500
4

text_image
I MANUAL SMART © ① MOOE select to5

text_image
MODE MANUAL SMART ① MODE ② MODE6
text_image
MANUAL SMART ⭕ ① MODE NOTE 207
text_image
! A ⚪ E J ① MANUAL SMART G ① MODE MODEout. No.
8
text_image
MANUAL SMART G ① MODE well in9

text_image
Pur A ⚡️ 1 ⑥ MANUAL SMART ♂ ① MODE seated 3s10

text_image
Pur MANUAL SMART © MODE Smart. No11
text_image
MANUAL SMART © M20E with it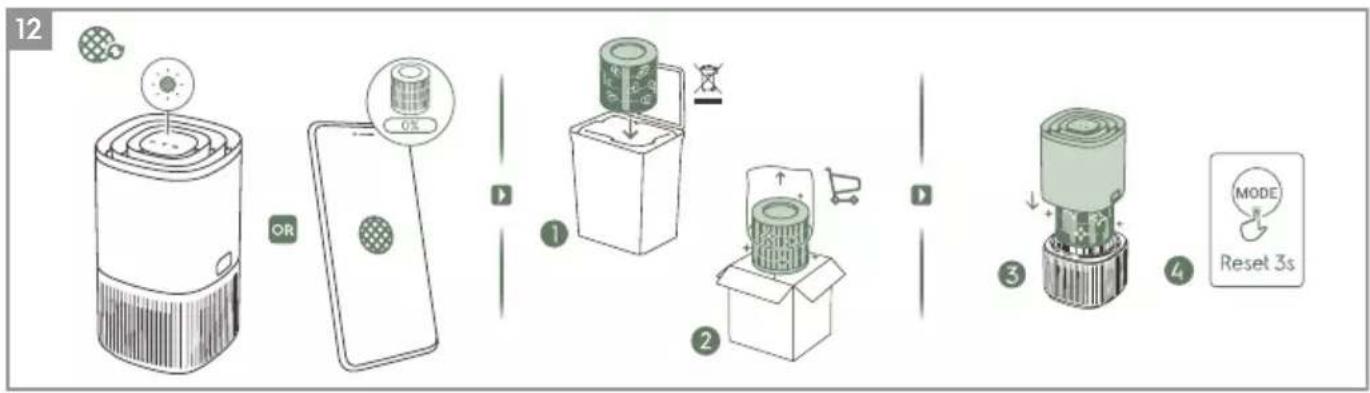
flowchart
graph LR
    A["Receipt"] --> B["OR"]
    B --> C["Cell with 0% charge"]
    C --> D["Cell with 1% charge"]
    D --> E["Cell with 2% charge"]
    E --> F["Cell with 3% charge"]
    F --> G["Mode Reset 3s"]
text_image
13 ① 1-2M ②
text_image
Three safety symbols and a prohibition sign: a cylindrical device with tape, a crossed-out battery labeled 'MAX', and a circular water tap with a 'no' symbol.text_image
ABMNOPQ D C E F G H J K R S MODE reset 3s T IDESCRIEREA PURIFICATORULUI DUMNEAVOASTRĂ DE AER
Aparatul:
A. Afisajul panoului de control
B. Ghid debit de aer (Evacuarea aer)
C. Butoane de deblocare
D. Corp principal (superior)
E. Cutie cu senzori
F. Mufă adaptor
G. Corp principal (inferior)
H. Cablu de alimentare
I. Filtru (interior)
Panou de comandă:
text_image
Diagram illustrating a mechanical assembly process with numbered steps and directional arrows indicating motion or movement.
text_image
Diagram of a portable air conditioner unit with labeled parts and an inset showing a plug inserted into a socket.
text_image
3 1 2 Pure 500 1 GooglePlay Download on the App Store 2.4 GHz 3 4
text_image
4 I TM SMART ① MODE must be
text_image
MODE MANUAL SMART MOSA MAIN 10
text_image
6 MANUAL SMART ① NODE GROW BY
text_image
7 INT MANUAL SMART ① MODEout to

text_image
8 MANUAL SMART MODE +440.2x
text_image
Pure 500 MANUAL SMART ① WRITE read To
text_image
10 Pure 500 MANUAL SMART ① MODE must be
text_image
11 1 + MODE 5 secs MANUAL SMART ① ② ③ ④ ⑤ ⑥ MODE next to12

flowchart
graph LR
    A["Device with fan icon"] --> B["OR"]
    B --> C["Phone with battery icon"]
    C --> D["Step 1: Display with battery icon"]
    D --> E["Step 2: Display with battery icon"]
    E --> F["Step 3: Reset 3s Mode"]
    F --> G["Step 4: Reset 3s MODE"]
13

text_image
1-2M ① ②
natural_image
Line drawing of a cylindrical device with a handle and lid, showing internal components (no text or symbols)
natural_image
Illustration of a crossed-out product with a glass sphere and a bottle labeled 'MAX', no text or symbols present.
text_image
Safety warning symbol for a water tap with no protection, featuring crossed-out pipes and a circular background with a downward arrow.text_image
ABMNOPQ D C E F G H J K R S MODE reset 3s T IBESKRIVNING AV DIN LUFTRENARE
Enheten:
text_image
Diagram illustrating six steps of a mechanical device with labeled components and directional arrows indicating motion.2

text_image
Diagram of a portable air conditioner unit with labeled parts and an inset showing a plug inserted into a socket.3

1

text_image
Diagram showing a hand holding a smartphone with a download icon and a notification box listing Google Play and App Store.3

2

4

text_image
Diagram showing a smartphone with Bluetooth signal and connected to a cylindrical device with a speaker grille.Pure 500
4
text_image
I MANUAL SMART © ① MOOE select to5

text_image
MODE MANUAL SMART ① MODE ② MODE6

text_image
MANUAL SMART ① NODE more to7

text_image
! A ⚪ E J ① MANUAL SMART G ① MODE MODE OFF: No.8

text_image
MANUAL SMART G ① MODE well in9

text_image
Pur A ⚡️ 1 ⑥ MANUAL SMART ♂ ① MODE seated 3s10

text_image
Pur MANUAL SMART © MODE Smart. No11
text_image
MANUAL SMART © M20E with it
flowchart
graph LR
    A["Receipt"] --> B["OR"]
    B --> C["Cell with 0% charge"]
    C --> D["Recycle with 12% charge"]
    D --> E["Cell with 12% charge"]
    E --> F["Recycle with 12% charge"]
    F --> G["Recycle with 12% charge"]
    G --> H["Recycle with 12% charge"]
    H --> I["Mode Reset 3s"]

text_image
13 ① 1-2M ②
text_image
Three safety symbols and a prohibition sign: a cylindrical device with tape, a crossed-out battery labeled 'MAX', and a circular water tap with a 'no' symbol.text_image
ABMNOPQ D C E F G H J K T R S MODE reset 3s IBESKRIVELSE AV LUFTRENSEREN
Apparatet:
A. Kontrollpanel displayet
B. Luftstrømguide (luftuttak)
C. Slipp knappene
D. Hoveddel (øverst)
E. Sensor
F. Adapterkontakt
G. Hoveddel (nederst)
H. Strømledning
I. Filter (innvendig)
Kontrollpanel:
J. PÅ/AV-knapp
K. VIFTE-knapp
L. MODUS-knapp
M. Advarsel-ikon
N. Filterbytte-ikon
O. Wifi-ikon*
P. Planlegger-ikon*
Q. Barnesikringsikon
R. MODUS-indikator
S. VIFTEHASTIGHET-indikator
T. Luftkvalitetsindikator
text_image
Diagram illustrating a mechanical assembly process with numbered steps and directional arrows indicating motion or movement.
text_image
Diagram of a portable air conditioner unit with labeled parts and an inset showing a plug inserted into a socket.
text_image
3 ① ② Pure 500 1 SATE @ On GooglePlay Download on the App Store 2.4 GHz ③ ④ 3 4
text_image
4 I TM TM TM TM MODE MODE to
text_image
MODE MANUAL SMART MOSA 1 2 3
text_image
6 MANUAL SMART NOTE NOTE to
text_image
7 INT Δ + - + - MANUAL SMART ① MODE mode 1s
text_image
8 MANUAL SMART ① MODE +440.2s
text_image
Pure 500 MANUAL SMART ① MODE read To
text_image
10 Pure 500 MANUAL SMART ① MODE must to
text_image
11 1 + 5 secs ↓ MANUAL SMART ① ② ③ MODE next to12

flowchart
graph LR
    A["Device with fan icon"] --> B["OR"]
    B --> C["Mobile phone icon"]
    C --> D["1: Display case"]
    D --> E["2: Box with battery icon"]
    E --> F["3: Reset box with battery icon"]
    F --> G["4: MODE Reset 3s"]
13

text_image
1-2M ① ②
natural_image
Line drawing of a cylindrical device with a handle and lid, showing internal components (no text or symbols)
natural_image
Illustration of a crossed-out product with a glass sphere and a bottle labeled 'MAX', no text or symbols present.
text_image
Safety warning symbol for a water tap with no protection, featuring crossed-out pipes and a circular background with a downward arrow.text_image
ABMNOPQ D C E F G H J K R S MODE reset 3s T IBESKRIVELSE AF LUFTRENSEREN
Luftrenseren:
A. Kontrolpanel skærm
B. Luftstrømsstyring (luftudtag)
C. Udløserknapper
D. Hoveddel (top)
E. Følerboks
F. Adapterstik
G. Hoveddel (bund)
H. Strømledning
I. Filter (inden i)
Kontrolpanel:
J. TÆND/FRA-knap
K. BLÆSER-knap
L. TILSTAND-knap
M. Advarselsikon
N. Ikon for filterudskiftning
O. Wi-Fi-ikon*
P. Planlægningsikon*
Q. Børnelåsikon
R. TILSTANDS-indikator
S. BLÆSERHASTIGHEDs indikator
T. Luftkvalitetsindikator
text_image
Diagram illustrating a step-by-step assembly of a mechanical component with numbered parts and directional arrows indicating motion.2
text_image
Diagram of a portable air conditioner unit with labeled parts and an inset showing a plug inserted into a socket.3

1
text_image
Diagram showing a hand holding a smartphone with a download icon and a Google Play app interface with 'Download on the App Store' button.3
2
4
text_image
Diagram showing a smartphone with a Bluetooth symbol and connected to a cylindrical device with a speaker grille.Pure 500
4

text_image
I TMED SMART © TMED SMART ©5

text_image
MODE MANUAL SMART ① ② ③ ④ ⑤ ⑥ ⑦ ⑧ ⑨ ⑩ ⑪ ⑫ ⑬ ⑭ ⑮ ⑯ ⑰ ⑱ ⑲ ⑳ ㉑ ㉒ ㉓ ㉔ ㉕ ㉖ ㉗ ㉘ ㉙ ㉚ ㉛ ㉜ ㉝ ㉞ ㉟ ㉳ ㉟a ㉟b6
text_image
MANUAL SMART ⭕ ① MODE RIGHT TO7
text_image
! ▲ ⚪ E1 ① MANUAL SMART Ⓡ ① MODE mode: No8
text_image
MANUAL SMART G ① MODE well th9
text_image
Pur MANUAL SMART ① MODE more 3s10
text_image
Pur MANUAL SMART © MODE Smart To11
text_image
1 + MODE 5 sec MANUAL SMART © M20E win it's
flowchart
graph LR
    A["Receipt"] --> B["Recycle with 12% charge"]
    B --> C["Recycle with 12% charge inside battery"]
    C --> D["Recycle with 12% charge inside battery box"]
    D --> E["Recycle with 12% charge inside battery box with recycling symbol"]
    E --> F["Recycle with 12% charge inside battery box with recycling symbol"]
    F --> G["Recycle with 12% charge inside battery box with recycling symbol"]
    G --> H["Recycle with 12% charge inside battery box with recycling symbol"]
    H --> I["Recycle with 12% charge inside battery box with recycling symbol"]
    I --> J["Recycle with 12% charge inside battery box with recycling symbol"]
    J --> K["Recycle with 12% charge inside battery box with recycling symbol"]
    K --> L["Recycle with 12% charge inside battery box with recycling symbol"]
    L --> M["Recycle with 12% charge inside battery box with recycling symbol"]
    M --> N["Recycle with 12% charge inside battery box with recycling symbol"]
    N --> O["Recycle with 12% charge inside battery box with recycling symbol"]
    O --> P["Recycle with 12% charge inside battery box with recycling symbol"]
    P --> Q["Recycle with 12% charge inside battery box with recycling symbol"]
    Q --> R["Recycle with 12% charge inside battery box with recycling symbol"]
    R --> S["Recycle with 12% charge inside battery box with recycling symbol"]
    S --> T["Recycle with 12% charge inside battery box with recycling symbol"]
    T --> U["Recycle with 12% charge inside battery box with recycling symbol"]
    U --> V["Recycle with 12% charge inside battery box with recycling symbol"]
    V --> W["Recycle with 12% charge inside battery box with recycling symbol"]
    W --> X["Recycle with 12% charge inside battery box with recycling symbol"]
    X --> Y["Recycle with 12% charge inside battery box with recycling symbol"]
    Y --> Z["Recycle with 12% charge inside battery box with recycling symbol"]
    Z --> AA["Recycle with 12% charge inside battery box with recycling symbol"]
    AA --> AB["Recycle with 12% charge inside battery box with recycling symbol"]
    AB --> AC["Recycle with 12% charge inside battery box with recycling symbol"]
    AC --> AD["Recycle with 12% charge inside battery box with recycling symbol"]
    AD --> AE["Recycle with 12% charge inside battery box with recycling symbol"]
    AE --> AF["Recycle with 12% charge inside battery box with recycling symbol"]
    AF --> AG["Recycle with 12% charge inside battery box with recycling symbol"]
    AG --> AH["Recycle with 12% charge inside battery box with recycling symbol"]
    AH --> AI["Recycle with 12% charge inside battery box with recycling symbol"]
    AI --> AJ["Recycle with 12% charge inside battery box with recycling symbol"]
    AJ --> AK["Recycle with 12% charge inside battery box with recycling symbol"]
    AK --> AL["Recycle with 12% charge inside battery box with recycling symbol"]
    AL --> AM["Recycle with 12% charge inside battery box with recycling symbol"]
    AM --> AN["Recycle with 12% charge inside battery box with recycling symbol"]
    AN --> AO["Recycle with 12% charge inside battery box with recycling symbol"]
    AO --> AP["Recycle with 12% charge inside battery box with recycling symbol"]
    AP --> AQ["Recycle with 12% charge inside battery box with recycling symbol"]
    AQ --> AR["Recycle with 12% charge inside battery box with recycling symbol"]
    AR --> AS["Recycle with 12% charge inside battery box with recycling symbol"]
    AS --> AT["Recycle with 12% charge inside battery box with recycling symbol"]
    AT --> AU["Recycle with 12% charge inside battery box with recycling symbol"]
    AU --> AV["Recycle with 12% charge inside battery box with recycling symbol"]
    AV --> AW["Recycle with 12% charge inside battery box with recycling symbol"]
    AW --> AX["Recycle with 12% charge inside battery box with recycling symbol"]
    AX --> AY["Recycle with 12% charge inside battery box with recycling symbol"]
    AY --> AZ["Recycle with 12% charge inside battery box with recycling symbol"]
    AZ --> BA["Recycle with 12% charge inside battery box with recycling symbol"]
    BA --> BB["Recycle with 12% charge inside battery box with recycling symbol"]
    BB --> BC["Recycle with 12% charge inside battery box with recycling symbol"]
    BC --> BD["Recycle with 12% charge inside battery box with recycling symbol"]
    BD --> BE["Recycle with 12% charge inside battery box with recycling symbol"]
    BE --> BF["Recycle with 12% charge inside battery box with recycling symbol"]
    BF --> BG["Recycle with 12% charge inside battery box with recycling symbol"]
    BG --> BH["Recycle with 12% charge inside battery box with recycling symbol"]
    BH --> BI["Recycle with 12% charge inside battery box with recycling symbol"]
    BI --> BJ["Recycle with 12% charge inside battery box with recycling symbol"]
    BJ --> BK["Recycle with 12% charge inside battery box with recycling symbol"]
    BK --> BL["Recycle with 12% charge inside battery box with recycling symbol"]
    BL --> BM["Recycle with 12% charge inside battery box with recycling symbol"]
    BM --> BN["Recycle with 12% charge inside battery box with recycling symbol"]
    BN --> BO["Recycle with 12% charge inside battery box with recycling symbol"]
    BO --> BP["Recycle with 12% charge inside battery box with recycling symbol"]
    BP --> BQ["Recycle with 12% charge inside battery box + recycling symbol"]
    BQ --> BR["Recycle with 12% charge within battery box + recycling symbol"]
    BR --> BS["Recycle without mode reset icon"]

text_image
13 ① 1-2M ②
text_image
Three safety symbols and a prohibition sign: a cylindrical device with tape, a crossed-out battery labeled 'MAX', and a circular water tap with a 'no' symbol.text_image
ABMNOPQ D C E F G H J K T R S MODE reset 3s IOPIS VAŠEGA ČISTILNIKA ZRAKA
Naprava:
text_image
Diagram illustrating a mechanical assembly process with numbered steps and directional arrows indicating motion or movement.
text_image
Diagram of a portable air conditioner unit with labeled parts and an inset showing a plug inserted into a socket.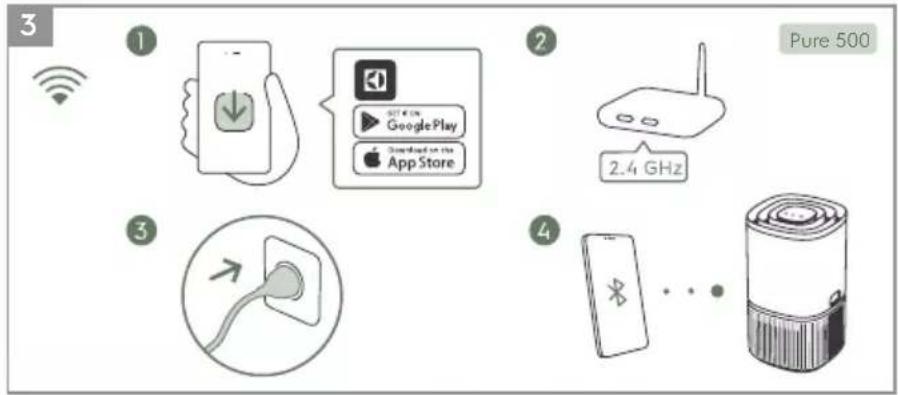
text_image
3 1 2 Pure 500 1 SOT €/m GooglePlay Download on the App Store 2.4 GHz 3 4 Mobile ... Battery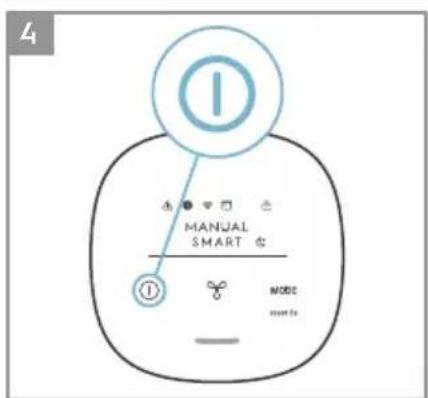
text_image
4 I TM TM TM TM MODE MODE to
text_image
MODE MANUAL SMART MOSA MAIN 1a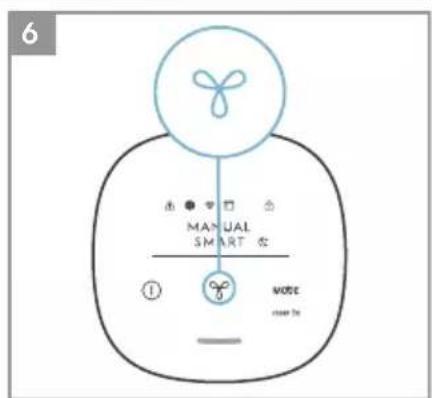
text_image
6 MANUAL SMART ① MODO more to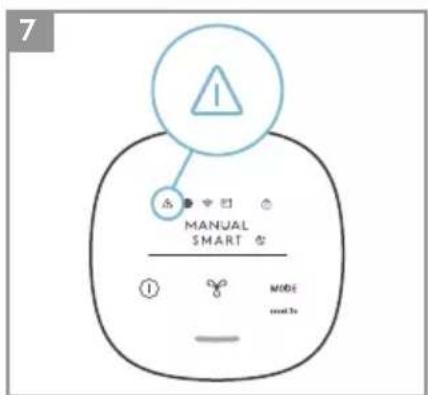
text_image
7 INT Δ + - + - MANUAL SMART ① MODE mode 1s
text_image
8 MANUAL SMART ① MODE +440.2s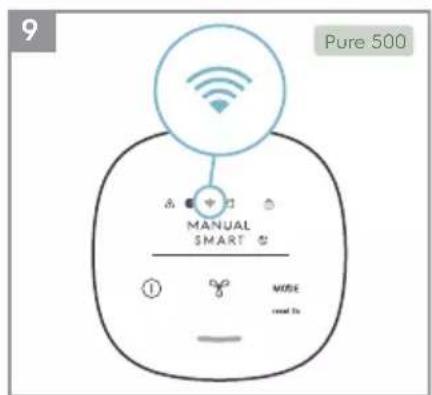
text_image
9 Pure 500 MANUAL SMART ① MUSE read to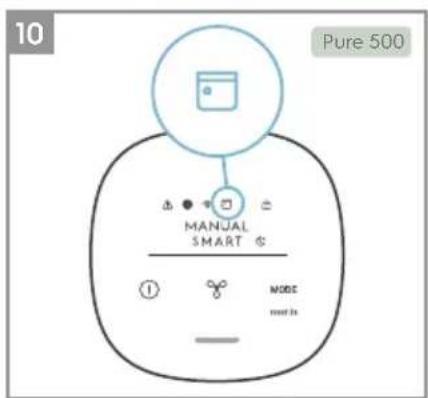
text_image
10 Pure 500 MANUAL SMART ① MODE must to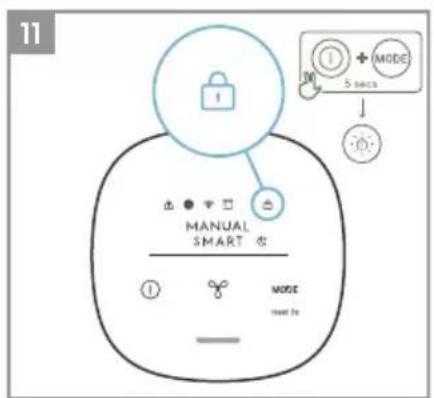
text_image
11 1 + MODE 5 secs MANUAL SMART ① ② ③ ④ ⑤ ⑥ MODE next to12

flowchart
graph LR
    A["Device with fan icon"] --> B["OR"]
    B --> C["Mobile phone icon"]
    C --> D["1: Display case"]
    D --> E["2: Box with battery stack"]
    E --> F["3: Reset box with battery icon"]
    F --> G["4: MODE Reset 3s"]
13

text_image
1-2M D 2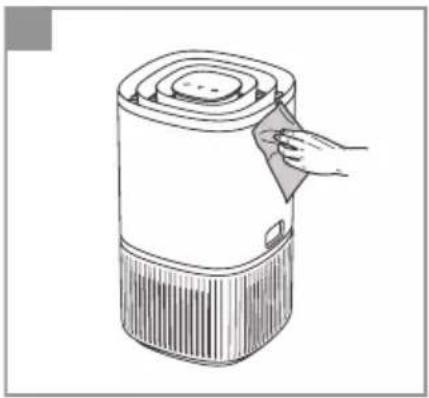
natural_image
Line drawing of a cylindrical device with a handle, showing internal components and a small inset component (no text or symbols)
natural_image
Illustration of a battery labeled 'MAX' crossed over a cube and a sphere, with no readable text or symbols beyond the label (151)
text_image
Safety warning symbol for a water tap with no protection, featuring crossed-out pipes and a circular background with a downward arrow.text_image
ABMNOPQ D C E F G H J K R S MODE reset 3s T IOPIS VAŠEJ ČISTIČKY VZDUCHU
Spotrebič:
text_image
Diagram illustrating six steps of a mechanical device with labeled components and directional arrows indicating motion.2

text_image
Diagram of a cylindrical device with labeled parts and an inset showing a plug inserted into a socket, with numbered annotations.3

1

text_image
Diagram showing a hand holding a smartphone with a download icon and a notification box listing Google Play and App Store.3

2

4

text_image
Diagram showing a smartphone with Bluetooth signal and connected to a cylindrical device with a speaker grille.Pure 500
4

text_image
I MANUAL SMART © ① MODE start to5

text_image
MODE MANUAL SMART ① MOSO MOSO6
text_image
MANUAL SMART ⓤ ① NODE NOTE 107
text_image
! A ⊕ ⊕ ① MANUAL SMART Ⓡ ① MODE MODE ② exit8

text_image
MANUAL SMART © ① MODE with9

text_image
Pur MANTUAL SMART ① MODE set to 3s10

text_image
Pur MANUAL SMART © MEOC Smart 3011

text_image
MANUAL SMART © MODE with it
flowchart
graph LR
    A["Receipt"] --> B["Recycle with 12% charge"]
    B --> C["Cell with 10% charge"]
    C --> D["Cell with 10% charge"]
    D --> E["Cell with 10% charge"]
    E --> F["Cell with 10% charge"]
    F --> G["Cell with 10% charge"]
    G --> H["Cell with 10% charge"]
    H --> I["Mode Reset 3s"]

text_image
13 ① 1-2M ②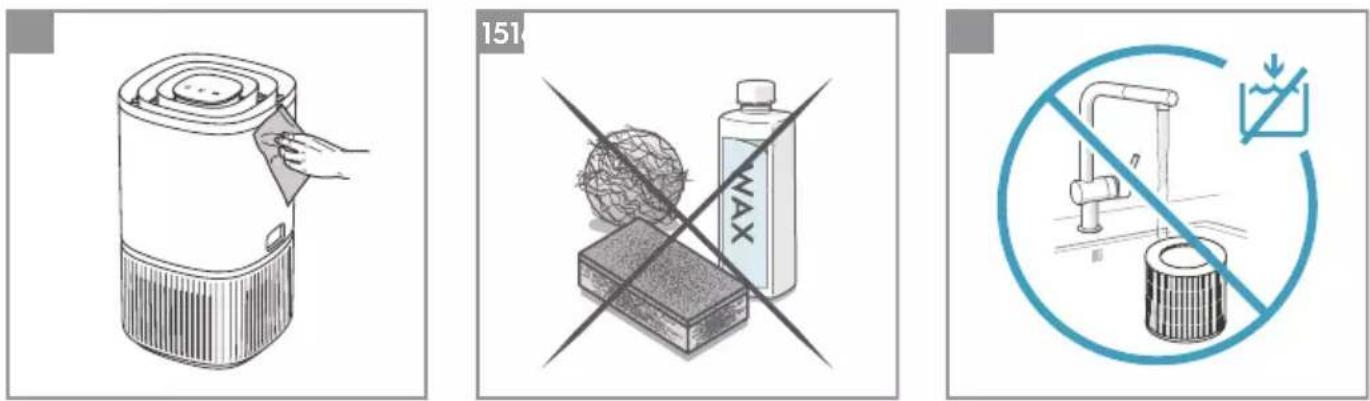
text_image
Three safety symbols and a prohibition sign: a cylindrical device with tape, a crossed-out battery labeled 'MAX', and a circular water tap with a 'no' symbol.text_image
ABMNOPQ D C E F G H J K T R S MODE reset 3s IHAVA TEMİZLEYİCİNİZİN AÇIKLAMASI
Cihaz:
text_image
Diagram illustrating a mechanical assembly process with numbered steps and directional arrows indicating motion or movement.
text_image
Diagram of a portable air conditioner unit with labeled parts and an inset showing a plug inserted into a socket.
text_image
3 ① Wireless ② Pure 500 ③ Mobile Phone GooglePlay Download on the App Store 2.4 GHz ④
text_image
4 I TM TM TM TM MODE MODE to
text_image
MODE MANUAL SMART MUTA 1 2 3
text_image
6 MANUAL SMART NOTE NOTE to
text_image
7 INT Δ + - + - MANUAL SMART ① MODE mode 1s
text_image
8 MANUAL SMART ① MODE +440.2s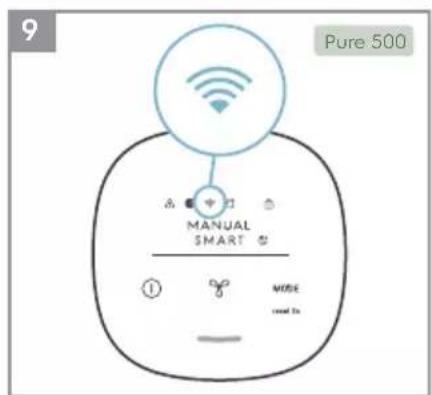
text_image
Pure 500 MANUAL SMART ① MODE read To
text_image
10 Pure 500 MANUAL SMART ① MODE must to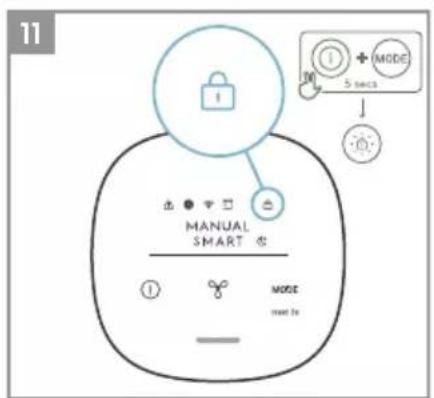
text_image
11 1 + 5 secs ↓ MANUAL SMART ① ② ③ MODE next to12
flowchart
graph LR
    A["Sensor input"] --> B["OR"]
    B --> C["Device with battery icon"]
    C --> D["Device with battery icon and switch"]
    D --> E["Device with battery icon and recycling symbol"]
    E --> F["Device with battery icon and recycling symbol"]
    F --> G["Device with battery icon and mode reset"]
    G --> H["Reset 3s"]
13

text_image
1-2M D 2
natural_image
Line drawing of a cylindrical device with a handle, showing internal components and a small screen (no text or symbols)
natural_image
Illustration of a crossed-out product with a sphere and a bottle labeled 'MAX', no text or symbols present.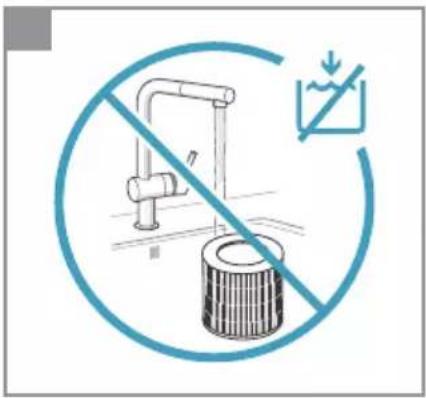
text_image
Safety warning symbol for a water tap with no protection, featuring crossed-out pipes and a circular background with a downward arrow.text_image
ABMNOPQ D E F G C H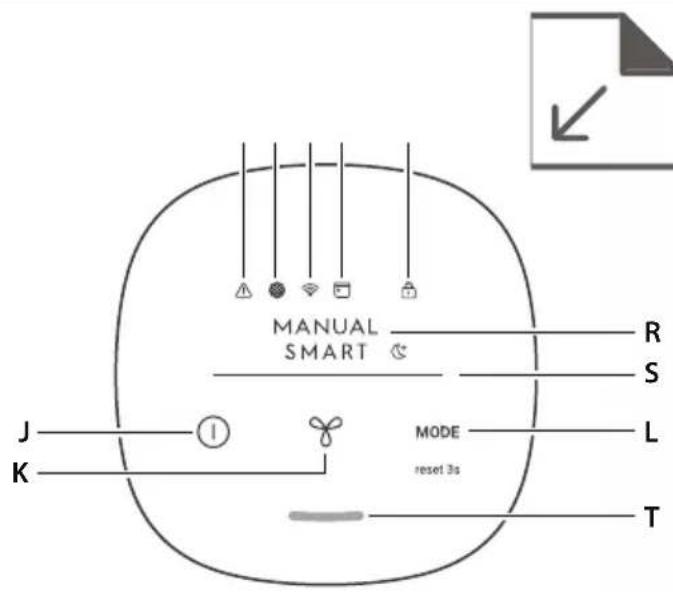
text_image
MANUAL SMART J K MODE reset 3s R S L T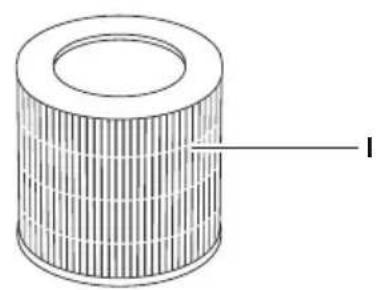
natural_image
Diagram of a cylindrical mechanical component with internal grooves and a labeled arrow pointing to one end (no text or symbols present)text_image
Illustration showing six steps of a mechanical device with numbered components and directional arrows indicating motion.2
text_image
Diagram of a portable air conditioner unit with labeled parts and an inset showing a plug inserted into a socket.3

①
text_image
GET ON Google Play Download on the App Store3
2
4
text_image
Diagram showing a smartphone connected to a battery with a symbol and dot, likely illustrating a basic wireless communication or battery model concept.Pure 500
4
text_image
I MANUAL SMART © ① MODE start to5

text_image
MODE MANUAL SMART ① MOBO MOBO MOBO6
text_image
MANUAL SMART ⭕ ① MODE more to7
text_image
! ▲ ⚪ E MANUAL SMART ⭕ ① ⚪ MORE more. No8
text_image
MANUAL SMART G ① MODE well B9
text_image
Pur Δ ◆ 1 ◇ MANUAL SMART ◆ ① MODE mode To10
text_image
Pur MANUAL SMART © MODE Smart To11

text_image
MANUAL SMART © M20E wait it's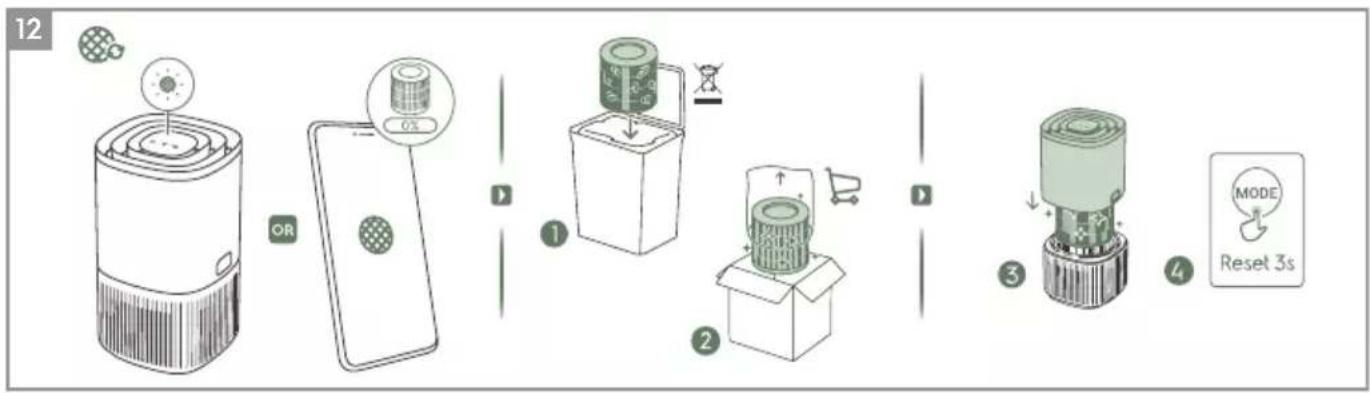
flowchart
graph LR
    A["Receipt"] --> B["OR"]
    B --> C["Cell with 0x charge"]
    C --> D["Cell with 1/2 charge"]
    D --> E["Storage unit with battery"]
    E --> F["Recycle with 3s mode"]
    F --> G["Reset 3s Mode"]

text_image
13 ① 1-2M ②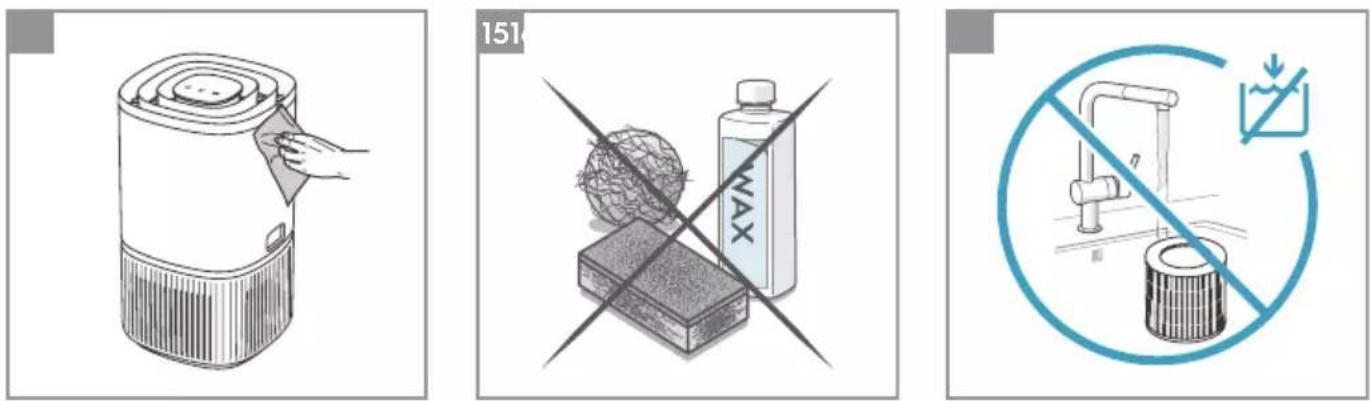
text_image
Three safety symbols and a prohibition sign: a cylindrical device with a hand, a crossed-out battery labeled 'MAX', and a circular water tap with a no-smoking symbol.text_image
ABMNOPQ D C E F G H J K T R S MODE reset 3s IJÜSU GAISA ATTİRİTÄJA APRAKSTS
lerice:
text_image
Diagram illustrating a mechanical assembly process with numbered steps and directional arrows indicating motion or movement.
text_image
Diagram of a portable air conditioner with labeled parts and an inset showing a plug inserted into a socket.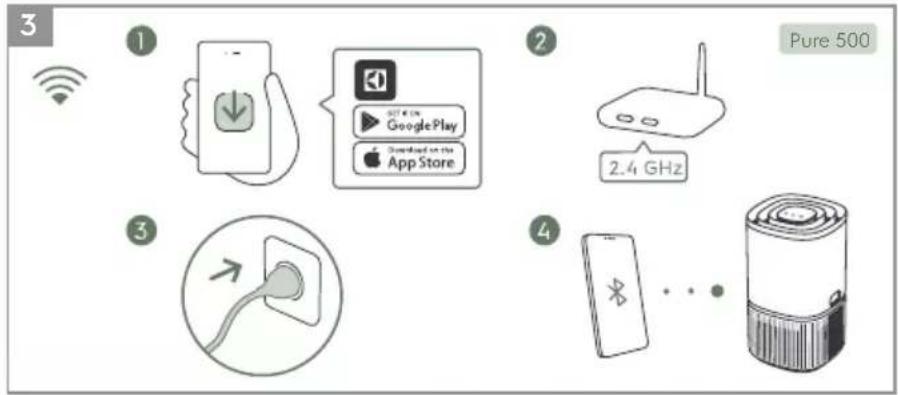
text_image
3 ① Wireless ② Pure 500 ③ ④ 2.4 GHz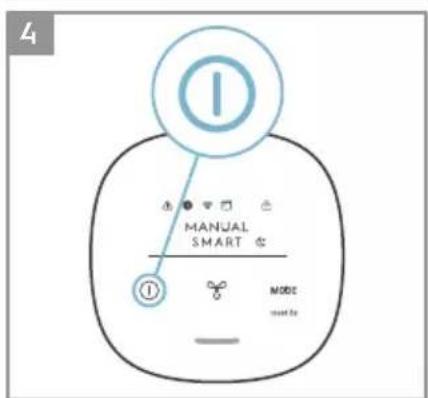
text_image
4 I TM TM TM TM MODE MOUT
text_image
MODE MANUAL SMART MOYA ① ② ③ ④ ⑤
text_image
6 MANUAL SMART ① NODE create by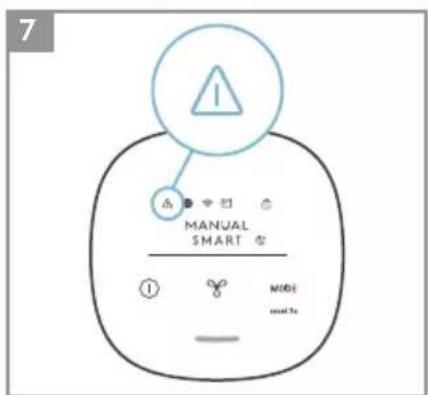
text_image
7 INT MANUAL SMART ① MODE #out to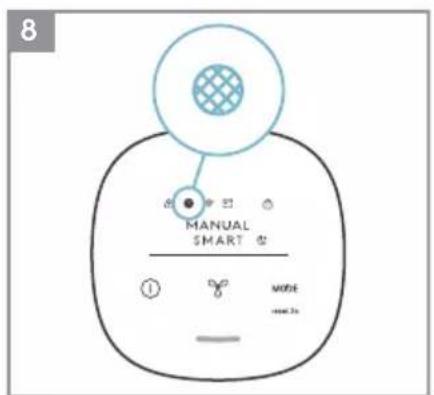
text_image
8 MANUAL SMART MODE +400.3x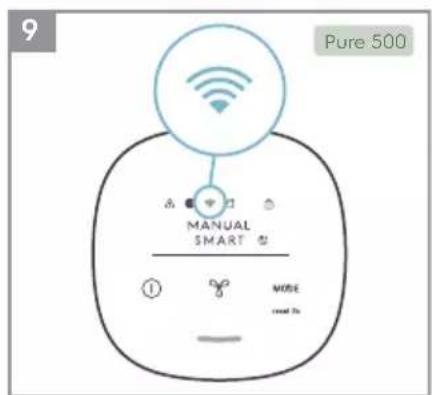
text_image
Pure 500 MANUAL SMART ① WRITE read To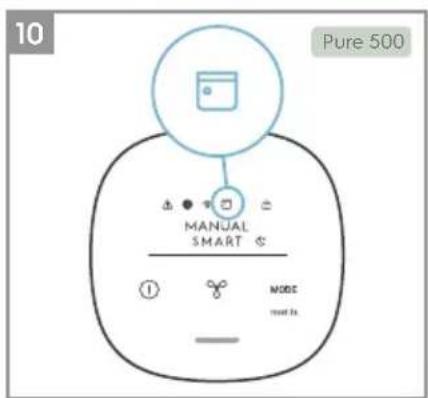
text_image
10 Pure 500 MANUAL SMART ① MODE must to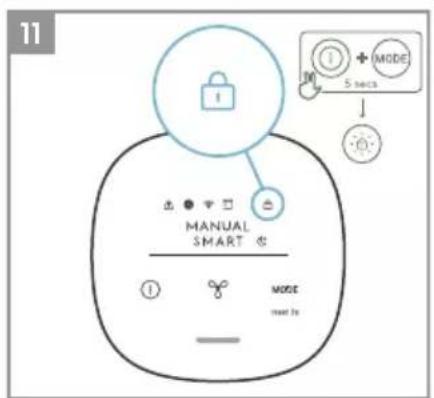
text_image
11 MANUAL SMART ① ② ③ ④ ⑤ ⑥ ⑦ ⑧ ⑨ ⑩ ⑪ ⑫ ⑬ ⑭ ⑮ ⑯ ⑰ ⑱ ⑲ ⑳ ⑴ ⑵ ⑶ ⑷ ⑧ ⑨ ⑩ ⑪ ⑫ ⑬ ⑭ ⑮ ⑯ ⑰ ⑱ ⑲ ⑳ ⑴ ⑵ ⑥ ⑦ ⑧ ⑨ ⑩ ⑪ ⑫ ⑬ ⑭ ⑮ ⑯ ⑰ ⑱ ⑲ ⑳ ㉑ ㉒ ㉓ ㉔ ㉕ ㉖ ㉗ ㉘ ㉙ ㉚ ㉛ ㉜ ㉝ ㉞ ㉟ ㉟a ㉟b ㉟c ㉟d ㉟e ㉟f ㉟g ㉟h ㉟i ㉟j ㉟k ㉟l ㉟m ㉟n ㉟o ㉟p ㉟q ㉟r ㉟s ㉟t ㉟u ㉟v ㉟w ㉟x ㉟y ㉟z ㉟a ㉟b ㉟c ㉟d ㉟e ㉟f ㉟g ㉟h ㉟i ㉟j ㉟k ㉟l ㉟m ㉟n ㉟o ㉟p ㉟q ㉟r ㉟s ㉟t ㉟u ㉟v ㉟w ㉟x ㉟o ㉟p ㉟q12

flowchart
graph LR
    A["Sensor input"] --> B["OR"]
    B --> C["Device with battery icon"]
    C --> D["Device with battery icon and switch"]
    D --> E["Device with battery icon and recycling symbol"]
    E --> F["Device with battery icon and mode reset"]
    F --> G["Device with battery icon and mode reset"]
    G --> H["Reset 3s MODE"]
13

text_image
1-2M ① ②
natural_image
Line drawing of a cylindrical device with a hand inserting a paper or tape, no text or symbols present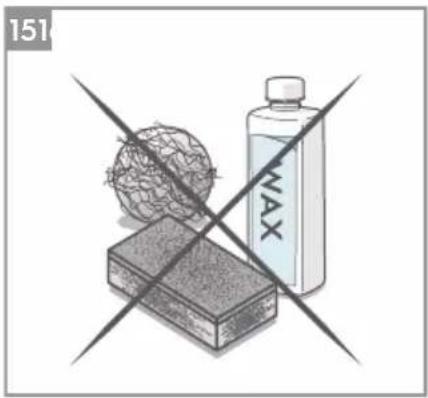
natural_image
Illustration of a battery labeled 'MAX' crossed over a grid circle and a rectangular block, with no readable text or symbols.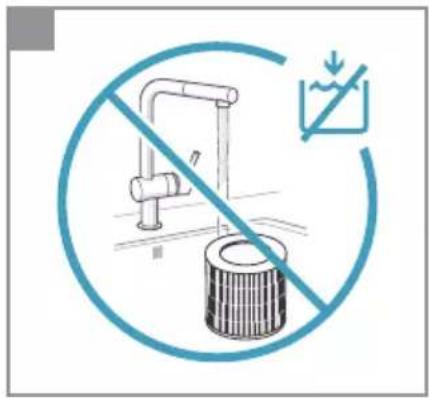
text_image
Safety warning symbol for water treatment with crossed-out pipes and a circular sign indicating no pollution.text_image
ABMNOPQ D C E F G H J K R S MODE reset 3s T IJÜSÜ ORO VALYTUVO APRAŠYMAS
Irenginys:
A. Valdymo skydelio ekranas
text_image
Diagram illustrating six steps of a mechanical device with labeled components and directional arrows indicating motion.2
text_image
Diagram of a cylindrical device with labeled parts and an inset showing a plug inserted into a socket, with numbered annotations.3

1

text_image
Diagram showing a hand holding a smartphone with a download icon and a notification box listing Google Play and App Store.3

2
4

text_image
Diagram showing a smartphone with Bluetooth signal and connected to a cylindrical device with a speaker grille.Pure 500
4
text_image
I MANUAL SMART © ① MODE start to5

text_image
MODE MANUAL SMART ① MOSO MOSO6

text_image
MANUAL SMART ⓤ ① NODE NOTE 307

text_image
! A ⊕ ⊕ ① MANUAL SMART Ⓡ ① MODE MODE ② MODE8
text_image
MANUAL SMART © ① MODE WRITE9

text_image
Pur A ⚡️ 1 ① MANUAL SMART ♂ ① MODE seated 3s10
text_image
Pur MANUAL SMART © MUSIC Smart 3011

text_image
MANUAL SMART © MODE with it
flowchart
graph LR
    A["Receipt"] --> B["Recycle with 12% charge"]
    B --> C["Cell with 10% charge"]
    C --> D["Cell with 10% charge"]
    D --> E["Cell with 10% charge"]
    E --> F["Cell with 10% charge"]
    F --> G["Cell with 10% charge"]
    G --> H["Cell with 10% charge"]
    H --> I["Mode Reset 3s"]

text_image
13 ① 1-2M ②
text_image
Three safety symbols and a prohibition sign: a cylindrical device with a hand, a cross-shaped barrier labeled '151', and a circular water tap with a 'no' symbol.text_image
ABMNOPQ D C E F G H J K T R S MODE reset 3s ITEIE ŌHUPUHASTI KIRJELDUS
Seade:
text_image
Diagram illustrating a mechanical assembly process with numbered steps and directional arrows indicating motion or movement.
text_image
Diagram of a portable air conditioner unit with labeled parts and an inset showing a plug inserted into a socket.
text_image
3 1 2 Pure 500 1 GooglePlay Download on the App Store 2.4 GHz 3 4
text_image
4 I TM TM TM MODE must be
text_image
MODE MANUAL SMART MATH MAIN 10
text_image
6 MANUAL SMART ① NODE GROW BY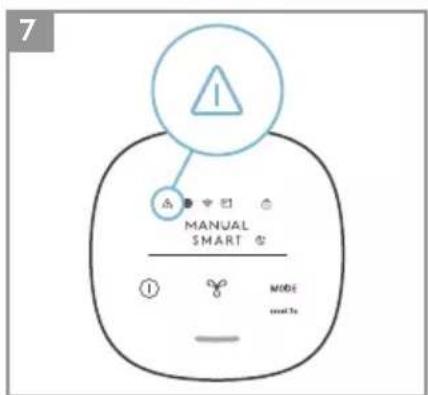
text_image
7 INT MANUAL SMART ① MODEout to

text_image
8 MANUAL SMART MODE +440.2x
text_image
Pure 500 MANUAL SMART ① WRITE read To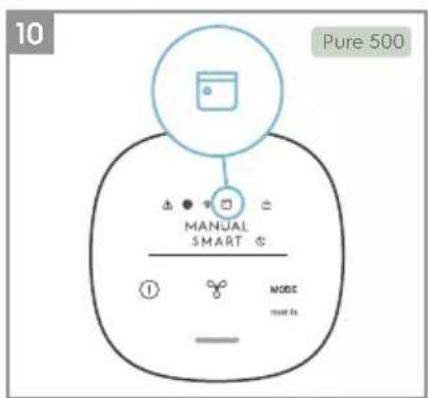
text_image
10 Pure 500 MANUAL SMART ① MODE must to
text_image
11 1 + MODE 5 secs MANUAL SMART ① ② ③ ④ ⑤ ⑥ MODE next to12

flowchart
graph LR
    A["Sensor input"] --> B["OR"]
    B --> C["Device with battery icon"]
    C --> D["Device with battery icon"]
    D --> E["Device with battery icon"]
    E --> F["Device with battery icon"]
    F --> G["Device with battery icon"]
    G --> H["Reset 3s MODE"]
13
text_image
1-2M ① ②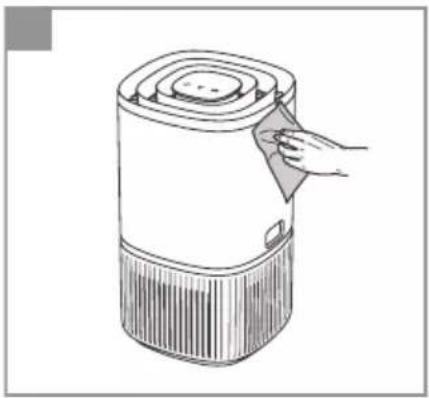
natural_image
Line drawing of a cylindrical device with a hand inserting a paper or tape, no text or symbols present
natural_image
Illustration of a battery labeled 'MAX' crossed over a grid circle and a rectangular block, with no readable text or symbols.
text_image
Safety warning symbol for water treatment with crossed-out pipes and a circular sign indicating no pollution.The software in the air purifier is partly based on free and open source software. To see the full copyright information and applicable license terms, please visit: https://emtech.delta.electrolux.com/license
For more information visit electrolux.com
flowchart
graph LR
    A["MODE Reset 3s"] --> B["Device 1: Display"]
    B --> C["Device 2: Box with Cover"]
    C --> D["Device 3: Display with Cover"]
    D --> E["Device 4: Display with Cover"]
    E --> F["Device 5: Display with Cover"]
    F --> G["Device 6: Display with Cover"]
    G --> H["Device 7: Display with Cover"]
    H --> I["Device 8: Display with Cover"]
    I --> J["Device 9: Display with Cover"]
    J --> K["Device 10: Display with Cover"]
    K --> L["Device 11: Display with Cover"]
    L --> M["Device 12: Smartphone Access"]
text_image
Diagram illustrating a device installation procedure with labeled steps and a 1-2M meter indicator.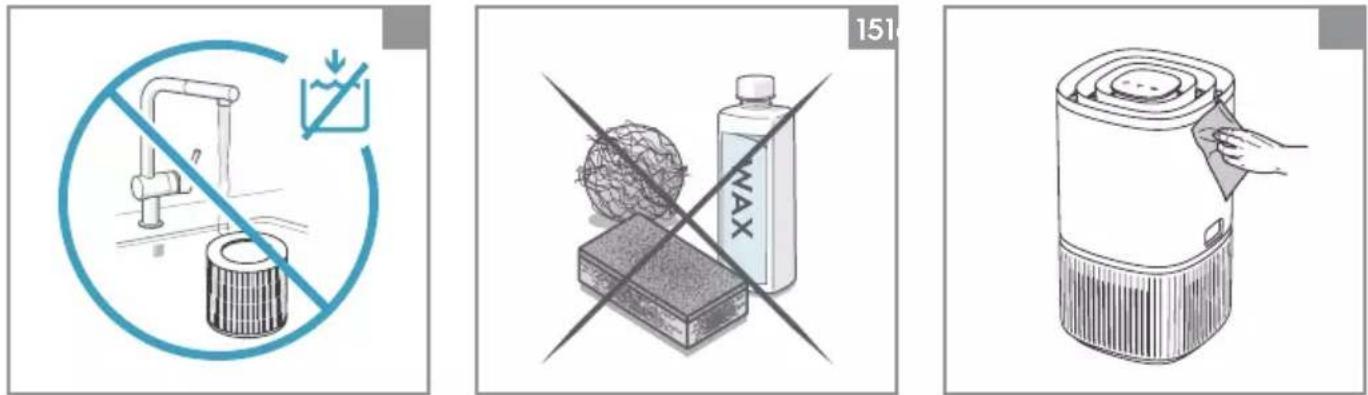
text_image
Three safety symbols and a device illustration: no anti-smoking, no clean air, and clean air filter.text_image
Illustration showing a mechanical assembly process with numbered steps from top view to bottom view, including a magnified view and directional arrows.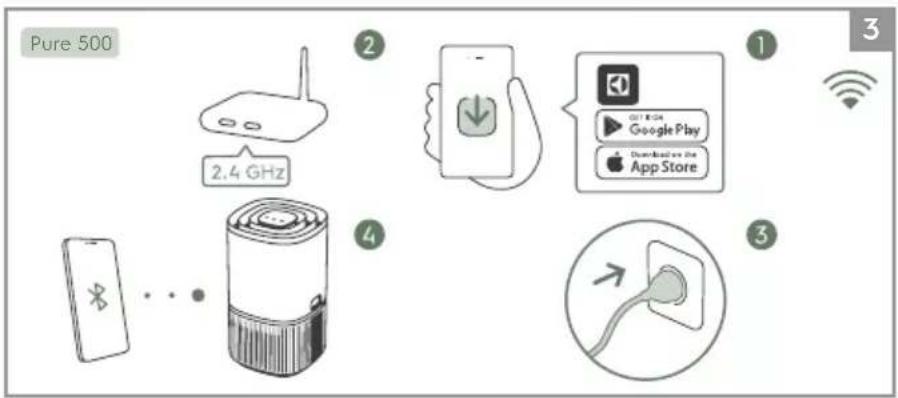
text_image
Pure 500 2.4 GHz 1 Google Play Download the App Store 3
text_image
Diagram of a portable air purifier with labeled parts and an inset showing a plug inserted into a socket.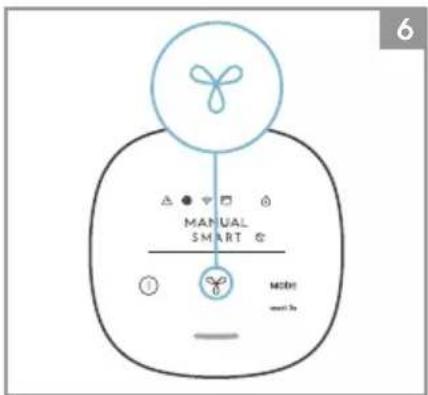
text_image
6 MANUAL SMART MODE must be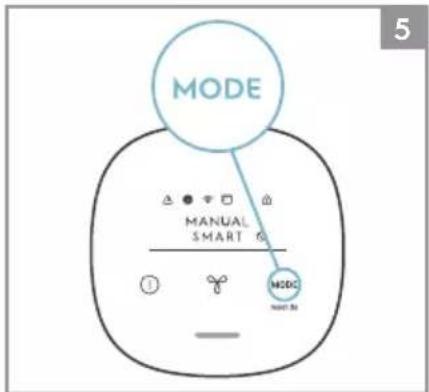
text_image
MODE MANUAL SMART M2BC M2B1 5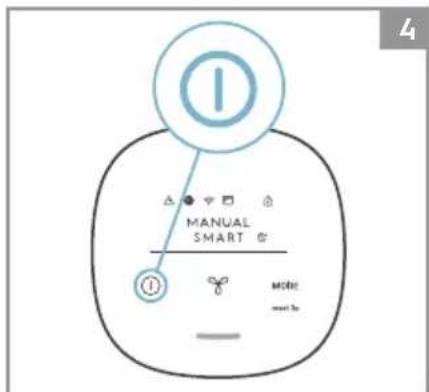
text_image
Pure 500 9 MANUAL SMART G ① MODE MODE #1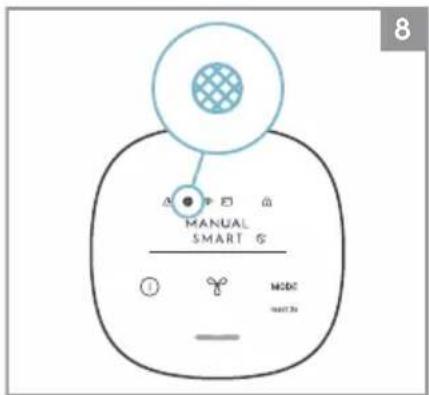
text_image
8 Δ ⚫ ⊥ ∅ MANUAL SMART S ① M2DC m017.3x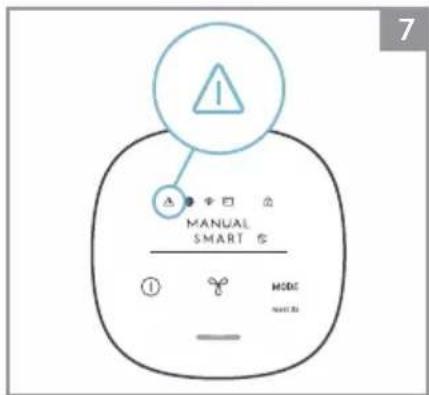
text_image
7 A MANUAL SMART ① MODE MUST B1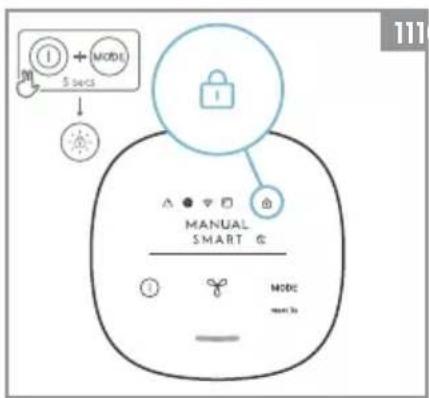
text_image
111 5 SECS MANUAL SMART © MODE must to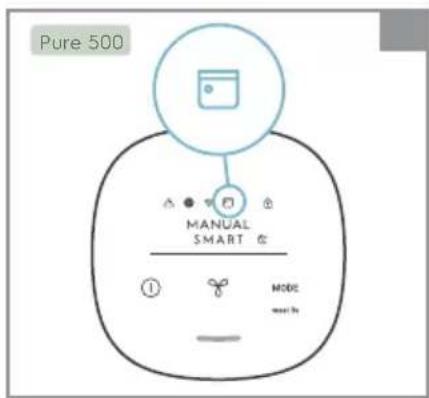
text_image
Pure 500 MANUAL SMART ① MODE must be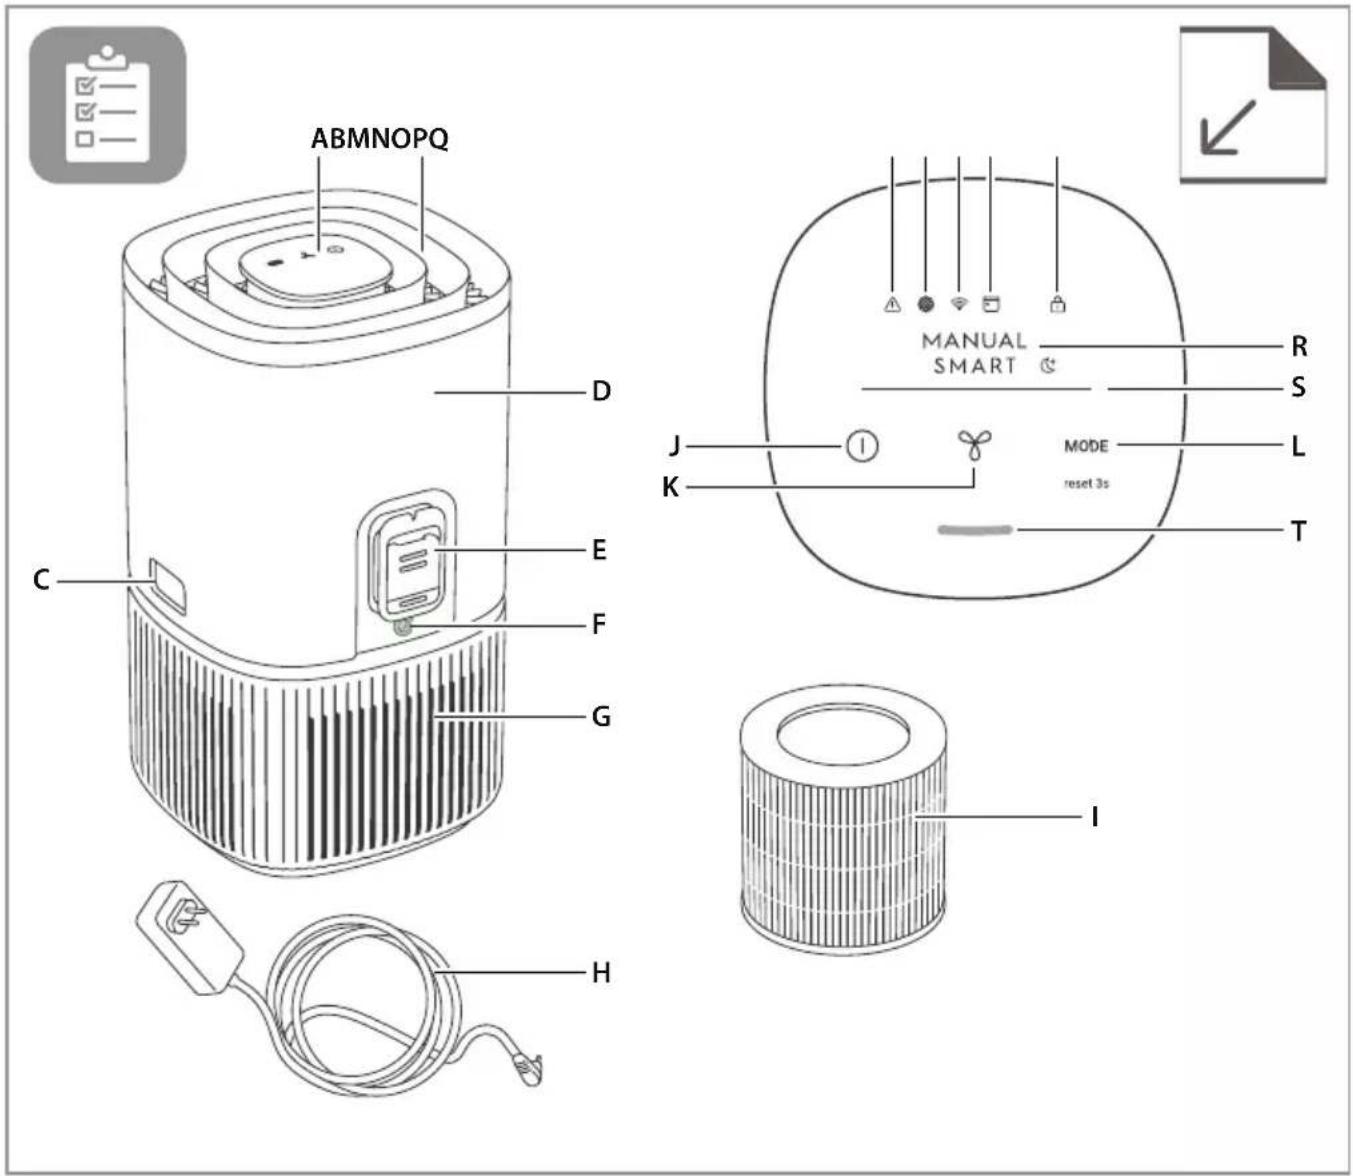
text_image
ABMNOPQ D C E F G H J K MANUAL SMART R S MODE reset 3s L T Inatural_image
Line drawing of a cylindrical electronic device with ventilation grilles and a top panel (no text or symbols)Pure 300
Pure 500
جهاز تنقبة الهواء