
VST414C - Fan INVENTUM - Free user manual and instructions
Find the device manual for free VST414C INVENTUM in PDF.

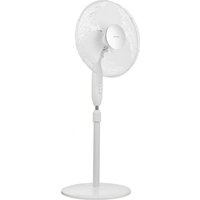
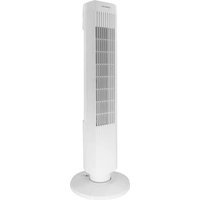
| Product type | Pedestal fan |
| Brand | Inventum |
| Model | VST414C |
| Number of speeds | 3 (Position 1, 2, 3) |
| Oscillation | Yes, oscillation button |
| Height adjustment | Yes, via foot adjustment nut |
| Tilt | Yes, manual head tilt |
| Fan blade diameter | 40 cm (approx) |
| Adjustable height | 110 to 140 cm (approx) |
| Weight | 5 kg (approx) |
| Power supply | 220-240 V~, 50 Hz (approx) |
| Power | 45 W (approx) |
| Foot material | Wood |
| Cage material | Plastic |
| Usage | Indoor only |
| Cleaning | Damp cloth, vacuum cleaner for the grille |
| Safety | Do not insert objects into the grille |
| Warranty | 2 years full manufacturer's warranty |
| Replacement parts | Not provided |
| Repairability | Repair by a specialist technician |
Frequently Asked Questions - VST414C INVENTUM
User questions about VST414C INVENTUM
0 question about this device. Answer the ones you know or ask your own.
Ask a new question about this device
Download the instructions for your Fan in PDF format for free! Find your manual VST414C - INVENTUM and take your electronic device back in hand. On this page are published all the documents necessary for the use of your device. VST414C by INVENTUM.
USER MANUAL VST414C INVENTUM
natural_image
A wooden tripod-mounted fan with a circular top, mounted on a stand (no text or symbols visible)- safety instructions page 11
- product description page 13
- assembly instructions page 14
- using the fan page 15
- cleaning and maintenance page 15
general terms and conditions of service and warranty page 16
Deutsch
natural_image
Technical line drawing of a mechanical assembly with no visible text or symbols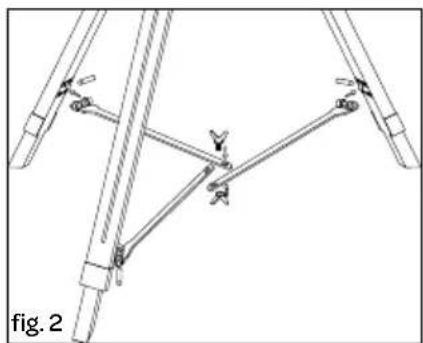
natural_image
Technical line drawing of a mechanical linkage assembly (no text or symbols)
flowchart
graph LR
    A["Device with fan icon"] --> B["Component 1: Screw"]
    B --> C["Component 2: Screw"]
    C --> D["Component 3: Screw"]
    D --> E["Component 4: Screw"]
    E --> F["Component 5: Screw"]
    F --> G["Component 6: Screw"]

natural_image
Technical line drawing of a mechanical fan assembly with labeled components (no text or symbols on the diagram itself)
natural_image
Technical line drawing of a mechanical component with two blades and a central blade, labeled 'fig. 5' (no text or symbols on the diagram itself)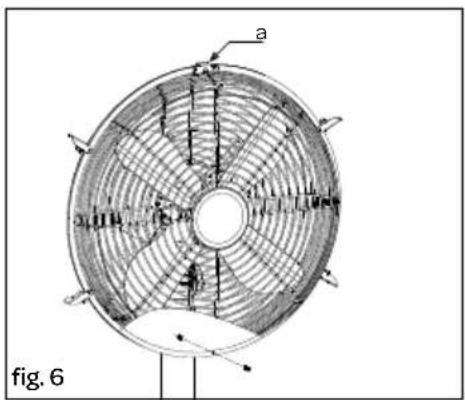

natural_image
Diagram of a fan with internal blades and a cross-section showing a cutaway view labeled 'b', no text or symbols present.8 • Nederlands
1 safety instructions
- First carefully read the instruction manual in full prior to using the appliance and store the manual in a safe place for future reference.
- Only use this appliance for the purposes described in the instruction manual.
- Caution: never insert objects into the ventilation grid when the appliance is switched on.
- Only connect the appliance to alternate current, with a mains voltage that corresponds with the information provided on the information plate of the appliance.
- Never bend the power cord sharply or allow it to run across hot parts.
- Fully unwind the cord to prevent it from overheating.
- Never place the appliance near appliances that give off heat, such as ovens, gas cookers, hotplates, etc. Keep the appliance away from walls or other objects that could catch flame, such as curtains, towels (cotton or paper, etc.).
• Always make sure the appliance is placed on an even, flat surface. - Only use the appliance indoors.
- Do not leave the appliance unsupervised if the appliance is operational.
- If you want to move the appliance, make sure the appliance is switched off.
- Do not use the appliance if the plug, cord or appliance are damaged, or if the appliance no longer functions properly or if it is damaged in any other way. If this is the case, consult the retailer or our maintenance service.
- If the cord of the appliance is damaged, it should be replaced by the manufacturer, his customer service or a similarly qualified person in order to prevent hazardous situations.
- Never replace the plug or cord yourself. Repairs to electrical appliances should only be performed by skilled persons. Incorrect repairs may expose the user to serious hazards.
- Never use the appliance with parts that are not recommended or supplied by the manufacturer.
-
Do not pull the cord and/or appliance to remove the plug from the wall socket. Never touch the appliance with wet or damp hands.
-
Never connect the appliance to an external timer or a separate remote control system, in order to prevent hazardous situations.
- Keep the appliance out of reach of children. Children do not see the dangers associated with handling electrical appliances. Therefore, never allow children to operate electrical appliances without supervision. Keep the appliance and cord out of reach of children younger than 8 years of age.
- The appliance can be used by children of 8 years and older and persons with a limited physical, sensory or mental capacity or lack of experience or knowledge, provided they use the appliance under supervision or have been instructed about its safe use and understand the hazards involved.
• Children must not play with the appliance. - The appliance may not be cleaned or maintained by children, unless this is done under supervision.
- If the appliance is not being used or is being cleaned, fully switch off the appliance by removing the plug from the socket.
- Extension cords may only be used if the mains voltage (see the information plate) and capacity are identical to or higher than that of the appliance. Always use an approved extension cord.
- If you decide to cease using the appliance due to a defect, we recommend cutting off the cord after removing the plug from the wall socket. Take the appliance to the waste processing department concerned of your municipality.
- Never submerge the appliance, cord or plug in water.
- This appliance is intended for household and similar use, such as:
- in staff kitchens, shops, offices and other work environments;
- by guests of hotels, motels and other residential environments;
- in Bed&Breakfast type environments;
- farms.
- If the appliance is not used as intended, no compensation can be claimed in case of defects or accidents and the warranty will be invalidated.
- If you decide to stop using the appliance due to a defect, we recommend cutting the cord after removing the plug from the wall socket. Small household appliances do not belong in the dustbin. Take the appliance to the waste processing department concerned of your municipality.
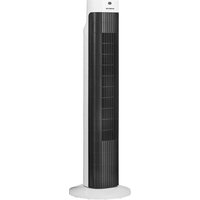
2 product description
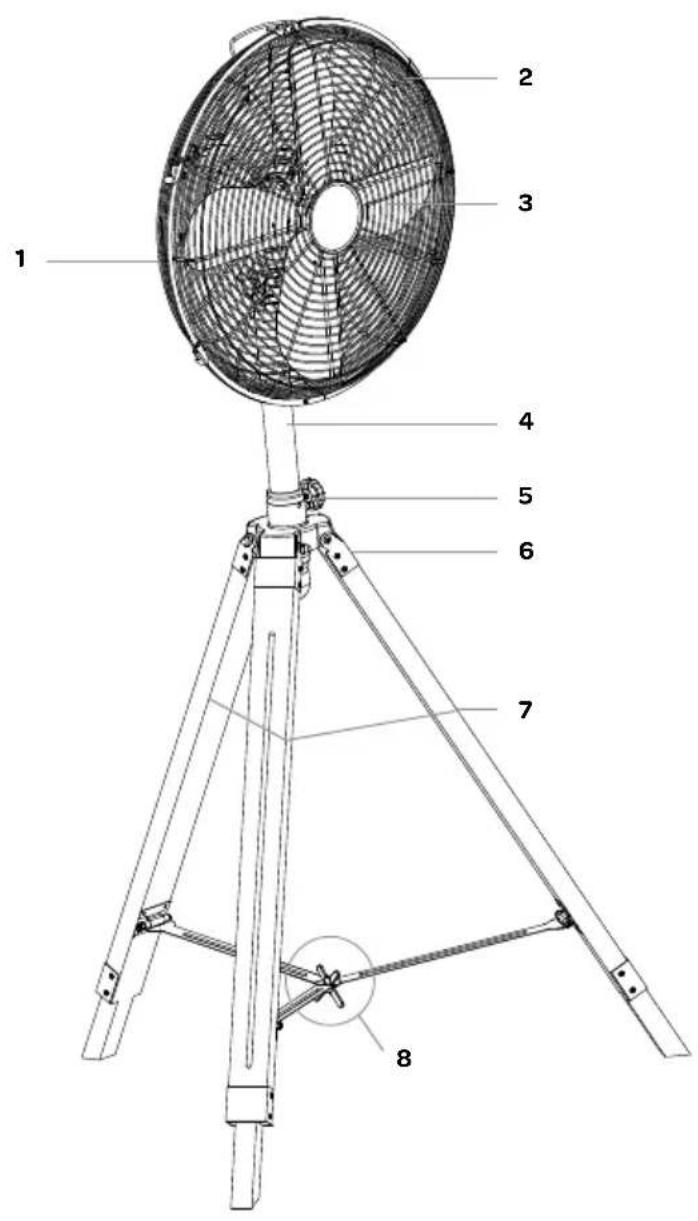
- Protective guard - rear
- Fan blade
- Protective guard - front
- Pedestal
- Pedestal adjusting nut
- Metal connector
- Wooden parts of tripod
- Metal connection pieces with wing nuts
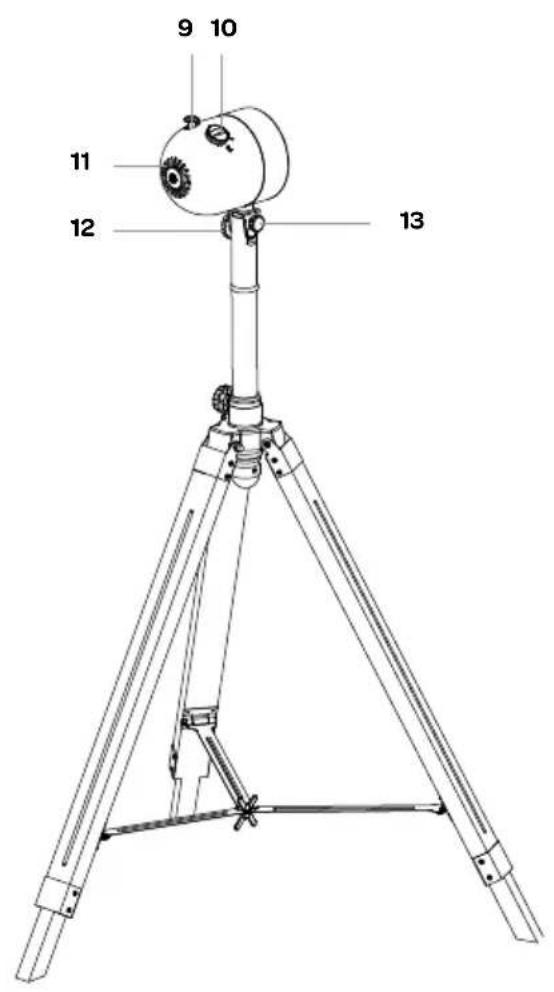
- Oscillation pen
- Position button
- Motor casing
- Adjusting screw for tilting
- Fixing bolt
3 assembly instructions
Before using the fan for the first time, please proceed as follows: carefully unpack the appliance and all components and remove all packaging material and any promotional stickers. Keep the packaging (plastic bags and cardboard) out of reach of children.
After unpacking the appliance, carefully check it for external damage that may have occurred during transport. Assemble the fan in accordance with the instructions.
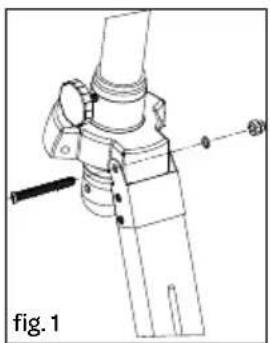
- Each wooden leg of the pedestal has a screw and a wing nut. Use a screwdriver to attach the wooden legs to the pedestal. Place a long screw through the metal connectors and fasten it with a wing nut. Do the same for all three wooden legs - fig. 1.
- Connect the metal coupling pieces of the pedestal using a screw and wing nut, thus creating a tripod - fig. 2.
- Place the motor section on the pedestal and fasten it with the screws, according to the drawings - fig. 3.
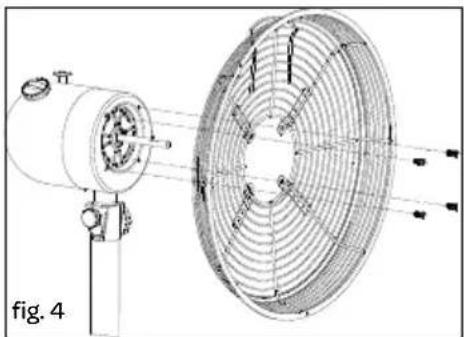
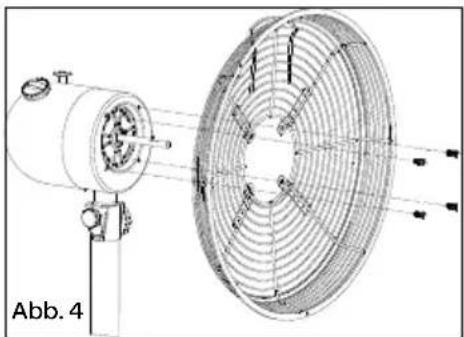
- Remove the four screws from the motor section - fig. 4.
- Place the rear protective guard on the motor shaft and fasten it with the screws that you have just removed - fig. 4.
- Place the fan blade on the motor shaft and use a screwdriver to fasten it to the pen with a screw - fig. 5. Test the fan blade by rotating it by hand. When rotating, the blade should not create any friction with the rear protective guard.
- Place the front protective guard on the fan and use the clamps to attach it to the rear protective guard.
- Align the front protective guard with the rear protective guard using the positioning clamp [a] on the top side in order to attach both parts to each other properly - fig. 6.
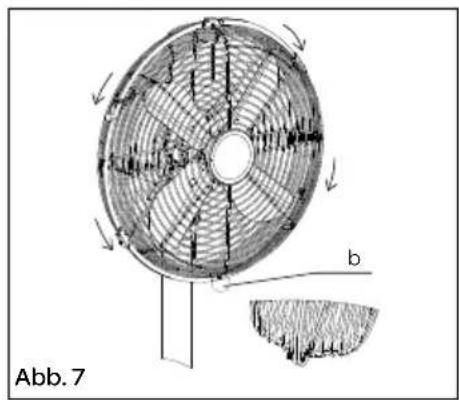
- Use the bolt and nut at the bottom side [b] of the guards to attach the guards to each other - fig. 7.
- Press the clamps downwards in order to attach the front and rear protective guards to each other.
Place the fan on a flat, stable surface. Clean the exterior of the fan using a slightly damp cloth and then wipe it with a dry cloth.
Caution: only wipe the wooden parts with a dry cloth.
The fan is ready for use.
natural_image
Technical line drawing of a mechanical assembly with no visible text or symbols
natural_image
Technical line drawing of a mechanical linkage assembly (no text or symbols)
flowchart
graph LR
    A["Device with fan icon"] --> B["Component 1: Screw"]
    B --> C["Component 2: Screw"]
    C --> D["Component 3: Screw"]
    D --> E["Component 4: Screw"]
    E --> F["Component 5: Screw"]
    F --> G["Component 6: Screw"]
natural_image
Technical line drawing of a mechanical fan assembly with labeled components (no text or symbols on the diagram itself)
natural_image
Technical line drawing of a mechanical component with two blades and a central blade, labeled 'fig. 5' (no text or symbols on the diagram itself)

natural_image
Diagram of a fan with internal blades and a cross-section showing a cutaway view labeled 'b', no text or symbols present.14 • English
4 using the fan
Place the pedestal fan on a flat, stable surface. Insert the plug in a socket.
Switching on/off
Turn the position button to position 1 to 3 to switch on the fan. By turning the position button back to 0, you switch off the appliance.
Position 0 = off
Position 1 = lowest position
Position 2 = middle position
Position 3 = highest position
Oscillation
This fan is able to oscillate (swerve to the left and right) for a better air displacement. Press in or pull out the oscillation knob. If you want to change the wind to an upward or downward direction, you can simply tilt the fan head upwards or downwards.
Adjusting the height of the pedestal
In order to adjust the height, loosen the pedestal adjusting nut and move the fan upwards or downwards. Properly hold on to the fan when loosening the pedestal adjusting nut, so it cannot drop down unexpectedly. Re-tighten the pedestal adjusting nut when the fan is at the required height.
5 cleaning and maintenance
Before cleaning the fan, you must switch it off by means of the on/off button and remove the plug from the socket.
- Wipe the exterior of the appliance with a slightly damp cloth and dry properly.
- Make sure the wooden parts of the pedestal do not get wet.
- If necessary, you can clean the protective guard using a vacuum cleaner (nozzle).
- Do not use aggressive or abrasive cleaning agents for cleaning the appliance.
- Never submerge the fan in water or any other liquid.
general terms and conditions of service and warranty
We do not need to remind you of the importance of service. After all, we develop our products to a standard so that you can enjoy them for many years, without any concerns. If, nevertheless, there is a problem, we believe you are entitled to a solution straight away. Hence our products come with an exchange service, on top of the rights and claims you are entitled to by law. By exchanging a product or part, we save you time, effort and costs.
2-year full manufacturer's warranty
- Customers enjoy a 2-year full manufacturer's warranty on all Inventum products. Within this period, a faulty product or part will always be exchanged for a new model, free of charge. In order to claim under the 2-year full manufacturer's warranty, you can either return the product to the shop you bought it from or contact the Inventum costumer service department via the form at www.inventum.eu/service-aanvraag.
- The 2-year warranty period starts from the date the product is bought.
- In order to claim under the warranty, you must produce a copy of the original receipt.
- The warranty applies only to normal domestic use of Inventum products within the Netherlands.
Breakdowns or faults outside the warranty period
- Breakdowns or faults in small or large domestic appliances outside the warranty period, can be reported to the costumer services department via the form at www.inventum.eu/service-aanvraag or by calling the costumer services department.
- The costumer services department may ask you to send the product for inspection or repair. The costs of dispatch will be at your expense.
- The inspection to establish whether repair is possible involves a charge. You need to grant your permission for this, in advance.
- In the event of a large domestic appliance, Inventum, at your request, can send out a service engineer. In that case, you will be charged the call-out costs, as well as parts and labour.
- In the event of an instruction to repair, the repair costs must be paid in advance. In the event of a repair by a service engineer, the costs of the repair must be settled with the engineer onsite, preferably by means of PIN payment.
Warranty exclusions
- The following is excluded from the aforesaid warranties:
• normal wear and tear;
- improper use or misuse;
• insufficient maintenance;
- failure to comply with the operating and maintenance instructions;
- unprofessional installation or repairs by third parties or the customer himself;
• non-original parts used by the customer;
- use for commercial or business purposes;
- removal of the serial number and/or rating label.
-
In addition, the warranty does not apply to normal consumer goods, such as:
-
dough hooks, baking tins, (carbon) filters, etc.;
- batteries, bulbs, carbon filters, fat filters etc.;
• external connection cables; -
glass accessories and glass parts such as oven doors;
• and similar items. -
Transport damage not caused by Inventum is also excluded. Therefore, inspect your new device before starting to use it. If you detect any damage, you must report this to the store where you purchased the product within 5 working days, or to the Inventum customer service department via the form at www.inventum.eu/service-aanvraag. If transport damage is not reported within this period, Inventum does not accept any liability in this respect.
-
The following are excluded from warranty and/or replacement: faults, loss of and damage to the device as a result of an event that is normally insured under the home contents insurance.
Important to know
- The replacement or repair of a faulty product, or a part thereof, does not lead to an extension of the original warranty period.
- If a complaint is unfounded, all costs arising from it will be at the customer's expense.
- Following expiry of the warranty period, all costs of repair or replacement, including administration costs, dispatch and call-out charges, will be charged to the customer.
- Inventum cannot be held liable for damage caused by external events, unless this liability arises from mandatory statutory provisions.
- These warranty and service provisions are governed by Dutch law. Disputes will be settled exclusively by the competent Dutch court.
natural_image
Technical line drawing of a mechanical assembly with no visible text or symbols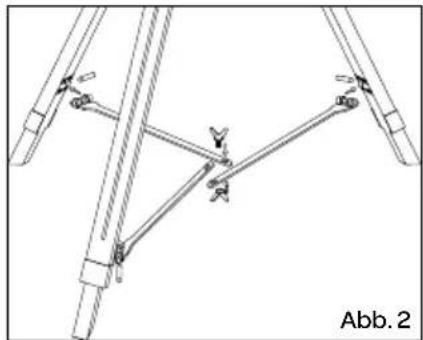
natural_image
Technical line drawing of a mechanical linkage assembly (no text or symbols)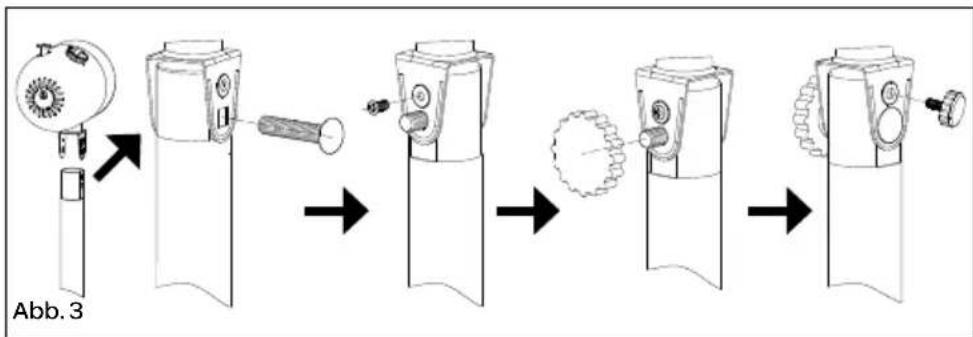
flowchart
graph LR
    A["Sensor Input"] --> B["Internal Component"]
    B --> C["Assembly"]
    C --> D["Final Output"]
natural_image
Technical line drawing of a mechanical fan assembly with labeled components (no text or symbols on the diagram itself)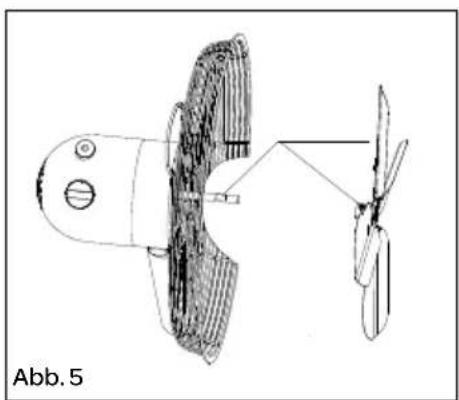
natural_image
Technical line drawing of a mechanical component with two blades and a central blade, labeled Abb. 5 (no text or symbols on the diagram itself)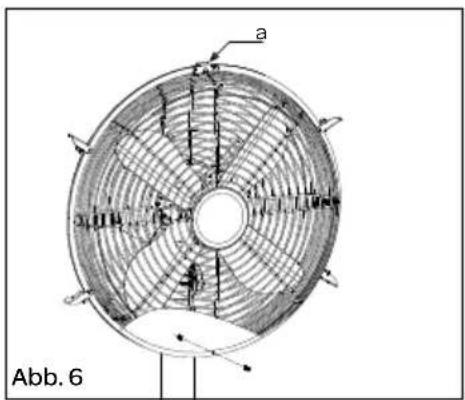
natural_image
Diagram of a circular fan with radial blades and a cross-section showing internal structure, labeled 'Abb. 7' (no text or symbols on the fan itself)natural_image
Technical line drawing of a mechanical assembly with no visible text or symbols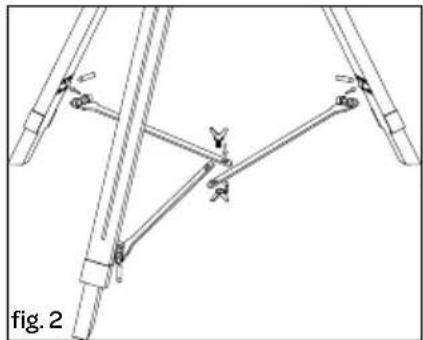
natural_image
Technical line drawing of a mechanical linkage assembly (no text or symbols)
flowchart
graph LR
    A["Device with fan icon"] --> B["Component 1: Screw"]
    B --> C["Component 2: Screw"]
    C --> D["Component 3: Screw"]
    D --> E["Component 4: Screw"]
    E --> F["Component 5: Screw"]
    style A fill:#f9f,stroke:#333
    style F fill:#f9f,stroke:#333

natural_image
Technical line drawing of a mechanical fan assembly with labeled components (no text or symbols on the diagram itself)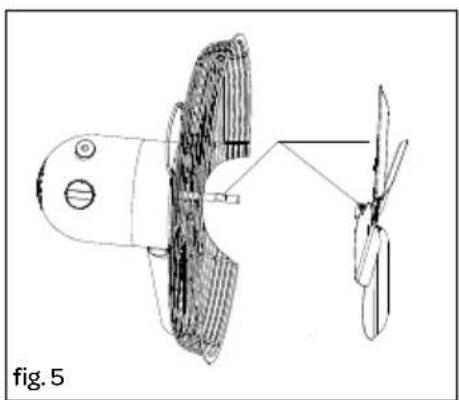
natural_image
Technical line drawing of a mechanical component with two blades and a central blade, labeled 'fig. 5' (no text or symbols on the diagram itself)

natural_image
Diagram of a fan with internal blades and a cross-section showing a cutaway view labeled 'b', no text or symbols present.28 • Français
facebook.com/inventum1908
youtube.com/inventum1908


- Deutsch
- • Nederlands
- safety instructions
- product description
- assembly instructions
- • English
- using the fan
- Switching on/off
- Oscillation
- Adjusting the height of the pedestal
- cleaning and maintenance
- general terms and conditions of service and warranty
- 2-year full manufacturer's warranty
- Breakdowns or faults outside the warranty period
- Warranty exclusions
- Important to know
- • Français
Brand : INVENTUM
Model : VST414C
Category : Fan