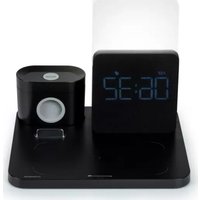
TH387841 - Battery charger THOMSON - Free user manual and instructions
Find the device manual for free TH387841 THOMSON in PDF.


| Product Type | Alarm clock with wireless charging station |
| Brand | Thomson |
| Model | TH387841 (CL800I) |
| Dimensions | 202 x 170 x 174 mm |
| Power supply | DC 9V/2.7A AC adapter (included) |
| Alarm clock backup battery | 1 x CR2032 3V |
| Wireless phone charging | 5W / 7.5W / 10W, distance ≤ 8 mm |
| Output ports (main station) | USB-A 5V/1A |
| Output ports (storage box) | USB-A 5V/0.75A, USB-C 5V/0.75A |
| Main functions | Qi wireless charging, alarm clock with alarm and snooze, ambient LED lamp (warm white/cool white/bright), time and date display, charging for smartwatch and earphones |
| Maintenance and cleaning | Disconnect before cleaning; use a soft cloth; do not use abrasive products |
| Safety | Do not open the device; do not expose to moisture; use only the supplied adapter; keep away from heat sources; do not place metal objects on the charging area |
| Spare parts and repairability | Entrust any repair to a qualified technician; no spare parts provided |
| General information | Manufactured by Bigben Interactive; 2-year warranty; declaration of conformity available at www.bigben.fr/support |
Frequently Asked Questions - TH387841 THOMSON
User questions about TH387841 THOMSON
0 question about this device. Answer the ones you know or ask your own.
Ask a new question about this device
Download the instructions for your Battery charger in PDF format for free! Find your manual TH387841 - THOMSON and take your electronic device back in hand. On this page are published all the documents necessary for the use of your device. TH387841 by THOMSON.
USER MANUAL TH387841 THOMSON
natural_image
Smart home appliance setup with digital clock, charging case, and smartphone (no visible text or symbols)MODE D'EMPLOI
AVANT D'UTILISER CET APPAREIL, VEUILLEZ LIRE ATTENTIVEMENT CE MODE D'EMPLOI ET LE CONSERVER AFIN DE POUVOIR LE CONSULTER ULTÉRIEUREMENT.

Fonctionnement
natural_image
Line drawing of a portable electronic device with cable and power plug (no text or symbols)flowchart
graph LR
    A["Initial catheter insertion"] --> B["Adjustment with valve closure"]
    B --> C["Adjustment with valve closure"]
    C --> D["Adjustment with valve closure"]
    D --> E["Final packaging with ring closure"]
natural_image
Line drawing of a battery connected to a plug via a cable (no text or symbols)natural_image
Line drawing of a smartphone charging station with a digital display and camera (no text or symbols)natural_image
Line drawing of a handheld device with a plus button and control panel (no text or symbols)Appareils concernés
BELGIQUE, customerservice@bigben-interactive.be
NEDERLAND, customerservice@bigben-interactive.nl
ESPAÑA, soporte@metronic.com
Tel.: 93 713 26 25
Alarm clock & wireless charging station

natural_image
Smart home appliance setup with digital clock, charging case, and smartphone (no visible text or symbols)INSTRUCTIONS
PLEASE READ THIS USER MANUAL CAREFULLY BEFORE OPERATING THIS UNIT AND RETAIN FOR FUTURE REFERENCE.
| Getting started 14 | Mobile phone wireless charging | 21 | |
| Safety warning and notice 14 | Instructions for operating the LED light | 21 | |
| Contents of the box 16 | Devices concerned | 22 | |
| Specifications 16 | Important points | 22 | |
| Product description | 16 | Technical specifications | 22 |
| Operation | 18 | Protection of the environment | 22 |
| Storage unit | 19 | Additional information | 23 |
| Setting the time and the alarm | 20 | Declaration of conformity | 23 |
Getting started
• Take the appliance out of the box.
- Remove all the packaging from the product.
- Place the packaging inside the box or dispose of it safely in compliance with the waste sorting instructions shown on the product packaging.
Safety warning and notice
You must read and understand all the instructions before using this appliance. The warranty will not apply if damage is caused by failure to follow the instructions.

- Never remove the appliance casing.
- Never place this appliance on top of other electrical equipment.
- Protect the power cord from being stepped on or pinched, particularly at the plugs, sockets, and the point where it exits the appliance. Make sure that the power voltage corresponds to the voltage shown on the rating plate at the rear of the appliance. Always pull the plug from the socket when disconnecting from the mains. Never pull on the cord. Ensure you have completed all the other connections before connecting the plug.
-
Only use attachments/accessories that are recommended by the manufacturer.
-
Entrust all appliance repairs to qualified repairers. Repair is needed when the appliance has been damaged in any fashion, and in particular:
-
if the power cord is damaged;
- in the event of a liquid spill or objects being inserted into the appliance;
- if the appliance is exposed to rain or dampness;
- if the appliance does not operate normally;
-
or if the appliance has been dropped or impacted.
-
The series panel is located on the bottom of the appliance.
-
Never block the air vents.
-
Make sure you have enough space for ventilation. Place the product on a stable surface.
-
This device must be used in a moderate climate, away from direct sunlight, naked flames or heat, heating devices, cookers or any other devices (including amplifiers) that generate heat. Do not install near a heat source.
-
The batteries (battery pack or inserted batteries) must not be exposed to excessive heat, such as sunshine, fire, etc.
-
Always unplug the device before cleaning it. Never lubricate any part of this appliance.
Clean it with a soft cloth. Do not use abrasive products or harsh cleaners.
- Ensure that you always have easy access to the power cord, plug or adaptor to disconnect this appliance from the mains if necessary.
- Do not use this appliance near water. It must not be dripped on or splashed. Do not use this appliance in a damp or wet environment.
- Disconnect this appliance in the event of a storm or if you are not going to use it for a long period of time.
- This appliance can be used by children aged 8 and over, and by persons with a physical or sensory disability, learning difficulties or a lack of experience and knowledge, provided they are supervised or have received instructions on the safe use of the appliance, and they understand the risks involved. Children must not play with the appliance or power cord (risk of strangulation). Children must not clean or maintain the appliance without supervision.
- This device must only be supplied with very low safety voltage corresponding to the marking on the device.
- The battery should be removed from the device before disposal. The device must be disconnected from the power supply when removing the battery.
- When using the product, it should be placed at least 20 cm away from the human body.
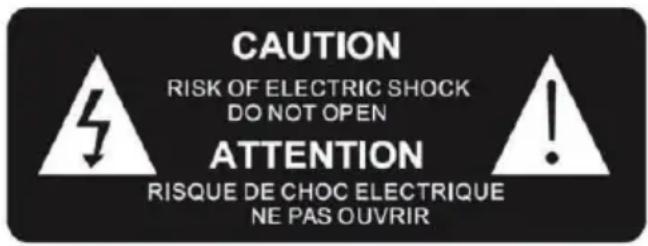
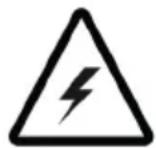
The lightning bolt symbol within an equilateral triangle alerts users to the presence of dangerous uninsulated electrical voltages inside the device that are strong enough to present a risk of electric shock.

The exclamation mark inside a triangle indicates the presence of important operating and maintenance (repair) instructions in the literature accompanying the appliance.
| Class II material |  |
| Direct current |  |
| Alternating current | 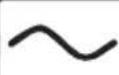 |
| For indoor use only |  |
Contents of the box
● Alarm clock & wireless charging station
- 1 mains adapter
● 1 storage unit + 2 covers + watch ring
- Instructions
Specifications
- LED mood light
- Alarm clock
- Mobile phone holder
● Charging station for earphones and connected watch, with space to store the cable
● Charging distance ≤ 8mm
Product description
- Wireless mobile phone charging area
- LED light
- Earphone charging station
- Holder for mobile phone
- Connected watch charging station
- Light adjustment touch button
Touch once to turn on the warm white light.
Twice for the cold white light.
3 times for the bright white light.
4 times to turn off the light.
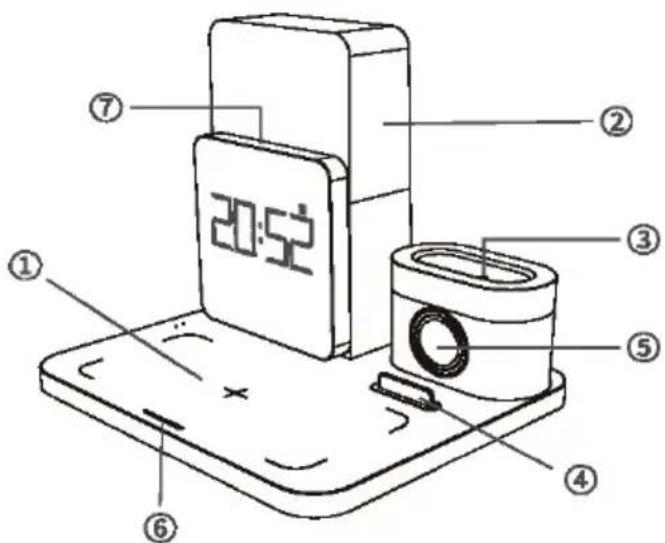
Press and hold the touch button when the light is on to increase or decrease the brightness. In alarm mode, tap the button to activate Snooze, and press and hold it to stop the alarm. In Snooze mode, press and hold the button to cancel Snooze.
7. Alarm clock screen brightness adjustment touch button
Touch to adjust the dimmer of the alarm clock screen: 100-50-20-0 %
In alarm mode, tap to activate Snooze. Snooze will repeat the alarm after 9 minutes
Or press and hold the button to stop the alarm.
8. Alarm clock functions button

Settings mode button
- Press and hold the time settings mode then press → 12/24 hour format → Alarm → Year → Month/Day;
- When the alarm goes off, tap the button to activate Snooze

Function change button
- In clock screen mode, press the button to display 12/24-hour format → Alarm → year → month/day
- In settings mode, press to change the hours or minutes, and change the month or day.
- When the alarm goes off, tap the button to activate Snooze

Increase value and adjust the light of the alarm clock screen
- Press ☐ to set the brightness of the alarm clock screen to 100% - 50% - 20%- Off.
- In settings mode, press 📋 to increase the value
- When the alarm goes off, tap the button to activate Snooze

Decrease value, alarm on/off and alarm sound levels
- Press ☐ to set the alarm volume to 3 different levels (High, Medium, Low)
- Press and hold 📄 to activate or deactivate the alarm
- In the settings mode, press = to decrease the value
- When the alarm goes off, tap the button to activate Snooze
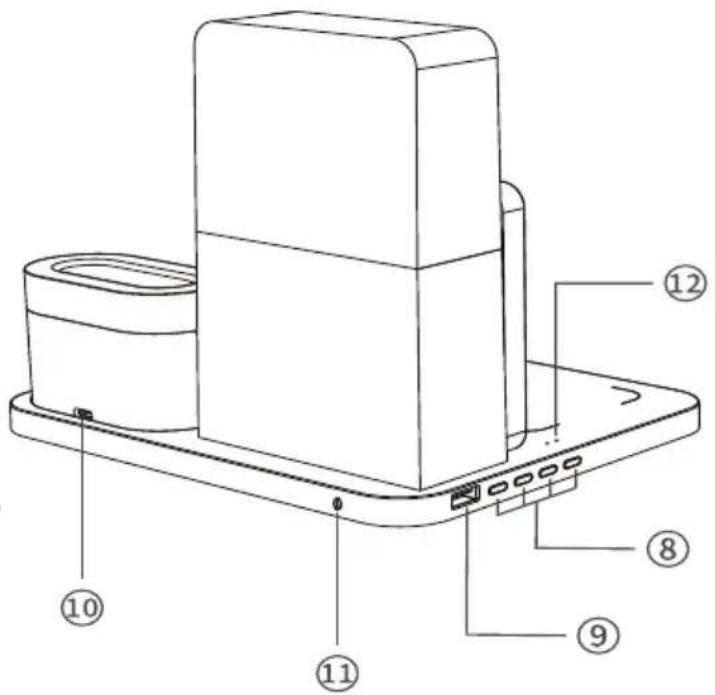
9. USB port (5 V/1 A)
10. USB type-C port of the storage unit
11. Mains plug
12. Mobile phone wireless charging indicator
White LED = no charge or full charge.
Blue LED = wireless charging.
Blinking white and blue LED = charging error.
- Storage unit
- USB-A port (5 V/0.75 A)
- USB-C port (5 V/0.75 A)

Operation
- IMPORTANT! Use only the mains adapter provided to power the wireless charger.
- Plug the mains adapter (included) into a standard wall outlet
- Plug the connector of the mains adapter into the power input port of the wireless charging station.
- After the product is powered on, the alarm clock screen lights up, and the product's blue and white LED charging indicators light up alternately, and the white light stays on.

natural_image
Line drawing of a device with a plug, cable, and charging unit (no text or symbols)Instructions for installing the storage unit for wirelessly charging a connected watch
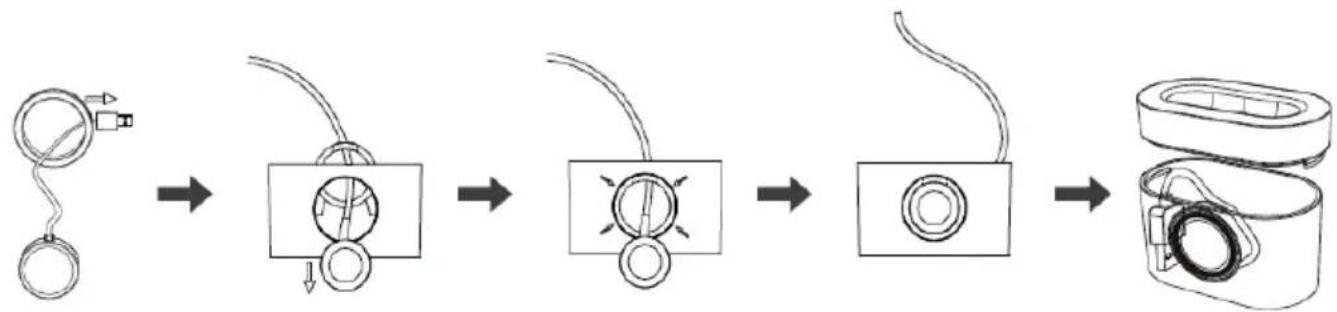
If you have a SE iWatch, please don't use all charging output at the same time.
Step 1: remove the silicone holder from the storage unit and thread the USB/Type C connector of the smartwatch wireless charger through the hole in the silicone ring.
Step 2: the wireless watch charger is not installed inside the silicone holder, thread both elements through the hole in the storage unit.
Step 3: fit the silicone ring onto the hole in the storage unit.
Step 4: fit the wireless watch charger into the silicone ring so that it lies flat
Step 5: connect the USB/Type C connector of the wireless watch charger to the USB-A/C port in the storage unit.
flowchart
graph LR
    A["Handheld weights"] --> B["Reinforced component with circular head"]
    B --> C["Reinforced component with circular head"]
    C --> D["Reinforced component with circular head"]
    D --> E["Reinforced component with circular head"]
    E --> F["Roller with roller rollers"]
Instructions for fitting the storage unit for wirelessly charging earphones
Step 1: insert the charging connector of the charging cable into the earphone charging station of the storage unit so that the charging connector protrudes from the surface of the charging station in order to connect the earphones.
Step 2: insert the USB-A/C connector into the USB-A or USB-C port in the storage unit (the charging cable can be stored in the storage unit), then close the cover.

Storage unit
- The storage unit can be charged separately for portable use during travel.
- The storage unit has 1 x USB-A port and 1 x Type-C port, which can be used to charge smartwatches and wireless earphones respectively. The unit can also be used to store cables.

natural_image
Line drawing of a battery connected to a plug via a cable (no text or symbols)Setting the time and the alarm
- Press and hold the ⏻ button to enter the settings mode; the hours and the clock icon flash. Use the ⏻ and ⏻ buttons to increase or decrease the hours
- Press the button to set the minutes; the minutes flash. Use the and buttons to increase or decrease the minutes.
- Press the ⏻ button to set the clock to 24/12 hour mode. Press the 📊 and 🖱 buttons to switch between modes.
- Press the ⚙ button to set the alarm time. The hours and the alarm icon flash. Use the Higgs and E-butions to increase or decrease the hours, and then the button to set the minutes.
- Press the ⚙ button to set the year. The year flashes. Press 📊 and — 🏱 to increase or decrease the year.
- Press the ⚙ button to set the month. The month flashes. Press and to increase or decrease the month.
- Press the button to set the day. The day flashes. Press and to increase or decrease the day.
When the alarm goes off, tap any button or touch the top of the alarm clock screen or the light adjustment touch button to enter SNOOZE mode. SNOOZE will repeat the alarm after 9 minutes
Press and hold the top of the alarm clock screen or the light adjustment touch button to silence the alarm. If you are unable to silence the alarm, it will stop automatically after 15 minutes.
Mobile phone wireless charging
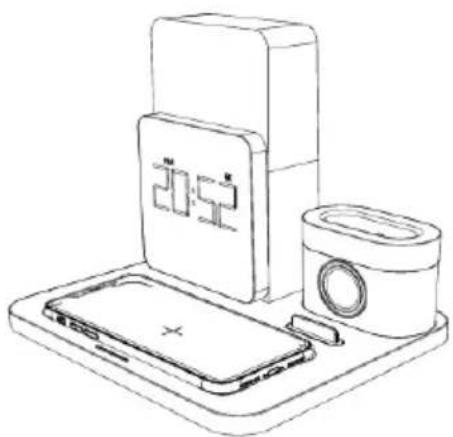
- Place the compatible phone in the centre of the charging area (1 on the diagram).
- The charging indicator changes from white to blue when your device is charging.
- If the alternating white and blue LED charging indicator flashes, it means that the smartphone has not been correctly placed on the charging zone.
- When the smartphone is fully charged, the charging indicator changes from blue to white
WARNING: do not place any metal parts and/or objects on the wireless charging pad as this could cause overheating.
natural_image
Line drawing of a smartphone charging setup with a digital timer and camera (no text or symbols)Instructions for operating the LED light
● Touch once to turn on the warm white light.
● Twice for the cold white light.
● 3 times for the bright white light.
- Touch 4 times to turn the light off.
- Whatever the colour of the light, press and hold the button to adjust the brightness.
- In alarm mode, tap the button to activate Snooze, and press and hold it to stop the alarm.
- In Snooze mode, press and hold the button to cancel Snooze.

natural_image
Line drawing of a handheld device with a plus button and control panel (no text or symbols)Devices concerned
This product supports fast wireless charging in accordance with the wireless charging standard; it transfers power wirelessly over short distances by magnetic fields using inductive coupling. This device supports all wireless charging devices that comply with the standard.
Important points
- Do not use or store the product in direct sunlight or at high temperatures for extended periods.
- Do not charge in close proximity to magnetic cards, magnetic recording media and precision instruments.
- Do not disassemble or modify this product.
- Do not touch the mains adapter with wet hands.
- Keep this product away from water or other liquids.
● To clean the product, disconnect the power supply. - Ambient temperature range for operating the product: -20 to 45°C
Technical specifications
Model number: CL800I
Power supply: DC 9V/2.7A
Charging efficiency: 75 %
Wireless output: 5W/7.5W/10W
USB-A port: DC 5V/1A
USB-A port: DC 5V/0.75A (storage unit)
USB-C port: DC 5V/0.75A (storage unit)
Alarm clock backup battery: 1 x CR2032 3V
Product dimensions: 202 x 170 x 174mm
Protection of the environment


Your product has been designed and manufactured using high-quality materials and components that can be recycled and reused.
Attention should be drawn to the environmental aspects of battery disposal.
When this crossed-out wheelie bin symbol is applied to a product, it means that the product is covered by European Directive 2002/96/EC. Please find out about the local separate collection system for electrical and electronic products. Please act according to your local rules and do not dispose of your old products in your household waste. By ensuring this product is disposed of correctly, you are also helping to prevent potentially negative consequences for the environment and human health.
Additional information
- THOMSON is a trademark of Talisman Brands, Inc. used under licence by Bigben Interactive.
- This product is manufactured and sold under the responsibility of Bigben Interactive.
- THOMSON and the THOMSON logo are trademarks operated under licence by Bigben Interactive – for more information: www.thomson-brand.com.
- All other products, services, corporate names, trademarks, trade names, product names and logos referenced herein are the property of their respective owners.
Declaration of conformity
- Bigben Interactive hereby declares that the CL800I type radio equipment complies with Directive 2014/53/EU. The full text of the EU declaration of conformity is available at the following internet address: https://www.bigben-interactive.co.uk/support/
Warranty
This product is guaranteed by Bigben for a period of 2 years from the date of purchase, except in countries of the European Economic Area, which offer a longer warranty period.
We recommend that you keep your receipt for any claims. The warranty covers breakdowns due to defective material, a missing element or manufacturing defect. In this case, contact our technical support. For any problem with a defective product, contact your point of purchase with your receipt. The warranty does not cover problems of improper use.
Support
www.bigben-interactive.co.uk/support
support@bigben.fr
Made in China
Manufactured by BIGBEN INTERACTIVE SA
396, Rue de la Voyette
CRT2 - FRETIN
CS 90414
59814 LESQUIN Cedex - France
www.bigben.eu

Fabricant : Bigben Interactive FRANCE
396, Rue de la Voyette, C.R.T. 2, Fretin,
CS90414 - 59814 Lesquin Cedex, France
BELGIQUE, customerservice@bigben-interactive.be
NEDERLAND, customerservice@bigben-interactive.nl
ESPANA, soporte@metronic.com
Tel.: 93 713 26 25
natural_image
Electricity charging setup with digital clock, smartphone, and smartphone connected to a mobile phone (no visible text or symbols)
Funcionamiento
natural_image
Line drawing of a portable electronic device with cable and power plug (no text or symbols)Carcasa
natural_image
Line drawing of a battery connected to a plug via a cable (no text or symbols)natural_image
Line drawing of a smart home appliance setup including a 20:32 timer, smartphone, and camera (no text or symbols)natural_image
Line drawing of a device with a plus button and control panel, no text or symbols presentAparatos aptos
BELGIQUE, customerservice@bigben-interactive.be
NEDERLAND, customerservice@bigben-interactive.nl
ESPAÑA, soporte@metronic.com
Tel.: 93 713 26 25
natural_image
Smart home appliance setup with digital clock, charging case, and smartphone (no visible text or symbols)ISTRUZIONI PER L'USO
LEGGERE IL PRESENTE MANUALE CON ATTENZIONE PRIMA DI METTERE IN FUNZIONE IL DISPOSITIVO E CONSERVARLO PER UNA CONSULTAZIONE FUTURA.
Avvio
Funzionamento
natural_image
Line drawing of a portable electronic device with cable and power plug (no text or symbols)flowchart
graph LR
    A["Initial Device"] --> B["Respiratory Valve"]
    B --> C["Concentric Circular Component"]
    C --> D["Concentric Ring with Cross"]
    D --> E["Final Packaging & Assembly"]
Custodia
natural_image
Line drawing of a device with a cable and plug, connected to a power outlet (no text or symbols)natural_image
Line drawing of a smartphone charging setup with a digital timer and camera (no text or symbols)natural_image
Line drawing of a handheld device with a plus button and control panel (no text or symbols)BELGIQUE, customerservice@bigben-interactive.be
NEDERLAND, customerservice@bigben-interactive.nl
ESPAÑA, soporte@metronic.com
Tel.: 93 713 26 25
natural_image
Smart home appliance setup with digital clock, charging case, and smartphone (no visible text or symbols)
Funcionamento
natural_image
Line drawing of a portable electronic device with cable and power plug (no text or symbols)flowchart
graph LR
    A["Intracranial catheter"] --> B["Initial catheter insertion"]
    B --> C["Initial device placement"]
    C --> D["Initial device assembly"]
    D --> E["Final packaging with tape measure"]
natural_image
Line drawing of a battery connected to a plug via a cable (no text or symbols)natural_image
Line drawing of a smartphone charging setup with a digital timer and camera (no text or symbols)natural_image
Line drawing of a handheld device with a plus button and control panel (no text or symbols)natural_image
Two black-and-white icons: a recycling symbol above and a waste bin with a dot below, both without any text or labels.BELGIQUE, customerservice@bigben-interactive.be
NEDERLAND, customerservice@bigben-interactive.nl
ESPAÑA, soporte@metronic.com
Tel.: 93 713 26 25
natural_image
Smart home appliance setup with digital clock, charging case, and smartphone (no visible text or symbols)BEDIENUNGSANLEITUNG
Betrieb
natural_image
Line drawing of a portable electronic device with cable and power plug (no text or symbols)flowchart
graph LR
    A["Inlet needle inserted"] --> B["Initial device with needle insertion"]
    B --> C["Initial device with needle insertion"]
    C --> D["Initial device with needle insertion"]
    D --> E["Final packaging with device component"]
Halterung
natural_image
Line drawing of a battery connected to a plug via a cable (no text or symbols)natural_image
Line drawing of a smart home appliance setup including a 20:52 timer, smartphone, and camera (no text or symbols)natural_image
Line drawing of a handheld device with a plus button and control panel (no text or symbols)Kompatible Geräte
BELGIQUE, customerservice@bigben-interactive.be
NEDERLAND, customerservice@bigben-interactive.nl
ESPANA, soporte@metronic.com
Tel.: 93 713 26 25
natural_image
Smart home appliance setup with digital clock, charging case, and smartphone (no visible text or symbols)GEBRUIKSAANWIJZING
ALVORENS DIT APPARAAT TE GEBRUIKEN, LEES DEZE INSTRUCTIES AANDACHTIG DOOR EN BEWAAR DEZE VOOR TOEKOMSTIGE RAADPLEGING.
Werking
natural_image
Line drawing of a portable electronic device with cable and power plug (no text or symbols)flowchart
graph LR
    A["Initial Device"] --> B["Internal Structure"]
    B --> C["Internal Component"]
    C --> D["Final Packaging"]
natural_image
Line drawing of a battery connected to a plug via a cable (no text or symbols)natural_image
Line drawing of a smart home appliance setup including a 20:52 timer, smartphone, and camera (no text or symbols)natural_image
Line drawing of a handheld device with a plus button and control panel (no text or symbols)Geschikte apparaten
natural_image
Two black-and-white icons: a recycling symbol above and a waste bin with a dot below, both without any text or labels.BELGIQUE, customerservice@bigben-interactive.be
NEDERLAND, customerservice@bigben-interactive.nl
ESPAÑA, soporte@metronic.com
Tel.: 93 713 26 25
natural_image
Smart home appliance setup with digital clock, charging case, and smartphone (no visible text or symbols)INSTRUKCJA OBSŁUGI
Działanie
natural_image
Line drawing of a portable electronic device with cable and power plug (no text or symbols)flowchart
graph LR
    A["Inlet needle inserted"] --> B["Initial device with needle insertion"]
    B --> C["Initial device with needle insertion"]
    C --> D["Initial device with needle insertion"]
    D --> E["Final packaging with attached device"]
Schowek
natural_image
Line drawing of a battery connected to a plug via a cable (no text or symbols)natural_image
Line drawing of a smartphone setup with a 20:32 timer, a digital clock, and a camera (no text or symbols)natural_image
Line drawing of a handheld device with a plus button and control panel (no text or symbols)BELGIQUE, customerservice@bigben-interactive.be
NEDERLAND, customerservice@bigben-interactive.nl
ESPAÑA, soporte@metronic.com
Tel.: 93 713 26 25
- MODE D'EMPLOI
- Fonctionnement
- Appareils concernés
- Alarm clock & wireless charging station
- INSTRUCTIONS
- Getting started
- Safety warning and notice
- Contents of the box
- Specifications
- Product description
- Alarm clock screen brightness adjustment touch button
- Alarm clock functions button
- Settings mode button
- Function change button
- Increase value and adjust the light of the alarm clock screen
- Decrease value, alarm on/off and alarm sound levels
- USB port (5 V/1 A)
- USB type-C port of the storage unit
- Mains plug
- Mobile phone wireless charging indicator
- Operation
- Instructions for installing the storage unit for wirelessly charging a connected watch
- Instructions for fitting the storage unit for wirelessly charging earphones
- Storage unit
- Setting the time and the alarm
- Mobile phone wireless charging
- Instructions for operating the LED light
- Devices concerned
- Important points
- Technical specifications
- Protection of the environment
- Additional information
- Declaration of conformity
- Warranty
- Funcionamiento
- Carcasa
- Aparatos aptos
- ISTRUZIONI PER L'USO
- Avvio
- Funzionamento
- Custodia
- Funcionamento
- BEDIENUNGSANLEITUNG
- Betrieb
- Halterung
- Kompatible Geräte
- GEBRUIKSAANWIJZING
- Werking
- Geschikte apparaten
- INSTRUKCJA OBSŁUGI
- Działanie
- Schowek
Brand : THOMSON
Model : TH387841
Category : Battery charger