
VRT 60221 VD - Vacuum Cleaner BEKO - Free user manual and instructions
Find the device manual for free VRT 60221 VD BEKO in PDF.
| Brand | Beko |
| Model | VRT 60221 VD |
| Type | Cordless stick vacuum cleaner |
| Power Supply | Mains (charger) / Rechargeable battery |
| Input Voltage | 100-240 V~ 50-60 Hz |
| Rated Power | 110 W |
| Charger Output | 27 V / 0.5 A |
| Charging Time | 4 to 6 hours |
| Max Runtime | 45 min (minimum speed) |
| Runtime at Max Power | 17 min |
| Filtration System | EPA E10 filter + plastic filter |
| Included Accessories | Crevice tool, Dusting brush, Electric turbo brush, Water tank with 2 cloths |
| Usage | Hard floors and carpets (dry vacuum only) |
| Maintenance | Clean dust container after each use, dust off filters (do not wash with water) |
| Repairability | Battery replaceable by qualified professional |
| Safety | Automatic shutdown on charging station |
| Dimensions (station height) | 112-114 cm |
Frequently Asked Questions - VRT 60221 VD BEKO
User questions about VRT 60221 VD BEKO
0 question about this device. Answer the ones you know or ask your own.
Ask a new question about this device
Download the instructions for your Vacuum Cleaner in PDF format for free! Find your manual VRT 60221 VD - BEKO and take your electronic device back in hand. On this page are published all the documents necessary for the use of your device. VRT 60221 VD by BEKO.
USER MANUAL VRT 60221 VD BEKO
Cordless Stick Vacuum Cleaner
User Manual

natural_image
Simple line drawing of a decorative pattern with circular motifs inside a square frame (no text or symbols)VRT 60221 VD - VRT 61225 VW
EN - FR - RO - IT - PL - SR - AR
Please read this guide first!
Dear Customer,
Thank you for choosing a Beko product. We would like you to achieve the optimal efficiency from this high quality product which has been manufactured with state of art technology. Please make sure you read and understand this guide and supplementary documentation fully before use and keep it as a reference. Include this guide with the unit if you hand it over to someone else. Observe all warnings and information herein and follow the instructions.
Symbols and their meanings
These symbols are used throughout this guide:

Important information and useful hints about usage.

WARNING: Warnings against dangerous situations concerning the security of life and property.

Electric shock protection rating
CONTENTS
| ENGLISH | 03-17 |
| FRANÇAIS | 18-32 |
| ROMANIAN | 33-51 |
| ITALIANO | 52-67 |
| POLSKI | 68-84 |
| SRPSKI | 85-97 |
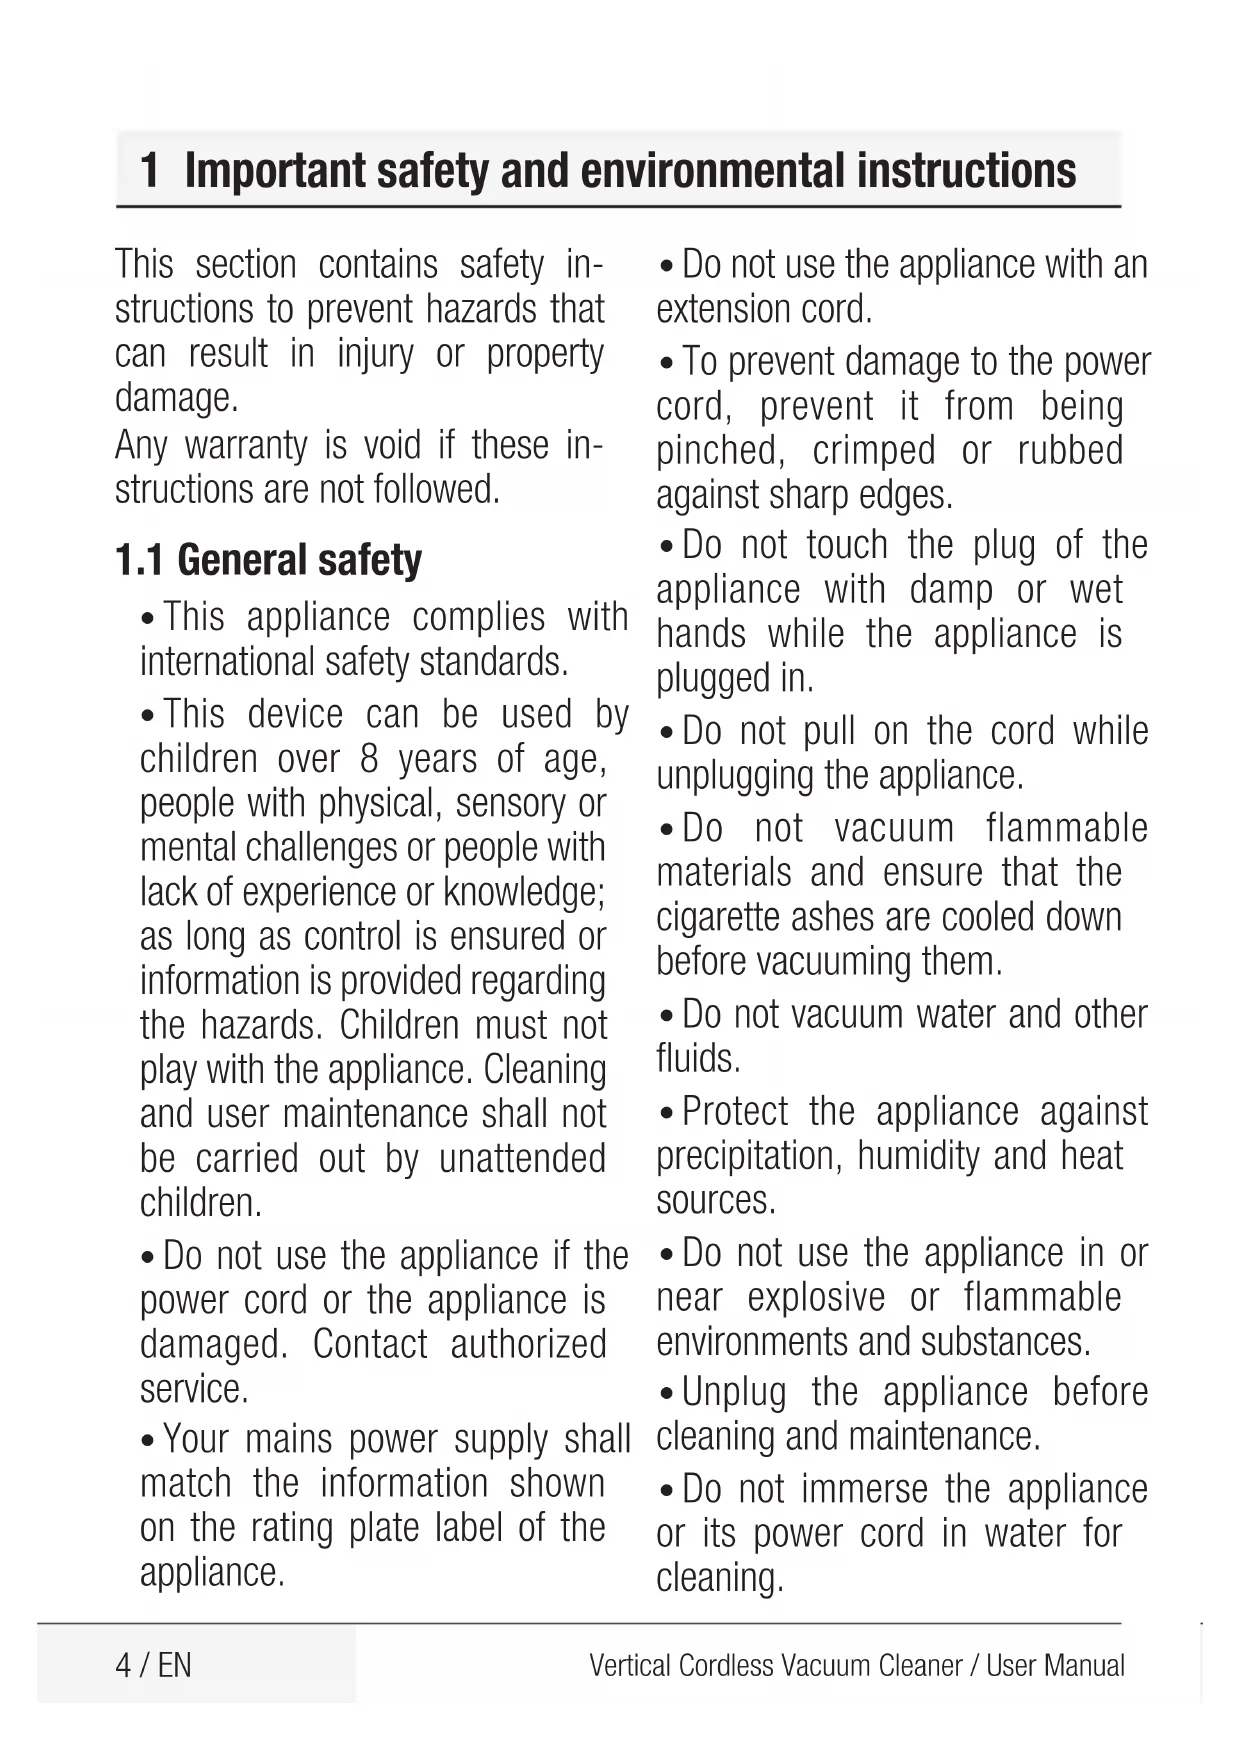
1 Important safety and environmental instructions
This section contains safety instructions to prevent hazards that can result in injury or property damage.
Any warranty is void if these instructions are not followed.
1.1 General safety
- This appliance complies with international safety standards.
- This device can be used by children over 8 years of age, people with physical, sensory or mental challenges or people with lack of experience or knowledge; as long as control is ensured or information is provided regarding the hazards. Children must not play with the appliance. Cleaning and user maintenance shall not be carried out by unattended children.
- Do not use the appliance if the power cord or the appliance is damaged. Contact authorized service.
- Your mains power supply shall match the information shown on the rating plate label of the appliance.
- Do not use the appliance with an extension cord.
- To prevent damage to the power cord, prevent it from being pinched, crimped or rubbed against sharp edges.
- Do not touch the plug of the appliance with damp or wet hands while the appliance is plugged in.
- Do not pull on the cord while unplugging the appliance.
- Do not vacuum flammable materials and ensure that the cigarette ashes are cooled down before vacuuming them.
- Do not vacuum water and other fluids.
- Protect the appliance against precipitation, humidity and heat sources.
- Do not use the appliance in or near explosive or flammable environments and substances.
- Unplug the appliance before cleaning and maintenance.
- Do not immerse the appliance or its power cord in water for cleaning.
1 Important safety and environmental instructions
- Do not disassemble the appliance.
- Use only original parts or parts recommended by the manufacturer.
- To prevent blockage of the filter or damage to the motor, do not vacuum cement, plaster or fragments of compressed paper.
- Use the appliance with the adapter delivered with the appliance only.
- Do not use the appliance without filters, it may get damaged.
- If you keep the packaging materials, keep them out of the reach of children.
- This appliance is not intended to be used by persons, including children, with physical, sensory and mental disabilities or those who have not adequate experience and knowledge regarding its use, unless they are under the supervision of a person responsible for their safety or they are informed about the operation of the appliance.
• Children shall be supervised to prevent them from playing with the appliance.
- Unplug the adaptor and remove the battery pack before any cleaning or maintenance procedure.
- To avoid any risk of hazard, a damaged adaptor shall be replaced by the manufacturer, the authorized representative of the manufacturer or a similarly qualified technician.
- Keep your fingers, hair and loose clothes away from moving parts or clearances while vacuuming.
- Batteries shall be removed from the appliance before discarding the appliance.
- Disconnect the appliance from power supply before removing the battery.
- Please discard used batteries in accordance with local laws and regulations.
- The batteries included in this appliance may only be replaced with qualified persons.
• Appliance is not intended to be operated for commercial purposes. This appliance is not designed for commercial use, it
1 Important safety and environmental instructions
is intended for home use and in applications as follows:
- In the staff kitchens of the stores, offices and other working environments
- In farm houses;
- By customers in hotels, motels or other accommodation facilities
- In hostels or similar environments.
- WARNING: Use the HCX1501-3200450E (VRT 61225 VW), HCX1501-2700500E (VRT 60221 VD) removable supply unit delivered with the appliance to charge to the battery.
- This appliance shall not be operated by children and people with limited physical, sensory and cognitive skills or people with lack of experience and knowledge unless they are under supervision or they are provided with the relevant instructions.
• Children shall be supervised to prevent them from playing with the appliance.
1.2 Compliance with the WEEE Directive and disposal of the waste product
This product complies with EU WEEE Directive (2012/19/EU). This product bears a classification symbol for waste electrical and electronic equipment (WEEE). This symbol indicates that this product shall not be disposed with other household wastes at the end of its service life. Used device must be returned to official collection point for recycling of electrical and electronic devices. To find these collection systems please contact to your local authorities or retailer where the product was purchased. Each household performs important role in recovering and recycling of old appliance. Appropriate disposal of used appliance helps prevent potential negative consequences for the environment and human health.
1.3 Packaging information

Packaging materials of the product are manufactured from recyclable materials in accordance with our National Environment Regulations. Do not dispose of the packaging materials together with the domestic or other wastes. Take them to the packaging material collection points designated by the local authorities.
1.4 Information on waste batteries
This symbol on the packaging of the packaging related with rechargeable batteries indicates that the rechargeable battery shall not be disposed of with domestic waste. A chemical symbol may accompany this symbol on some rechargeable batteries.
And mercury (Hg) and lead (Pb) symbols may also be added if the rechargeable batteries contain more than \%0.0005 mercury and more than \%0.004 lead content.
Rechargeable batteries shall not be disposed of with household waste even if they do not contain heavy metals. Always discard the used batteries as per local environmental legislation. Investigate the waste disposal regulations in effect in your area of residence.
1 Important safety and environmental instructions
1.5 What to do for energy saving
- When using your appliance, adjust the speed settings according to the surface, in order to save energy.
- Normally, lower speeds are used when cleaning hard surfaces, curtains and sofas, while high speeds are used in for cleaning carpets.
1.6 Compliance with RoHS Directive
The product you have purchased complies with EU RoHS Directive (2011/65/EU). It does not contain harmful and prohibited materials specified in the Directive.
2 Overview
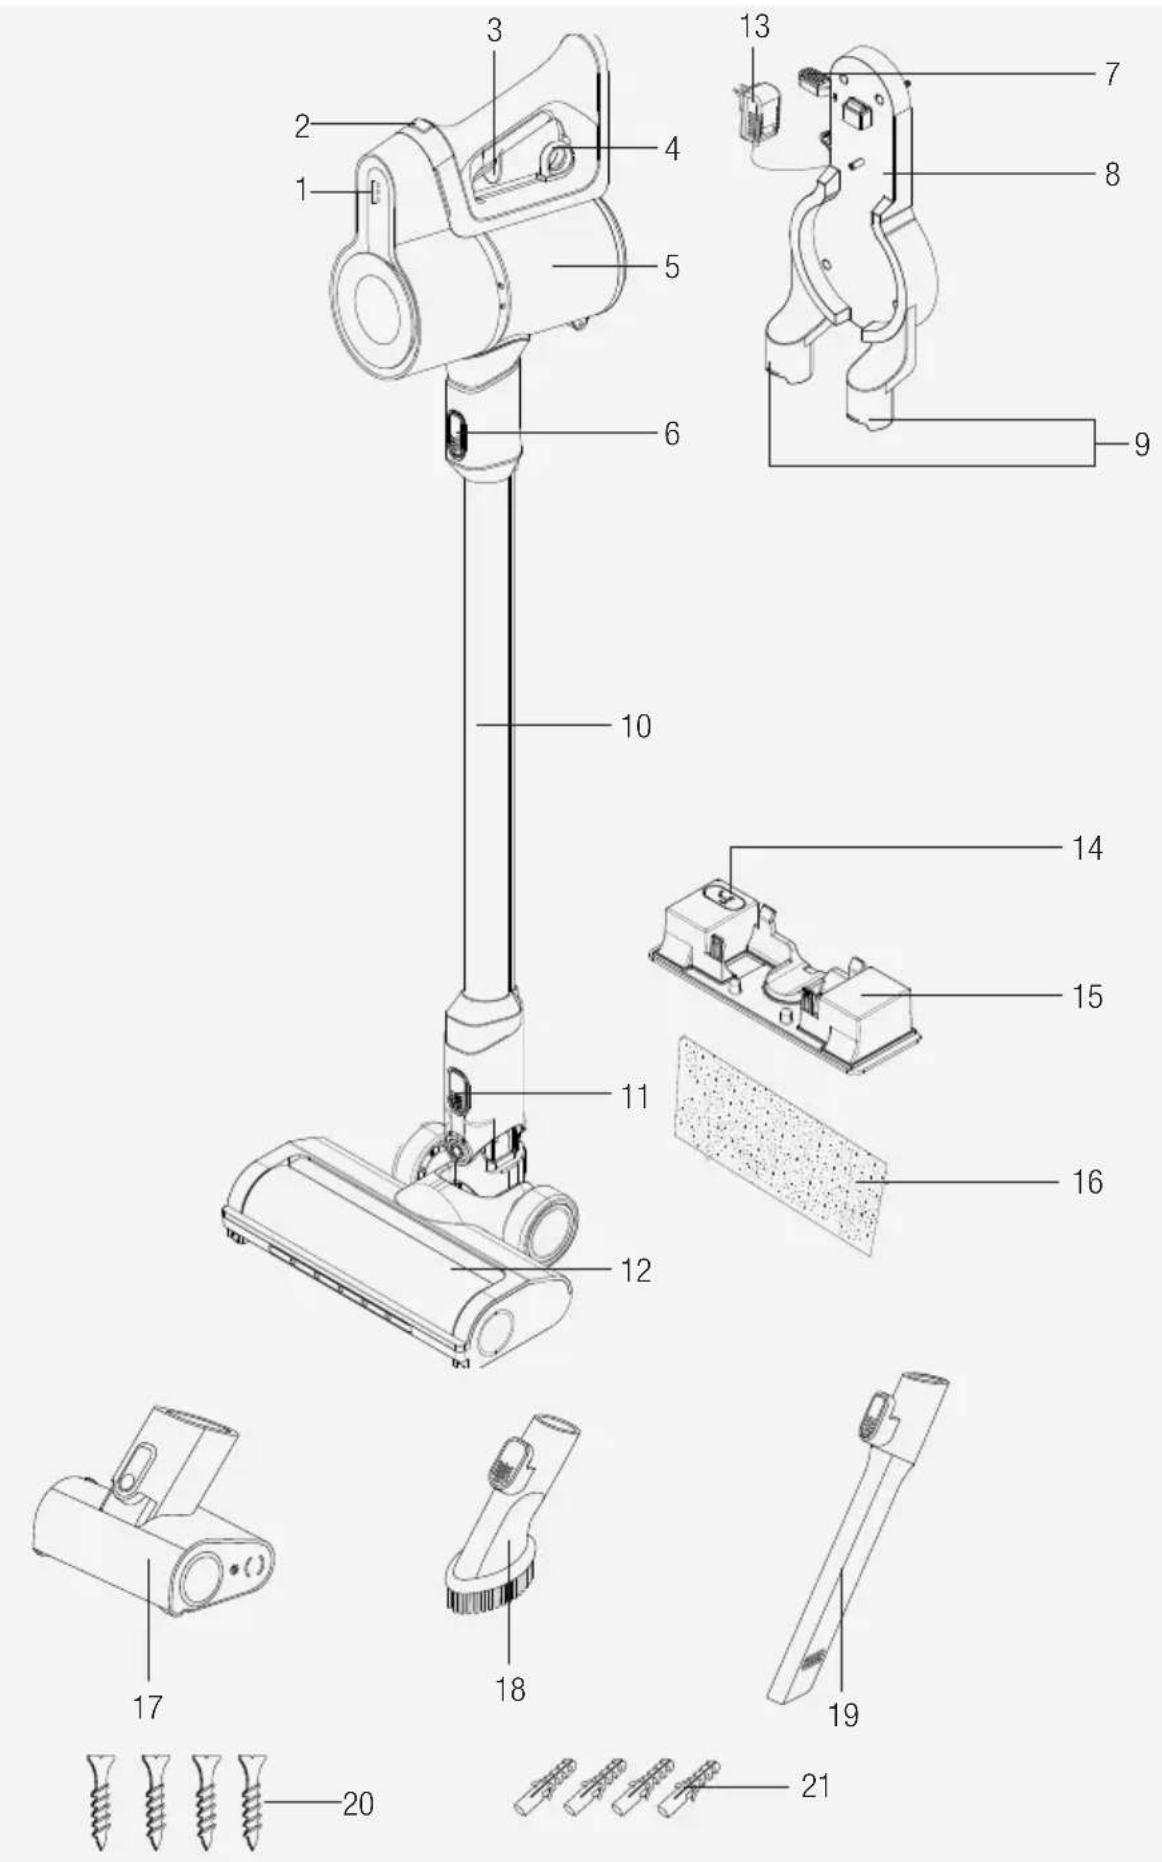
2.1 Controls and components
- Charge indicator LED lights
- Power Adjustment button
- On/off button
- Emptying dust container ring
- Dust container
- Tube release button
- Appliance release button
- Charging Dock
- Accessory attachment parts
- Tube
- Brush release button
- Electric turbo brush
- Charging adaptor
- Lid for filling the water tank
- Mop attachment; Water Tank
- Mopping cloth (x2 pcs)
- Mini turbo brush (VRT 61225 VW)
- Dust brush
- Crevice attachment
- Screw (4 pcs)
- Dowel (4 pcs)
2.2 Technical data
| VRT 61225 VW VRT 60221 VD | ||
| Nominal input power 150 W | 110 W | |
| Input 100 - 240 V~ 50-60 Hz | 0,5 A | |
| Output | 32 V =0.45 A 27 V | 0.5 A= |
| Charging time 4-6 hours | ||
| Runtime at max. power 17 mins | ||
| Runtime at min. power 45 mins | ||
The rights to make technical and design changes are reserved.
The values provided with the appliance or its accompanying documents are laboratory readings in accordance with the respective standards. These values may differ depending on the use and ambient conditions.
External Power Supply Parameter
| VRT 61225 VW VRT 60221 VD | ||
| Manufacturer: Guangdong Huachuangxing Power Supply Co.,Ltd | ||
| Model ID: HCX1501-3200450E HCX1501-2700500E | ||
| Input Voltage: 100-240V~ | ||
| Input Frequency: 50-60Hz | ||
| Input Current: 0.5A | ||
| Output Voltage 32.0V 27.0V | ||
| Output Current 0.45A 0.5A | ||
| Output Power: 14.4W 13.5W | ||
| Average active efficiency: | 85.5% 84.39% | |
| Efficiency at low load (10%): | 83.33% | 70.65% |
| Power consumption under no load: | 0.041W | 0.071W |
3 Installation
3.1 Intended use
This appliance is intended for household use and it is not suitable for industrial use.
3.2 Installation of the charging dock
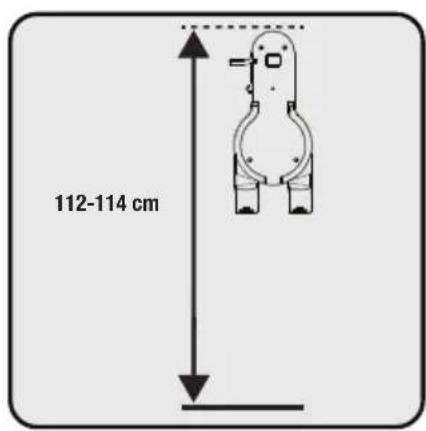
Position the charging dock at a height of 112-114 cm from the ground.

natural_image
Technical line drawing of a mechanical assembly with no visible text or symbols1- Fix four dowels on the wall
2- Place four screws into their locations on the charging dock and mount on the dowels on the wall.

natural_image
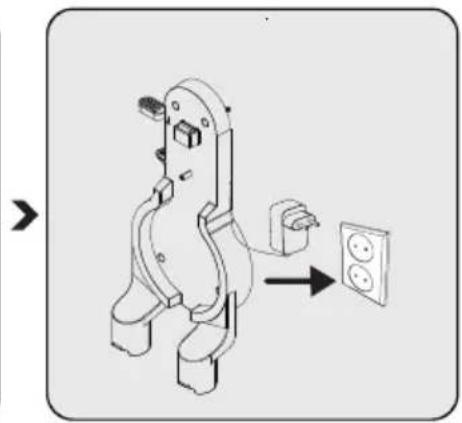
Diagram of a mechanical device with an outlet and plug, showing a transformation arrow (no text or symbols present)Plug the charging adaptor to the socket.
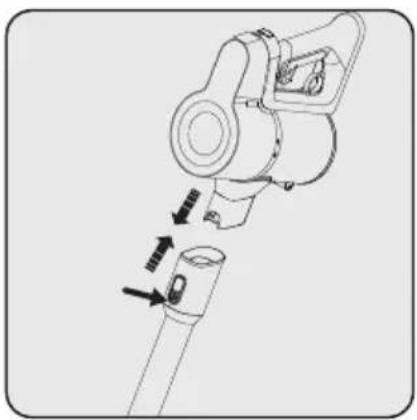
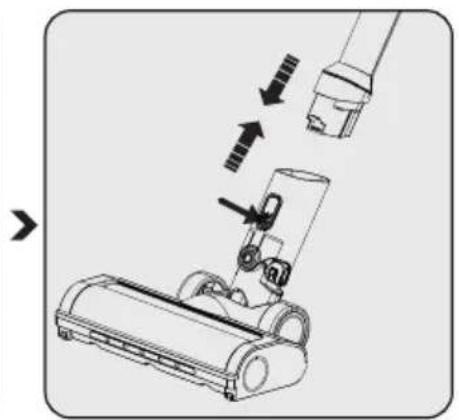
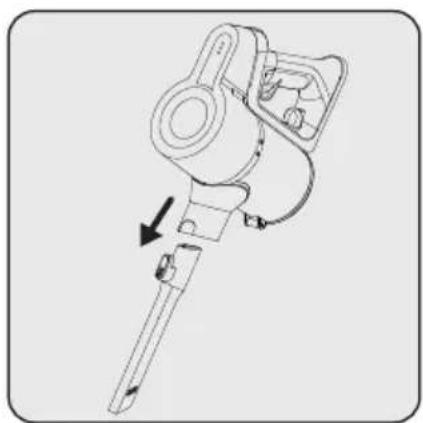
3.3 Installation of the body and the brush
natural_image
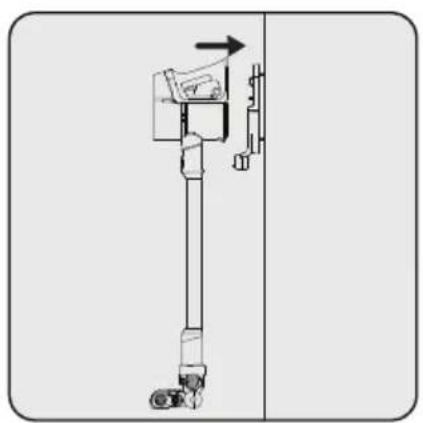
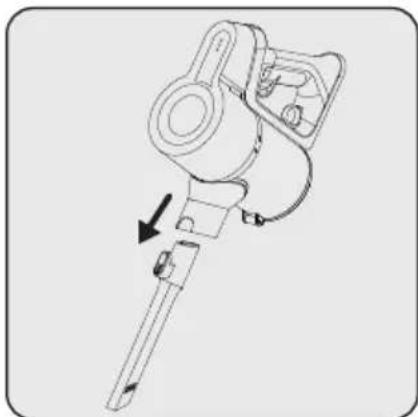
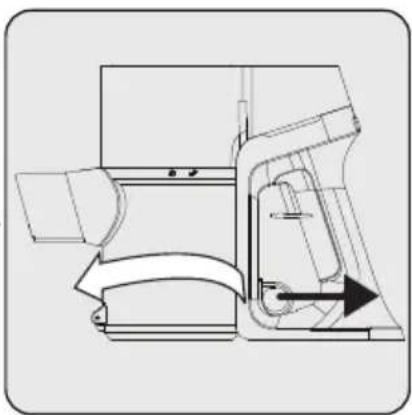
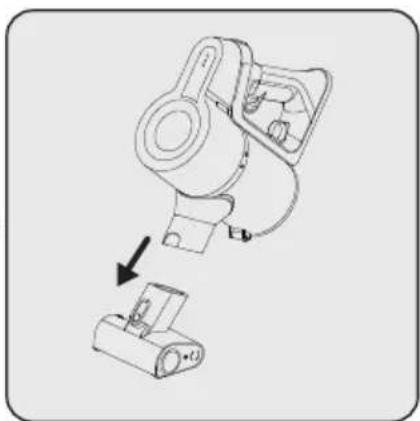
Diagram of a robotic arm with directional arrows indicating movement or force (no text or symbols present)Push the tube in the direction of arrow towards the body by pushing on the tube release button.
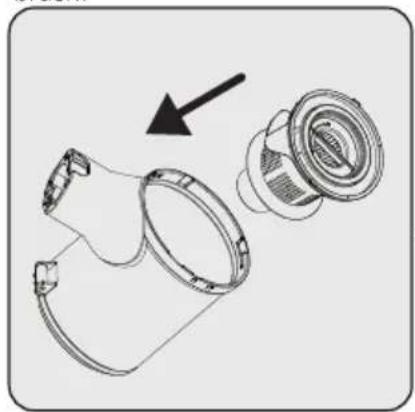
natural_image
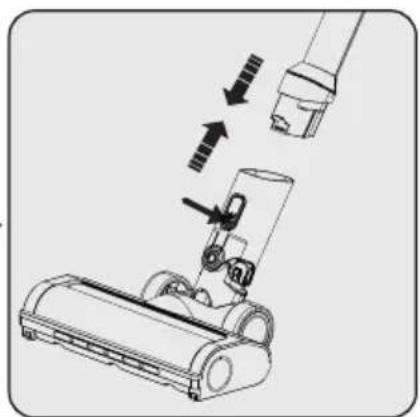
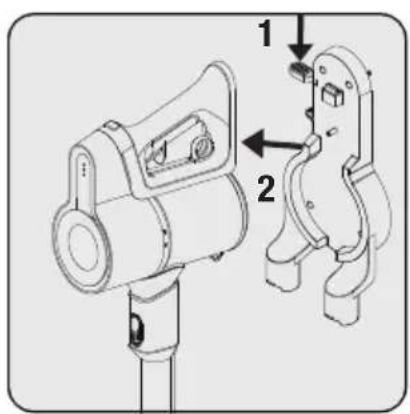
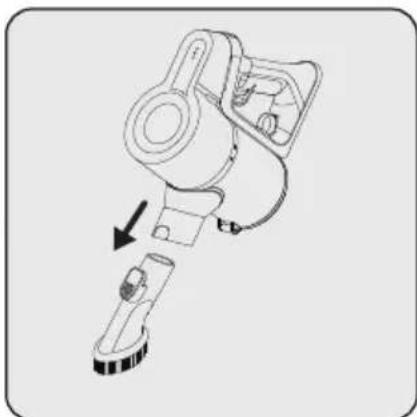
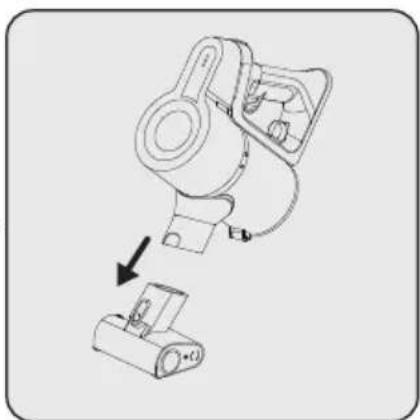
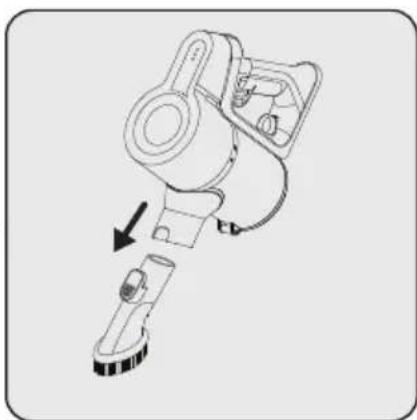
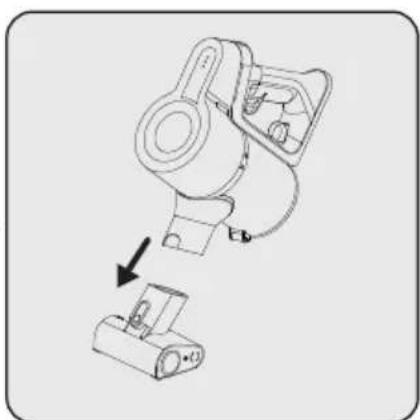
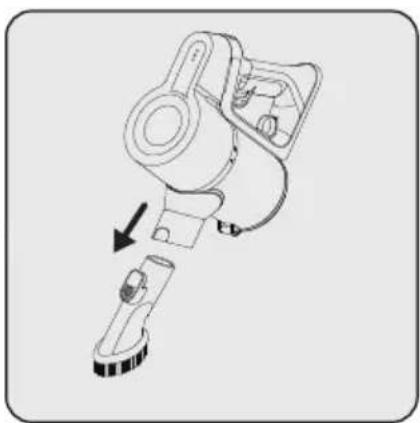
Diagram of a vacuum cleaner with arrows indicating motion or assembly (no text or symbols)Press the electric turbo brush release button on the electric turbo brush and push it in the direction of arrow towards the tube.
natural_image
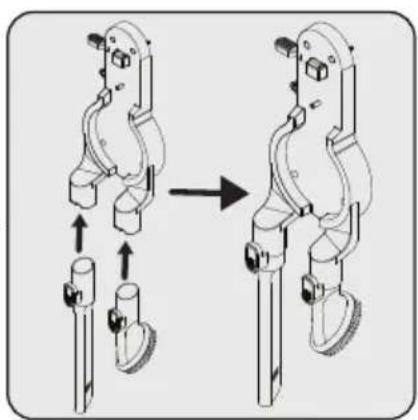
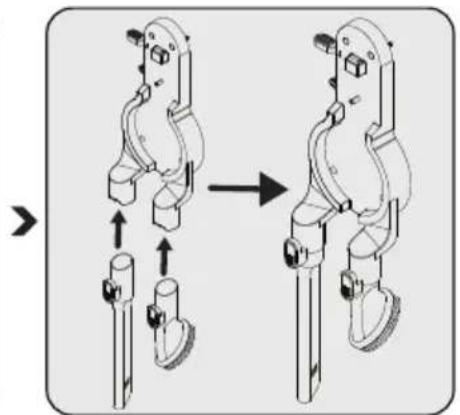
Diagram showing a mechanical device before and after assembly, with no visible text or symbolsAttach crevice attachment (16) and dust brush to the charging dock.
4 Operation
4.1 Charging the appliance
natural_image
Technical line drawing of a mechanical device with directional arrow (no text or symbols)Place the appliance on the charging dock.
After placing dust container on the charging dock, push the appliance towards the charging dock.
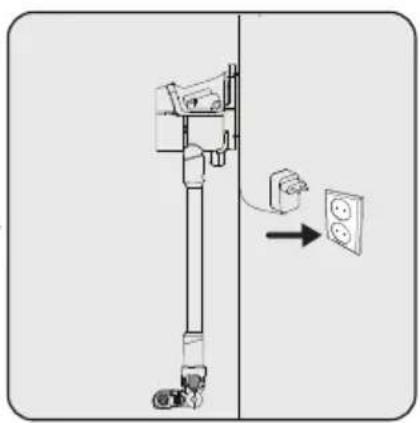
Plug the charging adaptor to the socket.
natural_image
Technical line drawing of a mechanical component with no visible text or symbolsFlashing of the charge indicator LEDs in white colour indicates that the appliance is being charged.
- When all levels of the charge indicator LEDs are illuminated, this indicates that the charging of the appliance is completed.

It takes up to 4 to 6 hours to charge the appliance completely. The appliance shall not be operated while charging.

If the appliance is placed on the charging dock while it is being operated, it shall be stopped automatically.
4.2 Usage
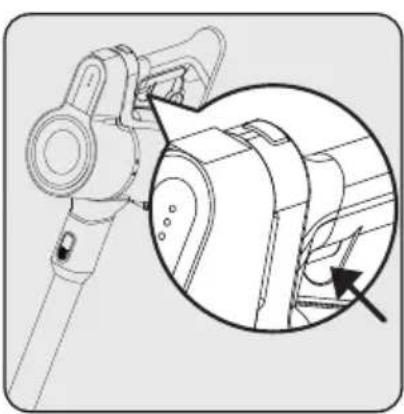
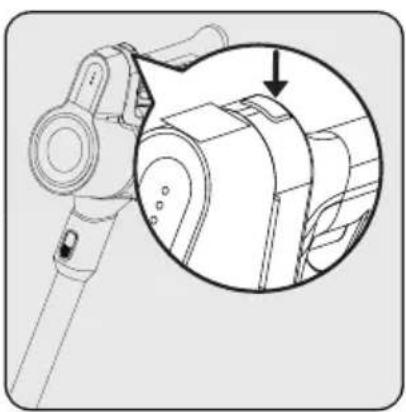
1- Push the appliance release button on the charging dock downward and pull the appliance towards yourself at the same time.
2- Remove the appliance from the charging dock.
natural_image
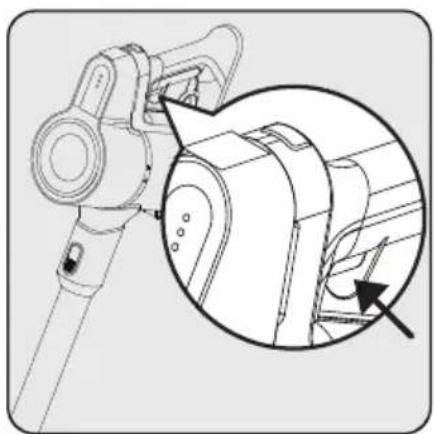
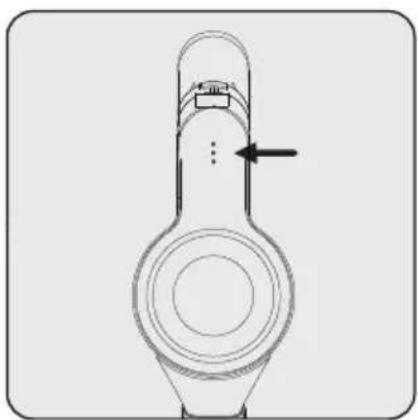
Technical line drawing of a mechanical device with an inset close-up showing internal components (no text or symbols)Press the on/off button to operate the appliance. The appliance starts operating with the minimum power when the on/off button is pressed.
natural_image
Technical line drawing of a mechanical device with an inset close-up showing a component detail (no text or symbols)To switch to the maximum power when operating in the minimum power, push the power adjustment button To switch to the minimum power when operating in the maximum power, push the power adjustment button again.
4 Operation

The appliance may be placed for charging before the complete discharging of the battery. The appliance may be kept continuously as charging on the charging dock until the next operation.
natural_image
Technical line drawing of a mechanical component with no visible text or symbols
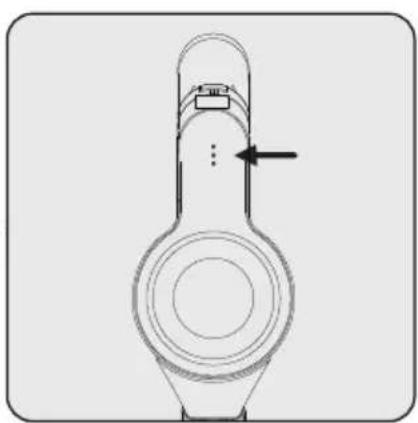
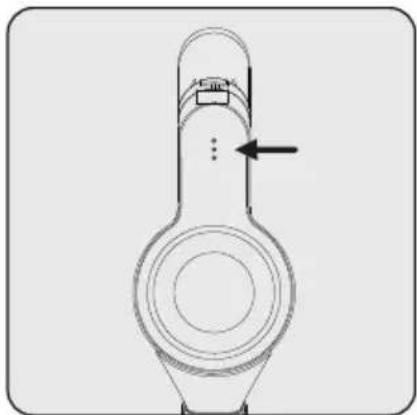
Pay attention to the power indicator LEDs (1) during operation. These indicators gradually turn off as the charge level is reduced, and when all indicators are turned off and only one indicator illuminates in red, then the charge of the appliance is about to run out. The appliance stops operating automatically after a short while when the red LED illuminates.
natural_image
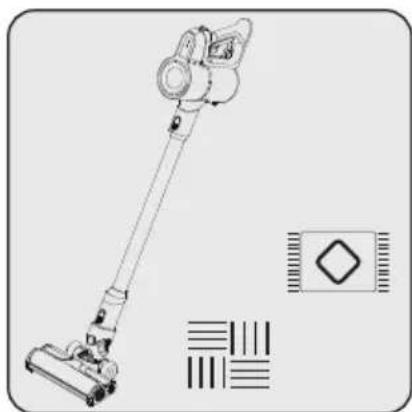
Line drawing of a vacuum cleaner with attached circuit symbols (no text or labels)This appliance is suitable for use on carpets and hard floors.
4.3 Accessories
natural_image
Technical line drawing of a mechanical device with a lever and handle, showing no text or symbols
natural_image
Line drawing of a handheld device with a cable and adjustment knob, no text or symbols present
natural_image
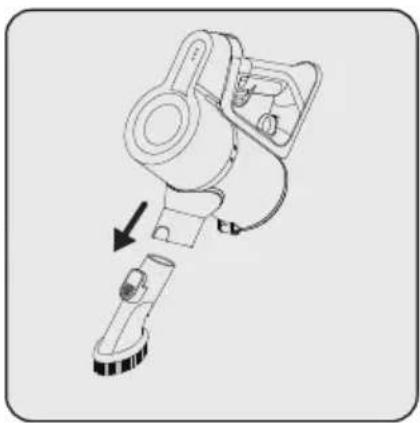
Diagram showing a robotic arm connecting to a battery pack, with an arrow indicating motion (no text or symbols present)Crevice: Suitable for vacuuming the rear of the furnitures, hard to reach areas and narrow areas.
Dust brush: Suitable for vacuuming curtains, waxed furniture and delicate and fragile objects.
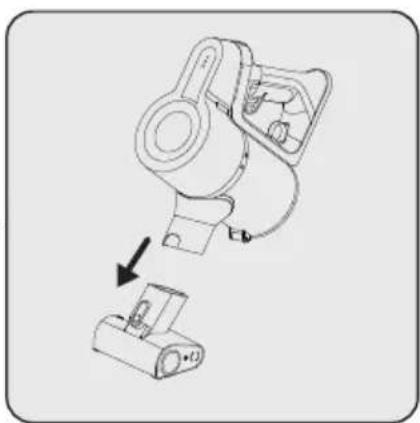
Mini turbo brush
(VRT 61225 VW): Suitable for vacuuming floorings, stair steps, car interiors, sofas and seat, etc. It is also used for vacuuming pet hair on such surfaces.
4 Operation
natural_image
Technical line drawing of a mechanical assembly with no visible text or symbols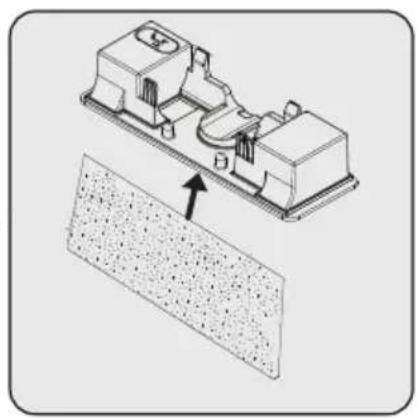
natural_image
Technical illustration of a mechanical assembly with a textured base and directional arrow (no text or symbols)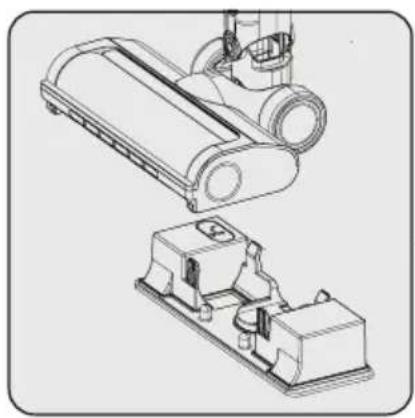
natural_image
Technical line drawing of a mechanical assembly with two views (top and side), no visible text or symbolsMop Attachment: Suitable for hard floor mopping process. Fill the water tank with potable water.
Attach mopping cloth to the bottom of water tank.
Attach mop attachment to the bottom of electrical turbo brush.
 | WARNING: Do not use the mop attachment on a carpet. |
 | WARNING: Do not put bleach or detergent in the water tank. |
 | WARNING: Remove the mop attachment after usage is completed. |
 | WARNING: Remove the mop attachment immediately after the mopping operation is completed to prevent damage to your wooden floors. |
 | WARNING: Clean the water tank after each use. |
 | Mopping cloths can be washed in washing machine. |
 | WARNING: Do not lift or tilt the nozzle, as water may spray out of the water tank. |
5 Cleaning and maintenance
Turn off and unplug the appliance before cleaning.

WARNING: Never use gasoline, solvent, abrasive cleaners, metal objects or hard brushes to clean the appliance.

WARNING: Deformation may occur on the filters within time as a result of usage. It shall be replaced with a new one to prevent loss of performance. Contact with the customer services to buy a new one.
5.1 Cleaning the Dust container and Filters

WARNING: Do not wash the filters.

We recommend you to clean the dustbin (5) after each operation.
natural_image
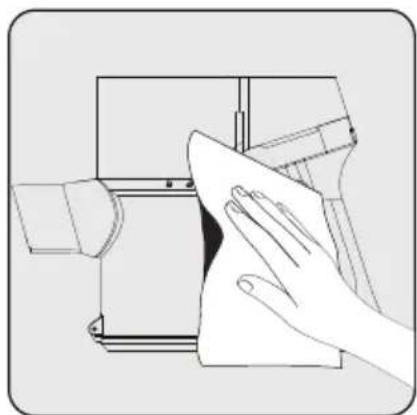
Illustration of a hand cleaning a mechanical component with a cloth (no text or symbols)Wipe the surface of the body with a wet cloth.

natural_image
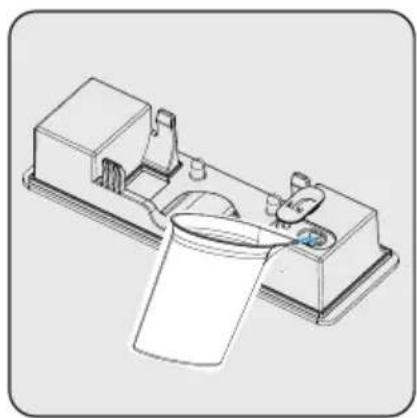
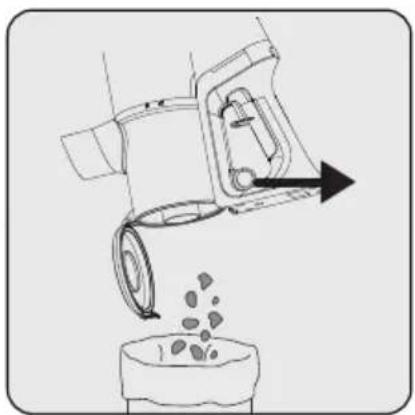
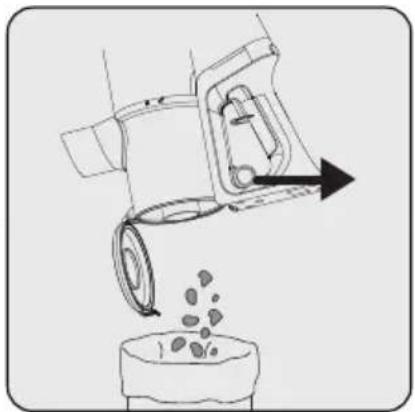
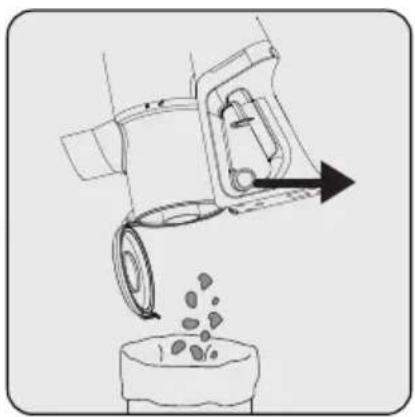
Line drawing of a robotic arm pouring liquid into a container (no text or symbols)Pull the emptying dust container ring to the last point. Dust container lid will be opened. Empty all the dust it contains.

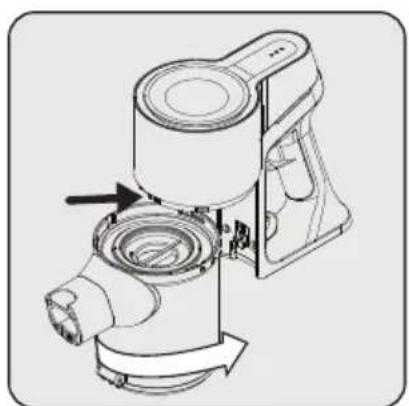
natural_image
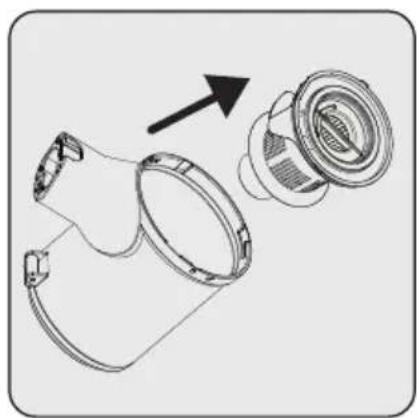
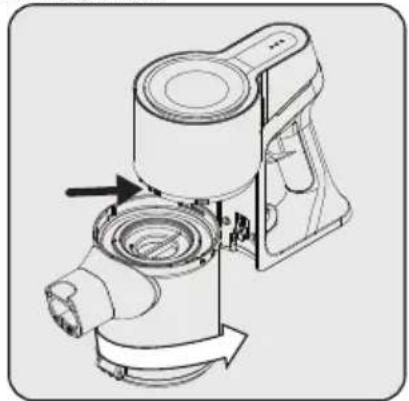
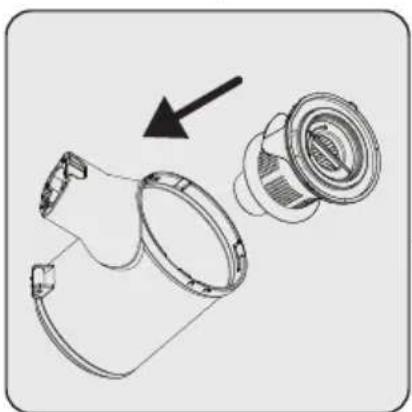
Technical line drawing of a mechanical component with internal flow arrows (no text or symbols)For a detailed cleaning of filters, remove the dust container by turning it clockwise while pulling dust container ring lightly.
5 Cleaning and maintenance
natural_image
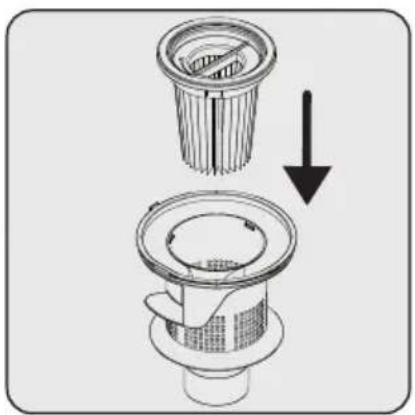
Diagram of a mechanical component with an arrow indicating direction, showing internal structure and assembly (no text or symbols)Pull EPA E10 and plastic filter holding from the EPA E10 handle.


natural_image
Technical illustration of a mechanical component with an arrow indicating direction (no text or symbols present)Seperate EPA E10 and plastic filter from each other.
natural_image
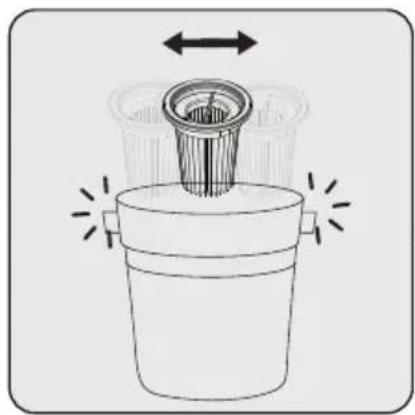
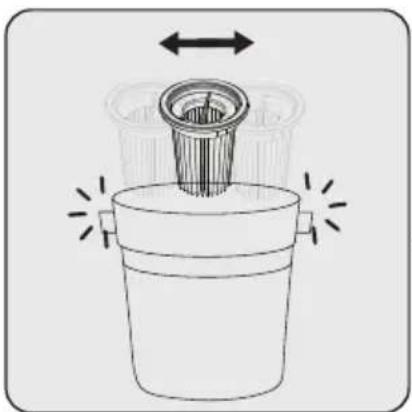
Diagram of a mechanical component with arrows indicating direction (no text or symbols)Remove the dust on the EPA E10 filter by tapping it on a hard surface such as a waste bin or by using a brush.
natural_image
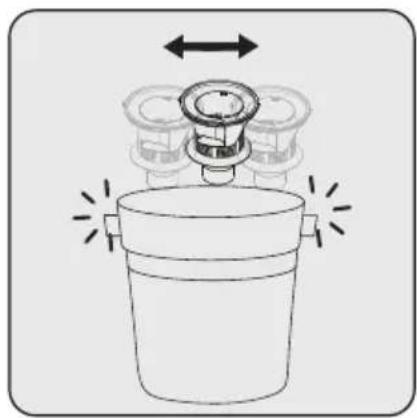
Diagram of a water pump or filter unit with directional arrows indicating flow or movement (no text or symbols)Remove the dust on the plastic filter by tapping it on a hard surface such as a waste bin or by using a brush.

natural_image
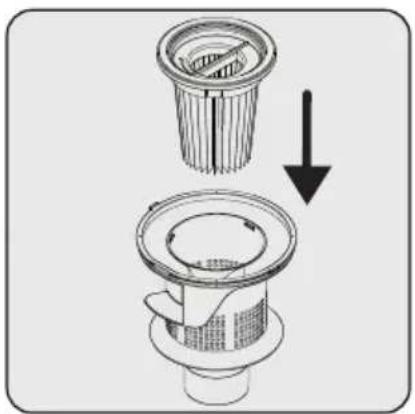
Diagram of a mechanical component with a downward arrow indicating a process or assembly (no text or symbols present)Attach EPA E10 filter to the plastic filter back.
natural_image
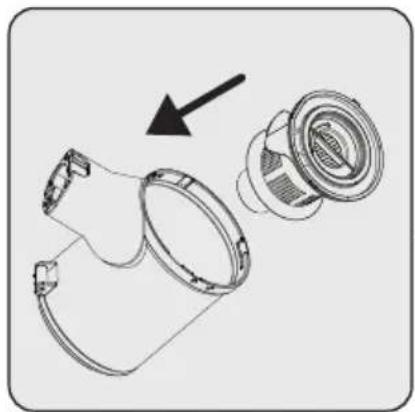
Technical line drawing of a mechanical component with an arrow indicating direction (no text or symbols)Attach plastic filter on the dustbin ring.
natural_image
Technical line drawing of a mechanical device with no visible text or symbolsFix the connector of dustbin to the holes on the body, then fix the dustbin by turning counter clockwise until you hear the click sound.
5 Cleaning and maintenance
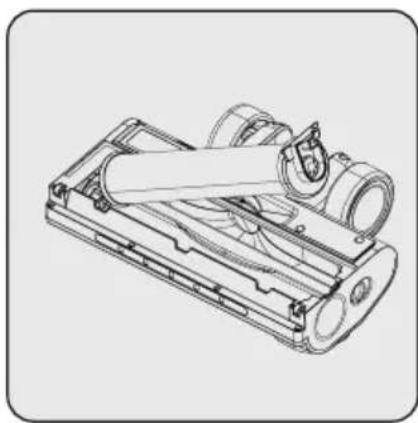
5.2 Cleaning of the brush

WARNING: Do not wash the turbo brush (8) and the main roller.
natural_image
Technical line drawing of a vacuum cleaner with a close-up circular button highlighting a button (no text or symbols present)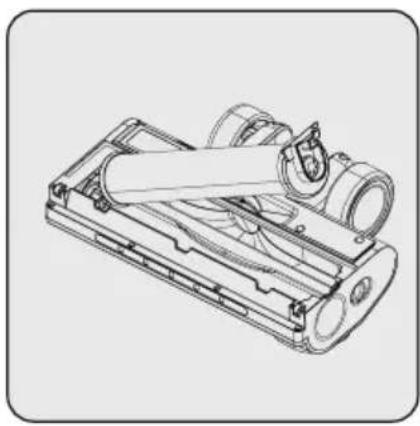
natural_image
Technical line drawing of a mechanical device with cylindrical components and mounting brackets (no text or symbols)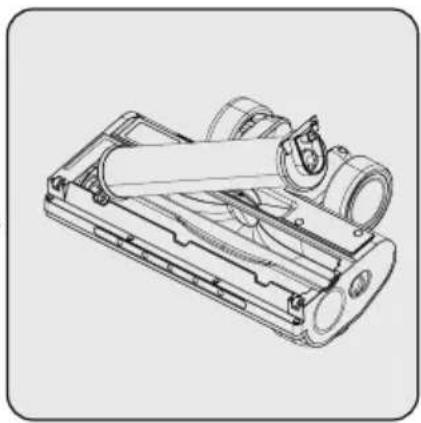
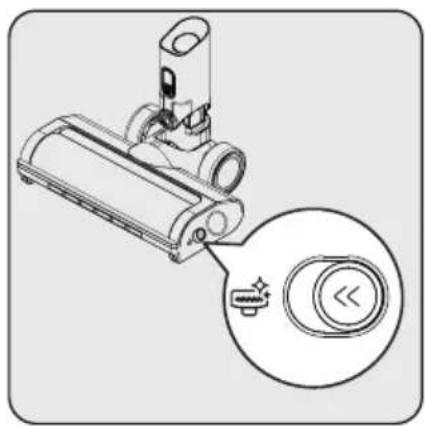
natural_image
Technical line drawing of a mechanical device with internal components and no visible text or symbolsPress on the roller release button. Remove the dust on it by tapping it lightly to a hard surface or remove the dust with a brush. If any hair, etc. is tangled, remove it by cutting it off.
Fix the roller back to its place by pushing.
5.3 Storage
- If you do not intend to use the appliance for a long time, store it carefully.
- Unplug the appliance.
- Ensure that the appliance is kept out of reach of children.
- If you shall not be using the battery for a long period of time, please keep it in a cool and dry place at half charged condition. Do not charge or discharge completely.
- Store the battery on a non-conducting material, and do not allow the battery to contact metal directly. This shall damage the battery.
5.4 Transport and shipping
- During transport and shipping, carry the appliance with its original packaging. The packaging of the appliance will protect the appliance against physical damage.
- Do not put heavy objects on the appliance or its packaging. Otherwise the appliance may be damaged.
- If the appliance is dropped, the appliance may not operate or permanent damage may occur.
natural_image
Technical line drawing of a mechanical assembly with no visible text or symbolsnatural_image
Diagram of a mechanical clamp or bracket assembly with an outlet wall, showing a switch and mounting bracket (no text or symbols present)natural_image
Diagram of a robotic arm with directional arrows indicating movement or force (no text or symbols present)natural_image
Diagram of a vacuum cleaner with arrows indicating motion or assembly (no text or symbols)natural_image
Diagram showing a mechanical device before and after assembly, with no visible text or symbolsnatural_image
Technical line drawing of a mechanical device with directional arrow indicating motion (no text or symbols)natural_image
Technical line drawing of a mechanical component with no visible text or symbolsnatural_image
Technical line drawing of a mechanical device with an inset close-up showing internal components (no text or symbols)natural_image
Technical line drawing of a mechanical device with an inset close-up showing a component detail (no text or symbols)natural_image
Technical line drawing of a mechanical component with no visible text or symbols
natural_image
Line drawing of a vacuum cleaner with attached circuit symbols (no text or labels)natural_image
Technical line drawing of a mechanical device with a lever and handle, showing motion arrows (no text or symbols)natural_image
Line drawing of a robotic device with a handle and sensor, showing a mechanical assembly (no text or symbols)natural_image
Diagram of a robotic arm lifting a battery, showing mechanical components and wiring (no text or symbols)natural_image
Technical line drawing of a mechanical device with a bucket and housing (no text or symbols)
natural_image
Technical illustration of a mechanical assembly with a textured surface and an arrow indicating direction (no text or symbols)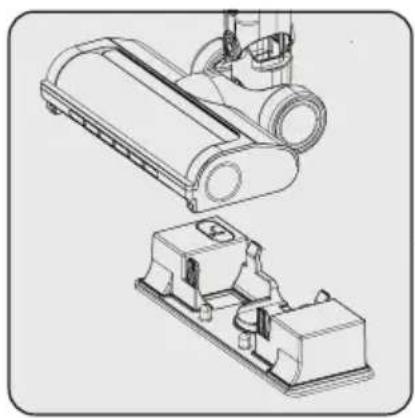
natural_image
Technical line drawing of a mechanical assembly with no visible text or symbolsnatural_image
Illustration of a hand cleaning a mechanical component (no text or symbols visible)natural_image
Illustration of a hand pouring liquid into a container with granular material (no text or symbols)natural_image
Technical line drawing of a mechanical component with internal flow arrows (no text or symbols)natural_image
Diagram of a mechanical component with an arrow indicating direction, showing internal parts and a final assembly (no text or symbols present)natural_image
Technical illustration of a mechanical component with a magnified inset showing internal structure (no text or symbols)natural_image
Diagram of a mechanical component with arrows indicating motion or force direction (no text or symbols)natural_image
Diagram of a water pump with directional arrows indicating flow or movement (no text or symbols)natural_image
Diagram of a mechanical component with a downward arrow indicating a process or assembly (no text or symbols present)natural_image
Technical illustration of a mechanical component with a highlighted section and arrow (no text or symbols)natural_image
Technical illustration of a mechanical device with internal components and directional arrows (no text or symbols)natural_image
Technical line drawing of a vacuum cleaner with a close-up inset showing the button (no text or symbols)natural_image
Technical line drawing of a mechanical device with cylindrical components and mounting brackets (no text or symbols)natural_image
Technical line drawing of a mechanical device with cylindrical components and internal components (no text or symbols)natural_image
Technical line drawing of a mechanical device with no visible text or symbolsnatural_image
Technical illustration of a mechanical clamp or bracket assembly with an outlet wall, showing no text or symbols.natural_image
Technical line drawing of a mechanical device with directional arrows indicating movement or assembly (no text or symbols)Impingeti tubul in directia indicata de sageata apasand butonul de eliberare a tubului.
natural_image
Diagram showing a vacuum cleaner with mechanical components and directional arrows indicating motion (no text or symbols)natural_image
Diagram showing two mechanical device configurations with arrows indicating movement or assembly (no text or symbols present)natural_image
Technical line drawing of a mechanical device with directional arrow (no text or symbols)natural_image
Technical line drawing of a mechanical component with no visible text or symbolsnatural_image
Technical line drawing of a mechanical device with an inset close-up showing internal components (no text or symbols)natural_image
Technical line drawing of a mechanical device with an inset circular detail showing a component (no text or symbols)natural_image
Technical line drawing of a mechanical component with no visible text or symbols
natural_image
Line drawing of a vacuum cleaner with circuit patterns and a diamond-shaped symbol (no text or labels)natural_image
Technical line drawing of a mechanical device with a lever and cable, showing no text or symbols
natural_image
Line drawing of a robotic device with a handle and cable, showing a mechanical assembly (no text or symbols)
natural_image
Diagram of a robotic arm with a battery and cable, showing a mechanical assembly (no text or symbols)natural_image
Technical line drawing of a mechanical assembly with a bucket and housing (no text or symbols)
natural_image
Technical illustration of a mechanical assembly with a textured base and directional arrow (no text or symbols)
natural_image
Technical line drawing of a robotic vacuum cleaner assembly (no text or symbols)natural_image
Line drawing of a hand cleaning a mechanical component (no text or symbols)natural_image
Line drawing of a mechanical device pouring granular material into a container (no text or symbols)natural_image
Technical line drawing of a mechanical component with directional arrows indicating flow or movement (no text or symbols)natural_image
Diagram of a mechanical component with an arrow indicating direction, showing internal structure and assembly (no text or symbols)natural_image
Technical illustration of a mechanical component with cross-sectional view and directional arrow (no text or symbols)natural_image
Diagram of a mechanical component with arrows indicating motion or force direction (no text or symbols)natural_image
Diagram of a water pump with directional arrows indicating flow or movement (no text or symbols)natural_image
Diagram of a mechanical component with a downward arrow indicating a process or assembly (no text or symbols present)natural_image
Technical line drawing of a mechanical component with an arrow indicating direction (no text or symbols)natural_image
Mechanical component diagram showing a valve assembly with directional arrows indicating motion (no text or symbols)natural_image
Technical line drawing of a vacuum cleaner with a close-up inset showing the button (no text or symbols)natural_image
Technical line drawing of a mechanical assembly with cylindrical components and mounting flanges (no text or symbols)natural_image
Technical line drawing of a mechanical device with cylindrical components and internal components (no text or symbols)□ □ Convector electric
□ Umidificator
Model / Serie:
VÂNZĂTOR
Nr. factură:......Data:......
natural_image
Technical line drawing of a mechanical assembly with no visible text or symbolsnatural_image
Diagram of a mechanical clamp or bracket assembly with an outlet wall, showing a switch and mounting bracket (no text or symbols present)natural_image
Diagram of a robotic arm with directional arrows indicating movement or force (no text or symbols present)natural_image
Diagram of a vacuum cleaner with arrows indicating motion or assembly (no text or symbols)natural_image
Diagram showing two mechanical device configurations with arrows indicating movement or assembly (no text or symbols present)natural_image
Technical line drawing of a mechanical device with directional arrow indicating motion (no text or symbols)natural_image
Technical line drawing of a mechanical component with no visible text or symbolsnatural_image
Technical line drawing of a mechanical device with an inset close-up showing internal components (no text or symbols)natural_image
Technical line drawing of a mechanical device with an inset circular detail showing a component detail (no text or symbols)natural_image
Technical line drawing of a mechanical component with no visible text or symbols
natural_image
Line drawing of a vacuum cleaner with attached circuit symbols (no text or labels)natural_image
Technical line drawing of a mechanical device with a lever and adjustment arrow (no text or symbols)natural_image
Line drawing of a robotic arm with a valve and handle, showing a downward motion (no text or symbols)natural_image
Diagram of a robotic arm with a battery and cable, showing a mechanical assembly (no text or symbols)natural_image
Technical line drawing of a mechanical assembly with a bucket and housing (no text or symbols)
natural_image
Technical illustration of a mechanical assembly with a textured base and directional arrow (no text or symbols)
natural_image
Technical line drawing of a mechanical assembly with no visible text or symbolsnatural_image
Line drawing of a hand cleaning a mechanical component (no text or symbols)Pulire la superficie del corpo con un panno umido.

natural_image
Diagram of a robotic arm pouring granular material into a container (no text or symbols)natural_image
Technical line drawing of a mechanical assembly with directional arrows indicating motion (no text or symbols)natural_image
Technical illustration of a mechanical component with an arrow indicating direction (no text or symbols present)natural_image
Technical illustration of a mechanical component with a magnified inset showing internal structure (no text or symbols)natural_image
Diagram of a mechanical component with arrows indicating motion or force direction (no text or symbols)natural_image
Diagram of a mechanical device with arrows indicating motion or force direction (no text or symbols)natural_image
Diagram of a mechanical component with a downward arrow indicating a process or transformation (no text or symbols present)natural_image
Technical line drawing of a mechanical component with an arrow indicating direction (no text or symbols)natural_image
Technical illustration of a mechanical device with directional arrows indicating motion (no text or symbols)natural_image
Technical line drawing of a vacuum cleaner with a close-up inset showing the button (no text or symbols)natural_image
Technical line drawing of a mechanical assembly with cylindrical components and mounting flanges (no text or symbols)natural_image
Technical line drawing of a mechanical device with cylindrical components and internal components (no text or symbols)natural_image
Technical line drawing of a mechanical device with no visible text or symbolsnatural_image
Technical illustration of a mechanical clamp or bracket assembly with an outlet wall, showing no text or symbols.natural_image
Diagram of a mechanical device with directional arrows indicating movement or force (no text or symbols present)natural_image
Diagram of a vacuum cleaner with mechanical components and directional arrows indicating motion (no text or symbols)natural_image
Diagram showing two mechanical device configurations with arrows indicating movement or assembly (no text or symbols present)natural_image
Technical line drawing of a mechanical device with directional arrow indicating motion (no text or symbols)natural_image
Technical line drawing of a mechanical component with no visible text or symbolsnatural_image
Technical line drawing of a mechanical assembly with an inset close-up showing a component detail (no text or symbols)natural_image
Technical line drawing of a mechanical device with an inset close-up showing a component detail (no text or symbols)natural_image
Technical line drawing of a mechanical component with no visible text or symbols
natural_image
Line drawing of a vacuum cleaner with a hexagonal button and three vertical stripes below (no text or symbols)natural_image
Technical line drawing of a mechanical device with a lever and adjustment knob (no text or symbols)
natural_image
Diagram of a robotic arm with a sensor and mechanical components, showing a downward force arrow (no text or symbols present)
natural_image
Diagram showing a robotic arm lifting a battery, with no visible text or symbolsnatural_image
Technical line drawing of a mechanical device with a bucket and housing (no text or symbols)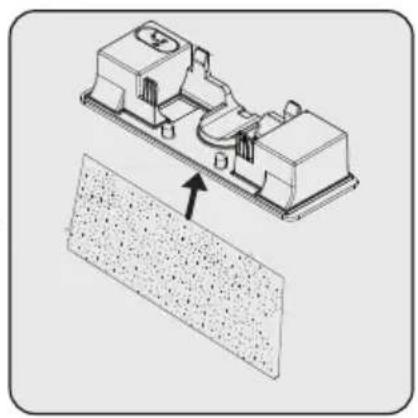
natural_image
Technical illustration of a mechanical assembly with a textured surface and directional arrow (no text or symbols)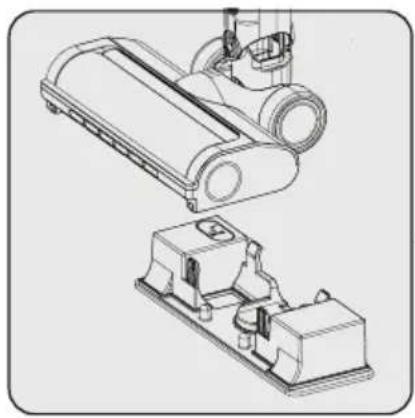
natural_image
Technical line drawing of a mechanical device with two views (top and side), no visible text or symbolsnatural_image
Illustration of a hand cleaning a mechanical component with a cloth (no text or symbols)natural_image
Diagram of a mechanical device pouring granular material into a container (no text or symbols)natural_image
Technical line drawing of a mechanical component with internal flow arrows (no text or symbols)natural_image
Technical line drawing of a mechanical component with an arrow indicating direction (no text or symbols)natural_image
Technical illustration of a mechanical component with a magnified inset showing internal structure (no text or symbols)natural_image
Diagram of a mechanical component with arrows indicating direction, no text or symbols presentnatural_image
Diagram of a mechanical device with arrows indicating motion or force direction (no text or symbols)natural_image
Diagram of a mechanical component with a downward arrow indicating a process or assembly (no text or symbols present)natural_image
Technical illustration of a mechanical component with an arrow indicating direction (no text or symbols present)natural_image
Technical line drawing of a mechanical device with directional arrows indicating motion (no text or symbols)natural_image
Technical line drawing of a vacuum cleaner with a close-up inset showing the button (no text or symbols)natural_image
Technical line drawing of a mechanical assembly with cylindrical components and mounting flanges (no text or symbols)natural_image
Technical line drawing of a mechanical device with cylindrical components and internal components (no text or symbols)natural_image
Technical line drawing of a mechanical assembly with no visible text or symbols1- Pričvrstite četiri tipla na zid 2- Postavite četiri vijka na njihova mesta na priključnoj stanici za punjenje i montirajte ih na tiple na zidu.
natural_image
Technical line drawing of a mechanical device with directional arrows indicating movement or assembly (no text or symbols)Gurajte štapić u smeru strelice prema telu pritiskajući dugme za otpuštanje štapića.

natural_image
Diagram of a vacuum cleaner with mechanical components and directional arrows indicating motion (no text or symbols)Pritisnite dugme za otpuštanje električne turbo četke koje se nalazi na električnoj turbo četki i pritisnite ga u smeru strelice prema cevi.
natural_image
Diagram showing two mechanical device configurations with arrows indicating movement or assembly (no text or symbols present)Pričvrstite usku mlaznicu i četku na priključnoj stanici za punjenje.
natural_image
Technical line drawing of a mechanical device with directional arrow (no text or symbols)natural_image
Technical line drawing of a mechanical component with no visible text or symbolsTreperenje belih LED lampica indikatora napunjenosti pokazuje da se uređaj puni.
- Kada sve LED lampice indikatora napunjenosti, to znači da je punjenje uređaja završeno.

1- Pritisnite prekidač za otpuštanje uređaja na priključnoj stanici za punjenje) nadole i istovremeno povucite uređaj prema sebi.
2- Uklonite aparat sa priključne stanice za punjenje.
natural_image
Technical line drawing of a mechanical device with an inset close-up showing a component detail (no text or symbols)natural_image
Technical line drawing of a mechanical device with an inset close-up showing a component detail (no text or symbols)Da biste prešli na maksimalnu brzinu kada radite na minimalnoj brzini, pritisnite dugme za podešavanje brzine.
Da biste prešli na minimalnu brzinu kada radite u maksimalnoj brzini, ponovo pritisnite dugme za podešavanje brzine.
4 Rad

natural_image
Technical line drawing of a mechanical component with no visible text or symbols
natural_image
Line drawing of a vacuum cleaner with a hexagonal button and patterned buttons (no text or symbols)natural_image
Technical line drawing of a mechanical device with a lever and handle, showing no text or symbols
natural_image
Diagram of a robotic arm with a sensor and mechanical components, showing a step without any text or symbols.
natural_image
Diagram of a robotic arm with a battery and cable, showing a mechanical assembly (no text or symbols)natural_image
Technical line drawing of a mechanical assembly with a bucket and housing (no text or symbols)
natural_image
Technical illustration of a mechanical assembly with a textured surface and an arrow indicating direction (no text or symbols)
natural_image
Technical line drawing of a mechanical assembly with no visible text or symbolsPriključak za krpu: Pogodno za proces brisanja tvrdih podova. Napunite rezervoar za vodu pitkom vodom.
Pričvrstite krpu za brisanje na dno rezervoara za vodu.
Pričvrstite priključak za krpu na dno električne turbo četke.
 | UPOZORENJE: Ne koristite priključak za brisanje na tepisima. |
 | UPOZORENJE: Ne stavljajte izbeljivač ili deterdžent u posudu za vodu. |
 | UPOZORENJE: Uklonite priključak za brisanje nakon završetka upotrebe. |
 | UPOZORENJE: Uklonite priključak za brisanje odmah nakon završetka brisanja da biste sprečili oštećenje drvenih podova. |
 | UPOZORENJE: Očistite rezervoar za vodu nakon svake upotrebe. |
 | Krpe za brisanje mogu se prati u mašini za pranje veša. |
 | UPOZORENJE: Nemojte podizati ili naginjati mlaznicu, jer voda može da prsne iz rezervoara za vodu. |
natural_image
Line drawing of a hand cleaning a mechanical component (no text or symbols)Unutrašnjost uređaja obrišite vlažnom krpom.

natural_image
Line drawing of a mechanical device pouring granular material into a container (no text or symbols)natural_image
Technical line drawing of a mechanical component with directional arrows indicating flow or movement (no text or symbols)Da biste detaljno očistili filtere, uklonite telo posude za prašinu okretanjem u smeru kazaljke na satu dok lagano povlačite prsten posude za prašinu.
natural_image
Diagram of a mechanical component with an arrow indicating direction, showing internal parts and a final assembly (no text or symbols present)natural_image
Technical illustration of a mechanical component with a magnified inset showing internal structure (no text or symbols)Odvojite EPA E10 i plastični filter jedan od drugog.

natural_image
Diagram of a mechanical component with arrows indicating direction, no text or symbols presentnatural_image
Diagram of a mechanical component with arrows indicating motion or force direction (no text or symbols)Uklonite prašinu sa metalnog filtera tapkajući ga o tvrdu površinu kao što je kanta za smeće ili to uradite pomoću četke.

natural_image
Diagram of a mechanical component with an arrow indicating downward motion (no text or symbols present)Pričvrstite EPA E10 filter na plastični filter nazad.
natural_image
Technical illustration of a mechanical component with an arrow indicating direction (no text or symbols present)Pričvrstite plastični filter na posudu za prašinu.
natural_image
Technical line drawing of a mechanical device with directional arrows indicating motion (no text or symbols)Provucite nazubljeni deo posude za prašinu do rupa na telu, a zatim podesite posudu okretanjem suprotno od kazaljke na satu dok ne čujete zvuk klika.
natural_image
Technical line drawing of a vacuum cleaner with a close-up inset showing the button (no text or symbols)Pritisnite dugme za otpuštanje roločetke.

natural_image
Technical line drawing of a mechanical assembly with cylindrical components and mounting brackets (no text or symbols)natural_image
Technical line drawing of a mechanical device with cylindrical components and internal components (no text or symbols)5.4 Transport i otprema
- Za vreme transporta i otpreme, uređaj nosite u originalnom pakovanju. Ambalaža uređaja ga štiti od fizičkih oštećenja.
- Nemojte stavljati teške predmete na uređaj ili njegovu ambalažu. U suprotnom, uređaj se može oštetiti.
- Ako uređaj padne, uređaj možda neće raditi ili može doći do trajnih oštećenja.
natural_image
Diagram of a vacuum cleaner with a close-up circular button highlighting the left side (no text or symbols present)
natural_image
Technical line drawing of a mechanical device with cylindrical components and mounting brackets (no text or symbols)
natural_image
Technical line drawing of a mechanical device with cylindrical components and mounting brackets (no text or symbols)natural_image
Technical line drawing of a mechanical component with an arrow indicating direction (no text or symbols)natural_image
Technical illustration of a mechanical component with a magnified inset showing internal structure (no text or symbols)Afghanistan EPA E10 وَالْفَلَّرِ الْبِلاْسَتِيَكِي عَنْ بَعْضُهَا الْبَعْضِ.
natural_image
Diagram of a cylindrical container with a side-mounted lid and two arrows indicating upward motion (no text or symbols)natural_image
Diagram of a water pump with directional arrows indicating flow or movement (no text or symbols)natural_image
Diagram of a mechanical component with a downward arrow indicating a process or assembly (no text or symbols present)Equitrat EPA E10 بَالْفَلَّتر بِتَّبِيْتُ الْفَلَّتر الْبَالْسَتِيْكِيُ مَرَةَ أَخْرَى.
natural_image
Technical line drawing of a mechanical component with an arrow indicating direction (no text or symbols present)natural_image
Technical line drawing of a mechanical device with internal components and directional arrows (no text or symbols)natural_image
Line drawing of a hand cleaning a mechanical component with a cloth (no text or symbols)natural_image
Line drawing of a mechanical device pouring granular material into a container (no text or symbols)natural_image
Technical line drawing of a mechanical component with internal flow arrows (no text or symbols)natural_image
Technical line drawing of a mechanical assembly with a bucket and housing (no text or symbols)natural_image
Technical illustration of a mechanical assembly with a textured surface and an arrow indicating direction (no text or symbols)natural_image
Technical line drawing of a mechanical assembly with no visible text or symbolsnatural_image
Technical line drawing of a mechanical component with no visible text or symbolsnatural_image
Line drawing of a vacuum cleaner with attached circuit board (no text or symbols)4.3
natural_image
Technical line drawing of a mechanical device with a lever and handle, showing motion direction (no text or symbols)natural_image
Line drawing of a robotic device with a handle and lever, showing a mechanical assembly (no text or symbols)natural_image
Diagram of a robotic arm and battery assembly with a downward arrow indicating motion (no text or symbols)natural_image
Technical line drawing of a vertical mechanical device with directional arrow (no text or symbols)natural_image
Diagram showing a vertical pipe mounted on a wall with an outlet, connected to a wall-mounted electrical socket (no text or symbols present)
natural_image
Technical line drawing of a mechanical component with no visible text or symbolsnatural_image
Technical line drawing of a mechanical device with an inset close-up showing internal components (no text or symbols)natural_image
Technical line drawing of a mechanical device with an inset close-up showing a component detail (no text or symbols)natural_image
Technical line drawing of a mechanical assembly with no visible text or symbolsnatural_image
Diagram of a mechanical device with a wall-mounted socket connected to a wall-mounted power outlet (no text or symbols present)natural_image
Technical line drawing of a mechanical assembly with directional arrows indicating motion (no text or symbols)natural_image
Diagram of a vacuum cleaner with mechanical components and airflow arrows (no text or symbols)natural_image
Diagram showing two mechanical device configurations with arrows indicating movement or assembly (no text or symbols present)natural_image
Simple line drawing of a decorative pattern with circular motifs inside a square frame (no text or symbols)VRT 60221 VD - VRT 61225 VW
AR

- Cordless Stick Vacuum Cleaner
- Please read this guide first!
- Symbols and their meanings
- CONTENTS
- Important safety and environmental instructions
- General safety
- Compliance with the WEEE Directive and disposal of the waste product
- Packaging information
- Information on waste batteries
- What to do for energy saving
- Compliance with RoHS Directive
- Controls and components
- Technical data
- Installation
- Intended use
- Installation of the charging dock
- Installation of the body and the brush
- Operation
- Charging the appliance
- Usage
- Accessories
- Mini turbo brush
- Cleaning and maintenance
- Cleaning the Dust container and Filters
- Cleaning of the brush
- Storage
- Transport and shipping
- VÂNZĂTOR
- Rad
- Transport i otprema
Brand : BEKO
Model : VRT 60221 VD
Category : Vacuum Cleaner