
POWXG6305 - Lawn mower PowerPlus - Free user manual and instructions
Find the device manual for free POWXG6305 PowerPlus in PDF.

| Product type | Robotic lawn mower |
| Brand | PowerPlus |
| Model | POWXG6305 |
| Battery voltage | 18 V |
| Battery capacity | 2.5 Ah |
| Battery type | Lithium-Ion |
| Runtime | 70 min |
| Charging time | 90 min |
| Cutting width | 18 cm |
| Adjustable cutting height | 25 - 50 mm |
| Maximum area | 500 m² |
| Maximum slope | 30% (17°) |
| Boundary wire length | 120 m |
| Weight | 7.5 kg |
| Sound pressure level | 48 dB(A) |
| Guaranteed sound power level | 62 dB(A) |
| Motor type | Brushless |
| Safety system | PIN code, emergency stop button, rain sensor, lift sensor, tilt detection |
| Replacement blade parts | Ref. POWACG9101 (blades and screws) |
| Warranty | 36 months |
| Recommended maintenance | Regular cleaning of blades and chassis, replacement of blades every 2-3 months |
Frequently Asked Questions - POWXG6305 PowerPlus
User questions about POWXG6305 PowerPlus
0 question about this device. Answer the ones you know or ask your own.
Ask a new question about this device
Download the instructions for your Lawn mower in PDF format for free! Find your manual POWXG6305 - PowerPlus and take your electronic device back in hand. On this page are published all the documents necessary for the use of your device. POWXG6305 by PowerPlus.
USER MANUAL POWXG6305 PowerPlus
natural_image
Yellow and black power plant robot with visible branding (no text or symbols on the robot itself)
NL NEDERLANDS VERTAALDE VERSIE VAN DE ORIGINELE HANDLEIDING
FR FRANÇAIS TRADUCTION DU MODE D'EMPLOI D'ORIGINE
EN ENGLISH ORIGINAL INSTRUCTION MANUAL
natural_image
Product assembly diagram showing a power adapter connected to multiple green plastic clips and metal components (no text or symbols present)FIG C
natural_image
Line drawing of a device's internal components and cable, showing a connector inserted into a housing (no text or symbols)Fig 1
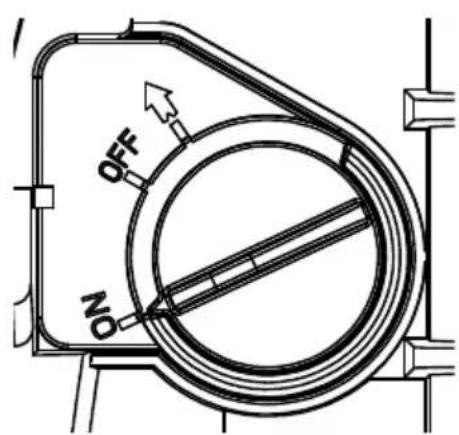
Fig 2

natural_image
Black plastic electrical enclosure with wiring and a coiled green cable attached, no visible text or symbols on the main subject.Fig 3
natural_image
Back view of a black power Luxembourg device with attached power plug and wiring, being handled by a gloved hand (no visible text or symbols on main body)Fig 4
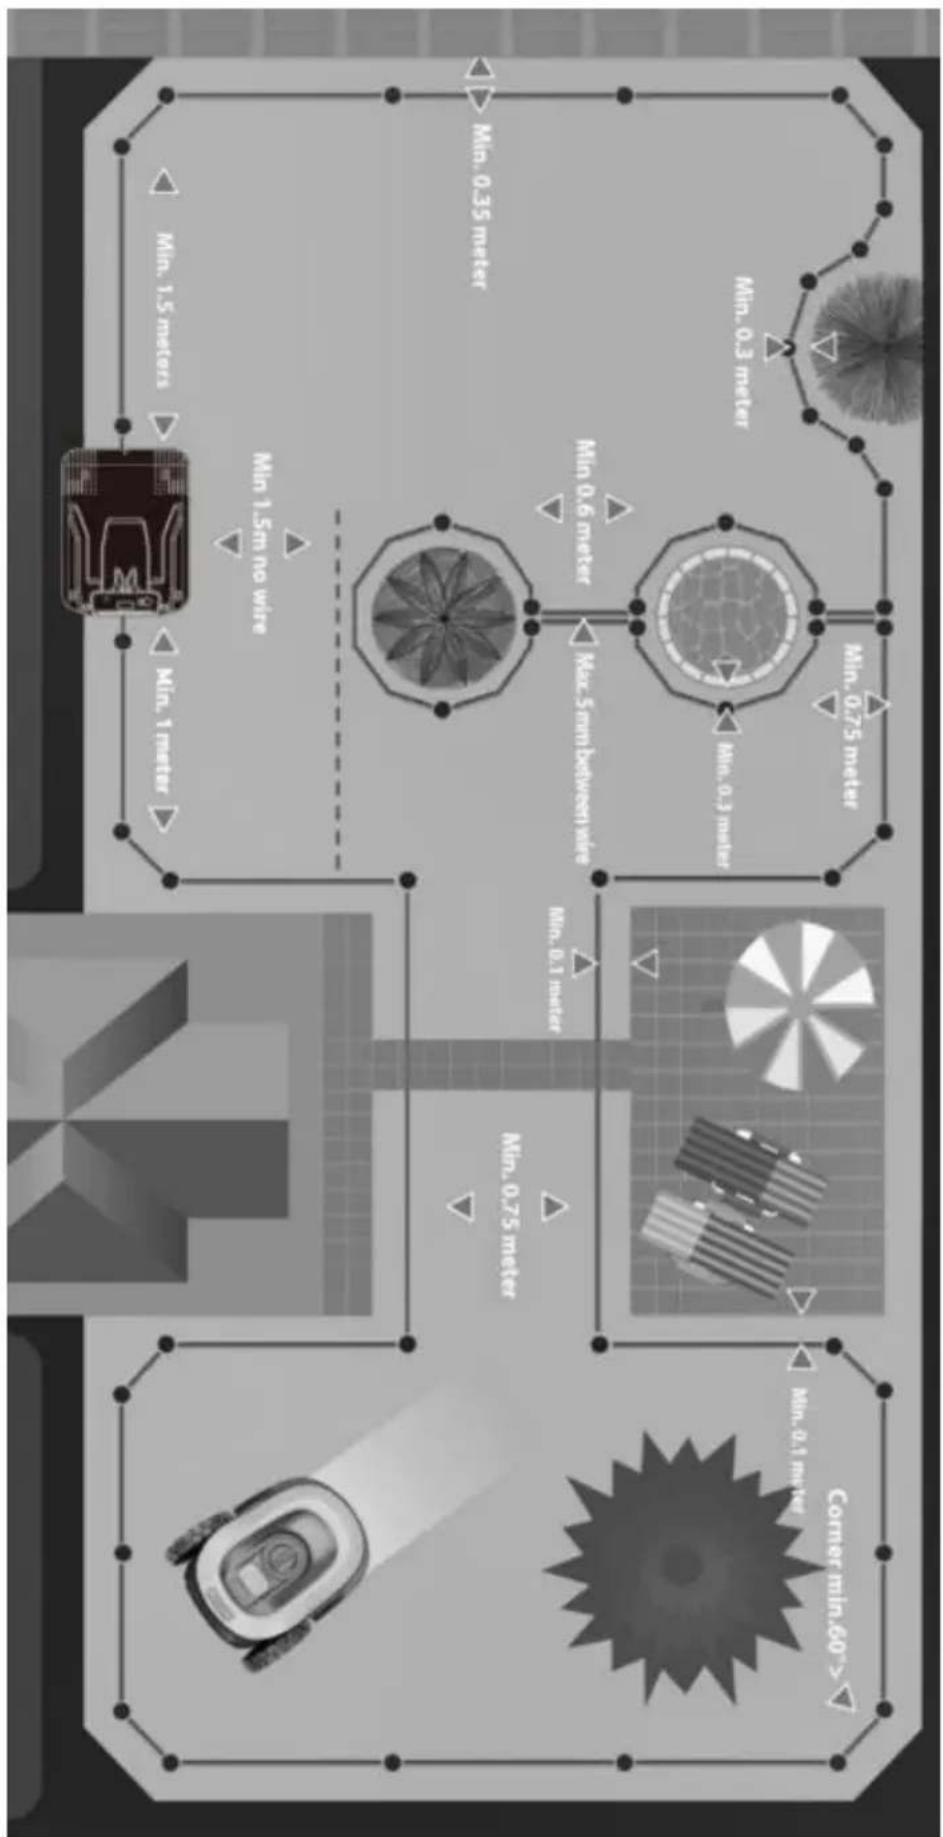
Fig 5

flowchart
graph LR
    A["Own land A1"] -->|>10 m| B["Neighbour A2"]
    B -->|≥1M| A
    style A fill:#f9f,stroke:#333
    style B fill:#bbf,stroke:#333

Fig 7
natural_image
Pure technical line drawing of a mechanical component and gear assembly without any text or symbolsFig 8
1 BEOOGD GEBRUIK 3
2 BESCHRIJVING (FIG A, B & C) 3
3 INHOUD VAN DE VERPAKKING 3
4 TOELICHTING VAN DE SYMBOLEN 4
5 VEILIGHEIDSINSTRUCTIES 5
5.1 Opleiding....5
5.2 Voorbereiding....5
5.3 Gebruik 5
5.3.1 Algemeen....5
5.3.2 Bijkomend wanneer de machine automatisch werkt 5
5.3.3 Onderhoud en opberging....6
5.3.4 Aanbevelingen....6
6 SPECIALE VEILIGHEIDSINSTRUCTIES VOOR DE ROBOTMAAIER....6
8 PROBLEEMOPLOSSING....14
8.1 Foutcodes....14
Notified Body ISET - Italy)
natural_image
Simple hand-drawn curved line with a small circular mark at the top (no text or symbols)Philippe Vankerkhove
Regelgevings- en compliancemanager
24/09/2021, Lier - Belgium
5.3.4 Recommendations
14 DÉCLARATION DE CONFORMITÉ


VARO – Vic. Van Rompuy N.V. - Joseph Van Instraat 9 - BE2500 Lier - BELGIQUE, déclare que :
Notified Body ISET - Italy)
natural_image
Simple hand-drawn outline of a rounded rectangle with no text or symbolsPhilippe Vankerkhove
24/09/2021, Lier - Belgium
1 INTENDED USE 3
2 DESCRIPTION (FIG. A, B & C) 3
3 PACKAGE CONTENT LIST....3
4 EXPLANATION OF USED SYMBOLS 4
5 SAFETY INSTRUCTIONS....5
5.1 Training....5
5.2 Preparation....5
5.3 Operation....5
5.3.1 General....5
5.3.2 Additionally when the machine is operating automatically ....5
5.3.3 Maintenance and storage....5
5.3.4 Recommendations....6
6 SPECIAL SAFETY REGULATIONS FOR ROBOTIC LAWNMOWER....6
6.1 Robotic lawnmower safety warning....6
6.2 Battery/Battery charger safety warnings....6
7 OPERATION....7
7.1 Lawn preparation....7
7.2 Charging station placement and connection....7
7.3 Charging the lawnmower....8
7.4 Setting up the perimeter wire (Fig. 3, Fig. 4 and Fig. 5)....9
7.5 Setting up the robotic lawnmower....10
7.5.1 Blade height adjusting knob (2)....10
7.5.2 PIN code....10
7.5.3 Immediate manual start of the mower 11
7.5.4 Setting the working time, mowing frequency and start time of the mower (outside the charging station)....11
7.5.5 Stop the robotic mower 12
7.5.6 Change PIN code....12
7.6 Control panel information (Fig. 7)....13
7.6.1 Light status....13
7.6.2 Buttons 13
8 TROUBLE SHOOTING 13
8.1 Fault codes....13
8.1.1 Fault codes (when outside charging station)....14
8.1.2 Fault codes (when charging)....14
8.1.3 Clear the fault code....15
8.2 Mower does not work ....15
9 MAINTENANCE 16
9.1 General maintenance plan....16
9.2 Cleaning the mower....17
9.3 Blade replacement (Fig. 8)....17
9.4 Storage 17
9.5 After cleaning, blade replacement or start-up after winter break ..... 17
10 TECHNICAL DATA 18
11 NOISE....18
12 WARRANTY....19
13 ENVIRONMENT 19
13.1 Battery pack 19
14 DECLARATION OF CONFORMITY 20
ROBOTIC LAWNMOWER 18 V - 2.5 AH - 500 M² POWXG6305
1 INTENDED USE
The robotic lawnmower is designed to mow grass ground areas where the slope is less than 17^ . No collection of grass is required, and small particles of cut grass will reduce the need of fertilizers. Before you can start mowing with your robotic lawnmower, you have to prepare the lawn initially, find a proper place for your charging station and set up the perimeter wire to define the borders of the mowing area. Not suitable for professional use.

WARNING! For your own safety, read this manual and the general safety instructions carefully before using the appliance. Your power tool should only be given to other users together with these instructions.
2 DESCRIPTION (FIG. A, B & C)
- Stop button
- Blade height adjust knob
- Control panel
- Rain sensor
- Handle
- On/Off switch
- Blades
- Wheels
-
Caster wheels
-
Charging pins
- Mounting holes
- Charging indicator
- Charging socket
- Terminals for perimeter wire
- Power adapter
- Peg for charging station
- Spare blades & screws
- Wire connector
3 PACKAGE CONTENT LIST
- Remove all packing materials.
- Remove remaining packaging and transit supports (if existing).
- Check the completeness of the packing content.
- Check the appliance, the power cord, the power plug and all accessories for transportation damages.
- Keep the packaging materials as long as possible till the end of the warranty period. Dispose it into your local waste disposal system afterwards.

WARNING: Packing materials are no toys! Children must not play with plastic bags! Danger of suffocation!
1 x robotic lawnmower
1 x charging station
1 x power adapter
4 x peg for charging station
6 x spare blades & screws
1 x wire connector
160 x installation peg
120 m perimeter wire
1 x manual

When parts are missing or damaged, please contact your dealer.
4 EXPLANATION OF USED SYMBOLS
 | Read manual before use. | Always keep a safe distance from the machine when operating. Never use the machine when persons, children or pets are in the cutting area. | |
| Always remove the disabling device (On/Off switch) before working on or lifting the machine. | Do not sit or ride on the machine. | ||
 | The product complies with the applicable European directives and an evaluation method of conformity for these directives was done. | At the end of its lifecycle, the device must not be disposed of with normal household waste. Ensure that the device is disposed of in accordance with local regulations. | |
 LHon LHon | Li-ion battery. This product has been marked with a symbol relating to 'separate collection' for all battery packs. It will then be recycled or dismantled in order to reduce the impact on the environment. | Guaranteed sound power level. | |
 | Wear gloves | Mandatory use of eye protection. | |
 | Wear noise protection |
5 SAFETY INSTRUCTIONS

IMPORTANT: READ CAREFULLY BEFORE USE! KEEP FOR FUTURE REFERENCE!
5.1 Training
- Read the instructions carefully. Be familiar with the controls and the proper use of the machine.
■ Never allow people unfamiliar with these instructions or children to use the machine. Local
■ regulations may restrict the age of the operator. - The operator or user is responsible for accidents or hazards occurring to other people or their property.
- Never allow children, persons with reduced physical, sensory or mental capabilities or lack of experience and knowledge or people unfamiliar with these instructions to use the machine, local regulations may restrict the age of the operator.
5.2 Preparation
- First mow the grass as short as possible and check the lawn for bumps, and equalize it as much as possible. The robotic lawnmower will not be able to get past large bumps.
- Ensure the correct installation of the charging station and boundary wire as instructed.
- Periodically inspect the area where the machine is to be used and remove all stones, sticks, wires, bones, and other foreign objects. Failure to do so can lead to the mower getting stuck / damaged!
- Periodically visually inspect to see that the blades, blade bolts and cutter assembly are not worn or damaged. Replace worn or damaged blades and bolts in sets to preserve balance.
- On multi-spindle machines, take care as rotating one blade can cause other blades to rotate.
5.3 Operation
5.3.1 General
- Never operate the machine with defective guards, or without safety devices.
- Do not put hands or feet near or under rotating parts.
- Never pick up or carry an machine while the motor is running.
- Remove (or Operate) the on/off switch from the machine
- before clearing a blockage;
- before checking, cleaning or working on the machine;
o after striking a foreign object to inspect the machine for damage; - if the machine starts to vibrate abnormally, and to check for damage before restarting.
5.3.2 Additionally when the machine is operating automatically
- Do not leave the machine to operate unattended if you know that there are pets, children or people in the vicinity.
5.3.3 Maintenance and storage
- Keep all nuts, bolts, and screws tight to be sure the machine is in safe working condition.
- Replace worn or damaged parts for safety.
- Ensure that only replacement cutting means of the right type are used.
POWXG6305 EN
- Ensure that batteries are charged using the correct charger recommended by the manufacturer. Incorrect use may result in electric shock, overheating or leakage of corrosive liquid from the battery.
- In the event of leakage of electrolyte flush with water/neutralizing agent, seek medical help if it comes into contact with the eyes, etc.
■ Servicing of the machine should be according to manufacturers' instructions.
5.3.4 Recommendations
- Connect the machine and/or its peripherals only to a supply circuit protected by a residual current device (RCD) with a tripping current of not more than 30 mA.
- Avoid using the machine and its peripherals in bad weather conditions especially when there is a risk of lightning.
- Read all safety warnings and all instructions. Failure to follow all warnings and instructions may result in electric shock, fire and/or serious injury. Save all instructions for future reference. The term "power tool" in the warnings refers to your mains operated (corded) power tool or battery operated (cordless) power tool.
6 SPECIAL SAFETY REGULATIONS FOR ROBOTIC LAWNMOWER
6.1 Robotic lawnmower safety warning
■ Never allow people unfamiliar with these instructions or children to use the machine.
- The use of the appliance by persons (including children) who have limited physical, sensory or mental abilities or lack the necessary experience and knowledge is prohibited unless they have been supervised at work by a person responsible for their safety and have received prior training in the use of the appliance. Do not allow children to play with the appliance. The appliance is not a toy.
- Wear long pants and sturdy shoes when nearby or inside the work area while the lawn mower is operating.
- Do not ride on the lawn mower, push the lawn mower, or use it for anything other than its intended purpose, otherwise you or someone else may be injured.
- Do not use automatic lawn watering systems while the lawn mower is operating, because the watering equipment may become damaged and the likelihood of water penetrating into the lawn mower is greatly increased. Adjust the work time of the lawn mower so that the watering systems and the lawn mower do not operate at the same time.
- Ensure the correct installation of the charging station and boundary wire as instructed in this manual.
- Periodically inspect the area where the machine is to be used and remove all stones, sticks, wires, branches and other foreign objects.

WARNING: The machine can be dangerous if used improperly.

WARNING: When carrying the lawn mower, make sure to carry it by the designed areas. If you carrying the lawn mower in any other way, you risk injury from the blades or charging socket of the lawn mower.
6.2 Battery/Battery charger safety warnings
- Protect the battery charger from rain and moisture. The penetration of water in a battery charger increases the risk of electric shock.
- Recharge only with the charger specified by the manufacturer. A charger that is suitable for one type of battery pack may create a risk of fire when used with another battery pack.
- Do not charge other batteries. The battery charger is suitable only for charging lithium ion batteries of POWXG6305. Otherwise danger, fire and explosion may occur.
POWXG6305 EN
- Keep the battery charger clean. Contamination may cause the danger of electric shock.
- Check the battery charger, cable and plug each time before using. Do not use the battery charger when defects are detected. Do not open the battery charger yourself and have it repaired only by qualified personnel using original spare parts. Damaged battery chargers, cables and plugs increase the risk of electric shock.
- Do not operate the battery charger on easily inflammable surfaces (e. g. paper, textiles, etc.) or in combustible environments. There is danger of fire due to the heating of the battery charger during charging.
■ Under abusive conditions, liquid may be ejected from the battery; avoid contact. If contact accidentally occurs, flush with water. If liquid contacts eyes, additionally seek medical help. Liquid ejected from the battery may cause irritation or burns. - Do not open the battery yourself. There is danger of a short circuit.
- Protect the battery against heat, e.g., including against continuous sun irradiation and fire. There is a danger of explosion.
- Do not short-circuit the battery. There is a danger of explosion.
- In case of damage and improper use of the battery, vapours may be emitted. In case of complaints, provide for fresh air and consult a physician. The vapours can irritate the respiratory system.
7 OPERATION
7.1 Lawn preparation
Before operating the robotic lawnmower, ensure that the mowing area is free of pets, kids or objects. Remove stones, loose pieces of wood, wire, cables from the lawn. Make sure that the lawn height is 50 mm or less. If the height is more than that, cut the lawn to a height of 50 using a standard lawnmower. Cut the area where you intend to lay the perimeter wire to the lowest setting you have with your conventional mower.
7.2 Charging station placement and connection
Find the best place for your charging station (if possible out of the sun), where your robotic lawnmower will return to get charged.
- Take the robotic lawnmower from the charging station and place the charging station on level ground.
Make sure
- the arrow marked with 'IN' on charging station needs to point towards the mowing area,
- the perimeter wire is placed in a 1.5 m straight track in front of the charging station. (Behind this 1.5 m, you may still need a 35 cm margin between the perimeter wire and the edge of the lawn.),
- the perimeter wire is placed at least in a 1 m straight track perpendicular to the rear the charging station. (Behind this 1 m, a space of 35 cm may still be needed between the perimeter wire and the edge of the lawn.),
- that the base stand is firmly on the ground and does not bend,
• not to put the charging station in confined spaces, - that you have 1.0 m of free space perpendicular to the rear the charging station,
- that the next power socket is within 6 meters, measured from backside of charging station (power cord is 6 m),
- that the charging station is not placed in direct sunlight, if possible.
It is recommended to place the charging as close to the power supply as possible.

Note: Your robotic lawnmower can only automatically return to the charging station counter-clockwise.
Note: When your robotic lawnmower receives direct sunlight for a prolonged period of time the battery can get too hot and will not function correctly.
- Fix the charging station with the four supplied pegs.
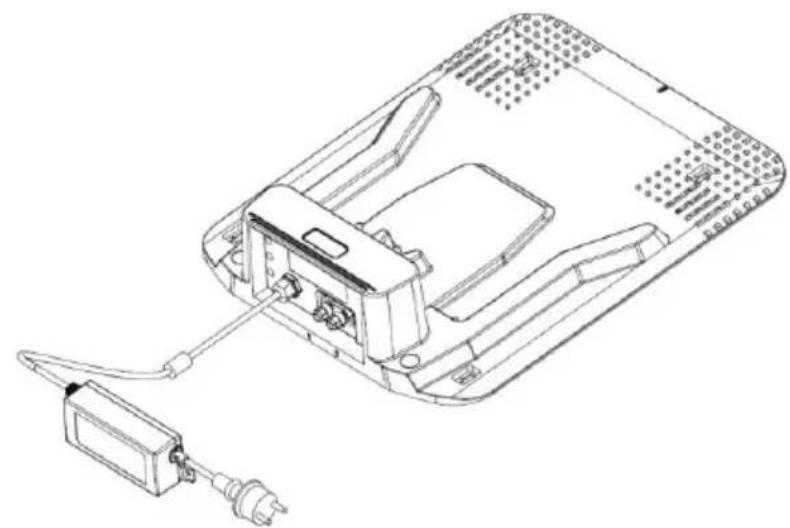
- Connect the charging socket to the charging adaptor.
- Connect the charging adaptor to the power supply (Fig. 1).
Make sure that the power supply is
- close to the charging station,
- protected from rain, e.g. under a roof,
- protected from direct sunlight, if possible.
→ Once connected you should now see a red light (power) on the charging station.
→ The green light (work) on the charging station indicates wiring conditions of the charging station. When the green light flashes, the wire is not set correctly and the mower cannot work.

Note: When the robotic lawnmower is in the charging station, the robotic lawnmower's status light and the green light on the charging station flash. When the robotic lawnmower is not in its charging station and the green light of the charging station flashes, this indicates a wire fault and the robotic lawnmower will not work.
7.3 Charging the lawnmower
Your robotic lawnmower's battery may be charged to a certain degree on delivery, but it's recommended to fully charge the battery of the lawnmower before use. To charge your robotic lawnmower follow these steps:
- Switch the robotic lawnmower on. The On/Off switch (6) is located at the bottom side of the robotic lawnmower (Fig. A and Fig. 2).

Note: The on/off switch is also a removable safety key. To remove the key, turn it fully clockwise as far as it will go, pull the knob down and turn it again to the left until the arrow mark (Fig. 2) to remove the key.

Switching on the red button will also program the start time of the mower. How to change the start time is described in 7.5.4.

Note: Your robotic lawnmower will not charge when it is not turned on.
- Slide the robotic lawnmower into the charging station to charge.
- Check the indicator on the charging station. The red power light turns up and the robotic lawnmower charges (green light flashes). If the power light does not light up, you should check the mains plug of the power supply is plugged in properly and that the mower is in the station correctly.
- When mower is charging the status light on the robot mower control panel will flash quickly (4 times a second), when mower is fully charged the status light will flash slowly (every 2 seconds).
- It takes about 90 minutes to get the battery fully loaded.
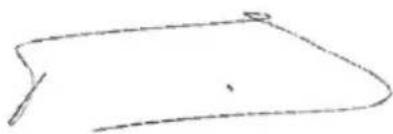
7.4 Setting up the perimeter wire (Fig. 3, Fig. 4 and Fig. 5)
The wire defines the borders of the mowing area. Everything in the inner area belongs to the mowing area, everything in the outer area doesn't belong to the mowing area. The wire also serves to mark obstacles and exclude them from the mowing area.
-
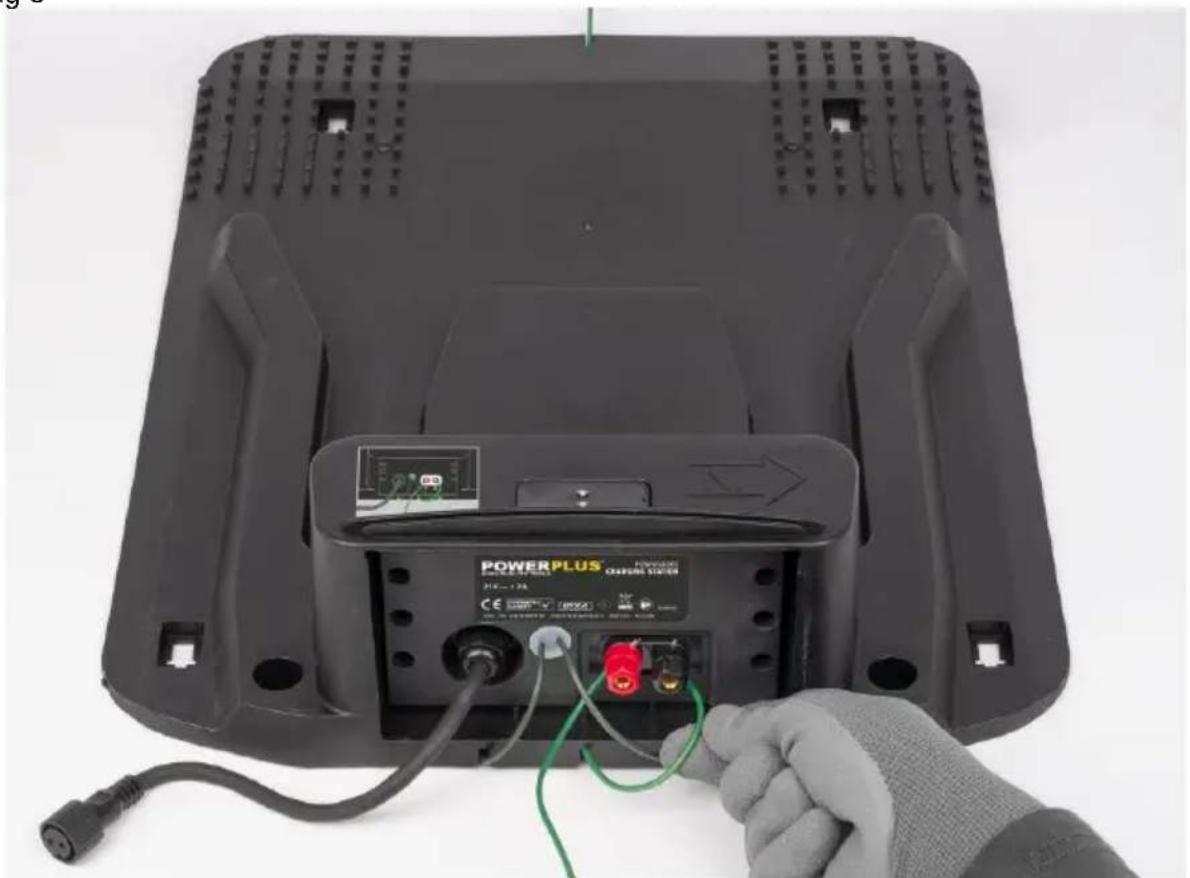
Feed the end of the perimeter wire through the groove on the front at the bottom side of the charging station, until it appears on the rear side (Fig. 3).
-
Carefully strip off 10-15 mm of the insulation of the wire.

Note: You should keep a length of 15-20 cm at start and the end of the wire for operating and handling the wire.
- Connect the wire to the right hand (black) B terminal of the charging station (Fig. 4).
- Start installing the perimeter wire from the charging station in a clockwise direction (Fig. 5). Pull the wire from the coil, tauten and fix it with one peg. Use a mallet to insert them in the lawn. Ensure the wire is straight and in line with the charging station groove for 1.5 m.
- Recommended distance between pegs is 50 to 75 cm (max).
- Continue to set the wire around the perimeter of the mowing area. For a more accurate perimeter, we advise that you leave less than 75 cm between pegs when wiring objects (like flower beds, bushes, trees and other items).

Loose wire can be cut during mowing. Make sure the wire is flat to the ground. Use additional pegs where the wire is slack. The wire is taut before placing the next peg (if you can place a couple of fingers under the wire this is not taut enough). Increase the number of pegs at a corner.

Note: If the mowing area borders against a flat path or a surface that is level with the lawn, your robotic lawnmower will be able to run over it. In such cases the perimeter wire should be positioned right up to the edge of the lawn (approx. 10 cm). This is not applicable for gravel, as your robotic lawnmower could hit a stone or get stuck in the gravel (here you need to keep 35cm distance).

Note: When installing the wire around the perimeter of pond of water, the distance between the wire and the edge of the pond must be more than 75 cm, because of safety reasons. In case there is a power cut your robotic lawnmower will stop after not noticing the wire for 50 cm.

Note: When marking objects remember there must be at least 60 cm distance between two perimeter wires. Leaving less distance than this will cause some interference.

Note: Do not install the wire on the slope (max 17° or 30%), or your mower could be slip out the boundary easily.
Note: The robotic lawnmower cannot go through distance less than 60cm.
POWXG6305 EN
- Encircling obstacles (Fig. 5). Mark out permanent objects you do not want the mower to run over, e.g. roots, ponds, flower beds or rocks. This will prevent your robotic lawnmower colliding with objects or going straight into them. To mark a obstacle:
a. Run the wire from the lawn perimeter to the object.
b. Continue round the objects in a clockwise direction. When going around the object use more pegs.
c. Return the wire back to the perimeter. Ensure the distance from the wire around the object and lawn perimeter wire is at least 60 cm.
Please ensure that the two parallel wires leading to and from the marked object are as close as possible by placing the wire under the same side of the peg. This will make the wire undetectable to your robotic lawnmower. Please ensure that the wires do not cross over each other at any point..

Note: Remember to leave 30 cm around the object to the wire! If objects are less than 75 cm from the lawn edge, surround the object when installing the wire, leaving the object outside of the lawn cutting area.
- When the perimeter wire has been laid around the entire cutting area, cut the wire and strip 10-15 mm of insulation off.
- Connect the wire to the left hand (red) terminal (Fig. 4).

Note: Observe the distances in Fig. 6 if a second mower is used next or on the property.
7.5 Setting up the robotic lawnmower
When your robotic lawnmower's battery is fully loaded, you can start setting up the lawnmower. When the mower is fully charged, the mower status light will flash slowly (every 2 seconds).

Note: Wait at least 10 sec after entering a command / setting. Give the mower time to process the command.

Note: When pressing any key, a beep should sound to confirm the entry, if not, the entry has failed.

Note: When setting up the robotic lawnmower, if you notice that lights 2D + 2H + 4H + 6H are flashing, the robotic lawnmower is in security mode and the PIN code must be entered.
7.5.1 Blade height adjusting knob (2)
First you have to set up the cutting height. Turn the knob to adjust the blades to a appropriate cutting height. They can be adjusted between 25 mm-50 mm manually.
7.5.2 PIN code
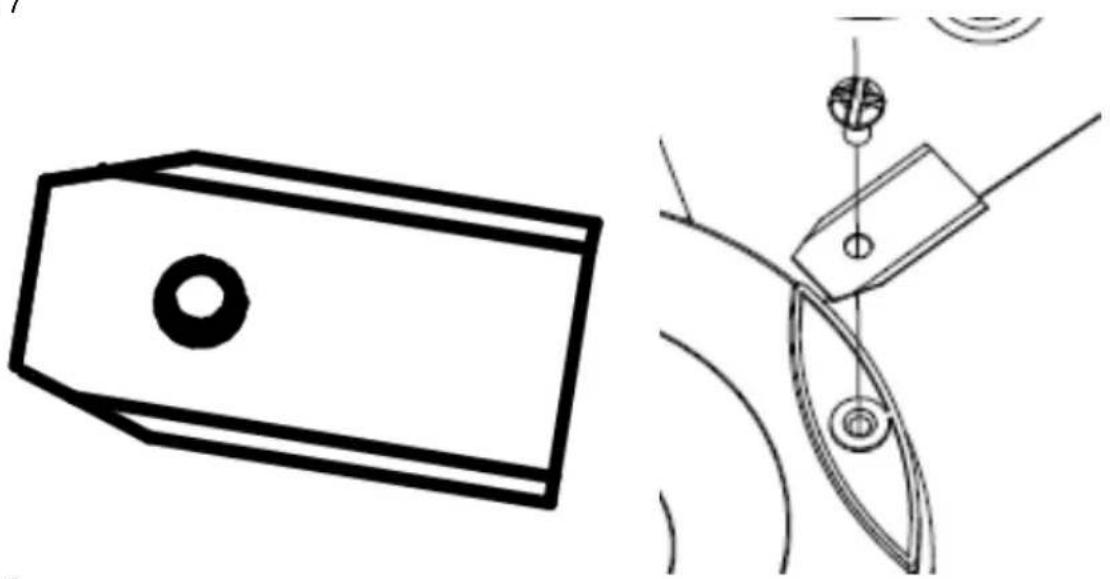
The robotic lawnmower is PIN code protected. To start the lawnmower for the first time, you have to enter the PIN code (the 2D, 2H, 4H and 6H light flashes). This needs to be done when the mower is OUTSIDE the charging station, when the mower is at the charging station you cannot enter the PIN code for the first time. Factory default PIN code is 1111. You can enter the PIN code by the panel on the top side of the mower.
POWXG6305 EN
See Fig. 7, panel on the top side, status light marked with a rectangle.
- Press CYCLE (for PIN code number "1"). The 2D light is off.
- Press CYCLE (for PIN code number "1") a second time. The 2H light is off.
- Press CYCLE (for PIN code number "1") a third time. The 4H light is off.
- Press CYCLE (for PIN code number "1") a fourth time. The 6H light is off.

Note: When no PIN code is entered, the system is in a PIN code protected state, and the machine cannot be operated through the panel. The machine can be charged. In this state, the state lamp (1D, 2D, 2H, 4H, 6H) are off and the machine cannot cut grass automatically.
7.5.3 Immediate manual start of the mower

Note: The mower will only work when there is no water on the rain sensor (4). The mower will only start when the battery level is sufficient.
If the mower is at the charging station:
Manual start: the status light flashes (depending on the battery status)
- Press START and then CYCLE, the lights 2D-2H-4H and 6H flash, wait 5 sec.
- Enter the PIN code, the lights 2D-2H-4H and 6H will turn off respectively (it takes about 10 seconds for the mower to start).
If the mower is outside the charging station:
Remove the mower from the charging station and wait for the 2D-2H-4H and 6H lights to flash, wait 5 sec.
-
Enter the PIN code, the lights 2D-2H-4H and 6H will turn off respectively. (The status light and lights 1D or 2D and 2H or 4H or 6H of the mowing settings are now on solid.) Wait 5 sec.
-
Push START then CYCLE (it takes about 10 sec. for the mower to start).

Note: The mower will now operate according to the default setting with a mowing frequency of 1x per day and a working time of 2 hours per day. To set your own mowing times, perform the steps in 7.5.4.
7.5.4 Setting the working time, mowing frequency and start time of the mower (outside the charging station)
You can set the times at which the robotic lawnmower should work. To set these times for the first time, the mower must be outside the charging station. The mower will ask for the PIN code when it is taken out of the station. The lights 2D and 2H / 4H / 6H flash, enter the pin code and wait 5 sec.:
- To set the mowing frequency: press CYCLE to select the mowing frequency (every day 1D, every two days 2D).
- To set the working time: press SET to set the total working time (2H, 4H or 6H).
- Manual start: by pressing START and then CYCLE, the mower will start the set mowing program after 10 sec. (the programmed start time will not be changed and can be used to include an extra mowing session).
- To set/change the start time: When START and then SET are pressed, the start time is set to the time at which START and then SET were pressed. The mower will now also start after 10 seconds and will therefore always start at this time during the next mowing sessions. (If you do this for example at 2 pm, the mower will always start at 2 pm with the chosen mowing program).
POWXG6305 EN

ATTENTION! The exact time the mower is turned on with the on / off switch will also set an automatic starting time. It can then be changed by starting the mower at a different time by pressing START and then SET. Turning off the mower with the on/off switch will clear the memory with the start time setting.

Note: Working time also includes battery loading time.
7.5.5 Stop the robotic mower
You can always stop your robotic mower by pressing the STOP button (1) on the top.
The robotic mower will stop immediately.

Note: The stop button has the highest priority, the robotic lawnmower will stop running in any case.
To restart the mower after pressing the STOP button:
- Make sure that all conditions for starting the mower are met (for the mower itself and in the mowing area).
- The status light flashes, this is the error code.
- The lights 2D-2H-4H and 6H flash, enter the pin code, wait 5 sec.
- Press CYCLE then HOME to exit the emergency stop mode (The status light and the mowing setting lights 1D or 2D and 2H or 4H or 6H are steady)
- Press START followed by CYCLE to start the mower (all lights are off), the mower will start with a new mowing program after 10 sec.
OR
Press HOME followed by CYCLE to return the mower to the charging station (all lights are off), the mower will start after 10 sec.
7.5.6 Change PIN code
You can change the PIN code from default ("1111") to your own combination of 4 numbers.
The PIN code combination consists 4 digits from 1 to 4.
- Remove the mower from the charging station (lights 2D-2H-4H and 6H are flashing).
- Enter the original PIN code 1111 (lights 2D-2H-4H and 6H turn off respectively) wait 5 sec.
- Press CYCLE and SET at the same time. (status light is steady, lights 2D-2H-4H and 6H are blinking).
- Enter a new PIN code consisting of 4 digits. (Light 1D is on continuously, lights 2D-2H-4H and 6H turn off respectively).
- Lamps 2D-2H-4H and 6H will blink again. Enter the new PIN for the 2nd time. (the status light and the mowing setting lights 1D or 2D and 2H or 4H or 6H are steady).
Example: if you want to change the PIN to "4231":
Press "SET" for number 4 light 2D turns off
Press "HOME" for number 2 light 2H turns off
Press "START" for number 3 light 4H turns off
Press "CYCLE" for number 1 light 6H turns off
When the two PINs are the same, the change is successful. After entering the new PIN code, the status light and the mowing setting lights 1D or 2D and 2H or 4H or 6H will light up. If the status light starts blinking, the change has failed and you will need to repeat the steps above.
7.6 Control panel information (Fig. 7)
7.6.1 Light status
| Light | 1st function | 2nd function |
| Status light | Shows fault code in case of a problem | Indicates that the mower is in the station (slow flashing), or charging (fast flashing). |
| 1D | Recurring work cycle: 1 day | When changing the PIN code: indicates the second time to enter the PIN code |
| 2D | Recurring work cycle: 2 days | When entering the PIN code: represents the first digit of the PIN code, if the first digit is entered, the light is off |
| 2H | Working time: 2 hours per day | When entering the PIN code: represents the second digit of the PIN code, if the second digit is entered, the light is off |
| 4H | Working time: 4 hours per day | When entering the PIN code: represents the third digit of the PIN code, if the third digit is entered, the light is off |
| 6H | Working time: 6 hours per day | When entering the PIN code: represents the fourth digit of the PIN code, if the fourth digit is entered, the light is off |
7.6.2 Buttons
| Button | 1st function | 2nd function |
| Cycle | Set the recurring work cycle | When entering the PIN code: number one (1) |
| Home | Send the mower to the charging station | When entering the PIN code: number two (2) |
| Start | Start the robotic mower | When entering the PIN code: number three (3) |
| Set | Set the working time per day | When entering the PIN code: number four (4) |
8 TROUBLE SHOOTING
8.1 Fault codes
The robotic mower displays a fault code when unexpected events occurs.
In case of an error, the lights 2D + 2H + 4H + 6H will flash. You will now need to enter the PIN code, the status light flashes a few times in quick succession, it lights up a little longer and starts flashing again a few times in quick succession. Check how many times the status light flashes in quick succession until the light is on a little longer. Immediately afterwards this cycle repeats itself.
You can check the fault code to find out the problem. See the list of fault codes below. If you are not sure how many times the status light flashes, press the CYCLE button again to observe the fault code again. The STATUS light is the framed light Fig. 7.

Note: Each error code starts with a long flash followed by a number of short flashes, according to the diagram below. The short flashes including 1 long flash must be counted.
| Status light flashing | Machine status |
| 1 time | The emergency stop button is triggered |
| 2 times | Self-check status (in this state, the button does not respond, just wait until the self-check status is completed before operating) |
| 3 times | Excessive inclination or overturning causes the mowing to end |
| 4 times | No enclosing signal was detected, which causes the mowing to end (check whether the wire is installed correctly and connected) |
| 5 times | The mower is not in the working area, this causes the mowing to end (check whether the wire is installed correctly and connected) |
| 6 times | The lift sensor is triggered causes the mowing to end |
| 7 times | Low battery causes the mowing to end |
| 8 times | High temperature causes the mowing to end |
| 9 times | Abnormal clogging of the mowing motor causes the mowing to end |
| 10 times | Alternative brake abnormally causes the mowing to end |
| 11 times | Boundary sensor failure causes the mowing to end |
| 12 times | Main brake failure caused the mowing to end |
| 13 times | Over-temperature of the mowing motor causes the mowing to end |
| 14 times | Rain caused the mower come back to charging station |
| 15 times | Driving motor operates abnormally |
| 16 times | Abnormal current of mowing motor |
| 17 times | Left driving motor operates abnormally |
| 18 times | Right driving motor operates abnormally |
| 19 times | Two times change PIN code is inconsistent |
| 20 times | Not work during issue such as slip or cannot go through the area |
8.1.2 Fault codes (when charging)
| Status light flashing | Machine status |
| Continuous block flash quickly (four times a second) | The mower is charging |
| Continuous slow flash (every two seconds) | The mower is completely charged |
| 1 time | Over charging temperature protection |
| 2 times | Abnormal charger protection, charging voltage is too high |
| 3 times | Abnormal charger protection, charging current is too high |
| 4 times | Abnormal battery protection, battery voltage is too low (no |
POWXG6305 EN
| charging below 10 V) | |
| 5 times | BMS (Battery Management System) protection, no charging allowed |
| The light is off | The mower does not turn on or is in low voltage protection state (the voltage is lower than 16 V, the mower should be restarted) |
8.1.3 Clear the fault code
To clear the fault code follow these steps:
- Make sure that all conditions for restarting the mower are met (for the mower itself and in the mowing area).
- The status light flashes, this is the error code.
- The lights 2D-2H-4H and 6H flash, enter the pin code, wait 5 sec.
- Press CYCLE then HOME to exit the emergency stop mode (The status light and the mowing setting lights 1D or 2D and 2H or 4H or 6H are steady)
- Press START followed by CYCLE to start the mower (all lights are off), the mower will start with a new mowing program after 10 sec.
OR
Press HOME followed by CYCLE to return the mower to the charging station (all lights are off), the mower will start after 10 sec.
8.2 Mower does not work
| Problem | Cause | Action |
| The mower stops during mowing | a) Battery low.b) Abnormal state due to unexpected interrupting. PIN code needed. | a) Re-charge the mower.b) Enter the PIN code. |
| Only status light flashes with all other LEDs keeping off in recurring cycles during charging | Automatic setting is invalid. | Re-enter a PIN code. |
| The mower needs PIN code while charging | Charging is interrupted. | Enter PIN code and check the reason:- If the mower is not connected to the charging station, reconnect.- If the power supply of the charging station is not connect correctly, reconnect it. |
| After entering the PIN code, the mower does not start | The START button is not pressed or pressed to late (more than 10 seconds after the last digit of the PIN code). | Enter the PIN code again. |
POWXG6305 EN
The PIN code change does not work
a) Changing of PIN code failed due to wrong PIN code.
b) Changing of PIN code was too slow (more than 20 seconds).
a) After restarting the mower by the On / Off switch, the power light flashes.
b) After restarting the mower by the On / Off switch, the power light does not flash.
Repeat the PIN code change procedure.
a) Charge the mower in the charging station within 5 seconds.
b) Charge the mower in the charging station after unplugging the perimeter wire.
9 MAINTENANCE

Note: To ensure long and reliable service, carry out the following maintenance regularly.
WARNING: Be aware of the danger of moving hazardous parts.
WARNING: Do not touch moving hazardous parts. Make sure the power switch is set to OFF and make sure that all moving parts have come to a stop before doing any maintenance on the mower.
9.1 General maintenance plan
| Item | Action | Once a week | Once a year / every 500 hours |
| Blades | Inspect | X | |
| Blade plate | Inspect | X | |
| STOP button | Inspect | X | |
| Chassis accessories | Clear | X | |
| Inspect | X (twice a year) | ||
| Charging station | Clear | X | |
| Inspect | X | ||
| Charging station base | Inspect / Adjust | X | |
| Driving wheel | Clear | X | |
| Inspect | X (twice a year) | ||
| Omnidirectional wheels | Clear | X | |
| Inspect | X (twice a year) |
9.2 Cleaning the mower

ATTENTION! The power switch must be set to OFF before cleaning the mower!
Wear thick gloves before turning the mower and while cleaning. The blades are sharp! Do not use high pressure cleaners!
- Set the On / Off switch of the mower to OFF.
- Clear the blades and the blade plate with a brush. Remove all dirt and check whether the blades can move free. Check this every two weeks.
- Clean the surface of the mower with a piece of cloth. Don't use any dissolvent.
9.3 Blade replacement (Fig. 8)

ATTENTION! When fitting new blades, make sure you replace ALL the blades. Always use new screws when fitting blades. This is important to ensure blade retention. Failure to use screws could cause serious injury.

ATTENTION! Wear gloves when handling the blade. Only use original replacement parts specified for this mower. Powerplus spare blades and screws item reference number: POWACG9101.
It's recommended that replace the blades within 2-3 months.
There are 3 blades on the robotic lawnmower, which are screwed into the blade disc. All 3 blades and screws must be replaced at the same time to obtain a balanced cutting system.
- Set the on/off switch of the mower to "OFF".
- Turn the robotic lawnmower upside down. Place the robotic lawnmower on a soft and clean surface to avoid scratching the body and the cover.
- Rotate the blade plate so that its holes align with the screws for the blade.
- Remove the 3 screws with a screwdriver.
- Remove each blade and screw.
- Fasten new blades and screws.
- Check that the blades can pivot freely.
9.4 Storage
Keep your mower and the charging station in a warm and dry place during winter.
- Fully charge the battery.
- Set the On / Off switch of the mower to OFF.
- Clean the mower.
- Disconnect the charging station from the power supply.
- Disconnect the wire from the charging station.
- Lift the charging station from the ground and clean it.
- Store the mower and the charging station in a dry place.
9.5 After cleaning, blade replacement or start-up after winter break
After maintenance/winter storage or each time the mower is switched off, it must be restarted by switching on the main switch, entering the PIN code and then pressing "Start" and "Set" to reset the mower's start time.
10 TECHNICAL DATA
| Type | POWXG6305 |
| Mains voltage (charger unit) | 220-240 V / 50 Hz |
| No load speed | 3200 min ^-1 |
| Running time | 70 min |
| Battery type | Li-Ion |
| Battery voltage | 18 V |
| Battery capacity | 2.5 Ah |
| Charging time (empty battery) | 90 min |
| Motor type | Brushless |
| Max. area | 500 m ^2 |
| Cutting width | 18 cm |
| Max slope | 30% (17°) |
| Boundary wire (max.) | 120 m |
| Charging current | 2 A |
| Weight with 2.5 Ah battery | 7.5 kg |
11 NOISE
The declared vibration total value has been measured in accordance with a standard test method and may be used for comparing one tool with another.
The declared vibration total value may also be used in a preliminary assessment of exposure.

The vibration emission during actual use of power tool can differ from the declared total value depending on the ways in which the tool is used.

The safety measures to protect the operator are identified based on an estimation of exposure in the actual conditions of use.
A-weighted emission sound pressure level at the operator position as determined according to the relevant standard, where this level does not exceed 70 dB(A):
| Acoustic pressure level LpA | 48 dB(A) |
| Acoustic power level LwA | 59 dB(A) |
If there is any abnormal vibration please inspect your mower for any abnormal blockage. If necessary clean the mower and/or replace the blades.
12 WARRANTY
- This product is warranted for a 36-month period effective from the date of purchase by the first user.
- This warranty covers all material or production flaws excluding : batteries, chargers, defective parts subject to normal wear & tear such as bearings, brushes, cables, and plugs, or accessories such as drills, drill bits, saw blades, etc. ; damage or defects resulting from maltreatment, accidents or alterations; nor the cost of transportation.
- Damage and/or defects resulting from inappropriate use also do not fall under the warranty provisions.
- We also disclaim all liability for any bodily injury resulting from inappropriate use of the tool.
- Repairs may only be carried out by an authorized customer service centre for Powerplus tools.
- You can always obtain more information at the number 00 32 3 292 92 90.
- Any transportation costs shall always be borne by the customer, unless agreed otherwise in writing.
- At the same time, no claim can be made on the warranty if the damage of the device is the result of negligent maintenance or overload.
- Definitely excluded from the warranty is damage resulting from fluid permeation, excessive dust penetration, intentional damage (on purpose or by gross carelessness), inappropriate usage (use for purposes for which the device is not suitable), incompetent usage (e.g. not following the instructions given in the manual), inexpert assembly, lightning strike, erroneous net voltage. This list is not exhaustive.
- Acceptance of claims under warranty can never lead to the prolongation of the warranty period nor commencement of a new warranty period in case of a device replacement.
- Devices or parts which are replaced under the warranty therefore remain the property of Varo NV.
- We reserve the right to reject a claim whenever the purchase cannot be verified or when it is clear that the product has not been properly maintained. (Clean ventilation slots, carbon brushes serviced regularly, etc.).
- Your purchase receipt must be kept as proof of date of purchase.
- Your appliance must be returned undismantled to your dealer in an acceptably clean state, (in its original blow-molded case if applicable to the unit), accompanied by proof of purchase.
- Your tool must be charged at least 1x per month to ensure optimal operation of this tool.
13 ENVIRONMENT
Should your appliance need replacement after extended use, do not discard it with the household rubbish but dispose of it in an environmentally safe way.
Waste produced by electrical machine items should not be handled like normal household rubbish. Please recycle where recycle facilities exist. Check with your Local Authority or retailer for recycling advice.
13.1 Battery pack
This product contains Li-ion. To preserve natural resources, please recycle or dispose of batteries properly. Local, state or federal laws may prohibit disposal of Li-ion batteries in ordinary trash. Consult your local waste authority for information regarding available recycling and/or disposal options.
VARO – Vic. Van Rompuy N.V. - Joseph Van Instraat 9 - BE2500 Lier - BELGIUM, declares that,
Product: Robot mower 18 V
trade mark: PowerPlus
model: POWXG6305
is in conformity with the essential requirements and other relevant provisions of the applicable European Directives, based on the application of European harmonized standards. Any unauthorized modification of the apparatus voids this declaration.
European Directives (including, if applicable, their amendments up to the date of signature):
2011/65/EU
2006/42/EC
2014/30/EU
2000/14/EC Annex VI LwA
Measured 60 dB(A)
Guaranteed 62 dB(A)
Notified Body ISET - Italy
European harmonized standards (including, if applicable, their amendments up to the date of signature):
EN60335-1:2012
EN50636-2-107:2015
EN55014-1:2017
EN55014-2:2015
Keeper of the Technical Documentation: Philippe Vankerkhove, VARO – Vic. Van Rompuy N.V.
The undersigned acts on behalf of the company CEO,
natural_image
Simple hand-drawn sketch of a rounded rectangle with no text or symbolsPhilippe Vankerkhove
Regulatory Affairs – Compliance Manager
24/09/2021, Lier - Belgium
POWXG6305 DE
9.5 After cleaning, blade replacement or start-up after winter break .....20
9.5 After cleaning, blade replacement or start-up after winter break
After maintenance/winter storage or each time the mower is switched off, it must be restarted by switching on the main switch, entering the PIN code and then pressing "Start" and "Set" to reset the mower's start time.
10 TECHNISCHE DATEN
Notified Body ISET - Italy)
natural_image
Simple hand-drawn outline of a rounded rectangular shape with a small circular mark on top (no text or symbols)Philippe Vankerkhove
natural_image
Yellow and black robotic lawn mower with a red control knob (no visible text or symbols)varo
WWW.VARO.COM
DESIGNED AND MARKETED BY VARO
©copyright by varo
VARO - VIC. VAN ROMPUY nv
JOSEPH VAN INSTRAAT 9 - 2500 LIER - BELGIUM


- SPECIALE VEILIGHEIDSINSTRUCTIES VOOR DE ROBOTMAAIER....6
- PROBLEEMOPLOSSING....14
- Recommendations
- DÉCLARATION DE CONFORMITÉ
- SPECIAL SAFETY REGULATIONS FOR ROBOTIC LAWNMOWER....6
- TROUBLE SHOOTING 13
- MAINTENANCE 16
- TECHNICAL DATA 18
- ROBOTIC LAWNMOWER 18 V - 2.5 AH - 500 M² POWXG6305
- INTENDED USE
- DESCRIPTION (FIG. A, B & C)
- PACKAGE CONTENT LIST
- SAFETY INSTRUCTIONS
- IMPORTANT: READ CAREFULLY BEFORE USE! KEEP FOR FUTURE REFERENCE!
- Training
- Preparation
- Operation
- General
- Additionally when the machine is operating automatically
- Maintenance and storage
- POWXG6305 EN
- SPECIAL SAFETY REGULATIONS FOR ROBOTIC LAWNMOWER
- Robotic lawnmower safety warning
- Battery/Battery charger safety warnings
- OPERATION
- Lawn preparation
- Charging station placement and connection
- Charging the lawnmower
- Setting up the perimeter wire (Fig. 3, Fig. 4 and Fig. 5)
- Note: You should keep a length of 15-20 cm at start and the end of the wire for operating and handling the wire.
- Setting up the robotic lawnmower
- Blade height adjusting knob (2)
- PIN code
- Immediate manual start of the mower
- If the mower is at the charging station:
- If the mower is outside the charging station:
- Setting the working time, mowing frequency and start time of the mower (outside the charging station)
- Stop the robotic mower
- Change PIN code
- Control panel information (Fig. 7)
- TROUBLE SHOOTING
- Fault codes
- Clear the fault code
- MAINTENANCE
- Cleaning the mower
- Blade replacement (Fig. 8)
- Storage
- After cleaning, blade replacement or start-up after winter break
- NOISE
- WARRANTY
- ENVIRONMENT
- Battery pack
- POWXG6305 DE
Brand : PowerPlus
Model : POWXG6305
Category : Lawn mower