Pro FX7880E - Beard trimmer BABYLISS - Free user manual and instructions
Find the device manual for free Pro FX7880E BABYLISS in PDF.

User questions about Pro FX7880E BABYLISS
0 question about this device. Answer the ones you know or ask your own.
Ask a new question about this device
Download the instructions for your Beard trimmer in PDF format for free! Find your manual Pro FX7880E - BABYLISS and take your electronic device back in hand. On this page are published all the documents necessary for the use of your device. Pro FX7880E by BABYLISS.
USER MANUAL Pro FX7880E BABYLISS
natural_image
Black and white photo of a baby ear Grenada-branded hairbrush (no text or symbols visible on body)TONDEUSE DE FINITION PROFESSIONNELLE
PROFESSIONAL TRIMMER
EDM TECHNOLOGY
FRANCAIS
TONDEUSE DE FINITION PROFESSIONNELLE EDM TECHNOLOGY
FX7880E
natural_image
Diagram of a regular device with handle and screwdriver (no text or symbols)natural_image
Illustration of a hand holding a digital blood glucose meter with a pen inserted (no text or symbols visible)Etape n°2.
natural_image
Diagram of a device's internal structure with no visible text or symbolsEtape 3.
natural_image
Illustration of hands installing or adjusting a device into a circular component with a pen (no text or symbols visible)Etape 5.
natural_image
Illustration of a hand holding a computer flash drive (no text or symbols visible)NORMAL (REGULAR)
Réinitialiser la position de la lame
Etape 1.
natural_image
Illustration of a hand using a tool to adjust a digital device with a ruler (no text or symbols visible)
natural_image
Illustration of a hand inserting a component into a device housing (no text or symbols visible)natural_image
Illustration of hands assembling a device into a circular housing with a screwdriver (no text or symbols visible)Etape 3.
natural_image
Line drawing of a hand holding a compact floppy disk with a screw and central slot (no text or symbols)NETTOYAGE ET ENTRETIEN
This heavy-duty trimmer features a choice of 2 interchangeable Japanese steel blades with zero gap adjustment for precision and control. Long-life lithium battery and super-fast charging guarantees sustained performance for the ultimate in precision detailing. A high torque digital motor delivers high power performance for clean, close cutting.
FEATURES
• High power cord or cordless control
- Precision engineered Japanese steel blades with super sharp V cutting angle
- Interchangeable 30mm ("U") and 40mm ("T") zero gap adjustable cutting blades
• Lithium technology for sustained power performance
• High-torque digital motor for long-lasting power and speed
- Absolutely balanced for superior handling
- 6mm and 10mm comb guides
- Robust all metal housing design
- Charging and storage stand
- Oil and cleaning brush
INSTRUCTIONS FOR USE
- Charging the appliance - Before using the appliance for the first time, charge the battery continuously for 3 hours. Maximum battery capacity will only be reached after 3 completed charging and discharging cycles.
- Plug the charging adapter into a suitable mains power socket. The red LED indicator light will flash when correctly connected to the mains power and will continuously flash until the battery has fully charged. When the battery is fully charged the LED indicator light will stop flashing but remain on.
NOTE: Always place the trimmer in the base with the '1/0' switch in the OFF (0) position.
- When the clipper is running low on charge, the LED indicator light will flash, warning there is approximately 3 minutes of battery use remaining. A 3 hour charge will provide approximately 2 hours use. A 30 minute quick charge will provide approximately 30 minutes use.
- If the charging light starts to flash rapidly (more than 4 flashes per second) then the appliance is faulty. If this happens then please stop charging and remove the adapter from the mains and contact the after-sales service.
- Preserving the batteries - In order to maintain the optimum capacity of the rechargeable batteries, the appliance should be recharged for 3 hours approximately every 3 months.
- Using the trimmer on the mains - ensure that the trimmer is switched off. Plug into a suitable
mains socket. Wait for approximately a minute, and then switch on.
IMPORTANT: Do not use the trim-mer in this mode for more than 20 minutes.
USE OF THE COMB GUIDES
This trimmer is supplied with 2 comb guides.
No.1 - 6mm
No.2 - 10mm
To attach a comb, hold it by the sides and clip it over the teeth of the blade. To remove the comb, simply push off.
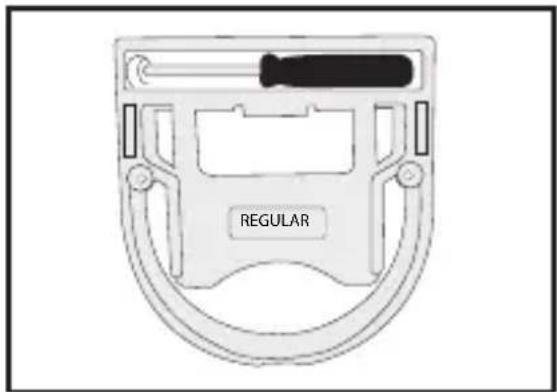
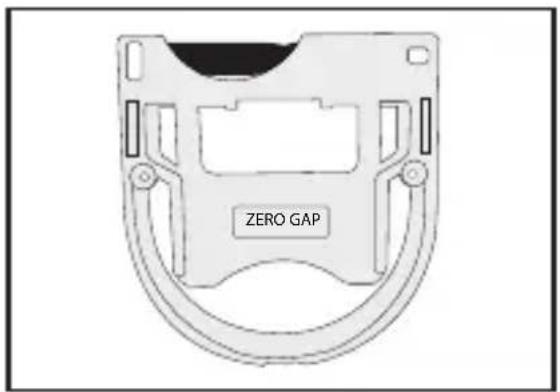
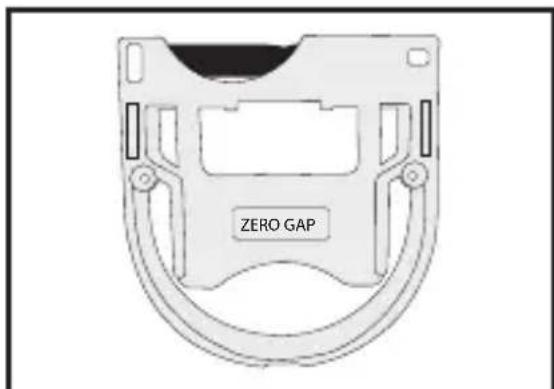
ZERO GAP ADJUSTMENT TOOL
IMPORTANT! Only ever attempt to zero gap the blades using the adjustment tool, following the instructions very precisely.
The adjustment tool is required to adjust the blades to zero gap, to achieve a closer, more precise cut.
Regular
natural_image
Diagram of a mechanical device with a labeled 'REGULAR' component (no other text or symbols)Zero Gap
text_image
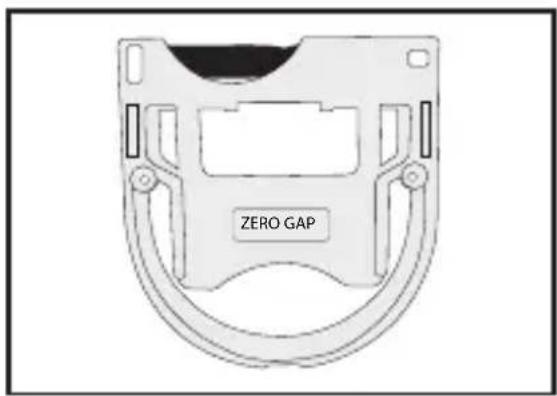
ZERO GAPZERO GAP
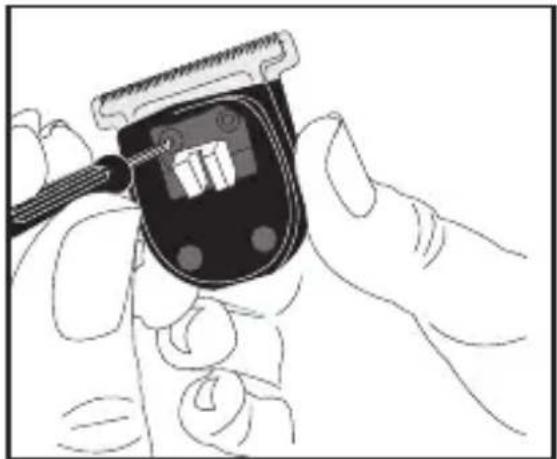
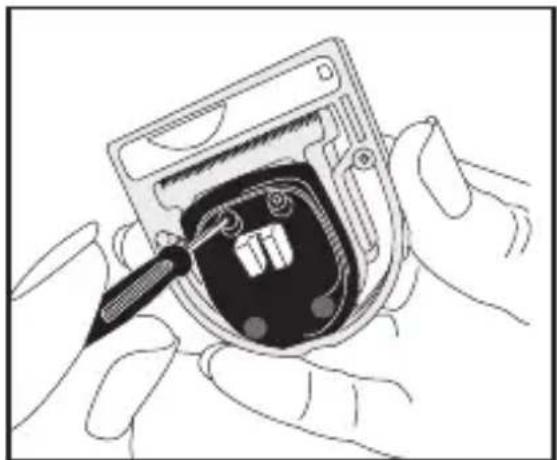
Step 1.
Before placing the blade into the adjustment tool, use the screwdriver provided to loosen the tension screws, without removing them completely from the blade holder.
natural_image
Illustration of a hand using a digital glucose meter to adjust the血糖 (no text or symbols visible)Step 2.
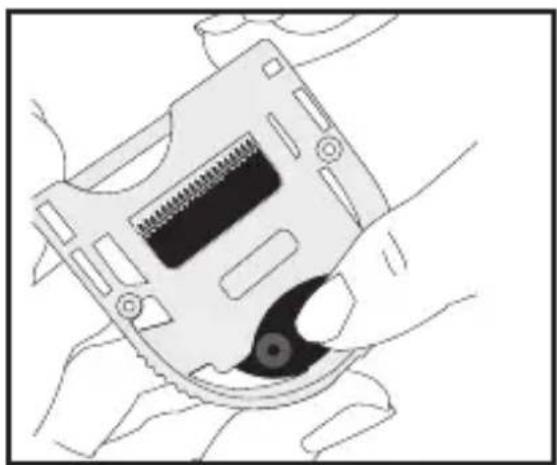
Place the blade into the adjustment tool in the side labelled 'Zero Gap'.
natural_image
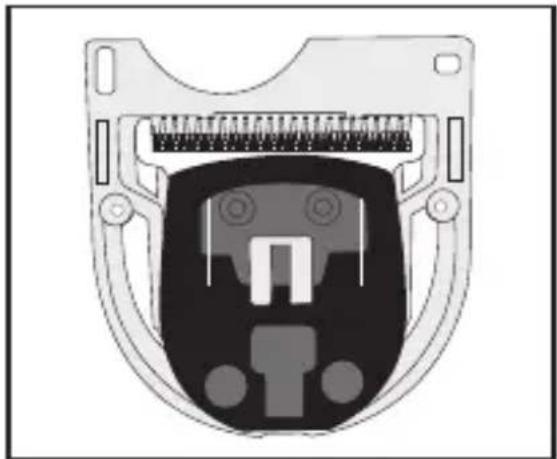
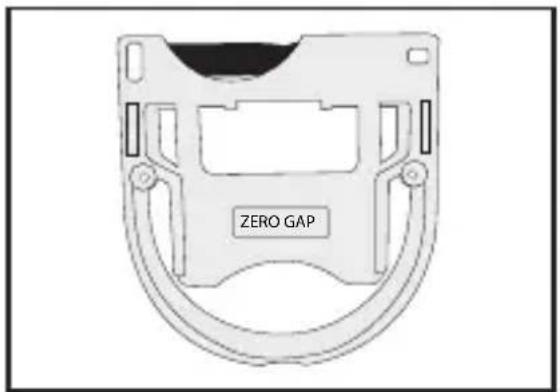
Diagram of a mechanical component with internal structure and mounting holes (no text or symbols)Step 3.
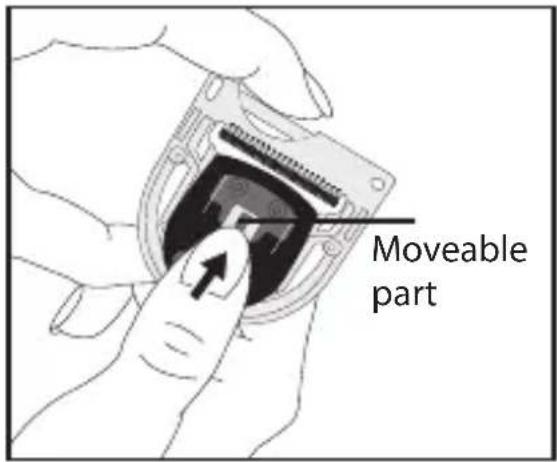
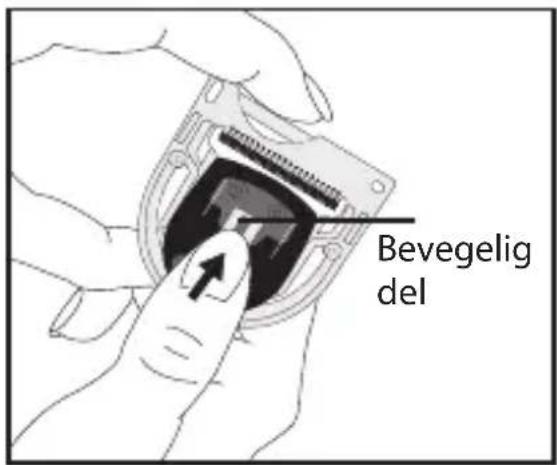
Push the blade guide up as far as the adjustment tool allows, so the moving blade sits closely with the top of the adjustment tool. The blades will now be flush with each other.
text_image
Moveable partStep 4.
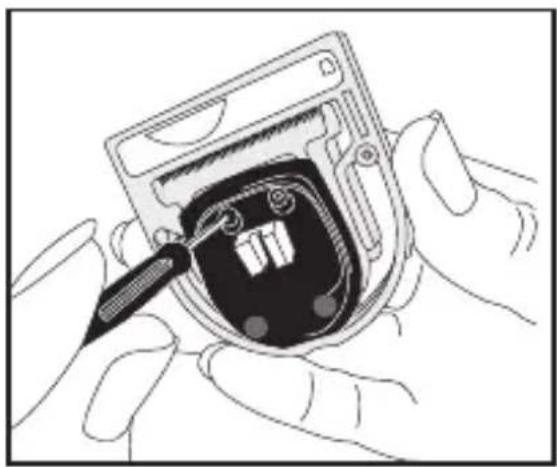
Using the screwdriver, tighten the tension screws to hold the blade in place.
natural_image
Illustration of hands installing or adjusting a device component with a screwdriver (no text or symbols visible)Step 5.
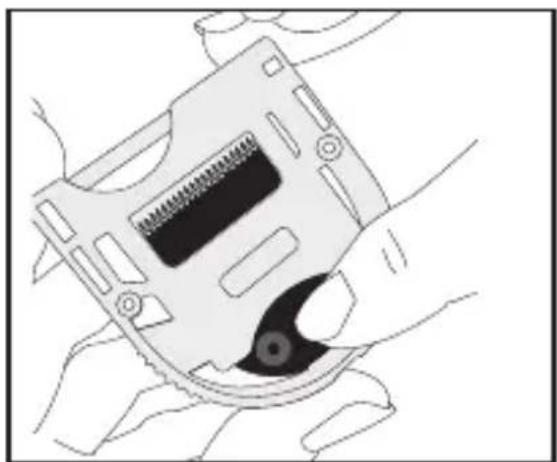
Remove the blade from the adjustment tool by gently pushing the blade from the opposite side.
natural_image
Illustration of a hand holding a computer flash drive (no text or symbols visible)REGULAR - Resetting the blade for regular use
Step 1
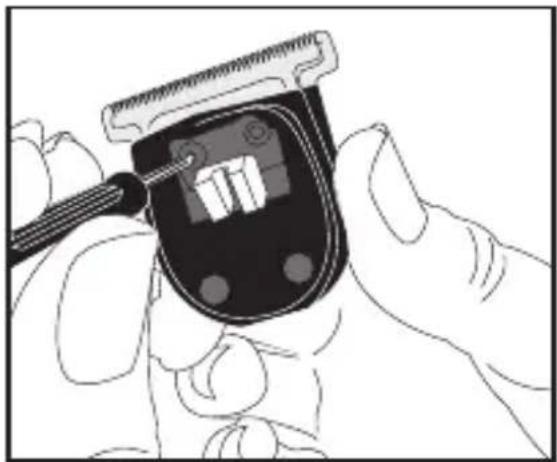
Before placing the blade into the adjustment tool, use the screwdriver provided to loosen the tension screws, without removing them completely from the blade holder. Place the blade into the adjustment tool in the side marked Regular.
natural_image
Illustration of a hand holding a digital blood glucose meter with a pen inserted (no text or symbols visible)
natural_image
Illustration of a hand inserting a device into a component (no text or symbols visible)The tool will automatically push the moving blade down to its regular position.
Step 2.
Tighten the tension screws to hold the blade in place.
natural_image
Illustration of hands installing or adjusting a device into a circular component with a screwdriver (no text or symbols visible)Step 3.
Remove the blade from the adjustment tool by gently pushing the blade from the opposite side.
natural_image
Illustration of hands holding a computer flash drive (no text or symbols visible)CLEANING AND MAINTENANCE
To maintain correct performance, the blades must be regularly cleaned and oiled. They are removable for easy cleaning.
- With the trimmer facing you, push the blade up and away from the trimmer to remove.
- Brush away the hair from the blades and the interior of the cutting head with the cleaning brush.
- It is recommended to oil the blades every time that the trimmer is used, using the oil provided. Never use any other
product: this oil was formulated for high speed trimmers, it does not evaporate or slow down the blades.
• After cleaning click the blade frame back in place.
DEUTSCH
PROFESSIONELLER HAARTRIMMER EDM TECHNOLOGY FX7880E
NULLSPALT (BUZZ-CUT)
Schritt 1
natural_image
Illustration of a hand using a digital blood glucose meter to measure the amount (no text or symbols visible)Schritt 2
natural_image
Cross-sectional diagram of a mechanical component with internal structure (no text or symbols)Schritt 3
natural_image
Illustration of hands installing or adjusting a device component with a pencil (no text or symbols visible)Schritt 5
natural_image
Illustration of a hand holding a compact floppy disk with a screw slot (no text or symbols)NORMAL (REGULAR)
natural_image
Illustration of a hand using a tool to adjust a digital device with a ruler (no text or symbols visible)
natural_image
Illustration of a hand inserting a component into a device housing (no text or symbols visible)natural_image
Illustration of hands installing or adjusting a device into a circular component with a pen (no text or symbols visible)Schritt 3
natural_image
Illustration of a hand holding a CD or DVD disc with a spring and screwdriver (no text or symbols)natural_image
Diagram of a mechanical device with a labeled 'REGULAR' component (no other text or symbols)Zero gap
text_image
ZERO GAPZERO GAP
Stap 1.
natural_image
Illustration of a hand holding a digital blood glucose meter with a pen inserted (no text or symbols visible)Stap 2.
natural_image
Cross-sectional diagram of a mechanical component with internal structure (no text or symbols)Stap 3.
natural_image
Illustration of hands installing or adjusting a device component with a pencil (no text or symbols visible)Stap 5.
natural_image
Illustration of a hand holding a compact floppy disk with a screw slot (no text or symbols)NORMAAL (REGULAR)
natural_image
Illustration of a hand using a tool to adjust a digital device with a ruler (no text or symbols visible)
natural_image
Illustration of a hand inserting a component into a device housing (no text or symbols visible)natural_image
Illustration of hands installing or adjusting a device into a circular component with a pen (no text or symbols visible)Stap 3.
natural_image
Illustration of a hand holding a CD or DVD disc with a spring and screwdriver (no text or symbols)REINIGING EN ONDERHOUD
natural_image
Illustration of a hand using a digital blood glucose meter to adjust the product (no text or symbols visible)Fase 2.
natural_image
Cross-sectional diagram of a mechanical component with internal structure (no text or symbols)Fase 3.
natural_image
Illustration of hands installing or adjusting a device component with a pencil (no text or symbols visible)Fase 5.
natural_image
Illustration of hands holding a computer flash drive (no text or symbols visible)NORMAL (REGULAR)
natural_image
Illustration of a hand using a tool to adjust a digital device with a ruler (no text or symbols visible)
natural_image
Illustration of a hand inserting a component into a device housing (no text or symbols visible)natural_image
Illustration of hands installing or adjusting a device into a circular component with a screwdriver (no text or symbols visible)Fase 3.
natural_image
Line drawing of a hand holding a compact floppy disk with a screw and central slot (no text or symbols)natural_image
Illustration of a hand holding a digital device with a tool, no text or symbols visibleEtapa 2
natural_image
Diagram of a mechanical component with internal structure and mounting holes (no text or symbols)Etapa 3
natural_image
Illustration of hands installing or adjusting a device into a circular component with a pen (no text or symbols visible)Etapa 5
natural_image
Line drawing of a hand holding a compact electronic device with a black screw and a black hole (no text or symbols)NORMAL (REGULAR)
natural_image
Illustration of a hand using a tool to adjust a digital glucose meter (no text or symbols visible)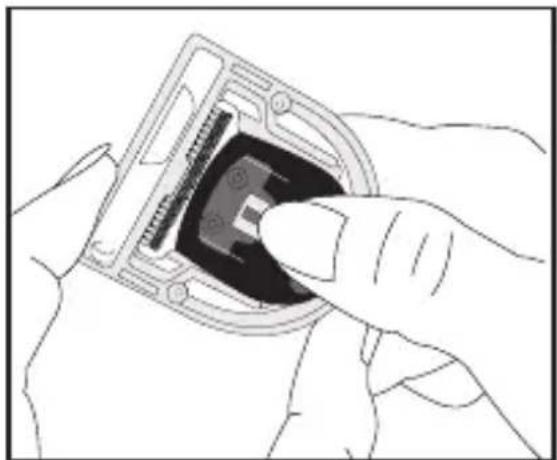
natural_image
Illustration of hands inserting a component into a device housing (no text or symbols visible)natural_image
Illustration of hands installing or adjusting a device with a screwdriver (no text or symbols visible)Etapa 3
natural_image
Line drawing of a hand holding a compact floppy disk with a screw and central slot (no text or symbols)LIMPIEZA Y MANTENIMIENTO
natural_image
Illustration of a hand holding a blood glucose meter with a pen inserted (no text or symbols visible)Etapa n°2.
natural_image
Diagram of a mechanical component with internal structure and mounting holes (no text or symbols)Etapa n°3.
natural_image
Illustration of hands assembling a device into a circular housing with a screwdriver (no text or symbols visible)Etapa n° 5.
natural_image
Illustration of a hand holding a compact computer flash drive (no text or symbols visible)NORMAL (REGULAR)
natural_image
Illustration of a hand using a tool to adjust a digital device with a ruler (no text or symbols visible)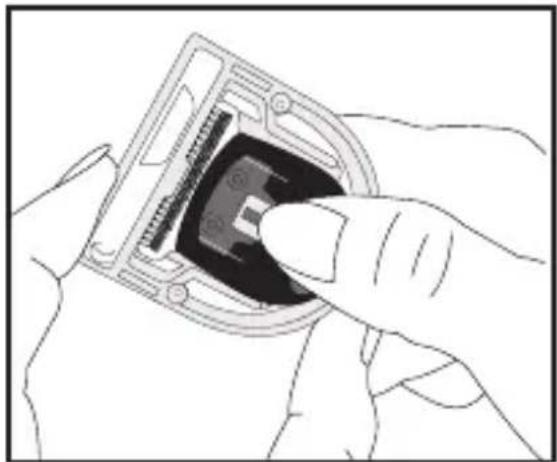
natural_image
Illustration of a hand inserting a component into a device housing (no text or symbols visible)natural_image
Illustration of hands installing or adjusting a device into a circular component with a screwdriver (no text or symbols visible)Etapa n°3.
natural_image
Line drawing of a hand holding a compact floppy disk with a screw and central slot (no text or symbols)natural_image
Illustration of a hand holding a digital glucose meter with a pen inserted (no text or symbols visible)Trin nr. 2.
natural_image
Diagram of a device's internal structure with no visible text or symbolsTrin 3.
natural_image
Illustration of hands installing or adjusting a device into a circular component with a screwdriver (no text or symbols visible)Trin 5.
natural_image
Illustration of a hand holding a computer floppy disk with a screwdriver inserted (no text or symbols visible)NORMAL (ALMINDELIG)
natural_image
Illustration of a hand using a handheld device to adjust a digital display (no text or symbols visible)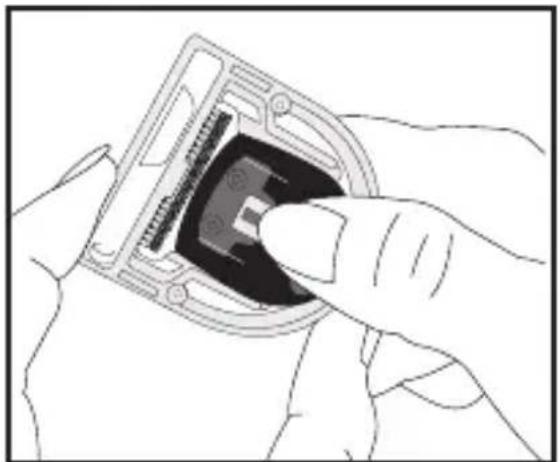
natural_image
Line drawing of a hand inserting a component into a device housing (no text or symbols)natural_image
Illustration of hands installing or adjusting a device into a circular component with a tool (no text or symbols visible)Trin 3.
natural_image
Illustration of hands holding a computer flash drive (no text or symbols visible)RENG∅RING OG
VEDLIGEHOLDELSE
natural_image
Illustration of a hand holding a digital blood glucose meter with a pen inserted (no text or symbols visible)Steg 2.
natural_image
Diagram of a device's internal structure with connector pins and ports (no text or symbols)Steg 3.
natural_image
Illustration of hands installing or adjusting a device into a circular component with a pencil (no text or symbols visible)Steg 5.
natural_image
Illustration of a hand holding a compact computer flash drive (no text or symbols visible)NORMALLÄGE (REGULAR)
natural_image
Illustration of a hand using a digital measuring device to adjust a battery (no text or symbols visible)
natural_image
Illustration of a hand inserting a component into a device housing (no text or symbols visible)natural_image
Illustration of hands installing or adjusting a device into a circular component with a screwdriver (no text or symbols visible)Steg 3.
natural_image
Illustration of hands holding a computer flash drive (no text or symbols visible)RENGÖRING OCH UNDERHÅLL
natural_image
Illustration of a hand using a handheld device to adjust a digital display (no text or symbols visible)Trinn nr. 2.
natural_image
Diagram of a device's internal structure showing connector pins and ports (no text or labels)Trinn nr. 3.
Skyv bladets bevegelige del oppover, så langt som justeringsverktøyet tillater det, så det bevegelige bladet er på nivå med toppen av justeringsverktøyet. Bladene vil då være på linje med hverandre.
text_image
Bevegelig delTrinn nr. 4.
natural_image
Illustration of hands installing or adjusting a device into a circular component with a pencil (no text or symbols visible)Trinn nr. 5.
natural_image
Illustration of a hand holding a computer floppy disk with a screw and key (no text or symbols)NORMAL (REGULAR)
natural_image
Illustration of a hand using a digital glucose meter to adjust it (no text or symbols visible)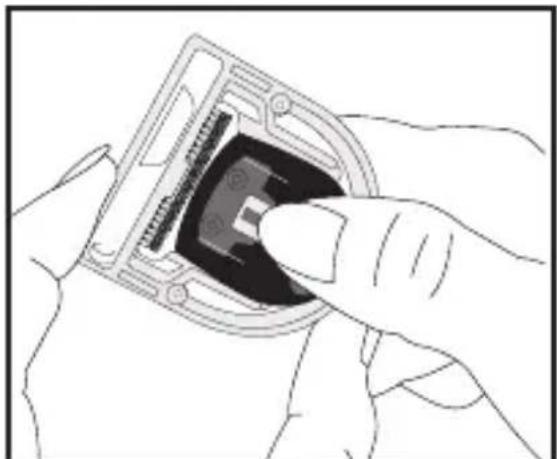
natural_image
Line drawing of a hand inserting a component into a device housing (no text or symbols)natural_image
Illustration of hands installing or adjusting a device into a circular component (no text or symbols visible)Trinn nr. 3.
natural_image
Illustration of hands holding a computer flash drive (no text or symbols visible)RENGJ∅RING OG VEDLIKEHOLD
natural_image
Diagram of a medical device labeled 'REGULAR' with no other text or symbolsNollataso (Zero Gap)
text_image
ZERO GAPNOLLATASO (ZERO GAP)
Vaihe 1.
natural_image
Illustration of a hand holding a digital blood glucose meter with a pen inserted (no text or symbols visible)Vaihe 2.
natural_image
Diagram of a device's internal structure with no visible text or symbolsVaihe 3.
natural_image
Illustration of hands installing or adjusting a device into a circular component with a pen (no text or symbols visible)Vaihe 5.
natural_image
Illustration of hands holding a hard disk drive with a screw and nut (no text or symbols)NORMAALI (REGULAR)
natural_image
Illustration of a hand using a digital thermometer to adjust a device (no text or symbols visible)
natural_image
Illustration of a hand inserting a device into a plastic housing (no text or symbols visible)natural_image
Illustration of hands installing or adjusting a device into a circular component with a screwdriver (no text or symbols visible)Vaihe 3.
natural_image
Line drawing of a hand holding a computer flash drive (no text or symbols)PUHDISTUS JA HUOLTO
natural_image
Illustration of a hand holding a digital blood glucose meter with a pen inserted (no text or symbols visible)Βήμα 2
natural_image
Diagram of a device's internal structure showing connector pins and ports (no text or labels)Βήμα 3
natural_image
Illustration of hands installing or adjusting a device component with a pencil (no text or symbols visible)Βήμα 5
natural_image
Illustration of a hand holding a computer flash drive (no text or symbols visible)KANONIKO KENO (REGULAR)
natural_image
Illustration of a hand using a tool to adjust a digital device with a ruler (no text or symbols visible)
natural_image
Illustration of a hand inserting a component into a device housing (no text or symbols visible)natural_image
Illustration of hands installing or adjusting a device into a circular component with a screwdriver (no text or symbols visible)Βήμα 3
natural_image
Illustration of a hand holding a computer flash drive with a screw and key (no text or symbols)natural_image
Illustration of a hand holding a small electronic device with a cable inserted (no text or symbols visible)2. lépés
natural_image
Diagram of a device's internal structure showing connector pins and ports (no text or symbols)3. lépés
natural_image
Illustration of hands installing or adjusting a device component with a pencil (no text or symbols visible)5. lépés
natural_image
Illustration of hands holding a compact electronic device with a black screw and a circular button (no text or symbols)NORMÁL (REGULAR)
natural_image
Illustration of a hand using a tool to adjust a digital device with a ruler (no text or symbols visible)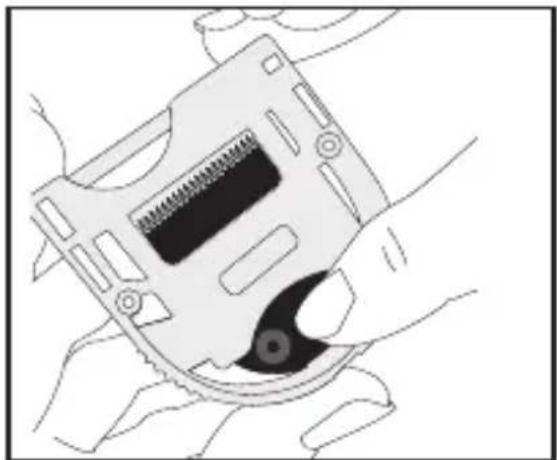
natural_image
Line drawing of a hand holding a compact electronic device with a screw and central slot (no text or symbols)
natural_image
Illustration of a hand inserting a component into a device housing (no text or symbols visible)natural_image
Illustration of hands installing or adjusting a device into a circular component with a tool (no text or symbols visible)3. lépés
PROFESJONALNY TRYMER PRECYZYJNY EDM TECHNOLOGY FX7880E
natural_image
Diagram of a medical device casing with a labeled 'REGULAR' button (no other text or symbols)natural_image
Illustration of a hand holding a digital glucose meter with a pen inserted (no text or symbols visible)Etap 2.
natural_image
Diagram of a mechanical component with internal structure and mounting holes (no text or symbols)Etap 3.
natural_image
Illustration of hands installing or adjusting a device component with a screwdriver (no text or symbols visible)Etap 5.
natural_image
Illustration of hands holding a compact computer drive with a screw and indicator lights (no text or symbols)NORAMLNIE (REGULAR)
natural_image
Illustration of a hand using a tool to adjust a digital device with a ruler (no text or symbols visible)
natural_image
Illustration of a hand inserting a component into a device housing (no text or symbols visible)natural_image
Illustration of hands installing or adjusting a device into a circular component with a pen (no text or symbols visible)Etap 3.
natural_image
Illustration of hands holding a compact electronic device with a screw and central slot (no text or symbols visible)CZYSZCZENIE I KONSERWACJA
natural_image
Illustration of a hand holding a digital device with a screwdriver, no text or symbols visible2. krok
natural_image
Diagram of a device's internal structure with no visible text or symbols3. krok
natural_image
Illustration of hands installing or adjusting a device component with a pencil (no text or symbols visible)5. krok
natural_image
Illustration of a hand holding a compact floppy disk with a screw and central slot (no text or symbols)BĚŽNÉ NASTAVENÍ –
natural_image
Illustration of a hand holding a digital glucose meter with a screwdriver (no text or symbols visible)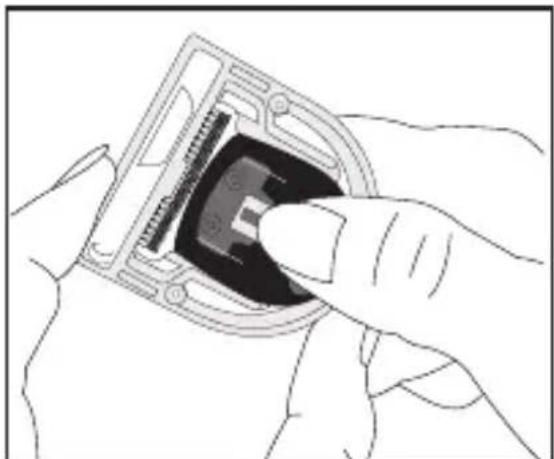
natural_image
Illustration of a hand inserting a device into a plastic housing (no text or symbols visible)natural_image
Illustration of hands installing or adjusting a device into a circular component with internal wiring (no text or symbols visible)3. krok
natural_image
Line drawing of a hand holding a CD or DVD disc with a screw and central slot (no text or symbols)ČIŠTĚNÍ A ÚDRŽBA
natural_image
Illustration of a hand holding a digital glucose meter with a pen inserted (no text or symbols visible)Этап №2
natural_image
Diagram of a device's internal structure showing connector pins and ports (no text or symbols)Этап №3
natural_image
Illustration of hands installing or adjusting a device into a circular component with a screwdriver (no text or symbols visible)Этап №5
natural_image
Line drawing of a hand holding a compact floppy disk with a screw and central slot (no text or symbols)natural_image
Illustration of a hand using a digital thermometer to adjust a device (no text or symbols visible)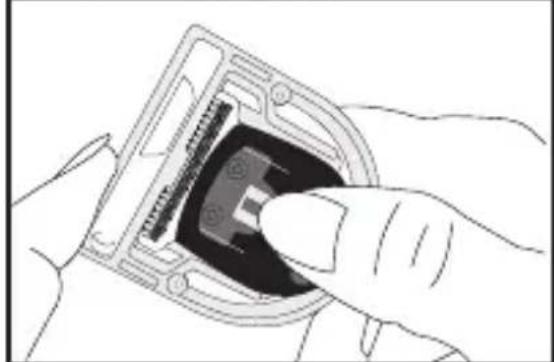
natural_image
Illustration of a hand inserting a component into a device housing (no text or symbols visible)natural_image
Illustration of hands installing or adjusting a device into a circular component with a tool (no text or symbols visible)Этап 3.
natural_image
Line drawing of a hand holding a device with a screw and circular button (no text or symbols)УХОД И ОЧИСТКА
natural_image
Diagram of a medical device labeled 'REGULAR' with no other text or symbolsSifir Boşluk
text_image
ZERO GAPSIFIR BOŞLUK
1.Adim
natural_image
Illustration of a hand holding a digital blood glucose meter with a pen inserted (no text or symbols visible)2.Adim
natural_image
Diagram of a mechanical component with internal structure and mounting holes (no text or symbols)3.Adim
text_image
Mobil kısim4.Adim
natural_image
Illustration of hands installing or adjusting a device into a circular component with a pen (no text or symbols visible)5.Adim
natural_image
Line drawing of a hand holding a compact electronic device with a screw slot and a circular button (no text or symbols)natural_image
Illustration of a hand using a digital glucose meter to adjust the blood glucose level (no text or symbols visible)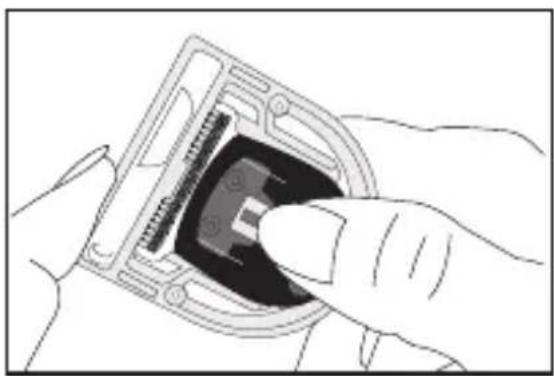
natural_image
Illustration of a hand inserting a device into a plastic housing (no text or symbols visible)natural_image
Illustration of hands installing or adjusting a device into a circular component with a screwdriver (no text or symbols visible)3.Adim
natural_image
Line drawing of hands holding a computer flash drive (no text or symbols)TEMİZLİK VE BAKIM
natural_image
Illustration of a hand holding a digital blood glucose meter with a pen, no text or symbols present2 žingsnis.
natural_image
Cross-sectional diagram of a device with internal components (no text or symbols)3 žingsnis.
natural_image
Illustration of hands installing or adjusting a device into a circular component with a pen (no text or symbols visible)5 žingsnis.
natural_image
Illustration of a hand holding a computer flash drive (no text or symbols visible)NORMALUS TARPAS
natural_image
Illustration of a hand holding a digital blood glucose meter with a pen, no text or symbols present
natural_image
Illustration of a hand inserting a component into a device housing (no text or symbols visible)natural_image
Illustration of hands installing or adjusting a device into a battery pack (no text or symbols visible)3 žingsnis.
natural_image
Line drawing of a hand holding a computer flash drive (no text or symbols)VALYMAS IR PRIEŽIŪRA
CE DECLARATION OF CONFORMITY
We the undersigned, hereby certify the conformity of the following product:
Type of product : Metal trimmer
Type Number : T149a
Trademark : BaByliss / CPL
with following characteristics : 100-240V\~ 50/60Hz 4.5VDC 1000mA
Country of origin : China
Within the essential requirements of the CE Directives:
2014/30/EU ElectroMagnetic Compatibility Directive
2014/35/EU Low Voltage Directive
2011/65/EC RoHS Directive
2009/125/EC Ecodesign Directives implemented by the Commission
Regulations (EC) No. 1275/2008 and (EC) No. 278/2009
(where applicable) amended by 2008/28/EC
2006/42/EC Machinery Directive
In accordance with the following standards:
LVD EN 60335-1 2012 A11; AC (2014)
EN 60335-2-8 2015 A1
(including EMF) EN 62233 2008
Ecodesign EN 50564 2011
EMC EN 55014-1 2006 A1; A2
EN 61000-3-2 2014
EN 61000-3-3 2013
EN 55014-2 1997 A1;A2
CE mark first affixed: June 2017
BABYLISS FACO S.P.R.L.
(authorised by BABYLISS S.A.R.L. and Conair Group Ltd)

text_image
C€BaByliss FACO s.p.r.l.