
AXCL10D - Oven AXIS - Free user manual and instructions
Find the device manual for free AXCL10D AXIS in PDF.
| Product Type | Professional convection and combi oven (steam) |
| Brand | Axis |
| Model | AXCL10D (ref. AX-CL10M) |
| Power supply | 208-240 V, 60 Hz, 52 A |
| Power | 21 kW |
| Water pressure | 1.5 - 2.0 bar |
| MCA (minimum current) | 52 A |
| MOP (maximum protection) | 80 A |
| Control panel | Digital with LED display and rotary encoder |
| Temperature range | 30 °C to 260 °C (86 °F to 500 °F) |
| Timer | Up to 999 minutes or continuous operation |
| Cooking programs | Up to 99 recipes with 3 to 4 phases each |
| Special functions | Adjustable humidification (0-100%), core probe, Delta T, automatic preheating, motor reversal |
| Fan speed | 2 speeds (Min and Max) |
| Motorized chimney | Yes, adjustable |
| Internal lighting | Replaceable bulb |
| Material | Stainless steel |
| Safety | Automatic shut-off on door opening, safety thermostat, audible alarms |
| Cleaning | Manual cleaning with soapy water, no high-pressure water jets |
| Installation | On table, minimum spacing: non-combustible walls 50 mm, combustible walls 500 mm sides and 700 mm rear |
| Weight | Not specified (estimated ~150 kg) |
Frequently Asked Questions - AXCL10D AXIS
User questions about AXCL10D AXIS
0 question about this device. Answer the ones you know or ask your own.
Ask a new question about this device
Download the instructions for your Oven in PDF format for free! Find your manual AXCL10D - AXIS and take your electronic device back in hand. On this page are published all the documents necessary for the use of your device. AXCL10D by AXIS.
USER MANUAL AXCL10D AXIS
ATTENTION
Read this instruction manual carefully and fully understand the information contained in it.
Such information is provided for the purpose of carrying out the installation, use, maintenance and cleaning phases in a proper manner.
Operations carried out incorrectly may cause damages and injuries (including serious ones) to people, animals and/or property.

ATTENTION
For your own safety, do not use or store any type of flammable substance near the appliance, during both the installation phase and the operating phase.
DELIVERY OF THE APPLIANCE
The oven you have purchased has been thoroughly tested for the purpose of guaranteeing the highest quality.
When you receive the oven, check carefully that it has not been damaged during transport, by carefully verifying the intactness of the packing in which the oven was delivered.
In case the packing shows significant damage, immediately contact the courier and the retailer where you purchased the oven, indicating the name of the product and its serial number and enclosing photographic evidence.
Keep all the documentation supplied with the oven, so as to ensure easy referral to information about maintenance, use and cleaning of the appliance itself.
Prior to installing and using the appliance, all information contained in this instruction manual must have been fully understood.
INSTALLATION OPERATIONS
To ensure proper installation, all operations need to be carried out by authorised and qualified personnel, according to the instructions provided in this manual and in compliance with regulations in force in the of installation.
Failure to comply with said instructions may cause damages and injuries (including serious ones) to people and/or property.
TRANSPORTING THE DEVICE

natural_image
Blue circular icon with two white human figures holding a document (no text or symbols)The appliance you purchased may be quite heavy.
In order to prevent any type of damage to installation personnel, always use a suitable number of qualified workers and/or equipment (forklift truck) when handling the device.

natural_image
Blue circular sign with white glove icons (no text or symbols)Use special safety gloves when handling, positioning and installing the appliance.
Failure to use such safety equipment may cause injury to installation personnel.
Make sure the passageway for the transport and the entrance door to the installation room are large enough.
Do not drag or tilt the appliance in order to move it. Instead, lift it up straight from the ground, moving it horizontally.
Prior to handling the appliance, always make sure that there are no cutting and/or delicate edges that may be damaged.
UNPACKING THE DEVICE
- Carefully remove the appliance from its packing Keep the cardboard box and all packing material until the appliance has been completely checked and tested.
- Carefully read all information contained in this manual prior to installing and using the appliance.
Operations other than the ones indicated in this manual may cause damages (including serious ones) to people, animals and/or property, in addition to causing the appliance warranty to be forfeited and relieving the manufacturing company from any and all responsibility. - The instruction manual is considered integral part of the appliance, hence it must be kept for future reference.
- Remove all protective film packing material and any accessories from the appliance prior to plugging it into the mains.
Store any accessories in a suitable place.
POSITIONING THE DEVICE
- The place of installation must be indoors and well ventilated.
The oven is not suited for outdoor installation.
- The ambient temperature of the place of installation of the appliance must be at least +4°C.
- Make sure the installation surface (table) is suited to withstand the weight of the appliance (also consider the additional weight when the oven is completely full).
- Make sure that the place intended for the oven installation is such as to allow the oven door to be opened all the way, for the purpose of working safely.
- The installation surface of the appliance must be made of fireproof material.
- The appliance must be positioned on top of a flat surface.
Check the flatness of the appliance once it is positioned, using the special measuring instruments.
The appliance is equipped with adjustable feet: in case the support surface is not flat, they can be unscrewed or screwed to adjust the oven height.
- It is advisable to position the appliance in such a way as to make it easy to carry out any maintenance and/or cleaning on the appliance itself.
- Do not obstruct or reduce the air flow rate of the natural ventilation openings provided on the oven.
These openings have been especially provided to allow cooling of the electrical components of the oven.
Failure to comply with this instruction may cause the internal oven components to break.
Failure to comply with this instruction shall cause the warranty on the appliance to be forfeited and shall relieve the manufacturing company from any and all responsibility.
- In case maintenance and/or cleaning operations require the appliance to be moved, at the end of such operations be especially careful to correctly reposition the appliance, according to the criteria provided above.
- Do not place the appliance near flammable materials or containers of flammable materials (walls, furniture, screens, gas canisters) as this can create a fire hazard.
- The oven is not suited for flush mounting, and its positioning has to comply with the minimum distances from the walls of the installation room (there is a label affixed to the appliance that specifies such distances:)
non-combustible walls: 50 mm from the sides and back of the oven. combustible walls: 500 mm from the sides and 700 mm from the back of the oven.
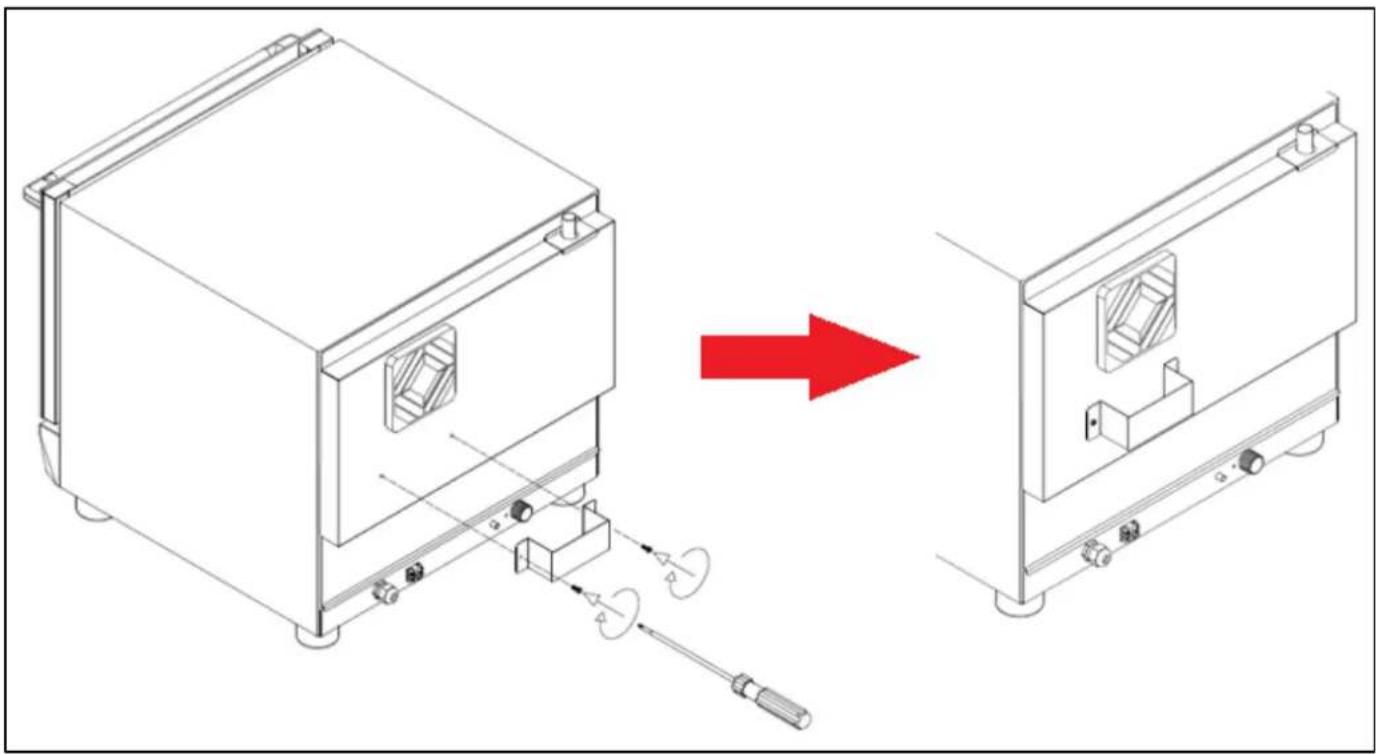
FOR THE PURPOSE OF KEEPING A PROPER DISTANCE FROM THE SURROUNDING WALLS, THE SPECIAL SPACER MUST BE MANDATORILY INSTALLED.
SUPPLIED TOGETHER WITH THE OVEN, THE SPACER MUST BE SCREWED TO THE REAR PANEL BY MEANS OF THE 2 SELF-THREADING SCREWS, ALREADY PRESENT ON THE REAR PANEL OF THE OVEN AND LOCATED IMMEDIATELY BELOW THE COOLING MOTOR PROTECTION, WHICH IS BLACK IN COLOUR.
(SEE ILLUSTRATIVE IMAGE PROVIDED HERE BELOW).
IN ADDITION TO CAUSING THE PRODUCT WARRANTY TO BE FORFEITED, FAILURE TO INSTALL THE SPACER PREVENTS SAFE OPERATION OF THE OVEN.
THIS TYPE OF WORKING CONDITIONS MAY CAUSE DAMAGES (INCLUDING SERIOUS ONES) TO PEOPLE, ANIMALS AND/OR PROPERTY.
THEREFORE, YOU ARE KINDLY REQUESTED TO COMPLY WITH THE INSTALLATION INSTRUCTIONS CONTAINED IN THIS MANUAL.
natural_image
Technical line drawing of a device with a red arrow indicating transformation from an open box to a closed unit (no text or symbols present)READING THE TECHNICAL DATA PLATE - example
Before you proceed with the subsequent installation operations, carefully read the technical data label affixed on the right side of the oven (looking at it from the front).

MADE IN ITALY
Model / Modèle:
ATTENTION
All electrical connections must be carried out by qualified and authorised personnel, in compliance with the laws in force.
Operations carried out incorrectly may cause damages and injuries (including serious ones) to people, animals and/or property.
Read this instruction manual carefully and fully understand the information contained in it prior to carrying out the installation.
The power supply must comply with the voltage and frequency specified in the technical data plate.
The technical data label indicated information useful for wiring the appliance; consequently, it must not be removed, ruined or altered in any way.

natural_image
Simple electrical symbol for a diode (no text or labels)The appliance must be connected to an earthing system, in compliance local regulations in force.
In the absence of regulations governing the earthing of the device, please refer to the “National Electrical Code ANSI/NFPA No.70”.
In Canada, all electrical connections must be performed according to standards CSA C22.1

natural_image
Blue circular traffic sign with electrical symbols (output button, fuse, plug) and right-pointing arrow (no text)ATTENTION
To prevent any damages (including serious ones) to people, animals and/or property, unplug the appliance from the mains prior to carrying out any type of maintenance, installation and/or cleaning operations.
The terminal strip is positioned on the right side of the appliance (looking at it from the front). To access the terminal strip, you need to remove the side panel of the oven, unscrewing the 2 screws located in the oven base (directly underneath the side panel). If necessary, also remove the back panel of the oven to facilitate the wiring operations, by unscrewing the self-threading screws the secure this panel.
On the rear panel of the oven, there is a wiring label you can refer to, since it illustrates the proper wiring to be carried out on the terminal strip.
Carefully follow the wiring instructions provided on the label.
Prior to using the oven, make sure that all cables and connectors are properly secured, since they can become loose during transport.
After having completed all the connections (electrical and water), check once again the proper fixing of all electrical connections.
WATER CONNECTION – inlet water (for preset ovens)

ATTENTION
Using a type of water with unsuitable characteristics may cause considerable damage to the heating elements, to the fans and to the cooking chamber of the oven.
It is recommended to use a type of water with suitable characteristics, as indicated in the paragraph below.
To supply the oven, always use cold drinking water, having the following characteristics:
Free chlorine → Less than 0.1ppm (mg / L)
Hardness → 30-70ppm
Chloride → Less than 30ppm (mg / L)
pH → 7.0 to 8.5
Silica → Less than 12ppm (mg / L)
Total dissolved solids (tds) → 50-125ppm
The owner of the oven is always and solely responsible for checking the quality of the water used-
Any damages caused by poor quality water shall also be ascribable to the owner of the oven.
Any damages caused by failure to comply with the water characteristics provided above are not covered by the Manufacturer's warranty.
Any operation aimed at verifying the quality of the water and any treatments carried out for the purpose of making it qualitatively acceptable shall be the full responsibility of the owner of the oven.
Install a tap between the appliance and the water supply of the installation room so that you can close the water inlet in manual mode.
Prior to carrying out the water connection to the appliance, allow some water to flow out so as to make sure there is no dirt or impurities in the piping.
The water connection was always be carried out by hooking up the water inlet pipe to the threaded fitting G^3/4 .
The inlet water must have a pressure value included between 150 kPa (1.5 bar) and 200 kPa (2.0 bar).
To prevent the water piping from bursting, it is recommended to close the water tap when the water is not being used.
WATER CONNECTION – water discharge (for preset ovens)
ATTENTION
Depending on how the oven is used, the liquids flowing out of the water discharge may reach extremely high temperature values.
The reference standard does not allow values exceeding 140^ F ( 60^ C). Therefore, in case the measured temperature value of the discharged fluids exceed such limit, a suitable cooling system will need to be installed, in compliance with the provisions of the Standard.
The appliance must be installed using a suitable anti-backflow system, in accordance with federal, state and local standards.
The drain pipe is in the rear part of the oven and is to be connected with a rigid or flexible pipe and directed to an open or siphoned drain. Its diameter must not be less than that of the discharge coupling of the oven.
It is recommended to insert a suitable siphon between the oven and the mains drain water system in order to prevent vapours from coming out of the oven and bad odours from entering from the mains drain water.
Avoid bends on the flexible pipes and rigid pipe elbows along the entire drain.
The pipe must have a minimum 5% gradient along the section in order to ensure adequate outflow.
The oven must have its own connection to the drains.
If several pieces of equipment or appliances are connected to the same pipe, make sure its size enables normal outflow without any issues.
Local regulations and standards must be complied with.

Once the discharge water connection of the oven has been carried out, verify its efficacy in a suitable manner, in order to identify any leaks that may cause damages (including serious ones) to people, animals and/or property.
USE OPERATIONS

ATTENTION
Read this instruction manual carefully and fully understand the information contained in it.
Such information is provided for the purpose of carrying out the installation, use, maintenance and cleaning phases in a proper manner.
Operations carried out incorrectly may cause damages and injuries
(including serious ones) to people, animals and/or property.
- The appliance was designed to cook food in closed environments and must be used solely for this purpose. Any other use must be avoided since it is considered improper and dangerous.
- The device is intended for professional use and should be used by qualified personnel only.
- People with reduced physical or mental abilities or unskilled and untrained people should not use the oven, unless they are supervised or have been instructed on how to operate the appliance by people in charge of their safety.
- Do not leave the appliance unattended in the presence of children, and make sure they do not have access to the appliance or use it as a toy.
- It is not recommended to position the appliance near sources of heat.
- Do not leave easily flammable material next to the appliance for any reason: it can cause a fire.
- The food containers, accessories or other items can reach high temperatures during and after cooking. Be careful when handling in order to prevent burns.
Only touch them when using heat-protection equipment such as thermal clothing. Danger of burns! - Be careful when opening the oven door: danger of burns from high-temperature steam coming out.
- The oven is equipped with a safety system that automatically disables the operation of heating elements, fans and steam supply when the door is opened.
- In the case of cooking using the core probe, use caution when removing the trays from the oven: make sure the probe is extracted from the food being cooked and that it does not get in the way.
- Do not place flammable objects or alcohol-based foods in the oven: they cause combustion and fire that could give rise to explosive phenomena.
- Do not put salt on food inside the cooking chamber of the oven.
This can damage the cooking chamber. If it cannot be avoided, clean the appliance as soon as possible. - Use your fingers to adjust the control panel options. Using any other object can damage the appliance and thus cause the warranty to be forfeited.
FIRST USE – TESTING PROCEDURE
Prior to starting the oven for the first time, make sure there are no plastic bags, instruction manuals, informative material or plastic film inside the cooking chamber. Make sure the tray support structures positioned inside the cooking chamber are well secured to the chamber walls.
The oven must be tested by carrying out a trial cooking session to check that the appliance is working properly and that there are no problems or malfunctions.
Following the setting instructions provided in the following pages, turn o the oven and set a cooking cycle with the temperature at 300^ F (approx. 150^ C), time at 10 min. and average steam (50%), (steam for preset ovens).
Check every item in the list below:
1) The cooking chamber light is ON.
2) The oven stops (heating elements, steam, motors) when the door is opened and resumes operation when the door is closed again.
3) On reaching the set temperature, the cooking temperature thermostat (or the probe in case of oven with digital control) turns the heating elements off.
4) The fans of the motors reverse their direction of rotation every 2 minutes. The steam turns off briefly for 20 seconds during the motor stop, necessary for reversal of the direction of rotation.
5) The cooking chamber fans spin in the same direction.
6) Check that water is being discharged towards the fan from the steam inlet ducts into the cooking chamber (for preset oven models).
While using the oven and at the end of a cooking process, the oven walls may exceed, depending on how the oven is used, a temperature of 140^ F ( 60^ C).
It is therefore recommended to refrain from touching the areas marked with the special “hot surface” label.
FIRST USE – FIRST CLEANING OF THE COOKING CHAMBER
Before cleaning, disconnect the device from the power supply and wait until it has cooled down completely.
The cooking chamber must not have any solvent or detergent residue.
They should be removed by rinsing thoroughly using a damp cloth and using appropriate eye, mouth and hand protection.
Possible danger of corrosion.
Heat the empty oven to 400^ F for about 30 minutes in order to eliminate any odour from the thermal insulation.
Clean the walls of the cooking chamber using hot water and soap, then rinse; never use aggressive or acidic products.
CONTROL PANELS – MECHANICAL FOR CONVECTION OVENS
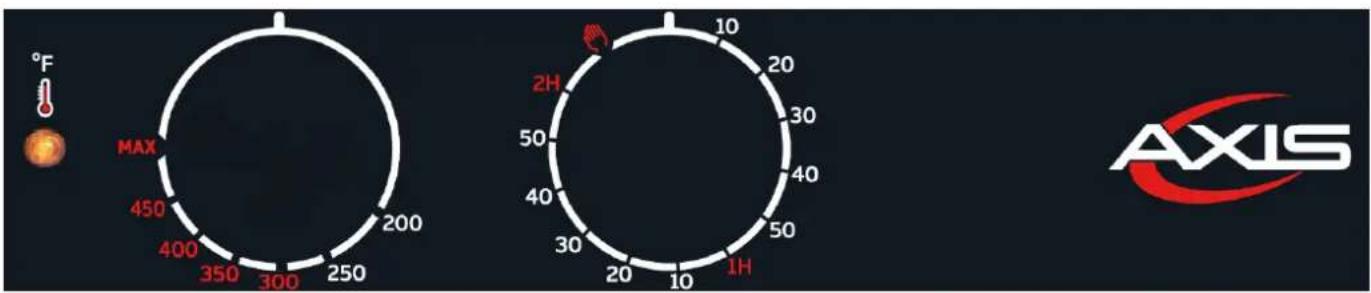
radar
| Metric | Value | |--------|-------| | MAX | 450 | | MAX | 400 | | MAX | 350 | | MAX | 300 | | MAX | 250 | | MAX | 200 | | 2H | 10 | | 2H | 20 | | 2H | 30 | | 2H | 40 | | 2H | 50 | | 2H | 10 | | 2H | 1H |TIMER ADJUSTMENT
When the manual option is selected, the oven always stays on until the operator turns it off. When a certain value is selected, the oven stays on for the set amount of time (maximum value 120 minutes).
TEMPERATURE ADJUSTMENT
This knob can be used to select the desired cooking temperature, from a minimum value of 200^ F up to a “MAX” value (corresponding to approximately 480-500^ F)
THERMOSTAT LIGHT
This light is on when the oven heating elements are working and therefore the internal temperature of the cooking chamber is lower than the value set by means of the thermostat knob. When the light goes off it means that the heat is off and that the cooking chamber has reached the set temperature.
STEAM BUTTON (for preset ovens)
This button activates the steam function. The steam stays on during the entire time the button is pressed.
CONTROL PANELS – DIGITAL FOR CONVECTION Ovens

SWITCHING ON THE OVEN
When the oven is powered on, the control panel will be in standby mode. To access the oven features, press 🏠 The upper display will show the actual temperature of the cooking chamber. From now on it is possible to proceed with the settings of a manual cooking or with a program
MANUAL COOKING
To create a cooking program in manual mode, proceed with the setting of the following necessary values:
- Temperature
- Timer
- Steam (optional)
TEMPERATURE

To set the desired temperature, press : the temperature display will show the set value in flashing mode.
Afterwards, use buttons or to choose the desired parameters.
Press once again to confirm: the display will now show the actual value of the temperature inside the cooking chamber.
The values can be set between 86°F (30°C) to 500°F (260°C).
During the cooking, the upper display shows the actual temperature inside the chamber; press to display the set temperature instead.

is lit up with a red LED when heating is activated, and the heating elements are used.
TIMER

To set the timer, press and then use buttons or + -
Press to confirm the set time.
The time setting range goes from “---” (infinite) to 999 minutes.
By choosing an infinite cooking time, the oven will keep on working with the set parameters until the cooking is stopped in manual mode by pressing START STOP
During a cooking for an infinite time, the lower display shows the time of use in minutes in order to determine ho long the oven has been working, whereas when cooking with a set time, the lower display shows the time countdown to the automatic stop.
This feature can be used to set a steam value during manual or program cooking.
To set the steam value, press and then use buttons or + -
The range of humidity that can be set is as follows: OFF - 20% - 40% - 60% - 80% - 100%.
During programming the values flash on the display, and by pressing again this value will be saved.
During the cooking, as steam is generated in the cooking chamber, the LED adjacent to the steam button lights up.
In case of steams with motor rotation reversal system, the steam supply stops momentarily, for the entire duration of the reversal.
The set of humidification is allowed only before running a cycle. During the cooking, pressing generates vapour in the cooking chamber for the entire time it is pressed.
AUTOMATIC PREHEATING
The pre-heating function is automatic in both manual cooking and program cooking.
It consists in preheating the oven to a temperature that is 20% higher than the temperature set in the first cooking phase. This function is necessary to compensate for the loss of heat when opening the door to put food in.
When a program starts, the oven first starts this preheat cycle (the upper display shows “PRE” while on the lower display you can see the actual temperature of the cooking chamber). At the end of the program, a beep is emitted which stops only when the door is opened.
The previously selected program starts automatically when the door is closed.
The beeping can be stopped by pressing any button.
During the pre-heating phase, it is not possible to use steam.
After the opening and subsequent closing of the oven door, the cooking previously set is started automatically.
PROGRAMMED COOKING

The oven can store up to 99 recipes, each one of which can be programmed with 3 phases (1,2,3). A cooking phase with infinite time cannot be followed by another phase.
To create a new cooking program, with the oven ON, press : the lower display will show a flashing "P01".
Use button + or to choose the desired program.
The caption “P01” will flash in case the program is free, otherwise it will light up steady. Press to confirm the desired program and to start creating it.
Now the oven positions itself on the first phase (LED lit up on phase no. 1), and it is possible to set the temperature, time and steam values (see previous paragraphs) needed for the first cooking
phase. To move on to the second cooking phase, press the button (LED lit up on phase no. 2). It is now possible to adjust the time, temperature and steam of phase 2 and move on to phase 3.
To save a program with 3 phases, after having set them press the button and then keep
button pressed until the adjacent LED starts to flash.
In case you only use 1 or 2 phases, enter "0" in the time field for the phase not being used and then save.
Once the program has been saved, you can press to activate the cooking process: the oven will start to pre-heat and after the "beep", it will be time to load the food to be cooked.
You can modify program data whilst cooking is in progress in order to adapt the cooking product needs.
Changes made during the cooking phase are valid only for the cooking underway.
The LED that is lit up indicates in which cooking phase the oven is operating at that moment.
By keeping pressed during the cooking with a program with multiple phases, continue to the next phase before the time expires.
DELETING A PROGRAM
To delete a program from the list of programs, you need to press and keep pressed keys and. The program displayed will be deleted and the program becomes empty.
DELETING A PHASE
Similar to deleting a program when a phase is being changed (except the first), press and keep them pressed for some time to delete the current phase and those following it.

RETURN TO MANUAL COOKING MODE
To go back to the manual cooking mode, exit the program mode and press until the temperature value appears on the upper display.
POWER FAILURE
In case of a power failure during the cooking cycle, the oven goes into the OFF position.
CONTROL PANELS – MECHANICAL FOR COMBI OVEN

TIMER ADJUSTMENT
When the manual option is selected, the oven always stays on until the operator turns it off.
When a certain value is selected, the oven stays on for the set amount of time (maximum value 120 minutes).
THERMOSTAT LIGHT
This light is on when the oven heating elements are working and therefore the internal temperature of the cooking chamber is lower than the value set by means of the thermostat knob.
When the light goes off it means that the heat is off and that the cooking chamber has reached the set temperature.
TEMPERATURE ADJUSTMENT
This adjustment can be used to select the desired cooking temperature, from a minimum value of 200^ F up to a “MAX” value (corresponding to approximately 540^ F)
STEAM LIGHT
When this light is on, it means that water is flowing inside the cooking chamber in order to obtain steam.
This occurs regardless of the temperature (the operator is responsible for checking that the temperature is high enough for the cooking to take place correctly).
STEAM/MOISTURE CONTROL
This knob is used to activate the steam function. It can be adjusted from minimum to maximum by turning the knob in a clockwise direction.
ATTENTION: So that the steam function can operate satisfactorily, the temperature needs to be set to at least 200^ F.
Furthermore, for proper cooking you need to pre-heat the oven to the desired temperature before activating the steam supply.
CONTROL PANELS – DIGITAL FOR COMBI OVEN
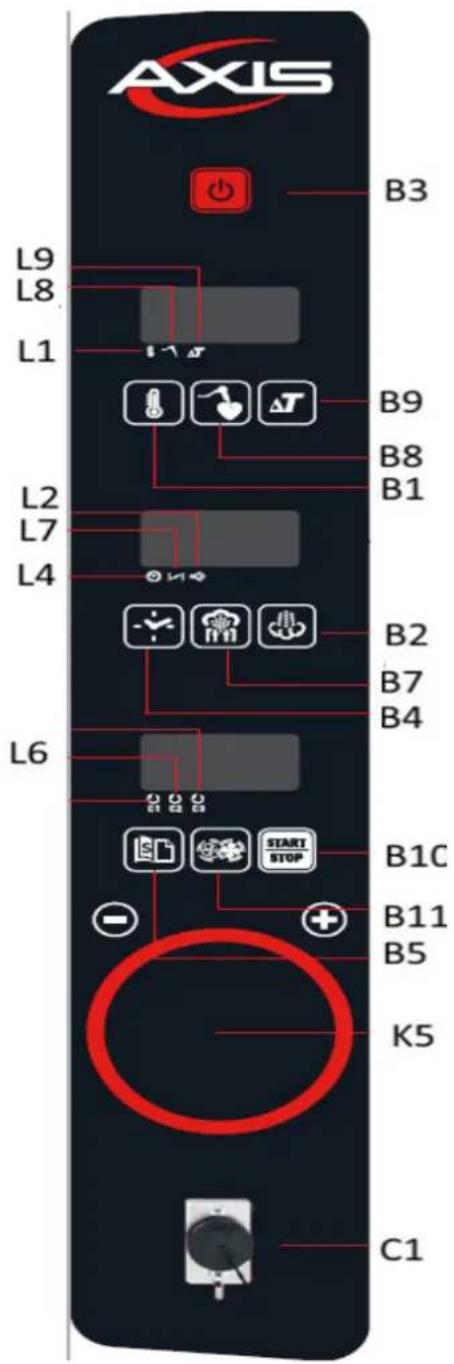
| K5 | Encoder for “+/-” adjustment |
| L1 | Thermostat light |
| L2 | Steam light |
| L4 | Timer light |
| L6 | Cooking phases light |
| L7 | Chimney light |
| L8 | Core probe light |
| L9 | Delta T light |
| B1 | Temperature button |
| B2 | Steam selector |
| B3 | ON/OFF button |
| B4 | Timer button |
| B5 | Cooking programs button |
| B7 | Chimney button |
| B8 | Core probe button |
| B9 | Delta T button |
| B10 | START/STOP cooking button |
| B11 | Fan/motor speed regulation |
| C1 | Core probe input |
| B12 | Value increase |
| B13 | Value decrease |
| B14 | Confirm value |
ON/OFF KEY
When power is supplied to the oven, the control panel lights up and the operation display indicates OFF. Press the key to start the control panel.
TEMPERATURE KEY
Press the key and set the temperature value by means of the encoder knob. It turns both clockwise and counter clockwise in order to increase or decrease the temperature that appears on the display. Press the knob to confirm the set value. The oven will always display the actual temperature in the cooking chamber.
To display the set temperature, press the key 6 The temperature can be set from a minimum of 86^ ( 30^ ) up to a maximum of 500^ ( 260^ ).

START/STOP
Press the button to start/stop a program previously set or the cooking program underway.

ENCODER
The encoder knob turns both clockwise and counter clockwise to allow you to increase or decrease the value shown on the display-
Remember to press the encoder to confirm the selected value, otherwise the system will not acknowledge the command.
CORE PROBE
To set a cooking using the core probe, insert the probe in the lower part of the control panel, removing the protective cap first.

Press the button and set the core temperature value by means of the encoder knob.
Press the encoder knob to confirm the set value.

After having set the value relative the core temperature, press the key and set the temperature value in the cooking chamber, by means of the encoder knob.
Press the encoder knob to confirm the set value.
The oven will cook the food at the set temperature in the cooking chamber and, subsequently, will turn off automatically when the probe inserted in the food records the set food temperature (core temperature).
The core temperature can be set from a minimum of 86^ F ( 30^ C) up to a maximum of 221^ F ( 105^ C).
DELTA T COOKING
To carry out a cooking in Delta T mode, insert the probe in the lower part of the control panel, removing the protective cap first.


Press button: The signalling LED will flash next to the symbol and it will be possible to set the desired core temperature value, by using the encoder knob.
To confirm the entered value, press the encoder knob: the signalling LED will flash next to the

symbol At this point you can set the value of the Delta T temperature by means of the encoder knob.
Press the encoder knob to confirm the set value.
Cooking will end when the oven, cooking at a chamber temperature equal to “actual core temperature (inside the food) + set Delta T temperature”, will reach the set core temperature.
The Delta T temperature can be set from a minimum of 0^ F up to a maximum of 126^ F.
CHIMNEY OUTLET ADJUSTMENT
Press the chimney button to open or close the motorised chimney of the oven.
Chimney light on = chimney open
Chimney light off = chimney closed
STEAM/MOISTURE ADJUSTMENT

Press the key and set the desired steam percentage by means of the encoder knob. Press the encoder knob to confirm the set value.
You can set a value included between 0 and 10. The table below indicates the corresponding percentage:
| Value | Steam percentage | Value | Steam percentage |
| 0 | 0% | 6 | 60% |
| 1 | 10% | 7 | 70% |
| 2 | 20% | 8 | 80% |
| 3 | 30% | 9 | 90% |
| 4 | 40% | 10 | 100% |
| 5 | 50% |
STEAM SELECTOR
During the cooking, press button pressed to continue adding steam

nually add steam to the cooking chamber. Keep it
COOKING PROGRAMS
1) Using a recipe already stored in memory: if you wish to use a cooking program that has
previously saved, press 📄, by means of the encoder knob, you can select the desired program number.
Press the encoder knob to confirm the choice of the selected program.
Press key to start the oven.
2) New cooking program: if you wish to save the new program
Press button and, using the encoder knob, reach the first flashing number, then press the same knob to confirm.
Press button: You can now start to enter all information regarding the first cooking phase (temperature, timer, steam, etc.).
While this data is being entered, the LED will be on next to the first phase During the
entering, (C1).
At the end of the settings for the first phase, press button to move on to the setting of phase 2.
You can enter all information regarding the second cooking phase (temperature, timer, steam, etc.).
During the entering of data pertaining to phase 2, the LED light will be on next to the second phase, (C2).
At the end of the settings for the second phase, press button move on to the setting of phase 3.
You can enter all information regarding the third cooking phase (temperature, timer, steam, etc.).
During the entering of data pertaining to phase 3, the LED light will be on next to the second phase, (C3).
At the end of the settings for the third phase, press button to move on to the setting of phase 4.
You can enter all information regarding the fourth cooking phase (temperature, timer, steam, etc.).
During the entering of data pertaining to phase 4, the LED light will be on next to all the
phases, (CC1, C2, C3).

At the end of the setting, press for 5 seconds the key that the caption "MEM" will be displayed, indicating that the program has been saved correctly.
IT IS NOT MANDATORY to enter 4 cooking phases in order to be able to save a program.
DELETING A PHASE OR PROGRAM

If you wish to delete a phase from a program, proceed as follows: press the button and, using the encoder, select the desired program number.
Confirm the choice by pressing the encoder.
Then press the button 📄 the desired phase has been selected. Keep the button pressed

for more than 5 seconds
If you wish to delete a program, you must first delete all the phases (as described above). Then
press the button for 5 seconds until MEM is displayed (it means that the program has been stored with the phases deleted and has thus been removed).
RETURN TO MANUAL COOKING
To exit the program function and return to the MANUAL cooking mode, hold the ENCODER knob down until the word "MAN" appears on the display.
OVEN PRE-HEATING
This function is used to compensate for the heat loss that occurs after opening the oven door and the introduction of food.
To switch on the oven pre-heating function, press the key card on the first phase (with the
LED on next to C1 (C1)) rotate the encoder in the opposite direction until the caption "INF" appears (this means infinite time); press the encoder knob to confirm.
You can now proceed to enter other cooking phases.
When you press the key, the oven will start to pre-heat the cooking chamber until reaching an increase equal to 20% of the set temperature value; subsequently, an acoustic signal will be emitted.
The signal is interrupted by opening the door to insert the food in the oven. When the door is closed, the program pre-set phase will start.
The signal can be stopped without turning the preheating feature on and off by simply pressing the
SPEED ADJUSTMENT
The oven fan/motor has two speed levels:
- Max: it means that the motor is at its maximum speed. Used for most cooking methods.
- Min: it means that the motor is at its minimum speed; it is mainly used for delicate foods, such as, for example, pastry.
To adjust the fan speed, press the button will appear on the display.

enter the desired "Min" or "Max" speed, which
AUTOMATIC COOLING OF THE COOKING CHAMBER
With the oven "ON" and with the door open, set a temperature lower than the cooking chamber temperature.

Once the value has been set and confirmed by pressing the encoder knob, press key automatically reduce the oven internal temperature.
Upon reaching the set-point, the fans turn off and an acoustic alarm is emitted.
During the cooling phase, the “TEMPERATURE” display shows the cooking chamber temperature and the TIME display shows “COO”.
The function can be forced to stop by pressing the key

CLEANING AND MAINTEANANCE
Cut out power to the appliance before carrying out any cleaning and/or maintenance operation on the oven.
ORDINARY CLEANING OF THE COOKING CHAMBER
At the end of a day's work, it is necessary to clean the equipment, both for hygiene reasons and to avoid operating failures.
The oven must never be cleaned with direct or high pressure water jets.
Similarly, for cleaning the appliance you should not use iron scouring pads, brushes or common steel scrapers; you can optionally use stainless steel wool, rubbing it in the direction of the satin finish of the sheets.
Wait for the cooking chamber to cool down.
Remove the side grids that hold the baking trays.
Remove any manually removable residues and put the extractable parts in a dishwasher.
Use warm soapy water to clean the cooking chamber.
Afterwards, all the surfaces concerned must be thoroughly rinsed, being careful to make sure that there is no detergent residue.
To clean the outside of the oven, use a damp cloth and a mild detergent.
In order to properly carry out the manual cleaning, follow the procedure below:
- Turn on the appliance and set the temperature to 176^ (80°C).
- Leave it on for 10 minutes (with the steam function, for preset ovens)
- Turn off the appliance and let it cool down
- Remove the side tray supports
- Spray the detergent on the entire inner surface of the oven and wait 10 minutes
- Rinse thoroughly and, at the end of the cleaning cycle, rinse the cooking chamber.
It is strictly forbidden to wash the cooking chamber at temperatures higher than 158°F (70°C).
Danger of scalding.
Daily cleaning of the oven cooking chamber lining must be carried out with a non-abrasive detergent to guarantee its proper functioning.
Use plastic bristles or a sponge soaked in vinegar and warm water in the case of dried residue.
Attention: any fats and food residues in the cooking chamber could catch fire when using the oven, therefore, it is advisable to remove them promptly.
Use only the recommended products to clean the stainless steel surfaces.
EXTERNAL CLEANING
Only use a damp cloth with warm water or products suitable for cleaning stainless steel. Do not use acidic products or ammonia.
ATTENTION: never clean the device with water jets or pressurised steam.
CLEANING THE DOOR AND THE DOOR INTERNAL GLASS - for COMBI OVENS
To clean the door internal glass wait until the oven has completely cooled down.
Simply unscrew the upper and lower screws manually from the side of the handle that secures the steel profile to the internal glass.
Then rotate the glass. In this position, with the glass still hinged, you can thoroughly clean the entire door.
REPLACING THE LIGHT BULB - COMBI OVENS
ATTENTION: Strictly adhere to the following procedure in order to avoid electrocution or damage to people:
- Disconnect the
oven from the electrical supply and let it cool down. - Remove the side supports that hold the baking trays.
- Remove cover "A", unscrewing the 4 fixing screws.
- Replace the lamp "B" with one having the same characteristics.
- Reposition the cover "A" and secure it once again using the screws previously removed.
- Put the side grids back on ensuring they are well fitted.
Should the glass lid break of get damaged, do not use the oven until the lid is replaced (Contact Customer Service).

natural_image
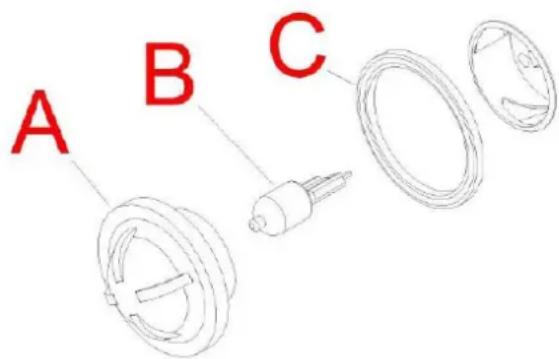
Exploded view diagram of a device showing internal components and labeled parts (A, B), no text or symbols present.REPLACING THE LIGHT BULB - CONVECTION OVENS
ATTENTION: Strictly adhere to the following procedure in order to avoid electrocution or damage to people:
- Disconnect the oven from the electrical supply and let it cool down.
- Remove the side supports that hold the baking trays.
- Unscrew the glass cover "A", being careful not to damage the gasket "C".
- Replace the lamp "B" with one having the same characteristics.
- Screw the glass cover "A" back on, being careful not to damage the gasket "C".
It is advisable to have the appliance subjected to periodical checks (at least once per year) by a specialist, authorised technician.
Any maintenance, installation or repair work must be carried out by qualified, authorised personnel by contacting the Customer Service.
Before carrying out any operation, the appliance must be disconnected from the mains power supply, turn off the water supply and wait for the appliance to cool down.
Before moving the appliance from its position, check that the electricity and water connections (electric cables, water pipe and drainage) have been properly disconnected.
If the appliance is on wheels check that the electric cables, pipes or anything else are not damaged while moving it.
Ensure the brake is on. Avoid placing the oven near heat sources (such as fryers, etc.). After carrying out the task and returning the appliance to its initial position, check that the electric and water supplies are connected correctly.
MAINTENANCE IN CASE OF BREAKAGE
If the appliance breaks, disconnect it from the mains power supply and turn off the water.
Before ringing the Customer Service, check the chart below.
| FAULT | CAUSE | SOLUTION |
| In START mode he oven does not turn on | Door open | Make sure the door is closed |
| The micro-switch does not signal that the door is closed | Contact a specialist technician for repairs (Customer Service). | |
| Oven light off | Loose lamp | Insert the lamp correctly into the lamp holder |
| Blown lamp | Replace the lamp (refer to ordinary maintenance) | |
| The oven does not cook uniformly | The fans no longer execute inversion | Contact a specialist technician for repairs (Customer Service). |
| One of the fans has stopped | Contact a specialist technician for repairs (Customer Service). | |
| One of the heating elements is broken | Contact a specialist technician for repairs (Customer Service). | |
| The oven is completely off | No power supply | Restore the power supply |
| Incorrect connection to the mains power s | Check connection to the mains power supply | |
| Safety thermostat triggered | Contact a specialist technician for repairs (Customer Service). | |
| No water is input into the steam pipes. | Water inlet closed | Open water inlet |
| Incorrect connection to the mains water supply | Check connection to the mains water supply | |
| Water inlet filters obstructed by dirt. | Clean the filters | |
| Water leaks out from the washer when the door is closed. | Dirty washer | Clean the washer with a damp cloth |
| Damaged washer | Contact a specialist technician for repairs (Customer Service). | |
| Door closing mechanism problem | Contact a specialist technician for repairs (Customer Service). | |
| The fan stops during operation | Motor safety thermostat triggered | Switch the oven off and wait for the motor's thermal protection to restore automatically. It the problems persists, contact a specialist technician for repairs (Customer Service). |
| Motor condenser breakage | Contact a specialist technician for repairs (Customer Service). |
WARNINGS AND ALARMS – DEDICATED TO DIGITAL CONVECTION MODELS
All alarms are indicated by a buzzer. The buzzer can be silenced by pressing a key.
Err = CHAMBER PROBE ALARM:
This is triggered if the chamber probe fails. Everything is deactivated except for the light. The cycle in progress is interrupted.
WARNINGS AND ALARMS – DEDICATED TO COMBI MODELS
All alarms are indicated by a buzzer. The buzzer can be silenced by pressing a key.
"Er1" CHAMBER PROBE ALARM:
This is triggered if the chamber probe fails. Everything is deactivated except for the light. The cycle in progress is interrupted.
"Er2" CORE PROBE ALARM
This is triggered if the core probe in the food being cooked fails (where used). Everything is deactivated except for the light. The cycle in progress is interrupted.
"ALL" MOTOR ALARM
This is triggered if the motor overheats. Everything is deactivated except for the light. The cycle in progress is interrupted.
Once the alarm is silenced, press the ON/OFF button for 1 second to reset the alarm (the control panel is set to OFF).
"H-t" CONTROL BOARD TEMPERATURE ALARM
This is triggered if the control board overheats. The cycle in progress is interrupted.
Once the alarm is silenced, press the ON/OFF button for 1 second to reset the alarm (the control panel is set to OFF).
ATTENTION
ATTENTION
natural_image
Blue circular sign with two white figures holding a document (no text or symbols)natural_image
Blue circular sign with white hand icons (no text or symbols)natural_image
Technical line drawing of a device with a red arrow indicating transformation from an open box to a closed unit (no text or symbols present)ATTENTION
natural_image
Simple electrical symbol for a diode (no text or labels)natural_image
Blue circular traffic sign with white electrical symbol and right arrow (no text)ATTENTION
ATTENTION
ATTENTION
ATTENTION
natural_image
Exploded view diagram of a device showing internal components and labeled parts (A, B), no text or symbols present.REPLACEMENT DE LA LAMPE D'ÉCLAIRAGE – FOURS À CONVECTION


- ATTENTION
- DELIVERY OF THE APPLIANCE
- INSTALLATION OPERATIONS
- TRANSPORTING THE DEVICE
- UNPACKING THE DEVICE
- POSITIONING THE DEVICE
- READING THE TECHNICAL DATA PLATE - example
- The power supply must comply with the voltage and frequency specified in the technical data plate.
- WATER CONNECTION – inlet water (for preset ovens)
- WATER CONNECTION – water discharge (for preset ovens)
- The appliance must be installed using a suitable anti-backflow system, in accordance with federal, state and local standards.
- USE OPERATIONS
- FIRST USE – TESTING PROCEDURE
- FIRST USE – FIRST CLEANING OF THE COOKING CHAMBER
- Before cleaning, disconnect the device from the power supply and wait until it has cooled down completely.
- CONTROL PANELS – MECHANICAL FOR CONVECTION OVENS
- TIMER ADJUSTMENT
- TEMPERATURE ADJUSTMENT
- THERMOSTAT LIGHT
- STEAM BUTTON (for preset ovens)
- CONTROL PANELS – DIGITAL FOR CONVECTION Ovens
- SWITCHING ON THE OVEN
- MANUAL COOKING
- TEMPERATURE
- TIMER
- AUTOMATIC PREHEATING
- PROGRAMMED COOKING
- DELETING A PROGRAM
- DELETING A PHASE
- RETURN TO MANUAL COOKING MODE
- POWER FAILURE
- CONTROL PANELS – MECHANICAL FOR COMBI OVEN
- STEAM LIGHT
- STEAM/MOISTURE CONTROL
- CONTROL PANELS – DIGITAL FOR COMBI OVEN
- ON/OFF KEY
- TEMPERATURE KEY
- START/STOP
- ENCODER
- CORE PROBE
- DELTA T COOKING
- CHIMNEY OUTLET ADJUSTMENT
- STEAM/MOISTURE ADJUSTMENT
- STEAM SELECTOR
- COOKING PROGRAMS
- DELETING A PHASE OR PROGRAM
- RETURN TO MANUAL COOKING
- OVEN PRE-HEATING
- SPEED ADJUSTMENT
- AUTOMATIC COOLING OF THE COOKING CHAMBER
- CLEANING AND MAINTEANANCE
- ORDINARY CLEANING OF THE COOKING CHAMBER
- EXTERNAL CLEANING
- CLEANING THE DOOR AND THE DOOR INTERNAL GLASS - for COMBI OVENS
- REPLACING THE LIGHT BULB - COMBI OVENS
- REPLACING THE LIGHT BULB - CONVECTION OVENS
- MAINTENANCE IN CASE OF BREAKAGE
- WARNINGS AND ALARMS – DEDICATED TO DIGITAL CONVECTION MODELS
- WARNINGS AND ALARMS – DEDICATED TO COMBI MODELS
- REPLACEMENT DE LA LAMPE D'ÉCLAIRAGE – FOURS À CONVECTION
Brand : AXIS
Model : AXCL10D
Category : Oven