87628 - Egg cooker WestBend - Free user manual and instructions
Find the device manual for free 87628 WestBend in PDF.


| Brand | WestBend |
| Model | 87628 |
| Category | Electric Egg Cooker |
| Capacity | Up to 7 hard-boiled or soft-boiled eggs, or 2 poached eggs |
| Power Supply | 120 V AC, 60 Hz |
| Power | Not specified in manual (estimated ~350 W) |
| Dimensions (approx.) | 20 x 20 x 15 cm |
| Weight (approx.) | 0.8 kg |
| Base Material | Heat-resistant plastic |
| Included Accessories | Lid, cooking rack, poached egg tray, measuring cup |
| Functions | Cooking hard-boiled, soft-boiled, poached eggs |
| Control Type | Push button with indicator light |
| Automatic Shut-off | Yes, when water has evaporated |
| Safety | Polarized plug, do not immerse base, do not use softened water |
| Maintenance | Hand wash accessories (dishwasher safe for lid, tray and rack, top rack only) |
| Descaling | With distilled white vinegar |
| Warranty | 1 year limited (parts and labor) |
| Customer Service | (866) 290-1851 / customercare@westbend.com |
| Warranty Validity Countries | United States and Canada |
Frequently Asked Questions - 87628 WestBend
User questions about 87628 WestBend
0 question about this device. Answer the ones you know or ask your own.
Ask a new question about this device
Download the instructions for your Egg cooker in PDF format for free! Find your manual 87628 - WestBend and take your electronic device back in hand. On this page are published all the documents necessary for the use of your device. 87628 by WestBend.
USER MANUAL 87628 WestBend
natural_image
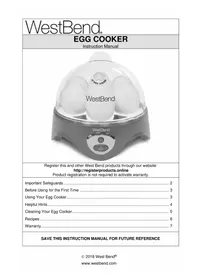
Exterior view of a WestBend portable steamer with clear lid and control buttons (no text or symbols on the device itself)Register this and other West Bend products through our website:
http://registerproducts.online
Product registration is not required to activate warranty.
Important Safeguards....2
Before Using for the First Time .... 3
Using Your Egg Cooker.... 3
Helpful Hints....4
Cleaning Your Egg Cooker....5
Recipes 6
Warranty....7
SAVE THIS INSTRUCTION MANUAL FOR FUTURE REFERENCE
IMPORTANT SAFEGUARDS

CAUTION
To prevent personal injury or property damage, read and follow all instructions and warnings.
When using electrical appliances, basic safety precautions should always be followed including:
- Read all instructions.
- Do not touch hot surfaces. Use handles or knobs and hot pads or oven mitts.
- Always unplug from outlet when not in use and before cleaning. Allow to cool before putting on or taking off parts and before cleaning.
- Close supervision is necessary when this appliance is used by or near children.
- Do not operate any appliance with a damaged cord or plug, after the appliance malfunctions, or has been damaged in any manner. For service information see warranty page.
- The use of accessory attachments not recommended by West Bend may cause fire, electric shock, or injury.
- Do not use this appliance outdoors.
- Do not let cord hang over the edge of the table or counter, or touch hot surfaces.
- Do not place on or near a hot gas or electric burner, or in a heated oven.
- Extreme caution must be used when moving an appliance containing hot oil or other hot liquids.
- To disconnect, turn control to "OFF," then remove plug from wall outlet.
- Do not use appliance for other than intended use.
- To protect against electric shock, do not immerse cord, plugs, or other electric parts in water or other liquids.
- A short power-supply cord is provided to reduce risks resulting from becoming entangled in or tripping over a longer cord.
- Longer extension cords are available, but care must be exercised in their use. While use of an extension cord is not recommended, if you must use one, ensure that the marked electrical rating of the extension cord is equal to or greater than that of the appliance. If the plug is of the grounded type, the extension cord must be a grounding-type 3-wire cord. To avoid pulling, tripping or entanglement, position the extension cord so that it does not hang over the edge of the counter, table or other area where it can be pulled on by children or tripped over.
- This appliance has a polarized plug (one blade is wider than the other). To reduce the risk of electric shock, this plug is intended to fit into a polarized outlet only one way. If the plug does not fit fully into the outlet, reverse the plug. If it still does not fit, contact a qualified electrician. Do not attempt to modify the plug in any way.
- Do not use an outlet or extension cord if the plug fits loosely or if the outlet or extension cord feels hot.
- Do not attempt to repair this appliance yourself.
• For household use only.
SAVE THESE INSTRUCTIONS
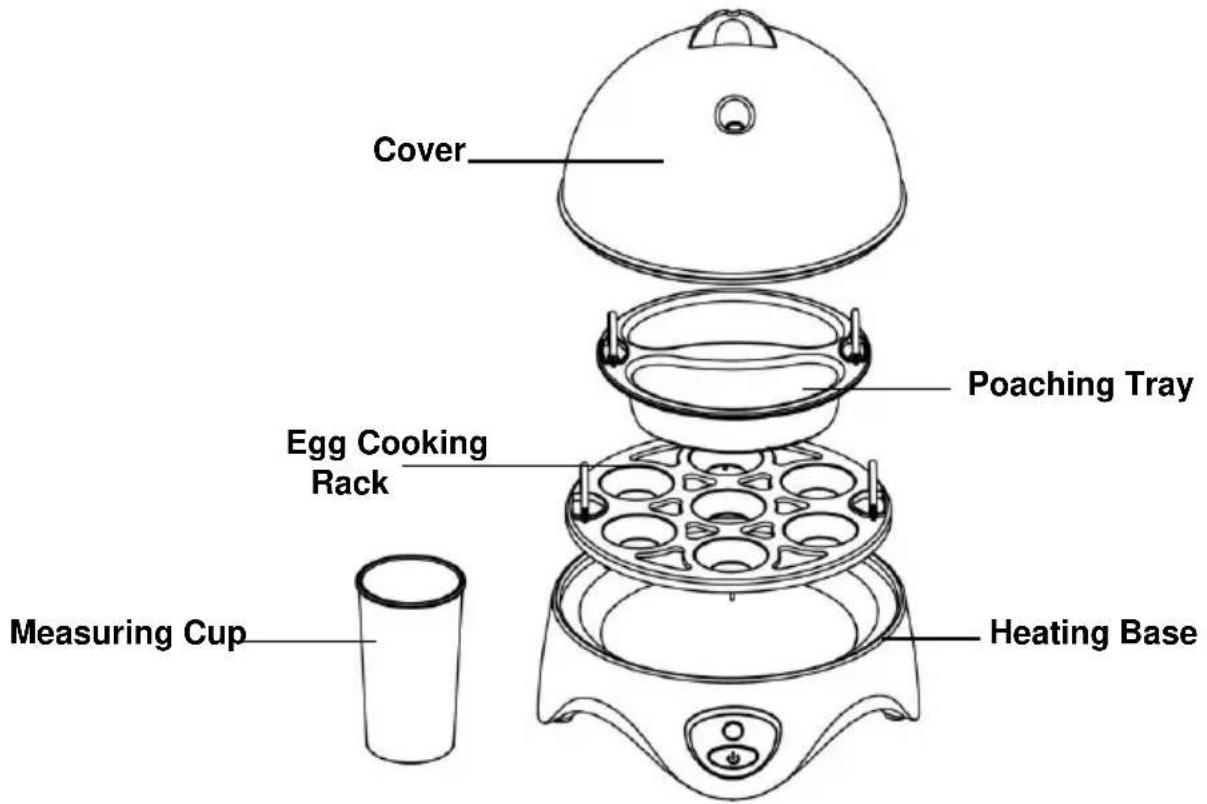
BEFORE USING FOR THE FIRST TIME
Before using your Egg Cooker, clean the entire unit according to the cleaning instructions. Wash all loose parts in warm, soapy water, rinse thoroughly and dry. Do not immerse heating base in water.
You can poach up to 2 eggs or hard-cook / soft-cook up to 7 eggs. Cooking times will vary depending on the size of the egg. This egg cooker is designed for use with medium sized eggs. If using large eggs, add 2 tsp. water to your measurements.
USING YOUR EGG COOKER
To get the best results, use the measuring cup included with the egg cooker which has water level markings to use as a guide. These amounts are approximate and can be varied to suit individual preferences. Use less water for softer cooked eggs and more water for harder cooked eggs. If using large eggs, add 2 tsp. water to your measurements.
To prolong the life of your appliance, do not use softened water.
Please note that this egg cooker does not have an audible alert when eggs are done.
TO POACH EGGS:
- Place the heating base on a dry, level surface. Use the ⏰ soft boiled water level markings on the measuring cup; fill with cold water to the 1 mark.
- Pour the cold water into the heating base. Place the egg cooking rack into the base.
- Lightly butter or oil the poaching cups. Place the poaching tray on top of the egg cooking rack. ALWAYS PLACE THE POACHING TRAY ON THE EGG COOKING RACK. Break one egg into each cup.
-
Place the cover onto the heating base and plug the appliance into a 120-volt, AC electrical outlet. Press the power switch. The light will glow, indicating the cooking process has begun. If the button is pressed before the egg cooker is plugged into an outlet, plugging the egg cooker into an outlet will start the heating cycle immediately. If the power button was pressed before plugging in, let the appliance complete the cooking cycle. This will/This reset the switch. Note: Do NOT remove the cover from the base while the eggs are cooking.
-
The egg cooker and light will turn off when the eggs are done. Unplug cord from electrical outlet. Use hot pads or oven mitts to remove the cover and poaching tray. You may need to rotate the cover to release it from the heating base. Serve the eggs immediately to prevent overcooking.
-
Allow the egg cooker to cool completely before discarding any remaining water from the base and before cleaning.
TO SOFT-COOK EGGS:
-
Place the heating base on a dry, level surface. Use the ⏻ soft boiled water level markings on the measuring cup to determine the amount of water for the number of eggs being cooked. Example: If soft cooking 7 eggs, fill the measuring cup to the 6&7 mark. Note: When cooking more eggs, less water is used.
-
Pour the cold water into the heating base. The recommended amount of water will provide eggs with soft yolks and cooked egg whites.
-
Place the egg cooking rack into the base and the eggs onto the egg cooking rack.
-
Place the cover onto the heating base and plug the appliance into a 120-volt, AC electrical outlet. Press the power switch. The light will glow, indicating the cooking process has begun. If the button is pressed before the egg cooker is plugged into an outlet, plugging the egg cooker into an outlet will start the heating cycle immediately. If the power button was pressed before plugging in, let the appliance complete the cooking cycle. It will then reset the switch. Note: Do NOT remove the cover from the base while the eggs are cooking.
-
The egg cooker and light will turn off when the eggs are done. Unplug cord from electrical outlet. Use hot pads or oven mitts to remove the cover and egg cooking rack. You may need to rotate the cover to release it from the heating base. Serve immediately to prevent overcooking. Eggs may be rinsed briefly with cold water while in the egg cooking rack for easy handling.
-
Allow the egg cooker to cool completely before discarding any remaining water from the base and before cleaning.
TO HARD-COOK EGGS:
-
Place the egg cooker on a dry, level surface. Use the hard boiled water level markings on the measuring cup to determine the amount of water for the number of eggs being cooked. Example: If hard cooking 7 eggs, fill the measuring cup to the 6&7 mark on the hard-boiled side of the measuring cup. Note: When cooking more eggs, less water is used.
-
Pour the cold water into the heating base. The recommended amount of water will provide eggs with fully cooked yolks and cooked egg whites.
-
Place the egg cooking rack into the base and the eggs onto the egg cooking rack.
-
Place the cover onto the heating base and plug the appliance into a 120-volt, AC electrical outlet. Press the power switch. The light will glow, indicating the cooking process has begun. If the button is pressed before the egg cooker is plugged into an outlet, plugging the egg cooker into an outlet will start the heating cycle immediately. If the power button was pressed before plugging in, let the appliance complete the cooking cycle. It will then reset the switch. Note: Do NOT remove the cover from the base while the eggs are cooking.
-
The egg cooker and light will turn off when the eggs are done. Unplug cord from electrical outlet. Use hot pads or oven mitts to remove the cover and egg cooking rack. You may need to rotate the cover to release it from the heating base. Eggs may be rinsed briefly with cold water while in the egg cooking rack for easy handling. Hard-cooked eggs may be refrigerated for up to 1 week.
-
Allow the egg cooker to cool completely before discarding any remaining water from the base and before cleaning.
-
A small amount of smoke and/or odor may occur upon heating due to the release of manufacturing oils – this is normal.
- Some minor expansion/contraction sounds may occur during heating and cooling – this is normal.
HELPFUL HINTS
- The egg cooker timing is controlled by the amount of water placed in the heating tray. The more water added, the longer the appliance will cook.
- This egg cooker does not have an audible alert when eggs are done.
- When hard cooking eggs, more water is needed to cook fewer eggs. This is due to steam escaping through the holes not occupied by eggs. When more holes are occupied by eggs, less steam escapes, meaning less water is needed to fully cook the eggs.
- To prolong the life of your egg cooker, do not use softened water.
- If you lose your measuring cup, you can still use your egg cooker. Follow the measuring charts below based on whether you're soft cooking/poaching or hard cooking your eggs. This egg cooker is designed for use with medium sized eggs. If using large eggs, add 2 tsp. water to your measurements.
| Line | Tsp. Water | # Poached Eggs | # Soft Cooked Eggs |
| 6&7 | 3 1/2 tsp. | 6-7 | |
| 5 | 4 1/2 tsp. | 5 | |
| 4 | 5 tsp. | 4 | |
| 3 | 5 1/2 tsp. | 3 | |
| 2 | 6 tsp. | 2 | |
| 1 | 7 tsp. | 1-2 | 1 |
| Line ○ | Tsp. Water | # Hard Cooked Eggs |
| 6&7 | 10 tsp. | 6-7 |
| 5 | 11 tsp. | 5 |
| 4 | 12 tsp. | 4 |
| 3 | 12 12 tsp. | 3 |
| 2 | 13 tsp. | 2 |
| 1 | 14 tsp. | 1 |
CLEANING YOUR EGG COOKER
To ensure optimal performance clean your Egg Cooker after each use. Wash the cover, poaching tray, egg cooking rack, and measuring cup in warm, soapy water, rinse and dry. The cover, poaching tray and egg cooking rack may be cleaned in an automatic dishwasher, top rack only.
Wipe the heating base with a damp cloth and dry. The heating base may accumulate mineral deposits over time. To remove mineral deposits, pour enough white distilled vinegar into the base to cover deposits and let soak until deposits are dissolved. Drain vinegar from base, rinse carefully, drain and wipe dry.
This appliance has no user serviceable parts.
RECIPES
Deviled Eggs
7 hard-cooked eggs, shelled and halved
12 tsp. salt
2 dashes hot pepper sauce
1 tbsp. lemon juice or vinegar
3 to 4 tbsp. mayonnaise or salad
1 tsp. prepared mustard
dressing
1 tsp. Worcestershire sauce
-
Remove the yolks from the eggs and mash. In a small mixing bowl, combine the remaining ingredients and mix well.
-
Refill the egg whites with the egg yolk mixture. Sprinkle with paprika if desired. Makes 16 deviled eggs.
Deviled Egg Variations: Follow the Deviled Egg recipe adding any of the ingredients listed below to the yolk mixture.
Ham: 14 cup finely chopped cooked ham
Bacon: 14 cup crumbled cooked bacon, about 2 slices
Dried Beef: ¼ cup finely chopped dried beef and 1 tbsp. sweet pickle relish
Seafood: 14 cup finely chopped cooked or canned shrimp, smoked fish, flaked tuna, salmon or crabmeat and a dash of curry powder
Cheese: 14 cup shredded cheddar cheese
Olive: 14 chopped green or ripe olives
OBrien: 2 tbsp. finely chopped green pepper, 1 tsp. finely chopped pimento and 12 tsp. instant minced onion
Eggs Benedict
4 eggs
4- 1/4-inch slices bacon, grilled
2 English muffins split, toasted and buttered
1 Easy Hollandaise Sauce, recipe below
-
Poach the eggs in the egg cooker according to the directions.
-
Place one slice of bacon on each muffin half and top with a poached egg. Spoon 2 tbsp. Hollandaise Sauce over each egg. Garnish with chopped parsley if desired. Makes 4 servings.
Easy Hollandaise Sauce
14 cup butter or margarine
1 tbsp. lemon juice
2 egg yolks
2 tbsp. cream or evaporated milk
^1/_4 tsp. salt
-
In a 1-quart saucepan, melt the butter over low heat.
-
In a small mixing bowl, combine the egg yolks, salt, lemon juice and cream. Mix well. Add the egg mixture to the saucepan, stirring constantly until the mixture is smooth and has the consistency of light cream.
PRODUCT WARRANTY
West Bend ^® (“the Company”) warrants this appliance from failures in the material and workmanship for one (1) year from the date of original purchase with proof of purchase, provided that the appliance is operated and maintained in conformity with the Instruction Manual. Any failed part of the appliance will be repaired or replaced without charge at the Company’s discretion. This warranty applies to indoor household use only.
This warranty does not cover any damage, including discoloration, to any non-stick surface of the appliance. This warranty is null and void, as determined solely by the Company, if the appliance is damaged through accident, misuse, abuse, negligence, scratching, or if the appliance is altered in any way.
THIS WARRANTY IS IN LIEU OF ALL IMPLIED WARRANTIES, INCLUDING WARRANTIES OF MERCHANTABILITY, FITNESS FOR A PARTICULAR PURPOSE, PERFORMANCE, OR OTHERWISE, WHICH ARE HEREBY EXCLUDED. IN NO EVENT SHALL THE COMPANY BE LIABLE FOR ANY DAMAGES, WHETHER DIRECT, INDIRECT, INCIDENTAL, FORSEEABLE, CONSEQUENTIAL, OR SPECIAL ARISING OUT OF OR IN CONNECTION WITH THIS APPLIANCE.
If you think the appliance has failed or requires service within its warranty period, please contact the Customer Care Department at (866) 290-1851, or e-mail us at customercare@westbend.com. A receipt proving the original purchase date will be required for all warranty claims, hand written receipts are not accepted. You may also be required to return the appliance for inspection and evaluation. Return shipping costs are not refundable. The Company is not responsible for returns lost in transit.
Valid only in USA and Canada
REPLACEMENT PARTS
Replacement parts, if available, may be ordered directly from the Company several ways. Order online at www.westbend.com, e-mail customercare@westbend.com, over the phone by calling (866) 290-1851, or by writing to:
West Bend
Attn: Customer Care Dept.
P. O. Box 53
West Bend, WI 53095
To order with a check or money order, please first contact Customer Care for an order total. Mail your payment along with a letter stating the model or catalog number of your appliance, which can be found on the bottom or back of the appliance, a description of the part or parts you are ordering, and the quantity you would like.
Your state/province's sales tax and a shipping fee will be added to your total charge. Please allow two weeks for processing and delivery.
This manual contains important and helpful information regarding the safe use and care of your product. For future reference, attach dated sales receipt for warranty proof of purchase and record the following information:
Date purchased or received as gift: ____
Where purchased and price, if known: ____
Item number and Date Code (shown bottom/back of product):
English - 7
WestBend®
natural_image
White portable oven with multiple eggs and a 'W/ HOT STEAM' label, no readable text beyond brand name.Attn: Customer Care Dept.
P. O. Box 53
West Bend, WI 53095
natural_image
White portable food heater with multiple eggs and a 'W/HOT STEAM' label, no additional text or symbols visible.
- IMPORTANT SAFEGUARDS
- CAUTION
- SAVE THESE INSTRUCTIONS
- BEFORE USING FOR THE FIRST TIME
- USING YOUR EGG COOKER
- TO POACH EGGS:
- TO SOFT-COOK EGGS:
- TO HARD-COOK EGGS:
- HELPFUL HINTS
- CLEANING YOUR EGG COOKER
- RECIPES
- Deviled Eggs
- Eggs Benedict
- Easy Hollandaise Sauce
- PRODUCT WARRANTY
- Valid only in USA and Canada
- REPLACEMENT PARTS
- WestBend®
Brand : WestBend
Model : 87628
Category : Egg cooker