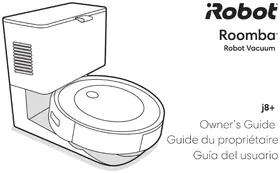
Roomba j8+ - Robot vacuum IROBOT - Free user manual and instructions
Find the device manual for free Roomba j8+ IROBOT in PDF.



| Product type | Robot vacuum |
| Brand | iRobot |
| Model | Roomba j8+ |
| Power source | Rechargeable lithium-ion battery via Clean Base |
| Recommended charge time (first use) | 3 hours |
| Navigation system | Precision Vision Navigation (front camera) |
| Obstacle detection | Yes, real-time via camera |
| Dirt detection | Yes (Dirt Detect) |
| Automatic emptying | Yes, via Clean Base with disposable bag |
| Connectivity | Wi-Fi 2.4 GHz |
| Mobile app | iRobot Home (iOS/Android) |
| Physical control | Clean button (start/pause/stop) |
| Floor types | Dry floors only (do not vacuum liquids) |
| Filter maintenance | Weekly cleaning, replacement every 2 months |
| Brush maintenance | Monthly cleaning, annual replacement |
| Front wheel maintenance | Cleaning every 2 weeks |
| Sensor and contact maintenance | Monthly cleaning |
| Clean Base bag capacity | Disposable bag (replace when indicator is solid red) |
| Safety | Thermal protection, automatic shut-off in case of overheating |
| Certifications | FCC, ICES-003 |
| Indoor use only | Yes |
Frequently Asked Questions - Roomba j8+ IROBOT
User questions about Roomba j8+ IROBOT
0 question about this device. Answer the ones you know or ask your own.
Ask a new question about this device
Download the instructions for your Robot vacuum in PDF format for free! Find your manual Roomba j8+ - IROBOT and take your electronic device back in hand. On this page are published all the documents necessary for the use of your device. Roomba j8+ by IROBOT.
USER MANUAL Roomba j8+ IROBOT
natural_image
Line drawing of a modern toilet with lid and ventilation slots (no text or symbols)iRobot®
Roomba®
Robot Vacuum
j8+
Owner's Guide
Important Safety Instructions
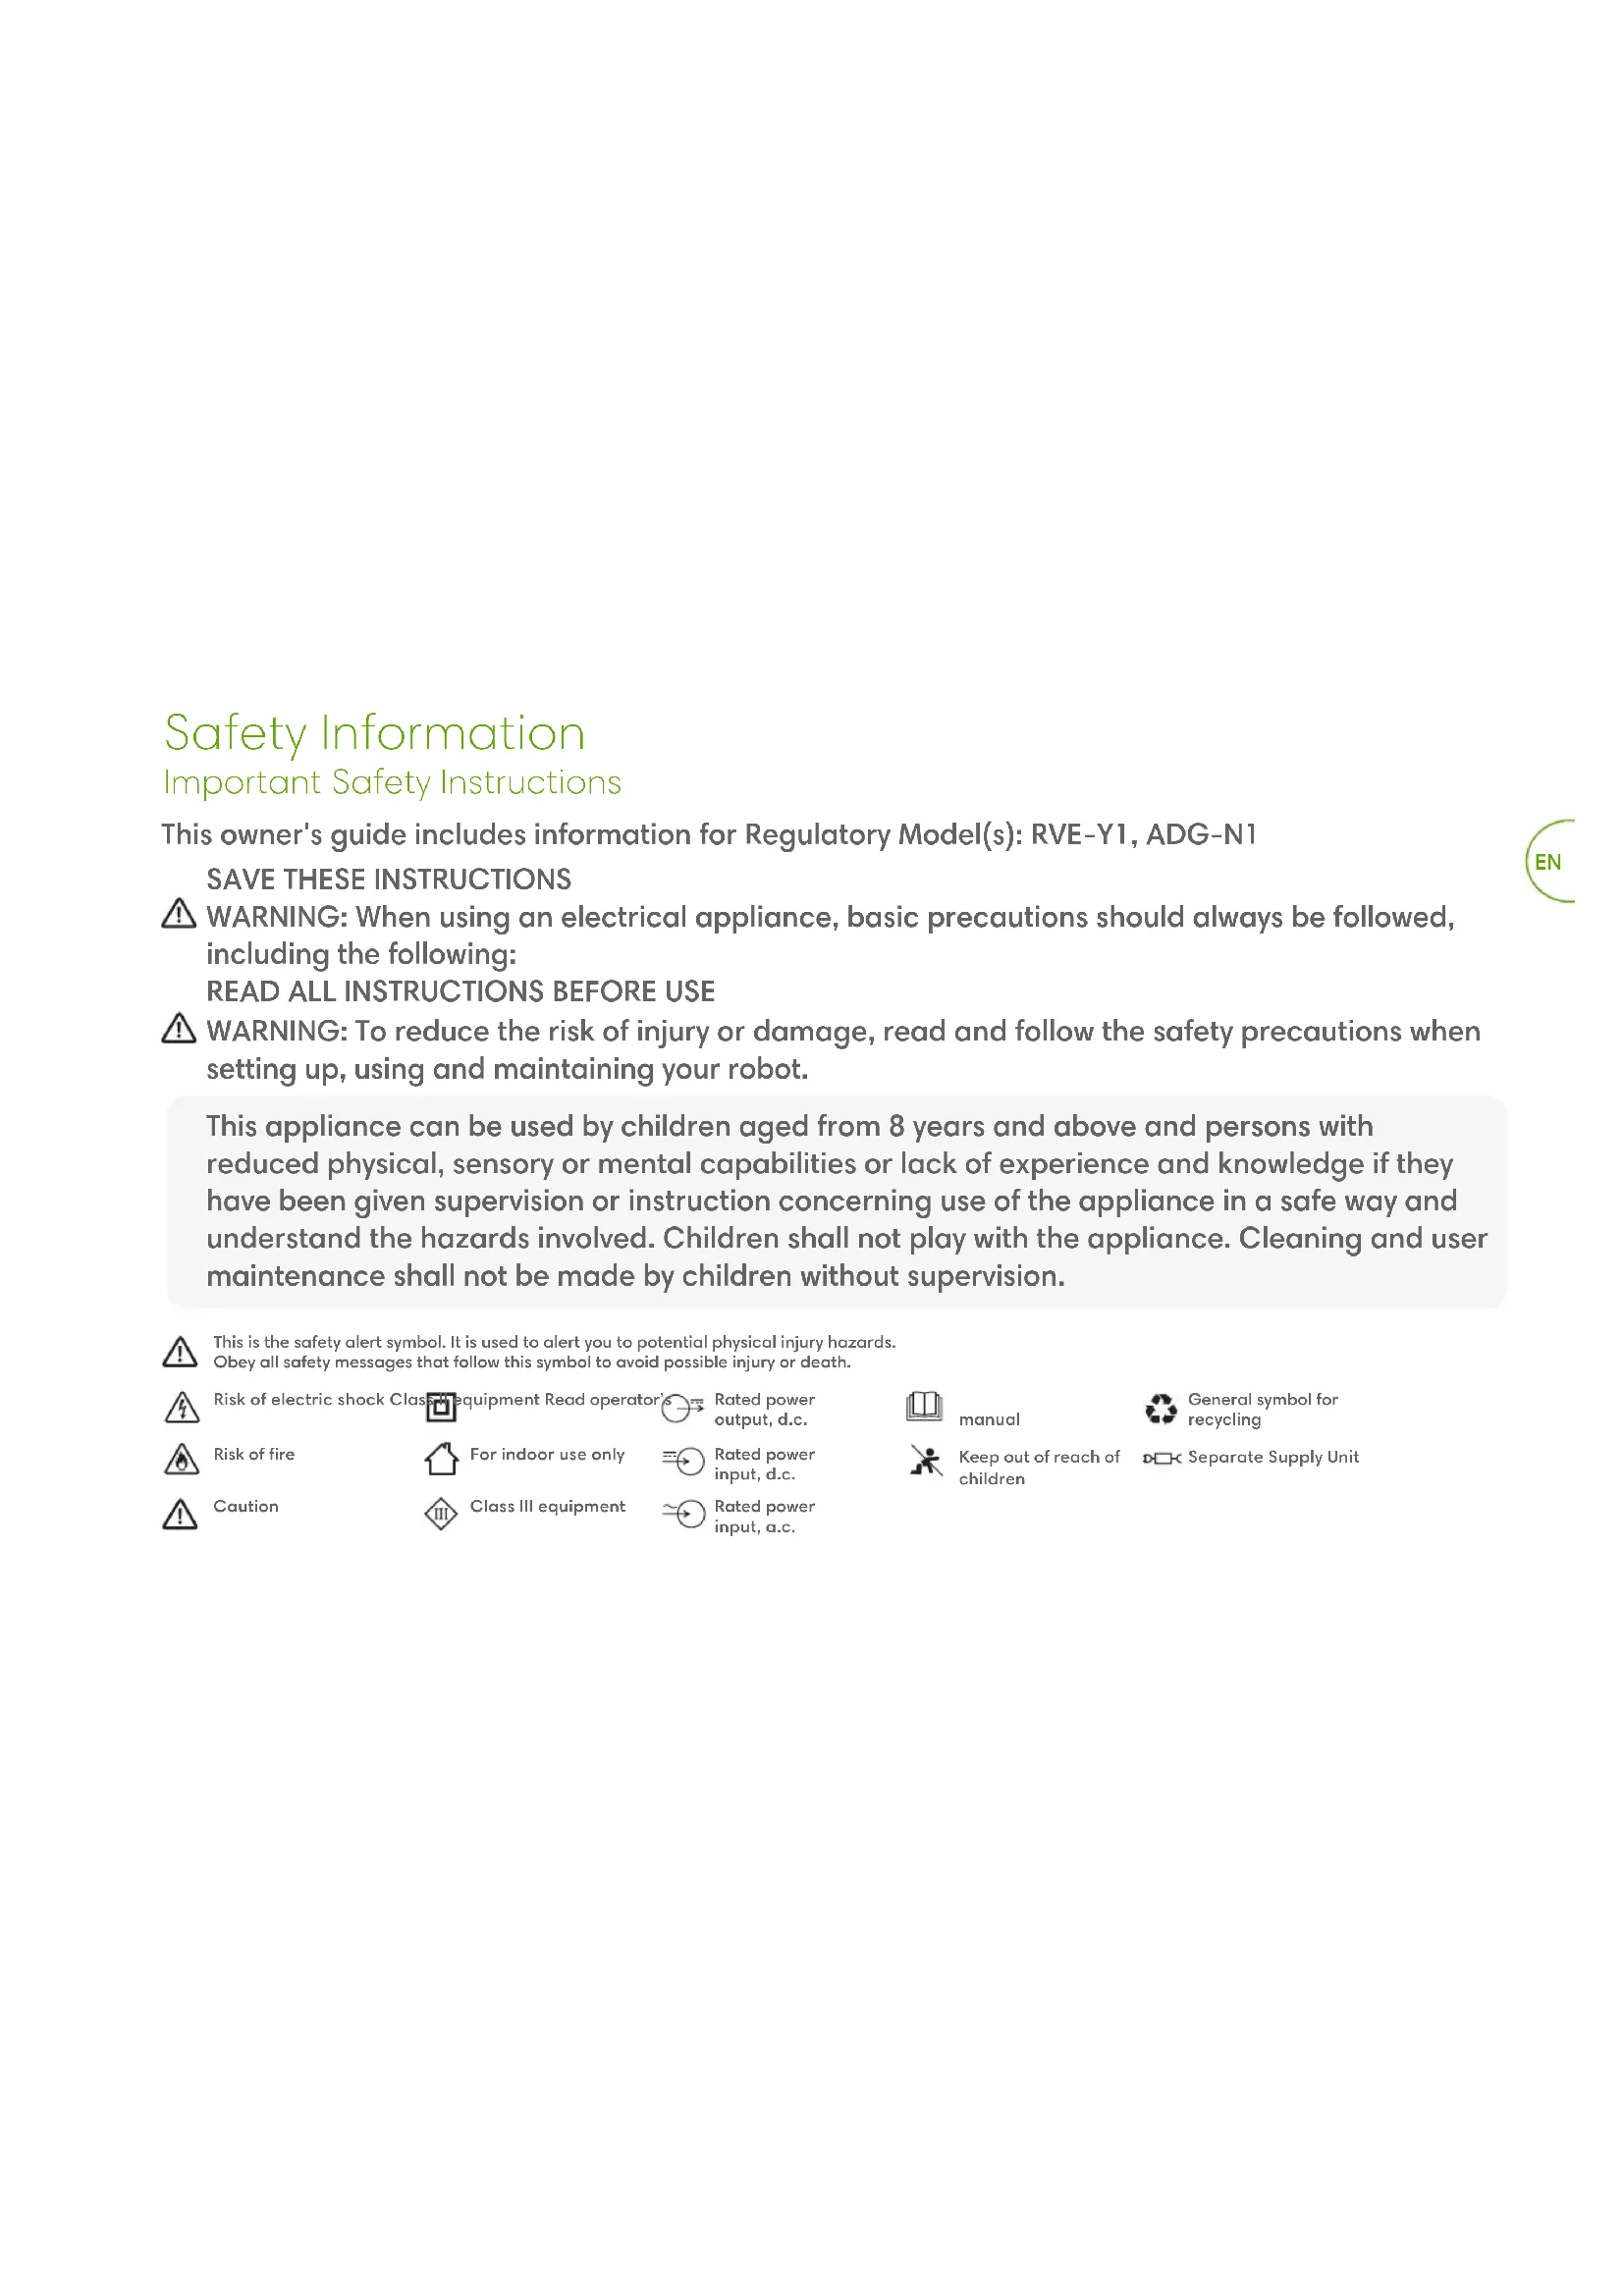
This owner's guide includes information for Regulatory Model(s): RVE-Y1, ADG-N1
SAVE THESE INSTRUCTIONS
⚠ WARNING: When using an electrical appliance, basic precautions should always be followed, including the following:
READ ALL INSTRUCTIONS BEFORE USE
⚠ WARNING: To reduce the risk of injury or damage, read and follow the safety precautions when setting up, using and maintaining your robot.
This appliance can be used by children aged from 8 years and above and persons with reduced physical, sensory or mental capabilities or lack of experience and knowledge if they have been given supervision or instruction concerning use of the appliance in a safe way and understand the hazards involved. Children shall not play with the appliance. Cleaning and user maintenance shall not be made by children without supervision.
This is the safety alert symbol. It is used to alert you to potential physical injury hazards. Obey all safety messages that follow this symbol to avoid possible injury or death.
Risk of electric shock Class equipment Read operator's Rated power output, d.c.
Risk of fire For indoor use only Rated power input, d.c.
Caution Class III equipment Rated power input, a.c.
manual General symbol for recycling
Keep out of reach of children □□K Separate Supply Unit
WARNING: Indicates a hazardous situation that, if not avoided, could result in death or serious injury.
CAUTION: Indicates a hazardous situation that, if not avoided, could result in minor or moderate injury.
NOTICE: Indicates a hazardous situation that, if not avoided, could result in property damage.
GENERAL
WARNING
- Your robot comes with a region approved power supply cord and is designed to be plugged into a standard household AC power outlet only. Do not use any other power supply cord or power strip. For replacement cords, please contact Customer Care to ensure proper selection of country specific power supply cord.
- Do not open your robot or dirt disposal other than instructed in the Owner's Guide. There are no user serviceable parts inside. Refer servicing to qualified service personnel.
- Risk of electric shock, use indoors in dry location only.
- Do not handle your robot or dirt disposal with wet hands.
- Do not use unauthorized chargers. Use of an unauthorized charger could cause the battery to generate heat, smoke, catch fire, or explode.
- Your robot is not a toy. Small children and pets should be supervised when your robot is operating.
- Do not sit or stand on your robot or dirt disposal.
- Store and operate your robot in room temperature environments only.
-
If the room to be cleaned contains a balcony, a physical barrier should be used to prevent robot access to the balcony and ensure safe operation.
-
If the room to be cleaned contains equipment, such as a stove, fan, space heater, or humidifier, remove the equipment before operation. There is a risk of injury, accident or malfunction if the robot comes in contact and pushes the equipment.
- Clean cliff sensors for buildup.
- This robot is intended for dry floor use only. Do not use this device to pick up spills. Do not allow your robot or charging station to become wet.
CAUTION
- Do not operate the robot in areas with exposed electrical outlets in the floor.
- Do not use this device to pick up sharp objects, glass, or anything that is burning or smoking.
- Be aware that the robot moves on its own. Take care when walking in the area that the robot is operating in to avoid stepping on it or tripping over it.
- If the device passes over a power cord and drags it, there is a chance an object could be pulled off a table or shelf. Before using this device, pick up objects like clothing, loose papers, pull cords for blinds or curtains, power cords, and any fragile objects. Extinguish candles. Shut off space heaters.
- Perform the required maintenance per the Owner's Guide to ensure safe operation of the robot and dirt disposal.
NOTICE
- Do not place anything on top of your robot.
- The failure to maintain cleanliness of charger contacts could result in loss of ability for the robot to charge the battery.
• Before running your robot on carpets or rugs, ensure that the
carpets or rugs are compatible with vacuums using bars or brushes. Using your robot on a carpet or rug that is not compatible could result in damage to your carpet or rug. Contact your carpet or rug manufacturer with questions on compatibility.
BATTERY
WARNING
- Do not open, crush, heat above 176^ : 80^ , or incinerate. Follow the Owner's Guide instructions for proper use, maintenance, handling, and disposal.
- Do not short-circuit the battery by allowing metal objects to contact battery terminals or immerse in liquid. Do not subject batteries to mechanical shock.
- Lithium ion batteries and products that contain lithium ion batteries are subject to stringent transportation regulations. If you need to ship this product (with the battery included) for service, travel or any other reason, you must see the Troubleshooting section of your manual or contact customer care for shipping instructions.
- Periodically inspect the battery pack for any sign of damage or leakage. Do not charge damaged or leaking battery packs, do not allow the liquid to come in contact with skin or eyes. If contact has been made, wash the affected area with copious amounts of water and seek medical advice. Place the battery in a sealed plastic bag and recycle or dispose of safely according to local environmental regulations, or return it to your local authorized iRobot Service Center for disposal.
CAUTION
- Battery usage by children should be supervised. Seek medical advice immediately if a cell or a battery has been swallowed.
NOTICE
- The battery pack must be removed from the robot before recycling or disposal.
- For best results, only use the iRobot Lithium Ion Battery that comes with the robot.
- Do not use non-rechargeable batteries. Use only the rechargeable battery supplied with the product. For replacement, purchase identical iRobot battery or contact iRobot Customer Care for alternative battery options.
• Always charge and remove the battery from your robot and accessories before long-term storage.

This symbol on the battery indicates that the battery must not be disposed of with unsorted common municipal waste. As the end-user, it is your responsibility to dispose of the end-of-life battery in your appliance in an environmentally sensitive manner as follows:
(1) returning it to the distributor/dealer from whom you purchased the product; or
(2) depositing it in a designated collection point the separate collection and recycling of end-of-life batteries at the time of disposal will help to conserve natural resources and to ensure that it is recycled in a manner that protects human health and the environment. For more information, please contact our local recycling office or the dealer from whom you originally purchased the product. Failure to properly dispose of end-of-life batteries may result in the negative potential effects on the environment and human health due to the substances in the batteries and accumulators.
Note: For battery recycling go to call2recycle.org; or call 1-800-822-8837
AUTOMATIC DIRT DISPOSAL

WARNING
- Do not use with damaged cord or plug. If appliance is not working as it should, has been dropped, damaged, left outdoors, or dropped into water, return it to a service center.
- Always disconnect your robot from the dirt disposal before cleaning or maintaining it.
- Do not use the dirt disposal as a step.
- Do not put any object into openings. Do not use with any opening blocked; keep free of dust, lint, hair, and anything that may reduce air flow.
- To properly maintain your dirt disposal, do not place foreign objects inside and ensure it is clear of debris.
- In order to avoid a hazard due to inadvertent resetting of the thermal cut-out, this appliance must not be supplied through an external switching device, such as a timer, or connected to a circuit that is regularly switched on and off by the utility.
- Do not pour any liquids into the device and do not immerse in water.
- Do not use outdoors or on wet surfaces.
- Do not allow to be used as a toy. Close attention is necessary when used by or near children.
- Use only as described in this manual.
- To reduce the risk of electric shock, unplug your dirt disposal before cleaning.
- Keep the dirt disposal and power cord away from heated surfaces.
- Do not allow liquids to get on or into the dirt disposal.
NOTICE
- Product may not be used with any type of power converter. Use of power converters will immediately void the warranty.
- If you live in an area prone to electrical storms, it is recommended that you use additional surge protection. Your dirt disposal may be protected with a surge protector in the event of severe electrical storms.
- Do not use without dust bag and/or filters in place.
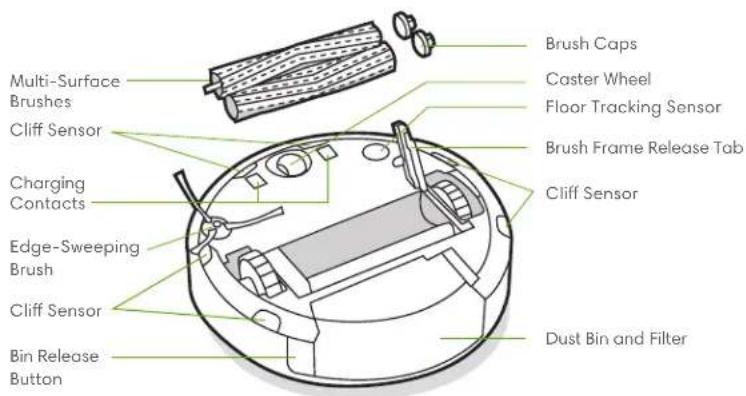
About your Roomba® Robot Vacuum
Top View
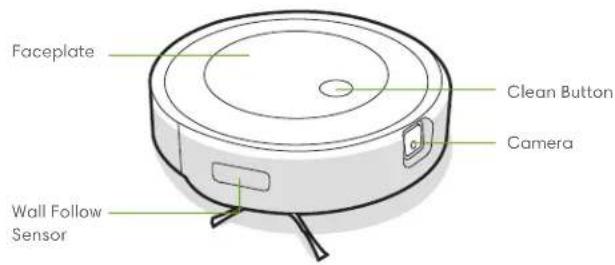
Bottom View
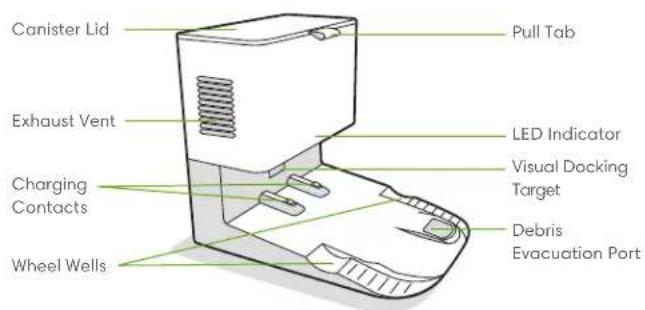
About Your Clean Base™ Automatic Dirt Disposal
Front View
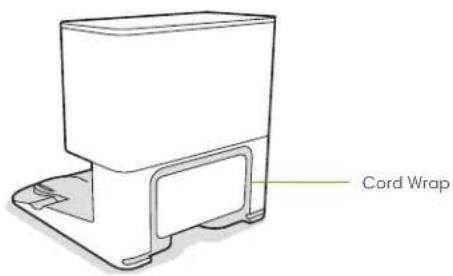
Back View
Top View
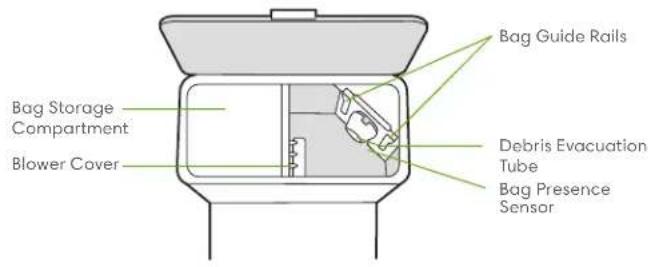
Bottom View
2 For more information, visit global.irobot.com
Using your Roomba® Robot Vacuum
Positioning the Clean Base™ Automatic Dirt Disposal
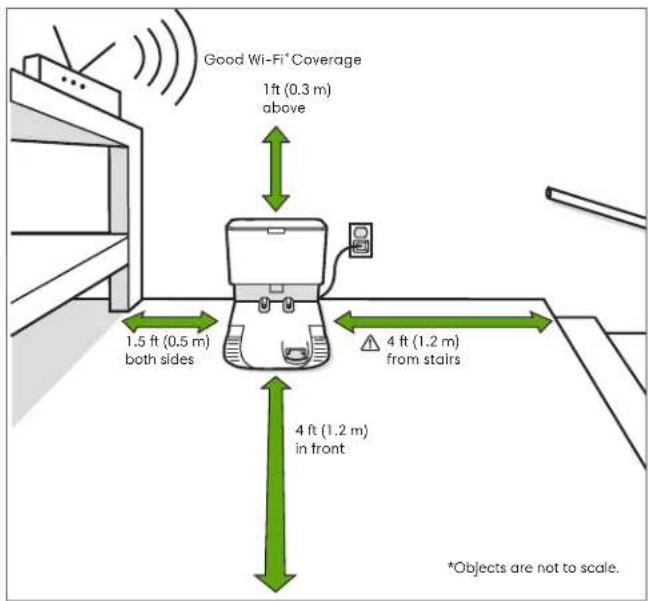

Note: Do not place your Clean Base Automatic Dirt Disposal in direct sunlight. Ensure the area around the dock is free of clutter to improve docking performance.

WARNING: To prevent the risk of your robot falling downstairs, ensure that the charging station is placed at least 4 feet (1.2 meters) away from stairs.
Download the iRobot Home App and connect to Wi-Fi\*
- Follow step-by-step instructions to set up your Roomba.
- Set up Precision Vision Navigation™ to avoid obstacles in real time.
- Set an automatic cleaning schedule and customize cleaning preferences.
- Create smart maps to tell your robot where and when to clean.

Charging
EN
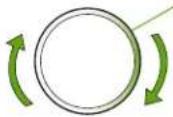
Light Ring Spiral While Charging
White Spiral: charging
Red Spiral: charging, low battery
A solid white light will indicate the battery charge percentage of your robot
- Place the robot on the charging station to activate the battery.
Note: Your robot comes with a partial charge, but we recommend that you charge the robot for 3 hours prior to starting the first cleaning job.
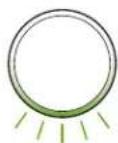
When your robot is fully charged, the light ring indicator will intermittingly pulse white at the rear.
- The robot uses a small amount of power whenever it is on the charging station. You can put the robot in a further reduced power state when not in use. To put your robot into reduced power standby mode, remove the dust bin and tap the clean button 5 times. To exit reduced power standby mode, place your robot on the charging station and tap the clean button. For more details on this Reduced Power Standby Mode, refer to the FAQ page on our website.
- For long-term storage, turn off the robot by removing it from the charging station and holding down the clean button for 3 seconds with one wheel off the ground. Store the robot in a cool, dry place.
Cleaning
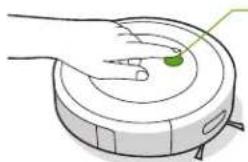
natural_image
Illustration of a hand using a robotic vacuum cleaner to touch a green circular component (no text or symbols)Just press the clean button
Tap to Start / Pause / Resume
Hold for 2-5 seconds to end a job
- Your robot will automatically explore and clean your home in neat rows, avoiding obstacles using its front-facing camera. It will return to the charging station at the end of a cleaning job and whenever it needs to recharge.
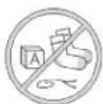
Your robot is able to recognize and avoid objects. However, it is still recommended to remove excess clutter before cleaning.
- To end a job and send the robot back to its charging station, hold the clean button down for 2-5 seconds. A blue light ring pattern will indicate that the robot is seeking the charging station.
- When your robot detects an especially dirty area, it will engage Dirt Detect™ mode, moving in a forward/backward motion to clean the area more thoroughly. The light ring indicator will flash blue.

When the robot senses its bin needs to be emptied, the light ring indicator will illuminate in a red sweeping motion toward the rear.
4 For more information, visit global.irobot.com
Troubleshooting
- Your robot will tell you something is wrong by playing an audio alert and turning the light ring indicator red. Press the clean button or tap the bumper for details. Check the iRobot Home App for further support.
Red Light Ring
Low battery. Please charge.
- After 90 minutes of inactivity o the charging station, the robot will automatically end its cleaning job.
- To factory reset your robot, remove the dust bin and hold the clean button down for seven (7) seconds. A sound will let you know when the factory reset has been completed. Press the clean button down once more to confirm.
Battery Safety & Shipping
For best results, only use the iRobot Lithium Ion Battery that comes with your robot.
WARNING: Lithium ion batteries and products that contain lithium ion batteries are subject to stringent transportation regulations. If you need to ship this product for service, travel or any other reason, you MUST follow the below shipping instructions.
- Battery MUST be turned o before shipping.
- Turn o the battery by removing the robot from the charging station and holding down the clean button for 3 seconds with one wheel o the ground. All indicators will turn o .
• Package the robot securely for shipping. - If you need further assistance, contact our Customer Care team or visit global.irobot.com.
About Your Automatic Dirt Disposal
While cleaning, your robot will automatically return to the dirt disposal to empty its bin and recharge as needed.
The dirt disposal's LED indicator will turn solid red when a new bag is needed. If a clog is detected, the dirt disposal will trigger additional attempts to automatically clear the clog.
Note: If you place your robot on the dirt disposal by hand, it will not empty automatically. In this case, use the iRobot Home App or hold the button down for 2-5 seconds.
Care and Maintenance
Care and Maintenance Instructions
To keep your robot running at peak performance, perform the procedures on the following pages.
There are additional instructional videos in the iRobot Home App. If you notice the robot picking up less debris from your floor, empty the bin, clean the filter and clean the brushes.
| Part Care Frequency Replacement* | ||
| Bin Wash bin as needed | ||
| Filter Clean once a week | (twice a week if you have a pet). Do not wash. | Every 2 months |
| Full Bin Sensor Clean every 2 weeks | ||
| Front Caster Wheel Clean every 2 weeks Every 12 months | ||
| Edge-Sweeping Brush and Multi-Surface Brushes | Clean once a month (twice a month if you have a pet) | Every 12 months |
| Sensors and Charging Contacts | Clean once a month | |
| Camera Window Clean and inspect once a month | ||
| Bags Bags should be replaced | when prompted by the LED indicator / app | |
| Dock Charging Contacts and Visual Docking Target | Once every month | |
| Blower Cover inside canister | Once every month (remove debris from blower cover) | |

Note:iRobot manufactures various replacement parts and assemblies. If you think you need a replacement part, please contact iRobot Customer Care for more information.
* Replacement frequency may vary. Parts should be replaced if visible wear appears.
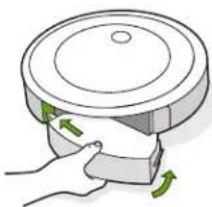
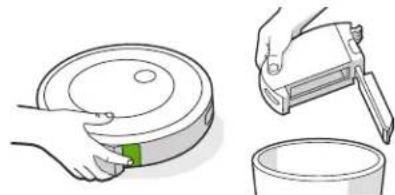
Emptying the Bin
1 Press bin release button to remove bin.
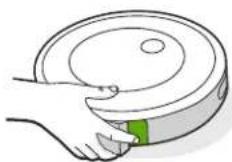
2 Open bin door to empty bin.
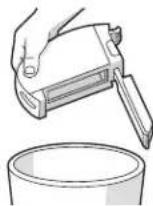
3 Place bin back in the robot.
natural_image
Illustration of a hand holding a circular object with green arrows indicating rotation or movement (no text or symbols)Cleaning the Filter
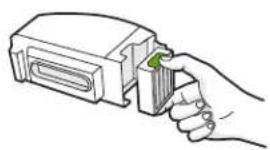
1 Remove the bin. Remove the filter by grasping both ends and pulling out.
natural_image
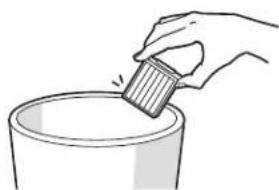
Line drawing of a hand inserting a component into a device (no text or symbols)2 Remove debris by tapping the filter against your trash container.
natural_image
Hand pouring liquid into a cylindrical container (no text or symbols visible)3 Reinsert filter with ridged grips facing out. Place bin back in the robot.
Important: The robot will not run if the filter is not installed correctly. Replace the filter every two months.
Cleaning the Full Bin Sensors
1 Remove and empty the bin.
natural_image
Illustration of three kitchen utensils: a circular tray with a handle, a hand holding a green clip, and a bucket with a handle (no text or symbols)2 Wipe the inner sensors with a clean, dry cloth
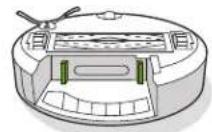
3 Wipe the bin door with a clean, dry cloth.

4 Clear any debris from the vacuum path.
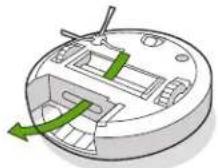
Washing the Bin

Important: Do not wash the filter. Remove the filter before washing the bin.
1 Release the bin, remove the filter, and open the bin door.
2 Rinse the bin using warm water.
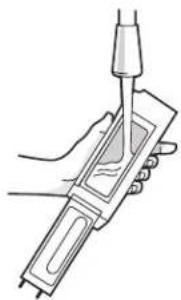
natural_image
Illustration of a hand holding a pen or stylus, no text or symbols present
Note: Bin is not dishwasher safe.
3 Make sure bin is completely dry. Reinsert filter and place bin back in the robot.
Cleaning the Edge-Sweeping Brush
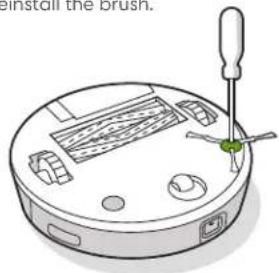
1 Use a coin or small screwdriver to remove the screw holding the Edge-Sweeping Brush in place.
2 Pull to remove the Edge-Sweeping Brush. Remove any hair or debris, then reinstall the brush.
Cleaning the Front Caster Wheel
1 Pull firmly on the front wheel module to remove it from the robot.
2 Pull firmly on the wheel to remove it from its housing (see illustration below).
3 Remove any debris from inside the wheel cavity.
4 Reinstall all parts when finished.
Make sure the wheel clicks back into place.
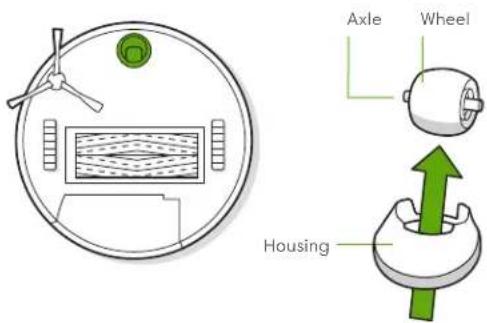
Important: A front wheel clogged with hair and debris could result in damage to your floor. If the wheel is not spinning freely after you have cleaned it, please contact Customer Care.
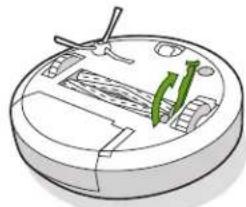
Cleaning the Multi-Surface Brushes
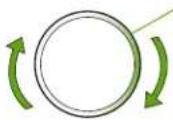
Pinch the brush frame release tab, lift the tab, and remove any obstructions.
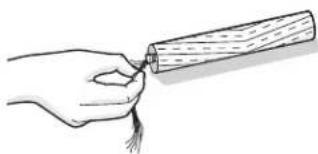
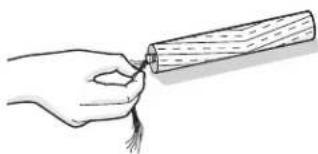
2 Remove the brushes from the robot. Remove the brush caps from the ends of the brushes. Remove any hair or debris that has collected beneath the caps. Reinstall the brush caps.
3 Remove any hair or debris from the square and hexagonal pegs on the opposite side of the brushes.
4 Reinstall the brushes in the robot. Match the shape of the brush pegs with the shape of the brush icons in the cleaning head module.
natural_image
Diagram of a robotic vacuum cleaner with green directional arrows indicating motion (no text or symbols)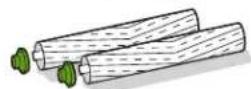
natural_image
Line drawing of a hand holding a wooden tool, no text or symbols present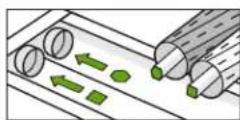
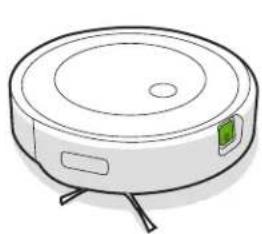
Cleaning the Sensors, Camera Window and Charging Contacts
1 Wipe sensors, camera window and charging contacts with a clean, dry cloth.
Note: Inspect the camera window. If you notice any cracks, please contact Customer Care.
natural_image
Line drawing of a robotic vacuum cleaner with green sensor icon (no text or symbols)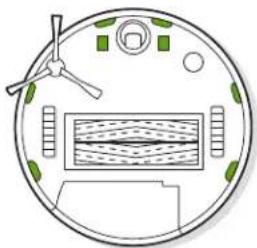
natural_image
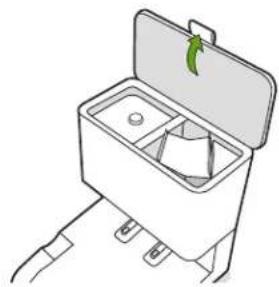
Circular diagram with a central rectangular structure and surrounding green circular elements, no text or symbols present.Replacing the Bag
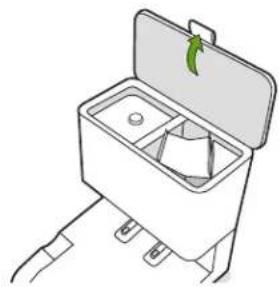
1 Lift up on the canister lid to open.
natural_image
Diagram of a mechanical device with a green arrow indicating rotation or force (no text or symbols)2 Pull up on the plastic card to remove the bag from the canister.
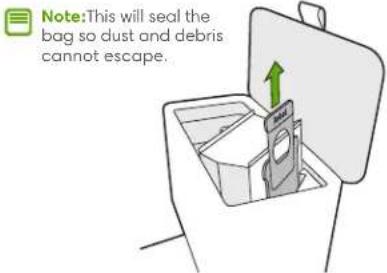
3 Discard the used bag.
4 Install a new bag, sliding the plastic card into the guide rails.
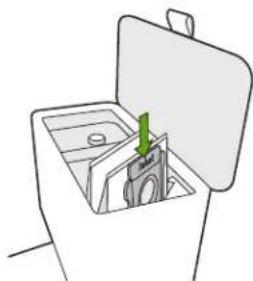
natural_image
Line drawing of a mechanical device with a green arrow indicating a component (no text or symbols)5 Press down on the lid making sure it is completely closed.
Note: To achieve optimal performance with your robot and automatic dirt disposal, clean and/or replace your robot's filter as needed.
Cleaning the Visual Docking Target and Charging Contacts
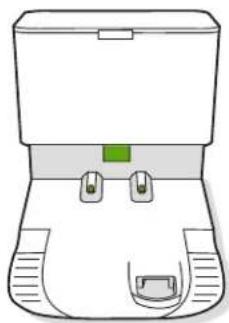
Inspect the visual docking target and charging contacts to make sure they are clear of debris. Wipe with a clean,dry cloth.
Note: Do not spray cleaning solution directly onto sensors or into sensor openings.
natural_image
Line drawing of a medical device with no visible text or symbolsRemoving Debris from Blower Cover
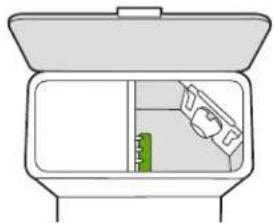
Inspect blower cover for any lint or debris built-up, and wipe with a clean dry cloth to remove.
natural_image
Line drawing of a box with an open lid and internal compartments (no text or symbols)Your dirt disposal will tell you if something is wrong via an LED indicator on the front of the canister and through the iRobot Home app.
| LED Indicator Common Error How to Fix | ||
| Solid Red Bag full or missing 1. Replace bag if it is full or missing.2. Make sure the bag is securely inserted.3. If problem persists, remove any debris from the port on the bottom of your robot and the dirt disposal. | ||
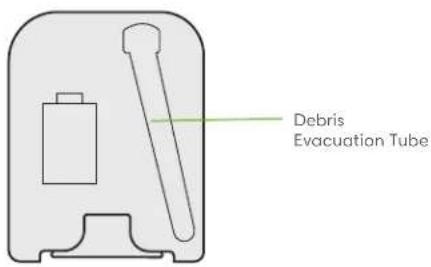
| Blinking Red There is a leak or a clog in the dock evacuation path | 1. Make sure the canister lid is pushed down and firmly sealed. Hold the clean button on your robot down for 2 seconds to manually empty the bin.2. Remove any debris from the port on the bottom of your robot and dirt disposal.3. Unplug the dirt disposal from the wall. Place it on its side and inspect the debris evacuation tube for debris. If necessary, remove the tube to clear any debris. | |
This product has been equipped with a thermal protector designed to protect against damage due to overheating. If the protector operates, the motor will stop running. If this happens, unplug the unit, allow to cool for 30 minutes, clear any obstructions from the evacuation port and evacuation tube, and plug the unit back in.
iRobot Customer CareTroubles
USA & Canada
If you have questions or comments about your Roomba ^® robot vacuum, please contact iRobot before contacting a retailer.
You can start by visiting global.irobot.com for support tips, frequently asked questions and information about accessories. This information can also be found in the iRobot Home App. If you need further assistance, call our Customer Care team at (877) 855-8593.
iRobot USA Customer Care Hours
• Monday to Friday, 9AM – 9PM Eastern Time
• Saturday and Sunday 9AM – 6PM Eastern Time
Outside USA & Canada
Visit global.irobot.com to:
- Learn more about iRobot in your country
- Get hints and tips to improve your Roomba * robot vacuum's performance
• Get answers to questions - Contact your local support center
Regulatory Information
FCC Supplier's Declaration of Conformity
iRobot Corporation
Roomba Model: RVE-Y1
Contains FCC ID: UFE-AXGY1 and contains IC: 6652A-AXGY1
This device complies with part 15 of the FCC Rules and ICES-003.
Operation is subject to the following two conditions:
(1) This device may not cause harmful interference, and
(2) This device must accept any interference received, including interference that may cause undesired operation.
This device complies with Industry Canada license-exempt RSS
standard(s). Operation is subject to the following two conditions:
(1) This device may not cause interference, and
(2) This device must accept any interference, including interference that may cause undesired operation of the device.
- Changes or modifications not expressly approved by iRobot Corporation could void the user's authority to operate the equipment.
-
This equipment has been tested and found to comply with the limits for a Class B digital device, pursuant to part 15 of the FCC Rules as well as ICES-003 Rules. These limits are designed to provide reasonable protection against harmful interference in a residential installation. This equipment generates, uses and can radiate radio frequency energy and, if not installed and used in accordance with the instructions, may cause harmful interference to radio communications. However, there is no guarantee that interference to radio communication will not occur in a particular installation. If this equipment does cause harmful interference to radio or television reception, which can be determined by turning the equipment off and on, the user is encouraged to try to correct the interference by one or more of the following measures:
-
Reorient or relocate the receiving antenna.
-
Increase the separation between the equipment and receiver.
-
Connect the equipment into an outlet on a circuit different from that to which the receiver is connected.
- Consult the dealer or an experienced radio/TV technician for help.
- Under Industry Canada regulations, this radio transmitter may only operate using an antenna of a type and maximum (or lesser) gain approved for the transmitter by Industry Canada. To reduce potential radio interference to other users, the antenna type and its gain should be so chosen that the equivalent isotropically radiated power (e.i.r.p.) is not more than the necessary for successful communication.
- FCC Radiation Exposure Statement: This product complies with FCC §2.1091(b) for mobile device RF exposure limits, set forth for an uncontrolled environment and is safe for the intended operation as described in this manual. Per FCC requirements, maintain a distance of more than 8 inches (20 cm) between any person and the host device (Roomba robot).
- ISED Radiation Exposure Statement: This product complies with the Canadian Standard RSS-102 for mobile device RF exposure limits, set forth for an uncontrolled environment and is safe for the intended operation as described in this manual. Per ISED requirements, maintain a distance of more than 8 inches (20 cm) between any person and the robot.
iRobot Corporation, 8 Crosby Drive, Bedford, MA 01730 USA.
http://global.irobot.com
For battery recycling go to call2recycle.org;
or call 1-800-822-8837


Robot
©2022 iRobot Corporation, 8 Crosby Drive, Bedford, MA 01730 USA. All rights reserved.
iRobot and Roomba are registered trademarks of iRobot Corporation.
Clean Base is a trademark of iRobot Corporation. Wi-Fi and the Wi-Fi logo are
registered trademarks of Wi-Fi Alliance.
Roomba°j8+ Owner's Guide
Download on the App Store
Recharge en cours
FR
natural_image
Illustration of a hand using a robotic vacuum cleaner to touch a green circular component (no text or symbols)natural_image
Illustration of a hand holding a circular device with green arrows indicating rotation or change (no text or symbols)Nettoyage du filtre
natural_image
Line drawing of a hand inserting a component into a device (no text or symbols)natural_image
Hand pouring liquid into a cylindrical container (no text or symbols visible)natural_image
Illustration of three kitchen utensils: a circular tray, a flat tool, and a cylindrical container (no text or symbols)natural_image
Illustration of a hand holding a pen or stylus, no text or symbols present
natural_image
Illustration of a circular electronic device with internal components and a tool inserted (no text or symbols visible)natural_image
Diagram of a robotic vacuum cleaner with green directional arrows indicating motion (no text or symbols)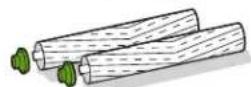
natural_image
Line drawing of a hand holding a wooden tool, no text or symbols present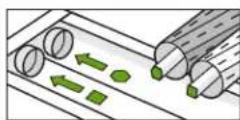
natural_image
Technical line drawings of a vacuum cleaner and its internal components (no text or symbols)Remplacement du sac
natural_image
Diagram of a mechanical device with a green arrow indicating rotation or force (no text or symbols)natural_image
Line drawing of a mechanical device inside a container with an open lid and green arrow indicating direction (no text or symbols)natural_image
Line drawing of a medical device with two buttons and a green label (no text or symbols)natural_image
Line drawing of a box with an open lid and internal compartments (no text or symbols)Dépannage
natural_image
Illustration of a hand using a robotic vacuum cleaner to touch a green circular component (no text or symbols)natural_image
Illustration of a hand holding a circular device with green arrows indicating rotation or movement (no text or symbols)Limpieza del filtro
natural_image
Line drawing of a hand inserting a component into a device (no text or symbols)natural_image
Hand pouring liquid into a cylindrical container (no text or symbols visible)natural_image
Illustration of three kitchen utensils: a circular tray, a flat tool, and a cylindrical container (no text or symbols)natural_image
Illustration of a hand holding a pen or stylus, no text or symbols present
natural_image
Line drawing of a circular electronic device with a screwdriver inserted, showing internal components and a green indicator light (no text or symbols)natural_image
Diagram of a robotic vacuum cleaner with green directional arrows indicating motion (no text or symbols)natural_image
Line drawing of a hand holding a wooden stick (no text or symbols)natural_image
Technical line drawings of a vacuum cleaner and its internal components (no text or symbols)Cambio de bolsa
Levanta la tapa del recipiente para abrirlo.
natural_image
Diagram of a mechanical device with a green arrow indicating rotation or movement (no text or symbols)natural_image
Line drawing of a mechanical device with a green arrow indicating a component (no text or symbols)natural_image
Line drawing of a medical device with no visible text or symbolsnatural_image
Diagram of a closed storage unit with a green internal component, no text or symbols present
- iRobot®
- Roomba®
- Important Safety Instructions
- GENERAL
- WARNING
- CAUTION
- NOTICE
- BATTERY
- AUTOMATIC DIRT DISPOSAL
- About your Roomba® Robot Vacuum
- About Your Clean Base™ Automatic Dirt Disposal
- Using your Roomba® Robot Vacuum
- Download the iRobot Home App and connect to Wi-Fi\*
- Charging
- Cleaning
- Troubleshooting
- Low battery. Please charge.
- Battery Safety & Shipping
- About Your Automatic Dirt Disposal
- Care and Maintenance
- Care and Maintenance Instructions
- Emptying the Bin
- Cleaning the Filter
- Cleaning the Full Bin Sensors
- Washing the Bin
- Cleaning the Edge-Sweeping Brush
- Cleaning the Front Caster Wheel
- Cleaning the Multi-Surface Brushes
- Cleaning the Sensors, Camera Window and Charging Contacts
- Replacing the Bag
- Cleaning the Visual Docking Target and Charging Contacts
- Removing Debris from Blower Cover
- iRobot Customer CareTroubles
- USA & Canada
- iRobot USA Customer Care Hours
- Outside USA & Canada
- Visit global.irobot.com to:
- Regulatory Information
- Robot
- Recharge en cours
- Nettoyage du filtre
- Remplacement du sac
- Dépannage
- Limpieza del filtro
- Cambio de bolsa
Brand : IROBOT
Model : Roomba j8+
Category : Robot vacuum