
Rapid DEC005RD - Egg cooker Dash - Free user manual and instructions
Find the device manual for free Rapid DEC005RD Dash in PDF.
| Product type | Egg cooker |
| Brand | Dash |
| Model | Rapid DEC005RD |
| Capacity | Up to 6 eggs |
| Dimensions (approx.) | 20 x 15 x 15 cm |
| Weight (approx.) | Approximately 0.5 kg |
| Power supply | 120 V ~ 60 Hz, 350 W |
| Main functions | Cooking hard-boiled, soft-boiled, poached eggs, omelets |
| Included accessories | Measuring cup with piercing pin, boiling tray, poaching tray, omelet bowl |
| Heating plate material | Stainless steel |
| Body material | Heat-resistant plastic |
| Indicator light | Yes, power indicator |
| Care and cleaning | Clean with a damp cloth; do not immerse; do not put in dishwasher |
| Safety | Hot lid, hot steam, do not lock lid |
| Power cord | Short (approx. 60 cm) to prevent tripping hazards |
| Polarized plug | Yes (one wider blade) |
| Use | Household use only |
| Protection type | Automatic shut-off after cooking (approx.) |
Frequently Asked Questions - Rapid DEC005RD Dash
User questions about Rapid DEC005RD Dash
0 question about this device. Answer the ones you know or ask your own.
Ask a new question about this device
Download the instructions for your Egg cooker in PDF format for free! Find your manual Rapid DEC005RD - Dash and take your electronic device back in hand. On this page are published all the documents necessary for the use of your device. Rapid DEC005RD by Dash.
USER MANUAL Rapid DEC005RD Dash
natural_image
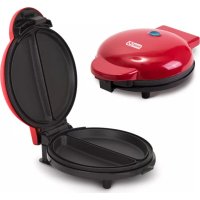
Red electric steamer with white eggs inside a transparent dome, no visible text or symbols on the main body.model # DEC005
RAPID
EGG COOKER

natural_image
Simple red line drawing of a cracked egg and an egg with wings (no text or symbols)One Touch Cooking | 6 Egg Capacity | 360 Watts


RAPID EGG COOKER
Important Safeguards....4-7
Parts & Features 8-9
Using Your Rapid Egg Cooker....10-11
Boiling Eggs 12-13
Poaching Eggs....14
Using the Omelette Bowl....15
Cleaning & Maintenance 16
Troubleshooting....17
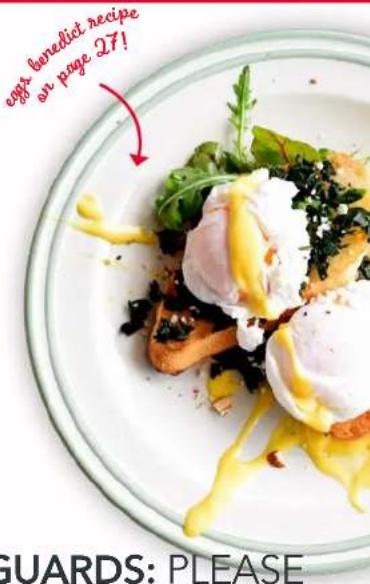
Recipes....19-27
More Recipe Ideas 28-29
Customer Support 30
Warranty 31
IMPORTANT SAFEGUARDS
IMPORTANT SAFEGUARDS: PLEASE READ AND SAVE THIS INSTRUCTION AND CARE MANUAL.
When using electrical appliances, basic safety precautions should be followed, including:
- Please read and save instruction and care manual.
- Read all instructions carefully.
- Remove all packaging and labels from appliance prior to use.
- Never leave appliance unattended when in use.
• Make sure the appliance is cleaned thoroughly before using. - Do not use appliance for other than its intended use. For household use only. Do not use outdoors.
- Do not operate this appliance with a damaged cord, damaged plug, after the appliance malfunctions, is dropped, or damaged in any manner. Return appliance to the nearest authorized service facility for examination, repair, or adjustment.
- For maintenance other than clearing, please contact StoreBound directly at 1-800-898-6970 from 7AM 7PM PST Monday Friday or by email at support@storebound.com.
- Only use approved ingredients with this appliance. Other ingredients may damage the appliance.
-
This appliance is not intended for use by persons (including children) with reduced physical, sensory, or mental capabilities, or lack of experience and knowledge unless they are provided with supervision and instruction concerning use of the appliance by a person responsible for their safety.
• Always be sure to unplug the appliance from outlet prior to moving, cleaning, storage, and when not in use. -
Refrain from using attachments that are not recommended by the appliance manufacturer, as this may result in fire, electric shock, or personal injury.
- Do not let the power cord touch hot surfaces or hang over the edges of tables or counters.
- Unplug the appliance from power outlet and allow to cool when not in use, during assembly/disassembly, and before cleaning the Rapid Egg Cooker.
- When clearing the Body of the appliance, do not submerge in water or other liquids. The Rapid Egg Cooker is NOT dishwasher sale.
- Do not place this appliance on or near a hot gas burner, hot electric burner, or in a heated oven.
- Do not put your hands or other foreign objects into the Rapid Egg Cooker while it is operating. If food spills onto the Heating Plate, make sure the Rapid Egg Cooker is turned off and cooled before cleaning.
• DO NOT place the Lid in the locked position while using the Rapid Egg Cooker as this will increase the risk of injury when removing the Lid once eggs have cooked. - WARNING! Hot steam! Never place your hands or arms over the Steam Hole while the appliance is in use.
-
Keep hands and utensils away from Heating Plate while cooking eggs to reduce the risk of injury or damage to the Rapid Egg Cooker.
-
Internal base and contents (water and eggs) of Rapid Egg Cooker are hot when in use. Let cool before handling and/or cleaning.
- Do not touch the Heating Plate when the Rapid Egg Cooker is hot. Use the handles.
- If using a longer power-supply cord or extension cord, make sure that the electrical rating of the wire is compatible with the appliance. If the appliance is of the grounded type, the extension cord should be a grounding-type 3-wire cord.
- Use extreme caution when handling the Measuring Cup as it contains a sharp Pin on the bottom of the cup which may cause injury.
- WARNING! The Lid becomes hot. When eggs are done, carefully remove the Lid by the Cover Handle. Allow the Lid to cool completely before touching or cleaning.
- NEVER place the Poaching Tray or Omelette Bowl directly on the Heating Plate. Always place on top of the Boiling Tray.
• Make sure the Rapid Egg Cooker is off before removing the eggs. - A short power cord should be used to reduce the risk of tripping and entanglement.
This appliance has a polarized plug (one blade is wider than the other). To reduce the risk of electric shock, this plug will fit in a polarized outlet only one way. If the plug does not completely fit in the outlet, reverse the plug. If it still does not fit, contact a qualified electrician. Do not attempt to modify the plug in any way.
IMPORTANT SAFEGUARDS: PLEASE READ AND SAVE THIS INSTRUCTION AND CARE MANUAL.
GARANTIES IMPORTANTES
MESURES DE SÉCURITÉ IMPORTANTES: VEUILLEZ LIRE ET CONSERVER CE MANUEL D'UTILISATION
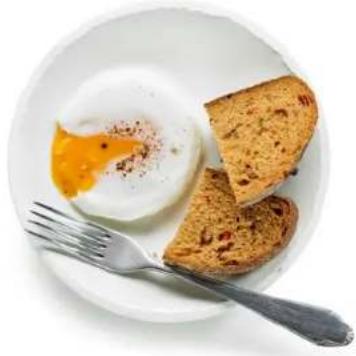
USING YOUR RAPID EGG COOKER USING YOUR RAPID EGG COOKER
SOFT, MEDIUM, AND HARD-BOILED EGGS:
The times listed below are guidelines so that you will know how long it will take to cook your eggs. The thermostat in the Rapid Egg Cooker will shut off automatically when the eggs are done - no additional timer is necessary. The following time guidelines are for medium to large eggs. Extra large or jumbo eggs may require additional time/water in the appliance to achieve the desired results.
If you like medium eggs firm: let the eggs sit covered in the Rapid Egg Cooker for a few extra minutes before removing them.
If you like completely hard-boiled eggs: let the eggs sit for an extra minute in the Rapid Egg Cooker after the buzzer sounds.
Soft BOILED
1-3 eggs 7 minutes
4-6 eggs 10 minutes
Medium BOILED
1-3 eggs 9 minutes
4-6 eggs 12 minutes
Hard BOILED
1-3 eggs 12 minutes
4-6 eggs 16 minutes
TIMER AUTO-OFF
This Rapid Egg Cooker is equipped with a precision thermal sensor and will turn off automatically when the water has fully evaporated from the Heating Plate and when the buzzer sounds.

ATTENTION: Do not unplug the unit while cooking. If you unplug the unit while cooking, it will still be turned on when you plug it back in. If the unit does not detect water on the Heating Plate, it will automatically shut off and reset itself in a few seconds.
natural_image
Plate of boiled egg with visible oil and sliced cookies, accompanied by a fork (no text or symbols)BOILING EGGS
natural_image
Close-up of a hand holding a white egg with a transparent container (no visible text or symbols)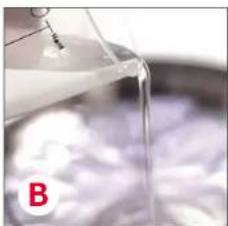
natural_image
Close-up of a glass beaker pouring liquid into a container with blurred background (no text or symbols visible)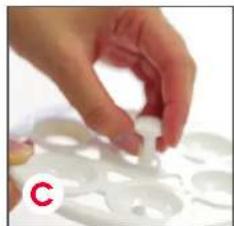
natural_image
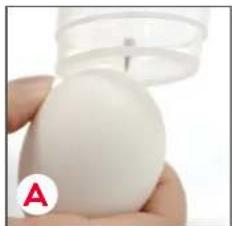
Hand holding a white plastic object, no text or symbols visible1 Make sure the Rapid Egg Cooker is unplugged before starting. Pierce the larger end of each egg with the attached Pin at the bottom of the Measuring Cup (photo A).
2 Use the Measuring Cup to pour the appropriate corresponding amount of cold water into the Heating Plate (photo B).
3 Attach the Boiling Tray Handle to the Boiling Tray (photo C), and place the Boiling Tray on the Heating Plate. Place an egg in each designated spot in the Boiling Tray. Make sure that the holes in the larger end of the eggs are pointed upwards.

WARNING: Do not lock the Lid when using your Rapid Egg Cooker as this may cause injury when removing the Lid once the buzzer sounds.

natural_image
Close-up of a transparent dome-shaped container with a small blue dot at the bottom (no text or symbols visible)
natural_image
Close-up of several white eggs on a white plate (no text or symbols visible)4 Cover with the Lid and plug in the Rapid Egg Cooker. Press the Power Button to start cooking (photo D). The Indicator Light will turn on.
5 When the eggs are finished cooking (photo E), a buzzer will sound. Press the power switch to silence the buzzer. Actual cooking time will depend on number of eggs and desired style. Uncover Lid by using the Lid Handle and remove eggs with heat-resistant tongs. Do not touch the parts with bare hands as they will be hot!
6 Press the Power Button to silence the buzzer and remove your eggs (photo F). Be careful when handling eggs. They will be hot!

Soak the eggs in ice water or run them under cold water immediately after removing them from the Rapid Egg Cooker to stop the cooking process, and to make peeling easier.
POACHING EGGS
USING THE OMELETTE BOWL
natural_image
Close-up of a glass pouring liquid into a metal bowl, with blurred background (no text or symbols visible)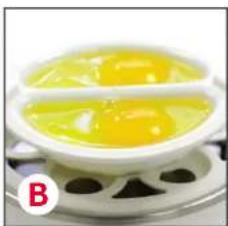
natural_image
Close-up of two cracked eggs in a white bowl on a perforated tray (no text or symbols visible)
natural_image
Close-up of a white bowl containing a light-colored substance, placed on a perforated metal tray (no text or symbols visible)1 Fill the Measuring Cup with cold water until it reaches the "Omelette/Poached" marking. Pour the water into the Heating Plate (photo A). Place the Boiling Tray on top of the Heating Plate.
2 Use cooking spray to lightly grease the Poaching Tray. Always place the Omelette Bowl or Poaching Tray on top of the Boiling Tray and never directly on the Heating Plate.
3 Break an egg into each section of the Poaching Tray (photo B). Cover with the Lid and plug in the Rapid Egg Cooker. Press the Power Button. When the buzzer sounds, your eggs will be ready to eat (photo C)!

WARNING: Do not lock the Lid when using your Rapid Egg Cooker as this may cause injury when removing the Lid once the buzzer sounds.
natural_image
Close-up of a glass container with liquid being poured into it, no visible text or symbols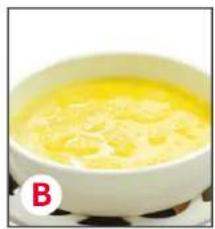
natural_image
Close-up of a bowl containing a yellowish creamy mixture, labeled with letter B in the corner (no text or symbols on the bowl itself)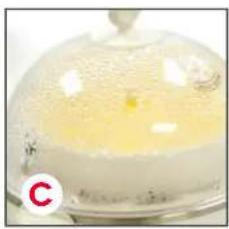
natural_image
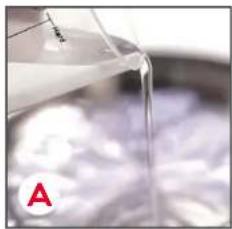
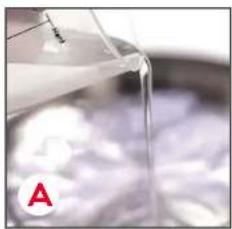
Close-up of a glass dome-shaped container with yellow liquid, labeled 'C' in the corner (no other text or symbols visible)1 Fill the Measuring Cup with cold water to the Poached / Omelette Line. Pour cold water onto the Heating Plate (photo A).
2 Use cooking spray to lightly grease the Omelette Bowl. Always place the Omelette Bowl on top of the Boiling Tray and never directly on the Heating Plate. Pour your eggs into the Omelette Bowl (photo B).
3 Cover with the Lid and plug in the Rapid Egg Cooker. Press the Power Button. When the buzzer sounds, your eggs will be ready to eat (photo C)! It is normal for the eggs to expand while cooking. They will contract once the Lid has been opened. Remove your omelette with a spatula.

For a drier omelette, leave the eggs in the Rapid Egg Cooker for an extra two minutes.
CLEANING & MAINTENANCE TROUBLESHOOTING
CLEANING THE HEATING PLATE:
- Before cleaning or moving the appliance, make sure to unplug the Rapid Egg Cooker.
- Wash the Rapid Egg Cooker Accessories and Lid with warm, soapy water.
- Wipe down the Body and Heating Plate with a wet cloth.
- Dry all parts thoroughly. When storing, place the accessories on the Heating Plate, cover with the Lid, and turn clockwise until the tabs on the Lid slide completely underneath the handles on the base of the Rapid Egg Cooker.
CLEANING THE HEATING PLATE:
Your Rapid Egg Cooker will not rust. Over time, the Rapid Egg Cooker may begin to develop some mineral deposits on the Heating Plate. While this may look like rust, it is merely the residue of natural minerals present in your water.
- Two different ways to clean the Heating Plate: Clean the Heating Plate with a mild solution of water and vinegar (10 parts water: 1 part vinegar) from time to time.
- Gently scrub the Heating Plate in a circular motion with a "magic eraser"-type sponge and a little warm water.

CAUTION: During and after use the appliance will be hot.
Do not attempt to clean your Egg Cooker until the appliance has cooled.
Do not submerge the Body in water or other liquids.
The Body of the appliance is NOT dishwasher safe.
Although your Rapid Egg Cooker is simple to use and durable, please refer to the following list if problems occur:
| ISSUE SOLUTION | |
 The Indicator Light does not turn on. The Indicator Light does not turn on. | 1. Ensure that the power cord is plugged into the power outlet.2. Check to make sure the power outlet is operating correctly.3. Press the Power Button (located on the front of your Rapid Egg Cooker).4. Determine if a power failure has occurred in your home, apartment, or building. |
 The eggs are over or under cooked. The eggs are over or under cooked. | 1. Use the Measuring Cup to determine the appropriate amount of water needed to make your eggs.2. Observe the recommended cooking times for soft/runny, medium, and hard-boiled eggs.3. If the eggs are overcooked, make sure to remove the eggs from the Rapid Egg Cooker immediately after the buzzer sounds.4. Make sure that the Heating Plate, Lid, and Accessories are completely dry before adding the appropriate amount of water to the Heating Plate and cooking the eggs. |

natural_image
Close-up of whole and cracked boiled eggs on a red surface (no text or symbols visible)RAPID EGG COOKER
RECIPE GUIDE

Follow us @unprocessyourfood for recipes, videos, & daily inspiration

DEVILED
EGGS
Ingredients:
6 hard-boiled eggs, cooled
3 tbsp mayonnaise
1 tbsp Dijon-style mustard
18 tsp salt
paprika, chives, plus dill to garnish
Directions
- Peel the eggs and cut in half lengthwise.
- Remove the yolks, place them in a large bowl, and cream them into a paste with a fork or spoon.
- Mix in the mayonnaise, mustard, and salt.
- Spoon or pipe the mixture into the egg white halves.
- Place the eggs in the refrigerator until they are ready to be served. Just before serving, garnish with a dash of paprika and freshly cut chives or dill.

natural_image
Four steamed boiled eggs topped with yellow cream and green herbs, served on a white rectangular plate (no text or symbols visible)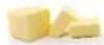
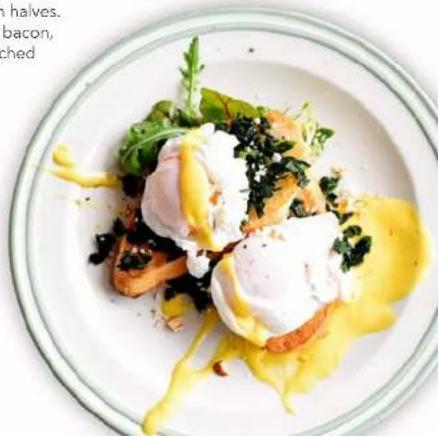
EGGS
BENEDICT
Ingredients:
For Hollandaise Sauce
For Eggs Benedict
4 eggs
4 eggs
3 ½ tbsp lemon juice
12 bunch asparagus, trimmed and boiled
1 pinch ground white pepper
4 strips Canadian-style bacon
18 tbsp water
2 English muffins, toasted
1 cup butter, melted
2 tbsp butter, softened
salt, to taste
chives or cayenne pepper, to garnish
Directions for the hollandaise sauce:
- On the stovetop, fill the bottom of a double boiler part-way with water. Make sure that water does not touch the bottom of the bowl. Bring water to a gentle simmer.
- In the top of the double boiler, whisk together egg yolks, lemon juice, white pepper, Worcestershire sauce, and 1 tablespoon water.
- Add the melted butter to the egg yolk mixture, 1 tablespoon at a time, while whisking yolks constantly. If the sauce becomes too thick, stir in a little hot water.
- Add salt and continue whisking until fully incorporated. Remove from heat and cover with a lid to keep the sauce warm.
Directions for the eggs benedict:
- Fill the Measuring Cup with water to the Omelette/Poached marking. Pour water into the Heating Plate.
- Place the Boiling Tray, then place the lightly greased Poaching Tray on top. Break an egg into each poaching section.
- Replace the Lid and plug in the Express Egg Cooker. Press the Power Lever.
- When the buzzer sounds, the eggs will be poached. Remove the eggs immediately to prevent overcooking. To make two servings of Eggs Benedict, repeat the poaching process with the other two eggs, starting at Step 1.
- Butter the toasted English muffin halves. Place a slice of Canadian-style bacon, a few asparagus spears, a poached egg, and a spoonful of hollandaise sauce on each half.
- Garnish with chives or cayenne pepper and serve immediately.
natural_image
Close-up of a plated dish featuring a bento with cream, greens, and herbs on a white plate (no visible text or symbols)EGG SALAD
Ingredients:
6 hard-boiled eggs, cooled and peeled
½ stalk celery
18 cup mayonnaise
2 tbsp Dijon-style mustard
14 tbsp salt
% tsp black pepper
Directions:
- Remove shells from fully cooked eggs. Cut the eggs into quarters.
- Finely dice the eggs and celery and mix together.
- Add the mayonnaise, mustard, salt, and pepper. Mix until desired texture is reached.
- Serve on multigrain bread with sliced cucumber.

natural_image
Close-up of a sandwich with scrambled eggs topped with chopped green onions, served on a breaded plate (no text or symbols visible)
TOMATO & SPINACH FRIT TATA
Ingredients:
2 egg whites
1 whole egg
2 tbsp spinach, chopped
2 tbsp mozzarella
2 basil leaves, cut into thin strips
salt & pepper, to taste
lettuce & tomato, to garnish
Directions:
- Fill the Measuring Cup with water to the Omelette / Poached Line and pour onto the Heating Plate.
- Place the Boiling Tray on the Heating Plate and then sit the lightly greased Omelette Bowl on top.
- Beat eggs and pour into the Omelette Bowl.
- Sprinkle the basil, spinach, mozzarella, and tomatoes over the whisked egg.
- Cover with the Lid and turn on the Rapid Egg Cooker. When buzzer sounds, remove eggs immediately to prevent overcooking.
- Add salt and pepper to taste.
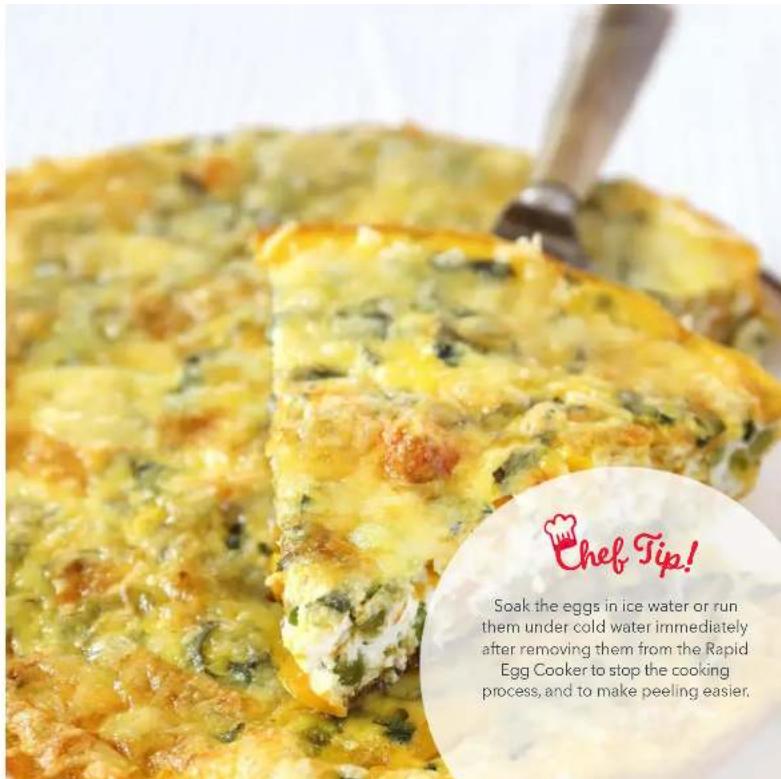
Chef Tip!
Soak the eggs in ice water or run them under cold water immediately after removing them from the Rapid Egg Cooker to stop the cooking process, and to make peeling easier.
MORE RECIPE IDEAS
RAW BROCCOLI FLORETS

1 cup
Pour 1.5 oz of water onto Heating Plate. Cook broccoli in Omelette Bowl 7 minutes until tender.
ASPARAGUS, HALVED

4 stalks
Pour 1.5 oz of water onto Heating Plate. Spread asparagus in Omelette Bowl & cook 7 minutes.
SALMON

4oz fillet
Fill Measuring Cup to the top or measure 2.7 oz of water and pour onto Heating Plate. Cook fillet 13 minutes in Omelette Bowl.
RAW SHRIMP

12 cup
Fill Measuring Cup to Soft Line and pour onto Heating Plate. Cook shrimp side by side in Omelette Bowl for 5 minutes.
DUMPLINGS

4 medium size
Add 1.75 oz water to Heating Plate. Cook dumplings side by side in Omelette Bowl for 9 minutes.
FROZEN EDAMAME

12 cup
Fill Measuring Cup to Soft Line and pour onto Heating Plate. Spread edamame in Omelette Bowl & cook 6 minutes.
FROZEN CORN

12 cup
Pour 1.5 oz of water onto Heating Plate. Cook corn 8 minutes in Omelette Bowl.
CUSTOMER SUPPORT

Dash values quality and workmanship and stands behind this product with our Feel Good Guarantee™. To learn more about our commitment to quality, visit bydash.com/feelgood.
Our US-based customer support team is at your service Monday - Friday during the times below. Reach us at 1 (800) 898-6970 or support@bydash.com

Hey Hawaii! You can reach our customer service team from 5AM to 5PM. And also, Alaska, feel free to reach out from 6AM - 6PM.
STOREBOUND, LLC - 1 YEAR LIMITED WARRANTY
Your StoreBound product is warranted to be free from defects in material and workmanship for a period of one (1) year from the date of the original purchase when utilized for normal and intended household use. Should any defect covered by the terms of the limited warranty be discovered within one (1) year, StoreBound, LLC will repair or replace the defective part. To process a warranty claim, contact Customer Support at 1-800-898-6970 for further assistance and instruction. A Customer Support agent will assist you by troubleshooting minor problems. If troubleshooting fails to fix the problem, a return authorization will be issued. Proof of purchase indicating the date and place of purchase is required and should accompany the return. You must also include your full name, shipping address, and telephone number. We are unable to ship returns to a PO box. StoreBound will not be responsible for delays or unprocessed claims resulting from a purchaser's failure to provide any or all of the necessary information. Freight costs must be prepaid by the purchaser.
Send all inquiries to support@storebound.com.
There are no express warranties except as listed above.
REPAIR OR REPLACEMENT AS PROVIDED UNDER THIS WARRANTY IS THE EXCLUSIVE REMEDY OF THE CUSTOMER. STOREBOUND SHALL NOT BE LIABLE FOR ANY INCIDENTAL OR CONSEQUENTIAL DAMAGES OR FOR BREACH OF ANY EXPRESS OR IMPLIED WARRANTY ON THIS PRODUCT EXCEPT TO THE EXTENT REQUIRED BY APPLICABLE LAW, ANY IMPLIED WARRANTY OF MERCHANTABILITY OR FITNESS FOR A PARTICULAR PURPOSE ON THIS PRODUCT IS LIMITED IN DURATION TO THE DURATION OF THIS WARRANTY.
Some states do not allow the exclusion or limitation of incidental or consequential damages, or limitations on how long an implied warranty lasts. Therefore, the above exclusions or limitations may not apply to you. This warranty gives you specific legal rights and you may also have other rights, which vary from state to state.
REPAIRS
DANGER! Risk of electric shock! The Dash Rapid Egg Cooker is an electrical appliance.
Do not attempt to repair the appliance yourself under any circumstances.
Contact Customer Support regarding repairs to the appliance.
TECHNICAL SPECIFICATIONS
Voltage 120V - 60Hz
Power Rating 360W
Stock#: DEC005_20181120_V9

- RAPID EGG COOKER
- IMPORTANT SAFEGUARDS
- IMPORTANT SAFEGUARDS: PLEASE READ AND SAVE THIS INSTRUCTION AND CARE MANUAL.
- GARANTIES IMPORTANTES
- MESURES DE SÉCURITÉ IMPORTANTES: VEUILLEZ LIRE ET CONSERVER CE MANUEL D'UTILISATION
- USING YOUR RAPID EGG COOKER USING YOUR RAPID EGG COOKER
- SOFT, MEDIUM, AND HARD-BOILED EGGS:
- Soft BOILED
- Medium BOILED
- Hard BOILED
- TIMER AUTO-OFF
- BOILING EGGS
- POACHING EGGS
- USING THE OMELETTE BOWL
- CLEANING & MAINTENANCE TROUBLESHOOTING
- CLEANING THE HEATING PLATE:
- RECIPE GUIDE
- DEVILED
- EGGS
- Ingredients:
- Directions
- BENEDICT
- Directions for the hollandaise sauce:
- Directions for the eggs benedict:
- EGG SALAD
- Directions:
- TOMATO & SPINACH FRIT TATA
- MORE RECIPE IDEAS
- CUSTOMER SUPPORT
- STOREBOUND, LLC - 1 YEAR LIMITED WARRANTY
- REPAIRS
- TECHNICAL SPECIFICATIONS
Brand : Dash
Model : Rapid DEC005RD
Category : Egg cooker