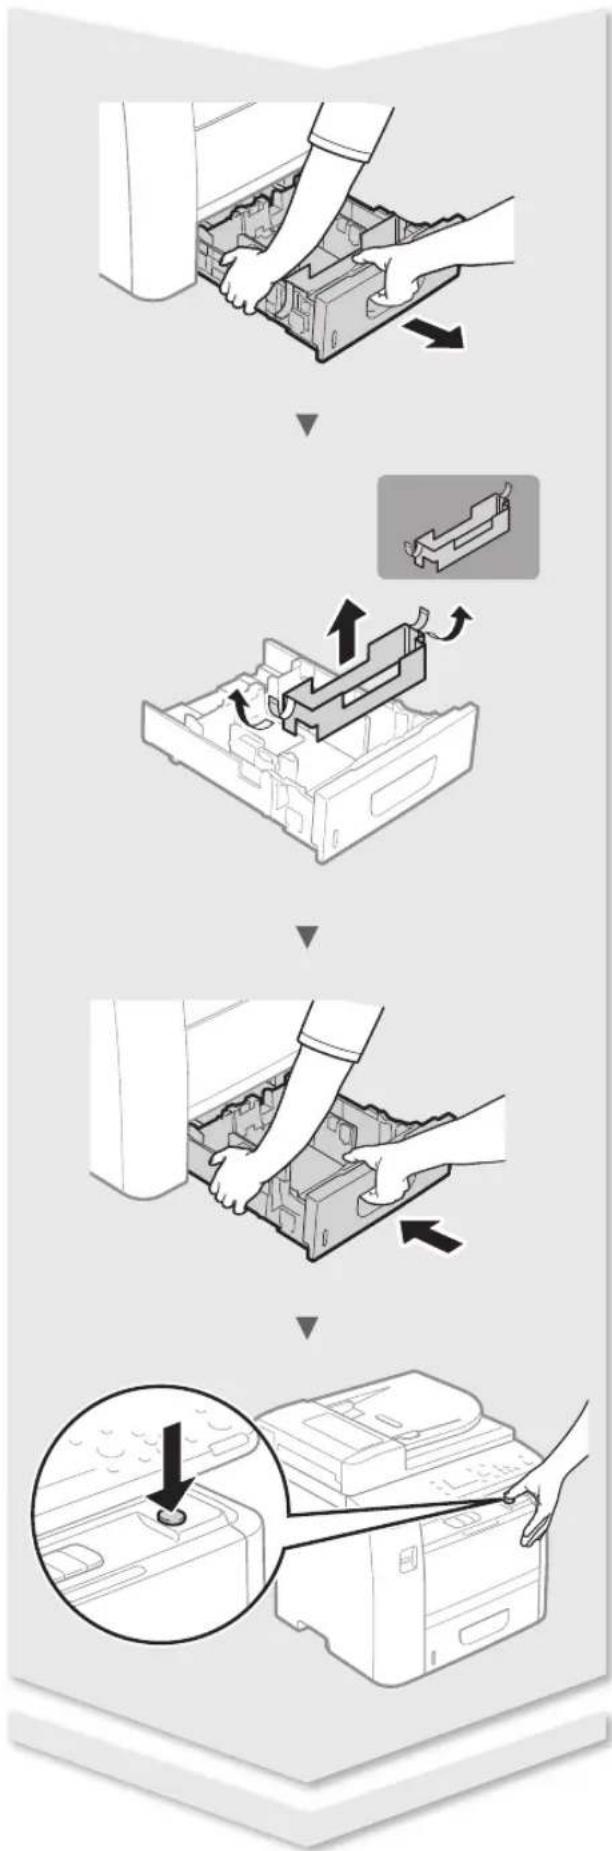
.
If a screen appears prompting you to enter the system manager PIN, enter the correct PIN using the numeric keys and tap .
5 Tap .
6 Read the message displayed on the screen and tap OK>. 7 Tap . 8 Tap .

9 Select a wireless network router. If there are multiple SSIDs, select the one at the top of the list (best signal). 10 Enter the network key you have written down. Enter the network key using the numeric keys and tap .

11 Tap . 12 Once the screen is displayed, wait until the Wi-Fi indicator stops blinking and lights up.

13 Wait about 2 minutes after connection. During this time, the IP address is configured.
If an error message appears:
Tap to close the screen, check that the network key is correctly configured, and then restart the settings.
If after this new attempt you still cannot connect to the access point, refer to the following instructions.
Electronic manual "If an error message appears"
Electronic manual "Connecting to a wireless LAN"
Follow the on-screen instructions to set the paper format and type.

Setting initial fax settings and connecting a telephone cable
1 Set the initial fax settings.

Follow the steps in the "Fax Setup Guide" to set the fax number, machine name, and reception mode. For more information about reception modes, refer to the electronic manual.
Electronic Manual "Fax" > "Setting Initial Fax Settings" > "Selecting the Reception Mode to Use"
When you send a document, the sender information you have stored is printed on the page received by the recipient.
2 Connect the telephone cable.

When the message appears, connect the telephone cable as shown in the illustration.
3 Exit the Fax Setup Guide, then restart the machine.

Turn off the machine and wait at least 10 seconds before turning it back on. The telephone line types are not detected automatically. Refer to the electronic manual to configure the telephone line manually.
Electronic Manual "Menu List of Settings" > "Fax Settings" > "Basic Settings" > "Selecting the Line Type"
For more information about installation procedures:
Install the driver and software using the provided DVD-ROM. For more information about installation procedures, refer to the MF Driver Installation Guide.
You can also download the driver from the Canon website.

Windows macOS

For Mac users:
The DVD-ROM provided with this machine may not include the driver for Mac OS. This depends on when you purchased the machine. Search for and download the appropriate driver from the Canon website. For more information on installing or using the driver, refer to the MF Driver Installation Guide provided with the machine.
Useful Procedures
Copying
Enlarging/Reducing Copies
You can enlarge or reduce standard-size documents to copy them onto standard-size paper, or set a reproduction ratio as a percentage.
Copy 2-sided
You can copy documents 2-sided on both sides of a sheet of paper.
Sequential sort
You can sort copies into organized sets in page order.
Layout reduction
It is possible to reduce multiple documents to copy them onto a single sheet of paper.

ID card copy
You can copy a card front and back onto the same side of a sheet.
Fax
Sending a document directly from a computer (PC Fax)
In addition to traditional fax sending and receiving, you can use the fax sending function from a computer.
Sending
You can store fax recipients in the address book. You can specify recipients in different ways to make sending documents easier and faster.
- Recipient search
- Favorites list Coded dialing Recipient group
- LDAP server Send history Multicast
Reception
- Memory reception You can store received documents in memory. You can then print them at any time or delete them if they are of no use.

- Remote reception
If an external telephone is connected, you can immediately switch to fax reception mode during a phone call by entering the fax reception ID number using the telephone's keypad.
I-Fax
You can send and receive faxes via the Internet. Documents are converted to TIFF images and sent as email attachments without using a telephone line.
Printing
Print enlargement/reduction
Duplex printing
Reduced layout
It is possible to reduce multiple documents to print them on a single sheet of paper.

Booklet printing

Poster printing, Watermark printing
Displaying a preview before printing
Selecting a "profile"
Network settings
This machine is equipped with a network interface to easily emulate a network environment. You can print a document or use the fax and network scanning functions from all computers connected to the machine. The machine increases work efficiency as a shared office machine.
Scanning
Saving documents using the machine's control panel

Saving documents using computer functions
- Scanning with MF Scan Utility
- Scanning from an application
- Scanning with the WIA driver*

Saving to a USB flash drive
You can save scanned documents to a USB flash drive connected to the machine.

Sending scanned documents by email
You can send scanned documents to your email application.

Sending scanned documents to a file server
You can send scanned documents to a file server.

You can monitor the machine status from computers connected to the network. You can access the machine and manage jobs or configure various settings from the network.
Clearing paper jams
When the following screen appears, it means a paper jam has occurred in the feeder or the machine. Follow the instructions on the screen to remove the jammed document or paper. Only the areas where a paper jam is likely to occur are indicated in this manual. For more information on each function, refer to the electronic manual.
Paper jam.
Press [Next] to display the procedure.
Next
Feeder


Output area

Multi-purpose tray
Inside the machine

Duplex feed
Paper cassette

Rear side Rear side


Replacing toner cartridges
Toner cartridges are consumables. When the remaining toner in a cartridge is low, a message appears on the screen or the following problems occur. Take appropriate measures.
When a message appears
The machine displays a message when the remaining toner in a cartridge is low.
| Message | Moment où le message s'affiche à l'écran | Description et solutions |
| Préparer une cartouche. | La quantité de toner restant dans les cartouches est faible. | Vérifiez le niveau de toner restant dans la cartouche et remplacez-la par une cartouche de toner neue avant d'imprimer de grands volumes de documents.
©e-Manual "Replacing Toner Cartridges" |
| Le cartouche est en fin de vie. Remplacement conseillé. | La cartouche de toner est arrivée en fin de vie. | Ce message ne disparaît pas, remplacez la cartouche d'encre. Vous pouvez continuer l'impression, mais la qualité d'impression n'est pas garantie.
©Manuel électronique "Remplacement des cartouches de toner" |
If prints are of poor quality
If your prints show any of the following characteristics, your toner cartridges may be almost empty. Replace the nearly empty toner cartridge, even if no message is displayed.
Streaks Partially faded Uneven density


Residual images in blank areas

White spots

Symbols used in this manual

WARNING
Warning about operations that may pose a risk of death or cause injury if instructions are not followed. Always follow these warnings to use the machine safely.

CAUTION
Important point about operations that may cause injury if instructions are not followed. These recommendations must be strictly observed.

IMPORTANT
Important point about operation. Read carefully to use the machine properly and avoid damaging it or causing property damage.
Keys and buttons used in this manual
Below are the notation conventions for symbols and key names.
- Control panel keys: [key icon] Example:
- Display:
- Buttons and options on the computer screen: [Preferences]
Illustrations and screen captures used in this manual
The illustrations and screen captures in this manual correspond to the imageCLASS MF419dw model, unless otherwise noted.
Important safety instructions
Read the "Important Safety Instructions" in this manual and the electronic manual carefully before using the machine.
Since these instructions help prevent injury to the user and others, or damage to the equipment, always read them carefully, along with the details on the required setup.
Note that you will be held responsible for any damage caused by failure to follow these instructions, use of this equipment for purposes for which it was not intended, or repairs or modifications performed by non-Canon certified technicians.
Installation

WARNING
- Never install the machine near flammable substances, such as alcohol-based products or thinners. If such substances come into contact with the internal electrical components of the machine, it may cause a fire or increase the risk of electric shock.
- Do not leave any necklaces or other metal objects, or containers holding liquid, near the machine. If foreign substances come into contact with the internal electrical components of the machine, it may cause a fire or electric shock.
If any of these objects fall into the machine, immediately turn off the machine and contact your Canon authorized dealer.
- Do not use the machine near medical electrical equipment. Radio waves emitted by the machine may interfere with such equipment and cause serious accidents.

CAUTION
- Do not install the machine in the following places. Doing so may cause injury, fire, or electric shock.
Unstable surface - Location subject to strong vibrations - Place where ventilation slots could be blocked (near walls, beds, carpets, and similar objects) - Humid or dusty place - Place exposed to direct sunlight or outdoors - Place exposed to high temperatures - Place near an open flame - Insufficiently ventilated place
- Although this machine produces ozone during operation, it has no impact on human health. However, if you plan to use this machine for an extended period, ensure that the room where it is installed is well ventilated. Also avoid places where people could be exposed to the machine's emissions.
- Do not connect non-certified cables to this machine. You may cause a fire or electric shock.
- Devices with a hard disk may not operate correctly if used at high altitudes, i.e., approximately 3000 meters above sea level.
Power Supply

WARNING
- Use only the supplied power cord to avoid any risk of fire or electric shock.
- The supplied power cord is intended for use with this machine only. Do not plug the power cord into other devices.
- Do not alter, twist, or pull the power cord with excessive force. Do not place heavy objects on it. Any damage to the power cord may cause fire or electric shock.
- Do not plug in or unplug the power cord with wet hands, as you may be electrocuted. Never use an extension cord or multiple socket with this machine. You risk causing a fire or electric shock. Do not coil the power cord or tie it in a knot, as this may cause fire or electric shock.
- Insert the power plug fully into the wall outlet. Failure to follow this instruction may cause a risk of fire or electric shock.
- In case of a thunderstorm, unplug the power plug from the wall outlet. Failure to follow this instruction may cause a fire, electric shock, or malfunction.

CAUTION
- Use only a power supply that conforms to the voltage requirements indicated in this document. Failure to follow this instruction may cause a fire or electric shock.
- Install this machine near a power outlet and leave enough space around the power plug so that it can be easily unplugged in an emergency.
Handling

WARNING
- Never disassemble or modify the machine. It contains high-voltage and high-temperature components that may cause fires or electric shocks. Keep children away from the power cord, cables, internal mechanisms, or electrical components of this machine. Failure to follow this instruction may cause serious injury.
- If the machine emits abnormal noises, smoke, heat, or an unusual odor, contact your authorized Canon dealer. If you continue to use the machine, it may cause a risk of fire or electric shock.
- Do not spray flammable products near the machine. If such substances come into contact with the internal electrical components of the machine, it can cause a fire or electric shock.
WARNING
For safety reasons, be sure to unplug the power cord from the machine if it is to remain unused for an extended period. - Open and close the covers carefully to avoid injuring your hands. - Keep your hands or clothing away from the roller in the output area. The roller could catch your hands or clothing and cause serious injury. - The internal components of the machine and the output slot are extremely hot during and immediately after operation. Avoid touching these areas to prevent burns. Printed paper may also be hot when it exits the printer, so handle it with care. Failure to follow these instructions may result in burns. - The laser beam can be harmful to the human body. The laser beam is completely enclosed in protective compartments and outer covers. Therefore, it cannot escape from the machine at any time during normal operation. Read the remarks and instructions carefully to ensure your safety.
- Never open the covers except as described in this manual.
- If the laser beam were to escape from the device and your eyes were exposed to it, the radiation could cause eye damage.
- If you operate the machine without following the control, adjustment, and operating procedures described in this manual, you may be exposed to harmful radiation.
Maintenance and inspections
WARNING
- Before cleaning, turn off the machine and unplug the power cord from the electrical outlet. Failure to follow these instructions may result in fire or electric shock.
- Regularly unplug the power cord from the electrical outlet and clean the area around the metal prongs of the power cord and the outlet itself with a dry cloth to remove dust and dirt. With humidity, dust deposits can cause short circuits or fires.
- Clean the machine with a well-wrung damp cloth. Moisten the cloth with water only. Do not use any flammable substances such as alcohol, benzene, or paint thinner. If such substances come into contact with the internal electrical components of the machine, it can cause a fire or electric shock.
- Regularly check that the power cord and its plug are not damaged. Make sure the machine does not show signs of rust or dents, scratches, cracks, or generate excessive heat. Insufficiently maintained equipment can cause a fire or electric shock.
Consumables
WARNING
- Do not throw used ink cartridges into fire. The ink may catch fire and cause burns or a fire.
- If you accidentally spill ink, carefully wipe up the ink particles with a soft, damp cloth, and avoid inhaling the ink dust. Never use a vacuum cleaner to clean up ink residue. This may cause the vacuum cleaner to malfunction or a dust explosion due to electrostatic discharge.
CAUTION
- Keep ink cartridges and other consumables out of the reach of young children. If ink is ingested, consult a doctor or poison control center immediately. Do not attempt to disassemble the ink cartridge. You may get ink splashed into your eyes or mouth. If ink comes into contact with your eyes or mouth, rinse immediately with cold water and consult a doctor.
- If ink leaks from the ink cartridge, be careful not to inhale it and avoid direct contact with skin. If ink comes into contact with skin, wash the affected area immediately with soap. If you inhale ink or experience irritation from skin contact, consult a doctor or poison control center immediately.
Other
WARNING
- If you wear a pacemaker:
- This machine emits a weak magnetic field. If you notice any abnormality, move away from the machine and consult your doctor immediately.
Telephone equipment
When using telephone equipment, always follow basic safety precautions to reduce the risk of fire, electric shock, and injury, including:
- Do not use this machine near water (near a bathtub, sink, or laundry tub), in a damp basement, or near a swimming pool.
- Avoid using the telephone during a thunderstorm, as there is a possible risk of electric shock from lightning.
- Do not use the telephone to report a gas leak if you are in the vicinity of the leak.
Legal Notices
Product Name
Safety regulations REQUIRE the registration of the product name. In some regions where this product is sold, the following product name(s) in parentheses () may be trademarked or registered.
imageCLASS MF419dw (F168712)
imageCLASS MF416dw (F168702)
imageCLASS MF414dw (F168702)
Legal limitations on the use of your product and the use of images
The use of your product to scan, print, or otherwise reproduce certain documents, as well as the use of these images after scanning, printing, or other reproduction methods with your product, may be prohibited by law, and may result in civil and/or criminal liability.
Below is a non-exhaustive list of such documents. This list is provided for information only. If you are not certain that it is legal to use your product to scan, print, or otherwise reproduce a specific document, or that it is legal to use these images, please consult a legal advisor for their opinion beforehand.
Banknotes - Money orders - Certificates of deposit - Postage stamps (cancelled or uncancelled) - Identification badges or insignia - Certain military papers - Checks or money orders issued by governmental entities - Driver's licenses and car registration - Traveler's checks - Food stamps - Passports - Immigration papers - Tax stamps (cancelled or uncancelled) - Bonds or other debt instruments - Stock certificates - Copyrighted works/artistic works, without authorization from the copyright holder
FCC (Federal Communications Commission) Users in the United States
imageCLASS MF419dw: F168712
imageCLASS MF416dw: F168702
imageCLASS MF414dw: F168702
Contains FCC transmitter module ID: TLZ-NM383
This device complies with Part 15 of the FCC Rules. Operation is subject to the following two conditions:
- This device may not cause harmful interference, and
- This device must accept any interference received, including interference that may cause undesired operation.
FCC PRECAUTIONS Users in the United States
Changes or modifications not expressly approved by the party responsible for compliance could void the user's authority to operate the equipment.
NOTE
This equipment has been tested and found to comply with the limits for a Class B digital device, pursuant to Part 15 of the FCC Rules. These limits are designed to provide reasonable protection against harmful interference in a residential installation. This equipment generates, uses and can radiate radio frequency energy and, if not installed and used in accordance with the instructions, may cause harmful interference to radio communications. However, there is no guarantee that interference will not occur in a particular installation. If this equipment does cause harmful interference to radio or television reception, which can be determined by turning the equipment off and on, the user is encouraged to try to correct the interference by one or more of the following measures:
- Reorient or relocate the receiving antenna. Increase the separation between the equipment and receiver.
- Connect the equipment into an outlet on a circuit different from that to which the receiver is connected.
- Consult the dealer or an experienced radio/TV technician for help.
This transmitter must not be co-located or operated in conjunction with any other antenna or transmitter.
This device complies with FCC radiation exposure limits set forth for an uncontrolled environment and meets the FCC radio frequency (RF) Exposure Guidelines. This equipment should be installed and operated with a minimum distance of 20 cm between the radiator and the user.
Use of a shielded cable is required to comply with the Class B limits set forth in Subpart B of Part 15 of the FCC Rules. Do not make any changes or modifications to the equipment unless otherwise specified in the manual. Any such changes or modifications could void your authority to use the equipment.
Canon U.S.A., Inc.
One Canon Park, Melville, NY 11747, USA
TEL.:1-800-OK-CANON
Users in the United States
System Requirements Before Installation for Canon Fax Equipment
A. Location
Install the machine on a suitable table, cabinet, or desk. Refer to the electronic manual for the device's dimensions and weight.
- You must use a single telephone line (touch-tone or rotary).
- Order an RJ11-C (USOC) telephone wall jack, which must be installed by any telephone company. If this RJ11-C wall jack is absent, no telephone/fax operation will be possible.
- Order a standard telephone line from your telephone company's sales representative. It must be a standard voice line or equivalent. Use one line per unit.
DDD (Direct Distance Dial) line
-0U-
IDDD (International Direct Distance Dial) line if you communicate abroad
NOTE
Canon recommends that you choose an individual line that complies with industry standards, namely 2500 (touch-tone) or 500 (rotary/pulse) sets. You can use a dedicated extension from a PBX (Private Branch Exchange) without the "Call Waiting" feature for the fax unit. Push-button telephone systems are not recommended because they send non-standard signals to each telephone for ringing and other special codes, which may cause a fax error.
C. Power Requirements
The machine must be connected only to a grounded 120-volt AC three-prong wall outlet.
Do not connect the machine to an outlet or power line shared with other devices that generate "electrical interference." Air conditioning systems, electric typewriters, photocopiers, and other such machines generate electrical noise that often interferes with communications equipment, as well as with sending and receiving documents.
Equipment Connection
This equipment complies with Part 68 of the FCC rules and with requirements adopted by ACTA. On the rear panel of this equipment is a label that contains, among other information, a product identifier in the format US:AAAEQ##TXXXX. If requested, provide this number to your telephone company.
The REN is used to determine the number of devices that may be connected to a telephone line. Excessive RENs on a telephone line may result in the devices not ringing in response to an incoming call. In most, but not all, areas, the sum of RENs should not exceed five (5).
To be certain of the number of devices that may be connected to a line, as determined by the total RENs, contact your local telephone company. For products approved after July 23, 2001, the REN for this product is part of the product identifier in the U.S. format: AAAEQ##TXXXX. The digits represented by ## are the REN without a decimal point (e.g., 03 indicates a REN of 0.3).
A FCC-compliant telephone cord and a modular plug are provided with this equipment. This equipment is designed to be connected to the telephone network or premises wiring using a compatible modular jack that is also compliant with Part 68.
This equipment cannot be used on telephone company-provided coin service. Connection to party line service is subject to state tariffs.
If Equipment Malfunctions
If a malfunction occurs that cannot be corrected using the procedures described in this manual or in the electronic manual, unplug the equipment from the telephone line and disconnect the power cord.
Do not reconnect the telephone line cord or turn the power switch back on until the problem has been fully resolved. Users should contact Canon authorized service and repair centers. For the addresses of these centers, contact Canon customer support (1-800-OK-CANON).
Rights of the Telephone Company
If this equipment (imageCLASS MF419dw/MF416dw/MF414dw) causes harm to the telephone network, the telephone company may disconnect the service. They also reserve the right to make changes to your installation or services that may affect the operation of this equipment. If such changes are necessary, the telephone company must notify the user in advance. However, if it is not possible to notify the user in advance, the telephone company must inform them as soon as possible. Additionally, the customer is advised of their rights to file a complaint with the FCC if they deem it necessary.
WARNING
The Telephone Consumer Protection Act of 1991 prohibits any person from using a computer or other electronic device, including fax machines, to send a message unless the message clearly contains, in the top or bottom margin of each transmitted page (or on the first page of each transmission), the date and time of sending, the identification of the business, organization, or person sending the message, and the telephone number of the fax machine, business, organization, or person originating the message. (The telephone number provided cannot be a 900 number or any other number for which charges exceed local or long-distance transmission charges.)
NOTE
To program this information into your fax machine, follow the procedure for registering your name, the unit's telephone number, the time, and the date in Getting Started.
Users in Canada
Configuration requirements before installation for Canon fax equipment
A. Location
Install the machine on a table, in a cabinet, or on an appropriate desk. Consult the electronic manual for the dimensions and weight of the device.
- You must use a single telephone line (touch-tone or rotary dial).
- Order a CA11A modular telephone jack, which must be installed by any telephone company. If this CA11A jack is absent, no installation is possible.
- Order a normal telephone line from the sales representative of your telephone company. It must be a standard voice line or equivalent line. Use one line per unit.
DDD (Direct Distance Dial) line
-OR
IDDD (International Direct Distance Dial) line if you communicate with foreign countries.
NOTE
Canon recommends that you choose an individual line conforming to industry standards, namely 2500 (touch tone) or 500 (rotary/pulse dial) stations. You may use a dedicated extension from a PBX (Private Branch Exchange) without the "Call Waiting" feature for the fax unit. Push-button telephone systems are not recommended because they send non-standard signals to each telephone for ringing and other special codes, which may cause fax errors.
C. Power Requirements
The wall power outlet must be a three-prong grounded outlet (single or duplex). It must be independent of copiers, heaters, air conditioners, or other electrical equipment with thermostatic controls. The nominal power supply is 115 volts and 15 amps. The modular CA11A jack should be relatively close to the wall outlet for easy installation.
Warning
The REN of this product is 1. - Before installing this equipment, the user must ensure that it is permitted to be connected to the facilities of the local telecommunications company. In addition, the equipment must be installed using an acceptable method of connection. In some cases, the company's inside wiring and individual service line may be extended by means of a certified connector (telephone cord extension). The customer should be aware that compliance with the above conditions does not prevent, in some cases, degradation of service. - Repairs to certified equipment must be carried out at a Canadian maintenance center designated by the supplier. Any repair or modification of this equipment by the user, or any malfunction of the equipment, may cause the telephone company to request disconnection of this equipment. - For your own protection, ensure that the electrical grounds of the power circuit, telephone lines, and metal pipes in the premises are connected. This precaution is particularly important in rural areas.
CAUTION
The user should not attempt to make these connections themselves. Contact a qualified electrician or your electric company.
NOTE
This product complies with the specifications of the Canadian ICES-003 Class B regulations.
Laser Safety
This product is classified as a Class 1 laser product according to IEC60825-1:2007 and EN60825-1:2007 standards.

CAUTION
Use of controls or adjustments, or performance of procedures other than those specified in this manual may result in hazardous radiation exposure.

About the supplied manuals
① Introduction (this manual):
Read this manual first. This manual describes the installation of the equipment, configuration, and precautions. Make sure to read this manual before using the equipment.

② MF Driver Installation Guide (supplied DVD-ROM):
Read this manual next. This manual describes the installation of the software.

③ e-Manual (supplied DVD-ROM):
Read the desired chapter according to your needs. The e-Manual is categorized by topic, so you can easily find the desired information.

Viewing the e-Manual from the DVD-ROM
1 Insert the supplied DVD-ROM into your computer. 2 Click [Manuals]. 3 Click [e-Manual]. If [AutoPlay] appears, click [Run MInst.exe]. A security warning message may appear depending on the operating system you are using. † If the supplied DVD-ROM is already inserted in the computer and [Manuals] does not appear, remove the DVD-ROM and insert it again.

Selecting items
Click an item to select it.
Click → to return to the previous screen.
Configuration confirmation
Press the item.
However, when
appears, press .
Text input method
Changing the input mode
Press < A / a / 12> to change the input mode. International to change the input mode.
| Modo de entrada | Texto disponible |
| <A> | Letras alfabetéticas mayúsculas y simbolos |
| <a> | Letras alfabetéticas minúsculas y simbolos |
| <12> Numberos |
Entering text, symbols, and names
Enter using the numeric keys.
Cursor movement (entering a space)
Press or to move the cursor. To enter a space, move the cursor to the end of the text and press
Deleting characters
Delete with . If you press and hold , all characters will be deleted.
| Modo de entrada: <A> | Modo de entrada: <a> | Modo de entrada: <12> |
| 1 | @, - / 1 | |
| 2 | ABC abc 2 | | |
| 3 | DEF def 3 | | |
| 4 | GHI | ghi 4 | |
| 5 | JKL | jkl | 5 |
| 6 | MNNO | mnno 6 | |
| 7 | PQRS | pqrs | 7 |
| 8 | TUV tuv 8 | | |
| 9 | WXYZ | wxyz | 9 |
| 0 | (No disponible) | áéióúū | 0 |
| # | (espacío) - , * #!", ;; ^ _ = / ?$ @ %&+ \\ ( ) [ ] < > | (No disponible) |
Connecting the power cord and turning on the power switch

Do not connect the USB cable at this time. Connect it when you install the software.
Initial setup specification
The first time you turn on the computer, follow the instructions that appear on the screen. For detailed information on how to navigate the menu and how to enter names, see "Menu navigation and text entry" (p.36).
- Complete the setup, starting with the language and the date and time
Follow the on-screen instructions and set the language, region, time zone, date, and time.

Selecting the method to connect the device to the computer
You can connect the device to the computer via a wired router. Use LAN cables to connect the device to the router (access point).

† Connect the computer to the router via cable or wirelessly. Make sure you have an available port on the router to connect the device and the computer. † You should have a Category 5 or higher twisted pair network cable ready.
- Connection with a USB cable
You can connect the device to the computer with a USB cable.

Make sure the USB cable you use is of the same brand.
You can connect the device to the computer via a wireless router*. The connection is made wirelessly, so no LAN cables are needed.

- A wireless router (or access point) compatible with IEEE802.11b/g/n is required. † Connect the computer to the router via cable or wirelessly.
Check if your router has a button
Choose between the two methods below depending on the router (access point) you are using.
There is a button.
You can easily complete the configuration if your router (access point) has a button and if the mark is present on the router.

There is no button.
If there is no button on the router (access point), you can select the SSID and complete the configuration manually.
NOTE
- If you wish to install your new device using a wireless network connection, you may find a video and written guides with instructions under the process on the [2]. Consulting these guides will ensure a trouble-free installation of the device in your existing wireless environment.
- Direct connection
Connect a mobile device to the equipment wirelessly and directly without routing through a network router (or wireless access point).

In the e-Manual, refer to "Network" > "Setting Options for Direct Connection (Access Point Mode)".
Selecting the connection method: Using wireless LAN or another method

Yes
There is a button.
There is no button.
Start from step 4 of "Push Button Mode" (p. 39). Start from step 4 of "Manual Access Point Configuration" (p. 40).
Proceed with "Connection via a wired LAN network" (p.38).
Proceed with "Connection with a USB cable" (p.38). Connect to the computer via a wireless LAN network later. Proceed with "Connection via a wireless LAN network" (p.39).
Check before configuration

Is the computer and the router (or hub) correctly connected with a LAN cable?
For more information, refer to the instruction manual of the network device you are using, or contact the manufacturer.
Is the network configuration on the computer completed?
If the computer is not configured correctly, it may not be possible to use the wired LAN connection even before performing the following settings.
NOTE
- You cannot use a wired LAN network and a wireless LAN at the same time. Additionally, the device is set to "wired LAN" by default.
- When connecting to an unprotected network environment, other people may be able to see your personal information. Be careful.
- To connect via a LAN in the office, consult the network administrator.
1 Connect the LAN cable.

The IP address will be configured automatically in a few moments. If you want to configure the IP address manually, see the following points.
In the e-Manual, see "Network" > "Connecting to a Network" > "Setting IP Addresses"
2 Install the driver and software using the supplied DVD-ROM.
See "For detailed information on installation procedures:" (p.41). Proceed with "Setting the Paper Size and Type" (p.41).
Connecting with a USB cable
Installing the drivers and software
Install the driver and software using the DVD-ROM supplied with the device.
See "For detailed information on installation procedures:" (p.41). Proceed with "Setting the Time and Paper Type" (p.41).
NOTE
- If you connected the USB cable before installation, first disconnect the USB cable and repeat the installation.
Connecting with a USB cable
Follow the MF Driver Installation Guide to connect the USB cable.

Check before configuration

For more information, refer to the instruction manual of the network device you are using, or contact the manufacturer.
Has the network configuration on the computer been completed?
If the computer is not configured correctly, you may not be able to use the wireless LAN connection even after completing the following settings.
NOTE
- You cannot use a wired LAN and a wireless LAN at the same time. Additionally, the device is set to "Wired LAN" by default.
- When connecting to an unsecured network environment, other people may be able to see your personal information. Be careful.
- To connect via a LAN in the office, consult the network administrator.
Router verification
Select the wireless LAN connection method. Choose between the following two methods depending on the router (access point) you are using.
There is a button.
This device supports WPS (Wi-Fi Protected Setup). You can easily complete the setup if your router (access point) has a button and the router has the WPS mark.


If you are unsure whether the router supports WPS, refer to the manual provided with the product or contact the manufacturer.
There is no button.
If there is no button on the router (access point), you will need to select the SSID and perform the configuration manually. In this case, you will need to remember the SSID and network key of your router (access point).
Refer to "1 Check the SSD or network key of the router or wireless LAN access point." (p.40) for more information about the SSD and network key.

To configure using the WPS PIN method or to configure manually:

In the e-Manual, refer to "Connecting to a wireless network"
Wireless LAN setup
Push button mode
1 Press on the Home screen. 2 Press <Network Settings>. 3 Press . 4 Read the displayed message, and press <OK>. 5 Press <WPS Push Button>.

6 Press <Yes>. 7 Press and hold* the button until the light turns on or blinks.
You must press the WPS button within 2 hours after pressing <Yes> in step 6.
- The time you need to press and hold the button may vary depending on the router you use.

8 Wait approximately 2 hours before connecting.
The IP address is set during this period.
When an error message appears:
Press to close the screen, check if the network key is correct, and then try the configuration again. If the access point cannot be connected after retrying, refer to the following.
In the e-Manual, refer to "When an error message appears"
Checking the network connection:
You can check whether the device is properly connected to the network using a computer that is connected to a network.
In the e-Manual, see "Viewing Network Settings"
To configure the IP address manually:
In the e-Manual, see "Connecting to a Wireless Network"
Manual configuration of the access point
1 Check the SSID or network key of the wireless LAN router or access point.
- Check the label on the wireless LAN router.
- To verify the SSID or network key, use the "Canon MF/LBP Wireless Setup Assistant" included on the DVD-ROM provided with the device.


If the wireless LAN router information is not displayed, click the [Refresh] button. If the information is not displayed after clicking [Refresh], check whether the computer's configuration for the wireless LAN router (access point) is complete.
2 Write down the SSID name and network key shown in step 1. If multiple access points appear, write down all the SSIDs shown.
SSID
Sometimes written as network name or access point name. If there are multiple SSIDs, write them all down.

Network key
Sometimes written as PIN, WEP key, WPA/WPA2 passphrase, or PSK (pre-shared key).

3 Press on the Home screen. 4 Press <Network Settings>.
If a screen appears asking you to enter a System Administrator PIN, enter the correct PIN using the numeric keys, and press .
5 Press .
6 Read the message displayed, and press < OK>. 7 Press < SSID Options> 8 Press < SELECT access point>

9 SELECT a wireless network router.
If multiple SSIDs are displayed, select the ID that appears first in the list (the one with the strongest signal).
10 Enter the network key that you have noted down. Enter the network key using the numeric keys, and press < Apply>.

11 Press < Yes> . 12 When the screen appears, wait until the Wi-Fi indicator stops blinking and lights up steadily.

13 Wait approximately 2 hours before connecting.
The IP address is established during this period.
When an error message appears:
Press < Close> to close the screen, check if the network key is correct, and then try the configuration again.
If the access point cannot be connected before trying again, refer to the following.
In the e-Manual, refer to "When an error message appears"
To manually configure the IP address:
In the e-Manual, refer to "Connecting to a wireless network"
Adjusting the time and paper type
Follow the on-screen instructions to set the time and paper type.

Specifying initial fax settings and connecting the telephone line cable
1 Specify the initial fax settings.

Follow the "Fax Setup Guide" to specify a fax number, a unit name, and a reception mode. For more information about the reception mode, refer to the e-Manual.
In the e-Manual, refer to "Fax" > "Initial Settings for Fax Functions" > "Deciding Which Fax Reception Mode to Use".
When sending a document, the registered sender information will be printed on the recipient's paper.
2 Connect a telephone cable.

When it appears on the screen, connect the telephone cable as shown in the illustration.
3 Close the Fax Setup Guide and restart the machine.

Turn off the machine and wait at least 10 seconds before turning it back on. Telephone line types are not detected automatically. Refer to the e-Manual and set a telephone line manually.
In the e-Manual, refer to "Configuration Menu List" > "Fax Settings" > "Basic Settings" > "Select Line Type".
Install the driver and software using the supplied DVD-ROM. For information about installation procedures, refer to the MF Driver Installation Guide.
International to download the driver from the Canon website.


For Mac systems:
The DVD-ROM supplied with the equipment does not include the printer driver for Mac OS. This varies depending on where you purchased the equipment. Search for and download the appropriate driver from the Canon homepage. For information on installing or using the driver, refer to the MF Driver Installation Guide included with the equipment.
Useful tasks
You can use various functions on this equipment. The functions presented below are an overview of the main tasks you can routinely perform.
Copying
Enlarging/reducing copies
You can enlarge or reduce standard-size documents to copy onto standard-size paper, or specify a copy scale in percentages.
Two-sided copying
You can copy one-sided documents onto both sides of the paper.
Collating
You can sort copies into sets ordered by page.
Reduced layout
You can reduce multiple documents to copy them onto a single sheet.

ID card copying
It is possible to copy a two-sided card onto a single side of the paper.
Fax
Sending documents directly from the computer (PC Fax)
In addition to the usual sending and receiving of faxes, you can use PC fax.
Sending
You can register fax destinations in the address book. You can specify destinations using various methods, which will allow you to send documents quickly and easily.
- Destination search
- Favorites list Speed dialing
- Destination group LDAP server
- Specification from the sending history Sequential broadcast
Receiving
- Memory reception You can save received documents in memory. You can print the stored documents at any time, and if you don't need them, you can delete them.

If an external telephone is connected, you can switch to fax reception mode immediately by dialing the ID number for fax reception; to do so, use the dial buttons on the telephone during a phone call.
I-Fax
You can send or receive faxes over the Internet. Documents are converted to TIFF images and sent as email attachments using a telephone line.
Printing
Enlarged/reduced printing
Duplex printing
Reduced page layout
You can reduce multiple documents to print them on a single sheet.

Booklet printing

Poster printing
Printing of overlay marks
Preview before printing
Selection of a "Profile"
Network options
This device is equipped with a network interface so that you can easily build a network environment. You can print a document, use PC fax, and network scanning from all computers connected to the device. The device allows you to efficiently increase work as a shared device in the office.
Reading
Storing documents from the device control panel

Storing documents with computer operations
- Scanning with MF Scan Utility
- Scanning from an application
- Scanning with the WIA driver*

Storing to a USB memory
You can save scanned documents to a USB memory connected to the machine.

Sending scanned documents by email
You can send scanned documents to your email application.

Sending scanned documents to a file server
You can send scanned documents to a file server.

Remote UI
You can obtain information about the machine's status from computers on the network. You can access the machine and manage problems or specify various options over the network.
Clearing paper jams
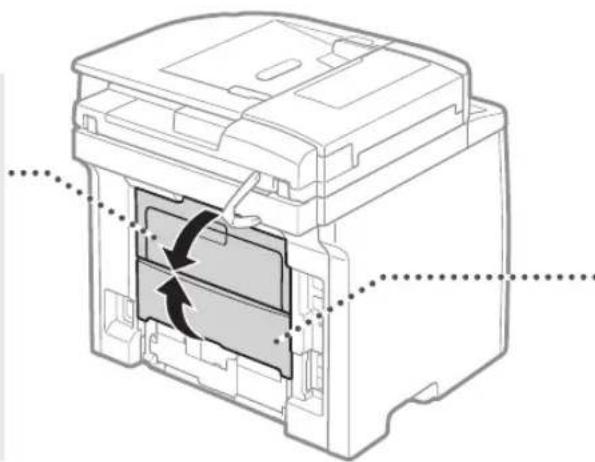
If the following screen appears, a paper jam has occurred in the feeder or inside the machine. Follow the procedure shown on the screen to remove the jammed document or paper. This manual indicates only the areas where paper jams may occur. For detailed information about each function, refer to the e-Manual.
Paper jam.
Press [Next] to view the steps.
Next
Feeder
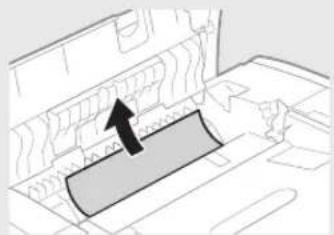


Output area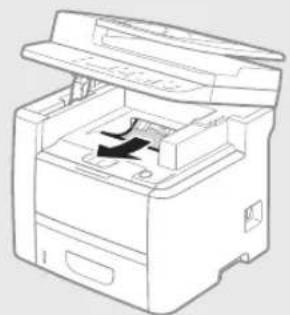

Multi-purpose tray
Machine interior

Duplex transport
Paper cassette

Rear side Rear side

Replacing the toner cartridges
Toner cartridges are consumable products. When the remaining amount in a toner cartridge is low, a message will appear on the screen or the following problems may occur. Perform the appropriate action.
When a message appears
The machine will display a message when the remaining amount in a toner cartridge is low.
| Mensaje | Cuando se mueste el mensaje en la pantalla | Descripción y SOLUTIONES |
| Prepare un cartucho. | LaULD restante en los cartuchos de tóner es baja. | Compruebe el nivel de tóner restante en el cartucho y sustitúyalo por uno nuevo antes de imprintar documents de gran extension. En el e-Manual, consulte "Sustitución de los cartuchos de tóner" |
| El cartucho se ha agotado. Cambiorecommended. | El cartucho de tóner se ha agotado. | Si el mensaje no desaparece, sustituya el cartucho de tóner. Podrá continua imprimiendo, excepta no se podrá garantizar la calidad de impresión. e-Manual "Replacing Toner Cartridges" |
If print quality is poor
If prints begin to exhibit any of the following characteristics, it means that one of the toner cartridges is almost exhausted. Replace the nearly exhausted toner cartridge even if no message appears.
Appear streaks Partially faded Irregular density

Residual images appear in blank areas


White dots appear


Symbols used in this manual

WARNING
Indicates a warning concerning operations that may lead to death or injury if not performed correctly. To use the equipment safely, always pay attention to these warnings.

CAUTION
Indicates a precaution concerning operations that may lead to personal injury if not performed correctly. To use the equipment safely, always pay attention to these precautions.

IMPORTANT
Indicates requirements and limitations of use. Read these points carefully to use the equipment correctly and avoid damage to it or other items.
Keys and buttons used in this manual
The following key names and symbols are examples of how keys should be pressed as expressed in this manual.
Control panel keys: [Key icon] Example: - Display: - Buttons and items on the computer screen: [Preferences]
Illustrations and screens used in this manual
The illustrations and screens used in this manual belong to the imageCLASS MF419dw unless otherwise specified.
Important Safety Instructions
Read the "Important Safety Instructions" in this manual and in the e-Manual carefully before using the equipment.
These instructions are intended to prevent injury to the user and other people, as well as damage to the equipment; therefore, always pay attention to these instructions and operational requirements.
Please note that you will be responsible for all damages caused as a result of failure to comply with the instructions provided in this document, as a result of using this device for any purpose for which it is not intended, or as a result of repairs or alterations performed by anyone who is not an authorized Canon technician.
Installation

WARNING
- Do not install the equipment near flammable substances such as alcohol-based products or solvents. If these substances come into contact with the electrical components inside the equipment, they could ignite and cause a fire or increase the risk of electric shock.
- Do not place necklaces and other metal objects or containers with liquids on the equipment. If any foreign substance comes into contact with the electrical components inside the equipment, a fire or electric shock could occur.
If any of these substances fall inside the equipment, turn off the equipment immediately and contact your local Canon dealer.
- Do not use the equipment near any medical equipment. The radio waves emitted by the equipment may interfere with such medical equipment, which could cause serious accidents.

CAUTION
- Do not install the equipment in the following locations. Otherwise, personal injury, fire, or electric shock could occur.
Unstable locations, locations subject to excessive vibrations, locations where the ventilation slots could be blocked (too close to a wall, on a bed, on a thick carpet, or similar objects)
Humid or dusty locations, outdoor locations or locations where the equipment is exposed to direct sunlight, locations subject to high temperatures, locations near open flames, locations with insufficient ventilation systems
- Although ozone is generated in the equipment when it is in
During operation, this has no effect whatsoever on the human body. However, if you intend to use the equipment for extended periods of time, ensure that the installation location is well ventilated. Avoid places where people are exposed to the equipment's emissions.
- Do not connect cables not approved for this equipment. Otherwise, fire or electric shock could occur.
- Equipment with a built-in hard disk may not function correctly if used at high altitudes, approximately 3,000 meters or more above sea level.
Power supply

WARNING
- Do not use power cords other than the one provided, as this could cause a fire or electric shock.
- The supplied power cord is designed for use with this equipment. Do not connect the power cord to other devices.
- Do not modify or bend the power cord, or pull it with excessive force. Do not place heavy objects on the power cord. If the power cord is damaged, fire or electric shock could occur.
- Do not connect or disconnect the plug with wet hands, as you could suffer an electric shock.
- Do not use extension cords or multiple outlet strips with this equipment. Otherwise, fire or electric shock could occur.
- Do not coil or knot the power cord, as this could cause a fire or electric shock.
- Insert the plug completely into the AC outlet. Otherwise, it could cause a fire or electric shock.
- Remove the plug completely from the outlet during electrical storms. Otherwise, fire, electric shock, or malfunctions could occur.

CAUTION
- Use only a power supply that meets the voltage requirements indicated here. Otherwise, fire or electric shock could occur.
- Install this equipment near the power outlet and leave enough space around the plug to unplug it easily in an emergency.
Handling

WARNING
- Do not disassemble or modify the equipment. Inside the equipment there are components with high temperature and high voltage that could cause a fire or electric shock.
- Do not allow children to touch or play with the power cord, cables, or electrical components. Otherwise, they could suffer serious personal injury.
- Contact an authorized local Canon dealer if the equipment makes unusual noises, emits strange odors, gives off smoke, or emits excessive heat. Continued use could cause a fire or electric shock.
- Do not use flammable sprays near the equipment. If any flammable substance comes into contact with the electrical components inside the equipment, a fire or electric shock could occur.

CAUTION
- For your safety, disconnect the power cord if you will not use the equipment for extended periods.
- Be careful when opening and closing the covers to avoid injuring your hands.
- Keep your hands and clothing away from the rollers in the output area. If your hands or clothing get caught in the rollers, you could suffer personal injury.
- The inside of the equipment and the output slot are very hot during and immediately before use. Avoid contact with these areas to prevent burns. Also, printed paper may be hot immediately after printing. Be careful when handling it. Otherwise, you could suffer burns.
- The laser beam can be harmful to the human body. The laser beam is confined under protective housings and an outer covering, so that the laser beam does not escape during normal operation of the machine. Read the following observations and instructions for your safety.
- Never open covers not indicated in this manual. If the laser beam were to escape and come into contact with your eyes, exposure to it could cause eye damage.
- If you use this equipment with control, adjustment, and operation procedures different from those specified in this manual, it may result in dangerous exposure to radiation.
Maintenance and inspection

WARNING
- Turn off the equipment and unplug the power cord from the power outlet before any cleaning operation. Otherwise, a fire or electric shock could occur.
- Periodically unplug the plug from the power outlet and clean the area around the base of the metallic connectors of the plug and the outlet with a dry cloth to remove all dust and dirt. In humid conditions, dust accumulation could cause short circuits and fires.
- Use a damp, well-wrung cloth to clean the equipment. Moisten cleaning cloths only with water. Do not use alcohol, benzene, solvents, or other flammable substances. If such substances come into contact with the electrical components inside the equipment, a fire or electric shock could occur.
- Periodically check for damage to the power cord and plug. Check for rust, dents, scratches, cracks, or excessive heat generation of the equipment. Use of equipment with inadequate maintenance could result in a fire or electric shock.
Consumables

WARNING
- Do not throw used toner cartridges into fire. They may catch fire and cause burns or a fire.
- If toner spills or is accidentally dispersed, carefully clean up the spilled toner with a soft, damp cloth and avoid inhaling the particles themselves. Never use a vacuum cleaner to clean up loose toner. This could cause vacuum cleaner malfunction or a dust explosion due to static electricity discharges.

CAUTION
- Keep toner cartridges and other consumables out of the reach of children. If toner is ingested, seek medical attention immediately or contact a poison control center.
- Do not attempt to disassemble the toner cartridge. Toner may spill and get into your eyes or mouth. If toner gets into your eyes or mouth, wash immediately with cold water and seek medical attention.
- If toner spills from the toner cartridge, avoid inhaling it or letting it come into contact with your skin. If toner comes into contact with your skin, wash immediately with water and soap. If you inhale toner or your skin becomes irritated upon contact with toner, seek medical attention immediately or contact the nearest poison control center.
Other

WARNING
- If you use a cardiac pacemaker: This equipment generates a low-level magnetic field. If you notice any abnormalities in your body during use, stay away from the equipment and seek medical attention immediately.
Telephone Equipment
When using telephone equipment, always follow basic safety precautions to reduce the risk of fire, electric shock, and personal injury, including the following precautions:
- Do not use this equipment near water (e.g., near a bathtub, sink, or laundry tub), in a damp basement, or near a swimming pool.
- Avoid using the telephone during electrical storms, as there may be a remote risk of electric shock from lightning.
- Do not use the telephone to report a gas leak in the vicinity of the leak.
Product Name
Safety regulations require that the product name be registered. In some regions where this product is sold, the name(s) in parentheses ( ) may need to be registered instead.
imageCLASS MF419dw (F168712)
imageCLASS MF416dw (F168702)
imageCLASS MF414dw (F168702)
Legal limitations on the use of the product and on the use of images
The use of the product to scan, print, or reproduce in any way certain documents, and the use of such scanned, printed, or reproduced images with your product, may be prohibited by law and may infringe criminal and/or civil laws.
Below is a non-exhaustive list of such documents. This list is merely a guide. If you are unsure about the legality of using the product to scan, print, or reproduce any particular document and/or about the use of scanned, printed, or otherwise reproduced images, you should consult a legal advisor beforehand for guidance.
Paper money - Money orders - Certificates of deposit - Postage stamps (canceled or not) - Identification badges or insignias - Selective service or draft documents - Checks or drafts issued by governmental agencies - Motor vehicle licenses and certificates of title - Traveler's checks - Food coupons - Passports - Immigration documents - Internal revenue stamps (canceled or not) - Bonds or other certificates of indebtedness - Stock certificates - Works protected by intellectual property rights / Works of art without permission from the copyright owner
FCC (Federal Communications Commission) Users in the U.S.
imageCLASS MF419dw: F168712
imageCLASS MF416dw: F168702
imageCLASS MF414dw: F168702
Contains FCC ID of the transmitter module: TLZ-NM383
This device complies with Part 15 of the FCC Rules. Operation is subject to the following two conditions:
- This device may not cause harmful interference, and
- This device must accept any interference received, including interference that may cause undesired operation.
FCC CAUTION Users in the U.S.
Changes or modifications not expressly approved by the party responsible for compliance could void the user's authority to operate the equipment.
NOTE
This equipment has been tested and found to comply with the limits for a Class B digital device, pursuant to Part 15 of the FCC Rules. These limits are designed to provide reasonable protection against harmful interference in a residential installation. This equipment generates, uses, and can radiate radio frequency energy and, if not installed and used in accordance with the instructions, may cause harmful interference to radio communications. However, there is no guarantee that interference will not occur in a particular installation. If this equipment does cause harmful interference to radio or television reception, which can be determined by turning the equipment off and on, the user is encouraged to try to correct the interference by one or more of the following measures:
Reorient or relocate the receiving antenna. - Increase the separation between the equipment and receiver. - Connect the equipment into an outlet on a circuit different from that to which the receiver is connected. - Consult the dealer or an experienced radio/TV technician for help.
This transmitter must not be co-located or operated in conjunction with any other antenna or transmitter.
This equipment complies with FCC radiation exposure limits set forth for an uncontrolled environment and meets the FCC radio frequency (RF) Exposure Guidelines. This equipment should be installed and operated with a minimum distance of 20 cm between the radiator and your body.
Shielded cables must be used to ensure compliance with the Class B limits in Subpart B of Part 15 of the FCC Rules. Do not make any changes or modifications to the equipment unless otherwise specified in the manual. If such changes or modifications should be made, you could be required to stop operation of the equipment.
Canon U.S.A., Inc.
One Canon Park, Melville, NY 11747, U.S.A.
Tel No.: 1-800-OK-CANON
Users in the U.S.A.
Pre-Installation Requirements for Canon Facsimile Equipment
A. Location
Provide a suitable table, cabinet, or desk for the equipment. See the e-Manual for specific dimensions and weight.
- A single telephone line (touch-tone or rotary) must be used.
- Order an RJ11-C (USOC) wall telephone jack, which must be installed by the telephone company. If you do not have an RJ11-C wall jack, use of the telephone/fax will be impossible.
- Request a normal commercial line from your telephone company representative. The line should be a normal voice line or equivalent. Use one line per unit.
DDD line (Direct Distance Dial)
IDDD line (International Direct Distance Dial) if communicating with foreign countries
NOTE
Canon recommends an individual line in accordance with industry regulations, i.e., 2,500 telephones (tone) or 500 (rotary/pulse dialing). An extension from a PBX (Private Branch Exchange) unit without "Call Waiting" may be used with your fax unit. Key telephone systems are not recommended, as they send non-standard signals to individual telephones for ringing and special tones, which could cause a fax error.
C. Power requirements
The equipment must be connected only to a standard 120-volt AC, three-wire grounded outlet.
Do not connect the equipment to an outlet or power line shared with other appliances that cause "electrical noise." Air conditioners, electric typewriters, copiers, and other machines of this type generate electrical noise that can interfere with communications equipment that sends and receives documents.
Connecting the equipment
This equipment complies with Part 68 of the FCC rules and the requirements adopted by ACTA. On the rear panel of this equipment is a label that contains, among other information, a product identifier in the format US:AAAEQ#TXXXX. If requested, you must provide this number to the telephone company.
The REN (Ringer Equivalence Number) is used to determine the number of devices that may be connected to a telephone line. An excessive number of RENs on a telephone line may result in devices not ringing in response to an incoming call. In most areas, but not all, the total RENs should not exceed five (5.0).
To be certain of the number of devices that may be connected to a telephone line, as determined by the total RENs, contact your local telephone company. For products approved after July 23, 2001, the REN for this product is part of the product identifier with the format US:AAAEQ##TXXXX. The digits represented by ## are the REN without the decimal point (e.g., 03 is the REN of 0.3).
This equipment is supplied with a telephone line cord and a modular connector in compliance with the FCC. This equipment is designed to be connected to the telephone network or the telephone installation wiring using a modular connector that complies with Part 68.
This equipment cannot be used on party lines provided by the telephone company. Connection to special numbers (party lines) is subject to applicable tariffs.
In case of equipment malfunction
If a malfunction occurs that cannot be corrected by the procedures described in this guide or in the e-Manual, disconnect the equipment from the telephone line and unplug the power cord.
The telephone line cord should not be reconnected, nor should the power switch be turned on, until the problem has been completely resolved. Users should contact authorized Canon service centers for repair of the equipment. Information regarding the locations of authorized service centers can be obtained by calling the Canon Customer Assistance Center (1-800-OK-CANON).
Rights of the telephone company
If this equipment (imageCLASS MF419dw/MF416dw/MF414dw) causes harm to the telephone network, the telephone company may temporarily discontinue service. The telephone company also reserves the right to make changes in facilities and services that may affect the configuration of this equipment. When such changes are necessary, the telephone company must provide adequate prior notice to the user.
However, if such prior notice is not possible, the telephone company will notify the customer as soon as possible. Likewise, the customer will be notified of their right to file a complaint with the FCC if they deem it necessary.
WARNING
The Telephone Consumer Protection Act of 1991 makes it unlawful for any person to use a computer or other electronic device, including fax machines, to send any message unless such message clearly contains, in a margin at the top or bottom of each transmitted page or on the first page of the transmission, the date and time of transmission and an identification of the business, other entity, or individual sending the message, as well as the telephone number of the sending machine or such business, other entity, or individual. (The telephone number provided may not be a 900 number or any other number for which charges exceed local or long-distance transmission rates.)
NOTE
To program this information into your equipment, you must follow the procedure for registering your name, the unit's telephone number, and the time and date of transmission.
Canadian Users
Pre-installation requirements for Canon fax equipment
A. Location
Provide a suitable table, cabinet, or desk for the equipment. Consult the e-Manual for specific dimensions and weight.
- You must use a single telephone line (touch-tone or rotary).
- Request a CA11A modular jack, which must be installed by the telephone company. If the CA11A jack is not present, installation cannot be performed.
- Request a normal business line from your telephone company's commercial representative. The line should be a normal voice line or equivalent. Use one line per unit.
DDD line (Direct Distance Dial) -0-
IDDD line (International Direct Distance Dial) if you communicate with foreign countries
NOTE
Canon recommends an individual line in accordance with industry standards, i.e., 2500 (touch-tone) or 500 (rotary/pulse dialing) telephones. You may use a dedicated extension from a PBX (Private Branch Exchange) unit without "Call Waiting" with your fax unit. Key telephone systems are not recommended, as they send non-standard signals to individual telephones for call codes and special features, which could cause a fax error.
C. Power Requirements
The power outlet must be a three-prong grounded receptacle (single or double). It should be independent of photocopiers, heaters, air conditioners, or any thermostatically controlled electrical equipment. The rating is 115 volts and 15 amps. The CA11A modular jack should be relatively close to the power outlet to allow installation.
Notice
The REN of this product is 1. - Before installing the equipment, users must ensure that connection to the local telecommunications network is permitted. The equipment must be installed using an acceptable method of connection. In some cases, the internal wiring associated with an individual line service may be extended by means of an approved connection assembly (telephone extension cord). The customer should be aware that compliance with the above conditions may not prevent service degradation in certain situations. Repairs to certified equipment must be performed by an authorized Canadian maintenance center designated by the supplier. Any repairs or modifications made by the user to this equipment, or equipment malfunctions, may cause the telephone company to request the user to disconnect the equipment. - Users should ensure, for their own protection, that the electrical ground connections of the electrical installation, telephone lines, and internal metallic water pipe system, if any, are connected together. This precaution may be especially important in rural areas.
ATTENTION
Users should not attempt to make these types of connections themselves, but should contact the appropriate electrical inspection authority, or an electrician, as applicable.
NOTE
This equipment complies with the limits of the Canadian ICES-003 Class B standard.
Laser safety
This product is considered a Class 1 laser product according to IEC60825-1:2007 and EN60825-1:2007 standards.
CAUTION
The use of controls, adjustments, or procedures not specified in this manual may result in hazardous radiation exposure.

About the provided manuals
① Introduction (this manual):
Read this manual first. This manual describes the installation of the machine, the settings, and the care. Make sure to read this manual before using the machine.

② MF Driver Installation Guide (provided DVD-ROM):
Read this manual next. This manual describes the software installation.

③ Electronic Manual (provided DVD-ROM):
Read the chapter that best suits your needs. The Electronic Manual is categorized by subject, so you can find the desired information more easily.

See the Electronic Manual on the DVD-ROM.
1 Insert the supplied DVD-ROM into the computer. 2 Click [Manuals]. 3 Click [e-Manual]. If the [AutoPlay] option appears, click [Run MInst.exe]. Depending on the operating system you are using, a security protection message may be displayed. If the DVD-ROM has already been inserted into the computer and [Manuals] still has not appeared, remove the DVD-ROM and insert it again.
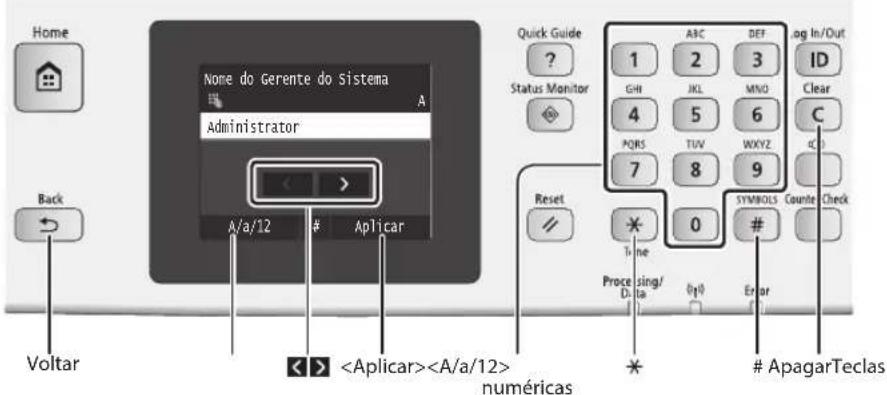
Selecting an item
Touch an item to select it. Press to return to the previous screen.
Confirming the setting
Touch the item. However, when it appears, touch .
Text input method
Changing the input mode
Touch < A / a / 12> to change the input mode. You can also press 喜 to change the input mode.
| Modo de entrada | Texto disponible |
| <A> | Letras alfabetéticas maiúsculas e símbolos |
| <a> | Letras alfabetéticas minúsculas e símbolos |
| <12>Númos |
Inserting text, symbols, and numbers Insert using the numeric keys or
Moving the cursor (inserting spaces)
Touch or to move the cursor. To insert a space, move the cursor to the end of the text and touch .
| Modo de entrada: <A> | Modo de entrada: <a> | Modo de entrada: <12> |
| 1 | @ . - / 1 | |
| 2 | AAAABCÇ aaaaBCÇ 2 | |
| 3 | DEEEEF deeeef 3 | |
| 4 | GHill ghiñ | 4 | |
| 5 | JKL | jkl | 5 |
| 6 | MNOÓOÖO | mnoóðö | 6 |
| 7 | PQRS | pqrs | 7 |
| 8 | TUÜV | tuúv | 8 |
| 9 | WXYZ | wxyz | 9 |
| 0 | (Não disponível) | 0 |
| # | (espaço) - , * # !", ;; ^ _ = / ? $ @ % & + ^ ( ) [ ] { < > | (Não disponível) |
Deleting characters
Delete with c. Press and hold to delete all characters.
How to connect the power cord and turn on the machine

Do not connect the USB cable at this time. Connect it when you install the software.
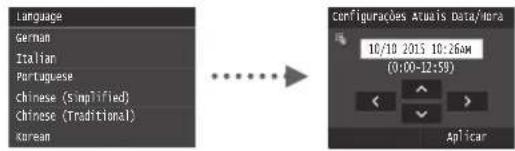
Initial settings
The first time you turn on the computer, follow the instructions on the screen. For more details on navigating menus and entering numbers, see "Navigating menus and entering text" (P.50).
Follow the on-screen instructions to set the language, region, time zone, date, and time.
Choosing how to connect the machine to the computer
You can connect the machine to the computer via a wired router. Use LAN cables to connect the machine to the computer (access point) with wires.

- Connect the computer to the router via a cable or wirelessly. † Check that there is an available port on the router to connect the machine and the computer. † Have a Category 5 or higher twisted-pair LAN cable on hand.
USB cable connection
You can connect the machine to the computer via a USB cable.

† Make sure the USB cable you use has the following mark.

Wireless LAN connection
You can connect the machine to the computer via a wireless router*. Once you are connected wirelessly, you will not need to use LAN cables.

- You need to use a wireless router (access point) compatible with the IEEE802.11b/g/n standard.
- Connect the computer to the router via a cable or wirelessly.
Check if your router has a button.
Choose one of the following methods depending on the router (access point) you are using.
Setup can be done easily if the router (access point) has a button and the mark is present on the router.

If there is no button on your router (access point), you can select the SSID manually and make the settings.
NOTE
- If you are trying to install your new device over a wireless network connection, you will find at www.usa.canon.com/WirelessHelp a video and manuals with step-by-step instructions to help you through this process. Viewing these manuals will ensure a smooth setup of the device in your existing wireless environment.
- Direct connection
Connect a mobile device to the machine wirelessly and directly without routing through a wireless LAN router (or access point).
Electronic Manual "Network" > "Configuring Settings for Direct Connection (Access Point Mode)"
Choosing a connection method: via wireless LAN or other method

Yes
There is a button.
Start from step 4 of "Button Press Mode" (P.53).
There is no button.
Start from step 4 of "Setting the Access Point Manually" (P.54).
Proceed to "Wired LAN Connection" (P.52).
Connect to the computer via a USB cable
Connect to the computer via wireless LAN later
Proceed to "USB Cable Connection" (P.52). Proceed to "Wireless LAN Connection" (P.53).
Check before configuration
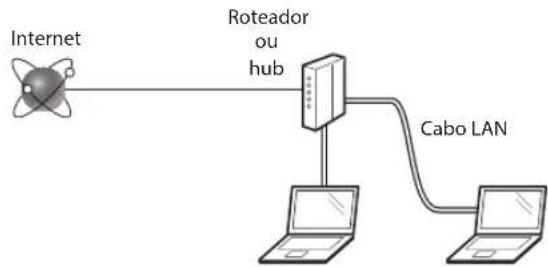
Is the computer and the router (or hub) connected correctly with a LAN cable?
For more information, refer to the instruction manual of the network device you are using or contact the manufacturer of the network device.
Have the network settings on the computer been completed?
If the computer is not configured correctly, it will not be possible to use the wired LAN connection even before completing the following settings.
NOTE
- You cannot connect to the wired LAN and the wireless LAN at the same time. In addition, the machine is configured by default for "Wired LAN".
- When you connect to a network environment without security protection, your personal information may be disclosed to third parties. Be extremely careful.
- To connect via LAN in the office, check with the network administrator.
1 Connect the LAN cable.

The IP address will be configured automatically in a few moments. If you intend to configure the IP address manually, refer to the items below.
Electronic manual "Network" "Connecting to a network" "Setting an IP address"
2 Install the driver and software using the provided DVD-ROM.
Refer to "For more details on installation procedures" (P.55). Proceed to "Configuring paper size and type" (P.55).
USB cable connection
Driver and software installation
Install the driver and software using the DVD-ROM provided with the machine.
Refer to "For more details on installation procedures" (P.55). Proceed to "Configuring paper size and type" (P.55).
NOTE
- If you connected the USB cable before installation, first remove the USB cable and then install again.
USB cable connection
Follow the instructions in the MF Driver Installation Guide to learn how to connect the USB cable.

Wireless LAN connection
Check before configuration

Is the computer connected to the router (access point) via a LAN cable or wireless LAN?
For more information, refer to the instruction manual of the network device you are using or contact the manufacturer of the network device.
Have the network settings on the computer been completed?
If the computer is not configured correctly, it will not be possible to use the wireless LAN connection even after completing the following settings.
NOTE
- You cannot connect to wired LAN and wireless LAN at the same time. In addition, the machine is set to "Wired LAN" by default.
- When you connect to a network environment without security protection, your personal information may be disclosed to third parties. Be very careful.
- To connect via LAN in the office, contact the network administrator.
Router check
Select the wireless LAN connection method. Choose one of the two methods below depending on the router (access point) you are using.
- There is a button.
This machine supports WPS (Wi-Fi Protected Setup). Setup can be done easily if the router (access point) has a button and if the mark

is present on the router.

If you are not sure whether your router supports WPS or not, refer to the manual included with the product or contact the product manufacturer.
- There is no button.
If there is no button on your router (access point), you can select the SSID manually and make the settings. In that case, you will need to remember the SSID and network key of your router (access point).
Refer to "1 Check the SSID or network key of the wireless LAN router/access point." (P.54) to find out how to discover your SSID and the corresponding network key.

Electronic manual "Connecting to a wireless LAN"
Wireless LAN configuration
Button press mode
1 Touch