RLTP169B - Smartphone RCA - Free user manual and instructions
Find the device manual for free RLTP169B RCA in PDF.
| Product Type | Smartphone (senior phone) |
| Brand | RCA |
| Model | RLTP169B |
| Screen | 1.77-inch TFT color display, 160×128 pixels |
| Network | Quad-band GSM (2G) |
| Processor | Spreadtrum 6531DA |
| Internal Memory | 32 MB RAM + 32 MB ROM |
| External Memory | MicroSD up to 32 GB |
| SIM Card | 1 x Standard SIM (2G) |
| Battery | 600 mAh Lithium-ion (BL-4C), rechargeable |
| Dimensions | 119.4 × 54.1 × 15.0 mm (approx.) |
| Weight | Approx. 80 g |
| Available Languages | French, English, Spanish (customizable) |
| Main Features | Calls, SMS, phonebook, camera, video, FM radio, audio player, voice recorder, calculator, alarm clock, calendar, flashlight, SOS |
| Power | USB 5V wall charger (included) |
| Care and Cleaning | Wipe with a soft, dry cloth. Do not use chemical or abrasive products. |
| Safety | Compliant with FCC Part 15. Minimum distance of 1.0 cm between body and handset. |
| Spare Parts and Repairability | Removable battery (BL-4C). Other parts available from manufacturer. |
| General Information | Designed for seniors. Extra-large keys, simplified icons, dedicated SOS button. Factory reset code: 1234. |
Frequently Asked Questions - RLTP169B RCA
User questions about RLTP169B RCA
0 question about this device. Answer the ones you know or ask your own.
Ask a new question about this device
Download the instructions for your Smartphone in PDF format for free! Find your manual RLTP169B - RCA and take your electronic device back in hand. On this page are published all the documents necessary for the use of your device. RLTP169B by RCA.
USER MANUAL RLTP169B RCA
This product is manufactured and sold by Curtis International Ltd.
RCA, the RCA logo, the two dogs (Nipper and Chipper) logo, are registered trademarks or trademarks of RCA Trademark
Management and are used under license by Curtis International Ltd.
Any other product, service, company, trade or product name and logo referenced herein are neither endorsed nor sponsored by RCA Trademark Management or its affiliates.
Specifications
- Designed for easy use for the elderly or people with special needs
- Extra-large dial pad buttons and icons
SOS support One key emergency call and 5 SOS numbers to enable someone to alert their contacts as quick as possible - Screen 1.77 inch TFT color screen 160^*128
Network Band GSM quad bands - Platform Spreadtrum 6531DA
- Memory 32MB+32MB
- External memory support, T-Flash card support up to 32GB
- Single SIM card
Audio player - Talking keypad
FM radio - Flashlight
Other functions: Calculator, Alarm clock, Calendar - Battery BL-4C battery 600mAh
- Customized Language
- Product Size 4.7 x 2.13x 0.59 inches
- Accessories:1pc*battery/1pc*Charger/
1pc*cable
Start to Use
Installing the battery
- Lift the corner of the battery cover as illustrated, and then slowly separate it from the phone.

- Put the battery into the opening. Please make sure the battery's metal contacts connect to the 3 metal pins in the opening.
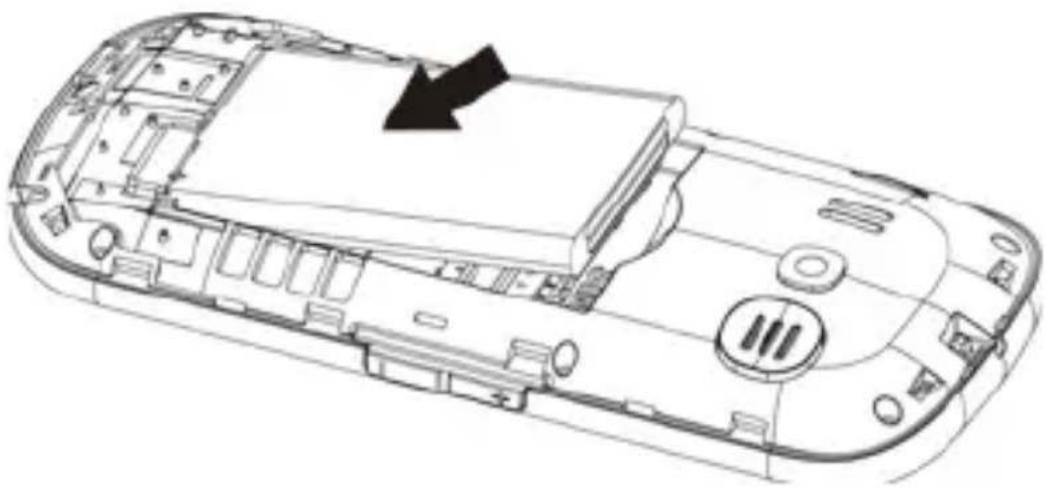
- Put the battery cover back by pressing each of the 4 sides until no gap can be seen along the edge of the phone.

Removing the battery
- Lift the corner of the battery cover as illustrated, and then slowly separate it from the phone.

- Remove the battery by lifting it out from the top.

- Put the battery cover back by pressing each of the 4 sides until no gap can be seen along the edge of the phone.

Note: Before removing the battery, turn the phone off and disconnect the charger. Please use only the battery included with the phone.
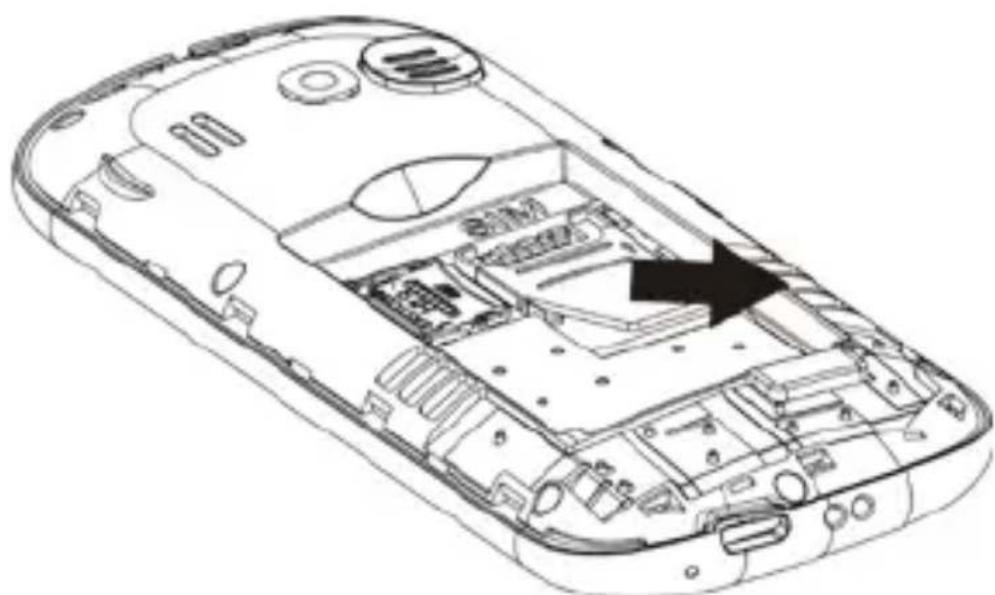
Installing & removing the SIM card
- Installation: Remove the battery cover. With the SIM card label side up, clipped corner faces outward, insert it in the direction as illustrated. Please make sure it is completely inserted into the slot.
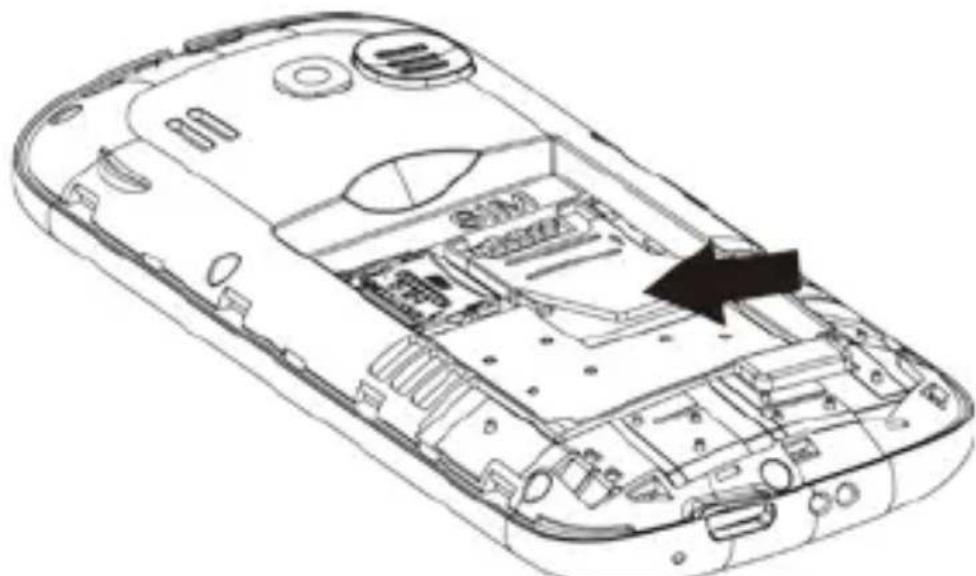
- Removal: Lift the outer edge of the SIM card up slightly, and then pull the card out carefully.
English - 7
Note: Before removing the SIM card, please turn the phone off and disconnect the charger. The SIM card can be damaged by overly bending it. Please be careful when installing or removing the SIM card. The phone only accepts a standard size GSM 2G SIM card.
Installing & removing the MicroSD memory card for added storage
Referring to the illustration, slide the metal tab towards the outer edge of the phone to unlock and then flip the metal tab up. Place the MicroSD card label side up into the opening. Please make sure the card's contacts match the contact pins in the opening. Flip the metal tab down and then move it towards the center of the phone to lock the card in place.

Charging the battery
Battery charging can be done when the phone is turned on or turned off.
Please make sure the battery is installed properly before charging.
- Connect the USB charging cable to the phone and to the AC charger. It will take 3 hours to fully charge a discharged battery.

- After the battery is fully charged, disconnect the AC charger from the AC outlet, then disconnect the USB charging cable from the phone.

English - 10
Note: Battery indication will be displayed after several minutes if battery is full-charged.
Your Phone
Standby mode
The phone will go into Standby mode if it is not operated for 20 seconds. Press "End Key" to exit Standby mode.
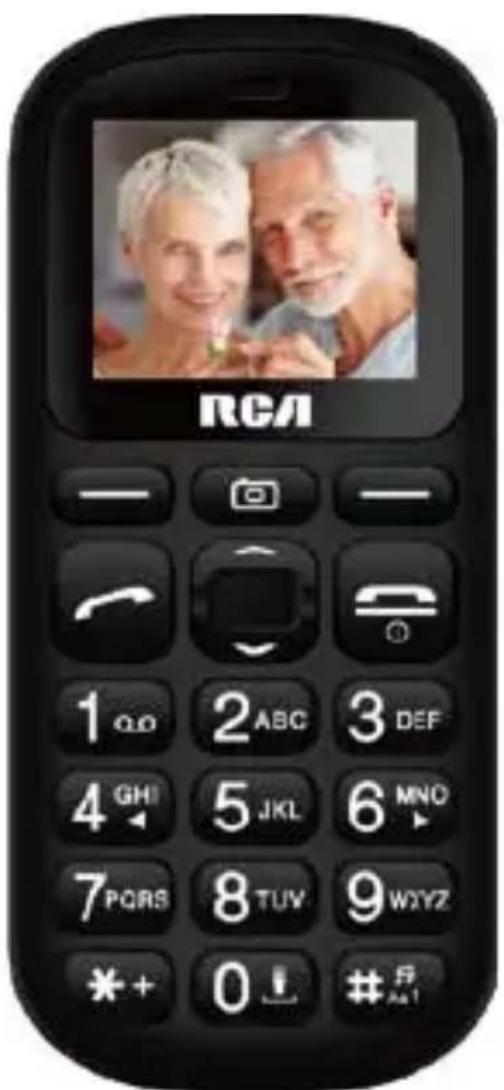
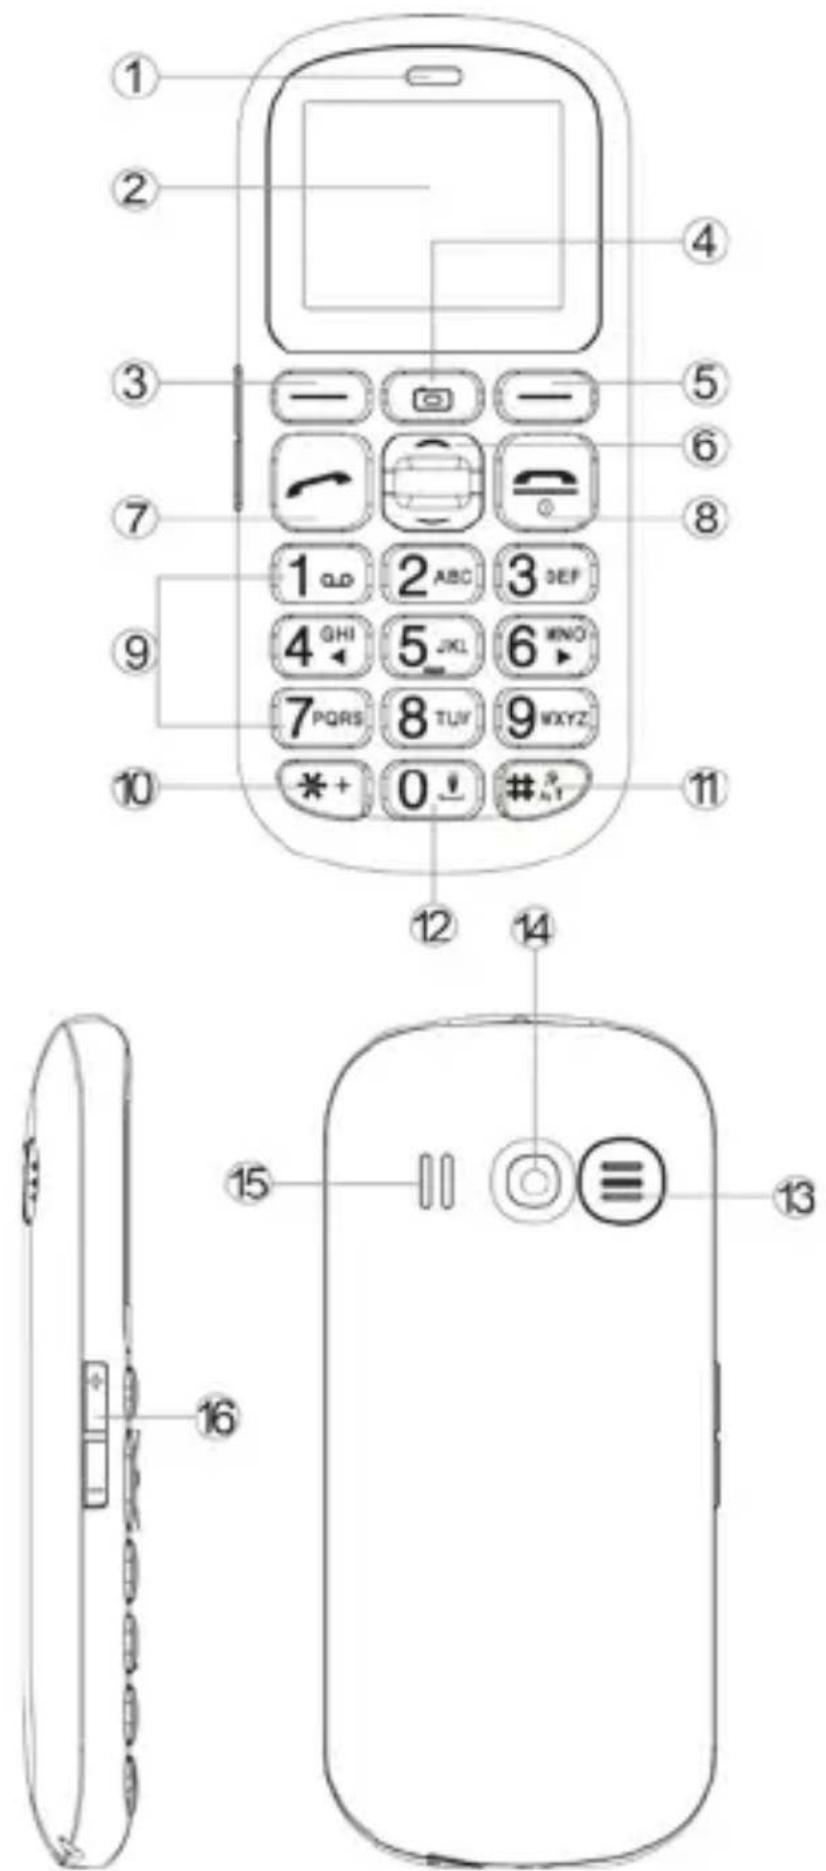
| 1 | Receiver | 2 | Display |
| 3 | Menu key | 4 | Camera key |
| 5 | Contact key | 6 | Navigation Up / Down key |
| 7 | Call / Answer Key | 8 | End Key, Power button |
| 9 | Numeric key | 10 | * key |
| 11 | # key : Vibrate/Silent | 12 | Flashlight On/Off |
| 13 | SOS button | 14 | Camera |
| 15 | Speaker | 16 | Volume key |
Please refer to next page for an explanation of each button.
English - 12
Icons on Screen
| Battery status | |
| Signal status | |
| Alarm | |
| Message Full | |
| Missed call | |
| Silent mode | |
| No SIM | |
| When listening FM | |
| W hen playing music | |
| W hen on call | |
| Flight mode | |
| When SOS procedure does not finish | |
| Vibration mode |
Setting up the phone up for the first time
Setting up the display language at the first time, English, French, Spanish for option
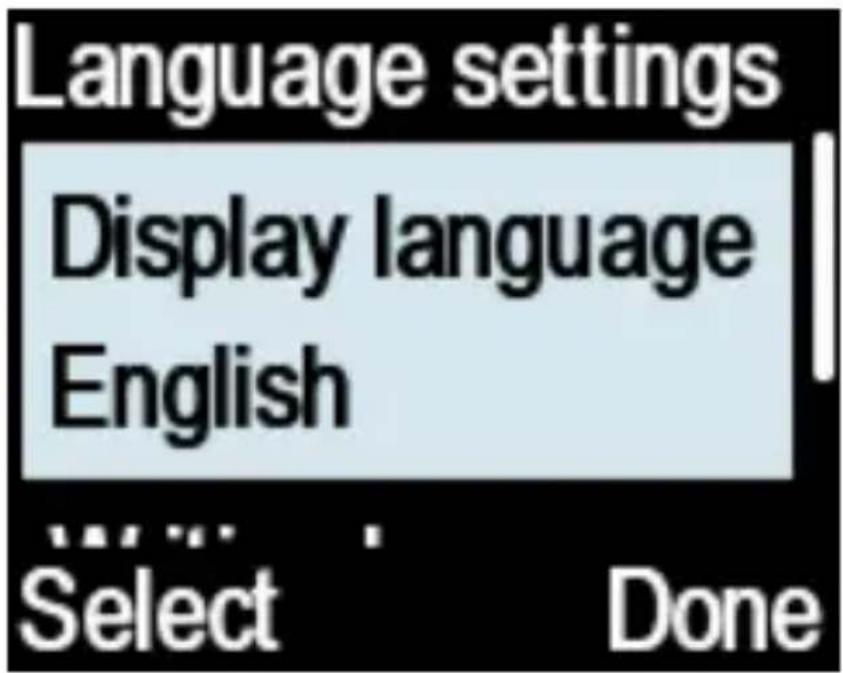
Then set up the date on “DD-MM-YY” format

At last, set up the time “on 12 hours” or “24 hours” format.

You can reset the languages, date & time under "Setting" Menu

FREQUENTLY ASKED QUESTIONS
How to add a Contact ?
Enter the number on the keypad
Press [Options] > [Add to contacts] > [OK] > [Add
to new contacts] > [OK] > [Edit]
Enter contact's name
Press [OK] > [Save] > [OK]
How to write message?
Press [Menu] > [Messaging] > [OK] > [Write Message]
How to Send Message?
After entering your message ,press
[Option] >[Send to]
Option 1: insert number (IF number is not stored in
phone's contracts)
Press [insert Number] > [Edit]
Enter contact number> press [OK]
Press [Options] > [Send] > [OK]
Option 2: Insert contacts (If number is stored in phone's contacts)
Press [insert Contacts] > [Edit]
Press options twice to automatically mark the contact, you can also send the message to all contacts through selecting [Mark All]
Press [Options] >[Done] >[OK]
Press [Options] >[Send] > [OK]
How to make a Call ?
Option 1: If the contact number is not stored in the contacts
Enter the Number on the keypad
Press the Call button on the keypad or press
[Option] > [Call] > [OK]
Option 2:If the contact number is stored in the Contacts
Press [Menu] > [Contacts] > [OK]
Enter the contact name
Press the call button on the keypad
How to take a Photo?
Press the [Camera Key] on the keypad to open the app and capture the photo
Press [Save] to store the image
How to Record Video?
Press the [Camera key] on the keypad
Press [Options] > DV mode > OK
Press the [Camera key] on the keypad to start recording
Note: The Video recorder can only be used When a memory card (Min.256MB) is inserted.
How to Play Music?
Press[ Menu] > [Multimedia] > [OK] > [Audio players]
Press the camera button on the keypad to play music
Use the up and down button to adjust the volume
How to record Sound?
Press [Menu] >[Multimedia] >[OK] >[Recorder]>
[ OK ] > [ Options ] > Start recording ]
How to Play FM?
Press [Menu] >[ FM radio] > [OK]
Press "4" "6" button to adjust the searching bar.
Press"5" to start / Pause the FM radio.
Use the up and down button to adjust the volume
How to set Shortcut?
Up and Down Key can set as the shortcut key to the function you like.
Up key is shortcut of Audio Player as default Down key is shortcut of Alarm as default
Press [Menu] > [Setting] > [Phone Setting]>to reset the shortcut for the up and down key.
How to copy media files from the PC to the phone?
Link the phone to PC with the USB cable. The PC will install the USB driver automatically.
Chose the [File copy mode] on the phone.
Open[Computer] on PC, find the phone disk and copy media files from PC to the phone.
How to SWITCH THE FLASHLIGHT ON/OFF?
Press the 0 button on the keypad for about 3 seconds.
How to Lock or unlock the Phone?
Press * on the keypad then press [Lock] Press [Unlock], then press* key to unlock the phone.
How to attach a lanyard on the phone.?
Lift the corner of the battery cover and then slowly separate it from the phone.
Tie the lanyard on phone through the hold on the top of the phone.
Put the battery cover back.

How to turn on/off talking numeric button?
Press [Menu] > [Settings] > [Profiles] > [Other alert tones] > [Dial Tone] >[Human voice tone] > to turn on/off talking numeric button
SOS function
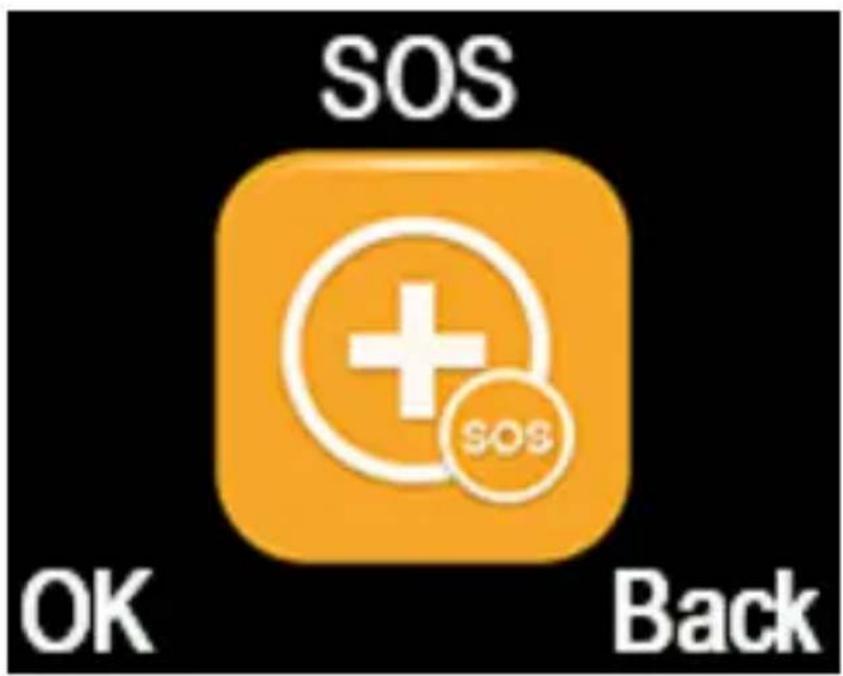
This phone is equipped with an SOS function that lets the user to perform the following operations by pressing the SOS button on the back of the phone.
- Send SMS to 5 designated contacts.
- Call the designated contacts continuously.
- Activate the built-in audible alarm.
Activate & deactivate the SOS function
Activate: Press [Menu] > [SOS] > [OK] > [SOS Switch] > [On / Off]
The SOS button can be deactivated to prevent the alarm and other SOS functions from initiated if the SOS button is accidentally pressed.
Setting up SOS SMS
SOS SMS will send a message to the designated contact once the SOS function is activated and the SOS button is pressed.
To turn on/off SOS SMS, press [Menu] > [SOS] > [OK] > [SOS SMS] > [On/Off].
To set up a SMS message, press [Menu] > [SOS] > [OK] > [SOS SMS] > [SOS message] > [Edit]. Enter a message such as "I need help, please..." or any other alert message to the SOS Contacts.
Setting up SOS Contacts
The SOS phone numbers (Number List) will be the people who will receive a SMS and a phone call when SOS is initiated. The list can store up to 5 contact numbers arranged in priority sequence. Once the SOS button is pressed, the first person in the list will be called first. All 5 persons will receive the SMS around the same time.
To set up SOS contacts, press [Menu] > [SOS] > [OK] > [Number List] > [OK] > [Options]. From here, you can add phone numbers from the
phone's "Contacts" or enter the phone numbers manually.
Setting up SOS alarm
To activate or deactivate the audible alarm, press [Menu] > [SOS] > [OK] > [Alarm sound] > [On/Off].
Low battery reminder
To active or deactivate, press [Menu] > [SOS] > [Low battery reminder] > [On /Off / Texting]
Phone will give alert when battery is not enough and display a message of low battery on screen.
Please charge battery. Please charge battery when you receive the alert of low battery during calling in order to keep the calling.
Note: It is not permitted to enter the numbers of public entities such as police stations, fire stations or rescue control centers here.
Speed Dial
press [Menu] > [Contacts] > [OK] > [Options] > [Others] > [Speed dial] to input the Speed Dial Number from on key from "2"to "9"
If you already set the speed dial numbers, then you can long press number key 2 to 9,^* key to dial set numbers out under standby mode.
Code for factory default:1234
Code for security password:1234
WARINGS
- Labeling requirements
This device complies with part 15 o the FCC Rules. Operation is subject to the condition that this device does not cause harmful interference.
- Information to user
Any changes or modifications not expressly approved by the party responsible for compliance could void the user's authority to operate the equipment.
- Information to the user
Note: This equipment has been tested and found to comply with the limits for a Class B digital device, pursuant to part 15 of the FCC Rules.
These limits are designed to provide reasonable protection against harmful interference in a residential installation. This equipment generate uses and can radiate radio frequency energy and, if not installed and used in accordance with the instructions, may cause harmful interference to radio communication. However, there is no guarantee that interference will not occur in a particular installation. If this equipment does cause harmful interference to radio or television reception, which can be determined by turning the equipment off and on, the user is encouraged to try to correct the interference by one or more of the following measures:
Reorient or relocate the receiving antenna.
Increase the separation between the equipment and receiver.
Connect the equipment into an outlet on a circuit different from that to which the receiver is connected.
Consult the dealer or an experienced radio / TV technician for help.
Body-worn Operation
This device was tested for typical body-worn operations. To comply with RF exposure requirements, a minimum separation distance of 1.0cm must be maintained between the user's body and the handset, including the antenna. Third-party belt-clips, holsters, and similar accessories used by this device should not contain any metallic components. Body-Worn accessories that do not meet these requirements may not comply with RF exposure requirements and should be avoided. Use only the supplied or an approved antenna.