
FF30SC15ABL - Fireplace Furrion - Free user manual and instructions
Find the device manual for free FF30SC15ABL Furrion in PDF.
| Product Type | Built-in electric fireplace |
| Brand | Furrion |
| Model | FF30SC15ABL |
| Power | 1465 W (5000 BTU) |
| Power Supply | 120 V AC, 12 A |
| Control Options | Control panel and remote control |
| Product Dimensions (W x H x D) | 760 mm x 450 mm x 439.5 mm (30-inch series) |
| Heating Area | Up to 500 sq ft |
| Main Functions | Adjustable thermostat, timer (30 min to 5 h), 3 flame colors (orange, blue, red), 4 brightness levels |
| Installation Type | Recessed or semi-recessed |
| Glass Material | Tempered glass |
| Maintenance and Cleaning | Clean the glass with a damp, lint-free cloth; do not use abrasive cleaners |
| Safety | Proximity sensor (auto shut-off if object within 6 inches), thermal protector, grounding required |
| Spare Parts and Repairability | Genuine Furrion replacement parts available from authorized dealer; call a qualified technician |
| Certifications | UL 2021, CSA 22.2 No. 46, FCC Class B, ICES-006 |
Frequently Asked Questions - FF30SC15ABL Furrion
User questions about FF30SC15ABL Furrion
0 question about this device. Answer the ones you know or ask your own.
Ask a new question about this device
Download the instructions for your Fireplace in PDF format for free! Find your manual FF30SC15ABL - Furrion and take your electronic device back in hand. On this page are published all the documents necessary for the use of your device. FF30SC15ABL by Furrion.
USER MANUAL FF30SC15ABL Furrion
natural_image
Black and white photo of a gas stove burner flame with visible flames and smoke, labeled 'FURRION' at bottom (no other text or symbols)* Picture shown here is for reference only.
* Wall-mount Bracket is optional.
* L'image montrée ici est pour la référence seulement.
* Support mural en option.
* El cuadro demostrado aquí está para la referencia solamente.
* El soporte de montaje en pared es opcional.
Welcome
Thank you for purchasing this Furrion® 1465W (5000BTU) Built-in Electric Fireplace. Before operating your new product, please read these instructions carefully. This will ensure safe use and reduce the risk of injury. This instruction manual contains information for installation, maintenance of the product and safe use.
Please keep this instruction manual in a safe place for future reference. Be sure to pass on this manual to any new owners of this product.
The manufacturer does not accept responsibility for any damages due to not observing these instructions.
Contents
Welcome....1
Contents 2
Important Safety Instructions....3
Grounding Instructions 4
FCC Statement 5
Function Overview 6
Control Panel 6
Remote Control 6
Installation 7
What's in the box....7
Wall-mount Installation (Flush-mounted)....7
Wall-mount Installation (Half Flush-mounted)......8
Residential Installation....9
RV Installation....9
Operation....10
To Turn On/Off 10
To Adjust the Temperature....10
Timer Setting....10
Interior Brightness Control....10
Thermostat Control....10
Care and Maintenance....11
Glass Cleaning 11
Fireplace Surface Cleaning....11
Servicing....11
Troubleshooting 12
Specifications 13
Important Safety Instructions
When using electrical appliances, basic precautions should always be followed to reduce the risk of fire, electric shock, and injury to persons, including the following:
- Read all instructions before using this appliance.
- This fireplace is hot when in use. To avoid burns, do not let bare skin touch hot surfaces. The trim around the heater outlet becomes hot during heater operation.
- Extreme caution is necessary when any heater is used by or near children or infants and whenever the heater is left operating unattended.
- Young children should be supervised to ensure that they do not play with the appliance.
- The appliance is not intended for use by young children or elderly persons without supervision.
- If the supply cord is damaged, it must be replaced by the manufacturer, or its service agent, or a qualified person in order to avoid a hazard.
- Do not operate any unit with a damaged cord or plug, if the heater has malfunctioned, or if the electric fireplace has been dropped or damaged in any manner.
- Do not use outdoors.
- Never locate fireplace where it may fall into a bathtub or other water container.
-
Do not run the cord under carpeting. Do not cover cord with throw rugs, runners, or the like. Arrange cord away from traffic area and where it will not be tripped over.
-
Do not locate the heater immediately below a fixed socket outlet.
- To disconnect the fireplace, press button, ensure the fireplace is turned off, then unplug it from the outlet.
- Do not insert or allow foreign objects to enter any ventilation or exhaust opening as this may cause an electric shock, fire, or damage to the heater.
- Do not block air intake or exhaust in any manner. Do not use on soft surfaces, like a bed, where openings may become blocked.
- All electrical heaters have hot and arcing or sparking parts inside. Do not use in areas where gasoline, paint, or flammable liquids are used or stored or where the unit will be exposed to flammable vapors.
- Do not modify the electric fireplace. Use it only as described in this manual. Any other use not recommended by the manufacturer may cause fire, electric shock or injury to persons.
- Avoid the use of an extension cord. Extension cords may overheat and cause a risk of fire. If you must use an extension cord, the cord shall be No. 14 AWG minimum size and rated no less than 1875 Watts.
- Do not burn wood or other materials in the electric fireplace.
- Do not strike the fireplace glass.
- Always use a certified electrician should new circuits or outlets be required.
- Always use properly grounded, fused and polarized outlets.
- Disconnect all power supplies before performing any cleaning, maintenance or relocation of the unit.
Important Safety Instructions
- When transporting or storing the unit and cord, keep in a dry place, free from excessive vibration and store so as to avoid damage.
Grounding Instructions
DANGER: Improper connection of the equipment-grounding conductor can result in a risk of electric shock. Check with a qualified electrician if you are in doubt as to whether the product is properly grounded. Do not modify the plug provided with the product. If it will not fit the outlet, have a proper outlet installed by a qualified electrician. This product must be grounded. If it should malfunction or breakdown, proper grounding provides a path of least resistance for electric current to flow and reduces the risk of electric shock. This product is equipped with a cord having an equipment-grounding conductor and a grounding plug. The plug must be inserted into an appropriate outlet that is properly installed and grounded in accordance with all local codes and ordinances. This fireplace is for use on 120 volt circuits and has a grounded plug. An adapter is available for connecting three-blade grounding type plugs to two-slot receptacles. The green grounding lug extending from the adapter must be connected to a permanent ground such as a properly grounded outlet box. The adapter should not be used if a three-slot grounded receptacle is available.

⚠ WARNING: Procedures and techniques which, if not carefully followed, will expose the user to the risk of fire, serious injury, illness or death.
NOTE: Procedures and techniques that are considered important enough to emphasize.
⚠️ CAUTION: Procedures and techniques which, if not carefully followed, will result in damage to the equipment.
Important Safety Instructions
FCC Statement
This equipment has been tested and found to comply with the limits for a Class B digital device, pursuant to Part 15 of the FCC Rules.
These limits are designed to provide reasonable protection against harmful interference in a residential installation. This equipment generates, uses, and can radiate radio frequency energy and, if not installed and used in accordance with the instructions, may cause harmful interference to radio communications. However, there is no guarantee that interference will not occur in a particular installation.
This device complies with Part 15 of the FCC Rules. Operation is subject to the following two conditions:
(1) This device may not cause harmful interference, and
(2) This device must accept any interference received, including interference that may cause undesired operation.
Modifications not approved by the party responsible for compliance could void user's authority to operate the equipment.
This Class B digital apparatus complies with Canadian ICES-006.
Save these instructions for future reference
Function Overview
Control Panel

| Item Function | |
| Turn on/off the fireplace.When fireplace is turning on, keep pressing for five seconds to toggle between °C and °F, and the LED will flash. | |
| Sets the timer of heating. | |
| Controls the interior brightness level of the fireplace.For model FF23SC15A-BL,FF23SC15A-SS, FF30SC15A-BL,FF30SC15A-SS, FF34SC15A-BL,FF34SC15A-SS, FF40SC15A-BL,FF40SC15A-SS, FF48SC15A-BL,FF48SC15A-SS, FF60SC15A-BLand FF60SC15A-SS, it is used to control the flame color and interior brightness level of the fireplace. | |
| Controls the temperature output mode.When fireplace is turning on, keep pressing for five seconds to select the desired temperature setting. | |
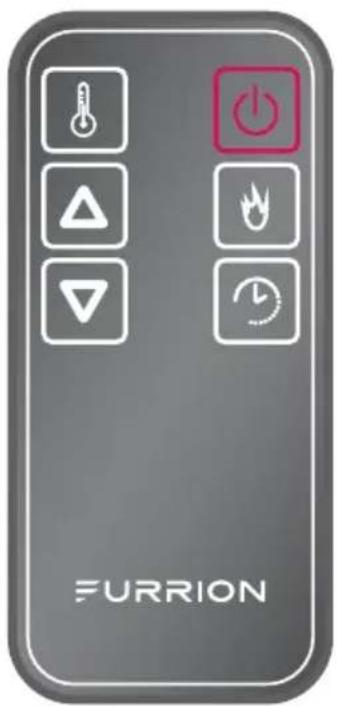
Remote Control
| Item Function | |
| Turn on/off the fireplace.When fireplace is turning on, keeping for five seconds to toggle between °C and °F, and the LED will flash. | |
| Sets the timer of heating. | |
| Controls the interior brightness level of the fireplace.For model FF23SC15A-BL,FF23SC15A-SS, FF30SC15A-BL,FF30SC15A-SS, FF34SC15A-BL,FF34SC15A-SS, FF40SC15A-BL,FF40SC15A-SS, FF48SC15A-BL,FF48SC15A-SS, FF60SC15A-BLand FF60SC15A-SS, it is used to control the flame color and interior brightness level of the fireplace. | |
| Controls the temperature output mode.When fireplace is turning on, keeping for five seconds to select the desired temperature setting. | |
| Decrease the heat output. | |
| Increase the heat input. | |
Installation
IMPORTANT: Failure to install the built-in electric fireplace as instructed below may result in damage to the equipment and/or may expose the user to the risk of fire, serious injury, illness or death.
What's in the box
Make sure all the following items are included in the packaging. If any item is damaged or missing, contact your dealer.
- Fireplace Main Body
• 4 Mounting Screws - Remote Control
- Instruction Manual
- Warranty Card
- Slide Out Wiring Diagram
Wall-mount Installation (Flush-mounted)
- Select a suitable location that is not susceptible to moisture.
- Mark and cut an opening in the cabinet according to the dimensions outlined in Fig. 1.
Cabinet Cutout Dimensions
| ModelABCDE | |||||
| 23" Series Fireplace | 24^5/_16" | 17^13/_16" | 21^1/_4" | 2" | |
| 30" Series Fireplace | 29^5/_16" | 17^13/_16" | 26^1/_4" | 2" | |
| 34" Series Fireplace | 33^3/_16" | 17^13/_16" | 30^9/_16" | 2" | |
| 40" Series Fireplace | 38^11/_16" | 17^13/_16" | 35^7/_16" | 2" | |
| 48" Series Fireplace | 47^11/_16" | 17^13/_16" | 44^1/_4" | 2" | |
| 60" Series Fireplace | 59^3/_8" | 17^13/_16" | 56^3/_16" | 2" |
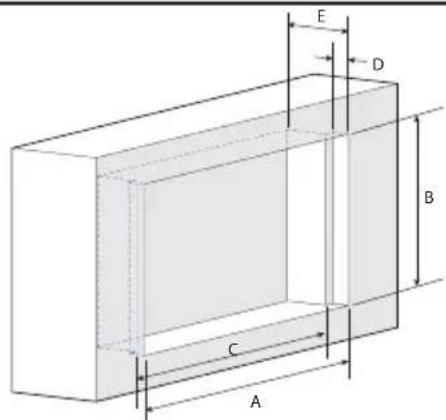
Fig. 1
NOTE: If wood thickness is under 12 , it is recommended to add a support base under the fireplace in the cabinet.
- Ensure the cabinet area is free of dust and debris, remove fireplace carefully from carton and discard the plastic and foam packaging.
- Lift to remove the glass cover from unit and set aside. (Fig. 2)
natural_image
Diagram of an electronic device showing a front panel with a door and internal components, no text or symbols present.Fig. 2
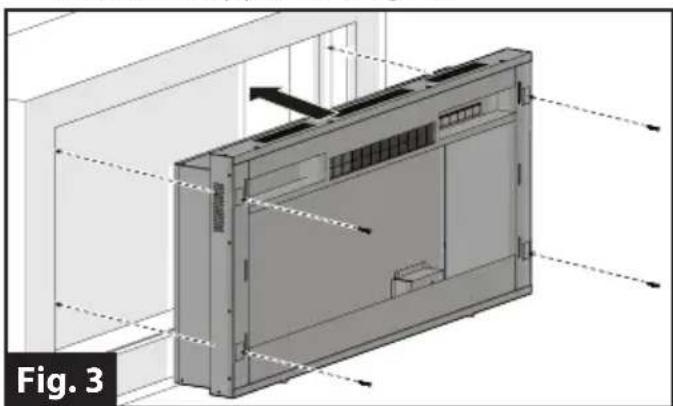
- Install the fireplace into the cut out area and secure with 4 mounting screws supplied. (Fig. 3)
natural_image
3D technical diagram of a device with internal components and directional arrows, labeled Fig. 3 (no text or symbols on the diagram itself)Installation
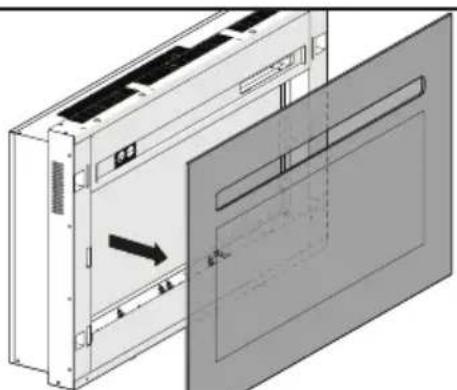
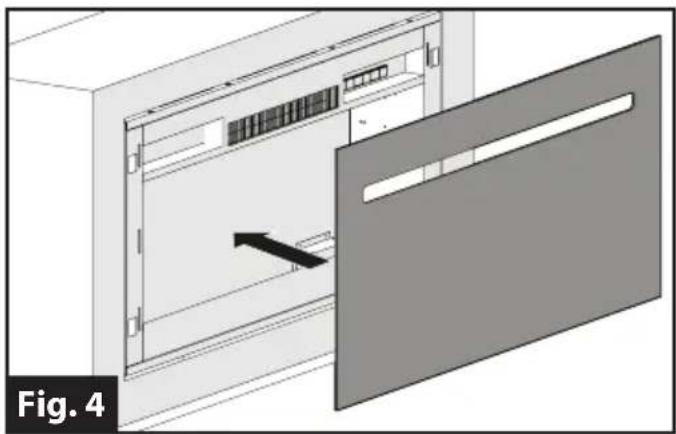
- Align the six tabs on back of the glass cover with the slots on the fireplace and reattach the glass cover to the fireplace. (Fig. 4)
natural_image
Diagram of a cabinet interior with an arrow indicating direction, labeled 'Fig. 4' (no text or symbols on the diagram itself)- Do not block the ventilation areas. (Fig. 5)

Wall-mount Installation (Half Flush-mounted)
- Select a suitable location that is not susceptible to moisture.
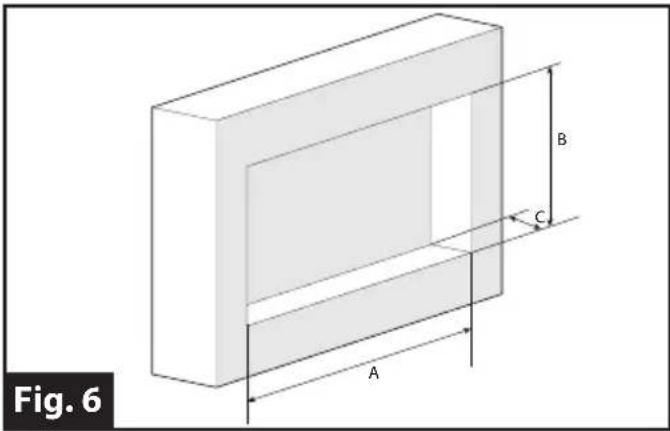
- Mark and cut an opening in the cabinet according to the dimensions outlined in Fig. 6.
Cabinet Cutout Dimensions
| Model | ABC | ||
| 23" Series Fireplace | 2114" 1614" 5" | ||
| 30" Series Fireplace | 2614" 1614" 5" | ||
| 34" Series Fireplace | 30916" 1614" 5' | ||
| 40" Series Fireplace | 35716" 1614" 5' | ||
| 48" Series Fireplace | 4414" 1614" | 5" | |
| 60" Series Fireplace | 56316" 1614" 5" |
- Ensure the cabinet area is free of dust and debris, remove fireplace carefully from carton and discard the plastic and foam packaging.
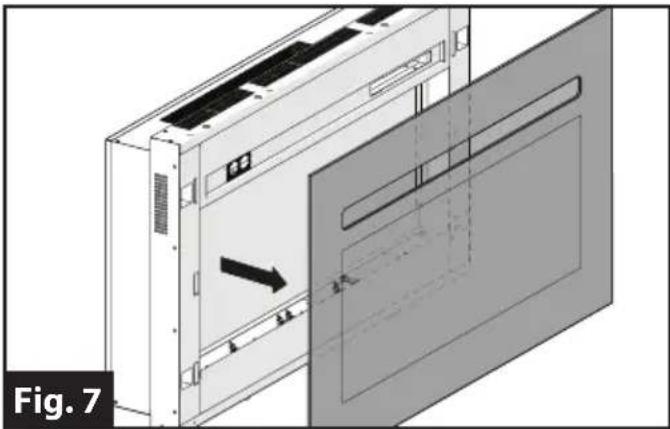
- Lift to remove the glass cover from unit and set aside. (Fig. 7)
natural_image
Diagram of a server rack with an open door and internal panel, showing a directional arrow (no text or symbols)Installation
- Install the fireplace into the cut out area and secure with 4 mounting screws supplied. (Fig. 8)
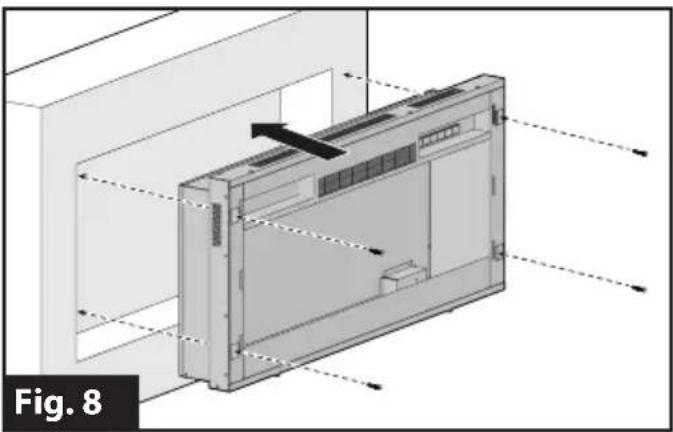
natural_image
Technical diagram of a device with internal components and directional arrows, labeled Fig. 8 (no text or symbols on the diagram itself)- Align the six tabs on back of the glass cover with the slots on the fireplace and reattach the glass cover to the fireplace. (Fig. 9)
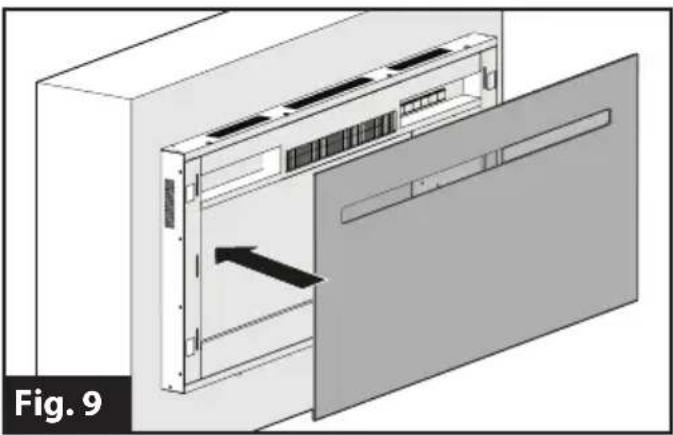
natural_image
3D diagram of an open server rack with a door, showing internal components and a directional arrow (no text or symbols)- Do not block the ventilation areas. (Fig. 10)
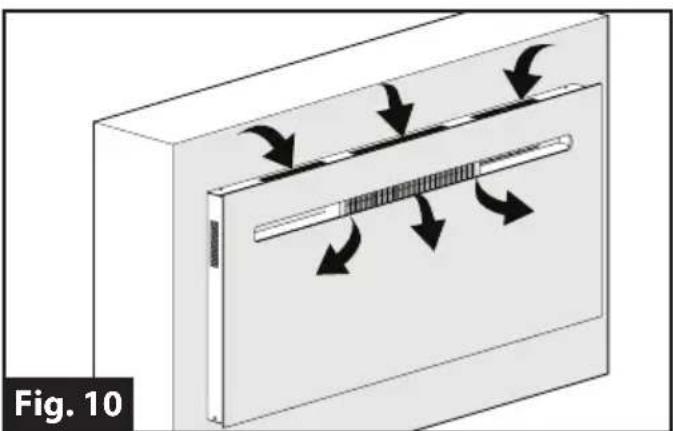
natural_image
Diagram of a device with directional arrows indicating flow or movement, labeled Fig. 10 (no text or symbols on the diagram itself)Residential Installation
CAUTION: When installing this fireplace in residential applications, ensure to leave 3 feet minimum from any object.
RV Installation
WARNING: When installing this fireplace in RV applications, ensure hot air will not directly blow onto soft furnishings or combustible materials during operation. For fireplace installation in RV slide out wall, we recommend you connect the slide out safety cut off wires to the slide out 12V DC activation system. This system will prevent operation while traveling and in storage mode. Do not operate the fireplace when slide out is in the stowed position.
NOTE: This fireplace is fitted with a proximity sensor and thermal cutoff for your safety. When fireplace is in operation and objects are placed within 6 inches or less the fireplace will automatically shut off and a red LED will flash. Remove the object and cycle the fireplace power switch to reset. Check for interference from other electrical product remotes that may affect fireplace operations.
Do not install the fireplace insert directly on carpet or similar surfaces which may restrict airflow.
CAUTION: If installing the fireplace in a carpeted area, place a one-piece solid, flat surface under the fireplace.
Operation
NOTE: For your safety, this fireplace is equipped with a proximity sensor device. When objects are detected within six inches, the fireplace will automatically cut out and a red LED will flash. The fireplace will not come back on without being reset.
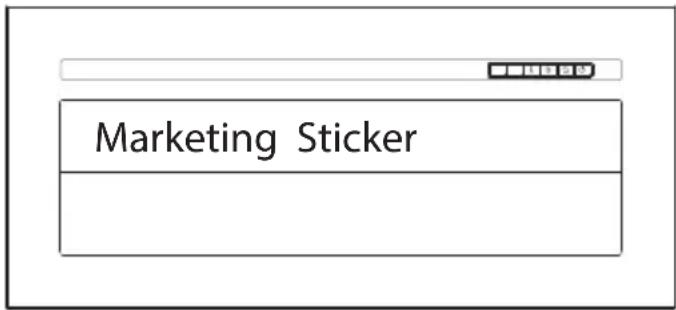
Remove the marketing sticker from the front glass and the protective film before use. Operation of the unit without complete removal of the protective film may increase the risk of fire and/or product damage or injury.
To Turn On/Off
Press on control panel or on the remote control to turn on/off the fireplace.
To Adjust the Temperature
Press △ on the remote control to increase the heat input, press ▽ to decrease the heat output.
Timer Setting
Press on control panel or on the remote control will allow you to set the timer of heating. You may set the time from 30 minutes to 5 hours.
Interior Brightness Control
Press 🎨button on control panel or on
the remote control to select the desired brightness levels.
- For FF23SC15A-BL, FF23SC15A-SS, FF30SC15A-BL, FF30SC15A-SS, FF34SC15A-BL, FF34SC15A-SS, FF40SC15A-BL, FF40SC15A-SS, FF48SC15A-BL, FF48SC15A-SS, FF60SC15A-BL and FF60SC15A-SS models, press button on control panel or on the remote control to select the desired flame color of Orange, Blue or Red. Press and hold for three seconds to show the brightness levels of L4, L3, L2 and L1 in sequence and release to select the desired.
- For FF23SW15A-BL, FF30SW15A-BL, FF34SW15A-BL, FF40SW15A-BL, FF48SW15A-BL, FF60SW15A-BL, FF23SW15A-SS, FF30SW15A-SS, FF34SW15A-SS, FF40SW15A-SS, FF48SW15A-SS, FF60SW15A-SS models, press 🏠 button on control panel or on the remote control to choose the brightness levels of L4, L3, L2 or L1.
Thermostat Control
Press ⏻ button on control panel or on the remote control to adjust the temperature to your individual requirements.
- Press once to activate the low heat setting.
- Press twice to select the high heat setting.
- Press the button a third time to turn off the fireplace.
- When the fireplace is turning on, press ⚙button for five seconds to allow you to select the desired temperature settings.
NOTE: When the fireplace is turning on, press ⏻ button for five seconds will toggle between °C and °F.
Care and Maintenance
WARNING
- Always disconnect the fireplace from the main power supply before performing any routine maintenance.
- Always utilize a qualified technician if assistance is required.
- Always install genuine Furrion replacement parts, which are available from your authorized dealer.
Glass Cleaning
CAUTION
GLASS INFORMATION
- Never strike or slam the glass.
- Never use abrasive cleaners to clean the glass.
- Never attempt to operate this fireplace if any glass component is broken.
- Always utilize a qualified service technician to replace broken glass components and always install genuine Furrion tempered glass replacements, which are available from your authorized dealer.
The glass is cleaned in the factory during the assembly operation. The clear door may collect dust particles during shipment, installation or handling, these can be removed by dusting lightly with a clean dry cloth.
To remove fingerprints or other marks, the clear door can be cleaned with a damp cloth. The clear door should be completely dried with a lint free cloth to prevent water spots. To prevent scratching, do not use abrasive cleaners or spray liquids on the clear door surface.
Fireplace Surface Cleaning
Metal painted parts may be cleaned using a clean, damp cloth. Never use any abrasive cleaners and chemical agents as these may damage the paint finish. Cleaning of the screen diffuser is to be done using only water and a lint free cloth. DO NOT use any abrasive household cleaners as these products will damage the diffusing screen.
Servicing
The motors used on the fan heater and flame blower are pre-lubricated for extended bearing life and require no further lubrication. However, periodic cleaning/vacuuming of the appliance and around the air intake and exhaust is recommended.
Troubleshooting
| Problem Root Cause Corrective Action | ||
| Display shows “EE” | The thermostat sensor is broken or disconnected. | Unplug the fireplace and remove the back panel. Check that the thermostat is plugged into the main circuit board. If this does not solve the problem, contact customer service for a replacement thermostat sensor. |
| Display shows “BB” | Manual reset overheat protection has triggered. | Inspect the fireplace and check that the air inlets and outlets are not blocked as this may cause overheating. |
| Fireplace does not blow warm air. | Cool down cycle | Normal operation will continue for 30 seconds before shutting down. |
| Thermostat setting is preventing the fireplace from turning on. | Adjust the temperature setting to ensure that the thermostat is set higher than the current room temperature. | |
| The RED LED is blinking constantly and the blower motor does not start. | Proximity switch cut off | Ensure there are no obstructions within a minimum distance of 6 inches from the air vents. Press the Power button to restart the fireplace. |
| The fireplace turns off automatically. | The slide out moves and activates the safety cut off. | Do not use the fireplace if the slide out is not in the fully extended position. |
| Remote control is not working | Weak or defective batteries | Replace the remote batteries. |
| Poor signal | Press the remote control buttons with an even motion and gentle pressure. Repeatedly pressing buttons in rapid succession may cause the remote to malfunction. | |
| Distance | Operate the remote at a distance less than 20 feet from the front of the fireplace. Point the remote at the control panel. | |
Specifications
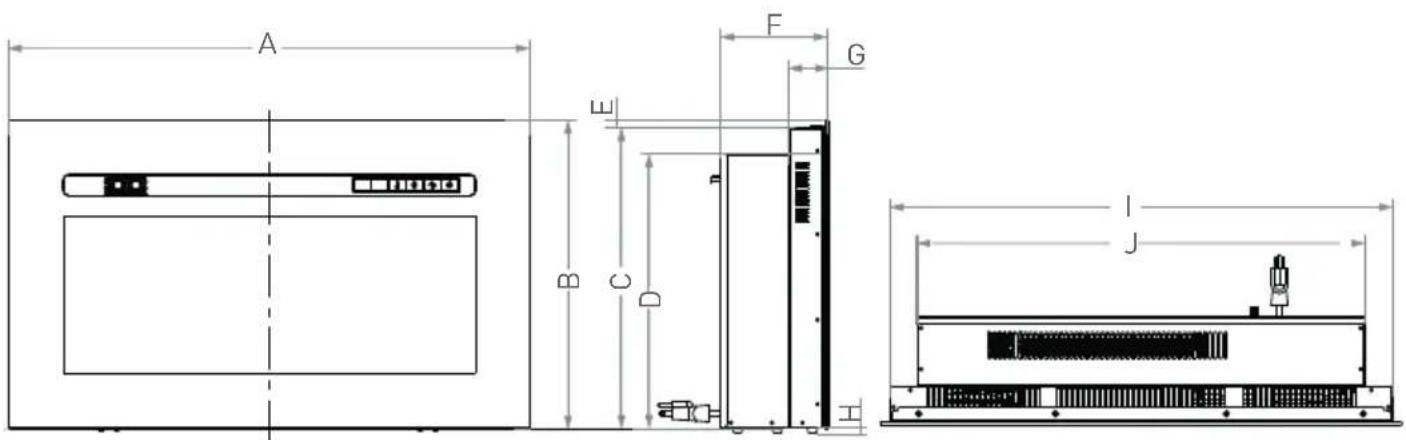
Technical Specifications
| Product Dimensions | ||||||||||
| Model A | B C D E F | G H I J | ||||||||
| 23" Series Fireplace | 25"(635mm) | 173⁄4"(450mm) | 173⁄8"(439.5mm) | 1513/16"(400.9mm) | 7/16"(10.5mm) | 65/16"(161mm) | 215/16"(58.4mm) | 5/16"(7mm) | 2315/16"(607.2mm) | 2013/16(528.5mm) |
| 30" Series Fireplace | 2915/16"(760mm) | 173⁄4"(450mm) | 173⁄8"(439.5mm) | 1513/16"(400.9mm) | 7/16"(10.5mm) | 65/16"(161mm) | 215/16"(58.4mm) | 5/16"(7mm) | 2815/16"(734.2mm) | 255/16"(655.5mm) |
| 34" Series Fireplace | 337⁄8"(860mm) | 173⁄4"(450mm) | 173⁄8"(439.5mm) | 1513/16"(400.9mm) | 7/16"(10.5mm) | 65/16"(161mm) | 215/16"(58.4mm) | 5/16"(7mm) | 3213/16"(832.2mm) | 2911/16"(753.5mm) |
| 40" Series Fireplace | 397/16"(1001mm) | 173⁄4"(450mm) | 173⁄8"(439.5mm) | 1513/16"(400.9mm) | 7/16"(10.5mm) | 65/16"(161mm) | 215/16"(58.4mm) | 5/16"(7mm) | 385/16"(972.2mm) | 353/16"(893.5mm) |
| 48" Series Fireplace | 48"(1219mm) | 173⁄4"(450mm) | 173⁄8"(439.5mm) | 1513/16"(400.9mm) | 7/16"(10.5mm) | 65/16"(161mm) | 215/16"(58.4mm) | 5/16"(7mm) | 467/8"(1191.2mm) | 433⁄4"1112.5mm |
| 60" Series Fireplace | 60"(1524mm) | 173⁄4"(450mm) | 173⁄8"(439.5mm) | 1513/16"(400.9mm) | 7/16"(10.5mm) | 65/16"(161mm) | 215/16"(58.4mm) | 5/16"(7mm) | 5815/16"(1496.2mm) | 5513/16"(1417.5mm) |
| Framing Dimensions | Refer to "Wall-mount Installation" section on Page 7 and Page 8 | |||||||||
| Electrical 12A @ 120V ac | ||||||||||
| Safety Requirements | UL 2021 and CSA 22.2 No.46 | |||||||||
| Operation Flame only - flame and heat | ||||||||||
| Control Options | Remote Control | |||||||||
| Control Panel | ||||||||||
| Installation Type Flush-mounted installation or half flush-mounted installation | ||||||||||
| Heating Area 500 sq. ft | ||||||||||
Bienvenue
natural_image
Diagram of a server rack with an open door, showing internal components and a directional arrow (no text or symbols)Installation
natural_image
3D technical diagram of a server rack unit with labeled components and directional arrows (no text or symbols beyond label)natural_image
Diagram of a server rack with an arrow indicating leftward movement, labeled 'Fig. 4' (no text or symbols on the diagram itself)natural_image
Diagram of a server rack with an open door and internal panel, showing a directional arrow (no text or symbols)natural_image
Technical diagram of an electronic device with labeled components and dashed alignment lines (no readable text or symbols)natural_image
Diagram of an open server rack with a door, showing internal components and a directional arrow (no text or symbols)natural_image
Diagram of a mechanical component with directional arrows indicating flow or movement, labeled Fig. 10 (no text or symbols on the diagram itself)natural_image
Technical line drawing of a mechanical assembly with no visible text or symbolsnatural_image
Diagram of a server rack with an open panel and directional arrow indicating movement (no text or symbols)natural_image
3D technical diagram of a device with labeled components and dashed alignment lines, no readable text or symbols present.Instalación
natural_image
Diagram of a server rack with an arrow indicating leftward movement, labeled 'Fig. 4' (no text or symbols on the diagram itself)natural_image
Isometric diagram of a rectangular block with labeled dimensions A, B, and C (no text or symbols beyond labels)Fig. 6
natural_image
Diagram of a server rack with an arrow indicating a component, showing internal structure and panel layout (no text or symbols)natural_image
3D diagram of a device with internal components and directional arrows, labeled Fig. 8 (no text or symbols on the diagram itself)natural_image
Diagram of a server rack unit with an open door and internal panel, labeled Fig. 9 (no text or symbols on the diagram itself)natural_image
Diagram of a mechanical component with directional arrows indicating flow or movement, labeled Fig. 10 (no text or symbols on the diagram itself)Furrion Innovation Center & Institute of Technology
● 52567 Independence Ct., Elkhart, IN 46514, USA ● Toll free:1-800-789-3341
Email: support@furrion.com
©2007-2020 Furrion Ltd. Furrion® and the Furrion logo are trademarks licensed for use by Furrion Ltd. and registered in the U.S. and other countries.

- Welcome
- Contents
- Welcome....1
- Contents 2
- Important Safety Instructions....3
- Function Overview 6
- Installation 7
- Operation....10
- Care and Maintenance....11
- Troubleshooting 12
- Specifications 13
- Important Safety Instructions
- Grounding Instructions
- FCC Statement
- Save these instructions for future reference
- Function Overview
- Control Panel
- Remote Control
- Installation
- What's in the box
- Wall-mount Installation (Flush-mounted)
- Wall-mount Installation (Half Flush-mounted)
- Residential Installation
- RV Installation
- Do not install the fireplace insert directly on carpet or similar surfaces which may restrict airflow.
- Operation
- To Turn On/Off
- To Adjust the Temperature
- Timer Setting
- Interior Brightness Control
- Thermostat Control
- Care and Maintenance
- WARNING
- Glass Cleaning
- CAUTION
- GLASS INFORMATION
- Fireplace Surface Cleaning
- Servicing
- Troubleshooting
- Specifications
- Bienvenue
- Instalación
- Furrion Innovation Center & Institute of Technology
Brand : Furrion
Model : FF30SC15ABL
Category : Fireplace