
ZICOM15010 - Compressor Zipper - Free user manual and instructions
Find the device manual for free ZICOM15010 Zipper in PDF.
| Brand | Zipper |
| Model | ZICOM15010 |
| Product type | Piston air compressor |
| Maximum pressure | 10 bar (1 MPa) |
| Air flow | 150 L/min |
| Power supply | 230 V / 50 Hz |
| Motor power | 1.5 kW (estimated) |
| Tank capacity | 24 L (estimated) |
| Lubrication | SAE30 oil |
| Number of air outlets | 2 |
| Pressure regulator | Yes |
| Pressure gauges | Outlet pressure and tank pressure |
| Safety valve | Yes |
| Thermal protection | Yes (overload circuit breaker) |
| Noise level | Approx. 85 dB(A) (estimated) |
| Weight | Approx. 30 kg (estimated) |
| Dimensions (L x W x H) | Approx. 70 x 35 x 60 cm (estimated) |
| Oil change maintenance | Every 250 hours of service |
| Air filter maintenance | Every 20 to 30 hours of service |
| Condensation drainage | After each use |
| Warranty | 2 years non-commercial use, 1 year commercial |
| Recommended use | Workshop, DIY, inflation, pneumatic tools |
Frequently Asked Questions - ZICOM15010 Zipper
User questions about ZICOM15010 Zipper
0 question about this device. Answer the ones you know or ask your own.
Ask a new question about this device
Download the instructions for your Compressor in PDF format for free! Find your manual ZICOM15010 - Zipper and take your electronic device back in hand. On this page are published all the documents necessary for the use of your device. ZICOM15010 by Zipper.
USER MANUAL ZICOM15010 Zipper
natural_image
Green ZIPPER air compressor with attached cooling unit (no visible text or symbols on body)ZI-COM200-10
EAN: 9120039232942

natural_image
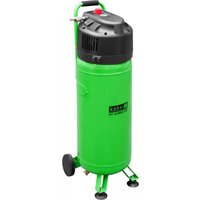
Green ZIPPER air compressor with attached control panel and wheels (no visible text or symbols on body)CE
ZI-COM150-10
EAN: 9120039234069

11.1 Intended Use....17
11.2 Security instructions .... 18
11.3 Assembly 19
12 OPERATION 20
12.1 Operation instructions.... 20
12.2 Operation 21
13 MAINTENANCE 21
13.1 Cleaning 21
13.2 Maintenance plan 22
13.2.1 Air filter cleaning 22
13.2.2 Condensation water 22
13.2.3 Storage.... 22
13.3 Disposal....22
14 TROUBLE SHOOTING 23
15 PREDGOVOR (HR) 24
16 SIGURNOST 25
16.1 Namjenska uporaba....25
16.2 Upute o sigurnosti 26
17 MONTAŻA 27
17.1 Sastavljanje....27
18 RAD 28
18.1 Upute o radu....28
18.2 Rukovanje 28
19 ODRŽAVANJE 29
19.1 Čišćenje....29
19.2 Servisiranje i plan održavanja 29
19.2.1 Čišćenje filtra za zrak 29
19.2.2 Kondenzirana voda 29
19.2.3 Skladištenje 30
19.3 Zbrinjavanje 30
20 UKLANJANJE POGREŠAKA 30
21 AVANT-PROPOS (FR) 31
22 SECURITE 32
EN EC-CONFORM: This product complies with EC-directives
HR CE SUKLADNOST: Ovaj proizvod ispunjava direktive EZ-a.
EN READ THE MANUAL! Read the user and maintenance manual carefully and get familiar with the controls in order to use the machine correctly and to avoid injuries and machine defects.
HR ROČITAJTE UPUTU! Pažljivo pročitajte uputu za uporabu i održavanje stroja i dobro se upoznajte s elementima za rukovanje strojem kako biste mogli ispravno rukovati strojem te spriječiti ljudske štete i štete na stroju.
EN ATTENTION! Ignoring the safety signs and warnings applied on the machine as well as ignoring the security and operating instructions can cause serious injuries and even lead to death.
HR UPOZORENJE! Obratite pozornost na simbole za sigurnost! Nepoštivanje propisa i uputa za korištenje stroja može dovesti do teških ljudskih šteta i smrtnih opasnosti.
EN Protective clothing!
EN Attention! Machine starts automatically!
HR Oprez - automatsko pokretanje!
EN Do not operate without safety protection!
| 1 | Kompressorpumpe / Compressor pump / Pumpa kompresora / Pompe du compresseur | 6 | Rad /Wheel / Kotač / Roue |
| 2 | Schaltereinheit / Pressure switch unit/ Jedinica s prekidačima / Unité de commutation | 7 | Druckbehälter / Air tank / Tlačni spremnik / Réservoir sous pression |
| 3 | Luftanschluss / Air connection / Priključak za zrak / Prise d'air | 8 | Sicherheitsventil / Safety valve / Sigurnosni ventil /Sigurnosni ventil / Soupape de sûreté |
| 4 | Ruckschlagventil / Not return valve / Nepovratni ventil / Clapet antiretour | 9 | Motor / Moteur |
| 5 | Ablasshahn für Kondenswasser / Drain clock /Slavina za ispuštanje kondenzirane vode / Robinet de décharge de l'eau de condensation | 10 | Luftfilter / Air filters / Filtar za zrak / Filtre à air |
3.1 Technische Daten / Technical data / Tehnički podaci / Données techniques
| ZI-COM150-10 | ZI-COM200-10 | |
| Spannung / Voltage / Napon Tension | 230 V / 50 Hz | 230 V / 50 Hz |
| Leistung / Power / Snaga Puissance | 2,2 kW | 2,2 kW |
| Druckbehältervolumen / Tank capacity / Volumen tlačnog spremnika Volume du réservoir sous pression | 150 l | 200 l |
| Dauer Druckbehälterfüllung / Tank filling duration/ Trajanje punjenja tlačnog spremnika Durée d remplissage du réservoir sous pression | 210 s | 250 s |
| Ansaugleistung / Air power / Usisna snaga Puissance d'aspiration | 356 l/min | 356 l/min |
| Betriebsdruck/ Working pressure / Radni tlak Pression de service | max. 10 bar (1,0 MPa) | max. 10 bar (1 MPa) |
| Motordrehzahl/ Rated speed / Broj okretaja motora Vitesse de rotation du moteur | 2850 min ^-1 | 2850 min ^-1 |
| Schutzklasse / Protection class / Klasa zaštite Classe de protection | IP 20 | IP 20 |
| Maschinenmaße / Machine dimension / Dimenzije stroja Dimensions de la machine | 1320 x 415 x 950 mm | 1370 x 490 x 970 mm |
| Gewicht / Weight / Težina Poids | 94 kg | 126 kg |
| Garantierter Schallleistungspegel / Guaranteed Sound power level / Razina zvučne snage LWA Niveau de puissance acoustique garanti | 97 dB(A) | 97 dB(A) |
4 VORWORT (DE)
This manual contains important information and advice for the correct and safe use and maintenance of the air compressor ZI-COM150-10 and ZI-COM200-10.
Following the usual commercial name of the device (see cover) is substituted in this manual with the name "machine".
The manual is part of the machine and may not be stored separately. Read it profoundly before first use of the machine and keep it for later reference. When the machine is handed to other persons always put the manual to the machine.
Please follow the security instructions!
Please read the entire manual, to prevent misunderstandings, machine damage or even injuries!

Due to continuous development of our products illustrations, pictures might differ slightly.
If you however find errors in this manual, please inform us.
Technical changes excepted!
Copyright law
© 2017
This manual is protected by copyright law – all rights reserved. Especially the reprinting as well as the translation and depiction of pictures will be prosecuted by law. Court of jurisdiction is the Landesgericht Linz or the competent court for 4707 Schlüsslberg, AUSTRIA.
Customer Support
The machine must only be used for its intended purpose! Any other use is deemed to be a case of misuse. To use the machine properly you must also observe and follow all safety regulations, the assembly instructions, operating and maintenance instructions lay down in this manual.
All people who use and service the machine have to be acquainted with this manual and must be informed about the machine's potential hazards.
It is also imperative to observe the accident prevention regulations in force in your area.
The same applies for the general rules of occupational health and safety.
The machine is used for:
Generating compressed air for tools operated by compressed air.
Any manipulation of the machine or its parts is a misuse, in this case ZIPPER-MASCHINEN and its sales partners cannot be made liable for ANY direct or indirect damage.

WARNING
Using compressed air equipment and tools
Please pay attention to the air consumption with the respective manufacturer. Check the performance of your compressor if the power is enough!
Ambient conditions
The machine may be operated:
humidity
max. 70%
temperature
+5°C to +40°C (+41°F to +104°F)
The machine shall not be operated in areas exposed to increased fire or explosion hazard.
Prohibited use:
- The operation of the machine outside the stated technical limits described in this manual is forbidden.
• The operation of the machine without provided protective devices is prohibited - Any manipulation of the machine and parts is forbidden.
- The use of the machine not being suitable for the use of the machine and not being certified is forbidden.
• The operation of the machine without provided protective devices is prohibited. - The use of the machine for any purposes other than described in this user-manual is forbidden.
• The unattended operation on the machine during the working process is forbidden! - It is not allowed to leave the immediate work area during the work is being performed.
- The machine has not been designed for use in commercial, trade or industrial applications. Use the machine only in try areas.
• To aim the compressed air gun at persons is prohibited.
11.2 Security instructions
Missing or non-readable security stickers have to be replaced immediately!
The locally applicable laws and regulations may specify the minimum age of the operator and limit the use of this machine!
To avoid malfunction, machine defects and injuries, read the following security instructions!

- Keep your work area dry and tidy! An untidy work area may cause accidents. Avoid slippery floor!
- Make sure the work area is lighted sufficiently!
• Work only in a well ventilated area! - Do not overload the machine!
- Always stay focused when working. Reduce distortion sources in your working environment. The operation of the machine when being tired, as well as under the influence of alcohol, drugs or concentration influencing medicaments is forbidden!
- Only one person shall operate the machine
- The machine must be operated only by trained persons (knowledge and understanding of this manual), which have no limitations of motor skills compared with conventional workers.
- Do not allow other people, particularly children, to touch the machine or the cable. Keep them away from your work area
- Make sure there is nobody present in the dangerous area. The minimum safety distance is 2m

- Use personal safety equipment: ear protectors, safety goggles and work wear when working with or on the machine!


- The plug of an electrical tool must strictly correspond to the socket. Do not use any adapters together with earthed electric tools
- Each time you work with an electrically operated machine, caution is advised! There is a risk of electric shock, fire;
- Protect the machine from dampness (causing a short circuit)
- When working with the machine outdoors, use extension cables suitable for outdoor use
- Use power tools and machines never in the vicinity of flammable liquids and gases (danger of explosion)
- Check the cable regularly for damage
- Do not use the cable to carry the machine or to fix the work piece
- Protect the cable from heat, oil and sharp edges
-
Avoid body contact with earthed components
-
Never leave the machine running unattended! Before leaving the working area switch the machine off and wait until the machine stops.
- Always disconnect the machine prior to any actions performed at the machine.
- Avoid unintentional starting
- Do not use the machine with damaged switch
Safety instructions when working with compressed air guns
• Compressor pump and lines reach high temperatures during operation. Touching cause burns
- When removing the hose coupling, hold the coupling piece of the hose is by hand. So the injury from rebounding hose is avoided
Safety instructions when paint spraying
- Do not process paints or solvents with a flash point of less than 55^ .
- Do not heat paints and solvents.
- If harmful liquids processed use dust masks. Note the instructions on protective measures made by the manufacturers of such substances.
- During the paint spraying process and in the work space may not be smoked. Even paint fumes are highly inflammable.
• In working area smoking and open flames are forbidden during paint spraying.
• Do not keep or consume food and drinks in the working area. Paint fumes are harmful. - Work only in a well ventilated area that is bigger than 30m^3 . Do not spray against wind direction. Note the local regulations.
- Do not process white spirit, butyl alcohol and methylene chloride when use PVC hoses because lifetime will substantially reduces
Operation of pressure vessels
- Anyone who operates a pressure vessel has this to get in proper condition, operate it properly, monitor, make any necessary maintenance and repair work without delay and to meet the circumstances necessary security measures.
• A pressure vessel may not be operated if it has defects or will endanger employees or third persons.
• The pressure vessel must be regularly checked for damage such rust,...assembly
Please check the product contents immediately after receipt for any eventual transport damage or missing parts. Claims from transport damage or missing parts must be placed immediately after initial machine receipt and unpacking before putting the machine into operation. Please understand that later claims cannot be accepted anymore.
11.3 Assembly
Wheels:
Mount the wheels like on the picture

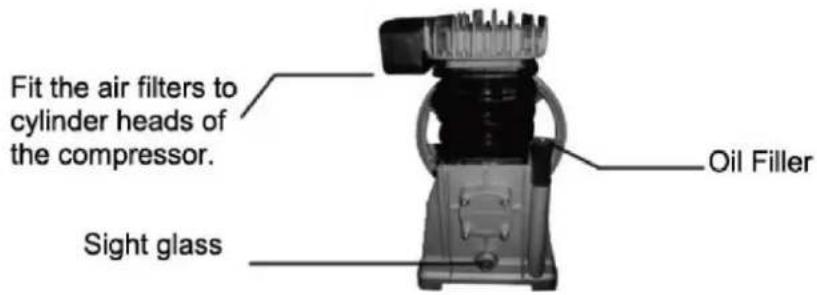
Air filter:
Mount the air filter like on the picture.
Remove any blank cover previously!
Oil:
Place machine on a level ground. Open the oil filler. Fill in Oil SAE30 until it reaches the middle mark of the oil sight glass. Close oil filler

WARNING
ATTENTION! For transport oil has been drained. Fill up with oil SAE30 before first operation! Failure to do so will result in permanent engine damage and void guarantee!
12 OPERATION
Device to be operated in a perfect state only. Inspect the device visually every time it is to be used. Check in particular the safety equipment, electrical controls, electric cables and screwed connection for damage and if tightened properly. Replace any damaged parts before operating the device.
12.1 Operation instructions

WARNING
Perform all machine settings with the machine being disconnected from the power supply!


NOTICE
• The oil level in the compressor pump has to be checked before each use
- The machine should be set up near the working consumer. Avoid long air lines and long supply lines (extensions).
• Make sure the intake air is dry and dust-free.
- Do not set up the machine in damp or wet areas.
- The machine must be operated on firm, level ground
- Safety valve must be closed before the start
- When removing the hose coupling, hold the coupling piece of the hose is by hand. So the injury from rebounding hose is avoided
12.2 Operation
Switch on:
Pull out the On-Off-switch
Switch off:
Press back in the On-Off-switch
Setting output pressure:
The output pressure can be set with the pressure regulator
Output pressure:
The output pressure is shown on the manometer output pressure
Air tank pressure:
The air pressure is shown on the manometer air pressure
Output 1 and 2:
To connect a device place the union joint into the coupling. The sleeve will go to starting position automatically. To disconnect pull the sleeve backwards and remove the hose.

13 MAINTENANCE
ATTENTI ON
Bevor maintenance:
- Switch off and disconnect from the power supply!
- Let cool down the air compressor!
- Depressurize the air tank
The machine does not require intense maintenance. However, to ensure a long lifespan, we strongly recommend following the upkeep and maintenance plan.
Repairs must be carried out by specialists! Use original ZIPPER parts only!
NOTICE
Only a properly maintained equipment may be a satisfactory tool. Care and maintenance deficiencies can cause unpredictable accidents and injuries.
Repairs should be performed only by authorized service centers.
Improper operation may damage the equipment or endanger your safety.
13.1 Cleaning
Keep the safety devices free of dirt and dust as far as possible. Wipe the machine with a clean cloth or blow it with compressed air at low pressure.
NOTICE
Do not use cleaning agents or solvents; these could attack the plastic parts of the machine!
Put on all coatless flats a thin coat of oil.
13.2 Maintenance plan
| Controls for the maintenance of the machine | |
| Loose or lost screws, nuts, bolts | Regularly prior to each operation |
| Damage of any part of the machine | Regularly prior to each operation |
| Oil level | Regularly prior to each operation |
| Machine cleaning | Regularly after operation |
| Air filter cleaning | Every 20-30 working hours |
| Oil changing | Every 250 working hours |
13.2.1 Air filter cleaning
The intake filter prevents dust and dirt being drawn in. It is essential to clean this filter. A clogged intake filter will decrease the compressor's performance dramatically. Open the air filter housing and remove the air filter. Use compressed air at low pressure (approx. 3 bar) to blow out all the parts of the filter and then assemble the filter in reverse order.
13.2.2 Condensation water
To ensure a long service life of the pressure vessel, drain off the condensed water by opening the drain cock each time after using.
The condensation water from the pressure vessel will contain residual oil. Dispose of the condensation water in an environmentally compatible manner
13.2.3 Storage
If the machine is stored for longer than 30 days:
- Let the machine cool down
- Clean the machine and dry
- Depressurize the air tank.
- Store in a dry, out of reach of children place, well packaged (protection against cuts)
13.3 Disposal

Do not dispose the machine, machine components fuel and oil in residual waste. Contact your local authorities for information regarding the available disposal options. When you buy at your local dealer for a replacement unit, the latter is obliged to exchange your old.
14 TROUBLE SHOOTING
Disconnect the machine from the power supply prior to any checks performed at the machine itself!
| Trouble | Possible cause | Solution |
| Pressure can no longer be stored | • Valve seals broken | • Replace the seals |
| Engine overheats | • low oil level• dirty air filter | • Refill oil• Clean or replace the air filter |
| Compressor runs but produces no pressure | • Clogged air filters• Defective seals• Defective valves in the cylinder head. | • Clean or replace the old air filter• Replace the seals• Replace the valves |
| Engine will not start | • No power supply• Overload protection activated | • Check the connection to an existing electrical grid.• Let the engine cool down and then pull the red pressure switch (on / off) |
| After reaching the escapes cut-off pressure Compressed air through the relief valve und Pressure switch to reach the starting pressure | • Leaking or defective check valve• Check valve is damaged | • Clean or replace check valve insert• Replace check valve |
| Compressor on frequently | • Very much condensate in the pressure boiler• Overload compressor | • Drain condensate |
MANY POTENTIAL SOURCES OF ERROR CAN BE CLEARED BY THE EXPERTLY CONNECTION TO THE ELECTRICITY GRID.

NOTICE
Should you in necessary repairs not able to properly to perform or you have not the prescribed training for it always attract a workshop to fix the problem
15 PREDGOVOR (HR)
Poštovani korisniče!
Ova uputa za uporabu sadrži informacije i važne upute za pokretanje i rukovanje kompresorom ZI-COM150, ZI-COM200-10.
Cher client, chère cliente,
28 ERSATZTEILE / SPARE PARTS/ REZERVNI DIJELOVI / PIECES DE RECHANGE
28.1 Ersatzteilbestellung / spare parts order / Naručivanje rezervnih dijelova / Commande de pièces détachées
(EN) With original ZIPPER spare parts you use parts that are attuned to each other shorten the installation time and elongate your machines lifespan.
IMP OR TAN T
The installation of other than original spare parts voids the warranty!
So you always have to use original spare parts
When you place a spare parts order please use the service formular you can find in the last chapter of this manual. Always take a note of the machine type, spare parts number and partname. We recommend to copy the spare parts diagram and mark the spare part you need.
You find the order address in the preface of this operation manual.
| NR | DESCRIPTION | QTY | NR | DESCRIPTION | QTY |
| 1 | BOLT | 6 | 49 | SPRING WASHER | 4 |
| 2 | SPRING WASHER | 6 | 50 | NUT | 4 |
| 3 | CYLINDER HEAD | 1 | 51 | MOTOR | 1 |
| 4 | GASKET | 1 | 52 | PULLEY | 1 |
| 5 | VALVE SEAT | 1 | 53 | KEY | 1 |
| 6 | ALUMINUM GASKET | 1 | 54 | NUT | 1 |
| 7 | VALVE PLATE | 4 | 55 | SPRING WASHER | 1 |
| 8 | VALVE SEAT | 1 | 56 | CONNECTING PLATE | 1 |
| 9 | GASKET | 1 | 57 | FLAT WASHER | 1 |
| 10 | CYLINDER | 1 | 58 | BOLT | 1 |
| 11 | GASKET | 1 | 59 | SPRING WASHER | 1 |
| 12 | CRANK CASE | 1 | 60 | BOLT | 1 |
| 13 | BOLT | 2 | 61 | FENDER | 1 |
| 14 | AIR CLEANER | 1 | 62 | NUT | 2 |
| 15 | BOLT | 4 | 63 | SPRING WASHER | 2 |
| 16 | SPRING WASHER | 4 | 64 | FLAT WASHER | 4 |
| 17 | CRANK CASE COVER | 1 | 65 | BOLT | 2 |
| 18 | GASKET | 2 | 66 | BELT | 1 |
| 19 | BEARING | 2 | 67 | NUT | 2 |
| 20 | CRANK SHAFT | 1 | 68 | SPRING WASHER | 2 |
| 21 | OIL FULL | 1 | 69 | WHEEL | 2 |
| 22 | OIL SIGHT GLASS | 1 | 70 | PIN | 2 |
| 23 | SHAFT SEAL | 1 | 71 | AIR COCK | 1 |
| 24 | BOLT | 1 | 72 | REGULATOR | 1 |
| 25 | GASKET | 1 | 73 | CONNECT | 1 |
| 26 | CRANKCASE COVER | 1 | 74 | PRESSURE SWITCH | 1 |
| 27 | BOLT | 12 | 75 | WIRE | 1 |
| 28 | NUT | 4 | 76 | SAFETY VALVE | 1 |
| 29 | SPRING WASHER | 4 | 77 | CONNECT | 1 |
| 30 | FLAT WASHER | 8 | 78 | PRESSURE GAUGE | 1 |
| 31 | BOLT | 4 | 79 | PRESSURE GAUGE | 1 |
| 32 | CONNECT | 1 | 80 | BOLT | 4 |
| 33 | PISTON RING | 2 | 81 | FLAT WASHER | 8 |
| 34 | PISTON | 2 | 82 | SPRING WASHER | 4 |
| 35 | SNAP RING | 4 | 83 | NUT | 4 |
| 36 | WRIST PIN | 2 | 84 | DRAIN COCK | 1 |
| 37 | CONNECTING ROD | 2 | 85 | TANK | 1 |
| 38 | SPRING WASHER | 6 | 86 | WHEEL | 1 |
| 39 | BOLT | 6 | 87 | SPRING WASHER | 4 |
| 40 | SHAFT SEAL | 1 | 88 | BOLT | 4 |
| 41 | CRANKCASE COVER | 1 | 89 | HANDLE | 1 |
| 42 | SPRING WASHER | 4 | 90 | PLUG | 2 |
| 43 | BOLT | 4 | 91 | CONNECT | 1 |
| 44 | PULLEY | 1 | 92 | CHECK VALVE | 1 |
| 45 | BOLT | 1 | 93 | EXHAUST PIPE | 1 |
| 46 | FLAT WASHER | 1 | 94 | UNLOADING ASSEMBLY | 1 |
| 47 | BOLT | 4 | 95 | SCREW | |
| 48 | FLAT WASHER | 8 | 96 | CYLINDER HEAD COVER |
Company ZIPPER Maschinen GmbH grants for mechanical and electrical components a warranty period of 2 years for amateur use; and warranty period of 1 year for professional use, starting with the purchase of the final consumer. In case of defects during this period, which are not excluded by paragraph 3, ZIPPER will repair or replace the machine at its own discretion.
2.) Report:
In order to check the legitimacy of warranty claims, the final consumer must contact his dealer. The dealer has to report in written form the occurred defect to ZIPPER. If the warranty claim is legitimate, ZIPPER will pick up the defective machine from the dealer. Returned shippings by dealers which have not been coordinated with ZIPPER, will not be accepted and refused.
3.) Regulations:
a) Warranty claims will only be accepted, when a copy of the original invoice or cash voucher from the trading partner of ZIPPER is enclosed to the machine. The warranty claim expires if the accessories belonging to the machine are missing.
b) The warranty does not include free checking, maintenance, inspection or service works on the machine. Defects due to incorrect usage of the final consumer or his dealer will not be accepted as warranty claims either. Some examples: usage of wrong fuel, frost damages in water tanks, leaving fuel in the tank during the winter, etc.
c) Defects on wear parts are excluded, e.g. carbon brushes, collection bags, knives, cylinders, cutting blades, clutches, sealings, wheels, saw blades, splitting crosses, riving knives, riving knife extensions, hydraulic oils, oil/air/fuel filters, chains, spark plugs, sliding blocks, etc.
d) Also excluded are damages on the machine caused by incorrect or inappropriate usage, if it was used for a purpose which the machine is not supposed to, ignoring the user manual, force majeure, repairs or technical manipulations by not authorized workshops or by the customer himself, usage of non-original ZIPPER spare parts or accessories.
e) After inspection by our qualified personnel, resulted costs (like freight charges) and expenses for not legitimated warranty claims will be charged to the final customer or dealer.
f) In case of defective machines outside the warranty period, we will only repair after advance payment or dealer's invoice according to the cost estimate (incl. freight costs) of ZIPPER.
g) Warranty claims can only be granted for customers of an authorized ZIPPER dealer who directly purchased the machine from ZIPPER. These claims are not transferable in case of multiple sales of the machine.
4.) Claims for compensation and other liabilities:
The liability of company ZIPPER is limited to the value of goods in all cases. Claims for compensation because of poor performance, lacks, damages or loss of earnings due to defects during the warranty period will not be accepted. ZIPPER insists on its right to subsequent improvement of the machine.
32 JAMSTVO (HR)
1.) Jamstvo:
Product experience form
We observe the quality of our delivered products in the frame of a Quality Management policy.
Your opinion is essential for further product development and product choice. Please let us know about your:
- Impressions and suggestions for improvement.
- experiences that may be useful for other users and for product design
- Experiences with malfunctions that occur in specific operation modes
We would like to ask you to note down your experiences and observations and send them to us via FAX, E-Mail or by post:
Erworben von / purchased from:
E-Mail/ e-mail:
Please describe amongst others in the problem: What has cause the problem/defect, what was the last activity before you noticed the problem/defect? For electrical problems: Have you had checked you electric supply and the machine already by a certified electrician?
3. Bitte beachten
/ Additional information
INCOMPLETELY FILLED SERVICE FORMS CANNOT BE PROCESSED! FOR GUARANTEE CLAIMS PLEASE ADD A COPY OF YOUR ORIGINAL SALES / DELIVERY RECEIPT OTHERWISE IT CANNOT BE ACCEPTED. FOR SPARE PART ORDERS PLEASE ADD TO THIS SERVICE FORM A COPY OF THE RESPECTIVE EXPLODED DRAWING WITH THE REQUIRED SPARE PARTS BEING MARKED CLEARLY AND UNMISTAKABLE. THIS HELPS US TO IDENTIFY THE REQUIRED SPARE PARTS FASTLY AND ACCEL- LERATES THE HANDLING OF YOUR INQUIRY.


- ZI-COM200-10
- ZI-COM150-10
- OPERATION 20
- MAINTENANCE 21
- TROUBLE SHOOTING 23
- PREDGOVOR (HR) 24
- SIGURNOST 25
- MONTAŻA 27
- RAD 28
- ODRŽAVANJE 29
- Zbrinjavanje 30
- VORWORT (DE)
- Please follow the security instructions!
- Copyright law
- Customer Support
- WARNING
- Using compressed air equipment and tools
- Ambient conditions
- Prohibited use:
- Security instructions
- Safety instructions when working with compressed air guns
- Safety instructions when paint spraying
- Operation of pressure vessels
- Assembly
- Wheels:
- Air filter:
- Oil:
- OPERATION
- Operation instructions
- NOTICE
- Operation
- Switch on:
- Switch off:
- Setting output pressure:
- Output pressure:
- Air tank pressure:
- Output 1 and 2:
- MAINTENANCE
- ATTENTI ON
- Bevor maintenance:
- Cleaning
- Maintenance plan
- Air filter cleaning
- Condensation water
- Storage
- Disposal
- TROUBLE SHOOTING
- PREDGOVOR (HR)
- Poštovani korisniče!
- Cher client, chère cliente,
- ERSATZTEILE / SPARE PARTS/ REZERVNI DIJELOVI / PIECES DE RECHANGE
- Ersatzteilbestellung / spare parts order / Naručivanje rezervnih dijelova / Commande de pièces détachées
- IMP OR TAN T
- The installation of other than original spare parts voids the warranty!
- 2.) Report:
- 3.) Regulations:
- 4.) Claims for compensation and other liabilities:
- JAMSTVO (HR)
- 1.) Jamstvo:
- Product experience form
- Bitte beachten
- / Additional information
Brand : Zipper
Model : ZICOM15010
Category : Compressor