
CMP 583 DAB - Cd player/recorder Trevi - Free user manual and instructions
Find the device manual for free CMP 583 DAB Trevi in PDF.
| Product type | CD player/recorder with DAB+/FM radio |
| Brand | Trevi |
| Model | CMP 583 DAB |
| Power supply | 100-240 V ~ 50/60 Hz, 8 W (standby 0.3 W) or 4 C batteries (UM-2) not included |
| DAB/DAB+ reception | 174.928 – 239.200 MHz |
| FM reception | 87.5 – 108 MHz |
| Audio power | 2 x 2 W |
| Inputs | USB, AUX IN (3.5 mm jack) |
| Headphone output | 3.5 mm jack |
| Playable formats | CD audio, CD MP3 |
| DAB/DAB+ presets | 30 stations |
| FM presets | 30 stations |
| CD functions | Play, pause, skip, fast search, repeat (track/disc/folder), random, program (20 CD tracks, 99 MP3) |
| Radio functions | Auto scan, manual search, DAB/FM menu with alarm, timer, DRC, brightness adjustment, software update |
| Speaker LED lighting | Enabled/disabled from menu |
| Antenna | Built-in FM (extendable) |
| Included accessories | Remote control, power cord |
| Maintenance | Slightly damp soft cloth, avoid solvents and abrasives |
| Laser safety | Class 1 – low power, safety device preventing operation when cover is open |
| Standby consumption | 0.3 W |
Frequently Asked Questions - CMP 583 DAB Trevi
User questions about CMP 583 DAB Trevi
0 question about this device. Answer the ones you know or ask your own.
Ask a new question about this device
Download the instructions for your Cd player/recorder in PDF format for free! Find your manual CMP 583 DAB - Trevi and take your electronic device back in hand. On this page are published all the documents necessary for the use of your device. CMP 583 DAB by Trevi.
USER MANUAL CMP 583 DAB Trevi
natural_image
Blue and black portable radio with control panel and speaker display (no readable text or symbols)
ATTENZIONE
RISCHIO DI SCOSSE
ELETTRICHE!
NON ESPORRE A
PIOGGIA E UMIDITÀ

ATTENZIONE: NON APRITE L'APPARECCHIO. ALL'INTERNO NON VI SONO COMANDI MANIPOLABILI DALL'UTENTE NE PARTI DI RICAMBIO. PER TUTTE LE OPERAZIONI DI SERVIZIO RIVOLGERSI AD UN CENTRO DI ASSISTENZA AUTORIZZATO TREVI

ATTENTION
RISQUE DE DECHARGES
ELECTRIQUES
NE PAS EXPOSER A LA PLUIE
ET A L'HUMIDITE

ATTENTION: NE PAS OUVRIR L'APPAREIL, A L'INTERIEUR IL N'Y A PAS DE COMMANDES A MANIPULER PAR L'UTILISATEUR OU DE PIECES DE RECHANGE. POUR TOUTES LES OPERATIONS DE SERVICE IL FAUT S'ADRESSER A UN SERVICE D'ASSISTANCE AUTORISE TREVI.

ATENCION
PELIGRO DE CHOQUES
ELECTRICOS
NO EXPONER A LLUVIA
Y HUMEDAD

WARNING: DO NOT OPEN THE SET. NEITHER CONTROLS OR SPARE PARTS TO BE USED BY THE USER ARE TO BE FOUND INSIDE IT. APPLY TO AUTHORISED TREVICENTERS FOR SERVICE OPERATIONS.

ACHTUNG
GEFAHR ELEKTRISCHER
SCHLÄGE
WIRES CONNECTIONS TO A UK THREE-PIN PLUG
The wires in this mains lead are coloured in accordance with the following wiring codes:
Blue: Neutral
Brown: Live
The wires in this mains lead must be connected to the terminals in the plug as follows:
Blue wire: N or Black
Brown wire: L or Red
Neither wire is to be connected to the earth (E or W) terminal of three-pin plug.
Should the fuse fail in the plug remove the plug form the wall socket and replace the fuse with a 3 Amp. ASTA approved BS 1362 fuse.

natural_image
Technical line drawing of a circular device with internal components and an arrow indicating left-side assembly (no text or symbols)RETE
 CAUTION CAUTION | DANGEROUS VOLTAGE | WARNINGS ON THE LASER |
| This symbol on the back of the unit and in this manual indicate the presence on them of important instructions for safe use. Please read them carefully before using the appliance. | This symbol on the back of the unit and in this manual indicates the presence in this equipment components operating at high voltage, do not open it to avoid the risk of electric shock. | This device is equipped with a laser beam reading system. Although the laser is of low power and with a safety device that prevents open door operation, scrupulously observe the following warnings: Do not bring the eye to the laser lens with the device open, risk of retinal injury. Do not attempt to disassemble or tamper with the laser unit, risk of radiation absorption. |
NOTES OF USE
Listen at high volume for long periods of time, may damage your hearing.
- Avoid using it in the following cases:
- Near strong heat sources, such as central heating plants or stoves.
- In very humid places such as bathrooms, swimming pools, etc...
- In very dusty places.
- In places subject to strong vibrations.
- Position the appliance in such a way that there is always enough room for free air circulation (at least 5cm).
- Do not block the air inlets.
• If any liquid enters the appliance, unplug it immediately from the socket and take it to the nearest TREVI authorised service centre.
- Before switching on the appliance, always check that the power cable and the connection cable are properly installed.
- No naked flame sources, such as lighted candles, should be placed on this.
- The apparatus shall not be exposed to dripping or splashing water and no object filled with water, such as vases, should be placed on the unit.
- Keep this manual for future reference.
CARE AND MAINTENANCE
For cleaning we recommend the use of a soft, slightly damp cloth. Avoid solvents or abrasives.
IMPORTANT
The good construction of this machine guarantees the perfect functioning for a long time. However, should any problem arise, you should consult your nearest authorized service center.
TREVI pursues a policy of continuous research and development. Therefore, the products may have different features from those described.
To avoid possible hearing damage, limit the time listening at high volumes
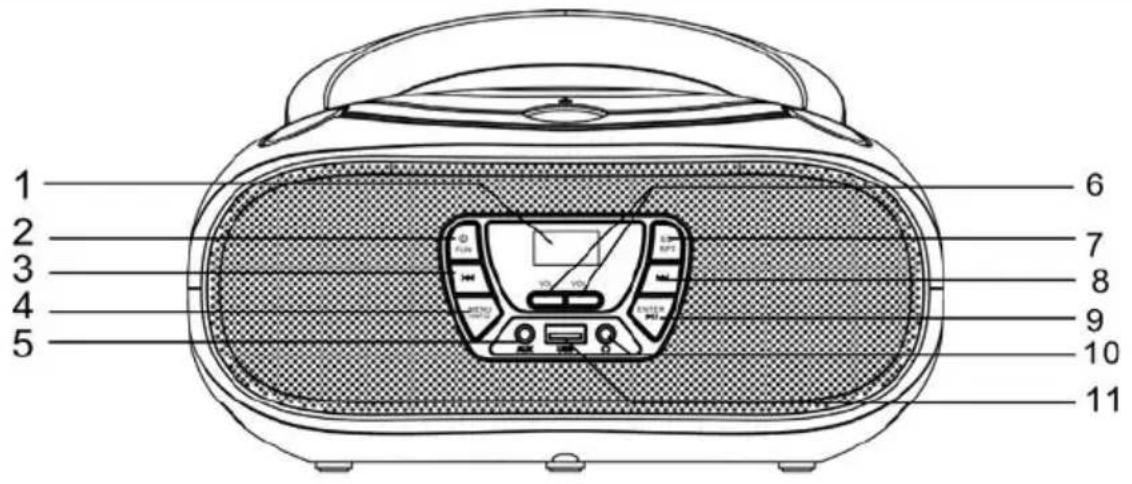
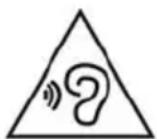
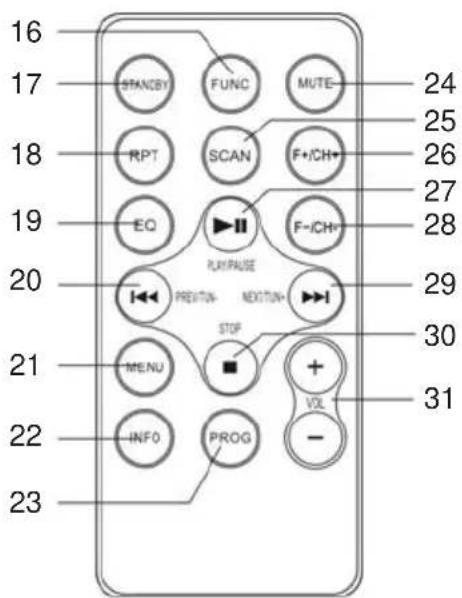
DESCRIPTION OF COMMANDS
- LCD display
- ⏻/FUN button
- button, Previous file/Station
- MENU/INFO button
- AUX IN input
- VOLUME buttons
- EQ/RPT button
- ▶ button, Next file/Station
- FUNC button, function
- STANDBY button
- RPT button, repeat
- EQ button
- ◀ button, Previous
- MENU button
- INFO button
- PROG button, program
- MUTE button
- SCAN button
- F+/CH+ button
- ▶|| button, Play/Pause
- F-/CH-button
- ▶ button, Next
- ■ button, Stop
-
Volume button
-
Enter/ ▶ button
-
Headphone output socket
- USB input
- Antenna
- AC outlet, mains power supply
- Handle
- Battery compartment
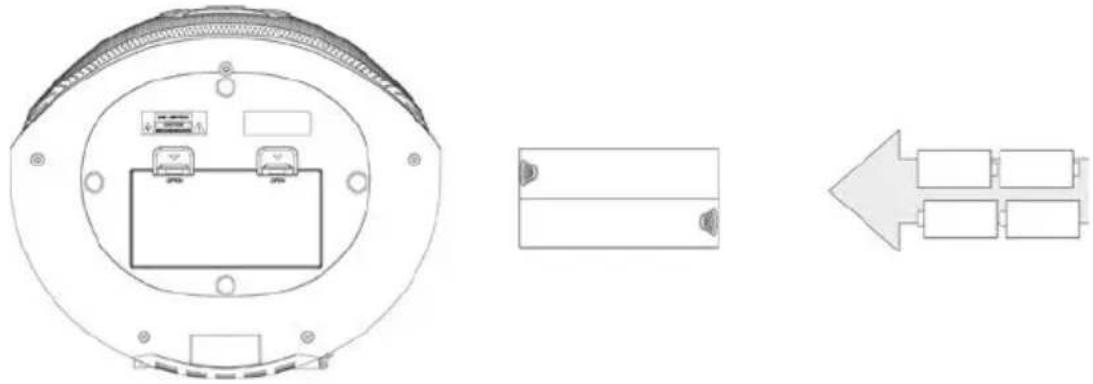
POWER SOURCE
BATTERY
Open the battery compartment (15) and insert 4 "C" size batteries (UM-2) taking care to respect the indicated polarities carefully. Replace the exhausted batteries immediately and remove them if you do not plan to use the appliance for a long time.
natural_image
Technical line drawing of a circular device with internal components and an arrow indicating left-side layout (no text or symbols)AC OPERATION
Connect the power cord to the AC socket (13). Insert the plug into a 100-240V 50/60 mains socket.
Do not connect the appliance to electrical outlets other than those indicated.
ON/OFF
-
Press the ⬤UN (2) button on unit or STANDBY button (17) on remote control to turn ON the unit;
-
Press repeatedly the ⏻/FUN (2) button on the unit or the FUNC button (16) on the remote control to select: DAB+ radio, FM radio, CD player, USB input and AUX input;
NOTE: In CD, USB or AUX source, if no operation is performed within 15 minutes, the unit will automatically enter STANDBY mode.
- Press the ⬤UN (2) button on unit or STANDBY button (17) on remote control to turn OFF the unit.
LED LIGHTING ON/OFF
-
In Stand-by mode, hold down the MENU/INFO button (4) on the unit for a few seconds;
-
Press the ENTER/ ▶(9) button to confirm;
-
Press the button ▶▶▶ (8) several times to display the various item;
-
Select the "SPK-Light" item and confirm with ENTER/ ▶(9) button;
-
Press the button ▶▶(8) to display the various options available. The option with the * symbol is the set one. Select ON to turn on the LEDs on the speakers, select OFF to keep the LEDs off;
-
Press ENTER/ ▶(9) button to confirm.
VOLUME CONTROL
Use the VOLUME buttons (6) on unit or VOLUME buttons (31) on remote control to increase or decrease the volume.
DAB/DAB+ RADIO
SCAN DAB/DAB+ RADIO STATIONS
- Select the DAB source using ⏻/FUN (2) on the unit or FUNC (16) button on remote control. The word DAB will appear.
When the radio is turned on for the first time, it will automatically scan and store all available DAB stations;
-
If you want to repeat the automatic scanning operation of the available DAB stations, long press ENTER/▶II (9) key on the unit or SCAN (25) button on remote control;
-
Press the button ▶▶(8) on the unit or the button ▶(29) on the remote control repeatedly to scroll through the various tuned DAB stations;
-
On the desired DAB station, press ENTER/ ▶II (9) button on the unit or the button ▶(17) on the remote control to start playback;
-
Repeatedly press MENU/INFO (4) button on the unit or the button INFO (22) on the remote control to display all information on the received station.
STORING RADIO STATIONS
To store a radio station, perform the following steps:
- Tune to the desired radio station;
- Long press the MENU/INFO (4) button on the unit or MENU (21) button on the remote control to access the DAB menu;
- To use the keys ◀◀ (3) and ▶(8) on unit and select "Preset Store", press ENTER/ (9) button on the unit to confirm;
- To use the keys ◀◀ (3) and ▶(8) son the unit and select a memory location, press ENTER/ (9) button on the unit to confirm and save the radio station;
Repeat this operation for each radio station you want to save. There are 30 memory locations available.
DAB RADIO MENU
- Press for a few seconds MENU/INFO (4) button on unit or MENU (21) button on the remote control to access the DAB menu;
- Press the key ▶▶(8) on the unit or the key ▶(29) on the remote control to display the various items of the DAB menu;
- Press ENTER/ ▶II (9) button on the unit or ▶II7) button on the remote control to select the displayed menu item:
Full scan: allows you to scan the entire DAB/DAB + band and automatically store the stations found.
Preset Recall: allows you to recall a radio station stored in one of the 30 available memories.
Preset Store: allows you to save a radio station in one of the 30 available memories.
Manual tune: allows you to manually scan a single DAB/DAB+ frequency. Press button ◀◀ (3) or ▶(8) on the unit to select the channel number for the frequency to be scanned and then press ENTER/▶II (9) button on the unit to start scanning. The stations found will be automatically memorized. At the end press and hold the MENU/INFO (4) button on the unit to return to the DAB menu.
DRC: allows you to enable/disable the DRC function to improve the sound when listening in noisy environments. The option with the * symbol is the one set. You can set the DRC level high, low or OFF.
Prune: allows you to delete all the radio stations found but not available (poor signal) from the list of stored stations. Move with the button ◀◀ (3) or ▶▶ (8) on the unit to "Yes" and confirm the deletion with ENTER/▶▶ (9) button on the unit.
TA: allows you to activate or not the traffic alert (traffic announcements), or to automatically tune in to radio stations that broadcast traffic information. Move with the button ◀◀ (3) or ▶(d) on the unit to "Yes" or "No" and confirm with ENTER/▶(H) button on the unit.
System: allows access to the system's submenu:
Alarm: Select whether to set "Alarm 1" or "Alarm 2", use the key (3) or ▶(8) on the unit and confirm with ENTER▶II (9) key on the unit.
Wake up time: set the alarm activation time.
Duration: duration in minutes of the alarm clock.
Source: set the type of ringtone between Buzzer, Digital radio (DAB), FM (FM radio), DC, USB.
Frequency: Daily (every day), Once (once only), Weekends (on Saturdays and Sundays), weekdays (from Monday to Friday).
Volume: playback volume of the alarm clock.
Preset: set which radio station to play when the alarm is activated (Last listened = the last one tuned or a radio among those saved in the available memories).
Alarm ON/OFF: to activate or deactivate the alarm.
Time: allows you to set the current time/date.
Set Time/Date: set the current time and date.
Auto Update: select from which source to automatically set the time and date if available.
Set 12/24 Hour: set the 12/24H time format
Set Date Format: set the date format.
Backlight: allows you to set the time and brightness level of the display:
Timeout: set the time after which the display lowers the brightness without commands.
On Level: indicates the brightness level of the display when the device receives commands.
Dim Level: indicates the brightness level of the display when the appliance is inactive.
SPK-Light: allows you to activate or deactivate the front LED lights. The option with the * symbol is the one set.
Language: allows you to select the system language.
Factory reset: allows you to restore all the settings to the factory settings. Select "Yes" for the restore.
Software upgrade: allows you to perform a scan to check for any updates available for the device.
SW version: software version installed.
DAB/DAB+ TRANSMISSION INFORMATION
In DAB mode, the display will show a series of information about the station and the track being played.
- Repeatedly press MENU/INFO (4) button on the unit or INFO (22) button on the remote control to change the information displayed.
Note: not all DAB stations provide the information displayed by the device.
If available, the following information is available:
DLS: displays information relating to the transmitted music (artist, song title, etc...).
Program type: displays information relating to the type of program transmitted.
Transmitter name: displays information relating to the service transmitter.
Transmitter Number/Frequency: displays information on the number and frequency of the transmitted DAB/DAB+ station.
Signal error index: displays information relating to the level of signal errors and the intensity with which it is received.
Bit Rate: displays information relating to the compression ratio of the current transmission.
Time: displays the time.
Date: displays information relating to the date.
FM RADIO
SCAN FUNCTION
-
Fully extend the antenna (12) and select the FM source; the display will show the frequency;
-
Press the button ◀◀ (3) or the button ▶▶ (8) on the unit or the buttons ◀◀ (20) or ▶▶ (29) n the remote control to increase or decrease the frequency and perform a step-by-step search;
-
Press for a few seconds the key ◀◀ (3) or the key ▶▶ (8) on the unit or the keys ◀◀ (20) or ▶▶ (29) on the remote control to tune in to the next or previous radio station with the best signal received;
-
Long press the ENTER/ ▶(9) button on the unit or the SCAN (25) button on the remote control to start scanning and automatic storage of FM stations. The first 30 stations received will be automatically stored;
-
Press F-/CH- (28) or F+/CH+ (26) buttons on the remote control to scroll through the various stored FM stations;
-
Repeatedly press the MENU/INFO (4) button on the unit or the INFO (22) button on the remote control to display all information on the station received.
NOTE:
To obtain the best FM reception, extend and orient the antenna (12). If reception is not good try to adjust the length and orientation of the antenna differently, however the quality of FM reception depends very much on the place where the device is placed.
The proximity of TV sets, neon lamps or other domestic appliances may cause disturbances in the reception of radio programs, in this case move the radio recorder away from the disturbing device.
STORING RADIO STATIONS
To store a radio station, do the following:
-
Tune to the desired radio station;
-
Press for a few seconds the MENU/INFO button (4) on unit or the MENU button (21) on the remote control to access the FM menu;
-
Use the keys ◀◀◀ (3) or ▶▶▶ (8) on the unit and select "Preset Store", press ENTER/▶▶▶ (9) sull'unità per confermare;
-
Use the keys ◀◀ (3) or ▶(8) on the unit and select a memory location, press the ENTER/ (9) button on the unit to confirm and save the radio station;
Repeat this for each radio station you want to save. 30 memory locations are available.
MENU
-
Long press the MENU/INFO (4) button on the unit or MENU (21) button on remote control to enter the FM menu;
-
Press the key ▶▶(8) on the unit or the key ▶(29) on the remote control to display the various FM menu items;
-
Press the ENTER/ ▶II (9) button on the unit or the button ▶(27) on the remote control to select the displayed menu item.
Preset Recall: allows you to recall a radio station stored in one of the 30 available memories.
Preset Store: allows you to save a radio station in one of the 30 available memories.
Scan setting: allows you to set the search for radio stations on all stations found (All stations) or only on those with strong signal (Strong station).
Audio setting: allows you to set audio in stereo (Stereo allowed) or mono (Forced mono).
System: allows access to the system menu (see RADIO DAB/DAB+ MENU).
CD-MP3 PLAYER
PLAYING A DISC
- Select the CD source. The "CD" will appear;
- Open the CD compartment and insert the disc with the written side facing up. Close the door carefully;
- After a few seconds the LCD display (1) will show the number of tracks on the disc. Playback will start automatically;
- Press ENTER/ ▶(9) button on the unit or ▶(27) button on the remote control to activate the pause; the elapsed time of the track will begin to flash. Press it again to turn off the pause;
- Press ■ (30) button on the remote control to stop playback permanently.
JUMP TRACE AND FORWARD/FAST BACK
- Press ◀◀ (3) or ▶▶ (8) button on the unit or the button ◀◀ (20), ▶▶ (29) on the remote control to move to the previous or next track;
- Press ◀◀ (3) or ▶▶ (8) button on the unit or the button ◀◀ (20), ▶▶ (29) on the remote control while listening to send the track back or forward quickly. Release the button to return to normal playback.
REPEAT OF SINGLE TRACE
- To play a single track continuously, press EQ/RPT (7) on the unit or RPT (18) button on remote control during playback until "REP-1" appears on the display. The CD player will continuously play the track shown on the display;
- To cancel uninterrupted playback of the single track, press EQ/RPT (7) on the unit or RPT (18) button on remote control several times until the "DISC" symbol appears.
DISK REPETITION
- To continuously play all the tracks on the disc, press EQ/RPT (7) on the unit or RPT (18) button on remote control during playback until "REP-ALL" appears on the display. The CD player will continuously play all the tracks on the disc;
- To cancel the uninterrupted playback of all tracks on the disc, press EQ/RPT (7) on the unit or RPT (18) button on remote control repeatedly until the "DISC" symbol appears.
FOLDER REPEAT
NOTE: function valid only for MP3 CDs.
- To play all tracks in a folder continuously, press EQ/RPT (7) on the unit or RPT (18) button on remote control during playback until "REP-DIR" appears on the display. The CD player will continuously play all the tracks in the folder;
- To cancel the uninterrupted playback of all the tracks in the folder, pressEQ/RPT (7) on the unit or RPT (18) button on remote control several times until the "DISC" symbol appears.
RANDOM FUNCTION
- To randomly play all the tracks on the disc, press EQ/RPT (7) on the unit or RPT (18) button on remote control during playback until "RANDOM" appears on the display. The CD player will randomly play all the tracks on the disc;
- To cancel random playback of all tracks on the disc, press EQ/RPT (7) on the unit or RPT (18) button on remote control several times until the "DISC" symbol appears.
PROGRAM
You can select the order in which the tracks are played.
- Press ■ (30) button on remote control to stop playback;
- Press PROG (23) button on the remote control, the message P01 will appear on the display;
- Select the tracks with button ◀◀ (3) or ▶▶ (8) button on unit or button ◀◀ (20) or ▶▶ (29) on the remote control;
- Press PROG button (23) on the remote control;
- Repeat steps 3 and 4 to store and play the tracks you want; for audio CDs a maximum of 20 tracks can be stored, while for MP3 CDs a maximum of 99 tracks can be stored;
- Press ENTER/ ▶|| (9) button on the unit or press ▶|| (27) button on the remote control to start playback;
- Press ■ (30) button on the remote control twice to cancel the programming.
USB INPUT
PLAYBACK
- Connect a USB device to the USB input (11);
- Select the USB source. The "USB" will appear on the display;
- After a few seconds the LCD display (1) will show the number of tracks on the disc. Playback will start automatically.
NOTE: Refer to the CD-MP3 PLAYER OPERATION paragraph for the rest of the functions.
AUX INPUT
REPRODUCTION
- Connect an external device to the AUX IN input (5);
- Select the AUX source. The "ENTER AUX" will appear on the display;
- Start playback of the external device. For all playback functions refer to the manual of the external device.
HEADPHONE
- Insert the headphones into the headphone jack (10);
- Start the desired playback and adjust the volume.
TECHNICAL FEATURES
GENERAL
Power and consumption: 100-240V ∼ 50/60 (8W, Stand-by 0.3W) 4 x "C" batteries (UM2) not included
FM band reception: 87.5 - 108 MHz
DAB / DAB + band reception: 174.928 - 239.200 MHz
Power Audio: 2x 2W
Dimensions: 274 x 232 x 134mm


PRECAUTIONS FOR CORRECT DISPOSAL OF THE PRODUCT.
The symbol shown on the equipment indicates that waste must be disposed of in “separate collection” and so the product must not be disposed of together with urban waste.
The user must take the product to special “separate waste collection centres” provided by local government, or deliver it to the retailer against the purchase of a new product.
Separate collection of waste and subsequent treatment, recycling and disposal operations promotes the production of equipment with recycled materials and limits negative effects on the environment and on health caused by improper handling of waste.
Illegal disposal of the product leads to the enforcement of administrative penalties.
natural_image
Technical line drawing of a circular electronic device with internal components and an arrow indicating left-side assembly (no text or symbols)OPERATION AC
Dimensions: 274x 232 x 134mm

RECOMMANDATIONS POUR L'ÉLIMINATION CORRECTE DU PRODUIT.
natural_image
Technical line drawing of a circular electronic device with internal components and an arrow indicating left-side connector (no text or symbols)AC-Betrieb
WIEDERHOLEN EINER SPUR
natural_image
Technical line drawing of a circular device with internal components and an arrow indicating left-side assembly (no text or symbols)OPERACION AC
SIMPLIFIED EU DECLARATION OF CONFORMITY
Hereby TREVI Spa declares that the radio equipment type CMP 583 DAB is in compliance with directive 2014/53/EU.
The full text of the EU declaration of conformity is available at the following internet address: https://www.trevi.it/dms/zidi/TREVI/DOCCMP583DAB.pdf

EN: If you will not find your language on the instruction manual, please go on our website www.trevi.it to find it


- RETE
- NOTES OF USE
- CARE AND MAINTENANCE
- IMPORTANT
- DESCRIPTION OF COMMANDS
- POWER SOURCE
- BATTERY
- AC OPERATION
- ON/OFF
- LED LIGHTING ON/OFF
- VOLUME CONTROL
- DAB/DAB+ RADIO
- SCAN DAB/DAB+ RADIO STATIONS
- STORING RADIO STATIONS
- DAB RADIO MENU
- DAB/DAB+ TRANSMISSION INFORMATION
- FM RADIO
- SCAN FUNCTION
- NOTE:
- MENU
- CD-MP3 PLAYER
- PLAYING A DISC
- JUMP TRACE AND FORWARD/FAST BACK
- REPEAT OF SINGLE TRACE
- DISK REPETITION
- FOLDER REPEAT
- RANDOM FUNCTION
- PROGRAM
- USB INPUT
- PLAYBACK
- AUX INPUT
- REPRODUCTION
- HEADPHONE
- TECHNICAL FEATURES
- GENERAL
- PRECAUTIONS FOR CORRECT DISPOSAL OF THE PRODUCT.
- OPERATION AC
- RECOMMANDATIONS POUR L'ÉLIMINATION CORRECTE DU PRODUIT.
- AC-Betrieb
- WIEDERHOLEN EINER SPUR
- OPERACION AC
- SIMPLIFIED EU DECLARATION OF CONFORMITY
Brand : Trevi
Model : CMP 583 DAB
Category : Cd player/recorder