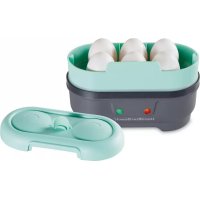
25511 - Egg cooker HAMILTON BEACH - Free user manual and instructions
Find the device manual for free 25511 HAMILTON BEACH in PDF.


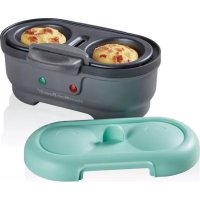
| Product Type | Egg Cooker |
| Brand | Hamilton Beach |
| Model | 25511 |
| Usage | Household |
| Power | 120 V, 60 Hz, 400 W (estimated) |
| Cooking Capacity | Up to 4 egg bites or 6 hard-boiled eggs |
| Cooking Modes | Egg bites, poached eggs, soft-boiled, medium-boiled, hard-boiled |
| Included Trays | Hard-boiled egg tray, egg bite tray, measuring cup |
| Housing Material | Plastic (estimated) |
| Dimensions (approx.) | 20 x 20 x 20 cm |
| Weight (approx.) | 1 kg |
| Cord Length (approx.) | 60 cm |
| Indicator Lights | Power indicator (red), cooking indicator (green) |
| Auto Shut-Off | Yes, when all water has evaporated |
| Cleaning | Lid, trays, and measuring cup are dishwasher safe (top rack). Wipe base with a damp cloth. Do not immerse. |
| Descaling | Use white vinegar for mineral deposits. |
| Safety | Polarized plug, do not immerse base, hot surfaces, use oven mitts. |
| Warranty | 1 year in the US, 5 years in Canada |
| Customer Service | Hamilton Beach: hamiltonbeach.com/customer-service (USA) or hamiltonbeach.ca/customer-service (Canada) |
Frequently Asked Questions - 25511 HAMILTON BEACH
User questions about 25511 HAMILTON BEACH
0 question about this device. Answer the ones you know or ask your own.
Ask a new question about this device
Download the instructions for your Egg cooker in PDF format for free! Find your manual 25511 - HAMILTON BEACH and take your electronic device back in hand. On this page are published all the documents necessary for the use of your device. 25511 by HAMILTON BEACH.
USER MANUAL 25511 HAMILTON BEACH
For recipes, tips and product information.
hamiltonbeach.ca
Open to US customers only • Ce concours
When using electrical appliances, basic safety precautions should always be followed to reduce the risk of fire, electric shock, and/or injury to persons, including the following:
- Read all instructions.
- This appliance is not intended for use by persons (including children) with reduced physical, sensory, or mental capabilities, or lack of experience and knowledge, unless they are closely supervised and instructed concerning use of the appliance by a person responsible for their safety.
- Close supervision is necessary when any appliance is used by or near children. Cleaning and user maintenance shall not be made by children unless they are supervised. Children should be supervised to ensure that they do not play with the appliance.
- Do not touch hot surfaces. Use handles or knobs. Use pot holders when removing hot containers.
- To protect against a risk of electrical shock, do not immerse cord, plug, or base in water or other liquid.
- Unplug from outlet when not in use and before cleaning.
Appliance is subject to residual heat after unplug. Allow to cool before putting on or taking off parts and before cleaning.
To unplug, grasp the plug and pull from the outlet. Never pull from the power cord. -
Do not operate any appliance with a damaged supply cord or plug, or after the appliance malfunctions or has been dropped or damaged in any manner. Supply cord replacement and repairs must be conducted by the manufacturer, its service agent, or similarly qualified persons in order to avoid a hazard. Contact Customer Service for Information on examination, repair, or adjustment as set forth in the Limited Warranty.
-
The use of accessory attachments not recommended by the appliance manufacturer may cause injuries.
- Do not use outdoors.
- Do not let cord hang over edge of table or counter, or touch hot surfaces, including stove.
- Do not place on or near a hot gas or an electric burner, or in a heated oven.
- Extreme caution must be used when moving an appliance containing hot food, water, or other hot liquids.
- To turn off appliance, remove plug from wall outlet.
- Do not use appliance for other than intended use.
- Lift and open cover carefully to avoid scalding, and allow water to drip into the base.
- Do not place the unit directly under cabinets when operating as this product produces large amounts of steam. Avoid reaching over the product when operating.
- Do not place lid on unit without egg tray or hard-boiled egg tray in place.
- Do not operate the appliance by means of an external timer or separate remote-control system.
- Do not leave appliance unattended when plugged in.
- Always allow the appliance to cool down completely before putting away. Never wind the cord around the appliance while it is still hot.
SAVE THESE INSTRUCTIONS

Other Consumer Safety Information
This appliance is intended for household use only.
WARNING Electrical Shock Hazard: This appliance is provided with a polarized plug (one wide blade) to reduce the risk of electric shock. The plug fits only one way into a polarized outlet. Do not defeat the safety purpose of the plug by modifying the plug in any way or by using an adapter. If the plug does not fit fully into the outlet, reverse the plug. If it still does not fit, have an electrician replace the outlet.
The length of the cord used on this appliance was selected to reduce the hazards of becoming tangled in or tripping over a longer cord. If a longer cord is necessary, an approved extension cord may be used. The electrical rating of the extension cord must be equal to or greater than the rating of the appliance. Care must be taken to arrange the extension cord so that it will not drape over the countertop or tabletop where it can be pulled on by children or accidentally tripped over.
To avoid an electrical circuit overload, do not use another high-wattage appliance on the same circuit with your appliance.
Parts and Features
To order parts, visit: hamiltonbeach.com

Before first use: Wash Lid, Hard-Boiled Egg Tray, Egg Tray, and Water Measuring Cup in warm, soapy water. Rinse and dry. Wipe interior of Water Reservoir with a damp, nonabrasive cloth.
CAUTION: HOT SURFACE. The temperature of accessible surfaces may be high when the appliance is operating.

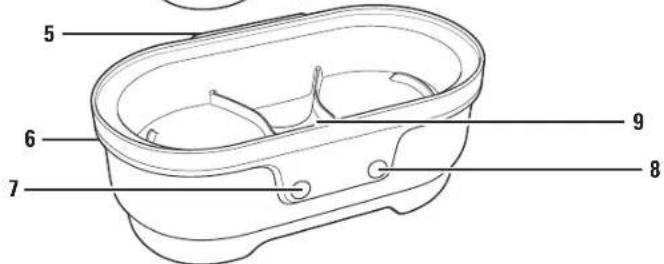
| 1 Lid Rest |
| 2 Hard-Boiled Egg Tray with Tab |
| 3 MAX Fill Line |
| 4 Egg Cup |
| 5 Lid Support |
| 6 Base |
| 7 Power Light |
| 8 Cooking Light |
| 9 Water Reservoir Center |
| 10 Egg Tray with Handle |
| 11 Water Measuring Cup |
| 12 Lid |
| 13 Lid Handle |
4
How to Make Egg Bites
WARNING Burn Hazard. Always use oven mitts to protect hands when opening the egg cooker. Escaping steam and hot water remaining under the lid can burn.
WARNING Food Safety Hazard.
- Consuming raw or undercooked eggs may increase your risk of foodborne illness.
For more information, refer to the U.S. FDA's Keep Food Safe page athttp://www.foodsafety.gov/keep/types/eggs/index.html

- Prepare egg bite recipe. Fill Water Measuring Cup with recommended amount of cold water for egg bites. See page 9 for water recommendations.
- Pour water into Water Reservoir Center. Always make sure center of Reservoir is filled before outer area.

- Divide egg bite mixture between Egg Cups. Do not exceed MAX Fill Line.
- Place Egg Tray on Base with Tray Handle toward front.

- Cover with Lid, aligning Lid Rest slot over Lid Support on Base. Plug into outlet. Red Power Light and green Cooking Light will come on and cooking will start.
- When water has evaporated, green Cooking Light will turn off and egg bites will be cooked. To check for doneness, insert knife halfway into center. If knife doesn't come out clean, cover Tray with Lid and let stand a few minutes.
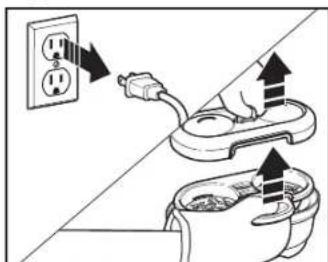
- Unplug. Using oven mitts, lift Lid. Lift up Egg Tray by Handle and place on a heatproof surface. Allow Egg Bites to rest a few minutes, then invert onto a serving plate to remove Egg Bites. Serve immediately.
NOTE: If preparing a second batch while the Egg Bite Maker is still hot, water will turn to steam quickly. To achieve the same cooking time as a cold start, add 10mL to the recommended amount of water.
NOTES:
- Never operate Egg Bite Maker without water in center of Reservoir, or use a liquid other than water for cooking purposes, since this may damage the unit.
Always use cold water. - Never cook in the Base of Egg Bite Maker. Always use Egg Tray.
How to Make Poached Eggs
AWARNING Burn Hazard. Always use oven mitts to protect hands when opening the egg cooker. Escaping steam and hot water remaining under the lid can burn.
WARNING Food Safety Hazard.
- Consuming raw or undercooked eggs may increase your risk of foodborne illness.
For more information, refer to the U.S. FDA's Keep Food Safe page at http://www.foodsafety.gov/keep/types/eggs/index.html

- Fill Water Measuring Cup with recommended amount of cold water for poaching eggs. See page 9 for water recommendations.
- Pour water into Water Reservoir Center. Always make sure center of Reservoir is filled before outer area.
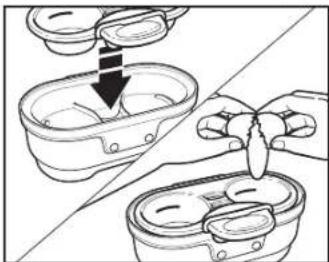
- Place Egg Tray on Base with Tray Handle toward front.
- Crack large eggs, one at a time, into each Egg Cup.
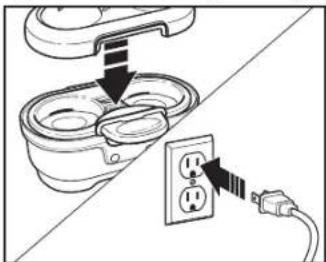
- Cover with Lid, aligning Lid Rest slot over Lid Support on Base. Plug into outlet. Red Power Light and green Cooking Light will illuminate and cooking will start.

- When water has evaporated, Green Cooking Light will turn off and poached eggs will be cooked.
- Unplug. Using oven mitts, lift Lid. Lift up Egg Tray by Handle and place on a heatproof surface. Allow poached eggs to rest a few minutes, then invert onto a serving plate to remove poached eggs. Serve immediately. NOTE: If preparing a second batch while the Egg Bite Maker is still hot, water will turn to steam quickly. To achieve the same cooking time as a cold start, add 10mL to recommended amount of water.
How to Cook Soft, Medium, or Hard-Boiled Eggs
AWARNING Burn Hazard. Always use oven mitts to protect hands when opening the egg cooker. Escaping steam and hot water remaining under the lid can burn.
WARNING Food Safety Hazard.
- Consuming raw or undercooked eggs may increase your risk of foodborne illness.
For more information, refer to the U.S. FDA's Keep Food Safe page athttp://www.foodsafety.gov/keep/types/eggs/index.html
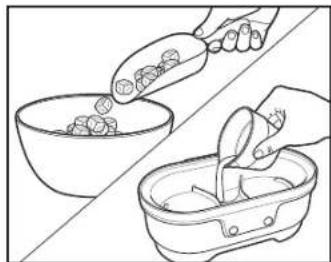
- Add ice cubes and cold water to a large bowl and set aside.
- Fill Water Measuring Cup with recommended amount of cold water for cooking eggs. See chart below for water recommendations.
- Pour water into Water Reservoir Center. Always make sure center of Reservoir is filled before outer area.

- Place Hard-Boiled Egg Tray on Base with Tab placed above Power and Cooking Lights.
- Add up to 6 large eggs into openings of Hard-Boiled Egg Tray. For best results, place wide end of egg down in Egg Tray.

- Cover with Lid, aligning Lid Support slot over Hard-Boiled Egg Tray Tab on Base. Plug into outlet. Red Power Light and green Cooking Light will come on and cooking will start.

- When water has evaporated, green Cooking Light will turn off and eggs will be cooked.
- Unplug. Using oven mitts, lift Lid by Handle and place on a heatproof surface. Immediately, lift Hard-Boiled Egg Tray and transfer eggs to large bowl of ice water.
Soft, Medium, and Hard-Boiled Egg Guide—Desired Doneness / Amount of Water in Base*
- Cooking times may vary. If eggs are not done to your desired doneness, add or subtract 5-10 mL of water to amounts listed in chart. More water means a longer cooking time, less water gives a shorter cooking time.
Number of Eggs Soft Medium Hard
680mL100mL120mL
5100mL115mL125mL
4110mL 120mL 135mL
Number of Eggs Soft Medium Hard
3115mL 130mL 140mL
2125mL 140mL 155mL
1 130~mL 145 mL 160 mL
NOTE: If making a second batch of Soft, Medium or Hard-Boiled eggs, and Egg Bites Maker is still hot, add 20 mL of water to amount specified above.
Care and Cleaning
WARNING Electrical Shock Hazard.
Disconnect power before cleaning. Do not immerse cord, plug, or base in water or any liquid.
- Unplug. Allow all parts to cool completely.
- Lid, Water Measuring Cup, Hard-Boiled Egg Tray, and Egg Tray are dishwasher-safe in top rack only. DO NOT use the "SANI" setting when washing in dishwasher. "SANI" cycle temperatures could damage your product.
- Wipe interior of Water Reservoir with a damp, nonabrasive cloth.
- For discoloration of Water Reservoir from water deposits in Base: Add enough white vinegar to cover stains. Let soak for a few minutes and drain. Without immersing Base in water, wipe Water Reservoir with a damp, soapy cloth. Rinse Water Reservoir with water and dry.
NOTE: Using filtered water will help reduce mineral deposits. - Wipe outside of Egg Bite Maker with soft, damp cloth. Let dry.
Troubleshooting
Egg Bites sticking to Egg Cups.
- Spray a small amount of cooking spray in egg cups before adding egg mixture.
Egg Bites are overcooked.
Less water can be used to reduce cooking time.
- Eggs were too small. Try large eggs.
- Egg bites were left in unit after cooking was complete. Cooking Light turns off when done, but will cycle on as the unit cools.
8
Troubleshooting (cont.)
Egg Bites are undercooked.
- If desired doneness was not reached, more water can be added to extend cooking time, or the Egg Tray can be left in Base for a few minutes to further cook.
- Egg cups were filled above MAX Fill Line. Only pour egg mixture up to MAX Fill Line.
Measured water was not poured into Water Reservoir Center. Water must be poured into center of Reservoir to ensure proper cooking. - Lid was not on correctly. Lid must be properly positioned to contain steam.
Water leaking from unit.
- Too much water was added to Water Reservoir. Do not use more water than is recommended.
- Lid was not on correctly. Lid must be properly positioned to contain steam and allow water to drip back into Base.
Soft, Medium or Hard-Boiled eggs are overcooked.
Less water can be used to reduce cooking time.
- Eggs were too small. Try large eggs.
- Eggs were left in unit after cooking was complete. Cooking Light turns off when done, but will cycle on as the unit cools.
Soft, Medium or Hard-Boiled eggs are undercooked.
- If desired doneness was not reached, more water can be added to extend cooking time, or the Hard-Boiled Egg Tray can be left in Base for a few minutes to further cook.
- Measured water was not poured into Water Reservoir Center. Water must be poured into center of Reservoir to ensure proper cooking.
- Lid was not on correctly. Lid must be properly positioned to contain steam.
Soft, Medium or Hard Boiled eggs crack.
- Ensure that eggs are fresh and free of cracks or fractures before cooking.
- Place wide end of egg down on Egg Tray before cooking.
Cooking Guide
Basic Egg Bites: In a small bowl, whisk the egg with liquid. Add cheese and mix-ins. Divide mixture between cups in Egg Tray. Do not fill above MAX Fill Line. Pour water into Water Reservoir Center and add Egg Tray with egg mixture. Cover with Lid. Plug into outlet. When green Cooking Light turns off, unplug from outlet. Using oven mitts, lift Lid and place on a heatproof surface. Allow to rest a few minutes, then lift Egg Tray by Handle and invert onto serving plate to remove egg bites. Serve immediately.
Eggs Liquid Cheese Mix-Ins Water in Base
| 1 whole large egg 1 teaspoon cream or milk | 1 tablespoon shredded Cheddar cheese | 1 tablespoon crumbled bacon | 100 mL |
| 2 large egg whites or 3 tablespoons of liquid egg whites | 1 teaspoon water 1 tablespoon Monterey Jack shredded cheese | 1 tablespoon chopped onion, peppers and basil, dash salt, pepper | 100 mL |
To check for doneness, insert knife into center and check to see if egg bites are cooked throughout. If not done, replace Lid and let stand for a few minutes, then check again.
Poached Eggs: Crack 1 large egg into each cup of Egg Tray. Pour water into Water Reservoir Center and add Egg Tray with eggs. Cover with Lid. Plug into outlet. When green Cooking Light goes off, unplug from outlet. Using oven mitts, lift Lid and place on a heatproof surface. Allow to rest a few minutes, then lift Egg Tray by Handle and invert onto serving plate to remove poached eggs. Serve immediately.
Desired Doneness Water in Base
Soft 70~mL
Medium 80~mL
Hard 100~mL
Coffee Shop Egg Bites
Ingredients
1 large egg
3 tablespoons (24 g) shredded Cheddar cheese
2 tablespoons (30g) softened cream cheese
1 1/2 teaspoons (4 g) crumbled cooked bacon
Directions
- In a personal blender jar, add egg and cheeses. Cover with Lid.
- Press and hold ON button until just blended, about 10 seconds. Divide mixture evenly between Egg Cups in Egg Tray. Do not exceed MAX Fill Line. Sprinkle tops with bacon.
- Add 100~mL water to Water Reservoir Center of Egg Bite Maker. Place Egg Tray over Reservoir. Place Lid on Egg Tray.
- Plug into outlet to start cooking. The Power Light and Cooking Light will illuminate. When the green Cooking Light turns off, egg bites are done. Unplug.
- Remove Lid. Remove egg bites to a plate to serve.
Serves: 1
Test Kitchen Tip: If cooking a second batch and Egg Bite Maker is still hot, add an additional 10mL of water.
Variation:
Egg Whites with Roasted Red Peppers and Basil: Follow recipe above, but substitute 2 large egg whites for 1 large egg, Monterey Jack cheese for Cheddar, and omit bacon. Add a pinch of salt and ground black pepper, if desired. Divide mixture evenly between Egg Cups in Egg Tray. Do not exceed MAX Fill Line. Add 1 teaspoon chopped fresh basil to each Egg Cup. Mix lightly. Sprinkle 1 teaspoon chopped roasted red pepper and 1 teaspoon sliced green onion on top of each Cup. Cook as directed.
Limited Warranty
This warranty applies to products purchased and used in the U.S. and Canada. This is the only express warranty for this product and is in lieu of any other warranty or condition.
This product is warranted to be free from defects in material and workmanship for a period of five (5) years from the date of original purchase in Canada and one (1) year from the date of original purchase in the U.S. During this period, your exclusive remedy is replacement of this product or any component found to be defective, at our option; however, you are responsible for all costs associated with our returning a product or component under this warranty to you. If the product or component is unavailable, we will replace with a similar one of equal or greater value.
This warranty does not cover glass, filters, wear from normal use, use not in conformity with the printed directions, or damage to the product resulting from accident, alteration, abuse, or misuse. This warranty extends only to the original consumer purchaser or gift recipient. Keep the original sales receipt, as proof of purchase is required to make a warranty claim. This warranty is void if the product is used for other than single-family household use or subjected to any voltage and waveform other than as specified on the rating label (e.g., 120V 60Hz ).
We exclude all claims for special, incidental, and consequential damages caused by breach of express or implied warranty. All liability is limited to the amount of the purchase price. Every implied warranty, including any statutory warranty or condition of merchantability or fitness for a particular purpose, is disclaimed except to the extent prohibited by law, in which case such warranty or condition is limited to the duration of this written warranty. This warranty gives you specific legal rights. You may have other legal rights that vary depending on where you live. Some states or provinces do not allow limitations on implied warranties or special, incidental, or consequential damages, so the foregoing limitations may not apply to you.
To make warranty claim, do not return this appliance to the store. Please write Hamilton Beach Brands, Inc., Customer Service Department, 4421 Waterfront Dr., Glen Allen, VA 23060, or visit hamiltonbeach.com/customer-service in the U.S. or hamiltonbeach.ca/ customer-service in Canada. For faster service, locate the model, type, and series numbers on your appliance.

PRECAUTIONS IMPORTANTES
Col. Polanco V Seccion,
Miguel Hidalgo
- SAVE THESE INSTRUCTIONS
- Other Consumer Safety Information
- Parts and Features
- How to Make Egg Bites
- WARNING Food Safety Hazard.
- NOTES:
- How to Make Poached Eggs
- How to Cook Soft, Medium, or Hard-Boiled Eggs
- Soft, Medium, and Hard-Boiled Egg Guide—Desired Doneness / Amount of Water in Base*
- Care and Cleaning
- WARNING Electrical Shock Hazard.
- Troubleshooting
- Egg Bites sticking to Egg Cups.
- Egg Bites are overcooked.
- Troubleshooting (cont.)
- Egg Bites are undercooked.
- Water leaking from unit.
- Soft, Medium or Hard-Boiled eggs are overcooked.
- Soft, Medium or Hard-Boiled eggs are undercooked.
- Soft, Medium or Hard Boiled eggs crack.
- Cooking Guide
- Eggs Liquid Cheese Mix-Ins Water in Base
- Desired Doneness Water in Base
- Coffee Shop Egg Bites
- Ingredients
- Directions
- Serves: 1
- Variation:
- Limited Warranty
- PRECAUTIONS IMPORTANTES
Brand : HAMILTON BEACH
Model : 25511
Category : Egg cooker