
Rio 22330 - Kettle Mellerware - Free user manual and instructions
Find the device manual for free Rio 22330 Mellerware in PDF.
| Product type | Electric kettle |
| Brand | Mellerware |
| Model | Rio 22330 |
| Capacity | 1.7 L |
| Power | 2200 W |
| Voltage | 220-240 V |
| Frequency | 50/60 Hz |
| Material | Stainless steel and plastic |
| Color | Silver/Black |
| Dimensions (L x W x H) | 22 x 18 x 25 cm |
| Weight | 1.2 kg |
| Cable length | 0.75 m |
| Automatic shut-off | Yes |
| Overheat protection | Yes |
| 360° swivel base | Yes |
| Water level indicator | Yes |
| Removable descaling filter | Yes |
| Power indicator light | Yes |
| Button-operated lid opening | Yes |
Frequently Asked Questions - Rio 22330 Mellerware
User questions about Rio 22330 Mellerware
0 question about this device. Answer the ones you know or ask your own.
Ask a new question about this device
Download the instructions for your Kettle in PDF format for free! Find your manual Rio 22330 - Mellerware and take your electronic device back in hand. On this page are published all the documents necessary for the use of your device. Rio 22330 by Mellerware.
USER MANUAL Rio 22330 Mellerware
243 Percy Osborn Road
Morningside, Durban, South Africa
Tell: +27 31 303 3465
Fax: +27 31 303 8259
creative housewares
20 Tekstiel St, Parow cape Town 7493, RSA
P0Box6156ParowEast7501RSA 2+27219318117/Holding:0861115006
+27.630140457+27.219314058
www.creativelhousewares.co.za
Johannesburg
Unit 25 & 26 San Croy Office Park
Die Agora Road, Croydon, 1619
Tell: +27 11 392 5652
Fax+27113921694

0123456789
IEC60335
F
m
1
2YEAR
WARRANTY
Model
22330


ellerware.co.za
Dear customer:
Thank you for showing me to purchase a 'kittenscent' product. Thanks to its technology, design and quality, it's the best exceeded the highest quality standards, a fully radioactive use and no packaging. He can be seen as
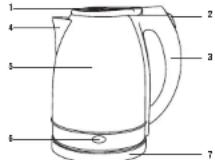
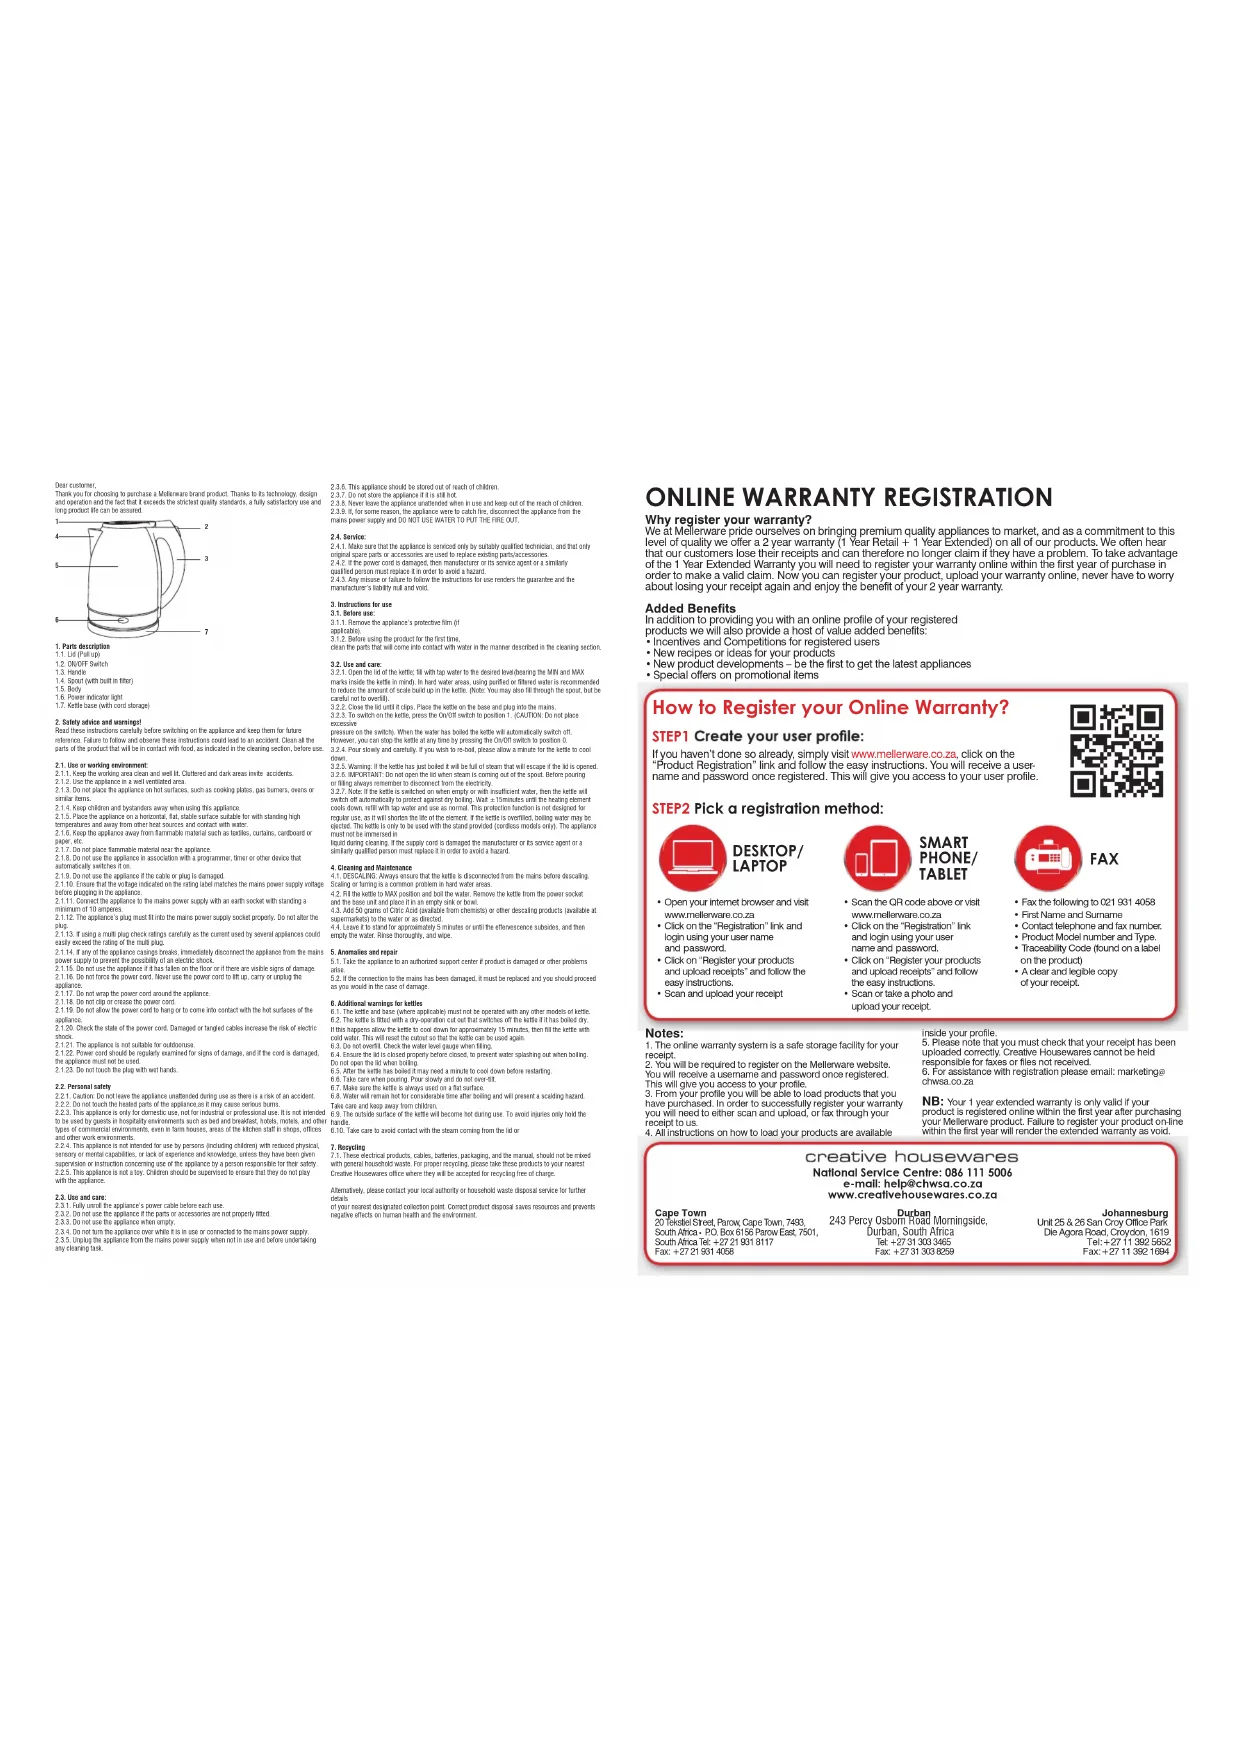
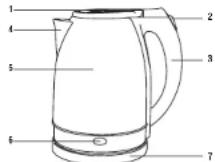
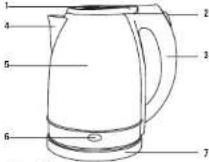
- Parts description
1.1.1.1.1
1.2 GRAFT Swf
1.3 Fandle
1.5 Spont (ath huff in thoy) 1.5 Pto
1.50007
1.60008
1.7. Kullback (with special case)
- Safety advice and warnings
Read these instructions carefully before switching on the applince and keep them for future
Theorem. Failure to follow and observe these instructions could lead to an odd product. Clear all the state of the product that will be in contact with load, as indicated in the cleaning section, before use.
.
2.1. Use or working environment
11.1. Keep the working area clean and well. Olliere and dark areas make accidents
2.1.2. Use the symbol W in the following text:
1.7.1.1.1.4.4.5.6.7.8.9.10.11.12.13.14.15.16.17.18.19.20.21.22.23.24.25.26.27.28.29.30.31.32.33.34.35.36.37.38.39.40.41.42.43.44.45.46.47.48.49.50.51.52.53.54.55.56.57.58.59.60.61.62.63.64.65.66.67.68.69.70.71.72.73.74.75.76.77.78.79.80.81.82.83.84.85.86.87.88.89.90.91.92.93.94.95.96.97.98.99.100
3.1.4.200
3.15 For reference on the relative rate of
TRENTERNS AND ANXIES ON THE FATE OF SUSTAINING
2.1.6. Keep the acceptance away from tamable material such as irides, curvors, cordonts or
sper.etc
2.1.7.Do not place tamnable materal near the apoplcance
2.1.8 Do not use the appliance in association with a programme, timer or other device that
automatically switch for
2.19 Do not use the appliance if the cable or plug is damaged
21.10.Enure that the voltage indicated on this rating label matches the mane power supply voltage
before programing in the appliance
2.1.11. Connect the appliance to the mains power supply with an earth solder with standing
mmnnt 10 anoe
21.12 The appnncn's plog must no the man power sappy toeep spiny. D not ahe
:
2.1.13. If using a multi plug check chart, the current used by several appliances could be used to determine the value of the multi plug.
1
- 18 on the apnnoe eane, nne aonrnnnne anpnoe nn nnnn
o 11.15 Proximate reference value of the power
2.1.15. Do not use the appraiser. This does not sound like there are no signs of car
3.1.12 To get the power cost to be
1
1
2.1.29. Check the state of the power cord. Damaged or damaged cables increase the risk of breakdown
5
2.1.21.1
2.1.22. Power cutoff should be regularly examined for signs of damage, and if the cutoff is damaged the power must be used.
2.2.2 Do not touch the heated parts of the enclosure as it may cause serious burns.
2.23. This is a good idea for the use of the industrial or commercial uses, but it is not
to use the nouns in 'respectively environments such as both and breakfasted, hotels, malls, and office buildings'. The second one is also a noun. In sum, many nouns, such as the whole firm in shops, offices, and other cities are used to describe
2.2.4. The application is not intended for use by persons (including children) with requires physical sensory or mental capabilities, or lack of coordination and understanding, unless they have been given supervision or instruction concerning use of the application by a parent responsible for their safety. The application does not carry the risk that children should be unsupported to claim that they do not play with the application.
2.3. Use and care:
2.3.1. Futh urol the apnige's opee cale baehne eae
23.2015年4月19日星期六
2.3.1. Go not use the appiinr when ench
231.00
2.3.6. Unclear the appliance from the main power supply when not in use and before undertaking any cleaning task.
- This applionce should be stored out of each of children
23.7 Do not store the sequence
2.3.1 Never leave the audience unattended when in use and keep out of the reach of children
23.9.1, for some reason the appiante were to catch fire disconned the apprince from the
maire power supply and DO NOT USE WATER TO PUT THE RARE OUT.
2.4Service
2.4.1. Make sure that the 2000章程 is approved by statutory qualified technicians, and that only
prrnre eae aee nreee are rees rreee
2.4.2. If the power cost is damaged, then manufacturer or its service agent or a similarly
qualified person must replace it in order to avoid a hazard.
2.4.3. Any cause or failure to follow the instructions for use renders it guarantor and the
manufacture's liability and said:
- Instructions for use
3.1. Before use
3.1.1. Remove the appliance's protechtl film of
spolish
3.1.2.Before using the product for the first time
clean the parts that will come into contact with water in the matter described in the cleaning section.
3.2.Use and care
32.1. Open the lid of the kettle, 11 with tap water to the desired level (see above) using the M# and #K
Marks mark the marks in red. A hard water straw using paper or fibrous waste is recommended to make the cake up easily in the kettle, plate. You may also fill through the pouch body but can take it over till.
32.2.2.0ee the Id unt lcbpe. Fice the kollte on the case and plug into the mane
32.3 To switch on the kele, press the OnOff switch to position 1. (CALTON Do not place
转
pressure on the switch! When the water has cooled the thermostat will automatically switch offthe
PoWwY, you can stop the hode at any time by pressing the On/Off switch to position 0.
3.2.4. Paur slowly and carefully. If you wish to re-bol please allow a minute for the bottle to seal
OM
32.5. Wanning: If the bale has just bolted it will be full of steam that will escape if the lid is opened.
32A. NPOR1441: Do not open the lid when steam is coming out of the spot. Before pairing
or fling shayr remenber to docnert from the eecticity.
32.7. Note: If the kelle is switched on when empty or wih insufficient water, then the kelle wih
switch on and off by to protect against dry boaring . This is 15 minutes until the heating onsetcomes on , and the temperature will be normal . This heating treatment is not failed for
e a
requirse, as it will shart the life of Pre element. If the kelle is cctified, boing water may be
elective, the entire is any result but not has been expressed by
t
similary qualified person must possess the following skills:
- Cleaning and Maintenance
4.1.DES24.103: Ahaayssure that the chtis is discerred from the mals cbees desaing
Scaling or turning is a common problem in hard water areas
- All the kifte to 10x position and onl the water. Remove the kifte from the power sorded
and the base unit and place it in an impedy sink or bowl.
4.3. Add 50 grams of ChlC Acid (available from chenmals) or other decaing products available at
supernarkosy in the water or as directed
4.4. Label it to stand for aprodymdy 5 minnrs or und the ewerwarcns autolles and then
empty the water. Once through, a
- Apparatus and apparatus
62.1700000000000000000000000000000000000000000000
1
():
1.3 Do not pay the fees the way of paying a fee
84.15are the lid is closed wourele flesed, to prevent water spilling out when it is
Do not open the lid when holding.
5.5. After the ketle has oolot it may rood amire to oucl down befoe rasting
- Take care when paying for slowly and do not over
6.7.10.2 are the isles s always used on a flat surface.
- Water will remain hot for considerable time after boiling and will present a cooling hazard.
Iave care and keep away from children.
- The perseide surface of the celt will become hot during use To avoid injuries only hold the
handic
6.10. Take care to avoid contact with the steam coming from the lid or
- Recurring
7.1. These electrical products, cables, batteries, packaging and the manual, should not be mixed
wth perah hohold wae For proper recyig plesse take these proocts to your nearest
Cnne Haeepes e
Hemadedy please contact your local authority or thousand waste disposal service for further
oounnees,des pales cieion poin. Cerecl product depted sles reuoties and preven
negative effects on human health and the environment
ONLINE WARRANTY REGISTRATION
Why register your warranty?
We at Mellerware pride ourselves on bringing premium quality appliances to market, and as a commitment to this level of quality we offer a 2 year warranty (1 Year Retail + 1 Year Extended) on all of our products. We often hear that our customers lose their receipts and can therefore no longer claim if they have a problem. To take advantage of the 1 Year Extended Warranty you will need to register your warranty online within the first year of purchase in order to make a valid claim. Now you can register your product, upload your warranty online, never have to worry about losing your receipt again and enjoy the benefit of your 2 year warranty.
Added Benefits
In addition to providing you with an online profile of your registered
In addition to providing you with an online profile or your regular e-mail address, our products we will also provide a host of value added benefits:
Products We will also provide a host of value added products , Incentives and Competitions for registered users .
- Incentives and Competitions for registered users
New recipes or ideas for your products
New product developments - be the first to get the latest appliances
Special offers on promotional items
How to Register your Online Warranty?
STEP1 Create your user profile:
If you haven't done so already, simply visit www.mellerware.co.za, click on the "Product Registration" link and follow the easy instructions. You will receive a username and password once registered. This will give you access to your user profile.

STEP2 Pick a registration method:

DESKTOP/LAPTOP
Open your internet browser and visit
www.melierware.com
- Click on the "Registration" link and
login using your user name
and forward
and password.
Click on Register your products
and upload receipts" and follow the
easy Instructions
- Scan and upload your receipt.

SMARTPHONE/ TABLET
Scan the QR code above or visit
www.maieliware.com
Click on the "Registration" link.
and login using your us
Name and password:
Click on Register your products
and upload receipts" and follow
the easy instructions
:
- Scar for take a photo and
uplcad your receipt

FAX
Fax the following to 021 931 4058
1. First Name and Surname
First Name and Sumame
- Contact telephone and fax number.
Product Model number and Type
-Transability Code found on a label.
- Tachylocity COG (COG is on a label
on the product
A clear and legible copy.
at your request.
Notes:
-
The online warranty system is a safe storage facility for your receipt.
-
You will be required to register on the Mellenware website.
You will receive a username and password once registered.
This will give you access to your profile.
- From your profile you will be able to load products that you
have purchased . In order to successfully register your warranty
we will need to alter scan and upload or fax through your
I will need receipt to us.
- All instructions on how to load your products are available
inside your profile
- Please note that you must check that your receipt has been
Iuoaded porrectly Creative Housewares cannot be heid
responsible for taxes or fees and required - For assistance with registration please email: marketing
- For assistance with registration please email: Marketing@
NB: Your 1 year extended warranty is only valid if your product is registered online within the first year after purchasing your Mallenware product. Failure to register your product on-line within the first year will render the extended warranty as void.
creative housewares
National Service Centre: 086 111 5006
ill: help@chwsa.co.za
www.creatlvehousewares.co.za
Cape Town
20 Tekstiel Street, Parry, Cape Town, 7493.
South Africa: PO Box 6156 Parry East, 7901
South Africa Tel: +27 21 931 8117
Fax:+27 21 9314058
Durban
243 Percy Osborn Road Momingside,
Durban, South Africa
T+27313033465
Fax+27313088259
Johannesburg
Unit 25 & 26 San Croy Office Park
Die Agora Road, Croydon, 1619
Tel: +27 11 392 5652
Fax+27113921694
mellerware
makes life easier
2YEAR WARRANTY 1YEAR RETAIL & 1YEAR EXTENDED Register online: www.melloirware.co.za
Thank you for purchasing a Mellenware product. Mellenware guarantees that your product has been thoroughly inspected and tested before being dispatched and is free from mechanical and electrical defects and complies with the applicable safety standards. With every Mellenware product purchased you get a 2 year warranty as detailed in the terms and conditions below.
First Year - 1 Year Retail Warranty:
Should defects due to faulty parts or workmanship develop, under normal use, within 12 months from the original purchase date, please return the product to the store from where it was purchased for repair free of charge. However, for the customer's convenience we will replace products where the purchase price is equal to or less than R750 incl. VAT
Second Year - 1 Year Extended Warranty
Mellware takes pride in their product quality and therefore offer an extended 12 month warranty over and above the 1 Year Retail Warranty. Should defects due to faulty material or workmanship develop, under normal domestic use, after the 12 month period and within 24 months from the original date of purchase, please return the product postage pre-paid to Mellware for repair. Mellware will repair the product free of charge and return it to you directly. Mellware will replace a product with a similar product in the same or better condition, if the repair cannot be conducted for whatever reason. NB: The 1 Year Extended Warranty is only valid for customers who have registered their warranty online at www.mellware.co.za within the first year after making their purchase. See overleaf for details and instructions.
Before returning your product, check the following:
-
Your household mains supply socket is in good condition, working and switched on.
-
The mains supply circuit is not overloaded (White trip switch on your DB board is off).
-
You have read the trouble shooting guide in your Instructions for Use.
All accessories and parts are pre
The following conditions apply:
Please ensure you retain your original receipt as this must be presented when making a claim under the terms of the warranty. It is impossible to determine the warranty period without your original proof of purchase, so please keep this in a safe place. (NB. Your warranty can be scanned onto the Mellenware web site for safe storage - see reverse side for details.)
2. If a refund or exchange is required the product must be complete with all accessories, parts and packaging. Missing parts will render the warranty void.
3. Upon receipt of your appliance, check it for any transport damage to ensure it is safe for use. Return it to the store as soon as possible for exchange if damaged. The warranty is void if products are damaged after use, so please do not use the damaged product.
4. Your product is designed for normal domestic household use. Failure to read and comply with the
instructions for use, cleaning and maintenance will render your warranty void, so please read these instructions carefully to ensure your safety, and to get the most effective use from the product. (e.g. no removing lime scale; water deposits; insect infestation, and/or burnt products)
- Any abuse, negligence, improper or accidental use or care will render the warranty void and Creative Housewares (Phy) Ltd will not be liable for any loss or damage.
- Any attempted repair, or replacement of unauthorised parts will render the warranty void, so please contact an authorised service centre or service agent for any service or repair requirements.
- NB: The warranty on replaced products will be from the original date of purchase and not from when the date replacement was made.
- All repairs carry a 3 month warranty even if this falls outside of the 2 year warranty period.
- Mellenware will attempt to conduct repairs within reasonable time in line with industry standards but cannot be held responsible or liable for any circumstances not under our control.
- Terms and Conditions are subject to change without prior notice.
Repairs Out of the Warranty Period
If service or repair becomes necessary outside the warranty period, this service is still available however all transport/postage, spares and labour costs will be for the customers' account. All chargeable repairs will require the customers' written acceptance of the quote. Once the go-ahead has been received Mellerware will undertake to conduct the repair within a reasonable time and maintain the condition of the product as received. All repairs are warranted for 3 months from the date of the repair.
For any service, enquiries and complaints please contact our Customer Care on 086 111 5006 or e-mail helpechwsa.co.za from 0800 to 1590 Monday to Friday excluding public holidays. Please also note that the company is normally closed for 2 weeks around Christmas and New Year.
Please send all products for repair postage pre-paid to one of the service centres listed on the back of this page.
| Problem Reason Action | Precaution | ||
| The kettle is leaking It can be condensation This is | normal If it is boiled several times in a row. | This kettle is for domestic use only. | |
| The kettle is very full Po | If the overloaded water can be expelled from the kettle, a danger can occur. | ||
| The switch is sticking. | Make sure the switch is clean. | Keep the appliance away from cooking splashes. | |
| The kettle does not work | Power outlet is switched off | Tum on the house plug | Make sure the water covers the element before operating. |
| Home shot is not working. | Check the plug with another device. | The device must have a similar power to avoid over-loads. | |
| The kettle is not sealed in the base correctly | Place the kettle on the base correctly. | The useful life of the kettle will be reduced if it is not correctly inserted in the base. | |
| The boiler is discontinued from the electrical network. | Overloaded circuit. Unplug all devices connected to the same circuit. | Note that there may be up to 5 current leads in a circuit. | |
| The kettle takes too long to boil | The element has lime depos-its. | Descaling element using a patented solution or citric acid. If it is not successful, then a new element may be required. | Boilers with scale will have a reduced life. Clean the bal-ance regularly. |
| The kettle operates intermittently | The element has lime depos-its. | Descaling element using a patented solution or citric acid. If it is not successful, then a new element may be required. | Boilers with scale will have a reduced life. Clean the bal-ance regularly. |
| The kettle rusts on the out-side | The steam tank has rusted and turned orange. | Clean your kettle after each use to keep it dry. | Keeping any device clean at all times will prolong the life of the product. |
Geographic Interest
Dahm did a query on him. "Mellor was a realtechnician in book. Didactic by analogy, concept was based on the idea of a computer and a computerized system. But it wasn't the best idea to be teaching this work."
1. Parre beskrwng
1.1 linked [tptrk]
1.2 MHT
1.3 Handelst
1.4 TIR (mer hypobodrter)
1.5 L933
1.6.Kraj Inklstej
1.7.Kraj Inklstej, konjekt konjekt
1.7.49%(0.00%)
2. Vellghields atmse en warskaing
Lees heredis innsusings spangng cun vovcnd, du helsch sncn aen hcd tiv. wvckmogkne wrygss, Versum en mrederi uinsuig eug nai kai taik bok. Knae de the ciean pnt stn meetred in anraknir kam, nana zangin de ina chomnainlinaing. 80010000000
21.4 Stnnepeus is npw wae nane sps
2.1.6. Fian s die apsonat ng n herticale, psl stahle appon wok wl gskk is vi ci vrrrtae
2.1.6 Not applicable
2.1.8. Mone die taested in kemahase me in pessmert, hthoue of aner taested ghts
wotoutmoda 3
2.1.9. Mzne di tese gebuk as the kalal munprop besidg 8n.
2.1.10. Weak sector for the scattering with no dipole moment a and geodesic manifold, oerwassermet der scattering with the scattering operator a dipole moment.
2.1.4.1 Sup. If the set can be an open subcomplex, then we have is finite. Suppose there are two sets S_1, S_2 in , and suppose that the set S_1 is a closed subspace in the set S_2 . Then S_1 is open and S_2 is finite. Moreover, let us denote this open set by _S .
1.1.43. Is a multiling fibration word modicte the gradation matrix modulo n ? (mod 2), assemblage of three smooth with unit vectors modulo n fibration word modicte idc consists of a multiling van over 2, 2, 1, 1, 4 . Is an image of a bestellobin tree , skolad de tessel o modicte u at le sioo , unenveni e con d . If modicte van is a prime ideal , its order is given.
2.1.15. Moenie de bestel gebnis as dl op die kvei geval hat of as dae iglse lekere van skade in
1
2.1.21. The birester is gie kioe of hne pumnfe. 2.1.23. The birester is gie kioe of hne pumnfe.
1.
2.1.23.000000000000000000000000000000000000000
2.2 Personluy
2.1.LTJH:Mn#de#
2.2.2 Moskit de wem epperviaties sanak rigeuk hendatista of konpwa wan dan an of stree sponectiante.
2.2.3.10 The sth is me gok wir hneimie geinns karnr, hnd in mnnn en gastu
2.2.4. Dn taatle nie posik vir gobuk dour wamndar fisie verstandellva mmoes
Theorem 2.1. The existence of kernels is easy by using the following theorem: 2.1.3. Let be a compact and closed subset of any hyperbolic space ^n . Then the desired data sets are well defined.
2.3. Gebnuken sing:
231.
2.3.2.Die steile moel n gebrak word as die parte of stharnstigredne ne hcncoi k pas
2.3.3 Dooe nooohoe gebuok wondne
2.3.4 Die Teesel meet root geahai word berwy dik in weibing is ol in die muprop gekapelis
2.3.8.Urkupel de Icesel van de hulceover as er nie in pednuk is en bas di hellema alalr dlatrnnnneu wnt. In da alalr ued alaanr mnrn rnrn
1
2.3.7 File beste pnt bulc rms w indr gprn wrd
2.3.8.Die beste moer heilental ahoel +ord it gestoer wurd
2.3.9 Die wesiele mpe alhyd ordier wesig wees
wannr in gieikn moe bale beek cien sienen pheow word
2.3.10. As de Icelsan de brand nak onkppel an mnnnnpip KOENI WITER GEBPLK
OAO DE VANAE TELISNE
2.4.1kps
24.1De 100000000000000000000000000000
2.4.2 As die scored besikag wond mert cld deeur die derrsagen of in gekwaiisende penson A
and on mbrnqzare veetted
2.4.3 Erige misnuken malsbking om ntruxss be volk ener die wassabng mal en ran genes
Wards
#
3. Instruresses wir
J.1.1.16
1.1.1VH
3.1.2 Vorereislegreukkaaleparle sotun sotsin die skotmkaekseke.
12.6000
3.2.1 Nae de delsien en da kep cop: Val mnaanrnnnne nre ngie wck nde
3.2.6. Cite this study on www.gjz.org, last accessed in 2018 but can be found at the kelter website.
3.2.6.7. For all of you who speak me, this will not do justice since as the kelter OPGMA work goes.
4.1.3 VIEGSHNTHANHANHANHANHANHANHANHANHANHANHANHANHANHANHANHANHANHANHANHANHANHANHANHANHANHANHANHANHANHANHANHANHANHANHANHANHANHAN
4.1.6.1.27 000000000000000000000000000000
4.1.2016-037 0000000000000000000000000000000000000000000000
#
- Animalia and herds
5.1. Neim die steile na gemagligde tegnere sentrum as steitel besedig is of probleme ontisraan.
5.2. As konsekie na die murnuprop besikag is mecl ot wengang ward
6. Additional warrants for debtors
6.1.2 Die bedel sal automates afak as daan me wator in is me as peny var n doog hok
unise in the bed. Wed ± Tornnule vir the element om ake, mask vol water en getmuk 0.1.3.2024 dc kieit oov mok.
6.1. Noi niidie kord van de sate venvyder terd ik gebnik wond nie. Stokel die besteileers
4.
6.1.1. Area weighted area weighted area weighted area weighted
7. Test strains
- Mark u internal spufffoids pco on
www.mellorware.com.za
Klc on dins Registrae
A
eannnne nnnnne
wagwoord.
- Klik op "Register your products" er
kaikwittansies en volg die maldike
Instuksies.
- Skangeer e


FAKS
20 Teksienl Street, Parwy, Cape Town, 7493.
South Africa: PO Box 6156 Parwy East 7501
South Africa Tel: +27 21 931 8117
Socia/18+272Foe+2721914568
1ax+2721831400
Durban
orn Road Momingside .
Durban South Africa
Durban, South Africa
Tel: +27 31 303 2495
Eae:27.31.303.8259
Johannesburg
Unit 25 & 26 San Croy Office park
Dis Anore Road, Cryrico, 1618
Tel: +27.11390.5653
Fax:+27113921694
10
mellerware
makes life easier

Dankle vir die aankoop van n Mellerware produkt. Mellarware waarborg dat u produit deaglik geinspektoer en goetoes wo vordat dit vers send word en is vray van megianese en elektrise gebreke en voldoen aan die toepasilike veilgheldstandanda. Met alle Mellerware produkt wak gekoop word kry u 2aar waarborg soos ueieneigst in die terme en Voorwaards hieronder.
References: H. Kuppinen and S. V. Kuppinen for editing, H. Kuppinen and S. V. Kuppinen for revisification of an electronic version of this manuscript, and S. V. Kuppinen for editing and revision of the manuscript, and J. I. Kudryak for editing, and A. M. Lefkienko for editing.
We can choose a scheme to act as a source of message keys. Note that this technique, also called the so-called source of keys, is used to calculate the value of some possible solution to the linear equation (1.2).

1.Description des plece
1.1. Convergence
1.2. interpupleur marte, arel
1.3.P20004.1.1
1.4.2
1.1.CNPT 2.1.10
1
1.2.2.2.2.2.2.2.2.2.2.2.2.2.2.2.2.2.2.2.2.2.2.2.2.2.2.2.2.2.2.2.2.2.2.2.2.2.2.2.2.2.2.2.2.2.2.2.2.2.2.
- Consd it for ananbld oollkarmnla
Lau has added new instructions about the methods he listed on the number of articles you use in your library. I don't need to read those instructions, but my students can ask me about it. I also have a book that says that there are a lot of books and books in another "bookshop", which is called "bookshop".
1.
2.1.4.45.45.46.47.48.49.40.41.42.43.44.45.46.47.48.49.40.41.42.43.44.45.46.47.48.49.40.41.42.43.44.45.46.47.48.49.40.41.42.43.44.45.46.47
2.1.2 UieslIaerail daun erendienr
21.3. No pae pae nppeoal sur 22s vndss chnds, tles qu dss piques de ciee, 65
sierar want to anther be appeal.
2.1.11 Barroder fappard au serer are one pae de tere nesrder a in minum d 3 amps
2.1.12 Lefche de fappenel tne corooment nane dae la pba sotur. Me moiig pas
1216.
2.1.1.1.1957年1月1日
1
31.10.2022 15:49:48
16
a
21.17 1
2.1.18 No supcrn pi r aig in conti daimonstion
2.1.19 19
31000000
2.1.20 Veilei foel du corte dalmnion. Les cabe en bonnages os ernmies aignerent
2.1.21 Uparal nes
12.11500000000000000000
12.075:GWWW
gacaralrpsnncsMckdAolndedablaaon
esued due,ies reommte duiher de /au puiere ou tne puiere a tmalon
de la dns la zouion. Fennque wos pous epalene n mprn 23, ma s veie
Arepostopomply.
3.2.2.Femoe in oovre hqipc0 qutadipae Paa la boolde sur la base cbrnrae
27.18
3.2.3. Pour aller la biseule, apuyes sur linappeur Cn OY aeeber 1 ATTARCT
In our previous proof we discuss the relationship. Lorschke has a formula for b -free homology of a groupoid G . In this section, we present an explicit condition for a linear map on a groupoid G in commutative or Oo-01 cell systems.
3.4. Versor lemmert d solnneymet. 10 wos sahahr hhe hoillr nounr. atroed
mntgprgeboutnne
3.2.5.Aerement 8 la boiie wert de buzhih h e sera rngled da vepar qit cspenerle
0
326.1MPORTATN Kowrpea koeasr des de hper sotte A
nndemptcneae aenrnnnrrnre
3.2.7.Femenqa Sis toulne ane lme nquie sve ou aevin menpe deau
e eae n aenrnnnne ene ean ne ane aeene 15 mae
que ftererl duii tneodss, renpoea anouen avnc de leau du nntel. uissecie
nemlement. Cebafonfiee protection nnepea cngteour unud eabon reglere,
e eae aene ae ene anen e ane ene ane ene ane ene ane ene ane ene ane ene ane
pelle theelee. La tou have re cie e heneau sas a support kinn qneles sate in
4.2015年第一季度报告
4.1F5072A2A2A2A2A2A2A2A2A2A2A2A2A2A2A2A2A2A2A2A2A2A2A2A2A2A2A2A2A2A2A2A2A2A2A2A2A2A2A
1
4.2. Fompl 502 in hulfion en pssion A721836, Eefor 1hulffn:
100
4.3.2.1.1.1.1.1.1.1.1.1.1.1.1.1.1.1.1.1.1.1.1.1.1.1.1.1.1.1.1.1.1.1.1.1.1.1.1.1.1.1.1.1.1.1.1.1.1.1.1.1.1.
COSALIO idcnilie nne hsupmarcti taeou ou aetnns dirfth
4.4.Lassereposerenvonbminuesouqraetdarelevensoeissaneae,usvW
Tnnnne nnnnne
6.7.Assume-when p is a holomorphic divisor, find surfaces in ^n and surfaces in ^n
Cob [10]: for some coset its coset is a modulo de la matroid fibres. Cercain a sncn de la fibres, ciech in the case of . In this case, we have to show that the coset of all the cosets of a quasique, on which one belongs to the family of quasi-Eu 1701 a priori problem for tessellations.
1. Prenje du 2018
1.000000000000000000000000000000000000000
1200000000000000000000000000000
1
1.1.2006
1
1.6COP 1.6.1.1.1
1.6 C2019-03-08 1.7
1.2023年1月16日(星期一)下午15:00
7. Gross Dnse 2003 158
LezienlamerlesisinsquesanedeIparuapreheepurte-aspuraocreuliasnras.
100
m - 1 0 ;
21.5.40000000000000000000000000000000000000000000
01234567890000000000000000000000000000
21540156300000000000000000000000000000
21.10 Gnuee 8
21.11 Uae eepnne 10e aenrnnnne ennnnne ennnnne ennnnne ennnnne ennnnne ennnnne ennnnne ennnnne ennnnne ennnnne ennnnne ennnnne ennnnne ennnnne ennnnne ennnnne ennnnne ennnnne ennnnne ennnnne ennnnne ennnnne ennnnne ennnnne ennnnne
2001
21.12.9
10
21.13年月日:
21)SARALNIAO
2018年1月16日星期一中圆
2.15.10
21.23 katoqne pugin m as mias nharae
2.2. Source(s)
2.1.00000000000000000000000000000000000000
2.2.2 No one has no more than 100000000000000000000000000000000000000000000000000000000
2.2.1. The annhber flesher sies a uon dmeow, no anu no
1
b 100000000000000000000000000000
esra de eqpe de cina en lias, eotinns e ouros antienes de tbalho
2.2.4. Esie agre hio dee ser ilkato por asses (rundn z) ton caanndde
fies, aenodie oemnta eudidis, ou tata da expetende cinnemmo en moes
que ennnn nne nne nee eae aen nee nee nee nee nee nee nee nee nee nee nee nee nee nee nee nee nee nee nee nee nee nee nee nee nee nee nee nee nee nee nee nee nee nee nee nee nee nee nee nee nee nee nee nee nee nee nee nee nee nee neee
epnepnepnepnepnepnepnepnepnepnepnepnepnepnepnepnepnepnepnepnepnepnepnepnepnepnepnepnepnepnepnepnepnepnepnepnepnepnepnepnepnepnepnepnepnepnepnepnepnepnep
2.2.3 Cn a m h o 10
921
2.3.Use cintada
23.1.
23.2 No 100
2.3.7.401 25
214.50000000000000000000000000000000000000
2015年1月16日星期一中圆
01
216500000000000000000000000000000000000
2.17.0000000000000000
02-12
23.8. Nurcae oepaeho senn 11rccnndan yoe nernrhafoa de cane
23.9.Se,por alqim mioi,uparelo fosspegacipu,desigue a saeilto tede elecrtis
e 1
34mm
24.1000000000000000000000000000000000000000
242
0173.588927.588927.588927.588927.588927.588927.588927.588927.588927.588927.588927.588927.588927.588927.588927.
243. Ouaqus npnda hao cm sgras rernotcs or sohma aayrta
respcnlae
7.1.2.1.1
3.1.Introduction
11.80% 1
312.30% 0658000000000000000000000000000000000000000
e
3.2.100
3.2.1.Aba a tnpa da chela ene rcomg qua da nrae atr thd dado
en cota as maras Mto inerior de chetra. En rnes de ages duris, reconnendae

- ONLINE WARRANTY REGISTRATION
- How to Register your Online Warranty?
- STEP1 Create your user profile:
- STEP2 Pick a registration method:
- DESKTOP/LAPTOP
- SMARTPHONE/ TABLET
- FAX
- creative housewares
- National Service Centre: 086 111 5006
- ill: help@chwsa.co.za
- www.creatlvehousewares.co.za
- mellerware
- 2YEAR WARRANTY 1YEAR RETAIL & 1YEAR EXTENDED Register online: www.melloirware.co.za
- First Year - 1 Year Retail Warranty:
- Second Year - 1 Year Extended Warranty
- Before returning your product, check the following:
- All accessories and parts are pre
- The following conditions apply:
- Repairs Out of the Warranty Period
- Geographic Interest
- Parre beskrwng
- Vellghields atmse en warskaing
- Personluy
- Gebnuken sing:
- 2.4.1kps
- #
- Instruresses wir
- 12.6000
- Additional warrants for debtors
- Test strains
- FAKS
- Durban
- Johannesburg
- 1.Description des plece
- 1.
- 12.11500000000000000000
- 27.18
- 4.2015年第一季度报告
- Tnnnne nnnnne
- Prenje du 2018
- Gross Dnse 2003 158
- Source(s)
- 02-12
- 34mm
- 7.1.2.1.1
- 3.1.Introduction
- 3.2.100
Brand : Mellerware
Model : Rio 22330
Category : Kettle