
Phantom K80 - Loudspeaker Dali - Free user manual and instructions
Find the device manual for free Phantom K80 Dali in PDF.



| Product type | In-wall speaker |
| Brand | Dali |
| Model | Phantom K80 |
| Category | Passive speaker |
| Usage | Indoor only |
| Installation | By a professional |
| Connectors | Spring terminals (red +, black -) |
| Adjustable switches | Tweeter (Normal/High+), Midrange (Normal/Mid+) |
| Tweeter rotation | Yes, off-center to aim at listening position |
| Wall angle brackets | Included, adaptable up to 65 mm thickness |
| Grille | Magnetic, optional square grille |
| Sound dispersion | Wide (DALI technology) |
| Break-in | Up to 100 hours for optimal performance |
| Magnetic shielding | No (may interfere with CRT, hard drives) |
| Maintenance | Mild household detergent, avoid abrasives |
| Grille cleaning | Vacuum or clothes brush |
| Safety | Do not expose to sun, extreme temperatures |
| Environment | WEEE compliant, mandatory recycling |
| Subwoofer recommended | Yes for optimal bass |
| Cutting template included | Yes |
Frequently Asked Questions - Phantom K80 Dali
User questions about Phantom K80 Dali
0 question about this device. Answer the ones you know or ask your own.
Ask a new question about this device
Download the instructions for your Loudspeaker in PDF format for free! Find your manual Phantom K80 - Dali and take your electronic device back in hand. On this page are published all the documents necessary for the use of your device. Phantom K80 by Dali.
USER MANUAL Phantom K80 Dali
DALI PHANTOM K Series
MANUAL
K-60
K-60 LP
K-80
TABLE 1
| ITEM | K-series |
| Speakers 1 pc | |
| Grilles 1 pc | |
| Cut-out template 1 pc | |
| DALI logo badge - | |
| Owner's manual 1 pc |
FIGURE 1A

flowchart
graph TD
    A["Object 1"] -->|A| B["Object 2"]
    A -->|V| C["Object 3"]
    B -->|V| C
FIGURE 1C

natural_image
Simple diagram showing a person falling into a water body with an upward arrow and a circular symbol above (no text or labels)FIGURE 1B

flowchart
graph TD
    A["Position A"] -->|D| B["Position B"]
    A -->|D| C["Position C"]
    B -->|X| D["Center"]
    C -->|X| D
    D -->|A| A
    D -->|B| E["Position E"]
    style A fill:#f9f,stroke:#333
    style B fill:#ccf,stroke:#333
    style C fill:#cfc,stroke:#333
    style D fill:#fcc,stroke:#333
    style E fill:#ffc,stroke:#333
FIGURE 2 FIGURE 3 FIGURE 4
natural_image
Simple line drawing of a person sitting in a chair facing a spotlight at an angle, with a small vehicle on the wall (no text or symbols)
natural_image
Symmetrical geometric pattern with four petal-like shapes and four circular holes, enclosed in a square frame (no text or symbols)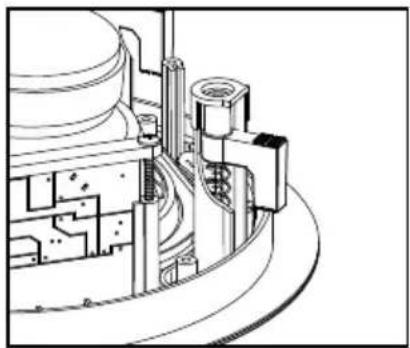
natural_image
Technical line drawing of a mechanical assembly with gears and housing (no text or symbols)FIGURE 5 FIGURE 6

natural_image
Technical line drawing of a mechanical assembly with gears and shafts (no text or symbols)
FIGURE 6B
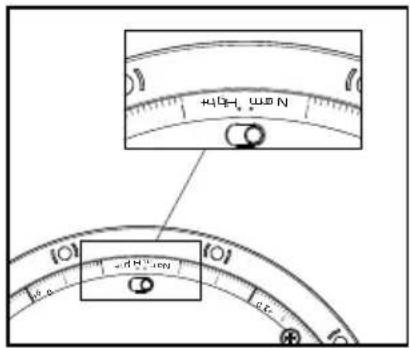
FIGURE 7

natural_image
Diagram of a human hand holding two circular bearing rings, with no text or symbols present.FIGURE 8 FIGURE 9


FIGURE 10

TABLE 2 - PHANTOM K Series TECHNICAL SPECIFICATIONS
| PHANTOM K-60 LP PHANTOM K-60 PHANTOM K-80 | |||
| Frequency range 52 - 26,000 Hz +3 dB | 51 - 25,000 Hz +3 dB 48 - 25,000 Hz +3 dB | ||
| Sensitivity 84 dB @ 1 m for 2.83 V 87 dB | @ 1 m for 2.83 V 87 dB @ 1 m for 2.83 V | ||
| Nominal impedance 8 ohm 6 ohm 6 ohm | |||
| Maximum SPL 103 dB 105 dB 107 dB | |||
| Crossover frequency 2,400 Hz 3,000 Hz | Hz 3,000 Hz | ||
| Crossover principle 2-way 2-way 2-way | |||
| Recommended amplifier power 40 - 150 W | 40 - 150 W | 50 - 200 W | |
| High frequency driver | 1 x 25 mm dome | 1 x 28 mm dome | 1 x 28 mm dome |
| High frequency diaphragm | Soft woven fabric | Soft woven fabric | Soft woven fabric |
| Low/Mid frequency driver | 1 x 6 inch low profile | 1 x 6 12 inch | 1 x 8 inch |
| Low/Mid frequency diaphragm | Anodised aluminium | Wood fibre cone | Wood fibre cone |
| Connection input | Single wire Single wire Single wire | ||
| Enclosure type | Open back | Open back | Open back |
| Other features | Normal/High+ | Normal/High+Normal/Mid+Tiltable (pivoting) tweeter | Normal/High+Normal/Mid+Tiltable (pivoting) tweeter |
| Installation location | In-coiling/in-wall | In-coiling/in-wall | In-coiling/in-wall |
| Recommended placement | Ceiling/Front/Centre/Surround | Ceiling/Front/Centre/Surround | Ceiling/Front/Centre/Surround |
| Outer dimensions incl. grille (∅ x D) | ∅ 265 x 43 mm∅ 10.43 x 1.70 inches | ∅ 265 x 108 mm∅ 10.43 x 4.26 inches | ∅ 301 x 120 mm∅ 11.85 x 4.73 inches |
| Outer dimensions excl. grille (∅ x D) | ∅ 242 x 41 mm∅ 9.53 x 1.62 inches | ∅ 242 x 106 mm∅ 9.53 x 4.18 inches | ∅ 278 x 118 mm∅ 10.95 x 4.65 inches |
| Cut-out dimensions | ∅ 223 mm∅ 8.78 inches | ∅ 223 mm∅ 8.78 inches | ∅ 261 mm∅ 10.28 inches |
| Mounting depth | 36.5 mm1.43 inches | 102 mm4.02 inches | 114 mm4.49 inches |
| Mounting depth incl. BACK CAN | N/A | 217 mm8.54 inches | 217 mm8.54 inches |
| Recommended rear volume (backbox) | 3 - 30 litres | 5 - 50 litres | 7 - 100 litres |
| Optimum rear volume | 9 litres | 15 litres | 30 litres |
| Ceiling/wall thickness(total dog leg span) | 10.5 - 28 mm0.41 - 1.10 inches | 9 - 65 mm0.35 - 2.56 inches | 9 - 65 mm0.35 - 2.56 inches |
| Weight incl. grille | 1.2 kg2.64 lb | 2.50 kg5.51 lb | 3.50 kg7.71 lb |
| Shipping weight | 2.50 kg5.51 lb | 3.50 kg7.71 lb | 4.5 kg9.92 lb |
| Finish | White White White | ||
| Accessories | ManualCut-out templateFront grille | ManualCut-out templateFront grille | ManualCut-out templateFront grille |
| Optional accessories | CLASSIC, SQUARE and DESIGN grillesPHANTOM UNIVERSAL 25 backboxPre construction Kit | CLASSIC, SQUARE and DESIGN grillesPHANTOM K 60 BACK CAN (retrofit)PHANTOM UNIVERSAL 25 backboxPre-construction Kit | CLASSIC, SQUARE and DESIGN grillesPHANTOM K 80 BACK CAN (retrofit)PHANTOM UNIVERSAL 25 backboxPre-construction Kit |
All technical specifications are subject to change without notice.
CONTENTS / INHALT / INDHOLD / 目录 / CONTENU / CONTENIDO
ENGLISH 6
DEUTSCH 12
简体中文 19
FRANÇAIS 24
ESPAÑOL 31
CONTENTS
1.0 OWNER'S MANUAL 7
2.0 SAFETY PRECAUTIONS 7
3.0 UNPACKING/PARTS LIST 7
4.0 DALI PHANTOM K-SERIES - SETUP AND POSITIONING 7
5.0 CUT-OUT TEMPLATE 10
7.0 RUNNING-IN 11
8.0 MAGNETIC SHIELDING 11
9.0 MAINTENANCE 11
10.0 ENVIRONMENTAL INFORMATION AND DISPOSAL 11
11.0 TECHNICAL SPECIFICATIONS 11
1.0 OWNER'S MANUAL
Congratulations on your new loudspeakers. Please read this manual carefully before you unpack and install your new loudspeakers to get the most out of your purchase. You can find more information on our website: www.dali-speakers.com or by contacting your authorized DALI dealer.
2.0 SAFETY PRECAUTIONS
• Always follow all safety guidelines.
• DALI PHANTOM K-series is intended for indoor use.
- The loudspeaker must only be used indoors and never in extreme hot or cold temperatures.
• DALI PHANTOM K-series must not be exposed to direct sunlight.
- Power off the amplifier when connecting the speaker cables to the loudspeaker and the amplifier.
• DALI PHANTOM K-series must be installed by professionals.
- Always make sure that there are no installations such as gas pipes, ventilation, cables, etc. in the ceiling or wall at the mounting location.
- The wall or ceiling must be able to support the loudspeaker's weight – see the technical specifications.
- If the loudspeakers are mounted in a ceiling or wall where there is a vapor barrier inside the wall, make sure not to pierce/damage the barrier.
- For extreme SPL performance we advise to low cut the signal in the amplifier or processor driving the loudspeaker.
- Extended use of loudspeakers at high volume levels may cause hearing damage. Do not raise the volume beyond comfortable levels.
3.0 UNPACKING/PARTS LIST
Be careful not to damage the contents when you unpack the parts. Check that all parts are contained in the cardboard box, see table 1. Keep the packaging materials if your loudspeakers should need to be relocated or serviced.
4.0 DALI PHANTOM K-SERIES - SETUP AND POSITIONING
DALI PHANTOM K-series provides the unique, acclaimed sound of a true DALI PHANTOM loudspeaker for easy and discreet integration into your home.
DALI PHANTOM K-series is equally suited for stereo and home cinema systems where good sound quality is a high priority. DALI PHANTOM K-series is also very suitable in larger areas where high quality sound is desired, e.g. in hallways or shop areas. DALI recommends the use of a subwoofer together with DALI PHANTOM K-series to permit reproduction of the lowest frequencies and an overall enhancement of your sound system.
For stereo and home cinema we recommend that you position the loud speakers symmetrically around your favorite listening position to achieve optimum soundstage (see figure 1A + 1B + 1C). To avoid compromising clarity from the loudspeaker, it
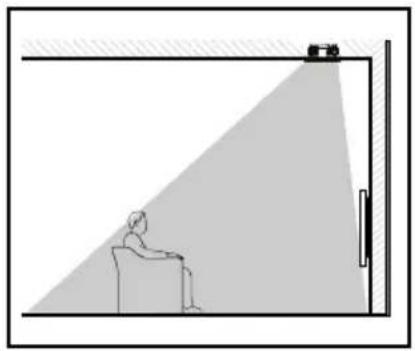
is also important, that you do not position the loudspeaker too far away from the listening position. We recommend that the greatest off axis listening angle is 45 degrees (measured between the center axis of the loudspeaker and the listening position – see figure 2).
In a distributed sound system setup it is important, that the loudspeakers are positioned so that the main area of the room(s) is covered with sound (see chapter 4.4). To achieve an even sound coverage, the loudspeakers should be installed evenly in the room(s) (see figure 3).
Objects positioned between the loudspeaker and listening position might negatively affect the sound quality. The PHANTOM K-series is designed to meet our wide dispersion sound principle. By using loudspeakers with wide dispersion technology, the distortion in the main listening area will be lowered and the room integration will be better. The wide dispersion principle will also ensure that sound is spread evenly within a large area in the listening room.
Every room has its own distinctive acoustics, which influence the way we experience sound from a loudspeaker. The sound you hear consists of both direct sound from the loudspeakers and reflected sound from the floor, ceiling and walls. The latter will affect how you experience the sound. As a basic rule, try to avoid large, hard and reflective areas in the immediate vicinity of your loudspeakers as it will typically cause strong reflections, which might disturb the precision and spatial effect of the sound reproduction. Soft items such as carpets, curtains etc. might help if the sound is too bright.
Both the amount and quality of the deep bass depend on the size and shape of the room, and the position of the loudspeakers. Positioning the loudspeakers near a side or back wall will accentuate the bass. A corner location will accentuate it even more, but will also increase the reflections.
4.1 Mounting the dogleg brackets
DALI PHANTOM K-series incorporates dogleg brackets for ceiling/wall mounting. The brackets attach the loudspeaker firmly to the rear of the surface on which it is mounted. The dogleg brackets extend out at a 90-degree angle when the screws are tightened (see figure 4). The screws should be tightened so that the loudspeaker sits securely in place – but be careful not to over tighten the screws. To tighten the screws, use an appropriate bit. The bit should be used with a hand bit screwdriver or a drilling machine with build-in torque setting. If using a drilling machine, set the torque to the minimum setting. The screws are appropriately tightened, when the gasket on the rear of the speaker is compressed and the bezel of the loudspeaker is flush with the mounting surface.
If you need to remove the loudspeaker, loosen the screws approximately 5 to 20 turns counter clockwise and the brackets will loosen their grip. NOTE: do not unscrew more than 20 to 25 turns or the brackets may fall off the screws.
If you are mounting the loudspeaker in very thick wall material, it might be needed to dismount the dogleg brackets from the screws and afterwards mounting them
upside down. Opposite mounting of the doglegs will make it possible to mount the loudspeaker in boards with up to 2.56"/ 65 mm thickness (see figure 5). It is not possible to turn the doglegs around on the K-60 LP due to its low profile installation depth. The max board thickness for the K-60 LP is 28 mm / 1.10", and minimum board thickness is 10.5 mm / 0.41".
4.2 Grille
The front grille is fixed in place by the magnets incorporated into the front baffle of the DALI PHANTOM K-series.
NOTE: There is an optional square grille available for order.
NOTE: On the inside of the grille there is a piece of non-woven. The non-woven is on the grille to protect the drivers against dust and dirt. Therefore the non-woven must remain on the grille.
4.3 Adjustment of Switches
When the grille is removed from the loudspeaker, you will see the woofer and the tweeter and one or two switches (see figure 6). The switches can be used to adjust the sound from the loudspeaker to a custom setup. The switches can be operated independent of each other.
One switch can increase the tweeter level 3 dB if it is switched from the "Normal" setting to the "High+" setting.
The other switch can increase the midrange level by 3 dB when switched from the "Normal" setting to the "Mid+" setting. The K-60 LP features the High+ switch only.
4.4 Loudspeaker Rotation - Using the Compass
When the grille is removed you can see a compass ring round the edge of the loudspeaker bezel, which can be used to read out the rotation of the loudspeaker relatively to, for example, a fixed line on the ceiling. The tweeter is slightly off-center and should be positioned so it is closest to the main listening position (see figure 7).
4.5 Connection of Cables/Selection of Cables
Your choice of cables is a crucial element in your installation. Be aware that replacing cables after installation is a difficult task. Therefore, select quality cables from the beginning. Please consult your authorized DALI dealer for further advice on which cable to select.
When connecting the cable to the loudspeaker and the amplifier, it is important that the loudspeaker is connected in correct phase. The red (+) loudspeaker terminal must be connected to the red (+) amplifier terminal. The black (-) loudspeaker terminal must be connected to the black (-) amplifier terminal. If the loudspeakers are not connected in correct phase, the soundstage will typically be diffuse and the bass will be weak.
To insert the cable end into the spring loaded terminals of the loudspeaker, remove cable insulation so that approximately 12 " / 12 mm of bare wire is exposed. Press the
top of the terminal down and insert the bare wire into the opening. When the wire is fully in place with no loose strands exposed, release the terminal. The cable is now connected. Please refer to figure 8 for correct cable connection.
5.0 CUT-OUT TEMPLATE
The enclosed cut-out template (see figure 9) can be used to initially visualize how your loudspeakers should be mounted and for marking where the cut-out should be made. Tape the template at the preferred mounting position, so that you can mark the necessary opening. The minimum mounting depth for the DALI PHANTOM K models can be found in the Technical Specifications.
6.0 INSTALLATION
Please study and follow the safety guidelines found in chapter 2.0 of this manual! Use a trained professional to ensure that all safety requirements are met to prevent the loudspeaker from falling.
The following tools and items are necessary for proper installation:
- Tape measure
- Pencil and saw or knife
- Appropriate bit or screwdriver
- Tape
- Cut-out template
When the correct placement has been found, tape the mounting template to the surface. Outline the cut-out area with a pencil.
Remove the template and drill holes for insertion of saw or knife. Saw/cut carefully along the line marked with pencil.
When the hole for the loudspeaker is made, make sure that the loudspeaker cable is not hanging loose inside the ceiling/wall. It must be securely fastened to the inside of the ceiling/wall to prevent tension on the cable when the cable is connected with the terminals of the loudspeaker. If left unsupported, cable can gradually come loose, creating a poor electrical connection between wire and terminals (see figure 8 for correct fastening of the cable).
When the speaker cable is fastened and the hole for the loudspeaker is prepared, you are ready to connect the speaker cables. Connect cable to the terminals – being careful to connect the amplifier's red (+) terminal to the loudspeaker's red (+) terminal and the amplifier's black (-) terminal to the loudspeaker's black (-) terminal. Please refer to chapter 4.5 of this manual.
When the cables are connected, turn on the system and listen to the loudspeakers before final mounting to make sure that all connections are correct. Insert the loudspeaker in the ceiling/wall opening and align the loudspeaker as described in chapter 4.4.
NOTE: Be careful not to touch the drivers during installation. When the loudspeaker is aligned, tighten the 4 screws in the loudspeaker brackets with an appropriate screwdriver or bit so that the loudspeaker is firmly mounted in place. Be careful to avoid over-tightening the screws and shredding the threads.
7.0 RUNNING-IN
You should expect the sound quality from your new loudspeakers to gradually improve during the first period of use. Nothing particular has to be done in order to run in the loudspeakers – but expect up to 100 hours of playback (depending on playback level) before full performance level is reached.
8.0 MAGNETIC SHIELDING
The loudspeaker drive units produce a magnetic field which may interfere with CRT televisions/monitors, hard drives, audio and video tapes as well as swipe cards etc. Therefore keep such items away from the loudspeakers to avoid damage. LCD and plasma televisions/monitors are not affected by magnetic fields.
9.0 MAINTENANCE
Cleaning the loudspeaker surfaces can be done with ordinary household cleaning agents. Avoid using products that are abrasive, or contain acid, alkali or antibacterial agents. Avoid using aerosols. Avoid using cleaning agents directly on the drive units and clean them with extreme care, particularly the tweeter. The grille may be cleaned using a vacuum cleaner or a normal clothes brush.
10.0 ENVIRONMENTAL INFORMATION AND DISPOSAL
DALI products are designed to meet the international directives concerning Restriction of Hazardous Substances (RoHS) and disposal of Waste Electrical and Electronic Equipment (WEEE). The waste symbol indicates that the loudspeakers meet the directives (see figure 10). The loudspeakers must be processed or recycled appropriately. Please consult your local waste authority for guidance.
11.0 TECHNICAL SPECIFICATIONS
In Table 2 (see page 4) you will find most common specifications for our loudspeakers. Please bear in mind, that the sound quality from a loudspeaker cannot be judged by technical specifications only. To compare the different loudspeakers, we recommend you to listen to the different loudspeakers in question.
INHALT





- DALI PHANTOM K Series
- MANUAL
- CONTENTS / INHALT / INDHOLD / 目录 / CONTENU / CONTENIDO
- CONTENTS
- OWNER'S MANUAL
- SAFETY PRECAUTIONS
- UNPACKING/PARTS LIST
- DALI PHANTOM K-SERIES - SETUP AND POSITIONING
- Mounting the dogleg brackets
- Grille
- Adjustment of Switches
- Loudspeaker Rotation - Using the Compass
- Connection of Cables/Selection of Cables
- CUT-OUT TEMPLATE
- INSTALLATION
- RUNNING-IN
- MAGNETIC SHIELDING
- MAINTENANCE
- ENVIRONMENTAL INFORMATION AND DISPOSAL
- TECHNICAL SPECIFICATIONS
- INHALT
Brand : Dali
Model : Phantom K80
Category : Loudspeaker