BG111826 - Barbecue Emerio - Free user manual and instructions
Find the device manual for free BG111826 Emerio in PDF.


| Brand | Emerio |
| Model | BG111826 |
| Product type | Electric barbecue |
| Power supply | 220-240 V ~ 50/60 Hz, 1600 W |
| Water capacity | 0.4 L (min) to 0.9 L (max) |
| Temperature adjustment | Yes, via rotary knob (MIN / MAX) |
| Functions | Grilling, keep warm |
| Safety | Safety switch (heating element locked), hot surface, do not use charcoal |
| Materials | Steel, plastic (feet, handles) |
| Included parts | Main housing, grill plate, drip tray, windscreen, heating element with control box, metal stand, grid, metal pipe, hook, 4 feet, 2 handles, screws and nuts |
| Cleaning | Hand wash non-electrical parts; never immerse the heating element or control box |
| Usage | Indoor only, on a flat and rigid surface, at least 50 cm from walls and flammable objects |
| Warranty | 2 years |
| Recycling | Compliant with WEEE directive 2012/19/EU |
Frequently Asked Questions - BG111826 Emerio
User questions about BG111826 Emerio
0 question about this device. Answer the ones you know or ask your own.
Ask a new question about this device
Download the instructions for your Barbecue in PDF format for free! Find your manual BG111826 - Emerio and take your electronic device back in hand. On this page are published all the documents necessary for the use of your device. BG111826 by Emerio.
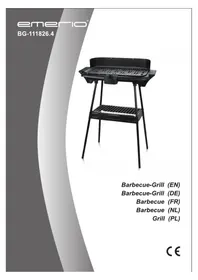
USER MANUAL BG111826 Emerio
natural_image
Black outdoor grill with metal legs and grating base (no text or symbols visible)Barbecue-Grill (EN)
Barbecue-Grill (DE)
Barbecue (FR)
Barbecue (NL)
Grill (PL)
Content – Inhalt – Teneur – Inhoud – Treść
Instruction manual – English ...... - 2 -
Before use make sure to read all of the below instructions in order to avoid injury or damage, and to get the best results from the appliance. Make sure to keep this manual in a safe place. If you give or transfer this appliance to someone else make sure to also include this manual.
In case of damage caused by user failing to follow the instructions in this manual the warranty will be void. The manufacturer/importer accepts no liability for damages caused by failure to follow the manual, a negligent use or use not in accordance with the requirements of this manual.
-
This appliance can be used by children aged from 8 years and above and persons with reduced physical, sensory or mental capabilities or lack of experience and knowledge if they have been given supervision or instruction concerning use of the appliance in a safe way and understand the hazards involved.
-
Children shall not play with the appliance.
-
Cleaning and user maintenance shall not be made by children unless they are older than 8 years and supervised.
-
Keep the appliance and its cord out of reach of children less than 8 years.
-
If the supply cord is damaged, it must be replaced by the manufacturer, its service agent or similarly qualified persons in order to avoid a hazard.
-
Regarding the instructions for cleaning the surfaces which come in contact with food or oil, please refer to the paragraph “cleaning and maintenance” of the manual.
-
This appliance is not intended to be operated by means of an external timer or separate remote-control system.
-
Before inserting the plug into the mains socket, please check that the voltage and frequency comply with the specifications on the rating label.
-
If an extension cord is used it must be suited to the power consumption of the appliance, otherwise overheating of
the extension cord and/or plug may occur. There is a potential risk of injuries from tripping over the extension cord. Be careful to avoid dangerous situations.
-
Ensure that the mains cable is not hung over sharp edges and keep it away from hot objects and open flames.
-
Do not immerse the appliance or the mains plug in water or other liquids. There is danger to life due to electric shock!
-
To remove the plug from the plug socket, pull the plug. Do not pull the power cord.
-
Do not plug or unplug the appliance from the electrical outlet with a wet hand.
-
Never leave the appliance unattended during use.
-
Do not use the appliance for other than intended use.
-
Do not wind the cord around the appliance and do not bend it.
-
WARNING: Charcoal or similar combustible fuels must not be used with this appliance.
-
Danger! Nominal voltage is still present in the appliance as long as the appliance is connected to the mains socket.
-
Switch off the appliance before disconnect from the mains.
-
Before use, the appliance must be placed on a firm, flat surface and at least 50 cm away from the nearest wall or any flammable objects.
-
Attention! The appliance is become very hot! It must cool down completely, before its surface can be touched. Removing and cleaning of the barbecue grill, the control unit and the drip tray may only be done after the appliance has cooled down completely.
-
Burn hazard! Be careful when handling hot oil and fat. Beware of spitting oil and hot steam!
-
Do not move the appliance during use.
-
Due to safety reasons, if the control unit is removed from the body of the appliance, the barbecue must not be switched on.
-
Always plug the appliance into an earthed plug socket.
-
When using the appliance, be careful not to position it next to a wall or corner, and ensure that no inflammable materials are stored near it.
- Always fill the main body with water before you switch on the appliance. The water helps to cool down the main body, reduces the build-up of smoke, and also facilitates cleaning.
- Water level inside the main body:

MAX 0.9L
MIN 0.4L
The maximum water capacity is 0.9L and the minimum water capacity is 0.4L. Do not add water that overflows the main body.
-
Before the appliance is used, always check that the heating element is correctly fitted in the body and safely locked. Do not connect the appliance to mains power until the body has been filled with water.
-
Always remove the plug from the mains supply socket in the case of any malfunction, before cleaning and maintenance and after use.
-
Before carrying, transporting or storing the appliance, ensure that is has sufficiently cooled down. Pour out any remaining water after use.
-
This appliance is designed for household use only and not for commercial applications.
-
The appliance must not be stored outdoors. Indoor use only.
-
WARNING: Never put the heating element, control box and the plug into water.
-
WARNING: Silver paper must not be used with this appliance.
-
WARNING: In order to avoid overheating, this appliance shall not be covered by any solid or flexible material such as an aluminum tray, aluminum foil or trays made of other heat resistant material. The use of such items or materials on the grill plate would impair the safety of your product and could lead to serious damage.
-
If you use products with non-stick surfaces, please make sure no birds are in the same room and that the room can be completely closed off and well-ventilated.
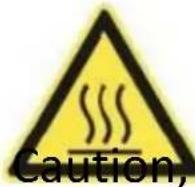
- Caution, hot surface.
WARNING!! Please do not touch surface while in use. The temperature of accessible surfaces may be high when the appliance is operating.
-
Caution: do not, under any circumstances, cover the grill plate with aluminous foil, barbecue dishes or other items, as the resulting build-up of heat could cause irreparable damage to the grill.
-
Do not, under any circumstances, use charcoal or any other solid or liquid fuel to operate the grill.
PARTS DESCRIPTION
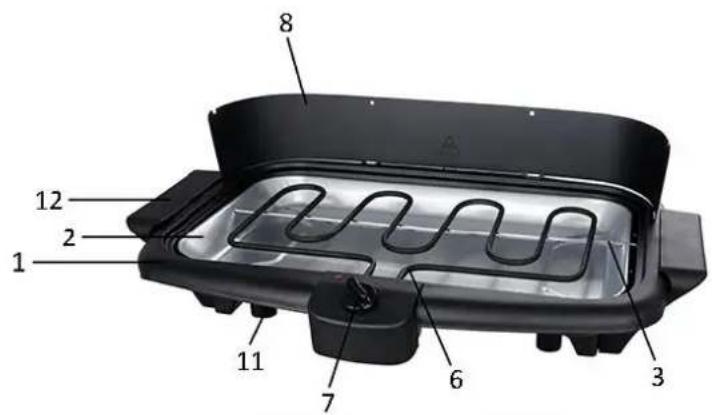
natural_image
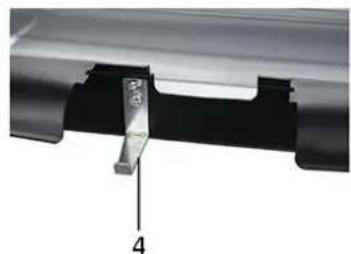
Close-up of a mechanical component with a labeled part (4), showing no visible text or symbols.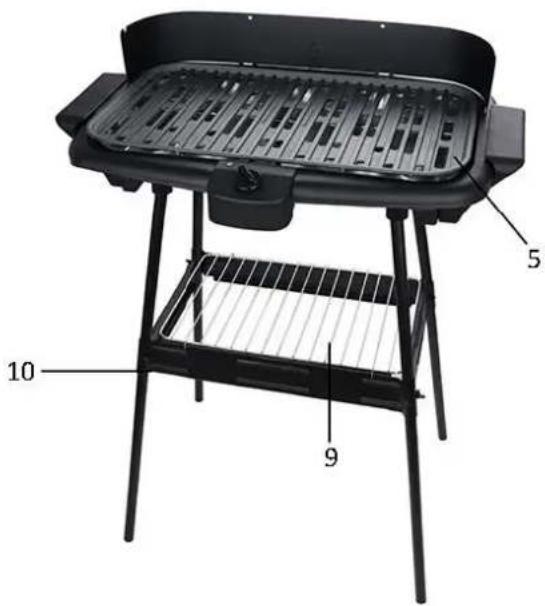
- Main body
- Drip tray
- Straight metal pipe
- Metal hook
- Grill plate
- Heating element with control box
- Control knob
- Wind shield
- Wire rack
- Stand with shelves
- Feet (4 pcs.)
- Handle (on both sides)
BEFORE FIRST USE
- Remove all packaging.
• Clean the appliance, as described in Cleaning and Maintenance. - Switch the barbecue on for 5 minutes without food on it before first use, so that possible production residues are removed. During that time, a smell might occur but this is not a defect of the appliance.
ASSEMBLY

Fig 1
natural_image
Technical line drawing of a car chassis frame with no visible text or symbolsFig 2
natural_image
Technical line drawing of a device casing with labeled component A (no text or symbols beyond label)Fig 3
natural_image
Technical line drawing of a vehicle front panel showing internal components and a downward arrow indicating assembly (no text or symbols)Fig 4
natural_image
Technical line drawing of a mechanical component with cross-sectional and top views (no text or symbols)Fig 5
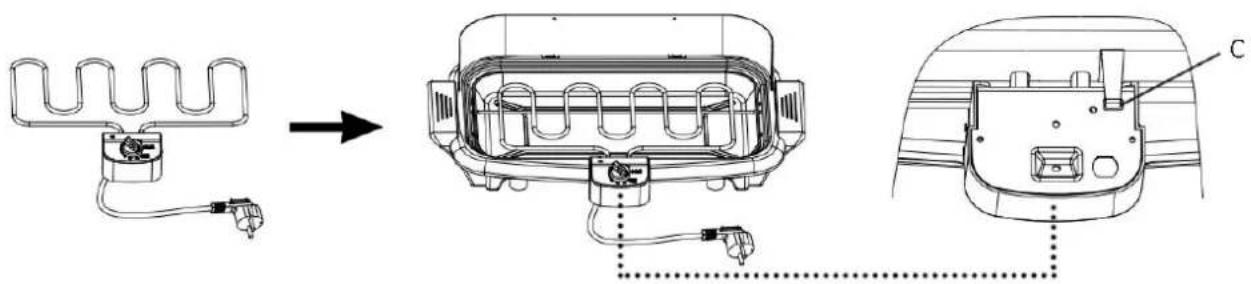
Fig 6
natural_image
Diagram showing a heat exchanger with internal grid structure before and after assembly (no text or symbols)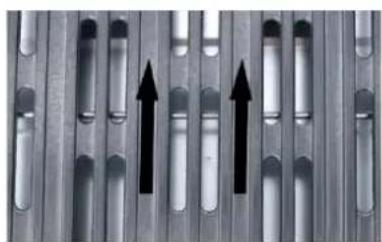
natural_image
Close-up of metallic cylindrical components with three upward-pointing arrows indicating direction (no text or symbols)Fig 7
-
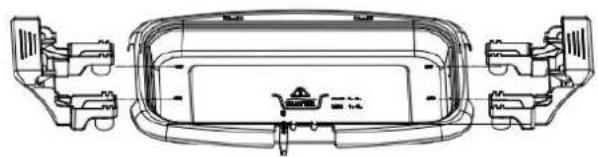
Insert the 4 pieces plastic feet into the handles. Make sure that the protruding part of all plastic feet are in outside direction.
-
Install the handles onto the main body. Align the two screw holes on each handle and on each side of the main body. Insert the ST2.9 screws into the holes. Tighten the screws to fix the handles and the main body firmly.
-
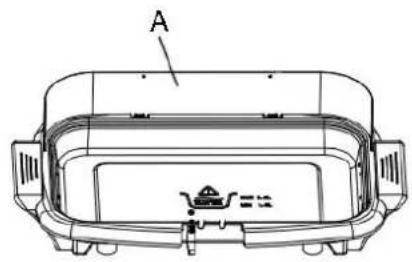
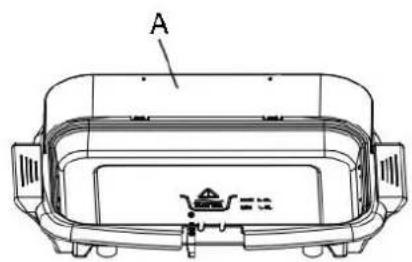
Install the wind shield (A) onto the main body. Fill the main body with cold water. The maximum water capacity is 0.9L and the minimum water capacity is 0.4L. Do not add water that overflows the main body. During use the water in the main body will evaporate and should be refilled. Otherwise the product will get too hot.
Note: Make sure you do not drip water on to the element.
-
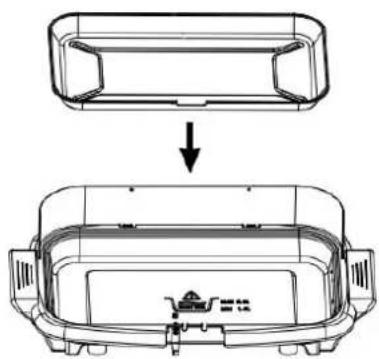
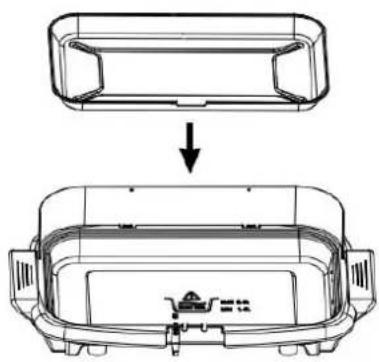
Place the drip tray onto the main body.
-
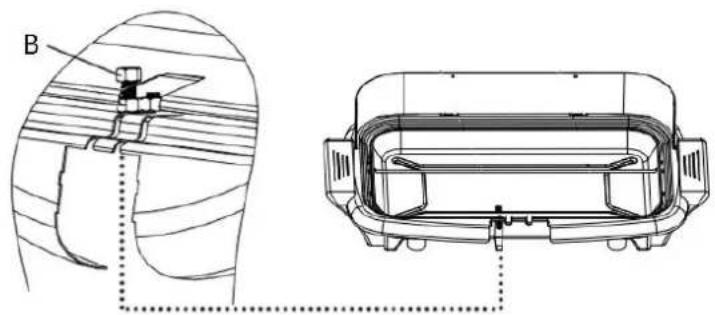
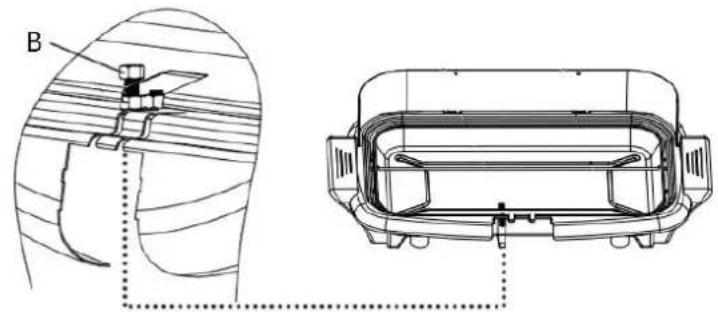
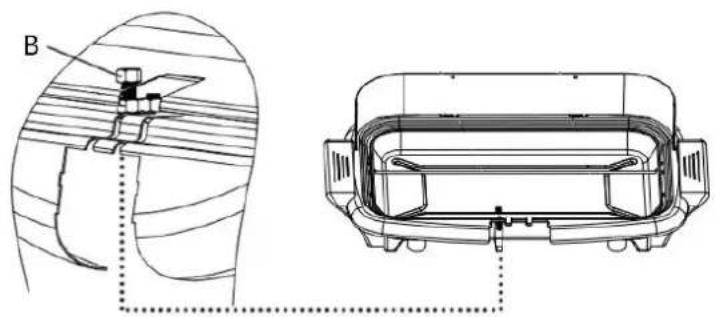
Have the straight metal pipe through the two holes of the drip tray and the main body on the left and right sides. Be sure the long screw of the metal hook through the hole of the drip tray to make it sit properly. Screw the provided M4 nut (B) onto the long screw to fix the drip tray.
-
Place the heating element with the control box on to the main body. Make sure the end of the metal hook is inserted into the bottom hole (C) of the control box, so that the safety switch is activated. Otherwise, the appliance cannot be switched on.
-
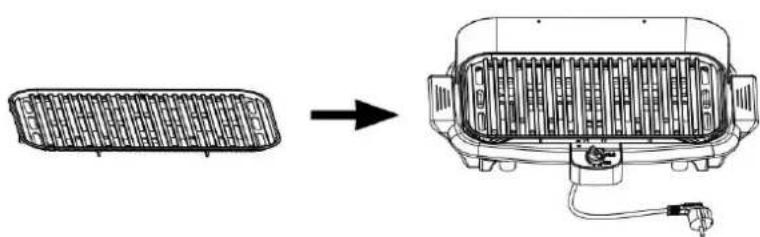
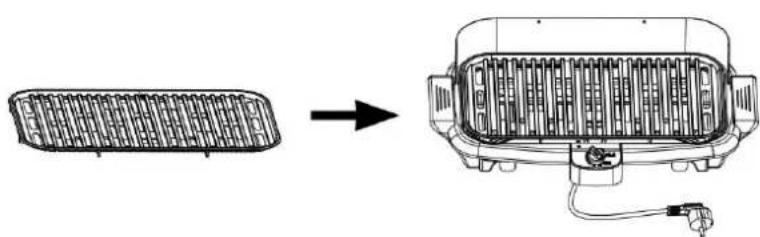
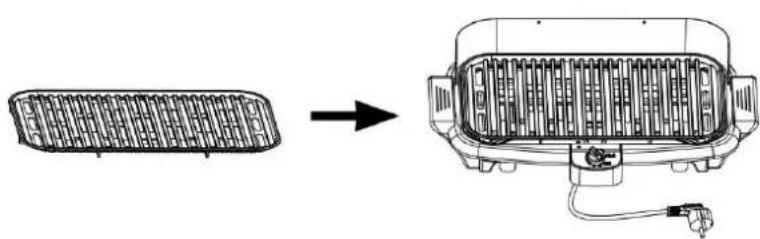
Place the grill plate on to the main body. Make sure the arrows on the grill plate face towards the direction of the wind shield, so that the heating element could be covered by the grill plate to avoid the oil dripping on to the element.
Stand assembly:
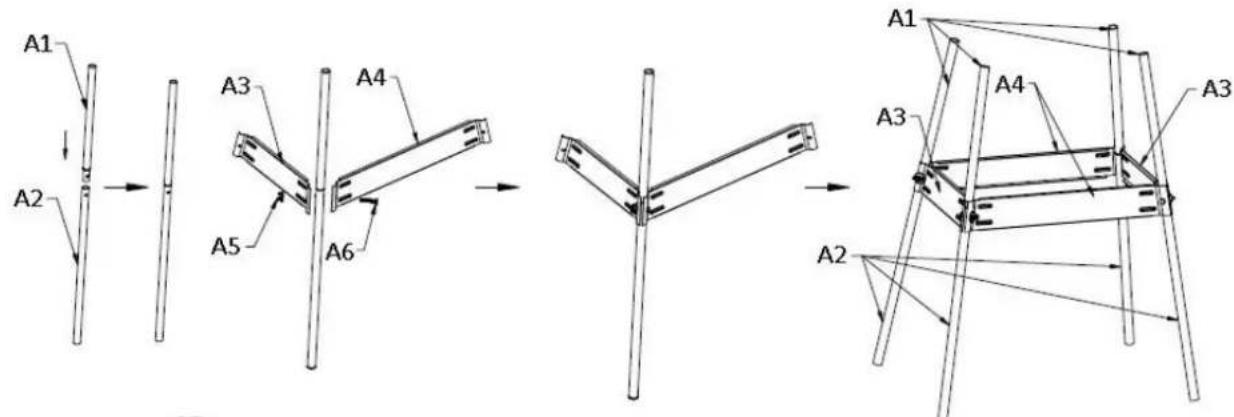
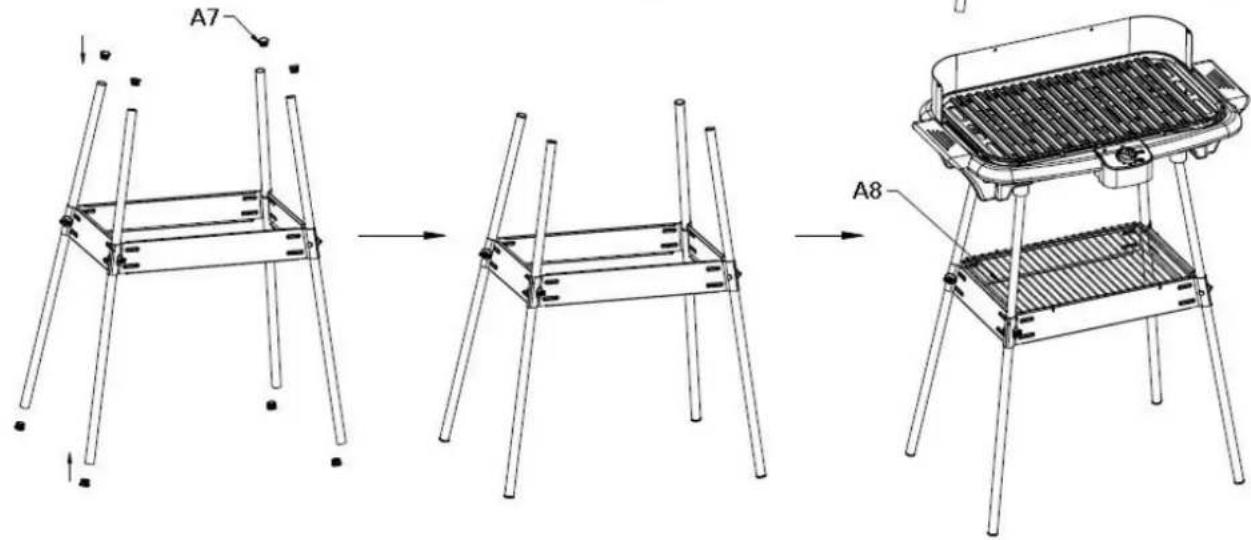
- Connect the short pipe (A1) with the long pipe (A2). Make sure they are fixed firmly.
- Attach the short metal shelf (A3) and the long metal shelf (A4) onto the pipe. Fix with the butterfly nut (A5) and the M5 screw (A6).
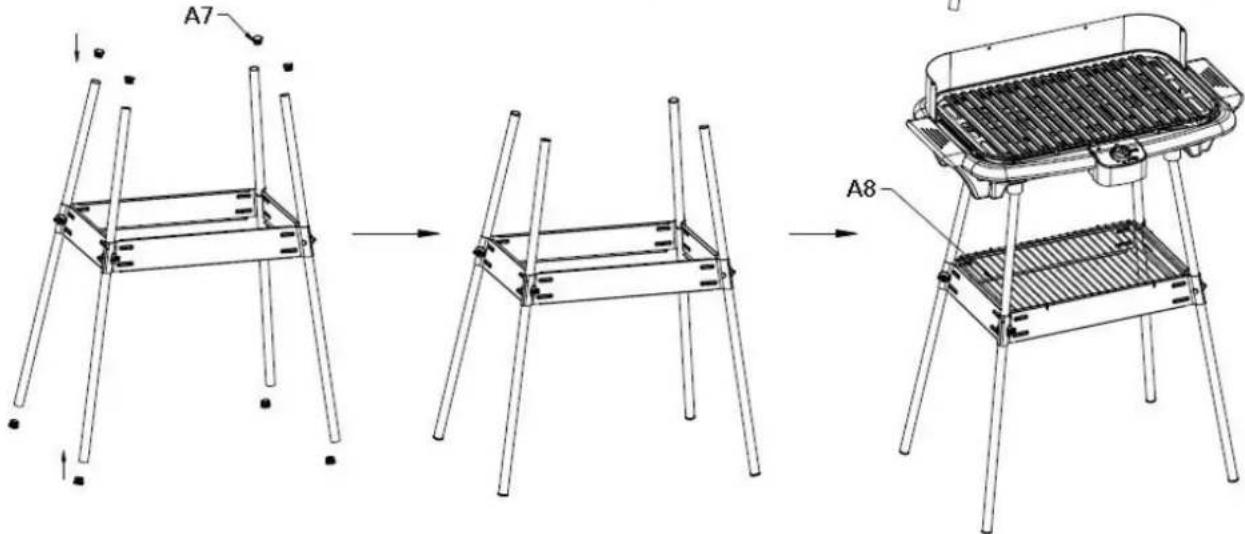
- Assemble the other 3 pieces of stands as above process. Insert fittings (A7) into the pipe openings.
- Place the main body on top of the stand. Place the wire rack (A8) onto the shelves.
OPERATION
- Connect the power plug into a suitable outlet.
- Turn the control knob to the "MAX" position, the indicator light will illuminate to indicate the heating element is heating up.
- After approximately 5-10 minutes, the heating element reaches the suitable temperature. Please place your food on the grill plate for grilling. During use, you can turn the control knob back to choose your desired position. Deep frozen food should be defrosted completely before barbecuing.
The grill can also be used to keep the food warm: turn the control knob to a lower position, the heating element will be switched on and off alternatively, and thus the food can be kept warm.
- To grill food evenly, it should be turned several times during the barbecue. The barbecuing time depends on the food to be grilled.
- Caution! To avoid a heat accumulation, do not place aluminum foil or other barbecue accessories on the barbecue grill.
- During use the water in the main body will evaporate and should be refilled. Otherwise the product will get too hot.
Note: Make sure you do not drip water on to the element.
- To switch off the appliance, turn the control knob to "MIN" position and unplug the power cord from outlet.
- The grill plate, the heating element and the control unit and other parts must be removed only after the appliance has cooled down completely.
CLEANING AND MAINTENANCE
• Before cleaning, unplug and allow the appliance to cool down.
- Never immerse the heating element and the control box into water or other liquid. Clean them with a clean dry cloth only. Never switch the heating element on when it is not placed onto the appliance.
- The other barbecue components can be cleaned with warm water and mild detergent.
- Let the appliance dry completely before it is reconnected to the supply.
- Use no sharp or abrasive cleaning agents.
- Do not put any parts in a dishwasher for cleaning.
TECHNICAL DATA
Operating voltage: 220-240V \~ 50/60Hz
Power consumption: 1600W
GUARANTEE AND CUSTOMER SERVICE
Before delivery our devices are subjected to rigorous quality control. If, despite all care, damage has occurred during production or transportation, please return the device to your dealer. In addition to statutory legal rights, the purchaser has an option to claim under the terms of the following guarantee:
For the purchased device we provide 2 years guarantee, commencing from the day of sale. If you have a defective product, you can directly go back to the point of purchase.
Defects which arise due to improper handling of the device and malfunctions due to interventions and repairs by third parties or the fitting of non-original parts are not covered by this guarantee. Always keep your receipt, without the receipt you can't claim any form of warranty. Damage caused by not following the instruction manual, will lead to a void of warranty, if this results in consequential damages then we will not be liable. Neither can we hold responsible for material damage or personal injury caused by improper use or if the instruction manual are not properly executed. Damage to accessories does not mean free replacement of the whole appliance. In such case please contact our service department. Broken glass or breakage of plastic parts is always subject to a charge.
Defects to consumables or parts subjected to wearing, as well as cleaning, maintenance or the replacement of said parts are not covered by the warranty and are to be paid.
ENVIRONMENT FRIENDLY DISPOSAL
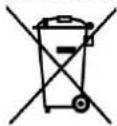
Recycling – European Directive 2012/19/EU
This marking indicates that this product should not be disposed with other household wastes. To prevent possible harm to the environment or human health from uncontrolled waste disposal, recycle it responsibly to promote the sustainable reuse of material resources. To return your used device, please use the return and collection systems or contact the retailer where the product was purchased. They can take this product for environmental safe recycling.
Manufactured by: Emerio Deutschland GmbH
natural_image
Close-up of a mechanical component with a labeled part (4) and a tool inserted, no visible text or symbols.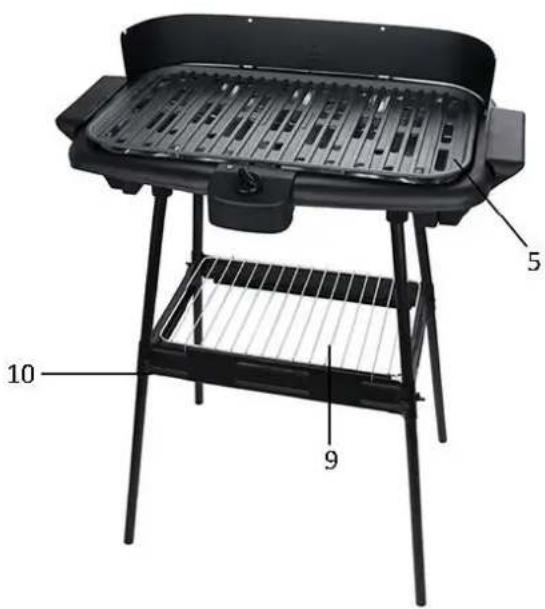
natural_image
Technical line drawing of a vehicle chassis with front and rear compartments (no text or symbols)Abb. 2
natural_image
Technical line drawing of a vehicle dashboard frame with labeled component A (no text or symbols beyond label)Abb. 3
natural_image
Technical line drawing of a vehicle interior frame with a downward arrow indicating transformation (no text or symbols)Abb. 4
natural_image
Technical line drawing of a mechanical component with cross-sectional view (no text or symbols)Abb. 5
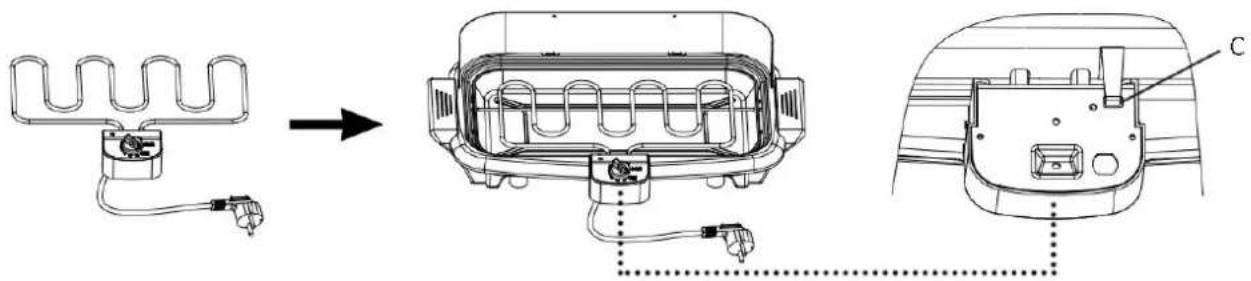
Abb. 6
natural_image
Diagram showing a heat exchanger with internal grid structure before and after assembly (no text or symbols)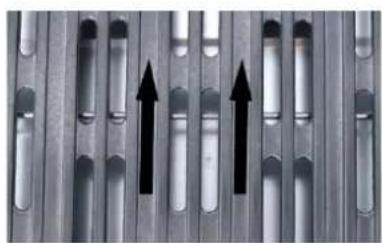
natural_image
Close-up of metallic cylindrical objects with three upward-pointing arrows, no visible text or symbolsAbb. 7
- Attention, surface chaude.
natural_image
Close-up of a mechanical component with a labeled part (4) and a tool inserted, no visible text or symbols.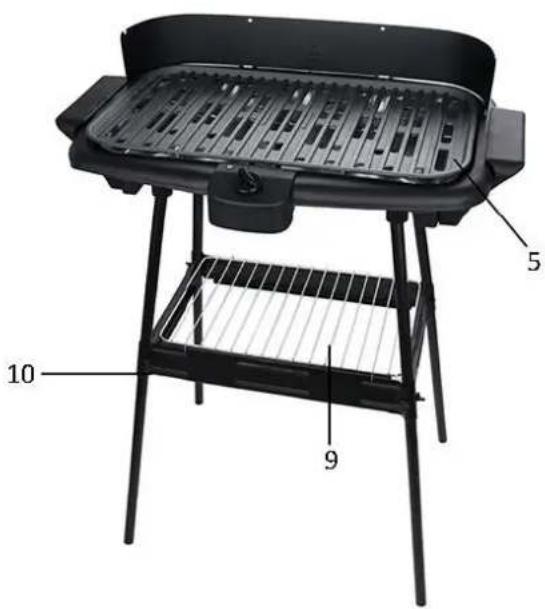
natural_image
Technical line drawing of a car interior frame with a downward arrow indicating transformation (no text or symbols)Fig 4
natural_image
Technical line drawing of a mechanical component with cross-sectional and top views (no text or symbols)Fig 5
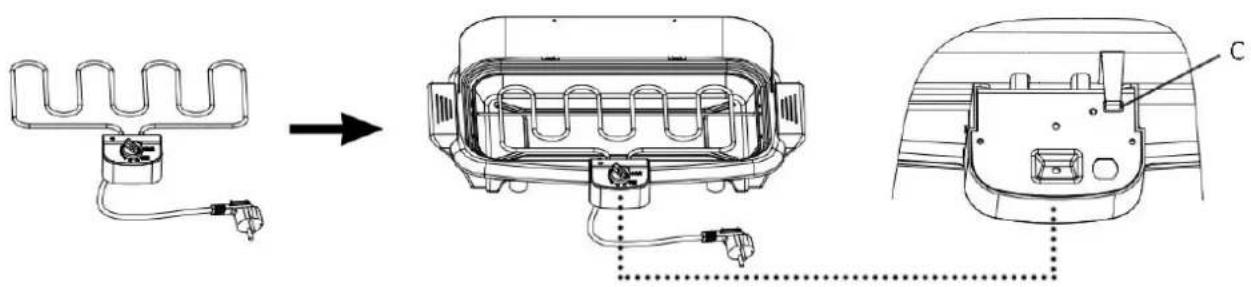
Fig 6
natural_image
Diagram showing a vehicle exhaust fan being processed from a flat panel to a rectangular heater with electrical plug (no text or symbols)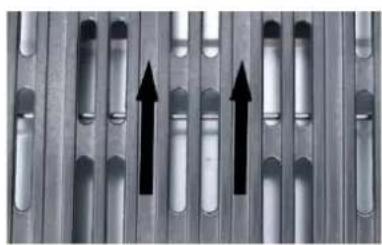
natural_image
Close-up of metallic cylindrical objects with three upward-pointing arrows, no visible text or symbolsFig 7
natural_image
Close-up of a mechanical component with a labeled part (4) and a tool inserted, no visible text or symbols.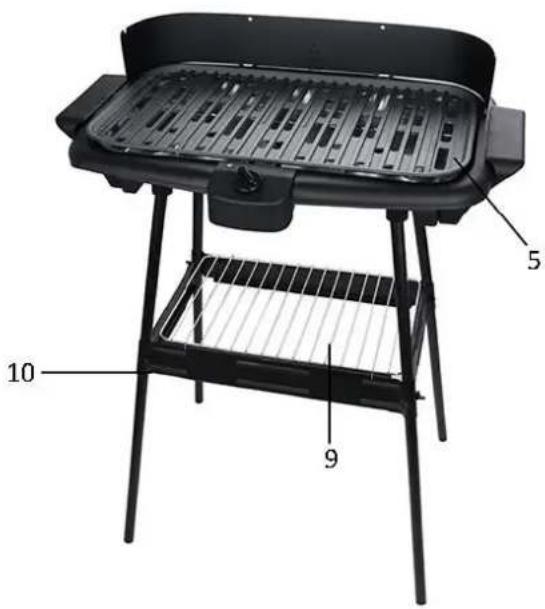
natural_image
Close-up of a mechanical component with a labeled part (4) and a tool inserted, no visible text or symbols.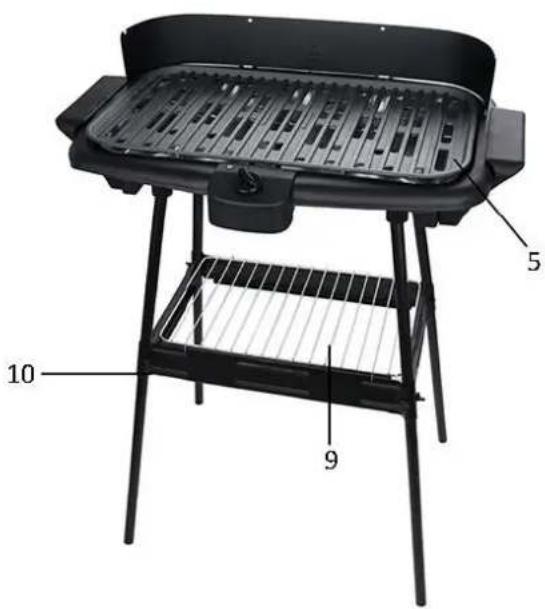

Brand : Emerio
Model : BG111826
Category : Barbecue