
ARC153 - Freezer Infiniton - Free user manual and instructions
Find the device manual for free ARC153 Infiniton in PDF.
| Product Type | Freezer |
| Brand | Infiniton |
| Model | ARC153 |
| Gross Total Capacity | 142 L |
| Freezer Useful Capacity | 142 L |
| Freezing Power | 6.5 kg/24 h |
| Annual Energy Consumption | 190 kWh/year |
| Climate Class | SN, N, ST, T (from +10 °C to +43 °C) |
| Power Supply Voltage | 220-240 V ~ 50 Hz |
| Rated Current | 0.5 A |
| Rated Power | 85 W |
| Refrigerant | R600a (isobutane) – 45 g |
| Net Weight | 27 kg |
| Defrost Type | Manual |
| Temperature Setting | Rotary thermostat (positions 1 to 7, ON) |
| Light Indicators | Red light (power) and green light (operation) |
| Included Accessories | Metal basket, ice tray |
| Adjustable Feet | Yes (2 front feet) |
| Rear Wheels | Yes (2 wheels for moving) |
| Installation | Wait 2 hours before first use |
| Cleaning | Warm water and mild detergent; do not use steam cleaner |
| Protection Class | Class I (grounding required) |
Frequently Asked Questions - ARC153 Infiniton
User questions about ARC153 Infiniton
0 question about this device. Answer the ones you know or ask your own.
Ask a new question about this device
Download the instructions for your Freezer in PDF format for free! Find your manual ARC153 - Infiniton and take your electronic device back in hand. On this page are published all the documents necessary for the use of your device. ARC153 by Infiniton.
USER MANUAL ARC153 Infiniton
In the interest of your safety and to ensure the correct use, before installing and first using the appliance, read this user manual carefully, including its hints and warnings. To avoid unnecessary mistakes and accidents, it is important to ensure that all people using the appliance are thoroughly familiar with its operation and safety features. Save these instructions and make sure that they remain with the appliance if it is moved or sold, so that everyone using it through its life will be properly informed on appliance use and safety.
For the safety of life and property keep the precautions of these user's instructions as the manufacturer is not responsible for damages caused by omission.
Children andvulnerable people safety
- This appliance can be used by children aged from 8 years and above and persons with reduced physical, sensory or mental capabilities or lack of experience and knowledge if they have been given super vision or instruction concerning use of the appliance in a safe way and understand the hazards involved.
- Children aged from 3 to 8 years are allowed to load and unload this appliance.
- Children should be supervised to ensure that they do not play with the appliance.
- Cleaning and user maintenance shall not be made by children unless they are aged from 8 years and above and supervised.
-
Keep all packaging well away from children. There is risk of suffocation.
-
If you are discarding the appliance pull the plug out of the socket, cut the connection cable (as close to the appliance as you can) and remove the door to prevent playing children to suffer electric shock or to close themselves into it.
- If this appliance featuring magnetic door seals is to replace an older appliance having a spring lock (latch) on the door or lid, be sure to make that spring lack unusable before you discard the old appliance. This will prevent it from becoming a death trap for a child.
General safety
WARNING! Keep ventilation openings, in the appliance enclosure or in the built-in structure, clear of obstruction.
WARNING! Do not use mechanical devices or other means to accelerate the defrosting process, other than those recommended by the manufacturer.
WARNING! Do not damage the refrigerant circuit.
WARNING! Do not use other electrical appliances (such as ice cream makers) inside of refrigerating appliances, unless they are approved for this purpose by the manufacture.
WARNING Do not touch the light bulb if it has been on for a long period of time because it could be very hot.
1) If there is a light in the compartment.
WARNING! When positioning the appliance, ensure the supply cord is not trapped or damaged.
WARNING! Do not locate multiple portable socket-outlets or portable power suppliers at the rear of the appliance.
- Do not store explosive substances such as aerosol cans with a flammable propellant in this appliance.
- The refrigerant isobutane (R-600a) is contained within the refrigerant circuit of the appliance, a natural gas with a high level of environmental compatibility, which is nevertheless flammable.
-
During transportation and installation of the appliance, be certain that none of the components of the refrigerant circuit become damaged.
-
avoid open flames and sources of ignition
-
thoroughly ventilate the room in which the appliance is situated
-
It is dangerous to alter the specifications or modify this product in any way. Any damage to the cord may cause a short circuit, fire and/or electric shock.
-
This appliance is intended to be used in household and similar applications such as
-
staff kitchen areas in shops, offices and other working environments;
-
farm houses and by clients in hotels, motels and other residential type environments;
-
bed and breakfast type environments;
- catering and similar non-retail applications.
WARNING! Any electrical components (plug, power cord, compressor and etc.) must be replaced by a certified service agent or qualified service personnel.
WARNING! The light bulb supplied with this appliance is a "special use lamp bulb" usable only with the appliance supplied. This "special use lamp" is not usable for domestic lighting.
- Power cord must not be lengthened.
- Make sure that the power plug is not squashed or damaged by the back of the appliance. A squashed or damaged power plug may overheat and cause a fire.
- Make sure that you can come to the mains plug of the appliance.
- Do not pull the mains cable.
- If the power plug socket is loose, do not insert the power plug. There is a risk of electric shock or fire.
- You must not operate the appliance without the lamp.
- This appliance is heavy. Care should be taken when moving it.
- Do not remove nor touch items from the freezer compartment if you hands are damp/wet, as this could cause skin abrasions or frost/freezer burns.
- Avoid prolonged exposure of the appliance to direct sunlight.
Daily use
- Do not put hot on the plastic parts in the appliance.
- Do not place food products directly against the rear wall.
1) If there is a light in the compartment.
- Frozen food must not be re-frozen once it has been thawed out.1)
- Store pre-packed frozen food in accordance with the frozen foodmanufacture8s instructions ^1 .
- Appliance's manufactures storage recommendations should be strictly adhered to. Refer to relevant instructions.
- Do not place carbonated of fizzy drinks in the freezer compartment as it creates pressure on the container, which may cause it to explode, resulting in damage to the appliance1).
- Ice lollies can cause frost burns if consumed straight from the appliance.
- To avoid contamination of food, please respect the following instructions
- Opening the door for long periods can cause a significant increase of the temperature in the compartments of the appliance.
- Clean regularly surfaces that can come in contact with food and accessible drainage systems.
- Clean water tanks if they have not been used for 48 ~h ; flush the water system connected to a water supply if water has not been drawn for 5 days.
- Store raw meat and fish in suitable containers in the refrigerator, so that it is not in contact with or drip onto other food.
-
Two-star frozen-food compartments (if they are presented in the appliance) are suitable for storing pre-frozen food, storing or making ice-cream and making ice cubes.
-
One-, two- and three -star compartments (if they are presented in the appliance) are not suitable for the freezing of fresh food.
- If the appliance is left empty for long periods, switch off, defrost, clean, dry and leave the door open to prevent mount developing within the appliance.
Care and cleaning
- Before maintenance, switch off the appliance and disconnect the mains plug from the mains - socket.
- Do not clean the appliance with metal objects.
- Do not use sharp objects to remove frost from the appliance. Use a plastic scraper. ^1)
- Regularly examine the drain in the refrigerator for defrosted water. If necessary, clean the drain.
If the drain is blocked, water will collect in te bottom of the appliance.
Installation
Important! For electrical connection carefully follow the instructions given in specific paragraphs.
-
Unpack the appliance and check if there are damages on it. Do not connect the appliance if it is damaged. Report possible damages immediately to the place you bought it. In that case retain packing.
-
It is advisable to wait at least four hours before connecting the appliance to allow the oil to flow back in the compressor.
- Adequate air circulation should be around the appliance, lacking this leads to overheating. To achieve sufficient ventilation follow the instructions relevant to installation.
- Wherever possible the spacers of the product should be against a wall to avoid touching or catching warm parts (compressor, condenser) to prevent possible burn.
- The appliance must not be located close to radiators or cookers.
- Make sure that the mains plug is accessible after the installation of the appliance.
Service
- Any electrical work required to do the servicing of the appliance should be carried out by a qualified electrician or competent person.
- This product must be serviced by an authorized Service Center, and only genuine spare parts must be used.
Energy saving
- Don't put hot food in the appliance;
- Don't pack food close together as this prevents air circulating;
-
Make sure food don't touch the back of the compartment(s);
-
If electricity goes off, don't open the door(s);
- Don't open the door(s) frequently;
- Don't keep the door(s) open for too long time;
- Don't set the thermostat on exceeding cold temperatures;
- Some accessories, such as drawers, can be removed to get larger storagevolume and lower energy consumption.
Environment Protection
This appliance does not contain gasses which could damage the ozone layer, in either its refrigerant circuit or insulation materials. The appliance shall not be discarded together with the urban refuse and rubbish. The insulation foam contains flammable gases: the appliance shall be disposed according to the appliance regulations to obtain from your local authorities. Avoid damaging the cooling unit, especially the heat exchanger.
The materials used on this appliancemarked by the symbol a re recyclable.
The symbol on the product or on its packaging indicates that this product may not be treated as household waste. Instead it should be taken to the appropriate collection point for the cling of electrical and electronic equipment. Ensuring this product is disposed of correctly, will help prevent potential negative equences for the environment and human health,
which could otherwise be caused by inappropriate waste handling of this product. For more detailed information about recycling of this product, please contact your local council, your household waste disposal service or the shop where you purchased the product.
Packaging materials
The materials with the symbol are recyclable. Dispose the packaging in a suitable collection containers to recycle it.
Disposal of the appliance
- Disconnect the mains plug from the mains socket.
- Cut off the mains cable and discard it.
WARNING! During using, service and disposal the appliance, please pay attention to symbol similar as left side, which is located on rear of appliance (rear panel or compressor) and with yellow or orange color.
It's risk of fire warning symbol. There are flammable materials in refrigerant pipes and compressor.
Please be far away fire source during using, service and disposal.
Parts And Features
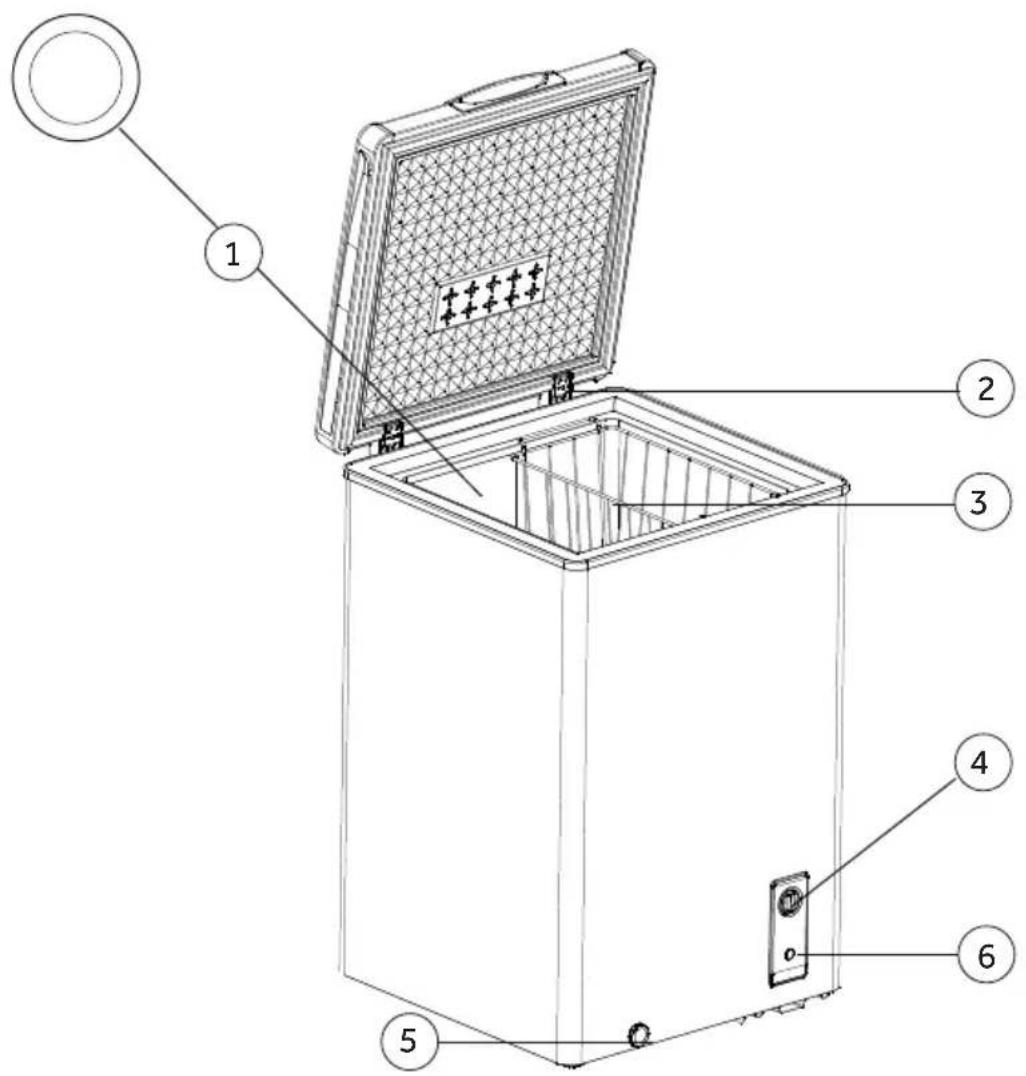
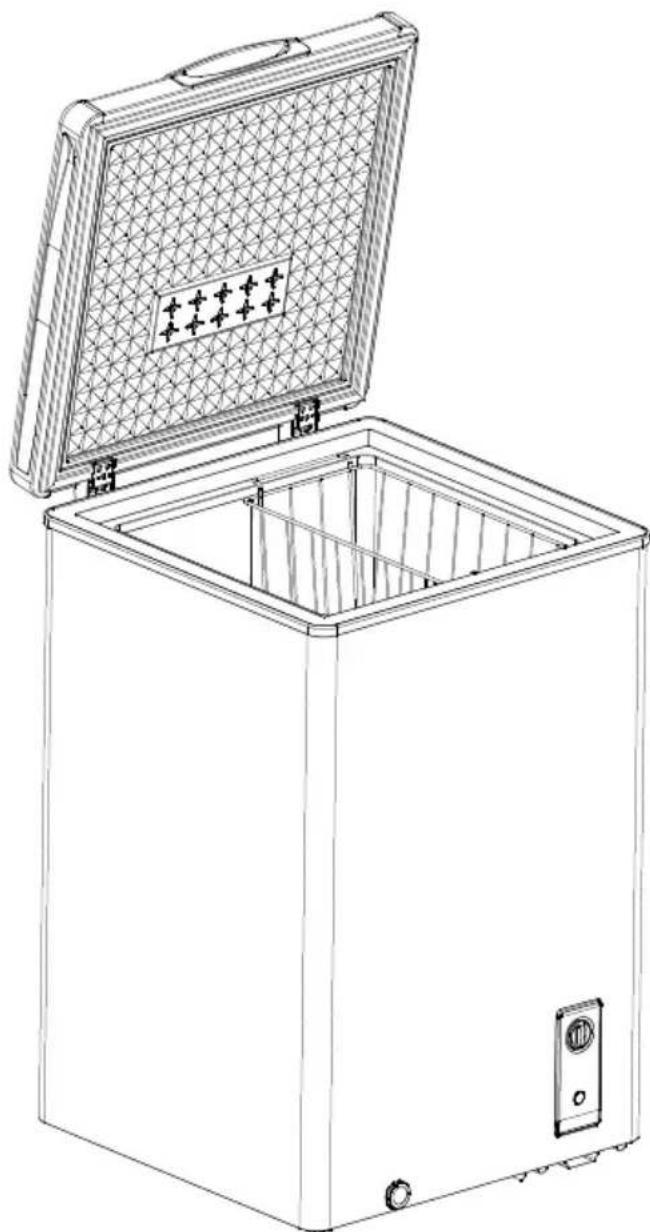
- Interior Drain Plug (See Insert)
2.Hinges - Vinyl Coated Wire Basket
- Temperature Control
- Exterior Drain Plug
- Compressor On Indicator
Installing Your Freezer
Unpacking Your Freezer
- Remove all packaging material. This includes the foam base and all adhesive tape holding the freezer accessories inside and outside.
- Inspect and remove any remains of packing, tape or printed materials before powering on the freezer.
Adjusting Your Freezer
- Your freezer is designed for freestanding installation only. It should not be recessed or built-in.
- Place the freezer on a floor strong enough to support it fully loaded.
- When moving the freezer, never tilt it more than a 45-degree angle. This could damage the compressor and the sealed system.
- If the freezer is tilted let it stand in an upright position for at least 24 hours prior to plugging. This is to allow the refrigerant to settle.
Proper Air Circulation
- To assure your freezer works at the maximum efficiency it was designed for, you should install it in a location where there is proper air circulation, plumbing and electrical connections.
- The following are recommended clearances around the freezer: Sides. 4'' (102mm) Back. 4'' (102mm) Top. .Do not block
Electrical Requirement
- Make sure there is a suitable power Outlet to power the freezer.
with proj
- Avoid the use of three plug adapters or cutting off the third grounding in order to accommodate a two plug outlet. This is a dangerous practice since it provides no effective grounding for the freezer and may result in shock hazard.

Use of Extension Cord
- Avoid the use of an extension cord because of potential safety hazards under certain conditions. If it is necessary to use an extension cord, use only a 3-wire extension cord that has a 3-blade grounding plug and a 3-slot outlet that will accept the plug. The marked rating of the extension cord must be equal to or greater than the electrical rating of the appliance. DO NOT USE EXTENSION CORD LONGER THAN 12 FT.
Install Limitations
- Do not install your freezer in any location not properly insulated or heated e.g. garage etc. Your freezer was not designed to operate in temperature settings below 55^ Fahrenheit.
- Select a suitable location for the freezer on a hard even surface away from direct sunlight or heat source e.g. radiators, baseboard heaters, cooking appliances etc. Any floor unevenness should be corrected.
Freezer Features and Use
Operating Your Freezer
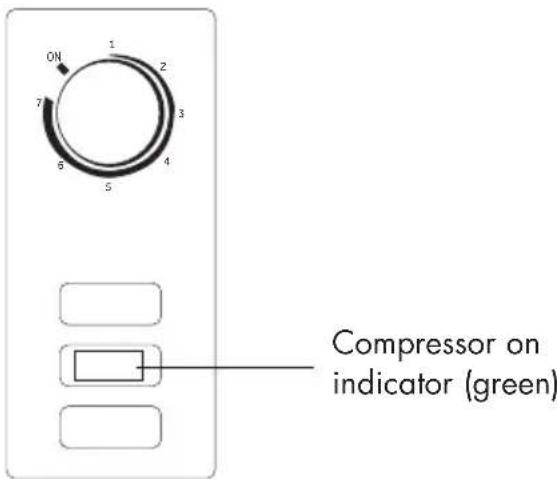
- Set the temperature, on the temperature control knob. "1" being the warmest and "7" being the coldest. Initially set the temperature on "4". Place food inside the freezer. After using the freezer for 24 hours set the freezer to your desired setting.
- In case you unplug your freezer or experience an electrical outage, allow 5 minutes before plugging it back in.
General Features
Adjustable temperature dial: (see fig. # 1)
Thermostat Instructions
This storage temperature is controlled by the electronic thermostat. According to different environmental temperature, different kinds and quantities of storage things,
The temperature of the inner cabinet can be adjusted by the thermostat button within proper range.
Under normal condition, when press the Refrigerating temperature setting button, the digital tube will flash to display the corresponding setting temperature, and the refrigerating indicator lamp will become bright. Each time setting, the refrigeration value is reduced by 1, until the minimum value, then it will change to the maximum value. No buttons for 5 seconds, or press 3 seconds, it will save the setting temperature and return to normal situation.
Freezing temperature setting:
Under normal condition, when press the freezing temperature setting button, the digital tube will flash to display the corresponding setting temperature, and the freezing indicator lamp will become bright. Each time setting, the setting value is reduced by 1, until the minimum value then it will change to the maximum value. and the jump is reached to the maximum value. No buttons for 5 seconds, or press for 3 seconds, it will save the setting temperature and return to normal situation.
Button Locked setting:
Under normal condition, continuously press the freezing temperature setting button for 3 seconds, indicating lamp which was not bright will flash, or no button operation after 30 seconds, it enters the button locked mode; Under button locked mode, continuously press the freezing temperature setting button for 3 seconds, the flash light go out and return to normal mode. (Note: As the product is constantly updated, please refer to the actual one.)
Normal Operating Sounds You May Hear
- Boiling water, gurgling sounds or slight vibrations that are the result of the refrigerant circulating through the cooling coils.
- The thermostat control will click when it cycles on and off.
Food Storage Basket
- Your freezer has a basket. Removable basket allows you to store food more accessibly or you can remove it if not needed.
Defrosting and Draining
- For most efficient operation and minimum energy consumption, defrost whenever the frost becomes 1/4'' thick. Never use a sharp or metallic instrument to remove the frost, as it may damage the cooling coils. (A punctured coil will void the warranty). Use only provided plastic scraper. Do not use boiling water as it may damage the unit.
- Remove frozen food from the freezer and place it in a cooler to protect the food.
- Unplug the unit. Defrosting usually takes a few hours. To defrost faster keep the freezer door open.
- For draining, place a tray beneath the outer drain plug. Unscrew and remove drain plug. This will let the water flow out in the tray. When done, screw on the drain plug in place.
Note: monitor the container under the drain to avoid overflow.
- When draining is complete, wipe the interior of the freezer with a soft cloth. Plug in power cord back into the electrical outlet.
- Reset the temperature control to the desired setting.
- Return the food into the freezer.
Food Storage Information
Frozen Food:
-
Wipe containers before storing to avoid needless spills.
-
Hot food should be allowed to cool before storing in the freezer. This will prevent unnecessary energy use.
-
When storing meats, keep in the original packaging or rewrap as necessary.
-
Proper freezer storage requires correct packaging. All foods must be in packages, which do not allow the flow of air or moisture in, or out. Improper storage will result in odor and taste transfer and will result in the drying out of the improperly packaged food.
-
Follow package or container instructions for proper storage.
-
Packaging Recommendations: Plastic containers with air tight lids Heavy duty aluminum foil Plastic wrap made from saran film Self-sealing plastic bags
-
Do not refreeze defrosted/thawed foods.
It is recommended that the freezing date be marked on the packaging.
These are some suggestions for safe storage:
TV Dinners 3 - 4 Months
- Fresh Shrimp, scallops, crawfish 3 - 6 Months
- Hamburger & stew meats 3 - 4 Months
Ground Turkey, veal, pork 3 - 4 Months
Chops 4-6 Months
- Steaks 6 - 12 Months
- Chicken or turkey, whole 1 year
instructions/manual shall also be available in our website:
www.gzwanbao.com/
Proper Freezer Care and Cleaning
Cleaning and Maintenance

Caution:
Before using cleaning products, always read and follow manufacturer's instructions and warnings to avoid personal injury or product damage.
General:
- Prepare a cleaning solution of 3-4 tablespoons of baking soda mixed with warm water. Use sponge or soft cloth, dampened with the cleaning solution, to wipe down your freezer.
- Rinse with clean warm water and dry with a soft cloth.
- Do not use harsh chemicals, abrasives, ammonium citrate, concentrated detergents, solvents or metal scouring pads. SOME of these chemicals may dissolve, damage and/or discolor your freezer.
Door Gaskets:
- Cleandoor gaskets every three months according to general instructions. Gaskets must be kept clean and pliable to assure a proper seal.
- Petroleum jelly applied lightly on the hinge side of gaskets will keep the gasket pliable and assure a good seal.
Power Interruptions
- Occasionally there may be power interruptions due to thunderstorms or other causes. Remove the power cord from AC outlet when a power outage occurs. When power has been restored, replug power cord to AC outlet. If outage is for a prolonged period, inspect and discard spoiled or thawed food in freezer. Clean freezer before reusing.
Vacation and Moving Care
- For long vacations or absences, empty food from freezer, unplug the unit and clean the door gaskets according to "General cleaning" section. Prop doors open, so air can circulate inside. When moving always move the freezer vertically. Do not move with the unit lying down. Possible damage to the sealed system could occur.
Troubleshooting
Freezer Does Not Operate:
- Check if freezer is plugged in.
- Check if there is power at the ac outlet, by checking the circuit breaker.
- Wait for 30-40 minutes to see whether freezer will start. Compressor cycle must be complete to operate.
Food temperature appears too warm:
- Frequent door openings.
- Allow time for recently added warm food to reach freezer temperature.
- Check gaskets for proper seal.
- Adjust temperature control to colder setting.
Too much frost build-up inside unit:
- Make sure temperature control is not set to "ON" setting for extended period of time.
Food temperature is too cold:
- If temperature control setting is too cold, adjust to a warmer setting and allow several hours for temperature to adjust.
Compressor runs too frequently:
- This may be normal to maintain constant temperature during high temperature and humid days.
- Doors may have been opened frequently or for an extended period of time.
- Check gasket for proper seal.
- Check to see if doors are completely closed.
- Check freezer compartment for blockage from frozen food packages, containers, etc.
Freezer has an odor:
- Interior needs cleaning.
- Foods improperly wrapped or sealed are giving off odors.
| Parameter\Model | ARC-103 | ARC-153 ARC-203 | |
| Climate | SN N ST T | SN N ST T | SN N ST T |
| Total gross volume | 98L | 142L | 198L |
| Total storage volume | 98L | 142L | 198L |
| Rated voltage | 220-240V | 220-240V | 220-240V |
| Rated Frequency | 50Hz | 50Hz | 50Hz |
| Amps | 0.5A | 0.5A | 0.6A |
| Input power | 70W | 85W | 105W |
| Freezing Capacity | 4.5kg/24h | 6.5kg/24h | 9kg/24h |
| Energy Consumption | 168 KW ·h/year | 190 KW ·h/year | 219 KW ·h/year |
| Refrigerant&Mass | R600a 38g | R600a 45g | R600a 52g |
| Weight | 23 Kg | 27 Kg | 31 Kg |
| Physical vescant | CYCLOPENTANE | CYCLOPENTANE | CYCLOPENTANE |
PROCEDURE IN CASE OF FAILURE OF A MILECTRIC PRODUCT
Dear customers, to request technical assistance or repair of your MILECTRIC product, you have our website, operating 24 hours a day, 7 days a week:
https://miletric.com/assistencia-technica/
Alternatively, if they wish, they can request technical assistance via email:
Gama Blanca: rmablanca@miletric.com
Gama Marrón: rma@miletric.com
To streamline all procedures, the following information should always be indicated:
- Name and surname
Telephone 1
Phone 2
Full address - Postal Code
Population - Brand
Product model - Serial number
Product failure
You can request technical assistance through the number 902 676 518 or 958 087 169, available only for white range products (except for free-standing microwaves).
MANUAL DE USUÁRIO
ARC-103
ARC-153
ARC-203
Ligaçao electrolytica
- Children andvulnerable people safety
- General safety
- Daily use
- Care and cleaning
- Installation
- Service
- Energy saving
- Environment Protection
- Packaging materials
- Disposal of the appliance
- Parts And Features
- Installing Your Freezer
- Unpacking Your Freezer
- Adjusting Your Freezer
- Proper Air Circulation
- Electrical Requirement
- Use of Extension Cord
- Install Limitations
- Freezer Features and Use
- Operating Your Freezer
- General Features
- Adjustable temperature dial: (see fig. # 1)
- Thermostat Instructions
- Freezing temperature setting:
- Button Locked setting:
- Normal Operating Sounds You May Hear
- Food Storage Basket
- Defrosting and Draining
- Food Storage Information
- Proper Freezer Care and Cleaning
- Cleaning and Maintenance
- Caution:
- General:
- Door Gaskets:
- Power Interruptions
- Vacation and Moving Care
- Troubleshooting
- Freezer Does Not Operate:
- Food temperature appears too warm:
- Too much frost build-up inside unit:
- Food temperature is too cold:
- Compressor runs too frequently:
- Freezer has an odor:
- PROCEDURE IN CASE OF FAILURE OF A MILECTRIC PRODUCT
- https://miletric.com/assistencia-technica/
- MANUAL DE USUÁRIO
- Ligaçao electrolytica
Brand : Infiniton
Model : ARC153
Category : Freezer