Spirit - Stroller Silver Cross - Free user manual and instructions
Find the device manual for free Spirit Silver Cross in PDF.
User questions about Spirit Silver Cross
0 question about this device. Answer the ones you know or ask your own.
Ask a new question about this device
Download the instructions for your Stroller in PDF format for free! Find your manual Spirit - Silver Cross and take your electronic device back in hand. On this page are published all the documents necessary for the use of your device. Spirit by Silver Cross.
USER MANUAL Spirit Silver Cross
IMPORTANT - READ THE INSTRUCTIONS CAREFULLY BEFORE USE AND KEEP FOR FUTURE REFERENCE


1.1
x2
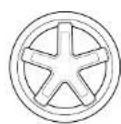
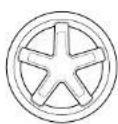
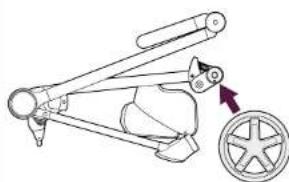
Fitting the Wheels
1.1. Attach one rear wheel to each side of the chassis.
1.2 Do this by inserting the axle into the rear wheel connection hole on the chassis.
1.3 The wheel is fitted correctly when it securely clicks into position.
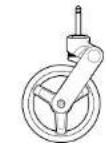
1.4 Attach one front wheel to each side of the chassis.

1.2
安装轮子
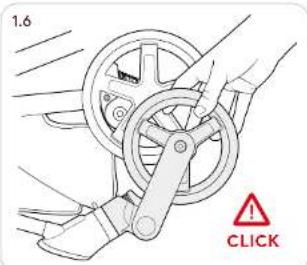
1.5 Do this by inserting the swivel pin into the front wheel connection hole on the chassis
1.6 The wheel is fitted correctly when it securely clicks into position.
1.5将旋转销插入底架上的前轮连接孔即可。
1.6 当听到“咔哒”声,即表示车轮已正确安装到位。
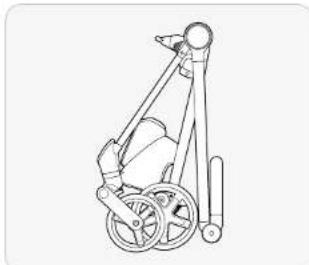

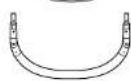
Unfolding
2.1 Press and hold the handle button (1) rotate the handle out from the chassis until it clicks (2).
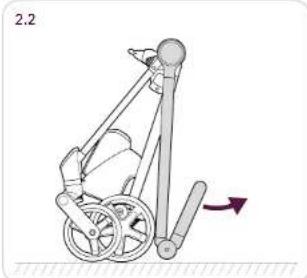
2.2 Pull the handle upwards.
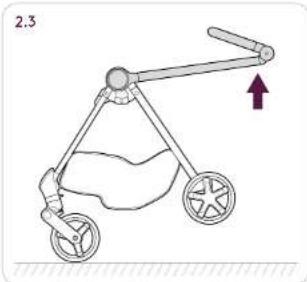
2.3 Continue to pull the handle upwards, unfolding the chassis.
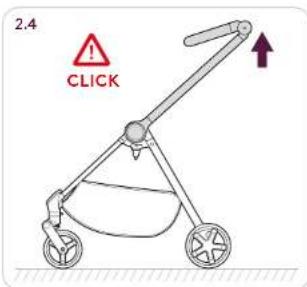
2.4 Keep rotating the handle until the chassis clicks into its fully unfolded position.
2.5 Press and hold the handle button to rotate the handle into one of the three positions.
打开
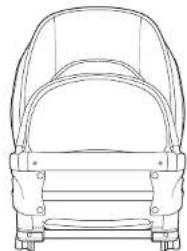
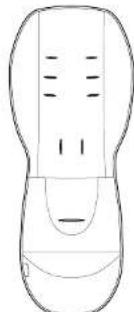
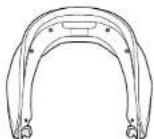
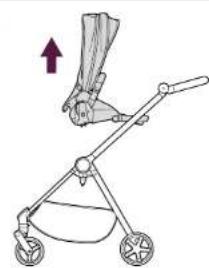
How to attach Seat Unit to Chassis
3.1 Lift the top section of the seat upwards.
3.2 Continue lifting the back section of the seat until it clicks into position.
3.3 To attach seat to chassis, lift seat and align with the connection points.
3.4 Once the seat and chassis are aligned lower the seat unit to connect to the chassis.
3.5 Recline the seat unit further until it clicks into its most upright position.
怎样安装座椅到车架上
Using the Parking Brake
4.1 To apply the brake, press down on the foot pedal.
4.2 To release the brake, rotate the foot pedal upwards.
使用驻停制动器
Adjusting the Front Footrest
5.1 To adjust the footrest, push both buttons on either side to allow the footrest to lock into positions 1,2 or 3.
调节前踏脚
Adjusting the Backrest
6.1 To adjust the backrest, lift the handle and move in either direction to lock into the desired position.
调节靠背角度
Locking & Unlocking the Front Wheels
7.1 To lock the front wheels in a forward position, simply flick the swivel locks to face into the chassis.
7.1锁定前轮处于直行状态,简单的转动锁定按钮即可
11
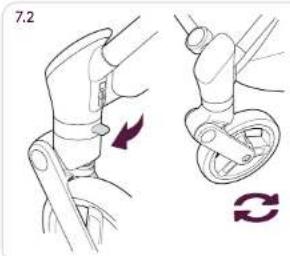
7.2 To allow the front wheels to swivel, simply flick the swivel locks to face straight.
7.2 解锁前轮直行状态,往反向简单的转动按钮即可
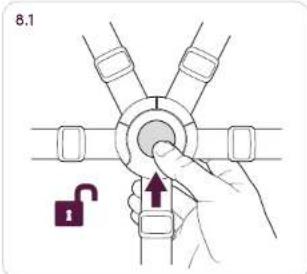
Using the Harness System
8.1 To release the harness press on the buckle centre.
8.2 To fasten the harness insert the pairs of clips into each side of the buckle, listen for the 'click'.
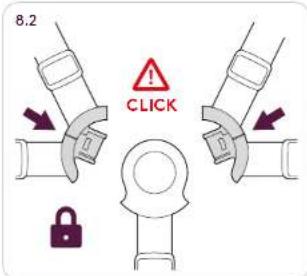
使用安全带系统
8.3 Pull the sliders in one direction to lengthen and in opposite direction to shorten strap.
8.4 Connect the shoulder clips to the waist clips.
8.5 Check that the shoulder straps are level or just below your child's shoulders.
8.6 If not adjust them by feeding the harness clips through the fabric loops on the backrest.
8.7 There are three shoulder strap height positions.

Fitting the Head Hugger, Shoulder Pads and Crotch Pad
9.1 When fitting the head hugger ensure the harness is in position 3.
9.2 Remove the shoulder pads & crotch pad to allow the harness to pass through the designated slots on the head hugger.
安装头枕,护肩和护胯
9.3 Attach the shoulder pads & crotch pad onto the harness.
9.4 When a child is sitting in the seat the head hugger must fit correctly, this is shown by the green tick.
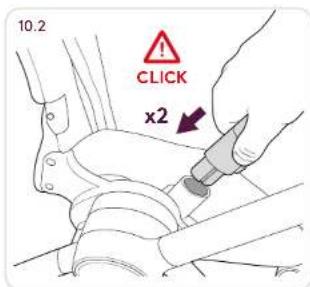
Attaching & Using the Bumper Bar
10.1 To attach the bumper bar simply press each end into the connection points on the chassis.
10.2 Push down on the bumper bar until both sides click into place.
10.3 To enable the bumper bar to swivel press the release button on 1 side to release it.
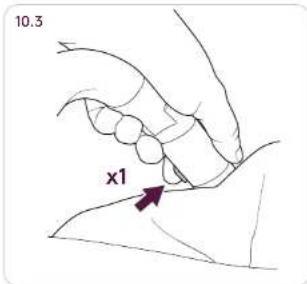
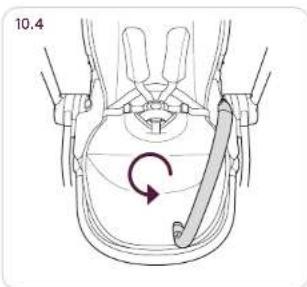
10.4 After releasing 1 side of the bumper bar it can be rotated out of the way to allow easy access for the child.
10.5 To remove the bumper bar press both release buttons to detach it.
安装和使用前扶手
10.6 Once both sides have been pressed the bumper bar will simply lift off.
10.6当两侧按钮被按下就轻易取下前扶手
Attaching the Hood to the Chassis
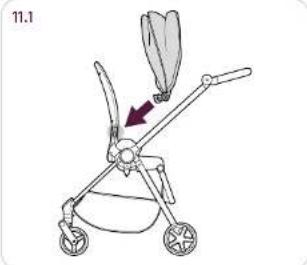
11.1 To attach the hood initially align the hood clips with the slots on each side of the seat unit.
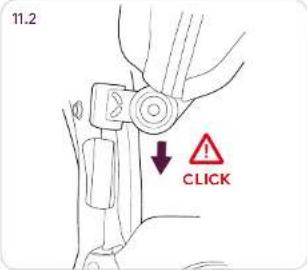
11.2 Push the hood down until it clicks into place.
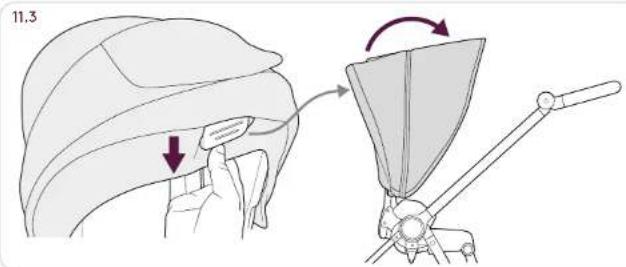
11.3 Attach the top section of the hood to the Velcro behind the backrest of the seat unit.
11.4 To complete the fitment of the hood click all press studs around the back of the seat unit to the Hood.
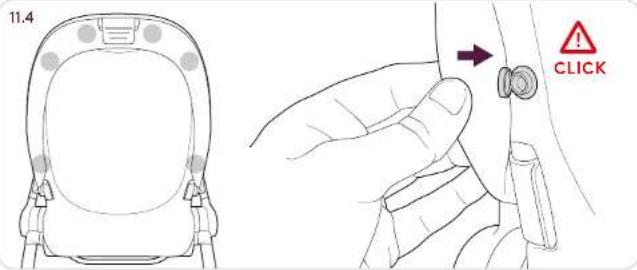
安装蓬头到车架上
Opening the Viewing Window & Sun visor
12.1 Simply lift the viewing window cover up to open and pull down to shut. A magnet holds it shut.
开合透视窗和遮阳罩
12.2 To open the sun visor simply pull it out from underneath the hood and push back in when not in use.
12.2 只需要简单的拖出遮阳罩去打开合往里推就可以收合
13.1
Opening Hood Extension
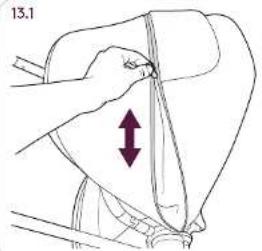
13.1 Unzip the centre section of the hood to allow the hood to open further, then pull the hood forward to fully open it.
打开延展蓬头
Changing the seat from Rearward Facing to Forw Facing
14.1 Unlock and rotate the backrest forward until it clicks, this will release the seat unit.
14.2 Lift the seat unit up to remove it from the chassis.
14.3 Once fully removed, rotate the seat 180 degrees and re-align to be connected facing forward.
14.2
座椅前后换向的操作
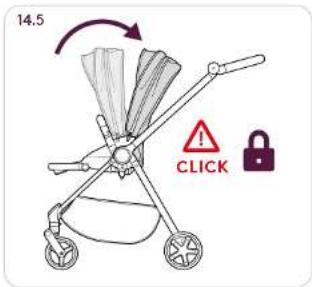
14.4 Slot the seat unit onto the chassis making sure the seat unit connects to the chassis properly.
14.5 Move the backrest backwards until it locks, this will be the seats most upright position.
14.4 沿着车架的卡门的方向插入座椅的接口就可以将座椅安装好了。
14.5 向后推动靠背这样就可以座椅挡位。这一档是座椅的直立挡位

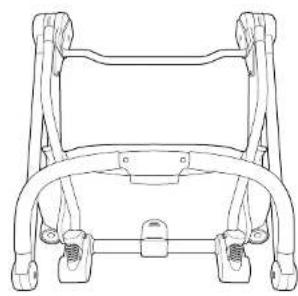
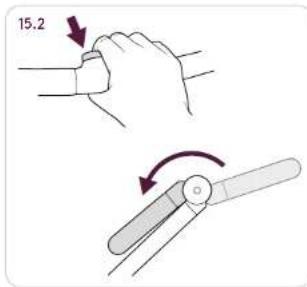
Folding
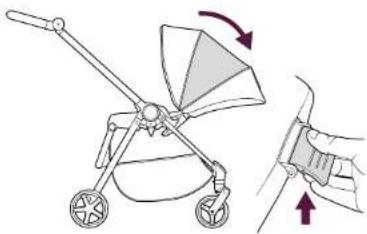
15.1 To fold the pushchair seat, lift and hold the seat recline adjustment lever on the back of the seat (1) and rotate the backrest to close the pushchair seat(2).
15.2 Press and hold the handle button (1) rotate the handle into its folded position (2).
15.3 Push down upon the handle.
折叠
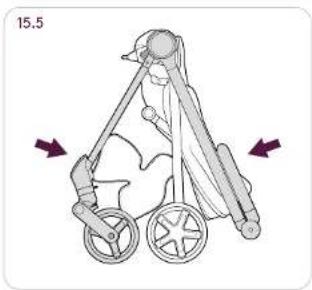
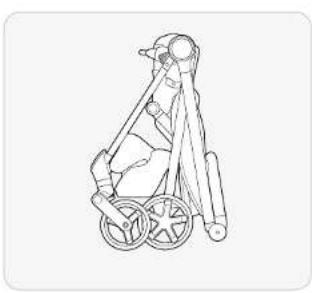
15.4 Continue to push down on the handle to fold over the chassis.
15.5 Fold over the chassis into its folded position.
15.4 继续向下推手柄以折叠底架。
15.5折叠底架至收起位置。
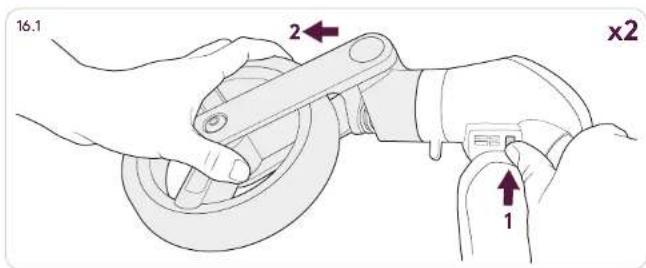
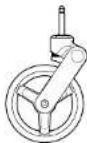
Removing Front Wheels
16.1 To remove the front wheels press the plastic button located above the swivel lock.
16.2 While pressing the release button slide the front wheel out.
拆卸前轮
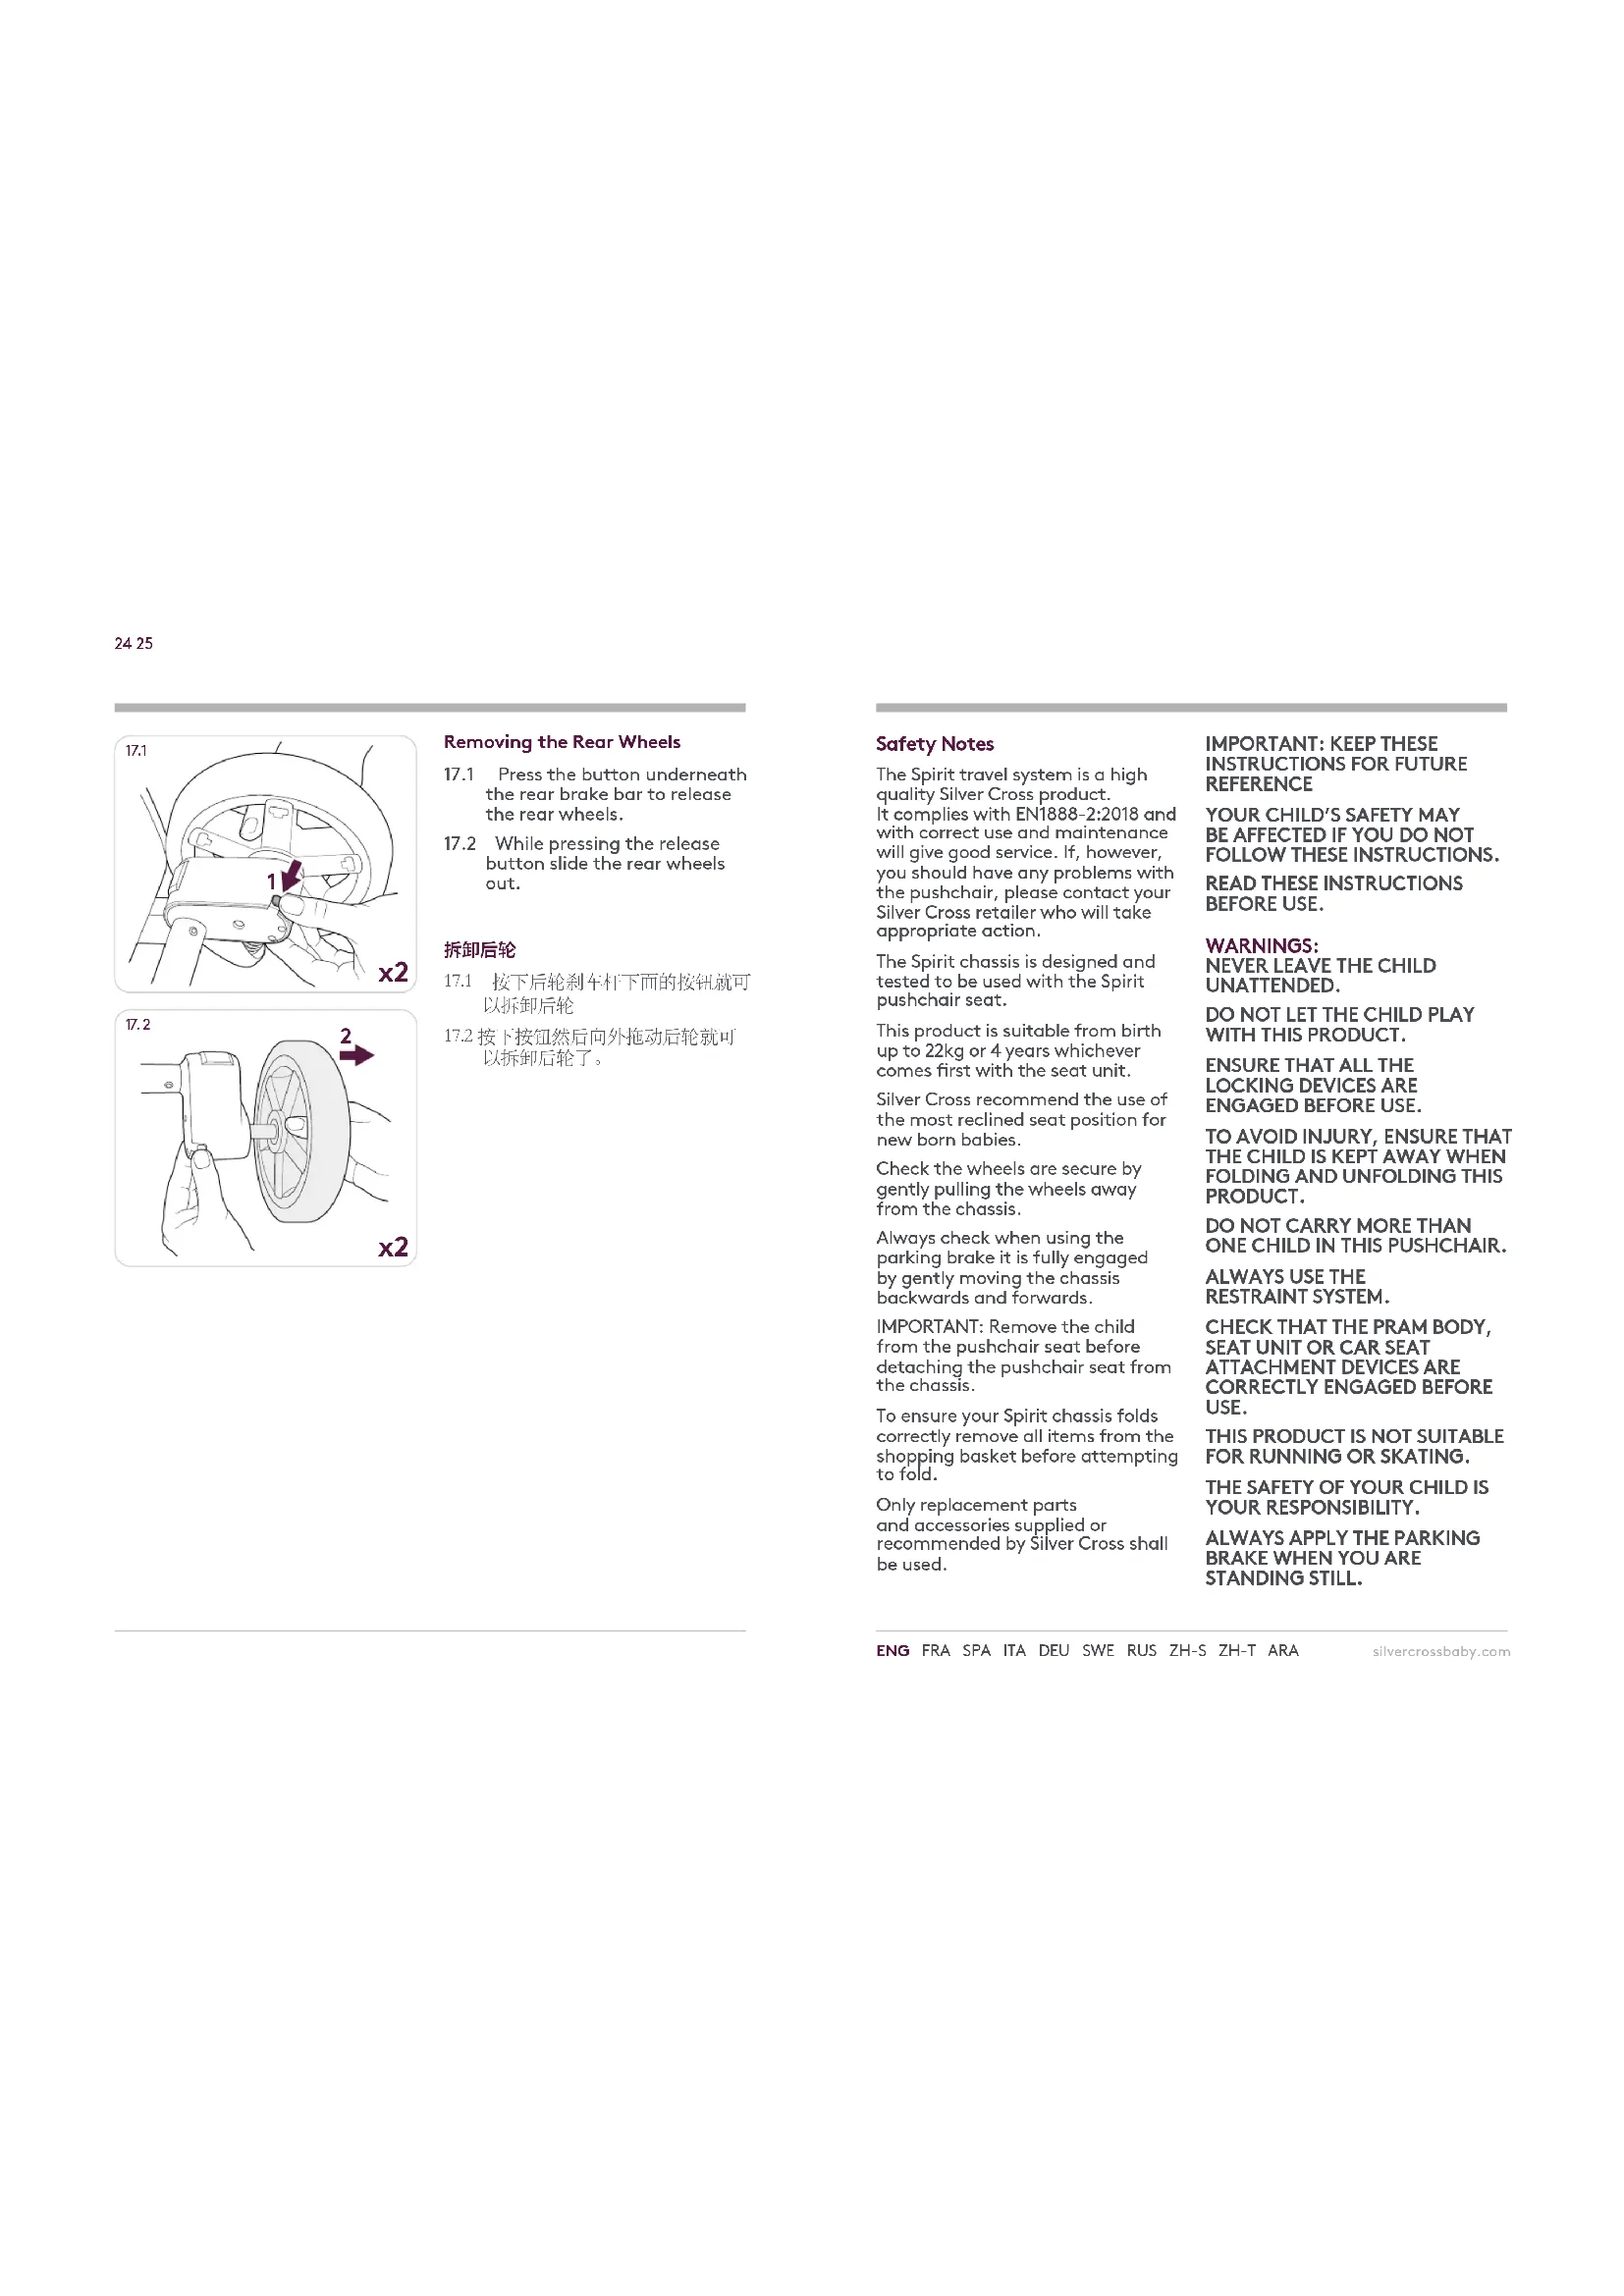
Removing the Rear Wheels
17.1 Press the button underneath the rear brake bar to release the rear wheels.
17.2 While pressing the release button slide the rear wheels out.
拆卸后轮
The Spirit travel system is a high quality Silver Cross product. It complies with EN1888-2:2018 and with correct use and maintenance will give good service. If, however, you should have any problems with the pushchair, please contact your Silver Cross retailer who will take appropriate action.
The Spirit chassis is designed and tested to be used with the Spirit pushchair seat.
This product is suitable from birth up to 22kg or 4 years whichever comes first with the seat unit.
Silver Cross recommend the use of the most reclined seat position for new born babies.
Check the wheels are secure by gently pulling the wheels away from the chassis.
Always check when using the parking brake it is fully engaged by gently moving the chassis backwards and forwards.
IMPORTANT: Remove the child from the pushchair seat before detaching the pushchair seat from the chassis.
To ensure your Spirit chassis folds correctly remove all items from the shopping basket before attempting to fold.
Only replacement parts and accessories supplied or recommended by Silver Cross shall be used.
IMPORTANT: KEEP THESE INSTRUCTIONS FOR FUTURE REFERENCE
YOUR CHILD'S SAFETY MAY BE AFFECTED IF YOU DO NOT FOLLOW THESE INSTRUCTIONS. READ THESE INSTRUCTIONS BEFORE USE.
WARNING:
NEVER LEAVE THE CHILD
UNATTENDED.
DO NOT LET THE CHILD PLAY WITH THIS PRODUCT.
ENSURE THAT ALL THE LOCKING DEVICES ARE ENGAGED BEFORE USE.
TO AVOID INJURY,ENSURE THAT THE CHILD IS KEPT AWAY WHEN FOLDING AND UNFOLDING THIS PRODUCT.
DO NOT CARRY MORE THAN ONE CHILD IN THIS PUSHCHAIR.
THIS PRODUCT IS NOT SUITABLE FOR RUNNING OR SKATING.
THE SAFETY OF YOUR CHILD IS YOUR RESPONSIBILITY.
ALWAYS APPLY THE PARKING BRAKE WHEN YOU ARE STANDING STILL.
ALWAYS APPLY THE PARKING BRAKE WHEN PLACING AND REMOVING THE CHILD.
DO NOT USE IF ANY PART IS BROKEN, TORN OR MISSING. BEFORE MAKING ANY ADJUSTMENTS TO THE CHASSIS, ENSURE THE PARKING BRAKE IS ENGAGED.
THE BUMPER BAR MUST BE SECURELY CONNECTED AT BOTH SIDES AT ALL TIMES WHEN IN USE. THE SAFETY OF YOUR CHILD IS YOUR RESPONSIBILITY.
DO NOT LIFT THE SEAT VIA THE BUMPER BAR WHILST A CHILD IS IN PLACE. THE BUMPER BAR IS NOT A CARRY HANDLE.
ALWAYS USE THE CROTCH STRAP IN COMBINATION WITH THE WAIST STRAP.
THE HARNESS CAN FORM LOOPS WHICH MAY BE A STRANGULATION HAZARD, NEVER LEAVE THE HARNESS CONNECTED WHEN NOT FITTED TO A CHILD IN THE PUSHCHAIR.
WINTER/SUMMERCLOTHING CAN MAKE A DIFFERENCE TO THE SIZE OF YOUR CHILD. BEFORE YOU USE THE PUSHCHAIR SEAT, THE HARNESS MUST BE ADJUSTED TO SUIT THE SIZE OF YOUR CHILD. ALWAYS USE THE HARNESS.
DUE CARE SHOULD BE TAKEN WHEN FOLDING AND UNFOLDING THE CHASSIS. PLEASE ENSURE FOLDING MECHANISMS ARE KEPT CLEAR TO AVOID POSSIBLE FINGER ENTRAPMENTS OR INJURIES TO PARTS OF THE BODY.
TO AVOID POSSIBLE INJURY OR DAMAGE, ALWAYS ENSURE THE FOLD LOCK HAS BEEN ENGAGED BEFORE LIFTING AND CARRYING THE CHASSIS.
CARRY THE FOLDED CHASSIS USING THE MAIN HANDLE.
ANY LOAD ATTACHED TO THE HANDLE AND/OR ON THE BACK OF THE BACKREST AND/OR ON THE SIDES OF THE PUSHCHAIR WILL AFFECT THE STABILITY.
BE AWARE OF THE RISK OF OPEN FIRE, GAS FIRES ETC. IN THE NEAR VICINITY OF THE CARRYCOT.
Do not hang shopping bags or other objects from the handle. This may cause the pushchair to tip up. Extra shopping or luggage should only be carried in the basket and should not exceed 1kg in weight, evenly distributed.
Never try to fold your Spirit when the child is seated as this may trap the child. If you have difficulty in folding or unfolding the pushchair, do not force. This will cause damage. Read section 2 and 15 carefully in the Spirit instructions. Do not fit accessories or spare parts other than those supplied or recommended by Silver Cross. If anyone other than the owner is going to use the Pushchair (e.g. grandparent, child minder), please show them how to use it correctly.
MAXIMUM CAPACITY FOR BASKET:1KG.
Care and Maintenance
Chassis
Always check your pushchair for signs of wear. Regularly lubricate all moving parts. Check for freedom of movement of all locking devices. Polish metal work with a clean, dry cloth.
Fabric items and seat unit For fabric wash care instructions please refer to the care guide included with your pram. Keep away from direct heat and strong sunlight.A certain degree of fading may occur over time through everyday use.
Never machine wash, tumble dry, iron or bleach.
Never leave accessories such as the Sunshade or raincover where heat and light may discolour the fabrics or distort the plastics, e.g. on the car parcel shelf in hot weather.
ANVAND INTE PRODUKTEN
OM NAGON DEL AR TRASIG,
INNAN JUSTERINGAR GORS PA CHASSIT.
FRAMBÄGEN MÄSTE VARA
SAKERT FASTSATT PA BADA SIDOR VID ANVANDNING.
BARNETS SAKERHET AR DITT ANSVAR.
LYFT INTE SITTDELEN MED HJALP
AV FRAMBAGEN NAR BARNET
SITTER I. FRAMBÄGEN AR INTE
ETTBARHANDTAG.
ANVAND ALLTID GRENREMEN
TILLSAMMANS MED
MIDJEREMMEN.
SELEN KAN FORMAS TILL
OGLOR OCH UTGOR
STRYPNINGSRISK. LAA
ALDRIG SELEN IHOPSATT NAR
DEN INTE ANVANDS PABARNETI
VAGNEN.
VINTER-/SOMMARKLÄDER
KAN PÅVERKA STORLEKEN PÅ
BARNET.
INNAN SITTVAGNEN ANVANDS
SKA SELEN JUSTERAS TILL
BARNETS STORLEK. ANVAND
ALLTID SELEN.
VAR FÖRSIKTIG NÄR CHASSIT
FALLS UPP OCH NER.
KONTROLLERA ATT
FALLMEKANISMEN AR FRI FOR
ATT UNDVIKA ATT FINGRAR
FASTNAR ELLER ATT ANDRA
KROPPSDELAR SKADAS.
FOR ATT UNVIKA SKADOR
KONTROLLERA ATT DEN
IHOPFALLDAVAGNEN AR LAST
INNAN DU LYFTER OCH BAR
CHASSIT.
BAR DET IHOPFALLDA CHASSITI
HANDTAGET.
VIKT PLACERAD PÅ
HANDTAGET OCH/ELLER BAK
PA RYGGSTÖDET OCH/ELLER
PASIDORNAAVVAGNEN
PAVERKAR STABILITETEN.
BABYLIFT VARNINGAR:
VAR UPPMÄRKSAmp RISKER MED OPPEN ELD, GASELD ETC. I NARHETEN AV BABYLIFTEN.
CKJADLbIBAR IN PACKJADlbIAB PAMY,HEOXBOMM
\POPBUBTb DIOJHXHYO OCTOPOKHOCTb.
OBCIEJIbTE,TOBbI CKNIABIBAOJU
MEXAHIN3MbI BbJIN
CBO6OJHb, BO 3B6EKAHNE 3AUEMTEHNI JALIeB INI TPABMPOBAHN KAKX-JIMBC YACTEIN TEIA.
BO N3BEXAHME BO3MOXHbIX
TPABM IINI NOPBEXJEHIM,
PPEXJE YEM NOJHMATb
N IIEPEHOCHNTb PAMY,
O83ATEJIHbHO IPOBEPRITTE, 3AIDECTBOBAH NIM KKCATOP CIOXEHHOI POJOKEXHNI
CIOXKEHHYIO PAMY
IIEPEHOCITE 3A ITIABHYIO
PYHKY.
BELIIN, BICRIUE HA PYUKE N/ INI HA OSPATHOHT CTOPOHE CTNIHKN N/INI BOKAX KOJIACKN CHIKKAOT EE YCTOUYBOCTb.
OCTEPEAITECBOTKbITOPOXAKAPN803OPAHNA7AHTN.T.D.BHEIOCPEDCTBEHHHOBNIOCTNOTJIOJIbKn.
He Beuaine Cymn N npytnpePmeTb H aPyK KONK
KOLRACKA MOKET ONPOOKHYBcR.
PpeDMtI N KOKYKN MOKHO
nepeBO3NtB TOBKBO CNEUAMbHOB
KOP3He, A INX O6UI BEC He D0JKeH
npBbIaTb 1 KITOnDJIKeH 6bTb
pacrpeDenen pabHomeHo.
HnB KOem Cnyuae He NbTaIteCb cnKoHT bKOaRcKy Spirit, nOKA B Hei CNDIT pe6eHOK: KOJIaCKa MOKeT erO 3auEeMTh. CknaDbIaBn A pacKnabIbBaN KOJIaCKy, He npKNaJdaBbAte
HNIUHIXYcHIN: BblMOKTe ee NOpeBntb. BHIMATEbHO npOHTaTE paADBeIb2 n15 NCTpyKUNn no NcONtB3OBAHIO H3dEIN Spirit.
PapaeTcncI cNIOB3OaBt TofbKo npHnAeNkHOCTN 3aNaChtbe DetanIn, NOCTABmEble Nn pekOMeHIOBaHHe KOMaHnei Silver Cross.Ecn Bauy KOJIACKY nCIOB3yET dpyroT yenOBek (HanPMep,6abUka,deUka knn HNA),OB3aTeJIbHO oBbCHNTe OTMY YenOBek,Kak PpaBnIbHo ee NcIOB3OaBt.
MAKCMAMJIbHAR HAHTPY3KA HA KOP3INHY:1KT.
YxOaI O6cJyKbBaHne
Pama Konjarcny
Bcerda npoebprrte koraKcHny
npedmet nHaOca.PeyraPHO
cm3aBaIbte Bce nOdBnKhBle deTaNl.
PnpoeBpe, Cbo6DNo Hn pa6ToAOT
Bce fncATopBy. Metanllneckme qactn
npotpaTBe cyxoi NCTOnTKaHbO.
TANI3 TKAHNI CnDEHe
YkazAHNIO CTnPKe DETANEI N3
TKAHM CM. B PYKOBDCTBE NO YXOyD,
BXOJIUEMYB KOMUNEK KOJAKCN.
DePKITE N3dEINE B CTOPHO
OT NCTOHNIKOB TENPA INPMAbIX
COJIHEHbIX Ipyei. CO BpEMeHem TKAhB
MOKET HEMHOI BbIcBeCTIN BPOLCEC
NOBCEDEHBORIO NCTOJIb3OBAHIN
He cTnpaIte Hc CyUHTe TKAHB CHTpAblHO MaMHe, He IpaBte Hc OtbENbIaTe ee.
Hn B KOEM CNYaee He OCTaBJIaIe TANAE PNIHADNEKHOIN, KAK COIHHe3aunTHbN KO3bIpeK INI DOKKeDBNK, B MeCtAX, Ite BcICoAeR
Tempeata Type WIM CBET MOYT Bb3BabT Bblbetame TKAHIN DEpOAMNU NPACTMaccbI, HAPIMEP Ha 8aRaXhoN OJIOke ABTOMOBnB X kApKyO noyDo.
安全须知
a a a a a a a a a a a a a a a a a a a a a a a a a a
a aaa aee aee aee aee aee
Silver Cross