
00210538 - Mobile device holder HAMA - Free user manual and instructions
Find the device manual for free 00210538 HAMA in PDF.
| Product type | Smartphone holder |
| Brand | Hama |
| Model | 00210538 |
| Intended use | Holding a smartphone on a table, desk or shelf |
| Clamp width | 6 to 8 cm |
| Maximum table/desk thickness | 7 cm |
| Maximum adjustable height | 65 cm |
| Adjustable angles | Yes, via ball head with tightening screw |
| Maximum recommended load | Approximately 1 kg |
| Holder weight | Approximately 0.5 kg |
| Power supply | None (mechanical device) |
| Material | Plastic and metal (estimated) |
| Color | Black (not specified, estimate) |
| Package contents | Holder, user manual |
| Care and cleaning | Wipe with a soft dry cloth. Do not use harsh products. |
| Safety | Do not exceed max load. Mount on a flat and stable surface. Check stability regularly. |
| Spare parts and repairability | Not specified. Contact Hama for parts. |
| Warranty | Legal warranty. Any modification voids the warranty. |
| Recycling | Follow local recycling guidelines for packaging and product at end of life. |
Frequently Asked Questions - 00210538 HAMA
User questions about 00210538 HAMA
0 question about this device. Answer the ones you know or ask your own.
Ask a new question about this device
Download the instructions for your Mobile device holder in PDF format for free! Find your manual 00210538 - HAMA and take your electronic device back in hand. On this page are published all the documents necessary for the use of your device. 00210538 by HAMA.
USER MANUAL 00210538 HAMA
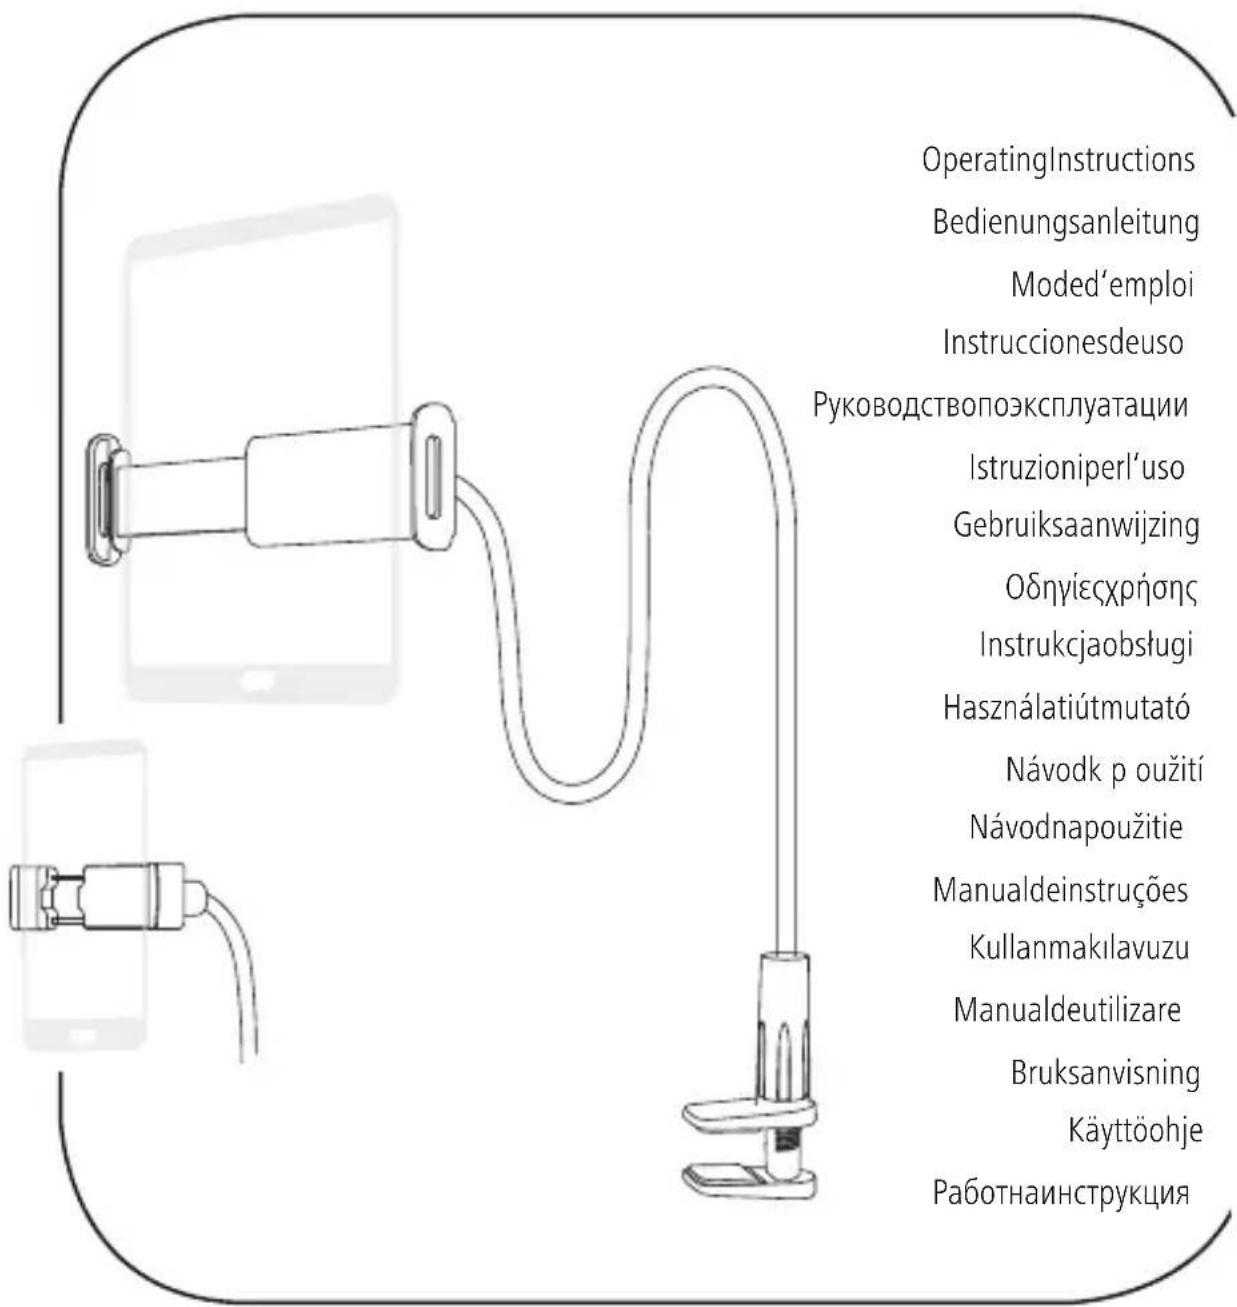
UniversalSmartphone-/Tablet-Holder
UniversalSmartphone-/Tablet-Halter
GB
D
F
E
RUS
1
NL
GR
PL
H
CZ
SK
P
TR
RO
S
FIN
BG

GB
Operatinginstruction
Thankyouforchoosinga H amaproduct.
Takeyourtimeandreadthefollowinginstructionsand informationcompletely.P leasekeeptheseinstructions in a safe place for future reference.If you sell the device, pleasepasstheseseoperatingsinstructionsontothewnew owner.
1.Explanationof warningsymbolsandnotes
Warning

Thissymbolisusedtoindicatesafetyinstructionsoarto draw your attention to specific hazards and risks.
Note

Thissymbolisusedtoindicateadditionalinformation orimportantnotes.
2.Packagecontents
- Smartphone/ t ableholder
Theseoperatingsinstructions
Note

Please check the package contents for completeness before installing the holder and ensure that there are no faulty yordamagedparts.
3.Safetyinstructions
The product is intended for private, non-commercial use only.
- Use the product only for the intended purpose.
- Do not use the product in a damp environment and avoidsplashingwater.
- Donotusetheproductintheimmediatevicinityof heaters,otherheatsourcesorindirectsunlight.
- Donotattachanyadditionalobjectstotheproduct.
- Keepthepackagingmaterialoutofthereachof childrenrenduetotheriskofsuffocation.
- Disposeofpackagingmaterialimmediatelyin accordancewiththelocallyapplicableregulations.
- Do not modify the product in any way. Doing so voids the warranty.
- Observetheother warningsandsafetyinstructions.
Warning

- Ensure that the product does not exceed its maximum permitted carrying capacity and that noload exceeding themaximum permitted dimensions is attached.
- Make sure that the product is loaded symmetrically.
During adjustment, ensure that the product is loaded symmetrically and thathemaximumpertitted carryingcapacityisnotexceeded.
Theproductisusedtosetupsmartphones,tablet PCsandsimilarortoattachthemtotabletopsand shelving.
4.Installation
Warning-Mounting

- Onlysettheproductuponeven, non-slipsurfaces with a sufficient load-bearing capacity for the product andthedeviceattachedtoit.
- Donotmounttheproductabovelocationswhere personsmightstorstand.
- Neverapplyforceduringmounting.Thiscandamage yourdeviceortheholder.
- During mounting, ensure that neither there are no coils, hobsorothersourcesofmoisture and heatin theareaoftheholder'smountingorswivelrange.
- Once you have mounted the product and the attached load, check that they are sufficiently secure, resilient and safeguard.
- You should repeat this check at regular intervals (at least every three months).
- Intheeventofdamagetotheproduct,removethe attachedloadandstopusingtheproduct.
4.1 Inserting/removingthedevice
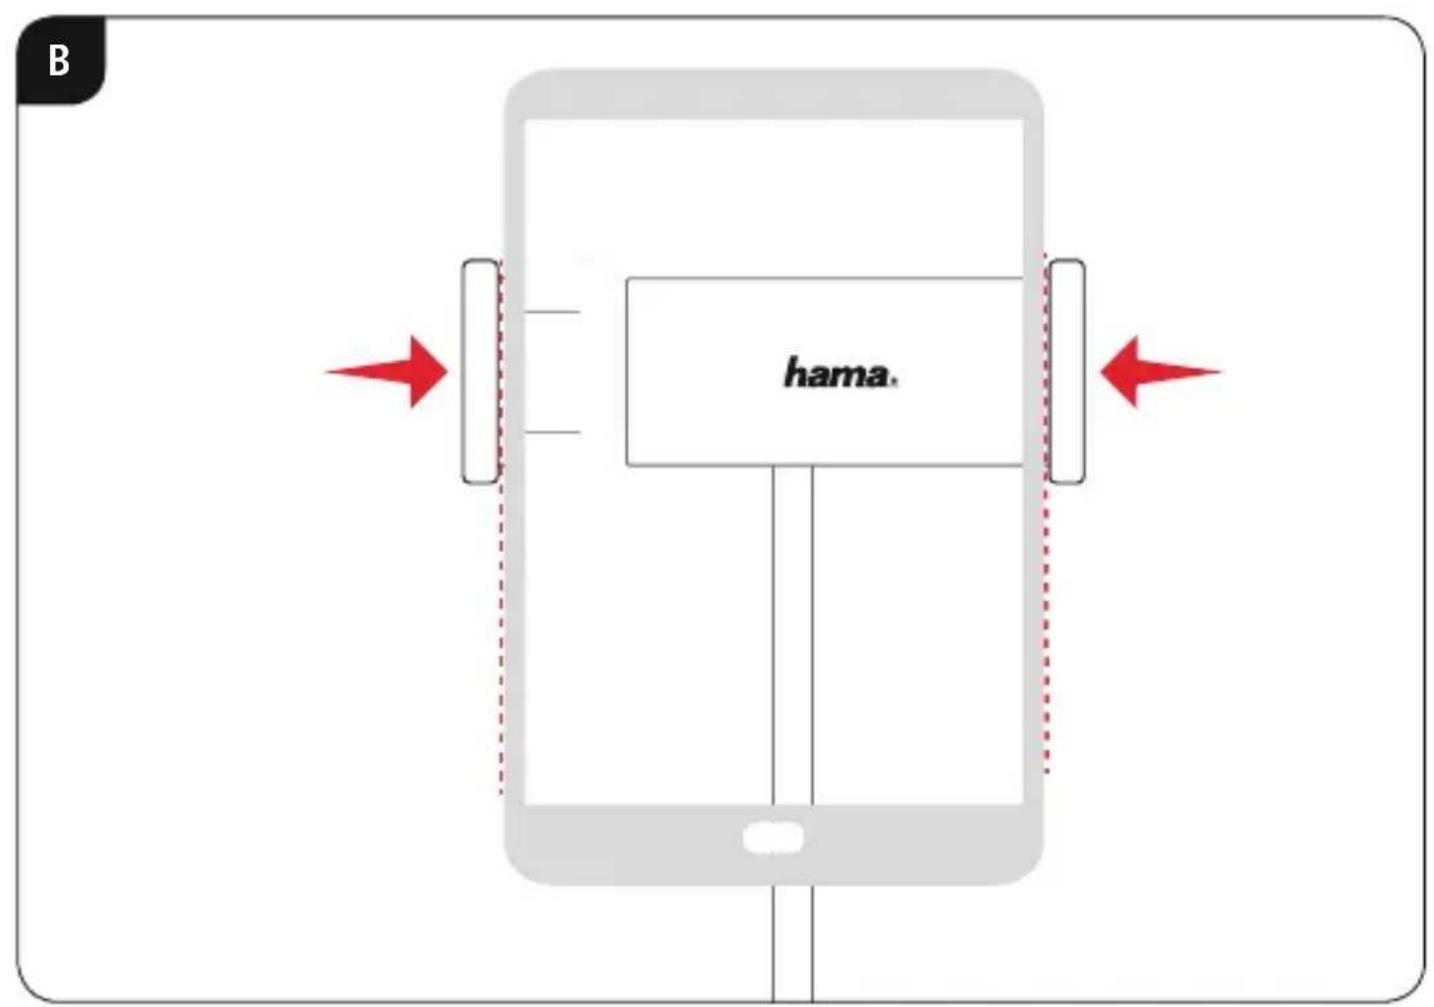
- Spreadtheholdingclampsontheholderfarenough apartforyoutobebabletoinsertyourdevice.(Fig.A)
- Hold the device firmly, position it between the holding clampsandthenpresstheholdingclamps gently together.(Fig.B)
Afterinsertion, checkthatthedevicessittingfirmly andsecurelyintheholder. - To remove your device, hold it firmly and carefully pushtheholdingclampsapart.
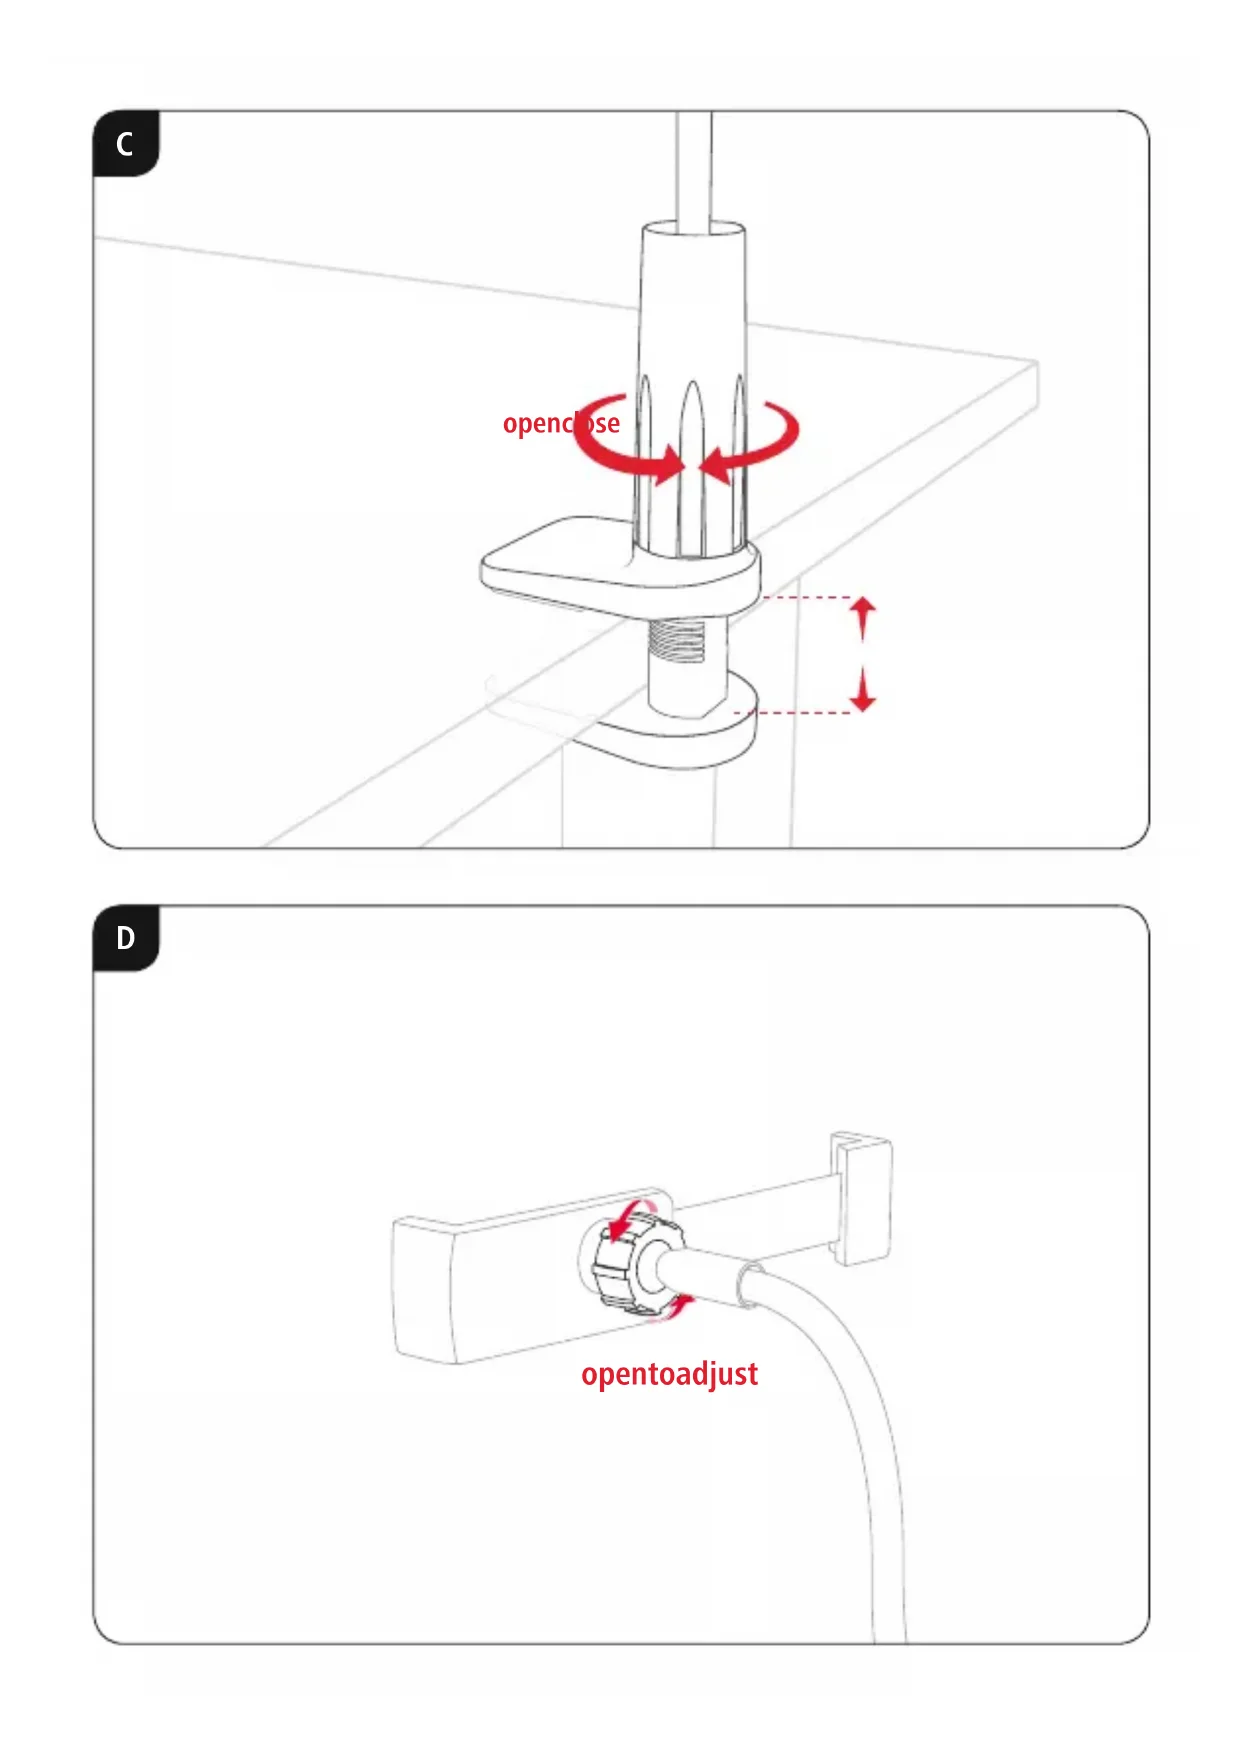
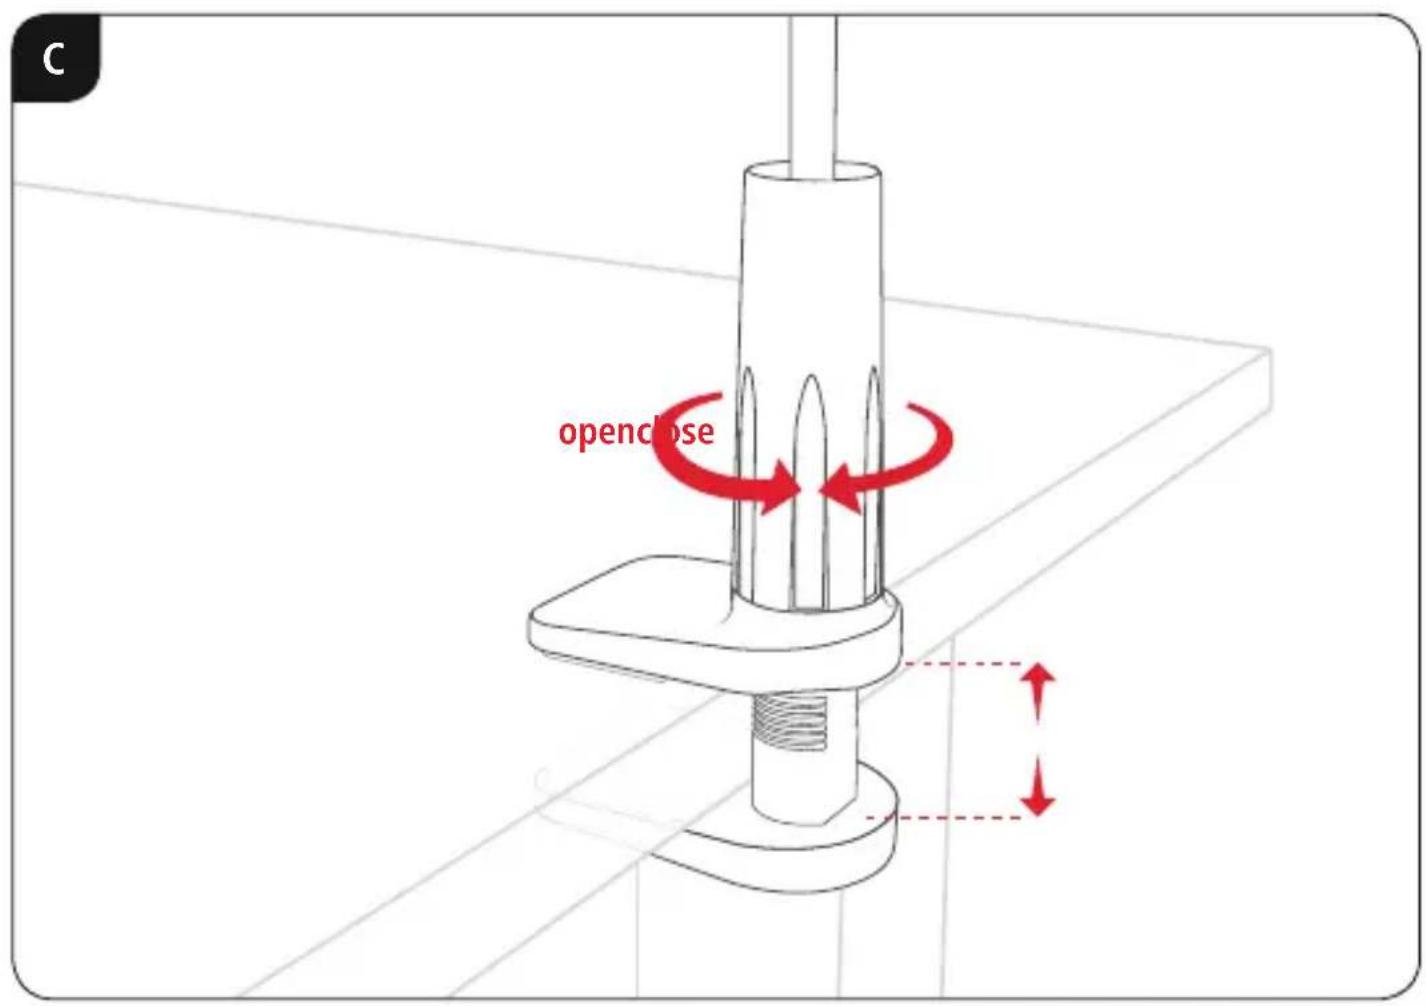
4.2Attachmenttothet tabletop/ shell
- Always affix the holder without the device inserted.
- Slightly open the closure on the holder by turning it anti-clockwise.(Fig.C)
- Positiontheholderintherequiredplaceonthe tabletop. Turn the holderto adapt it to the thickness of the tabletop.
- Turn the closure clockwise to attach the holder.
- Checkthattheholderisfirmlyandsecurelyseated.
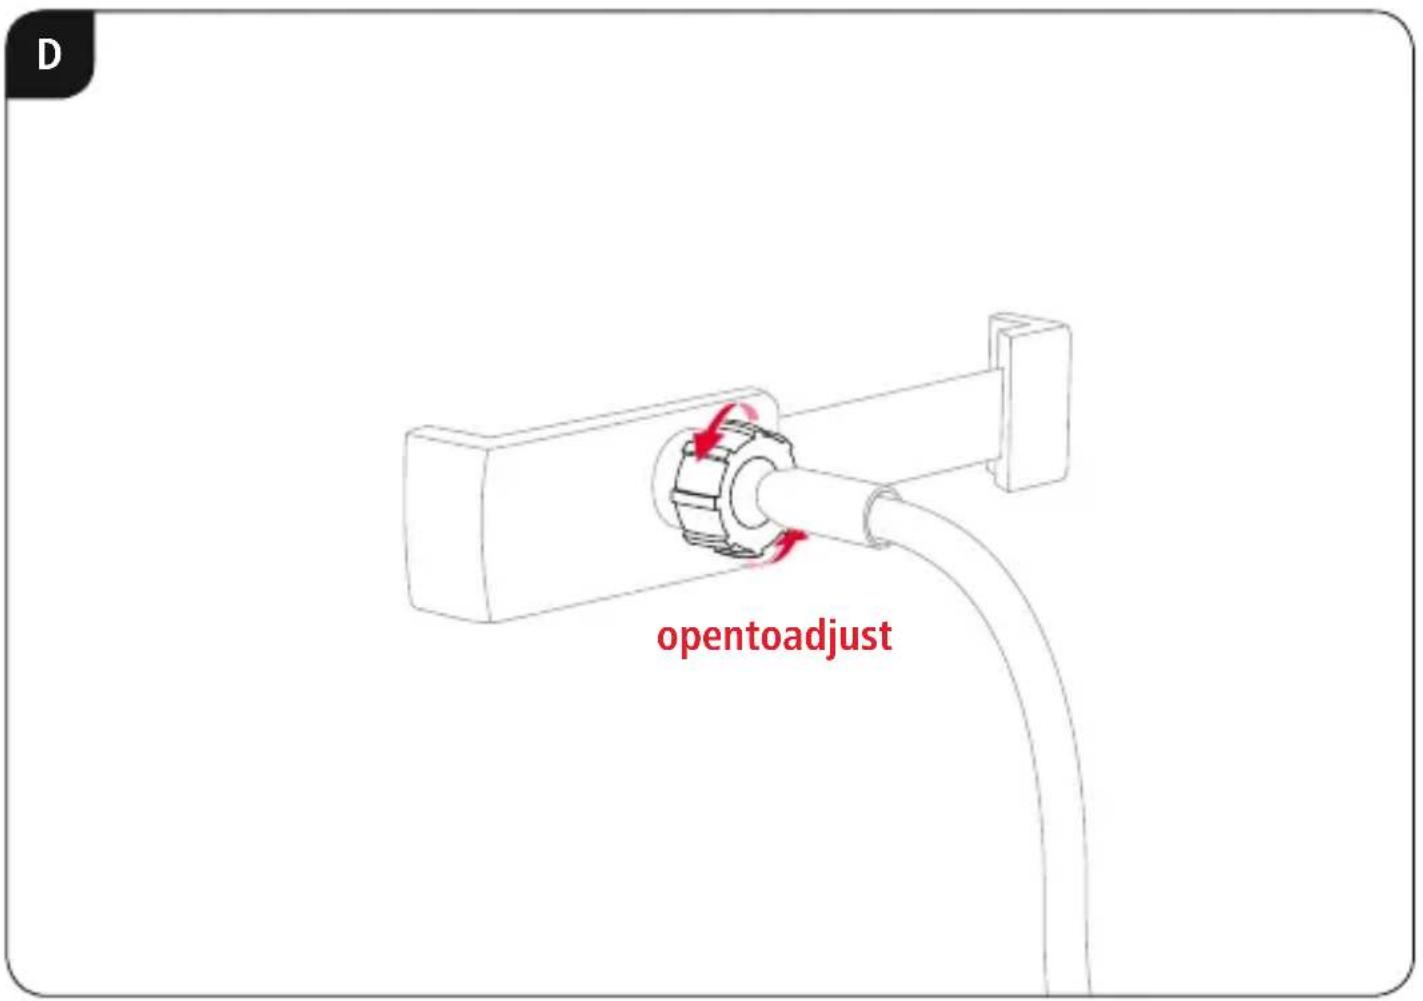
5. Adjusting the angle and tilt
Theholdercanbesteplesslyadjustedintermsofangle andtiltwhrespecttotheobserverusinga b allhead.
- Alwaysadjusttheangleandtiltwithoutthedevicess inserted.
Toadjust,loosentheclampscrewontheballhead. (Fig.D) - Adjusttheangleandtiltasrequiredandtightenthe clampscrew.
Theholderarmcanalsobeadaptedtotherequired height.
6. Technical data
| 00210538- S martphoneholder | |
| Uptomax(tabletop thickness)7cm | |
| Adjustableheightmax.65cm | |
| Holdingbracketwidth6 - 8 cm | |
| 00210539- T ableholder | |
| Uptomax(tabletop thickness)6.5cm | |
| Adjustableheightmax.75cm | |
| Holdingbracketwidth | min.13.5cm max.22cm |
7.WarrantyDisclaimer
HamaGmbH& Co K G a ssumesnoliabilityandprovides nowarrantyfordamageresultingfromimproper installation/mounting,improperuseoftheproductor from failure to observe the operating instructions and/ or safetynotes.
4.2 KpenenneK cToJeHHnue/NoJIke
KpenneHnepxateIaBcerda npoBONTcno yCTaHOBKnOKeHOrOyctpoiCTBa.
ClerkapanpnoTkoIte3amokdepxaTeIa,NOBepHyBero npotuB yacobO B CTpeKn. (Pnc.C)
- UctaHOBtTeepKataJIbHaBbI6paHHbIyAcTOK CToneuHnCbl.NobopaunBaJepKaTeJIb, OTperynpyteeronoTOnuHcyToJeHnCbl.
-ПовернITEЗAMOKNOчACOBОИстрелкеду 3akpenlleHЯДержateл.
-Пюверьтейдахноctьфкацикpenления.
5.PerynnpOBKayraHaKaIHOHa
C n OMOuBIOUAPOBOINOBKIMOXHONJIaBHO peYIInPOBaTByrOJIHaKIOHaepXaTeJIaOTHOCTeJIbHO IOnBJ3OBaTeJIa.
BceraperynpyteyroHaKaIOHaOyctaHOBKn OKOHeuHOrOyCTpoiCTBa.
-ДларунрOBKNOTKpyTNTe3axIMHbIBBnHT shapobOBI rONOBKn. (Pnc. D)
- YctaHOBHT Heo6xOIMbI yrOI HaKIOHa I 3aTAHNTe 3axMHbIBuHT.
TakKemoxHooTperynpoBaBkoHHTeHNo BbICOTE.
6.TexHnuecknneHaHHbIe
00210538—depxaTeIbIЯcMaprTfOHa
MaKc.ToJIuINHaCTOJIeUHnUbI7cm
PerynpyeMaBbICOTaMaKc.65cm
山u npHaekpenExHoR03axmAm6-8cm
00210539-depkaTeIbIaIHaHWeTa
MaKc.ToJIuHnactOJIeUHnUbI6,5cm
PerynpyeMaBbICOTaMaKc.75cm
UnpnHaKepeNckHoro3aKmMa
MNH.13,5cm
MaKc.22cm
7.0cbo60xdeHneoTobetCTBEHHOCTN
HamaGmbH&Co.KGHe He HeceTOTBeTCTBHeHOCTn
3aONOBpeXeHnRA03HnKwneB p e3yIbTaTe
HeHaJIeXaUeYcTaHOBKn,MOHTaxKa
HeHaJIeXaUeROUCNoJIb3OBAHnN3DeJI
nLIHecO6JIIODeHnTpe6oBaHnpyKOBOdCTBa
no3KcIIyatauNN/NJNyka3aHNlNOTExHnke
6e3OnaChOCTn.
4.1NoctabAHe/CBaJIaHEHaKaPaHOToycToPoiCTBO
Pa3TBopeTecko6nteHaNbbpXkaataKa,YeJaMOxTe Da nocTabte BaIeTo KpaHNo yCTpoiCTBO. (Pur.A)
XbaHETeKpaHHTOyCTpOICTBO,PO3NIOHpaTero MExDyCKo6ntHaIbPkaaH r H aTNCHeTeNeko eHa KbM dpyra. (Φur.B)
CneIIOCTaBHeNpOBepeTeCTa6HnHOTo3aTgAHeHa KpaHOTOyCTPOHCTBOHaDbpxKaHa.
3aanda3BaAnTeBaWeToKpaHoycTpoiCTBO,XBaHeTe ron p a3daJeTeBHNMaTeJIHOCKoBtHaIbpxaHa eHaOTdpyra.
4.23akpenBaHeKbMnIoTHaMaCa/paΦT
- 3akpenBaIteIbIpbXaayabHnHaIe3noCTaBeHo KpaHoycTpoIcTBo.
- OTBopTeNekeo3aTbapraunMexaHn3bMHaIbpxka, KaTOrO3aBbptNTeO6paTHOHauacOBHnKOBaTa cTpeJka.(ФИR.C)
Pa3noJoxeTeNbPjXaHaHaxEJaHOtOMcTOHaNlOta Hamacata.HactpoTecBbptHeNbPjXaAcnpraMo De6eHHataHaHnIota. - 3aBbpteTe3aTbapxuMexaH3bMnO yacOBHnKOBbTaCTpeJka,3aJa3aKpeNITeIbpxaHa.
- Поберетабилнотозатуганьржача.
5.PerynnpaHeHaBbIaH aKloHa
bTn H aKIOHbHaBpKaaacnpaONOTpe6nteMaorataceperyIinaPb6e3cteneHHOupe3cΦepuHaTa rnaBa.
BnHaIpyu npaTebbnaH aKIoHa6e3 nOCTaBeHOKpaHoycTpoiCTBO.
- 3aandaohanpaBnte,pa3xna6teTcTraaunBnHTha cfepuHata rnaBa. (Mvr. D)
- HactpoIte XeJIaHInTe bIbI n HaKIOH n 3aTeHHeTe CTraUINBAHT.
- OcbeHTOBAMoxeJacepeRyInpaXeJHaHATA BnCOUHaHaJaBpKaaOTopAmO.
6.TexHHuecknDaHHN
| 00210538-Държачзамартфон | |
| Домакс.дебелинанаплота Намаса РergуирagemависочиMuKc.65c m | 7 cm |
| Ширшинараздьржаши Челюстu | 6-8c m |
| 00210539-Държачзатаблét | |
| Домакс.дебелинанаплота Маса PergуирagemависочиMuKc.75c m | 6,5cm |
| Ширшинараздьржаши Чelюстu | Мин.13,5cm Мakc.22c m |
7.N3KNIOUyBaHeHaOTROBOPHOCT
HamaGmbH& C o K G HenoemaOTROBOPHOCT
IINrapaHnJ3aNOBpeDn,KOINTOCape3yJITATOT
He npabInHaHnHCTaJaCn,MOHTaxn y IOTpe6aHa
IpoNyKTaanNoTHeCnA3BaHeHapbKOBODCTBOT03a
EeKnloataaun/nnHayKa3aHnraTa3a6e3ONaCHOCT.
hama®
HamaGmbH& Co KG 86652Monheim/Germany
Service& Support
www.hama.com
+499091502-0
D GB
All listed brands are trademarks of the corresponding companies. Errors and omissions excepted, and subject to technical changes. Our general terms of delivery and payment are applied.