BM3126EG - Dishwasher Profilo - Free user manual and instructions
Find the device manual for free BM3126EG Profilo in PDF.



| Brand | Profilo |
| Model | BM3126EG |
| Product type | Built-in dishwasher |
| Dimensions (H x W x D) | Approx. 86 x 60 x 60 cm |
| Net weight | Approx. 50 kg |
| Power supply | 230 V, 50 Hz, 10 A |
| Capacity | 14 place settings (standard estimate) |
| Wash programs | Eco, Intensive, Quick, Delicate, Pre-wash |
| Special functions | VarioDrawer, EmotionLight, TimeLight, Gap Illumination |
| Water consumption | 9.5 L per cycle (Eco program) |
| Energy consumption | 0.92 kWh per cycle (Eco program) |
| Noise level | 44 dB(A) (estimate) |
| Installation type | Built-in, integrated or fully integrated |
| Tub material | Stainless steel |
| Filters | Removable filtration system (microfilter, coarse filter) |
| Spray arms | Removable upper and lower |
| Safety | Automatic shut-off, child safety (button lock), leak protection |
| Maintenance | Regular cleaning of filters, spray arms and door seal |
| Spare parts available | Yes, via after-sales service or specialized websites |
| Repairability | Detailed repair manual, many user-replaceable parts |
| Documentation | User manual and repair manual available in PDF (989 pages) |
Frequently Asked Questions - BM3126EG Profilo
User questions about BM3126EG Profilo
0 question about this device. Answer the ones you know or ask your own.
Ask a new question about this device
Download the instructions for your Dishwasher in PDF format for free! Find your manual BM3126EG - Profilo and take your electronic device back in hand. On this page are published all the documents necessary for the use of your device. BM3126EG by Profilo.
USER MANUAL BM3126EG Profilo
4.2 MoHTnpaHe Ha CnCTeMaTa OT KOUHnIu 9
4.2.1 MoHTnpaHHe HnB3rau Ha naneua 3a 86-cM moDen
4.2.2 MoHTIpaHe HaФИKcaTopa 3a Yauu.. 9
4.2.3 MoHTupaHe Ha BNoKkTaHa naporeHepaTopa.. 10
4.3 CmHa Ha rHe3nTo varioDrawer 11
4.3.1 ⅢaKaJaHe Ha rHeZIoTo varioDrawer 11
4.3.2 MoHTIpaHe Ha rHesdTo varioDrawer 12
4.4 CmHa Ha pa3npbckBaunte pameHa 13
4.4.1 ⅢBaKaDaHe Ha pa3npbckBaUTo pAmo 13
4.4.2 MoHTIpaHe Ha pa3npbckBaIoTo pAmo 13
4.5 CmHa Ha qnItpTe 14
4.5.1 ⅢBaXdaHe HaΦnTbpa 14
4.5.2 MoHTpaHHe Ha cHNTpHTe. 14
4.6 MoHTIpaHHe Ha npbckaTa Ta naba 3a Tabu.. 15
4.7 CmHa Ha 3axpaHbauaKa6en.. 16
4.7.1 ⅡKJIIOUOBAHe Ha 3axpaHbuaaKa6eI. 16
4.7.2 BknoBaHe Ha 3axpaHbauaKa6e1 16
4.8 CMraHa Ha KaanaKkata 3a NoocTbaun npenapat... 17
4.8.1 Cbane Ha kanayka 3a noHCTBaunn npenapat.. 17
4.8.2 NoctabRHe Ha npyKnHata. 17
4.8.3 MoHTnpaHHe Ha KaNaUkTa 3a NoocTbauu npenapat... 17
4.9 CmHa Ha Kanaka Ha NOMnata 3a OTnADH BOni.. 18
4.9.1 CbAJaHe Ha Kanaka Ha nomnata 3a OTnADH BODn 18
4.9.2 MoHTnpaHe Ha KaNaka Ha NOMNaTa 3a OTnADH BODn 18
4.10 CmHa Ha cTpaHnHnaHeI 19
4.10.1 CbAHe Ha cTpaHnHnaHn 19
4.10.2 MoHTpaHa Ha CTpaHmHnnaHe 20
4.11 CmHa Ha BbHnHa Ta BpTa.. 21
4.11.1 3BaKaDaHe Ha BbHuaHaTa BpaTa 21
4.11.2 MoHTnpaHe Ha BBHuaHa BpaTa 21
4.12 CMHa Ha KOHTpOHHnaHn 23
4.12.1 CbJIHe Ha KOHTpOJIHHaHEn 23
4.12.2 MoHTnpaHe Ha KOHTpOJIHHaHEn 23
4.13ФИКСИРанеHa npужинiteHa BpataTa 24
4.14 CmHa Ha donnnaHn 26
4.14.1 CbanyHe Ha donnna nane 26
4.14.2 MoHTpaHe Ha DoJIHnnaHn 26
4.15 CMHa Ha nnoyata Ha rnaBHnKoHTaKT 27
4.15.1 CbIaHHe Ha IIOyAHa IINABHHKoHTAKT 27
4.15.2 MoHTnpaHe Ha nnoyata Ha rnaBnKoHTaKT 27
4.16 CMHa Ha Tpb6oPpOda 3a npenbnahe. 28
4.16.1 CbanyHe Ha KaHana 3a npenbnahe 28
4.16.2 MoHTupaHe Ha TpbObonpoBa 3a npembIbaHe 29
4.17 CMHa Ha BbTpewHata Bpata 31
4.17.1 CbanyHe Ha BbTpewHata Bpata 31
4.17.2 MoHTpaHa He Ha BbTpewHaTa Bpata 31
4.18 CmHa Ha naHTata Ha BpaTata 32
4.18.1 CbAraHe Ha naHTata Ha BpaTata 32
4.18.2 MoHTpaHe Ha naHTata Ha BpaTata 32
4.19 CmHa Ha ynnbTHHeHneTo (DOnHo) Ha BpaTata 34
4.19.1 CbaIHe Ha ynnbTHHeTo Ha BpaTaTa 34
4.19.2 MoHTpaHe Ha yNbTHHeMeTo Ha BpaTaTa 35
4.20 CmHa Ha ynnbTHEHnETo (ropHo) Ha BpaTaTa 36
4.20.1 CbAraHe Ha yNtBTHHeTo Ha BpaTaTa 36
4.20.2 MoHTnpaHe Ha yNtBTHHeHMeTo Ha BpTaTa 36
CbBETn 3a peMOHT - CbDOMnJaHa MaunHa
4.21 CmHa Ha EmotionLight 37
4.21.1 CbAHe Ha EmotionLight 37
4.21.2 MoHTIpaHe Ha EmotionLight 37
4.22 CmHa Ha TimeLight 40
4.22.1 Cbajhe Ha TimeLight 40
4.22.2 MoHTupaHe Ha TimeLight 40
4.23 CmHa Ha Gap illumination (OcbetraBe Ha npolyu). 41
4.23.1 CbIaHepaGap illumination 41
4.23.2 MoHTipaHe Ha Gap illumination 42
OTHOCHO To3n DokyMeHT
1.1 Baxha nHΦopMaζη
1.1.1 Uen
TeHc cBbETn 3a pEmOH T NOMarat Ha Ntpe6nTEnla DpemOHtnpa Cam ypeiB C bOTBeTCTBnC pernameHTa 3a ekONOrOcb6paHO npoeKtnpaHe Ha ypeiNe (OT03.2021 r.).
Te cbIbpxk HnHOpMaunKa Ka Da CMeHrTe ONpeDeneHn pe3epBn YactN, BKIOHTENHO npdynpckdHn n PNCKOBe.
Ako IMATE HRAKAKINBbnpoM,MOJIa CbIpKeTe Ce c HAUNO OTdEe 3a OBCnykBaHe Ha KIMENTH. Hne HOCIM OTTOBOPHOCT 3a UETn, CAMO AKO CbBeNTe 3a peMOHT ca cna3eHN npabInHo.
1.2 06aCHeHne Ha cHMBOJInTe
1.2.1 HnBa Ha onaCHOCT
IpeynpeintenHnbeBaCeCbCToTOTCMBOJINCnHnHaDyMa.CnHnHaTaDyMa nok3Ba cepno3HOCTTA Ha onaCHOCTTA.
CIMBOHTE3aONACHOCTCa CIMBOHNUH N3o6paXeHNA, KOHTO DaBaT INDINKAUHA 3a BnDa ONACHOCT.
BTo3n DOKyMeHCTe H3N013BaT CNEdHInTe CMBOIN 3a OnaCHOCT:
| Симboл за орасост за чужения | ОвноPre dedупраздітелно сьобсято Орасост от[elekntrочко наpopжени Риск OT[eк科研院所 |
| Орасost от[nорязвany |
OTHOCHO To3n DokyMeHT
| Симbol 3a onachoct 3начени | Опachoct ot пемарази Опachoct ot горец поьрхости |
| Опachoct ot симно магнисто полес | |
| Опachoct ot неонисяцу льчени |
Ta5nuu2: CumbOnu 3a onachocm
1.2.3 CtpyKtpa Ha npéDynpexkdeHnra
PepynpexdHnraT BTO3N DOKMeHT MMAT CTAHapTN3nPAH BbHwEN BID NCTaHdAPTN3nPAH CTpykTypa.


ONACHOCT
BnHn3ToyHKn Ha onaCHOCTTla!
Bb3mOHHnocpeHnO tNfHopapaHeHa onaHocTt/npedynpckdHeHe
Mepkn 3a6paHn 3a npDoTbpaTbaHe Ha onaChocTta.
CneHnIy nPmep NOKaBA npEynpEKeHHe, KoTo yBcOMaBA 3a TOKOB Yapd, npEeIN3BnKAn OH tAcTn NoD HanpeKeHHe. CnOmeHabe Ce MApkata 3a N36RbAbe Ha onacHOCTA.


ONACHOCT
Pnck OT TokOB yap npaH nuactn noH anpekeHne!
CmbptOT TOKOB ynap
K3NkhOteyeHtneOEENKTnueCKKTo 3aXpaHbAneHO60ce HJnnpEe3aONuBaHaNe hApMOHTa.
1.2.4 06uCNMBOJI
BTO3NIOKYMENTCEH3NON3BATCNEDHNTeO6UINCNMBONI:
| Оьш симвов Зачени | |
| I | Иденихицаре на спесиален сьвет (Текст w/ллграфика) |
| I | Иденихицаре на постс сьвет (самоTekст) |
| I | Иденихицаре на врьзka Кьм Вideоурок |
| I | Иденихицаре на необхочимite ИСТрумени |
| I | Иденихицаре на необхочимiteпраздарителни ус自主创新 |
| I | Иденихицаре на ус自主创新 (ako ...,Тогава ... ) |
| I | Иденихицаре на рezуntат |
| [Стар] | Иденихицаре на Клиочни 6ытуон |
| [00123456] | Иденихицаре на Кatableожен Homep |
| [Статус] | Иденихицаре на по��аизяп Текст/ празорец (надиспега на урEDA) |
Ta6nua3:O6u cumeOnu

Be3onachocT
2.1 06uHnHCTpyKu3a6e3onacHOCT
2.1.1 BcHKn DoMaunHn ypeiN
Puck OT TOKOB yap nopadn qactn noh HanpexeHne!
- PrguKn pRn peMOHTN, BKNIOHbaaun eNEKTPnEeCKN KOMHOHeHTN, MORAT da DOBeaD aTOKOB ydap!
- Pankachate yepda oTe eneKtpueckaTa mpeka 3a nohe 60 cekyHdi, npeDi da 3a-noCHte pabOta.
Cnepe moHHTA TpRABa da ce HbPnpoBepeka 3a 6eOnaOCT cbnaCHO VDE 0701 nn B cTobETCTBn Cbc CneuHmHNTte 3a cTpanAaTAPone6bIe
Puck OT HapaHbAbe OCTpn p6oBe!
Hocete npedn3n pbkabn
PCK O T pme3A8Hn BO peme HA pMeOH, NOpIbJbKha,OTcPraBaBA ha HEn3PbABHOCTN andepBn3npaIe TkHn DBeWKeu CE KOMNoHEHTn
Hocete3aunTHn06yBKn.
3akpeneteTexknteKOMnoHeHTn,taKaYeHaHe NaHaT.
He no3BONRABaTe KOHTaKT Ha YAcTn OT TAnOTo C DmXeUc Ce KOMNoHEHTN.
Pnck 3a 6e3oanacocTtA/foHKuHraTa h ypeDa!
- 13no13BaIte cmo opunHaiHn pe3epBn YactN.
Pnck OT nobpeHa eNektpocTaTuHc YbCTBtENH KOMnoHeHTN (ESD)
HeDOKOcBaTeMoDyInTe,BKNIOHTeHnHO Bp3Kn IN PNOBODHNKOBN TbTnua.

IhctpymEnTu n NOMOuHcpeDCTBa
| посочане Робносту Избражения | |
| Оверты Торх T20 С овор [00340764] | 100 MM, за виHTове с преда- зен удиФТ |
| Оверты Торх T15 | Дылжина 80 MM |
| Плеска OTberрта Врьх 10 MM x 1,6 MM x 200 MM | |
| Кleineц с Истовд- ни челков [00340871] | Дылжина: 200 MM, пави |

PemOH
4.1CMHaHa pa60THnI NIO
N3nCKBaHe:
YpeBte n3KNIOueHOT3aXpaHBAHeTo.
YpeBt cBO6OHOIOCTbneH.
4.1.1 CbAJIHe Ha pa6OTHnI nnT
1.CBaTe DbTa BnHTa O3aI(1)(onu)
2. HatncheTe Dbata 3axBaauu npocTa npa6oTHn nnot Harope (2).
- NoburHete neko paobTHnnot Otnpei. (3).
4.N36yTaIe pa60THnN nNot Ha3aD(4).
5.CaJIePe pa6OTHnI IIOI.
4.1.2 MoHTnpaHe Ha pa6oTHnI IIO
1.3aknHcTe 3aHaTataact Ha pa6oTHnI Nnot BbB BOaHTe C NOMOuTa Ha 3aDbpKaaNTe Btynk (1).
- Hatnche pa60THnI nnT Hanpei (2).
- HatncheTe npedHata Hacr Ha pa6oTHnI pnoT haDony,doKato yyeTe daBaTa 3axBaauu nocta da upaKaBt Ha MRCTo (3).
4.3aBnTe OTHOBO DbTa BnHTa (4) (ONU).

PemOH
4.2 MoHTnpaHe Ha cncTeMaTa OT KOUHnIu
M3nCKBaHe:
CbOTBeTHATA KOUHnua e n3BaDena oT ypea.
4.2.1 MoHTnpaHe Ha nIb3rau Ha naIeua 3a 86-cM moDen
CneuaJIHHHnCTpyMeHTH:
Bodayha nanea [00614935]
Φнксаторзачаш[00618565]
- NocTabete nIb3raHa Ha naneua no dnaroHaN B npedHata qact Ha KOUHNuTa.
2.LeHTpnpaTe n pakHeTe yneHa naeua Ha macto.
4.2.2 MoThnpaHe HaФнкCaTopa 3aЧаш
CneuannHnHcTpymEnTH:
Boday hanaeta [00614935]
Φнксаторзачши[00618565]

KORA MNEte qaui, fHKCATOpb53 aauu Moke da 6bne cBbHAT. D0n bNHTENHNT BbN HAmAraBa CbBnPaHeTO Ha BOHa DA bHOTo HA uWITE. PnM MeHE Ha BcOKi Yauin PnpOpbYBaMe Da OCTABTe FHKCaTopa CbHAT HANONY. Ako ROPHNTE KOHNm IMat DoIbNHTeHn IuaCTMacOB BIOKKA, TRe PbBo TRPbBA da Ce 13BaDn.
1.ИЗБаДeTe nIaCTMaCObATo BnOxKa.
2.ⅢpaKHTeΦmKcTOpa3aHaMHaMCTO.
3.CrbHeteФнкcaTopa.

PemOH
- NocTabeTe npedMeTne 3a MHe.
4.2.3 MoHTnpaHe Ha BLOKKaTa Ha naporehepaTopa
CneuaHn HcTpymeHTn:

Boday Ha naneua [00614935]

YBepTe ce, Ye MapKnipOBKInTe cbc CtpeKN CBbNaT.

PemOH
4.6 MoThnpaHe Ha npbckaUaTa rnaBa 3a Tabu
1.CbaneTe ropaHa KaOHnHa.
2. NocTabete npbckaaata rna 3a Tabn B dbpxaua (1) n 3abptete HADRCO (2).
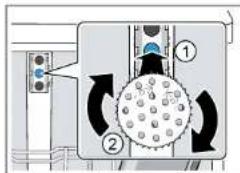
PpckaaTgnaaba3aTabnpaKaBaHaMcTo.

PemOH
4.7 CmHa Ha 3axpaHbuaa Ka6eI
N3nCKBaHe:
YpeBte n3KNIOueHOT 3aXpaHBAHeTo.
YpeBt E n3KIOUeH OT BOOChA6DnTeNHaT MpeXa.
YpeDnTe Ca CBO6OHO DOCtBnH.
4.7.1 N3KnIOVABe Ha 3axpaHbaua Ka6eI
PpeMeCTe BHMATEHNO e ncaHa haxpaHbuaaKa6en Harope/HaOny n ro u3dbpnaTe OT KOHTAKTA.
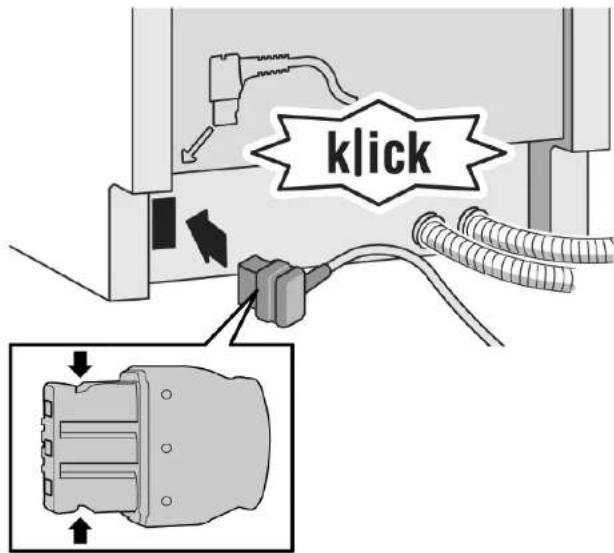
4.7.2 BkIIOUbaHe Ha 3axpaHbauJa6eN

BHIMAHINE!
PperpbaHe Ha OCHOBHaTa Bpb3KaI
Puckot nokap
BkapaTe nIbTHo 3axpaHBaunna KaBen,doKaTo upaKHe.
BkapaIte eencenaHa 3axpaHbaunKa6en B KOHTAKTa,doKATO Cyete,He paKaBa HA MACTO.

PemOH
4.8 CmHa Ha KaNaChKaTa 3a nouchTbuaa npenapat

KATOIOCTOB HHTPYMEHTMOXETe Da n3NON3BaTe MAnKa OTBepTKa.
N3nckBaHe:
YpeBt E n3KIOUeH OT 3aXpaHBaHeTO.
YpeBte H3KNIOueH OT BOOCHaDnTeHaTa Mpeka.
BpaTata e OTBopeHa
KanaKaTa 3a nouHCTBaunn npenapat e OTBopeHa.
4.8.1 Cbajhe Ha kanaykaTa 3a noocTbaun npenapat
1.ПьзHTe KanaykaTa 3a noHCTBaUma npenapat Ha pa3ctOHHe 5 MM.
2. ⅢaBpnaTe DoHnlaTc P7A H KaNaKHaTa 3a NoCTBaU pNpenapat OT HanpaBJIbAAWHTe 5HH N I3BADE To rPnHAt c TPAH H KaNaKHtAOT 5HHNTe
3.Cbanete npykinHata.
4.8.2 NocTabaHa Ha npyKHaTa
- NocetabeTe DblnH KpN H npyKHHATA B MOHTaXHHA OTBOP HA yCTPOINCTBOTO 3a Dozipane (1).
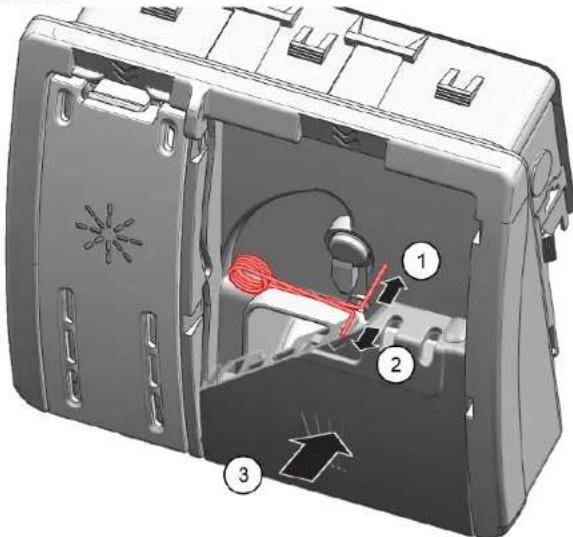
- Noctabe TcKn KpH Na npyXHHATA B MOtAaXHH OTBp HA KaNaYkata 3a no- nCTBaua pnpapat (2).
- Hatnche TKe kanaKATA B yCTpoIcTBOTo 3a do3npaHe (3).
4.8.3 MoHTnpaHe Ha kanaqKaTa 3a nouNCTBaUna npenapat
- NocTaBeTe KanaqKaTAta 3a NoHCTBaUINppeNaTHa pa3ToHHe 5 MM ot HAnbNHO OTBOpEHO NOLOXKeHHe B HAnpaBnRAuNTe WInnO To eDnata cTpaHa. Be3 da npNarate Mhoro CnHa, HATNCHe TPOTNBOIOnoXKHata CTpaHa B HAnpaBnRAuNTe WInnH.
- PpOBepTe pa6oTaHa kanaKkata 3a noNCTBaun npenapat.

PemOH
4.9CMraHa Ha Kanaka Ha nomnata 3a OTnADH BOHN
N3nCKBaHe:
KoUHnuaTa e cBaJeHa.
Φnntpnte ca cBaeneHn.→14
4.9.1 CbajrHe Ha kanaka Ha nomnata 3a OTnaDHN BODN
1.Пемхетесьбалanta сьда.Инорзайтсьа,akоe Heo6xOj
2. BdHrTe KaNkA Ha NOMnA, KATO HnONBATE NbKuMa Iro XBaHeTa 3a HanpeHnATa rPeJa.
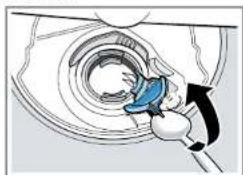
- NOBINHETe Kanaka Ha nomnata HABbpe noD bbl n ro cbanete.
4.9.2 MoHTnpaHe Ha Kanaka Ha nomnata 3a OTnadH BODn
NoctabeTe Kanaka Ha nomnata (1) n ro HATNCHTe Haonny (2).
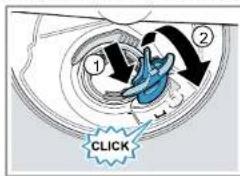
KanakbHa NOMnTa UpaKaBa Ha MRCTO.

PemOH
4.10 CmHa Ha cTpaHnHn naHeI
N3nCKBaHe:
YpeIbTe N3KIOUeHOT 3aXpaHbHaHeTo.
YpeBt E n3KIOHcH OT BOOChA6DnTeHNHa TmpeKa.
YpeDInTe ca Cbo6oHNO DocTbHNH.
CaMoCToTeHn ypei:paobTHnT nnot enpemaxHaT.→8
4.10.1 CbAJaHe Ha cTpaHmHa naHen
1.CBaIeTe BInTOBete OT CTpaHmHnnaHeN(1).
Due.1: Hanbno unmeapupan
- Janko HakoHeTe CtpaHnHHaHaH eOTope (2).
3.CnycheTe cTpaHnHHnaHEn Iro nIbprnAte Oyner Ha oChOBata (3).

PemOH
4.10.2 MoHTnpaHe Ha cTpaHnHnHa nHaen
- Noctabete CtpaHnHH naHEn B yner Ha OCHOBata (1).
Due. 2: Hantbno uHmeepupan

2. HATNCHeTe CtpaHnHnnaHnBbpxy ypeJa (2).
3.3akpenete ctpaHHHnnaHc BnHTOBete (3).

PemOH
4.11 CmHa Ha BbHnHaTa BpTa
M3nCKBaHe:
YpeBbTe H3KnIOueHOT 3aXpaHBAHeTO.
YpeBtE n3KNIOueH OT BOOCHa6nTENHa Mpeka.
MoHTnpaIteB06paTeH peI.

PemOH
4.13ФИКСИРанеHa npуЖинITEHa BpaTaTa
1.ⅠaedeKanaKaTaHaBoDaHaKa6eNa
2.1. OTBopete neko BpaTata (1).
2.ФИКСИРАТЕВБВДЛБОHAHATAHaунЯHA OCHOBATA(2).
- BABHO 3aTBOpTe BpaTata (3).
CnCTeMaTc Ka6enIe npKpeHn ABOMaTHNO KbM nHTaHa BpaTaTa.

PemOH
3.1.3aTbOpTe JeKO BpTaTAtA4
- PpemecTe Xnne6a 0r3aN OcBO6oTe naHTaHa BpaTata (5).
- Otbopete Bpatata (6).
- Nobtopete npoueypata oTHBOOTpyrata ctpana Ha ypeja.
KpaKaTa ca NdeHTNHH IN MOraT Da ce pa3MeHrT.
N3nckBaHe:
YpeBt E n3KIOUeH OT 3aXpaHBaHeTO.
YpeBTe N3KJIOUeH OT BOOChA6DnTeNHaTa MPexa.
BbHnHaTa BpaTa e CbaNeHa.
BbHuaTa BpaTa e CbaNeHa (HanbHnHO HHTerPpHa/HHTerPpHa).
4.14.1 CbajHe Ha donnna naHEn
1

HenpaBnHO CBAHHe.
Ako donHnAT naHEI ce paXnAb6 nOcTpaHN H cBaan, DBeTe cKo6n Moar da ce Okcbat. Ako camo eHaTA cKa6a e NOpeHAp, CtpaHATA MOKeJa ce CMeHH, Tb KATO cKo6NTe CA NDHTMHN. PnpenOpbYntHeO e Da NocTaBtne HeUo NpOyepaOTnpEi nOTcTpAHn, 3a da oBnKHTe HatoBapBaHTo Ha DonHnnaHn kPakata.
2.BdHHTe BOdaHTte (1) c NMOOHTa HA OTBePTKa n OCBoOBeTe fIKCaTOpA, KATO HATNCHETe HADONY.
- NobdHHe nHaHeia.
4.ɪəbaɪdete kpaKaTahanpei(1).
4.14.2 MoHTpaHe Ha DoJIHnnaHEn
- Noctabete KpaKaTa.
- PnPKPeneTe dOONHnaHEn OTrope (1) n ro HATNCHEte HADony, DOkato YyeTe, UpaKaBa Ha MCTo (2).

PemOH
4.15 CMHa Ha IIIOyTa Ha rNaBHn KOHTaKT

IIOyataHa IraBnHKe KOHTe pa3noJoxeHa BdoHaTcAht OTnped.
N3NCBaHe:
YpeBt E n3KnIOueH OT 3aXpaHBAHeTO.
YpeBTe N3KJIIOUeH OT BOOChA6DnTeNHaTa MPexa.
Me6enHnT nane (onuohane) e cBaneH.
BbHHaTa BpaTa e cBaNeHa.
BbHnHaTa BpaTa e CbaJeHa (HanbNHO INHTerPnpaHa/NHTerPnpaHa).
DonnHnT nAHen e CBAeH (onua).→26
4.15.1 CbaJrHe Ha nOuTaHa rIaBnKoHTaKT
1.CBaIeTe DbTa BnHTa(1).
2.Ocb6oDeTe KpeEnKHHte enMeHTn (2).
- HAKHOHE BHHMATEHNO HNOYATA HA HNABHNI KONTAKT Hanpei (1).


B 3abicIMoCT oCepnTaHaMoDeaIeCeNtKbMEmotionLight Bce OcEe z Akpenen KbM OChOBata.
OcbobodeTe 1eCenca Otnaneu Ha fKcTaOpa n DpbHHe TaHaad (Onnra) (2).
4.15.2 MoHTnpaHe Ha IIIOyTa Ha rJIAbHnKoHTaKT
MoHTnpaTne IIOHATA Ha IINABHHKoHTaK T O6pateH pe.

PemOH
4.16 CmHa Ha Tpb6oPbOda 3a npenbIbaHe

TpboPBOBbT 3a npenbnahe ce HAMpa B npednata doHa qact Ha ypeda.
N3nckBaHe:
YpeBt E n3KIOUeH OT 3aXpaHbHaHeTo.
YpeBTe N3KJIIOUeH OT BOOChA6DnTeNHaTa MPexa.
Me6enHnT nHaH e cBaH e (onzna).
BbHuiHaTa BpaTa e cBaNeHa.
DonnHnT naHEn eCBaneH (onua).→26
Nochata Ha nabHHMQHTe CBAHe.→27
4.16.1 CbajnHe Ha KaHaHa 3a npenBlaBe

OctaTbUHa BOna
PnO TcTpaHbAHe Ha DpeHakHnMa MPky MoKe Da n3TeYe ocTaBHa BOda.
Cnpete BOATA INI INPemaxHEOTOCOBHINCBCMYKATEHa CnPHIOBKA.
- OtnycheTe MexaHn3Ma 3a 3axBaUaHe oTrope (1,2).
- Ocbobodete KpeneKHN enemt otrope

PemOH
3.1.NoctabeTe OTBepkata Noi MetaHnHCTonep(1). 2.BHHMaTeHNO OcBO6oDeTe MeTaHnHaCko6a(2)
- NOBHHeTe Tp6bonpoB0da 3a npenbnahe.
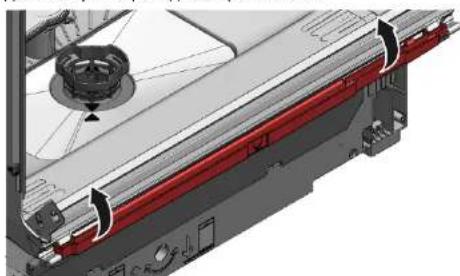
4.16.2 MoHTIpaHHe Ha Tpb6oPbOBoJa 3a npenbIbAne

IopoeiOn OT BODa NopAei HENpABINeH MOHTaX Na TpBcONpOBOda 3a nppebNaBe!
Bkaparape npabnnpbbonpoBa 3a npenbbahe ot dony bB BODaHa H na yhen a OCHOBATA.
ФИКСИРАТЕ Павлино ТрьбOptionDAа 3a ПЕнБЛВАе Н МЯСТОТМу OTROPE.
-
- IocTabete Tpb6onpoBaOa 3a npenbIbaHe (1).
-
PnemecTe TpB6oPbOda 3a npenbIbAhe B ynnbTHHeHMeTo (2).
- HatncheTe Tpb6oipOBOda 3a npenbIbaHe BbB BOdAHa Ha ynnbTHHeHHeTo (3).
- NocTabete TpbbonpoBoda 3a npenbnahe cTeHaT (4).
5.ФИКСИРаТеТрБбОп罗ВОдаЗ npelenBaHec(5).
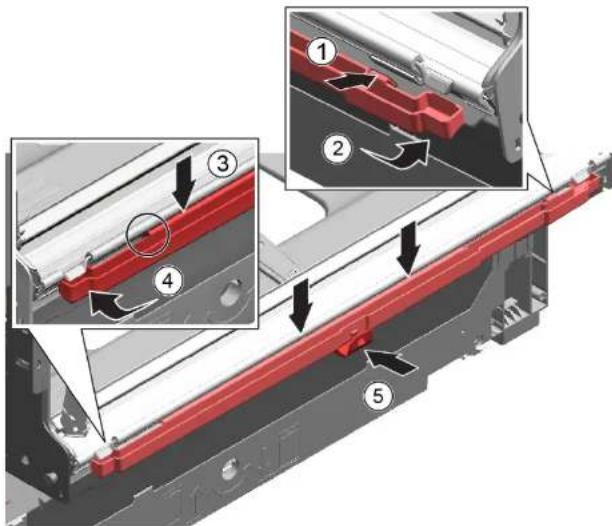

PemOH
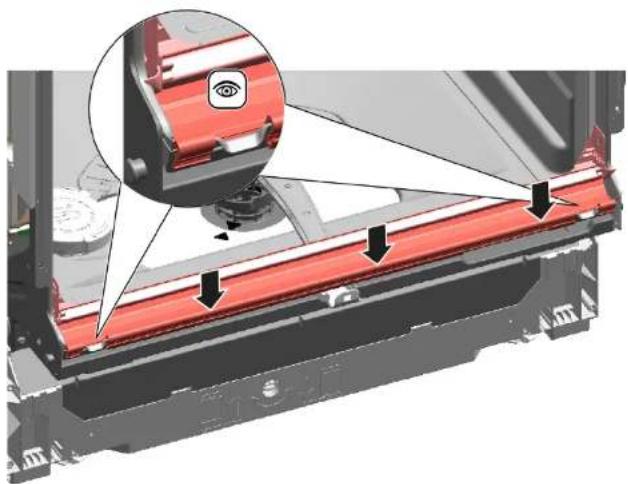
- PpOBepe MOHTaKa OTOJIbO IOTJACHO. 3. PpOBepe DaJI N CTOn CTaBnHIO.

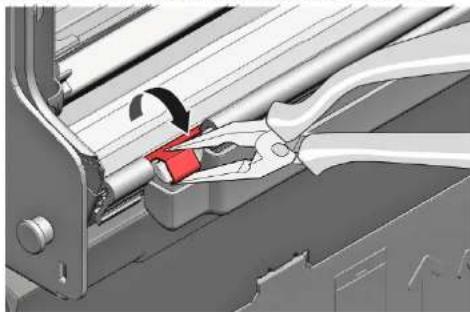
4.3akpenete c metanha ckoba ot JIbata n daChata cTpaHa.
4.23 CMHa Ha Gap illumination (OcbetBaHe Ha npolykn)
N3nCKBaHe:
YpeBTe n3KnIOueH OT 3aXpaHBaHeTo.
YpeIbTe n3KIOueH OT BOOChA6DnTeNHaT aMpexa.
BbHnHaTa BpTa e pa3rNo6eHa.
OnepaounHnT nHaen eCBaneH.
4.23.1 CbAaHe Ha Gap illumination
1.1.OTdeneTeΦκκatopa(1).
2.Cbanete eeneKtpnueckata Bpb3ka ot onepaunnoHHM Moyn (2).
2.1. OTdeneTe Kykata Ha fKcTaOpa O3ad (1).
2.CBaIeTe ONmHHTO BnakHO (2).

PemOH
3.1. OTeJeTe Kykata Ha fKcatopa (1).
- NOBdHnHTe NpuHTaT PnTaK cIbPkaHa N I H3BaTe OT pAMKaTHa NoepaONHINMOyJ(2).
4.23.2 MoHTIpaHc Ha Gap Illumination
- NocTabeteNbpxaHa Na neaTHata Nnata B paMaTa Ha onepaOnHHm Moyn.
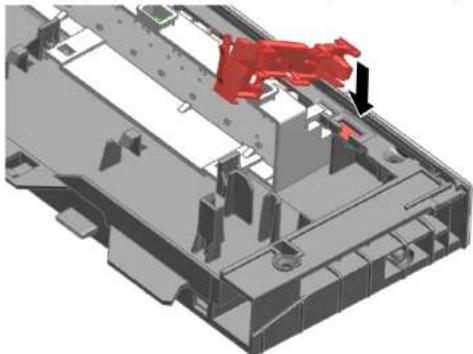
- MoHTnpaTe ONTNUHOT BnAkhno I rO 3aTeHHeTe, DOKaTO yyeTe UpaKaBaHe.
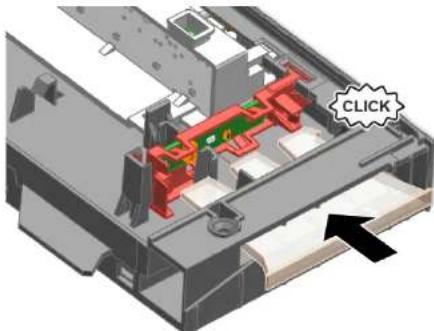
4.CBbpkeTe npoBOHnKa KbM OepaUMOHnMoyn.
4.1 Vymena homi desky 90
4.1.1 Sejmuti horni desky 90
4.1.2 Montaz hornl desky.. 90
4.2 Montaz systemu kosu 91
4.2.1 Montaz zasobniku na tabley u modelu 86 cm.. 91
4.2.2 Montaz drzaku salku 91
4.2.3 Montaz parni vlozky 92
4.3 Vymena zasuvky varioDrawer 93
4.3.1 Vyjmulzásuvky varioDrawer 93
4.3.2 Montaz zasuvky varioDrawer 94
4.4 Vymena ostrikovacich ramen 95
4.4.1 Vyjmuti ostrikovaciho ramena 95
4.4.2 Montaz ostrikovaciho ramena 95
4.5 Vymena filtru 96
4.5.1 Vyjmuti filtru.. 96
4.5.2 Montaz filtru 96
4.6 Montaz ostrikovaci hlavy pro plechy 97
4.7 Vymena napajeciho kabelu 98
4.7.1 Vytazeni napajecihokabelu 98
4.7.2 Pripojeni napajecho kabelu.. 98
4.8 Vymena krytu zasobniku na myci prostrefedek 99
4.8.1 Odstraneni krytu zasobniku na myci prostfedek 99
4.8.2 Vlozeni pruziny 99
4.8.3 Montaz krytu zasobniku na myci prostredek.. 99
4.9 Vymena krytu cerpadla odpadni vody 100
4.9.1 Odstraneni krytu cerpadla opadni vody 100
4.9.2 Montaz krytu cerpadla odpadni vody 100
4.10 Vymena bochniho panelu 101
4.10.1 Sejmuti bočniho panelu 101
4.10.2 Montaz bochniho panelu 102
4.11 Vymena vnejsich dvirek 103
4.23 Vymena Gap Illumination
Požadavek:
4.22.1 Fjernelse at timeLight 163
4.22.2 Montering at timeLight 163
4.23 Udskiftnig af Gap illumination 164
4.23.1 Fjernelse at Gap illumination 164
4.23.2 Montering of Gap illumination 165
4.21.2 Montering of emotionLight
- Sæt holderen i skylletankens ramme (1).
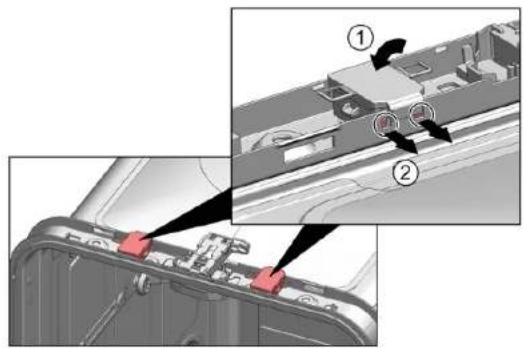

Reparation
- Aktivér lasekrogen (2).
3.

BEMERKI
Ukorrekt montering!
4.22 Udskifting at timeLight

4.22.1 Fjernelse at timeLight
4.22.2 Montering at timeLight
4.23 Udskiftning at Gap illumination
Preindstilling:
4.23.2 Montering of Gap illumination
- Saet printkortholderen i betjeningsmodulets ramme.
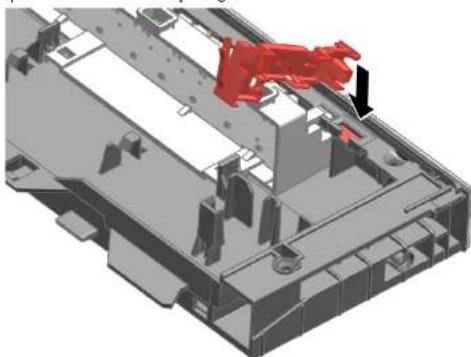
- Fastspaend den med en "klik"-lyd.
2.1 General Safety instructions 212
2.1.1 All domestic appliances 212
Tools and aids. 213
Repair 214
4.1 Replacing worktop 214
4.1.1 Removing worktop 214
4.1.2 Installing worktop 214
4.2 Installing basket system 215
4.2.1 Installing a tab slide for the 86 cm model 215
4.2.2 Installing cup support clip 215
4.2.3 Installing steamer insert 216
4.3 Replacing varioDrawer 217
4.3.1 Removing varioDrawer 217
4.3.2 Installing varioDrawer 218
4.4 Replacing spray arms 219
4.4.1 Removing spray arm 219
4.4.2 Installing spray arm 219
4.5 Replacing filters 220
4.5.1 Removing filter 220
4.5.2 Installing filters 220
4.6 Installing baking sheet spray head 221
4.7 Replacing power cord 222
4.7.1 Unplugging power cord 222
4.7.2 Plugging in power cord 222
4.8 Replacing detergent cover 223
4.8.1 Removing detergent cover 223
4.8.2 Inserting spring 223
4.8.3 Installing detergent cover 223
4.9 Replacing wastewater pump cover 224
4.9.1 Removing wastewater pump cover 224
4.9.2 Installing wastewater pump cover 224
4.10 Replacing side panel 225
4.10.1 Removing side panel 225
4.10.2 Installing side panel 226
4.11 Replacing outer door 227
4.12 Replacing control panel 229
4.12.1 Removing control panel 229
4.12.2 Installing control panel 229
4.19 Replacing (lower) door seal 240
4.19.1 Removing the door seal 240
4.19.2 Installing the door seal 241
4.20 Replacing (upper) door seal 242
4.20.1 Removing door seal 242
4.20.2 Installing door seal 242
Repair hints - Dishwasher
4.21 Replacing EmotionLight 243
4.21.1 Removing EmotionLight 243
4.21.2 Installing EmotionLight 243
4.22 Replacing TimeLight 246
4.22.1 Removing TimeLight 246
4.22.2 Installing TimeLight 246
4.23 Replacing Gap illumination 247
4.23.1 Removing Gap illumination 247
4.23.2 Installing Gap illumination 248
Concerning this document
1.1 Important information
1.1.1 Purpose
These repair hints support consumer to repair appliances by himself according to the applicable eco-design regulation (as of 03/2021).
They contain information how to exchange defined spare parts including warnings and risks.
In case of questions, please contact our customer service. We will only be liable for damages if the repair hints have been followed properly.
1.2 Explanation of symbols
1.2.1 Danger levels
The warning levels consist of a symbol and a signal word. The signal word indicates the severity of the danger.
Table 1: Danger levels
| Warning level Meaning | |
| Danger | Non-observation of the warning message will result in death or serious injuries. |
| Warning | Non-observation of the warning message could result in death or serious injuries. |
| Caution | Non-observation of the warning message could result in minor injuries. |
| Notice | Non-observation of the warning message could result in damage to property. |
1.2.2 Hazard symbols
Hazard symbols are symbolic representations which give an indication of the kind of danger.
The following hazard symbols are used in this document:
| Hazard symbol Meaning | |
| ! | General warning message |
| Danger from electrical voltage | |
| Risk of explosion | |
| Danger of cuts | |
| Danger of crushing |
Concerning this document
| Hazard symbol Meaning | |
| Danger from hot surfaces | |
| Danger from strong magnetic field | |
| Danger from non-ionizing radiation |
Table 2: Hazard symbols
1.2.3 Structure of the warnings
Warnings in this document have a standardised appearance and a standardised structure.

Danger
Type and source of danger!
Possible consequences of ignoring the danger / warning.
Measures and prohibitions for preventing the danger.
The following example shows a warning that warns against electric shock due to live parts. The measure for avoiding the danger is mentioned.

Danger
Risk of electric shock due to live parts!
Death by electrocution
- Disconnect appliances from electrical supply at least 60 seconds before disconnecting repairs.
1.2.4 General symbols
The following general symbols are used in this document:
| Gen. symbol Meaning | |
| 1 | Identification of a special tip (text and/or graphic) |
| i | Identification of a simple tip (only text) |
| Identification of a link to a video tutorial |
| Gen. symbol Meaning | |
| Identification of required tools | |
| Identification of required preconditions | |
| Identification of a condition (if ..., then ...) | |
| Identification of a result | |
| [Start]Identification of a key or button | |
| [00123456] Identification of a material number | |
| Status Identification of displayed text / window(in the appliance's display) | |
Table 3: General symbols
Safety
2.1 General Safety instructions
2.1.1 All domestic appliances
Risk of electric shock due to live parts!
Errors by repairs involving electrical components can lead to electrical shock!
- Disconnect the appliance from the mains for at least 60 seconds before starting work.
After the repair have a safety test according VDE 0701 or country-specific regulations performed.
Risk of injury from sharp edges!
Wear protective gloves.
Risk of crushing during repair, maintenance, troubleshooting and service due to heavy and moving components
Wear protective shoes.
- Secure heavy components from falling down.
- Do not stick body parts into moving components.
Risk to the appliance's safety / function!
Only use original spare parts.
Risk of damage to electrostatically sensitive components (ESDs)!
- Do not touch the modules, including connections and conductor paths.

Tools and aids
| Designation Details Images | ||
| Screwdriver Torx T20 with bore hole [00340764] | 100 mm, for screws with safety pin | |
| Insulated Screw- driver Torx T15 with bore hole [15000626] | Blade length 125 mm, for screws with safety pin | |
| Slotted screwdriver | Blade 10 mm x 1.6 mm x 200 mm | |
| Needle nose pliers [00340871] | Length: 200 mm, straight | |

Repair
4.1 Replacing worktop
Prerequisite:
Appliance is disconnected from the power supply.
Appliance is freely accessible.
4.1.1 Removing worktop
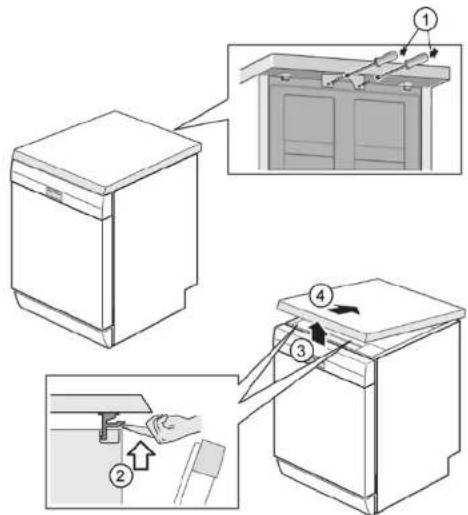
- Remove the two screws at the back (1) (optional).
- Press both catch levers under the worktop upwards (2).
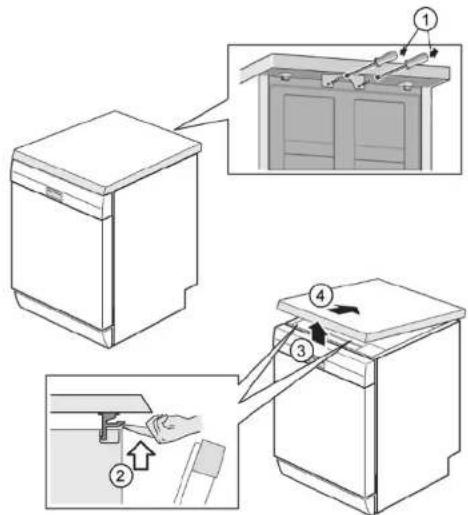
- Lift the worktop slightly at the front (3).
- Push worktop away towards the rear (4).
- Remove worktop.
4.1.2 Installing worktop
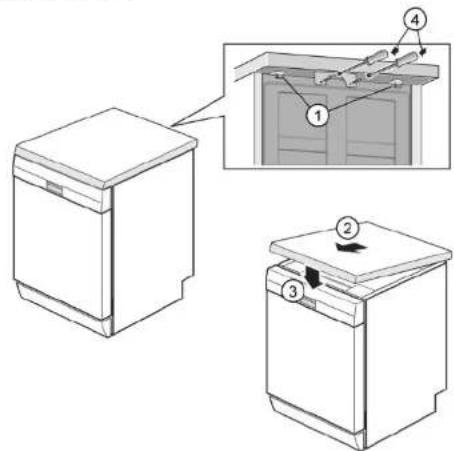
- Lock the rear of the worktop into the guides using the retaining collars (1).
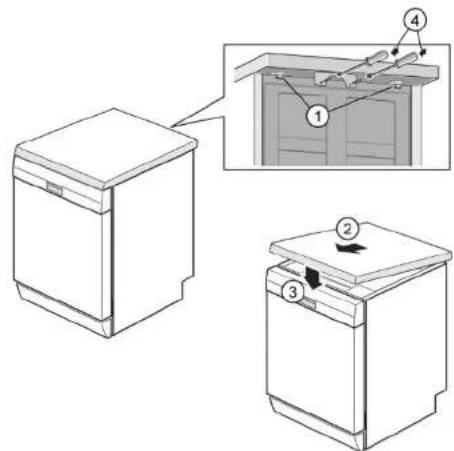
- Push worktop forwards (2).
- Press the front of the worktop downwards until both catch levers click audibly into place (3).
- Screw in the two screws again (4) (optional).

Repair
4.2 Installing basket system
Prerequisite:
The relevant basket has been removed from the appliance.
4.2.1 Installing a tab slide for the 86 cm model
Required tools:
Tabguide [00614935]
Cup support clip [00618565]
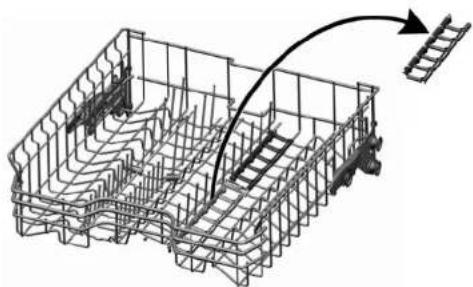
- Insert the tab slide diagonally at the front of the basket.
- Centre and click the tab chute into place.
4.2.2 Installing cup support clip
Required tools:
Tabguide [00614935]
Cup support clip [00618565]

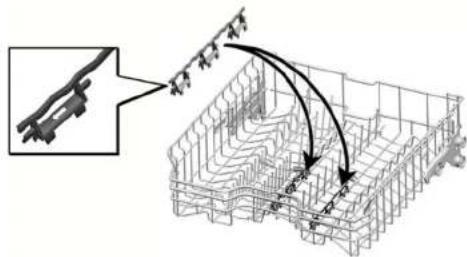
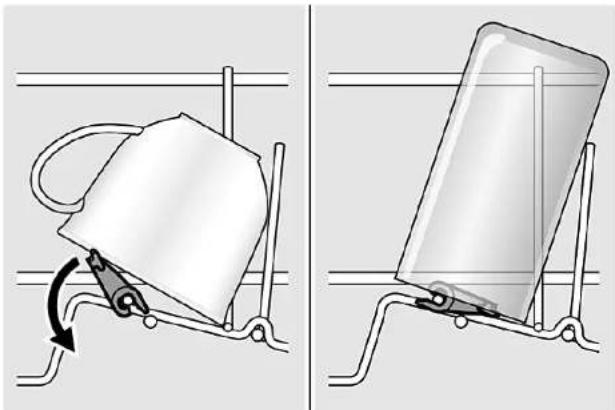
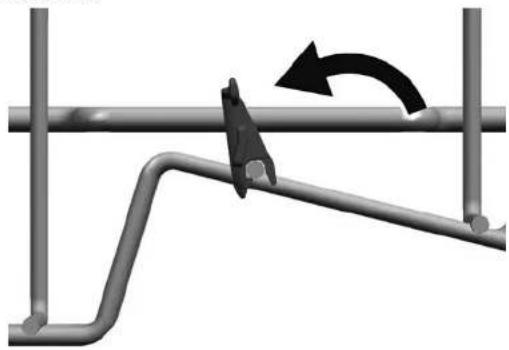
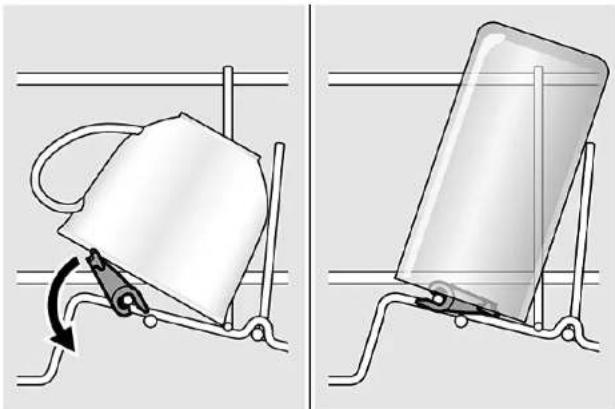
When washing cups, the cup support clip can be folded up. The additional angle reduces the collection of water on the bottom of cups. In the case of tall glasses we recommended leaving the cup support clip folded down. If upper baskets have an optional plastic insert, they must first be removed.
- Remove the plastic insert.
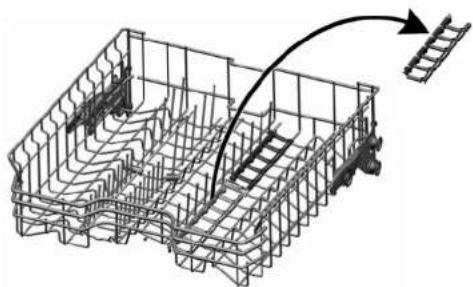
- Click the cup support clip into place.
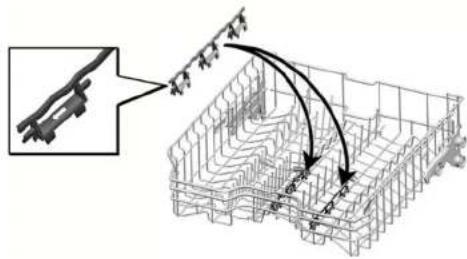
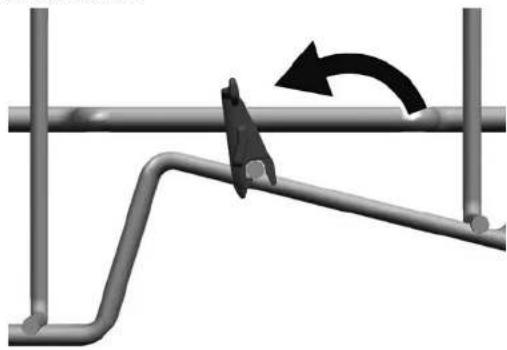
- Fold up the clip.

Repair
- Position the items to be washed.
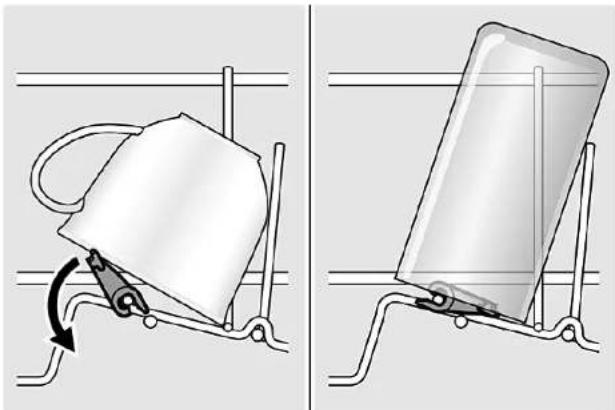
4.2.3 Installing steamer insert
Required tools:
Tabguide [00614935]
Cup support clip [00618565]
- Wedge the steamer insert with the end pieces under the basket system.
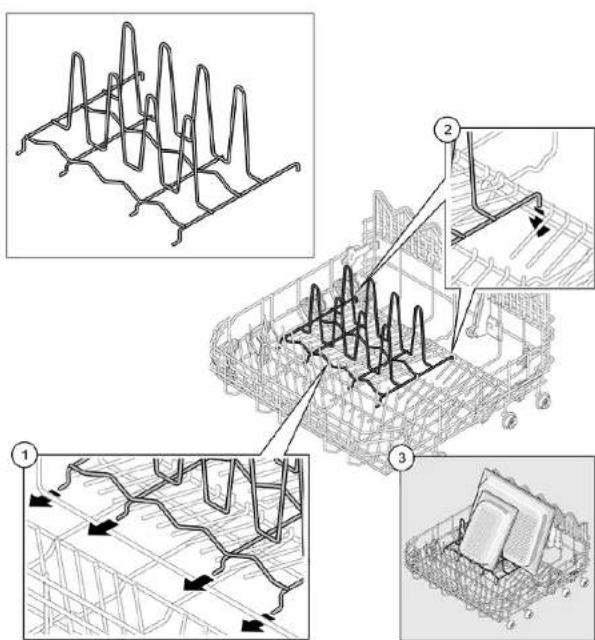

Repair
4.3 Replacing varioDrawer
4.3.1 Removing varioDrawer
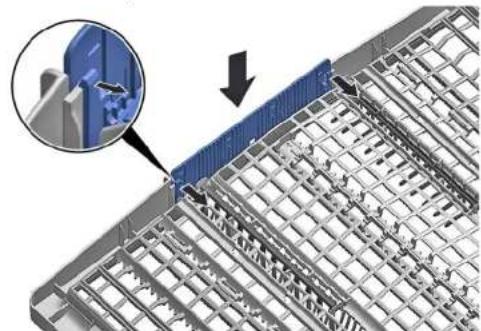
- Bend the handle flaps inwards.
-
Remove the handle upwards.
-
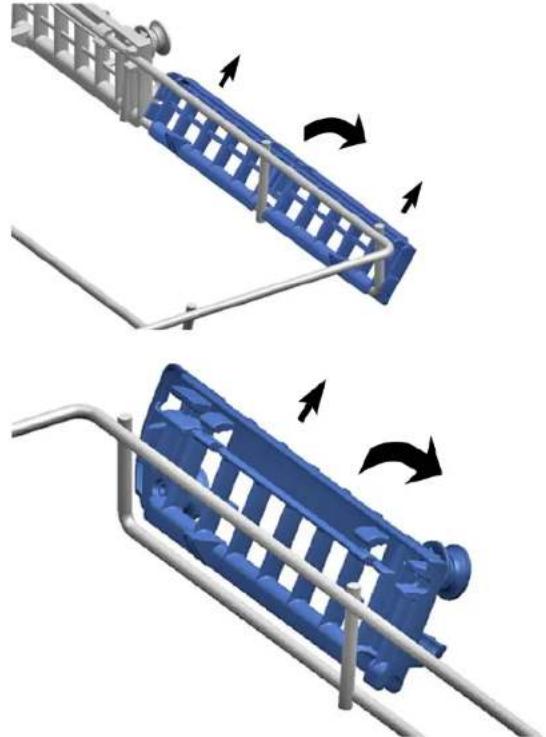
Press plastic side inserts outwards and press them upwards out of the frame.

Repair
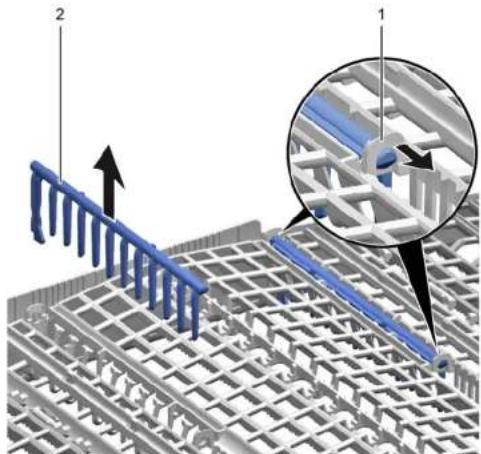
- Carefully bend the guide tabs outwards.
-
Pull the folding spines out of the tabs.
-
Press metal frame at the front out of the holders.
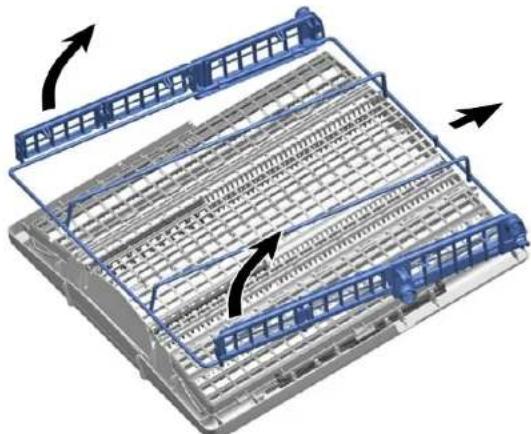
- Push metal frame back out of the guide.
4.3.2 Installing varioDrawer
Install in reverse order.

Repair
4.4 Replacing spray arms
4.4.1 Removing spray arm
- Unscrew the upper spray arm (1) and pull down to remove (2).
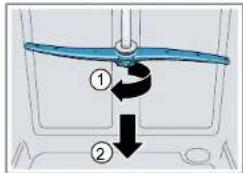
- Pull down the lower spray arm to remove.
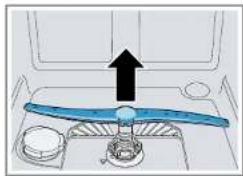
4.4.2 Installing spray arm
- Insert the lower spray arm.
The spray arm clicks into position. - Insert the upper spray arm and screw it firmly in place.

Repair
4.5 Replacing filters
4.5.1 Removing filter
- Turn the coarse filter anticlockwise (1) and remove the filter system (2).
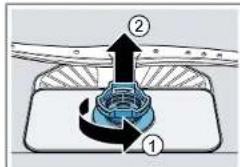
Check that no foreign objects fall into the sump.
- Pull down the micro filter to remove.
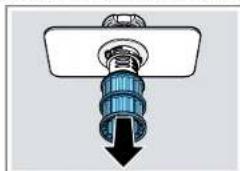
4.5.2 Installing filters
- Re-assemble the filter system.
Make sure that the locking catches on the coarse filter click into position. - Insert the filter system into the appliance and turn the coarse filter clockwise.
Make sure that the arrow markings match up.

Repair
4.6 Installing baking sheet spray head
- Remove top basket.
- Insert the baking sheet spray head in the holder (1) and turn to the right (2).
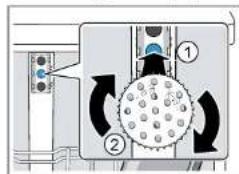

The baking sheet spray head clicks into position.

Repair
4.7 Replacing power cord
Prerequisite:
Appliance is disconnected from power supply.
Appliance is disconnected from water supply.
Appliances is freely accessible
4.7.1 Unplugging power cord
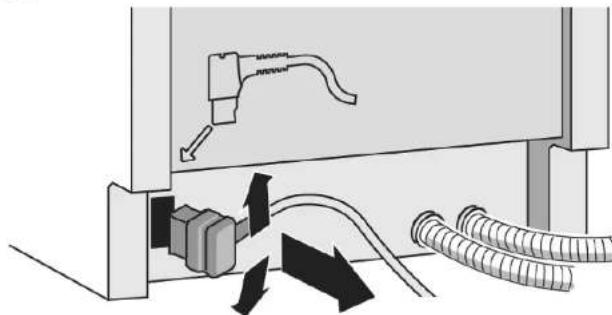
- Move the plug of the power cord carefully up and down and pull it out of the mains socket.
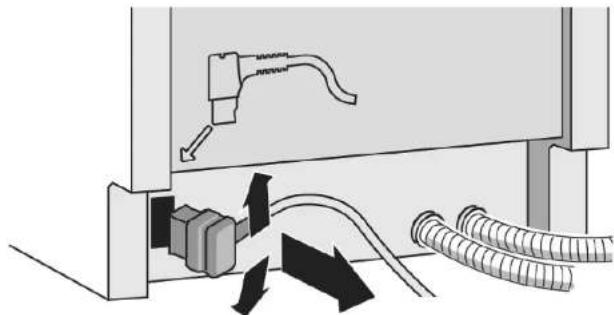
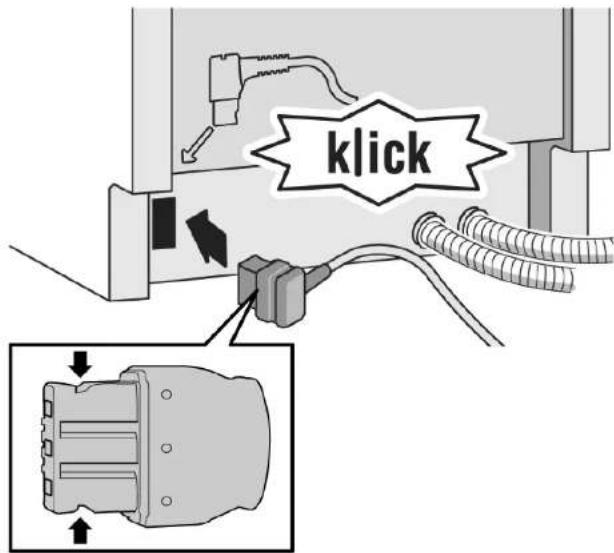
4.7.2 Plugging in power cord

Notice
Overheating of main connection!
Risk of fire
Firmly insert the power cord until it clicks.
- Insert the plug of the power cord into the mains socket until the plug clicks audibly into place.

Repair
4.8 Replacing detergent cover

A small screwdriver can be used as a levering tool.
Prerequisite:
Appliance is disconnected from power supply.
Appliance is disconnected from water supply.
Door has been opened.
Detergent cover has been opened.
4.8.1 Removing detergent cover
- Slide the detergent cover in 5mm
- Lever the detergent cover on the lower side out of the guide rails and take the detergent cover on the upper side out of the guide rails.
- Remove the spring.
4.8.2 Inserting spring
- Insert the long end of the spring into the mounting hole of the dispenser device (1).
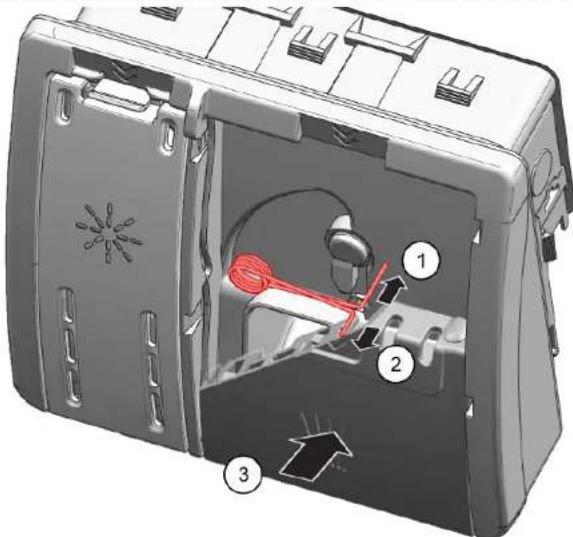
- Insert the short end of the spring into the mounting hole of the detergent cover (2).
- Press cover into the dispenser device (3).
4.8.3 Installing detergent cover
- Insert the detergent cover 5mm before the completely open position into the guide rails on one side. Applying gentle force, press the opposite side into the guide rails.
- Check the function of the detergent cover.

Repair
4.9 Replacing wastewater pump cover
Prerequisite:
Basket has been removed.
Filters has been removed. Page 220
4.9.1 Removing wastewater pump cover
- Scoop out any water.
Use a sponge if necessary.
- Prise off the pump cover using a spoon and grip it by the crosspiece.
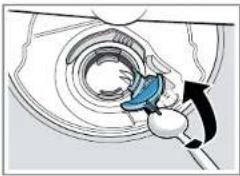
- Lift the pump cover inwards at an angle and remove.
4.9.2 Installing wastewater pump cover
Insert the pump cover (1) and press down (2).
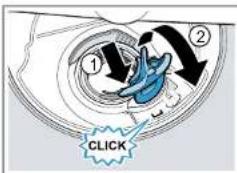
The pump cover clicks into position.

Repair
4.10 Replacing side panel
Prerequisite:
Appliance is disconnected from power supply.
Appliance is disconnected from water supply.
Appliances is freely accessible.
Free-standing appliances: Worktop has been removed. Page 214
4.10.1 Removing side panel
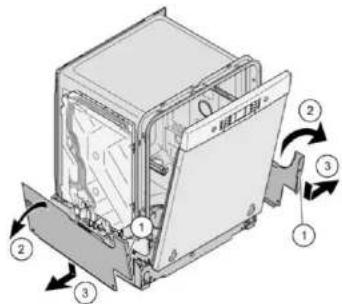
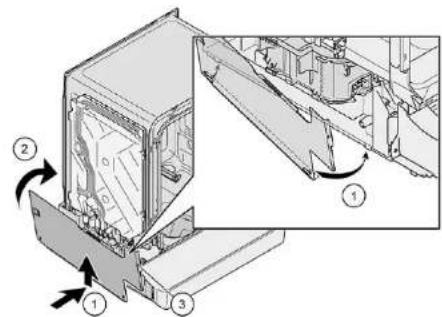
- Remove screws from the side panel (1).
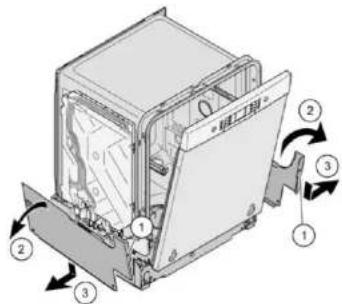

Fig. 1: Fully integrated
- Tilt the side panel slightly outwards at the top (2).
- Lower the side panel and pull it out of the base trough (3).

Repair
4.10.2 Installing side panel
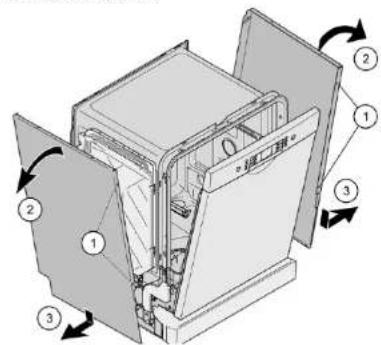
- Insert the side panel into the base trough (1).
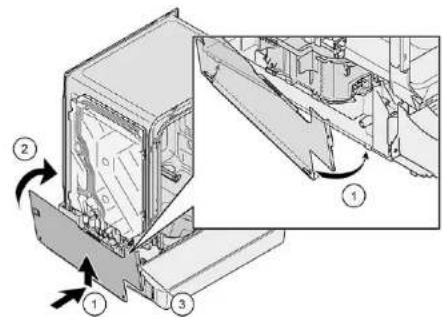
Fig. 2: Fully integrated
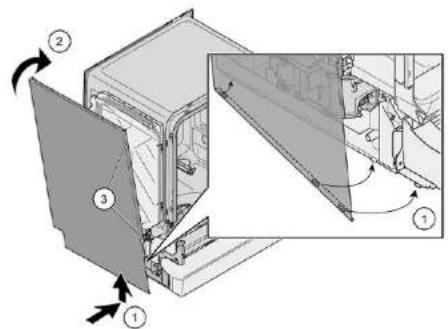
- Press the side panel onto the appliance (2).
- Secure the side panel with screws (3).

Repair
4.11 Replacing outer door
Prerequisite:
Appliance is disconnected from power supply.
Appliance is disconnected from water supply.
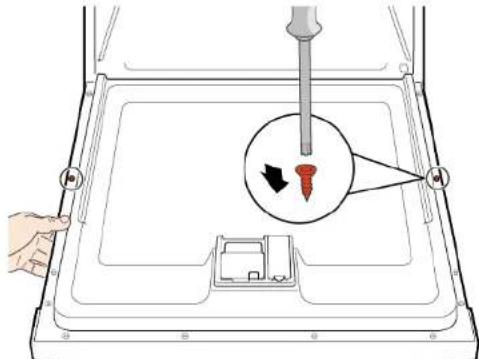
Just remove the screws which are described in the following steps.
- Open door.
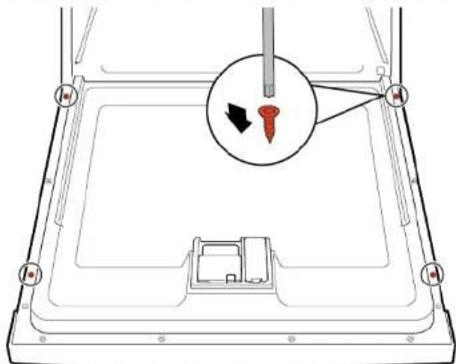
- Remove four screws.
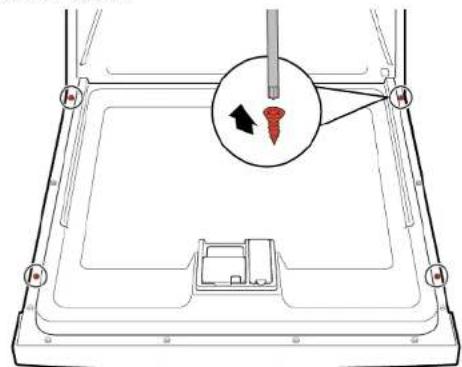
3

Secure the door by holding it on one side.
Remove two screws.
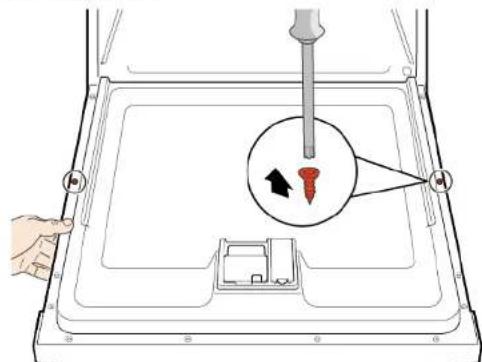
Insulating fleece has been correctly positioned and fixed on the inside of the outer door.
Hinges are inserted into the outer door.
-
Close the inner door without snapping it shut.
-
Push the outer door upwards underneath the control panel (1).
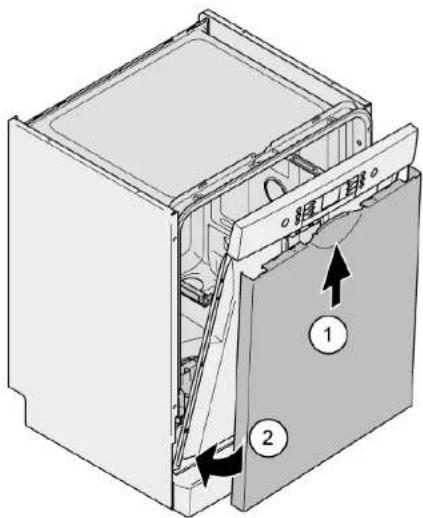
- Press the outer door against the inner door and hold (2).
4.

Secure the door by holding it on one side.
Open the door and secure it with two screws (4 x 11 mm metal screws).
- Secure the outer door with four screws (4 x 11 mm metal screws).

Repair
4.12 Replacing control panel

If an operating module is defective, the entire control panel must be replaced.
Prerequisite:
Appliance is disconnected from power supply.
Appliance is disconnected from water supply.
Outer door has been removed.
Outer door has been removed (fully integrated/integrated).
4.12.1 Removing control panel
- Disconnect electrical connections from the control panel and the low rinse-aid sensor (1, 2).
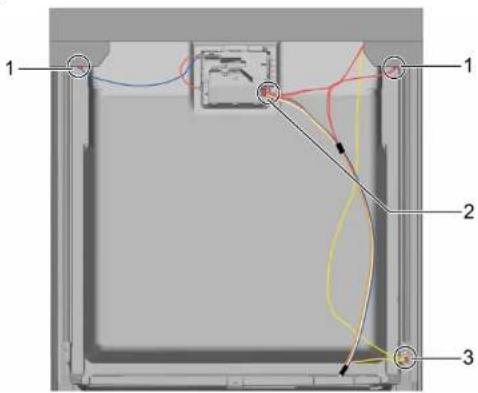
- Disconnect the earth cable (3) (optional).
- Open the appliance door.
-
Secure the control panel to prevent it from falling down (hold on to it).
-
Remove six screws.
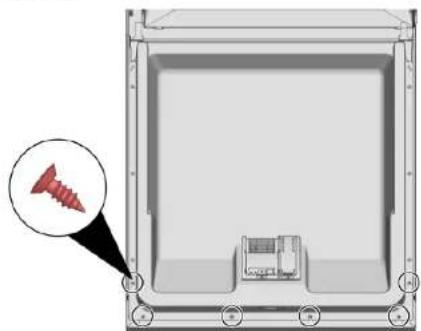
- Remove the control panel.
4.12.2 Installing control panel

Use screws 4 × 16 ~mm .
Install in reverse order.

Repair
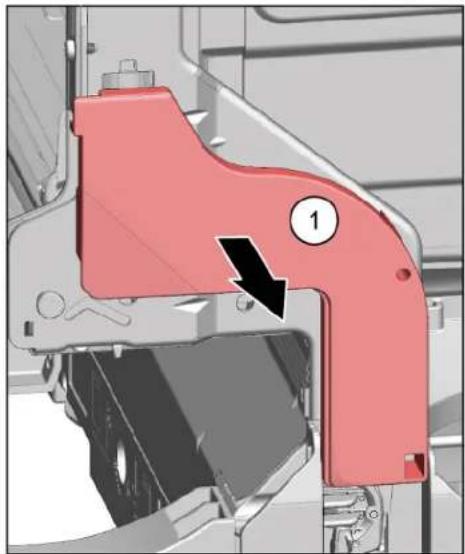
- Remove cord guide cover out.
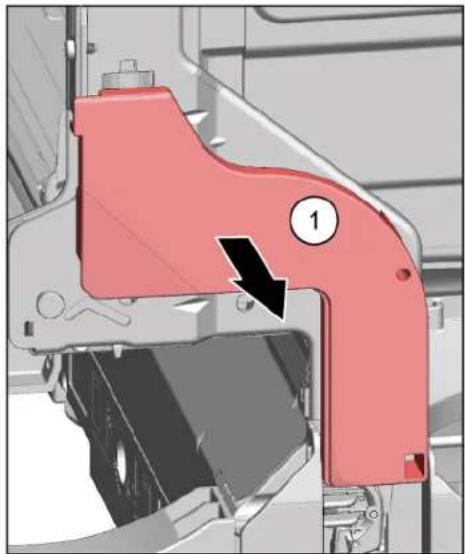
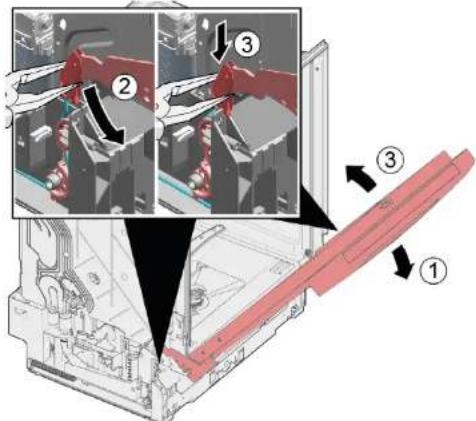
2.1.Open door slightly (1).
- Fix in the groove of the base trough (2).
- Slowly close the door (3).

The cord system attaches itself automatically to the door hinge.

Repair
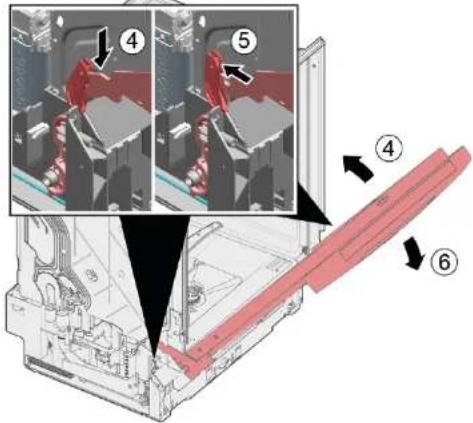
3.1. Slightly close the door (4).
- Move the groove to the back and release the door hinge (5).
- Open the door (6).
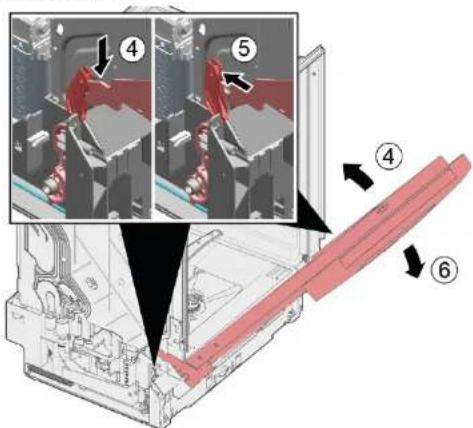
- Repeat the process again on other side of appliance.

Repair
4.14 Replacing toe panel

The feet are identical and can be swapped over.
Prerequisite:
Appliance is disconnected from power supply.
Appliance is disconnected from water supply.
Outer door has been removed.
Outer door has been removed (fully integrated/integrated).
4.14.1 Removing toe panel
1.

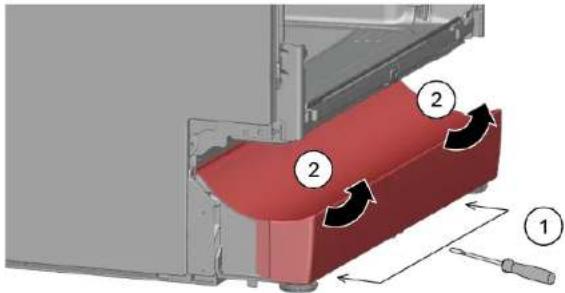
Incorrect removal. If the toe panel is loosened at the side and removed, the two brackets may break away. If only one bracket is damaged, the side can be changed as the brackets are identical. It is advisable to place something under the appliance at the front on the side to relieve the load on the toe panel with the feet.
- Reach into the guides (1) with a screwdriver and release the catch by pushing downwards.
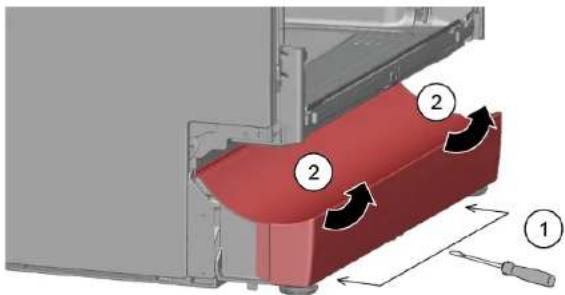
-
Lift the panel off.
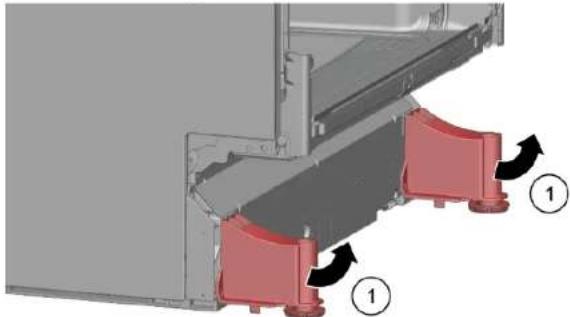
-
Remove the feet forwards (1).
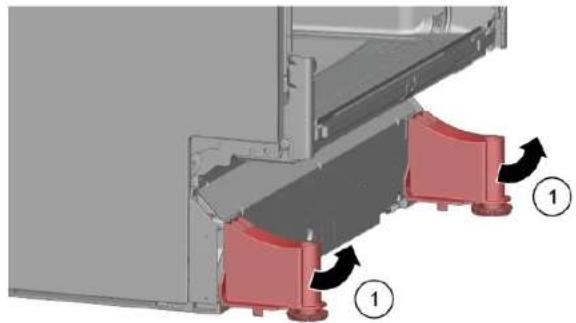
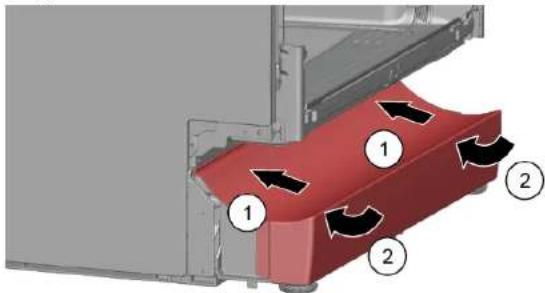
4.14.2 Installing toe panel
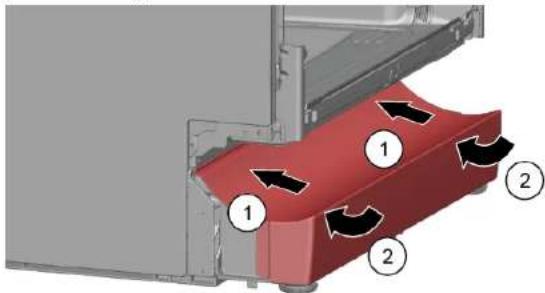
- Insert the feet.
- Attach the toe panel at the top (1) and press it down until it audibly clicks into place (2).

Repair
4.15 Replacing base socket plate

The base socket plate is located in the lower area at the front.
Prerequisite:
Appliance is disconnected from power supply.
Appliance is disconnected from water supply.
Furniture panel (optional) has been removed.
Outer door has been removed.
Outer door has been removed (fully integrated/integrated).
Toe panel has been removed (optional). Page 232
4.15.1 Removing base socket plate
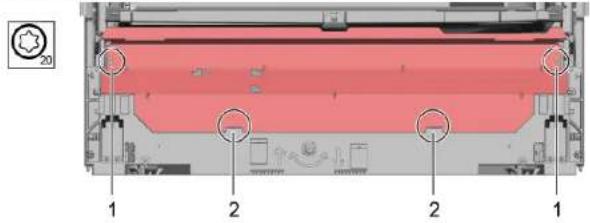
- Remove two screws (1).
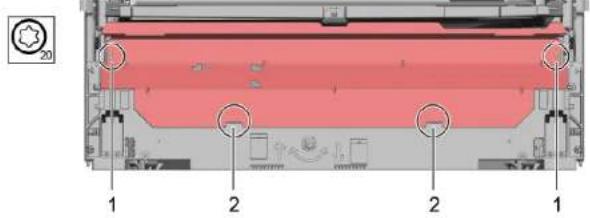
-
Disengage catch elements (2).
-
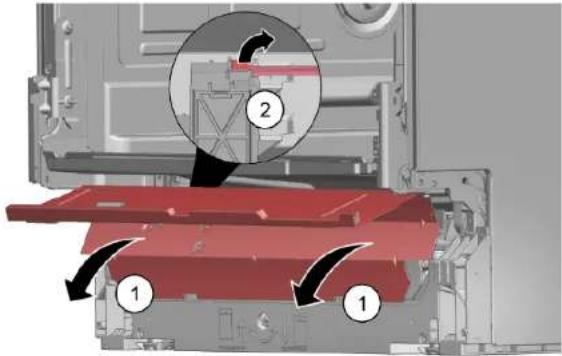
Tilt the base socket plate carefully forwards (1).
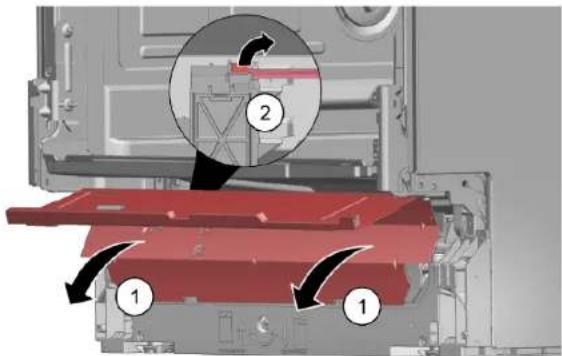
4.

Depending on the model series, the plug to the EmotionLight is still secured to the base.
Unlock the plug on the catch tappet and pull to the rear (optional) (2).
4.15.2 Installing base socket plate
Install the base socket plate in reverse order.

Repair
4.16 Replacing overflow conduit

The overflow conduit is located in the front lower area of the appliance.
Prerequisite:
Appliance is disconnected from power supply.
Appliance is disconnected from water supply.
Furniture panel has been removed (optional).
Outer door has been removed.
Toe panel has been removed (optional).→ Page 232
Base socket plate has been removed. Page 233
4.16.1 Removing overflow channel

Residual water
-
When the drainage hose is removed, residual water may run out.
Catch water or remove from the base pan with suction syringe. -
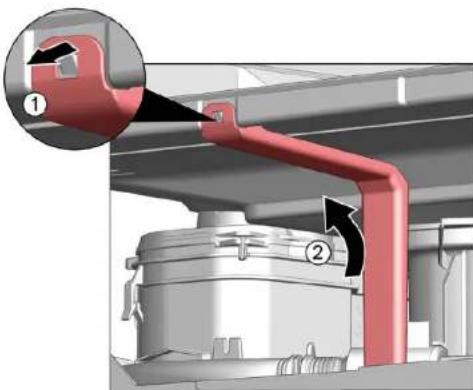
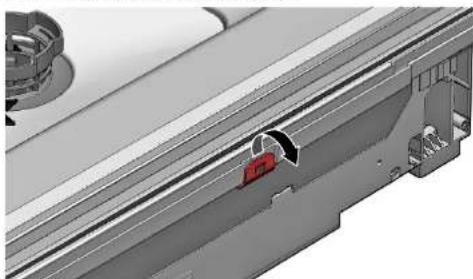
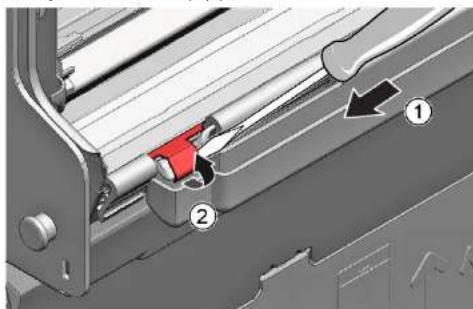
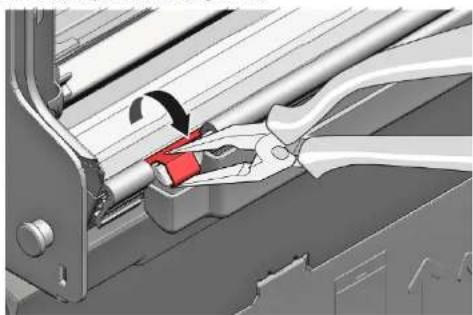
Lever out of the catch mechanism at the top (1, 2).

- Release catch element at top.
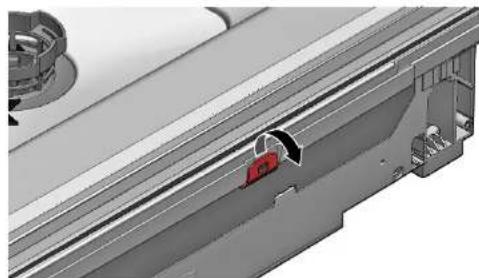
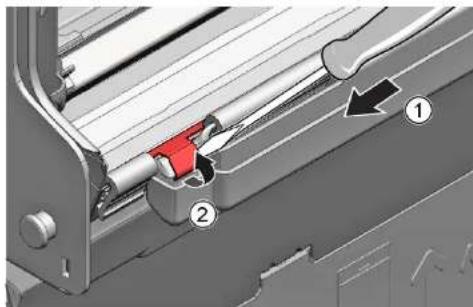
3.1. Insert screwdriver below metal brake (1).
- Gently release metal clip (2).

Repair
- Lift overflow conduit off.
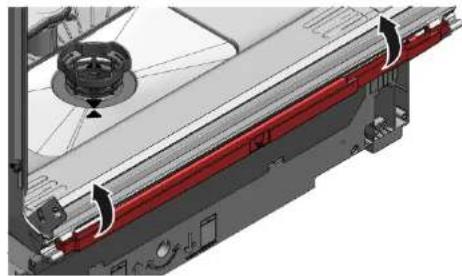
4.16.2 Installing overflow conduit

Water damage due to incorrect installation of the overflow conduit!
Correctly insert the overflow conduit at the bottom into the guide of the base trough.
Click the overflow conduit correctly into place at the top.
-
- Place overflow conduit (1).
-
Move overflow conduit into seal (2).
- Press overflow conduit in guide of seal (3).
- Insert overflow conduit concisely (4).
- Clip in overflow conduit (5).


Repair
- Check installation left and right. 3. Check firm seat.
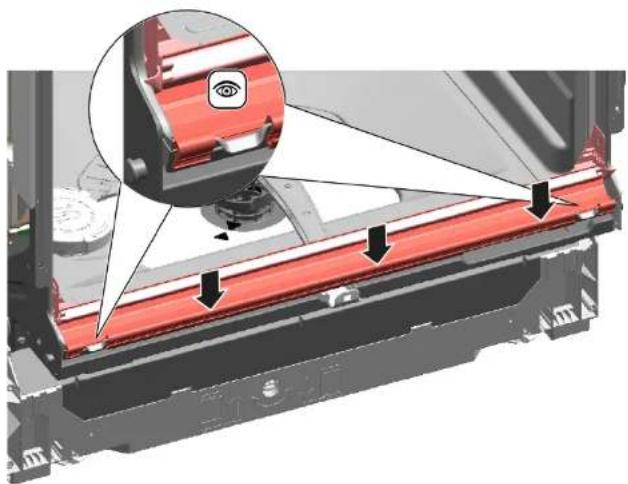
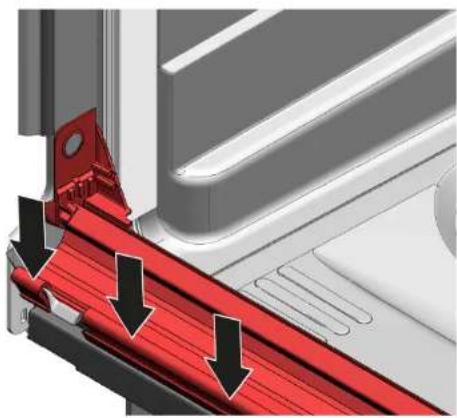
- Clip in metal clip on left and right side.

Repair
4.17 Replacing inner door
Prerequisite:
Appliance is disconnected from power supply.
Appliance is disconnected from water supply.
4.17.1 Removing inner door
- Remove screws (1).
- Remove inner door upwards (2).
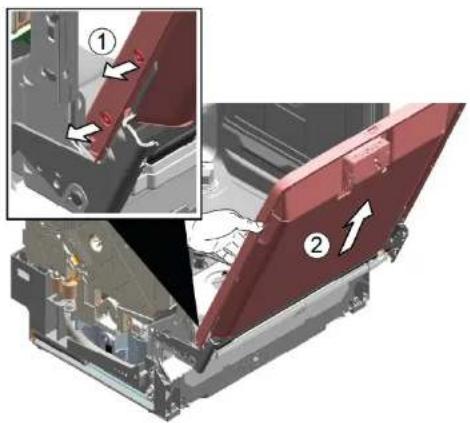
4.17.2 Installing inner door
- Flap door seal to front.
- Move inner door behind door seal.
- Close inner door.
- Flap door seal upwards. Sideparts show up
-
Move door hinge upwards.
-
Secure door hinge with screws.
- Place inner door on door hinge.
- Secure inner door with screws.

Repair
4.18 Replacing door hinge
Prerequisite:
Appliance is disconnected from power supply.
Appliance is disconnected from water supply.
Appliances is freely accessible
Side panel has been removed. Page 225
Outer door has been removed.
Inner door has been removed.
Control panel has been removed. Page 229
Door spings has been fixed. Page 230
Toe panel has been removed. Page 232
Base socket plate has been removed. Page 233
Overflow channel has been removed. Page 234
-
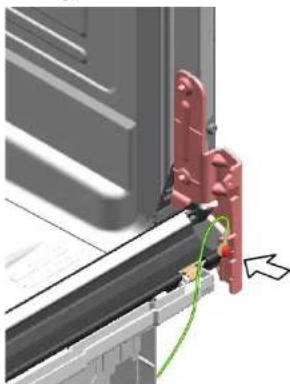
- Release catch hook with a screwdriver(1).
- Release ground connection on door hinge.
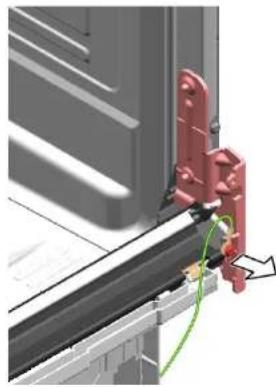
-
- Place hinge on appliance (1)
-
Move hinge downwards (2) till it is latched to the appliance.
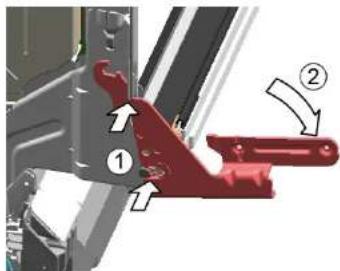
2.

A missing ground connection can lead to mains potential on door.
Establish ground connection.

Repair
4.19 Replacing (lower) door seal
Prerequisite:
Appliance is disconnected from power supply.
Appliance is disconnected from water supply.
Outer door has been removed.
Base socket plate has been removed. Page 233
Toe panel has been removed (optional). Page 232
Door springs have been removed.
Control panel has been removed.
Cable harness holder on bottom right has been removed.
4.19.1 Removing the door seal
- Remove the two retaining clips on the lower door seal (1, 2).
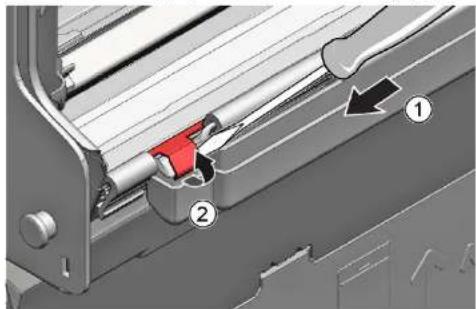
- Detach the overflow channel.
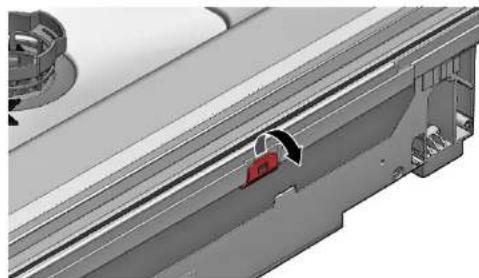
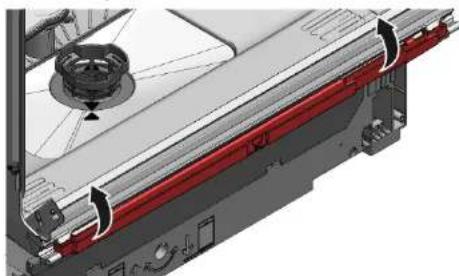
- Lift the overflow gutter off.

Repair
- Remove the lower door seal from the inner door.
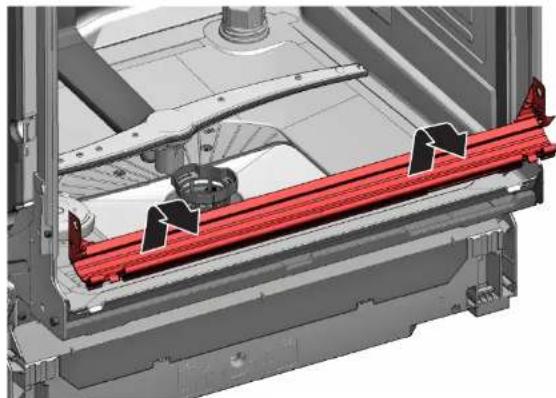
4.19.2 Installing the door seal
- Fit the sealing caps on the left and right to the sealing rail with the door seal.
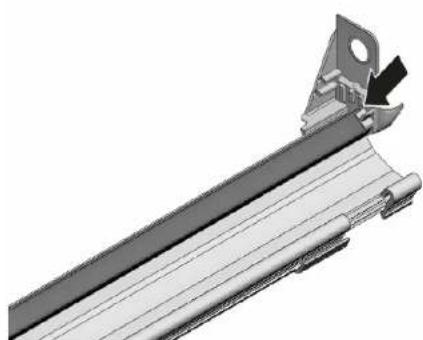
- Insert the door seal with the sealing flap in the inner door.
- Secure the door seal with two retaining clips.

Repair
4.20 Replacing (upper) door seal
Prerequisite:
Appliance is disconnected from power supply.
Appliance is disconnected from water supply.
4.20.1 Removing door seal
- Remove door seal from inner frame.
4.20.2 Installing door seal
The door seal must be cut to the correct length before installation. This is 1750mm for appliances of 81cm in height and 1850mm for appliances of 86cm in height.
- Prepare appropriate door seal.
- Ensure correct installation position of sealing profile.
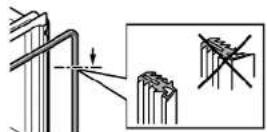
- White dot must be on level with sealing bed strip.
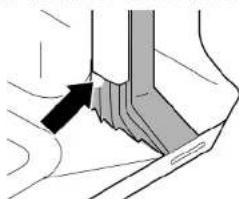
4

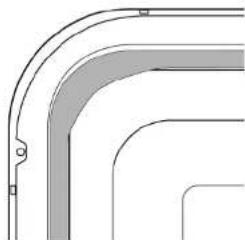
Sealing must not be wavy or stretched at corners. Seal is cut off diagonally at ends and tapers away into bottom of container at front.
Position end of seal straight to front underneath inner door. Seal should lie against side of container as far as possible.

Correctly installed door seal:

Repair
4.21 Replacing EmotionLight

The EmotionLight is situated in the upper front exterior area of the rinsing tank.
Prerequisite:
Appliance is disconnected from power supply.
Appliance is disconnected from water supply.
Appliances is freely accessible.
Worktop has been removed (optional).
The right-hand side panel has been removed (optional). Page 225
4.21.1 Removing EmotionLight
- Detach catch hook at the rear (1).

- Remove the holder upwards (2).
-
Pull plug out of connector (bottom right at front of appliance).
-
Remove electrical connection from the power module.
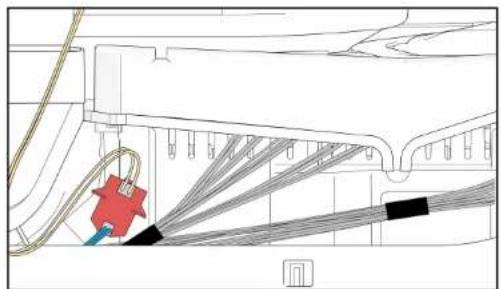
- Remove EmotionLight from the appliance.
4.21.2 Installing EmotionLight
- Insert the holder into the rinsing tank frame (1).
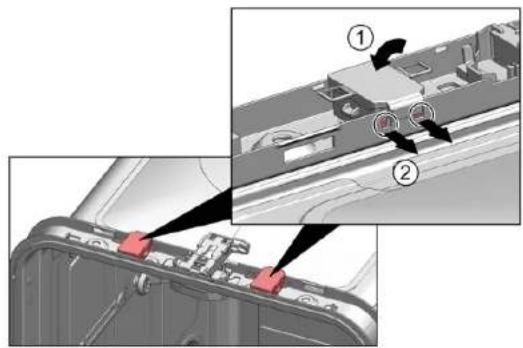

Repair
- Engage the catch hook (2).
3.
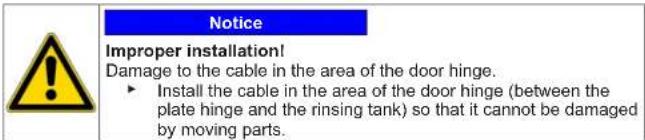
Install the cable on the right lower side.
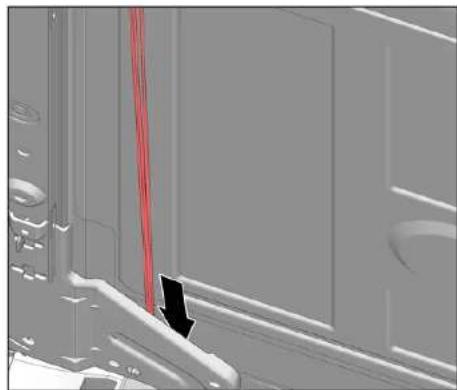

Repair
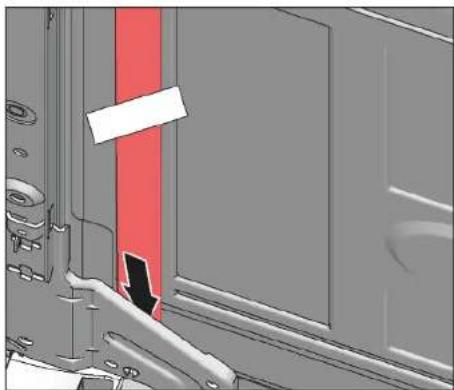
Fig. 3: Flat cable
- Insert the plug.

Repair
4.22 Replacing TimeLight

Replace the TimeLight only as a complete part.
The TimeLight module is fixed to the rear of the base socket plate.
Prerequisite:
Appliance is disconnected from power supply.
Appliance is disconnected from water supply.
Toe panel has been removed. Page 232
Base socket plate has been removed and turned. Page 233
4.22.1 Removing TimeLight
- Bend the catch elements (1) slightly outwards.
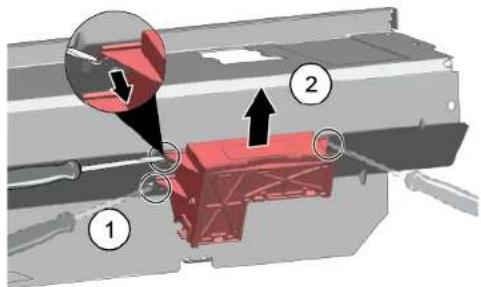
- Pull the TimeLight module upwards out of the guide (2).
4.22.2 Installing TimeLight
- Bend the catch elements (1) back again.
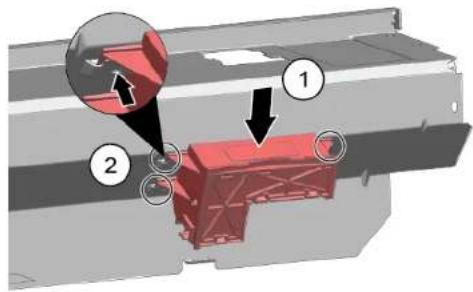
- Push the TimeLight module into the guide (2).
- Connect the electrical connection.

Repair
4.23 Replacing Gap illumination
Prerequisite:
Appliance is disconnected from power supply.
Appliance is disconnected from water supply.
Outer door is disassembled.
Operation panel has been removed.
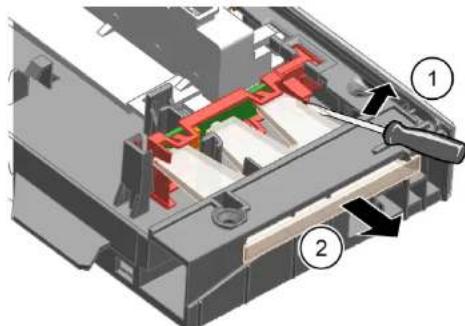
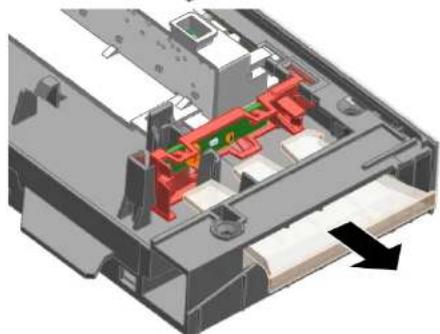
4.23.1 Removing Gap illumination
-
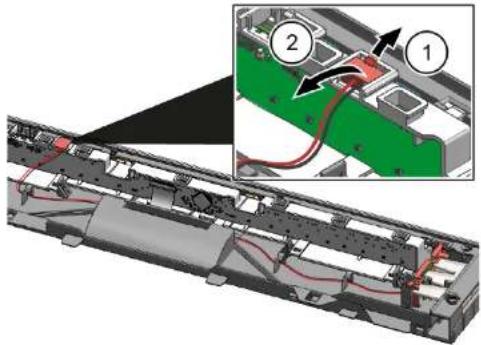
- Detach catch (1).
-
Remove electrical connection from the operation module (2).
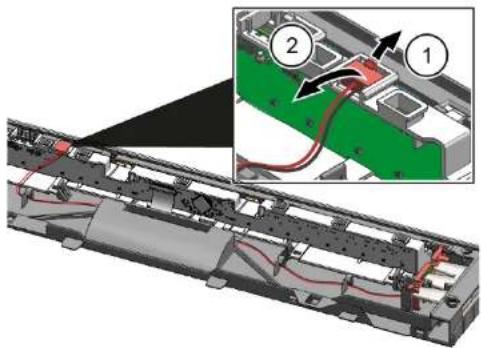
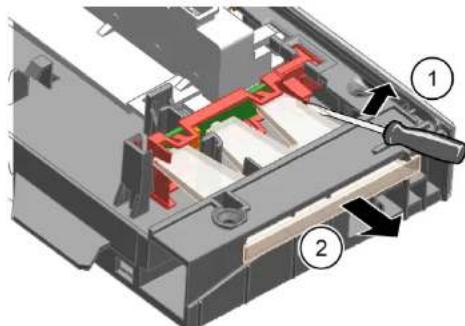
-
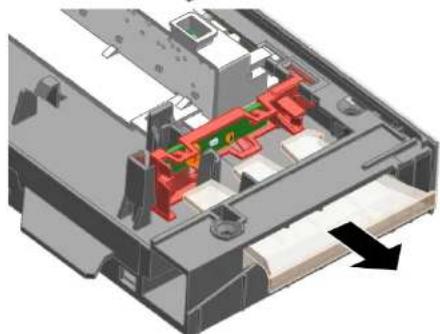
- Detach catch hook at rear (1).
-
Remove light fibre (2).
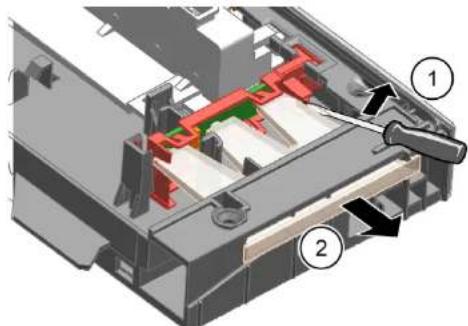
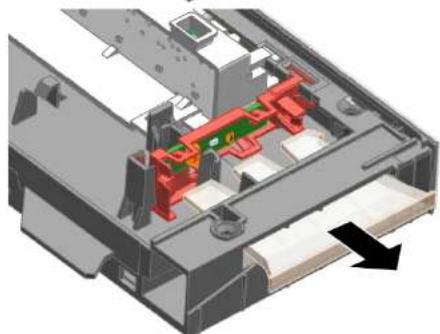

Repair
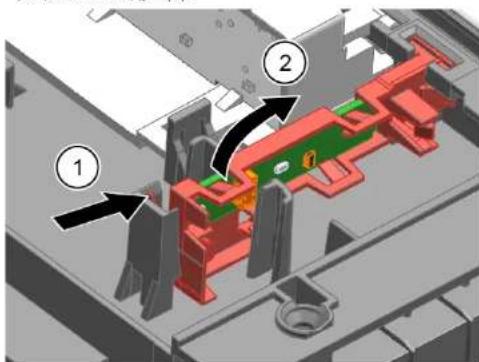
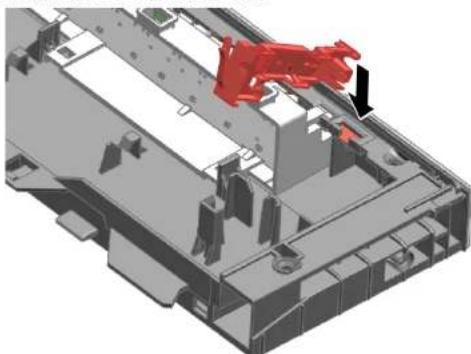
3.1.Detach catch hook (1).
- Lift up PCB with holder and remove it from operation module frame (2).
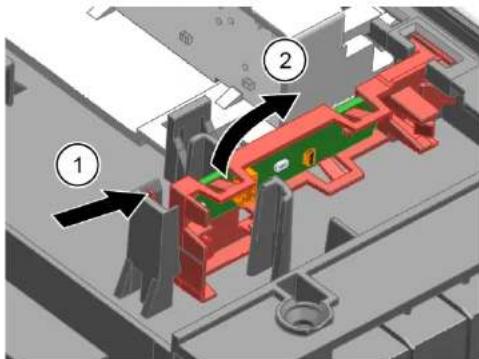
4.23.2 Installing Gap illumination
- Insert PCB holder to operation module frame.
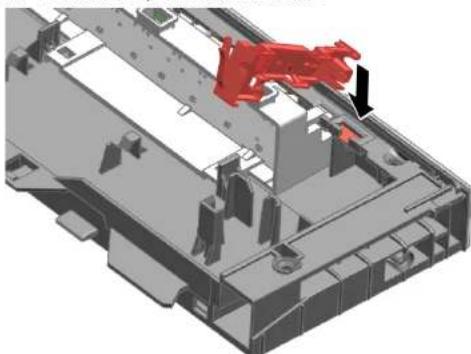
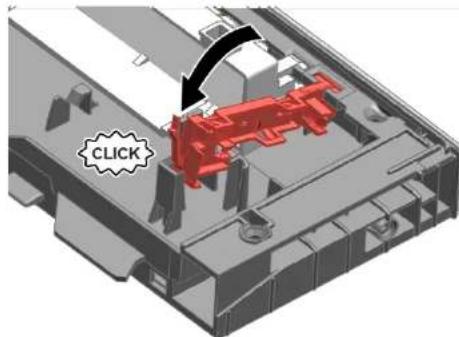
- Tighten it with a "click" sound.
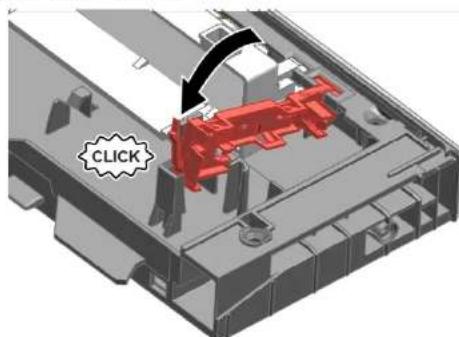
- Install light fibre and tighten it with a "click" sound.
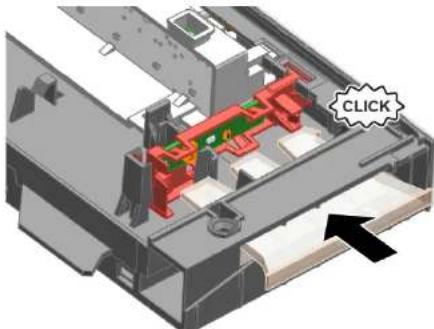
- Connect wire to operation module.
Remonditeave - Nõudepesumasin
Selle dokumendiga seoses 251
1.1 Tahtis teave 251
1.1.1 Eesmark 251
1.2 Sumbolite selgitus 251
1.2.1 Ohutased 251
1.2.2 Ohusumbolid 251
1.2.3 Hoiatuste struktuur 252
1.2.4 Üldised sumbolid 252
Ohutus 253
2.1 Uldised ohutusjuhised 253
2.1.1 Kofk kodumasinad 253
Tabel 1: Ohutasedmed
1.2.2 Ohusumbolid
1.1 Informations important 333
3.Avainwote to kain.

- TOnToeTeHToTe Ta AvtiKeIeVv ia TAnoIpo
4.2.3 ToTOnTeTOn eVToU atOpayepa EIOKα Bonentika μεσα:
∑upóevnθηkn taμπλετac [00614935]
KAIITOTnpiEIGPANZAVW[00618565]
- 2pynwote To EvTeo atmuayepa Te ta kpa KAToTo ouTnka KaalaiiWv.
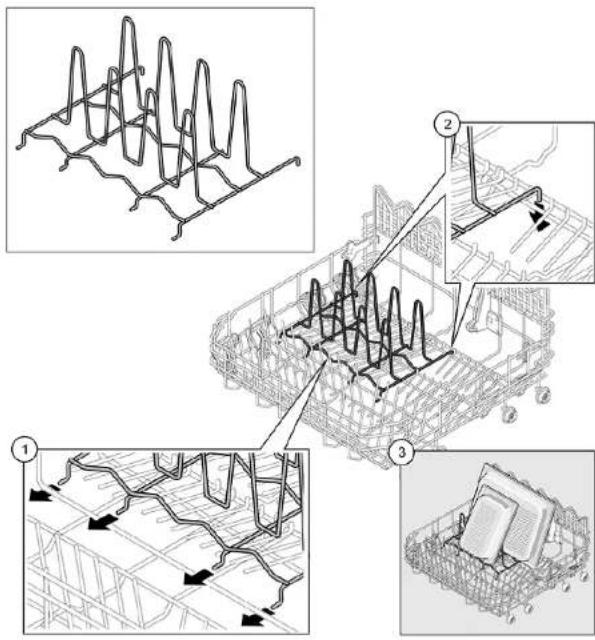

EMIOKEUN
4.3 Avtikataoan varioDrawer
- Isimkite,EmotionLight" is prietaio.
4.2.1.2 „EmotionLight" jdéjimas
4.23.2 Montaz Gap illumination
4.17.1 Remove a porta interior 731
4.17.2 Instalar a porta interior 731
4.18 Substitui a dobradiça da porta 732
4.18.1 Remove a dobradiça da porta 732
4.18.2 Instalar a dobradiça da porta 732
4.19 Substituir a vedao (inferior) da porta 734
4.19.1 Removea vedao da porta 734
4.19.2 Instalar aVEDa da porta 735
4.20 Substituir a vedao (superior) da porta 736
4.20.1 Remove aVEDaço da porta 736
4.20.2 Instalar a vedao da porta 736
Dicas de resolution - Maquina de lavar loça
4.21 Substituir o EmotionLight 737
4.21.1 Remover o EmotionLight 737
4.21.2 Instalar o EmotionLight. 737
4.22 Substitui o TimeLight 740
4.22.1 Remover o TimeLight 740
4.22.2Instalar o TimeLight 740
4.23 Substitui r a Gap Illumination 741
4.23.1 Remove a Gap Illumination 741
4.23.2 Instalar a Gap Illumination 742
4.17.1 Remover a porta interior
4.17.2 Instalar a porta interior
4.23.1 Remove a Gap Illumination
-
- Desprendero encaixe (1).
- Remova a ligaçao eletrica do modulo de operacao (2).
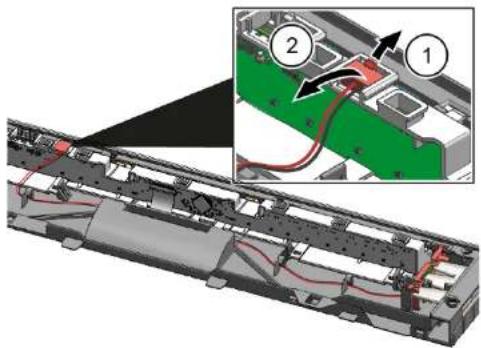
2.1. Despenda o gancho de encaixe aftas (1). 2. Remova a fibra otica (2).
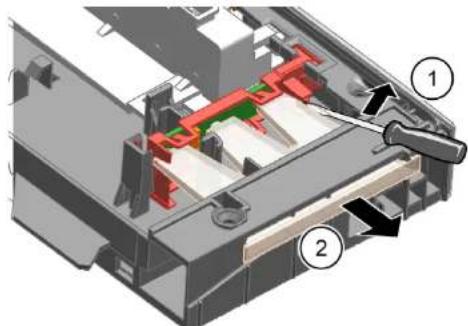
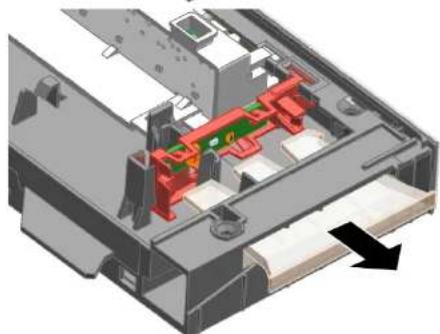

Reparacao
3. 1. Despendra o gancho de encaixe (1).
4.23 Vymena Gap illumination 823
4.23.1 Odstranenie Gap illumination 823
4.23.2 Montaz Gap illumination 824
O tomto dokunte
4.23 Vymena Gap illumination
Požiadavka:
4.23 Byta Gap illumination
Forutsattning:
Apparaten ar bortkopplad fran stromforsorjning.
Apparaten ar bortkopplad fran vattenforsorjning.
Den yttre luckan har demonterats.
Driftpanelen har tagits bort.
4.23.1 Ta bort Gap illumination
-
- Lossa spärren (1).
-
Ta bort elanslutningen fran driftmodulen (2).

2.1.Lossa faskroken baktill (1).
- Ta bort lusfibern (2).

Reparation
3.1.Lossa faskroken (1).
4.23.2 Montera Gap illumination
- Satt in kretskortet i driftmodulens ram.
Özel yardymcy ekipman:
Sekme Klavuzu [00614935]
Geçme parca [00618565]

- CbBETn 3a peMOHT - CbDOMnJaHa MaunHa
- OTHOCHO To3n DokyMeHT
- Baxha nHΦopMaζη
- Uen
- 06aCHeHne Ha cHMBOJInTe
- HnBa Ha onaCHOCT
- CtpyKtpa Ha npéDynpexkdeHnra
- ONACHOCT
- 06uCNMBOJI
- Be3onachocT
- 06uHnHCTpyKu3a6e3onacHOCT
- BcHKn DoMaunHn ypeiN
- IhctpymEnTu n NOMOuHcpeDCTBa
- PemOH
- 4.1CMHaHa pa60THnI NIO
- CbAJIHe Ha pa6OTHnI nnT
- MoHTnpaHe Ha pa6oTHnI IIO
- MoHTnpaHe Ha cncTeMaTa OT KOUHnIu
- MoHTnpaHe Ha nIb3rau Ha naIeua 3a 86-cM moDen
- MoThnpaHe HaФнкCaTopa 3aЧаш
- MoHTnpaHe Ha BLOKKaTa Ha naporehepaTopa
- MoThnpaHe Ha npbckaUaTa rnaBa 3a Tabu
- CmHa Ha 3axpaHbuaa Ka6eI
- N3KnIOVABe Ha 3axpaHbaua Ka6eI
- BkIIOUbaHe Ha 3axpaHbauJa6eN
- BHIMAHINE!
- CmHa Ha KaNaChKaTa 3a nouchTbuaa npenapat
- N3nckBaHe:
- Cbajhe Ha kanaykaTa 3a noocTbaun npenapat
- NocTabaHa Ha npyKHaTa
- MoHTnpaHe Ha kanaqKaTa 3a nouNCTBaUna npenapat
- 4.9CMraHa Ha Kanaka Ha nomnata 3a OTnADH BOHN
- CbajrHe Ha kanaka Ha nomnata 3a OTnaDHN BODN
- MoHTnpaHe Ha Kanaka Ha nomnata 3a OTnadH BODn
- CmHa Ha cTpaHnHn naHeI
- CbAJaHe Ha cTpaHmHa naHen
- MoHTnpaHe Ha cTpaHnHnHa nHaen
- CmHa Ha BbHnHaTa BpTa
- 4.13ФИКСИРанеHa npуЖинITEHa BpaTaTa
- CbajHe Ha donnna naHEn
- MoHTpaHe Ha DoJIHnnaHEn
- CMHa Ha IIIOyTa Ha rNaBHn KOHTaKT
- N3NCBaHe:
- CbaJrHe Ha nOuTaHa rIaBnKoHTaKT
- MoHTnpaHe Ha IIIOyTa Ha rJIAbHnKoHTaKT
- CmHa Ha Tpb6oPbOda 3a npenbIbaHe
- CbajnHe Ha KaHaHa 3a npenBlaBe
- OctaTbUHa BOna
- MoHTIpaHHe Ha Tpb6oPbOBoJa 3a npenbIbAne
- CMHa Ha Gap illumination (OcbetBaHe Ha npolykn)
- CbAaHe Ha Gap illumination
- OTeJeTe Kykata Ha fKcatopa (1).
- MoHTIpaHc Ha Gap Illumination
- Vymena Gap Illumination
- Montering of emotionLight
- Reparation
- BEMERKI
- Ukorrekt montering!
- Udskifting at timeLight
- Fjernelse at timeLight
- Montering at timeLight
- Udskiftning at Gap illumination
- Montering of Gap illumination
- Repair hints - Dishwasher
- Concerning this document
- Important information
- Purpose
- Explanation of symbols
- Danger levels
- Hazard symbols
- Structure of the warnings
- Danger
- General symbols
- Safety
- General Safety instructions
- All domestic appliances
- Tools and aids
- Repair
- Replacing worktop
- Removing worktop
- Installing worktop
- Installing basket system
- Installing a tab slide for the 86 cm model
- Installing cup support clip
- Installing steamer insert
- Replacing varioDrawer
- Removing varioDrawer
- Installing varioDrawer
- Replacing spray arms
- Removing spray arm
- Installing spray arm
- Replacing filters
- Removing filter
- Installing filters
- Installing baking sheet spray head
- Replacing power cord
- Unplugging power cord
- Plugging in power cord
- Notice
- Replacing detergent cover
- Prerequisite:
- Removing detergent cover
- Inserting spring
- Installing detergent cover
- Replacing wastewater pump cover
- Removing wastewater pump cover
- Installing wastewater pump cover
- Replacing side panel
- Removing side panel
- Installing side panel
- Replacing outer door
- Replacing control panel
- Removing control panel
- Installing control panel
- Replacing toe panel
- Removing toe panel
- Installing toe panel
- Replacing base socket plate
- Removing base socket plate
- Installing base socket plate
- Replacing overflow conduit
- Removing overflow channel
- Residual water
- Installing overflow conduit
- Replacing inner door
- Removing inner door
- Installing inner door
- Replacing door hinge
- Replacing (lower) door seal
- Removing the door seal
- Installing the door seal
- Replacing (upper) door seal
- Removing door seal
- Installing door seal
- Replacing EmotionLight
- Removing EmotionLight
- Installing EmotionLight
- Replacing TimeLight
- Removing TimeLight
- Installing TimeLight
- Replacing Gap illumination
- Removing Gap illumination
- 3.1.Detach catch hook (1).
- Installing Gap illumination
- Remonditeave - Nõudepesumasin
- Ohusumbolid
- ToTOnTeTOn eVToU atOpayepa EIOKα Bonentika μεσα:
- EMIOKEUN
- Avtikataoan varioDrawer
- „EmotionLight" jdéjimas
- Montaz Gap illumination
- Dicas de resolution - Maquina de lavar loça
- Remover a porta interior
- Instalar a porta interior
- Remove a Gap Illumination
- Reparacao
- 1. Despendra o gancho de encaixe (1).
- O tomto dokunte
- Byta Gap illumination
- Ta bort Gap illumination
- 3.1.Lossa faskroken (1).
- Montera Gap illumination
Brand : Profilo
Model : BM3126EG
Category : Dishwasher