
CL09F - Air conditioner LG - Free user manual and instructions
Find the device manual for free CL09F LG in PDF.
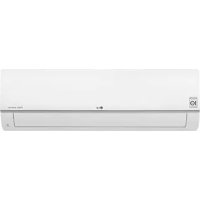



| Brand | LG |
| Model | CL09F |
| Product Type | Air conditioner |
| Refrigerant | R32 (flammable) |
| Maximum high side pressure | 4.2 MPa / 4.32 MPa |
| Maximum low side pressure | 2.4 MPa |
| Acoustic emissions (sound pressure) | Less than 70 dB(A) |
| Indoor unit type | Wall-mounted, ceiling cassette, console depending on chassis |
| Available chassis | SK, SJ, SR, TU, TT, TQ, TR, TP, TN, TM, etc. |
| Main functions | Cooling, heating (heat pump), ventilation, dehumidification |
| Filter type | Washable air filter |
| Filter cleaning | Every 2 weeks, with cold water (<40°C) |
| Power supply | See electrical diagram on the unit; H05RN-F cable |
| Protection | Circuit breaker, appropriate fuse, mandatory grounding |
| Recommended ambient temperature | Do not over-cool, maintain uniform temperature |
| Minimum installation area (R32) | Variable depending on refrigerant charge (up to 420 m² for floor mounting) |
| Weight (indoor unit) | Varies by chassis, approximately 20-50 kg |
| Dimensions (indoor unit) | Varies by chassis, e.g. 733x772x628 mm for L1 |
| Warranty | Warranty void if installation not carried out by an approved professional |
| Spare parts | Only use parts listed in the manual |
| Repairability | Repairs reserved for a qualified technician; self-diagnosis via error codes |
Frequently Asked Questions - CL09F LG
User questions about CL09F LG
0 question about this device. Answer the ones you know or ask your own.
Ask a new question about this device
Download the instructions for your Air conditioner in PDF format for free! Find your manual CL09F - LG and take your electronic device back in hand. On this page are published all the documents necessary for the use of your device. CL09F by LG.
USER MANUAL CL09F LG
OWNER'S & INSTALLATION MANUAL
AIR CONDITIONER
Please read this installation manual completely before installing the product. Installation work must be performed in accordance with the national wiring standards by authorized personnel only.
Please retain this installation manual for future reference after reading it thoroughly.
Original instruction
[Representative] LG Electronics Inc. EU Representative : LG Electronics European Shared Service Center B.V. Krijgsman 1, 1186 DM Amstelveen, The Netherlands
[Manufacturer] LG Electronics Tianjin Appliances co., Ltd. No.09, Jinwei Road, Beichen District, Tianjin, China.
This manual is the simplified version of original manual. You can obtain the original manual from www.lg.com.
MFL70520315
Rev.00_191125
www.lg.com
Copyright © 2015 - 2019 LG Electronics Inc. All Rights Reserved.
MODEL DESIGNATION
Product information
- Product Name : Air conditioner
- Model Name:
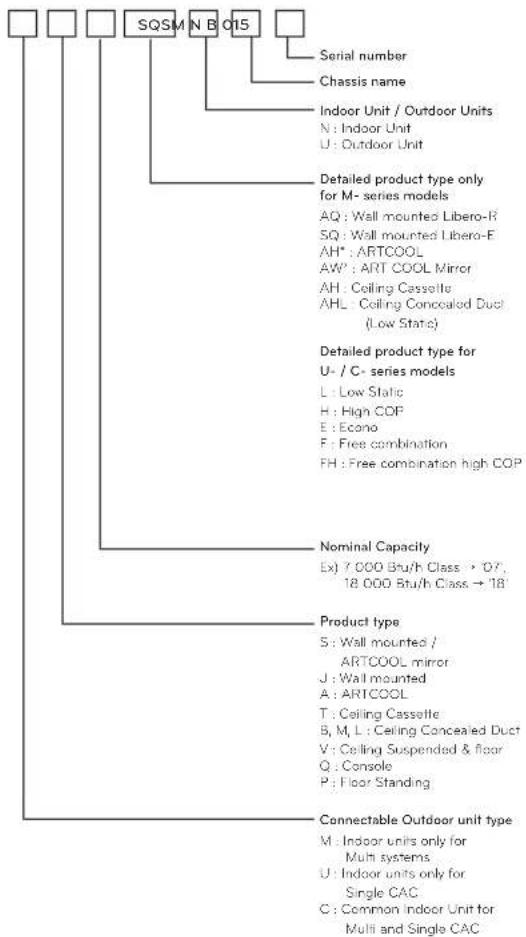
- Additional Information: The serial number refers to the barcode on the product.
- Maximum allowable pressure High side: 4.2 MPa / 4.32 MPa (it can be different by model) Low side: 2.4 MPa
- Refrigerant: R32
Airborne Noise Emission
The A-weighted sound pressure emitted by this product is below 70 dB.
** The noise level can vary depending on the site.
The figures quoted are emission levels and are not necessarily safe working levels.
Whilst there is a correlation between the emission and exposure levels, this cannot be used reliably to determine whether or not further precautions are required.
Factors that influence the actual level of exposure of the workforce include the characteristics of the work room and the other sources of noise, i.e. the number of equipment and other adjacent processes and the length of time for which an operator is exposed to the noise. Also, the permissible exposure level can vary from country to country.
This information, however, will enable the user of the equipment to make a better evaluation of the hazard and risk.

SAFETY INSTRUCTIONS
The following symbols are displayed on indoor and outdoor units.
 | Read the precautions in this manual carefully before operating the unit. |  | This appliance is filled with flammable refrigerant (for R32) |
 | This symbol indicates that the Operation Manual should be read carefully. |  | This symbol indicates that a service personnel should be handling this equipment with reference to the Installation Manual. |
The following safety guidelines are intended to prevent unforeseen risks or damage from unsafe or incorrect operation of the appliance.
The guidelines are separated into 'WARNING' and 'CAUTION' as described below.

This symbol is displayed to indicate matters and operations that can cause risk.
Read the part with this symbol carefully and follow the instructions in order to avoid risk.

WARNING
This indicates that the failure to follow the instructions can cause serious injury or death.

CAUTION
This indicates that the failure to follow the instructions can cause the minor injury or damage to the product.

WARNING
• Installation or repairs made by unqualified persons can result in hazards to you and others. • Installation work must be performed in accordance with the National Electric Code by qualified and authorized personnel only. - The information contained in the manual is intended for use by a qualified service technician familiar with safety procedures and equipped with the proper tools and test instruments. - Failure to carefully read and follow all instructions in this manual can result in equipment malfunction, property damage, personal injury and/or death. - Ducts connected to an appliance shall not contain an ignition source. (for R32) - This equipment shall be provided with a supply conductor complying with the national regulation.
- Compliance with national gas regulations shall be observed.
- Any person who is involved with working on or breaking into a refrigerant circuit should hold a current valid certificate from an industry accredited assessment authority, which authorizes their competence to handle refrigerants safely in accordance with an industry recognized assessment specification. (for R32)
- Servicing shall only be performed as recommended by the equipment manufacturer. Maintenance and repair requiring the assistance of other skilled personnel shall be carried out under the supervision of the person competent in the use of flammable refrigerants. (for R32)
Installation
- Do not use a defective or underrated circuit breaker. Use the correctly rated breaker and fuse. There is risk of fire or electric shock.
- For electrical work, contact the dealer, seller, a qualified electrician, or an Authorized Service Center. Do not disassemble or repair the product by yourself. There is risk of fire or electric shock.
- Always ground the product as per the wiring diagram. Do not connect the ground wire to gas or water pipes lightening rod or telephone ground wire. There is risk of fire or electric shock.
- Install the panel and the cover of the control box securely. There is a risk of fire or electric shock due to dust, water, etc.
- Use the correctly rated breaker or fuse. There is a risk of fire or electric shock.
- Do not modify or extend the power cable. If the power cable or cord has scratches, peeled skin, or deterioration, it must be replaced. There is a risk of fire or electric shock.
- For installation, removal, or reinstallation, always contact the dealer or an Authorized Service Center. There is a risk of fire, electric shock, explosion, or injury.
- Do not install the product on a defective installation stand. Ensure that the installation area does not deteriorate with age. It may cause the product to fall.
- Never install the outdoor unit on a moving base or in a place from where it can fall. The falling outdoor unit can cause damage, injury, or even death.
- In the outdoor unit, the step-up capacitor supplies high voltage electricity to the electrical components. Be sure to discharge the capacitor completely before conducting repair work. A charged capacitor can cause electrical shock.
- When installing the unit, use the installation kit provided with the product. Otherwise, the unit may fall and cause severe injury.
- Indoor/outdoor wiring connections must be secured tightly, and the cable should be routed properly so that there is no force pulling the cable from the connection terminals. Improper or loose connections can cause heat generation or fire.
- Safely dispose of the packing materials, such as screws, nails, batteries, broken things, etc., after installation or service, and then tear away and throw away the plastic packaging bags. Children may play with them and cause injury.
- Be sure to check the refrigerant to be used. Please read the label on the product. Incorrect refrigerant used can prevent the normal operation of the unit.
- The appliance shall be stored in a room without continuously operating ignition sources (for example: open flames, an operating gas appliance, or an operating electric heater).
- Keep any required ventilation openings clear of obstruction.
- The appliance shall be stored in a well-ventilated area where the room size corresponds to the room area as specified for operation. (for R32)
- For installation of the product, always contact the service center or a professional installation agency. Otherwise, it may cause a fire, electrical shock, explosion or injury.
- Mechanical connections shall be accessible for maintenance purposes.
- The appliance shall be disconnected from its power source during service and when replacing parts.
- The appliance shall be installed in accordance with national wiring regulations.
Operation
- When the product is soaked (flooded or submerged) in water, contact an Authorized Service Center for repair before using it again. There is risk of fire or electric shock.
- Be sure to use only those parts which are listed in the svc parts list. Never attempt to modify the equipment. The use of inappropriate parts can cause an electrical shock, excessive heat generation or fire.
- Do not touch, operate, or repair the product with wet hands. Hold the plug by hand when taking out. There is risk of electric shock or fire.
- Do not place a heater or other heating appliances near the power cable. There is risk of fire and electric shock.
- Do not allow water to run into electric parts. Install the unit away from water sources. There is risk of fire, failure of the product, or electric shock.
- Do not store or use or even allow flammable gas or combustibles near the product. There is risk of fire.
- Do not use the product in a tightly closed space for a long time. Perform ventilation regularly. Oxygen deficiency could occur and hence harm your health.
- Do not open the front grille of the product during operation. (Do not touch the electrostatic filter, if the unit is so equipped.) There is risk of physical injury, electric shock, or product failure.
- If strange sound, smell or smoke comes from product. Immediately turn the breaker off or disconnect the power supply cable. There is risk of electric shock or fire.
- Ventilate the room where the product is installed from time to time when operating it together with a stove or heating element, etc. Oxygen deficiency can occur and hence harm your health.
- Do not touch the refrigerant pipe, water pipe, or any internal parts while the unit is operating or immediately after operation. It can cause a burn or frostbite.
- Do not step on the indoor/outdoor unit and do not put anything on it. It may cause an injury through dropping of the unit or falling down.
- When the product is not to be used for a long time, disconnect the power supply plug or turn off the breaker. There is a risk of product damage or failure, or unintended operation.
- Take care to ensure that nobody, especially kids, could step on or fall onto the outdoor unit. This could result in personal injury and product damage.
- Take care to ensure that the power cable could not be pulled out or damaged during operation. There is a risk of fire or electric shock.
- Do not place anything on the power cable. There is a risk of fire or electric shock.
- When flammable gas leaks, turn off the gas and open a window for ventilation before turning on the product. Do not use the telephone or turn switches on or off. There is a risk of explosion or fire.
- Make sure to ventilate sufficiently when this air conditioner and a heating appliance such as a heater are used simultaneously. Failure to do so may result in fire, serious injury, or product failure.
- Periodically (more than once a year) clean the dust or salt particles stuck on the heat exchanger by using water.
- Do not use means to accelerate the defrosting process or to clean, other than those recommended by the manufacturer.
- Do not pierce or burn the refrigerant cycle part.
- Be aware that refrigerants may not contain an odour.
- When mechanical connectors are reused indoors, sealing parts shall be renewed. (for R32)
- When flared joints are reused indoors, the flare part shall be re-fabricated. (for R32)

CAUTION
Installation
- Two or more people must lift and transport the product. Avoid personal injury.
- Do not install the product where it will be exposed to sea wind (salt spray) directly. It may cause corrosion on the product.
- Install the drain hose to ensure that the condensed water is drained away properly. A bad connection may cause water leakage.
- Keep level even when installing the product. To avoid vibration or noise.
- Do not install the product where the noise or hot air from the outdoor unit could damage or disturb the neighborhoods. It may cause a problem for your neighbors and hence dispute.

- Always check for gas (refrigerant) leakage after installation or repair of product. Low refrigerant levels may cause failure of product.
- Wear adequate personal protection equipment (PPE) when installing, maintaining or servicing the product.
- The appliance shall be stored so as to prevent mechanical damage from occurring.
- Refrigerant tubing shall be protected or enclosed to avoid damage.
- Flexible refrigerant connectors (such as connecting lines between the indoor and outdoor unit) that may be displaced during normal operations shall be protected against mechanical damage.
- The installation of pipe-work shall be kept to a minimum.
- Pipe-work shall be protected from physical damage.
- A brazed, welded, or mechanical connection shall be made before opening the valves to permit refrigerant to flow between the refrigerating system parts.
- Keep level parallel in installing the product. Otherwise, it may cause vibration or water leakage. It may cause injury or an accident.
- If anyone other than a licensed Professional installs, repairs, or alters LG Electronics Air Conditioning Products, the warranty is voided.
All costs associated with repair are then the full responsibility of the owner.
- Means for disconnection must be incorporated in the fixed wiring in accordance with the wiring rules.
- Do not insert a drain hose in drain or soil pipe.
Bad smells can occur and it results in a corrosion of a heat exchanger or pipe.
Operation
- Do not use the product for special purposes, such as preserving foods, works of art, etc. It is a consumer air conditioner, not a precision refrigeration system. There is risk of damage or loss of property.
- Do not block the inlet or outlet of air flow. It may cause product failure.
- Use a soft cloth to clean. Do not use harsh detergents, solvents or splashing water etc. There is risk of fire, electric shock, or damage to the plastic parts of the product.
- Do not touch the metal parts of the product when removing the air filter. There is risk of personal injury.
- Do not step on or put anything on the product. There is risk of personal injury and failure of product.
- Always insert the filter securely after cleaning. Clean the filter every two weeks or more often if necessary. A dirty filter reduces the efficiency.
- Do not insert hands or other objects through the air inlet or outlet while the product is operating. There are sharp and moving parts that could cause personal injury.
- Be cautious when unpacking and installing the product. Sharp edges could cause injury.
- If the refrigerant gas leaks during the repair, do not touch the leaking refrigerant gas. The refrigerant gas can cause frostbite (cold burn).
- Do not tilt the unit when removing or uninstalling it. The condensed water inside can spill.
- Do not touch refrigerant pipe and water pipe or any internal parts while the unit is operating or immediately after operation. It can cause a burn or frostbite.
- If the refrigerant gas leaks during the installation, ventilate the area immediately. Otherwise it can be harmful for your health.
- Dismantling the unit, treatment of the refrigerant oil and eventual parts should be done in accordance with local and national standards.
- Replace the all batteries in the remote control with new ones of the same type. Do not mix old and new batteries or different types of batteries. There is risk of fire or product failure.
- Do not recharge or disassemble the batteries. Do not dispose off batteries in a fire. They may burn or explode.
- If the liquid from the batteries gets onto your skin or clothes, wash it well with clean water. Do not use the remote if the batteries have leaked. The chemicals in batteries could cause burns or other health hazards.
- If you swallow the battery fluid from a leak, wash out the inside of your mouth thoroughly and then consult a doctor. Failure to do so may result in serious health complications.
- Do not let the air conditioner run for a long time when the humidity is very high and a door or a window is left open. Moisture may condense and wet or damage furniture.
- Do not expose your skin or kids or plants to the cool or hot air draft. This could harm to your health.
- Do not drink the water drained from the product. It is not sanitary and could cause serious health issues.
- Use a firm stool or ladder when cleaning, maintaining, or repairing the product at a height. Be careful and avoid personal injury.
- Means for disconnection must be incorporated in the fixed wiring in accordance with the wiring rules.
- This appliance is not intended for use by persons (including children) with reduced physical, sensory, or mental capabilities, or lack of experience and knowledge, unless they have been given supervision or instruction concerning use of the appliance by a person responsible for their safety. Children should be supervised to ensure that they do not play with the appliance.
- This appliance can be used by children aged from 8 years and above and persons with reduced physical, sensory, or mental capabilities or lack of experience and knowledge if they have been given supervision or instruction concerning use of the appliance in a safe way and understand the hazards involved. Children shall not play with the appliance. Cleaning and user maintenance shall not be made by children without supervision.


INSTALLATION PLACES
- There should not be any heat source or steam near the unit.
- There should not be any obstacles to prevent the air circulation.
- A place where air circulation in the room will be good.
- A place where drainage can be easily obtained.
- A place where noise prevention is taken into consideration.
- Do not install the unit near the doorway.
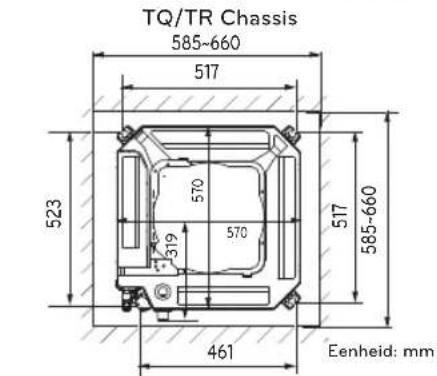
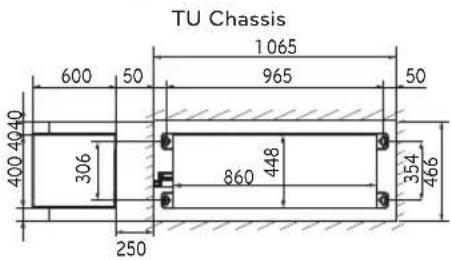
- Ensure the spaces indicated by arrows from the wall, ceiling, or other obstacles.
- The indoor unit must keep the maintenance space.
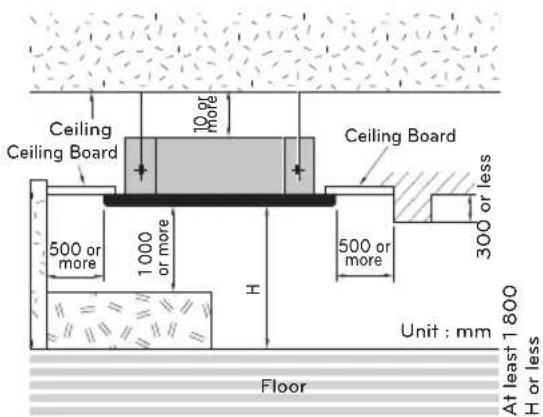
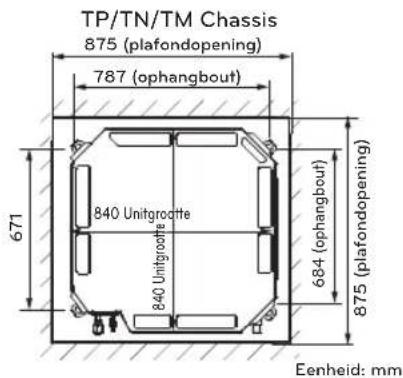
| Chassis H | |
| TU/TT 3 300 | |
| TQ/TR/TP/TP-B 3 600 | |
| TN/TM/TM-A 4 200 | |
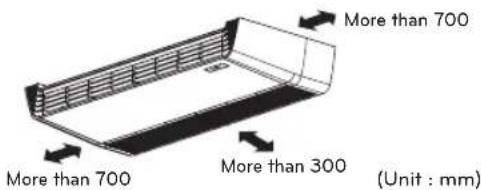
Top view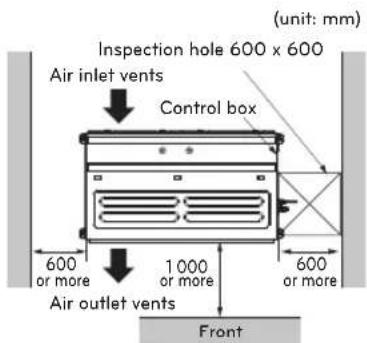
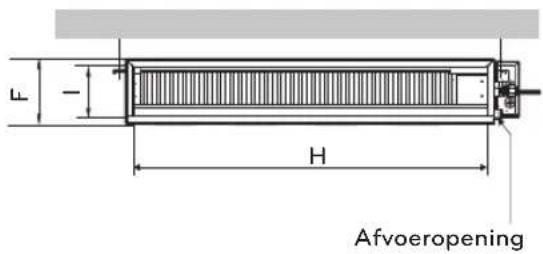
Side view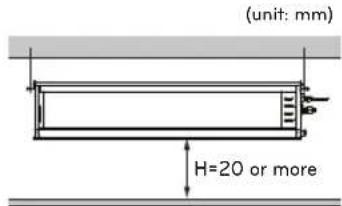
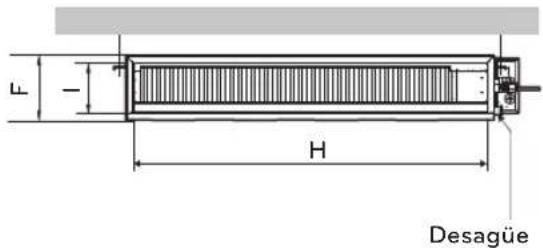
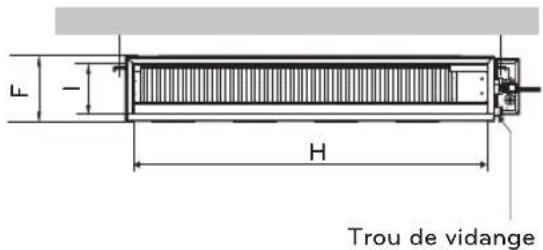
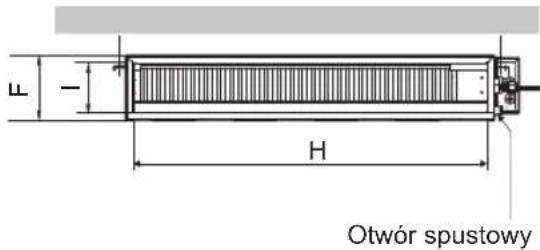
A suitable dimension "H" is necessary to create a slope for drainage, as shown in the figure.
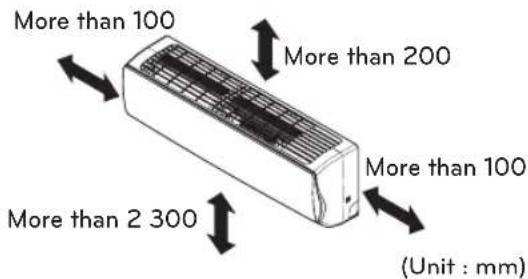
The feature may vary depending on the model type.

CAUTION
Handle the product with extreme care during transport.
- If the product weighs more than 20 kg, do not have a single person carry it.
- Some products are packed with PP bands. Do not use these bands for lifting or carrying, as they are dangerous.
- Do not touch the heat exchanger fins with bare hands, as this may cause cuts.
- Tear the plastic packaging bag and dispose of it so that children cannot play with it, as it may cause suffocation.
- When carrying the unit, always support it at four points. Carrying or lifting with 3-point support may make the outdoor unit unstable and cause it to fall.
- Use two belts, each at least 8 meters long.
- Place protective cloth or boards at points where the casing contacts the sling to prevent damage.
- Hoist the unit ensuring it is lifted at its center of gravity.
Minimum floor area (for R32)
- The appliance must be installed, operated, and stored in a room with a floor area larger than the minimum required area.
- Use the graph or table to determine the minimum area.
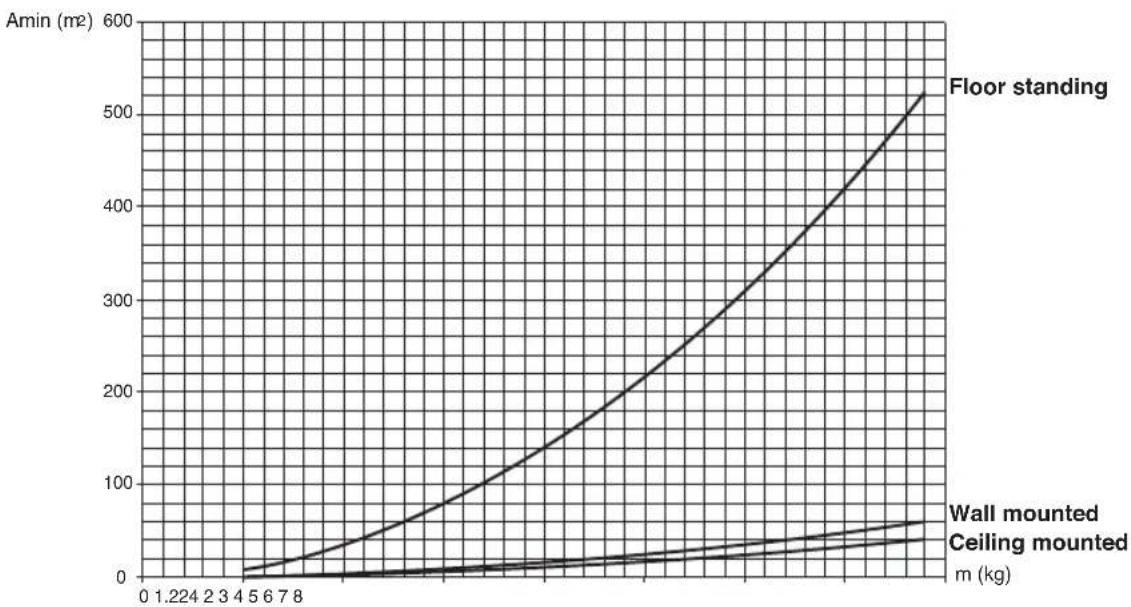
-m: Total refrigerant amount in the system - Total refrigerant amount: factory refrigerant charge + additional refrigerant amount - Amin: minimum area for installation
| Floor location | Floor location | ||
| m (kg) | Amin (m -2 ) | m (kg) | Amin (m -2 ) |
| < 1.224 | - | 4.6 | 181.56 |
| 1.224 | 12.9 | 4.8 | 197.70 |
| 1.4 | 16.82 | 5 | 214.51 |
| 1.6 | 21.97 | 5.2 | 232.02 |
| 1.8 | 27.80 | 5.4 | 250.21 |
| 2 | 34.82 | 5.6 | 269.09 |
| 2.2 | 41.53 | 5.8 | 288.65 |
| 2.4 | 49.42 | 6 | 308.90 |
| 2.6 | 58.00 | 6.2 | 329.84 |
| 2.8 | 67.27 | 6.4 | 351.46 |
| 3 | 77.22 | 6.6 | 373.77 |
| 3.2 | 87.86 | 6.8 | 396.76 |
| 3.4 | 99.19 | 7 | 420.45 |
| 3.6 | 111.20 | 7.2 | 444.81 |
| 3.8 | 123.90 | 7.4 | 469.87 |
| 4 | 137.29 | 7.6 | 495.61 |
| 4.2 | 151.36 | 7.8 | 522.04 |
| 4.4 | 166.12 | ||
| Wall mounted | Wall mounted | ||
| m (kg) | Amin (m -2 ) | m (kg) | Amin (m -2 ) |
| < 1.224 | - | 4.6 | 20.17 |
| 1.224 | 1.43 | 4.8 | 21.97 |
| 1.4 | 1.87 | 5 | 23.63 |
| 1.6 | 2.44 | 5.2 | 25.78 |
| 1.8 | 3.09 | 5.4 | 27.80 |
| 2 | 3.81 | 5.6 | 29.90 |
| 2.2 | 4.61 | 5.8 | 32.07 |
| 2.4 | 5.49 | 6 | 34.32 |
| 2.6 | 6.44 | 6.2 | 36.65 |
| 2.8 | 7.47 | 6.4 | 39.05 |
| 3 | 8.58 | 6.6 | 41.53 |
| 3.2 | 9.76 | 6.8 | 44.08 |
| 3.4 | 11.02 | 7 | 46.72 |
| 3.6 | 12.36 | 7.2 | 49.42 |
| 3.8 | 13.77 | 7.4 | 52.21 |
| 4 | 15.25 | 7.6 | 55.07 |
| 4.2 | 16.82 | 7.8 | 58.00 |
| 4.4 | 18.46 | ||
| Ceiling Mounted | Ceiling Mounted | ||
| m (kg) | Amin (m 2 ) | m (kg) | Amin (m 2 ) |
| < 1.224 | - | 4.6 | 13.50 |
| 1.224 | 0.956 | 4.8 | 14.70 |
| 1.4 | 1.25 | 5 | 15.96 |
| 1.6 | 1.63 | 5.2 | 17.26 |
| 1.8 | 2.07 | 5.4 | 18.61 |
| 2 | 2.55 | 5.6 | 20.01 |
| 2.2 | 3.09 | 5.8 | 21.47 |
| 2.4 | 3.68 | 6 | 22.98 |
| 2.6 | 4.31 | 6.2 | 24.53 |
| 2.8 | 5.00 | 6.4 | 26.14 |
| 3 | 5.74 | 6.6 | 27.80 |
| 3.2 | 6.54 | 6.8 | 29.51 |
| 3.4 | 7.38 | 7 | 31.27 |
| 3.6 | 8.27 | 7.2 | 33.09 |
| 3.8 | 9.22 | 7.4 | 34.95 |
| 4 | 10.21 | 7.6 | 36.86 |
| 4.2 | 11.26 | 7.8 | 38.83 |
| 4.4 | 12.36 | ||
THE INDOOR UNIT INSTALLATION
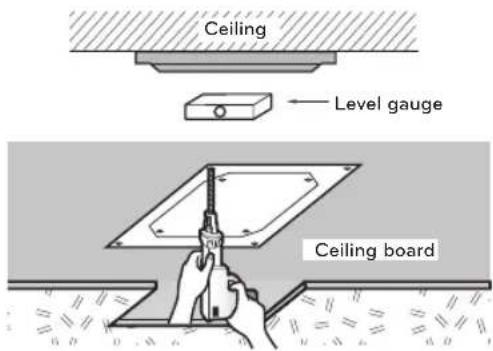
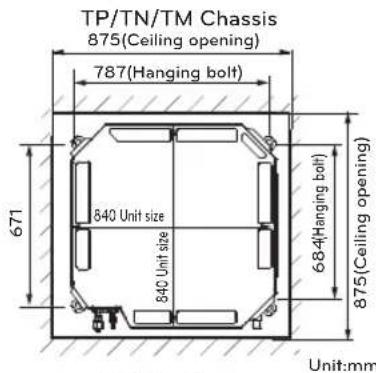
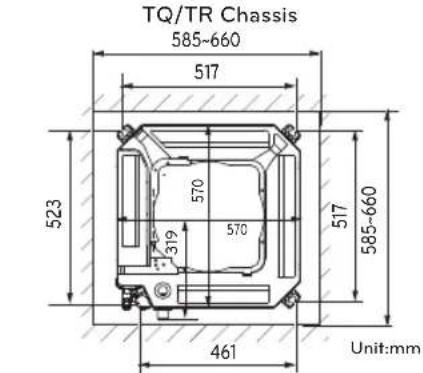
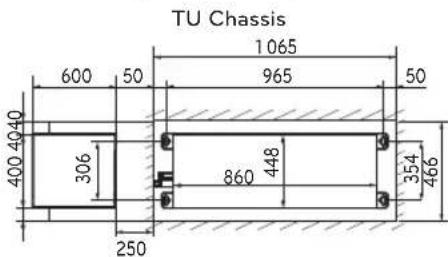
- Select and mark the position for fixing bolts and piping hole.
- Decide the position for fixing bolts slightly tilted to the drain direction after considering the direction of drain hose.
- Drill the hole for anchor bolt on the wall.
CAUTION
• This air-conditioner uses a drain pump. • Install the unit horizontally using a level gauge. - During the installation, care should be taken not to damage electric wires.
4Way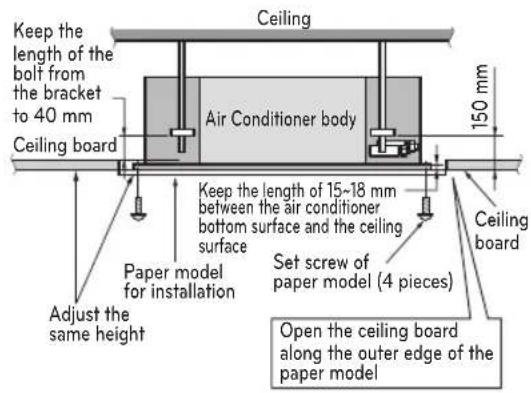
1Way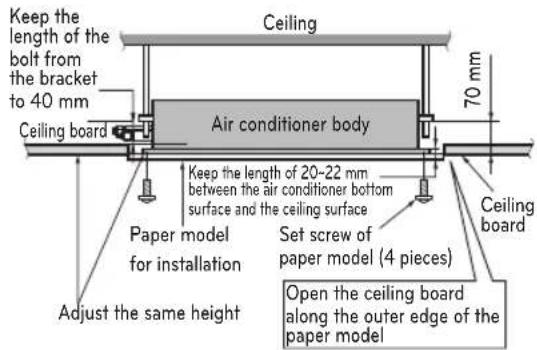
* The feature can be changed according to type of model.
Position of suspension Bolt
- Apply a joint-canvas between the unit and duct to absorb unnecessary vibration.
- Apply a filter Accessory at air return hole.
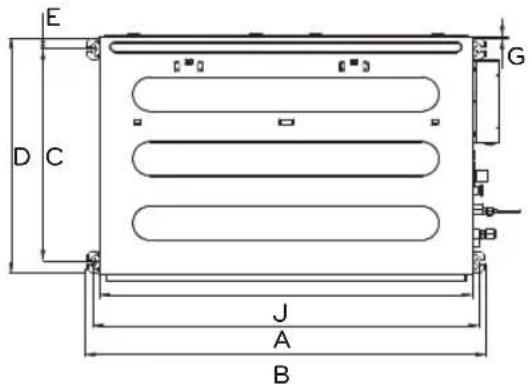
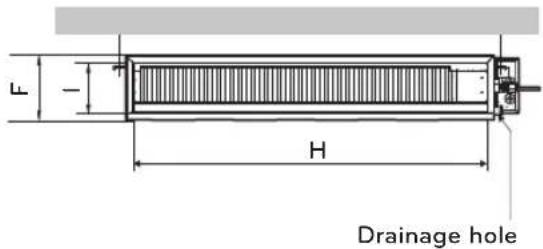
* The feature can be changed according to type of model.
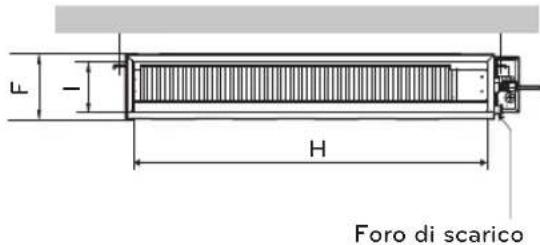
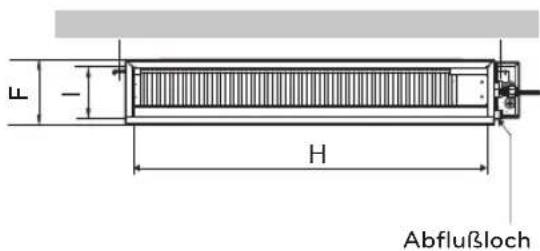
(Unit: mm)
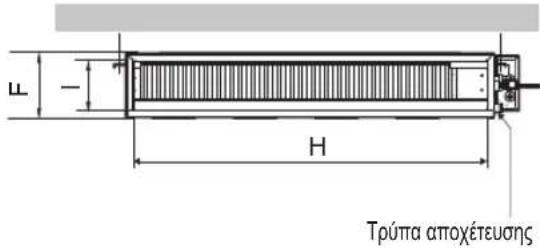
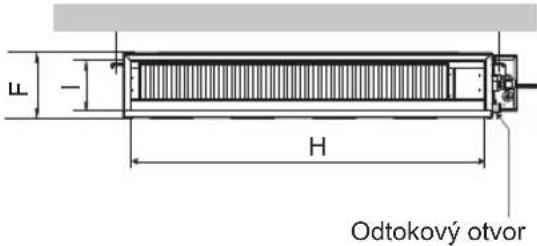
| DimensionChassis | A B C D E F G H I J | |||||||||
| Low Static | L1 733 | 772 628 | 700 36 | 190 20 | 660 | 55 | 700 | |||
| L2 933 | 972 628 | 700 36 | 190 20 | 860 | 55 | 900 | ||||
| L3 | 1133 | 1172 | 628 | 700 | 36 | 190 | 20 | 1060 | 155 | |
| L4 733 | 772 338 | 460 36 | 190 20 | 660 | 48 | 700 | ||||
| L5 933 | 972 338 | 460 36 | 190 20 | 860 | 48 | 900 | ||||
| L6 | 1133 | 1172 | 338 | 460 | 36 | 190 | 20 | 1060 | 148 | |
| Mid Static | M1 | 933.4 | 971.6 | 619.2 | 700 | 30 | 270 | 15.2 | 858 | 201.4 |
| M2 | 1 283.4 | 1 321.6 | 619.2 | 689.6 | 30 | 270 | 15.2 | 1 208 | 201.4 | |
| M3 | 1 283.4 | 1 321.6 | 619.2 | 689.6 | 30 | 360 | 15.2 | 1 208 | 291.4 | |
Position of console Bolt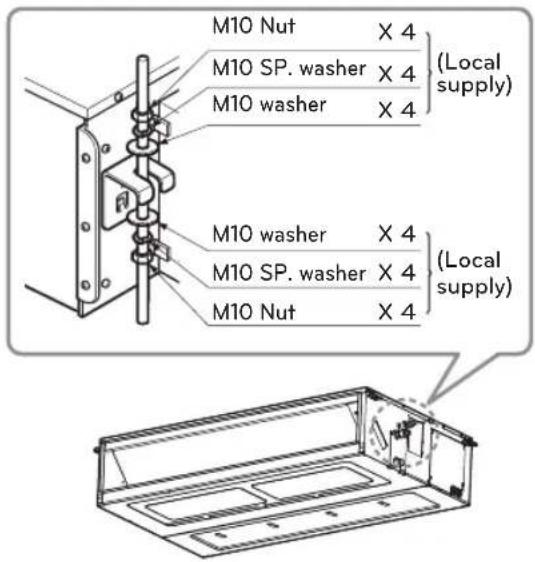
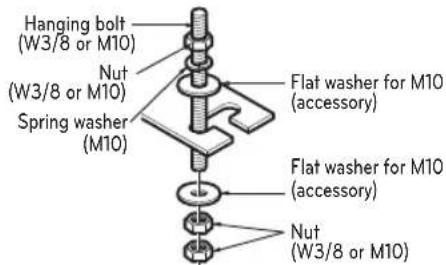
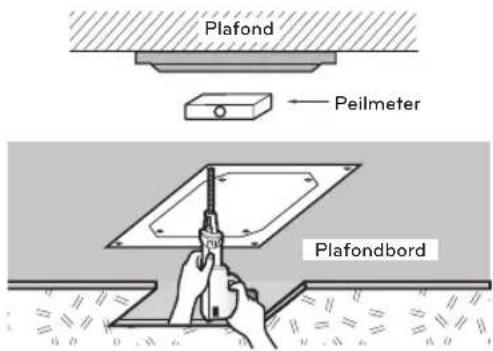
- Insert the set anchor and washer onto the suspension bolts for locking the suspension bolts on the ceiling.
- Mount the suspension bolts to the set anchor firmly.
- Secure the installation plates onto the suspension bolts (adjust level roughly) using nuts, washers and spring washers.
![graph TD A["Old building"] --> B["Set anchor"] A --> C["Plate washer"] A --> D["Spring washer"] A --> E["Nut"] A --> F["Suspension bolts"] G["New building"] --> H["New building"]](/content/2026/03/547578/images/0949d46e66cb76585a0fabed284dd52584b46de674704b2a91ac45b38edb65f0.jpg)
- Local supply
① Set anchor ② Plate washer - M10 ③ Spring washer - M10 ④ Nut - W3/8 or M10 ⑤ Suspension bolt - W3/8 or M10
Fixing Installation Plate
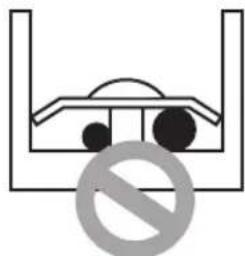
The wall you select should be strong and solid enough to prevent vibration.
1 Mount the installation plate on the wall with type "A" screws. If mounting the unit on a concrete wall, use anchor bolts.
- Mount the installation plate horizontally by aligning the centerline using Horizontal meter.
SK/SJ Chassis
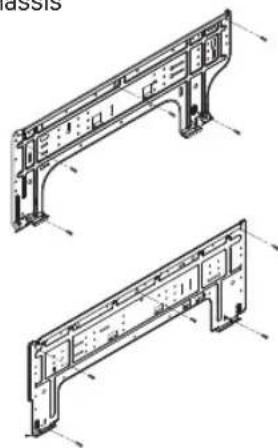
SR Chassis
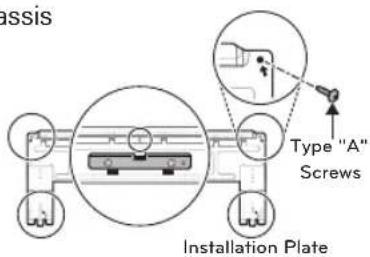
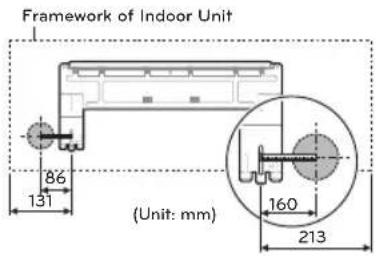
2 Measure the wall and mark the centerline. It is also important to use caution concerning the location of the installation plate. Routing of the wiring to power outlets is through the walls typically. Drilling the hole through the wall for piping connections must be done safely.
SK/SJ Chassis
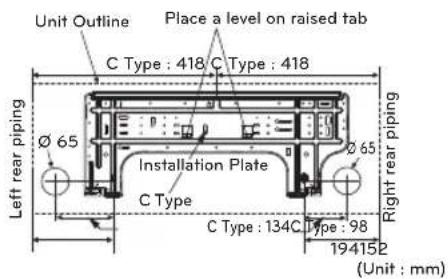
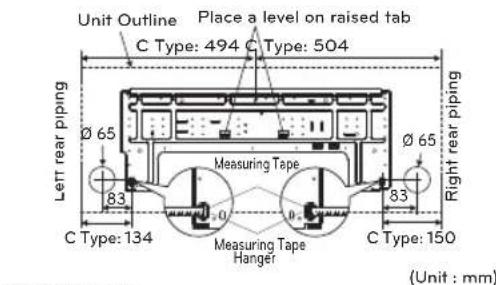
SR Chassis
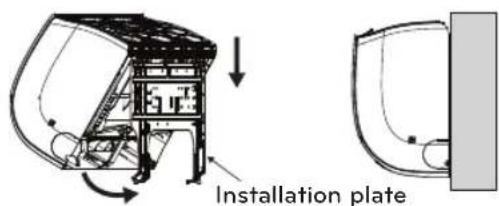
Installation of Indoor Unit
1. Hook the indoor unit onto the upper portion of the installation plate (engage the three hooks at the top of the indoor unit with the upper edge of the installation plate). Ensure that the hooks are properly seated on the installation plate by moving it left and right.
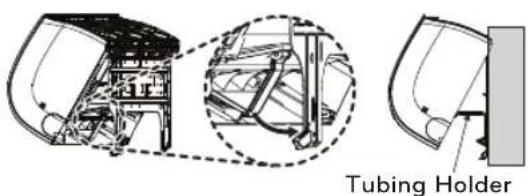
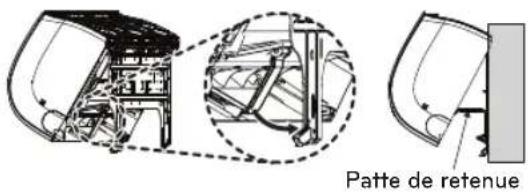
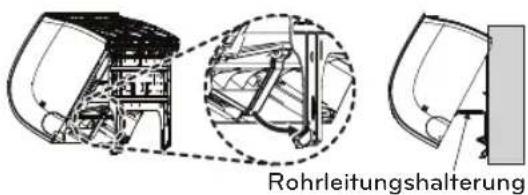
2. Unlock the tubing holder from the chassis and mount it between the chassis and the installation plate in order to separate the bottom side of the indoor unit from the wall.
* The feature can be changed according to the model type.
ELECTRIC WIRING WORK
General instructions
- All field-supplied parts and materials, and electric works must conform to local codes. Use copper wire only.
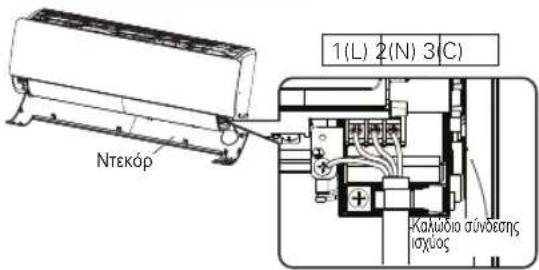
- Follow the "WIRING DIAGRAM" attached to the unit body to wire the outdoor unit, indoor units, and the remote controller.
- All wiring must be performed by an authorized electrician.
Wiring Connection
Connect the wires to the terminals on the control board individually according to the outdoor unit connection.
Ensure that the color of the wires of the outdoor unit and the terminal numbers are the same as those of the indoor unit respectively.
Connected to outdoor unit or B.D. unit.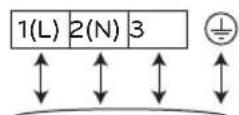

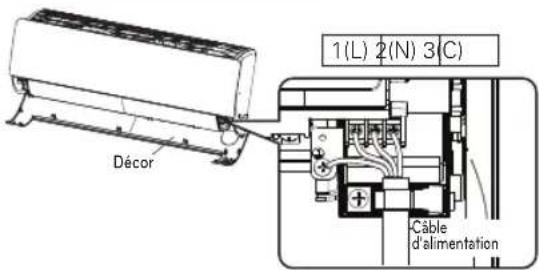
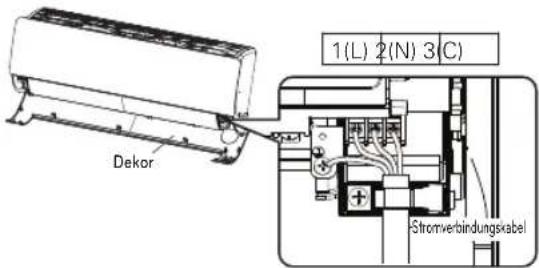
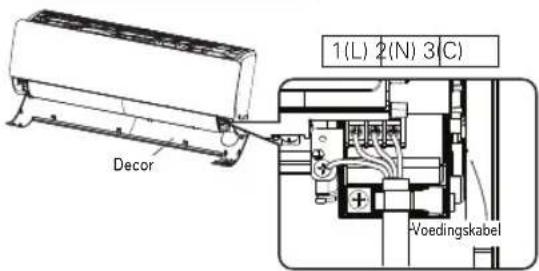
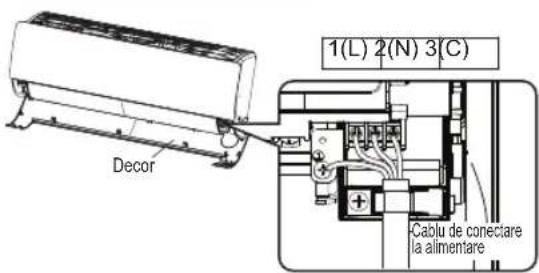
- Open the control box cover and connect the remote controller cord and indoor power wires.
- Remove the control box cover to make the electrical connection between the indoor and outdoor units. (Remove screws ①)
- Use the cord clamper to secure the cord.
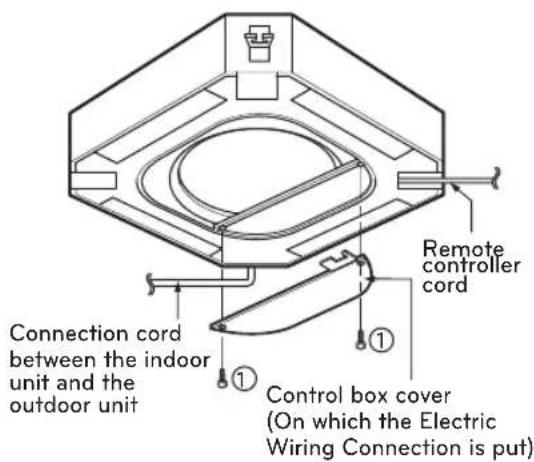
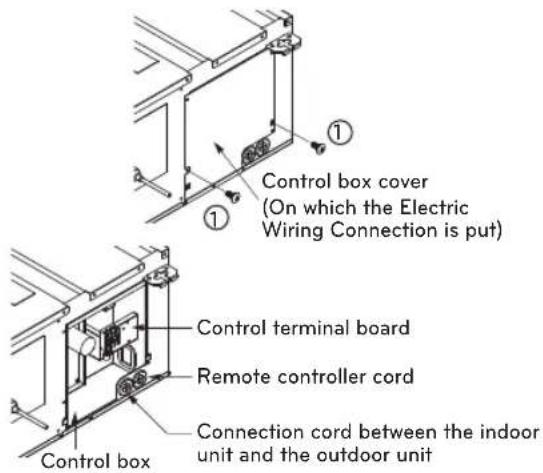
(1) Open the decor. (2) Unscrew the screw of the control box. (3) Slide up the metal plate cover. (4) Connect the connecting cable. (5) After connecting the cables, reassemble the metal plate cover with the screw.
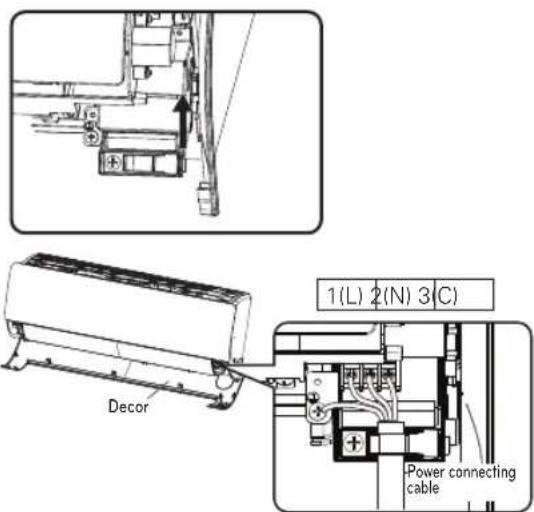
* The feature may vary depending on the model type.
CAUTION
- The connecting cable between the indoor and outdoor units must comply with the following specifications (rubber insulation, type H05RN-F approved by HAR or SAA).
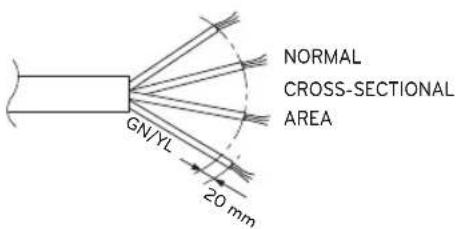
| Rated current of appliance A. | Nominal cross-sectional area mm2 |
| ≤0.2>0.2 and ≤3>3 and ≤6>6 and ≤10>10 and ≤16>16 and ≤25>25 and ≤32>32 and ≤40>40 and ≤63 | Tinsel cord0.50.751.0 (0.75)1.5 (1.0)2.54610 |
| NOTE For supply cords supplied with multi-phase appliances, the nominal cross-sectional area of the conductors is based on the maximum cross-sectional area of the conductors per phase at the supply cord connection to the appliance terminals. | |
- If the supply cord is damaged, it must be replaced by a special cord or assembly available from the manufacturer or its service agent.
Precautions when laying power wiring
Use round pressure terminals for connections to the power terminal block.
Round pressure terminal
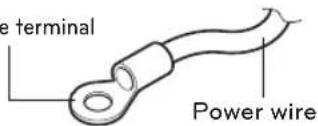
If none are available, follow the instructions below.
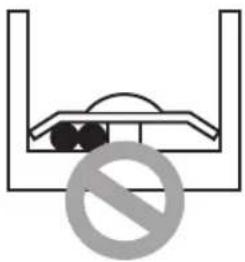
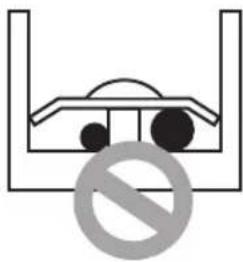
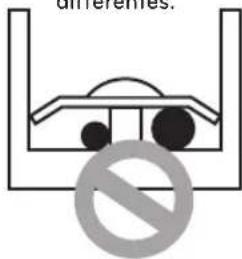
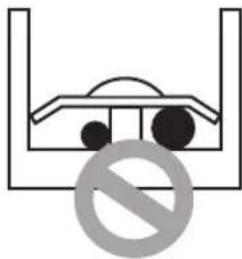
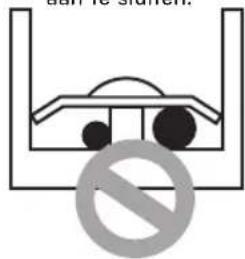
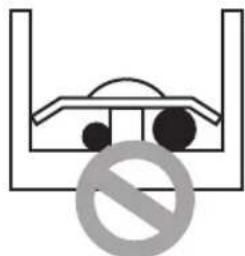
- Do not connect wires of different thicknesses to the power terminal block. (Loose power wiring may cause abnormal heat.)
- When connecting wires of the same thickness, do as shown in the figure below.
Connect wires of the same thickness to both sides.
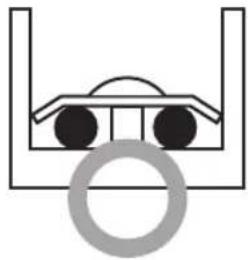
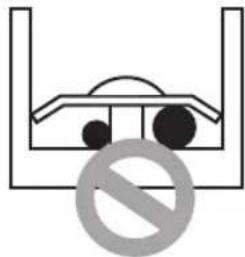
It is forbidden to connect two wires to one side.
It is forbidden to connect wiring of different thicknesses.
For wiring, use the designated power wire and connect firmly, then secure to prevent outside pressure being exerted on the terminal block.
Use an appropriate screwdriver for tightening the terminal screws. A screwdriver with a small head will strip the head and make proper tightening impossible.
Over-tightening the terminal screws may break them.
MAINTENANCE
Clean the product regularly to maintain optimal performance and to prevent possible breakdown.

CAUTION
- Turn off the power and unplug the power cord before you perform any maintenance; otherwise it may cause electric shock.
- Never use water that is hotter than 40 °C when you clean the filters. It may cause deformation or discoloration.
- Never use volatile substances when you clean the filters. They may damage the surface of the product.
Operation Tips!
- Do not overcool the room. This is not good for the health and wastes electricity.
- Keep blinds or curtains closed. Do not let direct sunshine enter the room when the air conditioner is in operation.
- Keep the room temperature uniform. Adjust the vertical and horizontal airflow direction to ensure a uniform temperature in the room.
- Make sure that the doors and windows are shut tight. Avoid opening doors and windows as much as possible to keep the cool air in the room.
- Clean the air filter regularly. Blockages in the air filter reduce the airflow and lower cooling and dehumidifying effects. Clean at least once every two weeks.
- Ventilate the room occasionally. Since windows are kept closed, it is a good idea to open them and ventilate the room now and then.
When the air conditioner is not going...
When the air conditioner is not going to be used for a long time.
1. Operate the air conditioner at the following settings for 2 to 3 hours. - Type of operation: Fan operation mode. (Refer to page "Fan Mode") • This will dry out the internal mechanisms.
2. Turn off the breaker.

CAUTION
Turn off the breaker when the air conditioner is not going to be used for a long time. Dirt may collect and may cause a fire.
3. Remove the batteries from the Remote Controller.
Helpful information
The air filters and your electric bill.
If the air filters become clogged with dust, the cooling capacity will drop, and 6% of the electricity used to operate the air conditioner will be wasted.
When the air conditioner is to be used again.
1. Clean the air filter and install it in the indoor unit. (Refer to page "Maintenance and Service") 2. Check that the air inlet and outlet of the indoor/outdoor unit are not blocked. 3. Check that the ground wire is connected correctly. It may be connected to the indoor unit side.
Troubleshooting Tips! Save time and money!
Check the following points before requesting repairs or service. If the malfunction persists, please contact your dealer.
| Case | Explanation |
| The air conditioner does not operate. | Have you made a mistake in timer operation?Has the fuse blown or has the circuit breaker been tripped? |
| The room has a peculiar odor. | Check that this is not a damp smell exuded by the walls, carpet, furniture or cloth items in the room. |
| It seems that condensation is leaking from the air conditioner. | Condensation occurs when the airflow from the air conditioner cools the warm room air. |
| Air conditioner does not operate for about 3 minutes when restart. | This is the protector of the mechanism.Wait about three minutes and operation will begin. |
| Does not cool or heat effectively. | Is the air filter dirty? See air filter cleaning instructions.The room may have been very hot when the room air conditioner was first turned on. Allow time for it to cool down.Has the setting temperature been set incorrectly?Are the indoor unit's air inlet or outlet vents obstructed? |
| The air conditioner operation is noisy. | For a noise that sounds like water flowing.- This is the sound of freon flowing inside the air conditioner unit.For a noise that sounds like the compressed air releasing into atmosphere.- This is the sound of the dehumidifying water being processed inside the air conditioning unit. |
| Crack sound is heard. | This sound is generated by the expansion/contraction of the inlet grille, etc. due to changes of temperature. |
| Remote control display is faint, or no display at all. | Has the circuit breaker been tripped?Are the batteries inserted in the opposite (+) and (-) directions? |
| The error code is occurred after lightning struck | This product has been applied to the over current protection circuit. Error can occur, but it is normal behavior. After few minutes, It will operate normally. |
Call the service immediately in the following situations:
1. If anything abnormal such as burning smell, loud noise, etc. happens, stop the unit and turn the breaker off. Never try to repair by yourself or restart the system in such cases. 2. If the main power cord is too hot or damaged. 3. If an error code is generated by self-diagnosis. 4. If water leaks from the indoor unit even if the humidity is low. 5. If any switch, breaker (safety, earth), or fuse fails to work properly.
The user must carry out routine checkups and cleaning to avoid poor performance of the unit. In case of special situations, the job must be carried out by service personnel only.





Chassis SR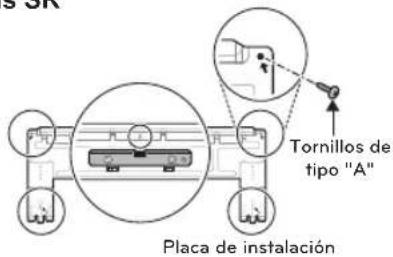
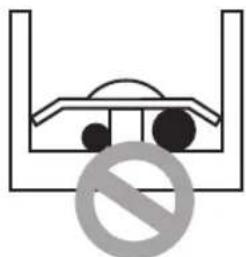
The wall you select should be strong and solid enough to prevent vibration.
2. Unlock the tubing holder from the chassis and mount it between the chassis and the installation plate in order to separate the bottom side of the indoor unit from the wall.
SR-Chassis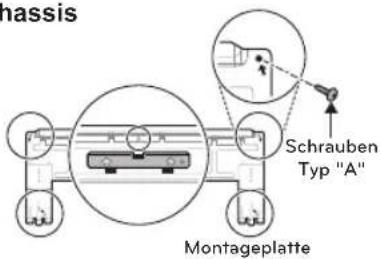
2. Unlock the tubing holder from the chassis and mount it between the chassis and the installation plate in order to separate the bottom side of the indoor unit from the wall.
OWNER'S MANUAL AND INSTALLATION MANUAL
AIR CONDITIONING
SR Chassis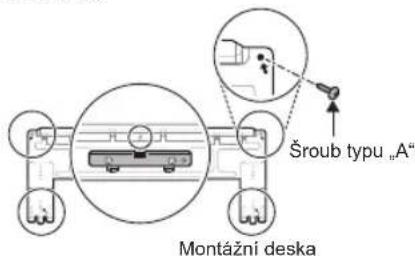
INSTALLATION OF THE INDOOR UNIT
SR Chassis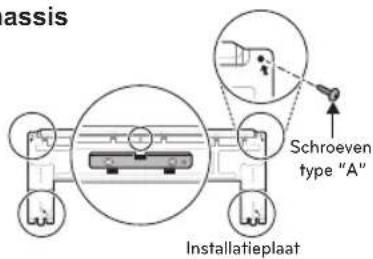
AH: Ceiling cassette
AHL: Concealed duct in ceiling
SR housing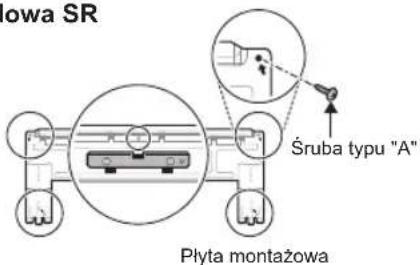

SR chassis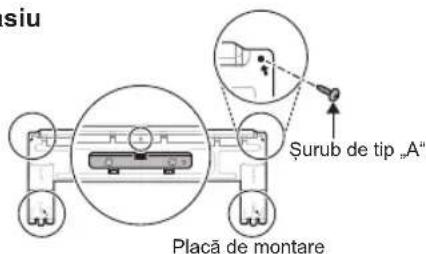
Control box
Control terminal panel
Remote control cable
- OWNER'S & INSTALLATION MANUAL
- AIR CONDITIONER
- MODEL DESIGNATION
- PRODUCT INFORMATION
- AIRBORNE NOISE EMISSION
- SAFETY INSTRUCTIONS
- WARNING
- CAUTION
- INSTALLATION
- OPERATION
- INSTALLATION PLACES
- MINIMUM FLOOR AREA (FOR R32)
- THE INDOOR UNIT INSTALLATION
- POSITION OF SUSPENSION BOLT
- FIXING INSTALLATION PLATE
- INSTALLATION OF INDOOR UNIT
- ELECTRIC WIRING WORK
- GENERAL INSTRUCTIONS
- WIRING CONNECTION
- PRECAUTIONS WHEN LAYING POWER WIRING
- MAINTENANCE
- OPERATION TIPS
- WHEN THE AIR CONDITIONER IS NOT GOING
- HELPFUL INFORMATION
- WHEN THE AIR CONDITIONER IS TO BE USED AGAIN
- TROUBLESHOOTING TIPS! SAVE TIME AND MONEY
- CALL THE SERVICE IMMEDIATELY IN THE FOLLOWING SITUATIONS
- OWNER'S MANUAL AND INSTALLATION MANUAL
- AIR CONDITIONING
- INSTALLATION OF THE INDOOR UNIT
Brand : LG
Model : CL09F
Category : Air conditioner