
WA71304GY - Air purifier ELECTROLUX - Free user manual and instructions
Find the device manual for free WA71304GY ELECTROLUX in PDF.
| Product Type | Air Purifier |
| Brand | Electrolux |
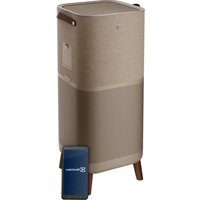
| Model | WA71304GY |
| Dimensions (approx.) | 30 × 30 × 50 cm |
| Weight (approx.) | 5 kg |
| Power Supply | Mains 50/60 Hz |
| Standby Power Consumption | < 2 W |
| Wi-Fi Frequency | 2.4 GHz |
| Max Wi-Fi Power | 15 dBm |
| RFID Frequency | 13.56 MHz |
| Max RFID Power | 30 dBm |
| Air Quality Sensor | Laser PM sensor (PM1, PM2.5, PM10) |
| Operating Modes | Smart (automatic) and Manual |
| Fan Speeds | 5 levels in manual mode |
| Ionizer | Integrated, can be activated via app |
| Child Lock | Yes (long press POWER+MODE 5 s or via app) |
| Filter Change Indicator | Yes (icon on device) |
| Wi-Fi Connectivity | Yes (2.4 GHz band) |
| Mobile Application | Electrolux Wellbeing (iOS/Android) |
| Main Filters | Washable mesh pre-filter, non-washable ultrafine particle filter, non-washable VOC charcoal filter |
| Recommended Cleaning | Vacuum sensor window every 4 weeks; clean plastic with soft cloth |
| Wall Mounting | Possible (hook provided) |
| Customization | Front panel, handle, interchangeable feet |
| Safety | Auto shut-off if filter absent, child protection |
Frequently Asked Questions - WA71304GY ELECTROLUX
User questions about WA71304GY ELECTROLUX
0 question about this device. Answer the ones you know or ask your own.
Ask a new question about this device
Download the instructions for your Air purifier in PDF format for free! Find your manual WA71304GY - ELECTROLUX and take your electronic device back in hand. On this page are published all the documents necessary for the use of your device. WA71304GY by ELECTROLUX.
USER MANUAL WA71304GY ELECTROLUX
WA51-303 & WA51-304 series
WA71-304 & WA71-305 series
OPERATING MANUAL
Thank you for choosing the Electrolux WELL A7 / A5 series air purifier. Always use original Electrolux consumables, accessories and spare parts to get the best results out of your unit. This appliance is designed with the environment in mind and hence all plastic parts are marked for recycling purposes.
GENERAL SAFETY INFORMATION
This USER MANUAL provides specific operating instructions for your model OR series. Use the unit only as instructed in this manual. These instructions are not meant to cover every possible condition and situation that may occur. Common sense and caution must be practiced when installing, operating, and maintaining any appliance.
WARNING! - CHILDREN & VULNERABLE PEOPLE SAFETY
Risk of suffocation, injury or permanent disability. Keep all packaging away from children.
This appliance can be used by children aged from 8 years and above and persons with reduced physical, sensory or mental capabilities or lack of experience and knowledge if they have been given supervision or instruction concerning use of the unit in a safe way and understand the hazards involved.
Cleaning and user maintenance shall not be made by children without supervision. Children shall not play with the unit. Children under 3 years of age should be kept away from the unit unless continuously supervised.
CAUTION! - AVOID INJURY OR DAMAGE TO THE UNIT OR PROPERTY
Do not direct airflow at fireplaces or other heat related sources as this could cause flare ups.
Do not climb on or place objects on the unit.
Do not hang objects off the unit.
Do not place containers with liquids on the unit.
Turn OFF the unit at the power source when it will not be used for an extended period.
Do not block or cover the air intake area, fan area and air outlet grill.
Ensure that any electrical/electronic equipment is at least 30cm away from the unit.
CAUTION! – WALL MOUNTING: AVOID INJURY OR DAMAGE TO PROPERTY
Always use appropriate screw and plastic plug for wall hang hook, depending on the wall material (e.g. nailable plug with screws for concrete OR expandable plug with screws for drywall, etc.). If you are not sure of the type of wall, have a qualified builder OR constructor inspect and recommend the correct screw and plug type according to local or national building standards.
Do not, under any circumstances, use the wall hang hook with only one screw.
Always use appropriate safety precautions and protective gear while drilling holes into the wall OR handling such equipment (e.g. safety gloves, dust mask, etc.).
Do not pull on OR tug on the unit from the power cord while it is wall mounted. Please ensure power cord is snug to the wall and the floor to avoid any undue tangling of objects with the cord and thus accidental tugs to the unit.
Ensure the wall hang hook is secured to the wall firmly and at the correct angle (e.g. parallel to the floor without any leaning) for best results.
If unsure of whether the wall hang hook has been secured correctly on the wall, before mounting the unit, please test the hook by a) applying some pressure on it from the top with your hands to see if it buckles and b) tugging the hook towards you with some pulling motion to see if screws come loose.
INFORMATION ABOUT RADIO
WiFi working frequency and maximum output power: 2.4 GHz; 15dBm
RFID working frequency and maximum output power: 13.56 MHz; 30dBm ± 10%
Power consumption of the product in network standby is less than 2.0W
ELECTRICAL SAFETY INFORMATION
WARNING! - AVOID FIRE HAZARD OR ELECTRIC SHOCK
This unit can be used in 50Hz or 60Hz power supply without any change.
Do not use an extension cord or an adaptor plug.
Do not remove any prong from the power cord. Do not pinch, bend, or knot the power cord.
Do not cut or damage the power cord. If the supplied power cord is damaged, it should only be replaced by Electrolux, its service agent or similarly qualified persons. This unit contains no user serviceable parts. Always call an authorized Electrolux servicer for repairs.
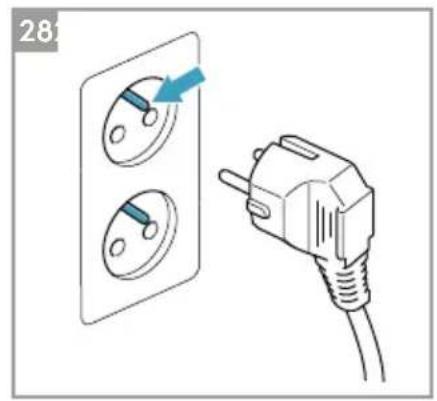
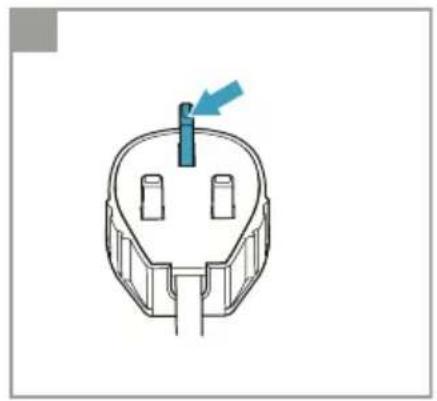
Do not, under any circumstances, cut, remove or bypass the grounding prong (see picture 26 on page 3; for UK see picture 27). If you are not sure the outlet is adequately grounded or protected by a time delay fuse or circuit breaker, have a qualified electrician install the proper outlet according to the National Electrical Code
OR applicable local codes and ordinances.
Do not store or use gasoline or other flammable vapors and liquids in the vicinity of this or any other appliance. Read product labels for flammability and other warnings.
Do not let water or any other liquid or flammable detergent enter the unit to avoid electric shock and/or a fire hazard. Be sure to unplug he unit before cleaning.
Never unplug the unit by pulling on the power cord. Always grip the plug firmly and pull straight out from the receptacle.
CAUTION! - AVOID SERIOUS INJURY OR DEATH
Do not insert or place fingers or objects into the air discharge area or front facing grille of the unit.
Do not start or stop the unit by unplugging the power cord or turning OFF the power at the electrical box.
In the event of a malfunction (sparks, burning smell, etc.), immediately stop the operation, disconnect the power cord, and call an authorized Electrolux servicer.
Do not operate the unit with wet hands.
Do not pull on the power cord.
Do not touch the fan blade when removing the filter(s).
DISPOSAL
This symbol on the unit or on its packaging indicates that the unit may not be treated as household waste. To recycle your unit, please take it to an official location where they can remove and recycle the battery and electric parts in a safe and professional way. Follow your country's rules for the collection of electrical products and rechargeable batteries.
BEFORE STARTING
Read this manual carefully and pay special attention to safety information.
Pay special attention to the CAUTION sections!
Check that all key components & parts described are included.

KEY COMPONENTS OF WELL A7 / A5 SERIES AIR PURIFIERS
| 1 | Removable & customizable front panel | 14 | Power cord cavity |
| 2 | Front panel magnets | 15 | Fan motor cavity, grill |
| 3 | Mesh pre-filter | 16 | RFID tag(s) |
| 4 | Ultrafine particle filter | 17 | Front panel hooks |
| 5 | VOC carbon filter | 18 | POWER button (ON/OFF) |
| 6 | Air quality indicator | 19 | MODE button |
| 7 | UI Display (UI: User Interface) | 20 | Mode display |
| 8 | Removable top handle for carrying | 21 | Filter change icon |
| 9 | Air outlet grill | 22 | Alert icon |
| 10 | Back grip for lifting & hanging | 23 | WiFi icon |
| 11 | Sensor box | 24 | Ionizer icon |
| 12 | Sensor window | 25 | Child lock icon |
| 13 | Removable feet x2 | 26 | FAN SPEED slider & indicator |
NOTE: Your specific model may not have all the components and features listed within this USER MANUAL. Please check the product packaging OR the product specification page on our website for exact details of your model. Electrolux reserves the right to change information contained herein without notice.


UNBOXING & SETUP - picture pages 6-7
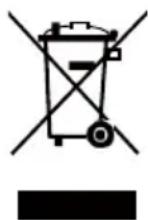
Please be careful while unboxing the air purifier. The unit has several detachable components which may have come loose in transport, so open the box with care and while placed on a large flat surface OR the floor.
-
Gently remove the unit (e.g. with top handle when available) and the ancillary components from the main box. Remove the plastic packaging and discard as per safety and local recycling instructions.
-
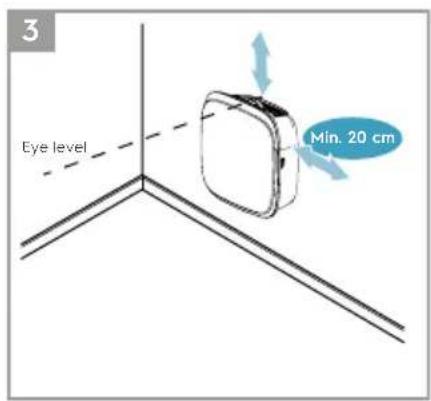
If wall mounting:
a. Please review safety instructions under the GENERAL SAFETY section before proceeding.
b. Identify a spot on the wall where you would like to mount the unit. The spot should be at least 20~cm below eye level when standing fully upright (even lower is ideal & recommended), for optimal viewing as well as cleanliness under the unit. Also ensure that nearest power socket is max 1,5 mts away and that there is a clearing of at least 20~cm between right side (sensor window) of the unit and other nearby surface.
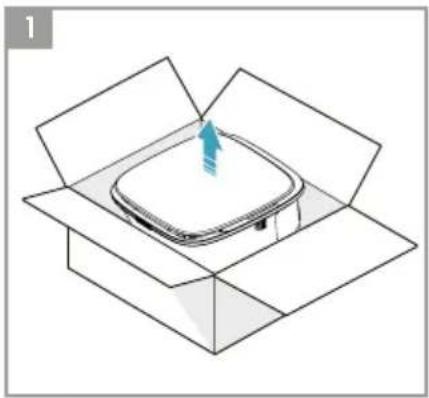
c. Gently place the provided hook flat against the surface of the wall and with a pencil mark the two spots where screws are to be drilled. The hook
should be placed such that the protruding tip (without the holes) is on the top (refer to picture #2).
d. Depending on the wall, please use appropriate drill to make two holes into the wall at the identified marks; and insert any plugs as needed.
e. Depending on the wall, please use appropriate screws for following step. Place the hook flat against the surface of the wall, so that the holes are concentric and the hook sits parallel to the floor without any inclination, and then tighten the screws till the hook is securely in place and does not move if tugged.
f. Lift the unit and place it onto the hook such that the top of the hook securely fits into the inbuilt grip at the back of the unit.
g. Gently adjust the unit to remove any inclinations, just like a painting. Ensure that the unit sits flat up against the wall.
h. When dismounting the unit, remember to disconnect the power cord from the wall socket first.
- If placing it on the floor:
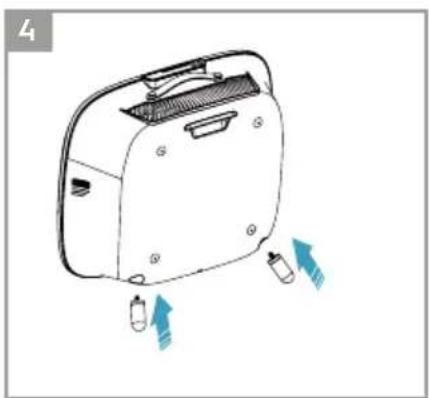
a. Take the cylindrical feet and screw them into the unit by rotating clockwise till you hear a click (or get some resistance).
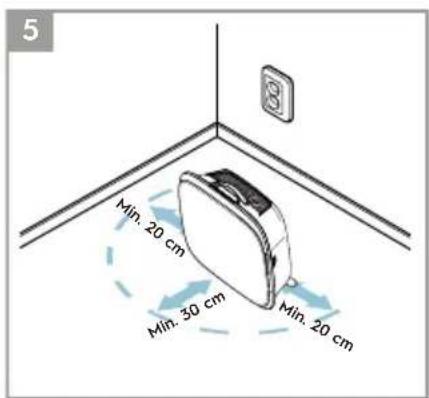
b. Lift the unit and place it next to the power socket to be used.
c. Ensure a clearance of at least 30~cm between front (air inlet) and at least 20~cm between right side (sensor window) of the unit and other surfaces. Also ensure ample free space above the top (air outlet grill), so the unit can operate at its best in spreading pure air through the room.
d. When wall mounting, please remove the cylindrical feet from the base of the unit for more efficient air distribution.
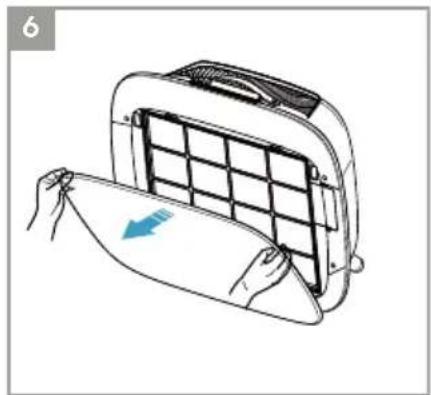
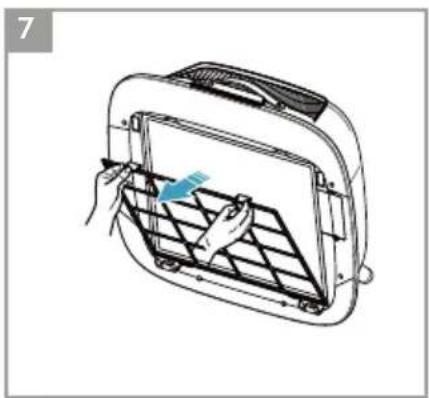
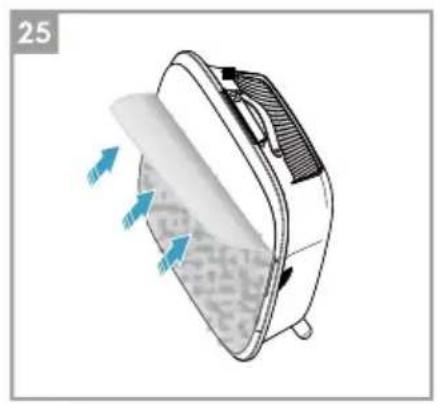
- Remove the front panel by gently pulling it away from the unit with both hands.
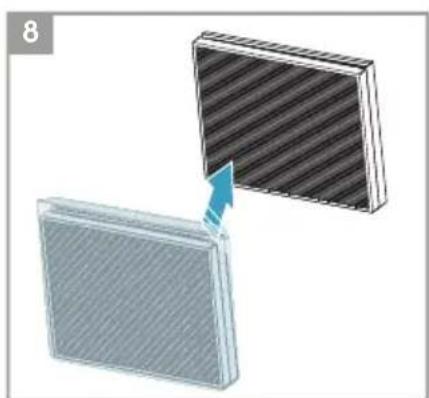
- Take out the mesh pre-filter, ultrafine particle filter and VOC carbon filter layers and remove all plastic packaging. Discard as per safety and local recycling instructions.
- Place the filter layers back into the unit in the same order as originally found (i.e. VOC carbon filter goes in first). While inserting, place take care to hold the filter so that the RFID tag on the filter is located at the top-right - it should be near the senor box hatch.
-
Attach the mesh pre-filter and the front panel back to the unit.
-
Plug the unit's power cord to the nearest power socket so that the POWER button
on the product UI gets illuminated.
- For best results, operate the unit in an enclosed area with doors & windows closed when feasible.
FIRST & ONGOING USE - picture pages 6-7
TURING ON
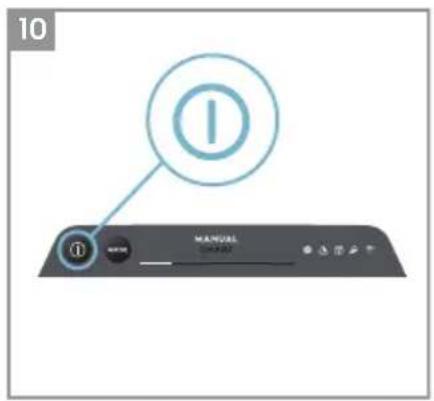
- Tap the POWER button once to turn ON the air purifier
NOTE: At every new run, it will take about 10 seconds for the sensors to calibrate and analyze the air quality before ramping up to the appropriate fan speed. During this time, the air quality indicator will pulsate slowly in white.
CHANGING MODES & FAN SPEEDS
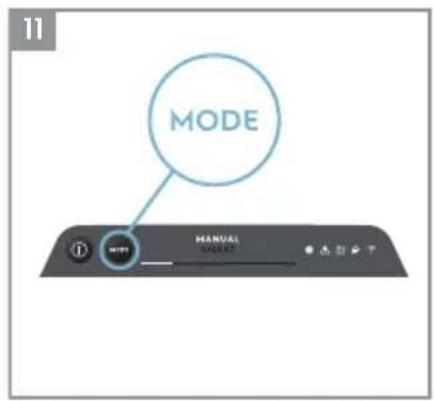
- Tap the MODE button once to toggle between the two modes: SMART and MANUAL
SMART: This is the default mode the unit will start in. In the SMART mode the unit will utilize the sensor data as input to decide on the appropriate fan speed and the UI display's type & intensity level. The fan speed cannot be adjusted manually by the user under this mode. Please see the AIR QUALITY INDICATOR section for more details.
NOTE: The AQI light will turn off completely in a dark room when the unit is in smart mode, so as not to disturb.
MANUAL: In the MANUAL mode the unit will utilize the sensor data as input only to show the air quality level via the air quality indicator but will not self-adjust the fan speed. This mode is best utilized for a quick burst of cleaning, especially when the user anticipates an increase in particulate matter in the room due to household chores (e.g. vacuuming).
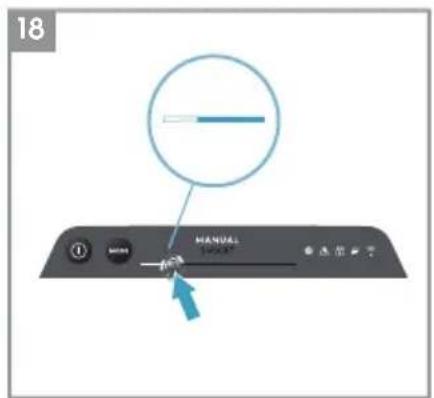
- While in MANUAL mode, tap and scroll on the fan speed slider to adjust the speed of cleaning - left most side being the lowest and right most side being the highest speed.
NOTE: The unit will ramp up OR down to chosen speed setting gradually. The slider also acts as the indicator for the current fan speed.
- STANDBY & WiFi OFF: The air purifier is designed with ECODESIGN principles in mind and hence will aim to limit power consumption to under 2.0W when unit is powered OFF (unless user permission to override). When unit is powered ON, if it has no WiFi connectivity OR is not onboarded, the WiFi radio signal will automatically turn OFF after 30 minutes to conserve power – to bring the WiFi
radio signal back ON manually please initiate ONBOARDING (step 21 only) or unplug and then plug it back in to the socket.
FEATURE ICONS AND INDICATORS
NOTE: Not all indicators OR feature icons might be available on your model. Please consult packaging information or the product specifications on the website for details on available features.
- FILTER CHANGE: The high efficiency filter(s) in the unit cannot be washed, they can only be replaced. The filter change icon light up to remind you to change your filter(s). Your air purifier may be equipped with more than one filter, so please refer to the Wellbeing App for details on which filter layer is to be replaced. Always ensure the plastic protective bag is removed from the filter before its use in the unit. After the used filter is replaced, the filter change icon will turn off automatically and no reset action is needed.
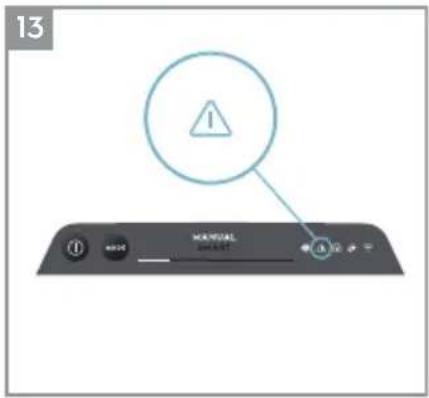
- ALERT: The alert icon will light up to alert you of a possible electrical or electronic error with your unit. Please refer to the Wellbeing App for details on the error type, component details and any mitigating actions. More details can be found in the ERRORS & TROUBLESHOOTING section below.
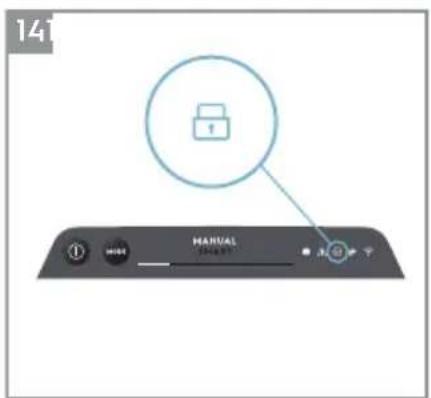
- CHILD LOCK: The unit is equipped with a safety lock feature to disable the product UI to avoid unintended pressing. The child lock feature can be toggled ON/OFF via the Wellbeing App or by long pressing for 5 seconds the POWER and MODE button simultaneously. The child lock icon light up when the feature is activated.
- IONZIER: The unit is equipped with an ionizer module, which when enabled generates negative ions to further aid with the air purification process. The ionizer is OFF by default and can only be toggled ON/OFF via the Wellbeing App. When the feature is activated the ionizer icon will light up. For more details on how an ionizer helps reduce airborne particles, please refer to the product information page on the website.
-
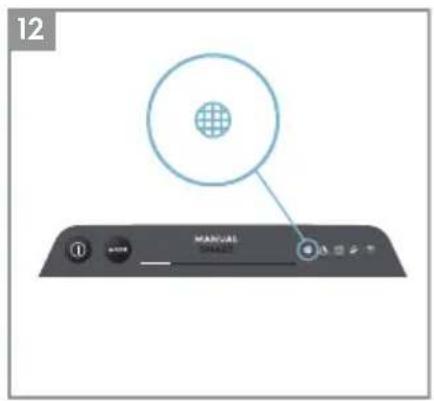
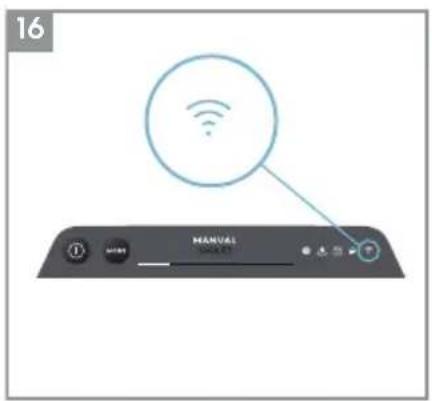
WiFi: The unit is equipped with a WiFi module, which enables remote control and access to many more features including time-based tracking of your indoor air quality data. When the unit is connected to the home WiFi, this icon will light up. If the icon is blinking, it indicates a temporary loss of WiFi connectivity – please refer to the Wellbeing App for more details.
-
AIR QUALITY INDICATOR: The unit is equipped with an air quality sensor(s). The laser-based particulate matter (PM) sensor is a high precision particle sensor that can detect PM1, PM2.5 and PM10 levels. The air quality indicator will visually – with the aid of a color scale - show the real-time air quality as per table below. When in SMART mode, the air quality level will also determine the fan speed as per table below.
NOTE: Please ensure regular cleaning of the sensor window to ensure it does not get clogged with dust and sensors keep performing accurately. Also ensure optimal humidity levels (between 35-80%) for accurate reading from the sensors.
| LIGHT COLOR | PM 2.5 (μg/m3) | AIR QUALITY STATUS | FAN SPEED |
| White | Calibrating | Onboarding | ||
| Green | 0 - 12 | Very Good | 2 |
| Yellow | 13 - 35 | Good | 3 |
| Orange | 36 - 55 | Poor | 4 |
| Red | 56 - 150 | Very Poor | 5 |
| Purple | 151 – 250 | Bad | 5 |
| Maroon | >250 | Very Bad | 5 |
ONBOARDING - picture pages 6-7
NOTE: Some steps in the onboarding flow may have changed, please follow step-step instructions in the latest version of the App as reference in case of discrepancy. Please ensure home WiFi is running on 2.4 GHz band and not 5 GHz band, as this will not be recognized by the air purifier.
- Please find the Wellbeing App in the iOS App or Google Play store, download it, sign up and login to the App. Here you will be able to 'Add a device' to the App and follow the step-step instructions for onboarding the unit - steps below are indicative.
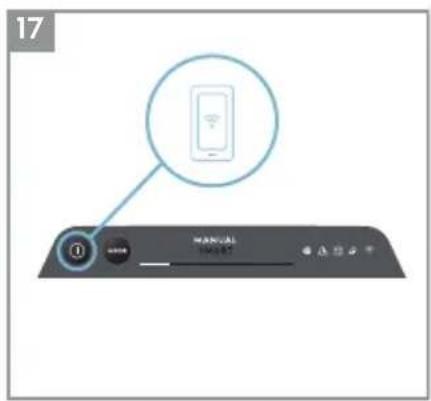
- After plugging the unit into the power socket, please long press the POWER button ① for 5 seconds until the WiFi icon ② starts blinking rapidly - this indicates that the unit's hotspot is activated and is ready for being connected to the WiFi.
- Head over to the Wellbeing App and using the phone's camera to scan the WiFi barcode. The WiFi barcode can be found on the rating label sticker on the unit (typically after the mesh pre-filter, reference image 7). You can also manually enter the digits under the barcode into the App if scanning it does not work.
-
Connect the App to the unit's hotspot.
-
Choose the 2.4 GHz home WiFi that the unit should connect to from available list and then enter the password for this home WiFi into the App - wait for the unit to establish a connection.
- Complete the steps of naming your newly onboarded air purifier!
- Later, if you would ever like to reset the WiFi credentials stored on your unit please long press the POWER button for 5 seconds until WiFi icon starts blinking (i.e. like step 20, hotspot activated). While in this state, again, long press the POWER button for 5 seconds until WiFi icon stops blinking and is not lit. Unit's WiFi settings are now reset and it will not aim to connect to your WiFi network.
CLEANING, CARING & STORAGE - picture pages 6-7
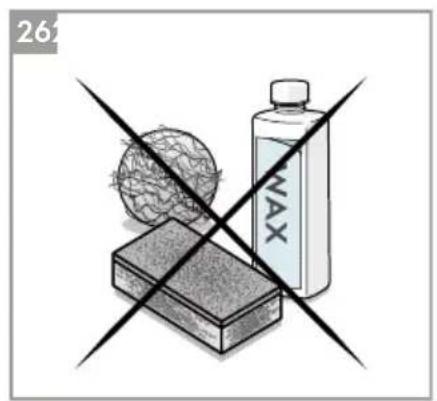
NOTE: Always unplug the air purifier before cleaning to prevent shock or fire hazards. Never use abrasive, harsh detergents OR wax for cleaning the unit. The high efficiency filters cannot be washed, they must always be replaced when at the end of life.
CLEANING & CARING
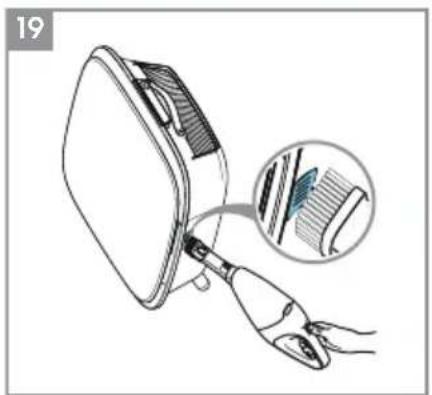
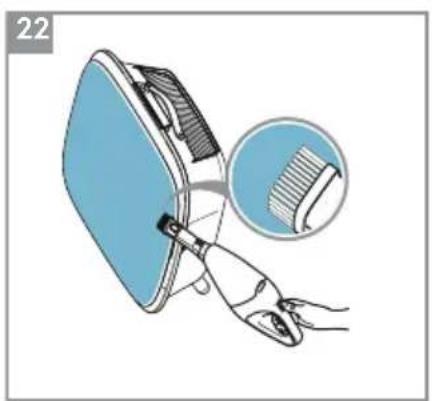
- Ensure the sensor window is kept unclogged for optimal performance of the unit. It is natural for dust to accumulate in this area, hence ensure regular (e.g. once per 4 weeks) vacuuming of the sensor window with a vacuum cleaner that has a narrow nozzle/brush.
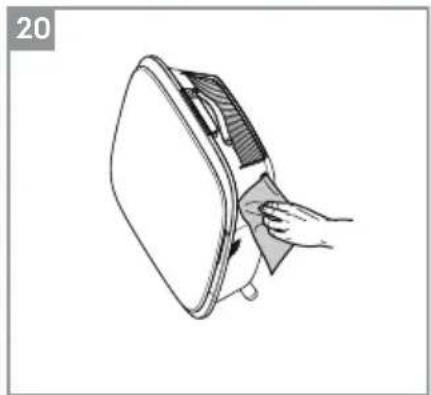
- The plastic parts of the unit should be cleaned with an oil-free dry cloth. For stains on plastic parts, use a slightly damp soft microfiber cloth to gently rub against the stain.
- The fabric attached to the front panel should be wiped with an oil-free dry cloth or by using a vacuum cleaner with a soft brush to avoid breaking of the fibers. The area around the air inlet on the front of the unit may accumulate more dust than some other parts and hence may require more frequent cleaning to ensure optimal performance.
STORAGE
- When storing away, besides unplugging the unit and winding the power cord loosely around the bottom feet, ensure that unit including the high efficiency filters and the fabric front panel are covered up to avoid accumulation of dust.
REPLACING FILTERS - picture pages 6-7
NOTE: The filters - except for the mesh pre-filter - cannot be washed and must always be replaced when at end of life. The WELL A7 / A5 series air purifiers have a variety of filters to choose from, tailored to your lifestyle needs. Each filter layer is equipped with a smart RFID tag to uniquely identify it as well as to track its usage over time. Head over to the Wellbeing App or the product information page on our website for a guide on choosing the appropriate filter for your needs.
- For the best experience and to secure an uninterrupted use of the air purifier, please monitor the filter's remaining lifetime in the Wellbeing App and order a replacement filter in advance of the lifetime hitting 0% . If you have notifications enabled, the Wellbeing App will inform you when the filter life is close to end of life (e.g. at 5% ).
- When one or more of the filters is at end of life, the filter change icon will light up on the product UI to indicate the need for replacement. Please head over to the Wellbeing App to correctly identify which filter is at end of life and needs replacement. When filter is at end of life, the unit's fan speed may be capped in SMART mode.
- The used filter might be heavily coated with dust and particulate matter so before opening the front panel, please ensure a disposable bag or packaging is at hand to place the used filter in.
- Remove the front panel and the mesh pre-filter and put them aside. Next remove the filter layer which is at end of life and place it in the disposable bag at hand.
- Next, please remove the plastic packaging from the replacement filter and insert the filter in the appropriate place. Please ensure the VOC carbon filter goes in first inside the unit, followed by the ultrafine particle filter. Reinsert the mesh pre-filter and close the front panel. The filter change icon on the product UI will no longer be lit and the Wellbeing App will indicate the same, with a new filter lifetime reading.
NOTE: In case the change is only reflected on the product UI and not the Wellbeing App, please restart the App and the unit, before further troubleshooting.
- Discard the used filter as well as any plastic packaging according to local recycling guidelines. The RFID tags contain circuitry and hence are to be disposed separately from the rest of the filter.
The WELL A7 / A5 series Air Purifier was designed with a unique form and aesthetic sense to ensure it fits in with your home and its furnishings, unlike other appliances. In addition, the series comes with many customization kits for the unit that add to the aesthetics but also functionality of the unit.
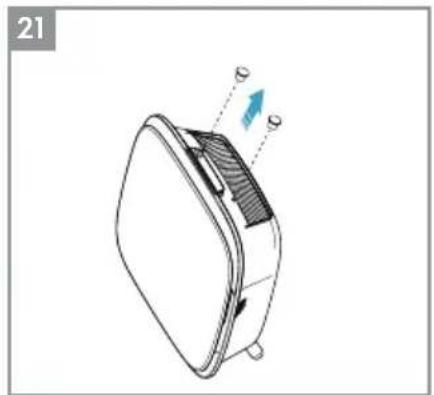
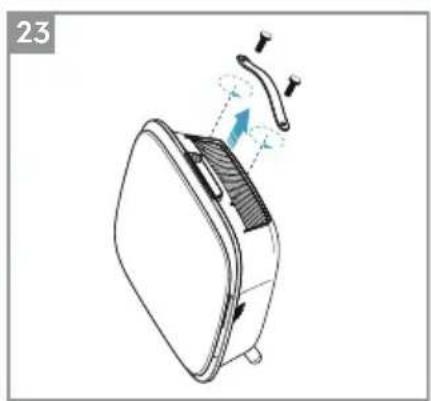
TOP HANDLE CUSTOMIZATION
The polyurethane leather (PU) handle at the top of the unit is attached to the unit by way of two screws. Follow the steps below to attach or replace an existing top handle.
- If you are replacing an existing top PU handle:
a. Remove the two screws, twisting counterclockwise and set aside along with existing handle.
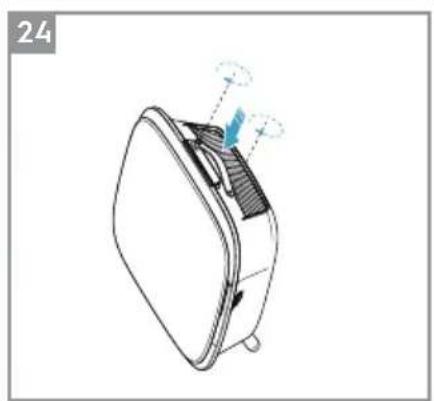
b. Remove any protective plastic packaging from the new handle and fit it onto the unit by tightening the screws, twisting clockwise, till you meet some resistance. Ensure a snug fit with no gap in between the unit and the screw.
c. Test out the handle by lifting the unit 5-6 cm above the ground with it and giving it a gentle shake.
- If you are adding a top handle for the first time:
a. At the top of the unit, in between the product UI & the air outlet grill you will find two circular cavities secured with a rubber plug. Uncover the cavity by removing these rubber plugs from the unit by gently pulling on the sides of the plug.
b. Follow the steps 37b. and 37c (above).
FRONT PANEL CUSTOMIZATION
The look of the front panel can be customized with a fabric cover to help accentuate it but also to ensure the unit blends well with the decor of the room. The fabric cover has an elastic seam that helps secure it to the front panel, hence no screws or staples are necessary for its installation.
- Please detach the front panel from the unit and if it already has a removable fabric cover please gently take it off the panel - ensuring not to bend the panel.
NOTE: Some models in the WELL A7 series come with a fabric permanently attached to the front panel, this fabric is not removable from the panel, but you can still customize the panel with another fabric cover on top of the existing fabric.
- Remove any plastic packaging from the new fabric cover to be used.
- Starting at the top left corner of the front panel, tuck the elastic band behind the panel and while holding that corner in place work your way with the other hand to the top right corner while continuously tucking the elastic band of the fabric cover behind the edge of the panel. Now pull the fabric cover towards the bottom edge of the panel and securely tug the rest of the fabric edge behind the bottom part of the panel.
- Smooth out any wrinkles on the fabric cover by pushing against the wrinkles.
- Attach the front panel with the newly fit fabric cover back to the unit and check the edges to ensure there is no blockage of the air inlet area.
NOTE: Customizable fabric covers are machine washable, as per the care instructions provided with the kit. It is important that the elastic band along the edges of the fabric cover is unbroken and tight as it helps ensure an optimum flow of air into the unit, with minimal decrease in performance. If you notice that the elastic band is broken or very loose, it is time to replace the fabric cover.
FEET CUSTOMIZATION
The thermoplastic elastomer (TPE) feet are attached to the unit by way of inbuilt screws. The feet – like the top handle – are detachable. Follow the steps below to attach or replace an existing set of feet.
- Place the unit flat on its back, so the front panel faces the ceiling. Unscrew the existing feet, if any, by twisting counterclockwise.
- Remove any protective plastic covering the new set of feet.
- Gently nudge the inbuilt screw of the new feet into the cavity at the bottom of the unit and secure them by twisting clockwise till you meet some resistance.
- Test out the stability of the feet by placing the unit back upright and lifting it about 5 - 6cm above the ground and giving it a gentle shake.
ERRORS & TROUBLESHOOTING
The table below is only a limited list. For the latest and complete section on troubleshooting, FAQ and error guide please refer to the corresponding section on our website or the Wellbeing App.
| # | ISSUE | TROUBLESHOOTING | NOTES |
| 1 | The air purifier's alert icon is lit | If you have just bought the unit OR inserted new filter(s), please ensure that the filter(s) are positioned in the correct way for the RFID tags to be read by the sensor (refer to point 6 within ONBOARDING & SETUP section above).Generally, the unit comes with a variety of sophisticated sensors, electronics and other electrical components and if one of these is malfunctioning, you will see the alert icon on the product UI light up. For more details on steps to resolve, please head over to the Wellbeing App and check for details whenever you see this icon lit. | Please have at hand the unit's PNC and SERIAL number when calling for support. |
| 2 | The air purifier is running at max fan speed all the time for extended periods | If in MANUAL mode, please check the fan speed slider on the product UI or within Wellbeing App and adjust it to desired level.If in SMART mode, please check air quality indicator on the product UI or within Wellbeing App – if all PM values are constantly showing 999-1000 without any reduction then most likely the sensor is clogged.Please use a vacuum cleaner to clean the sensor via the sensor window – detailed instructions in CLEANING, CARING & STORAGE section above. | The PM sensor in the unit is highly accurate and sensitive and it is normal for the purifier to react to poor air quality by ramping up the fan speed – to get your indoor air quality back to safe levels. |
| 3 | The air purifier is running at lowest fan speed all the time for extended periods | If in MANUAL mode, please check the fan speed slider on the product UI or within Wellbeing App and adjust it to desired level. If in SMART mode, please check air quality indicator on the product UI or within Wellbeing App – if all PM values are constantly reading very good without any increase then this is normal behavior for the unit - your air quality is very good! If the PM2.5 value is high and the unit is still operating at lowest fan speed, then please check filter change icon on the product UI or within Wellbeing App and if lit please replace used filter with a new one, this should resolve the specific fan speed issue. If neither of the above steps OR instructions in the Wellbeing App help, please refer to item 9 in the table. | The unit is designed so that when a filter is at end of life, at least within the SMART mode, it will discourage usage till the filter is replaced, by limiting the fan speed so as not to reintroduce the captured particulate matter back into the air. |
| 4 | The air purifier produces a loud or abnormal noise | Please ensure the air inlet (around front panel) and air outlet grill (top of the unit) are unobstructed and that there is a clearance of at least 30 cm between these areas and the nearest surface. If using a custom fabric cover, try to reapply the fabric cover to the panel tighter OR try operating without it to see if noise pattern becomes normal. If neither of the above steps OR instructions in the Wellbeing App help, please refer to item 9 in the table. | An abnormal pattern of noise OR an unusually high pitch is not by design, hence it is best to rectify this. |
| 5 | The air purifier or fan does not operate | Ensure that the house, wall socket being used, and the unit are all receiving power. If needed, try pushing the power plug firmly into the wall socket to check if this resolves the issue. If you have recently (re)placed a filter please remove and reinsert it. Check to make sure that the filter is oriented correctly, so the RFID sensor can detect it. If neither of the above steps OR instructions in the Wellbeing App help, please refer to item 9 in the table. | As a safety mechanism, to avoid risk of injury from the fan blade, the unit will not operate if it does not detect the presence of filter(s). |
| 6 | The air purifier is running but the air quality does not improve | If in SMART mode, closely monitor the difference in air quality levels within the Wellbeing App for next 20 minutes – if you do not see any improvement of the air quality values in the Wellbeing App during this period then follow the step below. Change to MANUAL mode and adjust the fan speed to a higher level to see if this helps resolve the issue. If you still do not see any improvement, please try the step below. Try and close any open doors OR windows to the outside of the room and rerun the unit at the highest fan speed for 20 minutes. If this resolves the issue, we recommend that you operate the unit in this sealed environment as much as possible, till the air quality outside (or in other rooms) is also at a good level. | If the unit is placed in a room larger than a minimum recommended size, it will take longer for the air quality to improve – please be patient and maintain the unit at the highest speed feasible. The unit comes with multiple filters – please ensure you have the appropriate filters to tackle the pollutant you seek to remove. |
| 7 | The air purifier produces or emits a strange smell | The first time you run the unit, you may perceive a plastic, glue or paint smell – especially near the air outlet grill – this is unavoidable in some cases (like the ‘new car smell’) but should disappear quickly. If you perceive a burning smell, please disconnect the unit and contact Electrolux authorized service center for further support. | Always ensure that the filters are covered in appropriate packaging while stored away between uses. |
| 8 | I am unable to onboard the air purifier to the App | If you are unable to onboard the unit and connect it to the Wellbeing App after a couple of attempts following the steps in the Wellbeing App and FAQ, then the best course of action is to contact an Electrolux authorized service center for support. | The WiFi chip in the unit operates only at 2.4Ghz so please ensure your home WiFi is operating at this bandwidth. |
| 9 | I have another issue not listed here OR none of the above steps have helped resolve the issue | You can search for more troubleshooting and FAQ guides on our website OR the Wellbeing App under the product information pages, or directly contact Electrolux authorized service center for support. Thank you! | Please have at hand the unit's PNC and SERIAL number. |
NAVOD K OBSLUZE

VIGTIG DELE VED WELL A7/A5-LUFTRENSE
INSTALLATION - billed side 6-7
UDSKIFTNING AF FILTRE - billed side 6-7
REEMPLACEMENT DES FILTRES - illustration pages 6-7
INFORMACije O RADIJU
WiFi radna frekvencija i maksimalna izlazna snaga: 2.4 GHz; 15dBm
RFID radna frekvencija i maksimalna izlazna snaga: 13.56 MHz; 30dBm ± 10%
Potrošnja energije proizvoda u stanju Čekanja mreže manja je od 2,0 W
INFORMACije O ELEKTRICNOJ SIGURNOSTI
UPOZORENJE! - IZBJEGAVAJTE OPASNOST OD POŽARA ILI STRUJNOG UDARA
Ova jedinica se moze koristiti s napajanjem od 50Hz ili 60Hz bez ikakvih
promjena. Ne koristite produktivny kabel ili utikač adaptera.
ONLITE MEPE B3BEOCTN
OBO yIyTCTBO 3A yIOTPE6y npjka cneuФnHa yIyTCTBa 3a kOpniHHe BaWer MoDeLa IIN cepnje. Ypehaj KopnCTte NCKbUynBO KaKo je OnncAo y OBOM yIyTCTBy. OBO yIyTCTBO He MoJKe POKPITN CBe MOrHy ycNoB e n CnTyauZije Do KoJnx MoJKe DoHn. Prn IHcTaIInpaHb, KOpNiHHebY n OdPrKaBaHbCBAkor ypehaja Tpe6a ce BODHTN 3dpaBm pa3ymom n Mepama Onpe3a.
YI03OPEHbE! - B636EDHOCT DEU E IOCETbBnBX OCOBA
Ioctojn pn3nk od ryuweBa, noBpea nll TpaJHor nHbAlnDnteTa. CBy am6aJkyu yBaJte npdaBe od deue.
Obaj ypehaj mory da kopncte deca stapnja od 8 roDHa n ocobe ca cmaheHm n3nukm, yIHNm nn MeHTaIHNm cnoc6hocTIma, kao n ocobe koJima HeIOCTaJy NCKyCTBO n 3HaHe, yKoJIko nM ce oBe36eDi n Haid3Op nIi nM ce dajy UnyTCTBa y Be3n ca yNoTpe6om ypehaja Ha 6e36eDaH nauHH n yKoJIko CXBaTajy Moryhne onacHOCTn.
Ushhe N Kopncnue OndpkaBaHe He cmej Da oabbajy Dea 6e3 Ha30pa.
Dea He cmej Da ce irpajy ypehajem. Deuy Do 3 roDInHe cTapocTn Tpe6a dpKaTn
daBe OD ypehaja, ocM aKO cy cTaJHo nOd Ha3Opom.
ONPE3! - ИЗБЕГНITE NOВРЕДЕ И OЛТЕŠЕŠЕ YPEŠAJA И ДPyгЕ ИMOВИНDE
He ycmepabajTe Ba3dyx Ka KamHHMa n dpyrHm N3BOpMa TOnIote jep To MoKe DoBeCTn Do noJaHaBa PImaMeHa.
He neHbnte ce Ha ypehaj n He cTabbajTe cTbapn Ha Hbera.
He kaunte npedmeTe ha ypehaj.
He ctabbajte nocyde ca teuHocTmHa ypehaj.
Ickbuyte ypehaj n3 ctpyjhe yTuHnue aKO ra HeheTe KopncTNTn dyke BpeMe.
He 6IoknajTe n He npekpmbajTe OTBOp 3a ycnc Ba3dYxa, noDpyuJe BeHTnilatopa n peweTky 3a n3dYB Ba3dYxa.
Bodnte paulyha da eIektpnHn/eIektpoHcKn ypehajn 6ydy hajmahe 30 cm ydaJIbeHn od ypehaja.
ONPE3! - MOHTAXA HA 3nД: N36EHNTE NOBPEDE N OwTeHbE NMOBnHE
3iDHy Hocehy Kyky yBek npuBpCTHte 3aBpTbeM n TnIOM nOroHm 3a MaTePnJaI od kora je 3nd n3paJhen (Hnp. ydapHn TnIe ca 3aBpTbHMa 3a 6eToH, npoHrpNB TnIe ca 3aBpTbHMa 3a rnc i cI.). Ako Hncte cnryphn oJ cera je 3n, Heka ra norleda KB rpaJebuHcKn padHk nll nHxpeBep n npenopyu odrobapajhy Bpcty 3aBpTba n TnIa y cKlady ca loKaIHom n HaunohalHom rpaJebuHcKOM HopMom. Hn noj m yCIOBHaMa He npuBpshyjTe 3ndHy Hocehy Kyky camo jeHNM 3aBpTbeM. YBek Kopnstte odrobapajhe Mepe npedocptpoXHOCTN n 3aHTTHy onpeMy dok 6yUIne pyne y 3ndy nll pykyjete TaKBom onpeMOM (Hnp. cnryphoche rykabuie, Macky 3a IInce n cI.).
He ByuTe H He ZmajTe Ka6I 3a HanajaBe DOK je ypehaj Okayeh Ha 3nD. NoppnHnte ce Da Ka6I 3a HanajaBe 6yde npNby6bEn y3 3nD n noD da 6n Ce cnpeuNo HexeJbeHO KaueHe Be pEmTa 3a Ka6I n ZimMaBe ypehaja.
Да 6исте постглн Hajбоьe pe3ултate, уberite ceда ќздна HOceha Куka Do6po npuBpsheha 3a 3nДида ќ по odroBaapajyHm yrIOM (Hnp. napaleHa ca noDom, 6e3 nmaLo HaHbHa).
Ako HnCTe cnrypn Ha da IJ je 3nHa Hoceha Kyka do6po npuBpshHeHa 3a 3nI, npe MoNTaJge ypejaja nCnpo6ajTe kyka a) npntnckajyHn je oO3ro pykama Da 6nCTe BnDeJI Na Ii ce cabna J6) noblauehN je Ka ce6n Da 6nCTe BnDeJI Na Ii cy ce 3aBPTbN Ola6abnI.
INHΦOPMAUJIJE O PAДИО-EMINTOBAHbY
PaHa peKBeHcIJa 3a WiFi n MaKcImaJIHa n3la3Ha cHa: 2,4 GHz; 15 dBm PaHa peKBeHcIJa 3a RFID n MaKcImaJIHa n3la3Ha cHa: 13,56 MHz; 30 dBm ± 10% . NotpoSha eHeprnje y naCINbHom peKIMy paJa je maHb oD 2,0 W
INHOPMAUJE O ELEKTPNUHOJ BE3BEdHOCTN
YNO3OPEHbE! -N36BHTNE ONACHOCT OД NOXAPA N CTPUJHO YdAPA
Obaj ypehaj moxe da ce kopncn ca n3bopor hanajaBa od 50 nnn 60
Hz 6e3 6nlo kaKBe n3meHe. He kOpncTe npoDyXHn Ka6I nll
aandaTep.
He BaIte KInHOBe n3 cTpyjHOr yTuKaua. He npo6najTe, He cabNJajTe n He Be3yJTe y YBOp Ka6JI 3a HanaJaHe.
He ceuTe n He ouTeHyjTe Ka6I 3a HanajaJIbe. Ako Ce npIoJKeHn Ka6I 3a HanajaJIbe OwtETn, Cme Da ra 3aMeHN cAmo KomnaHnja Electrolux, HEn cepBncep Nn cInuHO KBaIINΦIKOBaHO Lnue. Obaj ypehaj He caDpxN DeIOBe Koje KopncnK MoJe da onpabN. 3a onpabKy yBek nozOBITE OBlaawheHor cepBncepA KomnaHnje Electrolux. Hn Iod KoJIM ycNoBIma He ceuTe, He yKlaHbAJTe n He npcecnaJTe KInH y3emJbeHa (cI. 26 Na cTp. 3; 3a BeiNky BpntaHnju cy. 27). Ako HnCTe cnrypHn Da nn je yTuHnua
IpaBnH0 y3eMJIbeHa IIN 3aHTnHeHa BpeMeHcKIM OcNrypaYe M INI pKeiJaUeM, HeKa KBaIINoKOBaHN eJeKTPnUap NOCTABN ODROBapajyHy TtHuNciy U cKlaNy ca HaIoHOHaJIHm CTaHApDOM 3a eJeKTPoIHCTaIaCNIje IIN OJROBapajyHm loKaJIHm 3aKOHMa I NOd3aKOHcKIM aKTIma.
He dpjnte n He kopnctnte 6en3nH n dpyre 3anaJbNBe npape n TeuHocTn y 6nn3HH OBOr n 6nlo kOr dpyror ypehaja. IpochntajTe halePnue npOn3Boda koje roBope o 3anaJbNBOCTn n dpyra yno3OpeHa.
Да 6исте спpeчлпсгун удapи onacnoct od n36иьа пожар, He do3BOInte да вда плбшилkoja дрuya Teuhoct плзanaьивдетерцent yhy yype Haj. Пр чшеньа ИСКьчNTe ype Haj n3сту. <|im_start|>assistant
HnkaI He nckbuyjTe ypehaj noblaueHbem Ka6la 3a HanajaHe. YBeK YBpCTO yXBaTITe yTNKaU N3ByuNTe ra paBHO n3 yTNuHnIe.
ONPE3! - ИЗБЕГНITE TEШКЕ ПОВРЕДЕИ CMPT
He yBlaunTe n He cTbJbajTe npCTe n npEaMeTe y hCnycT Ba3dUxa n y npEaHbyepeWetky ypehaja.
He nokehnte n He 3ayctabbajte ypehaj Bahebe m Ka6la 3a HanajaBe nn NCKbUHBAHem cTpyje y pa3BOdHOJ KyTnjin.
Y clyuajy Kbapa (Bapnueha, Mnpca ropeha n dp.) odMax npeknHnte paad ypehaja, n3Bynte ka6I 3a Hanajahe i no3OBNTe OBlaawhehor cepBncepa kompanije Electrolux.
He npajte ypehaj mokpim pykama.
He ByuTe Ka6I 3a HanajaHe.
He do npjte Ionatnce BENTnlaTopa pn Baheby fntepa.
OДЛАГАБE
Obaj cmmboJ ha ypehajy nIi HberoBoj am6aIaxn yka3yje Ha To da ypehaj He cme da ce odIOxN Kao KyHn OTnaD. Da 6ncTe peuKlnpaIIypehaj, Ondecnte ra NaIeXHOJ cnY6n rDe mOry da n3 Hera 6e36eHNO n CtpyuHO n3BaJe n peuKlnpajy 6aTepnjy n eIekTpnuHe deLoBe.
NoTuJTe HaunohnHe npOnce O npKynbAby eJeKtpnHnx npOn3BODa n NyHBnBx 6aTepnja.
PPE NOYETKA
Paxbno npountajte ynytCTBO n noce6ho o6patnte naKbY ha
6e36eDnOcHe nHΦopMauzije. HapouHTy naKbY o6paTnte Ha OndeBKe ONPE3!
IpoBepTe da IIN cy CBe OINcaHe KOMNoHEnTe IN DeIOBn PpInIoXeHN.

KJbUHHe KOMNoHEHTE INPEuHCTaA BA3dYxA CEPnJE WELL A7/A5
| 1 | Од boйва и прилагорьва predecessor пioча | 14 | Шулbingа за кабл за нараJAыe |
| 2 | Магнети predecessor пioчe | 15 | Шулbingа за мотор вентilatedога, решетka |
| 3 | Решеткаки predecessorпioчe | 16 | RFID ознake |
| 4 | Филтет ултуарфийх чекица | 17 | Кушице predecessor пioчe |
| 5 | Угеляни foamер за История орrationа юденива | 18 | Дугма нараJAьа (ук./иск.) |
| 6 | Инданатор квалитера ваздауха | 19 | Дугма рекима рада „MODE" |
| 7 | Корисcentи interportфеяс | 20 | Прinksа рекима рада |
| 8 | Од boйва горьа ручка за пошевe | 21 | Слишица замене øлтета |
| 9 | Решетka идуна ваздауха | 22 | Слишица уноzerпьа |
| 10 | Задъа ручка за подизаъе и почевe | 23 | Слишица WiFi-ja |
| 11 | Сеньоторска кушиja | 24 | Слишица joонзатора |
| 12 | Проборчий сенида | 25 | Слишица блоке за бezбедост deuze |
| 13 | Од boйва пошице, 2 kom | 26 | Клиоза и Иndеликов ор看法а В entilataporta |
HANIOMEHA: Bau konkpmah Moden He Mopa umamu cbe KomnoHeHme u dyHKuJe HabeDehe y obom YIYTCTBY 3A YIOTPE6y. 3a mauhan hazue Modena noznejme ambaJky npou3boda unu cmpany ca cnepuuckaujom npou3boda Ha hawem cajmy. Kompanja Electrolux 3adpKaba npae Ho u3mey oBe u3hemux uHfopmauja 6e3 npemxodhe Hajabe.
PACNAKINBAHbE INIOCTABJbAHbE - cInke Ha cTp. 6-7
BoDnte paUHa npi pacnKaNbABy npueNCTaHa Ba3dyxa. Ypehaj mHa HeKoJIbKO OdBOJbNX KOMNoHeHaTkoJe MOry Da ce OTKaue TOKOM TpaHcnpTa, 3aTO NaKbIBO OTBOpIte KyTjy DOK je NolOKeHa Ha BeJIkoJ paBHOJ NOBpUnHn IIN NoDy.
-
Пажьиво ИЗВадиTe ypeй (нр. помену rathe pyuke, akо постони) и ддате Комноентe n3 Beлике КутNiJe. СкинITE n OДLOЖNTe пл actny am6aJaxy y cKlaIy ca 6e36eHOCnM n lokaIIHm npOncnMa o peunKnaJxN.
-
Y clyuajy MOHTaKe Ha 3nI:
a. Ппс Hero StTo HacTaBnTe, npOHTajTe 6e36eHocHe Mepe y OdeIbKy ONWTE MEPE 6E36EДHOCTN.
b. OndeTe MeTo Ha 3nDy rIe JeIte Da MoHTnpaTe ypehaj. To MeTo Mopa 6ntn 6ap 20 cm nCnoi HnBOa ounjy KaI cTojnte ycnpabbeHn (HnJke od tora je ndealno i npenopyucho) padn onTImaJIne BnBIOCTn I padn MOryHnocTn uHHeBa npocTopa nCnoi ypehaja. TaKoHe, Haj6nka cTpyjHa yTuHnca mopa 6ntn ydaBeHa hajBnwe 1,5 m I mopa noctoJatn pa3MaK od 6ap 20 cm n3MeHy deChe cTpaHe ypehaja (npo3OpuHa ceH3Opa) n obnnkhe nobpwnHe.
c. Пжьнво постаит e пиложену Кку paBHO Ha NOВршHy 3nda И OLOВКOM OЗнaynte DBe TaUKe rde heTe npo6yuHTn pyne 3a 3aBPThe. Кку Тpe6a постаит TaKo dA nCTypeHn Deo (Ha KOME Hema pyna) 6yde Odo3ro (cI.2).
d. Byprnjom koja oJroBapa BpCTn 3nda n36bUHnte DBe pyne y 3ndy Ha
MeCTnMa Koja CTe O3Haunn I No Notpe6n yByuIte TINIOBe.
e. Y cIeHeHem KOpaky yNoTpe6bTe 3aBpTbe KoJn OndroBapajy BpcTu 3nda. NocTabInTe KyKy paBHO Ha NOBpuHHy 3nda TaKO Da OTBOPn Ha HbOj 6ydy KOHcHTpruHN ca n36yweHm pynAm a KyKa NotnyHO npaJIeHa ca noDom 6e3 IKAKBor Harn6a, a 3aTM npTEKHe 3aBpTbe DOK KyKa He 6yDe UBPCTo pNvBpShena Hne Nomepa ce npn CImMaBy.
f. IOnnHnTe ypehaj n noCTabnte ra Ha KyKy TaKO da rOpBn Deo KyKe do6po lerHe y yrpaheNo lexNtTe ca 3aHbe cTpaHe ypehaja.
g. Пажьиво поеспгуpeйда-he 6удe нагуни на ѳднустрани,баш кao уметнчксclнк.Осигураjetда урehajdo6po hailexe y3 3nD.
h. Пи Демонтадуpeйа He 3a6opabnte Da npBO n3Byte Ka6I 3a HanajaHe n3 3nDne yTuHnue.
- Y clyuajy noctabbaHa Ha nOd:
a. 3aBpTHbHMa npuBpcTne BaIbKacTe HOxNue 3a ypehaj, okpehyh nX y cMepy Ka3aBkn Ha caty dok ce He 3auyje uKbOuahe (nIn dok He ocTe Te oDpehene H otnp).
b. IopnHnTe ypehaj n cTabte ra nopei ctpyjhe yTuHnue y Koju he 6ntn npNKbUyeH.
c. Ocnrgyapjte pa3mak od 6ap 30 cm n3meh y npedhe ctpahe (ycnc Ba3dyxa), odnocho 6ap 20 cm n3meh y deche ctpahe (npo3opun h ceH3opa) ypehaja n obnHex noBpwnHa. Tako, o6e36einte doBObHO npoctopa n3naD rOpHe noBpwnHe (peweTka n3dyBa Ba3dyxa) da 6n ypehaj morao da padn HajeKacnje i Da y npoctopny uCnyTa uNCT Ba3dyx.
d. Y clyuajy MOHTaKe Ha 3nD cKHNTe BaJbKaCTe HOXnCe ca noctoBa ypehaja paDi eOHKacHJe paCnoDeIe Ba3dyxa.
- CkHnTe npedby nlouy naKbBm noblauehem od ypehaja c obe pyke.
- Извашистец решеткаки пенилтор, сенинтурафигинх чекшиς и угьеннипенир за всяпапльны оразсka ѳдуне на уклонтесу пал actуну amбаложу. Oдюжпешу складу ca 6e36ednochим и lokaalnm npoисma o peцклajи.
- Bpnte fntepe y ypehaj tako da 6ydy nopehann kao npe (yrbeHn fntep 3a ncapbna opraHcka jeDnBeHa je npBn). Fntep npn noctabbaHy dpKHTe tako da my RFID or3naka 6yde y ropbem dechom yrny - 6n3y OTbopa ceH3OpCke Kytnje.
-
Bpata Te peWeTkactn npedhny npoeHy naypehaj.
-
Ппкьуне ka6л 3a Hanajahe ypehajya y Haj6mky ctpyjhy yTuHnuy da 6n ce ocBETnIIO dYrme HanajaHa Ha KOpncnukom nHTepfejcy ypehaja.
- Да бисте постлел Нajбове peултate, уpe Haj no могуности кориспу 3atbopoHOM npocTopy ca 3aTbopoHIM BpATnma n npo3OpHm.
PBAHDAbAUYOTPEBA-cnkeHa ctp.6-7
YKJbUyHBAHbE
- Довине дугme нараьа ќдомда бисту укыунл пецпатч вадуха HANOMEHA: П pu сбakom порема hy npoин he oko 10 cekydu dok ce ceh3opu kalubpuwuy u analu3upajy KBanumem ba3dyxa пе нео wmo y6p3ajy bohmunamop do nompe6he 6p3une. 3a mo bpe me undukamop KBanumema ba3dyxa cnopo nuncupa bolem bojom.
ПРOMEHA PEXKIMÀ PAДА И БРЗИНÀ BEHTNЛATOPA
- Довине дугme ржима рада „MODE" „ядом 3a пpeбацьаве Измe hy следиа два ржима: ПAMETHИ и РУн
PAMETHN: OBO je noDpa3yMeBaHn peKIM y Kome ce ypehaj nokpehe. Y
PametHom peKIMy ypehaj KopncTn noDaTke cEH3Opa Kao yla3He BpeHocTn 3a
oJpehnuBaHe notpe6He 6p3nHe BeHTnLaTopa N BpCTe N INTeH3NTeTa
KOpnsCHNuKor npka3a. KopnsHK y OBOM peKIMy He MoXe pyuHO da MeHa
6p3nHy BeHTnLaTopa. 3a BnSe HOpMaunja norledaJte oDeJbak INDnKATOP
KBALITETA BA3dYXA.
HANOMEHA: lamnuca uhdukamopa keanumema ba3dyxa ce nomnyho uckbyyje y mamhoj npocmopju kada jeypehaj y namemHom pekumy da he 6u omemana kopuchuka.
PuyH: y puHOM peKIMy paJa ypehaj KOpNCTn noaTke cEH3Opa kao yla3He BpeHocTn camo Da 6n noka3ao CTepeH KBaJIteTa Ba3dyxa NOMohy INdNKaTopa, aHn He noDeuBa 6p3nHy BeHTnlaTopa. Obaj peKIM je HajboJb 3a 6p3e Type uHneBa, norToBO KaJa KOpNCHK OueKyje NOBeHaHy KOJIuHHy cheTnca y npocTopnjn 36or paOBA y domaHnHCTBy (Hnp. ycncabaHa npaunHe).
- KaД cTe y ryHOM peKIMy paДa,doIrpHnTe n NOByuIte KIn3aU 6p3nHe BeHTnlaTopa Da 6nCTe IoIecnIn 6p3nHy uNshHeBa-JeBO je HajMaHa, a Deecho HajBeHa 6p3nHa.
HANOMEHA: Ypehaj he nocmeneho noehamu unu cmahmu 6p3uHy do u3a6pahe 6pehocmu. Knu3au denyje u kao uhdukamop mpehymne 6p3uHe bemulamopa.
- MIPOBAHbE N ICKJbUyEH WiFi:Пресntaч Ba3dUxa je KoHCTpyuncan y3 npimEnHy npinHcUnna ekOLOwKor dN3ajHa n cTora TeXn OrpaHnueBy notpoShbe
eheprnje do 2,0 W kaJa je ypehaj nckbuyen (cem ako kopncnKdo3BOJn npekopauebe). KaJa je ypehaj ykbuyen, aKO hema moryhnoCT WiFi Be3e nIi Hnje NOBe3an Ha mpeJy,WiFi paAno-cnHaJ he ce ayTomatcKn nckbuytN haKOH 30 MInyTa da 6n yStedeo eheprny - 3a pyuHNo ykbuyBaHe WiFi paAnocnHaIa noKpeHnte IOBE3INBAHbE HA MPEXy (camo Kopak 6p. 21) nIi NCKbuyte ypehaj n3 cTpyjHe yTuHnCe n IIOHO B ra npNKbuyTe.
CINuIe FyHKUNJA INHdNKATOPN
HAIOMEHA: He mopajy cbu undukamopu u ukohe yhkuja 6mu npucymhu ha bawem modeny. 3a unhopmauje o docmynum yhkujama noznejme unhopmauje ha ambaanhu uu nceuufkaujy npou3boda ha cajmy.
- 3AMEHA ΦИЛTEPA:Ефикаси Фиntер(n)у уpeйajу He мoryда ce nepу,Behcamo Da ce 3ameHe.Cnunuza 3a 3amEny Фиntepa e ce ypaIHTn Da BacnoDCETn Da 3ameHnte Фиntep(e).Прeунstач Ba3dUxa може Имати ВишefinlTepa,па 3a Ифорmaциjу O Tome kojn Фиntep Tpe6a 3ameHNTn NorlejaTe anIIkaциjy Wellbeing.YBek npobepinte Da Iи je пlaCTTuHa 3aSTHTHa KecaCKInHyTa ca Фиntepa npe Hero StTo ra cTbInTe y ypehaj. Habon 3ameHneNCKOpnsHehor Фиntepaa, Cnunuza 3a 3ameHy Фиntepa he ce ayTomatcNINCKJbYHTn Hnje notpe6Ho HeHo peceTOBaHbe.
673.УПОЗОРЕБ:Слунica унозорьа he ce yanaHTn da 6и bac yno3opILA ha moryhyeelenKtpnHy nIeKtpoHcKу rpeSKy ypehaja.3a nHΦopMaunje O BpCTn rpeShke, KOMNoHENTama n eBentyaJIHM peSeHbIMa npo6Iema norleJaTe anIIkaunjy Wellbeing.Додаthe nHΦopMaunje moKeTe haHn y OdeJbKy TPEUKE IN PEJABAHbE ПОБЛEMA y HaCTaBky.
674.БLOKAДA 3A 6E36EДHOCT DEUe: Upehaj nMa ΦyHKnju y cnrypHocHor 3aKbYuBaHa Ka oHeMOryHab a pad KOpIcHnUkor nHTeppejca n cnpeuBa HexOTnUHO npITnCKaHbe dYrMaDi.ФyHKnJa 6LoKaDe 3a 6e36eHocT Dee Me MoKe Da ce YKbYuN/ncKbYuN nyTeM anIIkauJe Wellbeing nIi nCTOBpeMeHm npITnCKOM dYrMaDi HaJajaHa n peXnMa paDa y TpaJbBy od 5 cekyHdN. CInuNa 6loKaDe 3a 6e36eHocT Dee e ypaJIne ce no akTnBnPaHb y fynKcnJe. - JOHIN3ATOP: Ypehaj Има мodyл joинзатopa, кojn, kaJ je omoryhen, CTbapa HeratNBHe johe koj ndoaTHO nocneuJy npouec npeunshahBaBa3dyxa. JOHIN3aTOp je cTaHdapdno nckbyuH n MOKe Ja ce yKbUy/NCKbUy n CaMo nyTeMa anIIkaCnje Wellbeing. CInuHa ja JoHN3atopa ypaIiHe ce no akTNBnpaHy fynkCnJe. 3a doaTHe INΦopMaCnJe o Tome KaKO joHN3atop nomaKe y CmaHBeBy KOJIuHHe YeCTNuA y Ba3DyXy nOrleJaTe cTpaHy ca HΦopMaunjaMa O
npon3bOdyHa cajTy.
- WiFi: Ypehaj noceyuje WiFi moyn Kojn omoryhaBa daIbHcKO ynpabbahe n npncTyMnOrHM dpyrIM fYHKunjama, Kao wTo je BpeMeHcKO npaHebe npataKa O KBaHTety Ba3dyxa y npocstopnju. Oba cInuHa cNaIi KaI ce ypehaj nobExe ca KyHm WiFi-jem. Ako cInuHa Tpenhe, To yka3yje Ha npnbpeMeHn r6ntak WiFi cnHaJa - 3a doaTHe HOpMaunje norleJte anlkaunjy Wellbeing.
HAIOMEHA: Ipey3mme hauy aannkaujuy Wellbeing u npamume nocmynHa ynymcmba 3a noe3uahe da bucme npueucmau b3dyxa noe3alu Ha unhmephem. - Инданков CBALNTETA BA3dYxA:Урегaj Има сензор(e) 3a KBALNTETBa3dYxa. Лacepen ceH3Op cheTua пpeDcTaBba BncoKoPepuHaN ceH3Op cheTua kojin можда DeTeKtjupe cheTuce BeIuynHe PM1, PM2,5и PM10. Инданков CBALNTETA BA3dYxa he Bn3yeIHo - cKaIOM y 6oJn - npiKa3NuBaTH KBAJIteT Ba3dYxa y CTbapHom BpemHy,прema DoHBoj Ta6eIi. KaJ je урегajу пametHom peKIMy, cTepeH KBALNTETA BA3dYxa yTucahe n Ha 6p3InHy BeHTnlaTopa,прema DoHBoj Ta6eIi.
HANOMEHA: Pedobno yucmune npo3opu h cen3opa da bucme cnpeunu he2o8o 3aaybe npauuHom u da bu ceh3opu padunu kako mpe6a. Takohe, obe3bedume onmumnhy bnaeknocm ba3dyxa (35-80%) da bu ouumaba ha cen3opa buna maHa.
| БОJA CBETLOCTN | PM2,5 (μg/m3) | КВАЛТET BAЗДУХА | БРЗИHA BEHTИLATOP A |
| Беля | Кал�брисаны Повezиваны | ||
| Зелena | 0-12 | Яко добар | 2 |
| Жута | 13-35 | Добар | 3 |
| Наранцаса | 36-55 | Слаб | 4 |
| Црва Быбоча Смeя | 56-150 | Яко слаб | 5 |
| 151-250 | Лош | 5 | |
| >250 | Яко лош | 5 | |
IIOBE3NBAHbEHAMPEKY-cnkeHa ctp.6-7
HANOMEHA: Heku kopaqu nocmynka noe3uaba Ha MPexy cy moja npomebehu, 3amo y cnyajy odcmyna ba obabe3no npamume nocmynho ynymcmeo damo y hajnoeujo bepzju anlukaueje. Nobpuhme ce da kyhnu WiFi padu ha onceey 2,4 GHz, a He Ha oncey 5 GHz, koju npueucmauy bazdyxa hehe npeno3hamu.
678.Пробны滥нкаги Wellbeing y подвни iOS App Ип Google Play, пузmites je, Perinctpyjte ce и при jabinte ce у hy. 3атим ho te moида „Доadingуpeй"у滥нкаги и паите постно уптсю за поевизье урейaja на мреку - корциу Настову су ор injentацнои.
- HakoH npNKbUyNBaHa ypehaja y ctpjHy yTnHuCy npNTncHte DyrMe HanajaHa 5 ceKyn, dok cnuHa WiFi He noyHe 6p3o da Tpenhe - To 3NaH da ce akTbNpaHa npCTynHa TaKa ypehaja n da je OH cnpeMaH 3a NOBe3NuBaHe Ha WiFi mpeJy.
- Празу уапликции Wellbeing и камером телега сенира对接 WiFi 6ap-koД. WiFi 6ap-КOD можete нан Ha Na HalenHиц ca O3HaKOM npOn3BOda Ha ypehajy (obuHNo n3a peшеткacterо ррдфпгета, сI. 7).ТakoHe, можete у.apликцииу руну уnetи сифpe koje stoje IncnoD 6ap-KOD aKO ckenpahe He ycne.
- Повекитулковуcaию спстуном тачkom уpeйaja.
- Ca liocTe DoctynHx MpeKa n3a6epnte KyhHi WiFi Ha 2,4 GHz c KojIm ypehaj Tpe6a Da ce nobExe na y anInkaunjy yHeCnTe lo3nKky 3a Taj kyhHi WiFi n cauekajTe da ypehaj ycnoCTabN Be3y.
- Пocтупak довшит e унocom Ha3nBa ynpaBO NOBe3aHOr npeuNCTaHa Ba3dUxa!
- Kacnje, ako HekaI noKeIte da pecetyjete noaTke 3a npnaBbNAbe Ha WiFi cmeTeHe y Bawem ypehajy, npntncHte Dyrme HanaJaBa a 5 ceKyndIn Dok cnuHa WiFi e noUHe da Tpenhe (akTNbnpa ce npicTynHa TaKa, kao y Kopaky 6p. 20). Tada noHOBO npNTcHte Dyrme HanaJaBa a 5 ceKyndIn dok cnuHa WiFi e npcTaHe da Tpenhe uYracn ce. WiFi noDeWabaHa ypehaja cy caDa pecetobHa n OH Hehne NOKywaBatn da ce nobExe ca BaWoM WiFi MpekOM.
YILLHTHeE,ODPKABAHbENCKIAIILITEHbE-cnkeHa ctp.6-7
HANOMEHA: Ipe yuheba yBek uckbuyme npuecmaa ba3dyxa u3 cmpye da 6ucme cnpeuunu cmpjuhu yadap u onacnoem od nokapaa. 3a yuhebe ypehaja hukad he kopucmume abpa3uha cpedcmea, jake demepuenme u bocak. Buokoeukacnu fumepu He mozy da ce nepy, beh Ha kpaJy padHO2 bKa yBek mopajy da ce 3amehe.
UHHeN ODPXABAHbE
- Пазида се позорчн сензopa He 3aueпд aбисту осигурал nontmaлан pad урehaja. Habynbahe npaunHe y obom npocstopy je hopmaHa nojaBa, 3ato peIOBHO (Hnp. cBAke 4 Heebe) ycucajte позорчн сензopa ycinsBaayem ca y3aHIM NaCTaBkOM/YeTKOM.
686.Пл actnue He deNoBe ypejaja Tpe6a nctntu cybom Kpnom 6e3 dnauua.Y
cIyauj y IeKa Ha IIaCTnHm DeIOBIma, NOKBaWeHOM Kpnom Od MnkpoΦnbepa naKbNBO nCTpJbajTe ΦIeKy.
- TkaHnHy npuBpshEny 3a npedbny nlouy Tpe6a npe6pcatn cybom Kpnom Koja He caDpxn yIbe nIIy ycncatn ycncnbayem ca Mekom Yetkom Da 6n ce cnpeyno Iom BlaKaHa. Y npocstopy oKO ycnca Ba3dyxa Ha npedBoj cTpaHn ypehaja Moxe Da Ce Hakyn Bnwe npaShne Hero Ha HeKIM dpyrIm DeIOBmMa n 3aTO Moxe 3axTeBaTn yeWe hne uWe hneJa da 6n ce ocNrgpao onTImmaJah pad ypehaja.
CKIADNIHTEHe
- Прилелkom складиштейа, осим Што неся NGьучту урегaj n3 CTpyje n la6аво hamotatn ka6л 3a Hanajahe OKO Doьnx HOжиca, п配电иITE урегaj, Hberove BricokoeФнКаСе ФнТepe и TeKCTINHy пedingу пLOUyда 6и ce cnpeuHNo NaKynBaHbe npaunHe.
3AMEHAФИПЕРА-cnkeHaCTp.6-7
HANOMEA: Fummepu - ocum pewemkacmo npeo fummepa - He mozy da ce nepy, beh ybeK mopajy da ce 3aeme Ha Kpajy padno2 beka. Ipeuocmaqu ba3dyxa cepuje WELL A7/A5 mozy da umajy pa3noBpcne fummepe koju cy npunaojehnu bawum nompebama. Cbaku fumep nocedyje pamemny RFID o3nky koja npecmaiba he2o8 jeudncmbenu udenmuqukamop u omozhyaba npahebe ynompe6e kpo3 bpeme. Ipehume y annukauiy Wellbeing unu ha cmpany ca unfopmaujaama o npou3body na hawem cajmy da bucme noznedanu boduy 3a u3bop fummepa Koju od2o4pa bawum nompebama.
- Да бисте обeбеди мakсималу eфн��ост и Heometан рад пруcentа ваздуха, патITE пeoctалу радни Век Фнелега у anecdн��и Wellbeing и hapунite заменckи Фнелер пpe Hero wto CTNRHe до 0%. Ако стve omoryнл сда obabewteha, anecdн��иja Wellbeing he Bac obabecntiКад ce Фнелетр пиближ Краjetу рад hor Век (нгр. на 5%).
- KaJa jeDaH ΦnITeR nII BnIe HbIX 6yDu Ha KpaJy paIHor BeKa, Ha KopINCHNcKOM nHTeppejcy npOn3BODa he ce ypaJIITn cInuIca 3a 3aMeHv fIITepa KoJa yKa3yJe Ha Notpe6y 3a 3aMeHOM. IpeHnte y anIIkaunjy Wellbeing da 6ncTe npabInHo odpeDnI N KoJn je fIITep Ha KpaJy padHor BeKa n Mopa Da ce 3aMeHN. KaI FnITePdoHe do Kpaja padHor BeKa, 6p3Ha BeHTnlaTopa ypehaja MoKe 6nTn orpaHnueHa y NaMeTHOM pexnmy pada.
- Искоршинни силтет може бити jakо запьан пашином и чесцама, на пося сизда на рedingи пioче пипремпгіксу плійу у kojy heTe CTaBHTN Искоршенни силтет.
- CkHnTe npedby nlouy n peweTkactn npedΦnIte npCTaBnTe nx ca cTpaHe. 3aTm n3BaInte ΦnIte koju je Ha Kpajy paDHor Beka n CTaBnTe ra y
nnpembehy kecy nnn Kytjy 3a odnahe.
- 3aTnM cKnHnTe pIaCTnHy aMbIaJy ca 3aMeHcKor fHnTepa n CTaBnTe fHnTep Ha odroBaapajyhe MeTo. NobpnHnTe ce da yIbeHn fHnTep 3a nCnapbNba oprAhcka jeIbHeBa 6yde npBn yHyTap ypehaja, a da 3a HbIM cIeDn fHnTep yItpaΦHHx YecTHuca. BpaHTe peWeTKactn PpeDfHnTep n 3aTBOpHTe npeDhy PloUy. CInuHa 3aMeHe fHnTepa Ha KOpNCnUcKOM INTEpEejCy Bnwe Heh e 6ntu yNaBeHa, a anIIkaunja Wellbeing he noka3NBaTu nCTo To, kao n padHn BeK HOBOr fHnTepa.
HAIOMEHA: Ako 3ameha 6yde Ha3nauhe ha cmo Ha KOpuchukom uHmepfejcy, aNu He u y aannukaqju Wellbeing, pecmapmyjme annukaquju y uypehaj npe daabe peswaba na npobnema.
- Искорши老人家 сбу пл actуну ambaяу odnoну у скlaу с lokaли посяма о peцклжи. RFID o3nake caдрже eilektpnua koja, na nx Tpe6a odloжитн odbojeho od octatka Флтepa.
PINIAIOTABAHbE-cnkeHaCTp.6-7
IpeuicTau Ba3dyxa cepije WELL A7/A5 nocedyje jeDnHCTBeHy oopMy dN3ajHa n eCTeTKy Koja ocngypaba HberOBO do6po yKlanahe y Baw dom n HameWtaj, 3a pa3nky od npyrnx ypehaja. Cem tora, 3a oby cepiny noctoje 6pojHn kOMnleTu 3a npilarohabhe koju nobehabajy eCTeTKy, aInn oYHKcnoHaJHocT ypehaja.
ПРИАГОБABAHE TOPHe PУЧКЕ
RENGÖ RING OCH SKÖ TSEL


- OPERATING MANUAL
- GENERAL SAFETY INFORMATION
- WARNING! - CHILDREN & VULNERABLE PEOPLE SAFETY
- CAUTION! - AVOID INJURY OR DAMAGE TO THE UNIT OR PROPERTY
- CAUTION! – WALL MOUNTING: AVOID INJURY OR DAMAGE TO PROPERTY
- INFORMATION ABOUT RADIO
- ELECTRICAL SAFETY INFORMATION
- WARNING! - AVOID FIRE HAZARD OR ELECTRIC SHOCK
- CAUTION! - AVOID SERIOUS INJURY OR DEATH
- DISPOSAL
- BEFORE STARTING
- UNBOXING & SETUP - picture pages 6-7
- FIRST & ONGOING USE - picture pages 6-7
- TURING ON
- CHANGING MODES & FAN SPEEDS
- FEATURE ICONS AND INDICATORS
- ONBOARDING - picture pages 6-7
- CLEANING, CARING & STORAGE - picture pages 6-7
- CLEANING & CARING
- STORAGE
- REPLACING FILTERS - picture pages 6-7
- TOP HANDLE CUSTOMIZATION
- FRONT PANEL CUSTOMIZATION
- FEET CUSTOMIZATION
- ERRORS & TROUBLESHOOTING
- NAVOD K OBSLUZE
- INSTALLATION - billed side 6-7
- UDSKIFTNING AF FILTRE - billed side 6-7
- REEMPLACEMENT DES FILTRES - illustration pages 6-7
- INFORMACije O RADIJU
- INFORMACije O ELEKTRICNOJ SIGURNOSTI
- UPOZORENJE! - IZBJEGAVAJTE OPASNOST OD POŽARA ILI STRUJNOG UDARA
- ONLITE MEPE B3BEOCTN
- YI03OPEHbE! - B636EDHOCT DEU E IOCETbBnBX OCOBA
- ONPE3! - ИЗБЕГНITE NOВРЕДЕ И OЛТЕŠЕŠЕ YPEŠAJA И ДPyгЕ ИMOВИНDE
- ONPE3! - MOHTAXA HA 3nД: N36EHNTE NOBPEDE N OwTeHbE NMOBnHE
- INHΦOPMAUJIJE O PAДИО-EMINTOBAHbY
- INHOPMAUJE O ELEKTPNUHOJ BE3BEdHOCTN
- YNO3OPEHbE! -N36BHTNE ONACHOCT OД NOXAPA N CTPUJHO YdAPA
- ONPE3! - ИЗБЕГНITE TEШКЕ ПОВРЕДЕИ CMPT
- OДЛАГАБE
- PPE NOYETKA
- PACNAKINBAHbE INIOCTABJbAHbE - cInke Ha cTp. 6-7
- PBAHDAbAUYOTPEBA-cnkeHa ctp.6-7
- YKJbUyHBAHbE
- ПРOMEHA PEXKIMÀ PAДА И БРЗИНÀ BEHTNЛATOPA
- CINuIe FyHKUNJA INHdNKATOPN
- IIOBE3NBAHbEHAMPEKY-cnkeHa ctp.6-7
- YILLHTHeE,ODPKABAHbENCKIAIILITEHbE-cnkeHa ctp.6-7
- UHHeN ODPXABAHbE
- CKIADNIHTEHe
- 3AMEHAФИПЕРА-cnkeHaCTp.6-7
- PINIAIOTABAHbE-cnkeHaCTp.6-7
- ПРИАГОБABAHE TOPHe PУЧКЕ
- RENGÖ RING OCH SKÖ TSEL
Brand : ELECTROLUX
Model : WA71304GY
Category : Air purifier