Xplorer Serie 95 RR7987 - Vacuum Cleaner ROWENTA - Free user manual and instructions
Find the device manual for free Xplorer Serie 95 RR7987 ROWENTA in PDF.

Download the instructions for your Vacuum Cleaner in PDF format for free! Find your manual Xplorer Serie 95 RR7987 - ROWENTA and take your electronic device back in hand. On this page are published all the documents necessary for the use of your device. Xplorer Serie 95 RR7987 by ROWENTA.
USER MANUAL Xplorer Serie 95 RR7987 ROWENTA
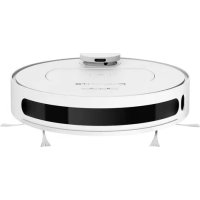
2. LDS (Laser Distance
3. Recharge / Spot cleaning
6. Button for taking out
dust box and water tank
7. Dust box and water tank
1. Dust box and water tank
8. Dust box and water tank
8. Rolling brush cover
Remove the bottom cover and connect the docking station with the adapter, and pay attention to arranging adapter connection wires to avoid being wound during sweep. Put the bottom cover back.
1.5m 0.5m 0.5m To place the docking station, make sure there is an empty area of 0.5m on the side and 1.5m in front of the docking station. Do not install the docking station near stairs. The cable must be tight. Always place the docking station on hard floor. Donot place the docking station on carpet.
Connect the adapter to a wall socket. The docking station lights when the robot is not plugged in. Remove the protective strip on the bumper to ensure proper operation of the device.
Please fully charge the robot before using it for the rst time. To do so, place the robot on the docking station and align it to the charging terminal. When the robot is correctly plugged, the docking station light will switch o. When the white indicators on the robot are normally set on, the robot is fully charged (4-5 hours).
In order to extend the battery lifespan, always keep the robot charging on the docking station while not using it. When not using the vacuum cleaner for a long time, please fully charge the battery, switch o the robot and store the robot in a cool dry place.
The robot has drop sensors to detect stairs and gaps. The robot will change direction when detecting them. In order to correctly detect the oor level dierence, make sure there are no objects (bags, shoes …) on the oor next to gaps, stairs or on the stairs’ steps. The robot near stairs without objects
The robot near stairs with shoes, bags or other objects (the robot will not properly detect the stairs and therefore fall).
Press the button during 3 seconds to turn on power (when the robot is not being charged). The white indicator will be normally set on. Reversely, press the button during 3 seconds to turn o power.
- The robot has completely cleaned
- Battery power is insucient ; once the battery is charged to 80%, the robot will resume to complete the remaining cleaning work
Press the button during 3 seconds to start spot cleaning mode. The robot will focus on a 1,5m x 1,5m specic area. After the whole area has been swept, the robot will automatically return to the charging dock.
To fully benet all the possibilities of your robot, download the free app “Rowenta X-plorer Series 75&95” (you can use the QR code above to nd it on AppStore or Google play) on your smartphone. Just follow the instructions in the application to enjoy the robot!
When the white indicator is ashing slowly, the device is waiting for connection. When the white indicator is ashing rapidly, the device is connecting WIFI. When the white indicator is normally set on, the device is connected !
Do not add cleaning agents in the water tank.
month Wipe robot sensors with a dry, soft cloth including:
- Wall sensor on the right side of the robot
- Four anti-drop sensors on the bottom of the robot
- Infrared anti-collision sensor in front of the robot on the bumper Please also wipe charging electrodes and the window of the charging dock regularly
month To clean the dust box and water tank, open the robot cover, press the release button and remove the dust box and water tank. Press the open button of the dust box and empty the dust box. Tap the dust box to knock o excess dirt. Take out the foam lter and pleated lter. Clean the lters with the cleaning tool. Users can also wash the lters for deep cleaning. Press the release button of dust box to separate the dust box from the water tank.
24h Flush the water tank, dust box and lter module thoroughly with water. Let the water tank, dust box and lter module naturally dry for the next use. Put the pre-lter, foam lter and pleated lter back, and put the lter module back into the dust box. Reinstall the water tank and dust box, and then install the module back to the machine.
To clean the central brush, turn the robot OFF and turn the robot upside down. Press down the locker to take out the protective cover. And take out the central brush upwards. Clean the central brush with the cleaning tool.
To replace the central brush after having cleaned it, put one end of the central brush into the corresponding hole rst. Then press the brush cover and x it with the locker
To clean side brush, remove it by unscrewing it and use a cleaning brush to clean the side brush and the entanglements in the slot of the side brush. Clean side brushes once a month.
Replace side brushes every 6 months. Throw away the old brushes and replace them with new ones. Screw the new brushes on the robot.
To clean the wheels, clean the front, left and right wheels once a month. The wheel shaft may be entangled by hair, cloth strips, etc. so please clean it in time !
month year NEW Every 6 months replace the pleated lter and the foam with new ones to maintain optimal performances.
Do not throw the robot in the bin. Always wear gloves and protection. Remove the 5screws. Remove the bottom cover. Take o the battery. Unplug the battery connector.
- Make sure the robot is connected to power supply.
- Make sure the battery is fully charged. The robot suddenly stops working
- Check whether the robot is stuck or blocked by obstacles.
- Check whether the battery is too low.
- If the problem persists, please shut it down, wait for 3 seconds, and then restart it.
- The appliance may be overheating : ū Stop the appliance and leave cool for at least 1 hour. ū If it overheats on repeated occasions, contact the Approved Services Centre. Cannot charge the robot
- Check whether the indicator on the charging dock is on (when the robot is not on the charging dock).
- If not, check that the charger is properly connected or contact an Approved services Centre to change the charger.
- Check whether the indicator on the charging dock is o and the indicator on the robot is ashing during charging.
- Wipe dust o charging electrodes with dry cloth. The charger is getting hot This is perfectly normal. The vacuum cleaner can remain permanently connected to the charger without any risk. The robot cannot return to the charging dock
- Clear the charging dock of objects within 0.5m on the left and right sides and within 1.5m ahead.
- Make sure that the robot starts cleaning from the charging dock without abnormal movement.
- When the robot is near the charging dock, it can return faster. But if the charging dock is located far away, the robot will need more time to return. Please wait during its return.
- Clean charging electrodes. The cleaning schedule is not executed
- Make sure the robot has been powered on.
- Set the time and schedule the time for automatic cleaning with the app.
- Make sure the appointment time has been set correctly.
- Check whether the battery level is too low to start cleaning.
- The robot will not start any scheduled cleaning when the task is being performed. Suction whistling
- Check the suction inlet for any obstruction.
- Check whether lters are wet due to water or other liquids on the oor. Let lters dry naturally thoroughly before use.
- The dust collector is not properly tted : ū re-position it correctly.
- The intake head is clogged : ū remove the power-brush and clean it. The rolling brush does not rotate
- Clean the rolling brush.
- Check whether the rolling brush and the brush cover are installed correctly. Abnormal action or sweep route of the robot
- Carefully clean the sensor with dry cloth.
- Restart the robot. No water released during mopping
- Make sure there is enough water in the water tank.
- Check whether the mop module is installed correctly.
- Check whether the water outlet is blocked. The robot cannot connect to your Wi-Fi network Ensure that your Wi-Fi router supports 2.4GHz and 802.11 b/g/n bands as this equipment does not support 5GHz bands.
According to model: * When the robot fails, the red indicator on the robot will blink. Please check on the App the stated error code. Error code Solution Error 1: Collision bumper is stuck, please check. The collision bumper is stuck. Please tap repeatedly to remove foreign matters. Ifthere is no foreign matter, please relocate it and then start it. Error 2: A wheel is stuck. Please check whether any foreign matter is stuck in the wheel, or move it to near its home position to start it. If any wheel is stuck, please check whether any foreign matter is stuck in the wheel, or move it to near its home position to start it. Error 3: A side brush is stuck, please check. The side brush may be entangled with foreign matters. Please clean and restart it. Error 4: The rolling brush is stuck. Please remove and clean it. The rolling brush may be entangled with foreign matters. Please remove and clean it, its connections, its cover and the suction inlet. Error 5: The robot is trapped. Please clear obstacles around. The robot is trapped. Please clear obstacles around. Error 6: The robot is trapped. Please move it near its home position to start it. The robot may be suspended. Please relocate it and start. If the anti-drop sensor is too dirty, it may also cause the fault. Please wipe the anti-drop sensor to eliminate the fault. Error 7: A wheel is suspended. Please move it to near its home position to start it. A wheel is suspended. Please move it to near its home position to start it. Error 8: The battery level is too low, and the robot is about to shut down automatically. Please charge it. The battery level is too low, and the robot is about to shut down automatically. Please charge it. Error 10: Optical flow sensor dirty, Please wipe it. The optical flow sensor is covered by dust. Please wipe it. Error 11: The recharge sensor is blocked. Please wipe it. The recharge sensor is covered by dust. Please wipe it. Error 12: The follow-wall sensor is blocked. Please wipe it. The follow-wall sensor is blocked. Please wipe it. Error 13: The robot is tilted. Please put the robot on the horizontal ground to start. The robot is tilted during startup. Please put the robot on the horizontal ground to start. Error 14: Please install the dust box and filters back. Please install the dust box and filters back, and make sure that filters and the dust box are installed in place. Then please restart the robot. Error 17: Restricted area detected. Please relocate it to start. The robot is too close to a restricted area during starting. Please relocate it to start. Error 18: The laser cover is stuck. Please check. The pressure sensor for laser cover is pressed or stuck. Please relocate it to start. Error 19: The laser sensor is stuck or twisted, please check. The laser distance sensor is stuck by foreign matter. Please clear it. Error 20: The laser sensor may be blocked, please check. The laser distance sensor is blocked, please clear the blocking. Too spacious environment and multi-reflection environment such as metal mirrors also affect the normal operation of a laser distance sensor. Please relocate it to art. Error 21: Please clear obstacles around the charging dock. The robot may be stuck or trapped. Please clear obstacles around the robot.
Error W1: Battery abnormal. Please consult the instructions or APP. Please open the battery compartment, check whether the battery is properly connected, and try to restart the robot. The battery temperature is too high or too low. Please wait for the battery temperature to be normal (0°С~40°С/32°F~104°F) before use. If the error persists, please contact our Service Department. Error W2: Wheel module abnormal. Please consult the instructions or APP. Please check whether any foreign matter is stuck in a wheel and try to restart the robot. If the error persists, please contact our Service Department. Error W3: Side brush module abnormal. Please consult the instructions or APP. Please check whether any foreign matter is stuck in a side brush and try to restart the robot. If the error persists, please contact our Service Department. Error W4: Rolling brush abnormal. Please consult the instructions or APP. Please remove and clean it, its connections, its cover and the suction inlet. Please try to restart the robot after cleaning. If the error persists, please contact our Service Department. *Error W5: Water pump abnormal. Please consult the instructions or APP. Please clean the water tank, water pump connections on the tank and water pump connections on the robot, the water outlet at the robot bottom, and check the mop module. Please try to restart the robot with all modules installed back after cleaning. If the error persists, please contact our Service Department. Error W6: Laser sensor abnormal. Please consult the instructions or APP. Please check the laser sensor for foreign matter and try to restart the robot after cleaning. If the error persists, please contact our Service Department. Error W7: Fan abnormal. Please consult the instructions or APP. Please check whether any foreign matter is stuck in the fan and try to restart the robot. Please clean the dust box and filters and try to restart the robot. If the error persists, please contact our Service Department.82 83
The languages NL, PT, RO, BG, CS, SK, UK, EL, SR, HR, HU and SL are included in the safety instructions.
TEST Straight line test For measuring dust collection performance in accordance with IEC 62885-7, testers can activate the straight line test by using the remote control feature in the app menu.