Aspire Z3605 - Desktop computer ACER - Free user manual and instructions
Find the device manual for free Aspire Z3605 ACER in PDF.
| Product Type | All-in-one desktop computer |
| Brand | Acer |
| Model | Aspire Z3605 |
| Dimensions (L x P x H) | Approximately 530 x 180 x 400 mm |
| Weight | Approximately 8 kg |
| Power supply | 65 W power adapter |
| Screen resolution | 1920 x 1080 pixels (Full HD) |
| Processor | Intel Core i5 (estimated) |
| RAM memory | 8 GB DDR3 (estimated) |
| Hard drive | 1 TB SATA (estimated) |
| Connectivity | Wi-Fi 802.11 b/g/n, Bluetooth 4.0, USB 3.0 ports, HDMI |
| Operating system | Windows 8 |
| Security features | Fingerprint reader (optional), BIOS password, Acer ProShield |
| Certifications | ENERGY STAR, FCC Class B, Canada NMB-003, Russian certification |
| Maintenance | Clean with a soft damp cloth; do not use liquids or aerosols |
| Repairability | Entrust any repairs to an authorized service center |
| General information | User manual available in PDF; warranty included |
Frequently Asked Questions - Aspire Z3605 ACER
User questions about Aspire Z3605 ACER
0 question about this device. Answer the ones you know or ask your own.
Ask a new question about this device
Download the instructions for your Desktop computer in PDF format for free! Find your manual Aspire Z3605 - ACER and take your electronic device back in hand. On this page are published all the documents necessary for the use of your device. Aspire Z3605 by ACER.
USER MANUAL Aspire Z3605 ACER
© 2012 All Rights Reserved.
TravelMate Series User's Manual
This revision: 09/2012
Model number: ____
Serial number: ____
Date of purchase: ____
Place of purchase: ____
Information for your safety and comfort
Safety instructions
Read these instructions carefully. Keep this document for future reference. Follow all warnings and instructions marked on the product.
Turning the product off before cleaning
Unplug this product from the wall outlet before cleaning. Do not use liquid cleaners or aerosol cleaners. Use a damp cloth for cleaning.
Warnings
Accessing the power cord
Be sure that the power outlet you plug the power cord into is easily accessible and located as close to the equipment operator as possible. When you need to disconnect power to the equipment, be sure to unplug the power cord from the electrical outlet.
Disconnecting the power source
Observe the following guidelines when connecting and disconnecting power to the power supply unit:
Install the power supply unit before connecting the power cord to the AC power outlet.
Unplug the power cord before removing the power supply unit from the computer.
If the system has multiple sources of power, disconnect power from the system by unplugging all power cords from the power supplies.
Using electrical power
- This product should be operated from the type of power indicated on the marking label. If you are not sure of the type of power available, consult your dealer or local power company.
- Do not allow anything to rest on the power cord. Do not locate this product where people will walk on the cord.
- If an extension cord is used with this product, make sure that the total ampere rating of the equipment plugged into the extension cord does not exceed the extension cord ampere rating. Also, make sure that the total rating of all products plugged into the wall outlet does not exceed the fuse rating.
- Do not overload a power outlet, strip or receptacle by plugging in too many devices. The overall system load must not exceed 80% of the branch circuit rating. If power strips are used, the load should not exceed 80% of the power strip's input rating.
• This product's AC adapter is equipped with a three-wire grounded plug. The plug
only fits in a grounded power outlet. Make sure the power outlet is properly grounded before inserting the AC adapter plug. Do not insert the plug into a non-grounded power outlet. Contact your electrician for details.

Warning! The grounding pin is a safety feature. Using a power outlet that is not properly grounded may result in electric shock and/or injury.

Note: The grounding pin also provides good protection from unexpected noise produced by other nearby electrical devices that may interfere with the performance of this product.
- The system can be powered using a wide range of voltages; 100 to 120 or 220 to 240 V AC. The power cord included with the system meets the requirements for use in the country/region where the system was purchased. Power cords for use in other countries/regions must meet the requirements for that country/region. For more information on power cord requirements, contact an authorized reseller or service provider.
Bundled dummy cards

Note: Information in this section may not apply to your computer.
Your computer shipped with plastic dummies installed in the card slots. Dummies protect unused slots from dust, metal objects or other particles.
Save the dummies for use when no cards are in the slots.
General
- Do not use this product near water.
- Do not place this product on an unstable cart, stand or table. If the product falls, it could be seriously damaged.
- Slots and openings are provided for ventilation to ensure reliable operation of the product and to protect it from overheating. These openings must not be blocked or covered. The openings should never be blocked by placing the product on a bed, sofa, rug or other similar surface. This product should never be placed near or over a radiator or heat register, or in a built-in installation unless proper ventilation is provided.
- Never push objects of any kind into this product through cabinet slots as they may touch dangerous voltage points or short-out parts that could result in a fire or electric shock. Never spill liquid of any kind onto or into the product.
• To avoid damage of internal components and to prevent battery leakage, do not
place the product on a vibrating surface.
- Never use it under sporting, exercising, or any vibrating environment which will probably cause unexpected short current or damage rotor devices, HDD, Optical drive, and even exposure risk from lithium battery pack.
- The bottom surface, areas around ventilation openings and AC adapter may get hot. To avoid injury, ensure they do not come in contact with your skin or body.
- Your device and its enhancements may contain small parts. Keep them out of the reach of small children.
- The surface temperature of the base will rise during normal operation, particularly when plugged in to AC power. Allowing sustained contact with exposed skin can cause discomfort or burns.
Product servicing
Do not attempt to service this product yourself, as opening or removing covers may expose you to dangerous voltage points or other risks. Refer all servicing to qualified service personnel.
Unplug this product from the wall outlet and refer servicing to qualified service personnel when:
- The power cord or plug is damaged, cut or frayed.
• Liquid was spilled into the product.
• The product was exposed to rain or water. - The product has been dropped or the case has been damaged.
• The product exhibits a distinct change in performance, indicating a need for service. - The product does not operate normally after following the operating instructions.

Note: Adjust only those controls that are covered by the operating instructions, since improper adjustment of other controls may result in damage and will often require extensive work by a qualified technician to restore the product to normal condition.
Guidelines for safe battery usage
This notebook uses a Lithium-ion battery. Do not use it in a humid, wet or corrosive environment. Do not put, store or leave your product in or near a heat source, in a high temperature location, in strong direct sunlight, in a microwave oven or in a pressurized container, and do not expose it to temperatures over 60^ C ( 140^ F). Failure to follow these guidelines may cause the battery to leak acid, become hot, explode or ignite and cause injury and/or damage. Do not pierce, open or disassemble the battery. If the battery leaks and you come into contact with the leaked fluids, rinse thoroughly with water and seek medical attention immediately. For safety reasons, and to prolong the lifetime of the battery, charging will not occur at temperatures below 0^ C ( 32^ F) or above 40^ C ( 104^ F).
The full performance of a new battery is achieved only after two or three complete charge and discharge cycles. The battery can be charged and discharged hundreds of times, but it will eventually wear out. When the operation time becomes noticeably shorter than normal, buy a new battery.
Use only the approved batteries, and recharge your battery only with the approved chargers designated for this device.
Use the battery only for its intended purpose. Never use any charger or battery that is damaged. Do not short-circuit the battery. Accidental short-circuiting can occur when a metallic object such as a coin, clip or pen causes direct connection of the positive (+) and negative (-) terminals of the battery. (These look like metal strips on the battery.) This might happen, for example, when you carry a spare battery in your pocket or purse. Short-circuiting the terminals may damage the battery or the connecting object.
The capacity and lifetime of the battery will be reduced if the battery is left in hot or cold places, such as in a closed car in summer or winter. Always try to keep the battery between 15^ C and 25^ C ( 59^ F and 77^ F). A device with a hot or cold battery may not work temporarily, even when the battery is fully charged. Battery performance is especially limited in temperatures well below freezing.
Do not dispose of batteries in a fire as they may explode. Batteries may also explode if damaged. Dispose of batteries according to local regulations. Please recycle when possible. Do not dispose as household waste.
Wireless devices may be susceptible to interference from the battery, which could affect performance.

Note: Please refer to www.acer.com for battery shipping documents.
Replacing the battery pack
The notebook uses lithium batteries. Replace the battery with the same type as that which came bundled with your product. Use of another battery may present a risk of fire or explosion.

Warning! Batteries may explode if not handled properly. Do not disassemble or dispose of them in fire. Keep them away from children. Follow local regulations when disposing of used batteries.
Caution for Optical Drive Device

Note: Information in this section may not apply to your computer.
CAUTION: This appliance contains a laser system and is classified as a "CLASS 1 LASER PRODUCT." In case of any trouble with this device, please contact your nearest
AUTHORIZED service station. To prevent direct exposure to the laser beam, do not try to open the enclosure.
CLASS 1 LASER PRODUCT
CAUTION: INVISIBLE LASER RADIATION WHEN OPEN. AVOID EXPOSURE TO BEAM.
APPAREIL A LASER DE CLASSE 1 PRODUIT
LASERATTENTION: RADIATION DU FAISCEAU LASER INVISIBLE EN CAS D'OUVERTURE. EVITTER TOUTE EXPOSITION AUX RAYONS.
LUOKAN 1 LASERLAITE LASER KLASSE 1
Telephone line safety
- Disconnect all telephone lines from the equipment when not in use and/or before servicing.
- To avoid the remote risk of electric shock from lightning, do not connect the telephone line to this equipment during lightning or thunderstorms.

Warning! For safety reasons, do not use non-compliant parts when adding or changing components. Consult your reseller for purchase options.
Radio frequency interference

Warning! For safety reasons, turn off all wireless or radio transmitting devices when using your laptop under the following conditions. These devices may include, but are not limited to: wireless LAN (WLAN), Bluetooth and/or 3G.
Remember to follow any special regulations in force in any area, and always switch off your device when its use is prohibited or when it may cause interference or danger. Use the device only in its normal operating positions. This device meets RF exposure guidelines when used normally. To successfully transmit data files or messages, this device requires a good quality connection to the network. In some cases, transmission of data files or messages may be delayed until such a connection is available. Ensure that the above separation distance instructions are followed until the transmission is completed. Parts of the device are magnetic. Metallic materials may be attracted to the device, and persons with hearing aids should not hold the device to the ear with the hearing aid. Do not place credit cards or other magnetic storage media near the device, because information stored on them may be erased.
Medical devices
Operation of any radio transmitting equipment, including wireless phones, may interfere with the functionality of inadequately protected medical devices. Consult a physician or the manufacturer of the medical device to determine if they are adequately shielded from external RF energy or if you have any questions. Switch off your device in health care facilities when any regulations posted in these areas instruct you to do so. Hospitals or health care facilities may be using equipment that could be sensitive to external RF transmissions.
Pacemakers. Pacemaker manufacturers recommend that a minimum separation of 15.3 centimeters (6 inches) be maintained between wireless devices and a pacemaker to avoid potential interference with the pacemaker. These recommendations are consistent with the independent research by and recommendations of Wireless Technology Research. Persons with pacemakers should do the following:
• Always keep the device more than 15.3 centimeters (6 inches) from the pacemaker
- Not carry the device near your pacemaker when the device is switched on. If you suspect interference, switch off your device, and move it.
Hearing aids. Some digital wireless devices may interfere with some hearing aids. If interference occurs, consult your service provider.
Vehicles
RF signals may affect improperly installed or inadequately shielded electronic systems in motor vehicles such as electronic fuel injection systems, electronic anti-skid (anti-lock) braking systems, electronic speed control systems, and air bag systems. For more information, check with the manufacturer, or its representative, of your vehicle or any equipment that has been added. Only qualified personnel should service the device, or install the device in a vehicle. Faulty installation or service may be dangerous and may invalidate any warranty that may apply to the device. Check regularly that all wireless equipment in your vehicle is mounted and operating properly. Do not store or carry flammable liquids, gases, or explosive materials in the same compartment as the device, its parts, or enhancements. For vehicles equipped with an air bag, remember that air bags inflate with great force. Do not place objects, including installed or portable wireless
equipment in the area over the air bag or in the air bag deployment area. If in-vehicle wireless equipment is improperly installed, and the air bag inflates, serious injury could result. Using your device while flying in aircraft is prohibited. Switch off your device before boarding an aircraft. The use of wireless teledevices in an aircraft may be dangerous to the operation of the aircraft, disrupt the wireless telephone network, and may be illegal.
Potentially explosive environments
Switch off your device when in any area with a potentially explosive atmosphere and obey all signs and instructions. Potentially explosive atmospheres include areas where you would normally be advised to turn off your vehicle engine. Sparks in such areas could cause an explosion or fire resulting in bodily injury or even death. Switch off the device at refueling points such as near gas pumps at service stations. Observe restrictions on the use of radio equipment in fuel depots, storage, and distribution areas; chemical plants; or where blasting operations are in progress. Areas with a potentially explosive atmosphere are often, but not always, clearly marked. They include below deck on boats, chemical transfer or storage facilities, vehicles using liquefied petroleum gas (such as propane or butane), and areas where the air contains chemicals or particles such as grain, dust or metal powders. Do not switch the notebook on when wireless phone use is prohibited or when it may cause interference or danger.
Emergency calls
Warning: You cannot make emergency calls through this device. To make an emergency call you shall dial out through your mobile phone or other telephone call system.
Disposal instructions
Do not throw this electronic device into the trash when discarding. To minimize pollution and ensure utmost protection of the global environment, please recycle. For more information on the Waste from Electrical and Electronics Equipment (WEEE) regulations, visit www.acer-group.com/public/Sustainability/sustainability01.htm
ENERGY STAR

Note: Information in this section may not apply to your computer.

ENERGY STAR
Acer's ENERGY STAR qualified products save your money by reducing energy cost and protecting the environment without sacrificing features or performance. Acer is proud to offer our customers products with the ENERGY STAR mark.
What is ENERGY STAR?
Products that are ENERGY STAR qualified use less energy and prevent greenhouse gas emissions by meeting strict energy efficiency guidelines set by the U.S. Environmental Protection Agency. Acer is committed to offering products and services worldwide that help customers save money, conserve energy and improve the quality of our environment. The more energy we can save through higher energy efficiency, the more we reduce greenhouse gases and the risks of climate change. More information refers to www.energystar.gov or www.energystar.gov/powermanagement.
Acer ENERGY STAR qualified products:
- Produce less heat and reduce cooling loads, and warmer climates.
- Automatically go into "display sleep" and "computer sleep" mode after 10 and 30 minutes of inactivity respectively.
- Wake the computer from sleep mode by pressing a key on the keyboard or moving the mouse.
• Computers will save more than 80% energy at "sleep" mode.
ENERGY STAR and the ENERGY STAR mark are registered U.S. marks
Tips and information for comfortable use
Computer users may complain of eyestrain and headaches after prolonged use. Users are also at risk of physical injury after long hours of working in front of a computer. Long work periods, bad posture, poor work habits, stress, inadequate working conditions, personal health and other factors greatly increase the risk of physical injury.
Incorrect computer usage may lead to carpal tunnel syndrome, tendonitis, tenosynovitis or other musculoskeletal disorders. The following symptoms may appear in the hands, wrists, arms, shoulders, neck or back:
- Numbness, or a burning or tingling sensation.
- Aching, soreness or tenderness.
- Pain, swelling or throbbing.
- Stiffness or tightness.
- Coldness or weakness.
If you have these symptoms, or any other recurring or persistent discomfort and/or pain related to computer use, consult a physician immediately and inform your company's health and safety department.
The following section provides tips for more comfortable computer use.
Finding your comfort zone
Find your comfort zone by adjusting the viewing angle of the monitor, using a footrest, or raising your sitting height to achieve maximum comfort. Observe the following tips:
- Refrain from staying too long in one fixed posture.
- Avoid slouching forward and/or leaning backward.
- Stand up and walk around regularly to remove the strain on your leg muscles.
• Take short rests to relax your neck and shoulders. - Avoid tensing your muscles or shrugging your shoulders.
- Install the external display, keyboard and mouse properly and within comfortable reach.
- If you view your monitor more than your documents, place the display at the center of your desk to minimize neck strain.
Taking care of your vision
Long viewing hours, wearing incorrect glasses or contact lenses, glare, excessive room lighting, poorly focused screens, very small typefaces and low-contrast displays could stress your eyes. The following sections provide suggestions on how to reduce eyestrain.
Eyes
• Rest your eyes frequently.
- Give your eyes regular breaks by looking away from the monitor and focusing on a distant point.
- Blink frequently to keep your eyes from drying out.
Display
- Keep your display clean.
- Keep your head at a higher level than the top edge of the display so your eyes point downward when looking at the middle of the display.
- Adjust the display brightness and/or contrast to a comfortable level for enhanced text readability and graphics clarity.
- Eliminate glare and reflections by:
- placing your display in such a way that the side faces the window or any light source
- minimizing room light by using drapes, shades or blinds
- using a task light
- changing the display's viewing angle
• using a glare-reduction filter - using a display visor, such as a piece of cardboard extended from the display's top front edge
xii
- Avoid adjusting your display to an awkward viewing angle.
- Avoid looking at bright light sources for extended periods of time.
Developing good work habits
The following work habits make computer use more relaxing and productive:
• Take short breaks regularly and often.
• Perform some stretching exercises.
- Breathe fresh air as often as possible.
• Exercise regularly and maintain a healthy body.

Warning! We do not recommend using the computer on a couch or bed. If this is unavoidable, work for only short periods, take breaks regularly, and do some stretching exercises.

Note: For more information, please refer to "Regulations and safety notices" on page 62.
First things first
We would like to thank you for making an Acer notebook your choice for meeting your mobile computing needs.
Your guides
To help you use your Acer notebook, we have designed a set of guides:
First off, the setup poster helps you get started with setting up your computer.
The TravelMate Series User's Manual contains useful information applying to all models in the TravelMate Series. It covers basic topics such as using the keyboard and audio, etc. Please understand that due to its nature, the User's Manual will occasionally refer to functions or features which are only contained in certain models of the series, but not necessarily in the model you purchased. Such instances are marked in the text with language such as "only for certain models."
The Quick Guide introduces you to the basic features and functions of your new computer. For more on how your computer can help you to be more productive, please refer to the TravelMate Series User's Manual. This guide contains detailed information on such subjects as system utilities, data recovery, expansion options and troubleshooting. In addition it contains warranty information and the general regulations and safety notices for your notebook. It is available in Portable Document Format (PDF) and comes preloaded on your notebook.
Follow these steps to access it:
- Type 'User' from Start.
- Click on Acer User's Manual.
Basic care and tips for using your computer
Turning your computer on and off
To turn on the computer, simply press and release the power button. Please refer to the setup poster for the location of the power button.
To turn the power off, do any of the following:
- Use the Windows shutdown command: Press the Windows key +
If you need to power down the computer for a short while, but don't want to completely shut it down, you can put it into Hibernate by:
- Pressing the power button.
- OR -
- Press the Windows key +
You can also put the computer in sleep mode by pressing the sleep hotkey
Note: If you cannot power off the computer normally, press and hold the power button for more than four seconds to shut down the computer. If you turn off the computer and want to turn it on again, wait at least two seconds before powering up.
Taking care of your computer
Your computer will serve you well if you take care of it.
- Do not expose the computer to direct sunlight. Do not place it near sources of heat, such as a radiator.
- Do not expose the computer to temperatures below 0^ C ( 32^ F) or above 50^ C ( 122^ F).
- Do not subject the computer to magnetic fields.
- Do not expose the computer to rain or moisture.
- Do not spill water or any liquid on the computer.
- Do not subject the computer to heavy shock or vibration.
- Do not expose the computer to dust or dirt.
- Never place objects on top of the computer.
- Do not slam the computer display when you close it.
- Never place the computer on uneven surfaces.
Taking care of your AC adapter
Here are some ways to take care of your AC adapter:
- Do not connect the adapter to any other device.
- Do not step on the power cord or place heavy objects on top of it. Carefully route the power cord and any cables away from foot traffic.
- When unplugging the power cord, do not pull on the cord itself but pull on the plug.
- The total ampere ratings of the equipment plugged in should not exceed the ampere rating of the cord if you are using an extension cord. Also, the total current rating of all equipment plugged into a single wall outlet should not exceed the fuse rating.
Taking care of your battery pack
Here are some ways to take care of your battery pack:
- Use only batteries of the same kind as replacements. Turn the power off before removing or replacing batteries.
- Do not tamper with batteries. Keep them away from children.
- Dispose of used batteries according to local regulations. Recycle if possible.
Cleaning and servicing
When cleaning the computer, follow these steps:
- Turn off the computer and remove the battery pack.
- Disconnect the AC adapter.
- Use a soft, moist cloth. Do not use liquid or aerosol cleaners.
If either of the following occurs: - The computer has been dropped or the body has been damaged;
- The computer does not operate normally
Please refer to "Frequently asked questions" on page 52.
Information for your safety and comfort iii
Safety instructions iii
Caution for Optical Drive Device vi
Radio frequency interference vii
Medical devices viii
Vehicles viii
Potentially explosive environments ix
Emergency calls ix
Disposal instructions ix
Tips and information for comfortable use x
First things first xiii
Your guides xiii
Basic care and tips for using your computer xiii
Turning your computer on and off xiii
Taking care of your computer xiv
Taking care of your AC adapter xiv
Taking care of your battery pack xv
Cleaning and servicing xv
Touchpad 1
Touchpad basics (with two buttons) 1
Using the keyboard 2
Lock keys and embedded numeric keypad 2
Hotkeys 2
Windows keys 4
Acer ProShield 5
Overview 5
Setting up ProShield 5
Personal Secure Drive 6
Credential Manager 7
Fingerprint Registration ^* 8
Data Protection 8
Data Removal 9
Acer Office Manager 10
Acer Office Manager Console 10
Dashboard 10
Client manager 11
Policies 12
Assets 13
Task scheduler 14
Settings 15
Recovery 16
Creating a recovery backup 16
Creating a drivers and applications backup 18
Recovering your system 20
Reinstalling drivers and applications 20
Returning to an earlier system snapshot 22
Returning your system to its factory condition 23
Recovering from Windows 23
Recovering from a recovery backup 25
Acer Backup Manager 29
Power management 31
Saving power 31
Battery pack 33
Battery pack characteristics 33
Charging the battery 33
Optimizing battery life 34
Checking the battery level 35
Battery-low warning 35
Installing and removing the battery pack 35
Traveling with your computer 37
Disconnecting from the desktop 37
Moving around 37
Preparing the computer 37
What to bring to meetings 38
Taking the computer home 38
Preparing the computer 38
What to take with you 38
Special considerations 38
Setting up a home office 39
Traveling with the computer 39
Preparing the computer 39
What to take with you 39
Special considerations 39
Traveling internationally with the computer 40
Preparing the computer 40
What to bring with you 40
Special considerations 40
Expanding through options 41
Connectivity options 41
Connecting to a network 42
Built-in network feature 42
Wireless networks 43
Connecting to the Internet 43
Wireless networks 43
ExpressCard 44
Thunderbolt 45
IEEE 1394 port 46
HDMI 47
Universal Serial Bus (USB) 48
Playing DVD movies 49
Upgrading memory 50
BIOS utility 51
Boot sequence 51
Enable disk-to-disk recovery 51
Setting passwords 51
Frequently asked questions 52
Requesting service 53
Troubleshooting 55
Troubleshooting tips 55
Error messages 55
Tips and hints for using Windows 8 57
Three concepts you might want to keep in mind 57
How do I access the charms? 57
How do I get to Start? 57
How do I jump between apps? 57
How do I turn off my computer? 57
Why is there a new interface? 57
How do I unlock my computer? 58
How do I personalize my computer? 58
I want to use Windows in the way that I'm used to - give me my desktop back! 59
Where are my apps? 59
What is a Microsoft ID (account)? 60
How do I add a favorite to Internet Explorer? 60
How do I check for Windows updates? 60
Where can I get more information? 61
Regulations and safety notices 62
Touchpad
The built-in touchpad is a pointing device that senses movement on its surface. This means the cursor responds as you move your finger across the surface of the touchpad. The central location on the palmrest provides optimum comfort and support.
Touchpad basics (with two buttons)
The following items show you how to use the touchpad with two buttons.
- Move your finger across the touchpad to move the cursor.
- Press the left and right buttons located beneath the touchpad to perform selection and execution functions. These two buttons are similar to the left and right buttons on a mouse. Tapping on the touchpad is the same as clicking the left button.
| Function Left button | Right button | Main touchpad | |
| Execute | Quickly click twice. | Tap twice (at the same speed as double-clicking a mouse button). | |
| Select Click once. Tap once. | |||
| Drag | Click and hold, then use finger on the touchpad to drag the cursor. | Tap twice (at the same speed as double-clicking a mouse button); rest your finger on the touchpad on the second tap and drag the cursor. | |
| Access context menu | Click once. | ||
Note: Illustrations for reference only. The exact configuration of your PC depends on the model purchased.
Note: When using the touchpad, keep it — and your fingers — dry and clean. The touchpad is sensitive to finger movement; hence, the lighter the touch, the better the response. Tapping harder will not increase the touchpad's responsiveness.
Note: By default, vertical and horizontal scrolling is enabled on your touchpad. It can be disabled under Mouse settings in Windows Control Panel.
Using the keyboard
The keyboard has full-sized keys and an embedded numeric keypad, separate cursor, lock, Windows, function and special keys.
Lock keys and embedded numeric keypad
Note: Information in this section may not apply to your computer. The keyboard has three lock keys which you can toggle on and off.
| Lock key Description | |
| Caps Lock | When Caps Lock is on, all alphabetic characters typed are in uppercase. |
| Num Lock+ | When Num Lock is on, the embedded keypad is in numeric mode. The keys function as a calculator (complete with the arithmetic operators +, -, *, and /). Use this mode when you need to do a lot of numeric data entry. A better solution would be to connect an external keypad. |
| Scroll Lock+ | When Scroll Lock is on, the screen moves one line up or down when you press the up or down arrow keys respectively. Scroll Lock does not work with some applications. |
The embedded numeric keypad functions like a desktop numeric keypad. It is indicated by small characters located on the upper right corner of the keycaps. To simplify the keyboard legend, cursor-control key symbols are not printed on the keys.
| Desired access Num Lock on Num Lock off | ||
| Number keys on embedded keypad | Type numbers in a normal manner. | |
| Cursor-control keys on embedded keypad | Holdwhile using cursor-control keys. | Holdwhile using cursor-control keys. |
| Main keyboard keys | Holdwhile typing letters on embedded keypad. | Type the letters in a normal manner. |
Hotkeys
The computer employs hotkeys or key combinations to access most of the computer's controls like screen brightness and volume output.
To activate hotkeys, press and hold the
| + | (○) | Communication key | Enables / disables the computer's communication devices. (Communication devices may vary by configuration.) |
| +Fn> + | Z^z | Sleep | Puts the computer in Sleep mode. |
| +Fn> + | □□ | Display toggle | Switches display output between the display screen, external monitor (if connected) and both. |
| +Fn> + | ◎◎ | Display off | Turns the display screen backlight off to save power. Press any key to return. |
| +Fn> + | ◎◎ | Touchpad toggle | Turns the built-in touchpad on and off. |
| +Fn> + | ◎◎ | Speaker toggle | Turns the speakers on and off. |
| +Fn> + | NumLk | Turns the embedded numeric keypad on or off (only for certain models). | |
| +Fn> + < > Brightness up | Increases the screen brightness. | ||
| +Fn> + < > Brightness down | Decreases the screen brightness. | ||
| +Fn> + < > Volume up Increases the sound volume. | |||
| +Fn> + < > Volume down Decreases the sound volume. | |||
| +Fn> + | ▶/II | Play/Pause | Play or pause a selected media file. |
| +Fn> + | ■ | Stop | Stop playing the selected media file. |
| +Fn> + | |◀◀ | Previous | Return to the previous media file. |
| +Fn> + | N ▶▶ | ext Jump to the next media file. | |
Windows keys
The keyboard has two keys that perform Windows-specific functions.
| Key Description | ||
| Windows key | Pressed alone it returns to the Start screen.It can also be used with other keys for special functions, please check Windows Help. | |
| Application key | This key has the same effect as clicking the right mouse button; it opens the application's context menu. | |
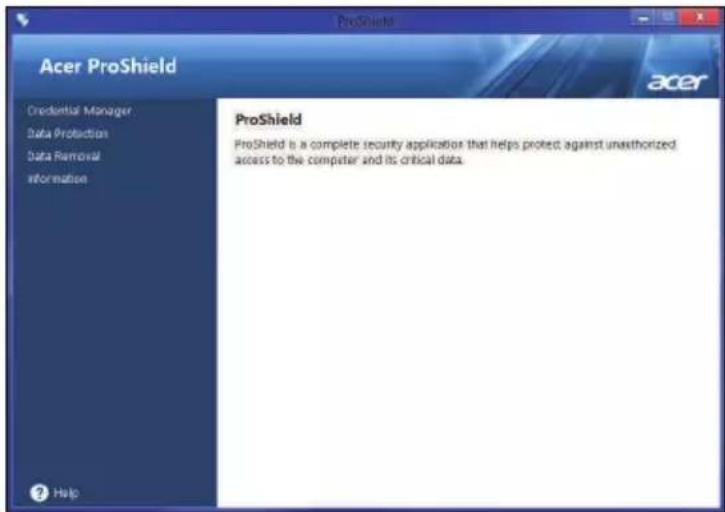
Acer ProShield (Only for selected models)
Overview
An all-in-one security solution, Acer ProShield provides an embedded security solution to address the following points of vulnerability:
- Protecting local storage
• Securing the network
• Securing the device against unauthorized access
Acer ProShield includes five modules that will secure your device from unauthorized access and intrusion.
- Credential Manager - Password, Fingerprint registration (if your PC has a fingerprint scanner), Online accounts configuration
- Pre-Boot Authentication - Boot sequence and device security
• Data Protection - Personal secure drive, file and folder encryption
• Data Removal - File shredder
• Information - About this software
Setting up ProShield
The first time you run ProShield, you will be led through a setup wizard that allows you to set up the parameters for ProShield. Click Start to begin. You will be required to set a password, and can choose to create a Personal Secure Drive.
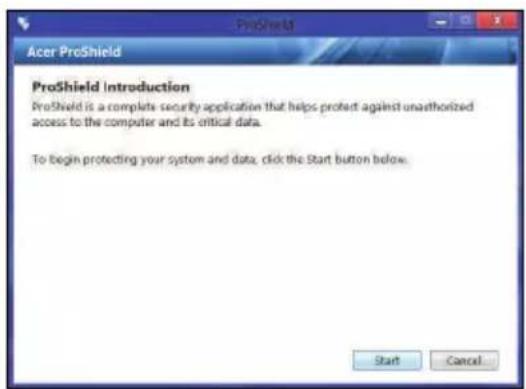

Note: Select a password that you will remember, but is difficult to guess. Do not use words that can be found in a dictionary. It is advisable to use a combination of letters and numbers.
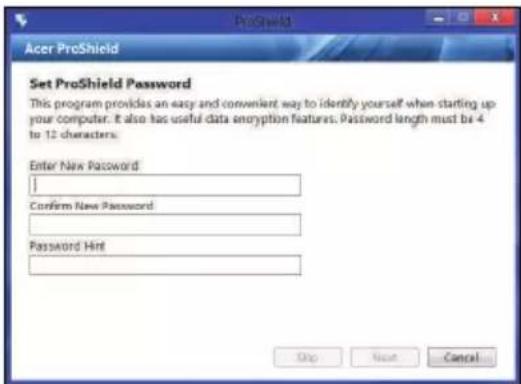
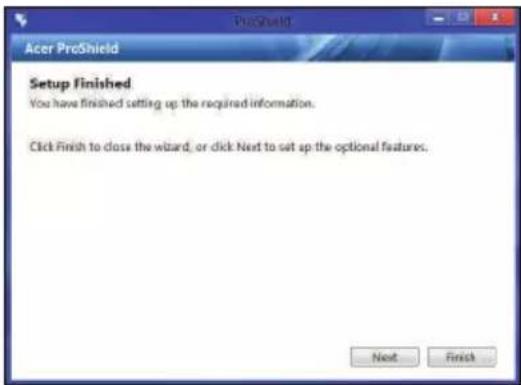
Once you have set a password, you can click Next to proceed to setting up a Personal Secure Drive or click Finish to exit the wizard.
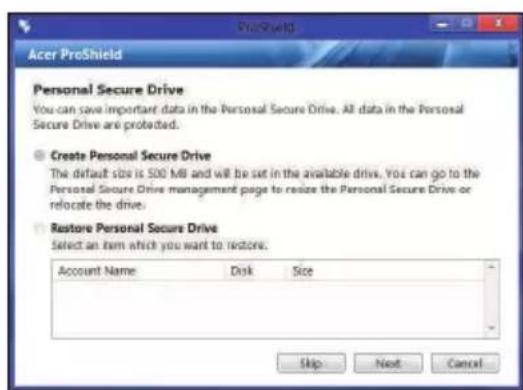
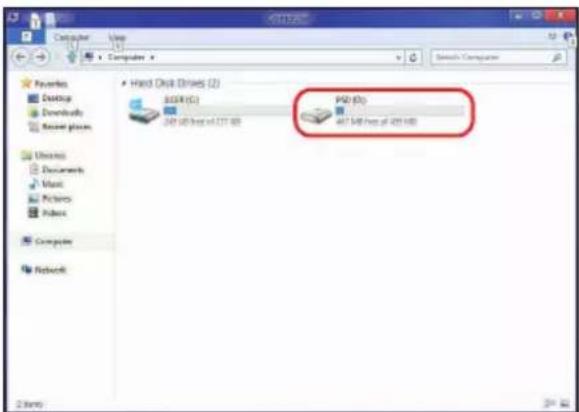
Personal Secure Drive
The Personal Secure Disk (PSD) is a secure section of your hard disk where you can save files. You can only get access to the PSD via password or fingerprint authentication.
Once setup is finished, you can go to the ProShield Console to manage your computer or make changes to the settings.
Use the menu in the left-hand pane to make changes.
Credential Manager
Here you can set and manage your credentials, including Pre-boot authentication.
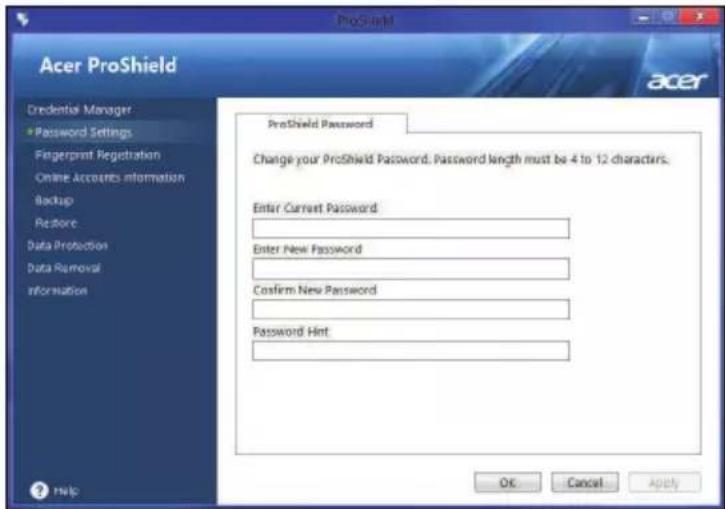
You can change your ProShield and Windows passwords, register fingerprints, manage online account information, and back up or restore credential information.
Fingerprint Registration\*
* (only if your PC has a fingerprint scanner)
You can use a fingerprint scanner to secure your PC from unauthorized access. Register two or more fingerprints that can then be used to access your PC during start up, instead of your password.
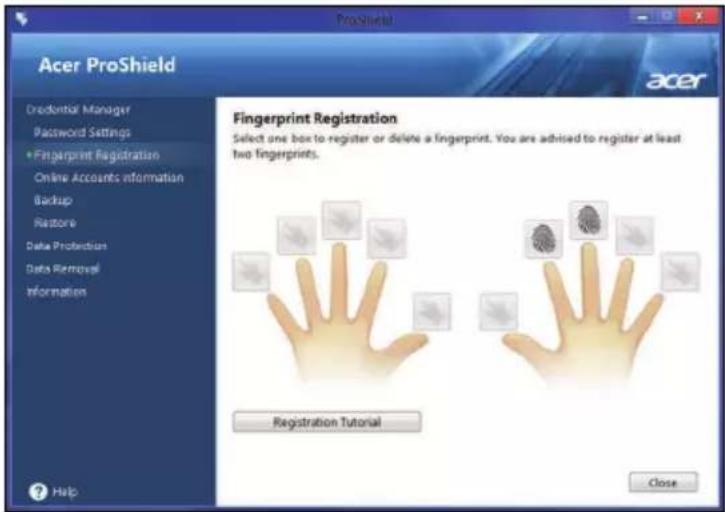
Click Registration Tutorial for more information.
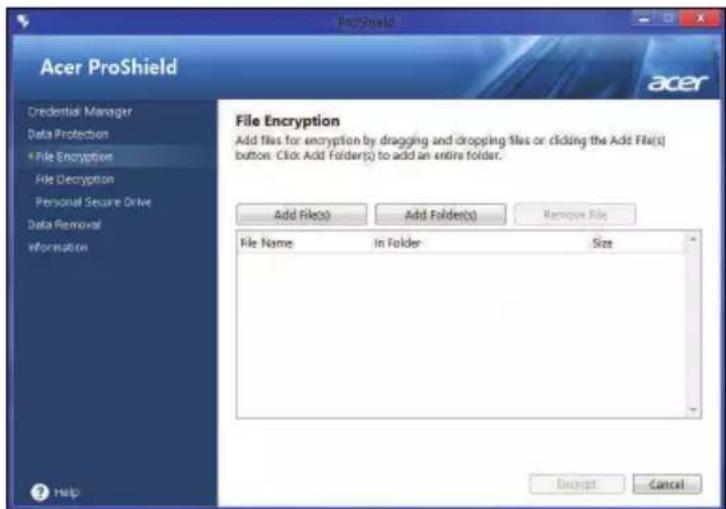
Data Protection
Here you can select files for encryption or decryption, and manage your Personal Secure Drive.
Data Removal
Here you can select files to be completely removed from the hard disk. The File Shredder overwrites the data to make recovering the data impossible.
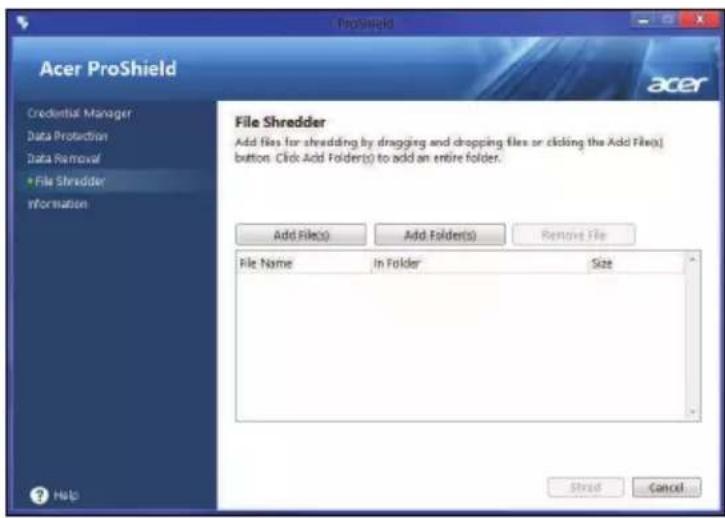
Warning: Make sure you select only the information you want to shred. Once you have shredded a file or folder, it is impossible to recover the data.
Acer Office Manager
Note: Only for selected models.
Acer Office Manager is a monitoring and assent management tool that allows MIS staff to remotely manage and update computers. There are two components to this software package: Acer Office Manager Console and Acer Office Manager Client.
Acer Office Manager Console
The Console application allows you to manage connected clients from a single computer. To start the Console in Windows 8, simply start typing "Office Manager Console". Alternatively, in Desktop mode, select Acer Office Manager Console.
The first time you run the Console, you will be asked to set up a password, and an email address for notifications.
Note: The password should be from 8 to 31 characters long and must include at least one digit, one capital letter and one lower-case letter.
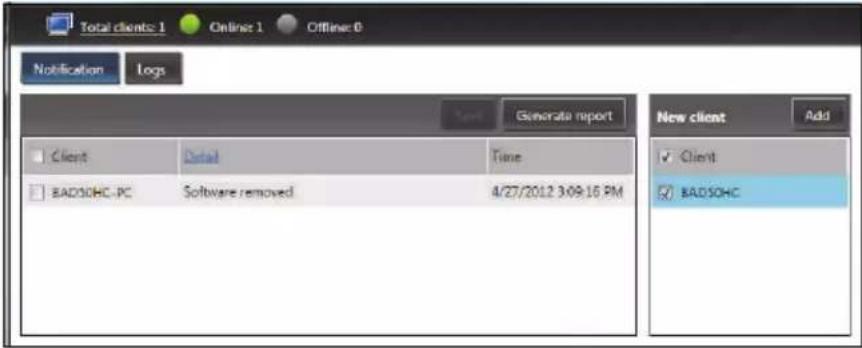
Dashboard
Once you have completed the setup steps, you will be shown the Dashboard, where you can view the total number of connected clients, the online clients and offline clients. You can also add a client by selecting a client under New client and clicking the Add button.
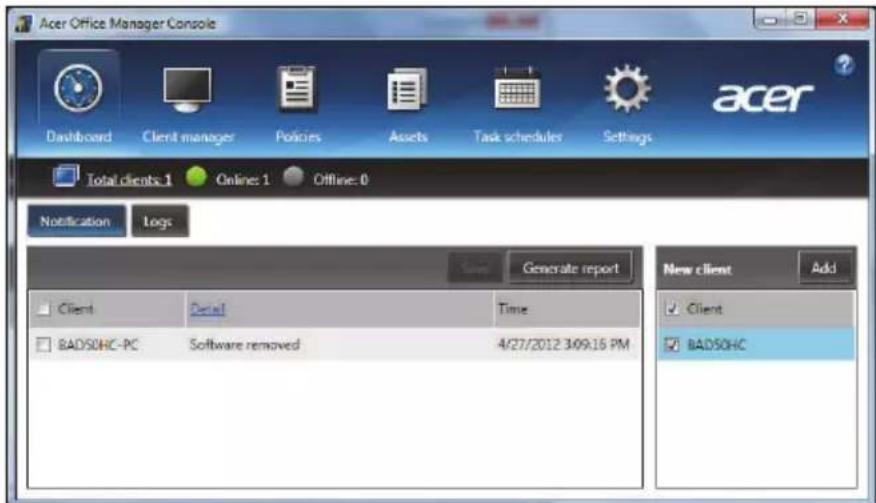
Tip: Select Client under New client to select all the found clients.
In the Notification area you can see any notifications received for the managed clients, including information such as hardware or software
being removed, if the.client has been in use, or if it has been off-line, for longer than the defined time.
Client manager
On the Client manager page you can view all the clients being managed from the Console. Double-click an icon to view the system information for that client.
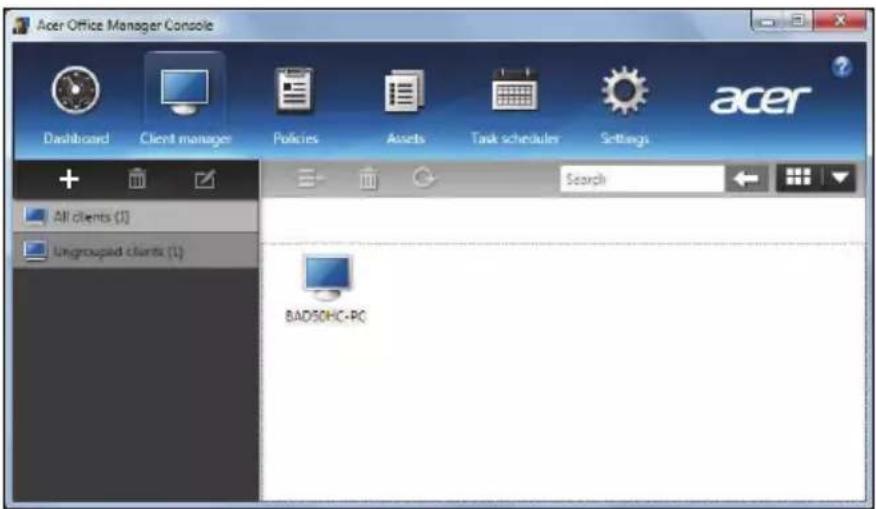
You can also group clients together for easier management. For example, you can create a group for admin staff and another for sales staff. To create a group and add clients to the group, click the + symbol above the list of clients.
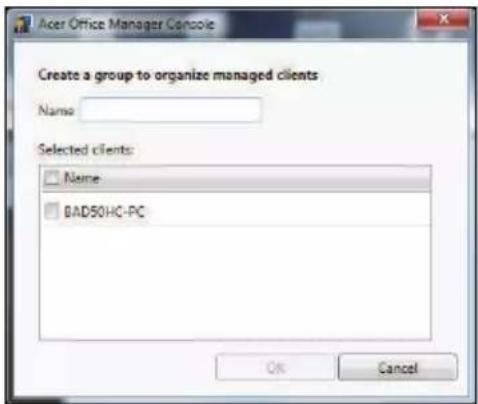
Note: Each client can only be assigned to one group.
Policies
You can set policies to apply to selected clients or groups of clients. Click the + symbol to add a new policy.
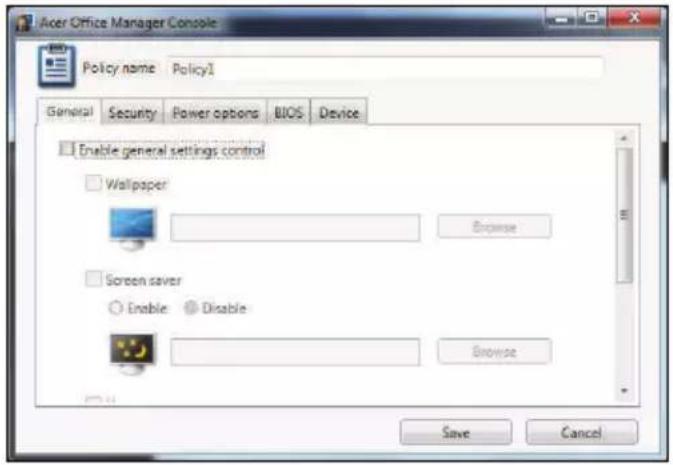
Note: The items in the Device tab are not supported for desktop computers. If you set a policy that includes items in this tab, and deploy the policy to a desktop computer, the settings will be ignored.
| Tab Item Function | ||
| General | Wallpaper | Set a wallpaper that will be applied to all clients. |
| Screen saver | Set a screen saver that will be applied to all clients. | |
| Homepage | Set which home page Internet Explorer will open when launched. | |
| Enable AutoPlay | Enable or disable AutoPlay for external devices or CD- / DVD-ROMs | |
| Security | Enable IE security settings | Define Internet Explorer security settings. |
| Enable user account policy | Set policies for user passwords, such as minimum password strength, password validity, and lockout parameters. | |
| Power options Define power settings. | ||
| BIOS | BIOS Supervisor password | Set a BIOS Supervisor password. If a password already exists, you will need to enter it before you can change it. |
| BIOS User password | Set a BIOS User password. If a password already exists, you will need to enter it or the Supervisor password before you can change the User password. | |
| Change boot sequence settings | Change the order of devices used to boot the system. | |
| Device | Enable or disable devices on notebook computers. | |
Assets
The Assets page gives you a quick overview of the managed clients and the hardware and software for each system. You can also see which Hotfixes have been applied to each system.
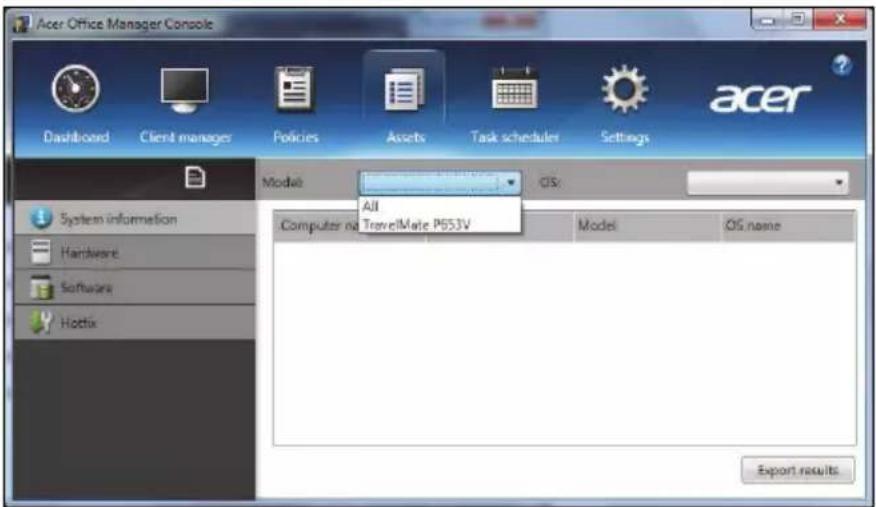
Select the system model from the Model drop-down menu. You can then further refine the search by operating system via the OS drop-down menu. The discovered clients will be listed.
If you wish to export the results as an Excel spreadsheet, click Export results or the icon. You will be asked where to save the file and for a file name.
Task scheduler
On the Task scheduler page, you can set a schedule to deploy selected policies on a regular basis. Click the + symbol to add a new task.
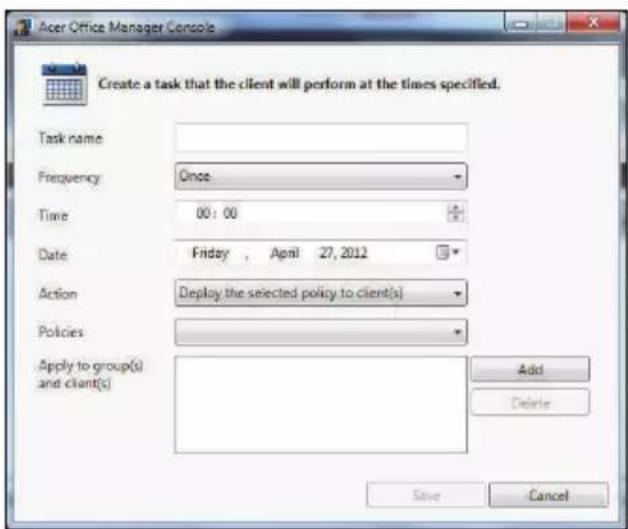
You will need to enter a Task name, select the Frequency, Time, Date, Action, the Policies to be deployed (if appropriate) and the group(s) or client(s).
Once you have entered the necessary information, click Save.
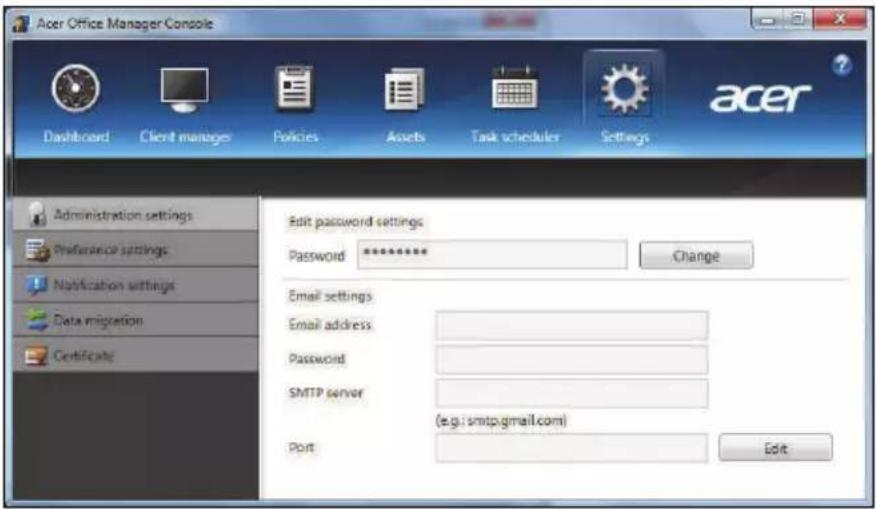
Settings
On the Settings page, you can change your settings as desired.
Tab Item Function
| Administration settings | Edit password settings | Change your Acer Office Manager Console password |
| Email settings | Set up an email account to receive email notifications. | |
| Preference settings | Set up your program launch and lock preferences. | |
| Notification settings | Set up what time-related notifications should show on the Dashboard. | |
| Data migration | Export your Acer Office Manager Console settings for use on another machine. | |
| Certificate | Create new certificate | Create a certificate that you can import to another machine.Certificates ensure that the client can only be managed from a single console. |
| Import certificate | Import a certificate from another machine. This will allow the console to manage a remote client that has a trusted relationship with another console. |
Recovery
If you are having trouble with your computer, and the frequently asked questions (see page 52) do not help, you can 'recover' your computer - i.e. return it to an earlier state.
This section describes the recovery tools available on your computer. Acer provides Acer Recovery Management, which allows you to create a recovery backup, a drivers and applications backup, and to start recovery options, either using Windows tools, or the recovery backup.
Note: Acer Recovery Management is only available with a pre-installed Windows operating system.
Important: We recommend that you create a Recovery Backup and Drivers and Applications Backup and as soon as possible. In certain situations a full recovery will require a USB recovery backup.
Creating a recovery backup
To reinstall from a USB storage drive, you must first create a recovery backup. The recovery backup includes the entire original contents of your computer's hard drive, including Windows and all factory-loaded software and drivers. Using this backup will restore your computer to the same state as when you purchased it, while giving you an option to retain all settings and personal data.
Note: Make sure you have a USB drive with a capacity of at least 16 GB.
- From Start, type 'Recovery' and then click Acer Recovery Management in the list of apps.

- Click Create Factory Default Backup. The Recovery Drive window opens.
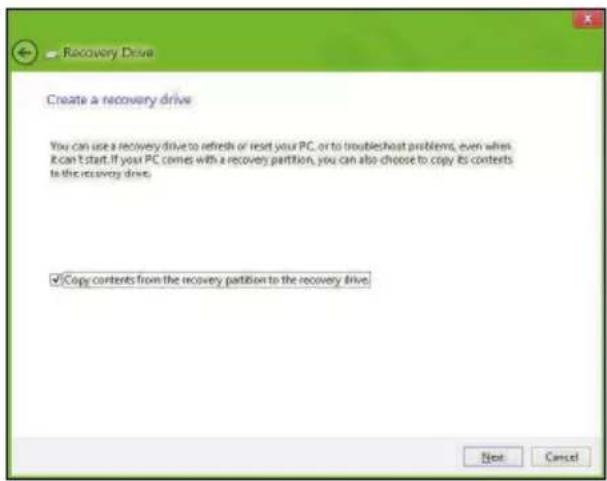
Make sure Copy contents from the recovery partition to the recovery drive is selected. This provides the most complete and safest recovery backup.
- Plug in the USB drive then click Next.
• Make sure your USB drive has enough capacity before continuing. The recovery backup requires at least 16 GB of storage

- You will be shown the backup progress on the screen.
- Follow the process until it completes.
- After creating the recovery backup, you can choose to delete the recovery information on your computer. If you delete this information, you can only use the USB recovery backup to restore your computer, if you lose or erase the USB drive, you cannot restore your computer.
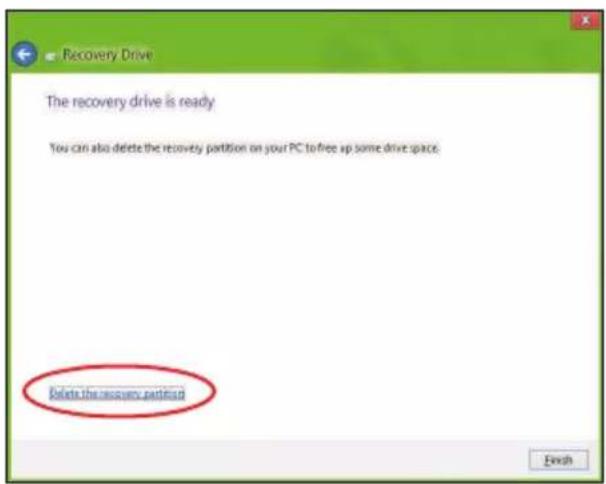
- Unplug the USB drive and label it clearly.
Important: Write a unique, descriptive label on the backup, such as 'Windows Recovery Backup'. Make sure you keep the backup in a safe place that you will remember.
Creating a drivers and applications backup
To create a Drivers and Applications Backup, that contains the factory-loaded software and drivers needed by your computer, you may use either a USB storage drive or, if your computer features a DVD recorder, one or more blank recordable DVDs.
- From Start, type 'Recovery' and then click Acer Recovery Management in the list of apps.
- Click Create Drivers and Applications Backup.
Plug in the USB drive or insert a blank DVD into the optical drive, then click Next.
- If you are using a USB drive, make sure your USB drive has enough capacity before continuing.
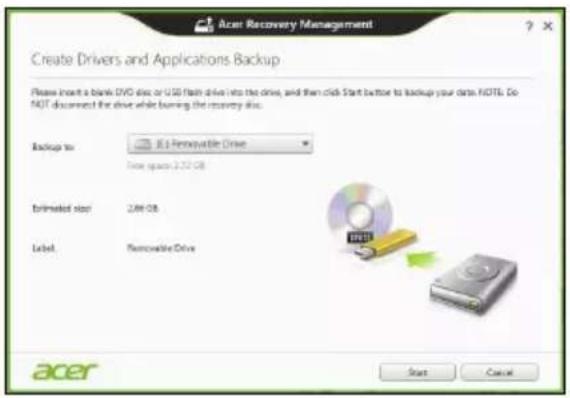
- If using DVDs, it will also show the number of blank, recordable discs you will need to complete the recovery discs. Make sure that you have the required number of identical, blank discs.
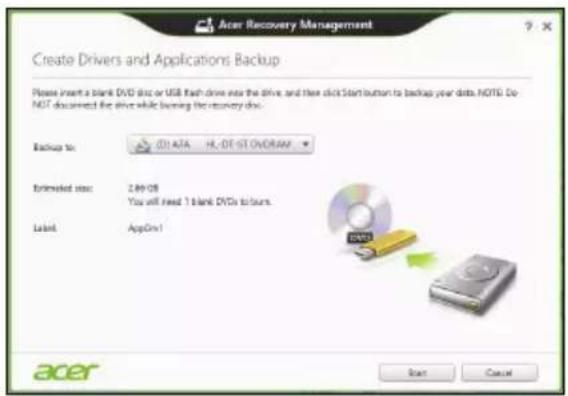
- Click Start to copy files. You will be shown the backup progress on the screen.
- Follow the process until it completes:
- If you are using optical discs, the drive ejects each disc as it completes burning it. Remove the disc from the drive and mark it with a permanent marker.
If multiple discs are required, insert a new disc when prompted, then click OK. Continue until the process is complete.
- If you are using a USB drive, unplug the drive and label it clearly.
Important: Write a unique, descriptive label on each backup, such as 'Drivers and Applications Backup'. Make sure you keep the backup in a safe place that you will remember.
Recovering your system
To recover your system:
- Perform minor fixes.
If only one or two items of software or hardware have stopped working correctly, the problem may be solved by reinstalling the software or the device drivers.
To reinstall software and drivers that were pre-installed at the factory, see "Reinstalling drivers and applications" on page 20.
For instructions on reinstalling software and drivers that were not pre-installed, see that product's documentation or support Web site.
- Revert to a previous system condition.
If reinstalling software or drivers does not help, then the problem may be solved by returning your system to a previous state when everything was working correctly.
For instructions, see "Returning to an earlier system snapshot" on page 22.
- Reset your operating system.
If nothing else has solved the problem and you want to reset your system, but keep your user information, see "Returning your system to its factory condition" on page 23.
- Reset your system to its factory condition.
If nothing else has solved the problem and you want to reset your system to factory condition, see "Returning your system to its factory condition" on page 23.
Reinstalling drivers and applications
As a troubleshooting step, you may need to reinstall the applications and device drivers that came pre-installed on your computer from the factory. You can reinstall using either your hard drive or the backup you have created.
- Other applications - If you need to reinstall software that did not come pre-installed on your computer, you need to follow that software's installation instructions.
- New device drivers - If you need to reinstall device drivers that did not come pre-installed on your computer, follow the instructions provided with the device.
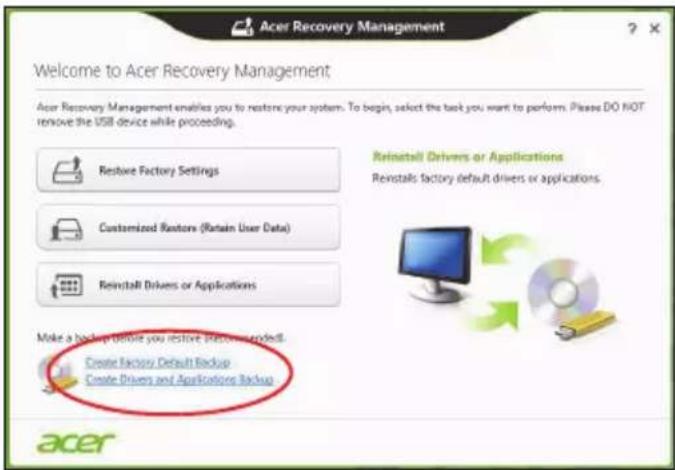
If you are reinstalling using Windows and the recovery information stored on your computer:
- From Start, type 'Recovery' and then click Acer Recovery Management in the list of apps.
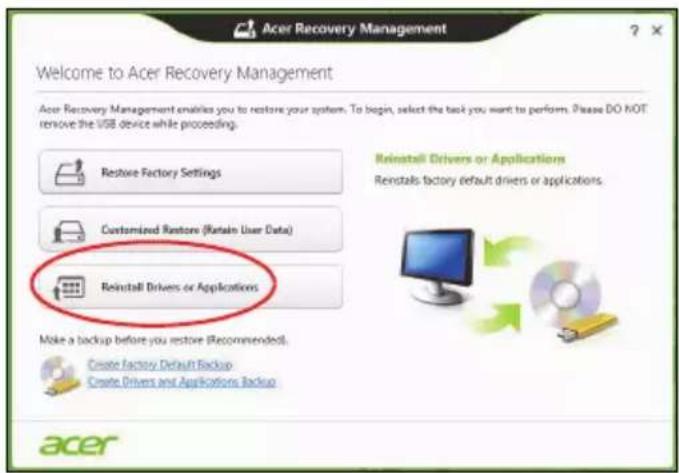
- Click Reinstall Drivers or Applications.
- You should see the Contents section of the Acer Resource Center.
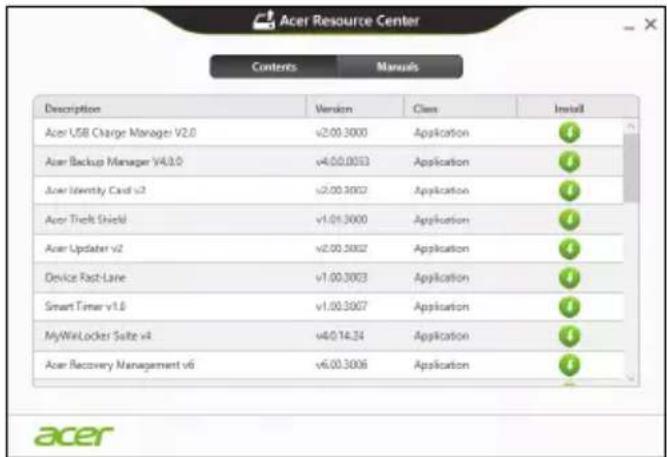
- Click the install icon for the item you want to install, then follow the onscreen instructions to complete the installation. Repeat this step for each item you want to reinstall.

If you are reinstalling from a Drivers and Applications Backup on a DVD or USB drive:
- Insert the Drivers and Applications Backup into the disc drive or connect it to a free USB port.
• If you inserted a DVD wait for Acer Resource Center to start.
- If Acer Resource Center does not start automatically, press the Windows key +
- If you are using a USB drive, press the Windows key +
- You should see the Contents section of the Acer Resource Center.

- Click the install icon for the item you want to install, then follow the onscreen prompts to complete the installation. Repeat this step for each item you want to reinstall.

Returning to an earlier system snapshot
Microsoft System Restore periodically takes a 'snapshot' of your system settings and saves them as restore points. In most cases of hard-to-resolve software problems, you can return to one of these restore points to get your system running again.
Windows automatically creates an additional restore point each day, and also each time you install software or device drivers.
Note: For more information about using Microsoft System Restore, from Start, type 'Help' and then click Help and Support in the list of apps. Type 'Windows system restore' in the Search Help box, then press Enter.
Returning to a restore point
- From Start, type 'Control Panel' and then click Control Panel in the list of apps.
- Click System and Security > Action Center, then click Recovery at the bottom of the window.
- Click Open System Restore, then Next.
-
Click the latest restore point (at a time when your system worked correctly), click Next, then Finish.
-
A confirmation window appears; click Yes. Your system is restored using the restore point you specified. This process may take several minutes, and may restart your computer.
Returning your system to its factory condition
If your computer experiences problems that are not recoverable by other methods, you may need to reinstall everything to return your system to its factory condition. You can recover from either your hard drive or the recovery backup you have created.
- If you can still run Windows and have not deleted the recovery partition, see "Recovering from Windows" on page 23.
- If you cannot run Windows, your original hard drive has been completely re-formatted or you have installed a replacement hard drive, see "Recovering from a recovery backup" on page 25.
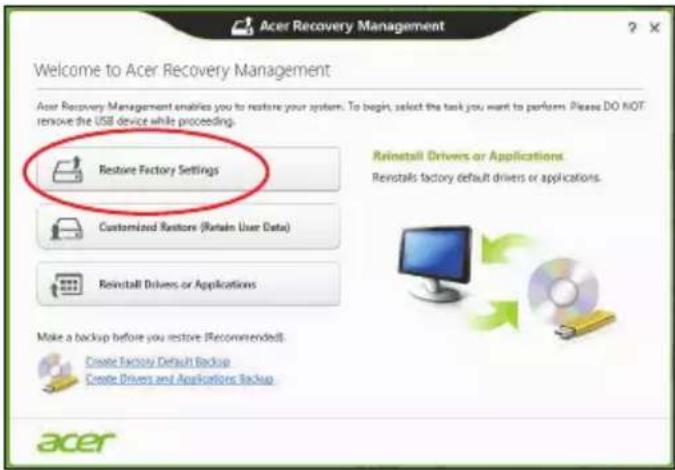
Recovering from Windows
Start Acer Recovery Management:
- From Start, type 'Recovery' and then click Acer Recovery Management in the list of apps.
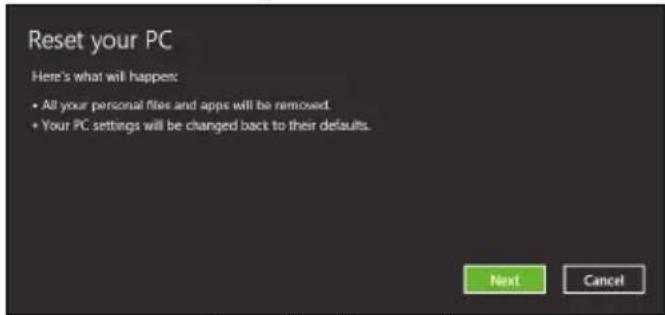
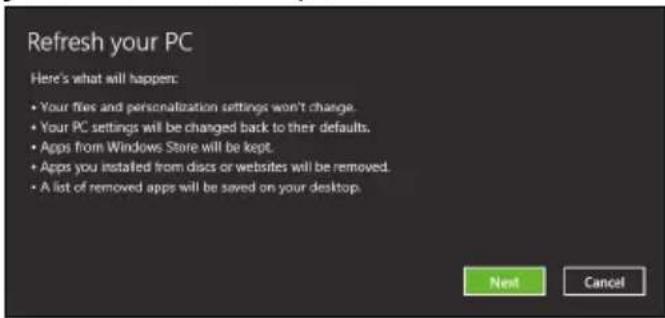
Two options are available, Restore Factory Settings (Reset my PC) or Customized Restore (Refresh my PC).
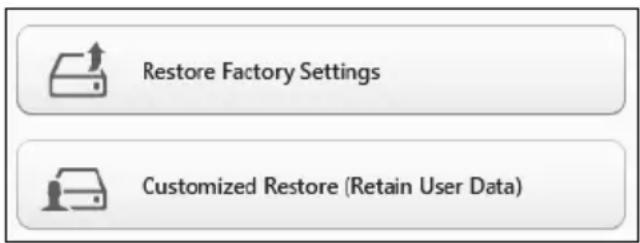
Restore Factory Settings deletes everything on your hard drive, then reinstalls Windows and all software and drivers that were pre-installed on your system. If you can access important files on your hard drive, back them up now. See "Restore Factory Settings with Acer Recovery Management" on page 24.
Customized Restore will attempt to retain your files (user data) but will reinstall all software and drivers. Software installed since you purchased your PC will be removed (except software installed from the Windows Store). See "Customized Restore with Acer Recovery Management" on page 25.
Restore Factory Settings with Acer Recovery Management
1. Click Restore Factory Settings.
Caution: 'Restore Factory Settings' will erase all files on your hard drive.
- If your computer is configured with two operating systems (only available on certain systems), a window opens with the option to restore either Windows 7 or Windows 8. If you choose Windows 7, your computer will restart and restore Windows 7. If you choose Windows 8, Reset your PC opens, as described below.
Note: To fully enjoy Windows 8 features after changing from Windows 7, enter the BIOS (press
- The Reset your PC window opens.
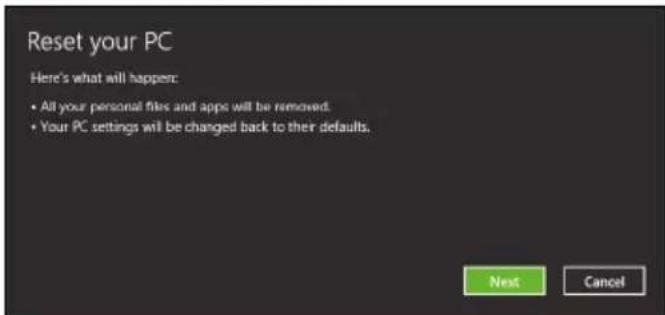
Images for reference only.
- Click Next, then choose how to erase your files:
a. Just remove my files quickly erases all files before restoring your computer and takes about 30 minutes.
b. Fully clean the drive completely cleans the drive after each file is erased, so no files can be viewed after the recovery. Cleaning the drive takes much longer, up to 5 hours, but is much more secure as old files are completely removed.
- Click Reset.
- The recovery process begins by restarting your computer, then continues by copying files to your hard drive.
- After the recovery has finished, you can start using your computer by repeating the first-start process.
Customized Restore with Acer Recovery Management
1. Click Customized Restore (Retain User Data).
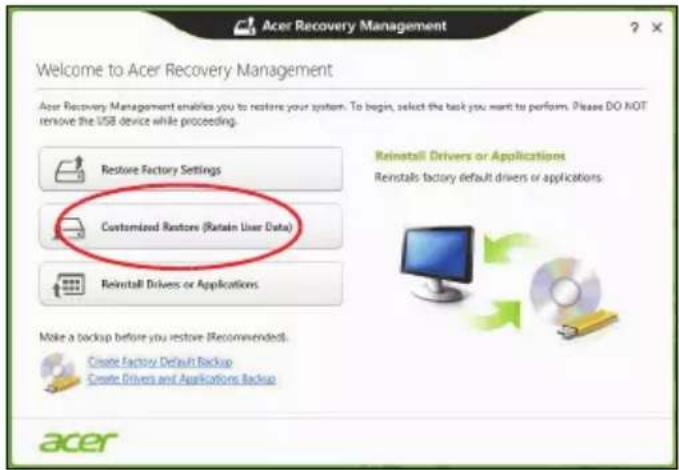
2. The Refresh your PC window opens.

- Click Next, then Refresh.
- The recovery process begins by restarting your computer, then continues by copying files to your hard drive. This process takes about 30 minutes.
Recovering from a recovery backup
To recover from a recovery backup on a USB drive:
- Find your recovery backup.
- Plug in the USB drive and turn on your computer.
- If it is not already enabled, you must enable the F12 Boot Menu:
a. Press
b. Use the left or right arrow keys to select the Main menu.
c. Press the down key until F12 Boot Menu is selected, press
d. Use the left or right arrow keys to select the Exit menu.
e. Depending on the type of BIOS your computer uses, select Save Changes and Exit or Exit Saving Changes and press Enter. Select OK or Yes to confirm.
f. Your computer will restart.
- During startup, press
to open the boot menu. The boot menu allows you to select which device to start from, select the USB drive.
a. Use your arrow keys to select USB Device, then press Enter.
b. Windows starts from the recovery backup instead of the normal startup process.
-
Select your keyboard type.
-
Select Troubleshoot and then choose the type of recovery to use:
a. Click Advanced then System Restore to start Microsoft System Restore:
Microsoft System Restore periodically takes a 'snapshot' of your system settings and saves them as restore points. In most cases of hard-to-resolve software problems, you can return to one of these restore points to get your system running again.
b. Click Reset your PC to start the reset process:
Reset your PC deletes everything on your hard drive, then reinstalls Windows and all software and drivers that were pre-installed on your system. If you can access important files on your hard drive, back them up now. See "Reset your PC from the recovery backup" on page 27.
c. Click Refresh your PC to start the refresh process:
Refresh your PC will attempt to retain your files (user data) but will reinstall all software and drivers. Software installed since you purchased your PC will be removed (except software installed from the Windows Store). See "Refresh your PC from the recovery backup" on page 28.
Reset your PC from the recovery backup
Caution: Reset your PC will erase all files on your hard drive.
- The Reset your PC window opens.
Images for reference only.
- Click Next.
- Select the operating system to recover (normally only one option is available).
- Choose to keep any changes to the hard drive:
a. If you have deleted the recovery partition or otherwise changed the partitions on the hard drive and want to keep these changes, select No.
b. To completely restore your computer to Factory Settings, select Yes.
- Choose how to erase your files:
a. Just remove my files quickly erases all files before restoring your computer and takes about 30 minutes.
b. Fully clean the drive completely cleans the drive after each file is erased, so no files can be viewed after the recovery. Cleaning the drive takes much longer, up to 5 hours, but is much more secure as old files are completely removed.
-
Click Reset.
-
After the recovery has finished, you can start using your computer by repeating the first-start process.
Refresh your PC from the recovery backup
- The Refresh your PC window opens.
- Click Next.
- Select the operating system to recover (normally only one option is available).
- Click Refresh.
- The recovery process begins by restarting your computer, then continues by copying files to your hard drive. This process takes about 30 minutes.
Acer Backup Manager
Note: This feature is only available on certain models.
Acer Backup Manager is a utility that enables you to do a variety of backup functions each accomplished in only three simple steps. You can even set these functions to automatically recur as often as your like.
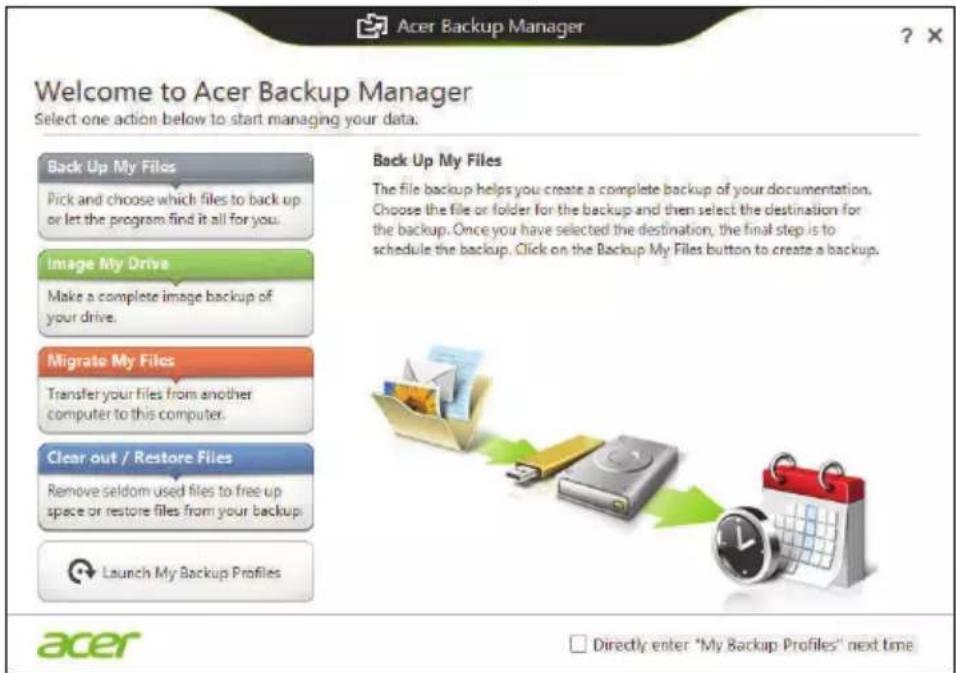
To start Acer Backup Manager in Windows 8, simply start typing "Backup Manager". Alternatively, in Desktop mode, select Acer Backup Manager. This opens the Welcome screen; from this screen you can select the type of backup you'd like to create.
- Back Up My Files: Select files to back up.
- Image My Drive: Create a backup file for the entire drive. You can burn this file to a DVD, save them to another drive on your computer*, or save them to removable media (i.e. a flash drive) to restore your computer at a later time.
- Migrate My Files: Allows you to copy files to a USB device so that you can migrate files from your old computer to your new one or any other computer with Acer Backup Manager.
- Clear out / Restore Files: Remove seldom used files to free up disk space or restore files from your backup.
Select the backup type you'd like to make and select the files or drive you want to back up, then follow the onscreen instructions:
-
Select the content you want to back up. The less content you select, the quicker the process will be, but it will increase your risks of losing data.
-
Select where you want the backup copies to be stored. Your options include removable media, a drive on your computer*, CD/DVD media, a remote PC, or the cloud using Microsoft SkyDrive.
- Select how often you want Acer Backup Manager to create backups.
Once you have finished these three steps, backups will be created according to the schedule.
*NOTE: You will need to select an external drive or your D: drive; Acer Backup Manager cannot store a backup on the source drive.
If you wish to change your settings at any time, go to the Acer Backup Manager profiles screen. To get there from the Acer Backup Manager welcome screen, click Launch My Backup Profiles.
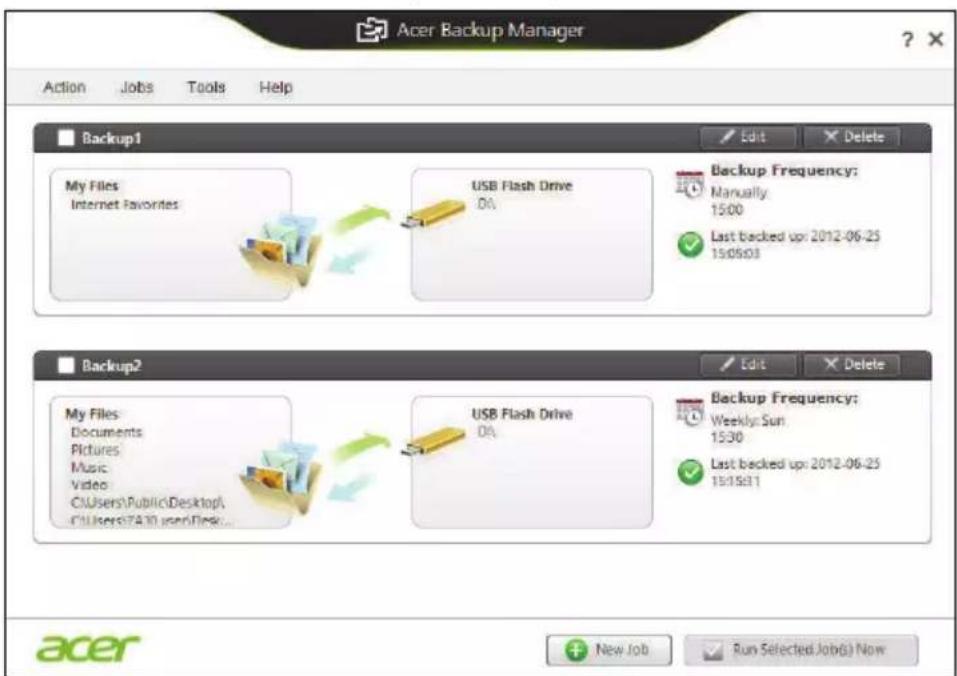
From here you can edit or delete existing backup profiles.
Power management
This computer has a built-in power management unit that monitors system activity. System activity refers to any activity involving one or more of the following devices: keyboard, mouse, hard disk, peripherals connected to the computer, and video memory. If no activity is detected for a period of time, the computer stops some or all of these devices in order to conserve energy.
Saving power
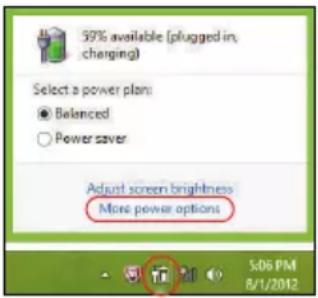
Disable Fast startup
Your computer uses Fast startup to start quickly, but also uses a small amount of power to check for signals to start. These checks will slowly drain your computer's battery.
If you prefer to reduce your computer's power requirements and environmental impact, turn off Fast startup:
Note: If Fast startup is off, your computer will take longer to start from Sleep. If your computer features Acer Instant On or Acer Always Connect, these will also be turned off.
Your computer will also not start if it receives an instruction to start over a network (Wake on LAN).
- Open the Desktop.
- Click Power Options in the Notification area.
-
Select More Power Options.
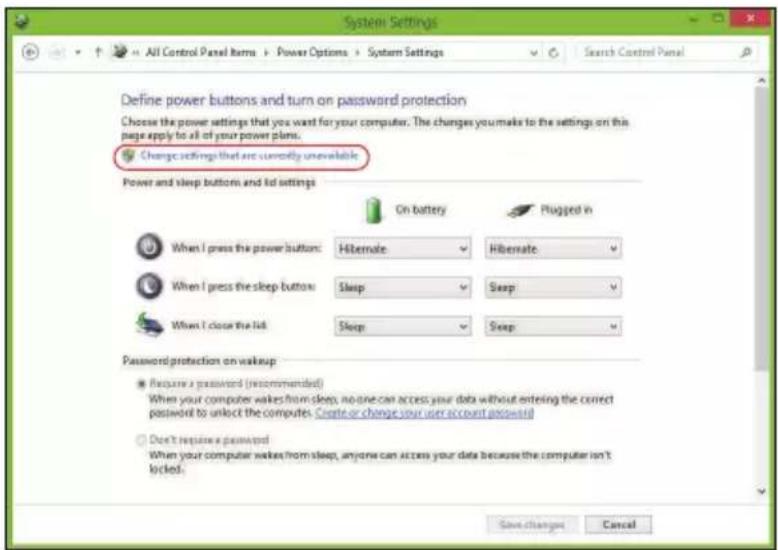
-
Select Choose what the power buttons do.
- To access Shutdown Settings, select Change settings that are currently unavailable.
- Scroll down and disable Turn on fast startup.
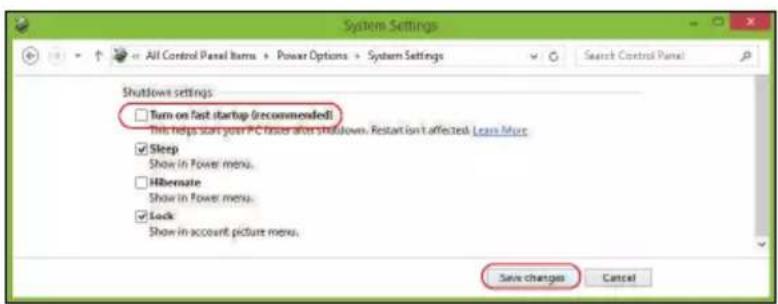
- Select Save changes.
Battery pack
The computer uses a battery pack that gives you long use between charges.
Battery pack characteristics
The battery pack has the following characteristics:
- Employs current battery technology standards.
- Delivers a battery-low warning.
The battery is recharged whenever you connect the computer to the AC adapter. Your computer supports charge-in-use, enabling you to recharge the battery while you continue to operate the computer. However, recharging with the computer turned off results in a significantly faster charge time.
The battery will come in handy when you travel or during a power failure. It is advisable to have an extra fully charged battery pack available as backup. Contact your dealer for details on ordering a spare battery pack.
Charging the battery
To charge the battery, first make sure that it is correctly installed in the battery bay. Plug the AC adapter into the computer, and connect to a mains power outlet. You can continue to operate your computer on AC power while your battery is charging. However, charging the battery with the computer turned off results in a significantly faster charge time.
Note: You are advised to charge the battery before retiring for the day. Charging the battery overnight before traveling enables you to start the next day with a fully charged battery.
Conditioning a new battery pack
Before you use a battery pack for the first time, there is a conditioning process that you should follow:
-
Insert the new battery without turning the computer on.
-
Connect the AC adapter and fully charge the battery.
-
Disconnect the AC adapter.
-
Turn on the computer and operate using battery power.
-
Fully deplete the battery until the battery-low warning appears.
-
Reconnect the AC adapter and fully charge the battery again.
Follow these steps again until the battery has been charged and discharged three times.
Use this conditioning process for all new batteries, or if a battery hasn't been used for a long time. If the computer is to be stored for more than two weeks, you are advised to remove the battery pack from the unit.
Warning! Do not expose battery packs to temperatures below 0^ C ( 32^ F) or above 45^ C ( 113^ F). Extreme temperatures may adversely affect the battery pack.
By following the battery conditioning process you condition your battery to accept the maximum possible charge. Failure to follow this procedure will prevent you from obtaining the maximum battery charge, and will also shorten the effective lifespan of the battery.
In addition, the useful lifespan of the battery is adversely affected by the following usage patterns:
- Using the computer on constant AC power with the battery inserted. If you want to use constant AC power, you are advised to remove the battery pack after it is fully charged.
- Not discharging and recharging the battery to its extremes, as described above.
- Frequent use; the more you use the battery, the faster it will reach the end of its effective life. A standard computer battery has a life span of about 300 charges.
Optimizing battery life
Optimizing battery life helps you get the most out of battery operation, prolonging the charge/recharge cycle and improving recharging efficiency. You are advised to follow the suggestions set out below:
• Purchase an extra battery pack.
- Use AC power whenever possible, reserving battery for on-the-go use.
- Eject a PC Card if it is not being used, as it will continue to draw power (for selected models).
- Store the battery pack in a cool, dry place. The recommended temperature is 10^ (50°F) to 30^ (86°F). Higher temperatures cause the battery to self-discharge faster.
- Excessive recharging decreases the battery life.
- Look after your AC adapter and battery.
Checking the battery level
The Windows power meter indicates the current battery level. Rest the cursor over the battery/power icon on the taskbar to see the battery's present charge level.
Battery-low warning
When using battery power pay attention to the Windows power meter.
Warning! Connect the AC adapter as soon as possible after the battery-low warning appears. Data will be lost if the battery to become fully depleted and the computer shuts down.
When the battery-low warning appears, the recommended course of action depends on your situation:
Situation Recommended Action
| The AC adapter and a power outlet are available. | 1. Plug the AC adapter into the computer, and then connect to the mains power supply.2. Save all necessary files.3. Resume work.Turn off the computer if you want to recharge the battery rapidly. |
| An extra fully charged battery pack is available. | 1. Save all necessary files.2. Close all applications.3. Turn off the computer.4. Replace the battery pack.5. Turn on the computer and resume work. |
| The AC adapter or a power outlet is unavailable. You have no spare battery pack. | 1. Save all necessary files.2. Close all applications.3. Turn off the computer. |
Installing and removing the battery pack
Important: Before removing the battery from the unit, connect the AC adapter if you want to continue using your computer. Otherwise, turn off the computer first.
To install a battery pack:
- Align the battery with the open battery bay; make sure that the end with the contacts will enter first, and that the top surface of the battery is facing up.
- Slide the battery into the battery bay and gently push until the battery locks in place.
To remove a battery pack:
- Slide the battery release latch to release the battery.
- Pull the battery from the battery bay.
Traveling with your computer
This section gives you tips and hints to consider when moving around or traveling with your computer.
Disconnecting from the desktop
Follow these steps to disconnect your computer from external accessories:
- Save any open files.
- Remove discs from optical drive(s).
- Shut down the computer.
- Close the display cover.
- Disconnect the cord from the AC adapter.
- Disconnect the keyboard, pointing device, printer, external monitor and other external devices.
- Disconnect the Kensington lock if you are using one to secure the computer.
Moving around
When you are just moving within short distances, for example, from your office desk to a meeting room.
Preparing the computer
Before moving the computer, close and latch the display cover to place it in Sleep mode. You can now safely take the computer anywhere you go within the building. To bring the computer out of Sleep mode, open the display; then press and release the power button.
If you are taking the computer to a client's office or a different building, you may choose to shut down the computer:
Press the Windows key +
Or:
You can put the computer in Sleep mode by pressing
When you are ready to use the computer again, open the display; then press and release the power button.
Note: The computer may enter Hibernation or Deep Sleep mode after being in Sleep mode for a period of time.
What to bring to meetings
If your meeting is relatively short, you probably do not need to bring anything with you other than your computer. If your meeting will be longer, or if your battery is not fully charged, you may want to bring the AC adapter with you to plug in your computer in the meeting room.
If the meeting room does not have an electrical outlet, reduce the drain on the battery by putting the computer in Sleep mode. Press
Taking the computer home
When you are moving from your office to your home or vice versa.
Preparing the computer
After disconnecting the computer from your desktop, follow these steps to prepare the computer for the trip home:
- Check that you have removed all media and compact discs from the drive(s). Failure to remove the media can damage the drive head.
- Pack the computer in a protective case that can prevent the computer from sliding around and cushion it if it should fall.
Caution: Avoid packing items next to the top cover of the computer. Pressure against the top cover can damage the screen.
What to take with you
Unless you have some items at home, take the following items with you:
- AC adapter and power cord.
- The printed setup poster.
Special considerations
Follow these guidelines to protect your computer while traveling to and from work:
- Minimize the effects of temperature changes by keeping the computer with you.
- If you need to stop for an extended period of time and cannot carry the computer with you, leave the computer in the trunk of the car to avoid exposing the computer to excessive heat.
- Changes in temperature and humidity can cause condensation. Allow the computer to return to room temperature, and inspect the screen for condensation before turning on the computer. If the temperature change is greater than 10^ C ( 18^ F), allow the computer to come to room temperature slowly. If possible, leave the computer for 30 minutes in an environment with a temperature between outside and room temperature.
Setting up a home office
If you frequently work on your computer at home, you may want to purchase a second AC adapter for use at home. With a second AC adapter, you can avoid carrying the extra weight to and from home.
If you use your computer at home for significant periods of time, you might also want to add an external keyboard, monitor or mouse.
Traveling with the computer
When you are moving within a larger distance, for instance, from your office building to a client's office building or traveling locally.
Preparing the computer
Prepare the computer as if you were taking it home. Make sure that the battery in the computer is charged. Airport security may require you to turn on your computer when carrying it into the gate area.
What to take with you
Take the following items with you:
- AC adapter
- Spare, fully-charged battery pack(s)
• Additional printer driver files if you plan to use another printer
Special considerations
In addition to the guidelines for taking the computer home, follow these guidelines to protect your computer while traveling:
- Always take the computer as carry-on luggage.
- If possible, have the computer inspected by hand. Airport security X-ray machines are safe, but do not put the computer through a metal detector.
Traveling internationally with the computer
When you are moving from country to country.
Preparing the computer
Prepare the computer as you would normally prepare it for traveling.
What to bring with you
Bring the following items with you:
- AC adapter.
- Power cords that are appropriate for the country to which you are traveling.
- Spare, fully-charged battery packs.
• Additional printer driver files if you plan to use another printer. - Proof of purchase, in case you need to show it to customs officials.
• International Travelers Warranty passport.
Special considerations
Follow the same special considerations as when traveling with the computer.
In addition, these tips are useful when traveling internationally:
- When traveling in another country, check that the local AC voltage and the AC adapter power cord specifications are compatible. If not, purchase a power cord that is compatible with the local AC voltage. Do not use converter kits sold for appliances to power the computer.
- If you are using the modem, check if the modem and connector are compatible with the telecommunications system of the country you are traveling in.
Expanding through options
Your computer offers you a complete mobile computing experience.
Connectivity options
Ports allow you to connect peripheral devices to your computer as you would with a desktop PC. For instructions on how to connect different external devices to the computer, read the following sections.
Connecting to a network
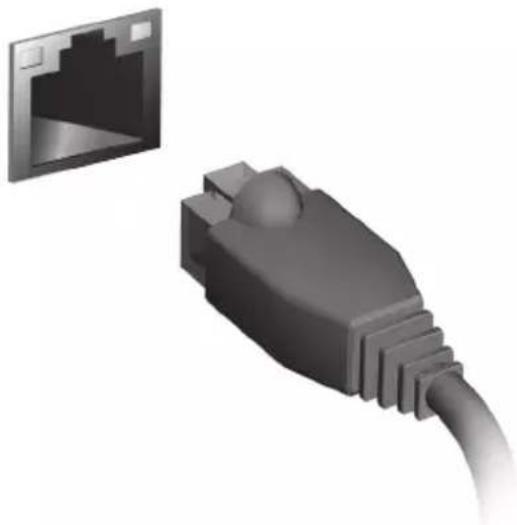
Built-in network feature
The built-in network feature allows you to connect your computer to an Ethernet-based network.
To use the network feature, connect an Ethernet cable from the Ethernet (RJ-45) port on the chassis of the computer to a network jack or hub on your network.
natural_image
3D illustration of a USB connector with a separate port socket (no text or symbols)Wireless networks
Connecting to the Internet
Your computer's wireless connection is turned on by default.
Windows will detect and display a list of available networks during setup.
Select your network and enter the password if required.
Otherwise, open Internet Explorer and follow the instructions.
Please refer to your ISP or router documentation.
Wireless networks
A wireless LAN or WLAN is a wireless local area network, which may link two or more computers without using wires. Setting up a wireless network is easy and allows you to share files, peripheral devices and an Internet connection.
What are benefits of a wireless network?
Mobility
Wireless LAN systems allow you and other users of your home network to share access to files and devices connected to the network, for example a printer or scanner.
Also you can share an internet connection with other computers in your home.
Installation speed and simplicity
Installing a wireless LAN system can be fast and easy and eliminates the need to pull cables through walls and ceilings.
Components of a wireless LAN
To set up your Wireless network at home you need to have the following:
Access point (router)
Access points (routers) are two-way transceivers that broadcast data into the surrounding environment. Access points act as a mediator between wired and wireless network. Most routers have a built-in DSL modem that will allow you access to a high speed DSL internet connection. The ISP (Internet Service Provider) you have chosen normally supplies a modem/router with the subscription to their services. Read carefully the documentation supplied with your Access point/router for detailed setup instructions.
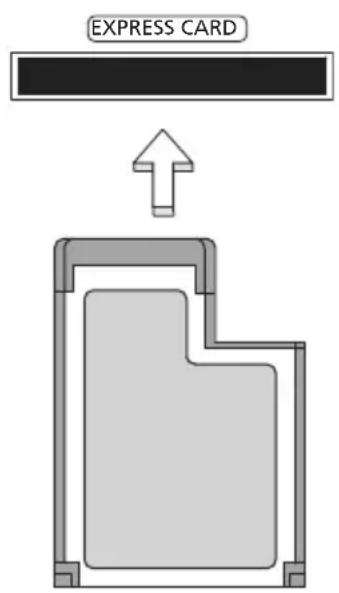
ExpressCard
ExpressCards support a vast number of expansion options, including flash memory card adapters, TV-tuners, Bluetooth connectivity and IEEE 1394b adapters. ExpressCards support USB 2.0 and PCI Express applications.
Important: There are two types, ExpressCard/54 and ExpressCard/34 (54 mm and 34 mm), each with different functions. Not all ExpressCard slots will support both types. Please refer to your card's manual for details on how to install and use the card, and its functions.
Inserting an ExpressCard
Insert the card into the slot and push gently until it clicks into position.
Ejecting an ExpressCard
Before ejecting an ExpressCard:
- Exit the application using the card.
- Left-click the remove hardware icon on the taskbar and stop the card operation.
- Push the card gently into the slot and release to pop out the card. Then pull the card free from the slot.
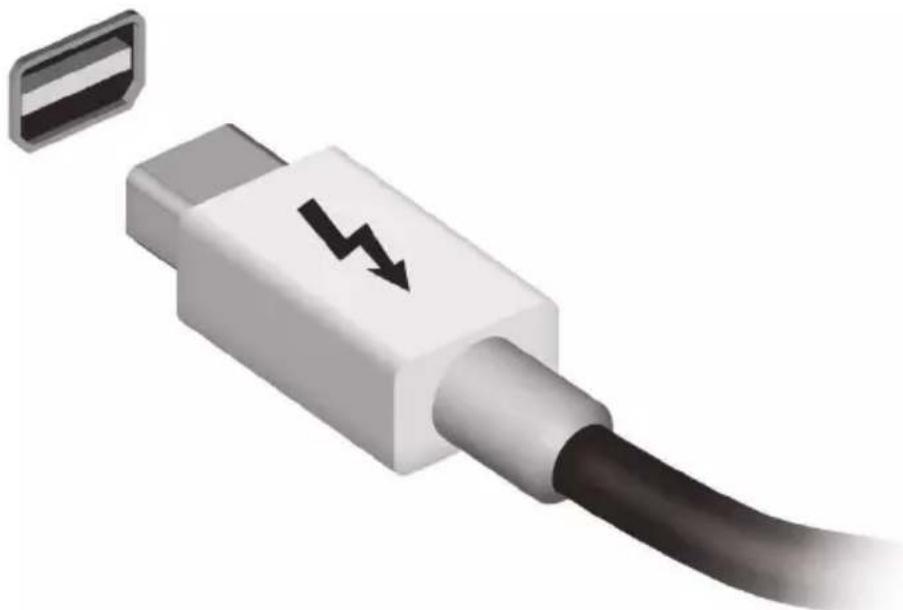
Thunderbolt
Thunderbolt is a high-speed connection that supports storage devices as well as external displays. It is compatible with the DisplayPort standard.
Note: Up to six Thunderbolt devices and one DisplayPort display can be daisy-chained, however, the DisplayPort display will be the last device in the chain, and it cannot be preceded by a Thunderbolt display.
natural_image
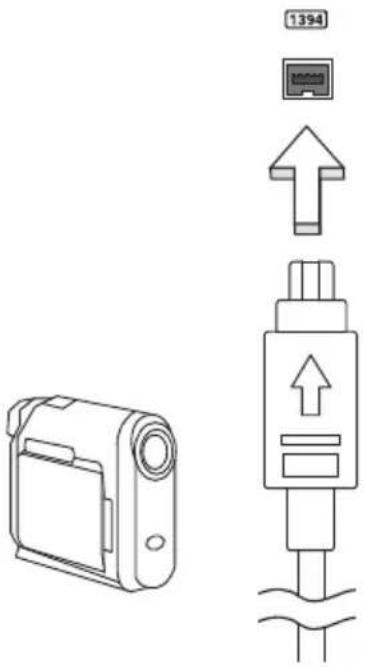
3D illustration of a white USB connector with a black lightning bolt symbol and a separate gray connector (no text or labels)IEEE 1394 port
The computer's IEEE 1394 port allows you to connect to an IEEE 1394-compatible device like a video camera or digital camera. See your video or digital camera's documentation for details.
HDMI
HDMI (High-Definition Multimedia Interface) is an industry-supported, uncompressed, all-digital audio/video interface. HDMI provides an interface between any compatible digital audio/video source, such as a set-top box, DVD player, and A/V receiver and a compatible digital audio and/or video monitor, such as a digital television (DTV), over a single cable.
Use the HDMI port on your computer to connect with high-end audio and video equipment. Single cable implementation allows tidy setup and fast connection.
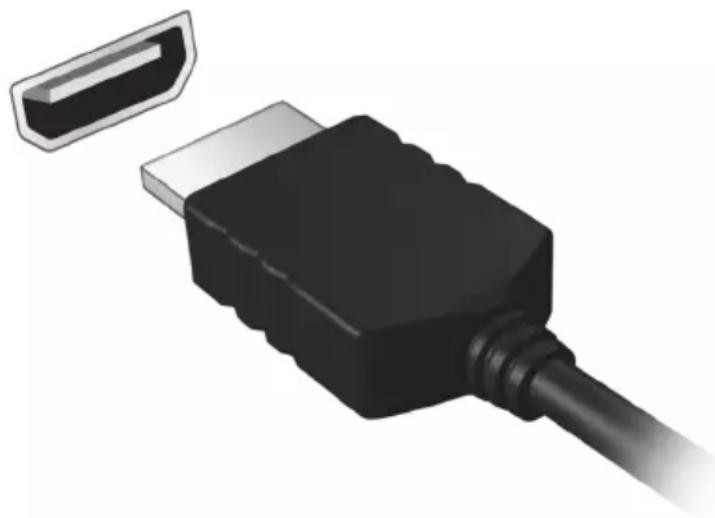
natural_image
Illustration of a black USB connector with a separate white connector (no text or symbols)Universal Serial Bus (USB)
The USB port is a high-speed serial bus which allows you to connect USB peripherals without taking up system resources.

natural_image
Close-up of a black USB connector with a cable, showing its connector and port (no text or symbols visible)Playing DVD movies
When the DVD drive module is installed in the optical drive bay, you can play DVD movies on your computer.
- Insert a DVD.
- The DVD movie will automatically play after a few seconds.
Important: When you launch the DVD player for the first time, the program asks you to enter the region code. DVDs are available for 6 regions.
| Region code Country or region |
| 1 USA, Canada |
| 2 Europe, Middle East, South Africa, Japan |
| 3 Southeast Asia, Taiwan, South Korea |
| 4 Latin America, Australia, New Zealand |
| 5 Former USSR, parts of Africa, India |
| 6 People's Republic of China |
Note: To change the region code, insert a DVD movie of a different region into the DVD drive.
Once your DVD drive is set to a region code, it will only play DVDs for that region. You can set the region code a maximum of five times (including the first time), after which the last region code set will remain permanent.
Recovering your hard disk does not reset the number of times the region code has been set.
Upgrading memory
Follow these steps to install memory:
- Turn off the computer, unplug the AC adapter (if connected) and remove the battery pack. Then turn the computer over to access its base.
- Remove the screws from the memory cover; then lift and remove the memory cover.
- (a) Insert the memory module diagonally into the slot, then (b) gently press it down until it clicks into place.
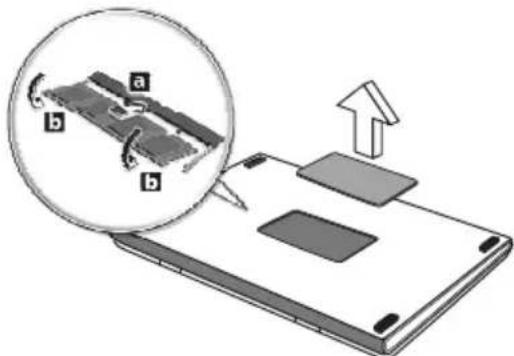
- Replace the memory cover and secure it with the screw.
- Reinstall the battery pack, and reconnect the AC adapter.
- Turn on the computer.
The computer automatically detects and reconfigures the total memory size.
BIOS utility
The BIOS utility is a hardware configuration program built into your computer's BIOS.
Your computer is already properly configured and optimized, and you do not need to run this utility. However, if you encounter configuration problems, you may need to run it.
To activate the BIOS utility, press
Boot sequence
To set the boot sequence in the BIOS utility, activate the BIOS utility, then select Boot from the categories listed at the top of the screen.
Setting passwords
To set a password on boot, activate the BIOS utility, then select Security from the categories listed at the top of the screen. Find Password on boot: and use the
Frequently asked questions
The following is a list of possible situations that may arise during the use of your computer. Easy solutions are provided for each one.
I turned on the power, but the computer does not start or boot up. Look at the power indicator:
- If it is not lit, no power is being supplied to the computer. Check the following:
- If you are using on the battery, it may be low and unable to power the computer. Connect the AC adapter to recharge the battery pack.
- Make sure that the AC adapter is properly plugged into the computer and to the power outlet.
- If it is lit, check the following:
- Is a disc in the optical drive? Remove it and press
+ + to restart the system. - Do you have a USB storage device (USB disk or smartphone) plugged into your computer? Unplug it and press
+ + to restart the system.
Nothing appears on the screen
The computer's power management system automatically blanks the screen to save power. Press any key to turn the display back on.
If pressing a key does not turn the display back on, three things might be the cause:
- The brightness level might be too low. Press <Fn>+<_> (increase) to adjust the brightness level.
- The display device might be set to an external monitor. Press the display toggle hotkey
+ to toggle the display back to the computer. - If the Sleep indicator is lit, the computer is in Sleep mode. Press and release the power button to resume.
No audio is heard from the computer
Check the following:
- The volume may be muted. In Windows, look at the volume control (speaker) icon on the taskbar. If it is crossed-out, click the icon and deselect the Mute all option.
- The volume level may be too low. In Windows, look at the volume control icon on the taskbar. You can also use the volume control buttons to adjust the volume.
- If headphones, earphones or external speakers are connected to the line-out port on the computer, the internal speakers automatically turn off.
I want to eject the optical drive tray without turning on the power. There is a mechanical eject hole on the optical drive. Simply insert the tip of a pen or paperclip into the hole and push to eject the tray.
The keyboard does not respond
Try attaching an external keyboard to a USB port on the computer. If it works, contact your dealer or an authorized service center as the internal keyboard cable may be loose.
The printer does not work
Check the following:
- Make sure that the printer is connected to a power outlet and that it is turned on.
- Make sure that the printer cable is connected securely to a USB port and the corresponding port on the printer.
Requesting service
International Travelers Warranty (ITW)
Your computer is backed by an International Travelers Warranty (ITW) that gives you security and peace of mind when traveling. Our worldwide network of service centers are there to give you a helping hand.
An ITW passport comes with your computer. This passport contains all you need to know about the ITW program. A list of available, authorized service centers is in this handy booklet. Read this passport thoroughly.
Always have your ITW passport on hand, especially when you travel, to receive the benefits from our support centers. Place your proof-of-purchase in the flap located inside the front cover of the ITW passport.
If the country you are traveling in does not have an Acer-authorized ITW service site, you can still get in contact with our offices worldwide. Please visit www.acer.com.
Before you call
Please have the following information available when you call Acer for online service, and please be at your computer when you call. With your support, we can reduce the amount of time a call takes and help solve your problems efficiently. If there are error messages or beeps reported by your computer, write them down as they appear on the screen (or the number and sequence in the case of beeps).
You are required to provide the following information:
Name:
Address:
Telephone number:
Machine and model type:
Serial number:
Date of purchase:
Troubleshooting
This chapter shows you how to deal with common system problems.
Read it before calling a technician if a problem occurs. Solutions to more serious problems require opening up the computer. Do not attempt to open the computer yourself; contact your dealer or authorized service center for assistance.
Troubleshooting tips
This computer incorporates an advanced design that delivers onscreen error message reports to help you solve problems.
If the system reports an error message or an error symptom occurs, see "Error messages" below. If the problem cannot be resolved, contact your dealer. See "Requesting service" on page 53.
Error messages
If you receive an error message, note the message and take the corrective action. The following table lists the error messages in alphabetical order together with the recommended course of action.
Error messages Corrective action
| CMOS battery bad | Contact your dealer or an authorized service center. |
| CMOS checksum error | Contact your dealer or an authorized service center. |
| Disk boot failure | Insert a system (bootable) disk, then pressto reboot. |
| Equipment configuration error | Press(during POST) to enter the BIOS utility, then pressExitin the BIOS utility to reboot. |
| Hard disk 0 error | Contact your dealer or an authorized service center. |
| Hard disk 0 extended type error | Contact your dealer or an authorized service center. |
| I/O parity error | Contact your dealer or an authorized service center. |
| Keyboard error or no keyboard connected | Contact your dealer or an authorized service center. |
| Keyboard interface error | Contact your dealer or an authorized service center. |
Error messages Corrective action
| Memory size mismatch | Press <F2> (during POST) to enter the BIOS utility, then press Exit in the BIOS utility to reboot. |
If you still encounter problems after going through the corrective measures, please contact your dealer or an authorized service center for assistance.
Tips and hints for using Windows 8
We know this is a new operating system that will take some getting used to, so we've created a few pointers to help you get started.
Three concepts you might want to keep in mind
1. Start
The Start button is no longer available; you can launch apps from the Start screen.
2. Tiles
Live tiles are similar to thumbnails of the apps.
3. Charms
Charms allow you to perform useful functions, such as sharing content, turning off your PC or changing settings.
How do I access the charms?
Move the cursor to the upper or lower right-hand corner of the screen to access the charms, or press the Windows key +
How do I get to Start?
Press the Windows key on the keyboard; press the Windows key +
How do I jump between apps?
Move the cursor to the left-hand edge of the screen to view thumbnails of apps that are currently running.
You may also press the Windows key +
How do I turn off my computer?
Press the Windows key +
Why is there a new interface?
The new interface for Windows 8 is designed to work well with touch input. Windows Store apps will automatically use the whole screen and don't
require closing in the traditional way. Windows Store apps will be displayed on Start using live-tiles.
What are 'live tiles?'
Live tiles are similar to thumbnails of the apps that will be updated with new content whenever you're connected to the Internet. So, for example, you can view weather or stock updates without needing to open the app.
How do I unlock my computer?
Press the any key and click on a user account icon to unlock the computer. If your account has a password set, you will need to enter the password to continue.
How do I personalize my computer?
You can personalize Start with a different background image or by arranging the tiles to suit your personal needs.
To change the background, press the Windows key +
How do I move tiles?
Click and hold a tile to select it, then drag it to the place on Start that you want it to appear. Other tiles will be moved to accommodate the tile in its new location.
Can I make tiles bigger or smaller?
Right-click on a tile, then select Smaller or Larger from the menu that appears at the bottom of the screen.
How do I personalize the Lock screen?
You can personalize the lock screen with a different image or to show you quick status and notifications to suit your personal needs.
To change the background, press the Windows key +
So, how do I close an app?
Move the cursor to the top of the screen and click and drag the window downwards to close the app.
You can close apps from the thumbnails on the left-hand edge of the screen by right-clicking on a thumbnail and selecting Close.
Can I change the screen resolution?
From Start, start typing 'Control Panel' to open Search and display the results; click Control Panel > Adjust screen resolution.
I want to use Windows in the way that I'm used to - give me my desktop back!
From Start click the Desktop tile to see a traditional desktop. You can pin apps you frequently use to the taskbar to easily open them.
If you click an app that is not a Windows Store app, Windows will automatically open the app using Desktop.
Where are my apps?
From Start, simply start typing the name of the app you would like to open, and Search will automatically open and list results.
To view the complete list of apps, press the space bar or the Menu key and click All apps.
How do I make an app appear on Start?
If you're in All apps and you want to make an app appear on Start, you can select the app and right-click on it. Select Pin to Start from the menu that appears at the bottom of the screen.
How do I remove a tile from Start?
Right-click the tile and click Unpin from Start from the menu that appears at the bottom of the screen.
How do I make an app appear on my taskbar in Desktop?
If you're in All apps and you want to make an app appear on the taskbar in Desktop, you can select the app and right-click on it. Select Pin to taskbar from the menu that appears at the bottom of the screen.
How do I install apps?
You can download Windows Store apps from Store. You will need to have a Microsoft ID to purchase and download apps from Store.
I can't find apps like Notepad and Paint! Where are they?
From Start you can simply start typing the name of the app you're looking for to open Search and list the results. Alternatively, open All apps and scroll to 'Windows Accessories' to see the list of legacy programs.
What is a Microsoft ID (account)?
A Microsoft account is an email address and password that you use to sign in to Windows. You can use any email address, but it is best if you choose the one you already use to communicate with friends and sign in to your favorite websites. When you sign in to your PC with a Microsoft account, you'll connect your PC to the people, files, and devices you care about.
Do I need one?
You do not need a Microsoft ID to use Windows 8, but it makes life easier because you can sync data across different machines you sign in to using a Microsoft ID.
How do I get one?
If you've already installed Windows 8 and didn't sign in with a Microsoft account or you don't have a Microsoft account and want to get one, press the Windows key +
How do I add a favorite to Internet Explorer?
Internet Explorer 10 doesn't have traditional favorites, instead you can pin shortcuts to Start. Once you have the page open, right-click anywhere on the page to open the menu at the bottom of the screen. Click Pin to Start.
How do I check for Windows updates?
Press the Windows key +
Where can I get more information?
For more information please visit:
- Windows 8 tutorials: www.acer.com/windows8-tutorial
- Support FAQs: www.acer.com/support
Regulations and safety notices
FCC STATEMENT
This device has been tested and found to comply with the limits for a Class B digital device pursuant to Part 15 of the FCC rules. These limits are designed to provide reasonable protection against harmful interference in a residential installation. This device generates, uses, and can radiate radio frequency energy and, if not installed and used in accordance with the instructions, may cause harmful interference to radio communications.
However, there is no guarantee that interference will not occur in a particular installation. If this device does cause harmful interference to radio or television reception, which can be determined by turning the device off and on, the user is encouraged to try to correct the interference by one or more of the following measures:
- Reorient or relocate the receiving antenna.
- Increase the separation between the device and receiver.
- Connect the device into an outlet on a circuit different from that to which the receiver is connected.
- Consult the dealer or an experienced radio/television technician for help.
Notice: Shielded cables
All connections to other computing devices must be made using shielded cables to maintain compliance with FCC regulations.
NOTICE: PERIPHERAL DEVICES
Only peripherals (input/output devices, terminals, printers, etc.) certified to comply with the Class B limits may be attached to this equipment. Operation with non-certified peripherals is likely to result in interference to radio and TV reception.
Caution: Changes or modifications not expressly approved by the manufacturer could void the user's authority, which is granted by the Federal Communications Commission, to operate this computer.
NOTICE FOR CANADA
This Class B digital apparatus complies with Canadian ICES-003.
The LCD unit is produced with high-precision manufacturing techniques. Nevertheless, some pixels may occasionally misfire or appear as black or red dots. This has no effect on the recorded image and does not constitute a malfunction.
RADIO DEVICE REGULATORY NOTICES
Note: Below regulatory information is for models with wireless LAN and / or Bluetooth only.
To prevent radio interference to the licensed service, this device is intended to be operated indoors.
This product complies with the radio frequency and safety standards of any country or region in which it has been approved for wireless use. Depending on configurations, this product may or may not contain wireless radio devices (such as wireless LAN and/or Bluetooth modules). Below information is for products with such devices.
Declaration of Conformity for EU countries
Hereby, Acer, declares that this computer is in compliance with the essential requirements and other relevant provisions of Directive 1999/5/EC.
Wireless operation channels for different domains
N. America 2.412-2.462 GHz Ch01 through Ch11
Japan 2.412-2.484 GHz Ch01 through Ch14
Europe ETSI 2.412-2.472 GHz Ch01 through Ch13
France: Restricted wireless frequency bands
Some areas of France have a restricted frequency band. The worst case maximum authorized power indoors is:
- 10 mW for the entire 2.4 GHz band (2400 MHz - 2483.5 MHz)
- 100 mW for frequencies between 2446.5 MHz and 2483.5 MHz
Note: Channels 10 through 13 inclusive operate in the band 2446.6 MHz to 2483.5 MHz.
There are few possibilities for outdoor use: On private property or on the private property of public persons, use is subject to a preliminary authorization procedure by the Ministry of Defense, with maximum authorized power of 100 mW in the 2446.5 - 2483.5 MHz band. Use outdoors on public property is not permitted.
In the departments listed below, for the entire 2.4 GHz band:
- Maximum authorized power indoors is 100 mW
- Maximum authorized power outdoors is 10 mW
Departments in which the use of the 2400 - 2483.5 MHz band is permitted with an EIRP of less than 100 mW indoors and less than 10 mW outdoors:
| 01 Ain Orientales | 25 Doubs | 59 Nord | 71 Saone et Loire |
| 02 Aisne | 26 Drome | 60 Oise | 75 Paris |
| 03 Allier | 32 Gers | 61 Orne | 82 Tarn et Garonne |
| 05 Hautes Alpes | 36 Indre | 63 Puy Du Dome | 84 Vaucluse |
| 08 Ardennes | 37 Indre et Loire | 64 Pyrenees | 88 Vosges |
| 09 Ariege | 41 Loir et Cher | Atlantique | 89 Yonne |
| 11 Aude | 45 Loret | 66 Pyrenees | 90 Territoire de |
| 12 Aveyron | 50 Manche | 67 Bas Rhin | Belfort |
| 16 Charente | 55 Meuse | 68 Haut Rhin | 94 Val de Marne |
| 24 Dordogne | 58 Nievre | 70 Haute Saone |
This requirement is likely to change over time, allowing you to use your wireless LAN card in more areas within France.
Please check with ART for the latest information (www.art-telecom.fr).
Note: Your WLAN Card transmits less than 100 mW, but more than 10 mW.
List of national codes
This equipment may be operated in the following countries:
| Country | ISO 31662 letter code | Country | ISO 31662 letter code |
| Austria | AT | Malta | MT |
| Belgium | BE | Netherlands | NT |
| Cyprus | CY | Poland | PL |
| Czech Republic | CZ | Portugal | PT |
| Denmark | DK | Slovakia | SK |
| Estonia | EE | Slovenia | SL |
| Finland | FI | Spain | ES |
| France | FR | Sweden | SE |
| Germany | DE | United Kingdom | GB |
| Greece | GR | Iceland | IS |
| Hungary | HU | Liechtenstein | LI |
| Ireland | IE | Norway | NO |
| Italy | IT | Switzerland | CH |
| Latvia | LV | Bulgaria | BG |
| Lithuania | LT | Romania | RO |
| Luxembourg | LU | Turkey | TR |
CANADA — LOW-POWER LICENSE-EXEMPT RADIO COMMUNICATION DEVICES (RSS-210)
Exposure of humans to RF fields (RSS-102)
The computer employs low gain integral antennas that do not emit RF field in excess of Health Canada limits for the general population; consult Safety Code 6, obtainable from Health Canada's website at www.hc-sc.gc.ca/rpb.
This device complies with RSS210 of Industry Canada.
This Class B digital apparatus complies with Canadian ICES-003, Issue 4, and RSS-210, No 4 (Dec 2000) and No 5 (Nov 2001).
"To prevent radio interference to the licensed service, this device is intended to be operated indoors and away from windows to provide maximum shielding. Equipment (or its transmit antenna) that is installed outdoors is subject to licensing."
Caution: When using IEEE 802.11a wireless LAN, this product is restricted to indoor use due to its operation in the 5.15- to 5.25-GHz frequency range. Industry Canada requires this product to be used indoors for the frequency range of 5.15 GHz to 5.25 GHz to reduce the potential for harmful interference to co-channel mobile satellite systems. High power radar is allocated as the primary user of the 5.25 to 5.35 GHz and 5.65 to 5.85-GHz bands. These radar stations can cause interference with and/or damage to this device.
The maximum allowed antenna gain for use with this device is 6 dBi in order to comply with the E.I.R.P limit for the 5.25- to 5.35 and 5.725 to 5.85 GHz frequency range in point-to-point operation.
The FCC RF safety requirement
The radiated output power of the wireless LAN Mini PCI Card and Bluetooth card is far below the FCC radio frequency exposure limits. Nevertheless, the computer shall be used in such a manner that the potential for human contact during normal operation is minimized as follows:
- Users are requested to follow the RF safety instructions on wireless option devices that are included in the user's manual of each RF option device.
Caution: To comply with FCC RF exposure compliance requirements, a separation distance of at least 20 cm (8 inches) must be maintained between the antenna for the integrated wireless LAN Mini PCI Card built in to the screen section and all persons.
Note: The wireless Mini PCI adapter implements a transmission diversity function. The function does not emit radio frequencies simultaneously from both antennas. One of the antennas is selected automatically or manually (by users) to ensure good quality radiocommunication.

- This device is restricted to indoor use due to its operation in the 5.15 to 5.25 GHz frequency range. FCC requires this product to be used indoors for the frequency range 5.15 to 5.25 GHz to reduce the potential for harmful interference to co-channel Mobile Satellite systems.
- High power radar is allocated as the primary user of the 5.25 to 5.35 GHz and 5.65 to 5.85 GHz bands. These radar stations can cause interference with and/or damage this device.
- An improper installation or unauthorized use may cause harmful interference to radio communications. Also any tampering of the internal antenna will void the FCC certification and your warranty.
CANADA — LOW-POWER LICENSE-EXEMPT RADIO COMMUNICATION DEVICES (RSS-210)
Exposure of humans to RF fields (RSS-102)
The computer employs low gain integral antennas that do not emit RF field in excess of Health Canada limits for the general population; consult Safety Code 6, obtainable from Health Canada's website at www.hc-sc.gc.ca/rpb.
This device complies with RSS210 of Industry Canada.
This Class B digital apparatus complies with Canadian ICES-003, Issue 4, and RSS-210, No 4 (Dec 2000) and No 5 (Nov 2001).
"To prevent radio interference to the licensed service, this device is intended to be operated indoors and away from windows to provide maximum shielding. Equipment (or its transmit antenna) that is installed outdoors is subject to licensing."
Caution: When using IEEE 802.11a wireless LAN, this product is restricted to indoor use due to its operation in the 5.15- to 5.25-GHz frequency range. Industry Canada requires this product to be used indoors for the frequency range of 5.15 GHz to 5.25 GHz to reduce the potential for harmful interference to co-channel mobile satellite systems. High power radar is allocated as the primary user of the 5.25 to 5.35 GHz and 5.65 to 5.85-GHz bands. These radar stations can cause interference with and/or damage to this device.
The maximum allowed antenna gain for use with this device is 6 dBi in order to comply with the E.I.R.P limit for the 5.25- to 5.35 and 5.725 to 5.85 GHz frequency range in point-to-point operation.
Gamme TravelMate
www.acer-group.com/public/Sustainability/sustainability01.htm.
Acer Office Manager 11
Console du Acer Office Manager 11
Tableau de bord 11
Acer Backup Manager 34
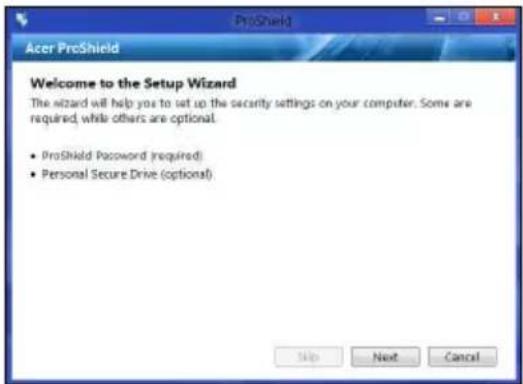

Customized Restore (Retain User Data)
natural_image
3D rendering of a gray USB port connector with a separate inset showing its internal structure (no text or symbols)Réseaux sans fil
natural_image
Illustration of a white USB connector with a black lightning bolt symbol and a separate gray connector (no text or labels)Port IEEE 1394
HDMI
natural_image
Illustration of a black USB connector with a separate white connector (no text or symbols)Universal Serial Bus (USB)
natural_image
Close-up of a black USB connector with a cable, showing its connector and internal structure (no text or symbols visible)Lecture de films DVD
This Class B digital apparatus complies with Canadian ICES-003.
This Class B digital apparatus complies with Canadian ICES-003, Issue 4, and RSS-210, No 4 (Dec 2000) and No 5 (Nov 2001).
"To prevent radio interference to the licensed service, this device is intended to be operated indoors and away from windows to provide maximum shielding. Equipment (or its transmit antenna) that is installed outdoors is subject to licensing."
CLASS 1 LASER PRODUCT
ACHTUNG: INVISIBLE LASER RADIATION WHEN OPEN. AVOID EXPOSURE TO BEAM.
APPAREIL A LASER DE CLASSE 1 PRODUIT
LASERATTENTION: RADIATION DU FAISCEAU LASER INVISIBLE EN CAS D'OUVERTURE. EVITTER TOUTE EXPOSITION AUX RAYONS.
LUOKAN 1 LASERLAITE LASER KLASSE 1
Acer Office Manager 12
Acer Office Manager Console 12
Dashboard 12
Client-Manager 14
Richtlinien 15
Assets 17
Aufgabenplanung 18
Einstellungen 19
Acer Backup Manager 37

Datenlöschung
Acer Office Manager Console
Client-Manager
Customized Restore (Retain User Data)
natural_image
3D rendering of a gray USB connector with a separate inset showing its internal structure (no text or symbols)Drahtlosnetzwerke
natural_image
Illustration of a white USB connector with a black lightning bolt symbol and a separate gray connector (no text or labels)IEEE 1394-Anschluss
natural_image
Illustration of a black USB connector with a separate white connector (no text or symbols)natural_image
Close-up of a black USB connector with a cable, showing its connector and cable extension (no text or symbols visible)Acer Office Manager 12
Acer Office Manager Console 12
Acer Backup Manager 33
Installing and removing the battery pack 39
Come arrivo a Start? 62

Rimozione dati
Acer Office Manager Console
Gestore client
Installing and removing the battery pack
natural_image
3D rendering of a gray USB port connector with a separate inset showing its internal structure (no text or symbols)Reti wireless
natural_image
Illustration of a white USB connector with a black lightning bolt symbol and a separate metallic clip (no text or labels)Porta IEEE 1394
HDMI
natural_image
Illustration of a black USB connector with a separate white connector (no text or symbols)Universal Serial Bus (USB)
natural_image
Close-up of a black USB connector with a cable, showing its connector and internal structure (no text or symbols visible)ITW (International Traveler's Warranty)
Come arrivo a Start?
CLASS 1 LASER PRODUCT
PRECAUCIÓN: INVISIBLE LASER RADIATION WHEN OPEN. AVOID EXPOSURE TO BEAM.
APPAREIL A LASER DE CLASSE 1 PRODUIT
LASERATTENTION: RADIATION DU FAISCEAU LASER INVISIBLE EN CAS D'OUVERTURE.EVITTER TOUTE EXPOSITION AUX RAYONS.
LUOKAN 1 LASERLAITE LASER KLASSE 1
Acer Office Manager 11
Consola de Acer Office Manager 11
Panel 11
Gestor de clientes 12
Políticas 13
Activos 14
Programador de tareas 15
Configuración 16
Recuperación 17
Acer Backup Manager 32

Gestor de clientes
natural_image
3D illustration of a gray USB connector with an open port, shown from its side view (no text or symbols)Redes inalámbricas
Conectarse a Internet
natural_image
Illustration of a white USB connector with a black lightning bolt symbol and a separate connector (no text or labels)Puerto IEEE 1394
HDMI
natural_image
Illustration of a black USB connector with a separate white connector (no text or symbols)Universal Serial Bus (USB)
natural_image
Close-up of a black USB connector with a cable, showing its connector and internal structure (no text or symbols visible)CLASS 1 LASER PRODUCT
CAUTION: INVISIBLE LASER RADIATION WHEN OPEN. AVOID EXPOSURE TO BEAM.
APPAREIL A LASER DE CLASSE 1 PRODUIT
LASERATTENTION: RADIATION DU FAISCEAU LASER INVISIBLE EN CAS D'OUVERTURE.EVITTER TOUTE EXPOSITION AUX RAYONS.
LUOKAN 1 LASERLAITE LASER KLASSE 1
www.acer-group.com/public/Sustainability/sustainability01.htm.

Acer Office Manager 11
Consola Acer Office Manager 11
Painel de instrumentos 11
Gestor de clientes 12
Políticas 14
Activos 15
Agendamento de tarefa 16
Definições 17
Recuperação 18
Acer Backup Manager 32


Remoção de dados
Gestor de clientes
Inicie AcerRecovery Management:
Customized Restore (Retain User Data)
natural_image
3D rendering of a gray USB connector with a separate inset showing its internal structure (no text or symbols)Redes sem fios
Ligar à Internet
natural_image
Illustration of a white USB connector with a black lightning bolt symbol and a separate connector (no text or labels)Porta IEEE 1394
natural_image
Illustration of a black USB connector with a separate white connector (no text or symbols)Universal Serial Bus (USB)
natural_image
Close-up of a black USB cable with a separate rectangular connector (no text or symbols visible)This Class B digital apparatus complies with Canadian ICES-003.
www.hc-sc.gc.ca/rpb.
LASERPRODUCT KLASSE 1
VOORZICHTIG: ONZICHTBARE LASERSTRALING INDIEN GEOPEND. VOORKOM BLOOTSTELLING AAN STRAAL.
APPAREIL A LASER DE CLASSE 1 PRODUIT
LASERATTENTION: RADIATION DU FAISCEAU LASER INVISIBLE EN CAS D'OUVERTURE. EVITTER TOUTE EXPOSITION AUX RAYONS.
LUOKAN 1 LASERLAITE LASER KLASSE 1
Acer Office Manager 12
Acer Office Manager Console 12
Dashboard 12
Clientmanager 13
Beleid 15
Activa 16
Taakplanner 17
Instellingen 18
Herstel 19
Acer Backup Manager 33
Energiebeheer 35
Stand-by 35
Accu 37
Geheugen upgraden 56
BIOS utility 57
Opstartreeks 57
Acer Office Manager Console
Tip: Selecteer Client in Nieuwe client om alle gevonden clients te selecteren.
Clientmanager
Tab Item Functie
Tab Item Functie
Start Acer Recovery Management
natural_image
3D rendering of a gray USB port connector with a separate inset showing its internal structure (no text or symbols)Draadloze netwerken
natural_image
Illustration of a white USB connector with a black lightning bolt symbol and a separate gray connector (no text or labels)IEEE 1394 poort
Hdmi
natural_image
Close-up of a black USB connector with a separate white connector (no text or symbols visible)natural_image
Close-up of a black USB connector with a cable, showing its connector and internal structure (no text or symbols visible)DVD-films afspelen
ITW (International Travelers Warranty)
This Class B digital apparatus complies with Canadian ICES-003.
KLASSE 1 LASERPRODUKT
FORSIKTIG: USYNLIG LASERSTRÅLING I ÅPEN TILSTAND. UNNGÅ STRÅLEN.
APPAREIL A LASER DE CLASSE 1 PRODUIT
LASERATTENTION: RADIATION DU FAISCEAU LASER INVISIBLE EN CAS D'OUVERTURE. EVITTER TOUTE EXPOSITION AUX RAYONS.
LUOKAN 1 LASERLAITE LASER KLASSE 1
www.acer-group.com/public/Sustainability/sustainability01.htm.
PSD (Personal Secure Drive) 7
Credential Manager 8
Acer Office Manager 11
Acer Office Manager-konsollen 11
Dashbord 11
Klienthändterer 12
Policyer 13
Aktiva 14
Acer Backup Manager 31
Strømstyring 33
Strømsparing 33
Batteri 35
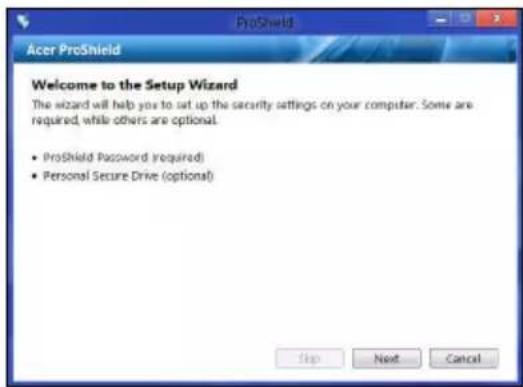
PSD (Personal Secure Drive)
PSD (Personal Secure Disk) er et sikkert område på harddisken der du kan lagre filer. Du har bare tilgang til PSD via passord eller autentisering med fingeravtrykk.
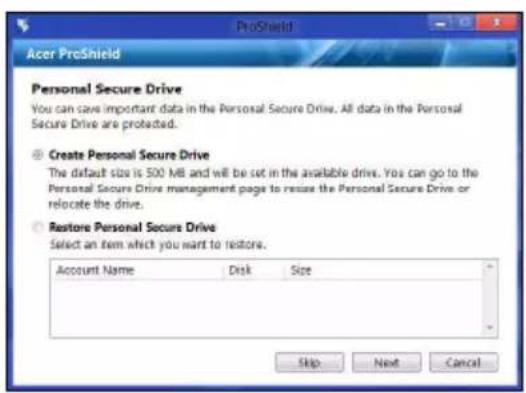
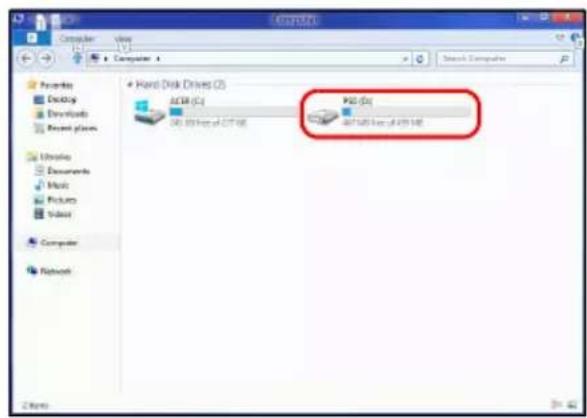
Bruk menyen i venstre rute for å foreta endringene.
Credential Manager
Datafjerning
Klienthändterer
Kategori Element Funksjon
Du må angi et oppgavenavn, velge frekvens, klokkeslett, dato, handling, hvilke policyer som skal implementeres (hvis aktuelt) og gruppen(e) eller klienten(e).
Kategori Element Funksjon
| Administrasjon sinnstillinger | Rediger passordinnstillinger | Endre passordet til Acer Office Manager-konsollen. |
| E-postinnstillinger | Sette opp en e-postkonto for å motta e-postvarslinger. | |
| Preferanseinn stillinger | Sette opp programstart- og sperrepreferanser. | |
| Varslingsinnstilinger | Sette opp hva slags tidsrelaterte varslinger som skal vises på dashbordet. | |
| Datamigrering | Eksporter innstillingene dine for Acer Office Manager-konsollen for å bruke dem på en annen maskin. | |
| Sertifikat | Opprett nytt sertifikat | Opprett et sertifikat du kan importere til en annen maskin. Sertifikater sikrer at klienten bare kan administreres fra en enkelt konsoll. |
| Importer sertifikat | Importer et sertifikat fra en annen maskin. Dette lar konsollen administrere en ekstern klient som har en klarert relasjon med en annen konsoll. |
Gjenoppretting
- Plugg ut USB-stasjonen og merk den tydelig.
Start Acer Recovery Management:
Bildene er kun for referanseformål.
2. Vinduet Oppdater din PC äpnes.

Bildene er kun for referanseformål.
Her kan du redigere eller slette eksisterende sikkerhetskopiprofiler.
Strømstyring
Deaktiver hurtigoppstart
- Velg Lagre endringer.
Batteri
natural_image
3D rendering of a gray USB connector with a separate inset showing its internal structure (no text or symbols)Trådløse nettverk
Koble til Internett
natural_image
Illustration of a white USB connector with a black lightning bolt symbol and a separate gray connector (no text or labels)IEEE 1394-port
Datamaskinens IEEE 1394-port lar deg koble til en IEEE 1394-enhet, f.eks. et video- eller digitalkamera. Se dokumentasjonen til video- eller digitalkameraet hvis du vil ha detaljer.
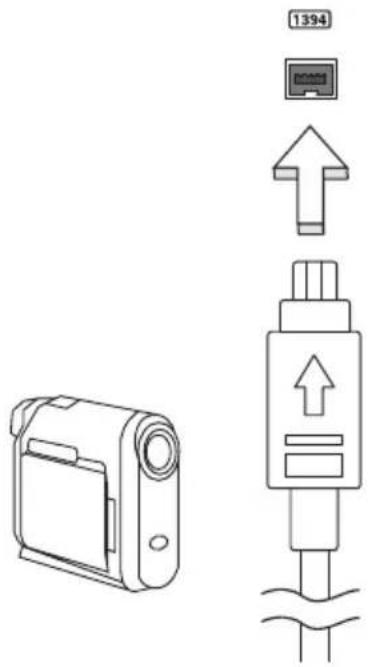
HDMI
HDMI (High-Definition Multimedia Interface) er en bransjestandard for ukomprimert, heldigitalt lyd/videogrensesnitt. HDMI tilbyr et grensesnitt mellom eventuelle kompatible digitale lyd-/videokilder, for eksempel en set-top-boks, DVD-spiller og A/V-mottaker og en kompatibel digital lyd- og/eller videoskjerm, for eksempel en digital TV (DTV), over en enkelt kabel.
natural_image
Illustration of a black USB connector with a separate white connector (no text or symbols)
Universal Serial Bus (USB)
natural_image
Close-up of a black USB connector with a cable, showing its connector and port (no text or symbols visible)Spille DVD-filmer
International Travelers Warranty (ITW)
This Class B digital apparatus complies with Canadian ICES-003.
CLASS 1 LASER PRODUCT
CAUTION: INVISIBLE LASER RADIATION WHEN OPEN. AVOID EXPOSURE TO BEAM.
APPAREIL A LASER DE CLASSE 1 PRODUIT
LASERATTENTION: RADIATION DU FAISCEAU LASER INVISIBLE EN CAS D'OUVERTURE. EVITTER TOUTE EXPOSITION AUX RAYONS.
LUOKAN 1 LASERLAITE LASER KLASSE 1
www.acer-group.com/public/Sustainability/sustainability01.htm.
Credential Manager 7
Fingeraftryksregistrering * 8
Databeskyttelse 8
Datafjernelse 9
Acer Office Manager 10
Acer Office Manager Console 10
Kontrolbord 10
Klient manager 11
Politikker 13
Beholdning 14
Opgavestyring 15
Indstillinger 16
Gendannelse 17
Acer Backup Manager 31
Strømstyring 33
Strømbesparelser 33
Batteriet 35
Batteripakke - karakteristika 35
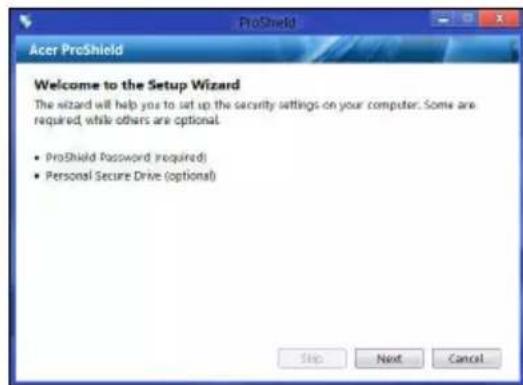
Personlig Sikkert Drev
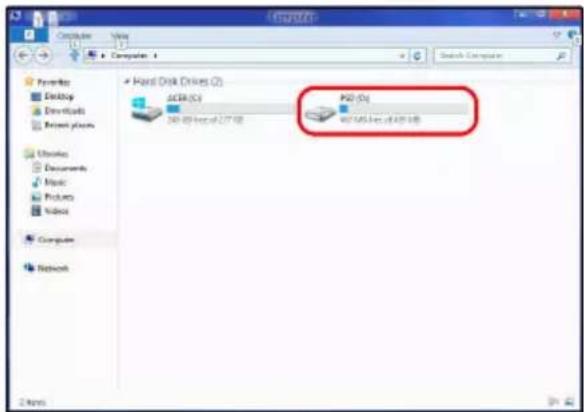
Du kan ændre dine ProShield og Windows kodeord, registrere fingeraftryk, administrere online kontoinformation, backup og gendanne credential information.
Fingeraftryksregistrering \*
Klik på Registreringsguide for mere information.
Databeskyttelse
Datafjernelse
Acer Office Manager Console
Konsol applikationen tillaxder dig at administrere forbundne klienter fra en enkelt computer. For at starte Konsollen i Windows 8, indtast simpelt hen "Office Manager Console". Alternativt, i skrivebordstilstand, vælg Acer Office Manager Console.
Klient manager
På siden Klient-styring kan du vise alle klienter, der styres fra Console. Dobbeltklik på et ikon for at vise systemoplysninger for den klient.
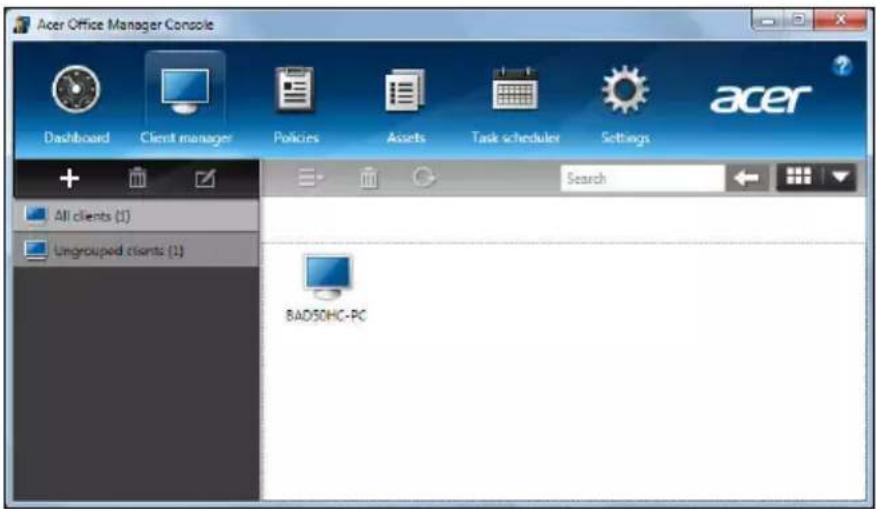
Tab Punkt Funktion
Tab Punkt Funktion
- Klik på Opret drivere og programsikkerhedskopiering.
Start Acer Recovery Management:
- Fra Start indtaster du 'Recovery', hvorefter du klikker på Acer Recovery Management i listen over apps.
- Vælg Gem ændringer.
Batteriet
natural_image
3D rendering of a gray USB connector with a separate inset showing the same port (no text or symbols visible)Trådløse netværk
natural_image
Illustration of a white USB connector with a black lightning bolt symbol and a separate connector (no text or labels)IEEE 1394 port
Computerens IEEE 1394 port tillader dig at forbinde IEEE 1394-kompatible enheder så som et videokamera eller digital kamera. Se dit videokamera eller digitale kameras dokumentation for detaljer.
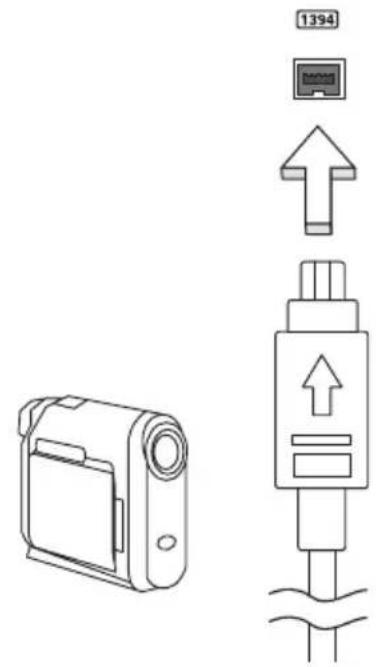
HDMI
natural_image
Close-up of a black USB connector with a separate white connector (no text or symbols visible)Universal Serial Bus (USB)
natural_image
Close-up of a black USB connector with a cable, showing its connector and internal structure (no text or symbols visible)This Class B digital apparatus complies with Canadian ICES-003.
KLASS 1 LASERPRODUKT
WARNING: OSYNLIG LASERSTRÅLNING NÄR DENNA DEL ÄR ÖPPEN. UNDVIK ATT UTSÄTTA DIG FÖR STRÅLEN.
APPAREIL A LASER DE CLASSE 1 PRODUIT
LASERATTENTION: RADIATION DU FAISCEAU LASER INVISIBLE EN CAS D'OUVERTURE. EVITTER TOUTE EXPOSITION AUX RAYONS.
LUOKAN 1 LASERLAITE LASER KLASSE 1
www.acer-group.com/public/Sustainability/sustainability01.htm.

Credential Manager 7
Fingeravtryckregistrering ^* 8
Dataskydd 8
Acer Office Manager 10
Acer Office Manager konsol 10
Instrumentpanel 10
Klienthanterare 11
Policyn 12
Resurser 13
Schemaläggaren 14
Inställningar 15
Återställning 16
Acer Backup Manager 30
Uppgradera minnet 50
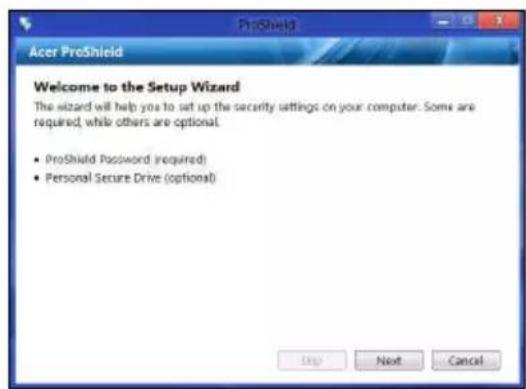
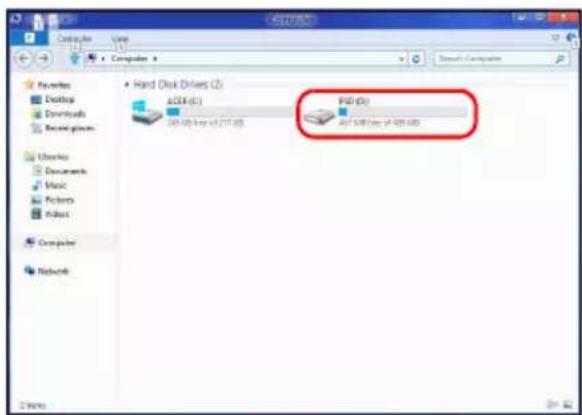
Klicka instruktionsprogram för mer information.
Dataskydd
Borttagning av data
Klienthanterare
Starta Acer Recovery Management:
natural_image
3D rendering of a gray USB connector with a separate white port housing (no text or symbols visible)Trådlösa nätverk
natural_image
Illustration of a white USB connector with a black lightning bolt symbol and a separate rectangular clip (no text or labels)IEEE 1394-port
HDMI
natural_image
Illustration of a black USB connector with a separate white connector (no text or symbols)natural_image
Close-up of a black USB connector with a cable, showing its connector and internal structure (no text or symbols visible)This Class B digital apparatus complies with Canadian ICES-003.
Acer Office Manager 11
Acer Office Manager Konsoli 11
Kojelauta 11
Acer Backup Manager 32
Virranhallinta 34
Virransäästö 34
Akku 36
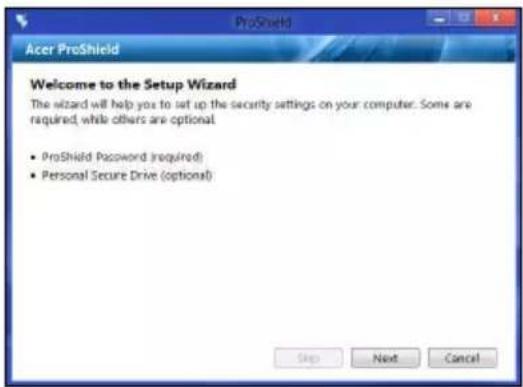
Oma salattu asema