USER MANUAL MultiSync 1940CX NEC
natural_image
Illustration of a black computer monitor with a stand and circular base (no text or symbols)
User's Manual / Manuel de l'utilisateur/ Manual del Usuario
MultiSync™ LCD195WVXM MultiSync™ 1940WCXM
Manufacturer's Recycling and Energy Information ....18
Avertissement 20
Contenu 21
TO PREVENT FIRE OR SHOCK HAZARDS, DO NOT EXPOSE THIS UNIT TO RAIN OR MOISTURE. ALSO, DO NOT USE THIS UNIT'S POLARIZED PLUG WITH AN EXTENSION CORD RECEPTACLE OR OTHER OUTLETS UNLESS THE PRONGS CAN BE FULLY INSERTED.
REFRAIN FROM OPENING THE CABINET AS THERE ARE HIGH VOLTAGE COMPONENTS INSIDE. REFER SERVICING TO QUALIFIED SERVICE PERSONNEL.

CAUTION

CAUTION: TO REDUCE THE RISK OF ELECTRIC SHOCK, MAKE SURE POWER CORD IS UNPLUGGED FROM WALL SOCKET. TO FULLY DISENGAGE THE POWER TO THE UNIT, PLEASE DISCONNECT THE POWER CORD FROM THE AC OUTLET. DO NOT REMOVE COVER (OR BACK). NO USER SERVICEABLE PARTS INSIDE. REFER SERVICING TO QUALIFIED SERVICE PERSONNEL.

symbol warns user that uninsulated voltage within the unit may have sufficient magnitude to cause shock. Therefore, it is dangerous to make any kind of contact with any part inside this unit.

symbol alerts the user that important literature concerning the operation and maintenance of this is been included. Therefore, it should be read carefully in order to avoid any problems.
Canadian Department of Communications Compliance Statement
DOC: This Class B digital apparatus meets all requirements of the Canadian Interference-Causing Equipment Regulations.
C-UL: Bears the C-UL Mark and is in compliance with Canadian Safety Regulations according to CAN/CSA C22.2 No. 60950-1.
- Use the attached specified cables with the MultiSync ^® LCD195WVXM ^™ (L195H0)/MultiSync ^® 1940WCXM ^™ (L195H0) color monitor so as not to interfere with radio and television reception.
(1) Please use the supplied power cord or equivalent to ensure FCC compliance.
(2) Please use the supplied shielded video signal cable.
Use of other cables and adapters may cause interference with radio and television reception.
-
This equipment has been tested and found to comply with the limits for a Class B digital device, pursuant to part 15 of the FCC Rules. These limits are designed to provide reasonable protection against harmful interference in a residential installation. This equipment generates, uses, and can radiate radio frequency energy, and, if not installed and used in accordance with the instructions, may cause harmful interference to radio communications. However, there is no guarantee that interference will not occur in a particular installation. If this equipment does cause harmful interference to radio or television reception, which can be determined by turning the equipment off and on, the user is encouraged to try to correct the interference by one or more of the following measures:
-
Reorient or relocate the receiving antenna.
- Increase the separation between the equipment and receiver.
- Connect the equipment into an outlet on a circuit different from that to which the receiver is connected.
- Consult your dealer or an experienced radio/TV technician for help.
Changes or modifications not expressly approved by the party responsible for compliance could void the user's authority to operate the equipment.
If necessary, the user should contact the dealer or an experienced radio/television technician for additional suggestions. The user may find the following booklet, prepared by the Federal Communications Commission, helpful: "How to Identify and Resolve Radio-TV Interference Problems." This booklet is available from the U.S. Government Printing Office, Washington, D.C., 20402, Stock No. 004-000-00345-4.
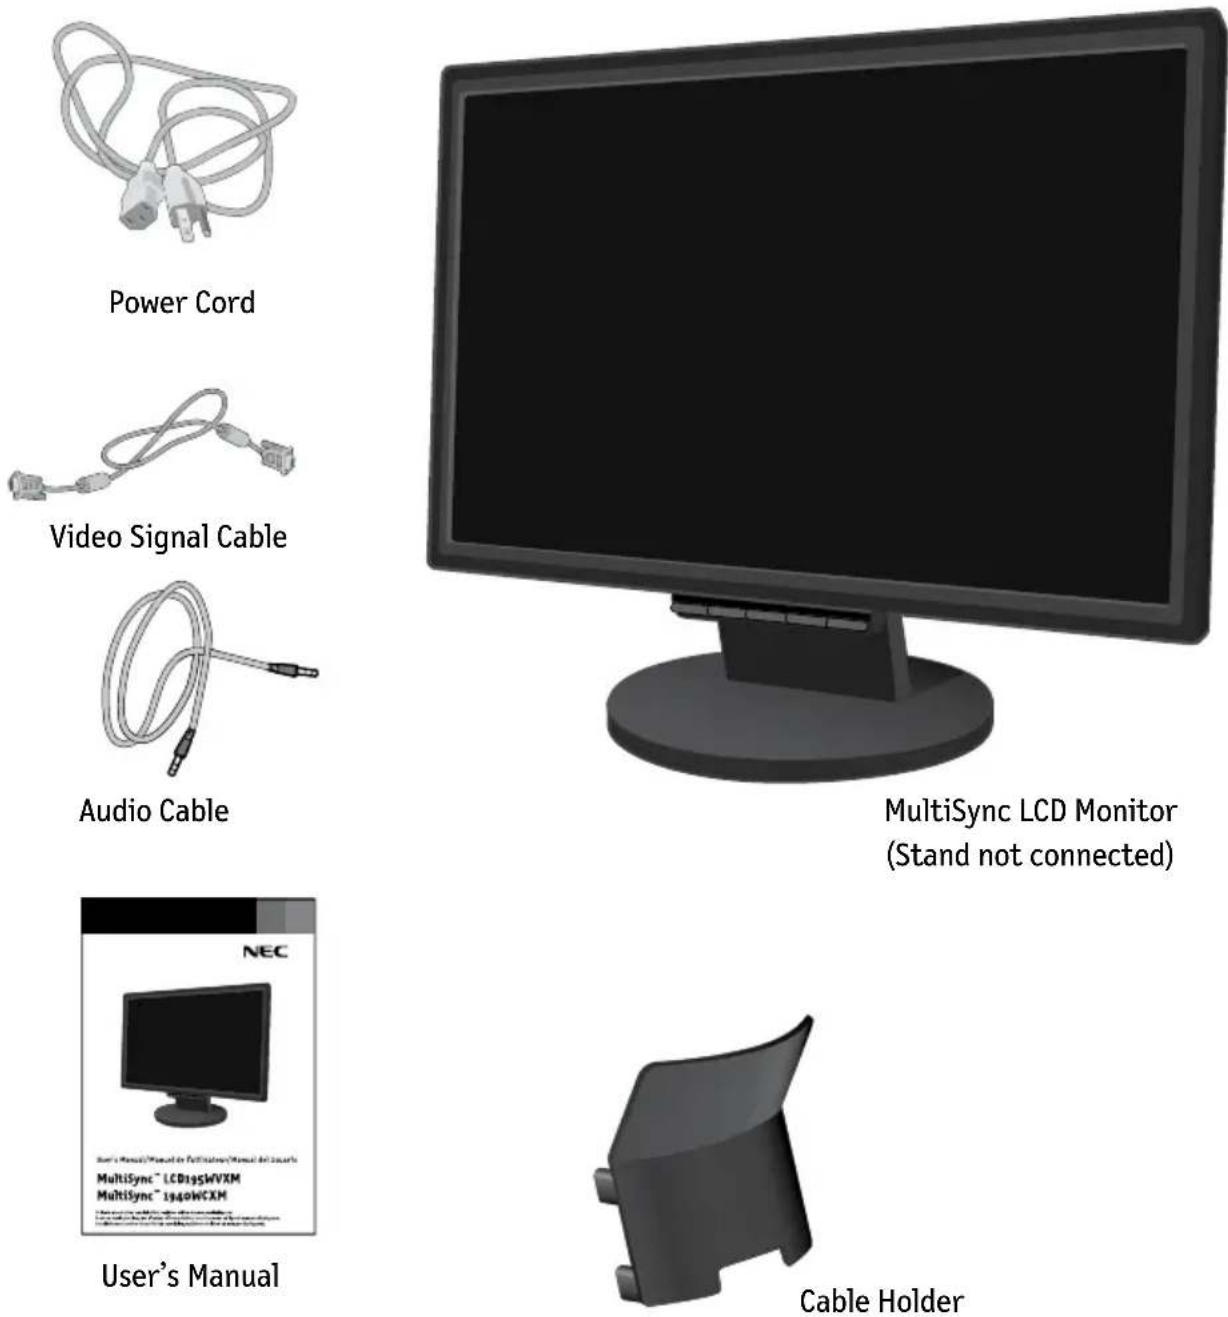
Your new NEC MultiSync LCD monitor box* should contain the following:
- MultiSync LCD monitor
- Power Cord
- User's Manual
- Video Signal Cable
- Audio Cable
- Base Stand
- Cable Holder
To attach the Base to the LCD Stand:
- Insert the front of the LCD Stand into the holes in the front of the Base (Figure 1).
-
Attach the Base to the Stand. The locking tab on the Base should fit into the hole on the back of the Stand.
-
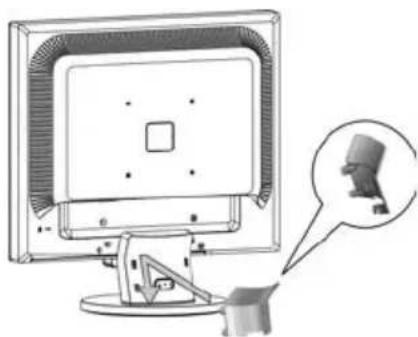
Attach the Cable Holder onto the Base (Figure 2). Insert the hooks on the Cable Holder into the holes at the back of the Stand and slide the Cable Holder downward into place.
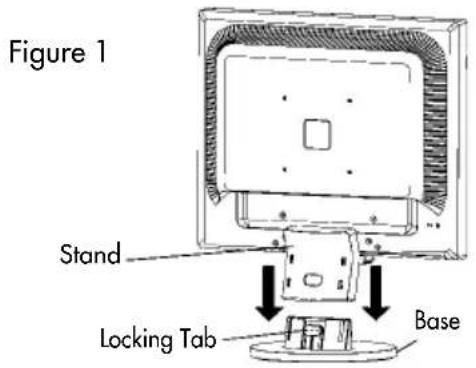
Figure 2
natural_image
Illustration of a computer monitor with a magnified inset showing a small mechanical component (no text or symbols present)
To attach the MultiSync LCD monitor to your system, follow these instructions:
- Turn off the power to your computer.
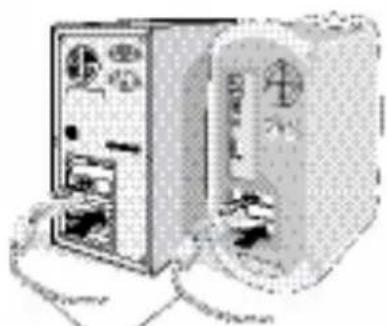
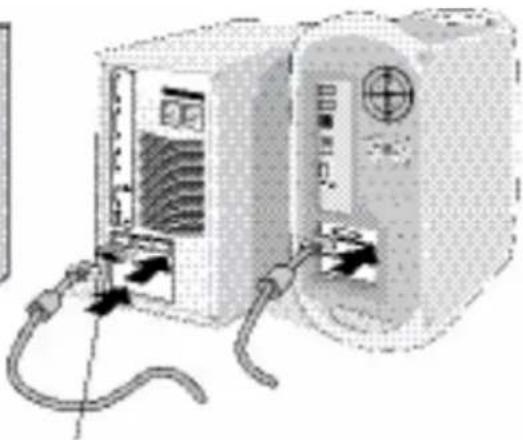
- For the PC or MAC with DVI digital output: Connect the DVI signal cable (not included) to the connector of the display card in your system Figure A.1). Tighten all screws.
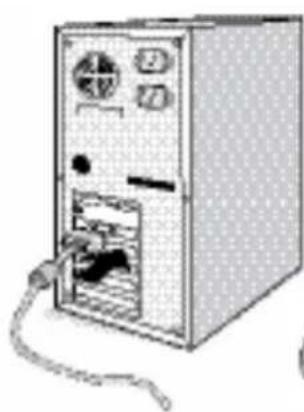
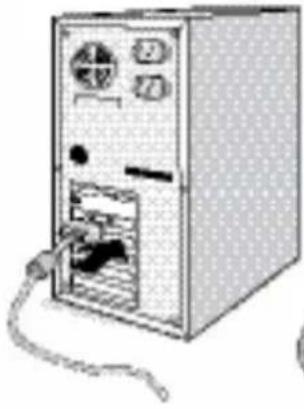
For the PC with Analog output: Connect the 15-pin mini D-SUB signal cable to the connector of the display card in your system (Figure A.2). Tighten all screws.
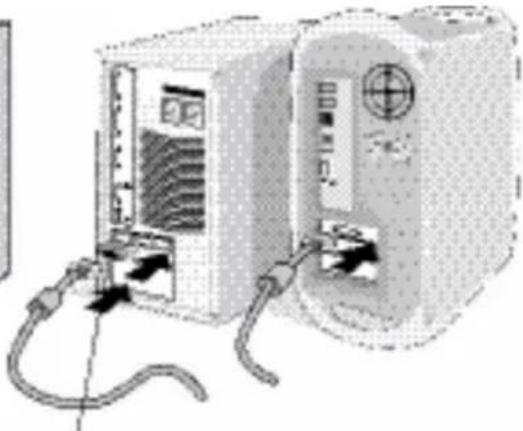
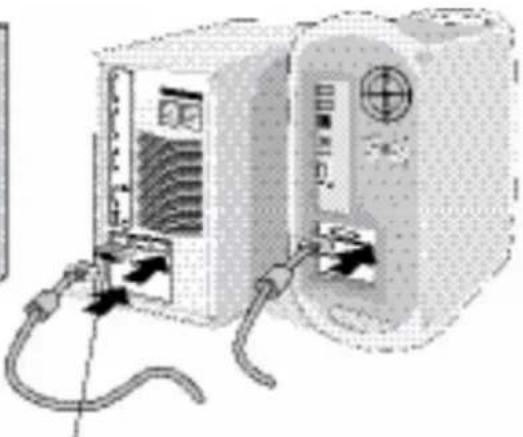
For the MAC: Connect the MultiSync Macintosh cable adapter to the computer, then attach the 15-pin mini D-SUB signal cable to the MultiSync Macintosh cable adapter (Figure A.3). Tighten all screws.
NOTE: To obtain the MultiSync Macintosh cable adapter, call NEC Display Solutions of America, Inc. at (800) 632-4662.
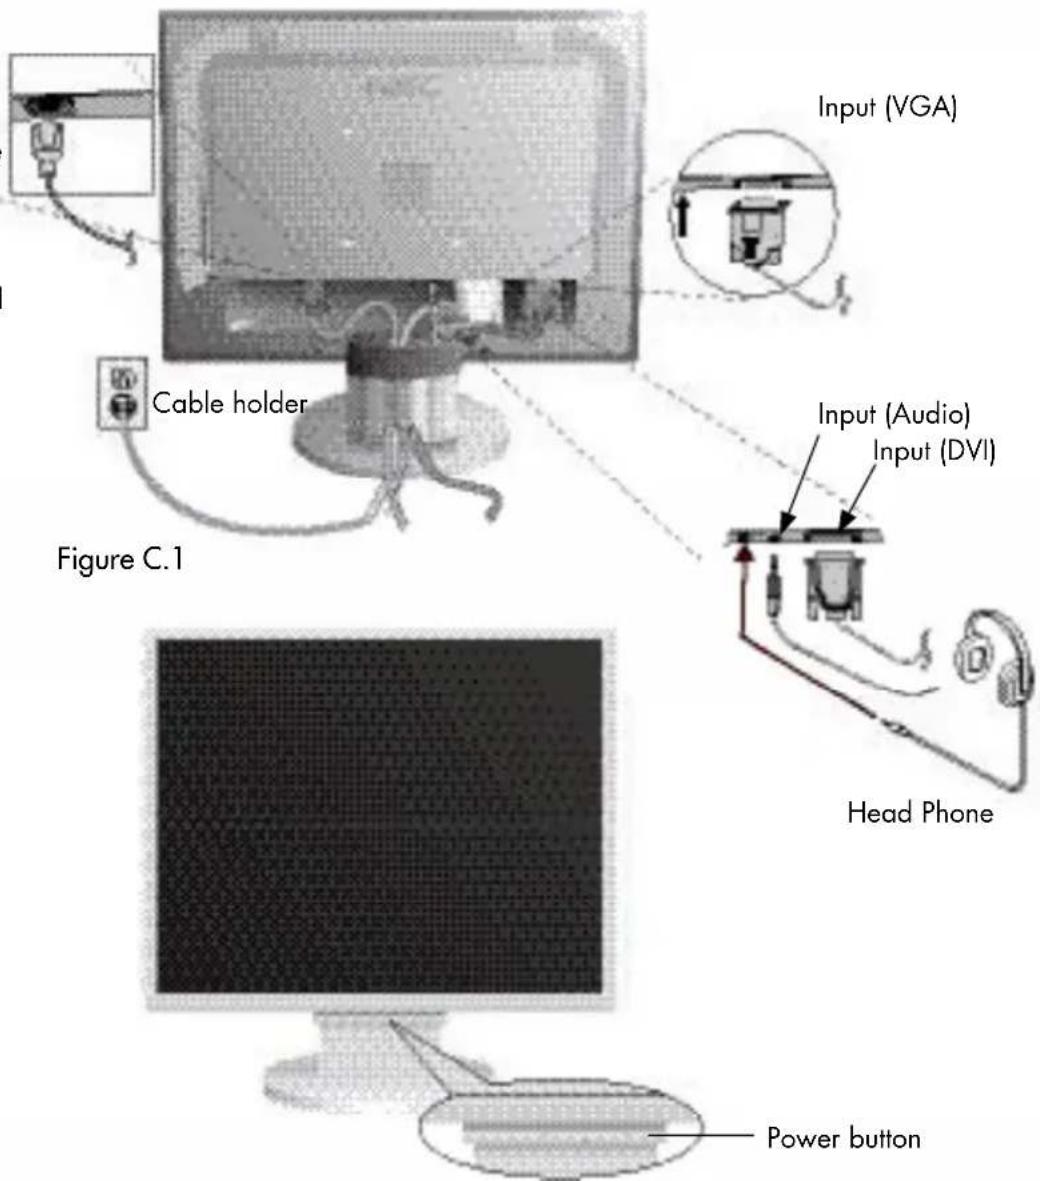
- Connect the 15-pin mini D-SUB cable to the appropriate connector on the back of the monitor (Figure B.1) Connect one end of the audio cable to AUDIO-INPUT on the back of the monitor and the other end to the "Audio Out" terminal on the computer. Headphones may connected to the "Headphones" output, "I" on the front of the monitor. While headphones are connected, the sound from the speakers will be disabled.
NOTE: If you use this monitor at AC125-240V, please refer to Recommended Use section of this manual for proper selection of power cord.
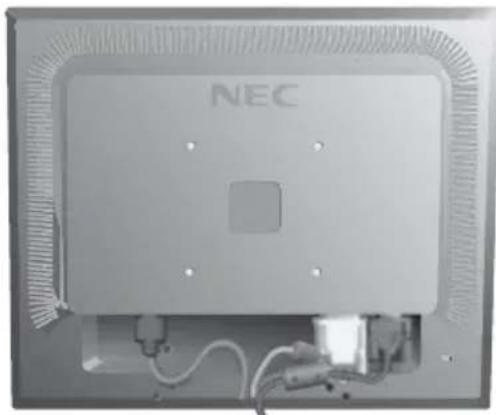
- Connect one end of the power cord to the LCD and the other end to the power outlet. Place the video signal cable, power cord and DVI cable into the cable hold (Figure B.1).
NOTE: Adjust the position of cables in the cable holder to avoid damage.
NOTE: If you use this monitor at AC125-240V, please refer to Recommended Use section of this manual for proper selection of power cord.
- Turn on the monitor with the front power button and the compute(Figure C.1)
- No-touch Auto Adjust automatically adjusts the monitor to optimal settings upon initial setup for most timings. For further adjustments, use the following OSM® controls:
- Auto Adjust Contrast
- Auto Adjust
Refer to the Controls section of this User's Manual for a full description of these OSM controls.
NOTE: For download information on the Windows ^ 95/98/Me/2000/XP INF file for your MultiSync monitor, refer to the References section of this User's Manual.
NOTE: If you have any problems, please refer to the Troubleshooting section of this User's Manual.
Figure A.1
natural_image
Illustration of a vintage electronic device with ports and cables (no visible text or symbols)
DVI Signal Cable (not included)
Figure A.2
natural_image
Illustration of a desktop computer tower with ports and cables (no text or symbols visible)
Figure A.3
natural_image
Illustration of a portable electronic device with ports and cables (no visible text or symbols)
Macintosh Cable Adapter (not included)
Note: Some Macintosh systems do not require a Macintosh Cable Adapter
Power Cable
Figure B.1
Tilt
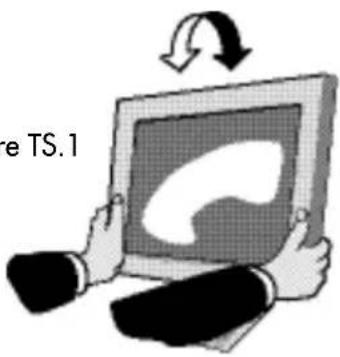
Grasp both sides of the monitor screen with your hands and adjust the tilt as desired (Figure TS.1).
NOTE: Handle with care when tilting the monitor screen.
Figure TS.1
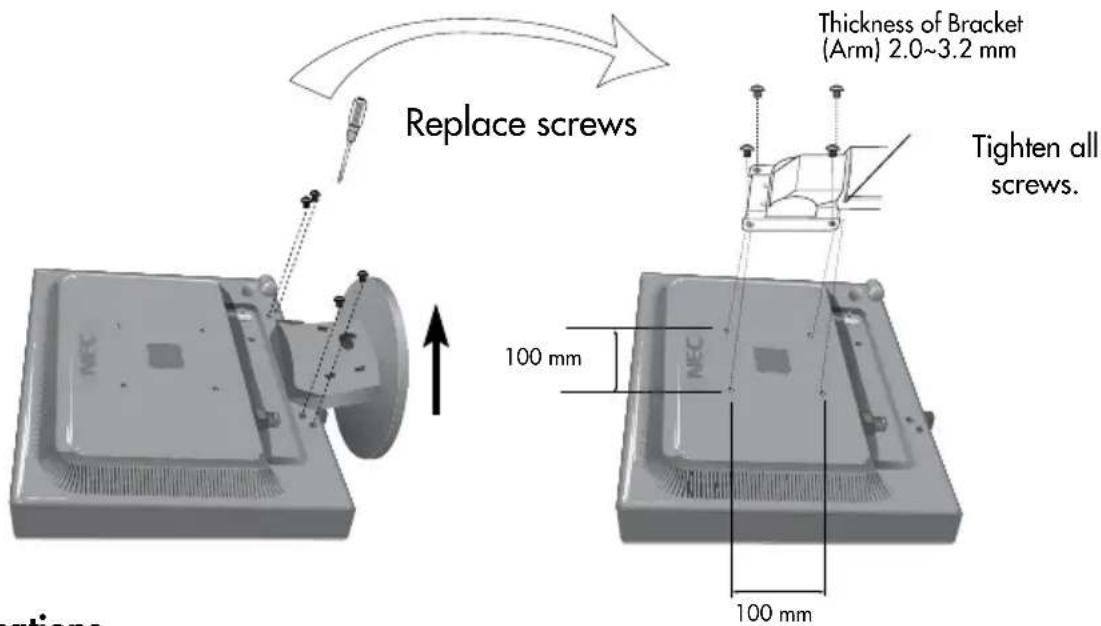
Remove Monitor Stand for Mounting
To prepare the monitor for alternate mounting purposes:
- Disconnect all cables.
- Place monitor face down on a nonabrasive surface (Figure R.1).
- Remove the 4 screws connecting the monitor to the stand and slide the stand off from the LCD (Figure R.1).
The monitor is now ready for mounting in an alternate manner.
-
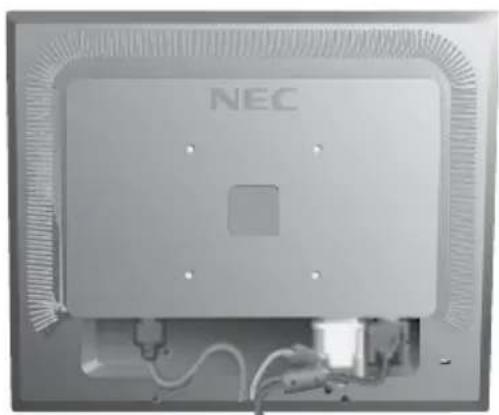
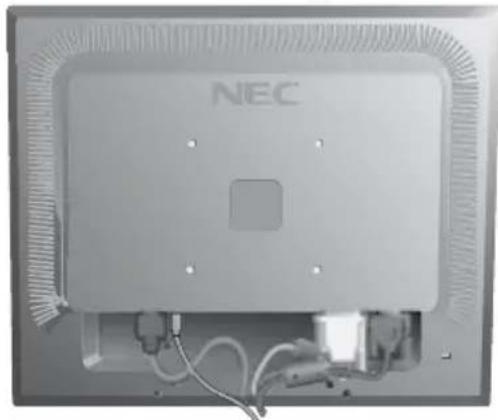
Connect the AC cord and signal cable to the back of the monitor (Figure R.2).
-
Reverse this process to reattach stand.
NOTE: Use only VESA-compatible alternative mounting method.
NOTE: Handle with care when removing monitor stand.
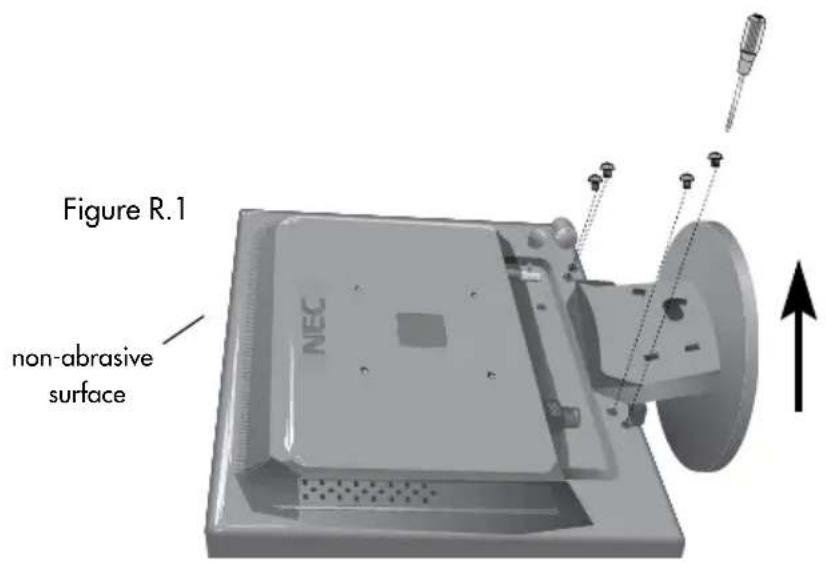
Figure R.2
natural_image
Back view of a NEC device with visible wiring and mounting holes (no text or symbols beyond branding)
Removing the Base
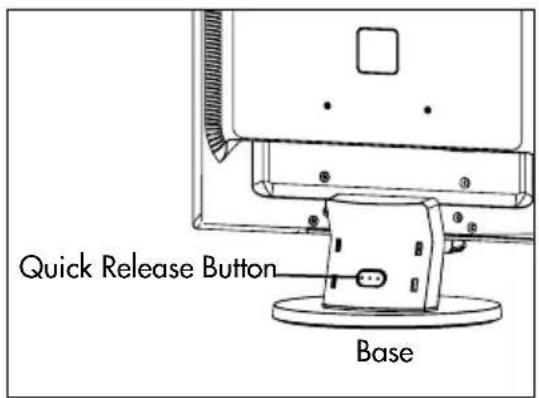
Note: Always remove the Base when shipping the LCD.
- Place monitor face down on a non-abrasive surface.
- Using your thumb, press the quick release button to unlock the stand.
- Pull the unlocked base off the stand.
Connecting a Flexible Arm
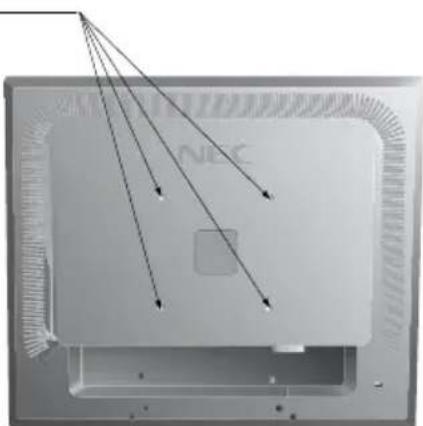
This LCD monitor is designed for use with a flexible arm. Please use the attached screws (4pcs) as shown in the picture when installing.
To meet the safety requirements, the monitor must be mounted to an arm which guarantees the necessary stability under consideration of the weight of the monitor. The LCD monitor should only be used with an approved arm (e.g. GS mark).
Specifications
4-SCREWS (M4) (MAX depth: 7.0 mm)
natural_image
Diagram showing multiple arrows pointing outward from a central square, with no visible text or symbols.
Weight of LCD assembly: 4.2 kg (MAX)
If using other screws, check depth of holes.
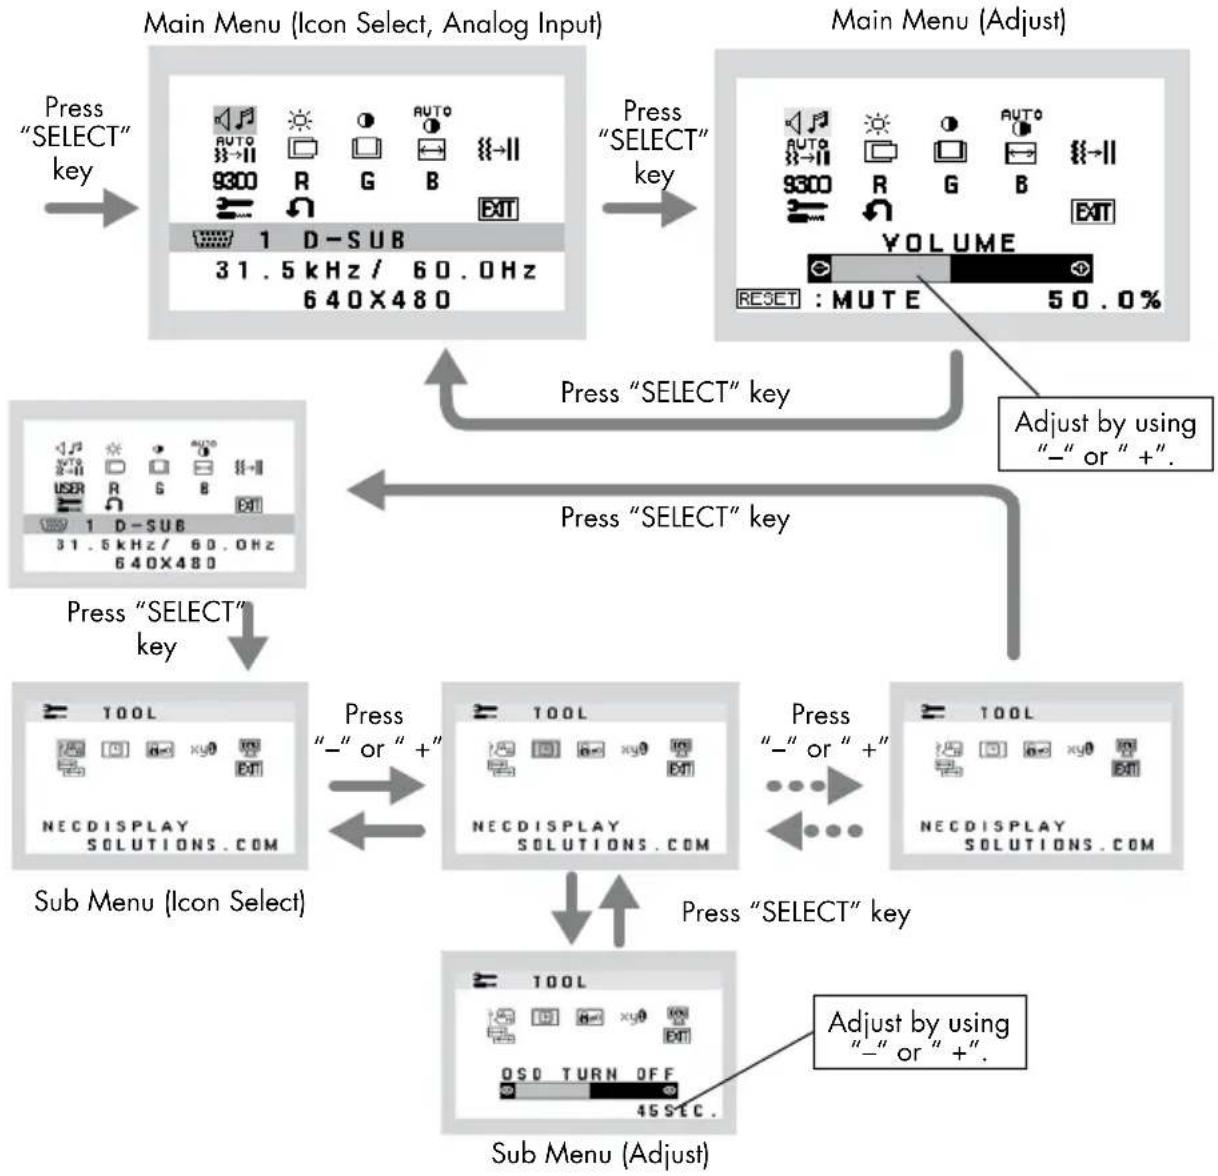
1. Basic key function
| Button | SELECT | - | + | 1<->2 / RESET |
| OSM Off | OSM displayed | Shortcut to bright adjust window | Shortcut to volume adjust window | Select Input Signal |
| OSM On (Icon selection stage) | Go to Adjustment stage | Cursor moves left | Cursor moves right | |
| OSM On (Adjustment stage) | Go to Icon selection stage | Decrease Value or Move highlighted selection to the left. | Increase value or Move highlighted selection to the right. | Reset operation Turn MUTE on/off Open Volume adjust window. |
2. OSM structure
flowchart
graph TD
A["Main Menu (Icon Select, Analog Input)"] -->|Press "SELECT" key| B["Main Menu (Adjust)"]
B -->|Press "SELECT" key| C["Sub Menu (Icon Select)"]
C -->|Press "SELECT" key| D["Sub Menu (Adjust)"]
D -->|Press "SELECT" key| E["Adjust by using "-" or "+".<br> E --> F[Adjust by using "-" or "+".<br> F --> G[NECDISPLAY SOLUTIONS.COM"]
G --> H["NECDISPLAY SOLUTIONS.COM"]
H --> I["NECDISPLAY SOLUTIONS.COM"]
I --> J["NECDISPLAY SOLUTIONS.COM"]
J --> K["NECDISPLAY SOLUTIONS.COM"]
K --> L["NECDISPLAY SOLUTIONS.COM"]
L --> M["NECDISPLAY SOLUTIONS.COM"]
M --> N["NECDISPLAY SOLUTIONS.COM"]
N --> O["NECDISPLAY SOLUTIONS.COM"]
O --> P["NECDISPLAY SOLUTIONS.COM"]
P --> Q["NECDISPLAY SOLUTIONS.COM"]
Q --> R["NECDISPLAY SOLUTIONS.COM"]
R --> S["NECDISPLAY SOLUTIONS.COM"]
S --> T["NECDISPLAY SOLUTIONS.COM"]
T --> U["NECDISPLAY SOLUTIONS.COM"]
U --> V["NECDISPLAY SOLUTIONS.COM"]
V --> W["NECDISPLAY SOLUTIONS.COM"]
W --> X["NECDISPLAY SOLUTIONS.COM"]
X --> Y["NECDISPLAY SOLUTIONS.COM"]
Y --> Z["NECDISPLAY SOLUTIONS.COM"]
Z --> AA["NECDISPLAY SOLUTIONS.COM"]
AA --> AB["NECDISPLAY SOLUTIONS.COM"]
AB --> AC["NECDISPLAY SOLUTIONS.COM"]
AC --> AD["NECDISPLAY SOLUTIONS.COM"]
AD --> AE["NECDISPLAY SOLUTIONS.COM"]
AE --> AF["NECDISPLAY SOLUTIONS.COM"]
AF --> AG["NECDISPLAY SOLUTIONS.COM"]
AG --> AH["NECDISPLAY SOLUTIONS.COM"]
AH --> AI["NECDISPLAY SOLUTIONS.COM"]
AI --> AJ["NECDISPLAY SOLUTIONS.COM"]
AJ --> AK["NECDISPLAY SOLUTIONS.COM"]
AK --> AL["NECDISPLAY SOLUTIONS.COM"]
AL --> AM["NECDISPLAY SOLUTIONS.COM"]
AM --> AN["NECDISPLAY SOLUTIONS.COM"]
AN --> AO["NECDISPLAY SOLUTIONS.COM"]
AO --> AP["NECDISPLAY SOLUTIONS.COM"]
AP --> AQ["NECDISPLAY SOLUTIONS.COM"]
AQ --> AR["NECDISPLAY SOLUTIONS.COM"]
AR --> AS["NECDISPLAY SOLUTIONS.COM"]
AS --> AT["NECDISPLAY SOLUTIONS.COM"]
AT --> AU["NECDISPLAY SOLUTIONS.COM"]
AU --> AV["NECDISPLAY SOLUTIONS.COM"]
AV --> AW["NECDISPLAY SOLUTIONS.COM"]
AW --> AX["NECDISPLAY SOLUTIONS.COM"]
AX --> AY["NECDISPLAY SOLUTIONS.COM"]

AUDIO
Controls the volume of the speakers or headphones.
To mute the speaker output, press the "1<->2 / RESET" button.

BRIGHTNESS
Adjusts the overall image and background screen brightness.

CONTRAST
Adjusts the image brightness in relation to the background.

Adjusts the image displayed for non-standard video inputs.

Automatically adjusts the Image Position, H. Size and Fine setting.

Controls Horizontal Image Position within the display area of the LCD.

Controls Vertical Image Position within the display area of the LCD.

Adjusts the horizontal size by increasing or decreasing this setting.

Improves focus, clarity and image stability by increasing or decreasing this setting.

Four color presets (9300/7500/6500/USER) select the desired color setting.

COLOR RED
Increase or decreases Red. The change will appear on screen.

COLOR GREEN
Increase or decreases Green. The change will appear on screen.

COLOR BLUE
Increase or decreases Blue. The change will appear on screen.

Selecting TOOL allows you to get into the sub menu.

FACTORY PRESET
Selecting Factory Preset allows you to reset all OSM control settings back to the factory settings. The "1<->2 / RESET" button will need to be held down for several seconds to tage effect. Individual settings can be reset by highlighting the control to be reset and pressing the "1<->2 / RESET" button.

EXIT
Selecting EXIT allows you exit OSM menu/sub menu.

LANGUAGE
OSM control menus are available in seven languages.

OSM TURN OFF
The OSM control menu will stay on as long as it is in use. In the OSM Turn OFF submenu, you can select how long the monitor waits after the last touch of a button to shut off the OSM control menu. The preset choices are 10 - 120 seconds in 5 second intervals.

OSM LOCK OUT
This control completely locks out access to all OSM control functions without Brightness and Contrast. When attempting to activate OSM controls while in the Lock Out mode, a screen will appear indicating the OSM are locked out. To activate the OSM Lock Out function, press "1<->2 / RESET", then "+" key and hold down simultaneously. To de-activate the OSM Lock Out, press "1<->2 / RESET", then "+" key and hold down simultaneously.

RESOLUTION NOTIFIER
If ON is selected, a message will appear on the screen after 30 seconds, notifying you that the resolution is not at optimal resolution.

MONITOR INFO
Indicates the model and serial numbers of your monitor.

Sets of the resolution of input signal to one of the following: 1280x768 and 1360x768
1280x768: Determines the resolution to 1280x768
1360x768: Determines the resolution to 1360x768
OSM® Warning: OSM Warning menus disappear with SELECT button.
NO SIGNAL: This function gives a warning when there is no signal present. After power is turned on or when there is a change of input signal or video is inactive, the No Signal window will appear.
RESOLUTION NOTIFIER: This function gives a warning of use with optimized resolution. After power is turned on or when there is a change of input signal or the video signal doesn't have proper resolution, the Resolution Notifier window will open. This function can be disabled in the TOOL menu.
OUT OF RANGE: This function gives a recommendation of the optimized resolution and refresh rate. After the power is turned on or there is a change of input signal or the video signal doesn't have proper timing, the Out Of Range menu will appear.
Safety Precautions and Maintenance


- DO NOT OPEN THE MONITOR. There are no user serviceable parts inside and opening or removing covers may expose you to dangerous shock hazards or other risks. Refer all servicing to qualified service personnel.
- Do not spill any liquids into the cabinet or use your monitor near water.
- Do not insert objects of any kind into the cabinet slots, as they may touch dangerous voltage points, which can be harmful or fatal or may cause electric shock, fire or equipment failure.
- Do not place any heavy objects on the power cord. Damage to the cord may cause shock or fire.
- Do not place this product on a sloping or unstable cart, stand or table, as the monitor may fall, causing serious damage to the monitor.
- When operating the MultiSync LCD monitor with its AC 125-240V power supply, use a power supply cord that matches the power supply voltage of the AC power outlet being used. The power supply cord you use must have been approved by and comply with the safety standards of your country. (Type H05VV-F should be used in Europe)
- In UK, use a BS-approved power cord with molded plug having a black (5A) fuse installed for use with this monitor. If a power cord is not supplied with this monitor, please contact your supplier.
- Do not place any objects onto the monitor and do not use the monitor outdoors.
- The inside of the fluorescent tube located within the LCD monitor contains mercury. Please follow the bylaws or rules of your municipality to dispose of the tube properly.
- Do not bend power cord.
- Do not use monitor in high temperature, humid, dusty, or oily areas.
- If glass is broken, handle with care.
- Do not cover vent on monitor.
Immediately unplug your monitor from the wall outlet and refer servicing to qualified service personnel under the following conditions:
- When the power supply cord or plug is damaged.
- If liquid has been spilled, or objects have fallen into the monitor.
- If the monitor has been exposed to rain or water.
- If the monitor has been dropped or the cabinet damaged.
- If the monitor does not operate normally by following operating instructions.
- If monitor or glass is broken, do not come in contact with the liquid crystal and handle with care.

CAUTION
- Allow adequate ventilation around the monitor so that heat can properly dissipate. Do not block ventilated openings or place the monitor near a radiator or other heat sources. Do not put anything on top of monitor.
- The power cable connector is the primary means of detaching the system from the power supply. The monitor should be installed close to a power outlet which is easily accessible.
- Handle with care when transporting. Save packaging for transporting.
Image Persistence
Image persistence is when a residual or “ghost” image of a previous image remains visible on the screen. Unlike CRT monitors, LCD monitors’ image persistence is not permanent, but constant images being displayed for a long period of time should be avoided.
To alleviate image persistence, turn off the monitor for as long as the previous image was displayed. For example, if an image was on the monitor for one hour and a residual image remains, the monitor should be turned off for one hour to erase the image.
As with all personal display devices, NEC Display Solutions of America, Inc. recommends displaying moving images and using a moving screen saver at regular intervals whenever the screen is idle or turning off the monitor when not in use.

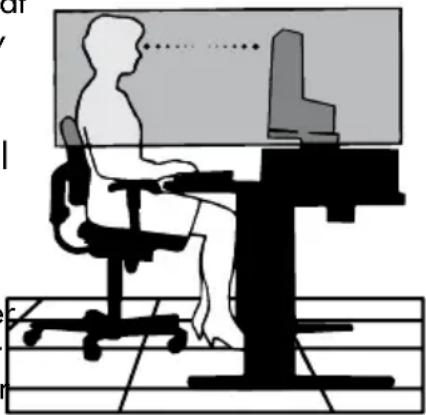
CORRECT PLACEMENT AND ADJUSTMENT OF THE MONITOR CAN REDUCE EYE, SHOULDER AND NECK FATIGUE. CHECK THE FOLLOWING WHEN YOU POSITION THE MONITOR:

- For optimum performance, allow 20 minutes for warm-up.
- Adjust the monitor height so that the top of the screen is at or slightly below eye level. Your eyes should look slightly downward when viewing the middle of the screen.
- Position your monitor no closer than 16 inches and no further away than 28 inches from your eyes. The optimal distance is 20 inches.
- Rest your eyes periodically by focusing on an object at least 20 feet away. Blink often.
- Position the monitor at a 90° angle to windows and other light sources to minimize glare and reflections. Adjust the monitor tilt so that ceiling lights do not reflect on your screen.
- If reflected light makes it hard for you to see your screen, use an antiglare filter.
- Adjust the monitor's brightness and contrast controls to enhance readability.
- Use a document holder placed close to the screen.
- Position whatever you are looking at most of the time (the screen or reference material) directly in front of you to minimize turning your head while you are typing.
- Get regular eye checkups.
natural_image
Silhouette of a person sitting at a desk with a computer monitor, no text or symbols visible
Ergonomics
To realize the maximum ergonomics benefits, we recommend the following:
- Use the preset Size and Position controls with standard signals.
- Use the preset Color Setting.
- Use non-interlaced signals with a vertical refresh rate between 60-75Hz.
- Do not use primary color blue on a dark background, as it is difficult to see and may produce eye fatigue to insufficient contrast.
Cleaning the LCD Panel
- When the liquid crystal panel becomes dusty or dirty, wipe gently with a soft cloth.
- Do not rub the LCD panel with coarse or hard material.
- Do not apply pressure to the LCD surface
- Do not use OA cleaner as it will cause deterioration or discoloration to the LCD surface.
Cleaning the Cabinet
- Unplug the power supply.
- Dampen a soft cloth with water and a neutral detergent. Gently wipe the cabinet then dry gently with a soft cloth.
NOTE: Many plastics are used on the surface of the cabinet. DO NOT clean with benzene, thinner, alkaline detergent, alcoholic system detergent, glass cleaner, wax, polish cleaner, soap powder, or insecticide. Do not touch rubber or vinyl to the cabinet for a long period of time. These types of fluids and fabrics can cause the paint to deteriorate, crack or peel.
For more detailed information on setting up a healthy work environment, write the American National Standard for Human Factors Engineering of Visual Display Terminal Workstations – ANSI-HFS Standard No. 100-1988 – The Human Factors Society, Inc. P.O. Box 1369, Santa Monica, California 90406.
Monitor
Specifications
MultiSync
LCD195WVXM
1940WCXM
Notes
| LCD Module Diagonal: 19.0 inch Active matrix; thin film transistor (TFT)Viewable Image Size: 19.0 inch liquid crystal display (LCD); 0.284 mm dotNative Resolution (Pixel Count): 1440 x 900 pitch; 300cd/m700:1 contrast ratio, typical |
| Input Signal PC INPUTVideo: ANALOG 0.7 Vp-p/75 Ohms Digital Input: DVISync: Separate sync TTL Level (Positive/Negative)Horizontal sync Positive/NegativeVertical sync Positive/NegativeAUDIO INPUT STEREO Mini Jack500mV rms Input Impedance 14 Kohm |
| Head Phone Output Headphone Impedance 32 Ohm | STEREO Mini Jack |
| Display Colors | Analog input: | 16.2M | Depending on display card used. |
| Maximum Horizontal: | 170° (CR>5) | | |
| Viewing Angles | Vertical: | 160° (CR>5) | |
| Synchronization | Horizontal: | 31.5 kHz to 81.1 kHz | Automatically |
| Range | Vertical: | 56 Hz to 76 Hz | Automatically |
| Resolutions Supported | 720 x 400*1 : VGA text640 x 480*1 at 60 Hz to 75 Hz | Some systems may not support all modes listed. |
| 800 x 600*1 at 56 Hz to 75 Hz832 x 624*1 at 75 Hz1024 x 768*1 at 60 Hz to 76 Hz1280 x 768*1 at 60 Hz1152 x 864*1 at 60 Hz to 75 Hz1152 x 870*1 at 75 Hz1280 x 960*1 at 60 Hz to 75 Hz1280 x 1024 at 60 Hz to 76 Hz |
| NEC DISPLAY SOLUTIONS cites1360 x 768 at 60 Hz1440 x 900 at 60 Hz to 75 Hz | recommended resolution at 60 Hz for optimal display performance. |
| Active Display Area | Horizontal: | 408.2 mm/16.1 inches | |
| Vertical: | 255.2 mm/10.0 inches | |
| Power Supply | 100-240 V ~ 50/60 Hz |
| Current Rating | 0.65-0.3A/100-240V |
| Speakers | Practical Audio Output: | 1+1 watts |
| Dimensions | 440.0 mm (W) x 361.0 mm (H) x 210.0 mm (D) |
| 17.3 inches (W) x 14.2 inches (H) x 8.3 inches (D) |
| Weight | 4.6 kg |
| 10.1 lbs | |
| Environmental Considerations | |
| Operating Temperature: | 5°C to 35°C/41°F to 95°F |
| Humidity: | 10% to 80% |
| Altitude: | 0 to 10,000 Feet |
| Storage Temperature: | -10°C to +60°C/14°F to 140°F |
| Humidity: | 10% to 85% |
| Altitude: | 0 to 40,000 Feet |
*1 Interpolated Resolutions: When resolutions are shown that are lower than the pixel count of the LCD module, text may appear different. This is normal and necessary for all current flat panel technologies when displaying non-native resolutions full screen. In flat panel technologies, each dot on the screen is actually one pixel, so to expand resolutions to full screen, an interpolation of the resolution must be done.
NOTE: Technical specifications are subject to change without notice.
Reduced Footprint: Provides the ideal solution for environments requiring superior image quality but with size and weight limitations. The monitor's small footprint and low weight allow it to be moved or transported easily from one location to another.
AccuColor® Control System: Allows you to adjust the colors on your screen and customize the color accuracy of your monitor to a variety of standards.
OSM® (On-Screen Manager) Controls: Allow you to quickly and easily adjust all elements of your screen image via simple to use on-screen menus.
NaViSet™ Software: NaViSet offers an expanded and intuitive graphical interface, allowing you to more easily adjust OSM display settings via mouse and keyboard.
No-touch Auto Adjust™: No-touch Auto Adjust automatically adjusts the monitor to optimal settings upon initial setup.
ErgoDesign® Features: Enhance human ergonomics to improve the working environment, protect the health of the user and save money. Examples include OSM controls for quick and easy image adjustments, tilt base for preferred angle of vision, small footprint and compliance with MPRII and TCO guidelines for lower emissions.
Plug and Play: The Microsoft® solution with the Windows®95/98/Me/2000/XP operating system facilitates setup and installation by allowing the monitor to send its capabilities (such as screen size and resolutions supported) directly to your computer, automatically optimizing display performance.
IPM ^® (Intelligent Power Manager) System: Provides innovative power-saving methods that allow the monitor to shift to a lower power consumption level when on but not in use, saving two-thirds of your monitor energy costs, reducing emissions and lowering the air conditioning costs of the workplace.
Multiple Frequency Technology: Automatically adjusts monitor to the display card's scanning frequency, thus displaying the resolution required.
FullScan® Capability: Allows you to use the entire screen area in most resolutions, significantly expanding image size.
VESA® Standard Mounting Interface: Allows users to connect their MultiSync monitor to any VESA standard third party mounting arm or bracket. Allows for the monitor to be mounted on a wall or an arm using any third party compliant device.
OSM Display Screen Copyright 2004 by NEC Display Solutions of America, Inc.
No picture
- The signal cable should be completely connected to the display card/computer.
- The display card should be completely seated in its slot.
- Front Power Switch and computer power switch should be in the ON position.
- Check to make sure that a supported mode has been selected on the display card or system being used. (Please consult display card or system manual to change graphics mode.)
- Check the monitor and your display card with respect to compatibility and recommended settings.
- Check the signal cable connector for bent or pushed-in pins.
- Check the signal input.
- Unplug the power cord of the monitor from the AC outlet to turn off and reset the monitor.
Image Persistence
- Image persistence is when a residual or "ghost" image of a previous image remains visible on the screen. Unlike CRT monitors, LCD monitors' image persistence is not permanent, but constant images being displayed for a long period of time should be avoided.
To alleviate image persistence, turn off the monitor for as long as the previous image was displayed. For example, if an image was on the monitor for one hour and a residual image remains, the monitor should be turned off for one hour to erase the image.
NOTE: As with all personal display devices, NEC Display Solutions of America, Inc. recommends displaying moving images and using a moving screen saver at regular intervals whenever the screen is idle or turning off the monitor when not in use.
Image is unstable, unfocused or swimming is apparent
- Signal cable should be completely attached to the computer.
- Use the OSM Image Adjust controls to focus and adjust display by increasing or decreasing the FINE control. When the display mode is changed, the OSM Image Adjust settings may need to be readjusted.
- Check the monitor and your display card with respect to compatibility and recommended signal timings.
- If your text is garbled, change the video mode to non-interlace and use 60Hz refresh rate.
LED on monitor is not lit (no green or amber color can be seen)
- Power Switch should be in the ON position and power cord should be connected.
Display image is not sized properly
- Use the OSM Image Adjust controls to increase or decrease the H.SIZE.
- Check to make sure that a supported mode has been selected on the display card or system being used. (Please consult display card or system manual to change graphics mode.)
No Video
- If no video is present on the screen, turn the Power button off and on again.
- Make certain the computer is not in a power-saving mode (touch the keyboard or mouse).
No Sound
- Make sure the speaker cable is proper connected.
- Check to see if mute is activated.
- Check the volume in the OSM menu.
NEC Monitor Customer Service & Support
Customer Service and Technical Support: (800) 632-4662
Fax: (800) 695-3044
Parts and Accessories/Macintosh
Cable Adapter: (800) 632-4662
Warranty Information: www.necdisplay.com
Online Technical Support www.necdisplay.com
Sales Information Line: (888) 632-6487
Canadian Customers: (866) 771-0266, Ext#: 4037
Government Sales: (800) 284-6320
Government Sales email: gov@necdisplay.com
Electronic Channels
World Wide Web: www.necdisplay.com
Product Registration: www.necdisplay.com
European Operations: www.nec-display-solutions.com
Drivers and Downloads www.necdisplay.com
Limited Warranty
NEC Display Solutions of America, Inc. (hereinafter "NEC DISPLAY SOLUTIONS") warrants this Product to be free from defects in material and workmanship and, subject to the conditions set forth below, agrees to repair or replace (at NEC DISPLAY SOLUTIONS' sole option) any part of the enclosed unit which proves defective for a period of three (3) years from the date of first consumer purchase. Spare parts are warranted for ninety (90) days. Replacement parts or unit may be new or refurbished and will meet specifications of the original parts or unit.
This warranty gives you specific legal rights and you may also have other rights, which vary from state to state. This warranty is limited to the original purchaser of the Product and is not transferable. This warranty covers only NEC DISPLAY SOLUTIONS-supplied components. Service required as a result of third party components is not covered under this warranty. In order to be covered under this warranty, the Product must have been purchased in the U.S.A. or Canada by the original purchaser. This warranty only covers Product distribution in the U.S.A. or Canada by NEC DISPLAY SOLUTIONS No warranty service is provided outside of the U.S.A. or Canada. Proof of Purchase will be required by NEC DISPLAY SOLUTIONS to substantiate date of purchase. Such proof of purchase must be an original bill of sale or receipt containing name and address of seller, purchaser, and the serial number of the product.
It shall be your obligation and expense to have the Product shipped, freight prepaid, or delivered to the authorized reseller from whom it was purchased or other facility authorized by NEC DISPLAY SOLUTIONS to render the services provided hereunder in either the original package or a similar package affording an equal degree of protection. All Products returned to NEC DISPLAY SOLUTIONS for service MUST have prior approval, which may be obtained by calling 1-800-632-4662. The Product shall not have been previously altered, repaired, or serviced by anyone other than a service facility authorized by NEC DISPLAY SOLUTIONS to render such service, the serial number of the product shall not have been altered or removed. In order to be covered by this warranty the Product shall not have been subjected to displaying of fixed images for long periods of time resulting in image persistence (afterimage effects), accident, misuse or abuse or operated contrary to the instructions contained in the User's Manual. Any such conditions will void this warranty.
NEC DISPLAY SOLUTIONS SHALL NOT BE LIABLE FOR DIRECT, INDIRECT, INCIDENTAL, CONSE - QUENTIAL, OR OTHER TYPES OF DAMAGES RESULTING FROM THE USE OF ANY NEC DISPLAY SOLUTIONS PRODUCT OTHER THAN THE LIABILITY STATED ABOVE. THESE WARRANTIES ARE IN LIEU OF ALL OTHER WARRANTIES EXPRESS OR IMPLIED, INCLUDING, BUT NOT LIMITED TO, THE IMPLIED WARRANTIES OF MERCHANTABILITY OR FITNESS FOR A PARTICULAR PURPOSE. SOME STATES DO NOT ALLOW THE EXCLUSION OF IMPLIED WARRANTIES OR THE LIMITATION OR EXCLUSION OF LIABILITY FOR INCIDENTAL OR CONSEQUENTIAL DAMAGES SO THE ABOVE EXCLUSIONS OR LIMITATIONS MAY NOT APPLY TO YOU.
This Product is warranted in accordance with the terms of this limited warranty. Consumers are cautioned that Product performance is affected by system configuration, software, the application, customer data, and operator control of the system, among other factors. While NEC DISPLAY SOLUTIONS Products are considered to be compatible with many systems, specific functional implementation by the customers of the Product may vary. Therefore, suitability of a Product for a specific purpose or application must be determined by consumer and is not warranted by NEC DISPLAY SOLUTIONS.
For the name of your nearest authorized NEC Display Solutions of America, Inc. service facility, contact NEC Display Solutions of America, Inc. at 1-800-632-4662.
TcODevelopment

Congratulations!
The display you have just purchased carries the TCO'03 Displays label. This means that your display is designed, manufactured and tested according to some of the strictest quality and environmental requirements in the world. This makes for a high performance product, designed with the user in focus that also minimizes the impact on our natural environment.
Some of the features of the TCO'03 Display requirements:
Ergonomics
- Good visual ergonomics and image quality in order to improve the working environment for the user and to reduce sight and strain problems. Important parameters are luminance, contrast, resolution, reflectance, color rendition and image stability.
Energy
- Energy-saving mode after a certain time – beneficial both for the user and the environment
- Electrical safety
Emissions
• Electromagnetic fields
- Noise emissions
Ecology
- The product must be prepared for recycling and the manufacturer must have a certified environmental management system such as EMAS or ISO 14 001
- Restrictions on
- chlorinated and brominated flame retardants and polymers
- heavy metals such as cadmium, mercury and lead.
The requirements included in this label have been developed by TCO Development in co-operation with scientists, experts, users as well as manufacturers all over the world. Since the end of the 1980s TCO has been involved in influencing the development of IT equipment in a more user-friendly direction. Our labelling system started with displays in 1992 and is now requested by users and IT-manufacturers all over the world.
For more information, please visit
www.tcodevelopment.com
NEC DISPLAY SOLUTIONS is strongly committed to environmental protection and sees recycling as one of the company's top priorities in trying to minimize the burden placed on the environment. We are engaged in developing environmentally-friendly products, and always strive to help define and comply with the latest independent standards from agencies such as ISO (International Organization for Standardization) and TCO (Swedish Trades Union). For more information, and for help in recycling your old NEC monitors, please visit our website at:
USA: http://www.necdisplay.com
Europe: http://www.nec-display-solutions.com
Japan: http://www.nec-display.com
Country-specific recycling programs can also be found at:
Sweden - http://www.el-retur.se
Germany - http://www.recyclingpartner.de/
Holland - http://www.mirec.nl/
Japan - http://www.diarcs.com/
Energy saving:
This monitor features an advanced energy saving capability. When a VESA Display Power Management (DPM) Standard signal is sent to the monitor, the Energy Saving mode is activated. The monitor enters a single Energy Saving mode.
Mode Power consumption LED color
Normal Operation Approx. 42W Green
Energy Saving Mode Less than 2W Amber
Off Mode Less than 1W Unlit
Declaration of the Manufacturer
We hereby certify that the color monitor
MultiSync LCD195WVXM (L195H0), or MultiSync 1940WCXM (L195H0)
are in compliance with
Council Directive 73/23/EEC:
- EN 60950-1
Council Directive 89/336/EEC:
- EN 55022
- EN 61000-3-2
- EN 61000-3-3
- EN 55024
and marked with

NEC Display Solutions, Ltd.
4-13-23, Shibaura,
Minato-Ku
Tokyo 108-0023, Japan
Disposing of your old NEC Products
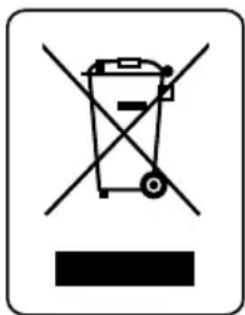
Within the European Union
EU-wide legislation, as implemented in each Member State, requires that waste electrical and electronic products carrying the mark (left) must be disposed of separately from normal household waste. This includes monitors and electrical accessories, such as signal cables or power cords. When you need to dispose of your NEC display products, please follow the guidance of your local authority, or ask the shop where you purchased the product, or if applicable, follow any agreements made between yourself and NEC. The mark on electrical and electronic products only applies to the current European Union Member States.
Outside the European Union
If you wish to dispose of used electrical and electronic products outside the European Union, please contact your local authority so as to comply with the correct disposal method.

AVERTISSEMENT

AFIN D'ÉVITER TOUT RISQUE D'INCENDIE OU D'ÉLECTROCUTION, NE PAS EXPOSER CET APPAREIL À LA PLUIE OU À L'HUMIDITÉ. NE PAS UTILISER LA FICHE D'ALIMENTATION POLARISÉE AVEC UNE PRISE DE CORDON DE RALLONGE OU AUTRE PRISE SAUF SI LES BROCHES PEUVENT ÊTRE ENTIÈREMENT INTRODUITES.
NE PAS OUVRIR LE BOÎTIER, LEQUEL CONTIENT DES COMPOSANTS À HAUTE TENSION. CONFIER TOUS TRAVAUX À DU PERSONNEL TECHNIQUE QUALIFIÉ.

ATTENTION

ATTENTION : POURÉVITER TOUT RISQUED'ÉLECTROCUTION, NE PAS OUVRIR LE COUVERCLE (L'ARRIÈRE). À L'INTÉRIEUR, AUCUNE PIÈCE NE NÉCESSITE L'INTERVENTION DE L'UTILISATEUR. EN CAS DE PROBLÈME, S'ADRESSER À DU PERSONNEL TECHNIQUE QUALIFIÉ.
natural_image
Coiled cable with two terminal plugs (no text or symbols visible)
natural_image
Illustration of a coiled tube with two connectors (no text or symbols)
Câble d'audio
natural_image
Illustration of a black computer monitor with a circular base and stand (no text or symbols visible)
Moniteur MultiSync LCD (Socle non connect)

natural_image
3D rendered black mechanical component with curved surfaces (no text or symbols)
natural_image
Illustration of a computer monitor with a small inset image showing a device (no text or symbols present)
natural_image
Illustration of a vintage electrical device with cables and ports (no visible text or symbols)
Câble DVI
(non fourni)
Figure A.2
natural_image
Illustration of a computer tower with ports and cables (no text or symbols visible)
Figure A.3
natural_image
Illustration of a computer server unit with attached cables and ports (no visible text or symbols)
natural_image
Illustration of a person holding a tablet with a speech bubble and arrow symbol (no text or symbols present)
Figure R.2
natural_image
Interior view of a NEC device showing a central panel with mounting holes and wiring (no text or symbols visible)
Enlever la Base
4 vis (M4)
(MAX depth: 7,0 mm)
natural_image
Diagram showing multiple arrows pointing outward from a central rectangular panel, with no visible text or symbols.
Poids of assemblee: 4,2 kg (MAX)
natural_image
Silhouette of a person sitting at a desk with a computer, viewed from behind (no text or symbols present)
Félicitations !
www.tcodevelopment.com
NEC Display Solutions, Ltd.
4-13-23, Shibaura,
Minato-Ku
Tokyo 108-0023, Japan
natural_image
Illustration of a computer monitor with a small inset image showing a device, labeled 'Figura 2' (no text or symbols on the main subject)
natural_image
Illustration of a vintage computer case with attached cables (no visible text or symbols)
natural_image
Illustration of a desktop computer tower with ports and cables (no text or symbols visible)
Figura A.3
natural_image
Illustration of a computer server unit with ports and cables (no visible text or symbols)
natural_image
3D mechanical component diagram showing a NEC device with mounting holes and a central hub, no text or symbols present
Figura R.2
natural_image
Back view of a NEC device showing internal components and wiring (no text or symbols visible)
Cómo quitar la base
Especificaciones
NEC Display Solutions of America, Inc.
Sin imagen
¡Felicitaciones!
www.tcodevelopment.com
Council Directive 89/336/EEC:
- EN 55022
- EN 61000-3-2
- EN 61000-3-3
- EN 55024
NEC Display Solutions, Ltd.
4-13-23, Shibaura,
Minato-Ku
Tokyo 108-0023, Japan
The information disclosed in this document, including all designs and related materials, is the valuable property of NEC Display Solutions of America, Inc. and/or its licensors, as appropriate, reserve all patent, copyright and other proprietary rights to this document, including all design, manufacturing, reproduction, use and sales rights thereto, except to the extent said rights are expressly granted to others.
The NEC Display Solutions of America, Inc. product(s) discussed in this document are warranted in accordance with the terms of the Limited Warranty Statement accompanying each product. However, actual performance of each such product is dependent upon factors such as system configuration, customer data and operator control. Since implementation by customers of each product may vary, the suitability of specific product configurations and applications must be determined by the customer and is not warranted by NEC Display Solutions of America, Inc..
To allow for design and specification improvements, the information in this document is subject to change at any time without notice. Reproduction of this document or portions thereof without prior approval of NEC Display Solutions of America, Inc. is prohibited.
This device complies with Part 15 of FCC Rules. Operation is subject to the following two conditions. (1) This device may not cause harmful interference, and (2) this device must accept any interference received, including interference that may cause undesired operation.
U.S. Responsible Party: NEC Display Solutions of America, Inc.
Address: 500 Park Blvd, Suite 1100
Itasca, Illinois 60143
Tel. No.: (630) 467-3000
Type of Product: Display Monitor
Equipment Classification: Class B Peripheral
Model : MultiSync LCD195WVXM (L195H0) and
MultiSync 1940WCXM (L195H0)

We hereby declare that the equipment specified above conforms to the technical standards as specified in the FCC Rules.
Windows is a registered trademark of Microsoft Corporation. NEC is a registered trademark of NEC Corporation. Energy Star is a U.S. registered trademark. All other brands and product names are trademarks or registered trademarks of their respective owners.
As an Energy Star ^® Partner, NEC Display Solutions of America, Inc. has determined that this product meets the Energy Star guidelines for energy efficiency. The Energy Star emblem does not represent EPA endorsement of any product or service.