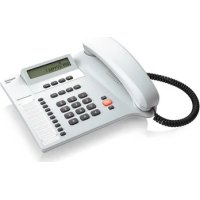
Euroset 5020 - Telephone GIGASET - Free user manual and instructions
Find the device manual for free Euroset 5020 GIGASET in PDF.



| Brand | Gigaset |
| Model | Euroset 5020 |
| Product type | Analog corded telephone |
| Display | Backlit LCD display (12 characters) |
| Power supply | Via telephone line (optional AC adapter for caller ID and call log) |
| Dimensions (approx.) | 220 x 150 x 80 mm (estimated) |
| Weight (approx.) | 400 g (estimated) |
| Directory | 20 numbers on speed-dial keys (2 levels) |
| Redial | Last 5 dialed numbers (32 characters max.) |
| Call log | 50 entries with date, time and number of calls |
| Hands-free function | Yes, with volume adjustment on 7 levels |
| Baby call (direct dial) | Yes, automatic dialing of a programmed number |
| Keypad lock | Yes, prevents dialing (except baby call) |
| Mute | Yes, cuts the microphone during a call |
| Dialing modes | Tone (DTMF) and pulse |
| Ringer settings | Volume (4 levels), frequency (3 levels), melody (10 melodies) |
| Recall key (R) | For supplementary services and private branch exchanges |
| Caller ID | Yes (with operator subscription), display up to 20 digits |
| Outside line prefixes | Up to 3 prefixes for PABXs |
| Care and cleaning | Damp or antistatic cloth; no harsh detergents |
| Safety | Do not expose to moisture, heat, or open the device |
| Spare parts | Label sheets available at gigaset.com |
| General information | User manual downloadable as PDF; compatible with analog networks |
Frequently Asked Questions - Euroset 5020 GIGASET
User questions about Euroset 5020 GIGASET
0 question about this device. Answer the ones you know or ask your own.
Ask a new question about this device
Download the instructions for your Telephone in PDF format for free! Find your manual Euroset 5020 - GIGASET and take your electronic device back in hand. On this page are published all the documents necessary for the use of your device. Euroset 5020 by GIGASET.
USER MANUAL Euroset 5020 GIGASET
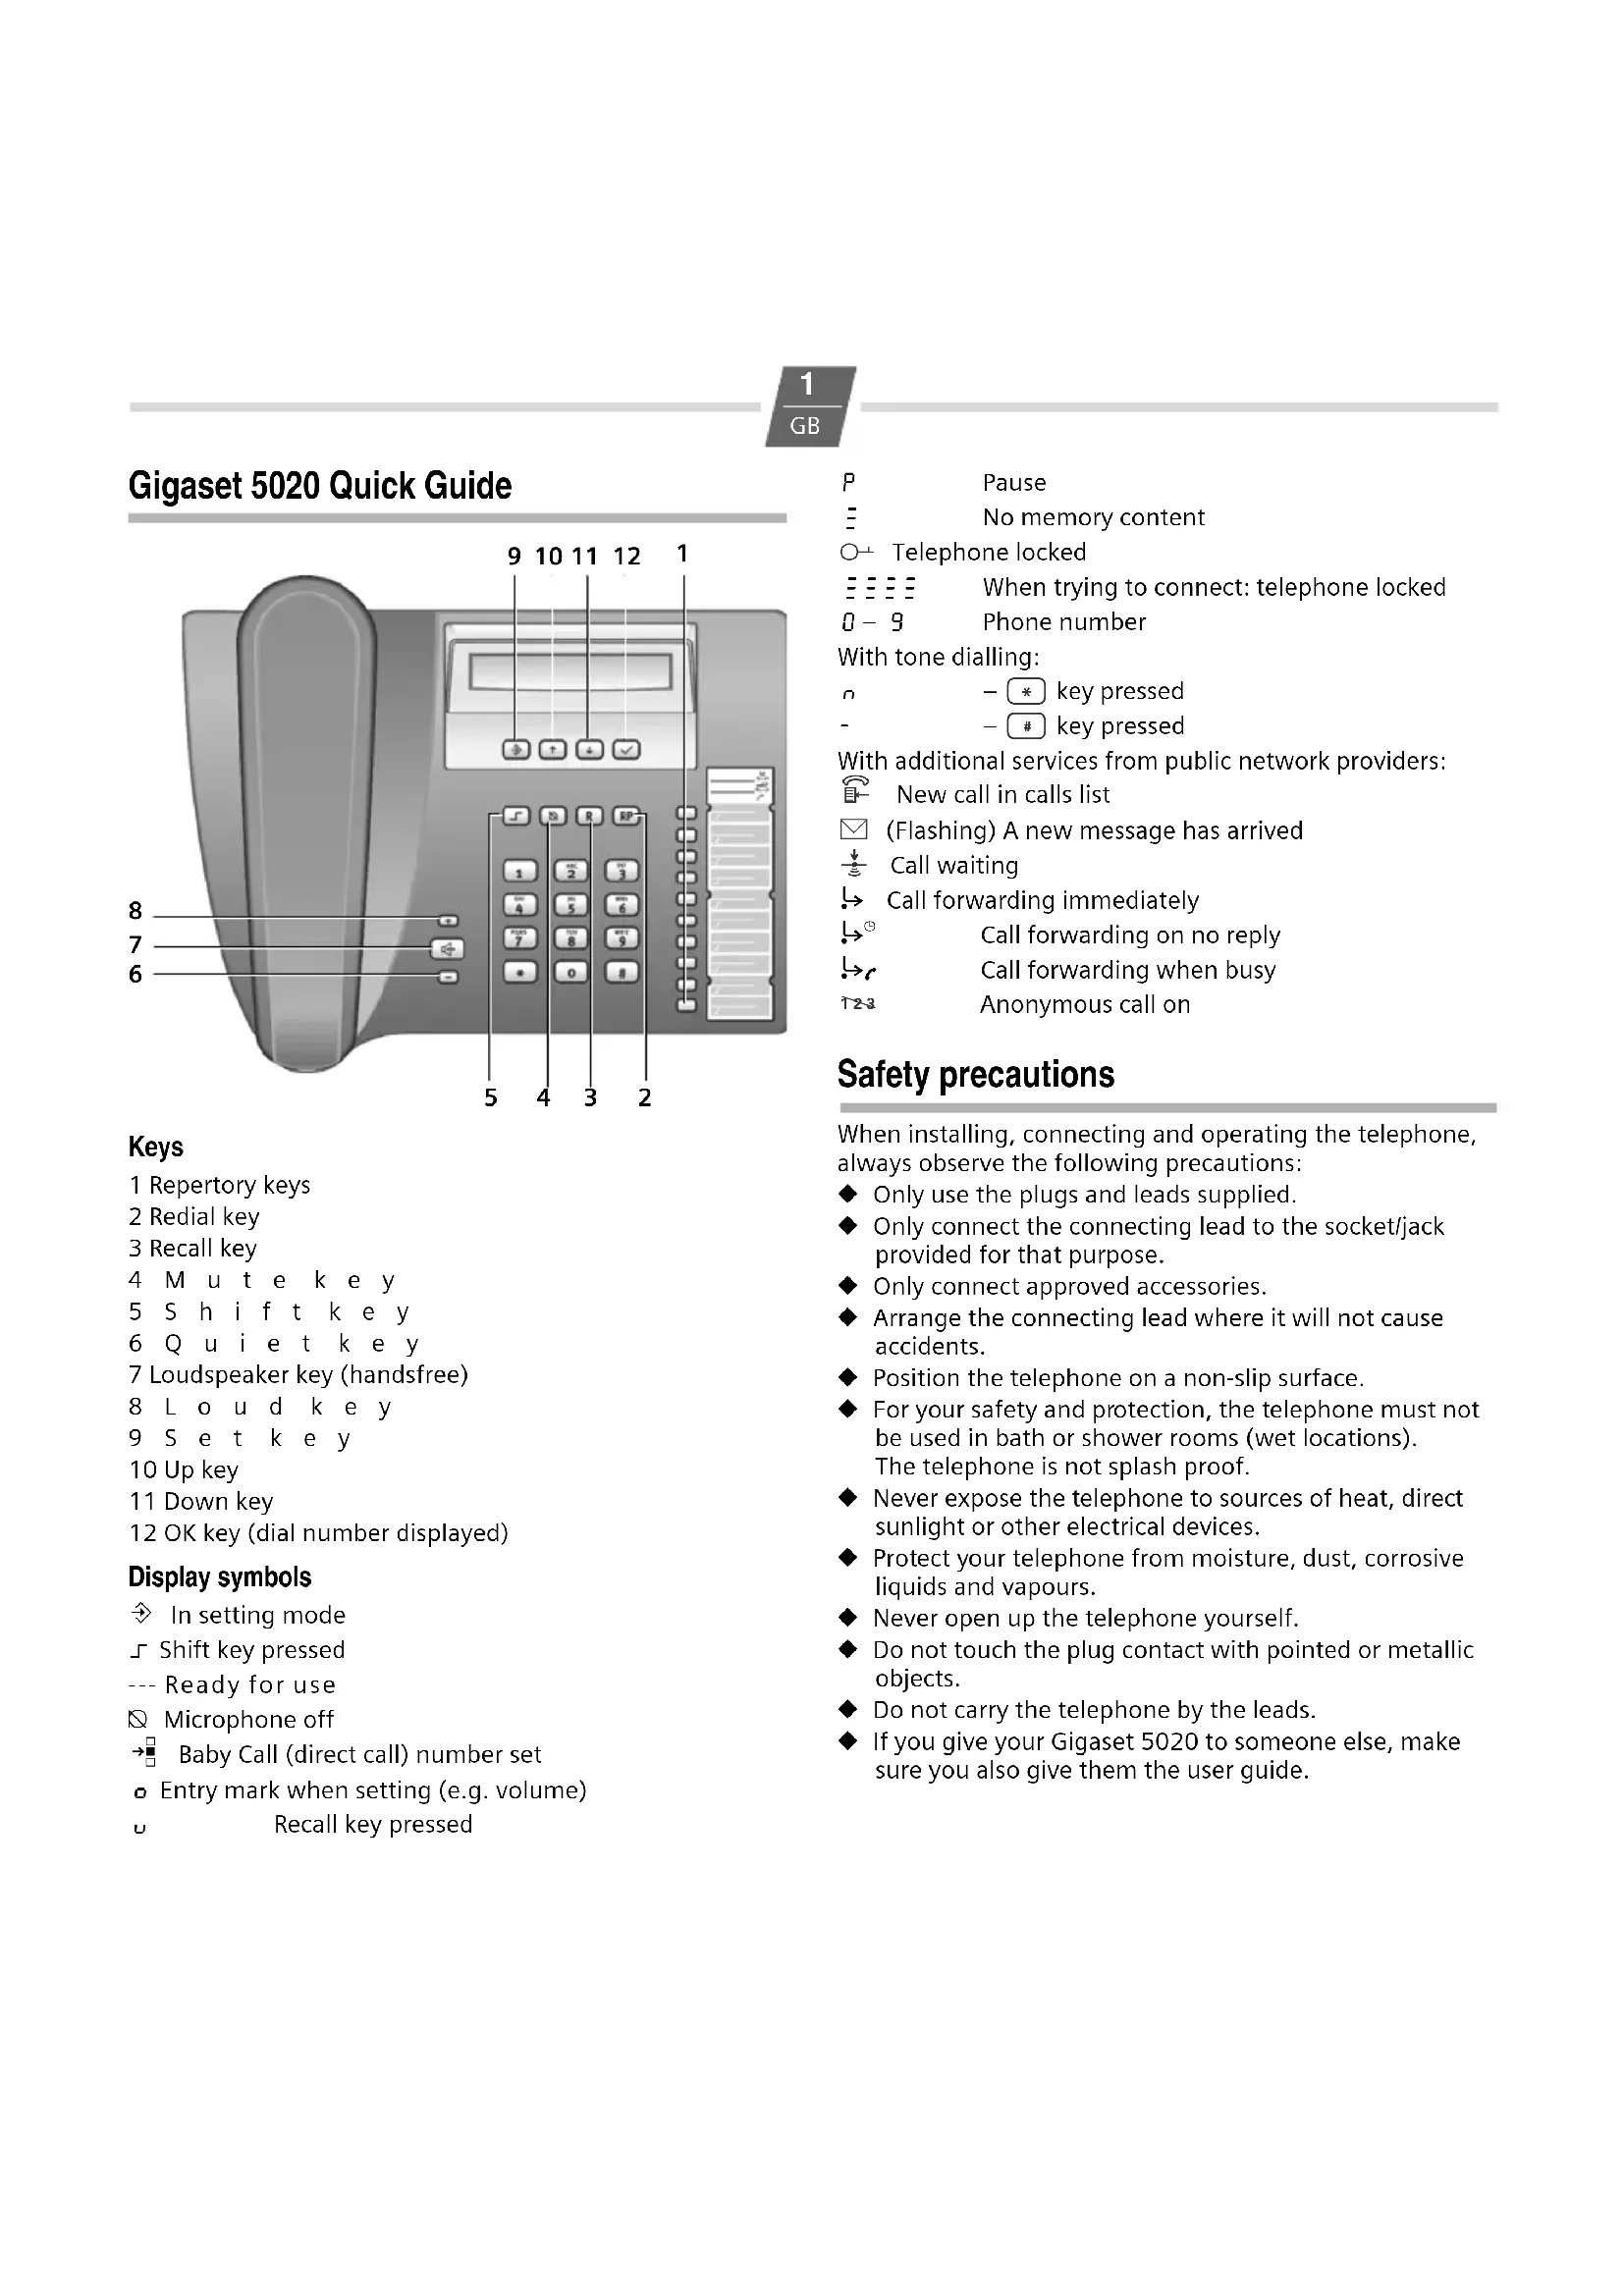
12 OK key (dial number displayed)
Display symbols
In setting mode
Shift key pressed
--- Ready for use
Microphone off
→■ Baby Call (direct call) number set
- Entry mark when setting (e.g. volume)
u Recall key pressed
P Pause
No memory content
○← Telephone locked
When trying to connect: telephone locked
0 - 9 Phone number
With tone dialling:
- * key pressed
- - # key pressed
With additional services from public network providers:
New call in calls list
(Flashing) A new message has arrived
Call waiting
→ Call forwarding immediately
Call forwarding on no reply
Call forwarding when busy
1-2-3 Anonymous call on
Safety precautions
When installing, connecting and operating the telephone, always observe the following precautions:
◆ Only use the plugs and leads supplied.
- Only connect the connecting lead to the socket/jack provided for that purpose.
◆ Only connect approved accessories.
◆ Arrange the connecting lead where it will not cause accidents.
◆ Position the telephone on a non-slip surface.
◆ For your safety and protection, the telephone must not be used in bath or shower rooms (wet locations). The telephone is not splash proof.
◆ Never expose the telephone to sources of heat, direct sunlight or other electrical devices.
◆ Protect your telephone from moisture, dust, corrosive liquids and vapours.
◆ Never open up the telephone yourself.
◆ Do not touch the plug contact with pointed or metallic objects.
◆ Do not carry the telephone by the leads.
◆ If you give your Gigaset 5020 to someone else, make sure you also give them the user guide.
2
GB

This crossed-out wheeled bin symbol on the product means the product is covered by the European Directive 2002/96/EC.
The correct disposal and separate collection of your old appliance will help prevent potential negative consequences for the environment and human health. It is a precondition for reuse and recycling of used electrical and electronic equipment.
For more detailed information about disposal of your old appliance, please contact your local council refuse centre or the original supplier of the product.
Preparing the telephone for use
Recommended installation of telephone
◆Do not expose the telephone to direct sunlight or other sources of heat.
◆Operate at temperatures between +5°C and +40°C.
◆Maintain a distance of at least one metre between the telephone and radio equipment, e.g. wireless telephones, wireless pagers or TV sets. Otherwise, telephone communication could be impaired.
◆Do not install the telephone in dusty areas as this can shorten the service life of the telephone.
◆ To clean, wipe with a moist or antistatic cloth only, never with a dry cloth (risk of electrostatic charging and discharge) or harsh cleaning agent.
◆Furniture lacquer and polish can be damaged by contact with parts of the unit (e.g. device feet).
Connecting
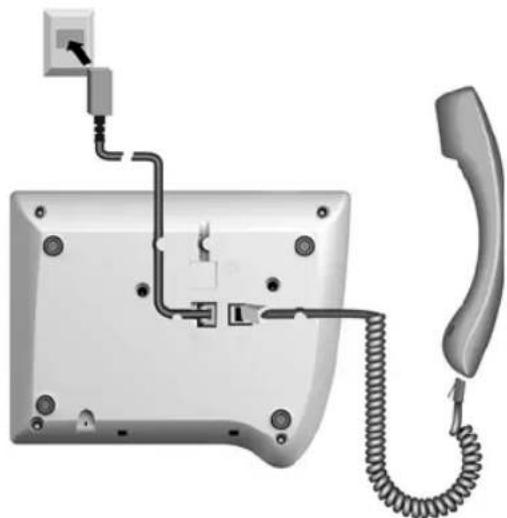
Insert the short end of the coiled handset cord in the socket provided in the handset and the long end in the socket marked with an 📋 on the underside of the device. Plug the phone cord into the outlet on the wall and the other end into the socket marked with a 📞 on the underside of the device. Then your telephone is ready to use.
natural_image
Diagram of a telephone handset with attached cable and connector, no text or symbols presentSetting the internal clock

Initiate function.
The current set time is displayed in 24-hour mode (default setting: 00:00).

Enter the correct time in hours

Press the Set key.
Making calls
Dialling a number

Lift handset, dial number.
or ...


Dial number (you can delete wrongly entered digits with ↓ and then enter the correct digit) and press the OK key.
After 2 seconds the number is dialled. Lift the handset if you want to talk via the handset.
Any digits after the 20th digit are moved from right to left in the display. The Last number redial key can be used to insert pauses when dialling, starting from the 2nd digit.
Select phone number from the calls list (if available): see 6.
Activating/deactivating handsfree talking
With this telephone you can also make calls (handsfree mode) or settings without lifting the handset. The best distance from the microphone for speaking is about 50 cm.
◆Activating during a call via the handset
+ With the Loudspeaker key pressed replace the handset.
◆Activating before dialling the number
Before dialling: hold down the Loudspeaker key until you can hear the dialling tone.
Deactivating handsfree talking
Lift the handset during the call.
Last number redial
The last 5 numbers dialled (up to 32 digits) are saved automatically. You can retrieve these numbers from the last number redial list and dial them again:
Redialling the last number dialled
Lift the handset and press the last number redial key. The last number dialled is redialled immediately.
Dialling from the last number redial list
→ Without lifting the handset: Press the last number redial key. The last number dialled is displayed. (You can leave the last number redial list at any time by pressing R.)
↓ ... ↑ Using the Down/Up key, scroll through the list to the desired number.
Press OK or 📋 key. After 2 seconds the number is dialled. Lift the handset if you want to talk via the handset.
Dialling using the repertory keys
Lift handset. (If necessary, press 📄 for a 2nd level repertory key).
☐ Press repertory key.
or ...
☐ Press repertory key. (If necessary, press ☐ for a 2nd level repertory key).
Press OK or ☑ key. After 2 seconds the number is dialled. Lift the handset if you want to talk via the handset.
Saving numbers
Different telephone settings must be completed with the Set key ➕ so that they are available permanently. In order to cancel without saving, e. g. after an incorrect entry, replace the handset instead of pressing ➕ at the end. The original setting is then retained.
Saving with notebook function
You can also save phone numbers during a conversation with the notebook function.
Saving repertory numbers
You can save up to 20 phone numbers (or even functions, see page 7) on both levels of the repertory keys.
Press the Set key. (For 2nd memory level, also press 📋.)
☐ Press the repertory key under which you want to save the repertory number. A number that has already been saved is shown in the display. If the memory for this repertory key is empty, appears in the display
Enter the number to be saved (up to 32 digits).
or ...
Saving from the calls list (if service is available)
Press the Down/Up key until the desired number appears in the display.
or ...
Saving from the redial list:
→ Press the last number redial key. ↓ ... ↑ If necessary, press the Down/Up key until the desired number appears in the display.
To terminate the process:
Press the Set key.
Saving during a call
You can also save phone numbers in the same way during a call (notebook function).
Note: After the 20th digit, any following digits are moved from right to left in the display.
Delete all repertory numbers
1 ABC 5 1
Initiate function.
Press the Set key.
Adjusting the telephone
Adjusting the ringer volume
The volume of the ringer can be set to one of 4 levels and can also be deactivated completely (default setting: level 4).
◆To adjust when the telephone is idle:
→ 5 Initiate function.
+ ... - Adjust the volume with the Loud/Quiet key.
Press the Set key.
◆To adjust while the telephone is ringing:
Press +... - before lifting the handset.
The last value set is saved.
Setting the ringer frequency
The frequency (speed) of the ringer can be set to one of three levels (default setting: level 3).
→ 6 Initiate function.
1 ... 3 Press one of the keys 1...3: 1: highest frequency; 3: lowest frequency.
Press the Set key.
Setting the ringtone
Ten different ringtones can be set for the ringer (default setting: ringtone 9).
◆To set with the telephone is idle:
→ 7 Initiate function.
0 ... 9 Press one of the keys 0 ... 9
Press the Set key.
◆To set while the telephone is ringing:
0 ... 9 Press one of the keys 0 to 9.
Setting the handset volume
The volume on the handset can be set to one of 3 levels and saved (default setting: level 1).
→ 9 Initiate function.
+... - Adjust the volume with the Loud/Quiet key.
Press the Set key.
Mute
You can deactivate the telephone's handset and microphone. Then the other party can no longer hear you.
During a call: Press the Mute key Activate: Press the key again.
Adjusting the loudspeaker
While in handsfree mode, you can set the volume to one of 7 levels and save it (default setting: 1).
+ ... - Adjust the volume with the Loud/Quiet key.
Activating/deactivating the mute melody
You can activate and deactivate the mute melody for the mute (default setting: on).
→ 1 Wxyz 9 #
Initiate function.
0 / 1 0: deactivate; 1: activate.
Press the Set key.
Baby call (direct call) number setting
If a phone number is set for the Baby Call function, it is dialled automatically when the telephone is locked (s. "Activating/deactivating the telephone lock") after you lift the handset (or press the Loudspeaker key) and press any key (except ☐, ☑, + and −). The telephone does not allow other phone numbers to be dialled, but incoming calls can be received.
→ TUV 8 ADC 2
Initiate function.
Enter direct call number (max. 32 digits).
→ Press the Set key.
When the baby call function is activated, you will see and O ^- in the display.
Deactivating
→ 8 0
Initiate function.
Press the Set key.
Deleting a baby call phone number
→ 1 ADC 2 JCL 5 DEF 3
Initiate function.
→ Press the Set key.
Activating/deactivating the telephone lock
The telephone can be locked completely (with the exception of a baby call phone number if set) so that it cannot dial any phone numbers, including the baby call phone number. You can continue to receive incoming calls.
→ 8 Initiate function..
0 / 1 0: unlock; 1: lock
Press the Set key.
When the telephone is locked, you will see ^ in the display.
Activate/deactivate call duration display
The telephone can display the approximate call duration in the display (up to 99 min. 59 sec., default setting: on). If the call duration display is activated, the time display begins 8 seconds after the last digit is dialled.

Initiate function.
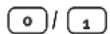
0: deactivate; 1: activate.
→ Press the Set key.
Setting the pause time
If necessary, the pause time of the Pause key (pause function from second input position) can be changed to 1, 3 or 6 seconds (default setting: 3 seconds).

Initiate function.
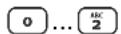
0: 1 sec.; 1: 3 sec.; 2: 6 sec..
Press the Set key.
Changing the dialling mode
→ # Initiate function.
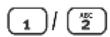
1: Tone dialling.
2: Pulse dialling without flash function.
Press the Set key.
Changing dialling modes during a call
If your telephone is set to pulse dialling and you want to use functions that require tone dialling (e.g. remote access to an answering machine), you can change the dialling mode during a call.
* With an open connection: press the star key.
Enter digits for remote control/data transfer.
The telephone is reset to the original dialling mode by hanging up the handset.
Operation on a PABX
Enter/delete an external line prefixe
If you are using your telephone on a PABX, you may have to save one or more external line prefixes. A dialling pause is set automatically with the external line prefix. You can save up to three external line prefixes.
→ o Initiate function.
If no external line prefix has been set in a location, ( \overline{\overline{\overline{\overline{\overline{\overline{\overline{\overline{\overline{\overline{\overline{\overline{\overline{\overline{\overline{\overline{\overline{\overline{\overline{\overline{\overline{\overline{\overline{\overline{\overline{\overline{\overline{\overline{\overline{\overline{\overline{\overline{\overline{\overline{\
To delete an external line prefix:
Press the Set key.
To enter an external line prefix:
Enter a one- to three-digit code.
Enter additional external line prefixes:

Press the Redial key, enter next external line prefix.
Press the Set key.
Recall key (on a PABX)
During an external call, you can make a recall or divert the call. To do this, press the Recall key ☐. The subsequent procedure depends on your PABX. By default, the Recall key is preset to a flash time (interruption time) of 90 ms for use of new features on public telephone systems. With a connection to a PABX, it may be necessary to change the flash time (e.g. 600 ms). To do this, please refer to the operating instructions for your PABX.
Setting the flash time for the Recall key

Initiate function.
o ... 4 Enter desired flash code:
0: 90 ms (default setting); 1: 120 ms;
2: 270 ms; 3: 375 ms; 4: 600 ms.
Press the Set key.
Using functions for additional services of public telephone systems
If you want to use services that are to be triggered with the Recall key, make sure beforehand that the correct flash time is set for the key.
Recall key (in public telephone systems)
In public telephone systems, this key is required to use certain additional services.
The appropriate flashtime for the specific country must be set before using the Recall key can be used:
◆Belgium, Netherlands, Switzerland: 120 ms (access code 1)
◆France, Luxemburg, Portugal, Germany, Greece: 270 ms (access code 2)
◆other European countries: 90 ms (access code 0).
Using Calling Line Identification
Under the following conditions, the phone numbers of incoming calls are
(a) shown on the display (up to the first 20 digits) and (b) automatically saved in a calls list:
◆Both your network provider and the caller's network provider must offer Calling Line Identification.
◆Both you and the caller must have requested this service (if necessary) from your respective network providers. If these conditions are met, but a caller has suppressed Calling Line Identification before making the call, you will see ---P--- on the display instead of the phone number. If it has not been possible to identify the number for other (technical) reasons, you will see ---0--- or ---E--- on the display. Up to 20 digits can be shown on the display. Longer phone numbers are shown with the end of the number shortened.
Calls list
The calls list includes up to 50 entries. If the same subscriber calls more than once, a new entry is not created. Up to 99 repeated calls are displayed in the additional information.
Sequence of list entries: The most recent call is displayed in the first position (position number "01"). Older entries are moved downwards with each new incoming phone number until they are deleted from the list.
In the calls list
◆you can scroll through the phone numbers displayed,
◆query additional information:
(a) date and time, if this is transferred from the telephone system, otherwise only the time according to the telephone's internal clock,
(b) frequency of an incoming phone number,
◆delete entries,
◆ save phone numbers from the calls list to a repertory key (see page 3),
◆dial a displayed phone number directly.
Viewing caller histories and dialling phone numbers
If there are entries in the calls list that have you have not yet seen, ⏻ flashes in the display.
You can retrieve the calls list, scroll through its entries, view additional information about a call and call back directly:
Press the Down key.
The phone number of the most recent call appears in the display. Its position number "01" is displayed to the left of the number. If the phone number contains more than 17 digits, the first 17 digits will be displayed first, then the rest after one second. (You can leave the calls list at any time by pressing R.)
To scroll through the calls list:
↓ ... ↑ Press the Down/Up key.
To view additional information:
Press the Shift key.
The date and time of the displayed entry is displayed with the number of calls (on the right).
Back to the calls list (calling line display):
Press the Shift key again.
Dial the phone number:
Press OK or 🔊 key.
After 2 seconds the number is dialled. Lift the handset if you want to talk via the handset.
Deleting entries in the calls list
Delete all entries at the same time
↓/↑ Press the Down/Up key.
→ * → Press the Set key, star key and Set key one after another.
The calls list is deleted and closed.
Delete individual entries
↓... ↑ Scroll to the desired entry.
→→ Press the Set key twice.
The entry is deleted.
Activating/deactivating display of the area code
You can set the telephone so that the area code is not displayed for incoming calls. This can be useful, for example, if you cannot see the last digits of a long phone number on the display.
You can deactivate the display for 2 area codes (up to 5 digits each).
→ 4 Initiate function.
If no number has been set in a storage location appears in the display.
If both storage locations are in use, these are displayed side by side; the current storage location to be edited flashes. If necessary, use the key to toggle between the storage locations displayed to edit them as follows:
Delete a number:
Press the Set key.
Enter a number:
Enter a one to five digit number.
Enter another prefix:
→ Press the last number redial key, enter next prefix.
→ Press the Set key.
"You have a message" display
Different network providers offer services for saving messages (e.g. voice mail services).
If one or more newly received messages have been stored with the network provider, it may inform you via your telephone. In the display, this notification from the network provider is displayed with the flashing ☑ symbol and the phone number.
You can now dial the corresponding phone number in order to check the stored messages. If there are no more new messages for you, the ☑ symbol disappears.
Using the repertory keys as "function keys"
Different public telephone services/functions – possibly by order/request – can be selected via predetermined key combinations which you can obtain from your network provider. You can save the necessary key combinations like normal phone numbers on repertory keys and similarly "select" and also deactivate the service again.
Note:
If you activate the symbol display and save the function calls on the 2nd level of the repertory keys, you can link the activation and deactivation of different services for each "function key" with the display or hiding of certain symbols on the display.
Therefore, when setting the repertory keys on the 2nd level, bear in mind that activating and deactivating the display symbols ,^, r,112 and r≥ a is linked to very specific keys in the 2nd level – regardless of the phone numbers or function calls stored on it!
Deactivating/activating the symbol display for additional services
Displaying the symbols can be activated or deactivated as needed. In the default setting, the display is activated.
→ 1 GH 4 5
Initiate function.
0 / 1 0: deactivate; 1: activate.
Press the Set key.
Recommended assignment of symbols to keys
When the symbol display ⏻ is activated and you then press one of the following repertory keys, the display symbol assigned to each is activated or deactivated respectively (key numbering from top to bottom):
| + | A s s i g n m e n | t D icon | |
| 1 | Call forwarding immediately | on | |
| 2 | off | ||
| 3 | Call forwarding on no reply | on | ^ |
| 4 | off | ||
| 5 | Call forwarding when busy | on | r |
| 6 | off | ||
| 7 | Call waiting | on | 总 |
| 8 | off | ||
| 9 | Anonymous call (only the next call) | r≥a | |
Assigning/changing function keys
→ ↗ Initiate function.
☐ Press the function key (=repertory key) that is to be assigned.
If the function key is already assigned, the key assignment appears in the display. If the memory for this function key is empty, appears in the display.
Enter the key combination/code for the desired service.
Important!
If a part of the key combination to be saved includes numbers/characters that must be changeable (e.g. a phone number for a forwarded call destination, or a time for the appointment reminder), the shift key ⏚ must be used in this place.
During a later activation of the service, this key makes the cursor for entering the changeable part flash.
Press the Set key.
Example: Call forwarding
In the following, you will see an example of repertory keys used as "function keys". If the symbol display is activated, in the "call forwarding" example when the service is activated, the symbol provided for it is displayed, or hidden when the service is deactivated.
The key sequence for activating the function "call forwarding immediately" from your network provider consists of e.g. three parts:
| Select function Forwarded call destination End of function | |||
| * 2 1 * | Phone number of the forwarded call destination | # | |
You now have the following options:
◆You can dial the entire key sequence each time on the keypad.
You can save the key sequence on Repertory keys as an entire function together with the phone number of a set forwarded call destination or
only the select function and the function end. With this, you still have the option to set a forwarded call destination that may change on a case-by-case basis.
Saving call forwarding on a function key
→ ↗ Initiate function.
☐ Press the repertory key that is designated for the symbol display "L→ on", see "Deactivating/activating the symbol display for additional services" on page 7.
A number already saved is shown in the display. If the memory for this repertory key is empty, appears in the display.
* 2 1 *
Enter the select function for "Immediate call forwarding".
(a) Set the phone number for the call forwarding
Enter the phone number of the forwarded call destination.
# Press the hash key to mark the function end.
Press the Set key.
or ...
(b) Reserve changeable call forwarding
Press the Shift key.
When "Call forwarding immediately" is activated later, this key makes the cursor for entering the phone number of the forwarded call destination flash.
# Press the hash key to mark the function end.
→ Press the Set key.
Activating call forwarding with a function key
Lift handset, press Shift key.
☐ Press the repertory key for the symbol display "L→ on".
!→ appears in the display.
(a) Phone number for call forwarding set
You may hear an announcement that the service is activated.
Replace the handset.
From now on, incoming calls will be forwarded to the forwarded call destination. Your telephone will not ring.

(b) Changeable call forwarding
Enter the phone number of the forwarded call destination, press the last number redial key to mark the end of the phone number entered. You may hear an announcement that the service is activated.

Replace the handset.
Incoming calls will be forwarded from now on to the forwarded call destination. Your telephone will not ring.
Saving "Deactivate call forwarding" on a function key
The call forwarding, as described in the previous example, can be deactivated again with your network provider e.g. with key sequence # 2 1 # .
You can save this key sequence on a dedicated repertory key as well. If the symbol display is activated and the service is activated as described, the symbol in the display disappears after the service is deactivated.

Initiate function.

Press the repertory key that is designated for symbol display " off", see "Deactivating/activating the symbol display for additional services" on page 7.

Enter the select function for "Immediate call forwarding".

Press the Set key.
Deactivating call forwarding with a function key

Lift handset, press the Shift key.

Press the repertory key for symbol display "!→ off". Replace handset.
The symbol disappears. You may hear an announcement that the service is deactivated.
Appendix
Care
To clean, wipe with a moist or antistatic cloth only, never with a dry cloth (risk of electrostatic charging and discharge) or harsh cleaning agent.
If your telephone is not working perfectly
No signal tone: The tone volume might be set to 0. Lift handset, no dialling tone: Is the connecting lead correctly plugged into the telephone and the telephone socket?
Dialling tone audible but telephone will not dial: The connection is OK. Is the dialling mode set correctly (see page 5)?
PABX only: No connection or incorrect connection when dialling from memory (e.g. redial, speed dial):
Program external line prefixe.
The other party cannot hear you: Have you pressed the Mute key? Press the key again. Is the plug from the handset cord inserted correctly?
Recall key does not work: Set appropriate flash time.
The caller's phone number and the calls list are not displayed:
Is the adapter connected (see page 2)?
Can Calling Line Identification be used (see page 6)?
Insert strips
Blank insert strips for the repertory keys can be found on the Internet at www.gigaset.com/cordedphones.
Contacts
If you should encounter any problems when operating the telephone connected to a communication system with analogue network access, please contact the network operator responsible or your dealer.
Authorisation
This device is intended for connection to analogue networks outside the EEA (with the exception of Switzerland) depending on national type approval.
Country-specific requirements have been taken into consideration.
We, Gigaset Communications GmbH, declare that this device meets the essential requirements and other relevant regulations laid down in Directive 1999/5/CE.
A copy of the 1999/5/EC Declaration of Conformity is available at this Internet address:
www.gigaset.com/docs
CE 0682
natural_image
Diagram of a telephone handset with attached cable and connector, no text or symbols presentRégler l'horloge
Baby call (appel direct)
2:270 ms; 3:375 ms; 4:600 ms.
natural_image
Diagram of a telephone handset with attached cable and connector, no text or symbols presentnatural_image
Diagram of a telephone handset with attached cable and connector (no text or symbols)2: 270 ms; 3: 375 ms; 4: 600 ms.
Declaration of Conformity
We, Gigaset Communications GmbH
Frankenstrasse 2
46395 Bocholt
Germany
declare, that the hereinafter mentioned product is assessed according to our Full Quality Assurance System certified by CETECOM ICT Services GmbH in compliance with
Annex V of the R&TTE-Directive 1999/5/EC
Product: „Gigaset 5020“ IM* Version
Analogue Corded Phone with handsfree
The presumption of conformity with the essential requirements regarding Council Directive 1999/5/EC is ensured according to
Art. 3.1 a)
Safety:
EN 60950-1
(equivalent to 2006/95/EC)
Art 31a)
FMF/SAR
Not Applicable
Art. 3.1 a) Acoustic Shock:
ES 200677
Art. 3.1 b)
EMC:
EN 55022 / EN 55024
Art. 3.2
Radio:
(equivalent to 2004/108/EC)
Not Applicable
The product is labelled with the European Approvals Marking CE and the 0682 for the notified Body.
Any unauthorized modification of the product voids this Declaration.
* Intended for use in Hungary, Poland and Romania.
Use outside EEA, excluding CH, is depending on national Type Approval.
Bocholt, 10 February 2010
Place and Date
u. AM
Mr. Alt
Senior Approvals Manager
13
HR
14
HR
Issued by
Gigaset Communications GmbH
Frankenstr. 2a
D-46395 Bocholt
© Gigaset Communications GmbH 2011
All rights reserved. Subject to availability.
Rights of modification reserved.
www.gigaset.com
- Display symbols
- Safety precautions
- 2
- GB
- Preparing the telephone for use
- Recommended installation of telephone
- Connecting
- Setting the internal clock
- Making calls
- Dialling a number
- Activating/deactivating handsfree talking
- ◆Activating during a call via the handset
- ◆Activating before dialling the number
- Deactivating handsfree talking
- Last number redial
- Redialling the last number dialled
- Dialling from the last number redial list
- Dialling using the repertory keys
- Saving numbers
- Saving with notebook function
- Saving repertory numbers
- Saving from the calls list (if service is available)
- Saving from the redial list:
- To terminate the process:
- Saving during a call
- Delete all repertory numbers
- Adjusting the telephone
- Adjusting the ringer volume
- Setting the ringer frequency
- Setting the ringtone
- Setting the handset volume
- Mute
- Adjusting the loudspeaker
- Activating/deactivating the mute melody
- Baby call (direct call) number setting
- Deactivating
- Activating/deactivating the telephone lock
- Activate/deactivate call duration display
- Setting the pause time
- Changing the dialling mode
- Changing dialling modes during a call
- Operation on a PABX
- Enter/delete an external line prefixe
- Recall key (on a PABX)
- Setting the flash time for the Recall key
- Using functions for additional services of public telephone systems
- Recall key (in public telephone systems)
- Using Calling Line Identification
- Calls list
- Viewing caller histories and dialling phone numbers
- Deleting entries in the calls list
- Delete all entries at the same time
- Delete individual entries
- Activating/deactivating display of the area code
- "You have a message" display
- Using the repertory keys as "function keys"
- Note:
- Deactivating/activating the symbol display for additional services
- Recommended assignment of symbols to keys
- Assigning/changing function keys
- Important!
- Example: Call forwarding
- Saving call forwarding on a function key
- Set the phone number for the call forwarding
- Reserve changeable call forwarding
- Activating call forwarding with a function key
- Phone number for call forwarding set
- Changeable call forwarding
- Saving "Deactivate call forwarding" on a function key
- Deactivating call forwarding with a function key
- Appendix
- Care
- If your telephone is not working perfectly
- Insert strips
- Contacts
- Authorisation
- Régler l'horloge
- Baby call (appel direct)
- Declaration of Conformity
Brand : GIGASET
Model : Euroset 5020
Category : Telephone