
CCE616X - Basket CANDY - Free user manual and instructions
Find the device manual for free CCE616X CANDY in PDF.
Download the instructions for your Basket in PDF format for free! Find your manual CCE616X - CANDY and take your electronic device back in hand. On this page are published all the documents necessary for the use of your device. CCE616X by CANDY.
USER MANUAL CCE616X CANDY
SCOPE OF INSTRUCTION MANUΑL
Dear Customer, In the sections provided herein, there is necessary information which will enable you to use the device efficiently and safely. Please, read these instructions carefully before installation of the device
Section 1 Important points which must be observed before using the chimney
Section 2 Technical specifications of the chimney hood.
Section 3 Technical dimensions of the chimney hood
Section 4 Electrical diagram of the chimney hood.
Section 5 Information about installation connection of the chimney hood.
Section 6 Information about use of the chimney hood.
Section 7 Information about maintenance of the chimney hood.
1. The electrical and installation connections must be done by the service staff who is well-
informed of the subject;
2. The operating voltage is 220 – 240 Volts. Do not operate the device in lower or higher
3. Do not connect to the chimneys where the heating stove is connected, to the gas flue or to
the chimneys where the fire rises.
4. Plug the product into the socket where there is an earthed connection.
5. Fire catching food should not be cooked under the device.
6. Do not use other materials instead of aluminum filter in the device.
7. Do not plug into the socket without completion of the installation of the device.
8. Do not run the device without aluminum filter.
9. Do not touch the bulb of the device when it is left on for a long time..2
10. Do not remove the aluminum filter when the device is running.
11. Do not turn off the device directly by plugging it out when it is running. Turn it off from
12. The device should be cleaned periodically..
13. The height between the lower surface of the chimney hood and oven must be 65 cm for
electrical ovens, and 75 cm for gas-fired or mix ovens
14. Keep the packaging material away from the children because they may be dangerous for
15. Run the chimney hood after the kettle or frying pan is put on the oven.
16. Run the chimney hood for 15 minutes more after the operation of cooking or frying is
finished in order to clean the air of the kitchen off the smell and vapor which appeared during cooking..
17. Let some fresh air into environment when the chimney hood is running, especially, when it
is used in the same time with the gas-fired ovens.
18. Contact the nearest service if your device is failed to run with any reason.
19. Our Company may not be held responsible from the failures arising from use which is not
consistent with the cautions stated above. TECHNICAL SPECIFICATIONS
Note: All dimensions are in mm.4
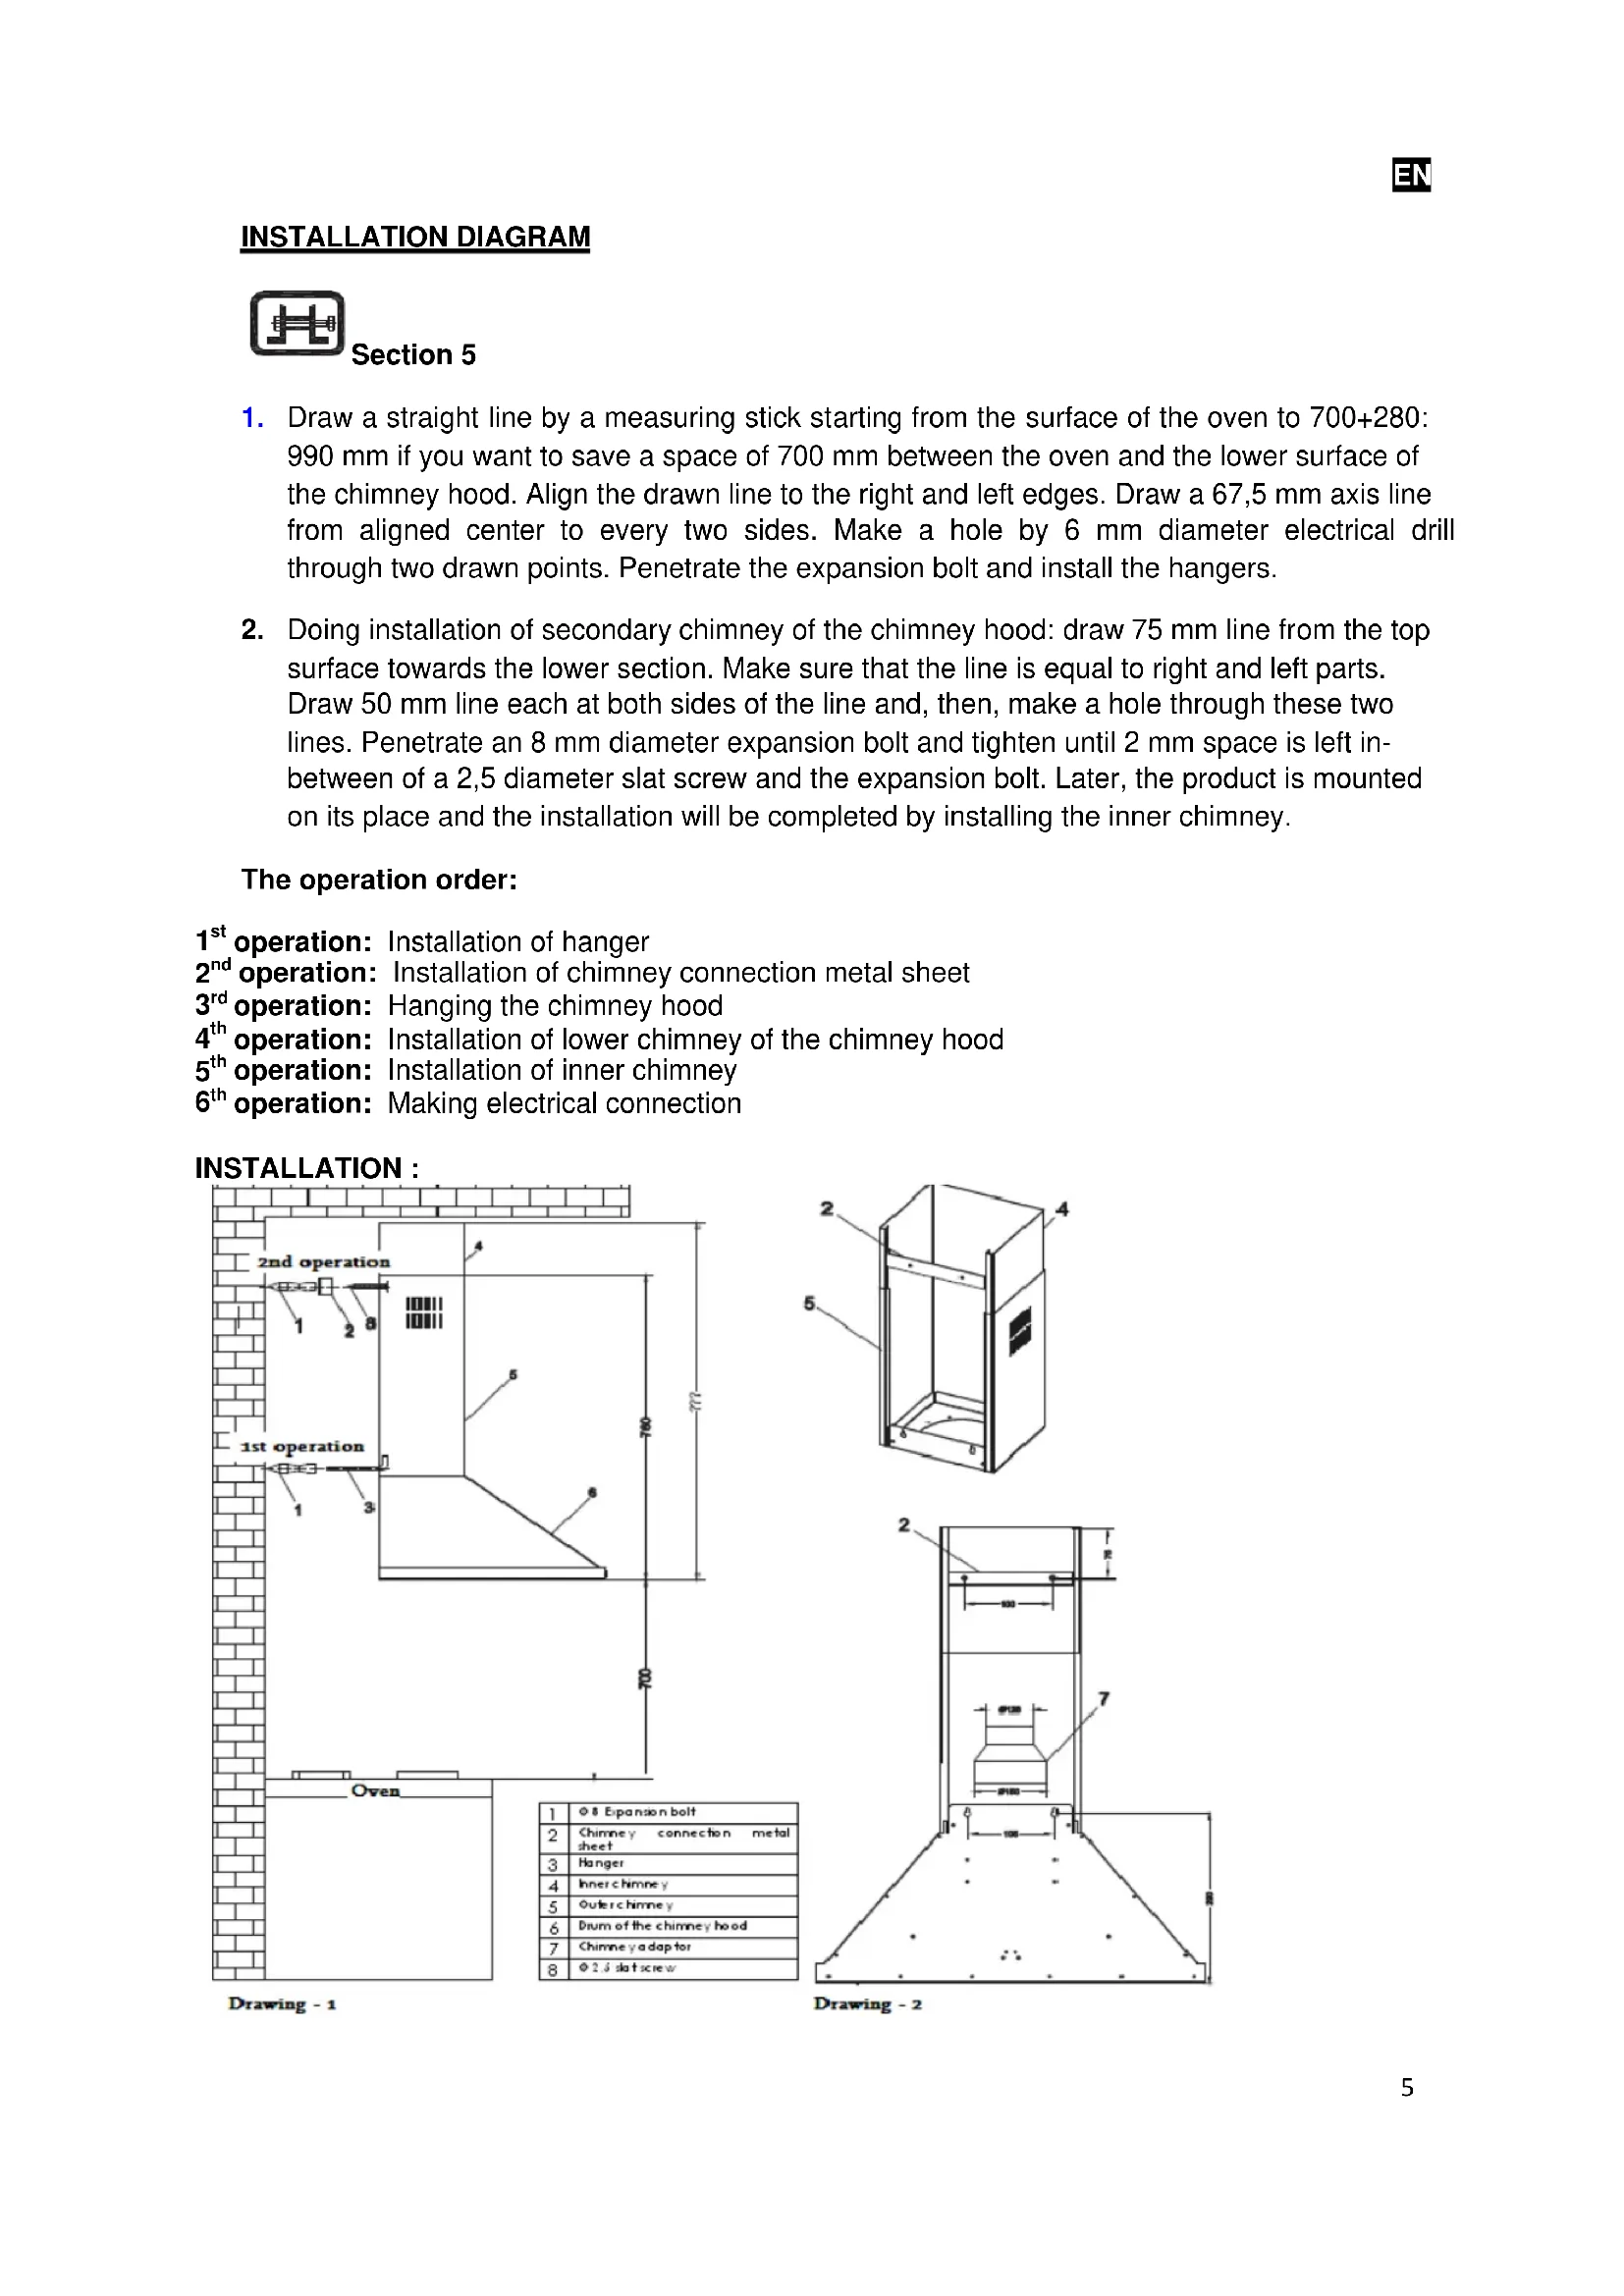
1. Draw a straight line by a measuring stick starting from the surface of the oven to 700+280:
990 mm if you want to save a space of 700 mm between the oven and the lower surface of the chimney hood. Align the drawn line to the right and left edges. Draw a 67,5 mm axis line from aligned center to every two sides. Make a hole by 6 mm diameter electrical drill through two drawn points. Penetrate the expansion bolt and install the hangers.
2. Doing installation of secondary chimney of the chimney hood: draw 75 mm line from the top
surface towards the lower section. Make sure that the line is equal to right and left parts. Draw 50 mm line each at both sides of the line and, then, make a hole through these two lines. Penetrate an 8 mm diameter expansion bolt and tighten until 2 mm space is left in- between of a 2,5 diameter slat screw and the expansion bolt. Later, the product is mounted on its place and the installation will be completed by installing the inner chimney. The operation order:
operation: Installation of hanger
operation: Installation of chimney connection metal sheet
operation: Hanging the chimney hood
operation: Installation of lower chimney of the chimney hood
operation: Installation of inner chimney
operation: Making electrical connection INSTALLATION :6
ALARM BUTTON On/Off Button: used to start and stop the motor. In the beginning, the motor runs in 2
cycle. The number of cycle is represented by bar levels and the rotation speed of the fan shown at the left-side of the display. Minus Button: the cycle of motor reduces until it reaches 1
cycle each time when it is pushed if the motor is running. In addition, it is used to reduce the timer value. On the display, it is represented by the number of bars and the number of rotation of the fan. Plus Button: used to increase the cycle of motor each time when it is pushed until it reaches the highest cycle level if the motor is running. In addition, it is used to reduce the timer value. On the display, it is represented by the number of bars and the number of rotation of the fan. Shutdown Timer Button: a 15 minute starting timer value will be displayed and the clock icon will flash for 5 times when this button is pushed while the motor is running. The clock icon will be displayed until the timer value lapses. The motor will stop and the bulb will turn off, if it is on, when the timer lapsed. Alarm Timer Button: a 5 minute alarm timer will be displayed as starting timer on the display and the bell icon will flash for 5 times when this button is pushed independent of whether or not the motor is running. The bell icon will be displayed on the display until the timer time lapses. The buzzer will ring for 20 seconds and the bell icon will flash when the timer lapsed. The buzzer can be shut by pushing the alarm timer when it is ringing. Being valid for both of them; the timer value can be adjusted to any value in-between of 1 minute and 9 hour 59 minutes by pushing MINUS or PLUS buttons while flashing. The timer value will increase or decrease very quickly when the MINUS or PLUS buttons are held pushed. The current value of the timer will be displayed on the display when the timer button is pushed while the timer is set. The started timer button is pushed one more time and it will be reduced until the timer becomes zero by pushing MINUS button if the started timer is needed to be cancelled.7
Bulb Button: used to turn on and off the bulb. The bulb will appear at the right-side of the display while it is on. Boost Adjusting: pressing the PLUS button one more time while the motor is running with the highest cycle will let to enter into a boost mode. In the boost mode, the motor will pass to a next lower cycle in every 3 minute lapse and will rotate in 2
cycle continuously by getting out from boost mode. The TURBO icon will flash on the display while in boost mode. The boost mode will be exited if the cycle of the motor is changed. Filter Warning: the (CLEAN FILTER) message which expresses that the filter should be cleaned will appear on the display when the motor runs for 60 hours. The beep sound will be heard and the (CLEAN FILTER) message will appear for 1,5 seconds more when the M.on/off button is held pressed for 4 seconds. Power On: the clock which is valid when the power failure occurred will be brought on the power on, and the operation will continue in clock adjusting mode. Adjusting the Clock: pressing the MINUS and the PLUS button in the same moment will let to enter into a clock adjusting mode. During clock adjustment, a triangular icon in the right midst of the clock will flash on the display. The clock is adjusted by MINUS and PLUS buttons. The clock adjusting mode will be exited if any other button is pushed other than MINUS and PLUS buttons. Returning to Factory Settings A beep sound will be heard and the (Fac) message will appear on the display when the M. on/off, MINUS and PLUS buttons are kept pushed for 4 seconds in the same moment, and the factory settings are returned. The Factory Settings RGB Display Lightening Color: Red-100, Green-100, Blue-100 Display Lightening: ON Click (the key sound): ON Bulb Option: ON
The functions of the buttons are as follows:
Note: While cooking food, push the buttons 1 or 2. For frying or similar meals, use 3.8
0 : Stop the engine 1 : Powering the first level 2 : Powering the second level 3 : Powering the third level : On and off button of lamp
A – On/Off Button: used to start and stop the motor. The motor starts running in 2
cycle when On-Off button is pushed for the first time. B – Minus Button: reduces the cycle of the motor. C – Digital Display: shows in which cycle the motor is. D – Plus Button: used to increase the cycle of the motor with one level. E – Timer Button: when this button is pushed, the cycle of the motor flashes on digital display and the motor stops within 15 minutes. It is necessary to keep pushed this button for 3 seconds to activate it. Push only one time to cancel it. F – Bulb Button: used to turn on and off the bulb.9
Plug out the product, or turn off the power switch, or loosen or turn off the safety fuse supplying the chimney hood, before starting maintenance operation. Aluminum Filter This filter is used to catch the oil particles in the air and, thus, it will be blocked after a period of time which will change depending on the frequency of use of the device. We recommend that this filter is cleaned once a month at most to make sure that the device does not pose a danger. For this operation, firstly, remove the aluminum filter. Wash the filters with liquid washing agent and flush, and mount it on its place after drying. The change in color may be observed as the aluminum filters are washed. This is normal and there is no need to replace the filters. It is also possible to wash the aluminum filter in the dishwashing machine. Removing Aluminum Filter
1. Push the lock of the aluminum filter forward.
2. Then, slightly lower it downwards and push forward. Otherwise, the filter can be defected.
Wash the aluminum filter and mount it again into its place by applying the steps mentioned above in reverse. Carbon filter (it is for flueless use) This filter removes the cooking smell. It cleans the circulating air within the kitchen in case there is no possibility to use chimney. Physical life of the carbon filter of the device will expire depending on the frequency of use and mode of cooking, and that of aluminum filter will expire depending on the cleaning regularly. In usual use, it should be replaced once in every 4 months at most. Removing Carbon Filter:
1. Remove the aluminum filter.
2. To remove the carbon filter, turn it to the left and pull it towards yourself.
3. Mount a new carbon filter.
Use soft cloth wetted with water to clean the exterior surface of the chimney hood. Never use abrasive and scratching products for cleaning. The cloth must be applied in the same direction with the brush in order to avoid scratching of the steel drum. The bulb glasses must not be removed during cleaning. CAUTION! You may cause fire if you do not observe the rules pertaining to cleaning and replacing the filters of the chimney hood. Replacing the Bulb There are 2 pieces of 25 W halogen bulbs on the chimney hood. First of all, plug out the product, or turn off the power switch, or loosen or turn off the safety fuse supplying the chimney hood to replace the bulb. Slightly press on the connecting tabs existing on the cover of the halogen bulb with a thin tip screwdriver and push them downward. Hold the cover carefully not to let it drop down when performing this operation. Slightly push the cover by aligning the tabs to the cavities on bulb hole after the bulb is replaced. It is recommended that the new bulb is fixed with cloth. It is because of fact that the life of the bulb will expire in 1 day when the halogen bulbs are touched with bare hand. CAUTION! Touch the bulb only when you will replace it. The life of bulb will expire after one day when the halogen bulb is touched when it is not broken. Firstly, disconnect the electricity of the chimney hood and dismantle it if you need it to be transported. Carry it in its original box, if possible, and observe the transportation signs put on the box. If no original box, make sure that the product is packed so that it would protect from any damage. We kindly ask you to observe following recommendations:
1. Make sure that the Warranty Certificate is endorsed by the Authorized Seller when the
product is received.