
Delirice RK7006 - Rice cooker TEFAL - Free user manual and instructions
Find the device manual for free Delirice RK7006 TEFAL in PDF.
| Brand | Tefal |
| Model | Delirice RK7006 |
| Product type | Rice cooker multi-cooker |
| Bowl capacity | Approximately 3 L (standard model) or 4 L (depending on variant) |
| Bowl material | Non-stick |
| Steam vent material | Removable metal |
| Power | Approximately 800 W |
| Voltage / Frequency | 220-240 V ~ 50/60 Hz |
| Power cord | Detachable |
| Number of functions | 13 (rice cooking, quick, small quantity, glutinous rice, rice soup, braised rice, congee/porridge, soup, stew, steam, keep warm, reheat, delayed program) |
| Keep warm | Automatic after cooking, up to 24 h |
| Delayed timer | Yes, setting the end cooking time |
| Timer | Adjustable for congee, soup, stew, steam modes |
| Included accessories | Plastic spoon, measuring cup, inner steam basket |
| Control panel | Touchscreen with display and buttons: Menu, Program, Timer, Hours, Minutes, Start, Stop |
| Maintenance and cleaning | Bowl, steam basket, and steam vent are dishwasher safe (lower rack). Do not immerse the housing. |
| Safety | Automatic restart after power outage (less than 2 h) |
| Troubleshooting | Send to an authorized repair center for any electronic malfunction |
Frequently Asked Questions - Delirice RK7006 TEFAL
User questions about Delirice RK7006 TEFAL
0 question about this device. Answer the ones you know or ask your own.
Ask a new question about this device
Download the instructions for your Rice cooker in PDF format for free! Find your manual Delirice RK7006 - TEFAL and take your electronic device back in hand. On this page are published all the documents necessary for the use of your device. Delirice RK7006 by TEFAL.
USER MANUAL Delirice RK7006 TEFAL
text_image
TEFAL TEFAL Start 12°18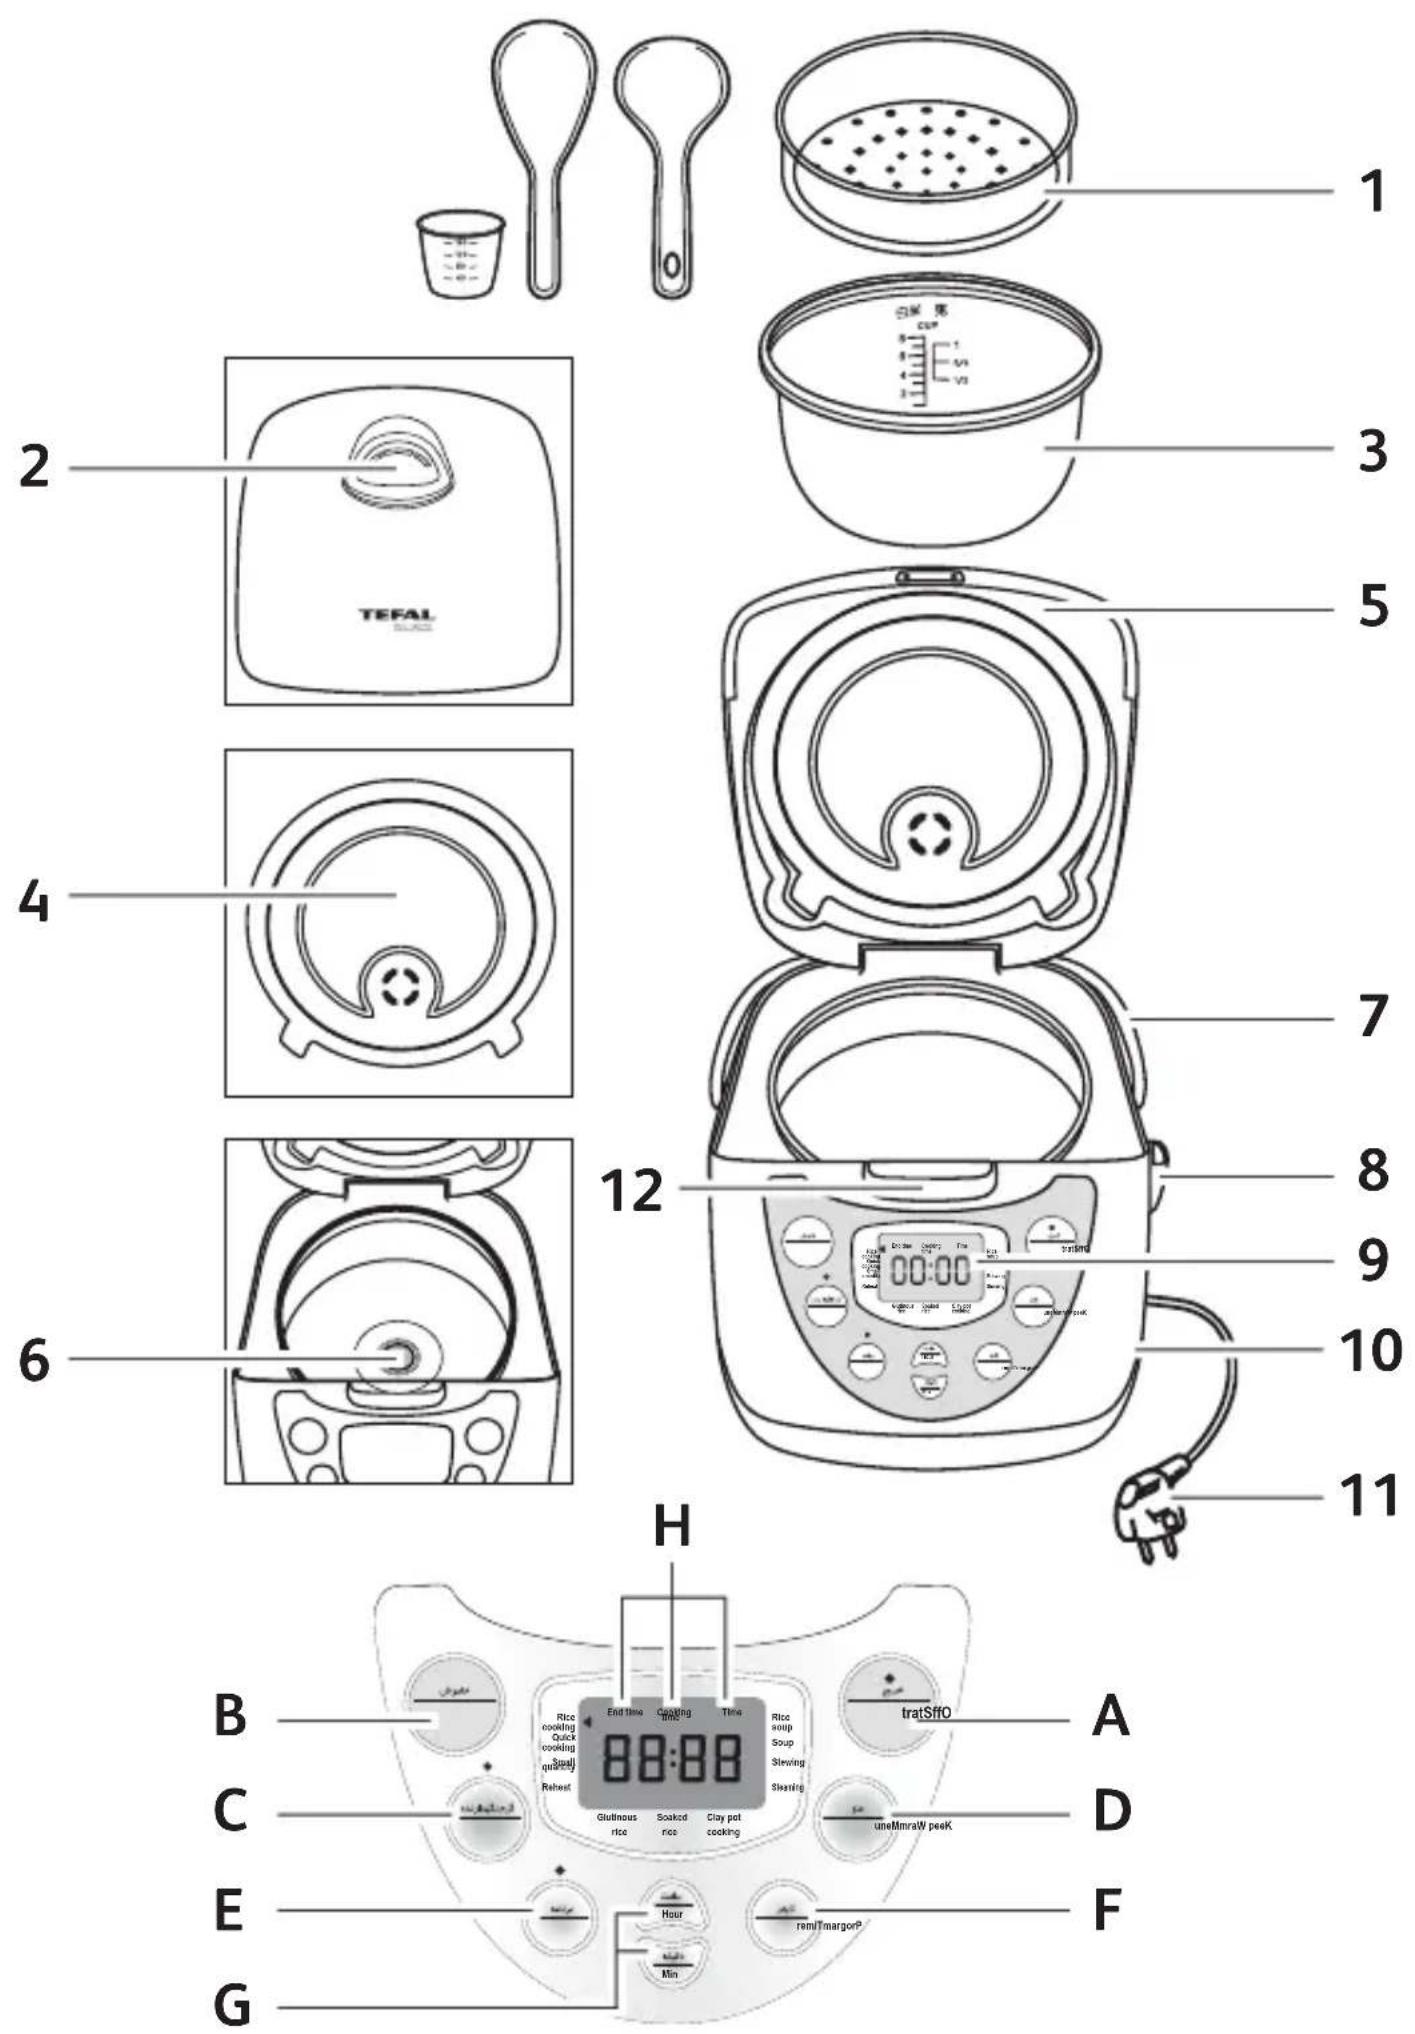
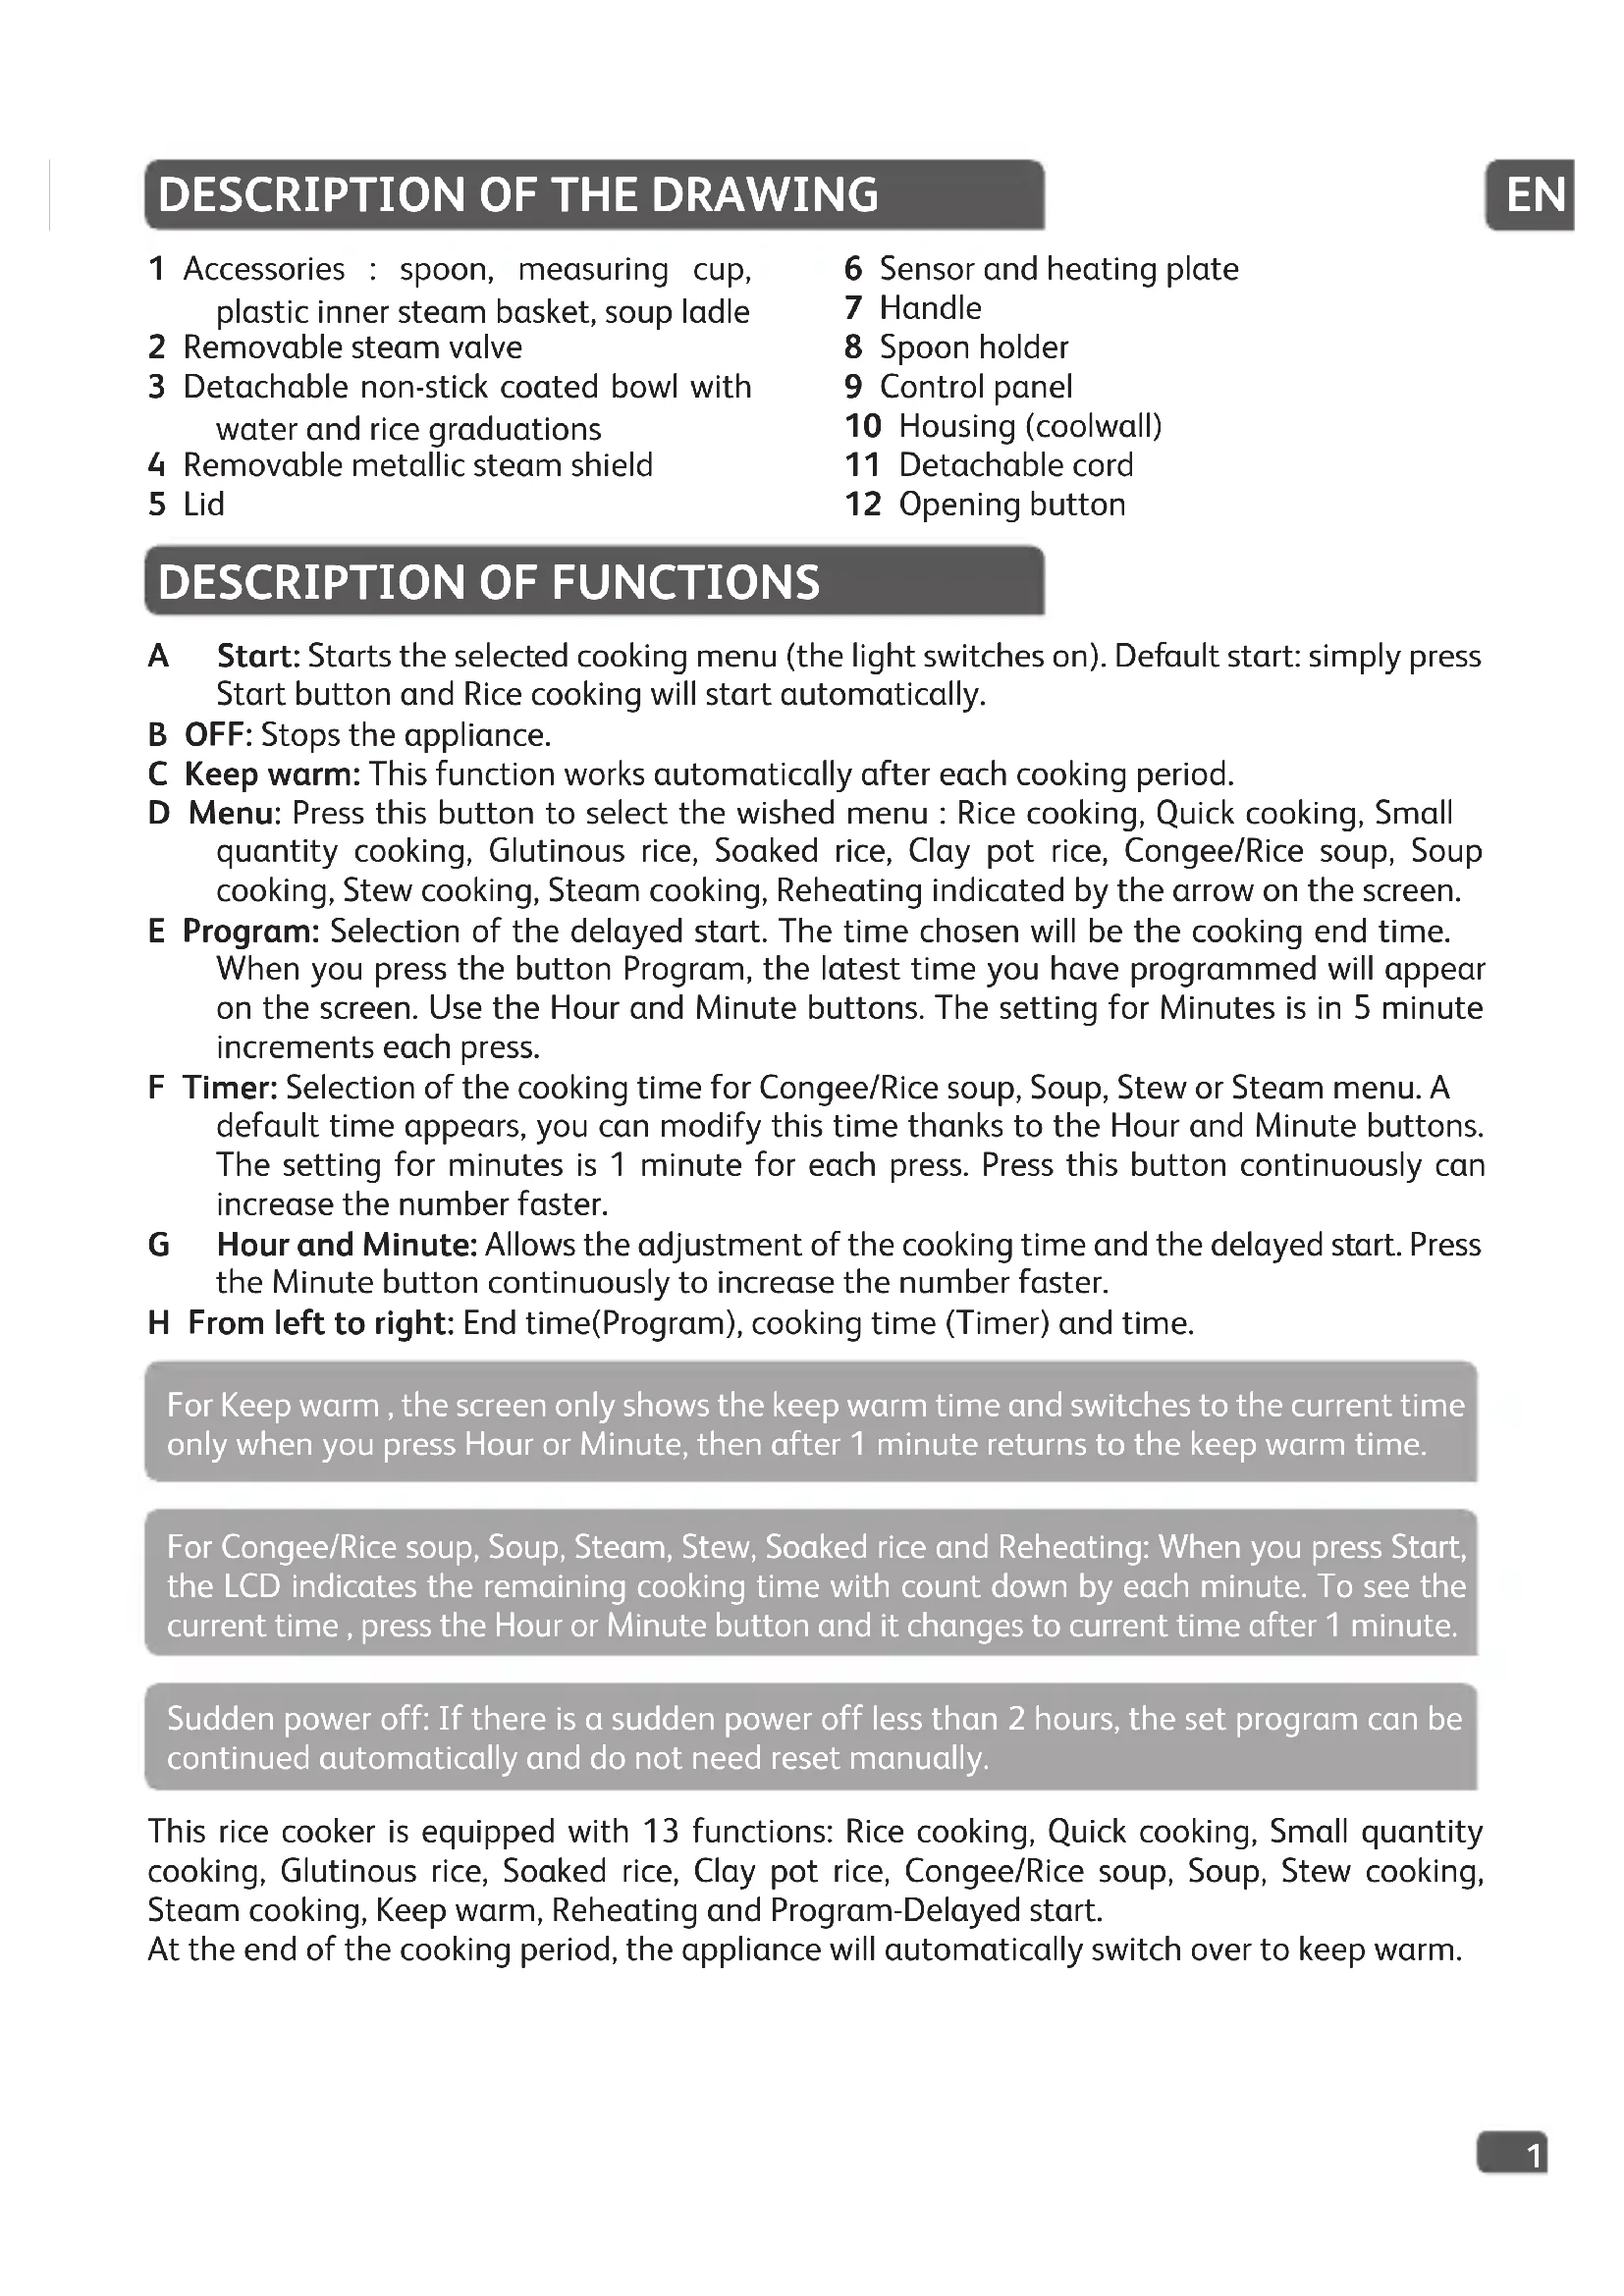
DESCRIPTION OF THE DRAWING
EN
1 Accessories : spoon, measuring cup, plastic inner steam basket, soup ladle
2 Removable steam valve
3 Detachable non-stick coated bowl with water and rice graduations
4 Removable metallic steam shield
5 Lid
6 Sensor and heating plate
7 Handle
8 Spoon holder
9 Control panel
10 Housing (coolwall)
11 Detachable cord
12 Opening button
DESCRIPTION OF FUNCTIONS
A Start: Starts the selected cooking menu (the light switches on). Default start: simply press Start button and Rice cooking will start automatically.
B OFF: Stops the appliance.
C Keep warm: This function works automatically after each cooking period.
D Menu: Press this button to select the wished menu : Rice cooking, Quick cooking, Small quantity cooking, Glutinous rice, Soaked rice, Clay pot rice, Congee/Rice soup, Soup cooking, Stew cooking, Steam cooking, Reheating indicated by the arrow on the screen.
E Program: Selection of the delayed start. The time chosen will be the cooking end time. When you press the button Program, the latest time you have programmed will appear on the screen. Use the Hour and Minute buttons. The setting for Minutes is in 5 minute increments each press.
F Timer: Selection of the cooking time for Congee/Rice soup, Soup, Stew or Steam menu. A default time appears, you can modify this time thanks to the Hour and Minute buttons. The setting for minutes is 1 minute for each press. Press this button continuously can increase the number faster.
G Hour and Minute: Allows the adjustment of the cooking time and the delayed start. Press the Minute button continuously to increase the number faster.
H From left to right: End time(Program), cooking time (Timer) and time.
For Keep warm, the screen only shows the keep warm time and switches to the current time only when you press Hour or Minute, then after 1 minute returns to the keep warm time.
For Congee/Rice soup, Soup, Steam, Stew, Soaked rice and Reheating: When you press Start, the LCD indicates the remaining cooking time with count down by each minute. To see the current time, press the Hour or Minute button and it changes to current time after 1 minute.
Sudden power off: If there is a sudden power off less than 2 hours, the set program can be continued automatically and do not need reset manually.
This rice cooker is equipped with 13 functions: Rice cooking, Quick cooking, Small quantity cooking, Glutinous rice, Soaked rice, Clay pot rice, Congee/Rice soup, Soup, Stew cooking, Steam cooking, Keep warm, Reheating and Program-Delayed start.
At the end of the cooking period, the appliance will automatically switch over to keep warm.
BEFORE FIRST USE
Read the instructions and carefully follow the operating method.
Unpack the appliance
- Remove the appliance from the packaging and unpack all the accessories as well as the printed documents.
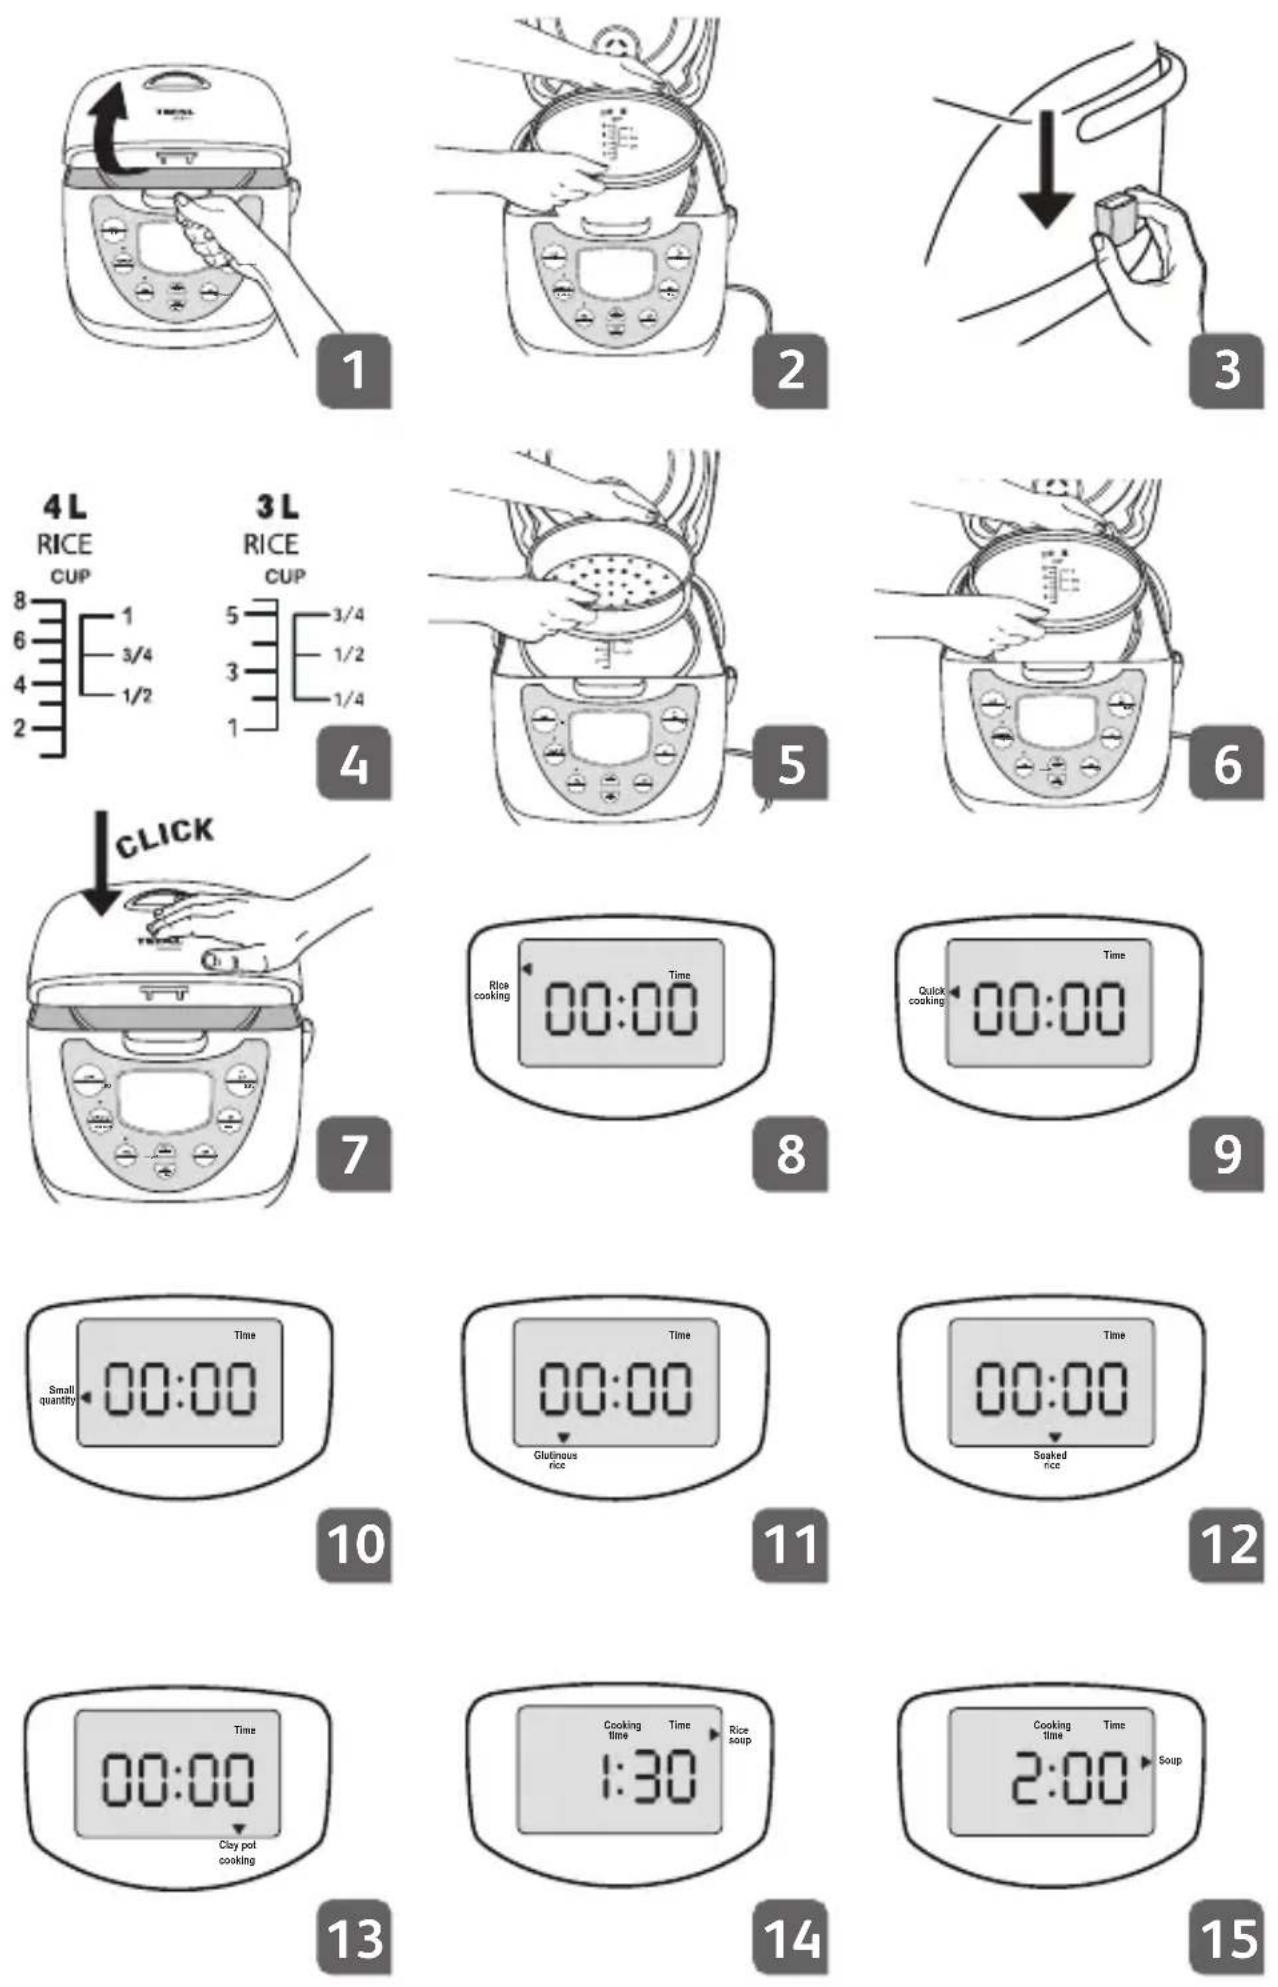
- Open the lid by pushing the opening button located on the housing. Fig. 1
- Remove the non-stick bowl, the steam valve and the steam shield. Fig. 2
- Clean the bowl, the steam valve and the steam shield with a sponge and washing-up liquid.
- Dry off carefully.
- Put all the elements back in their original position.
Install the detachable cord.
Install the spoon holder.
• Install the spoon holder in the hole on the side of the rice cooker. Fig. 3
Do not switch on until the previous steps have been completed.
Measuring the ingredients-max capacity of the container.
- The graduated markings on the inside of the bowl are given in litres and cups, these are used for measuring the amount of water when cooking rice and Congee/Rice soup. The graduations in cups are used for rice and the graduations in litres are used for Congee/Rice soup. Fig. 4
- The plastic measuring cup provided with your appliance is for measuring rice and not water. 1 level measuring cup of rice weighs 150g.
- Fill with water up to the CUP mark printed in the bowl corresponding to the number of measuring cups put in the bowl.
- The maximum quantity of water + rice should not exceed the highest level mark inside the bowl.
ADJUSTMENT OF THE TIME
Press Hour or Minute more than 3 seconds. The time flashes on the screen. Adjust the time thanks to the Hour and Minute buttons. Press OFF to quit the setting mode or do nothing for one minute and the appliance will automatically set to the time you have entered.
PREPARATION BEFORE COOKING
When cooking rice:
- It is better not to rinse rice directly inside the bowl in order to avoid scuffing non-sticking coating of inner pot or deformation of pot body by impact.
- Put the already rinsed rice into the bowl and fill it with water to a corresponding water level.
- The water quantity can be adjusted depending on your taste.
- Never add water higher than the highest level mark.
When steam cooking:
- The quantity of water must be appropriate to avoid water overflowing into the food steamer bowl.
- Place the steam basket on top of the bowl. Fig. 5
- Add the ingredients.
For all uses:
EN
- Carefully wipe the outside of the bowl (especially the bottom). Make sure that there are no foreign residues underneath the bowl and on the heating element.
- Place the bowl into the appliance, making sure that it is correctly positioned. Fig. 6
- Slightly rotate the bowl in both directions, so as to ensure good contact between the bottom of the bowl, the sensor and the heating plate.
Make sure that the sensor moves when you put the bowl on it.
- Make sure that the steam shield is correctly in position.
- Close and lock the lid. Fig. 7
- Plug in the appliance.
- Do not switch on the appliance until all the above stages have been completed.
COOKING
1 Rice cooking menu
2 Quick cooking menu
3 Small quantity menu
4 Glutinous rice menu
5 Soaked rice menu
6 Clay pot rice menu
7 Congee/Rice soup menu
8 Soup cooking menu
9 Stew cooking menu
10 Steam cooking menu
11 Keep warm function
12 Reheating function
13 Program-Delayed start function
| Cooking Menus | Number of measuring cups of rice | Weight of rice | Level of water in the bowl* | Number of persons | Indicative cooking time |
| White rice 5 7 | 50 g 5 6 to 7 5 | 5 min | |||
| Quick cooking 5 | 750 g 5 6 to 7 | 35 min | |||
| Small quantity cooking | 1 150 g | 1 1 to 2 28 | min | ||
| Brown rice 5 7 | 50 g 5 6 to 7 5 | 5 min | |||
| Mixed rice 5 7 | 50 g 5 6 to 7 5 | 5 min | |||
| Glutinous rice 5 | 750 g | specific markings inside the bowl | 6 to 7 50 min | ||
| Soaked rice 5 | 750 g 5 6 to 7 3 | 30 min | |||
| Clay pot rice** 3 | 450 g 3 4 to 5 | 1 h 15 min | |||
| Congee/ Rice soup | 0.75 112.5 | g | specific markings inside the bowl | 2 to 4 | 1-4 hours (depending on taste) |
| Soup --- | 2 to 3 | 1-4 hours (depending on taste) | |||
| Steam cooking (vegetables, fish, eggs) | --4 (max) - 20-25 min | ||||
* Please refer to white rice markings for all types of rice except Glutinous rice and Congee/Rice soup.
** The rice capacity when making Clay pot rice should not exceed 3 measuring cups of rice for the 3L version and 5 measuring cups of rice for the 4L version.
1. Rice cooking - Fig. 8
- Pour the required quantities of rice and water into the bowl.
- Close the lid.
- Plug in the appliance.
- Press start. The appliance will switch on.
- Choose the menu Rice cooking using the menu button, the cursor indicates this.
- At the end of the cooking period, the appliance will automatically switch over to keep warm.
2. Quick cooking - Fig. 9
- Pour the required quantities of rice and water into the bowl.
- Close the lid.
- Plug in the appliance.
- Choose the menu Quick cooking using the menu button, the cursor indicates this.
- Press start. The appliance will switch on.
- At the end of the cooking period, the appliance will automatically switch over to keep warm.
3. Small quantity of rice - Fig. 10
- Pour the required quantities of rice and water into the bowl.
- Close the lid.
- Plug in the appliance.
- Choose the menu Small quantity using the menu button, the cursor indicates this.
- Press start. The appliance will switch on.
- At the end of the cooking period, the appliance will automatically switch over to keep warm.
4. Glutinous rice - Fig. 11
- Use the specific markings inside the bowl.
- Pour the required quantities of rice and water into the bowl.
- Close the lid.
- Plug in the appliance.
- Choose the menu Glutinous rice using the menu button, the cursor indicates this.
- Press start. The appliance will switch on.
- At the end of the cooking period, the appliance will automatically switch over to keep warm.
5. Soaked rice - Fig. 12
- Pour the required quantities of rice and water into the bowl.
- Close the lid.
- Plug in the appliance.
-
Choose the menu Soaked rice using the menu button, the cursor indicates this.
-
Press start. The appliance will switch on.
- At the end of the cooking period, the appliance will automatically switch over to keep warm.
EN
6. Clay pot rice - Fig. 13
- Pour the required quantities of rice and water into the bowl.
- Close the lid.
- Plug in the appliance.
- Choose the menu Clay pot rice using the menu button, the cursor indicates this.
- Press start. The appliance will switch on.
- The menu starts. A sonic alert tells you when you can add other ingredients.
- At the end of the cooking period, the appliance will automatically switch over to keep warm.
7. Congee/Rice soup - Fig. 14
- Use the specific markings inside the bowl.
- Pour the required quantities of rice and water into the bowl.
- Close the lid.
- Plug in the appliance.
- Choose the menu Congee/Rice soup using the menu button, the cursor indicates this.
- Adjust the cooking time. The cooking time indicated by default is of 1h30. You can choose the cooking time by pressing Timer and Hour and Minute. The cooking time cannot exceed 4 hours. The Timer range is 1 to 4 hours.
- Press start. The appliance will switch on.
- After pressing Start, the LCD indicates the remaining time of cooking with count down by minute. To see the current time, press the Hour or Minute button, it will return to remaining cooking time after 1 minute.
- At the end of the cooking period, the appliance will automatically switch over to keep warm.
8. Soup cooking - Fig. 15
- Pour the ingredients into the bowl.
- Close the lid.
- Plug in the appliance.
- Choose the menu Soup Cooking using the menu button, the cursor indicates this.
- Adjust the cooking time. The cooking time indicated by default is of 2 hours. You can choose the cooking time by pressing Timer and Hour and Minute. The cooking time cannot exceed 4 hours. The Timer range is 1 to 4 hours.
- Press start. The appliance will switch on.
- After pressing Start, the LCD indicates the remaining time of cooking with count down by each minute. To see the current time, press the Hour or Minute button and it will change to remaining cooking time after 1 minute.
- At the end of the cooking period, the appliance will automatically switch over to keep warm.
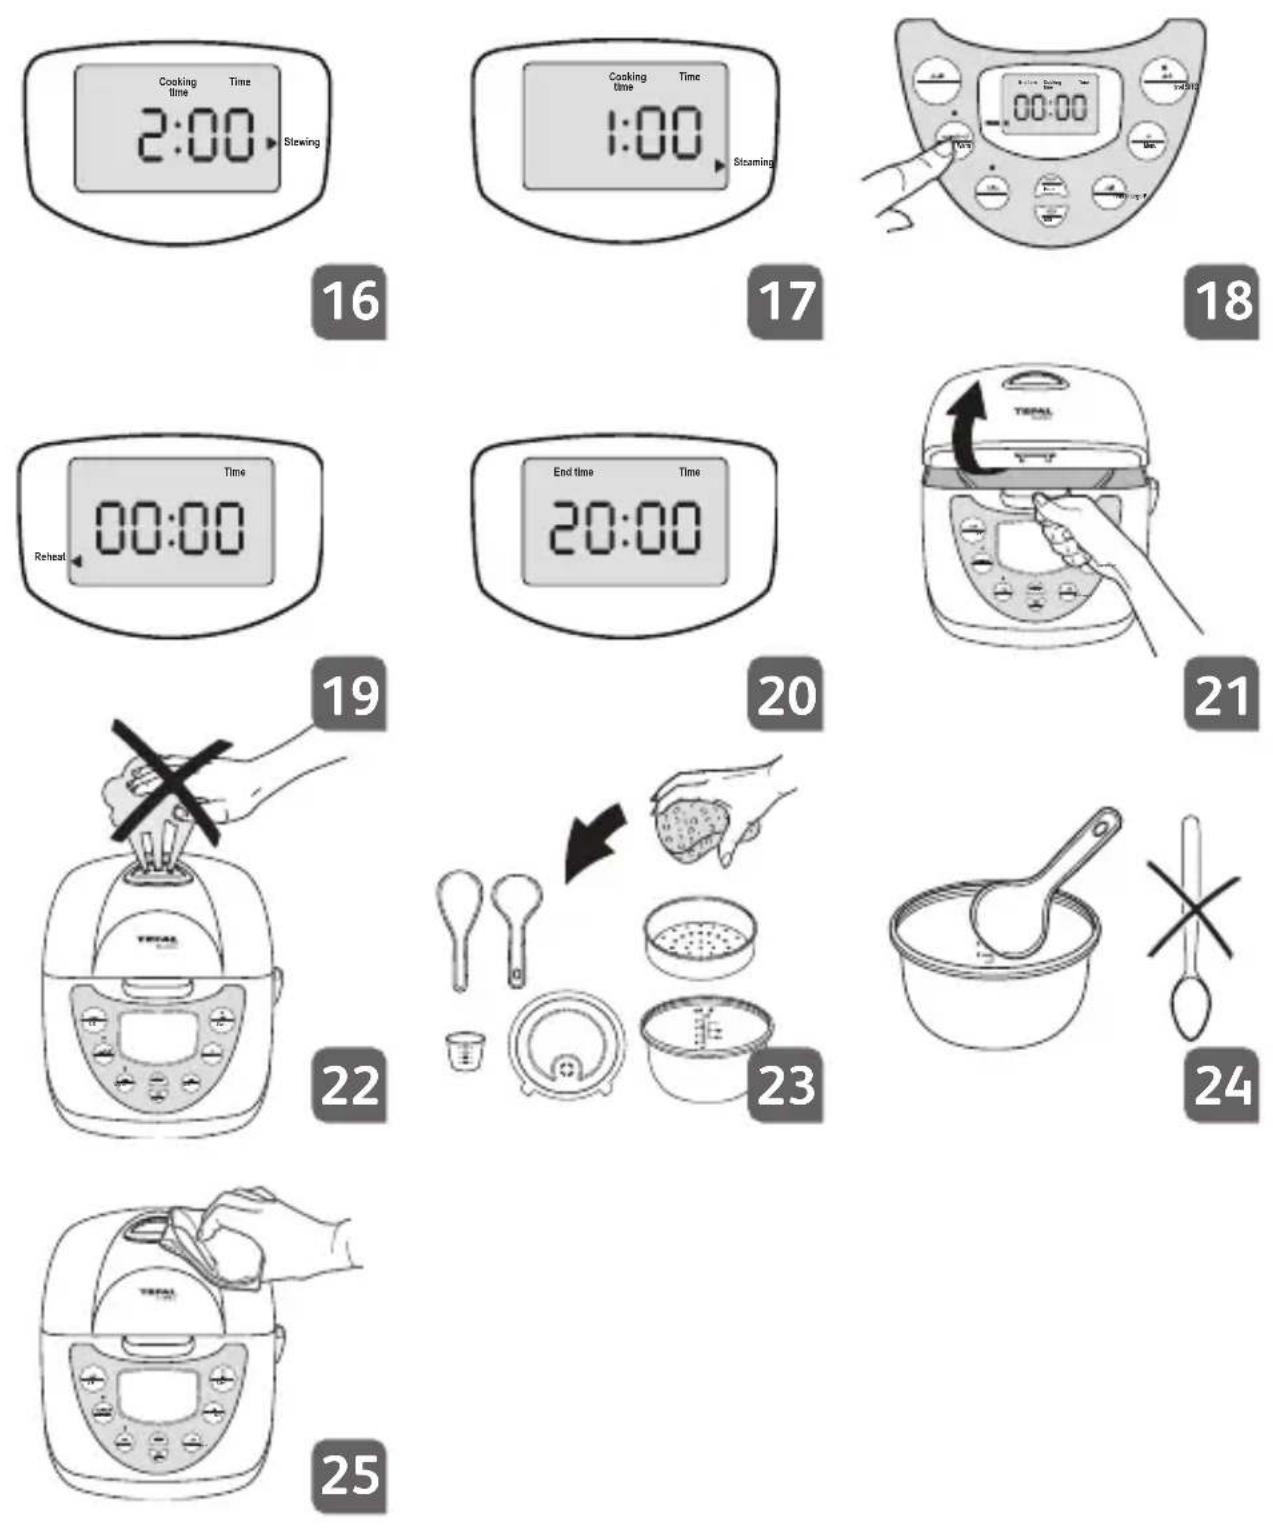
9. Stew cooking - Fig. 16
- Pour the ingredients into the bowl.
- Close the lid.
- Plug in the appliance.
- Choose the menu Stew cooking using the menu button, the cursor indicates this.
- Adjust the cooking time. The cooking time indicated by default is of 2 hours. You can choose the cooking time by pressing Timer and Hour and Minute. The cooking time cannot exceed 12 hours. The Timer range is 1 to 12 hours.
-
Press start. The appliance will switch on.
-
After pressing Start, the LCD indicates the remaining time of cooking with count down by each minute. To see the current time, press the Hour or Minute button and it will change to remaining cooking time after 1 minute.
- At the end of the cooking period, the appliance will automatically switch over to keep warm.
10. Steam cooking - Fig. 17
- Pour water into the bowl.
- Put the ingredients into the steam basket.
- Close the lid.
- Plug in the appliance.
- Choose the menu Steam cooking using the menu button, the cursor indicates this.
- Adjust the cooking time. The cooking time indicated by default is of 1h. You can choose the cooking time by pressing Timer and Hour and Minute. The cooking time cannot exceed 1h30. The Timer range is up to 1h30.
- Press start. The appliance will switch on.
- After pressing Start, the LCD indicates the remaining time of cooking with count down by each minute. To see the current time, press the Hour or Minute button and it will change to remaining cooking time after 1 minute.
- At the end of the cooking period, the appliance will automatically switch over to keep warm.
11. Keep warm function - Fig. 18
- On completion of cooking, irrespective of the cooking mode chosen, the rice cooker passes automatically to the Keep warm function.
- The food is thus kept warm and ready to serve until 24 hours.
- To switch off this function at any time, press OFF.
- The Keep warm function can be started manually by pressing the button.
12. Reheating function - Fig. 19
- Use this function only to reheat cooked rice or cooked soups.
- Do not exceed the 1/2 level mark.
• Always add 1/2 cup of water to rice. - Choose the menu Reheating thanks to the Menu button and to the cursor.
- After pressing Start, 00:25 appears on the screen. Indicative reheating time: 25 minutes. The LCD indicates the remaining time of cooking with count down by each minute. To see the current time, press the Hour or Minute button and it will change to remaining cooking time after 1 minute.
- Stir the rice during or at the end of reheating.
- Never use this function to reheat other foods.
13. Program-Delayed start function - Fig. 20
- You have the possibility to adjust the time of the end of the cooking period by pressing the Program button.
- Choose the Menu, press Program and then select the end of cooking time with Hour and Minute buttons.
- You can choose the cooking time by pressing Timer and Hour and Minute.
- Press start to commence the programme.
- The light of the Program button switches on.
The screen will automatically change every minute between the end time and the current time (with the light above the Program button on).
When the cooking starts, the light of the Program button switches off and the screen shows the current time (as normal cooking).
EN
On completion of cooking
- Open the lid. Fig. 21
The escaping steam is very hot.
Never place your hand on the steam exhaust during cooking, as there is a danger to burn yourself. Fig. 22
If the bowl is not properly in place in the appliance, The cooker switches to keep warm.
- Serve the food using the plastic spoon provided with your appliance and reclose the lid.
- The food remaining in the container will keep warm for any second serving.
- Press OFF.
- Unplug the appliance.
Some recommendations for better results with the cooking of rice:
- Measure out the rice and wash it under running water in a separate receptacle. Then place the rice into the bowl together with the corresponding quantity of water.
- Make sure that the rice is well distributed around the whole surface of the Rice cooker, in order to allow even cooking.
- On completion of cooking, when the Keep warm function is selected, stir the rice and then leave it in the rice cooker for a few minutes longer in order to get perfectly cooked rice.
CLEANING AND MAINTENANCE
Cleaning the bowl, the steam basket and the steam shield. Fig. 23
- Use hot water liquid soap and a sponge to clean the bowl and the steam shield. Scouring powders and metal sponges are not recommended.
- If food has stuck to the bottom, allow the bowl to soak for a while before washing it.
- Dry the bowl carefully.
- Do not immerse the appliance in water nor pour water into it.
You can also wash the bowl, the steam basket and the steam shield in the bottom shelf of a dishwasher.
For the bowl, carefully follow the instructions below:
- When putting into the machine, be careful not to damage the inside coating on the dishwasher racks.
- So as to keep the non stick quality for as long as possible, it is recommended not to cut food in it.
- Make sure you put the bowl back into the rice cooker.
IMPORTANT
The brown marks and scratches that may appear after many hours of use are not a problem. We guarantee that the non stick coating COMPLIES WITH THE RULES on materials suitable for contact with food.
Taking care of the bowl
- Use the plastic spoon provided or a wooden spoon and not a metal one so as to avoid damaging the bowl surface. Fig. 24
- To avoid any risk of corrosion, do not pour vinegar into the bowl.
- The color of the bowl surface may change after using for the first time or after longer use. This change in color is due to the action of steam and water and does not have any effect on the use of the Rice cooker, nor is it dangerous for your health. It is perfectly safe to continue using it.
Cleaning and care of the other parts of the appliance
- Clean the outside of the Rice cooker, the inside of the lid and the cord with a damp cloth and wipe dry. Do not use aggressive or abrasive products. Fig. 25
- Do not use water to clean the inside of the appliance.
TROUBLESHOOTING
How to solve problems you can have with your Rice cooker?
| Malfunction Causes Solution | ||
| Indicator light is not alight: heating plate does not heat. | 1. Circuit of electric rice cooker is not connected to power supply.2. Power wiring board is damaged.3. Circuit connection break down.4. Master circuit board is damaged. | Check that the product is plugged in.Send to the designated service department for maintenance. |
| Indicator light is alight: Heating plate is not warm. | 1. Failure of the master temperature controller.2. Components of the electric hot tray are burnt out.3. Circuit board disconnects partially.4. Power circuit board is damaged. | Send to the designated service department for maintenance. |
| Rice is crude. | 1. Problems of quantities. | Make sure that the total volume of rice and water should lie between the max and min water level markings. |
| 2. Heating plate is deformed. | Send to the designated service department for maintenance. | |
| 3. Bowl is sloping and one side is hanging in the air. | Turn the interior pot lightly to make it return to normal. Check the sensor. | |
| 4. There is foreign matter between the bowl and heating plate. | Wipe it without water. | |
| 5. Bowl is deformed. | Send to the designated service department for a new interior pot. | |
| 6. Master circuit board is damaged. | Send to the designated service department for maintenance. | |
| 7. Master temperature is not working. | Send to the designated service department for maintenance. | |
| Cooked rice is burnt. | 1. Problems of quantities. | Make sure that the total volume of rice and water should lie between the max and min water level markings. |
| 2. Master circuit board is damaged. | Send to the designated service department for maintenance. | |
| 3. Master temperature controller is not working. | ||
| Overflow happens when making Congee/Rice soup. | Problems of quantities. | Make sure that the total volume of rice and water should lie between the max and min water level markings. |
| LCD display shows E1, E2, E3 or E4. | Electronical problem. | Send to the designated service department for maintenance. |
EN