
1966 49525D52A1A1BK6A - Watch Girard-Perregaux - Free user manual and instructions
Find the device manual for free 1966 49525D52A1A1BK6A Girard-Perregaux in PDF.

| Brand | Girard-Perregaux |
| Model | 1966 49525D52A1A1BK6A |
| Product type | Luxury wristwatch |
| Movement | Mechanical automatic winding (manufacture caliber) |
| Power reserve | Approximately 46 hours |
| Water resistance | 30 meters (3 ATM) – splash resistant |
| Case material | Stainless steel |
| Case diameter | 40 mm (estimated) |
| Case thickness | Approximately 10 mm (estimated) |
| Strap | Leather (alligator or calf) |
| Crystal | Anti-reflective sapphire |
| Functions | Hours, minutes, seconds, date, power reserve, day/night indicator, moon phases, second time zone |
| Warranty | 2 years international (subject to conditions) |
| Country of origin | Switzerland |
| Maintenance | Water resistance check and service every 2 to 3 years at an authorized center |
| Repairability | Spare parts available through the authorized Girard-Perregaux network |
Frequently Asked Questions - 1966 49525D52A1A1BK6A Girard-Perregaux
User questions about 1966 49525D52A1A1BK6A Girard-Perregaux
0 question about this device. Answer the ones you know or ask your own.
Ask a new question about this device
Download the instructions for your Watch in PDF format for free! Find your manual 1966 49525D52A1A1BK6A - Girard-Perregaux and take your electronic device back in hand. On this page are published all the documents necessary for the use of your device. 1966 49525D52A1A1BK6A by Girard-Perregaux.
USER MANUAL 1966 49525D52A1A1BK6A Girard-Perregaux
MANUALE D'USO....123
INSTRUCCIONES DE USO....163
INDICATEUR JOUR NUIT
INDICATEUR DES PHASES DE LUNE 27
BI-RETRO 29
CALENDRIER COMPLET 32
CALENDRIER ANNUEL ET ÉQUATION DU TEMPS 35
CALENDRIER PERPÉTUEL 38
text_image
FORD GAIN RASS MINI MINI MINI MINI MINI MINI MINI MINI MINI MINI MINI MINI MINI MINI MINI MINI MINI MINI MINI MINI MINI MINI MINI MINI MINI MINI MINI MINI MINI MINI MINI MINI MINI MINItext_image
C OFF-IN-POWER-BACK 12:00:00 12:00:00 12:00:00 12:00:00 12:00:00 12:00:00 12:00:00 12:00:00 12:00:00 12:00:00 12:00:00 12:00:00Date à aiguille
natural_image
Close-up of a wristwatch face showing dial, wrist, and dial (no text or symbols visible)
natural_image
Top-down schematic of a wristwatch dial with analog dials and a close-up view (no text or labels)natural_image
Top-down view of a wristwatch face showing dial, wrist, and wristband (no text or symbols visible)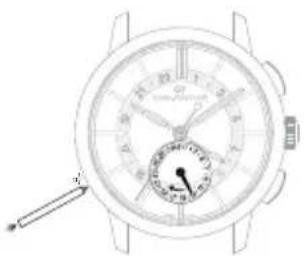
natural_image
Line drawing of a wristwatch with dial and wrist strap (no text or symbols)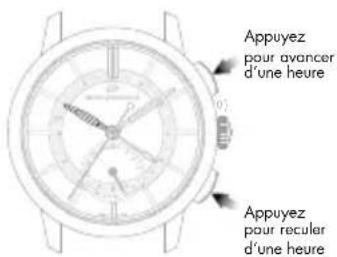
INDICATEUR JOUR NUIT
Introduction
text_image
170° 17°/20°B
natural_image
Close-up of a wristwatch dial with measurement scales and adjustment knobs (no visible text or symbols)C
natural_image
Line drawing of a wristwatch with dual dials and a dial indicator (no text or symbols)
Jour de la semaine
natural_image
Line drawing of a wristwatch with dial and analog dial (no text or symbols)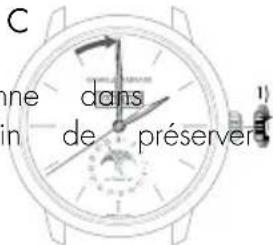
text_image
Diagram of a wristwatch with labeled parts and directional arrow, showing dial and adjustment mechanismB
text_image
Diagram of a wristwatch with labeled parts and directional arrows indicating motion or movementC
text_image
Diagram of a wristwatch with labeled parts and directional arrows indicating motion or movementA
text_image
A 1)Date et mois
B

text_image
a) 1) b)WATER-RESISTANCE PRECAUTIONS 50
USER GUIDE 52
SETTINGS 52
CROWN 52
WINDING 53
PRACTICAL FUNCTIONS 55
HOUR AND MINUTE 55
DATE 59
POWER RESERVE INDICATOR 61
SECOND TIME ZONE 62
TACHOMETRIC SCALE 64
CHRONOGRAPH 65
English
ASTRONOMIC FUNCTIONS 66
DAY/NIGHT INDICATOR
MOON PHASES INDICATOR 67
BI-RETRO 69
FULL CALENDAR 72
ANNUAL CALENDAR AND EQUATION OF TIME 75
PERPETUAL CALENDAR 78
You are now the proud owner of a Girard-Perregaux watch, and we would like to thank you for your choice.
Our expert watchmakers and craftsmen have mastered all the expertise required to create exceptional pieces, from traditional watchmaking to the latest cutting-edge technologies.
Our uninterrupted history spanning more than two centuries, our dozens of watch patents and our never-ending quest for innovation make our Brand one of the most prestigious names in Swiss Haute Horlogerie.
Our heritage is our most precious asset, and we are proud to count you as one of its guardians.
We invite you to consult the user guide and hope you enjoy your Girard-Perregaux watch.

INTERNATIONAL WARRANTY
The international warranty below is applicable to all Girard-Perregaux watches sold by Girard-Perregaux brand authorized dealers and submitted for repair or inspection under warranty in all countries.
Only Girard-Perregaux authorized Repair Centers are authorized to provide the service set out by the international warranty, in accordance with Girard-Perregaux's instructions. Any service, repairs or other operations on your watch not performed by a Girard-Perregaux authorized Repair Center shall render the international warranty void.
We guarantee your watch against any lack of conformity and against any defect due to the materials used for a period of two years from the purchase date. If during this period your timepiece were to exhibit one of these defects, we are committed to repairing it free of charge. Once the warranty period has expired, repairs will be invoiced for parts and labor.
To be entitled to this warranty, you must submit a copy of the warranty certificate, properly completed, dated, stamped and signed by an authorized dealer or distributor. You are therefore advised to keep the Girard-Perregaux international warranty certificate safe, as it is the only document validating the warranty.
If need be, we recommend giving the watch to be inspected or repaired to one of our exclusive distributors or authorized dealers, who will send it to our nearest authorized Repair Center. You can also send your watch directly to one of our authorized Repair Centers.
If posting your watch, we recommend packaging it very carefully and sending by secure mail, to prevent any incident in transit.
Girard-Perregaux can under no circumstances guarantee the authenticity of Girard-Perregaux products acquired outside its official distribution and authorized dealer network.
This warranty entitles you to specific aforementioned rights, which may be supplemented by other rights varying between countries.
The warranty does not cover:
- Leather, rubber and fabric straps;
The consequences of wear and normal aging of the watch (in particular scratches, scoring, etc.); - Damage caused deliberately, or resulting from incorrect handling, negligence or an accident;
- Damage resulting from abnormal use or misuse (in particular impacts or crushing);
- Watches with the identification number or any other identification mark deliberately removed or altered;
- Loss and theft;
- Damage caused by natural events such as fire, natural catastrophes and acts of war;
- Any defect resulting from the addition of one or more accessories not issued from the manufacture Girard-Perregaux will automatically lead to the end of the warranty.
PRECAUTIONS FOR USE AND CARE
Your watch has been manufactured with the greatest care, and will provide years of service if you take the following precautions:
1. Precautions for use and care
- Never activate the crown or push-buttons of your watch in water. If your watch has a screw-down crown, make sure that it never comes into contact with water when its crown is unscrewed;
- Avoid thermal shocks and exposing your watch to extreme temperatures, below 0° or above 60° (sauna, baths, etc.);
- Never use corrosive or chemical products to clean your watch;
- Avoid contact with certain chemical substances (petrol, thinners, perfumes, cleaning products, glues, paints, etc.), to prevent any damage to your watch and its leather strap;
- Avoid exposing your watch to a powerful magnetic field (magnets, loudspeaker, etc.);
- Avoid violent impacts;
- Avoid leaving your watch immobile for long periods of time. Only regular wear prevents the oils contained in the movement from congealing;
- Never attempt to open the case of your watch yourself;
- Rinse your watch with fresh water after bathing in the sea; avoid bathing with a leather strap to prevent accelerated wear.
2. Maintenance service
Therefore, to ensure that your watch continues, after years of use, to provide the accuracy you can rightly expect, Girard-Perregaux recommends entrusting your watch to one of its authorized Repair Centers every 2 to 3 years for the necessary inspections.
WATER-RESISTANCE PRECAUTIONS
Your watch has undergone numerous water-resistance tests in our workshops, depending on the required protection level, to ensure you can enjoy the following activities:
| ACTIVITIES / DEGREE OF WATER-RESISTANCE | 3 atm - 3 bar30 m - 100 ft | 5 atm - 5 bar50 m - 165 ft | 10 atm - 10 bar100 m - 330 ft | 50 atm - 50 bar500 m - 1650 ft |
| Rain, splashing | yes | yes | yes | yes |
| Shower, bath, surface water sports | no | yes | yes | yes |
| Swimming, snorkeling | no | no | yes | yes |
| Scuba diving | no | no | no | yes |
English
1. Water-resistance precautions
Your watch has been rigorously checked and will retain its water-resistance if you take the following precautions:
- Ensure that the crown and the push-buttons on your watch are in their initial position - position 0 - to prevent any damage to the mechanism. To do this, press the crown against the case.
- If your watch is equipped with a screw-down crown, ensure that it is locked after any adjustment and before use in an aquatic environment. To do this, screw the crown in a clockwise direction, whilst keeping it pressed against the case of your watch.
- Never activate the crown or push-buttons of your watch under water, if the watch is in contact with water or when it is wet.
2. Water-resistance test
The water-resistance of your watch is ensured by a sophisticated system of seals. These are subject to the damaging effects of a range of external factors (perspiration, changes in temperature, ultraviolet rays, salt or chlorinated water, dust, etc.). For this reason, and to ensure the seals can carry out their role perfectly, Girard-Perregaux recommends entrusting your watch to one of its authorized Girard-Perregaux Repair Centers every 2 to 3 years for the necessary water-resistance inspections.
text_image
A GATEZ BEANSAGE ATTUCE 11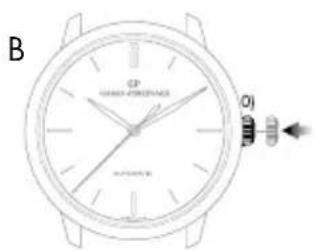
text_image
B CP HAWAR STAFFICUATOR A-FOODER O1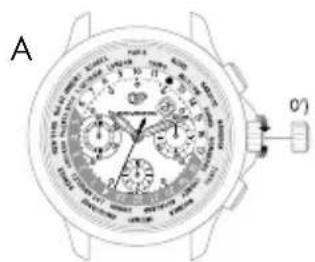
text_image
A 0°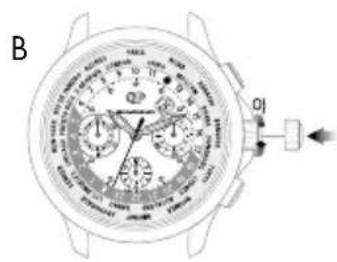
text_image
B 01USER GUIDE
SETTINGS
CROWN
Introduction
The crown is a component allowing the adjustment of different \ functions, such as setting the time, manual winding and on certain models, setting the day or the date.
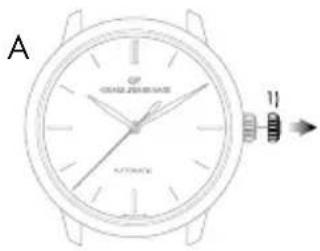
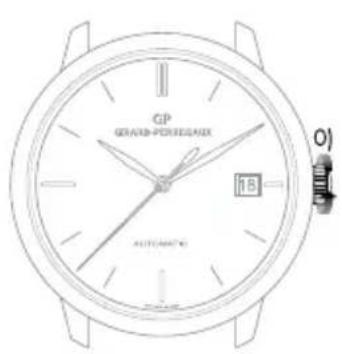
Simple crown
Setting
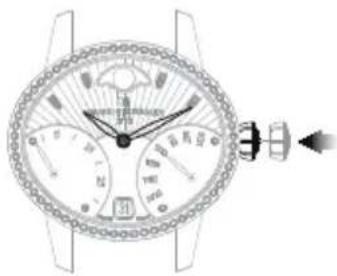
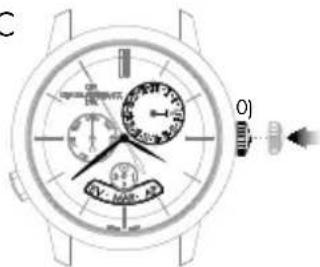
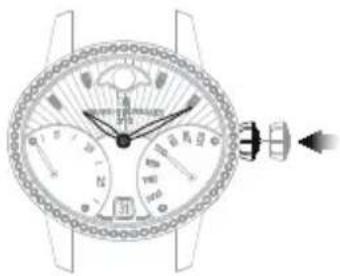
A. Pull out the crown to go on to different settings.
B. To assure its water-resistance, it is important that the crown is pushed back into position 0) once you have finished using it. To do this, press the crown against the case as illustrated below.
Screw-down crown
The screw-down crown ensures perfect water-resistance to the depth for which the model was designed.
Setting
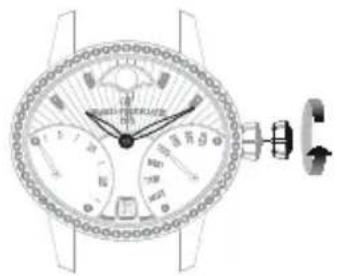
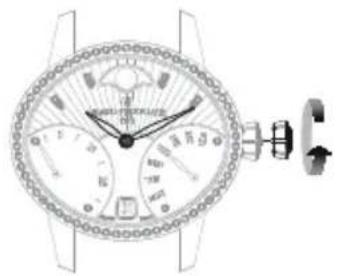
A. Unscrew the crown to go on to different settings. To do this, turn the crown counter-clockwise.
B. To assure its water-resistance, it is important that the crown is pushed back into position 0) once you have finished using it. To do this, screw the crown in clockwise while pressing it against the case, as illustrated on the right.

WINDING
Introduction
Winding allows the movement to store up the energy necessary for your watch to function well.
Mechanical movements manufactured and produced at the manufacture Girard-Perregaux can be manual or automatic depending on the model of your watch.
Manual winding mechanical movement
This type of movement means that to function normally, your watch needs to be regularly wound. Depending on the model and the power reserve of your watch, it can go between 30 to 60 hours between two windings.
Setting
To wind your watch, turn the crown clockwise when it is in position 0) or 0') when it is a screw-down crown. As soon as it starts to resist, it means the mechanism is sufficiently wound.
Warning: Do not force if the resistance increases, the movement mechanism could be damaged.
text_image
CP GERAVEN-PERREGLANX 18 AUTOMATO®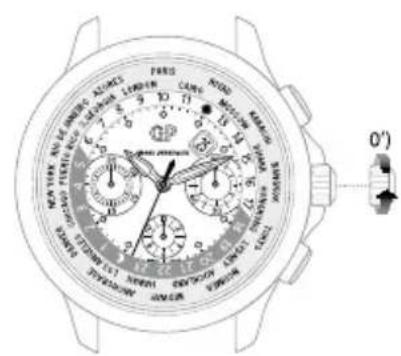
text_image
NEW YORK AVENZER GREEN ADJORS FORD LARGE STOCK MOTTER BATHUA SWEET TICKLETTLE PANEER MINI AVENZER BRINCH DAUL GARL JORDAN 0°)Automatic mechanical movement
This term means that your watch automatically stores up energy as you wear it on your wrist. Indeed, your daily movement allows the oscillating mass to carry out rotating movements which, thanks to a clockwork system, reproduce an energy to the movement and allows it to automatically wind itself. Daily wear is enough to assure the power reserve necessary for your watch to function well without it being necessary to wind it.
If your watch has not been worn for several consecutive days, it has to be manually wound. To do this, please refer to the paragraph above 'Manual winding mechanical movement'.

PRACTICAL FUNCTIONS
HOUR AND MINUTE
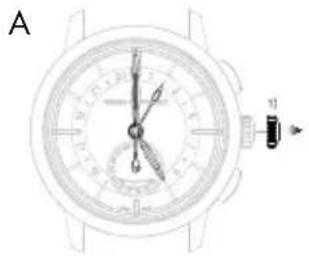
Introduction
Setting the time of your watch is completed via the crown. This could be in two or three positions, depending on the model of your watch.
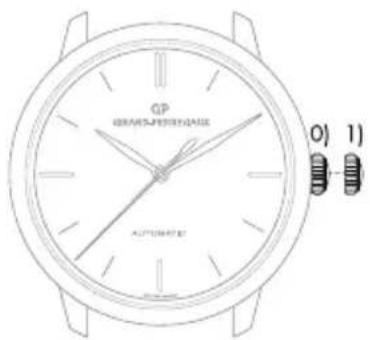
2 position crown
0) Movement manual winding position (crown not pulled out).
1) Time setting position (crown pulled out).
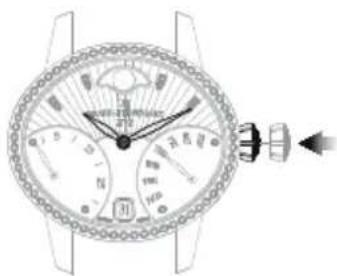
3 position crown
0) Movement manual winding position (crown not pulled out).
1) Date setting position (crown half pulled out).
2) Time setting position (crown fully pulled out).
text_image
GP GEP/SPRINGHAI AUTOMATED 0) 1)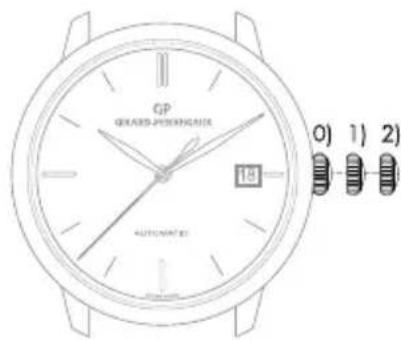
text_image
GP GEIARD-PIONEINGLASS 19 AUTOMATED 0) 1) 2)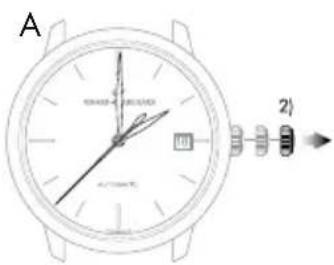
text_image
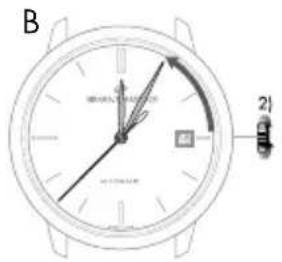
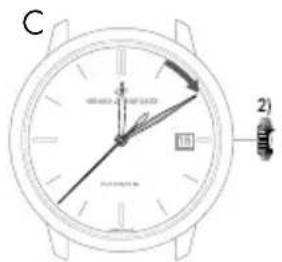
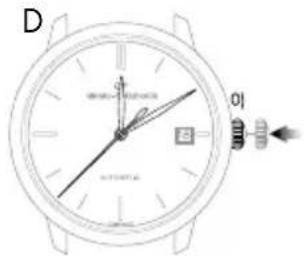
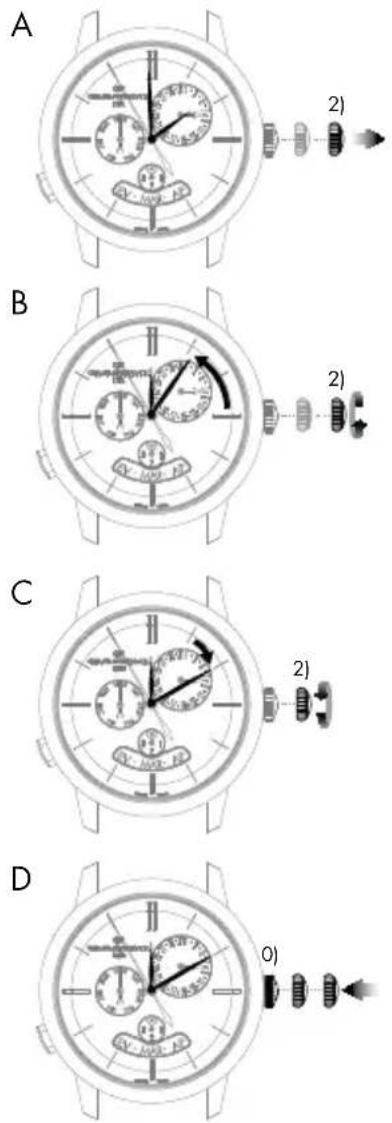
A 2)If your watch has a date indicator, make sure that the hands are in the date change position, i.e. at midnight rather than midday. Use midnight as a reference for the date and day change to ensure you are positioned at the right time of day.
text_image
B 21Setting
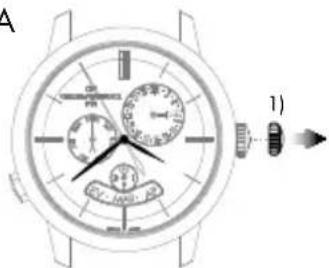
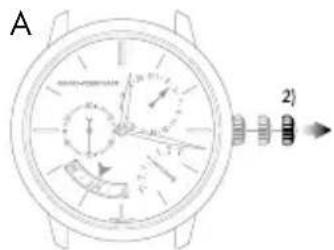
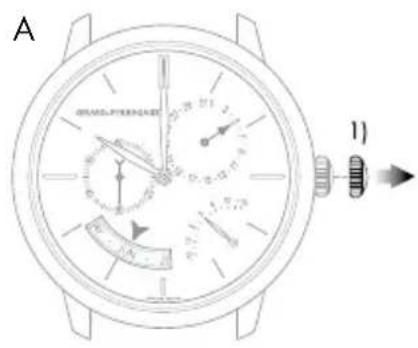
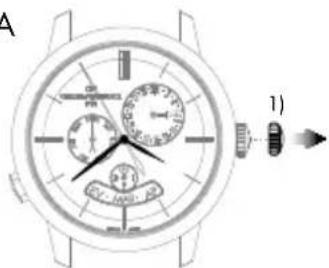
A. Pull your crown out to the time setting position. On watches with a seconds indicator, the seconds hand will stop.
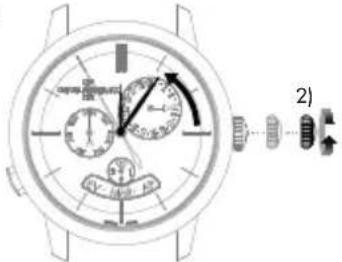
B. Turn your crown clockwise so as to indicate the selected time minus 5 minutes.
C. Slowly move the minute hand forward clockwise, stopping it exactly at the selected minute.
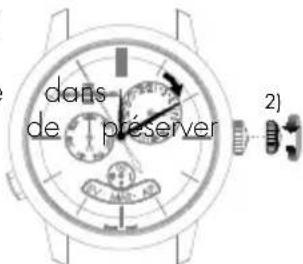
D. At the desired time, push the crown back against the case, in position 0). The watch will restart immediately.
text_image
C 2)Warning: After making any setting, always return the crown to its original position against the case, position 0), to preserve the water-resistance of your watch and prevent any damage to the mechanism. To do so, refer to the chapter "Crown".
text_image
D 01 02 03 04 05 06 07 08 09 10 11 12 13 14 15 16 17 18 19 20 21 22 23 24 25 26 27 28 29 30 31 32 33 34 35 36 37 38 39 40 41 42 43 44 45 46 47 48 49 50 51 52 53 54 55 56 57 58 59 60 61 62 63 64 65 66 67 68 69 70 71 72 73 74 75 76 77 78 79 80 81 82 83 84 85 86 87 88 89 90 91 92 93 94 95 96 97 98 99 100
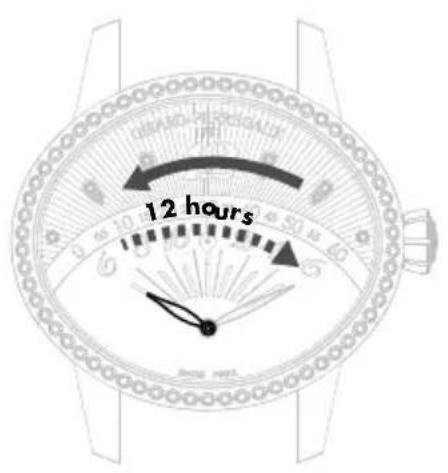
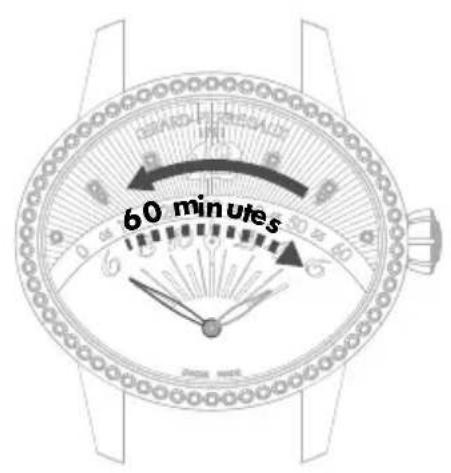
Retrograde display
The retrograde hour and minute hands move from 6 to 6 o'clock (left to right) and from 0 to 60 minutes (left to right) respectively, before returning immediately to their starting point and beginning their journey once more.
text_image
12 hoursHour hand Minute hand
text_image
60 minutes
text_image
A 1) B 1) C 1) DSetting
A. Pull your crown out to the time setting position.
B. Rotate the crown until the required time, less 5 minutes, is displayed.
C. Slowly move the minute hand forward clockwise, stopping it exactly at the selected minute.
D. At the desired time, push the crown back against the case, in position 0). The watch will restart immediately.
Warning: After making any setting, always return the crown to its original position against the case, position 0), to preserve the water-resistance of your watch and prevent any damage to the mechanism. To do so, refer to the chapter "Crown".

DATE
Introduction
The date indication shows the number of the day in the month.
This function enables rapid date setting for your watch without altering the time. The indication of the date is synchronized with the hour and minute hands. In any case, you need to correct the date display for any month not lasting 31 days, for a single date.
Warning: Do not perform this operation between 8 PM and 8 AM as the date change mechanism is engaged, and the mechanism could become damaged.
text_image
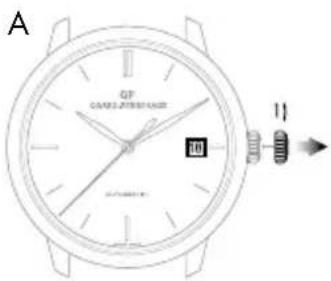
A GPS GASSE,2000/1983 10 11Setting
Window display date
A. Pull out the crown of your watch into the date setting position, in position 1).
B. Turn the crown clockwise until the desired date appears in the window. According to the model, the crown may be turned in the opposite direction.
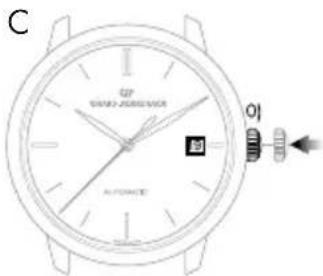
C. At the desired date, push the crown back against the case, in position 0).

text_image
B GP GRAVE JUERSTAVE AUTOATACWarning: After making any setting, always return the crown to its original position against the case, position 0), to preserve the water-resistance of your watch and prevent any damage to the mechanism. To do so, refer to chapter "Crown".
text_image
C GEP GRIANO JUANSENION AFTONICS EIHand display date
If your watch has a hand display date, you can correct it via the corrector, found on the case of your watch.
Press on the corrector, with the help of the little tool delivered with your watch, until the date hand indicates the desired date. One press on the corrector corresponds to one day forward.

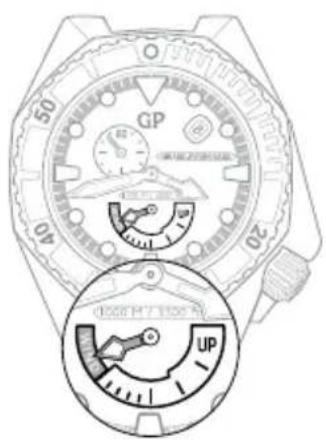
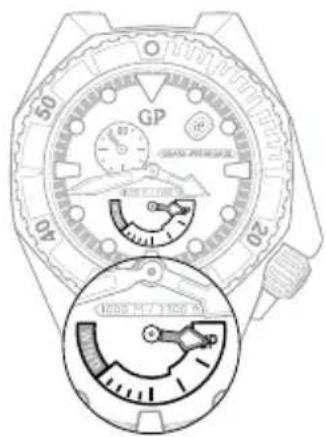
POWER RESERVE INDICATOR
Introduction
This indicator allows you to know the status of your watch power in real time, or how long your watch can work for before it will need to be wound again.
Reading
The power reserve status of your watch is indicated by a little hand moving along a graded arc.
Setting
The power reserve indicator is synchronized with the movement, so it does not need to be set.
text_image
50 GP 20 40 UP UP UP UPStop soon Full
text_image
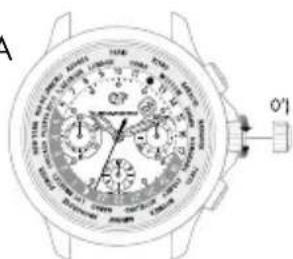
50 GP 20 40 1000 MHz 1000 HzSECOND TIME ZONE
Introduction
This function, which is highly valued by travellers, is used to display two time zones simultaneously: The reference time or «home time», and the local time.
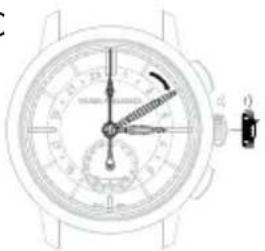
Reading
The reference time («home time») is displayed on the central 24-hour graduated disc. As usual, the local time is read on the external graduated scale.
Setting
Reference time («home time») hours and minutes
Before every setting, make sure the position of the hands corresponds to the date changing at midnight and not at midday. Use midnight as an approximate reference for the date jump to ensure you are positioned at the right time of day.
Warning: The date hand only follows the local hour hand (set using the push-buttons at 2 o'clock and 4 o'clock).
natural_image
Close-up of a wristwatch face showing dial, wrist, and analog dial (no text or symbols visible)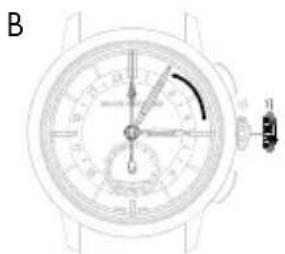
natural_image
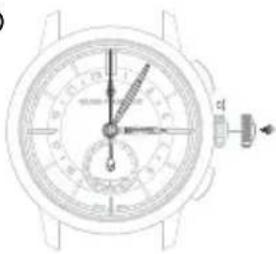
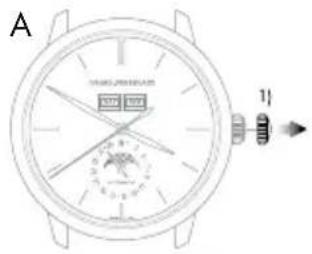
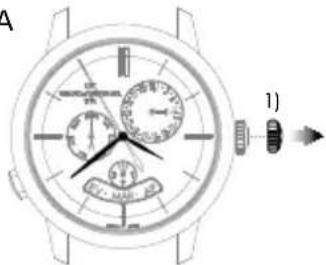
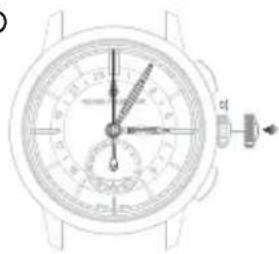
Top-down schematic of a wristwatch dial with analog dials and a close-up view (no text or labels)A. Pull the crown of your watch out to the time setting position, in position 1). The seconds hand will stop.
B. Turn the crown clockwise so as to indicate the selected time minus 5 minutes. This setting simultaneously moves the reference («home time») hour and minute hands and the local hour hand.

C. Slowly move the minute hand forward in a clockwise direction, stopping it exactly at the selected minute.
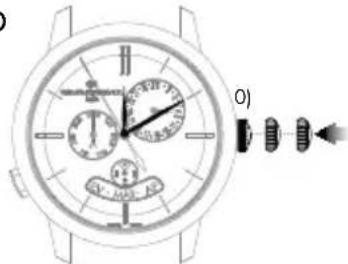
D. At the desired time, push the crown back against the case, in position 0); the watch will restart immediately.
Warning: After making any setting, always return the crown to its original position against the case, position 0), to preserve the water-resistance of your watch and prevent any damage to the mechanism. To do so, refer to chapter "Crown".
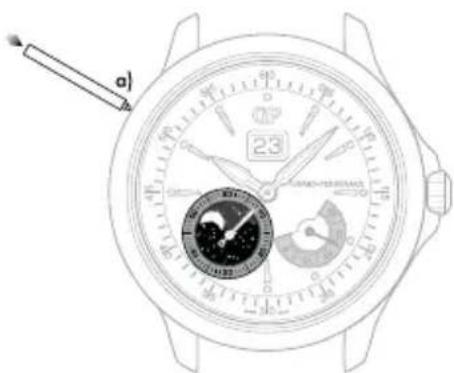
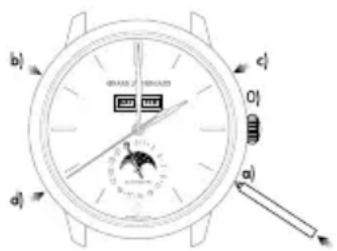
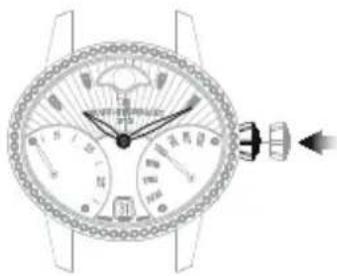
Date change by hand
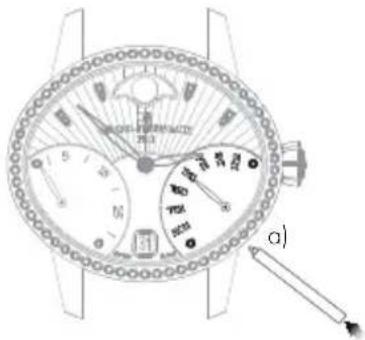
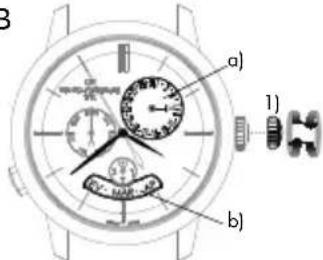
Press on the corrector a) located at 8 o'clock using the small tool supplied with your watch, until the date hand indicates the desired date. One press on the corrector corresponds to one day forward.
Warning: Between 11PM and midnight, a date correction using corrector a) will only enable the date to be moved forward by one day. However, this action will not damage your mechanism.
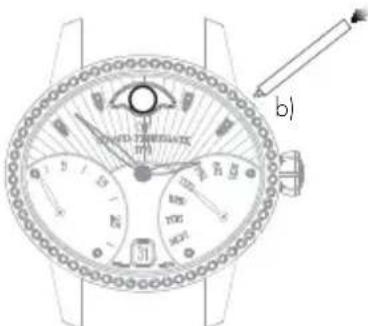
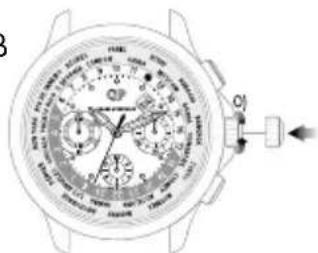
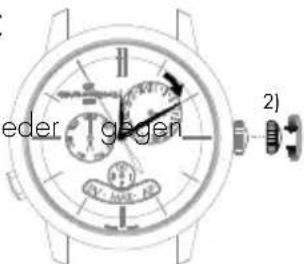
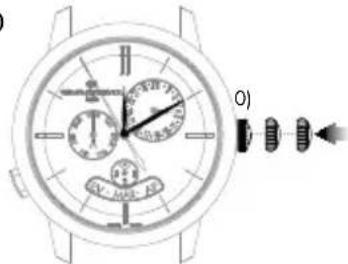
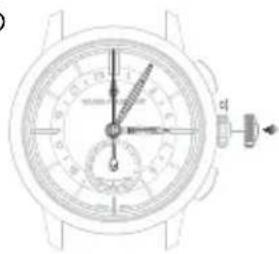
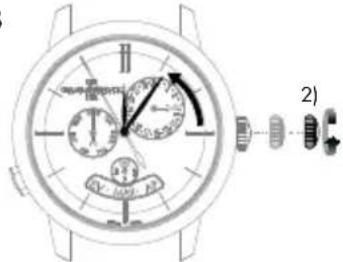
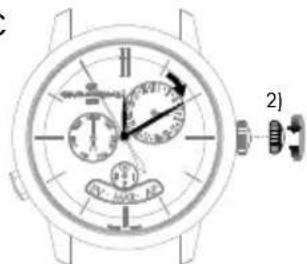
Second time zone (local time)
The push-buttons located at 2 o'clock and 4 o'clock can be used to move the second time zone hour hand forwards or backwards (local time). Press once to move the time forwards or backwards one hour.
C
natural_image
Line drawing of a wristwatch face showing dial, wrist, and dial (no text or symbols)D
natural_image
Line drawing of a wristwatch face showing dial, wrist, and dial (no text or symbols)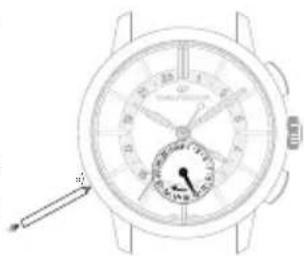
natural_image
Top-down view of a wristwatch with dial and wrist strap (no visible text or symbols)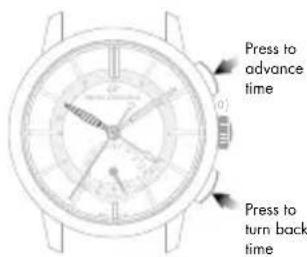
text_image
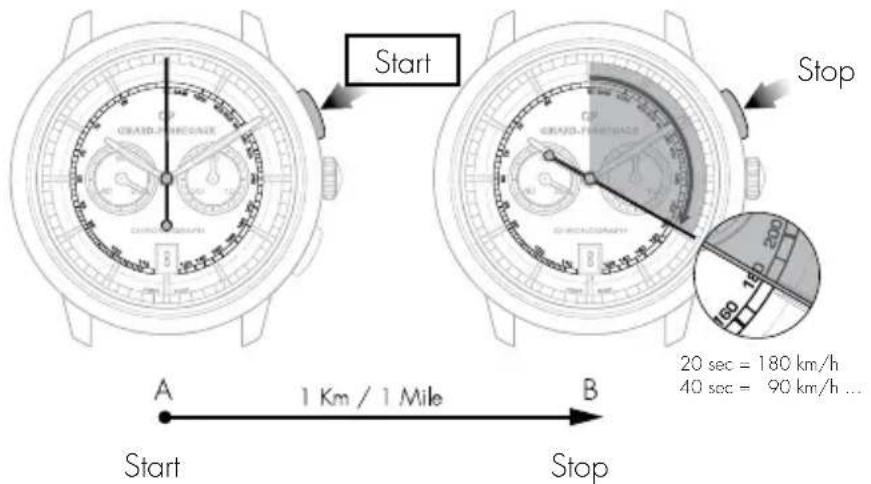
Press to advance time Press to turn back timeTACHOMETRIC SCALE
Introduction
This function measures an average speed over a given distance.
Reading
Let us take a road with 2 markers A and B set one kilometer (or mile) apart. Start your chronograph as your car passes marker A, then stop it as it passes marker B. Then read the average speed in kilometers/hour or miles/hour on the tachometer scale at the tip of the chronograph center seconds hand.
text_image
Start A 1 Km / 1 Mile B Stop 20 sec = 180 km/h 40 sec = 90 km/h ...
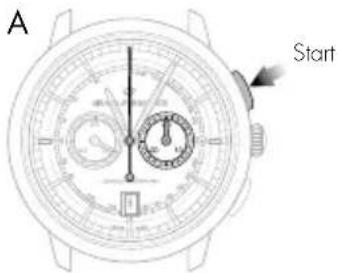
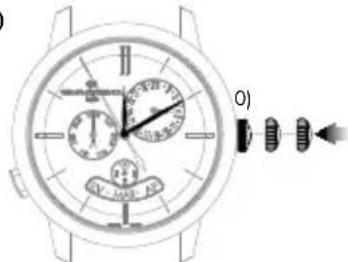
CHRONOGRAPH
Introduction
The chronograph seconds are displayed by a large center hand. The minute, and possibly the hour, are generally displayed by 1 or 2 small counters.
The seconds hand and the counters are interconnected.
On certain models, minute timing may also be indicated by a center hand pointing to the dial's graduated rim.
text_image
A StartSetting
A. Press your watch's push button at 2 o'clock: The center seconds hand will start.
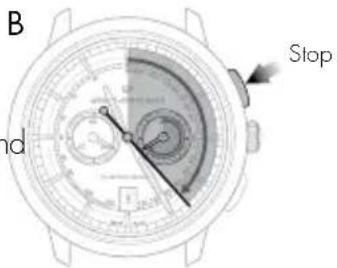
B. Press the same push button at 2 o'clock again: the center seconds hand will stop.
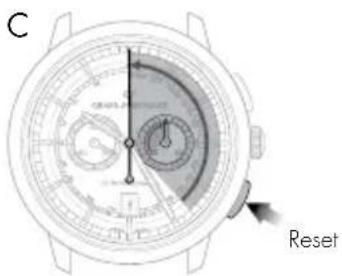
C. Press your watch's push-button at 4 o'clock: The center seconds and the counter hands will return to zero.
text_image
B nd StopWarning: While the second hand is working, never reset to zero to prevent damage to the mechanism. Always check the second hand has stopped before resetting to zero.
text_image
C ResetASTRONOMIC FUNCTIONS
DAY/NIGHT INDICATOR
Introduction
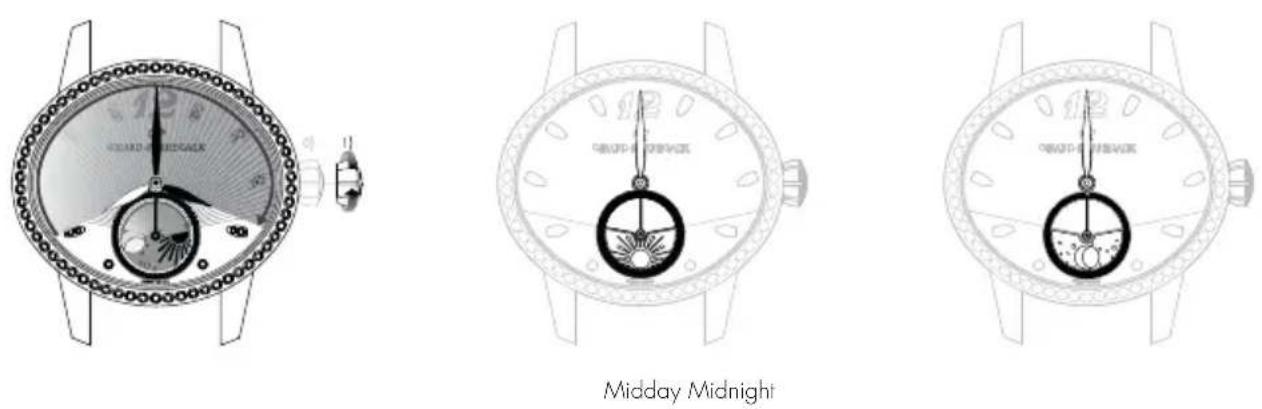
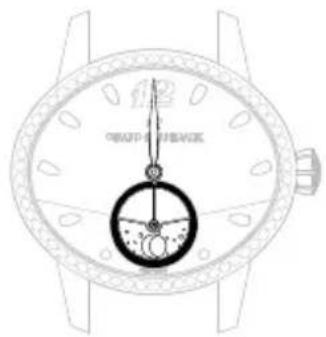
The day/night indicator uses a system of discs representing the sun and moon to indicate whether it is day or night. The special window depicts the night sky, in which the shape of the moon and sun changes as the day advances.
Reading
When setting the time, take into account the day/night indication, as this is synchronised with the hour and minute indications. For example, at midnight, the moon should appear at 6 o'clock, while at midday the sun should appear at 6 o'clock.

MOON PHASES INDICATOR
Introduction
Moon phases indication allows the reproduction of the moon cycle (new moon, first quarter, full morn, final quarter) by means of a disc or a window. The moon phases indicator offers a representation of the sky in which the form of the moon is shown at its different stages throughout the lunar month.
Reading
A disc, with two moons placed in a starry sky, turns in a window.
At the start of each moon phase, one of the two moons appears in the left-hand section of the window; it initially appears as a slim crescent, emerging from behind the rounded edge, then gradually grows over the course of the days.
In the middle of the lunar month, the moon appears in the middle of the window in its full form. It then starts to gradually disappear behind the second rounded cover on the right.

New moon First quarter Last quarterFull moon
Setting
Press on the corrector a), using the little tool received with your watch, until the desired moon phase is displayed. One press on the corrector corresponds to one day forward.
Warning: Do not correct the moon phases indicator when the mechanism changing the date is engaged, between 3 PM and 3 AM, as this could damage the mechanism. To be sure, use midnight as a reference for the date and day change to ensure you are positioned at the right time of day.
text_image
a)*Corrector with variable position according to the model

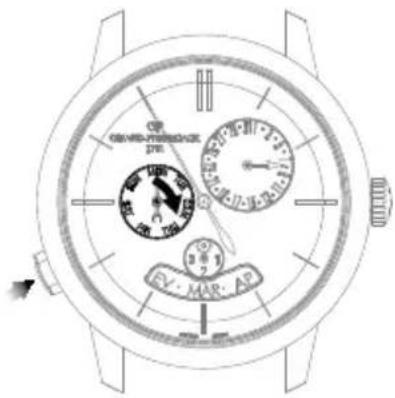
BI-RETRO
Introduction
The retrograde seconds and day of the week hands move from 0 to 30 (up to down) and from MON to SUN (down to up) respectively before returning immediately to their starting point and beginning their once more.
Setting
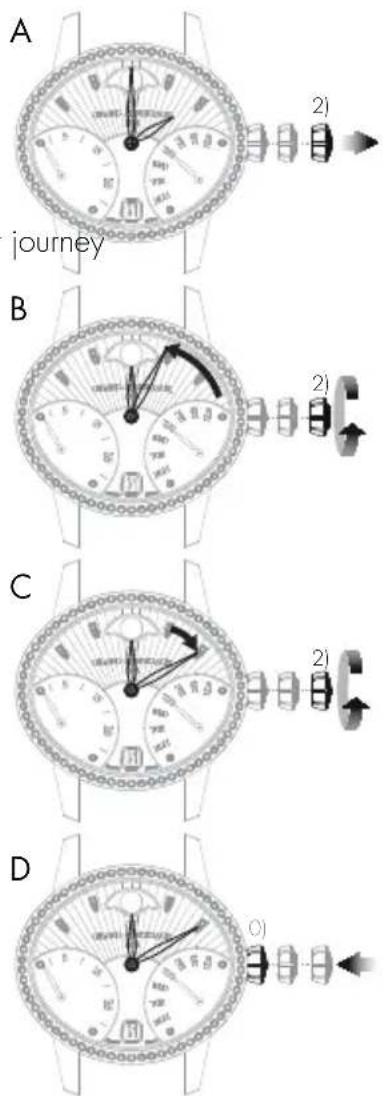
Hour and minute
A. Pull out the crown of your watch into the hour setting position, in position 2).
B. Rotate the crown until the required time, less 5 minutes, is displayed.
C. Slowly move the minute hand forward clockwise, stopping it exactly at the selected minute.
D. At the desired time, push the crown back against the case, in position 0). The watch will restart immediately.
Warning: After making any setting, always return the crown to its original position against the case, position 0), to preserve the water-resistance of your watch and prevent any damage to the mechanism. To do so, refer to the chapter "Crown".
text_image
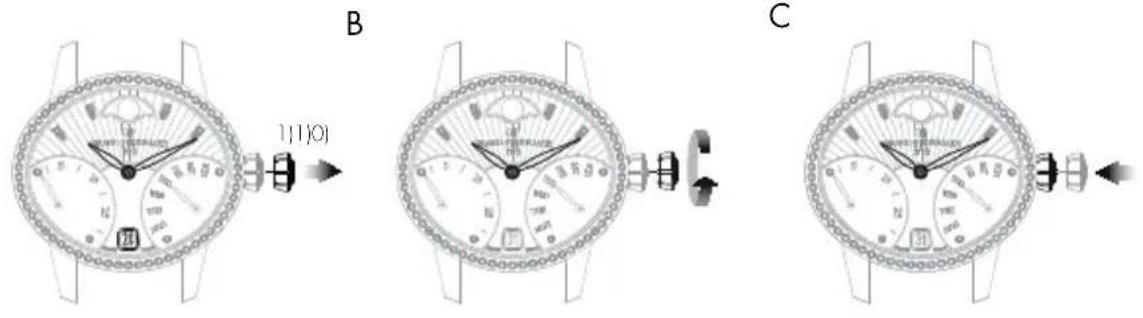
A journey B 21 C 21 DDate
A. Pull out the crown of your watch into the date setting position, in position 1).
B. Turn the crown clockwise until the desired date appears in the window.
C. At the desired date, push the crown back against the case, in position 0).
Warning: After making any setting, always return the crown to its original position against the case, position 0), to preserve the water-resistance of your watch and prevent any damage to the mechanism. To do so, refer to chapter "Crown".
A
C

Day of the week
The day can be corrected by pressing on the corrector a), positioned at 4.30, using a small tool delivered with your watch. One press on the corrector corresponds to one day forward.
Warning: Do not change the day of the week between 19:00 and 1:00, when the date-change mechanism is being activated, as this could damage the movement.
text_image
OFF-DRAGON 100 200 300 400 500 600 700 800 900 1000 a)Moon phases
Press corrector b), positioned at 14.30, using the small tool supplied with your watch, until the desired moon phase is displayed. One press on the corrector corresponds to one day forward.
Warning: Do not correct the moon phase indicator between 7:00 PM and 1:00 AM, when the date-change mechanism is being activated, as this could damage the movement. To be sure, use midnight as a reference for the date and day change to ensure you are positioned at the right time of day.
text_image
b)FULL CALENDAR
Introduction
As well as showing the hours and the minutes, the watchmaking complication "Full calendar" also clearly displays the date, the day of the week, the month and indicates moon phases.
Warning: Do not correct the calendar or the moon phases indicator when the mechanism changing the date is engaged, between 3 PM and 8 PM, as this could damage the mechanism. To be sure, use midnight as a reference for the date and day change to ensure you are positioned at the right time of day.

Setting
Hour and minute
Before every setting, make sure the position of the hands corresponds to the date changing at midnight and not at midday. To be sure, use midnight as a reference for the date and day change to ensure you are positioned at the right time of day.
A. Pull your crown out to the time setting position, in position 1). The seconds hand will stop.
B. Turn your crown clockwise so as to indicate the selected time minus 5 minutes.
C. Slowly move the minute hand forward clockwise, stopping it exactly at the selected minute.
D. At the desired time, push the crown back against the case, in position 0). The watch will restart immediately.
Warning: After making any setting, always return the crown to its original position against the case, position 0), to preserve the water-resistance of your watch and prevent any damage to the mechanism. To do so, refer to the chapter "Crown".
text_image
A 11 11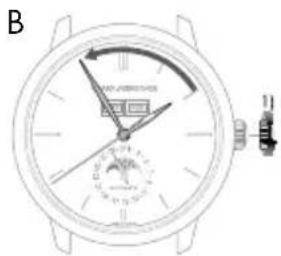
text_image
B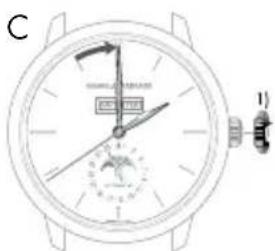
text_image
C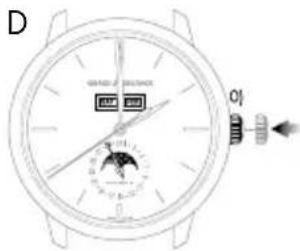
text_image
D WATER & RELAANCE 0.1Date change by hand
Press on the corrector a) located at 4 o'clock using the small tool supplied with your watch, until the date hand indicates the desired date. One press on the corrector corresponds to one day forward.
Warning: Going from the 31 ^st to the 1 ^st leads to a change in the month indicated (continuing to the next month).
Day of the week
Press on the corrector b) (located at 10 o'clock) using a small tool delivered with your watch, until the desired day of the week appears in the window.
Month
Press on the corrector c) (located at 2 o'clock) using a small tool delivered with your watch, until the desired month appears in the window.
Warning: Do not perform this operation if the date or calendar display is between the 30 ^th and the 2 ^nd , as the month change mechanism is engaged, as you risk damaging the mechanism.
Moon phases
Press on the corrector d) (located at 8 o'clock) using a small tool delivered with your watch, until the desired moon phase appears. One press on the corrector corresponds to one day forward.
ANNUAL CALENDAR AND EQUATION OF TIME
Introduction
Unlike a conventional calendar mechanism, your annual calendar only requires date correction for February in non-leap years, i.e. 3 corrections in total in a 4-year cycle.
Setting
Hour and minute
Before every setting, make sure the position of the hands corresponds to the date changing at midnight and not at midday. Use midnight as an approximate reference for the date jump to ensure you are positioned at the right time of day.
A. Pull out the crown of your watch into the hour setting position, in position 2). The seconds hand will stop.
B. Turn your crown clockwise so as to indicate the selected time minus 5 minutes.
C. Slowly move the minute hand forward, stopping it exactly at the selected minute.
D. At the desired time, push the crown back against the case, in position 0); the watch will restart immediately.
Warning: After making any setting, always return the crown to its original position against the case, position 0), to preserve the water-resistance of your watch and prevent any damage to the mechanism. To do so, refer to the chapter "Crown".
text_image
A 2)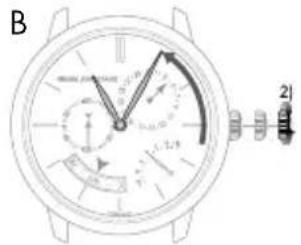
text_image
B 1/2.9 2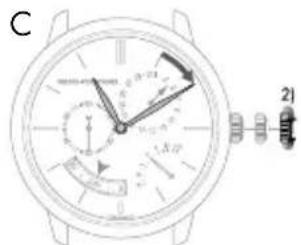
text_image
C 21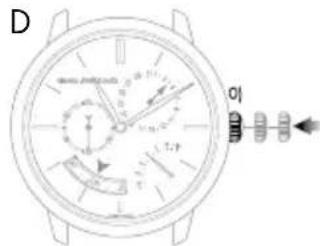
text_image
D 0.1 0.2 0.3 0.4 0.5 0.6 0.7 0.8 0.9 1.0 1.1 1.2 1.3 1.4 1.5 1.6 1.7 1.8 1.9 2.0 2.1 2.2 2.3 2.4 2.5 2.6 2.7 2.8 2.9 3.0 3.1 3.2 3.3 3.4 3.5 3.6 3.7 3.8 3.9 4.0 4.1 4.2 4.3 4.4 4.5 4.6 4.7 4.8 4.9 5.0Date and month
Warning: Before making any correction, ensure that the time display is between 9:30 AM and 8:30 PM. Outside this range, any rotation of the stem in position 1) will have no effect. Use midnight as a reference for the date and day change to ensure you are positioned at the right time of day.
A. Turn the crown of your watch into the date setting position, position 1).
B. Turn the crown until the day hand a) indicates the desired date. The crown can be turned in both directions. The month disc b) is synchronized with the date hand, so it does not need to be changed.
C. At the desired date, push the crown back against the case, in position 0); the watch will restart immediately.
Warning: After making any setting, always return the crown to its original position against the case, position 0), to preserve the water-resistance of your watch and prevent any damage to the mechanism. To do so, refer to chapter "Crown".
Warning: For months with 30 days, the date takes approximately 4 hours 30 minutes to jump to the first day of the next month, passing through the 3 ^st . For February, the date take approximately 7 hours 30 minutes to jump to the March 1 ^st , passing through the 30 ^th and 31 ^st .
text_image
A 1)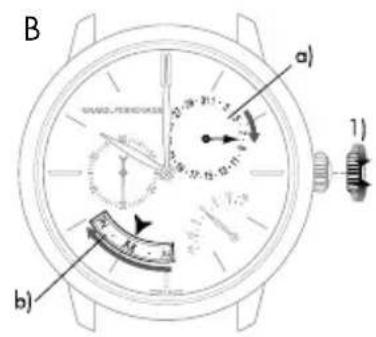
text_image
B a) b)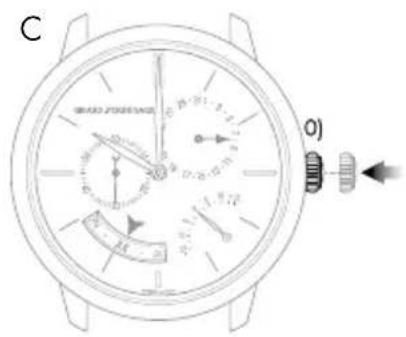
text_image
C WIKKO ZENKKAU 0)
Equation of time
Introduction
The Earth's orbit around the sun is not perfectly circular. As with most of the celestial bodies in our solar system, its trajectory is elliptical. In addition, the Earth's axis is tilted in relation to the orbit's plane. A consequence of this irregular trajectory is that the length of the solar day – the interval between the times at which the sun twice passes the meridian at a given location – varies according to the season. The 24-hour day used for civil time is calculated using the average duration of the solar day.
Reading
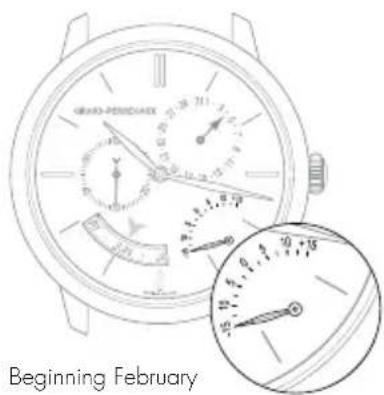
The equation of time function indicates the difference between the mean time and the solar time. This difference is indicated by a little hand which moves along a graduated arc. It can extend to between approximately +14 and -16 minutes for certain dates at the start of February and November respectively.
Setting
The equation of time indicator is synchronized with the calendar readings, and therefore does not require adjustment.
text_image
GRAD-PENCHAEX Beginning February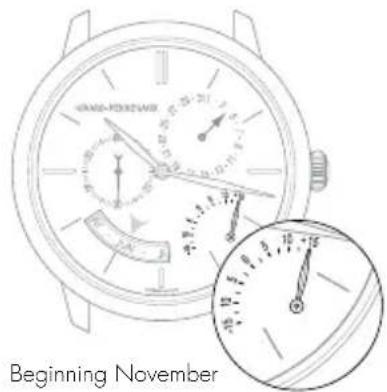
text_image
VANIA-FOXIXAVAX Beginning NovemberPERPETUAL CALENDAR
Introduction
The perpetual calendar indicates the date, day and month, taking into account the different lengths of the months in the Gregorian calendar, including leap years. Its "mechanical memory" therefore counts 1461 days, or four years.
Please note that this type of mechanism cannot take non-standard common years into account (years which are not leap years as they can be divided by 100 but not by 400, such as 2100).
Setting
Before making any correction, ensure that the time display is between 1:00 PM and 8:30 PM. Outside this range, any rotation of the stem in position 1) will have no effect. Use midnight as an approximate reference for the date jump to ensure you are positioned at the right time of day.
Adjustment outside the hours of 1:00 PM and 8:30 PM will not cause any mechanism.

Hour and minute
Before every setting, make sure the position of the hands corresponds to the date changing at midnight and not at midday. Use midnight as an approximate reference for the date jump to ensure you are positioned at the right time of day.
A. Pull out the crown of your watch into the hour setting position, in position 2). The seconds hand will stop.
B. Rotate the crown until the required time, less 5 minutes, is displayed.
C. Slowly move the minute hand forward clockwise, stopping it exactly at the selected minute.
D. At the desired time, push the crown back against the case, in position 0); the watch will restart immediately.
Warning: After making any setting, always return the crown to its original position against the case, position 0), to preserve the water-resistance of your watch and prevent any damage to the mechanism. To do so, refer to chapter "Crown".
A
text_image
A 1)Date and month
B
text_image
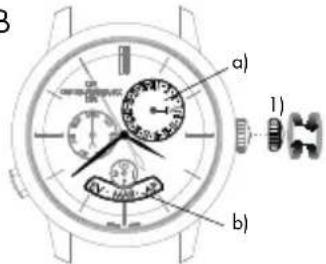
a) 1) b)A. Pull out the crown of your watch into the date setting position, in position 1).
B. Turn the crown until the day hand a) indicates the desired date. The crown can be turned in both directions. The month disc b) is synchronized with the date hand, so it does not need to be changed.
C. At the desired date, push the crown back against the case, in position 0); the watch will restart immediately.
Warning: After making any setting, always return the crown to its original position against the case, position 0), to preserve the water-resistance of your watch and prevent any damage to the mechanism. To do so, refer to chapter "Crown".
C
text_image
C 0)Warning: For months with 30 days, the date takes approximately 4 hours 30 minutes to jump to the first day of the next month, passing through the 31^st . For the month of February, the date takes approximately 7 hours 30 minutes to jump to the first of March in a leap year, passing through the 30^th and 31^st , and approximately 12 hours in a common year, passing through the 29^th , 30^th and 31^st .

Day of the week
The day of the week is corrected by pressing the push-button at 8 o'clock. One press on the push-button corresponds to one day forward.
Please note that the push-button can be activated at any time of day without any risk of damage.
text_image
OFF-VER/THY 2PM 10:30 15:00 17:00 18:00 19:00 20:00 21:00 22:00 23:00 24:00 25:00 26:00 27:00 28:00 29:00 30:00 31:00 32:00 33:00 34:00 35:00 36:00 37:00 38:00 39:00 40:00 41:00 42:00 43:00 44:00 45:00 46:00 47:00 48:00 49:00 50:00 51:00 52:00 53:00 54:00 55:00 56:00 57:00 58:00 59:00 60:00 61:00 62:00 63:00 64:00 65:00 66:00 67:00 68:00 69:00 70:00 71:00 72:00 73:00 74:00 75:00 76:00 77:00 78:00 79:00 80:00 81:00 82:00 83:00 84:00 85:00 86:00 87:00 88:00 89:00 90:00 91:00 92:00 93:00 94:00 95:00 96:00 97:00 98:00 99:00 100:31Leap year indicator
The leap year indicator is synchronised with the month disc, which is in turn synchronised with the date hand. It does not need to be set.
DEUTSCH
INHALT
INTERNATIONALE GARANTIE 87
text_image
WATERMACHINE OFFICEA
text_image
Technical diagram of a wristwatch with labeled dials and dial indicatorsB
text_image
Technical diagram of a wristwatch with labeled dials and dial indicators, showing mechanical components and control buttons.BEDIENUNGSANLEITUNG
EINSTELLUNGEN
KRONE
Einführung
text_image
FORD GARO NATRA SARMA POTATO MINI MINI MINI MINI MINI MINI MINI MINI MINI MINI MINI MINI MINI MINI MINI MINI MINI MINI MINI MINI MINI MINI MINI MINI MINI MINI MINI MINI MINI MINI MINI MINI MINI MINItext_image
60 minutes
text_image
A 1) B 1) C 1) DEinstellung
natural_image
Top-down view of a wristwatch face showing dial, wrist, and viewing instrument (no text or symbols visible)natural_image
Line drawing of a wristwatch with dial and hand pointer (no text or symbols)natural_image
Top-down line drawing of a wristwatch with dial and wrist strap (no text or symbols)natural_image
Four analog clocks showing different times of day with starry night sky and moon, no text or symbols presentnatural_image
Line drawing of a wristwatch with dial and wrist strap (no text or symbols)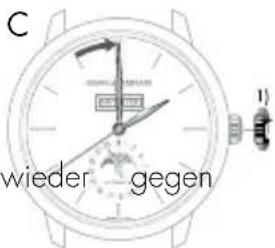
text_image
Diagram of a wristwatch with labeled parts and directional arrows indicating motion or movementC
text_image
eder Tgegen 2)D
text_image
Diagram of a wristwatch with dual dials and a close-up view showing dial indicator and sensor components.A

text_image
A 1)Datum und Monat
text_image
Technical diagram of a wristwatch with labeled dials and control buttons, showing front and side views.Schaltjahr-Anzeiger
text_image
60 minutestext_image
A GP GAFS, INTERIOR 11Regolazione
Datario a finestrella
natural_image
Close-up of a wristwatch face showing dial, wrist, and dial (no text or symbols visible)
natural_image
Top-down schematic of a wristwatch dial with analog dials and a close-up view (no text or labels)natural_image
Top-down line drawing of a wristwatch face showing dial, wrist, and dial (no text or symbols)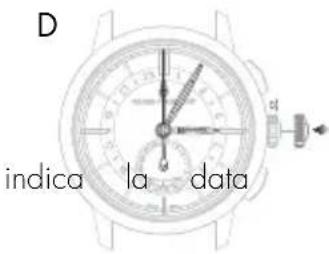
text_image
D indica la data
natural_image
Line drawing of a wristwatch with dial and wrist strap (no text or symbols)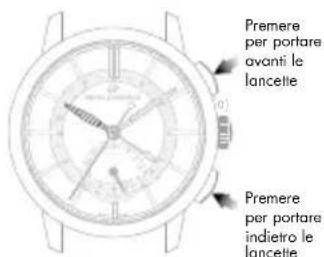
natural_image
Top-down view of a wristwatch with dual dials and a dial, showing no text or symbols on the dial itself.
natural_image
Line drawing of a wristwatch with a circular dial and wrist strap (no text or symbols)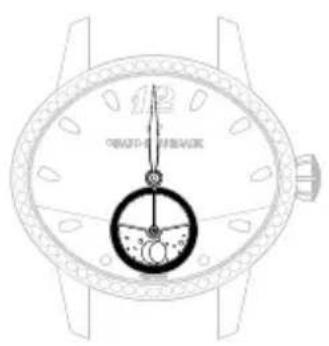
natural_image
Line drawing of a wristwatch with a dial indicator and wrist strap (no text or symbols)natural_image
Line drawing of a wristwatch with dial and wrist strap (no text or symbols)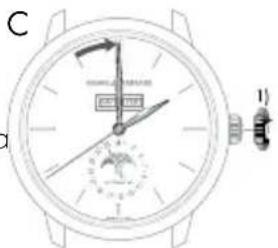
text_image
C 1)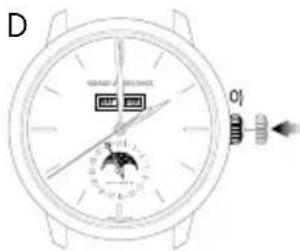
text_image
D WATER & BEVERAGE OFF OFF OFFDatario a lancetta
text_image
OR OFF: 20-15-03/20 PM 3.8 1 2 RV: MAR APnatural_image
Close-up of a wristwatch face showing dial, wrist, and dial (no text or symbols visible)
natural_image
Top-down view of a wristwatch face showing dial, wrist, and wristbell (no text or symbols visible)text_image
permitran, as de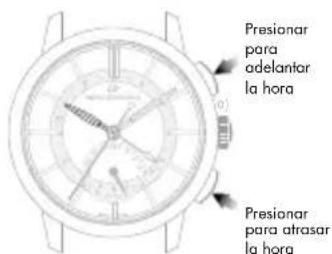
natural_image
Line drawing of a wristwatch with a circular dial and wrist strap (no text or symbols)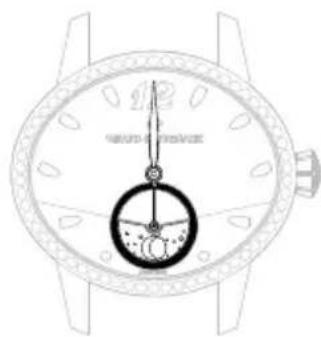
natural_image
Line drawing of a wristwatch with dial and wrist strap (no text or symbols)Medioda Medianoche

natural_image
Four analog clocks showing different times of day with starry night sky and moon, no text or symbols presentnatural_image
Line drawing of a wristwatch with dual dials and a dial, showing no text or symbolsC
text_image
Diagram of a wristwatch with dual dials and dial, showing measurement ranges and pointer mechanism
Día de la semana
natural_image
Line drawing of a wristwatch face with dual dials and a dial (no text or symbols)text_image
Diagram of a wristwatch with labeled parts and directional arrows indicating motion or movementD
text_image
Diagram of a wristwatch with labeled parts and directional arrows indicating motion or movementA

text_image
A 1)Fecha y mes
text_image
CHINESE-TRAVEL DTS FR: MAR APtext_image
PARS CANO BONZ MINI MINI MINI MINI MINI MINI MINI MINI MINI MINI MINI MINI MINI MINI MINI MINI MINI MINI MINI MINI MINI MINI MINI MINI MINI MINI MINI MINI MINI MINI MINI MINI MINI MINItext_image
60 minutes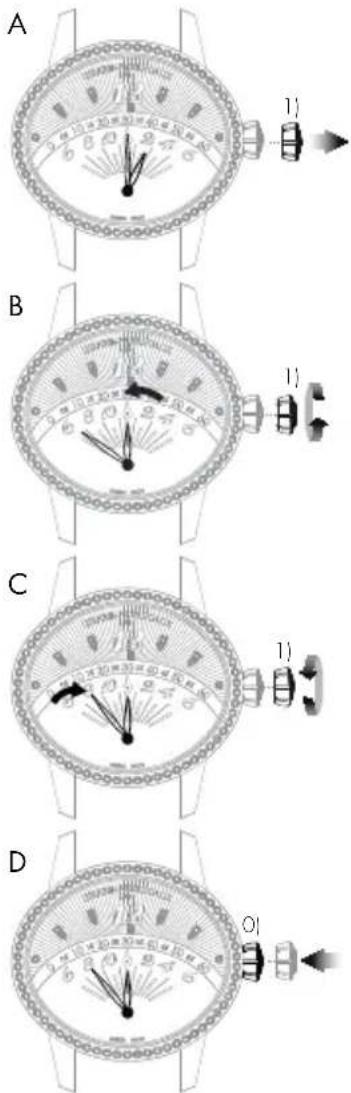
text_image
A 1) B 1) C 1) DНастройка
natural_image
Line drawing of a wristwatch face showing dial, wrist, and dial (no text or symbols)
natural_image
Top-down schematic of a wristwatch dial with analog dials and a close-up view (no text or labels)natural_image
Line drawing of a wristwatch face with dial and wrist (no text or symbols)D
natural_image
Top-down schematic of a wristwatch face showing dial, wrist, and wristband (no text or labels)
natural_image
Line drawing of a wristwatch with dial and wrist strap (no text or symbols)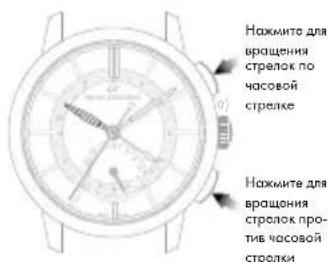
natural_image
Top-down view of a wristwatch with dual dials and a dial, showing no text or symbols on the dial itself.
natural_image
Line drawing of a wristwatch with a dial and circular dial (no text or symbols)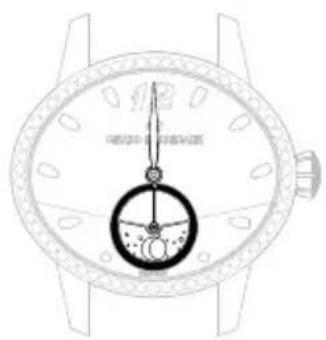
natural_image
Line drawing of a wristwatch with a dial and wrist strap (no text or symbols)Полдень Полночь

ИНДИКАТОР ФАЗЫ ЛУНЫ
Введение
natural_image
Line drawing of a wristwatch with dual dials and a dial (no text or symbols)C
natural_image
Line drawing of a wristwatch with dual dials and a dial indicator (no text or symbols)
День недели
text_image
PAPUS RICHEN BOTTLE AVOCATION MINI MINI MINI MINI MINI MINI MINI MINI MINI MINI MINI MINI MINI MINI MINI MINI MINI MINI MINI MINI MINI MINI MINI MINI MINI MINI MINI MINI MINI MINI MINI MINI MINI MINI自动上弦机械机芯
text_image
60 minutes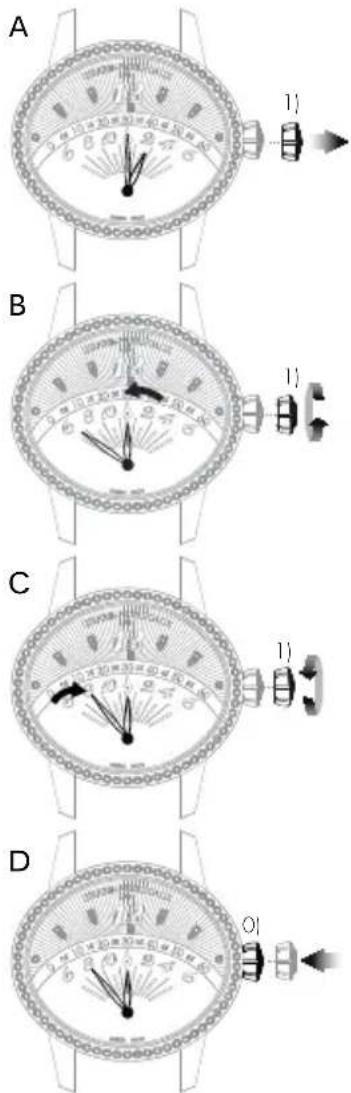
text_image
A 1) B 1) C 1) D设置
natural_image
Close-up of a wristwatch face showing dial, wrist, and analog dial (no text or symbols visible)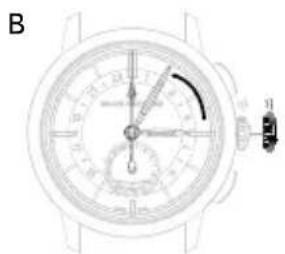
natural_image
Top-down schematic of a wristwatch dial with analog dials and a close-up view (no text or labels)natural_image
Line drawing of a wristwatch face showing dial, wrist, and dial (no text or symbols)手动调节日期
natural_image
Top-down view of a wristwatch face showing dial, wrist, and dial (no text or symbols visible)natural_image
Line drawing of a wristwatch with dual dials and a pointer indicating the dial (no text or symbols present)
natural_image
Top-down technical drawing of a wristwatch with dual dials and a dial indicator (no readable text or symbols)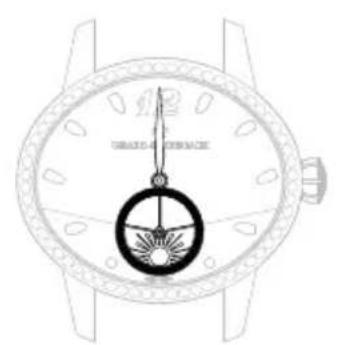
natural_image
Line drawing of a wristwatch with a dial and circular dial (no text or symbols)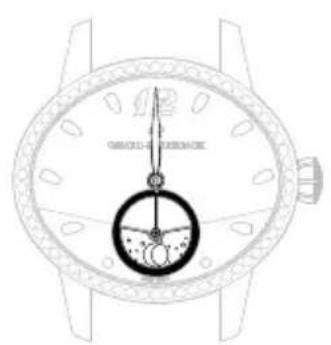
natural_image
Line drawing of a wristwatch with a dial and wrist strap (no text or symbols)正午 午夜

月相指示器
介绍
text_image
Northwestern b)全历显示
介绍
text_image
D 0.5 1.0 2.0 3.0 4.0 5.0 6.0 7.0 8.0 9.0 10.0 11.0 12.0 13.0 14.0 15.0 16.0 17.0 18.0 19.0 20.0 21.0 22.0 23.0 24.0 25.0 26.0 27.0 28.0 29.0 30.0 31.0 32.0 33.0 34.0 35.0 36.0 37.0 38.0 39.0 40.0 41.0 42.0 43.0 44.0 45.0 46.0 47.0 48.0 49.0 50.0 51.0 52.0 53.0 54.0 55.0 56.0 57.0 58.0 59.0 60.0 61.0 62.0 63.0 64.0 65.0 66.0 67.0 68.0 69.0 70.0 71.0 72.0 73.0 74.0 75.0 76.0 77.0 78.0 79.0 80.0 81.0 82.0 83.0 84.0 85.0 86.0 87.0 88.0 89.0 90.0 91.0 92.0 93.0 94.0 95.0 96.0 97.0 98.0 99.0 100.0日期和月份
text_image
Diagram of a wristwatch with analog dials and a directional arrow, labeled '2)' indicating motion or sequence.B
text_image
Diagram of a wristwatch with labeled parts and directional arrow indicating motion or movementC
text_image
Diagram of a wristwatch with dual dials and a close-up view showing dial indicator and mechanical parts.D
natural_image
Line drawing of a wristwatch with dual dials and a pointer (no text or symbols)A
text_image
A 1)B
text_image
D 01 AUSTINATEレトログラード式表示
text_image
60 minutes分针

text_image
A 1) B 1) C 1) D操作方法
natural_image
Line drawing of a wristwatch face with dial and wrist (no text or symbols)D
natural_image
Top-down view of a wristwatch face showing dial, wrist, and dial (no text or symbols visible)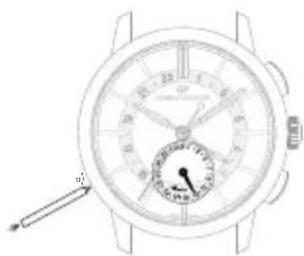
natural_image
Line drawing of a wristwatch with dial and wrist strap (no text or symbols)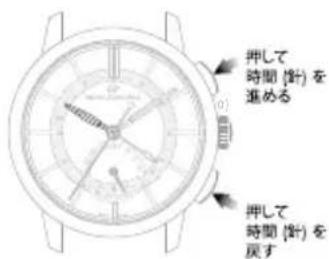
natural_image
Line drawing of a wristwatch with a circular dial and wrist strap (no text or symbols)正午
natural_image
Line drawing of a wristwatch with dial and wrist strap (no text or symbols)真夜中
ムーンフェイズ表示
說明
text_image
120° 110°B
natural_image
Close-up of a wristwatch dial with measurement scales and adjustment knobs (no visible text or symbols)C
natural_image
Line drawing of a wristwatch with dial and wrist strap (no text or symbols)曜日設定
natural_image
Line drawing of a wristwatch with dial and wrist strap (no text or symbols)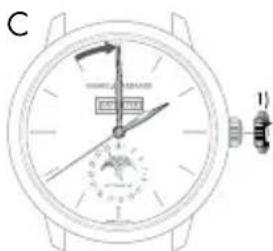
natural_image
Line drawing of a wristwatch face showing dial, wrist, and dial (no text or symbols)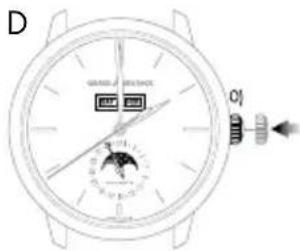
text_image
D WATERMELONIC 0.1日付針の設定
text_image
Diagram of a wristwatch with dual dials and a directional arrow, labeled '2)' indicating clockwise motion.B

text_image
Diagram of a wristwatch with labeled parts and directional arrow indicating motion or movementC

text_image
Diagram of a wristwatch with dual dials and a close-up view showing dial and wrist components, labeled with '2)' indicating part 2.D
