USER MANUAL TWINGO 1 RENAULT
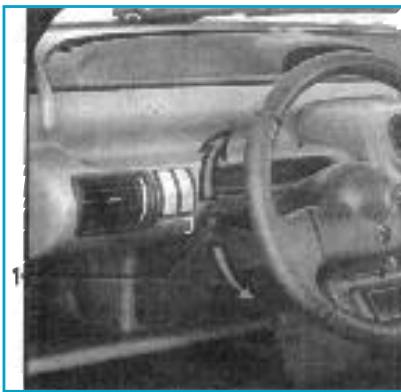
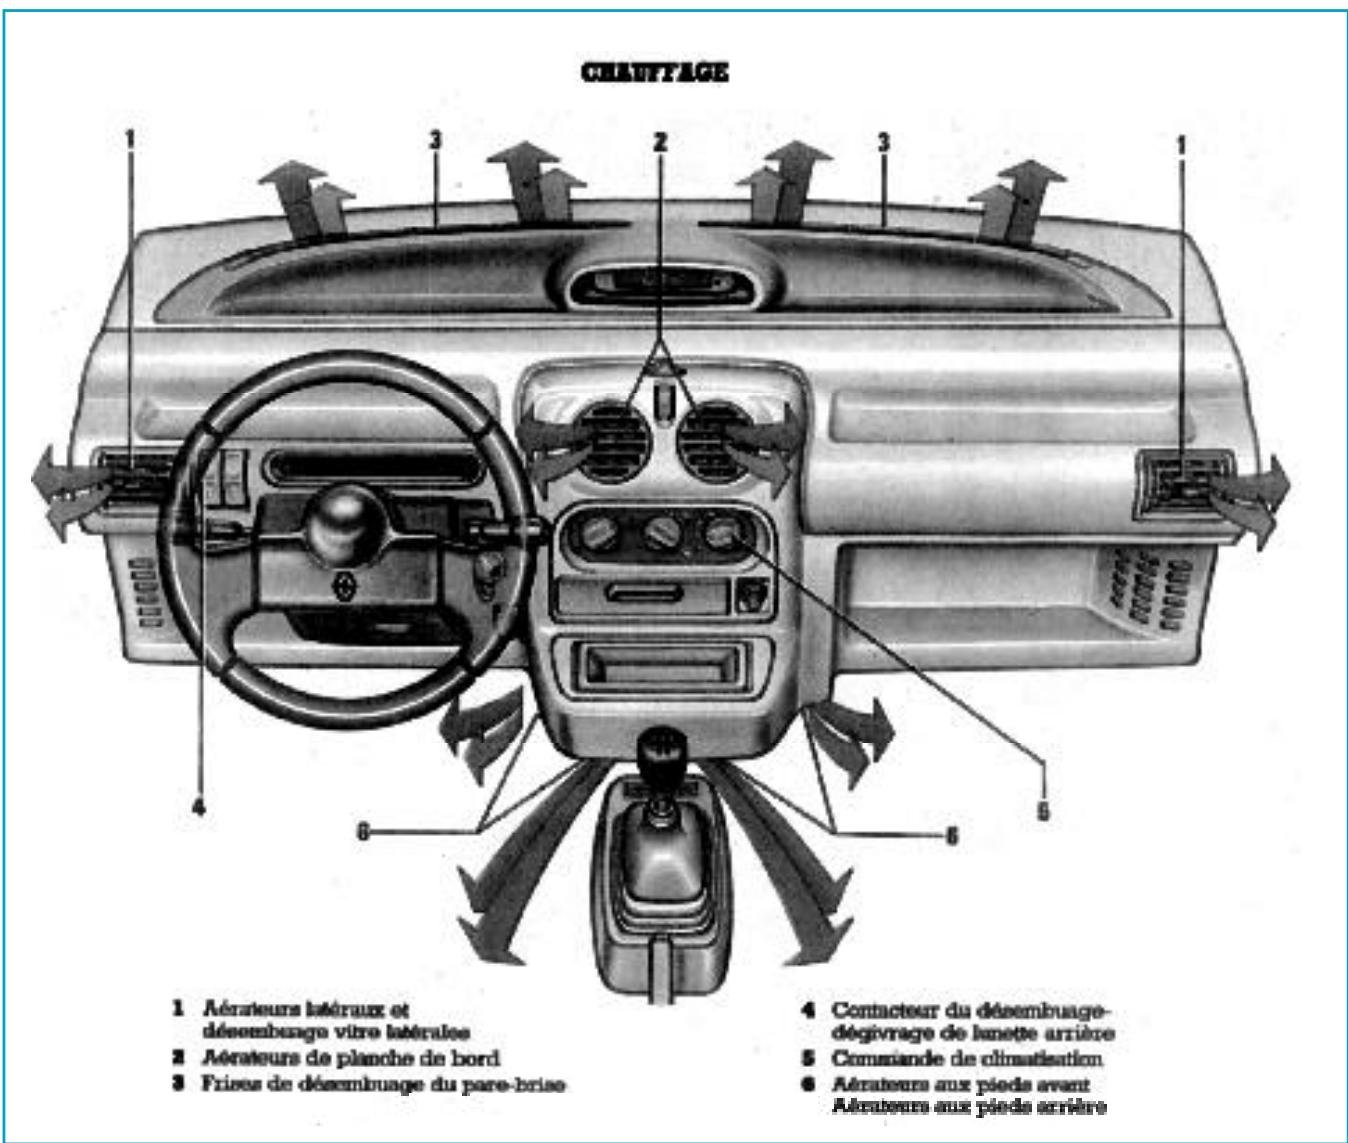
1 Lateral air vent
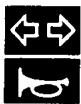
2 Rear window defrosting control switch
3 Rear fog light switch
4 Indicator bar
5 Windshield defroster
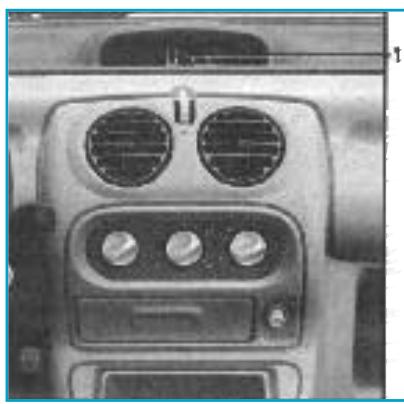
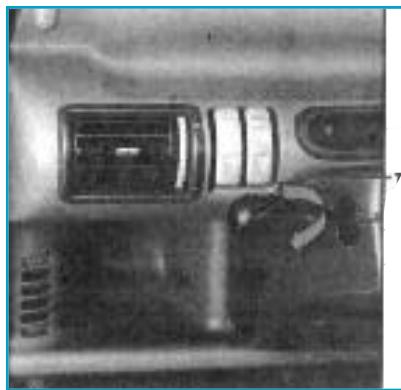
6 Central air vents
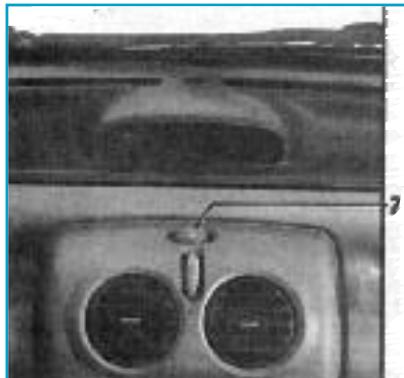
7 Display module
8 Hazard warning switch
9 Lateral air vent D
10 Speaker location D
11 Storage pocket D
12 Fan speed control button
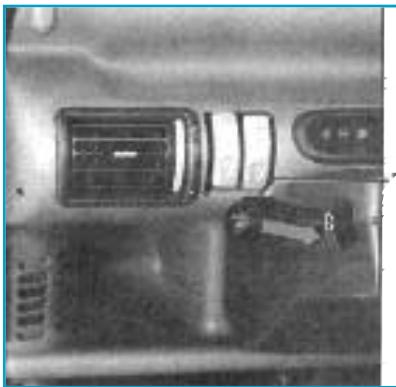
13 Cigarette lighter
14 Ashtray
15 Storage compartment or car radio location
16 Coin tray
17 Parking brake
18 Gear shift lever
19 Air distribution control button
20 Heating control button
21 Display module control button
22 Hood opening control
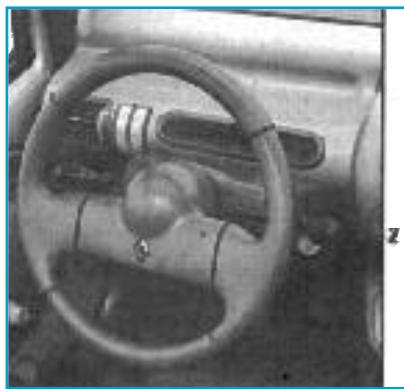
23 Starter switch
24 Front and rear windshield wiper/washer lever
25 Fuse box
26 Storage pocket L
27 Turn signal, horn, and light control lever
28 Speaker location L
Driving - Maintenance
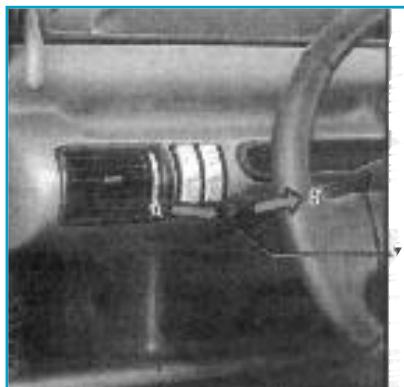
DISPLAY MODULE
1 Display
Light intensity decreases in day/night mode when the lights are turned on.
2 Display selection button
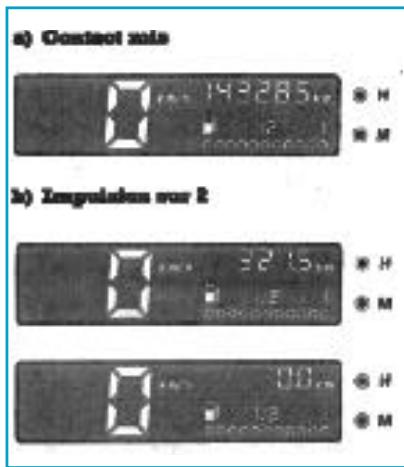
By successive presses of button 2 located at the end of the wiper lever, step-by-step scrolling of the following information:
a) total mileage counter.
b) daily mileage counter,
c) time display.
Important. In case of power supply failure (battery disconnected, power cable cut), the values displayed by the clock and the daily counter lose their meaning. It is necessary to reset the time. We recommend not making adjustments while driving.
Total mileage counter
- Display of distance traveled (in km) since the vehicle was commissioned.
Daily mileage counter
Distance traveled since the last reset of the counter.
The daily counter is reset by pressing button 2 for more than two seconds.
- The digits flash then the indicator displays 0.0 km.
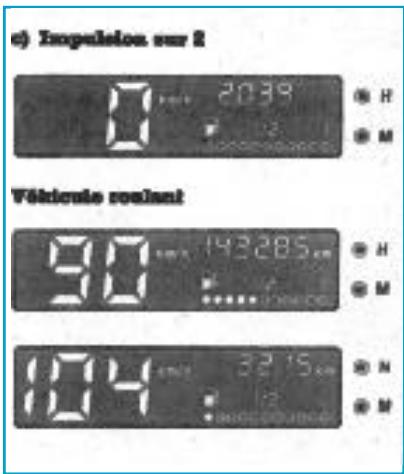
Time display
Adjust hours by pressing button H.
- Adjust minutes by pressing button M
Speed display (km/h)
- This information varies depending on vehicle speed.
Fuel level bar graph
- Level indication, shown by a series of light points.
- When 5 to 8 liters of fuel remain, an orange light comes on under the fuel indicator.
- Fill up as soon as possible.
Note. - To ensure proper reading of the bar graph during refueling, turn off the ignition.
Important. - Clock setting: for safety reasons, adjust the hours and minutes with the ignition on and the vehicle stopped.
Usage recommendations
for the dashboard
- Do not touch the display with your fingers.
- Do not press on the display.
If there are marks on the display, use only a disposable cotton wipe soaked with alcohol to wipe the display without pressing.
Do not use solvents for cleaning.
INDICATOR LIGHTS BAR ON DASHBOARD

1 Position indicator light

2 Driving hours indicator

3 Rear fog light indicator

4 Rear window defrosting indicator

5 Turn signal indicators right and left
Warning. Lighting of these indicators while driving requires an immediate and mandatory stop.

P Parking brake and brake system fault indicator
If it lights up while driving, it indicates a drop in the brake circuit level, it can be dangerous to continue driving.

Oil pressure warning light
It goes out as soon as the engine runs; if it comes on while driving,
stop immediately and turn off the ignition. Check the oil level. If the oil level is normal, the fault comes from another cause.

Coolant temperature warning light
If it lights up, stop and let the engine run at idle for one or two minutes. The temperature should drop and the light should go out, otherwise stop the engine, check the coolant level (after letting it cool down), check the belts.

Battery charge indicator
While driving, this indicates an overcharge or undercharge of the electrical circuit. Stop and have the circuit checked.
CONTROLS
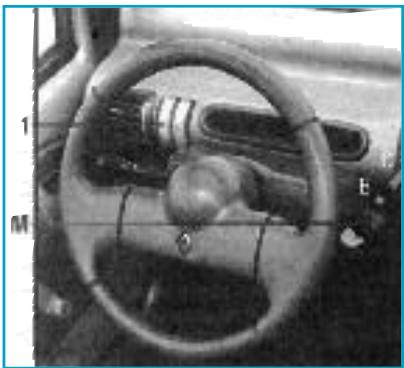
Horn
Press at the end of lever 1, towards the steering column A.
Light flash
To get a light flash, even if lighting is not in use, press lever 1 towards you, perpendicular to the steering wheel plane B.
Hazard warning

-
Press switch 2
-
The turn signal indicator lights up and flashes on the indicator bar.
-
This device activates all four flashing lights and side repeaters simultaneously.
-
Use only in case of danger to warn other drivers when:
-
forced to stop in an unusual or prohibited location,
- in particular driving conditions.
Turn signal lights
- Move lever 1 in the steering wheel plane in the direction you will turn the wheel.
Note. - On highway driving, steering wheel movements are generally insufficient to automatically return the lever to 0. There is an intermediate position in which you must hold the lever during the maneuver. Releasing the lever, it automatically returns to 0.
Exterior lighting
Parking lights
Low beam
- Rotate the end of lever 1 by 1/2 turn until the symbol appears.
- The position indicator remains lit on the indicator bar.
High beam
- Lever 1 in low beam position, push the lever towards you B.
When the high beams are on, an indicator lights up on the indicator bar.
To return to low beam position, push the lever towards you again B.
Turning off
- Bring lever 1 back to its initial position.
Audible alarm
- When the front left door opens, an audible alarm sounds to signal that the lights have remained on
#
while the engine ignition is off (battery discharge).
Rear fog lights

- Operation depends on the position selected in exterior lighting and an indicator lights up on the indicator bar.
Note. -- Remember to turn off this light when no longer needed so as not to bother other drivers.
Front windshield wiper
- Ignition on, operate lever M downward, in the steering wheel plane.
- 0 Off.
- Single stroke, the wiper performs one sweep.
- This function stops as soon as you release pressure on the lever.
- 1 Continuous slow sweep.
- 2 Continuous fast sweep.
Front windshield washer

- by operating lever M towards you, perpendicular to the steering wheel plane regardless of the lever position.
When you release pressure on the lever, the windshield washer stops.
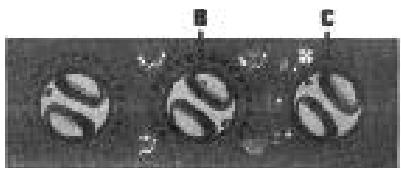
Rear window wiper/washer
- Press lever M perpendicular to the steering wheel plane towards the dashboard.
- B Press to the first detent: the rear wiper
performs continuous sweeping.
C Press to full stroke: spraying and rear window wiper sweeping occur.
The spraying function stops as soon as you release pressure on the lever.
Rear window defrosting/defogging
Press switch 1, an indicator lights up on the dashboard. Avoid leaving it running unnecessarily.
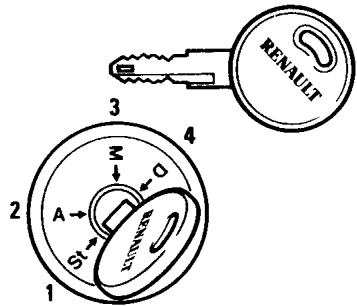
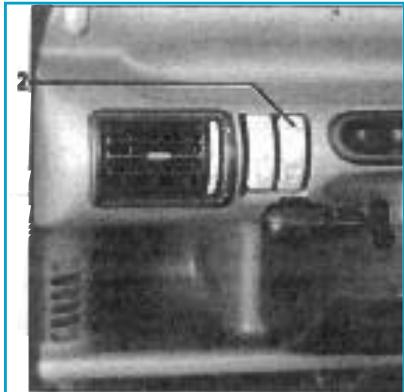
IGNITION/ANTI-THEFT SWITCH
1 Position "Stop and Anti-theft" St
To lock, remove the key and turn the steering wheel until the steering lock clicks.

To unlock, slightly wiggle the key and steering wheel.
2 Position "Accessories" A
Ignition off, any optional accessories (radio...) continue to operate.
3 Position "Running" M
The ignition is on, everything is ready to start.
4 Position "Starting" D
If the engine does not start, bring the key back before operating the starter again. Release the key as soon as the engine starts.
Engine starting
Cold or hot engine
Engine stopping
- Engine at idle, bring the key to "Stop" position
- Never remove the key before the engine has completely stopped.
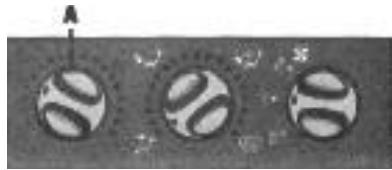
Heating controls without air conditioning
A Temperature control
B Air distribution control
C Air intake control
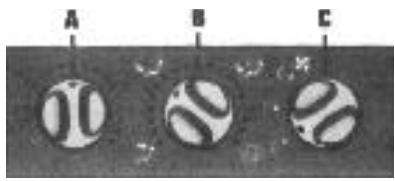
Air intake temperature
Air distribution in the cabin
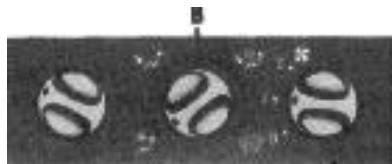

- Position
- Air flow is directed only to the dashboard vents.
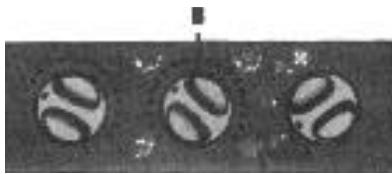

- Position
Air flow is directed to the feet of front and rear occupants and to the dashboard vents.
To direct air flow only to the feet, close the dashboard vents.
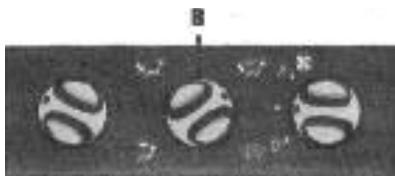

- Position
- Air flow is distributed between the vents, the windshield defrost vents and the feet of occupants.

- Position
- For better efficiency, close the central dashboard vents and direct the side vents to the side windows.
All air flow is then directed to the windshield defrost vents and front side windows.
To achieve maximum efficiency, position control C on 2.
Central air vents
Flow adjustment
Flow: operate dial 1.
maximum opening upward
closing downward
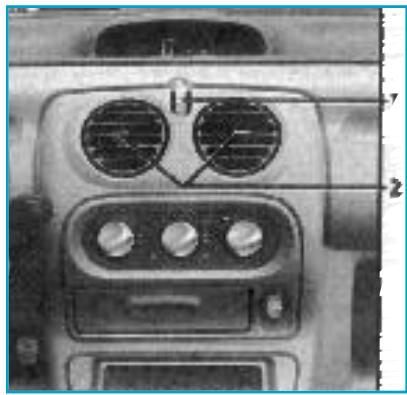
- right/left: operate slider 2
- up/down: press the top or bottom of the diffuser
Rear window defrosting
- Press button 3 (indicator lit on the indicator bar).
Side air vents
-
Flow adjustment
-
operate lever 4.

maximum opening
closing

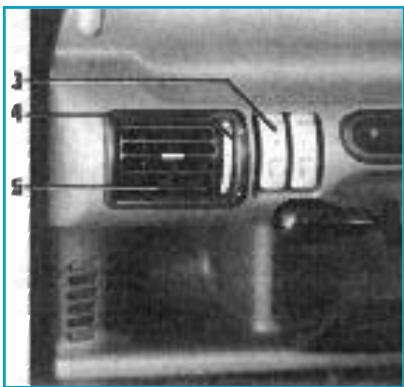
- right/left: operate slider 5.
- up/down: press the top or bottom of the diffuser.
Maintenance
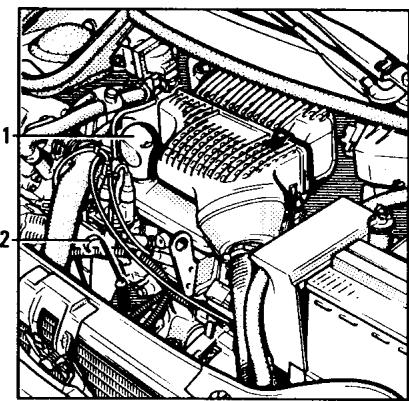
ENGINE OIL LEVEL
- An engine normally consumes oil for lubrication and cooling of moving parts and it is sometimes necessary to top up the oil between oil changes.
Periodically
- The elimination of engine oil changes between 1000 and 3000 km does not exclude checking the oil level periodically, approximately every 1000 km and, in any case, before each long trip, on pain of risking engine damage.
Level
- Engine cold or after a long stop, it is measured using dipstick 2 and should never drop below the "mini" mark A.
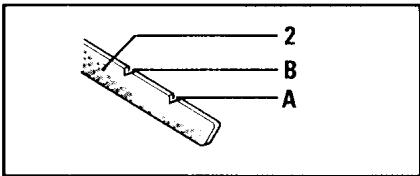
Filling
Cap 1. Top up the level with the same oil as the previous oil change.
- Do not exceed the "maxi" mark B.
Warning. During work under the engine hood, the cooling fan can start running at any time.
ENGINE OIL CHANGE
- Cap 3.

