
PRCD906BT - Turntable Proscan - Free user manual and instructions
Find the device manual for free PRCD906BT Proscan in PDF.
| Product Type | Vinyl turntable with 7-in-1 functions (turntable, CD, cassette, Bluetooth, AM/FM radio, USB, AUX) |
| Brand | Proscan |
| Model | PRCD906BT |
| Power Supply | AC adapter (DC IN); mains voltage 120V ~ 60Hz |
| Power | Not specified, estimated 15-30 W |
| Dimensions | Approximately 40 x 30 x 15 cm (estimated) |
| Weight | Approximately 4-5 kg (estimated) |
| Main Functions | Vinyl playback (33/45/78 RPM), CD, cassette, Bluetooth, AM/FM radio, USB, AUX input, USB encoding from vinyl |
| Turntable Speeds | 33 1/3, 45, 78 RPM (selector) |
| Auto Stop | Yes, ON/OFF switch for auto stop at end of record |
| 45 RPM Adapter | Included |
| Connectivity | Bluetooth, AUX input (RCA), USB (front), TF card, headphone jack (not mentioned but likely) |
| Antenna | FM antenna included |
| Care and Cleaning | Soft dry cloth; do not use liquids or abrasives |
| Safety | Do not expose to water or moisture; do not open the casing (class 1 laser risk for CD); use only recommended accessories |
| Spare Parts and Repairability | Replaceable stylus (lifespan ~400-450 h); other interventions by a qualified technician |
| Warranty | 90 days (parts and labor); return at customer's expense |
| General Information | FCC and Industry Canada compliant; minimum distance 20 cm for RF exposure |
Frequently Asked Questions - PRCD906BT Proscan
User questions about PRCD906BT Proscan
0 question about this device. Answer the ones you know or ask your own.
Ask a new question about this device
Download the instructions for your Turntable in PDF format for free! Find your manual PRCD906BT - Proscan and take your electronic device back in hand. On this page are published all the documents necessary for the use of your device. PRCD906BT by Proscan.
USER MANUAL PRCD906BT Proscan
This product has been manufactured and sold under the responsibility of CURTIS INTERNATIONAL LTD.
PROSCAN, and the PROSCAN logo are trademarks used under license by CURTIS INTERNATIONAL LTD. – further information at www.proscan-brand.com. All other products, services, companies, trademarks, trade or product names and logos referenced herein are the property of their respective owners.
IMPORTANT SAFETY INSTRUCTIONS

CAUTION
RISK OF ELECTRIC SHOCK DO NOT OPEN

CAUTION: TO REDUCE THE RISK OF ELECTRIC SHOCK, DO NOT REMOVE COVER (OR BACK). NO USER-SERVICEABLE PARTS INSIDE. REFER SERVICING TO QUALIFIED SERVICE PERSONNEL.
CAUTION:
THIS DIGITAL VIDEO DISC PLAYER EMPLOYS A LASER SYSTEM.
TO PREVENT DIRECT EXPOSURE TO LASER BEAM, DO NOT TRY TO OPEN THE ENCLOSURE. VISIBLE LASER RADIATION MAY BE PRESENT WHEN THE ENCLOSURE IS OPENED. DO NOT STARE INTO BEAM.
WARNING:
TO REDUCE THE RISK OF FIRE OR ELECTRIC SHOCK, DO NOT EXPOSE THIS PRODUCT TO RAIN OR MOISTURE.
WARNING:
TO REDUCE THE RISK OF FIRE OR ELECTRIC SHOCK, AND ANNOYING INTERFERENCE, USE THE RECOMMENDED ACCESSORIES ONLY.
INDUSTRY CANADA CONFORMITY CAN ICES-3(B)/NMB-3(B)
This device complies with Industry Canada licence-exempt RSS standard(s). Operation is subject to the following two conditions:
(1) this device may not cause interference, and (2) this device must accept any interference, including interference that may cause undesired operation of the device.
WARNING: The mains plug is used as disconnected device. The disconnect device shall remain readily operable. The equipment is Class II or double insulated electrical appliance.

It has been designed in such a way that it does not require a safety connection to electrical earth.

The lightning flash with arrowhead symbol within an equilateral triangle is intended to alert the user to the presence of uninsulated dangerous voltage within the product's enclosure that may be of sufficient magnitude to constitute a risk of electric shock to persons.

The exclamation point within an equilateral triangle is intended to alert the user to the presence of important operating and maintenance(servicing) instructions in the literature accompanying the appliance.
FCC NOTICE:
This equipment has been tested and found to comply with the limits for a Class B digital device, pursuant to part 15 of the FCC Rules. These limits are designed to provide reasonable protection against harmful interference in a residential installation. This equipment generates, uses and can radiate radio frequency energy and, if not Installed and used in accordance with the instructions, may cause harmful interference to radio communications.
However, there is no guarantee that interference will not occur in a particular installation. If this equipment does cause harmful interference to radio or television reception, which can be determined by turning the equipment off and on, the user is encouraged to try to correct the interference by one or more of the following measures:
• Reorient or relocate the receiving antenna.
- Increase the separation between the equipment and receiver.
- Connect the equipment into an outlet on a circuit different from that to which the receiver is connected.
- Consult the dealer or an experienced radio/TV technician for help.
FCC WARNING:
To assure continued compliance, follow the attached installation instructions and use only shielded cables when connecting to other devices. Modifications not authorized by the manufacturer may void user's authority to operate this device.
FCC Radiation Exposure Statement:
This equipment complies with FCC radiation exposure limits set forth for an uncontrolled environment. This equipment should be installed and operated with minimum distance 20cm between the radiator & your body.
IMPORTANT SAFETY INSTRUCTIONS
Before using the unit, be sure to read all operating instructions carefully. Please note that these are general precautions and may not pertain to your unit.
For example, this unit may not have the capability to be connected to an outdoor antenna.
1) Read these instructions.
All the safety and operating instructions should be read before the product is operated.
2) Keep these instructions.
The safety and operating instructions should be retained for future reference.
3) Heed all warnings.
All warnings on the product and in the operating instructions should be adhered to.
4) Follow all instructions.
All operating and use instructions should be followed.
5) Do not use this apparatus near water.
Do not use this product near water and moisture, for example: near a bathtub, washbowl, kitchen sink or laundry tub; in a wet basement; or near a swimming pool.
6) Clean only with dry cloth.
Unplug this product from the wall outlet before cleaning. Do not use liquid cleaners or aerosol cleaners. Use a dry cloth for cleaning.
7) Do not block any ventilation openings. Install in accordance with the manufacturer's instructions.
Slots and openings in the cabinet and in the back or bottom are provided for ventilation, to ensure reliable operation of the product and to protect it from overheating. These openings must not be blocked or covered. The openings should never be blocked by placing the product on a bed, sofa, rug or other similar surface. This product should never be placed near or over a radiator or heat source. This product should not be placed in a built-in installation such as a bookcase or rack unless proper ventilation is provided or the manufacturer's instructions have been adhered to.
8) Do not install near any heat sources such as radiators, heat registers, stoves, or other apparatus (including amplifiers) that produce heat.
9) Do not defeat the safety purpose of the polarized or grounding-type plug. A polarized plug has two blades with one wider than the other. A grounding type plug has two blades and a third grounding prong. The wide blade or the third prong are provided for your safety. If the provided plug does not fit into your outlet, consult an electrician for replacement of the obsolete outlet.
10) Protect the power cord from being walked on or pinched particularly at plugs, convenience receptacles, and the point where they exit from the apparatus.
11) Only use attachments/accessories specified by the manufacturer.
12) Use only with the cart, stand, tripod, bracket, or table specified by the manufacturer, or sold with the apparatus. When a cart is used, use caution when moving the cart/apparatus combination to avoid injury from tip-over.
An appliance and cart combination should be moved with care. Quick stop, excessive force and uneven surfaces may cause the appliance and cart combination to overturn.

13) Unplug this apparatus during lightning storms or when unused for long periods of time.
To protect your product from a lightning storm, or when it is left unattended and unused for long periods of time, unplug it from the wall outlet and disconnect the antenna or cable system. This will prevent damage to the product due to lightning and power-line surges.
14) Refer all servicing to qualified service personnel. Servicing is required when the apparatus has been damaged in any way, such as power-supply cord or plug is damaged, liquid has been spilled or objects have fallen into the apparatus, the apparatus has been exposed to rain or moisture does not operate normally, or has been dropped.
15) Power source
This product should be operated only from the type of power source indicated on the marking label. If you are not sure of the type of power supply to your home, consult your appliance dealer or local power company. For products intended to operate from battery power, or other source, refer to the operation instructions.
16) Power lines
An outside antenna system should not be located in the vicinity of overhead power lines or other electric light or power circuits, or where it can fall into such power lines or circuits. When installing an outside antenna system, extreme care should be taken to keep from touching such power lines or circuits as contact with them might be fatal.
IMPORTANT SAFETY INSTRUCTIONS
17) Overloading
Do not overload wall outlets and extension cords as this can result in a risk of fire or electric shock.
18) Object and liquid entry
Never push objects of any kind into the product through openings as they may touch dangerous voltage points or short out parts that could result in fire or electric shock. Never spill or spray any type of liquid on the product.
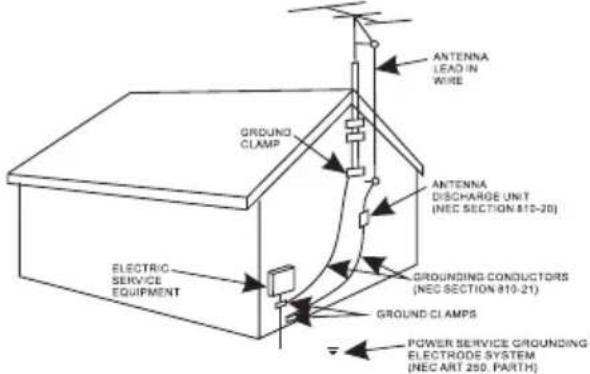
19) Outdoor antenna grounding
If an outside antenna is connected to the product, be sure the antenna system is grounded so as to Provide some protection against voltage surges and built up static charges. Section 810 of the National Electric Code ANSI/NFPA 70 provides information with respect to proper grounding of the mast and supporting structure, grounding of the lead-in wire to an antenna discharge product, size of grounding conductors, location of antenna-discharge product, connection to grounding electrodes and requirements for the grounding electrodes.
text_image
ANTENNA LEAD IN WIRE GROUND CLAMP ANTENNA DISCHARGE UNIT (NEC SECTION 810-20) GROUNDED CONDUCTORS (NEC SECTION 810-21) GROUND CLAMPS ELECTRIC SERVICE EQUIPMENT POWER SERVICE GROUNDING ELECTRODE SYSTEM (NEC ART 250, PART)20) Service
Do not attempt to service this product yourself as opening or removing covers may expose you to dangerous voltage or other hazards. Refer all servicing to qualified service personnel.
21) Replacement parts
When replacement parts are required, be sure the service technician uses replacement parts specified by the manufacturer or those that have the same characteristics as the original parts. Unauthorized substitutions may result in fire or electric shock or other hazards.
22) Safety check
Upon completion of any service or repairs to this product, ask the service technician to perform safety checks to determine that the product is in proper operating condition.
23) Damage requiring service
Unplug this product from the wall outlet and refer service to qualified service personnel under the following conditions.
a) When the power-supply cord or plug is damaged.
b) If liquid has been spilled or objects have fallen into the product.
c) If the product has been exposed to rain or water.
d) If the product does not operate normally by following the operating instructions. Adjust only those controls that are covered by the operating instructions, as an adjustment of other controls may result in damage and will require extensive work by a qualified technician to restore the product to its normal operation.
e) If the product has been dropped or the cabinet has been damaged.
f) When the product exhibits a distinct change in performance—this indicates a need for service.
24) Note to CATV system installer
This reminder is provided to call the CATV system installer's attention to Article 820-40 of the NEC that provides guidelines for proper grounding and, in particular, specifies that the cable ground shall be connected to the grounding system of the building, as close to the point of cable entry as practical.
NOTE:
Refer all servicing to qualified service personnel. Servicing is required when the unit has been damaged in any way such as the following: the power-supply cord or plug has been damaged, liquid has been spilled into unit, the unit has been exposed to rain or moisture, the unit has been dropped or the unit does not operate normally.
Cleaning The Music System
Wipe the music system with a soft ,dry, lint-free cloth.
Do not:
Immerse the music system in water or any other liquid.
Expose the media centre to liquid, moisture or humidity to avoid the unit's internal circuit being affected. Use any abrasive cleaning solvents to clean the music system, as this can cause damage.
Expose the music system to extremely high or low temperatures, as this will shorten the life of electronic devices, destroy the battery or distort certain plastic parts.
Drop the music system, as the internal circuit may become damaged.
Attempt to disassemble the media centre, as this may cause damage to the unit.
Dispose of the music system in a fire, as it will result in an explosion.
Getting Started
Remove the unit from the box.
Remove any packaging from the unit.
Place the packaging inside the box and either store or dispose of safely.
In the Box
Nostalgia Bluetooth 7 in 1 music system
AC Power Adaptor
RCA Cable
Instruction Manual
4 legs
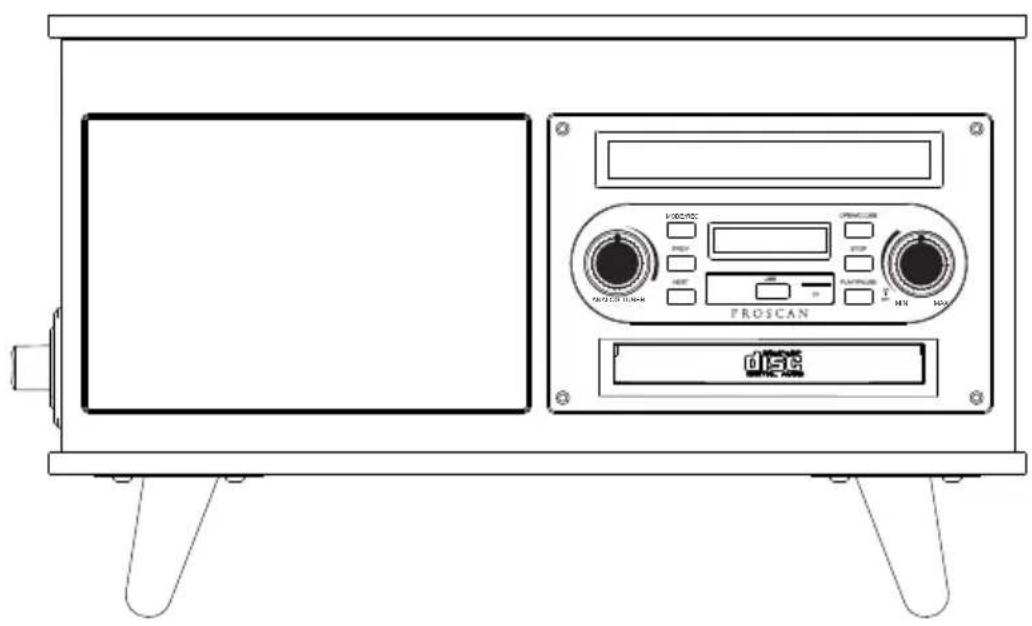
Location Of Controls
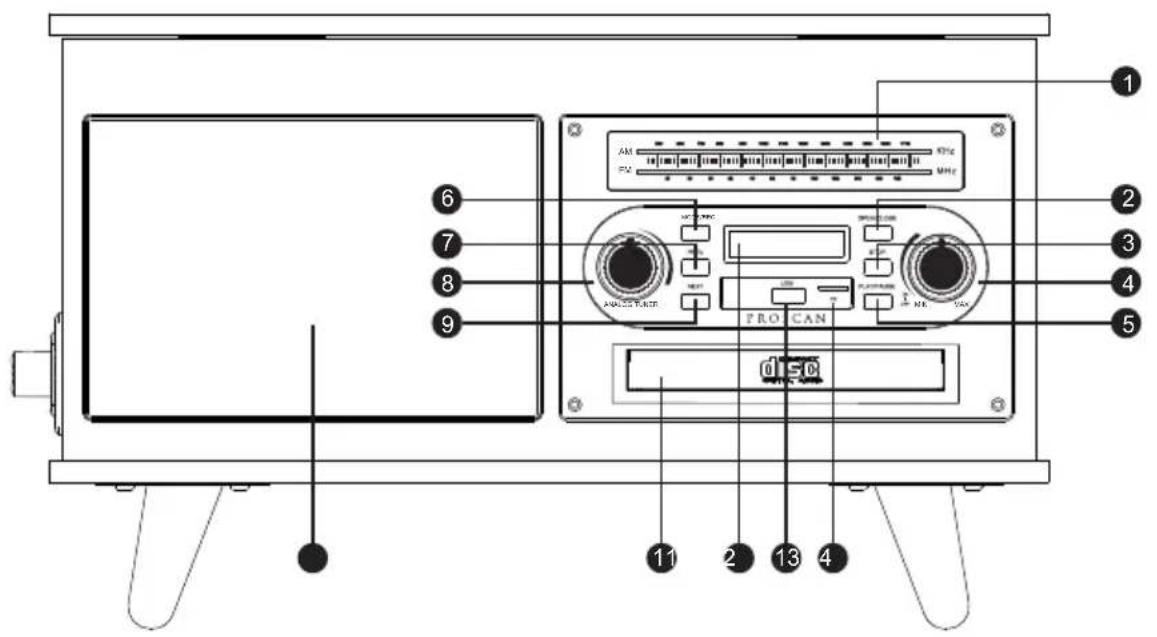
Front View
text_image
1 2 3 4 5 6 7 8 9 AM MHz PRO CAN 0 10 11 2 13 41: Frequency Display
2: Open / Close Button
3: Stop Button
4: On / Off / Volume Control Dial
5: Play/Pause Button
6: Mode / Encoding
Short press to switch mode
Long press to USB Encoding
7: Skip-Button (PREV)
8: AM/FM Radio Control Dial
9: Skip+Button (NEXT)
10: Speakers
11: Disc Tray
12: LED Display
13: USB Input Port
14: TF Card Input Port
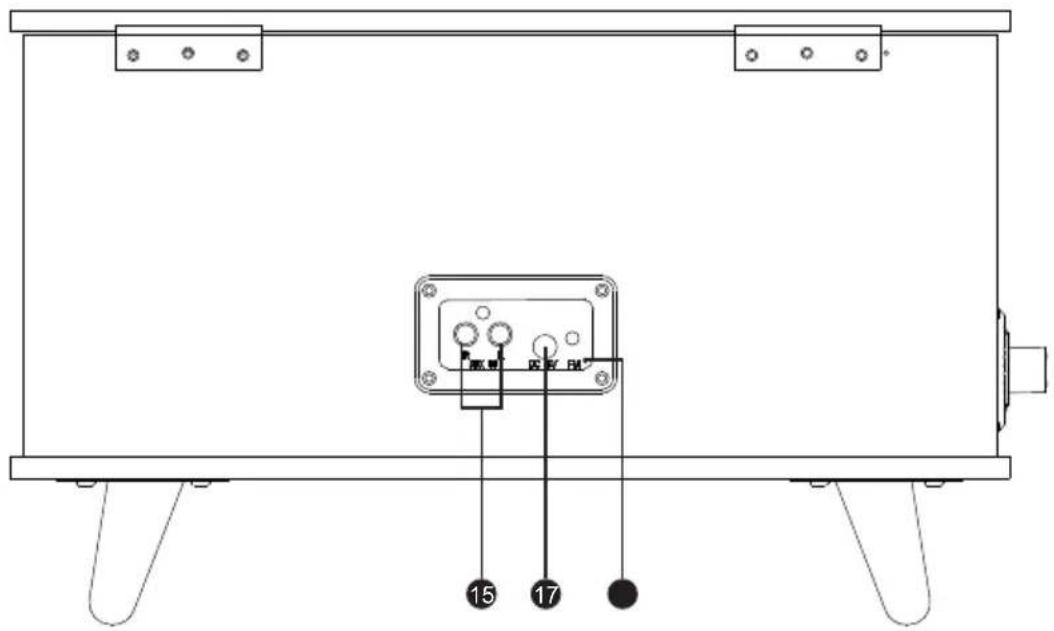
Back View
text_image
15 1715: RCA Input Ports
16: DC Input Socket
17: FM Antenna
Location Of Controls
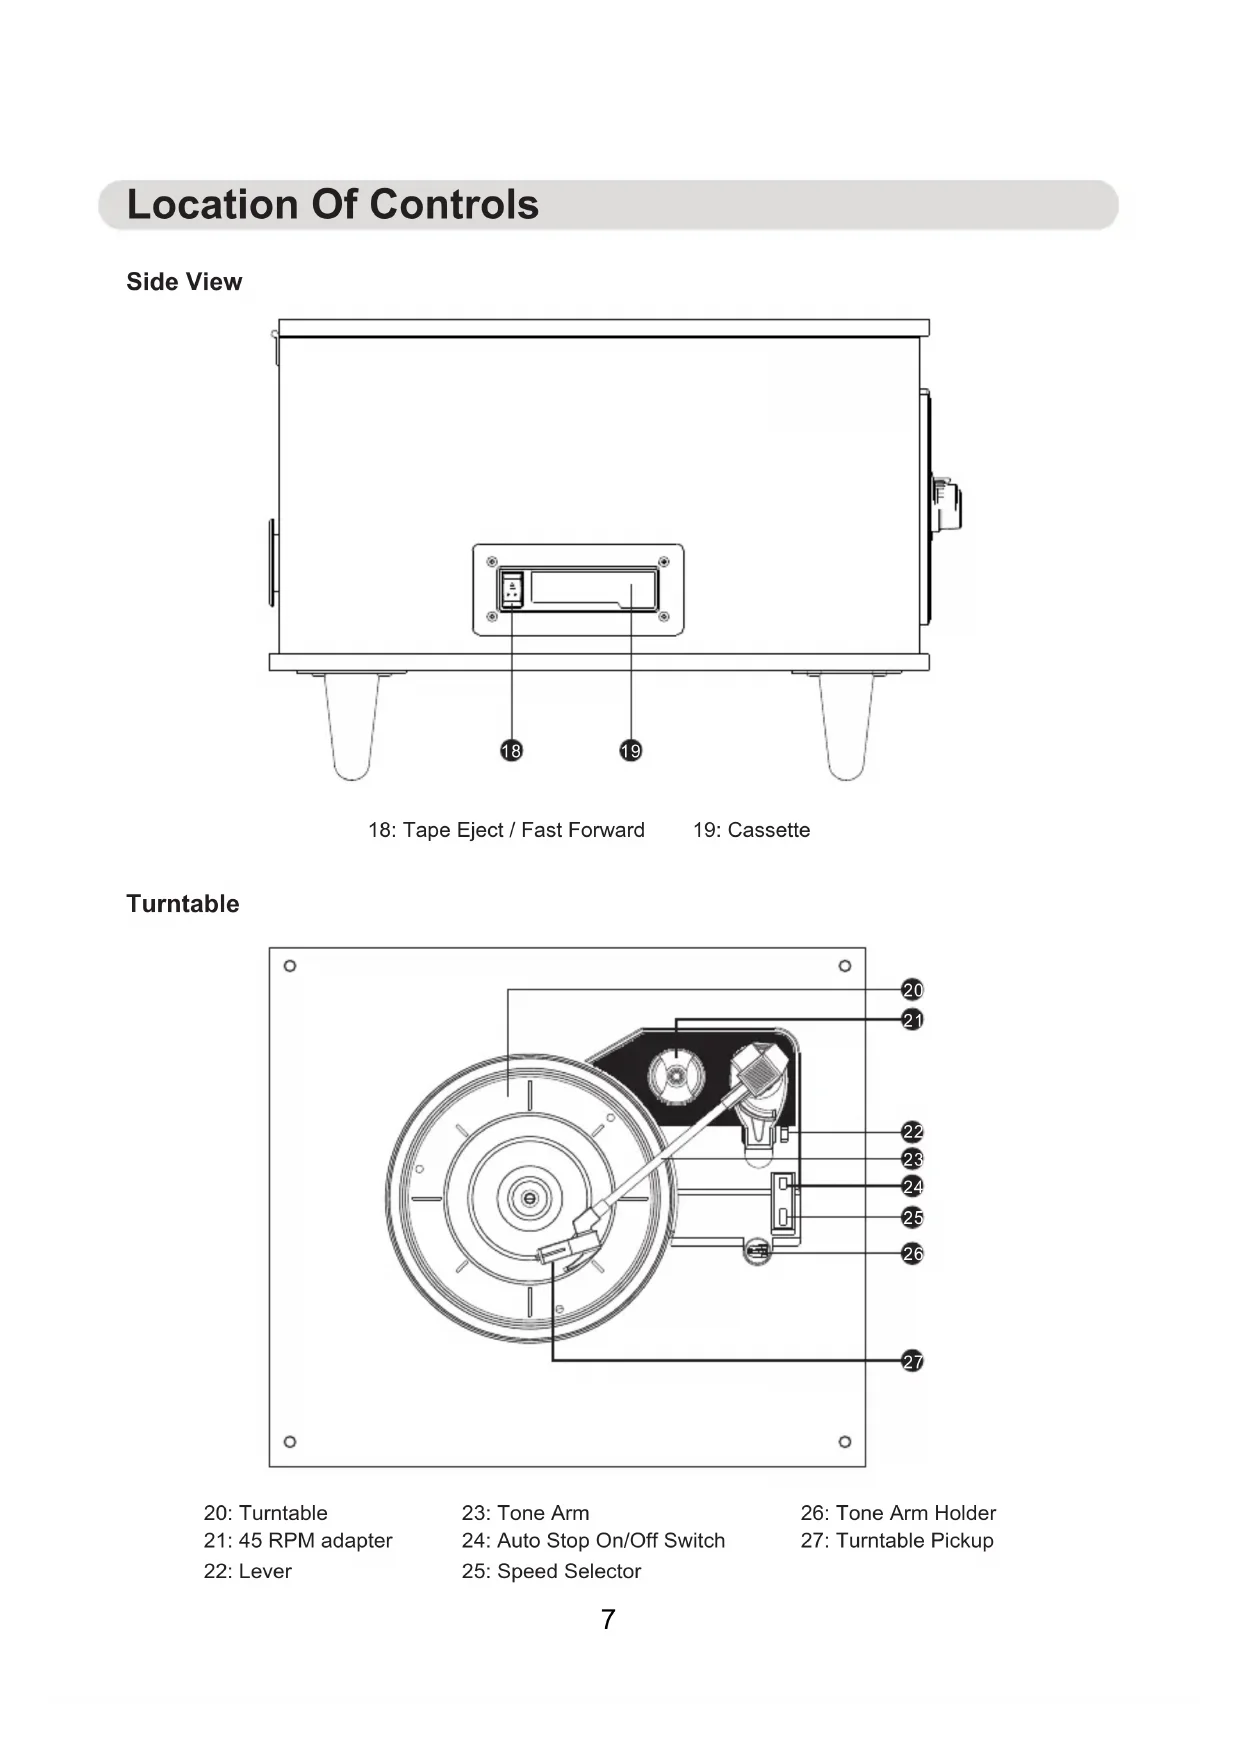
Side View
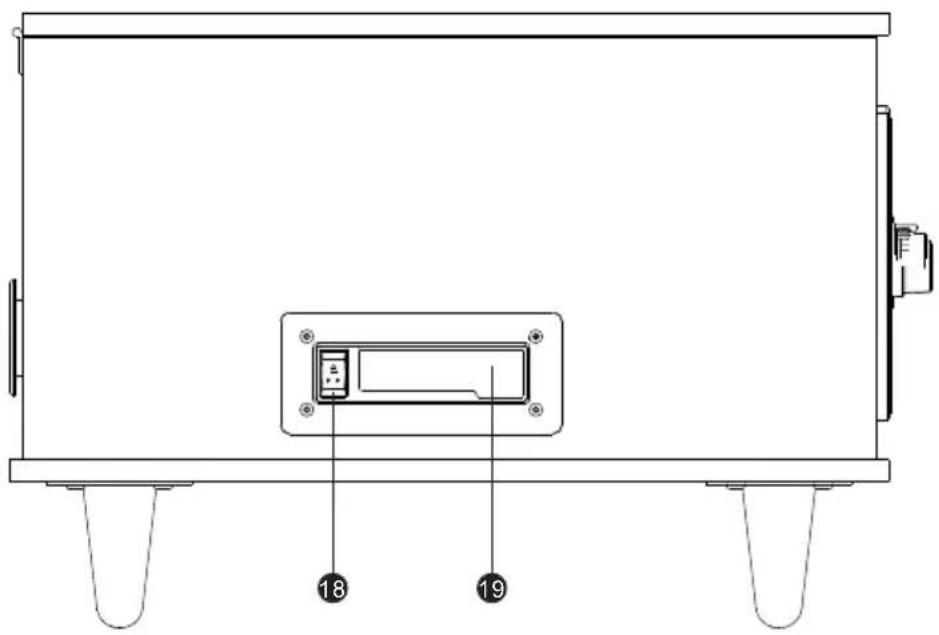
text_image
Technical diagram of a device front view with labeled components 18 and 19, showing internal components and support structures.18: Tape Eject / Fast Forward
19: Cassette
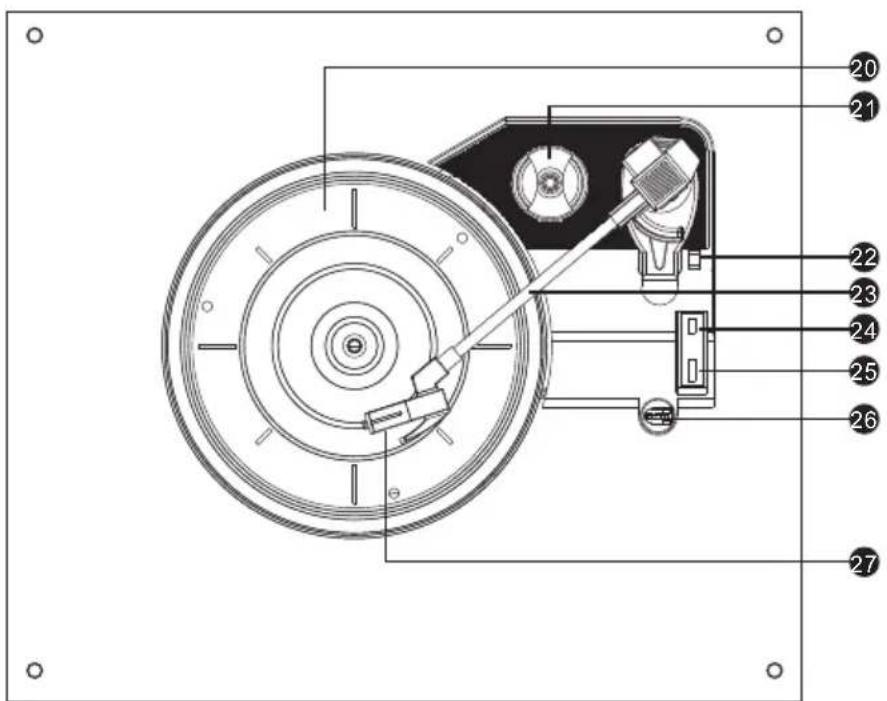
Turntable
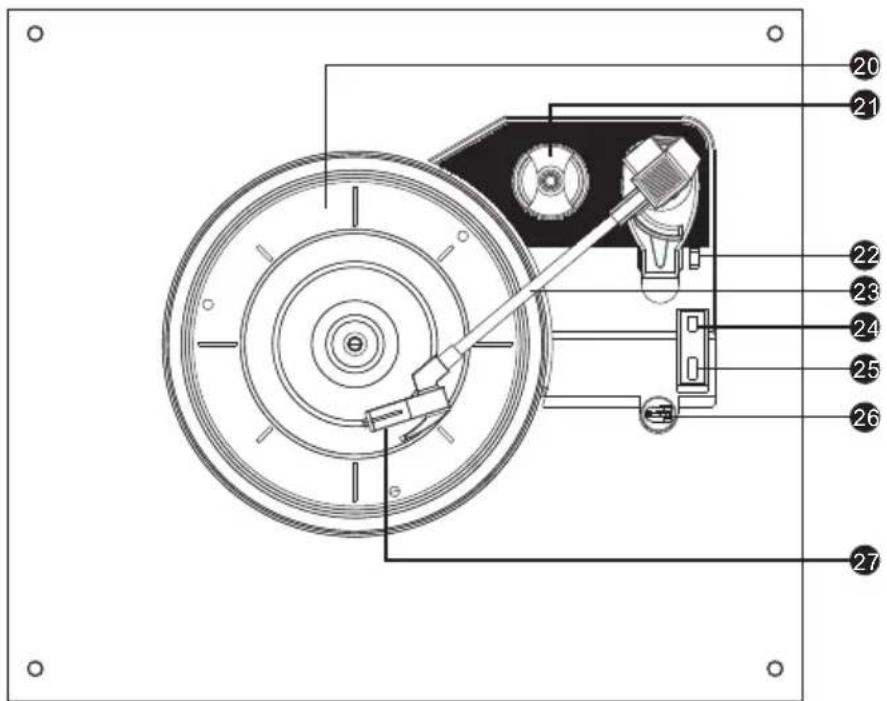
text_image
Technical diagram of a mechanical device with numbered parts labeled 20 to 2720: Turntable
21: 45 RPM adapter
22: Lever
23: Tone Arm
24: Auto Stop On/Off Switch
25: Speed Selector
26: Tone Arm Holder
27: Turntable Pickup
Instructions For Use
Assembly
Carefully turn the Nostalgia Bluetooth 7 in 1 music system over so that lid is resting on the floor, place it onto a soft surface to protect it from scratches.
Screw the four legs onto the underside of the 7 in 1 music system.
Stand the Nostalgia Bluetooth 7 in 1 music system on a flat ,stable surface
Using music system
Basic Functionality
Plug the DC input jack on the power adaptor into the DC input socket on the reverse of the music system and then plug the adaptor into the mains power supply and switch it on.
Turn on the music system by rotating the on/off/volume control dial in a clockwise direction, until it clicks.
Short Press "MODE/REC" button until your desired operation is selected (Bluetooth, CD, Turntable, FM, AM, Aux, USB, TAPE).
Long press "MODE/REC" button to USB encoding (Only encoding during turntable mode).
Rotate the AM/FM Radio control dial in a clockwise direction to your desired radio mode Adjust volume by rotating the on/off/volume control dial. Rotate in a clock direction to increase the volume and Rotate in an anticlockwise direction to decrease the volume.
To pause the track, press PLAY/PAUSE button, push it again to resume the track.
Switch to next track by pressing "Next" button; play previous track by pressing "PREV" button.
To open the Disc tray by pressing "OPEN/CLOSE" button, press "OPEN/CLOSE" button again to close Disc tray.
To Stop CD play by pressing "Stop" button.
To turn off the music system, rotate the on/off/volume control dial in an anticlockwise direction, until it clicks.
Listening to a Record
STEP 1: Turn on the music system by rotating the 'On/Off/ Volume Dial' in a clockwise direction.
STEP 2: Short press the "MODE/REC" button to turntable mode.
STEP 3: Remove the protective white needle cover by gently sliding it away from the tone arm.
STEP 4: Carefully place a record onto the turntable, remembering to apply the 45 rpm adapter first, if listening to a 45 rpm record with a large centre hole.
STEP 5: Unlock the tone arm from the arm lock by pushing it aside.
STEP 6: Raise the tone arm using the arm raising lever or by carefully lifting it.
STEP 7: Move the tone arm across to the outlet edge of the record and gently lower it, the turntable will begin to spin and play automatically.
STEP 8: Once the tone arm reaches the end of the record at the centre of the turntable, the turntable will stop. Lift away the tone arm and place it back into the armrest.
STEP 9: Secure the tone arm once more by engaging the arm lock.
STEP 10: Rotate the "On/Off/ Volume Dial" in an anticlockwise direction unit it clicks, to turn off Turntable.
Note: Always ensure that the tone arm is secured before transporting.
Instructions For Use
Replacing The Stylus
The music system stylus should last approximately 400\~450 hrs under normal use. However, it is recommended that the stylus be replaced as soon as a change in sound quality is noticed. Prolonged use of a wore-out stylus may damage any records and the highest speed 78rpm records will wear out the stylus more quickly.
Removing the old stylus
STEP 1: Carefully place a screwdriver at the tip of the stylus and push downward (A).
STEP 2: Remove the old stylus by gently pulling it down and forward simultaneously.
Installing a New Stylus
STEP 1: Hold the stylus at front edge(needle side) and insert the rear edge onto the tone arm(B). STEP 2: Push the stylus upward, until it locks into position©.
Caution: The music system must be powered off using the on/off /volume control dial before replacing the stylus. Do not bend the stylus or touch the needle, as the may cause injury.
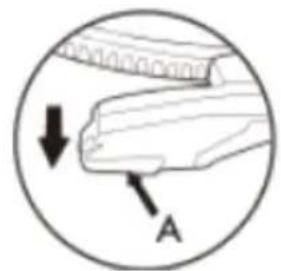
natural_image
Diagram of a hand holding a piece with a downward arrow and labeled point A (no text or symbols beyond labels)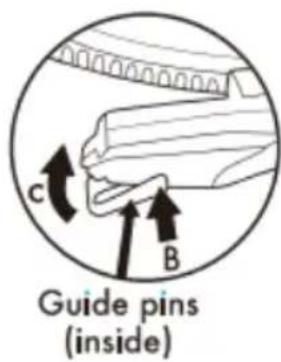
text_image
Guide pins (inside)Playing with CD
Inserting a CD
STEP 1: To access the built-in CD player, eject the disc tray by pressing "OPEN/CLOSE" button.
STEP 2: Insert the CD to be played with artwork visible. Gently press the CD into the disk tray and then close the CD player
STEP 3: Short press the "MODE/REC" button to CD mode
Warning: The CD player utilizes a class 1 laser. Always exit CD mode before opening the CD player to remove or change CDs. Never look directly at laser pickup head.
Listening to a CD
STEP 1: To use the CD player, follow the instructions in the section entitled "Inserting a CD".
STEP 2: To control the sound when a CD is inserted into the music system, follow the instructions in the section entitled "Using Music System".
STEP 3: To end CD playback by pressing "STOP" button.
Listening to a Cassette Tape
STEP 1: Turn on the music system by rotating the 'On/Off Volume Dial' in a clockwise direction.
STEP 2: Short press the "MODE/REC" button to TAPE mode.
STEP 3: Insert the Cassette tape into the Cassette Deck on the left side panel.
STEP 4: Turn the 'On/Off/ Volume Dial to adjust the volume level
Instructions For Use
Quick press the tap Eject/Fast Forward button to fast forward. Full press the Tape Eject/Fast Forward button inward to eject. When tap has finished playing, it will stop.
Listening through Bluetooth
STEP 1: Turn on the music system by rotating the 'On/Off/ Volume Dial' in a clockwise direction, short press the "MODE/REC" button until Bluetooth mode is selected. STEP 2: Search for the music system using a Bluetooth compatible device. Select "Pro PRCD9060BT" to connect and pair. Note: Once connected, the sound can be controlled using the control panel or the relevant controls on the Bluetooth compatible device.
Listening through Aux
STEP 1: To use Aux mode, connect the RCA cable to RCA input port(ensuring that each plug is correctly inserted according to the corresponding color(red and white), RCA port on the back of the music system and the other end to an MP3 player or other compatible audio source. STEP 2: Short press the "MODE/REC" button to Aux mode.
Note: Once connected, the sound can be controlled using the relevant controls on the compatible audio device.
Listening through USB
STEP 1: To use USB mode, insert a compatible USB drive (not included) into the USB port on the front of the unit. STEP 2: Short press the "MODE/REC" button to USB mode
Note: Once connected, the sound can be controlled using the music system. The music system will only recognize MP3 audio files; if other files are present on the USB drive, this may prevent the music system from playing.
USB Encoding during Turntable Mode
STEP 1: Set to play the vinyl STEP 2: Insert USB to USB port STEP 3: Long press "MODE/REC" button enter into USB encoding, then you can encode the music you like. STEP 4: When you want to finish the USB encoding, long press the "MODE/REC" button to finish the USB encoding.
Note: Only can proceeding the USB encoding function when at turntable model, can not encode at Bluetooth mode or other mode.
Listening to the Radio
STEP 1: Extend the antenna for the best possible reception. STEP 2: Short press the "MODE/REC" button to select your desired radio mode(AM/FM) STEP 3: Select the desired station by rotating the analog tuner.
90 Day Warranty
This product is warranted to be free from defects in material and workmanship for a period of ninety (90) days from the date of original purchase. During this period, your exclusive remedy is repair or replacement of this product or component found to be defective, at our option; however, you are responsible for all costs associated with returning the product to us. If the product or component is no longer available, we will replace with a similar one of equal or greater value. Prior to a replacement being sent, the product must be rendered inoperable or returned to us.
This warranty does not cover glass, filters, wear from normal use, use not in conformity with the printed directions., or damage to the product resulting from accident, alteration, abuse, or misuse. This warranty extends only to the original consumer purchaser or gift recipient. Keep the original sales receipt, as proof of purchase is required to make a warranty claim. This warranty is void if the product is used for other than single-family household use or subjected to any voltage and waveform other than as on the specified rating on the label (e.g., 120V\~60Hz).
We exclude all claims for special, incidental, and consequential damages caused by breach of express or implied warranty. All liability is limited to the amount of the purchase price. Every implied warranty, including any statutory warranty or condition of merchantability or fitness for a particular purpose, is disclaimed except to the extent prohibited by law, in which case such warranty or condition is limited to the duration of this written warranty.
This warranty gives you specific legal rights. You may have other legal rights that vary depending on where you live. Some states or provinces do not allow limitations on implied warranties or special, incidental, or consequential damages, so the foregoing limitations may not apply to you.
For faster service, locate the model, type, and serial numbers on your appliance.
ATTACH YOUR PROOF OF PURCHASE HERE, PROOF OF PURCHASE IS REQUIRED TO OBTAIN WARRANTY SERVICE.
Please have the following information available when you contact the Support Team: Name, address and telephone number. Model number and serial number.
A clear, detailed description of the problem. Proof of purchase including dealer or retailer name, address and date of purchase.
PROSCAN
NOSTALGIA BLUETOOTH 7 EN 1 SYSTEME DE MUSIQUE
text_image
PROSCAN I-ISCMODELES PRCD906BT: NORMES DE PROCESSUS
MOULEUX-3(B)/NMB-3(B)
text_image
Diagram of a device rear panel with labeled ports and control buttons, including AM/FM indicators and I/O ports.text_image
Technical diagram of a device panel with labeled components and numbered partstext_image
Technical diagram of a device rear panel with labeled components and numbered parts18: Éjection de bande / Avance rapide
19: Cassette
Platine
text_image
Technical diagram of a mechanical device with numbered parts labeled 20 to 2720: Platine
natural_image
Diagram of a hand holding a piece with arrows indicating force or movement (no text or symbols)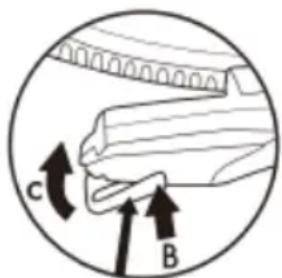
text_image
C BGuide pins (inside)