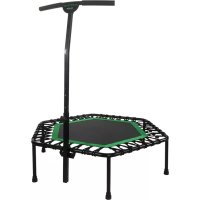
Fitness Trampoline - Trampoline TUNTURI - Free user manual and instructions
Find the device manual for free Fitness Trampoline TUNTURI in PDF.


| Product Type | Fitness Trampoline |
| Brand | Tunturi |
| Model | Fitness Trampoline |
| Overall Dimensions | 116 x 125.5 cm (L x W), height 120–154 cm |
| Jumping Surface | 96.5 x 83.5 cm |
| Maximum User Weight | 130 kg |
| Recommended Age | 14 years and up (not recommended for under 14) |
| Intended Use | Domestic, indoor |
| Assembly | 2 adults, about 30 minutes |
| Main Materials | Steel for frame, jumping mat, protective cushion (frame pad) |
| Number of Elastic Cords | 36 pieces |
| Handlebar | Height adjustable |
| Safety | Adult supervision required, one user at a time, no somersaults, max weight 130 kg, min age 14 years |
| Maintenance | Regularly check screws, cords, mat and cushion; replace cushion annually |
| Spare Parts and Repairability | Available parts: elastic cords, frame, handlebar, cushion; replacement according to supplier instructions |
| Cleaning | Clean with a damp cloth, avoid abrasive products |
| Warranty | Not specified in the manual |
Frequently Asked Questions - Fitness Trampoline TUNTURI
User questions about Fitness Trampoline TUNTURI
0 question about this device. Answer the ones you know or ask your own.
Ask a new question about this device
Download the instructions for your Trampoline in PDF format for free! Find your manual Fitness Trampoline - TUNTURI and take your electronic device back in hand. On this page are published all the documents necessary for the use of your device. Fitness Trampoline by TUNTURI.
USER MANUAL Fitness Trampoline TUNTURI
Fitness Trampoline with Handle
Assembly, Installation, Care, Maintenance, and User Instructions
natural_image
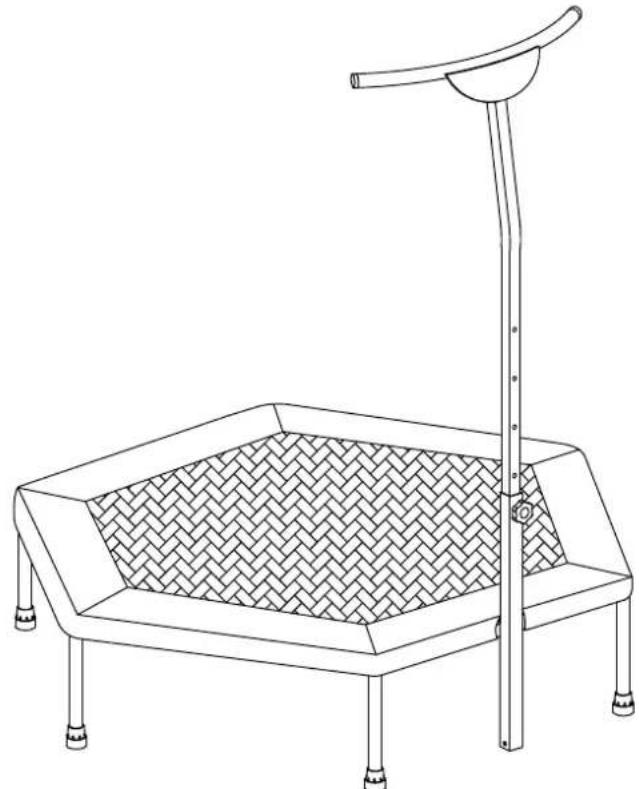
Line drawing of a small outdoor walkie with a woven mat and vertical support (no text or symbols)N.W.: approx.. 11kg
Surface Area : approx. 96.5 x 83.5cm
Assembly Size: approx. L 116cm x W 125.5cm x H 120\~154cm
IT IS VERY IMPORTANT THAT YOU READ AND UNDERSTAND THE INSTRUCTIONS BEFORE ASSEMBLING AND USING THE TRAMPOLINE.

WARNING
● These instructions are important to minimise chances of injury. Please read each of them thoroughly before you assemble and use this trampoline. Retain this manual for future reference.
● No more than one person on the trampoline at a time. Multiple users increase the risk of injury.
● Use trampoline only with mature, knowledgeable supervision.
● Maximum weight of the user shall NOT exceed 286lbs/130kg for this product.
● This product is not suitable for persons under 14 years!
- It is a sports device
● Domestic and indoor use only.
● Adult supervision required.
- The free area shall be not less than 0.6m greater than the training area in the directions from which the equipment is accessed. The free area must also include the area for emergency dismount. Always ensure the trampoline is on level ground with a minimum of 1 meters clear space from any structure or obstruction.
● The free standing equipment shall be installed on a stable and levelled base.
● Estimated Assembly time: 2 persons, 30 minutes
TUNTURI®
Important Safety Information
Please keep this manual in a safe place for reference.
- It is important to read this entire manual before assembling and using the equipment. Safe and efficient use can only be achieved if the equipment is assembled, maintained and used properly. It is your responsibility to ensure that all users of the equipment are informed of all warnings and precautions.
- Use the equipment on a solid, flat level surface with a protective cover for your floor or carpet.
- The safety level of the equipment can only be maintained if it is regularly examined for damage and/or wear and tear. Special attention to components most susceptible to wear (e.g. mat, padding and its attachment, tension and its mounts, anti-slip or connection points).
- Always use the equipment as indicated. If you find any defective components whilst assembling or checking the equipment, or if you hear any unusual noise coming from the equipment during use, stop. Do not use the equipment until the problem has been rectified. Defective parts are to be replaced in accordance with the manufacturer's instructions.
- Wear suitable clothing whilst using the equipment. Avoid wearing loose clothing which may get caught in the equipment or that may restrict or prevent movement.
- The equipment is not suitable for therapeutic use.
- Care must be taken when lifting or moving the equipment so as not to injure your back. Always use proper lifting techniques and/or use assistance.
- Warning. Only for domestic use and indoor use.
- Warning. Not suitable for children under 3 years. Small parts. Choking hazard.
- Warning. Maximum weight of user : 286lbs/130kg.
- Warning. Only one user. Collision hazard.
- Warning. Practice with shoes.
- Warning. Do not use the mat when it is wet.
- Warning. Empty pockets and hands before practice.
- Always jump in the middle of the mat.
- Warning. Do not eat while jumping.
- Warning. Do not exit by a jump.
- Limit the time of continuous usage. Make regular stops. Do not jump when tired.
- Trampolines shall neither be installed over concrete, asphalt or any other hard surface nor at proximity of other conflicting installations (e.g. paddling pools, swings, slides, climbing frames).
- Adult supervision required.
- No somersaults.
- This product is not suitable for persons under 14 years!
- When using the trampoline, always keep your body weight centered. Do NOT lean your entire body weight on the handlebar in order to avoid flipping or tipping over.
TUNTURI®
READ IT! Failure to follow these instructions to ensure proper operational condition of your trampoline may lead to serious injury or death. Do not allow more than one person on the trampoline at a time.
● Maintenance instruction:
Shall carry out checks and maintenance of the main parts (frame, suspension system, mat, padding and Anti-slip) at regular intervals. If these checks are not carried out, the trampoline could become dangerous.
It is of particular importance that the following recommendations shall be followed at the beginning of each season, as well as at regular intervals during the usage season:
- Regular maintenance is required. Neglecting regular maintenance can lead to a risk for users.
- All nuts and bolts must be checked for tightness and if necessary must be retightened.
- All elastic cords and joints must be checked to see that they are still intact and cannot become dislodged during play.
- Check all coverings for bolts and sharp edges and replace them if necessary.
- Check that mat and padding are without defects and can withstand load. Environment and extreme temperatures will make these parts lose strength.
● Maintenance of Frame Pad
Frame pad is prone to wear and tear like tires on a car. Gradual deterioration of the material will occur, the speed of which will depend on the level of exposure to UV rays, airborne pollution, and outdoor weather conditions such as rain and wind.
The pad needs to be properly maintained and checked by following the Maintenance Schedule set out in these instructions. When the material shows any signs of weakness, you must stop using the trampoline immediately, properly store the trampoline and restrict access by users until a new replacement pad is properly installed.
| 1 to 3 Months 3 to 6 Months 6 to 12 Months | ||
| Thorough inspection for UV damage and prior to every use for pad. | Thorough inspection for UV damage and prior to every use for pad, net and straps. | Thorough inspection before every use. Replace after 12 months or earlier |
IT IS RECOMMENDED THAT THE PAD BE REPLACED ON A YEARLY BASIS OR EARLIER UNDER NORMAL USE, EVEN IF IT DOES NOT SHOW ANY VISIBLE SIGNS OF DAMAGE.
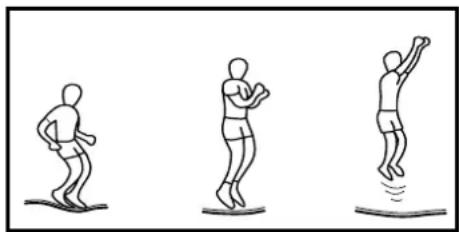
BASIC TRAMPOLINE BOUNCES
THE BASIC BOUNCE
natural_image
Three sequential line drawings of human figures in various poses, showing motion or movement (no text or symbols)- Start from the standing position, with your feet having shoulder width apart and with head up and eyes on mat
- Swing arms forward and up in a circular motion
- Bring feet together while in mid-air and point toes downwards.
- Keep the feet shoulder width apart when landing on mat
Parts List
| Part Number | Diagram Description | Quantity |
TUNTURI®
| 1 |  | Trampoline Mat 1 | |
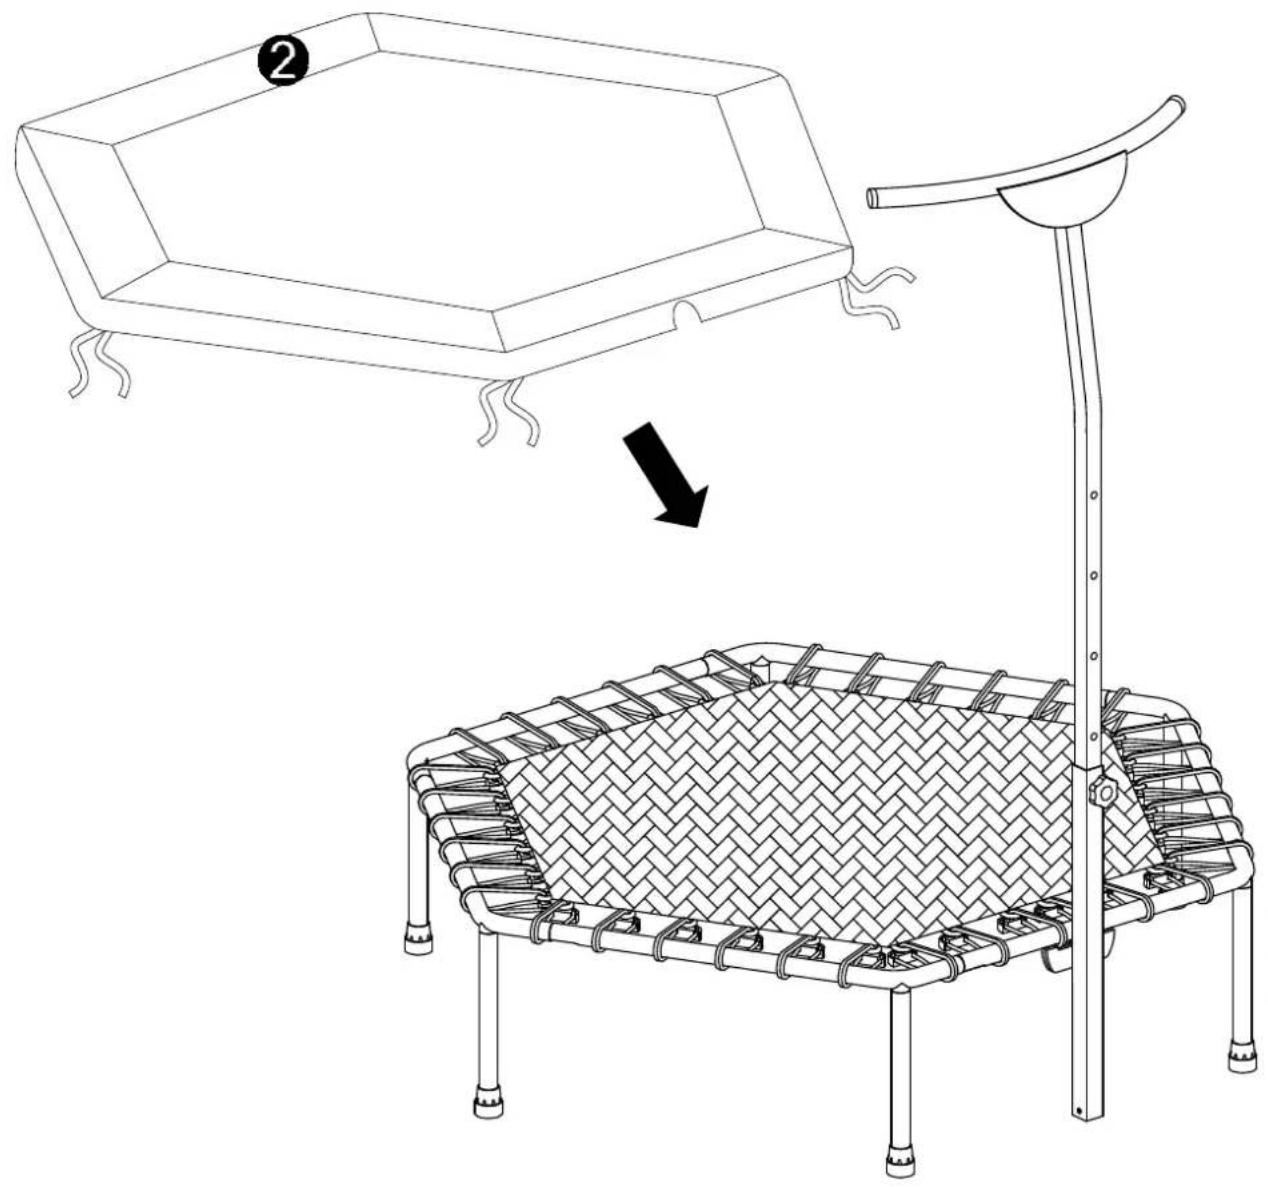
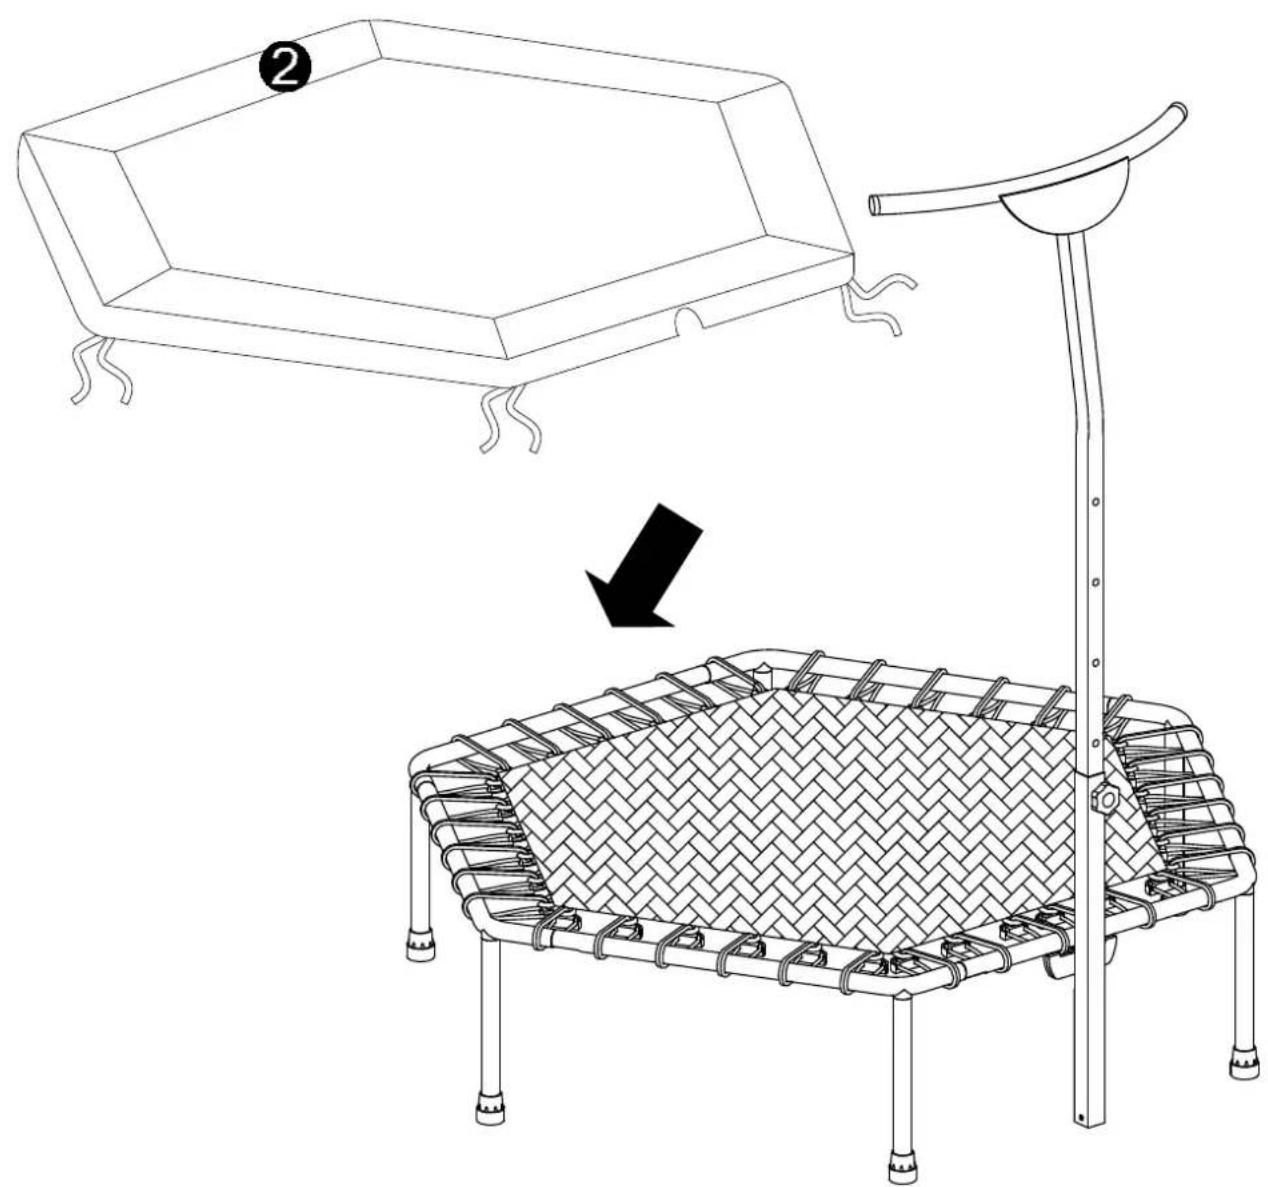
| 2 | 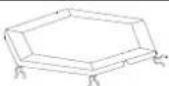 | Frame Pad 1 | |
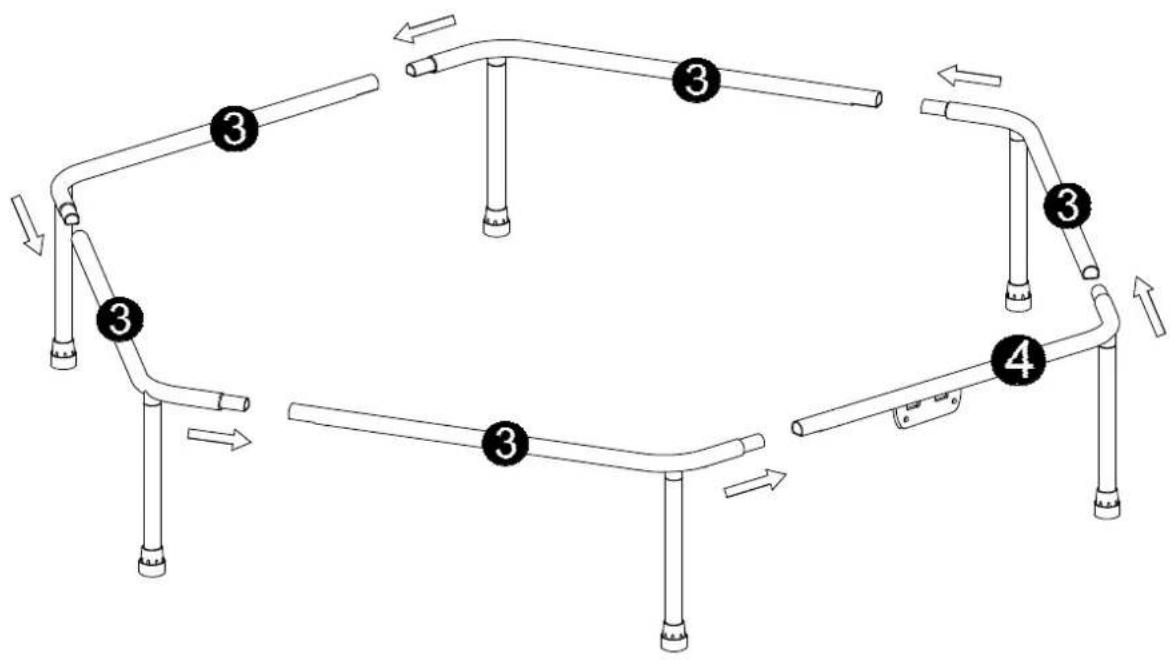
| 3 | 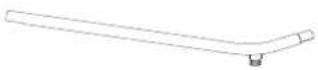 | Top Rail 5 | |
| 4 |  | Top Rail with Metal Plate 1 | |
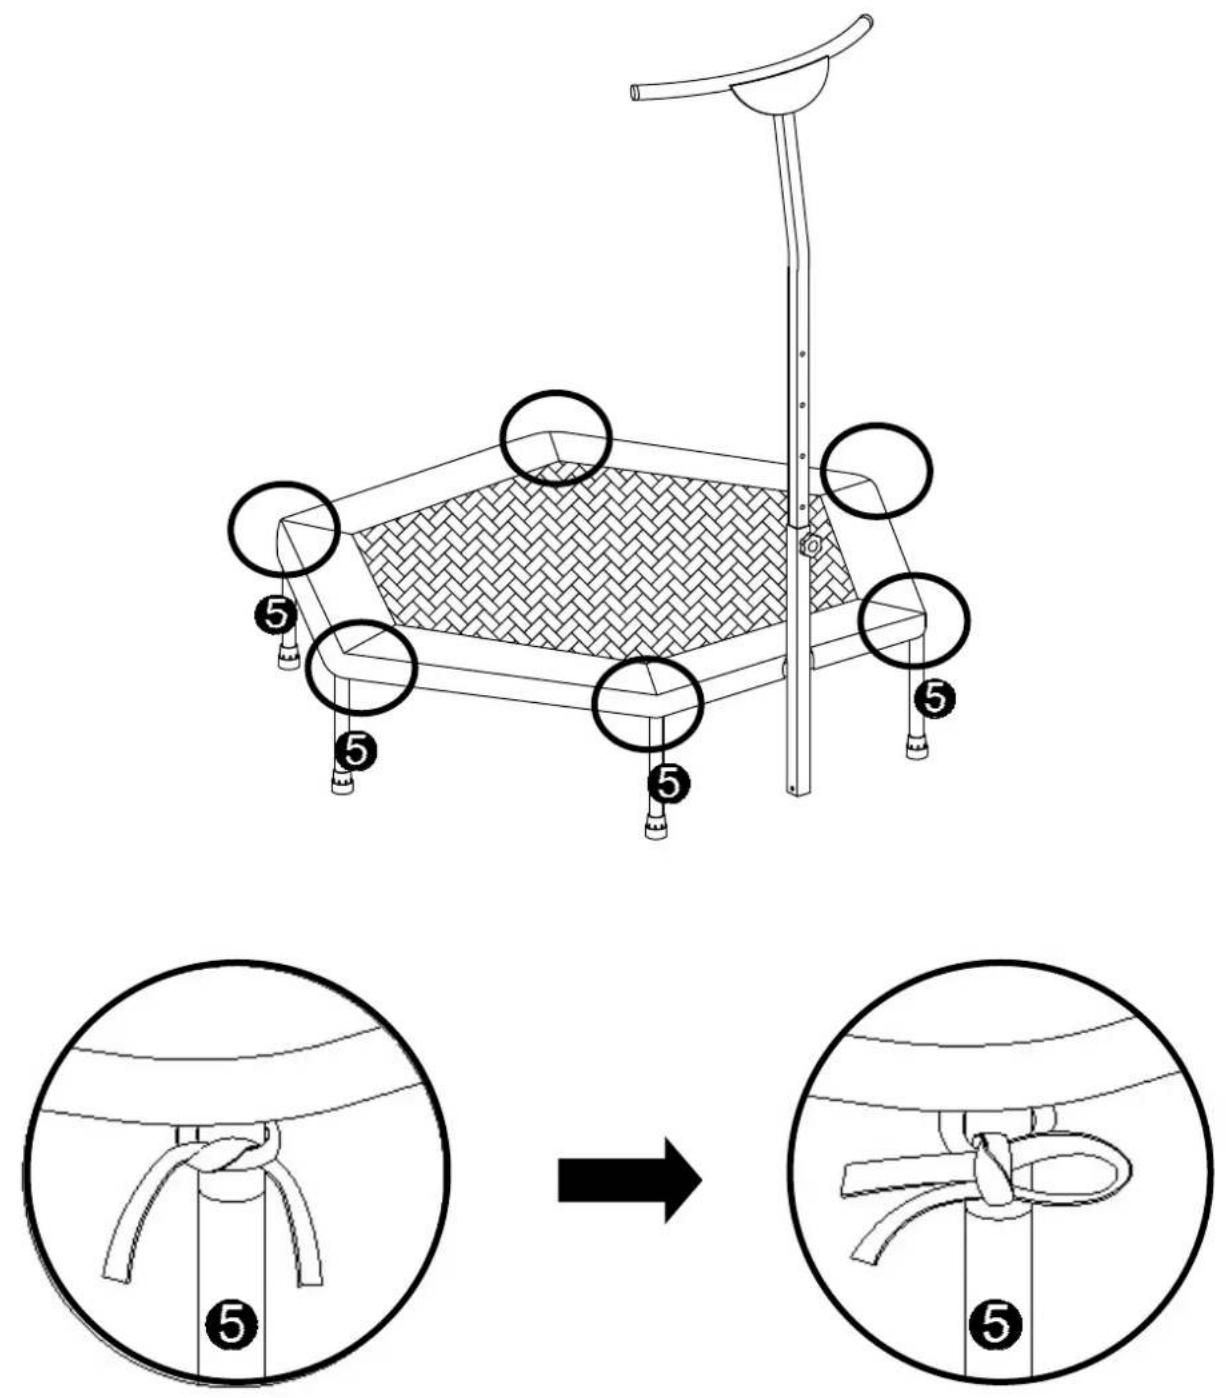
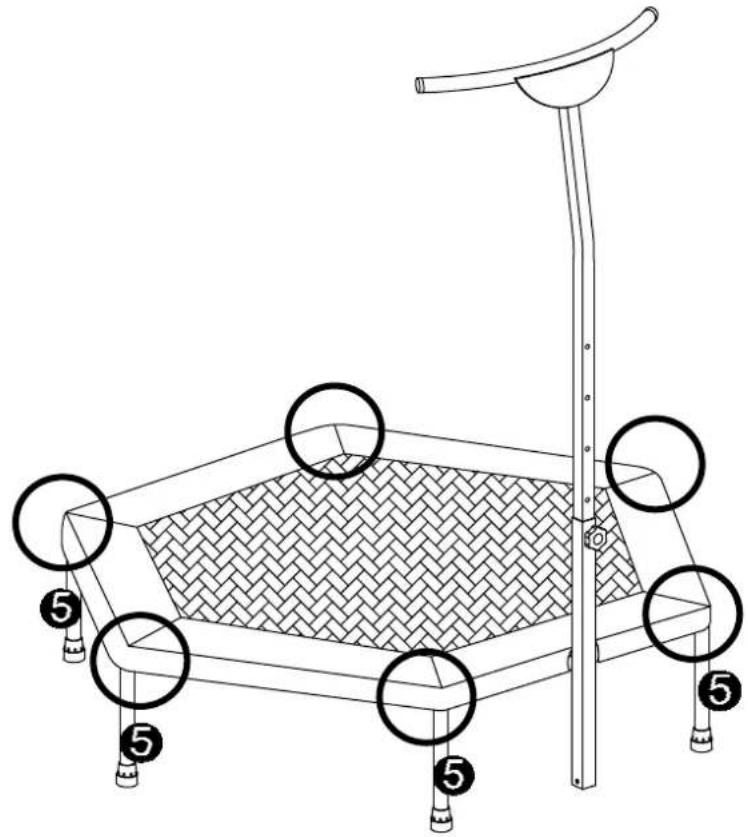
| 5 | 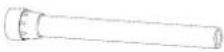 | Leg with Leg Cap | 6 |
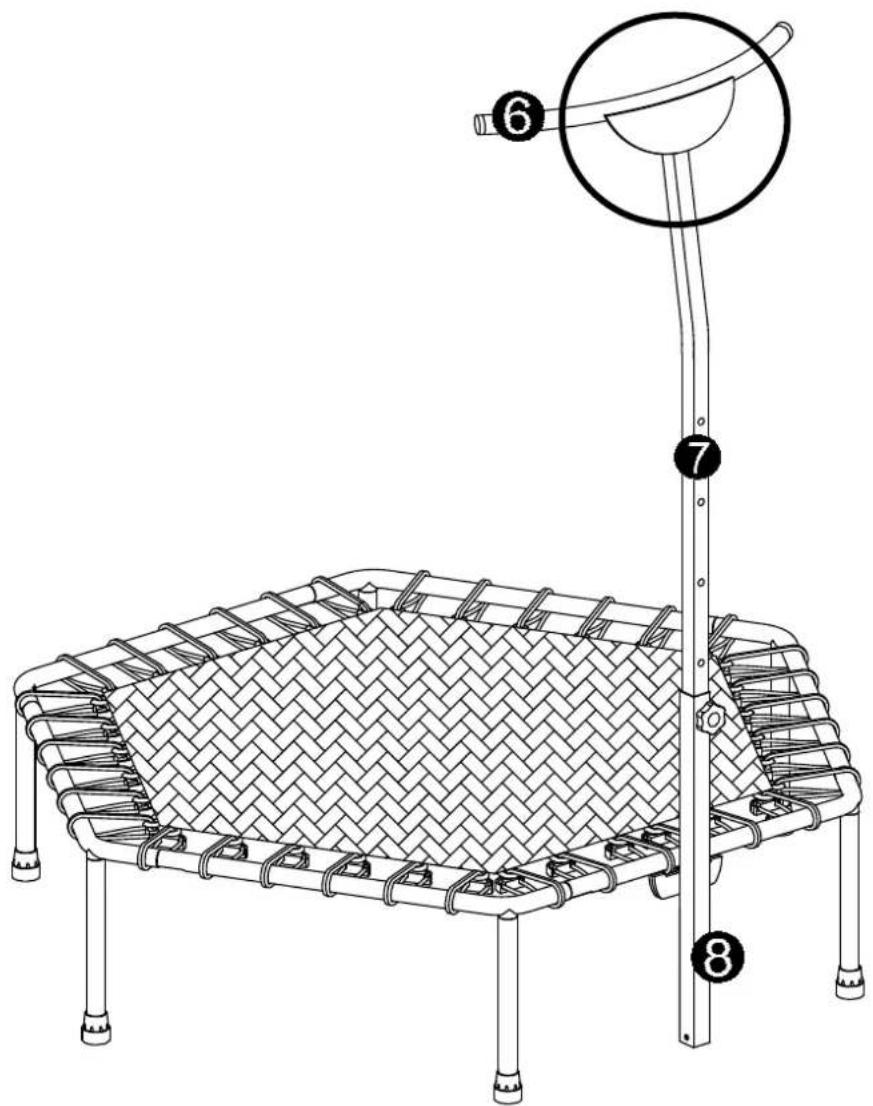
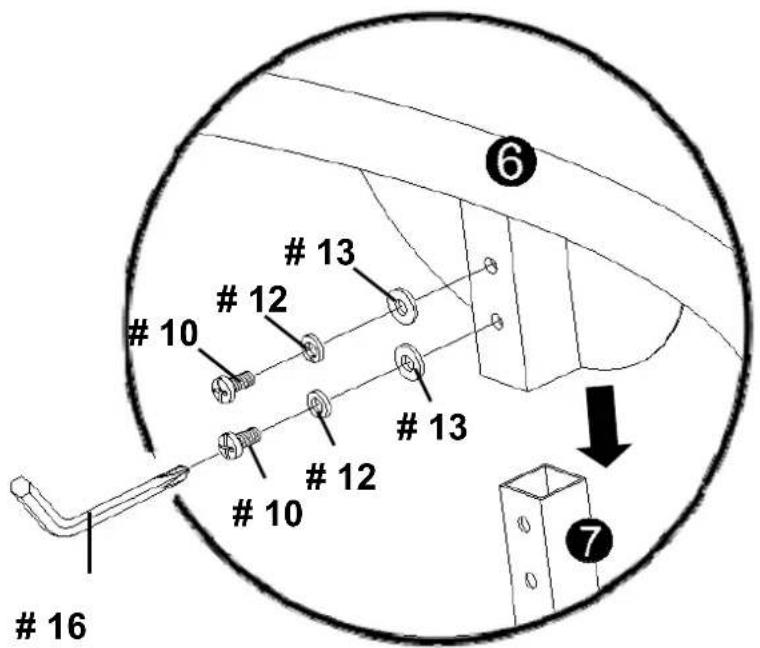
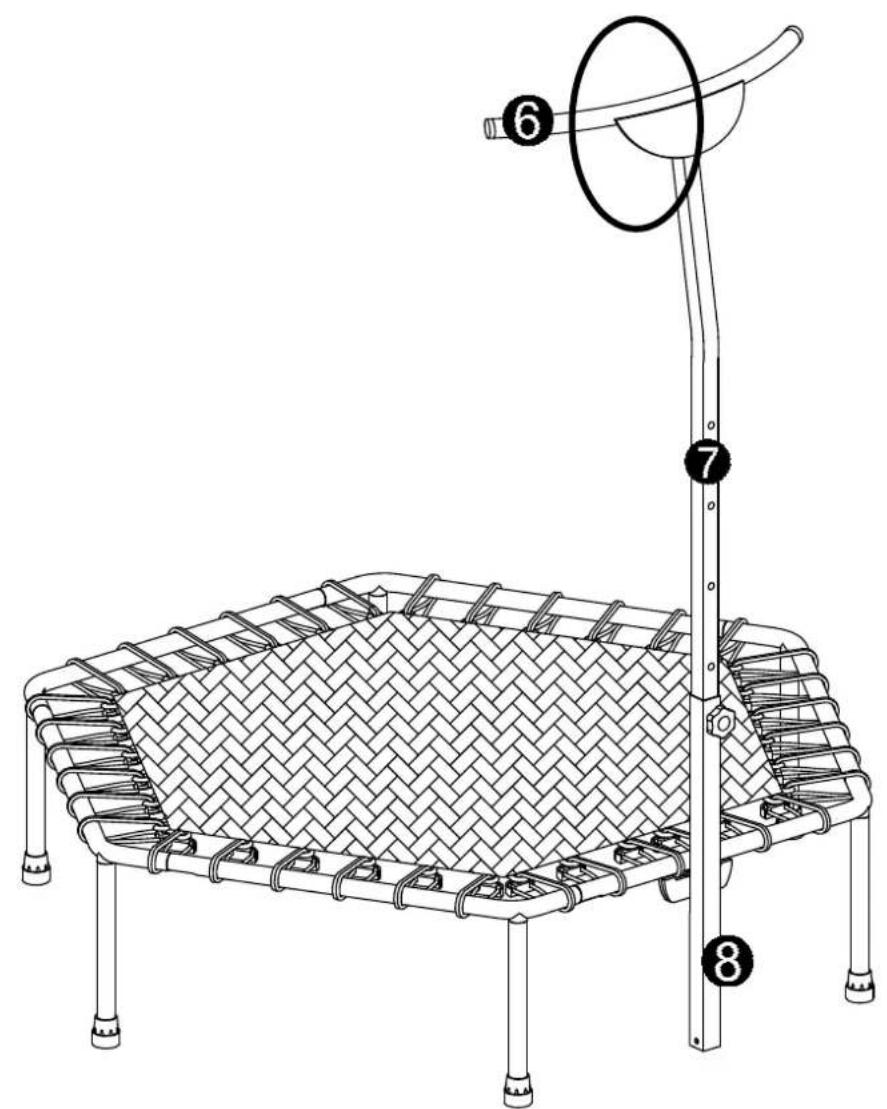
| 6 | 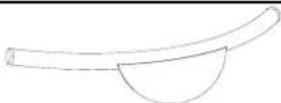 | T-Part with Handlebar 1 | |
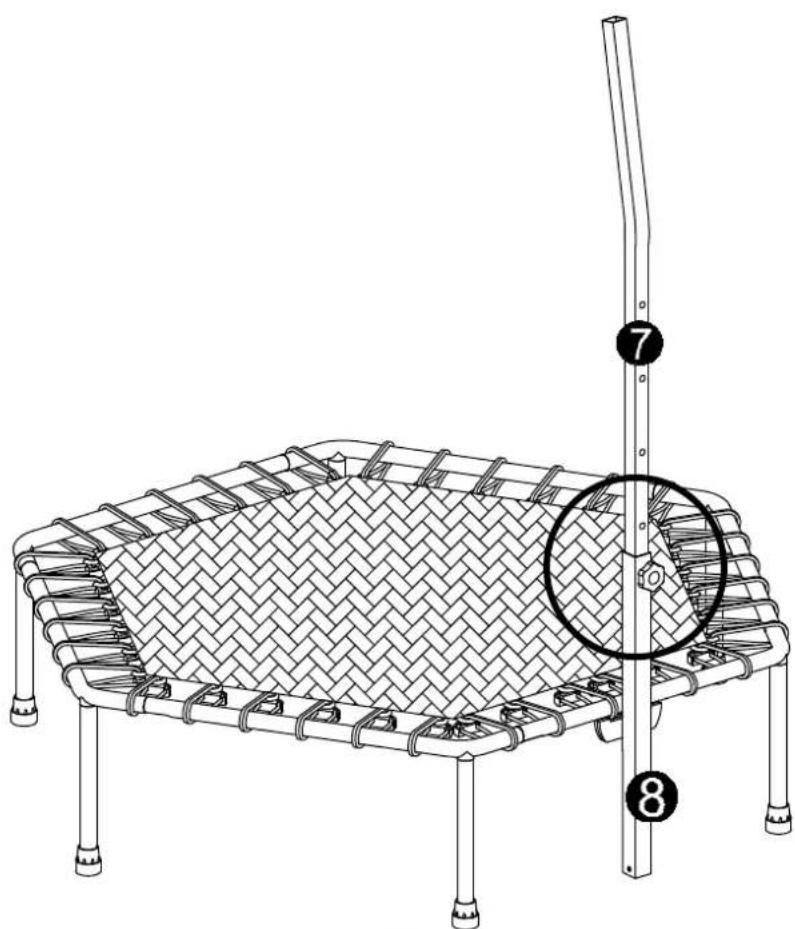
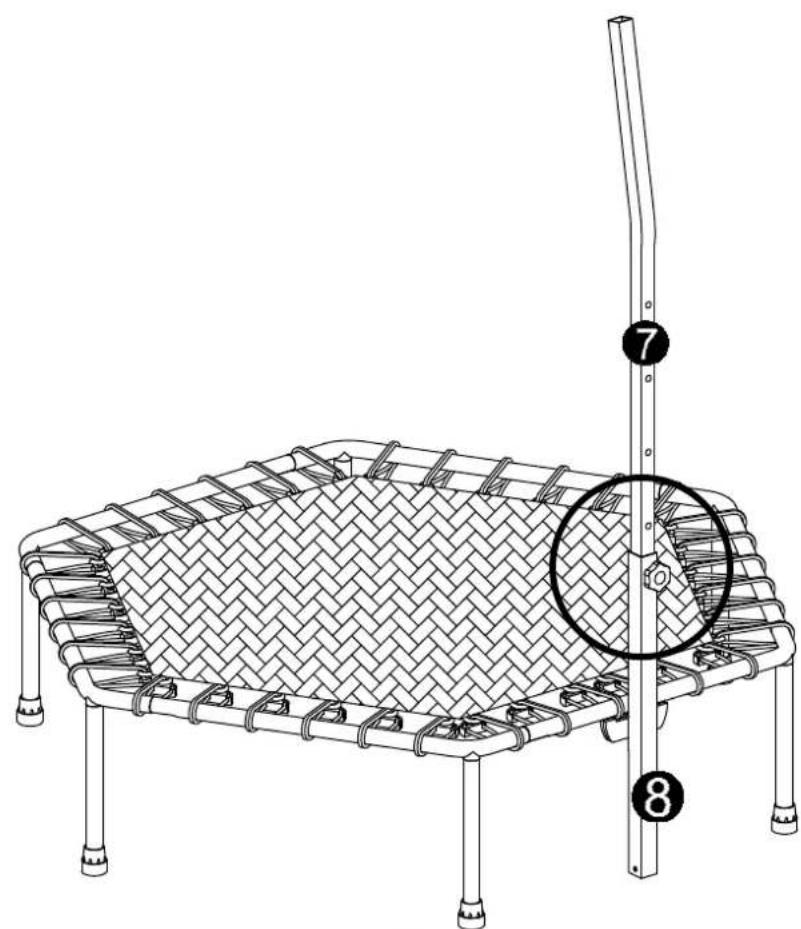
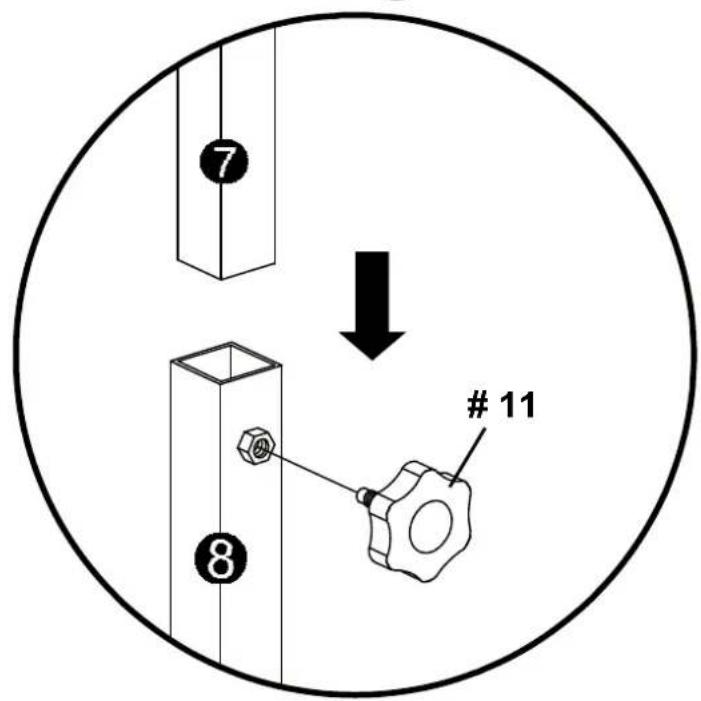
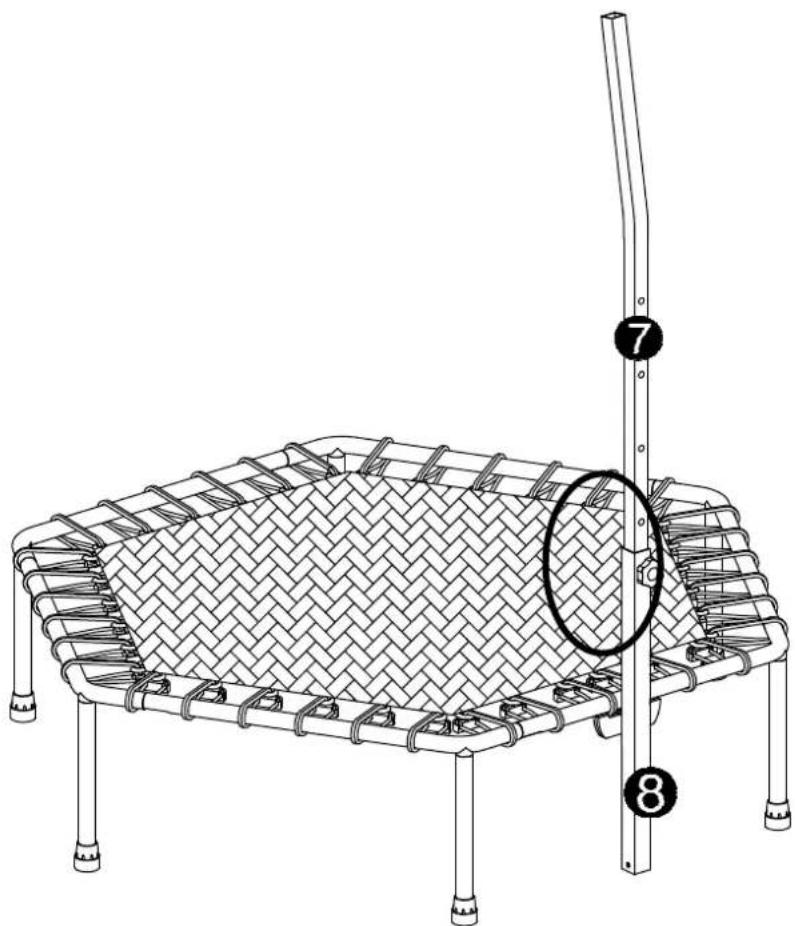
| 7 |  | Upper Support Tube 1 | |
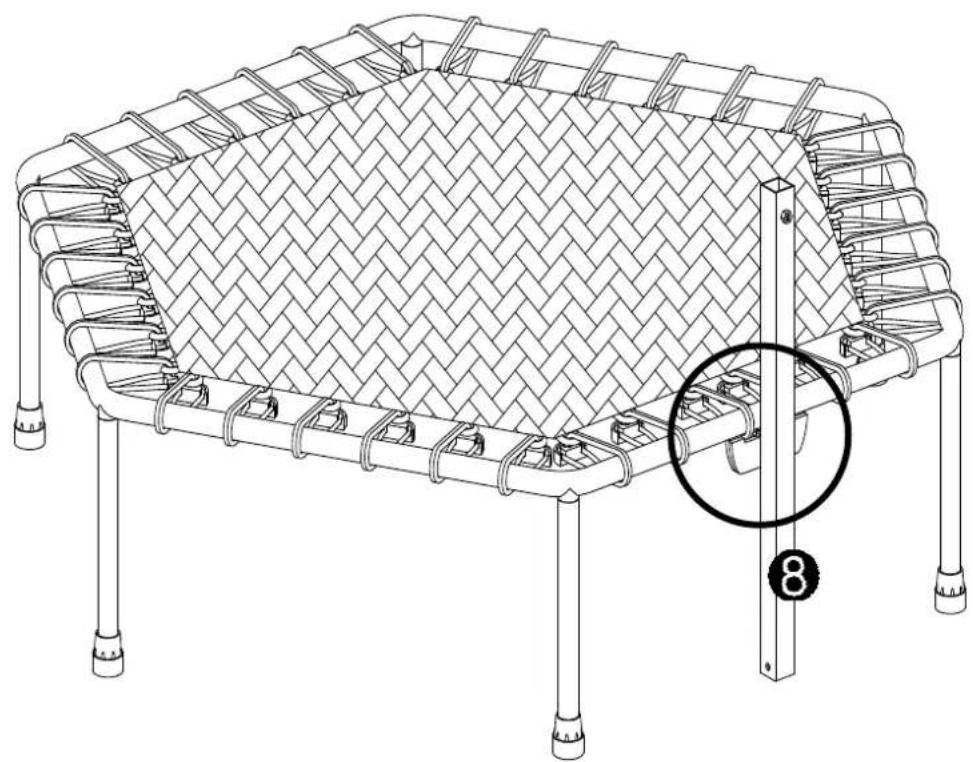
| 8 | 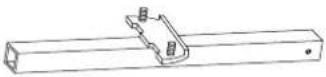 | Lower Support Tube 1 | |
| 9 | 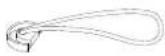 | Elastic Cord 36 | |
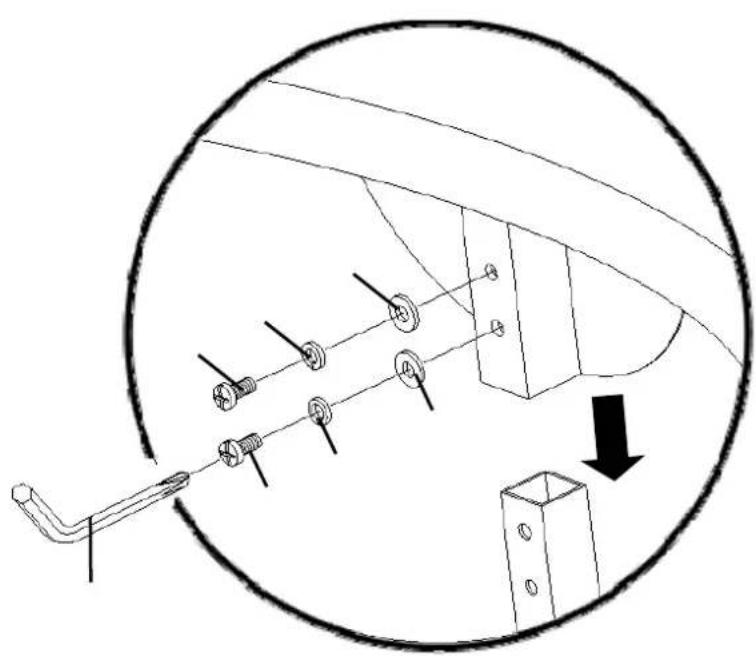
| 10 | 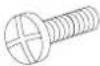 | Screws 2 | |
| 11 |  | Nut | 2 |
| 12 |  | Spring Washer | 2 |
| 13 |  | Flat Washer 2 | |
| 14 |  | Screw Lock 1 | |
| 15 | 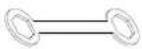 | Wrench 1 | |
| 16 | 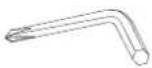 | Allen Wrench 1 | |
| 17 | 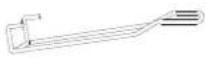 | Elastic Cord Loading Tool 1 |
TUNTURI®
| 18 | PVC RING 6 |
AS SE MB
LY INSTRUCTION
STEP 1
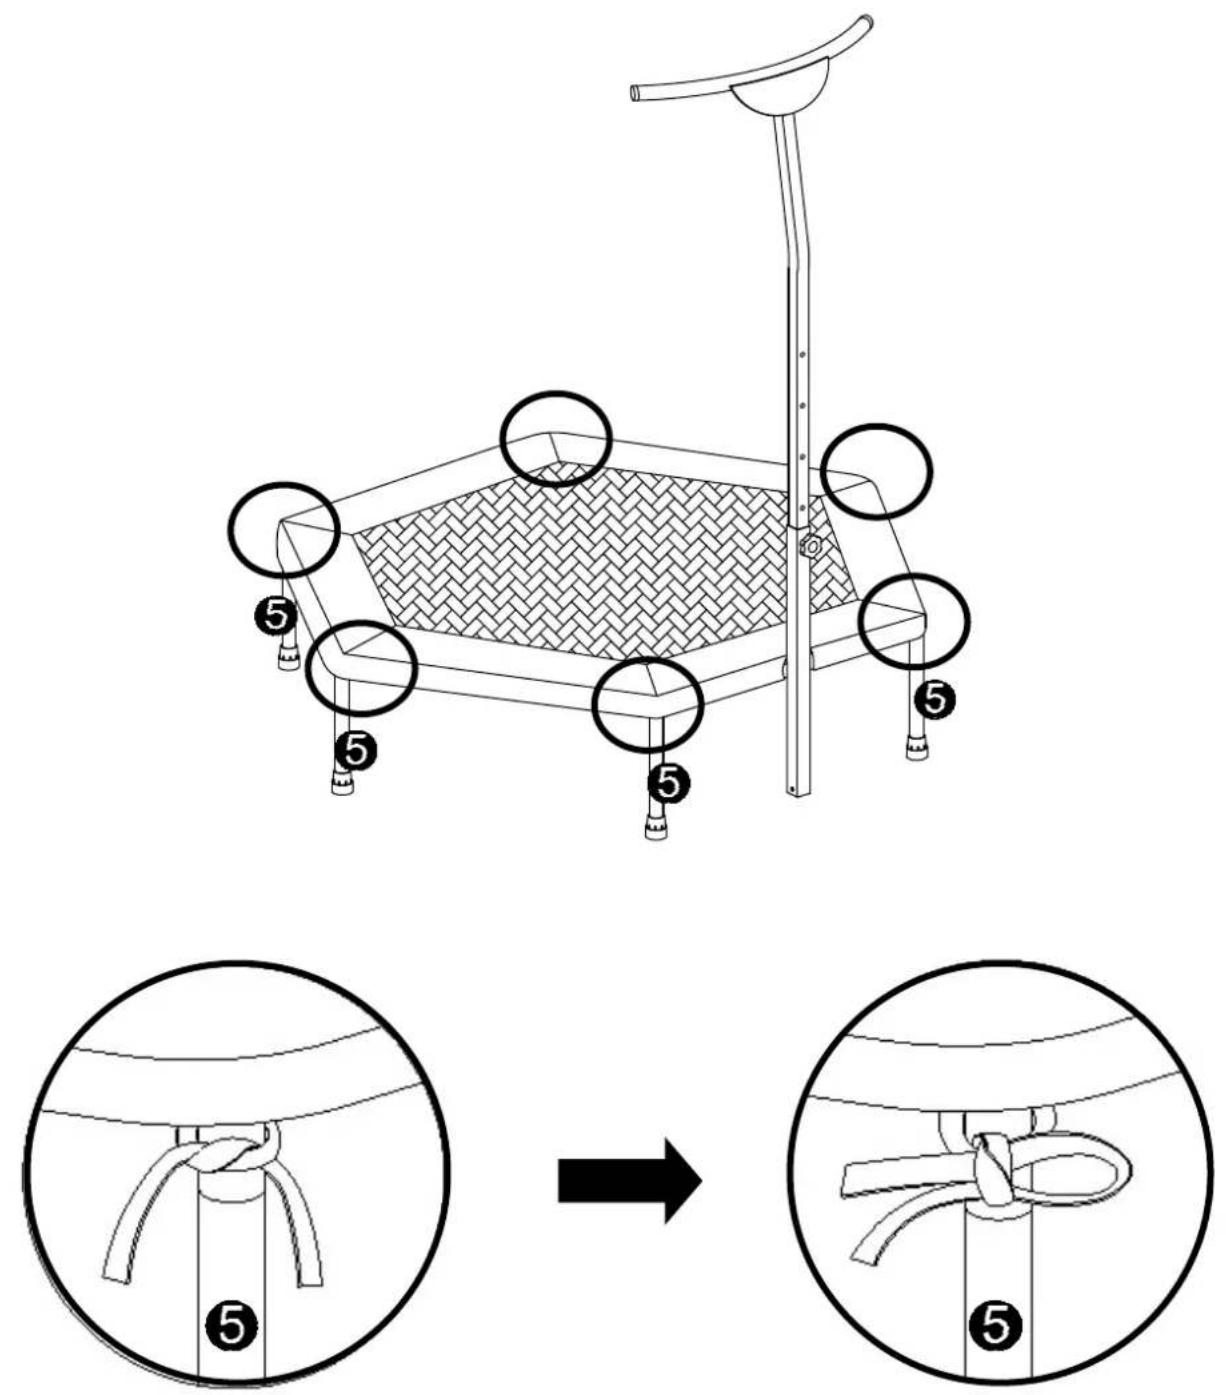
● Two adults shall assemble the trampoline and check it before use.
flowchart
graph TD
    A["Step 3: X 5"] --> B["Step 4: X 1"]
    B --> C["Step 5: X 5"]
    C --> D["Step 4: X 1"]
    D --> E["Step 5: X 1"]
    style A fill:#f9f,stroke:#333
    style B fill:#f9f,stroke:#333
    style C fill:#f9f,stroke:#333
    style D fill:#f9f,stroke:#333
    style E fill:#f9f,stroke:#333
flowchart
graph TD
    A["Light Lamp"] --> B["Left Block"]
    B --> C["Right Block"]
    C --> D["Left Block with Arrow indicating rotation"]
    D --> E["Right Block with Arrow indicating rotation"]
    E --> F["Left Block with Arrow indicating rotation"]
    F --> G["Right Block with Arrow indicating rotation"]
TUNTURI®
STEP 2
flowchart
graph TD
    A["Component 3"] --> B["Component 3"]
    B --> C["Component 4"]
    C --> D["Component 3"]
    D --> E["Component 3"]
    E --> F["Component 3"]
    F --> G["Component 3"]
    G --> H["Component 3"]
    H --> I["Component 3"]
    I --> J["Component 3"]
    J --> K["Component 3"]
    K --> L["Component 3"]
    L --> M["Component 3"]
    M --> N["Component 3"]
    N --> O["Component 3"]
    O --> P["Component 3"]
    P --> Q["Component 3"]
    Q --> R["Component 3"]
    R --> S["Component 3"]
    S --> T["Component 3"]
    T --> U["Component 3"]
    U --> V["Component 3"]
    V --> W["Component 3"]
    W --> X["Component 3"]
    X --> Y["Component 3"]
    Y --> Z["Component 3"]
    Z --> AA["Component 3"]
    AA --> AB["Component 3"]
    AB --> AC["Component 3"]
    AC --> AD["Component 3"]
    AD --> AE["Component 3"]
    AE --> AF["Component 3"]
    AF --> AG["Component 3"]
    AG --> AH["Component 3"]
    AH --> AI["Component 3"]
    AI --> AJ["Component 3"]
    AJ --> AK["Component 3"]
    AK --> AL["Component 3"]
    AL --> AM["Component 3"]
    AM --> AN["Component 3"]
    AN --> AO["Component 3"]
    AO --> AP["Component 3"]
    AP --> AQ["Component 3"]
    AQ --> AR["Component 3"]
    AR --> AS["Component 3"]
    AS --> AT["Component 3"]
    AT --> AU["Component 3"]
    AU --> AV["Component 3"]
    AV --> AW["Component 3"]
    AW --> AX["Component 3"]
    AX --> AY["Component 3"]
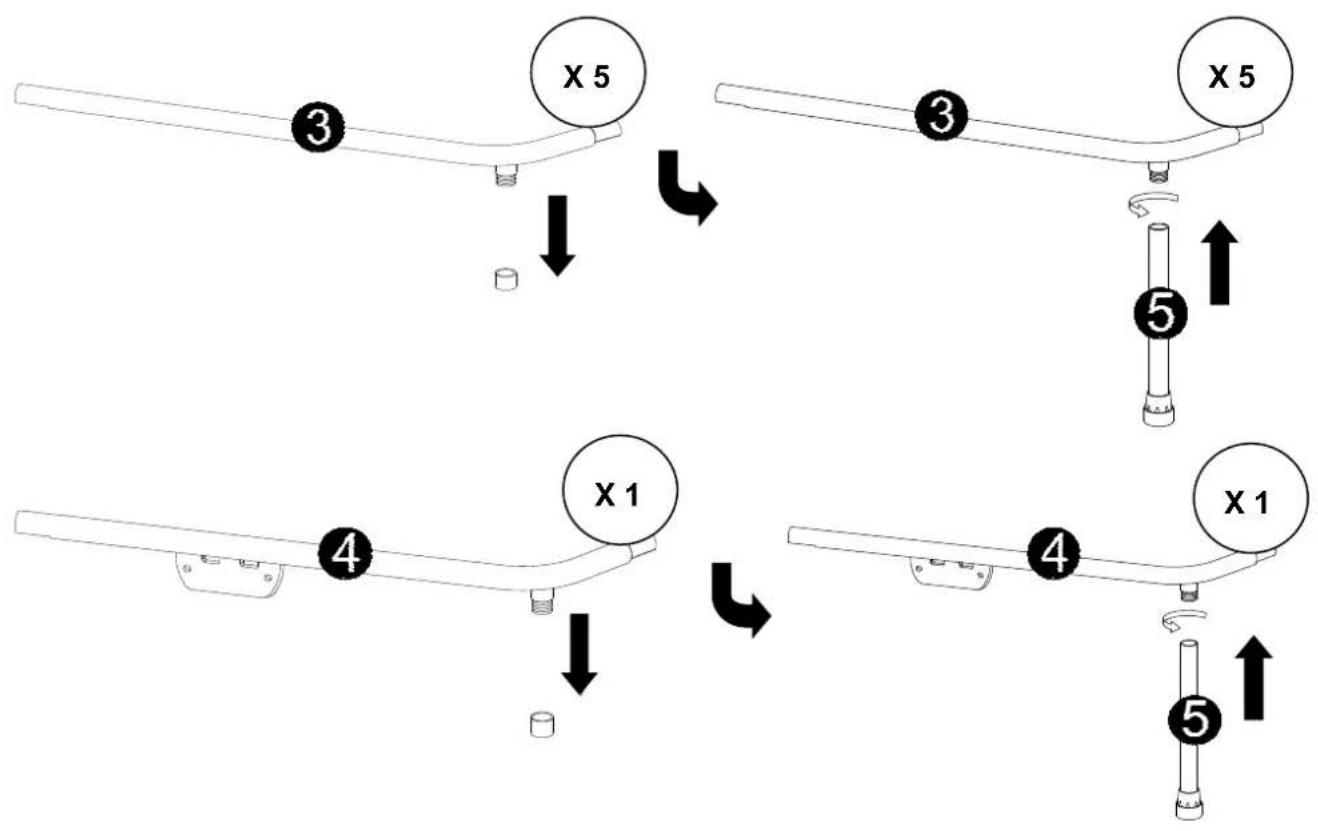
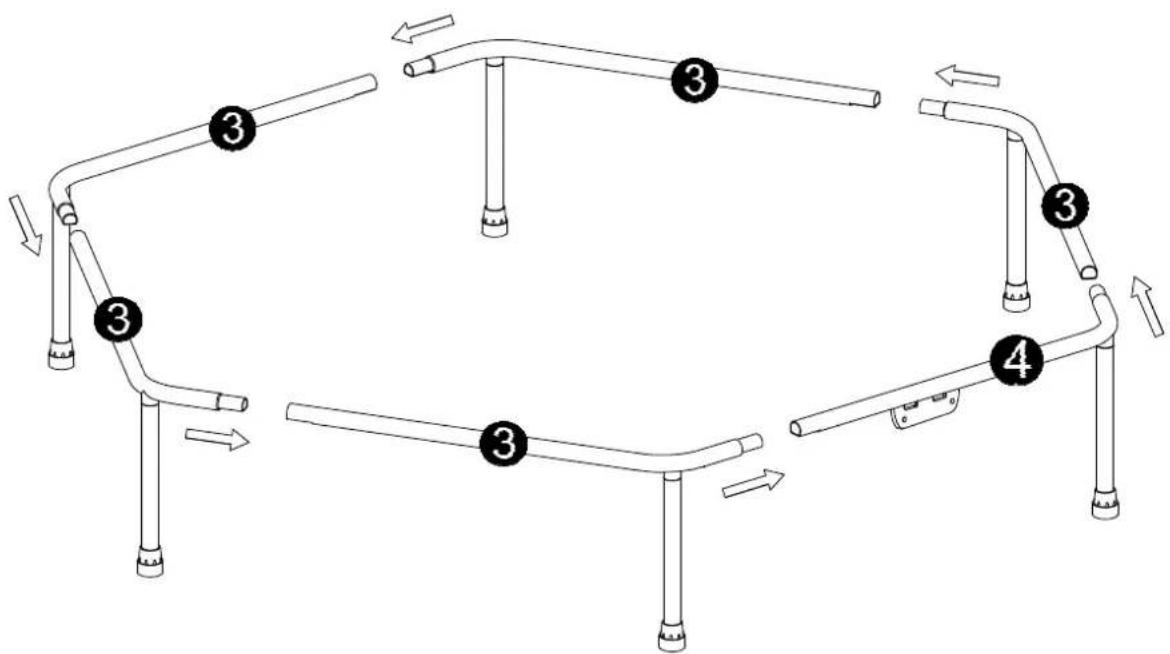
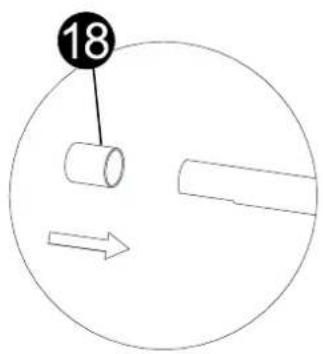
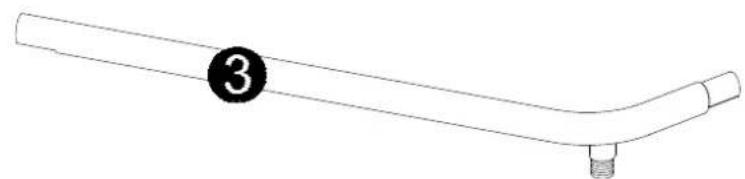
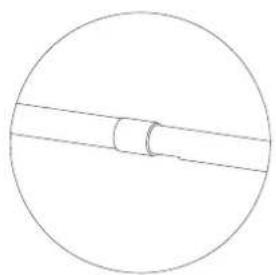
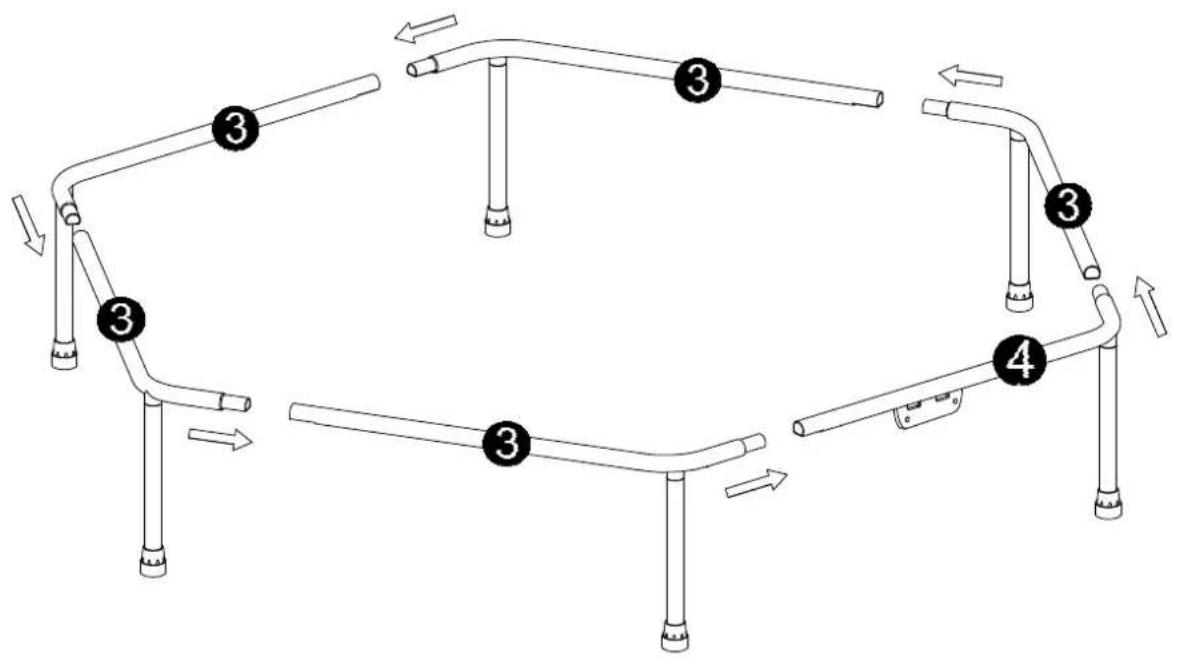
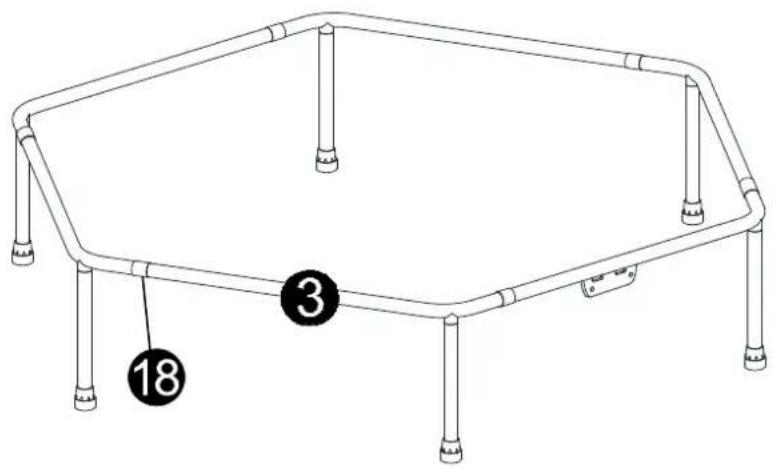
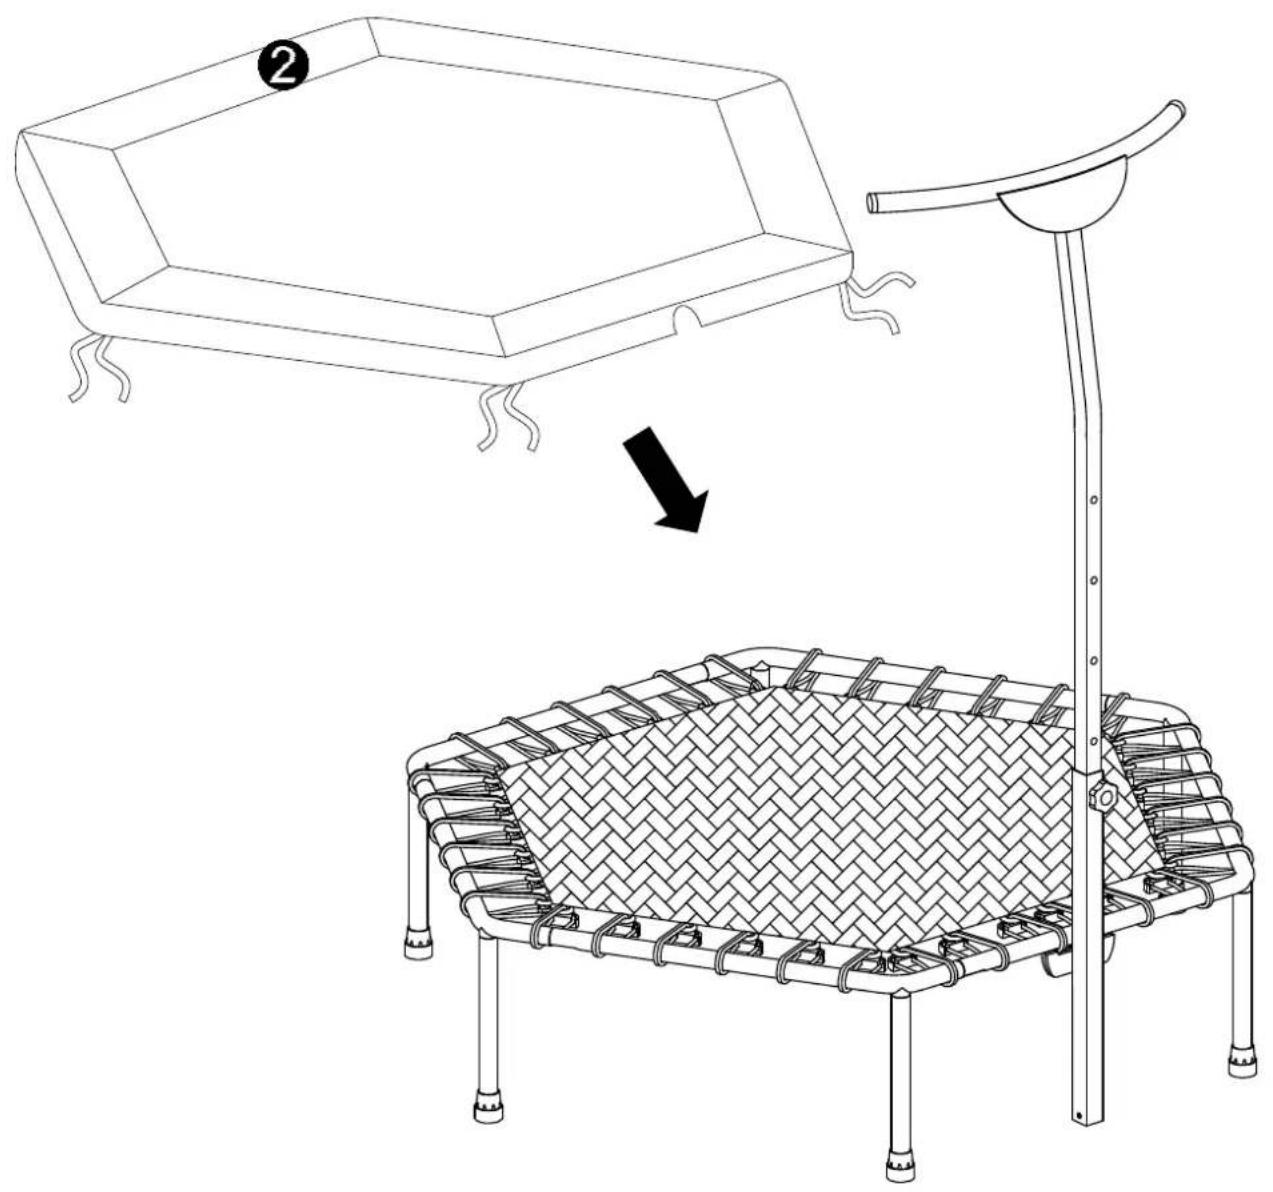
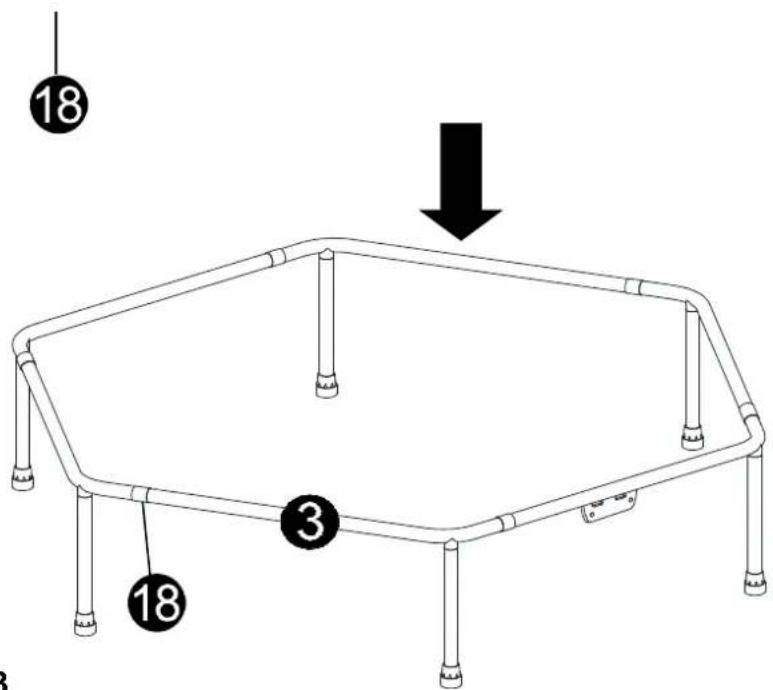
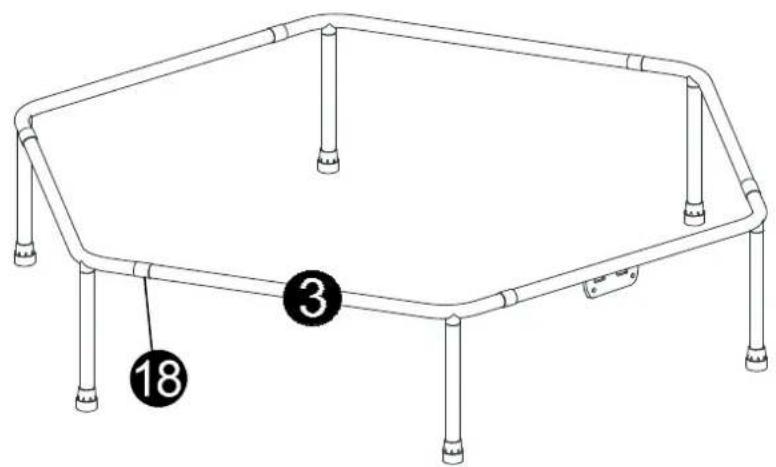
Slide the PVC rings #18 over the contact points of the frame parts #3 and #4.
These PVC rings will help to protect the elastic cords from friction on the tube edges.
natural_image
Simple line drawing of a bent pipe with a numbered circle marker (3) on the left end, no text or symbols present.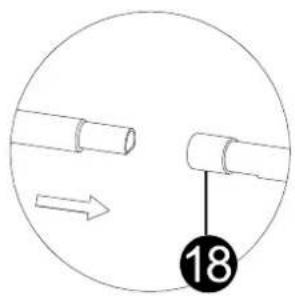
natural_image
Simple line drawing of a circle with a central vertical line and a small circular mark (no text or symbols)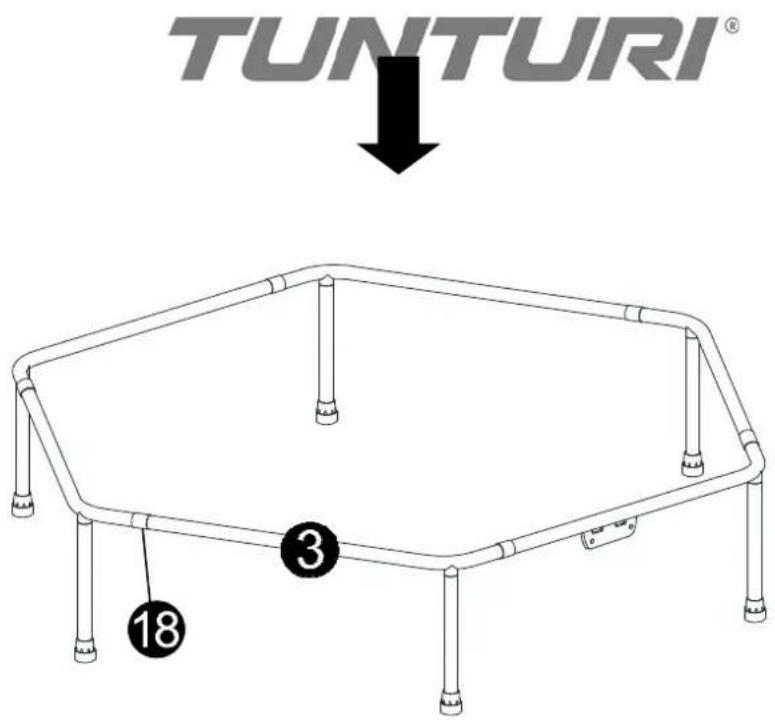
STEP 3
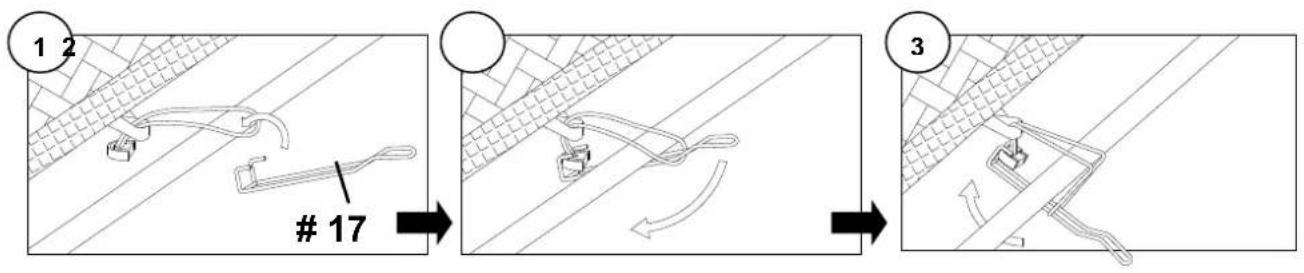
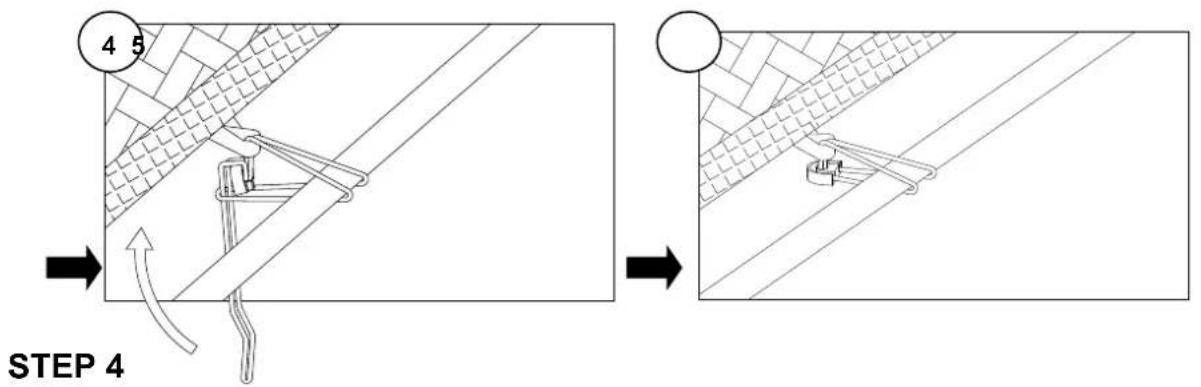
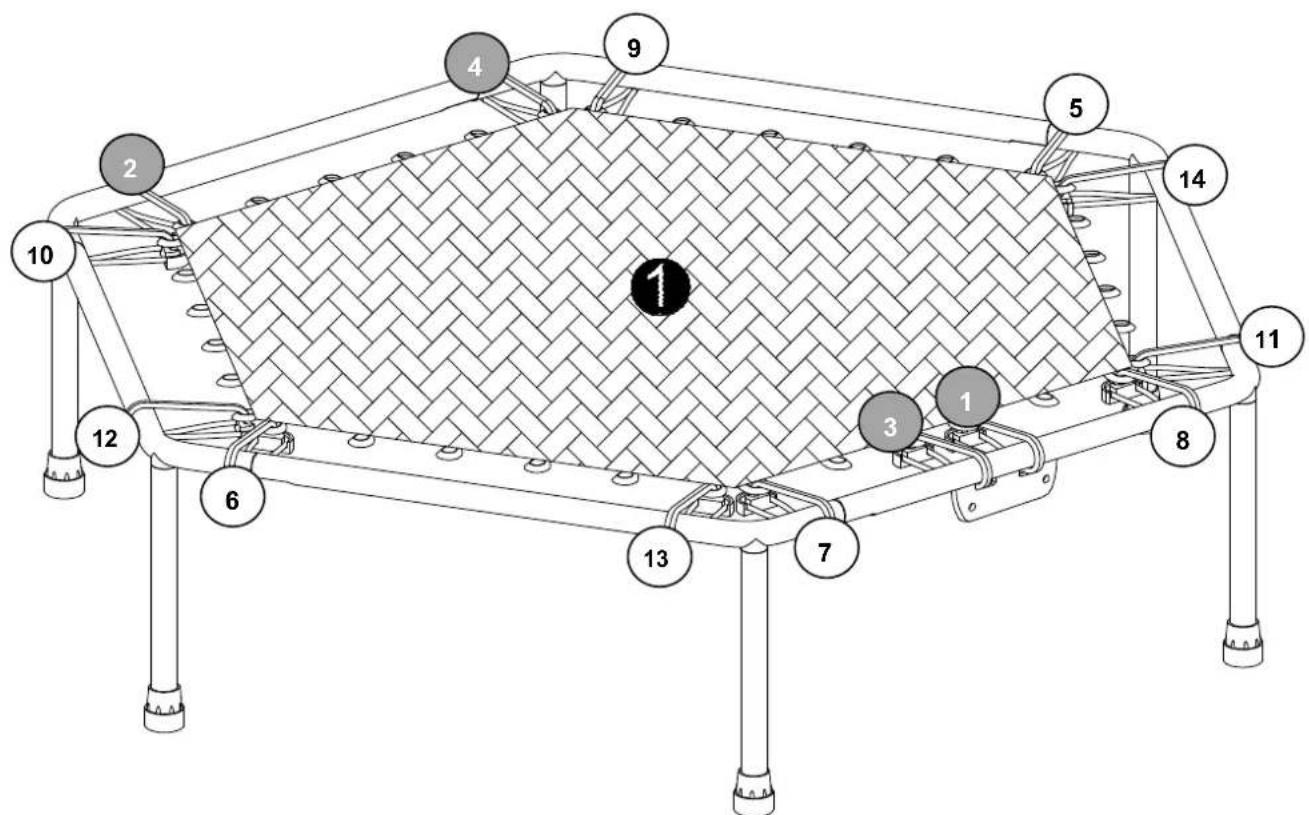
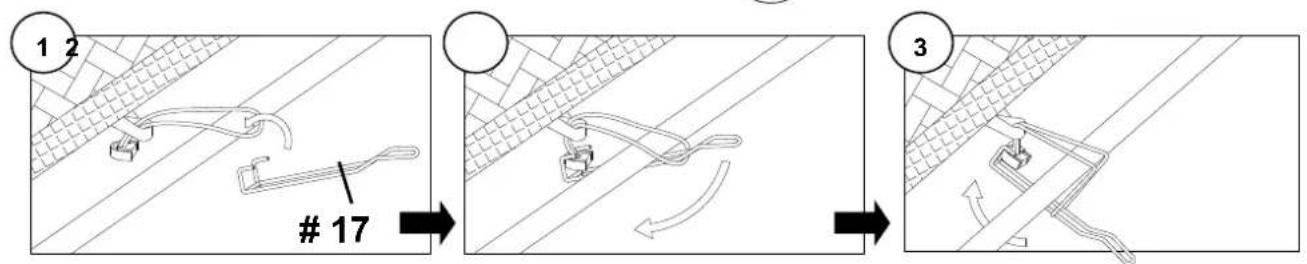
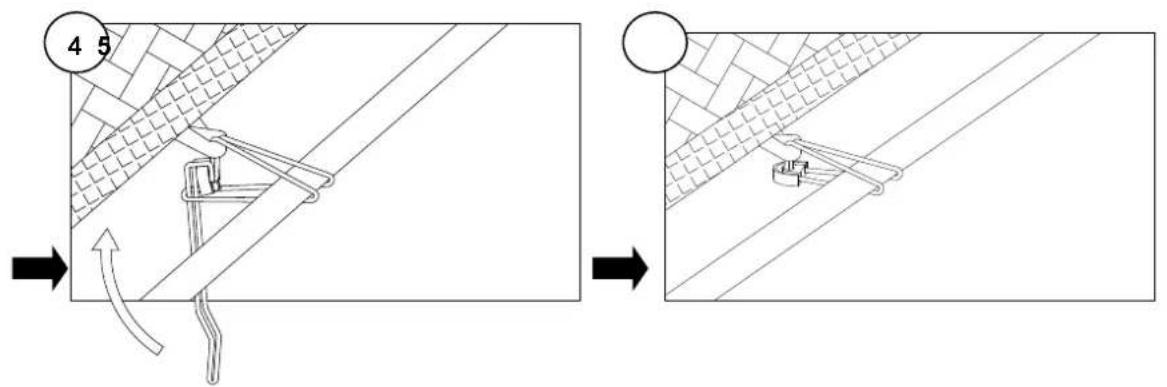
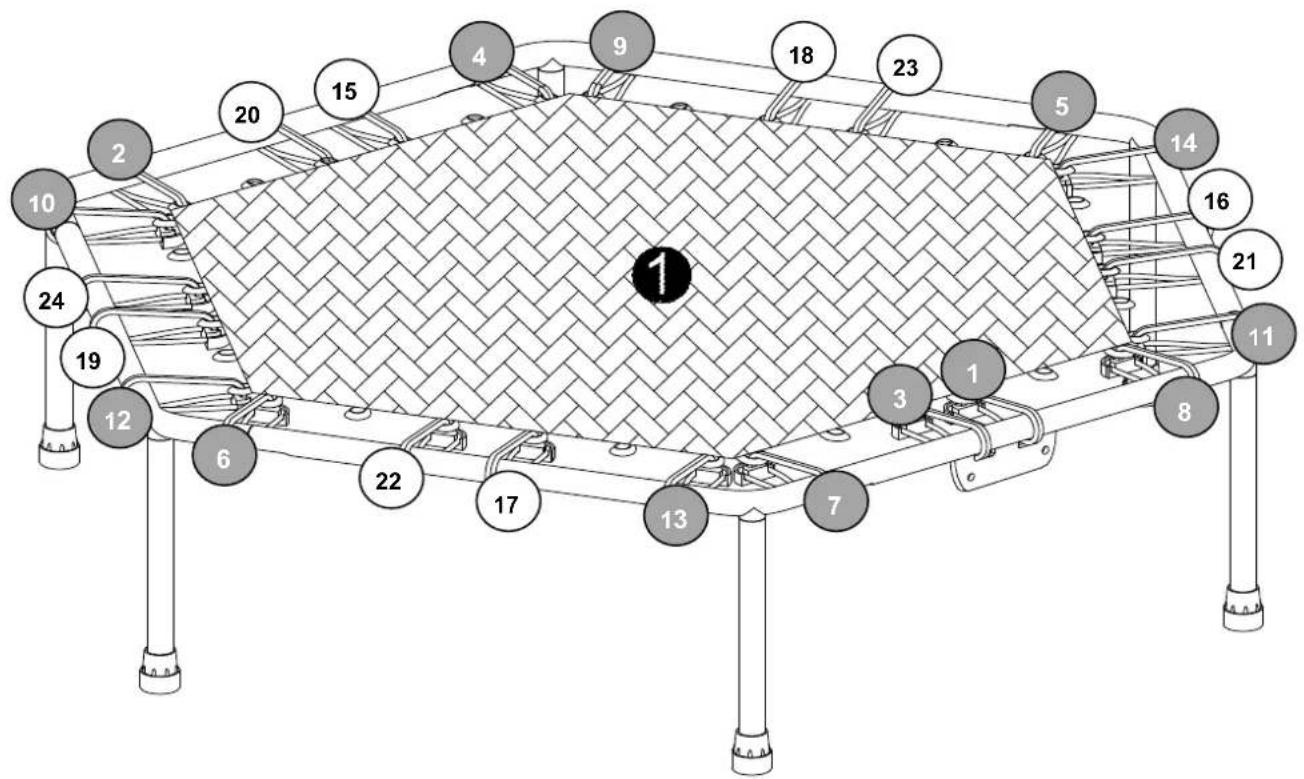
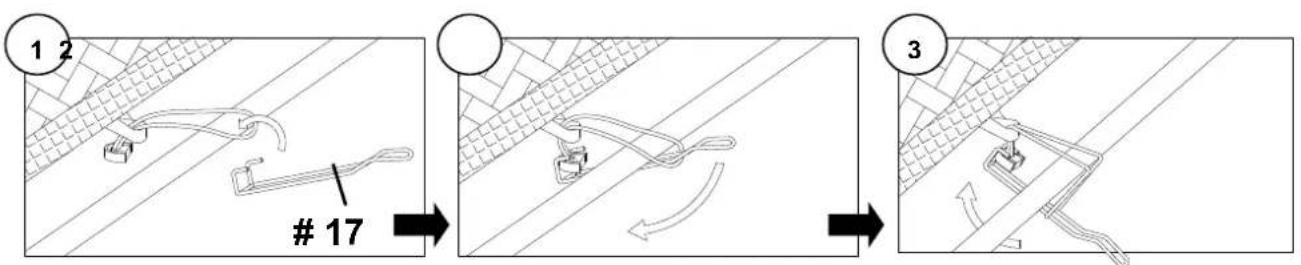
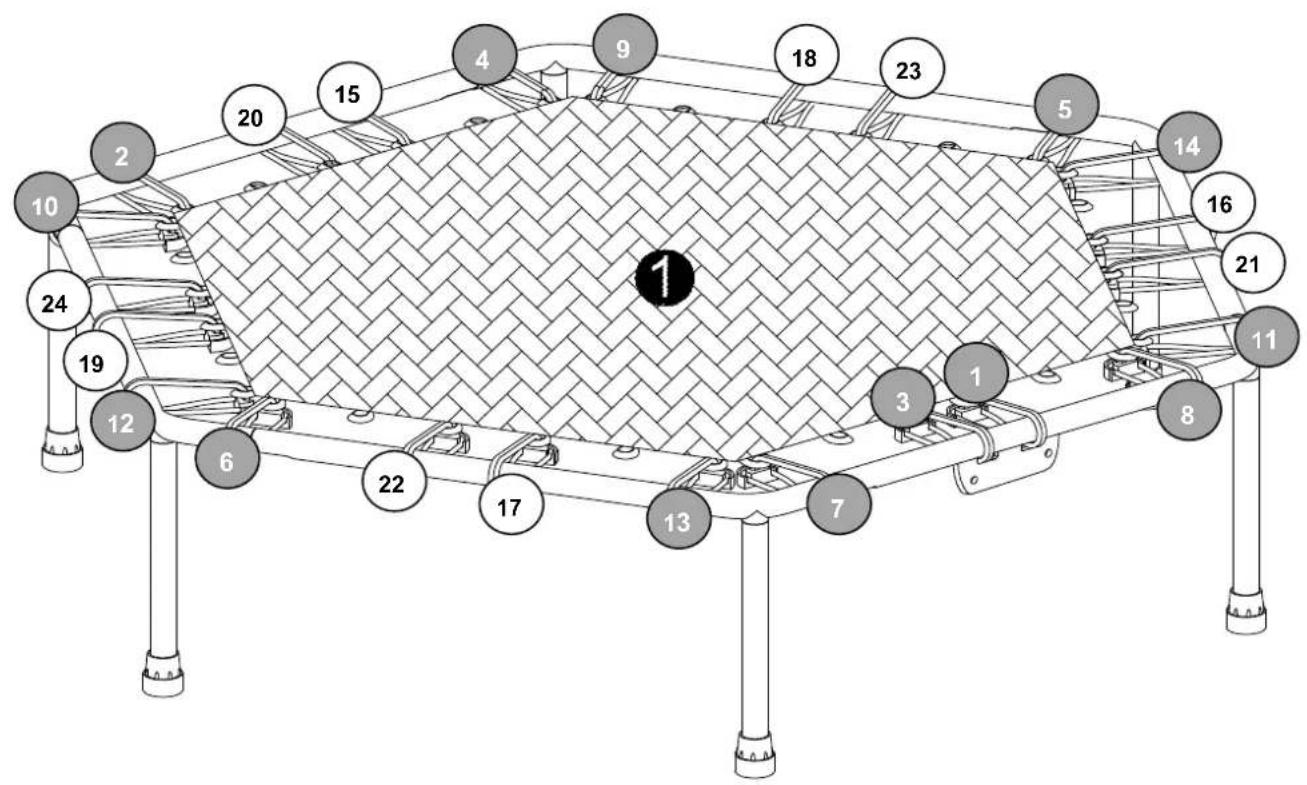
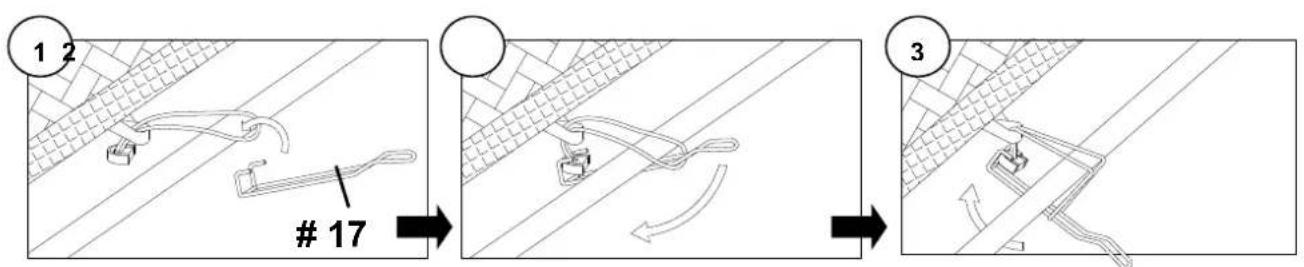
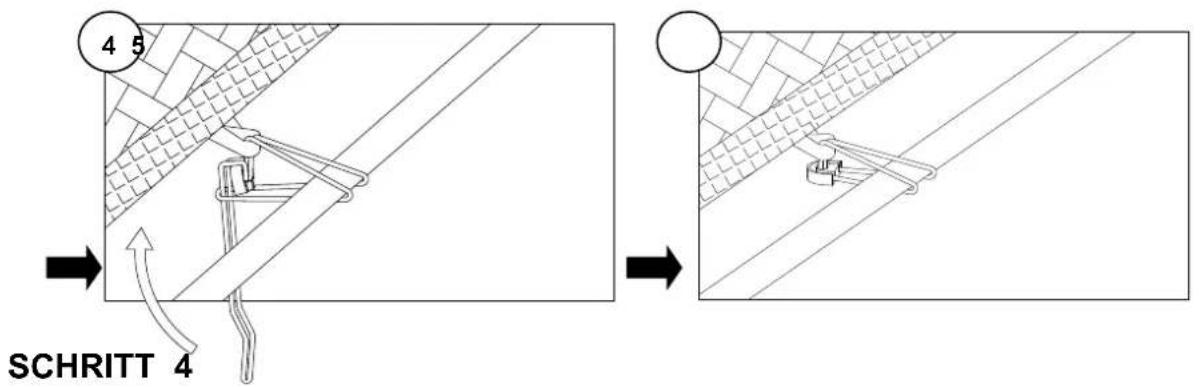
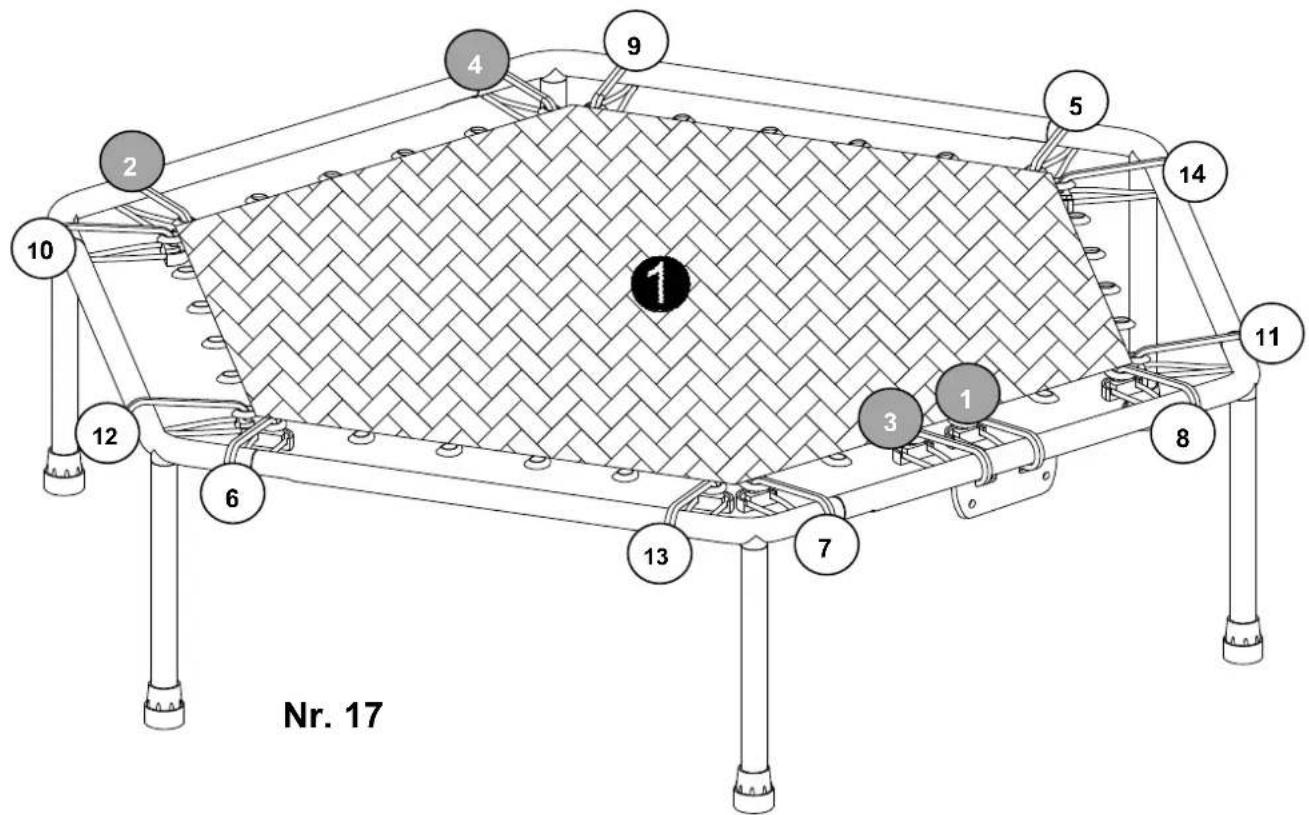
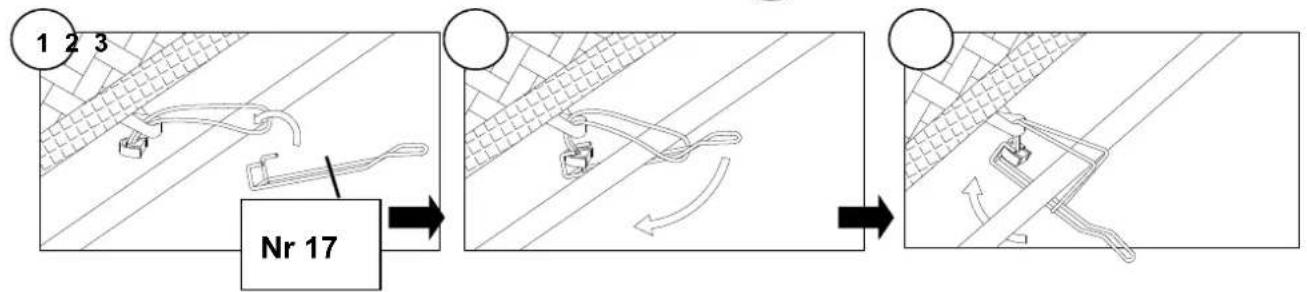
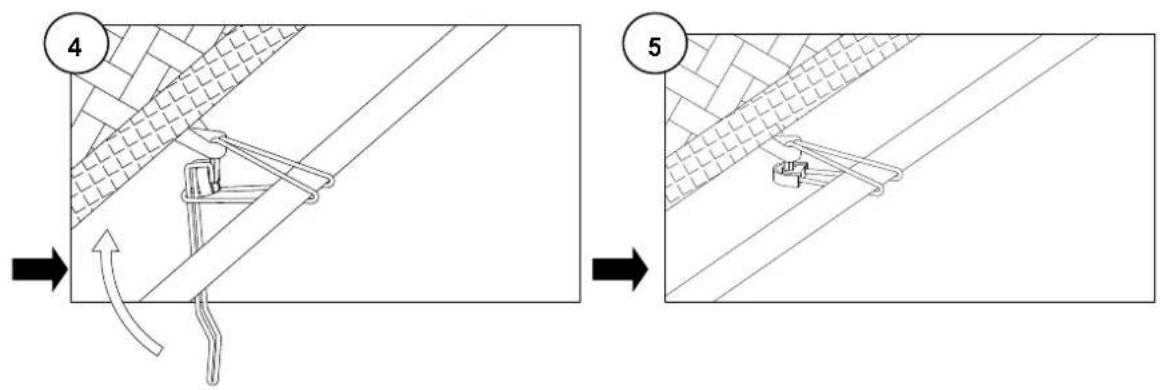
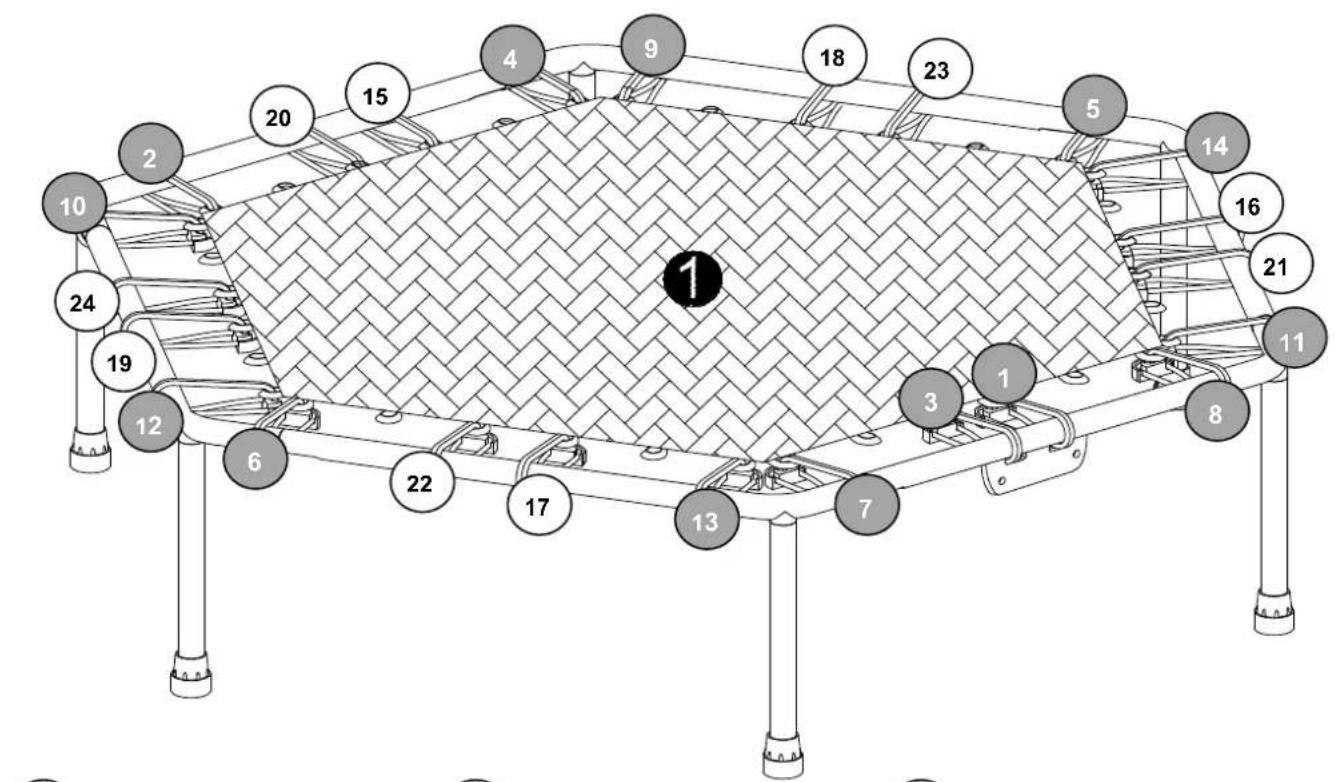
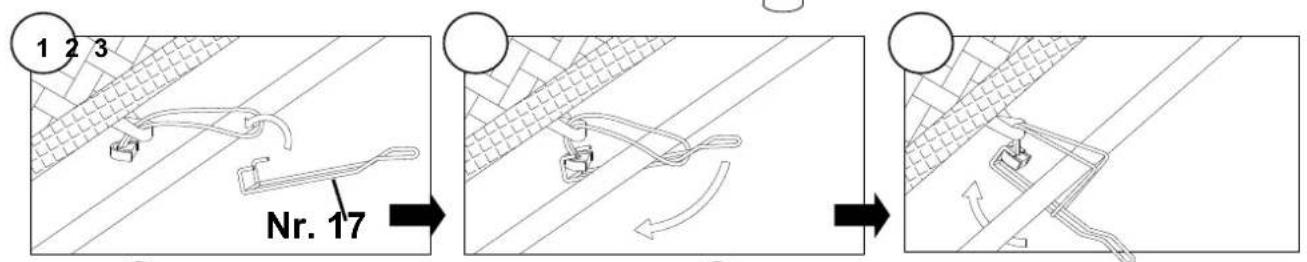
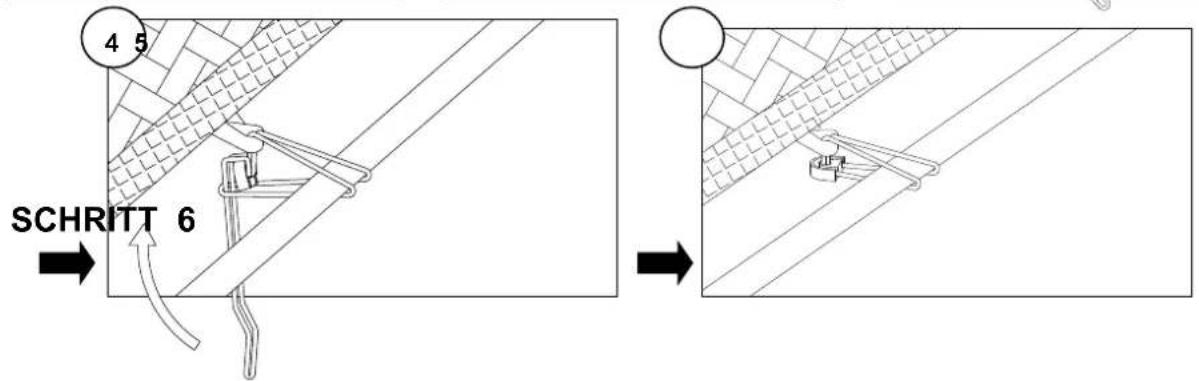
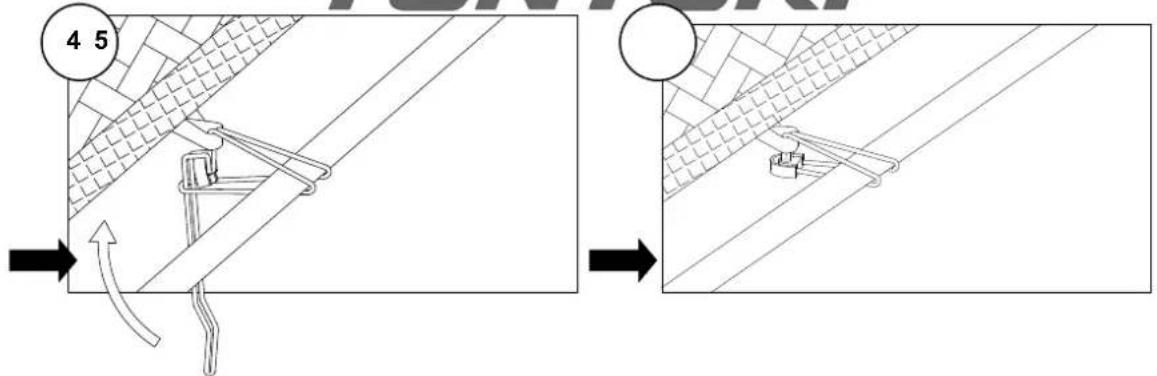
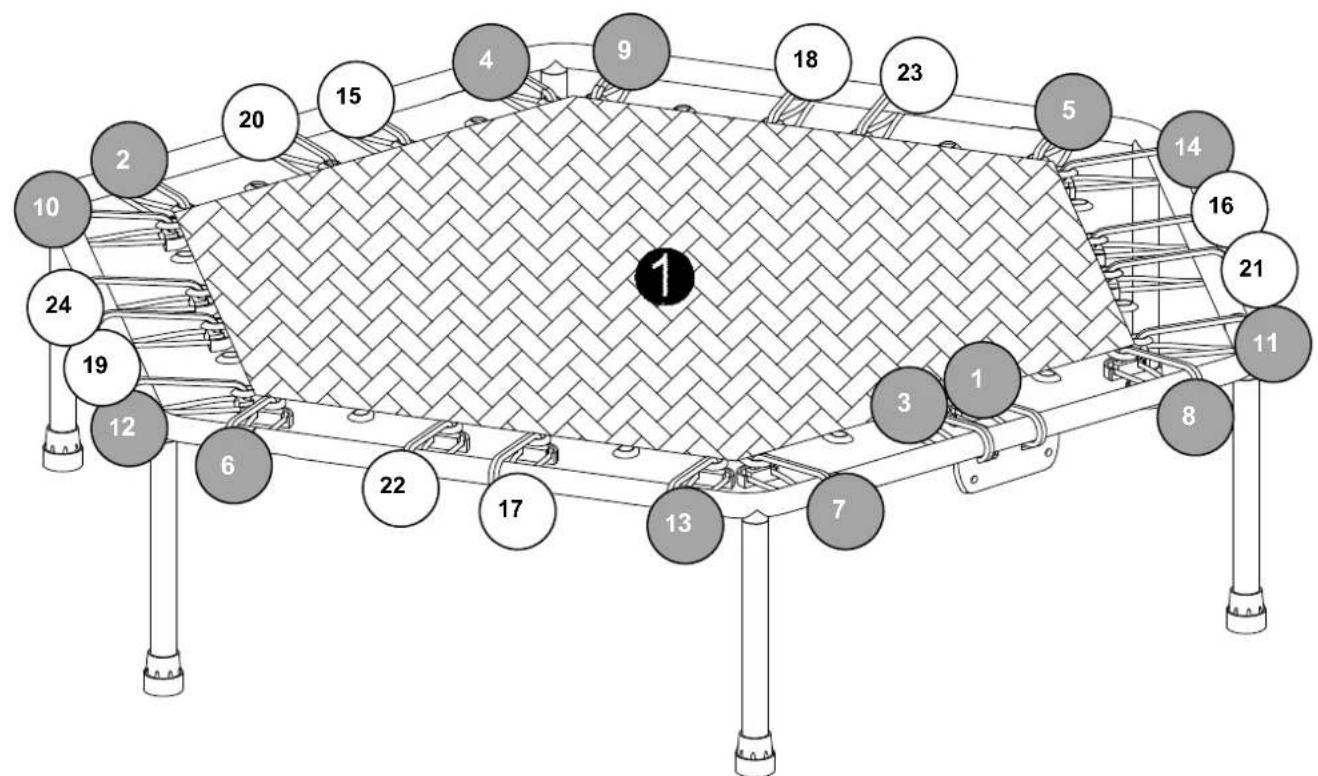
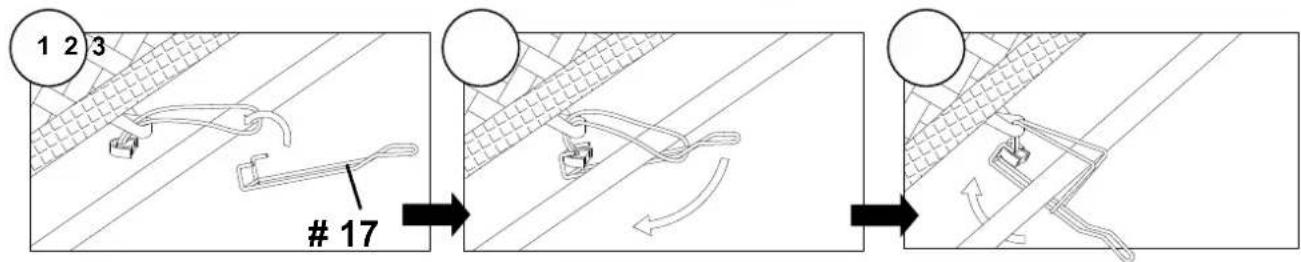
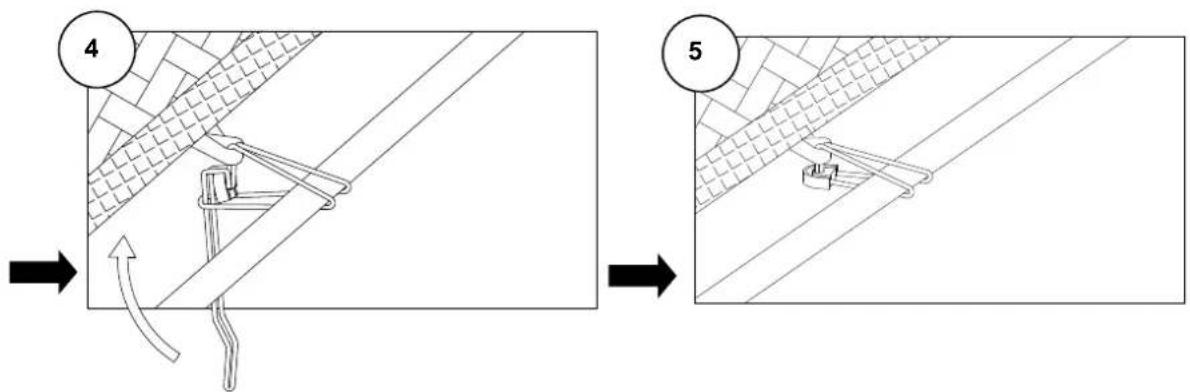
- There is a total of 36pcs #9 Elastic cords. For even distribution of tension and ease of assembly, the Elastic cords must always be installed on opposite sides of the mat in an alternating manner.
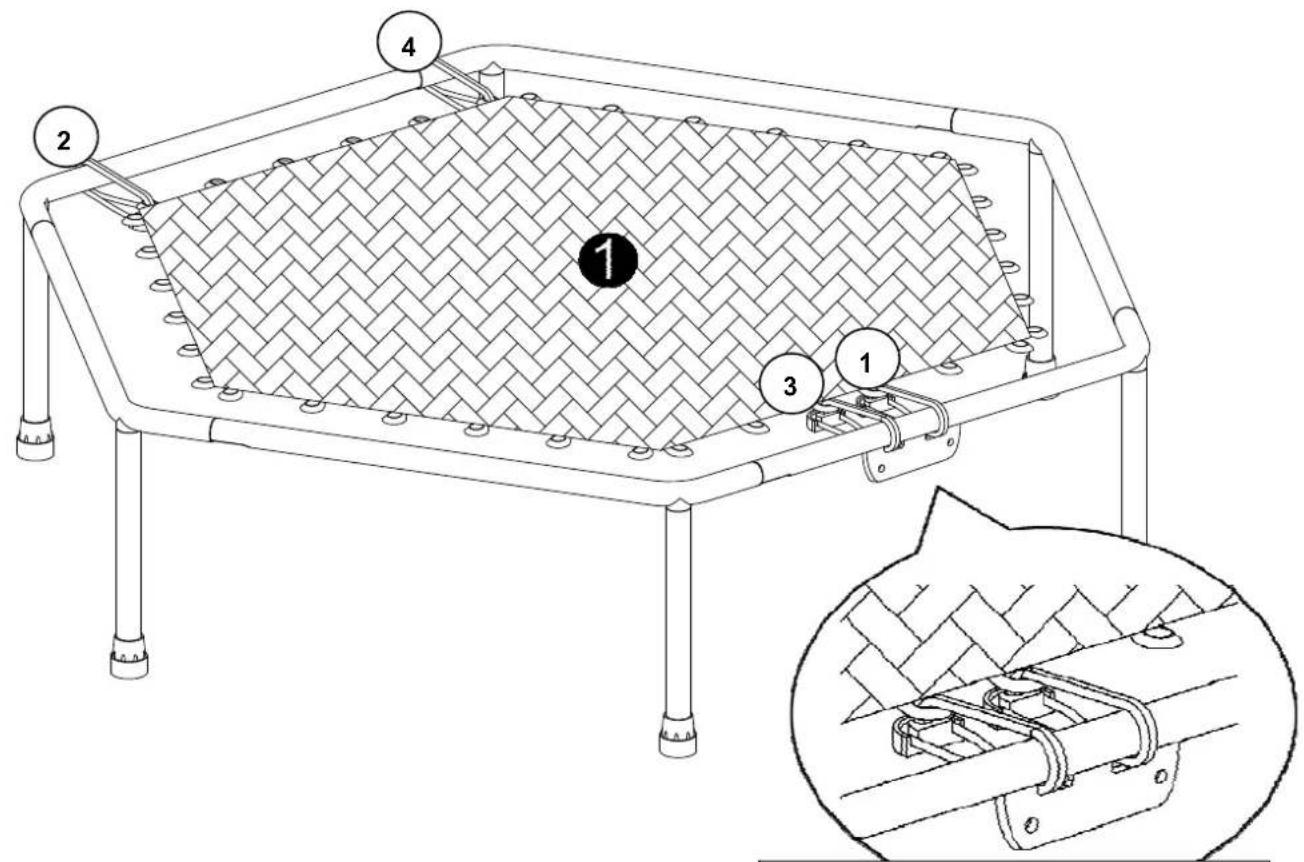
NO. 1 & NO. 3 : The elastic cords must be loaded through the holes on the Metal Plate
TUNTURI®
flowchart
graph TD
    A["Step 1: Initial state with two clips"] --> B["Step 2: Positioning on a grid-patterned surface"]
    B --> C["Step 3: Final state with a bracket and directional arrow"]
flowchart
graph TD
    A["Step 1: Initial component with zigzag line and grid pattern"] --> B["Step 2: Component with curved arrows indicating motion"]
    B --> C["Step 3: Final assembly with directional arrows and a bracket"]
TUNTURI®
STEP 5
TUNTURI®
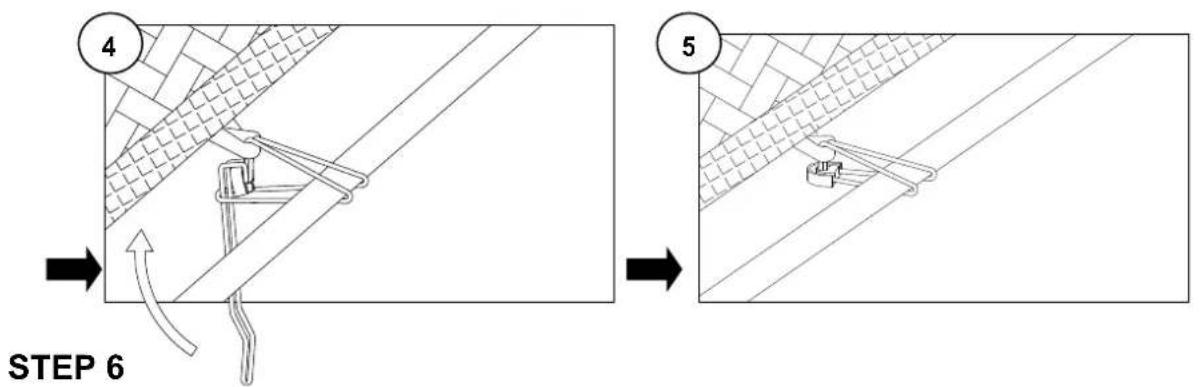
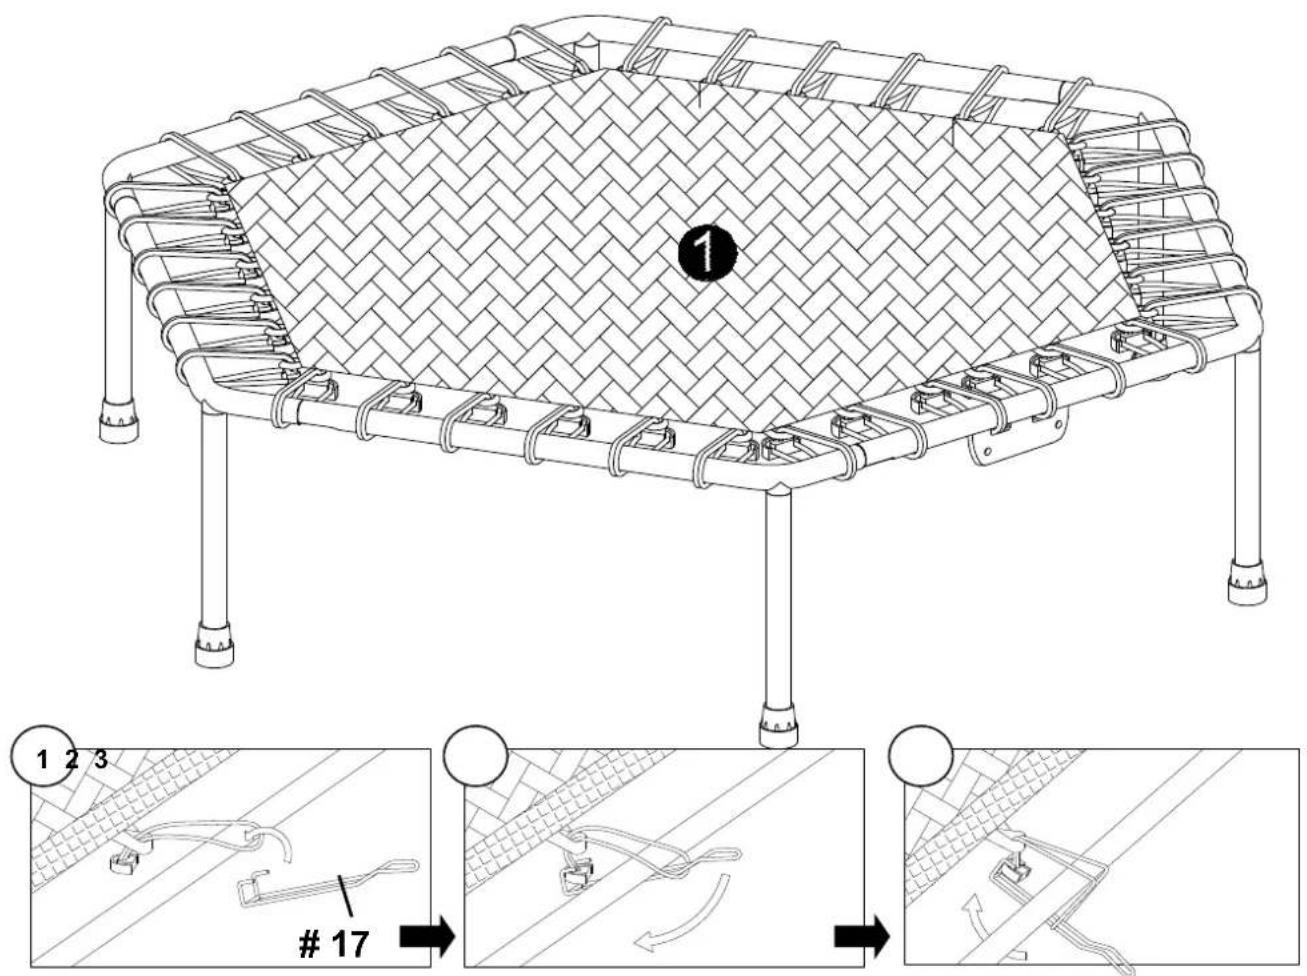
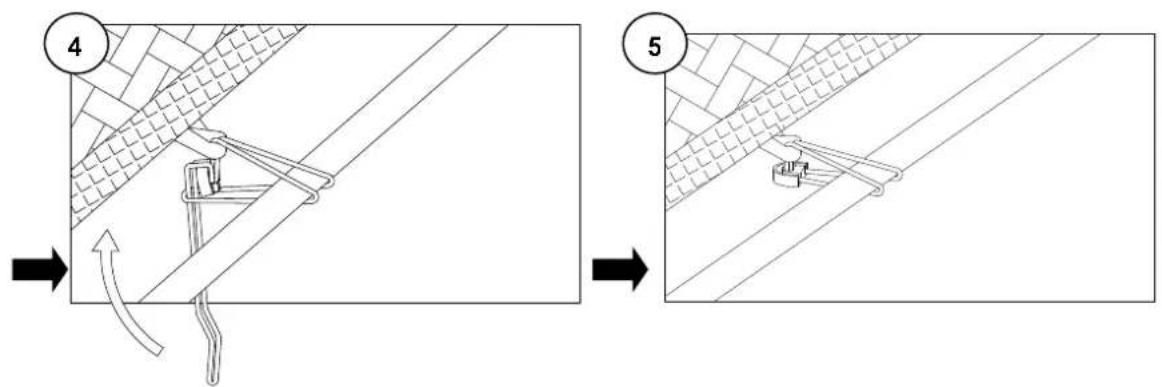
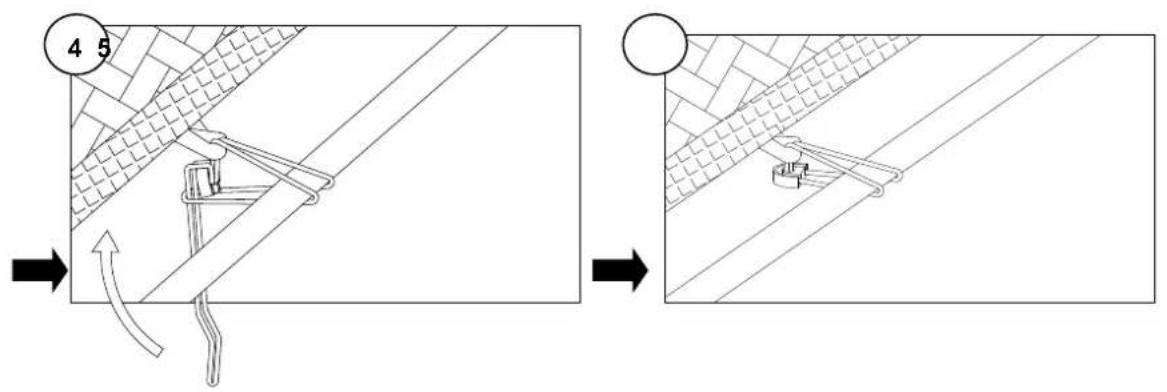
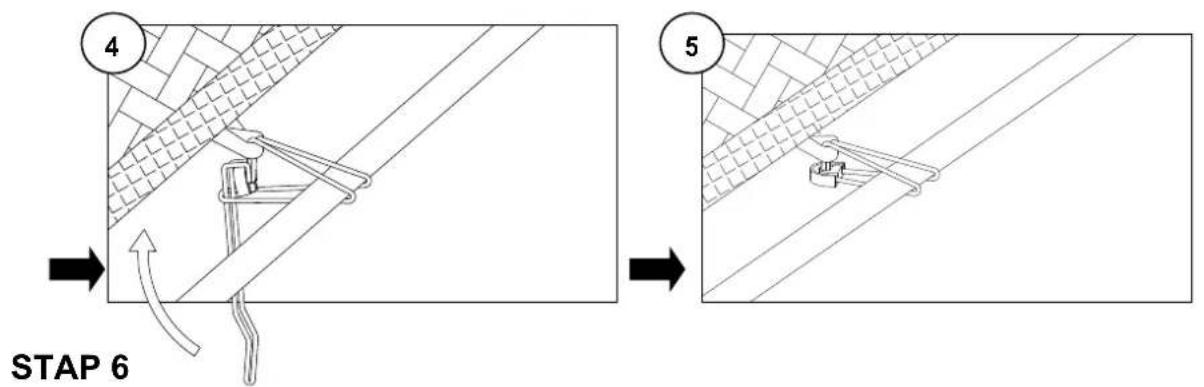
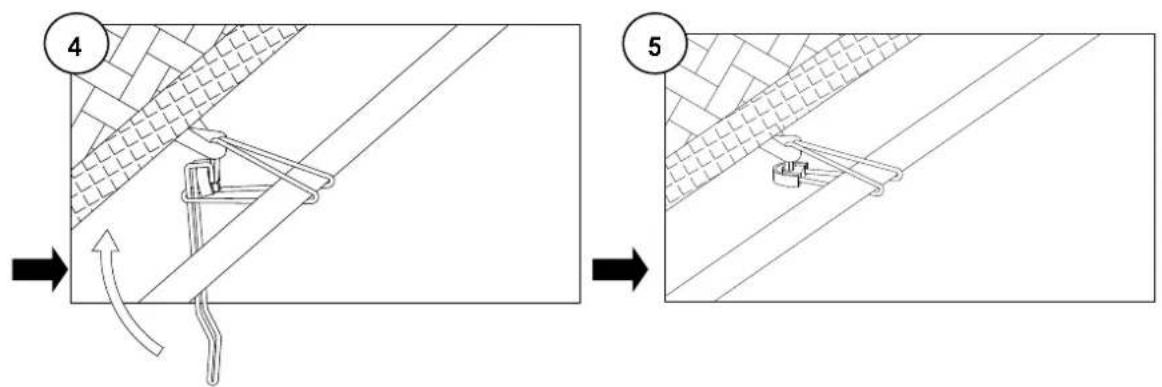
- Continue to attach the remaining 12pcs of #9 Elastic cords in the same manner as the previous step.
Hint: There is 6 pieces of Elastic cords on each side of the trampoline.
TUNTURI®
STEP 7
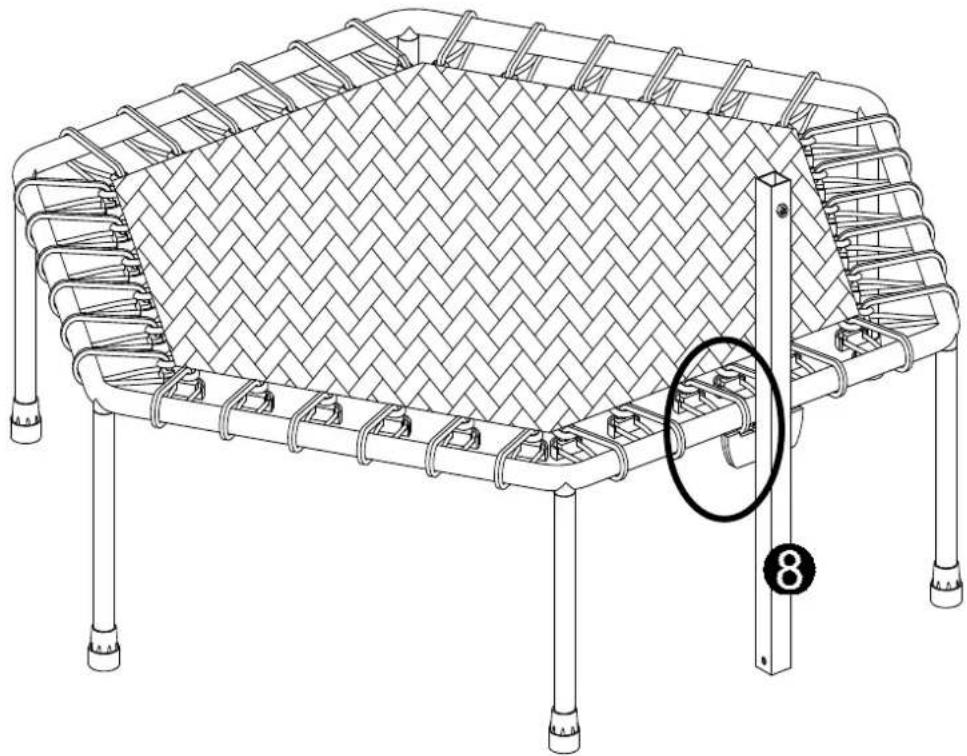
natural_image
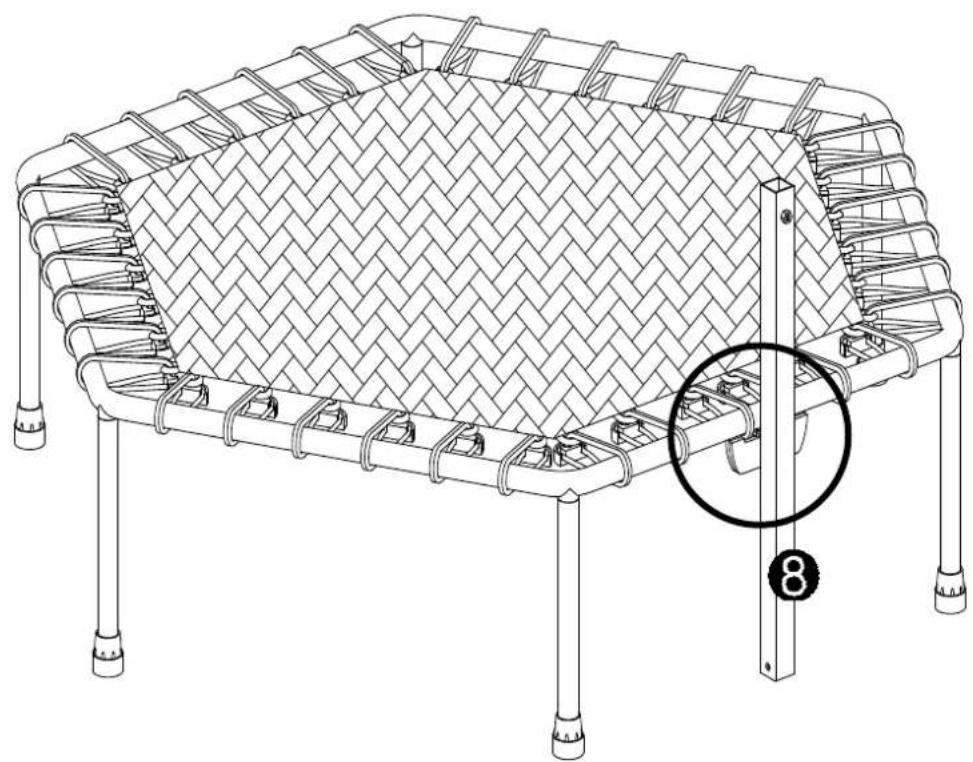
Line drawing of a woven-wrapped object with four legs and a circular annotation highlighting a numbered point (8) on the side.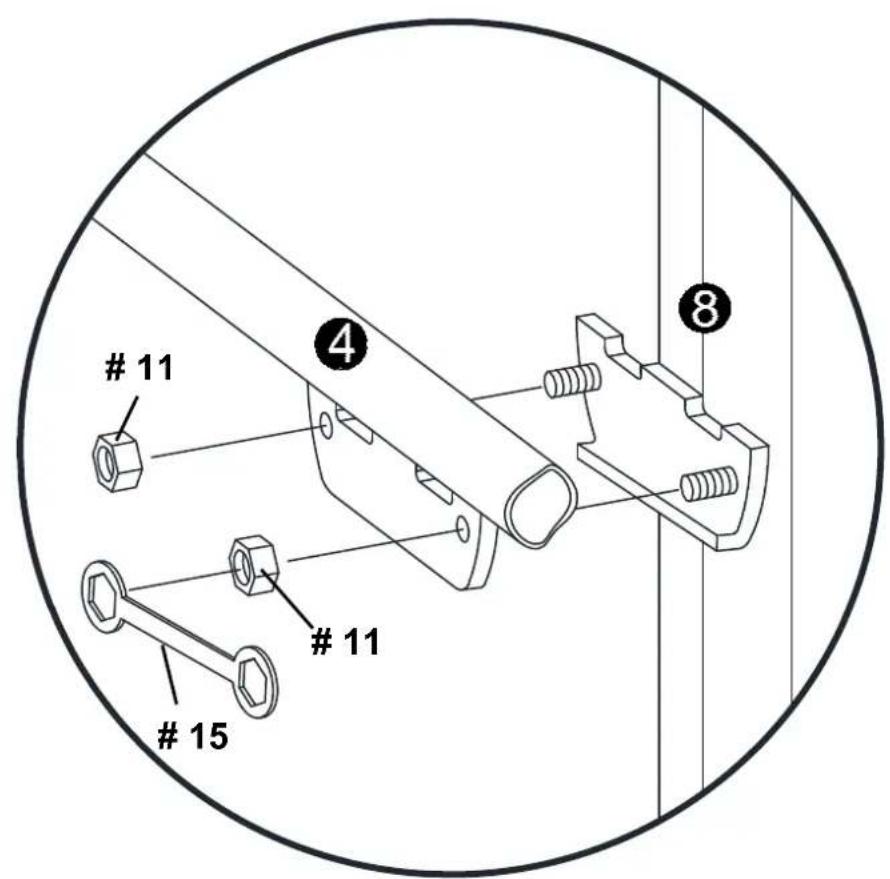
TUNTURI®
STEP 8
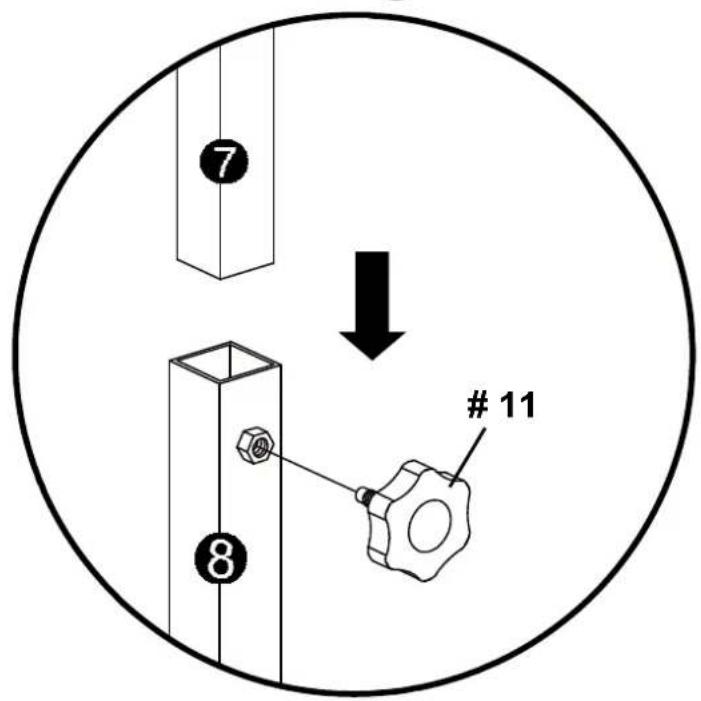
TUNTURI®
STEP 9
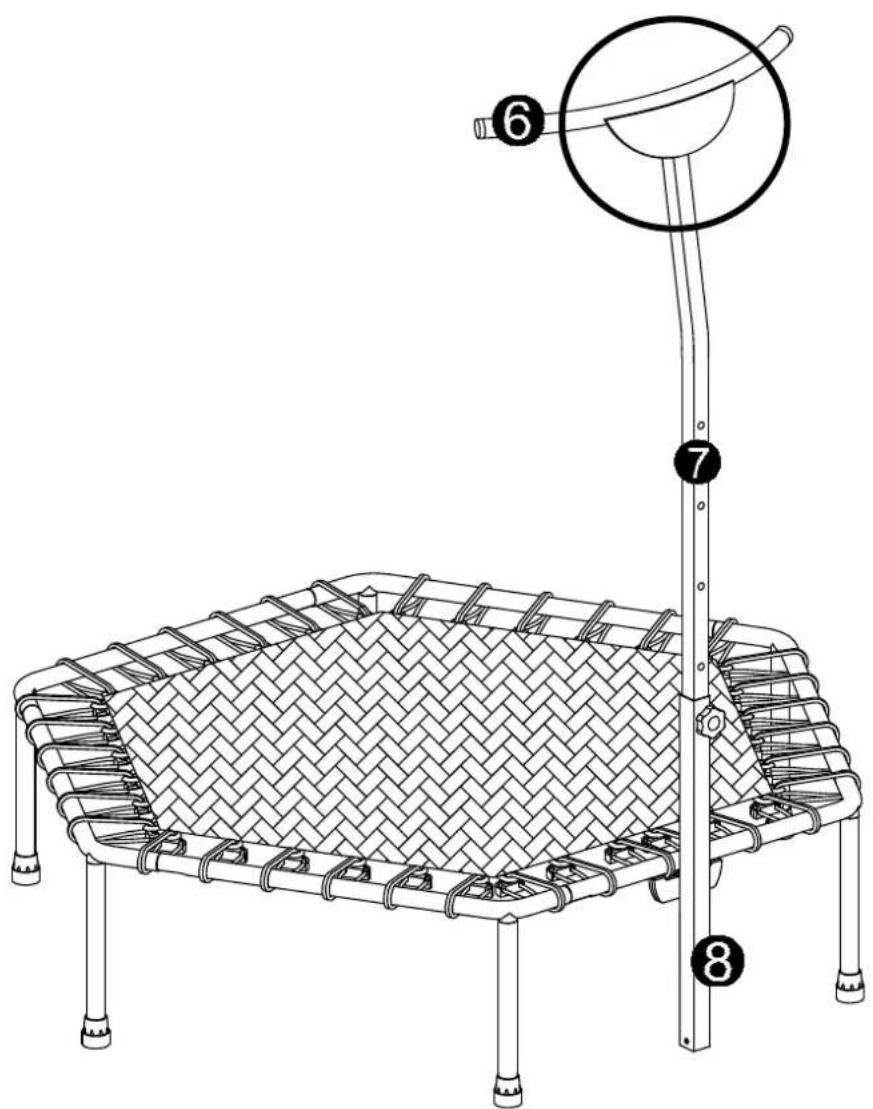
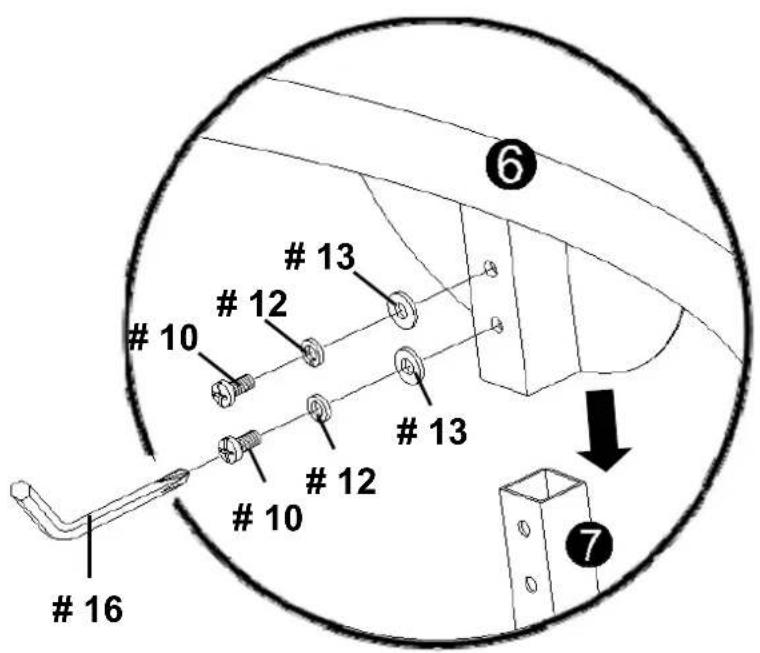
TUNTURI®
STEP 10
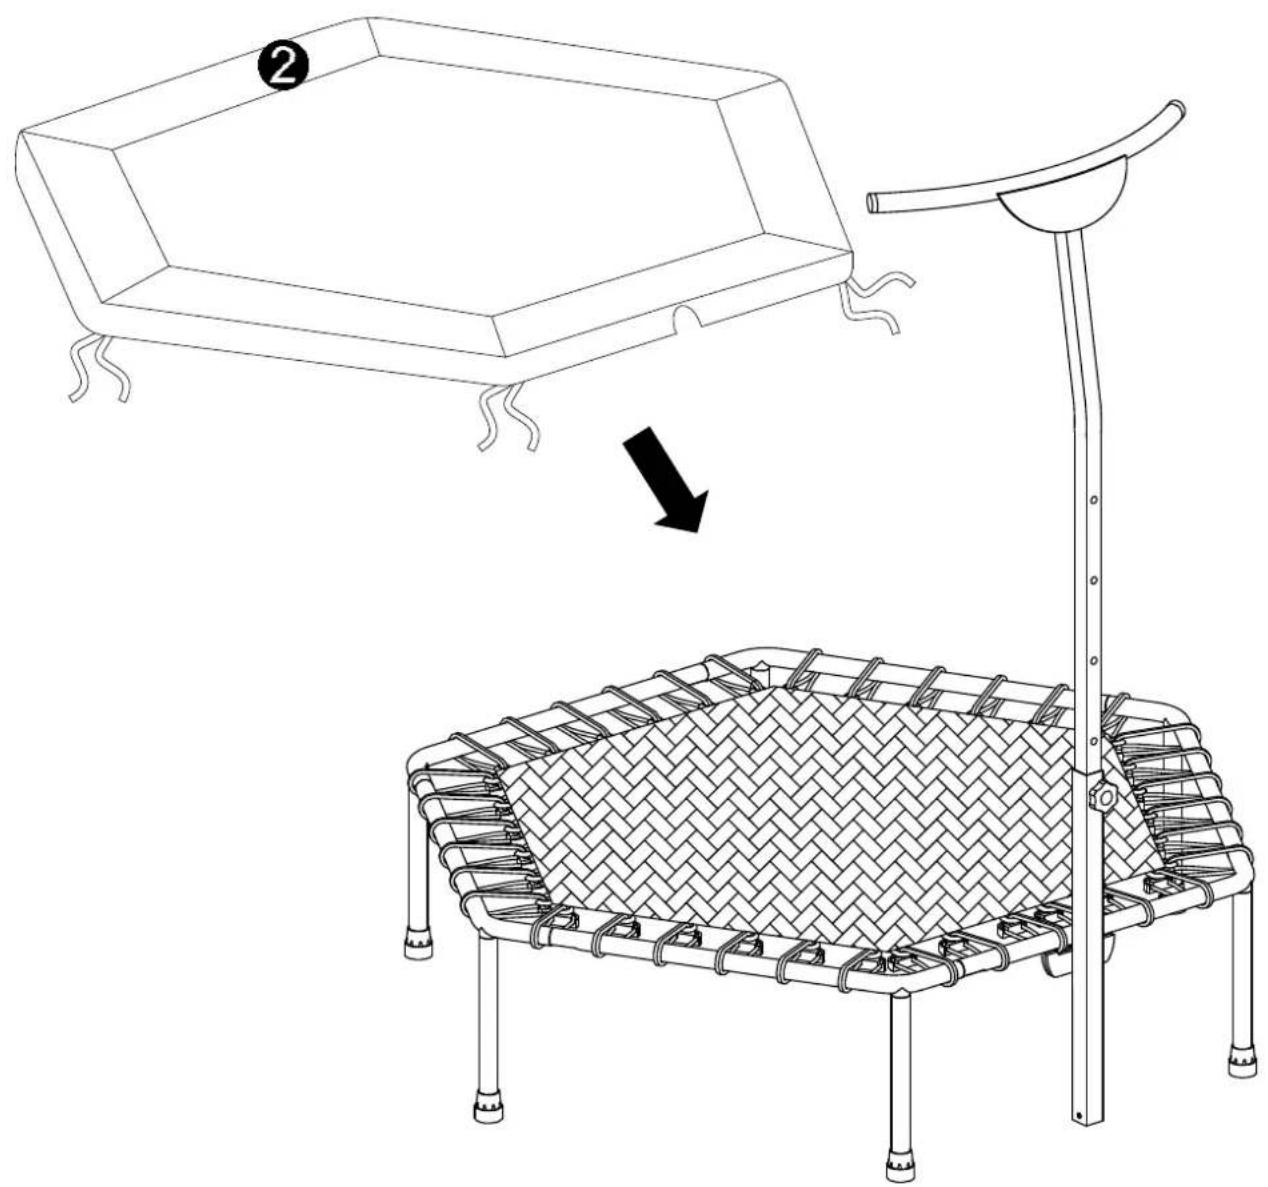
natural_image
Line drawing of a two-woven table lamp with a handle, showing structural change from top to side (no text or symbols)TUNTURI®
STEP 11
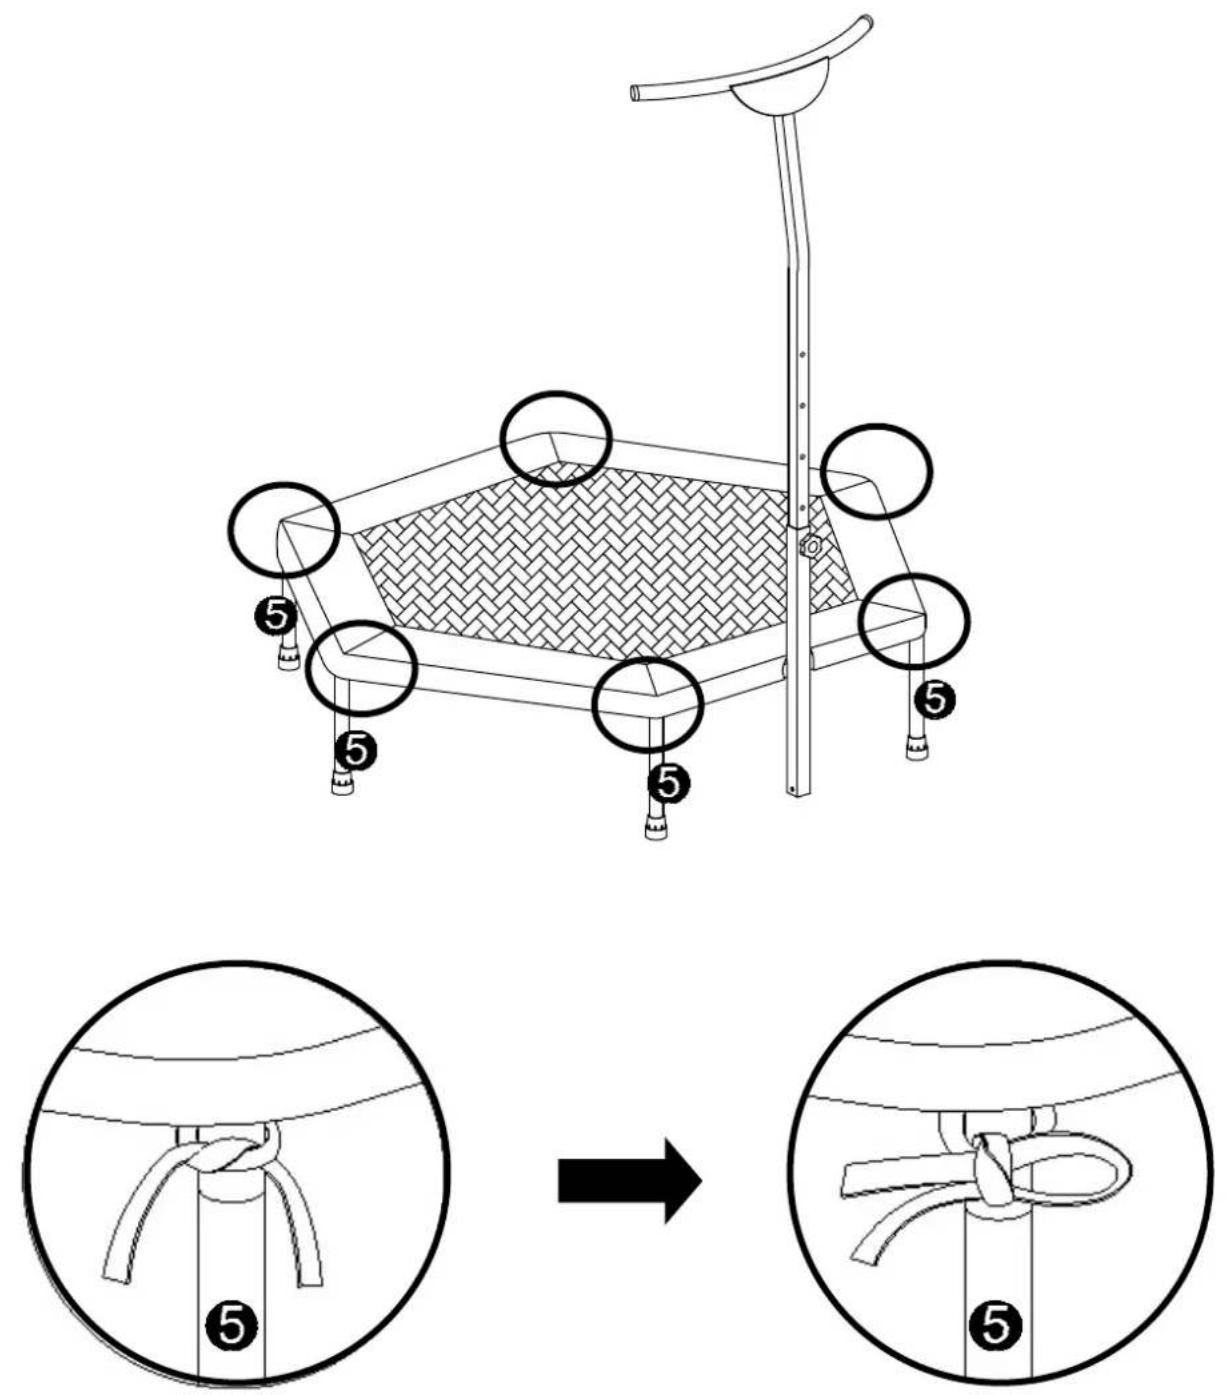
TUNTURI®
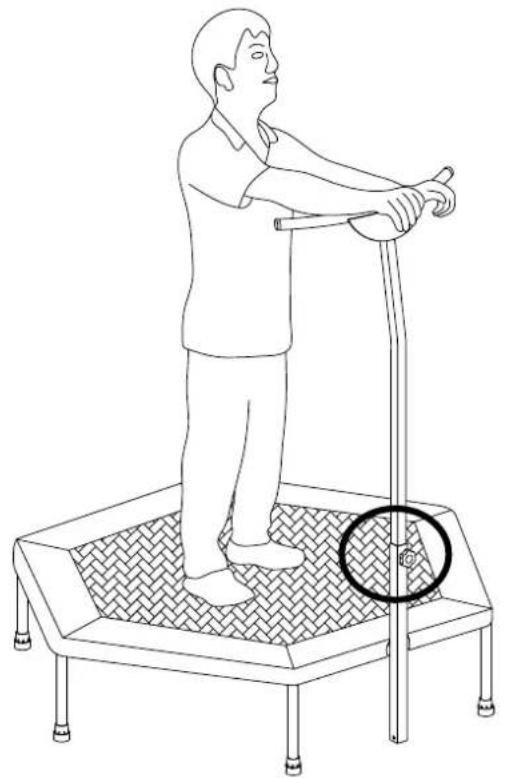
Adjustable Handlebar
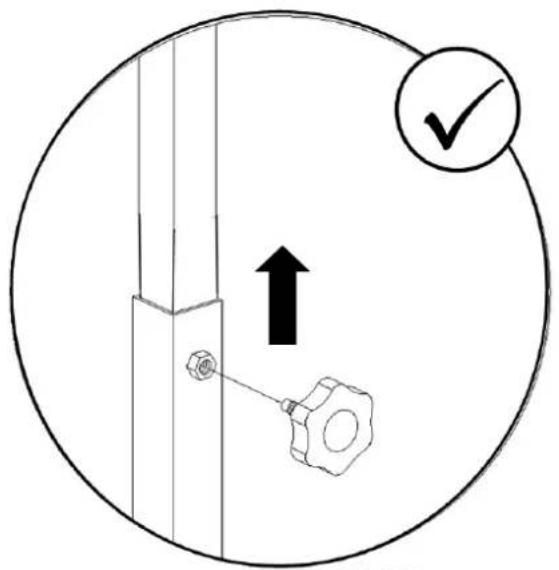
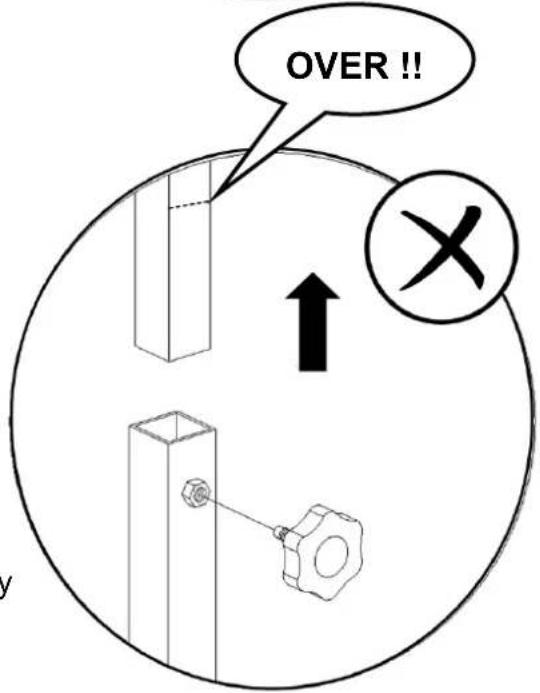
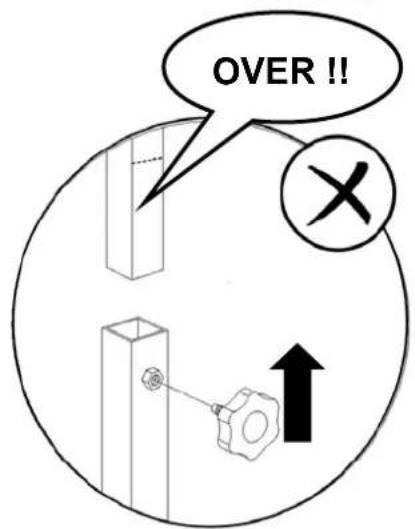
- The handlebar can be adjusted based on the user height. When adjusting the #7 Upper Support Tube, please ensure that the indented mark cannot be seen once fully assembled.
Hint: When using the trampoline, always keep your body weight centered. Do NOT lean your entire body weight on the handlebar in order to avoid flipping or tipping over.
natural_image
Line drawing of a person using a walking fitness device on a trampoline (no text or symbols)Disassembly of the Trampoline
To disassemble the trampoline, follow assembly in reverse order.
MOVING THE TRAMPOLINE
When moving, lift the trampoline slightly off the ground and keep it horizontal to the ground. For any type of other movement, you should disassemble the trampoline.
Tunturi New Fitness B.V.
Purmerweg 1 NL - 1311 XE Almere
P.O. Box 60001 NL - 1320 AA Almere
The Netherlands
www.tunturi-fitness.com
natural_image
Abstract gray ribbon-like shape with no text or symbolsTUNTURI®
WORLDWIDE FITNESS
TUNTURI®
natural_image
Line drawing of a small outdoor table with a woven mat and vertical support (no text or symbols)N.G.: ca. 11kg
Oppervlakte : ca. 96,5 x 83,5cm
Montage grootte: ca. L 116cm x B 125,5cm x H 120\~154cm
HET IS ENORM BELANGRIJK DAT U DEZE INSTRUCTIES LEEST EN BEGRIJPT VOORDAT U DE TRAMPOLINE MONTEERT EN GEBRUIKT.

WAARSCHUWING
natural_image
Three stick figures in motion poses, showing different postures (no text or symbols)flowchart
graph TD
    A["Step 3: Lender with X5"] --> B["Step 3: Right arm with X5"]
    B --> C["Step 4: Left arm with X1"]
    C --> D["Step 4: Right arm with X1"]
    D --> E["Step 5: Right arm with X1"]
    E --> F["Step 5: Right arm with X1"]
    F --> G["Step 5: Right arm with X5"]
    G --> H["Step 5: Right arm with X5"]
TUNTURI®
STAP 2
flowchart
graph TD
    A["Component 3"] --> B["Component 3"]
    B --> C["Component 3"]
    C --> D["Component 4"]
    D --> E["Component 3"]
    E --> F["Component 3"]
    F --> G["Component 3"]
    G --> H["Component 3"]
    H --> I["Component 3"]
    I --> J["Component 3"]
    J --> K["Component 3"]
    K --> L["Component 3"]
    L --> M["Component 3"]
    M --> N["Component 3"]
    N --> O["Component 3"]
    O --> P["Component 3"]
    P --> Q["Component 3"]
    Q --> R["Component 3"]
    R --> S["Component 3"]
    S --> T["Component 3"]
    T --> U["Component 3"]
    U --> V["Component 3"]
    V --> W["Component 3"]
    W --> X["Component 3"]
    X --> Y["Component 3"]
    Y --> Z["Component 3"]
    Z --> AA["Component 3"]
    AA --> AB["Component 3"]
    AB --> AC["Component 3"]
    AC --> AD["Component 3"]
    AD --> AE["Component 3"]
    AE --> AF["Component 3"]
    AF --> AG["Component 3"]
    AG --> AH["Component 3"]
    AH --> AI["Component 3"]
    AI --> AJ["Component 3"]
    AJ --> AK["Component 3"]
    AK --> AL["Component 3"]
    AL --> AM["Component 3"]
    AM --> AN["Component 3"]
    AN --> AO["Component 3"]
    AO --> AP["Component 3"]
    AP --> AQ["Component 3"]
    AQ --> AR["Component 3"]
    AR --> AS["Component 3"]
    AS --> AT["Component 3"]
    AT --> AU["Component 3"]
    AU --> AV["Component 3"]
    AV --> AW["Component 3"]
    AW --> AX["Component 3"]
    AX --> AY["Component 3"]
natural_image
Simple line drawing of a bent pipe with a numbered circle marker (3) on the left end, no text or symbols present.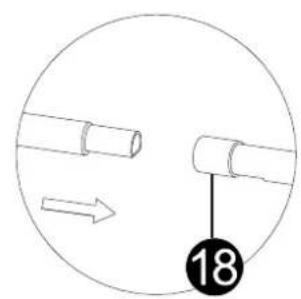
natural_image
Simple line drawing of two cylindrical objects inside a circle with an arrow and number 18 (no text or symbols on the objects)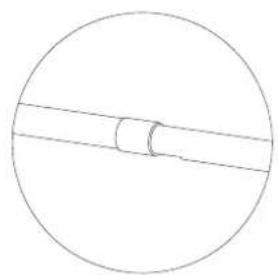
natural_image
Simple line drawing of a circle with a central vertical line and a small circular cutout (no text or symbols)
natural_image
Line drawing of a rectangular frame with four legs and three labeled points (18 and 3), no text or symbols present.STAP 3
flowchart
graph TD
    A["Step 1: Initial component with zigzag edge"] --> B["Step 2: Component with curved line and grid pattern"]
    B --> C["Step 3: Final assembly with directional arrows indicating motion"]
TUNTURI®
STAP 5
flowchart
graph TD
    A["Step 1: Initial state with two clips"] --> B["Step 2: Formation of a looped part with #17 label"]
    B --> C["Step 3: Final state with a bracket and directional arrow"]
TUNTURI®
TUNTURI®
STAP 7
natural_image
Line drawing of a woven-wrapped object with four legs and a circular annotation highlighting a numbered point (8) on the side.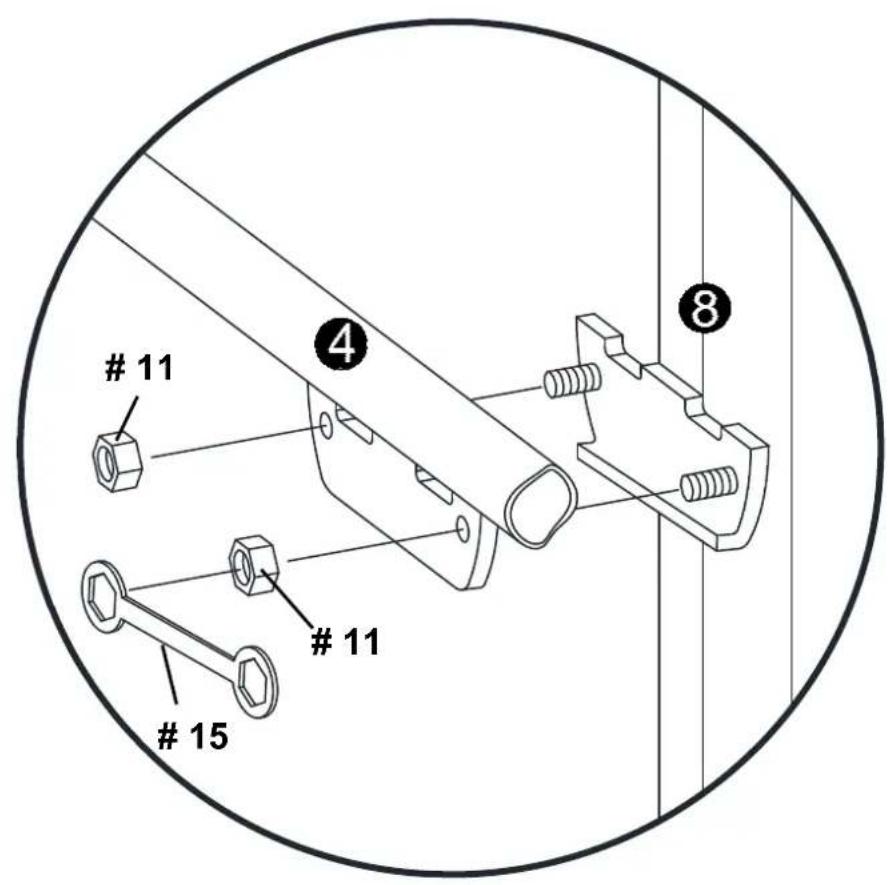
TUNTURI®
STAP 8
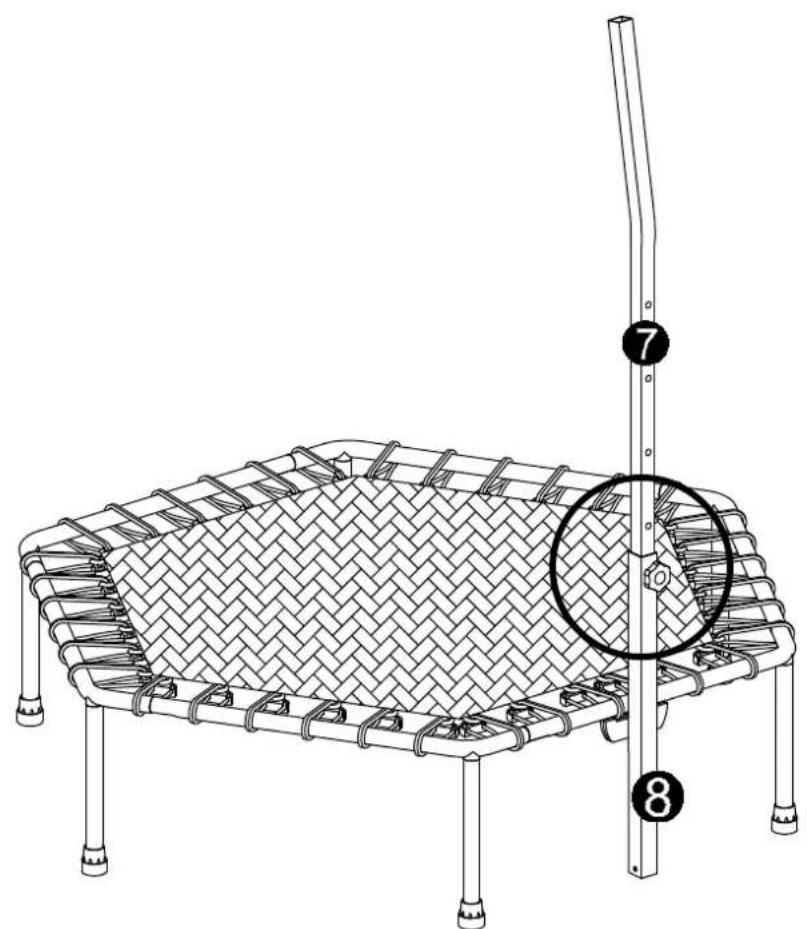
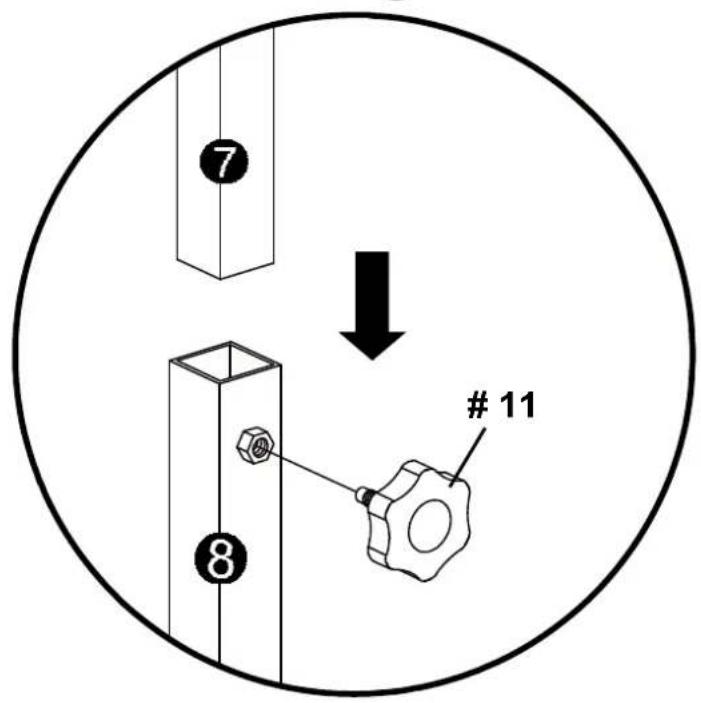
TUNTURI®
STAP 9
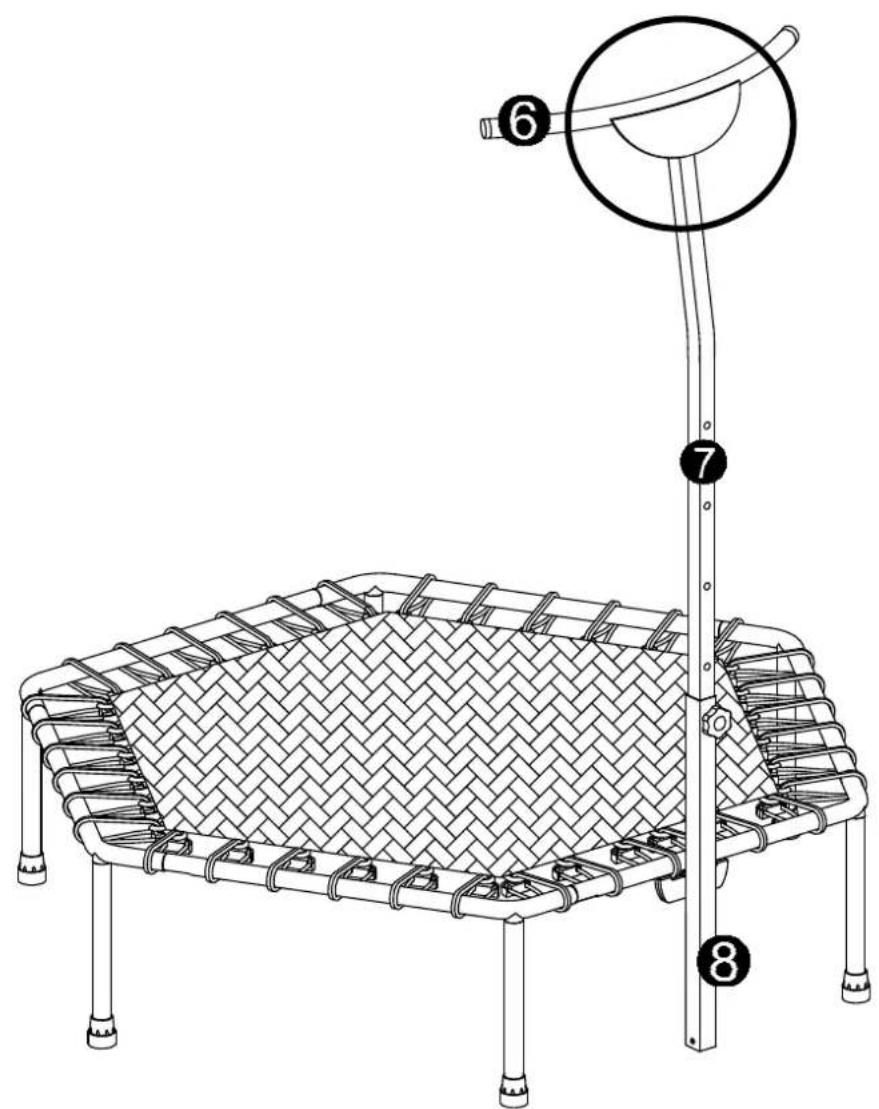
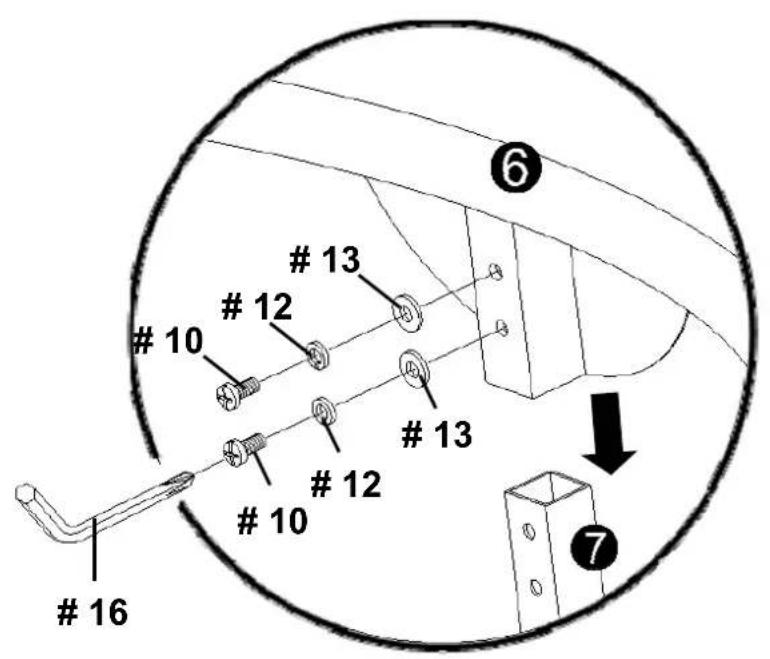
TUNTURI®
STAP 10
natural_image
Technical line drawing showing a box device with a handle and a woven mat base, both without any text or symbols.TUNTURI®
STAP 11
Verstelbare handgreep
natural_image
Line drawing of a person using a walking cane on a square platform, with a circled area highlighting the point of interest (no text or symbols present)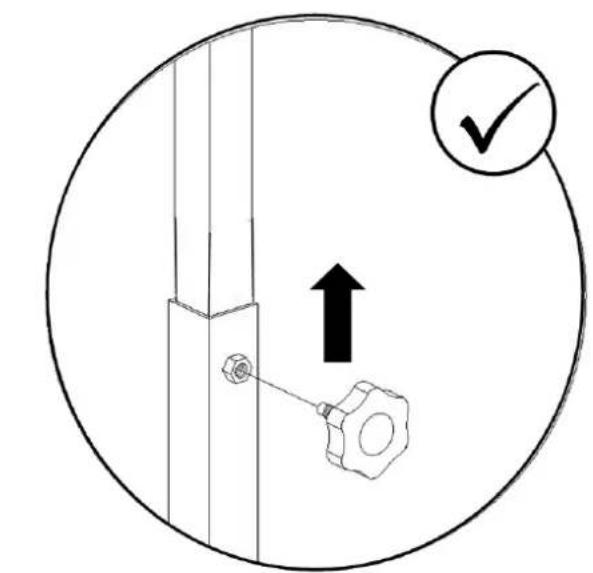
www.tunturi-fitness.com
natural_image
Abstract gray ribbon-like shape with no text or symbolsTUNTURI®
WORLDWIDE FITNESS
TUNTURI®
natural_image
Line drawing of a square water feature with a horizontal walkway and mesh-patterned base (no text or symbols)natural_image
Three sequential line drawings of human figures in various poses, showing progressive motion (no text or symbols)natural_image
Diagram showing a mechanical assembly process with an arrow indicating direction (no text or symbols present)TUNTURI®
natural_image
Simple line drawing of a cylindrical object with two vertical arrows indicating upward and downward motion (no text or symbols)SCHRITT 2
natural_image
Diagram showing a cylindrical object with an arrow indicating direction, and two bent tool-like shapes with arrows pointing right (no text or symbols)
flowchart
graph TD
    A["Component 3"] --> B["Component 3"]
    B --> C["Component 4"]
    C --> D["Component 3"]
    D --> E["Component 3"]
    E --> F["Component 3"]
    F --> G["Component 3"]
    G --> H["Component 3"]
    H --> I["Component 3"]
    I --> J["Component 3"]
    J --> K["Component 3"]
    K --> L["Component 3"]
    L --> M["Component 3"]
    M --> N["Component 3"]
    N --> O["Component 3"]
    O --> P["Component 3"]
    P --> Q["Component 3"]
    Q --> R["Component 3"]
    R --> S["Component 3"]
    S --> T["Component 3"]
    T --> U["Component 3"]
    U --> V["Component 3"]
    V --> W["Component 3"]
    W --> X["Component 3"]
    X --> Y["Component 3"]
    Y --> Z["Component 3"]
    Z --> AA["Component 3"]
    AA --> AB["Component 3"]
    AB --> AC["Component 3"]
    AC --> AD["Component 3"]
    AD --> AE["Component 3"]
    AE --> AF["Component 3"]
    AF --> AG["Component 3"]
natural_image
Simple line drawing of a bent pipe with a numbered circle marker (3) on the left end, no text or symbols present.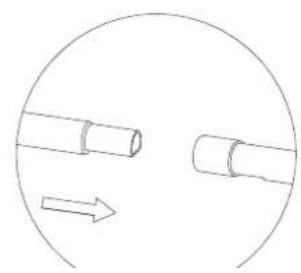
natural_image
Simple line drawing of two cylindrical objects inside a circle with an arrow indicating direction (no text or symbols)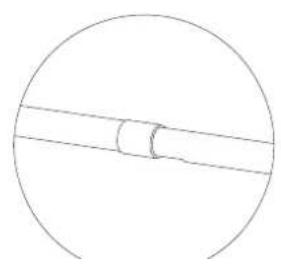
natural_image
Simple line drawing of a circle with a central vertical line and a small circular cutout (no text or symbols)TUNTURI®
SCHRITT 3
flowchart
graph TD
    A["Step 1: Initial state with two connectors"] --> B["Step 2: Positioning on a textured surface"]
    B --> C["Step 3: Final state with a bracket and directional arrow"]
flowchart
graph TD
    A["1 2 3"] --> B["Nr 17"]
    B --> C["Step 1: Positioning on clamp or clamp device"]
    C --> D["Step 2: Rotation of clamp or clamp device"]
    D --> E["Step 3: Rotation of clamp or clamp device"]
TUNTURI®
SCHRITT 5
TUNTURI®
TUNTURI®
SCHRITT 7
natural_image
Line drawing of a woven-wrapped object with four legs and a circular annotation highlighting a numbered point (8) on the side.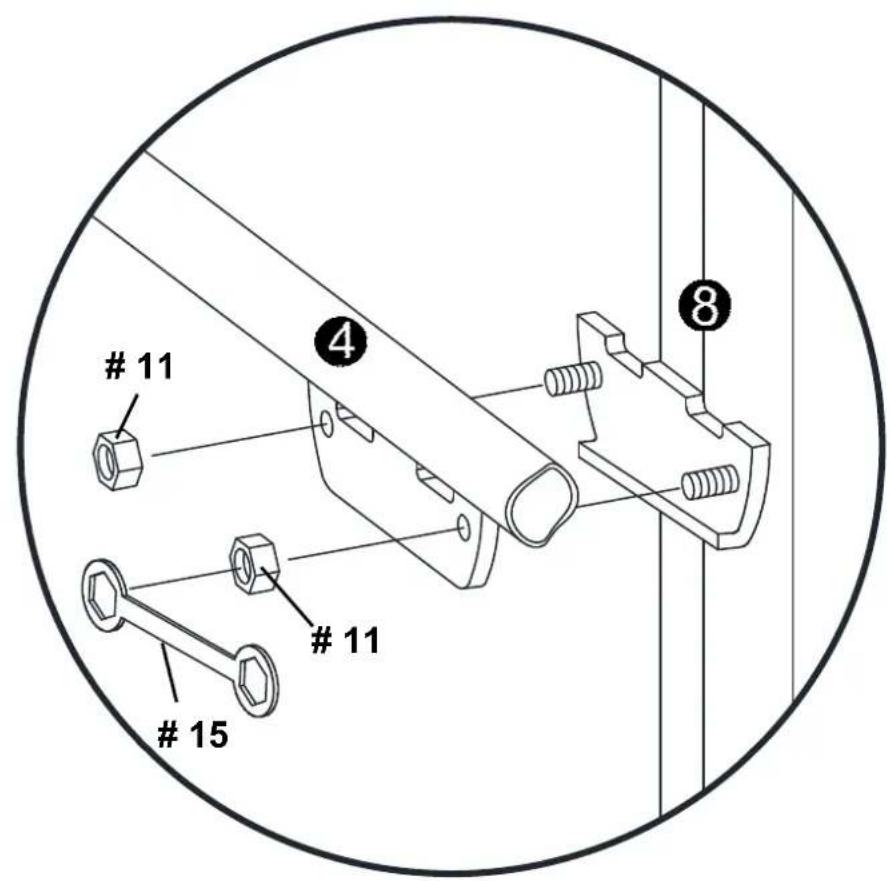
TUNTURI®
SCHRITT 8
TUNTURI®
SCHRITT 9
TUNTURI®
SCHRITT 10
natural_image
Line drawings of a two-woven table device with a handle and woven mat, showing structural change (no text or symbols)TUNTURI®
SCHRITT 11
TUNTURI®
www.tunturi-fitness.com
natural_image
Abstract gray wavy ribbon design on white background (no text or symbols)TUNTURI®
WORLDWIDE FITNESS
TUNTURI®
Manuel FitnessTrampoline
natural_image
Line drawing of a square water feature with a vertical stand and mesh pattern (no text or symbols)N.W.: environ 11kg
natural_image
Three sequential line drawings of human figures in different poses: walking, holding a ball, and jumping with motion lines (no text or symbols)flowchart
graph TD
    A["Step 3: Ladder with X5"] --> B["Step 3: Ladder with X5"]
    B --> C["Step 4: Ladder with X1"]
    C --> D["Step 4: Ladder with X1"]
    D --> E["Step 5: Ladder with X5"]
    E --> F["Step 5: Ladder with X1"]
    F --> G["Step 5: Ladder with X5"]
    G --> H["Step 5: Ladder with X1"]
    H --> I["Step 5: Ladder with X5"]
    I --> J["Step 5: Ladder with X1"]
    J --> K["Step 5: Ladder with X5"]
    K --> L["Step 5: Ladder with X1"]
    L --> M["Step 5: Ladder with X5"]
    M --> N["Step 5: Ladder with X1"]
TUNTURI®
ETAPE 2
flowchart
graph TD
    A["1"] --> B["2"]
    B --> C["3"]
    C --> D["4"]
    D --> E["5"]
    E --> F["6"]
    F --> G["7"]
    G --> H["8"]
    H --> I["9"]
    I --> J["10"]
    J --> K["11"]
    K --> L["12"]
    L --> M["13"]
    M --> N["14"]
    N --> O["15"]
    O --> P["16"]
    P --> Q["17"]
    Q --> R["18"]
    R --> S["19"]
    S --> T["20"]
    T --> U["21"]
    U --> V["22"]
    V --> W["23"]
    W --> X["24"]
    X --> Y["25"]
    Y --> Z["26"]
    Z --> AA["27"]
    AA --> AB["28"]
    AB --> AC["29"]
    AC --> AD["30"]
TUNTURI®
natural_image
Line drawing of a rectangular frame with four legs and three labeled points (18 and 3), no text or symbols present.ETAPE 3
TUNTURI®
ETAPE 5
flowchart
graph LR
    A["Step 1: Clamp or hook"] --> B["Step 2: Capture"]
    B --> C["Step 3: Capture"]
    C --> D["Step 4: Capture"]
    D --> E["Step 5: Capture"]
    style A fill:#f9f,stroke:#333
    style E fill:#bbf,stroke:#333
TUNTURI®
ETAPE 6
TUNTURI®
ETAPE 7
natural_image
Line drawing of a woven-wrapped object with four legs and a circular annotation highlighting a numbered point (8) on the side.
TUNTURI®
ETAPE 8
natural_image
Line drawing of a woven mat with four legs and a vertical rod, marked with numbers 7 and 8 (no text or symbols on the mat itself)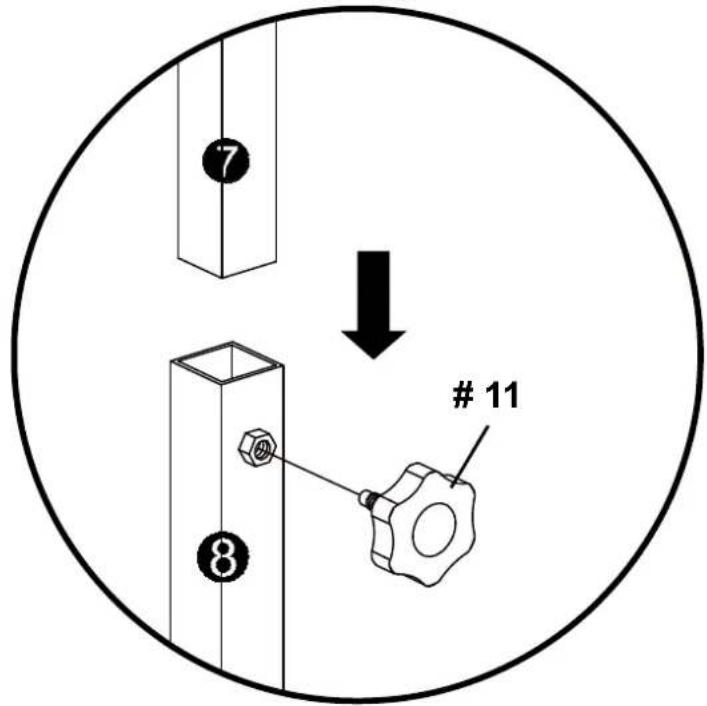
TUNTURI®
ETAPE 9
natural_image
Technical diagram of a mechanical assembly with labeled components and an arrow indicating downward motion (no text or symbols present)TUNTURI®
ETAPE 10
natural_image
Technical line drawing showing a two-step assembly: top panel with a rectangular box and base, bottom panel with woven mesh structure (no text or symbols)TUNTURI®
ETAPE 11
natural_image
Line drawing of a small outdoor walkway with a woven mat and vertical support, marked with circles and numbers 5 (no text or symbols on the diagram itself)
natural_image
Diagram showing a rope knot being twisted into a spherical object, with an arrow indicating the process (no text or symbols present)TUNTURI®
Guidon réglable
natural_image
Line drawing of a person using a walking trampoline with a circular marker highlighting the point of the knee (no text or symbols present)natural_image
Technical diagram showing a mechanical assembly with a checkmark and upward arrow, no readable text or symbols present.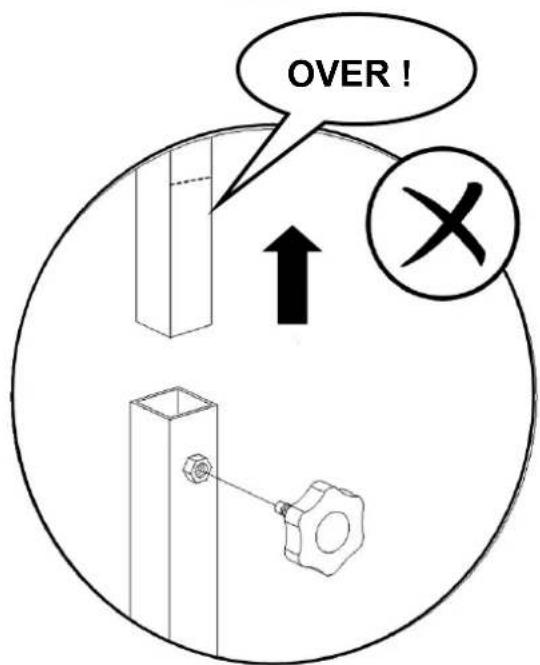
Tunturi New Fitness B.V.
Purmerweg 1 NL - 1311 XE Almere P.O. Box 60001 NL - 1320 AA Almere The Netherlands
www.tunturi-fitness.com


- Fitness Trampoline with Handle
- IT IS VERY IMPORTANT THAT YOU READ AND UNDERSTAND THE INSTRUCTIONS BEFORE ASSEMBLING AND USING THE TRAMPOLINE.
- WARNING
- TUNTURI®
- Important Safety Information
- Please keep this manual in a safe place for reference.
- ● Maintenance instruction:
- ● Maintenance of Frame Pad
- BASIC TRAMPOLINE BOUNCES
- LY INSTRUCTION
- STEP 1
- STEP 2
- STEP 3
- 17
- 11
- 15
- 16
- 10
- 12
- 13
- Adjustable Handlebar
- Disassembly of the Trampoline
- MOVING THE TRAMPOLINE
- HET IS ENORM BELANGRIJK DAT U DEZE INSTRUCTIES LEEST EN BEGRIJPT VOORDAT U DE TRAMPOLINE MONTEERT EN GEBRUIKT.
- WAARSCHUWING
- STAP 2
- STAP 3
- Verstelbare handgreep
- SCHRITT 3
- SCHRITT 7
- Manuel FitnessTrampoline
- ETAPE 3
- ETAPE 6
- ETAPE 10
- Guidon réglable
Brand : TUNTURI
Model : Fitness Trampoline
Category : Trampoline