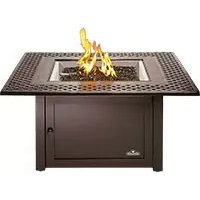
KENS2BZ1 - Cooker Napoleon - Free user manual and instructions
Find the device manual for free KENS2BZ1 Napoleon in PDF.


| Product type | Decorative gas outdoor fireplace (Patioflame) |
| Brand | Napoleon |
| Model | KENS2BZ1 |
| Fuel | Propane gas (20 lb or 30 lb cylinder) or natural gas (convertible) |
| Dimensions (approx.) | Width 92 cm, height 143 cm, depth 61 cm (KENS2 model) |
| Materials | Stainless steel, aluminum, Bronze finish |
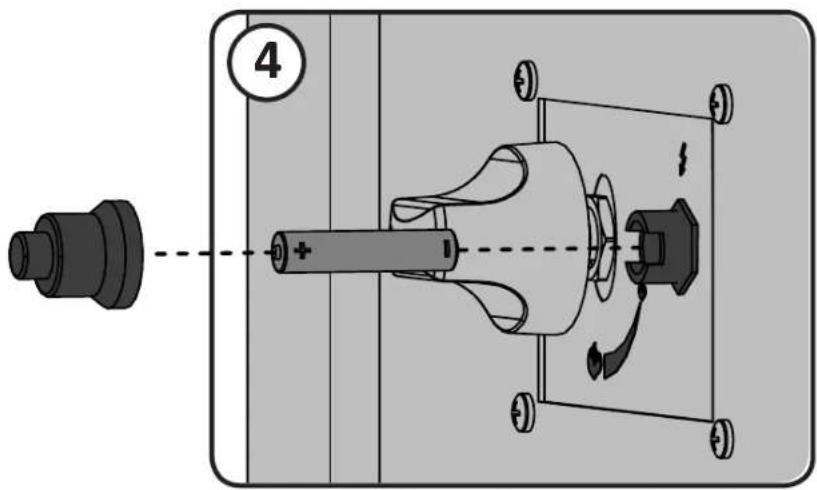
| Ignition | Electronic by AAA battery (1.5 V) |
| Flame control | Rotary knob with Off / High / Low positions |
| Burner | Stainless steel, converter included for natural gas |
| Minimum clearances | Side walls: 24 in (61 cm), ceiling: 72 in (183 cm), floor: 9 in (23 cm) |
| Vitrified embers | Topaz provided (2 bags), color options available |
| Use | Outdoor only, do not use for cooking |
| Warranty | Limited 3 years on burner and housing, 2 years on other components |
| Maintenance | Clean with soapy water, brass brush for the burner, annual inspection |
| Safety | Thermocouple, leak detection, automatic shutoff device |
| Optional accessories | Table cover, glass deflector |
| Certification | ANSI Z21.97-2014 / CSA 2.41-2014 |
Frequently Asked Questions - KENS2BZ1 Napoleon
User questions about KENS2BZ1 Napoleon
0 question about this device. Answer the ones you know or ask your own.
Ask a new question about this device
Download the instructions for your Cooker in PDF format for free! Find your manual KENS2BZ1 - Napoleon and take your electronic device back in hand. On this page are published all the documents necessary for the use of your device. KENS2BZ1 by Napoleon.
USER MANUAL KENS2BZ1 Napoleon
This gas appliance must be used only outdoors in a well-ventilated space and must not be used inside a building, garage, screened-in porch, gazebo or any other enclosed area.
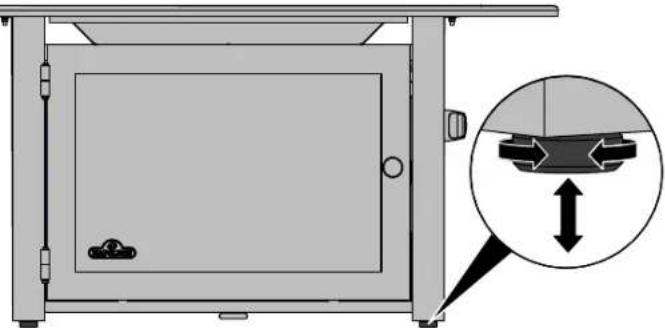
NAPOLEON
APPLY SERIAL NUMBER LABEL FROM CARTON

Serial No. XXXXXXX000000 MODEL NO.
DO NOT DISCARD
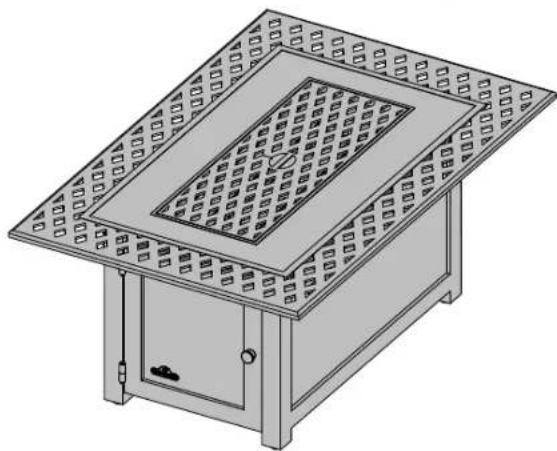
PATIOFLAME
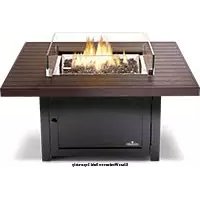
OUTDOOR GAS FIREPIT
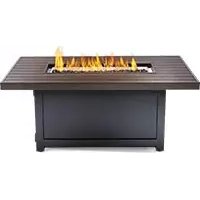
KENS1 (GPFR)
KENS2 (GPFS)
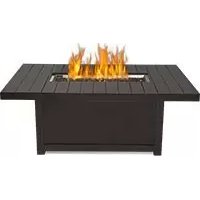
KENS3 (GPFC40)
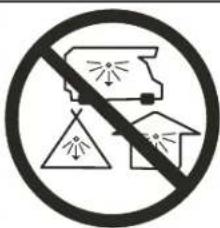
DANGER! CARBON MONOXIDE HAZARD
This appliance can produce carbon monoxide, which has no odor. Using it in an enclosed space can kill you. Never use this appliance in an enclosed space such as a camper, tent, car or home.

DANGER
IF YOU SMELL GAS:
- Shut off gas to the appliance.
- Extinguish any open flame.
- If odor continues, keep away from the appliance and immediately call your gas supplier or fire department.

WARNING! For Outdoor Use Only.

WARNING
Do not try to light this appliance without reading the "LIGHTING" instructions section of this manual.
Do not store or use gasoline or other flammable liquids or vapors in the vicinity of this or any other appliance. An L.P. cylinder not connected for use must not be stored in the vicinity of this or any other appliance. If the information in these instructions is not followed exactly, a fire or explosion may result, causing property damage, personal injury or death.
INSTALLER: LEAVE THIS MANUAL WITH THE APPLIANCE.
CONSUMER: RETAIN THIS MANUAL FOR FUTURE REFERENCE.

Intertek
Wolf Steel Ltd.
214 Bayview Drive,
Barrie, Ontario, CANADA L4N 4Y8
grills@napoleonproducts.com
Napoleon President's 3 Year Limited Warranty
NAPOLEON products are designed with superior components and materials, and are assembled by trained craftsmen who take great pride in their work. This product has been thoroughly inspected by a qualified technician before packaging and shipping to ensure that you, the customer, receive the quality product you expect from NAPOLEON.

NAPOLEON warrants that components in your new NAPOLEON product will be free from defects in material and workmanship from the date of purchase, for the following period:
Aluminum table top and pedestal 3 years
Stainless steel housing....3 years
Stainless steel burner assembly....3 years
All other parts .... 2 years
* Conditions and Limitations
This Limited Warranty creates a warranty period as specified in the aforementioned table, for any product purchased through an authorized NAPOLEON dealer, and entitles the original purchaser to the specified coverage in respect of any component replaced within the warranty period, either by NAPOLEON or an authorized NAPOLEON dealer, to replace a component of such product that has failed in normal private use as a result of a manufacturing defect. The "50% off" indicated in the table means the component is made available to the purchaser at a 50% discount off the regular retail price of the component for the period indicated. This Limited Warranty does not cover accessories or bonus items.
For greater certainty, “normal private use” of a product means that the product has been installed by a licensed, authorized service technician or contractor, in accordance with the installation instructions included with the product and all local and national building and fire codes; has been properly maintained; and has not been used as a communal amenity or in a commercial application.
Similarly, "failure" does not include: over-firing, blow outs caused by environmental conditions such as strong winds or inadequate ventilation, scratches, dents, corrosion, deterioration of painted and plated finishes, discoloration caused by heat, abrasive or chemical cleaners or UV exposure, chipping of porcelain enameled parts, or damages caused by misuse, accident, hail, grease fires, lack of maintenance, hostile environments such as salt or chlorine, alterations, abuse, neglect or parts installed from other manufacturers. Should deterioration of parts occur to the degree of non-performance (rusted through or burnt through) within the duration of the warranted coverage, a replacement part will be provided. The replacement component is the sole responsibility of NAPOLEON defined by this Limited Warranty; in no event will NAPOLEON be responsible for installation, labor or any other costs or expenses related to the re-installation of a warranted part, for any incidental, consequential, or indirect damages or for any transportation charges, labor costs or export duties.
This Limited Warranty is provided in addition to any rights afforded to you by local laws. Accordingly, this Limited Warranty imposes no obligation upon NAPOLEON to keep parts in stock. Based on the availability of parts, NAPOLEON may at its discretion discharge all obligations by providing a customer a prorated credit towards a new product. After the first year, with respect to this Limited Warranty NAPOLEON may, at its discretion, fully discharge all obligations with respect to this warranty by refunding to the original warranted purchaser the wholesale price of any warranted but defective part(s).
The bill of sale or copy will be required together with a serial number and a model number when making any warranty claims from NAPOLEON.
NAPOLEON reserves the right to have its representative inspect any product or part prior to honoring any warranty claim. You must contact NAPOLEON Customer Service or an authorized NAPOLEON dealer to obtain the benefit of the warranty coverage.
napoleongrills.com

WARNING! For Outdoor Use Only.

WARNING! Improper installation, adjustment, alteration, service or maintenance can cause injury or property damage. Read the installation, operating and maintenance instructions thoroughly before installing or servicing this gas appliance.
Safe Operating Practices
- THIS APPLIANCE IS HOT WHEN OPERATING AND CAN CAUSE SEVERE BURNS IF CONTACTED.
- Installation and repair should be done by a qualified service person. The appliance should be inspected before use and at least annually by a qualified service person. More frequent cleaning may be required as necessary. It is imperative the control compartment, burners and circulating air passageways of the appliance be kept clean.
- Do not operate appliance before reading and understanding operating instructions. Failure to operate appliance according to operating instructions could cause fire or injury.
- Risk of burns. The appliance should be turned off and cooled before servicing.
- Do not install damaged, incomplete or substitute components.
- Young children should be carefully supervised when they are in the area of the appliance. Toddlers, young children and others may be susceptible to accidental contact burns. A physical barrier is recommended if there are at risk individuals in the vicinity. To restrict access to an appliance or stove, install an adjustable safety gate to keep toddlers, young children and other at risk individuals out of the vicinity and away from hot surfaces.
- Ensure you have incorporated adequate safety measures to protect infants/toddlers from touching hot surfaces.
- Under no circumstances should this appliance be modified.
- Keep the packaging material out of reach of children and dispose of the material in a safe manner. As with all plastic bags, these are not toys and should be kept away from children and infants.
- Do not leave appliance unattended when in use.
- For Outdoor use only.
• This appliance must not be used for cooking.
- This unit is not for use with solid fuel.
- Improper installation, adjustment, alteration, service, or maintenance can cause injury or property damage. Read the installation, operating and maintenance instructions thoroughly before installing or servicing this equipment.
- This appliance shall be used ONLY outdoors in a well-ventilated space and shall NOT be used inside a building, garage, or any other enclosed area.
- Cylinders must be stored outdoors in a well-ventilated area out of reach of children. Disconnected cylinders must have threaded valve plugs tightly installed and must not be stored in a building, garage or any other enclosed area.
- Storage of this appliance indoors is permissible only if it has been disconnected from its fuel supply (natural gas line or LP gas cylinder).
- If it is evident there is excessive abrasion or wear, or the hose is cut, it must be replaced prior to the appliance being put into operation.
- Clothing or other flammable materials should not be hung from the appliance, or placed on or near the appliance.
- Any guard or other protective device removed for servicing the appliance must be replaced prior to operating the appliance.
- Inspect the fuel supply connection for signs of leakage (including the hose for LP models) before each use of the appliance.
- The pressure regulator and hose assembly supplied with LP models must be used. Replacement pressure regulators and hose assemblies must be those specified in this manual.
- The LP gas supply cylinder used with LP models must be constructed and marked in accordance with the specifications for LP-gas cylinders as required by the U.S. Department of Transportation (DOT) or the Canadian Transport Commission (CTC).
- The LP gas cylinder supply system must be arranged for vapour withdrawal.
- The LP-gas cylinder used must include a collar to protect the cylinder valve.
- When an LP model is not in use, the LP-gas must be turned off at the supply cylinder.
- To extend the life of your appliance, protect and cover it from the elements when not in use.
- This product must be installed by a licensed plumber or gas fitter when installed within the commonwealth of Massachusetts.
General Information
This gas appliance was tested and listed to Canadian and American National Standards, ANSI Z21.97-2014/CSA 2.41-2014 "Standard for Outdoor Decorative Gas Appliance". When an appliance is for connection to a fixed piping system, the installation must conform with local codes, or in the absence of local codes, with the National Fuel Gas Code, ANSI Z223.1/NFPA 54, International Fuel Gas Code, Natural Gas and Propane Installation Code, CSA B149.1, or Propane Storage and Handling Code, B149.2, as applicable.
This appliance should be installed and serviced by a qualified installer to conform with local codes.
Installation practices vary from region to region and it is important to know the specifics that apply to your area, for example: in Massachusetts State:
- The appliance off valve must be a "T" handle gas cock.
- The flexible connector must not be longer than 36 inches.
The appliance and its individual shut off valve must be disconnected from the gas supply piping system during any pressure testing of the system at test pressures in excess of 1/2 psig (3.5kPa).
This appliance must be isolated from the gas supply piping system by closing its individual manual shut off valve during any pressure testing of the gas supply piping system at test pressures equal to or less than 1/2 psig (3.5kPa).
The following clearances to combustible materials must be maintained:
Sides (all around) - 24 inches (610mm)
Top - 72 inches (1830mm)
Floor -9 inches (229mm)
• Always keep the appliance area clear and free from combustible materials, gasoline, and other flammable vapours and liquids.
- Do not locate appliance where it can get excessively wet.
- Do not use this appliance if any part has been under water. Immediately call a qualified service technician to inspect the unit and to replace any part of the control system and any gas control, which has been underwater.

CERTIFIED
www.nficertified.org
We suggest that our gas hearth products be installed and serviced by professionals who are certified in the U.S. by the National Fireplace Institute® (NFI) as NFI Gas Specialists.

WARNING : This product can expose you to chemicals including lead and lead compounds, which are known to the State of California to cause cancer, and chemicals including carbon monoxide, which are known to the State of California to cause birth defects or other reproductive harm. For more information go to www.P65Warnings.ca.gov.
Getting Started
- Remove all of the parts from the carton. Use the parts list to ensure all necessary parts are included.
- Do not destroy packaging until the appliance has been installed and operates to your satisfaction.
- Choose a location that meets the clearance to combustibles as outlined in this manual. Take into consideration the need for clear and easy access to the on/off valve AFTER the appliance is installed and connected to the gas supply in order to safely turn off the burner.
- Most stainless steel parts are supplied with a protective plastic coating that must be removed prior to using the appliance. The protective coating has been removed from some of the parts during the manufacturing process and may have left behind a residue that can be perceived as scratches or blemishes. To remove the residue, vigorously wipe the stainless steel in the same direction as the grain.
- Read and follow all instructions in this manual before installing or servicing this gas appliance.

If you have any questions about assembly or appliance operation, or if there are damaged or missing parts please call our Customer Solutions Department at 1-866-820-8686 between 9 AM and 5 PM (Eastern Standard Time).

WARNING! This appliance is designed for non-combustible enclosures only, and must be installed and serviced by a qualified installer to local codes.
Specifications
DIMENSIONS
KENS1
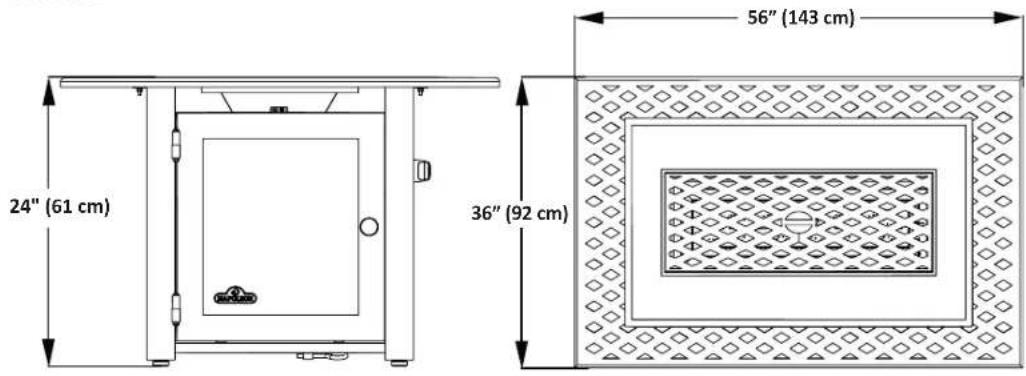
KENS2
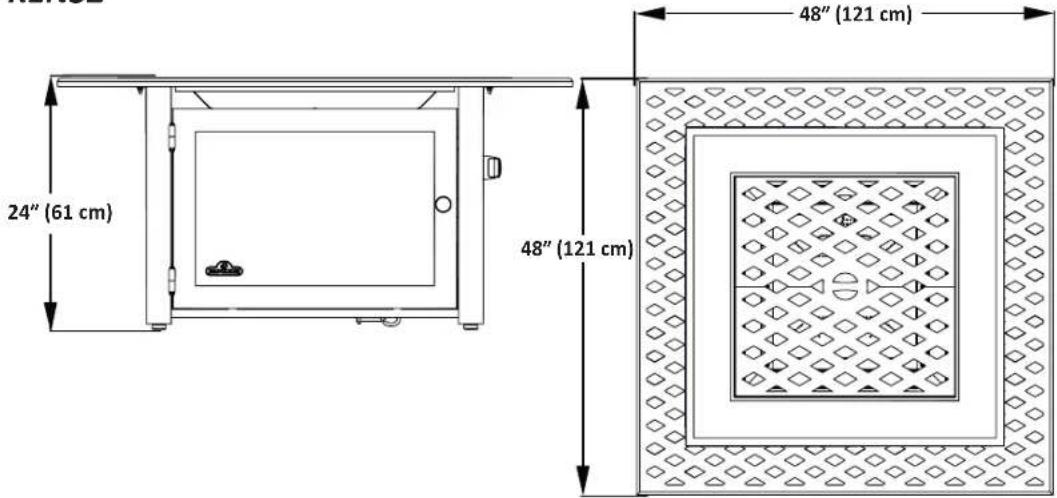
KENS3
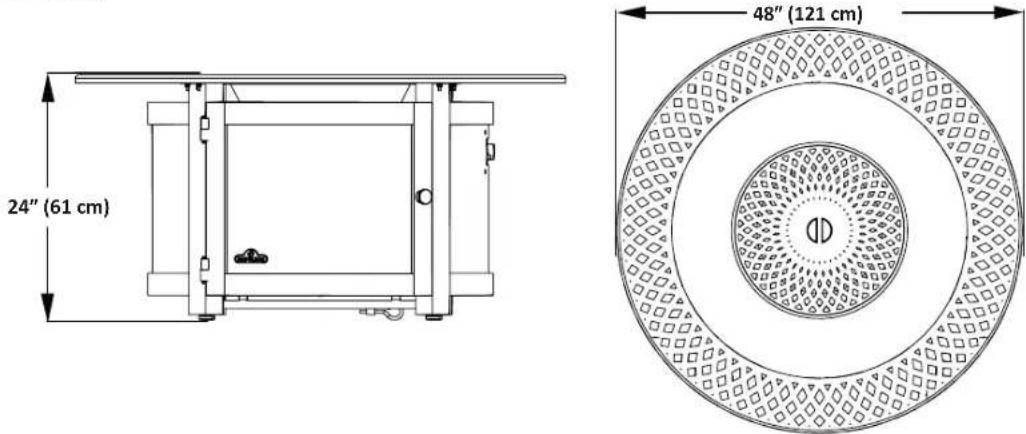
| INPUT | ||
| MODEL FUEL MAX. INPUT Btu/Hr | ||
| KENS1KENS2 | Natural Gas 60, | 000 |
| KENS1KENS2 | Propane Gas 60, | 000 |
| KENS3 Natural Gas 40,000 | ||
| KENS3 Propane Gas 40,000 | ||
| MINIMUM CLEARANCE TO COMBUSTIBLES | ||
| INCHES MM | ||
| Side Walls 24 610 | ||
| Top of unit to ceiling 72 | 1830 | |
| GAS INLET PRESSURES | |
| NATURAL PROPANE | |
| Maximum Inlet Pressure 7.0" w.c. 11.0" w.c. | |
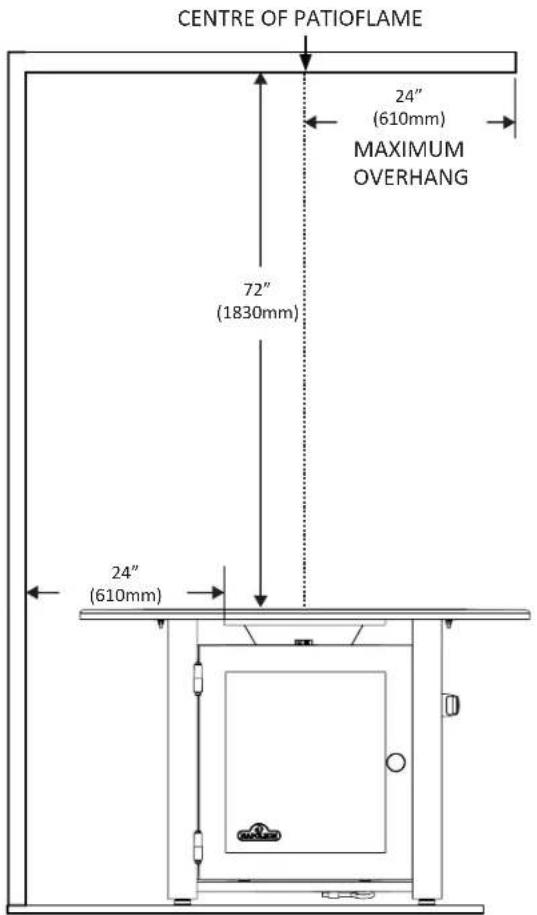
THE TABLE IS APPROVED FOR USE ON COMBUSTIBLE FLOORS.
Location
Locating Your Outdoor Appliance
It is important when selecting a location for your appliance to ensure clearances to adjacent combustibles are met. This appliance is intended for installation on an outdoor patio or in your yard. It is highly recommended that this appliance be installed in a sheltered area (following the guidelines outlined below). Direct wind will cause an erratic flame and possible pilot or main burner outage. An erratic flame could also lead to excessive carboning (black soot), this condition is not a safety issue but is visually undesirable.
Note: When choosing a location for your appliance, care must be taken to avoid areas where excessive moisture or running water may be a problem.
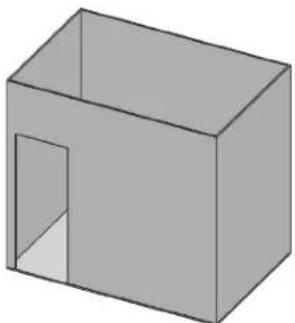
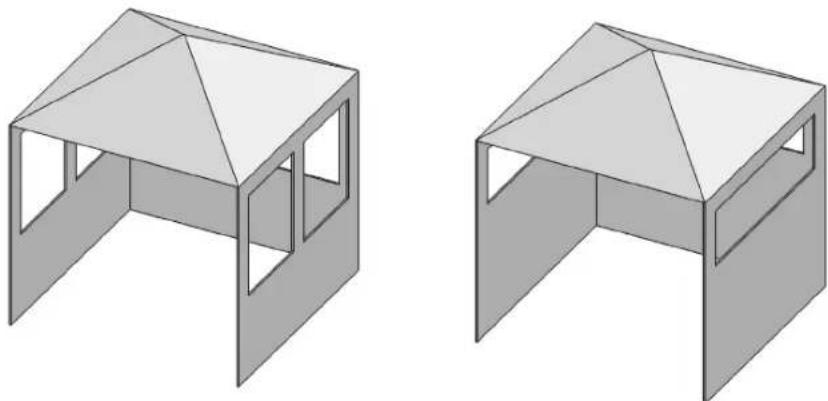
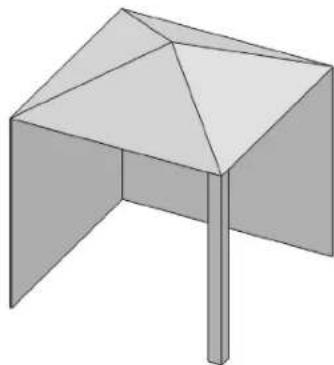
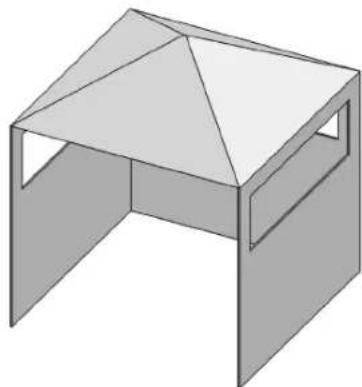
Any enclosure (shelter) in which the appliance is used must comply with one of the following:
With walls on all sides, but at least one permanent opening at ground level and no overhead cover.
Within a partial enclosure which includes an overhead cover and no more than two sidewalls. These sidewalls may be parallel, as in a breezeway, or at right angles to each other.
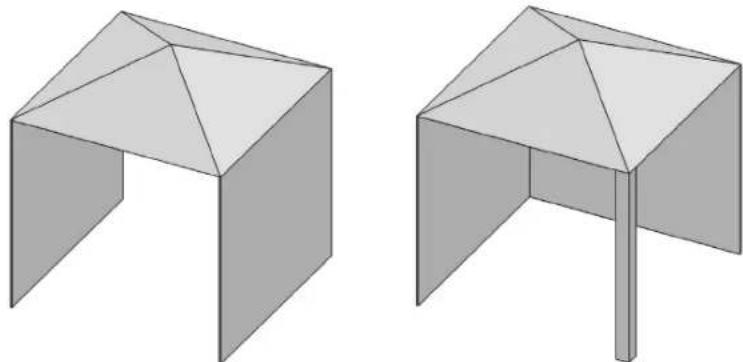
Within a partial enclosure which includes an overhead cover and three sidewalls, as long as 30 percent or more of the horizontal periphery of the enclosure is permanently open.
Gas Hook-Up Instructions
WARNING! If these instructions are not followed exactly, a fire causing death or serious injury may occur.
Propane Cylinder Specifications
A dented or rusty cylinder may be hazardous and should be checked by your propane supplier. Never use a cylinder with a damaged valve. The LP-gas supply cylinder must be constructed and marked in accordance with the U.S. D.O.T. Specifications for LP-Gas Cylinders or the Standard for Cylinders, Spheres and Tubes for Transportation of Dangerous Good and Commission, CAN/CSA-B339, as applicable.
This appliance has been designed for use with a 20 lb. (9.1 kg) or 30 lb (13.6 kg) size propane cylinder only (not supplied).
The LP-gas supply cylinder must be provided with a cylinder-connection device compatible with the connection for the appliance. The propane cylinder must be provided with a shut-off valve terminating in a propane cylinder valve type QCC1, and a safety relief device having direct communication with the vapor space of the cylinder. The cylinder supply system must be arranged for vapor withdrawal and the cylinder shall include a collar to protect the cylinder valve. The LP-gas cylinder must be provided with a listed overfill protection device (OPD). Do not store a spare LP-gas cylinder under or near this appliance. Never fill the cylinder beyond 80 percent full.
Use only the pressure regulator and hose assembly provided with this appliance. Replacement pressure regulators and hose assemblies must be specified by the manufacturer. The regulator supplies a pressure of 11 inches. water column to the appliance and has a QCC1 type fitting. Cylinders to be used with this unit must be supplied with a QCC1 cylinder valve. A QCC1 cylinder has a positive seating connection, which will not allow gas flow until a positive seal has been achieved. It is also equipped with an excess flow device. In order to attain full flow to the appliance, the valve must be in the off position when the cylinder valve is turned on.
WARNING! A fire will result if the gas supply hose makes contact with the underside of the appliance.
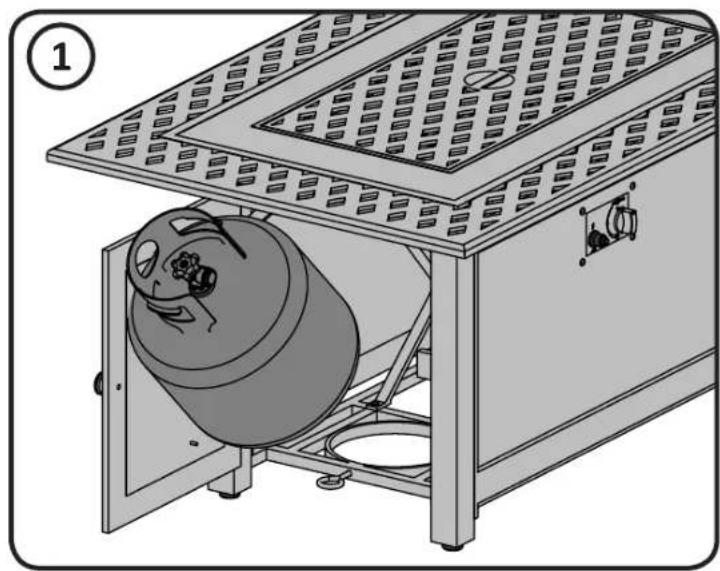
LP (Propane) Gas Cylinder Mounting
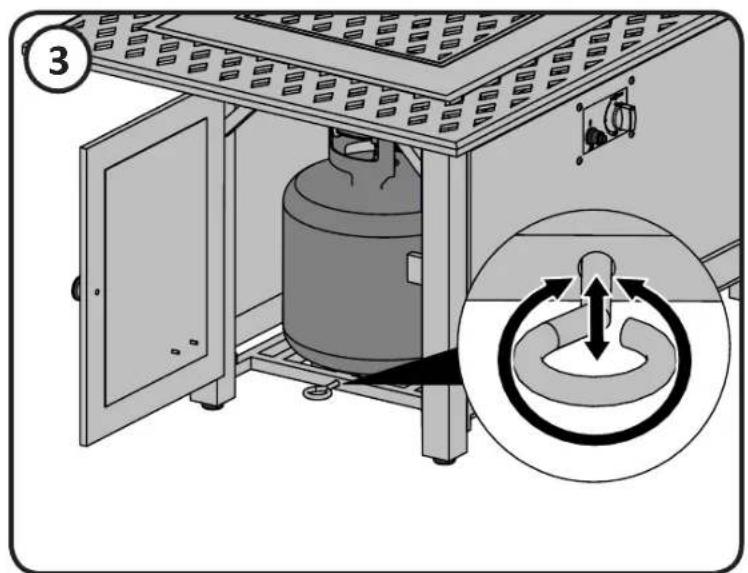
Attach cylinder retaining bracket to the base of the cylinder. Then secure to the surface to which it sits. Cylinder should be on a level surface.
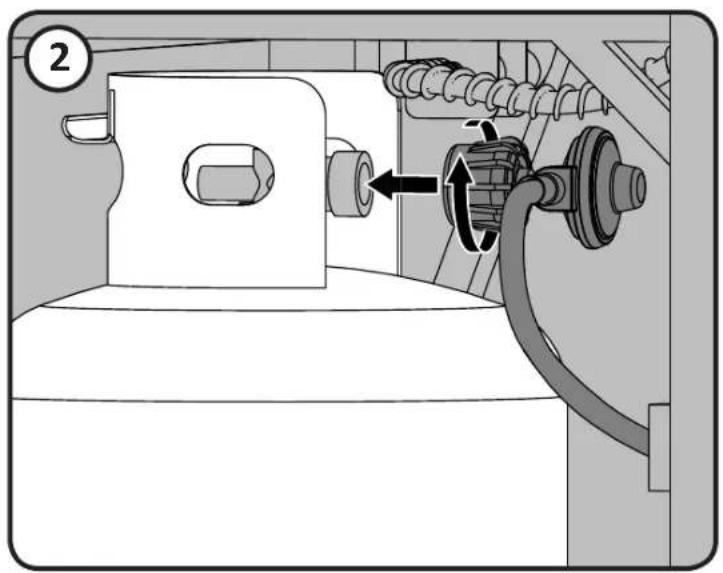
Cylinder Connection: Ensure the gas regulator hose is kink free. Remove the cap or plug from the cylinder fuel valve. Insert the black QCC1 regulator nipple onto the QCC1 fuel valve. Hand tighten clockwise. Do not use tools. Leak test all joints prior to using the appliance. A leak test must be performed annually and each time a cylinder is hooked up or if a part of the gas system is replaced.
If this appliance is to be connected directly to a house propane gas supply line, follow the instructions for the natural gas hook-up.
CAUTION!
- Make sure cylinder valve is in its full off position. (Turn clockwise to stop).
- Check cylinder valve features to ensure it has proper external mating threads. (Cylinder Valve Marked: USE WITH TYPE 1)
- Inspect hose shipped with the unit for damage. Never attempt to use damaged or plugged equipment. See your local LP Gas Dealer for repairs.
- When connecting regulator assembly to the cylinder valve, hand tighten black QCC1 nut clockwise to a positive stop. DO NOT use a wrench to tighten. Use of a wrench may damage the quick closing coupling nut and result in a hazardous condition.
- Locate the hose out of pathways where people may trip over it or in areas where the hose may be subject to accidental damage.
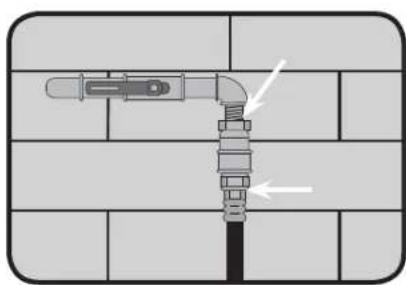
- Open cylinder valve fully (counter-clockwise). Turn the on/off valve at the unit slowly to the on position and use a soapy water solution to check all connections for leaks as indicated in the diagrams before attempting to light the appliance. If a leak is found, turn tank valve off and do not use the appliance until repairs can be made.

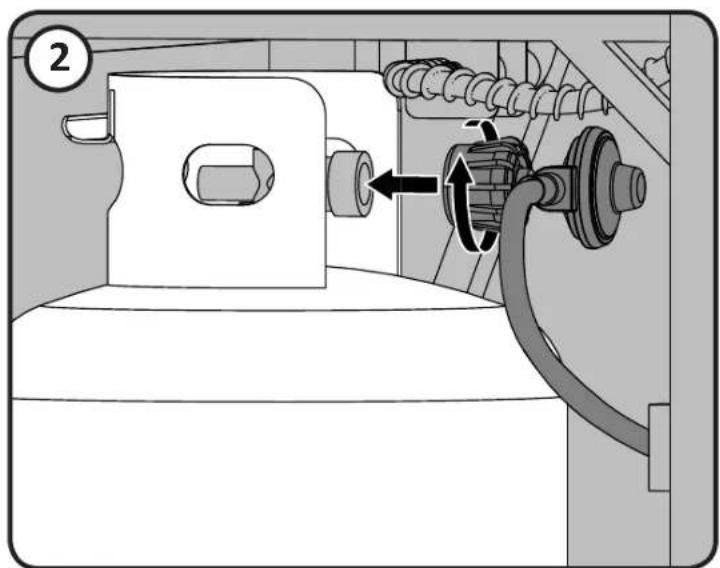
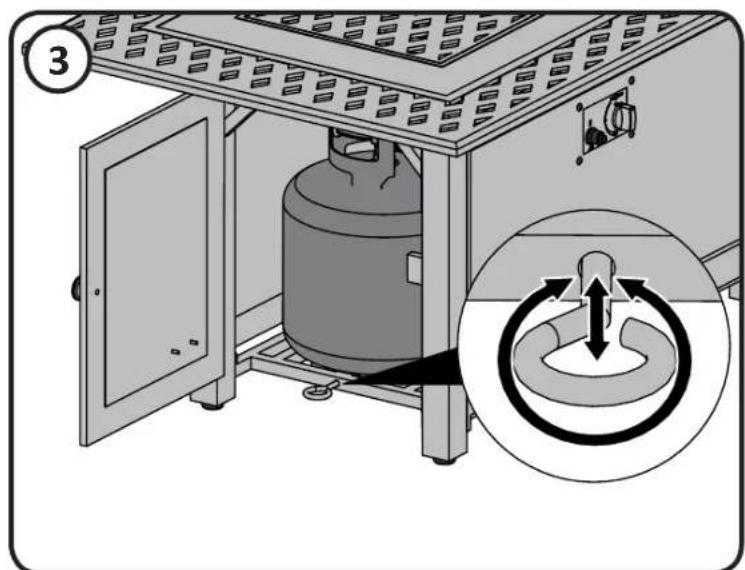
N415-0500 JUN 25.18
www.napoleongrills.com
Conversion to Natural Gas
WARNING! To avoid the possibility of burns conversions should only be done when the patio flame is. Ensure burner is turned off. Turn gas off at source and disconnect the patio flame before beginning conversion.
WARNING! Glass embers may have sharp edges wear safety glasses and gloves when handling.
WARNING! This conversion must be performed by a licensed gas fitter, and all connections must be leak tested before operating the patio flame.
Your patio flame can be easily converted to natural gas by following these steps:
- Remove the glass embers from the burner.
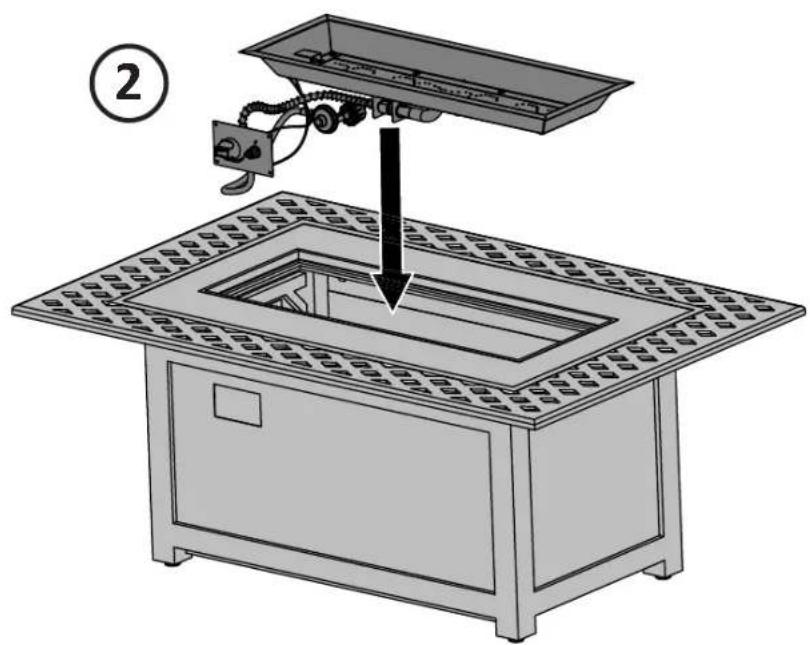
- Remove the burner from the enclosure. Take care not to damage or kink the thermocouple wire.
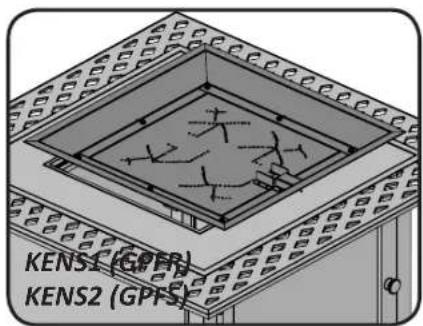
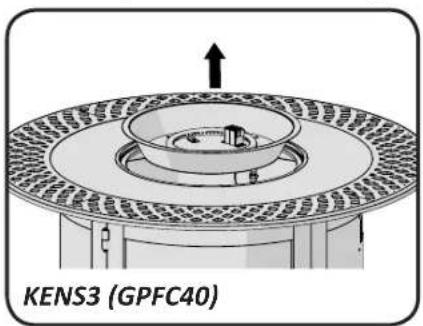
- Disconnect the stainless steel flex connector from the orifice using (2) wrenches.
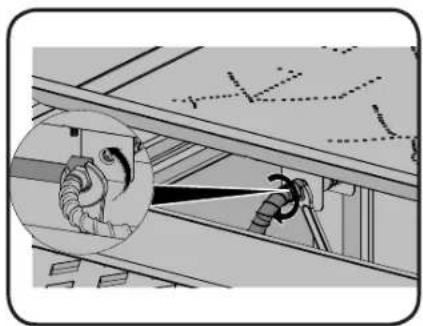
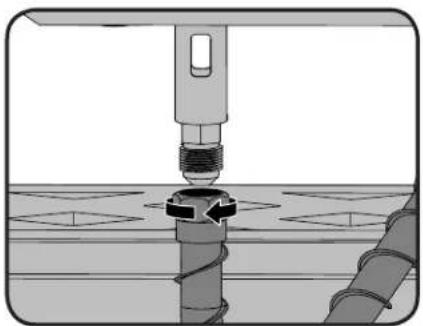
- Unscrew the propane orifice from the inside of the burner as illustrated.
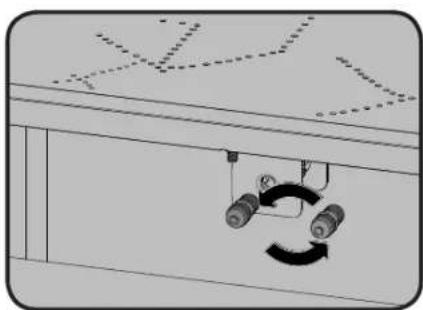
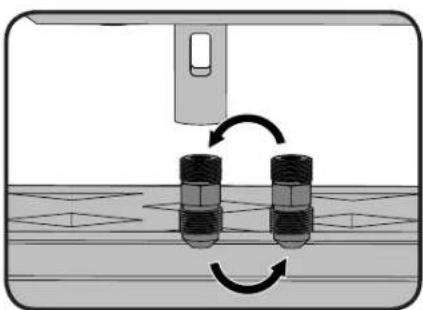
- Replace the propane orifice with the natural gas orifice supplied.
Note: The air shutter has been factory set and does not need to be adjusted.
- Reconnect the stainless steel flex connector to the orifice and tighten using (2) wrenches.
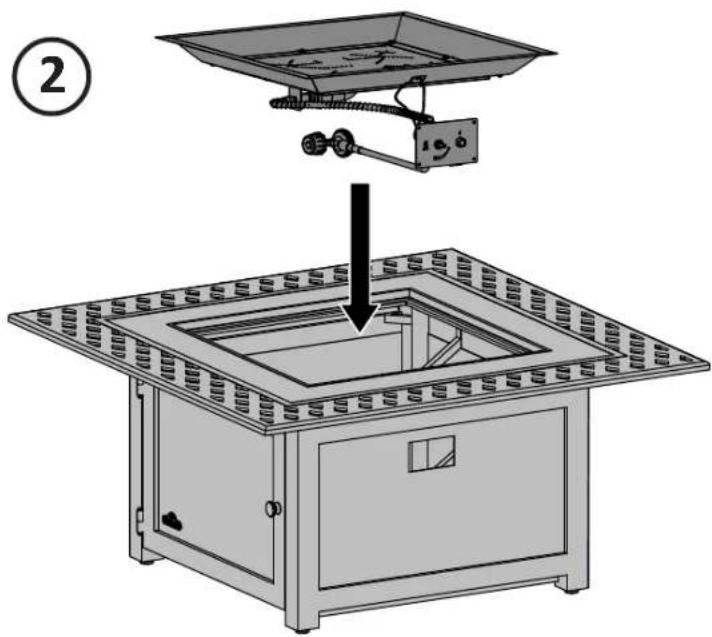
- Place the burner back into the enclosure.
- Fill out the conversion label included with your patio flame and apply it to the inside of the control panel access door.
A leak test must be performed according to the leak testing instructions found in the manual.
Natural Gas Hook-Up
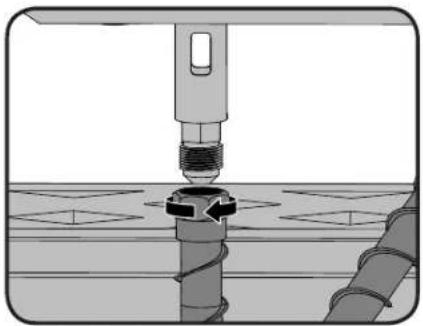
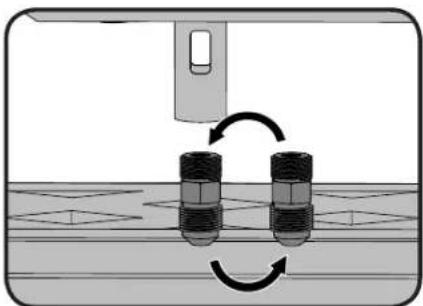
The gas appliance is designed to operate at an inlet pressure of 7 inches water column. The piping up to the appliance is the responsibility of the installer. Connect the inlet valve to rigid pipe, copper tube or an approved flexible metal connector, which complies with Z21.4/CSA 6.10. If using a gas hose (not supplied) connect the flared end of the hose to the connector on the end of the inlet valve. Tighten using two wrenches. (Do not use thread sealer/pipe dope.) Leak test all joints prior to using the appliance. Piping and valves upstream of the quick disconnect are not supplied. The gas supply pipe must be sufficiently sized to supply the BTU/h specified on the rating plate, based on the length of the piping run. The quick disconnect must not be installed in an upward direction and a readily accessible manual shut-off valve must be installed upstream of, and as close to, the quick disconnect as is feasible.
Purge the gas supply line of any trapped air prior to the first firing of the unit.

WARNING!
- The installation must be performed by a licensed gas fitter, and all connections must be leak tested before operating the appliance.
- Ensure all hose connections are tightened using two wrenches. Do not use Teflon tape or pipe dope on any hose connection.
- Ensure the hose does not contact any high temperature surfaces or it may melt and leak causing a fire.
- Locate the hose out of pathways where people may trip over it or in areas where the hose may be subject to accidental damage.
- Leak test all the connections using a soap and water solution as per the leak testing instructions found in the manual.
Finishing
Glass Ember Installation
WARNING! Do not use the patio flame without the glass embers in place.
WARNING! Glass embers may have sharp edges, wear safety glasses and gloves when handling. Do not change or substitute the glass ember material provided with this appliance. If replacing, use only replacement glass embers available from your local authorized dealer / distributor.
WARNING! Glass embers may have a fine oil residue that needs to be cleaned prior to installation. Clean the glass with mild dish soap, drain, rinse thoroughly and dry before installing.
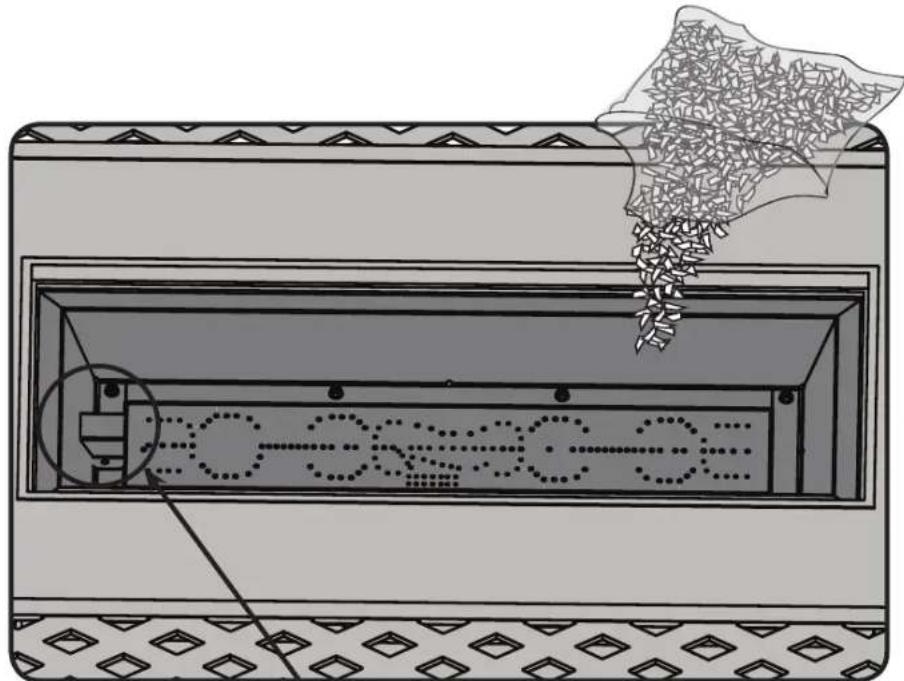
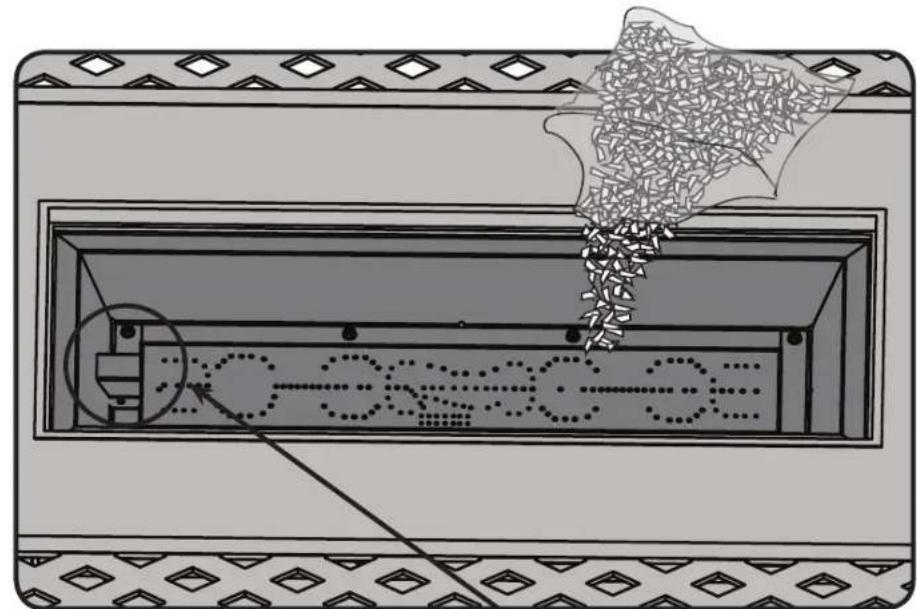
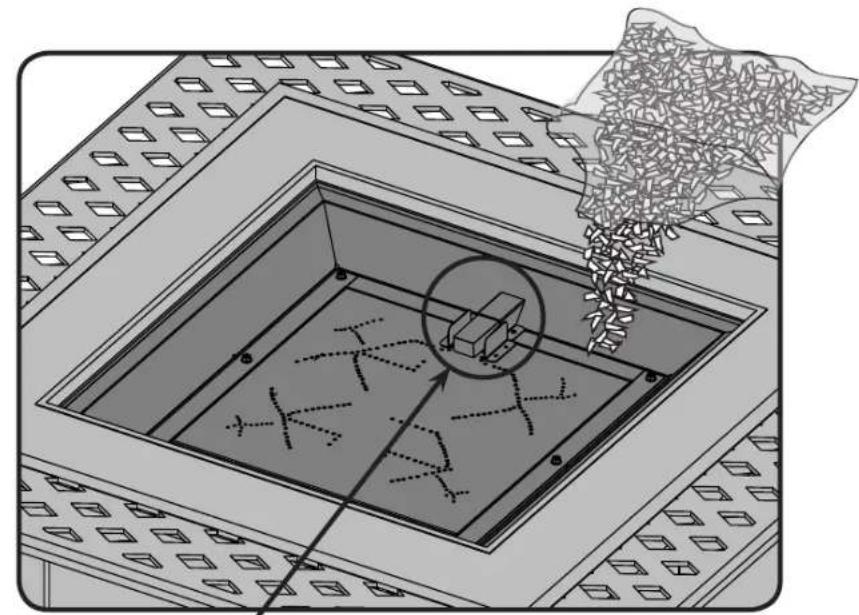
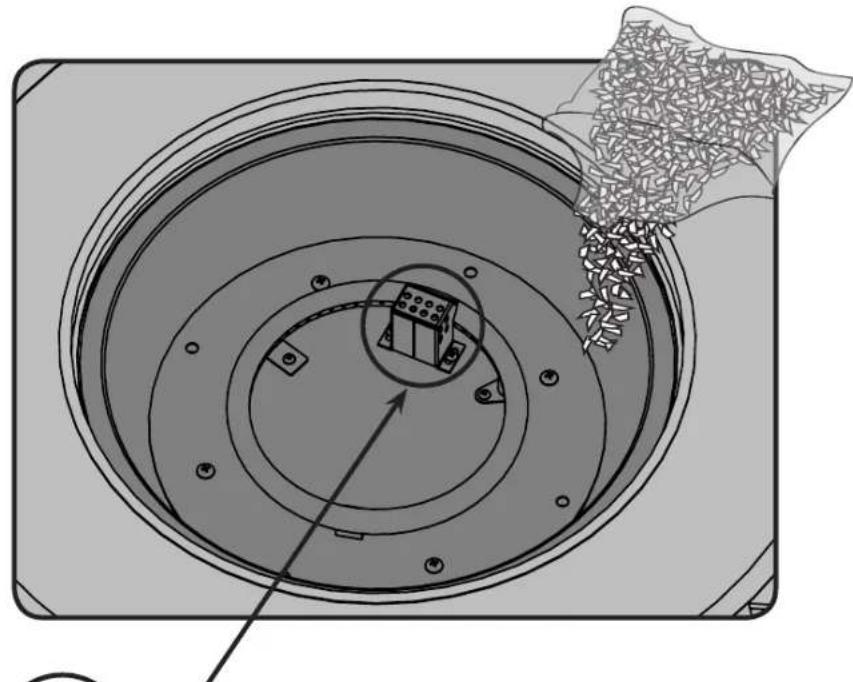
- Carefully pour the glass embers onto the appliance ember tray as shown.
- Spread the glass embers over the tray and burner. The distribution of clear glass over the burner will influence flame height.
- The glass embers must cover the entire burner tray while ensuring no glass is placed on the ignition portion of the burner as illustrated below.
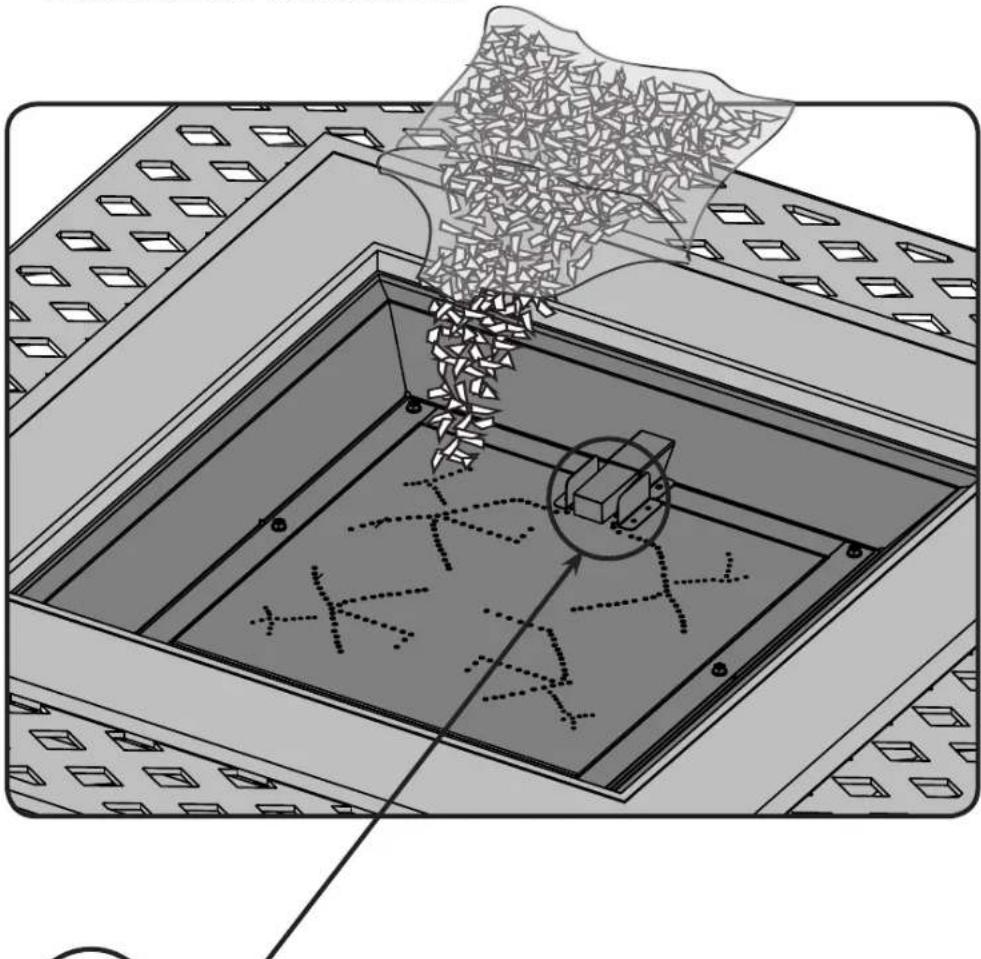

ENSURE NO GLASS IS BLOCKING ANY OF THE OPEN PORTS ON THE IGNITION PORTION OF THE BURNER, DIFFICULTIES IN LIGHTING MAY RESULT.
Leak Testing Instructions

WARNING! A leak test must be performed annually, or if a part of the gas system is replaced.

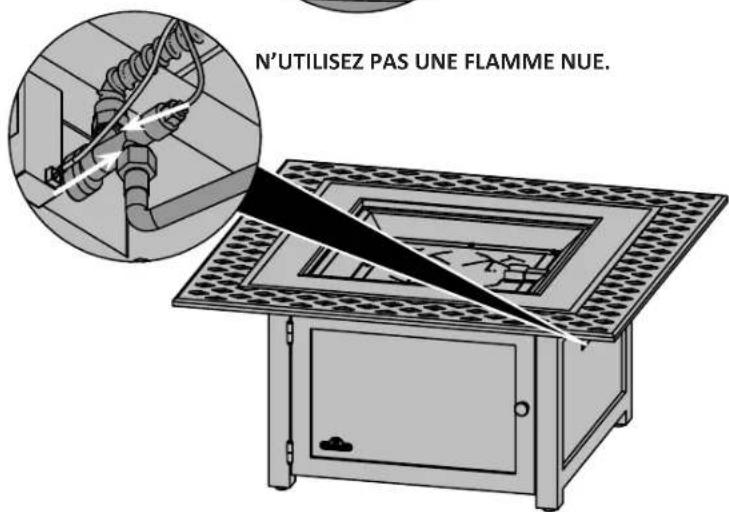
WARNING! Never use an open flame to check for gas leaks. Be certain no sparks or open flames are in the area while you check for leaks. Sparks or open flames will result in a fire or explosion, damage to property, serious bodily injury, or death.
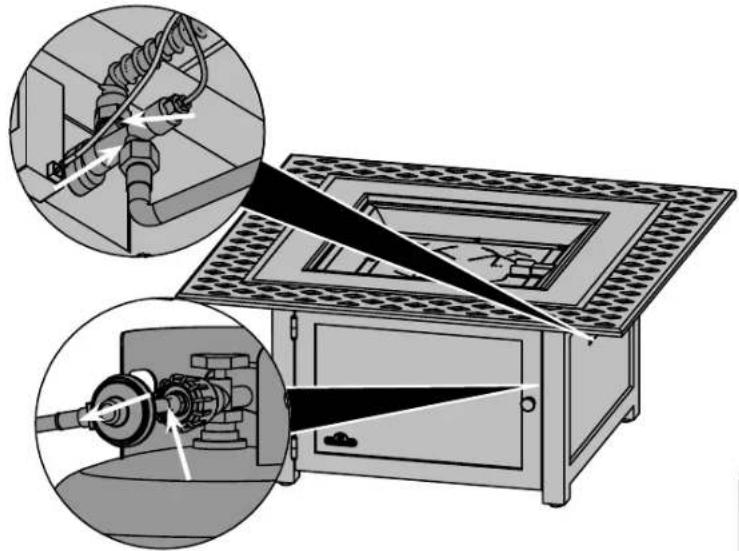
Leak testing: This must be done before initial use, annually, and whenever any gas components are replaced or serviced. Do not smoke while performing this test, and remove all sources of ignition. See Leak Testing Diagram for areas to check. Turn all burner controls to the off position. Turn gas supply valve on.

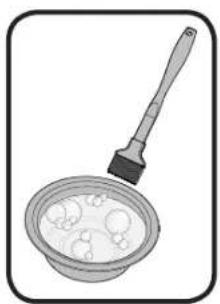
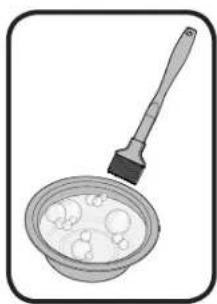
Brush a half-and-half solution of liquid soap and water onto all joints and connections of the regulator, hose, manifolds and valves.

Bubbles will indicate a gas leak. Either tighten the loose joint or have the part replaced with one recommended by the Napoleon Customer Solutions department and have the appliance inspected by a certified gas installer.
If the leak cannot be stopped, immediately shut off the gas supply, disconnect it, and have the grill inspected by a certified gas installer or dealer. Do not use the appliance until the leak has been corrected.
DO NOT USE AN OPEN FLAME.
DO NOT USE AN OPEN FLAME.
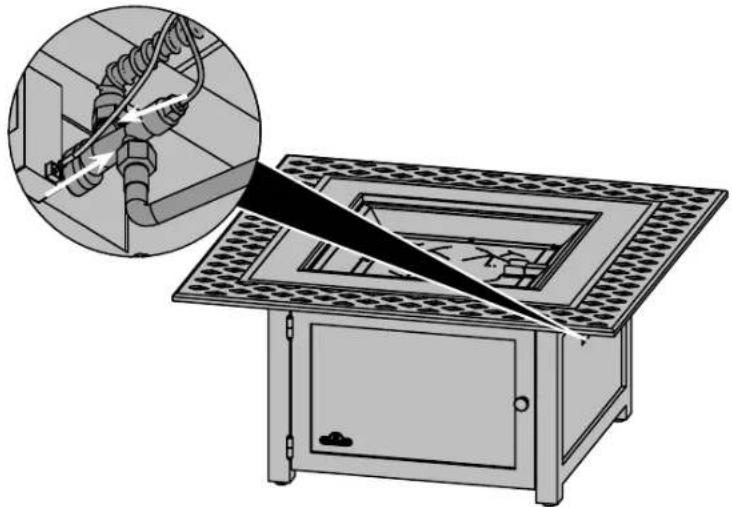
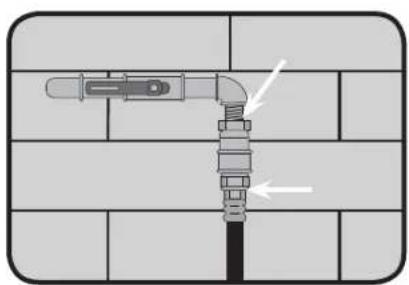
Lighting Instructions
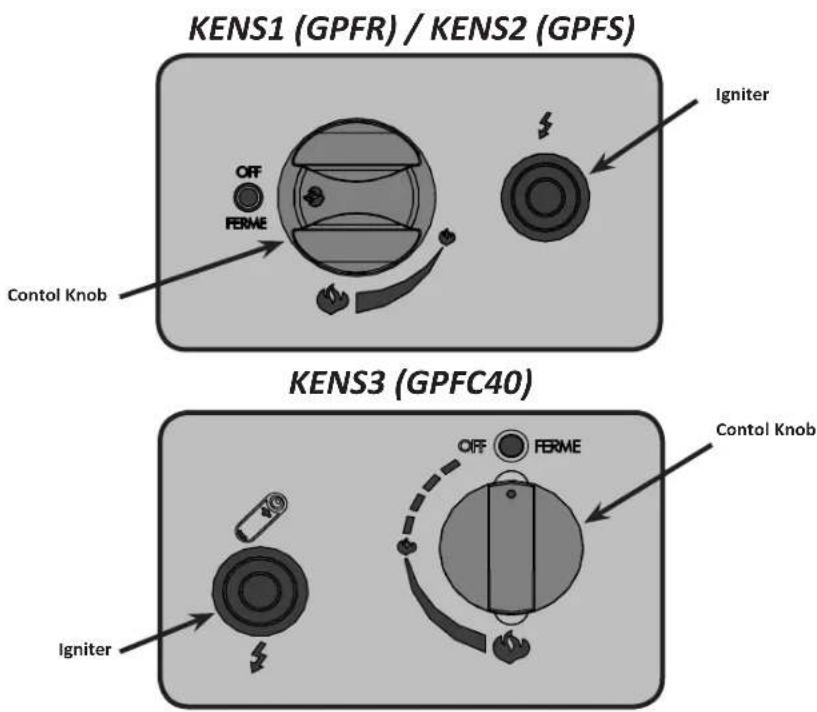

WARNING! Keep face and body away from burner area when lighting.
WARNING! Ensure burner controls are in the off position. Slowly turn on the gas supply valve.
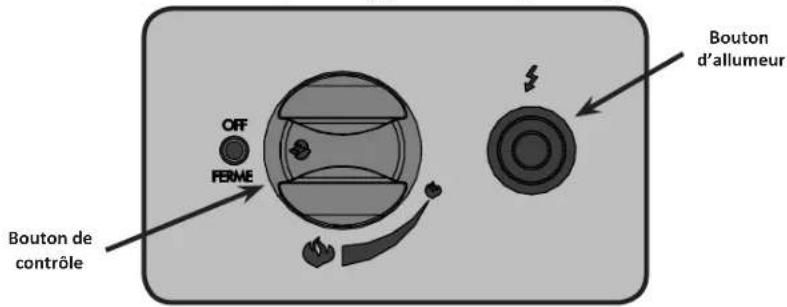
| 1. Press and hold electronic igniter button (⚡). |
| 2. Turn the burner control to the high position, press and hold in. When the burner lights, release the electronic igniter button. |
| 3. Continue to depress the burner control knob for 30 seconds and then release. If the flame goes out, repeat the procedure. |
| 4. Adjust the flame to the desired height with the burner control knob. |
| 5. If the burner will not light with the electronic igniter, hold a lit long match or lit long butane lighter to the ignition area of the burner and continue with step 2. |
| 6. To shut down the burner turn the burner control knob clockwise to the off position. Then turn the gas off at the source (propane cylinder valve or natural gas supply valve). |

WARNING! The propane cylinder is equipped with an excess flow device. Unless burners are turned off prior to turning the cylinder on, only small flames and low heat will be achievable.
WARNING! If the burner does not light within 10 seconds, turn the valve off and wait 5 minutes for any gas to dissipate before repeating the procedure.
Operating The Patio Flame

WARNING! Never use this appliance for other than the intended use. Do not use this appliance to prepare food.

WARNING! You must have clear and easy access to the on/off valve AFTER the appliance is installed and connected to the gas supply in order to safely turn off the burner.
Initial Lighting: When lit for the first time, the appliance emits a slight odor. This is a normal temporary condition caused by the "burn-in" of internal paints and lubricants used in the manufacturing process and does not occur again. Simply run the main burner on high for approximately one-half hour.

WARNING!
- Children and adults should be alerted to the hazards of high surface temperatures and should stay away from the appliance to avoid burns or clothing ignition.
- Children should be carefully supervised when they are in the area of the appliance.
- Clothing or other flammable materials should not be hung from the appliance, or placed on or near the appliance. The area above the enclosure may be extremely hot. Direct contact with these surfaces should be avoided in order to prevent burns or clothing ignition.
- Any guard or protective device removed for servicing the appliance must be replaced prior to operating the appliance.
• Installation and repair should be done by a qualified service person. - The appliance should be inspected before each use and at least annually by a qualified service person. More frequent cleaning may be required as necessary. It is imperative that the control compartment, burners and circulating air passageways of the appliance be kept clean.

WARNING!
- Never use the appliance while it is raining.
• Always turn the appliance off when raining. - Never splash any liquid on the glass / glass embers when the appliance is operating.
- The glass / glass embers will be extremely hot while operating, never try to touch them.
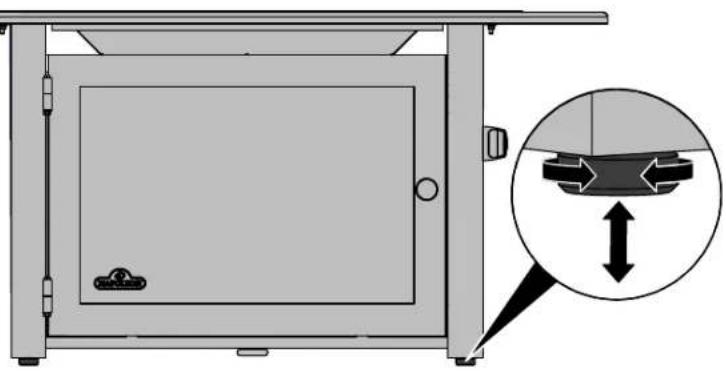
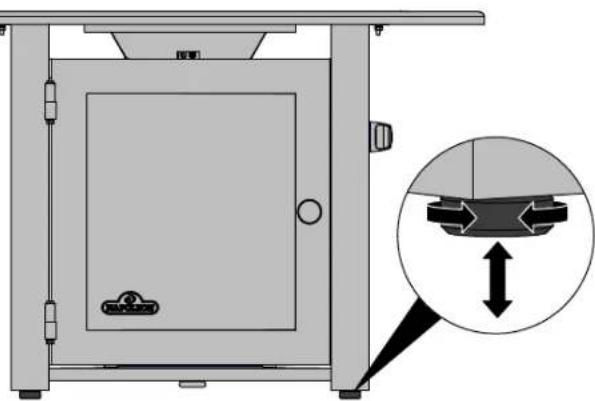
• Always ensure the appliance stands firmly on level ground. - Never use the appliance if the burner is damaged. Inspect the burner before each use. Ensure that no debris such as leaves; grass or other objects have entered or are on the appliance. If the burner is damaged it must be replaced prior to using the appliance with a replacement burner specified by your Napoleon dealer.
- Inspect the hose assembly before each use. If there is evidence of excessive abrasion or wear, or if the hose is damaged it must be replaced prior to using the appliance with a replacement hose assembly specified by your Napoleon dealer.
NOTE! The appliance has been designed with several safety features, which include a safety valve. If the burner flame is extinguished the appliance will automatically shut down.

WARNING! Any modification to the appliance may compromise the safety of this appliance. Special concern is as follows.
- Do not bypass thermocouple safety.
- Do not operate the appliance if any part has been under water. Immediately call a qualified service technician to inspect the appliance and replace any part of the control system and any gas control, which has been underwater.
Maintenance / Cleaning Instructions
WARNING! Glass embers may have sharp edges, wear safety glasses and gloves when handling. Do not change or substitute the glass ember material provided with this appliance. If replacing, use only replacement glass embers available from your local authorized dealer / distributor.


WARNING! To avoid the possibility of burns, maintenance should be done only when the appliance is. Avoid unprotected contact with hot surfaces. Ensure burner is turned off. Turn gas off at source and disconnect the appliance before servicing. Clean the appliance in an area where cleaning solutions will not harm decks, lawns, or patios. Do not use flammable, corrosive or abrasive cleaners.
Note: Stainless steel tends to oxidize or stain in the presence of chlorides and sulfides, particularly in coastal areas and other harsh environments, such as the warm, highly humid atmosphere around pools and hot tubs. These stains could be perceived as rust, but can be easily removed or prevented. To provide stain prevention and removal, wash all stainless steel and chrome surfaces every 3-4 weeks or as often as required with fresh water and/or stainless steel cleaner.
Control Panel: The control panel text is printed directly on the stainless steel and with proper maintenance will remain dark and legible. To clean the panel, use only warm soapy water or stainless steel cleaner available from your Napoleon dealer. Never apply abrasive cleaners on any stainless surfaces, especially the printed portion of the control panel or the printing will gradually rub off.

WARNING! Hose: Check for abrasions, melting, cuts, and cracks in the hose. If any of these conditions exist, do not use the appliance. Have the part replaced by your Napoleon dealer or qualified gas installer.
Cleaning Inside The Appliance: While washing your appliance, be sure to keep the area around the burner and pilot assembly dry at all times.

WARNING! If the gas control is exposed to water in any way, DO NOT try to use the appliance. The gas control must be replaced.
Burner: The burner is made from stainless steel, but extreme heat and a corrosive environment can cause surface corrosion to occur. This can be removed with a brass wire brush. Inspect the burner at least annually for cracks, insect nests, excessive corrosion or any other damage. If the burner is damaged, it must be replaced with a burner specified by the manufacturer before the appliance is put into operation.
CAUTION! Beware of Spiders.
Spiders and insects are attracted to the smell of propane and natural gas. The burner is equipped with an insect screen on the air shutter, which reduces the likelihood of insects building nests inside the burner but does not entirely eliminate the problem. A nest or web can cause the burner to burn with a soft yellow or orange flame or cause a fire (flashback) at the air shutter underneath the control panel. Other warning signs that may indicate a problem are:
• Strong or unusual odor coming from the appliance.
- Continued difficulty or delayed ignition.
- Flame appears either very short or very long.
- Flame only burns part way across the burner.
- Excessive soot building up on the glass embers.
To clean the inside of the burner, it must be removed from the appliance: Remove the glass embers and examine the burner. If dirty, clean with a wire brush.
Cleaning: Use a flexible venturi tube brush to clean the inside of the burner. Shake any loose debris from the burner through the gas inlet. Check the burner ports and valve orifices for blockages. Burner ports can close over time due to debris and corrosion; use an opened paperclip or a drill bit to clean them. The ports are easier to clean if the burner is removed from the appliance, but it can also be done with the burner installed.

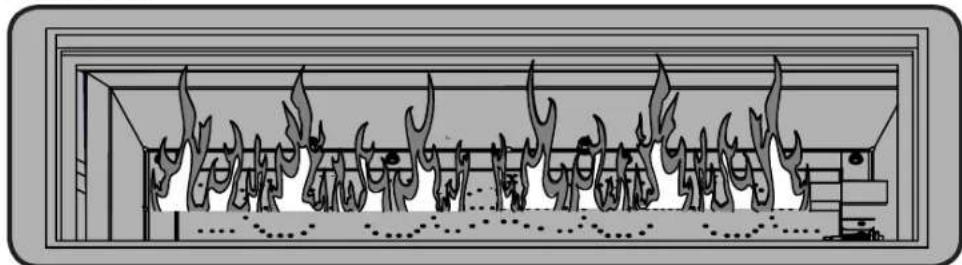
Reinstallation: Reverse the procedure to reinstall the burner. Check that the valve enters the burner when installing. Replace the glass embers. When the appliance is put back in service, check the burner flame pattern with the image below.
NORMAL
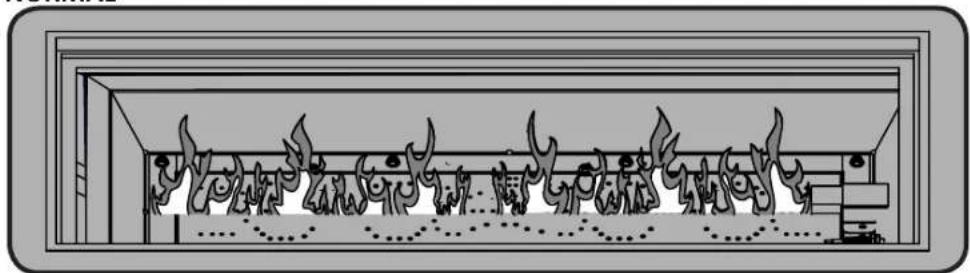
ABNORMAL
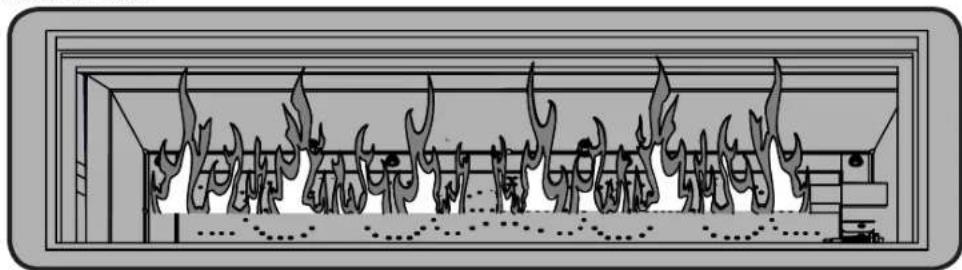
Cleaning The Outer Appliance Surface: Do not use abrasive cleaners or steel wool on any painted, or stainless steel parts of your Napoleon Appliance. Doing so will scratch the finish. Exterior surfaces should be cleaned with warm soapy water. To clean stainless surfaces, use a stainless steel or a non-abrasive cleaner. Always wipe in the direction of the grain. Over time, stainless steel parts discolor when heated, usually to a golden or brown hue. This discoloration is normal and does not affect the performance of the appliance

WARNING! The appliance area must be clear and free from combustible materials, gasoline and other flammable vapors and liquids. Do not obstruct the flow of combustion and ventilation air. Keep the ventilation opening of the cylinder enclosure free and clear of debris.
Troubleshooting
| Problem Possible Causes Solution | ||
| Low heat / Low flame when valve turned to high. | For propane - improper lighting procedure.For natural gas - undersized supply line. | Ensure lighting procedure is followed carefully. The valve must be in the off position when the tank valve is turned on. Turn tank on slowly to allow pressure to equalize. See lighting instructions.Pipe must be sized according to installation code. |
| Burners burn with yellow flame, accompanied by the smell of gas. | Possible spider web or other debris. Thoroughly clean burner venturi. See general maintenance instructions. | |
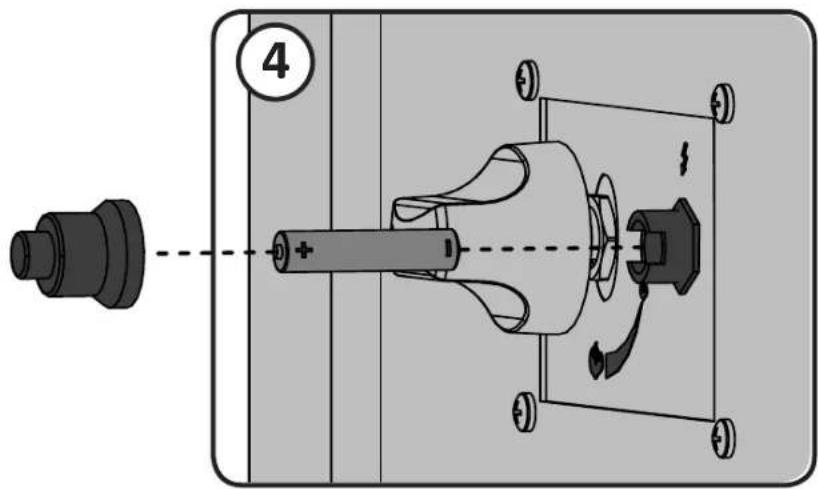
| Burner will not light with the igniter, but will light with a match. | Dead battery / or installed incorrectly. Loose electrode wire or switch terminal wires.Improper gap at electrode tip. | Replace with heavy duty battery.Check that electrode wire is firmly pushed onto the terminal on the back of the igniter. Check that the lead wires from the module to the ignition switch (if equipped) are firmly pushed onto their respective terminals.The gap can be adjusted by bending the tip in or out. Until a spark is achieved. |
| Burner will not stay lit when control knob is released. | Knob not being held in long enough. Too windy.Glass or debris in ignition area of the burner preventing thermocouple from being fully engulfed in flame.Dirty thermocouple or thermocouple connection.Faulty thermocouple or valve. | Thermocouple must have time to heat up – hold the knob in for 30 seconds after the burner lights, then releaseUnit will shut down if winds are greater than 10mph (16km/h). Either locate to different area or use when it is less windy.Ensure there is no glass or other debris in ignition area, and that the small hole below the thermocouple is unobstructed.Clean the thermocouple and clean the connection between the valve and thermocouple. Ensure the connection is properly tightened.Replace thermocouple and / or valve. |
| Humming regulator. | Normal occurrence on hot days. | This is not a defect. It is caused by internal vibrations in the regulator and does not affect the performance or safety of the gas heater.Humming regulators will not be replaced. |
| Burner output on “high” setting is too low. (Rumbling noise and fluttering blue flame at burner surface.) | Lack of gas.Supply hose is pinched.Dirty or clogged orifice.Spider webs or other matter in venturi tube.Propane regulator in “low flow” state. | Check gas level in propane cylinder.Reposition supply hose as necessary.Clean burner orifice.Clean out venturi tube.Ensure lighting procedure is followed carefully. All valves must be in the off position when the tank valve is turned on. Turn tank on slowly to allow pressure to equalize. See lighting instructions. |
KEEP YOUR RECEIPT AS PROOF OF PURCHASE TO VALIDATE YOUR WARRANTY.
Ordering Replacement Parts
Warranty Information
MODEL:
DATE OF PURCHASE: ____
SERIAL NUMBER: ____
(Record information here for easy reference)
For replacement parts and warranty claims, contact the Napoleon dealer where the product was purchased.
Before contacting the dealer, check the Napoleon Grills Website for more extensive cleaning, maintenance, troubleshooting and parts replacement instructions at www.napoleongrills.com.
To process a claim, the following information is required:
- Model and serial number of the unit.
- Part number and description.
- A concise description of the problem ('broken' is not sufficient).
- Proof of purchase (photocopy of the invoice).
In some cases, Napoleon could request to have the parts returned to the factory for inspection before providing replacement parts.
Before contacting Napoleon dealer, please note that the following items are not covered by the warranty:
• Costs for transportation, brokerage or export duties.
• Labour costs for removal and reinstallation.
• Costs for service calls to diagnose problems.
• Discolouration of stainless steel parts.
- Part failure due to lack of cleaning and maintenance, or use of improper cleaners (oven cleaner or other harsh chemicals).
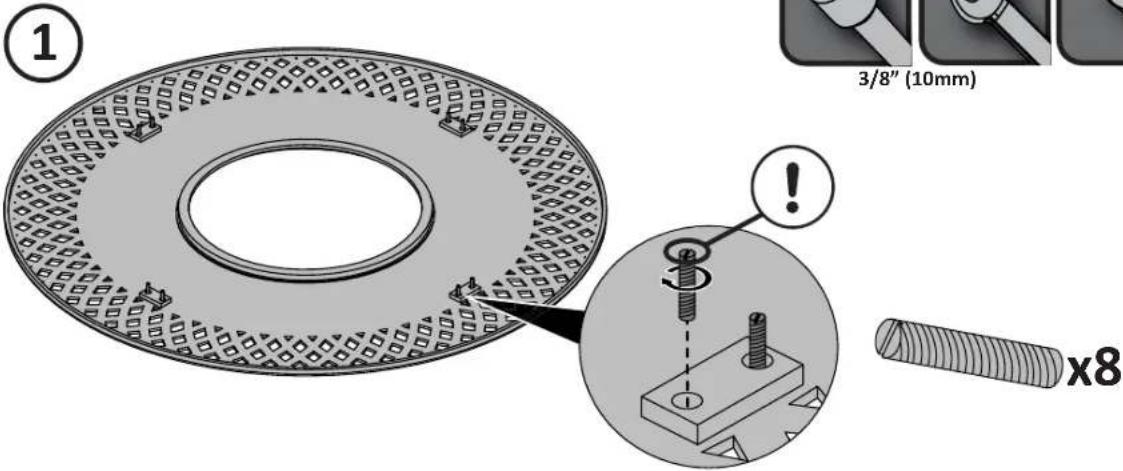
KENS1
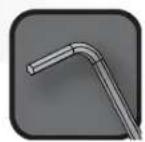
①
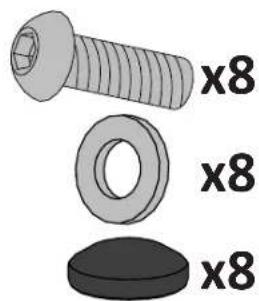
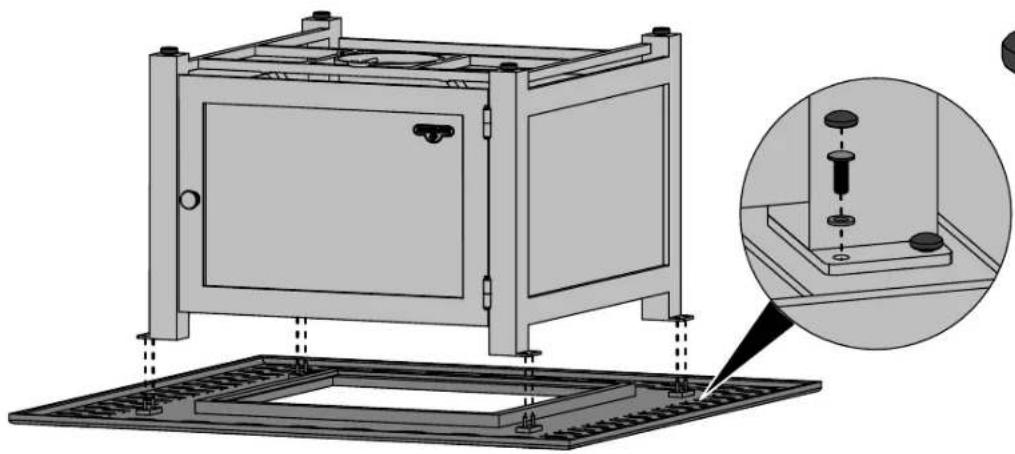

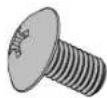
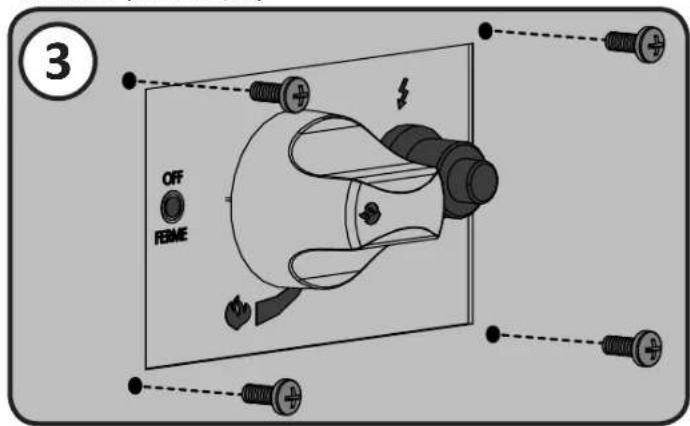
x4
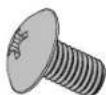
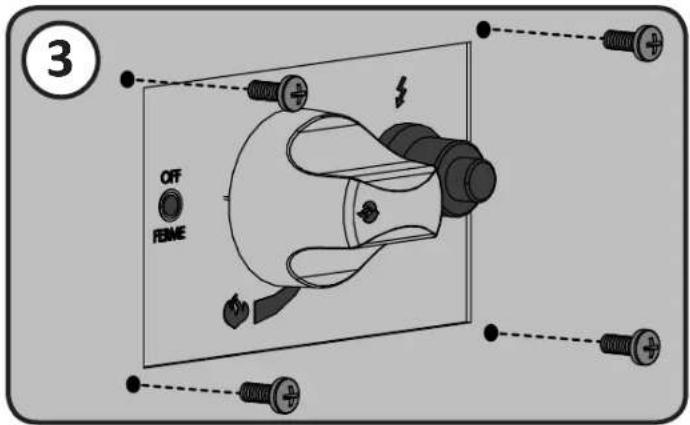
Z570-0033 (10-24 x 1/2")
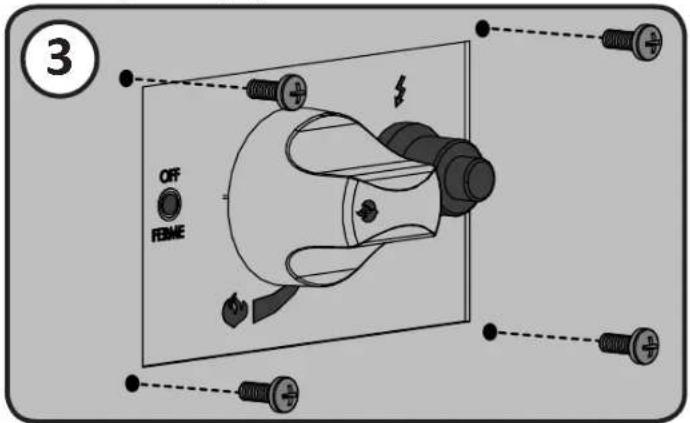
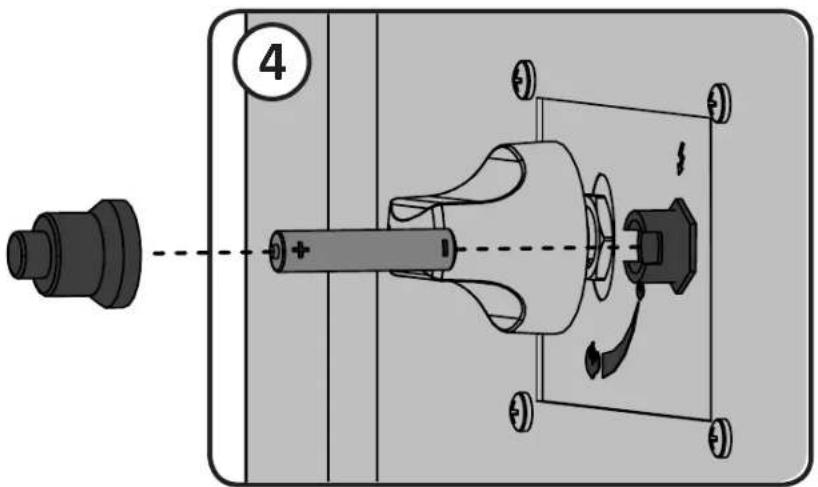

ENSURE NO GLASS IS BLOCKING ANY OF THE OPEN PORTS ON THE IGNITION PORTION OF THE BURNER, DIFFICULTIES IN LIGHTING MAY RESULT.

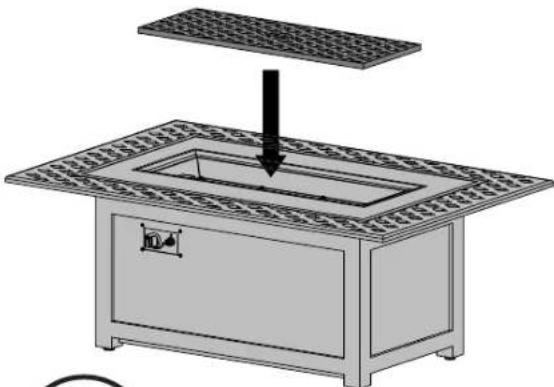
WARNING! The cover must be removed when the burner is in operation. After use, wait until the unit cools before installing the cover.


The table surfaces are hand painted. The variation in brush strokes enhances the natural beauty of the product.
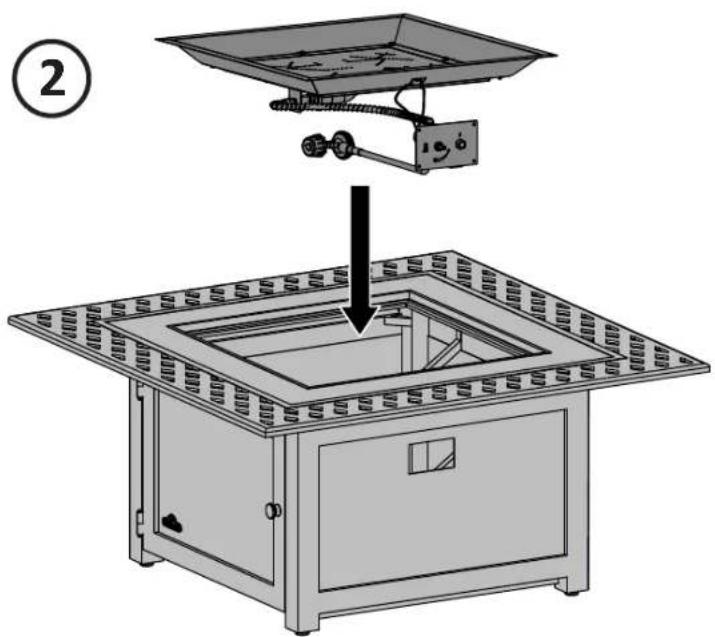
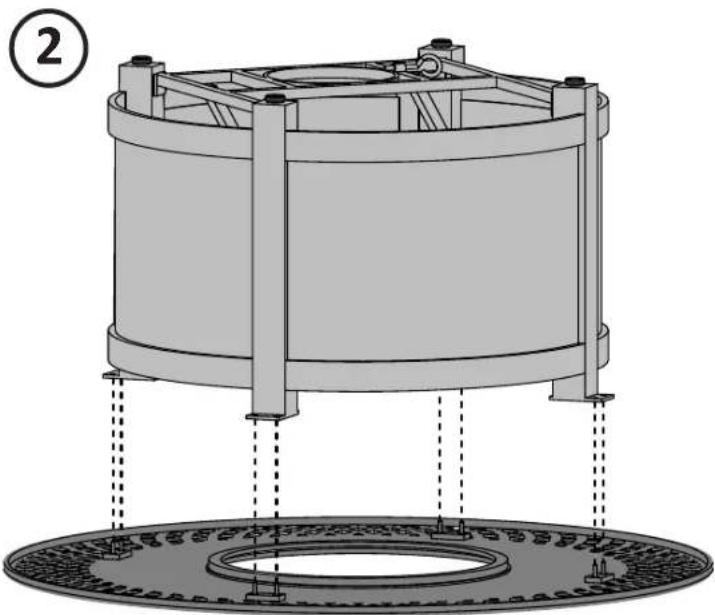
KENS2
EN
①
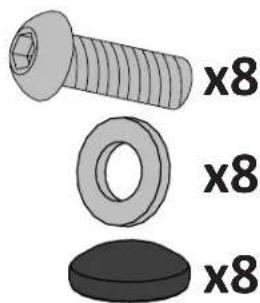
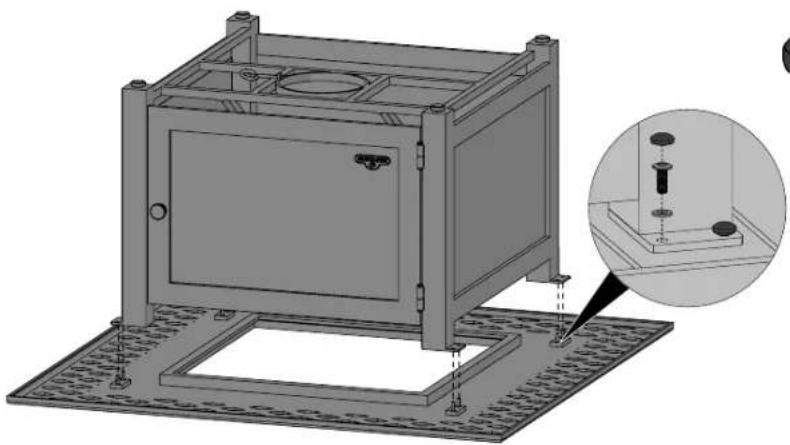
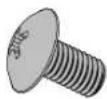
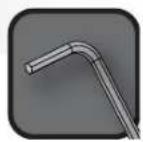
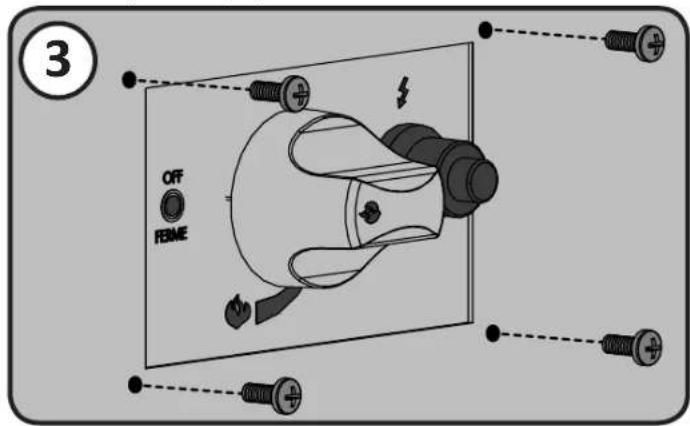
x4
Z570-0033 (10-24 x 1/2")
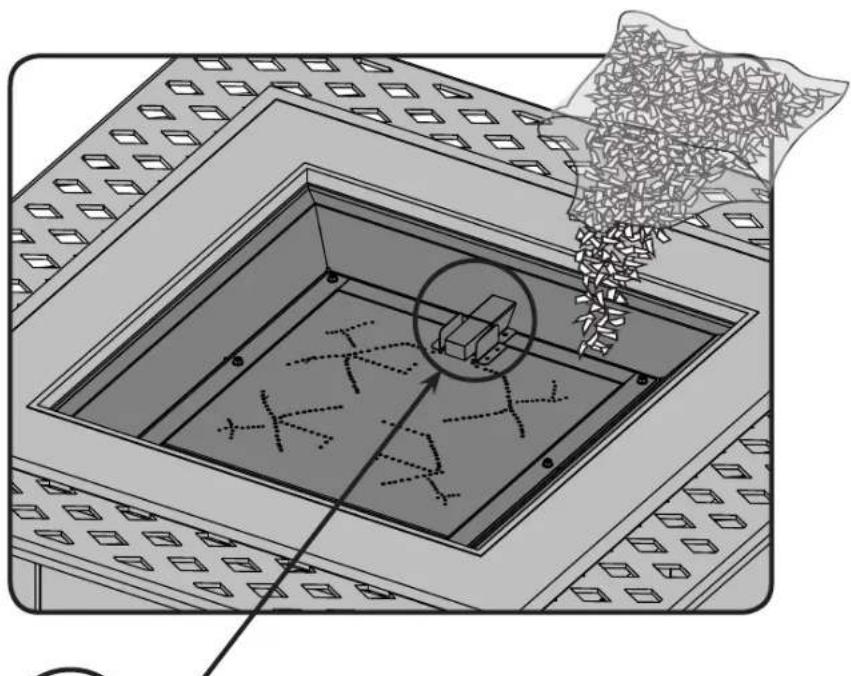

ENSURE NO GLASS IS BLOCKING ANY OF THE OPEN PORTS ON THE IGNITION PORTION OF THE BURNER, DIFFICULTIES IN LIGHTING MAY RESULT.

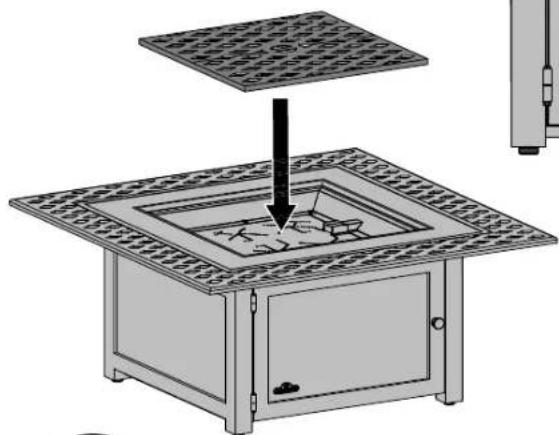
WARNING! The cover must be removed when the burner is in operation. After use, wait until the unit cools before installing the cover.

The table surfaces are hand painted. The variation in brush strokes enhances the natural beauty of the product.
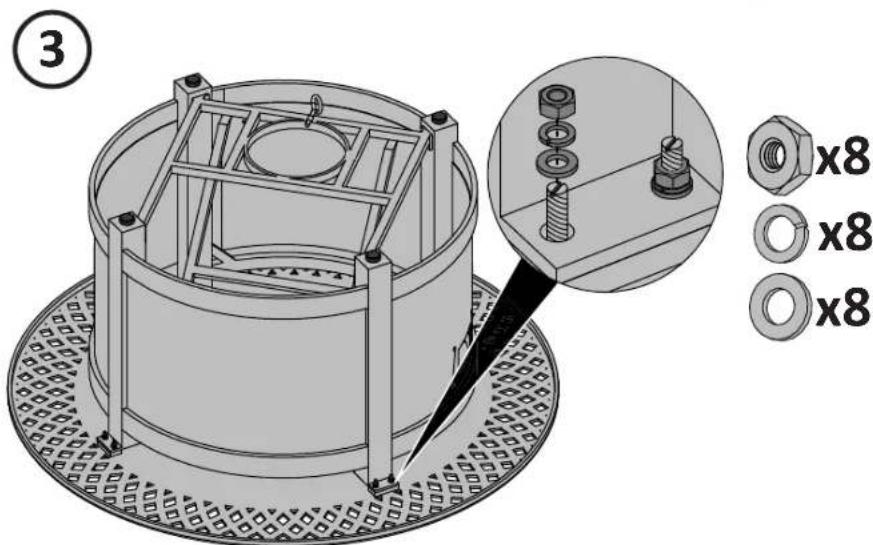
KENS3
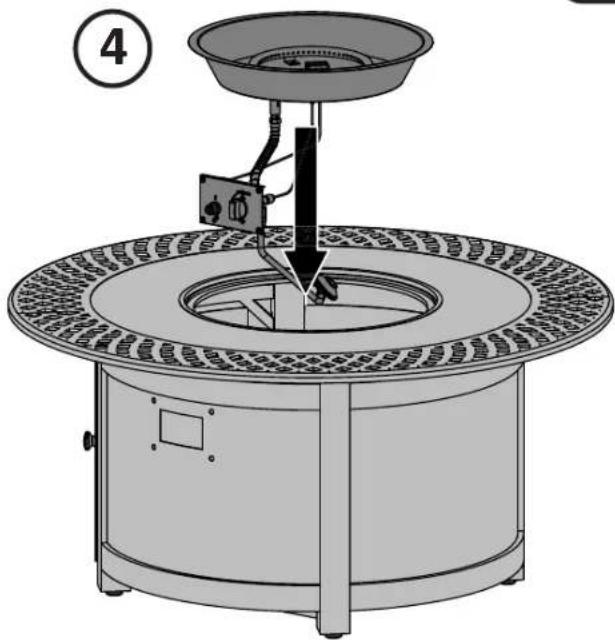
1
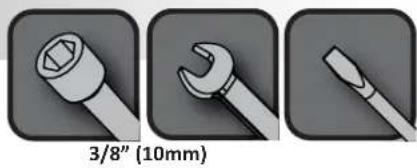
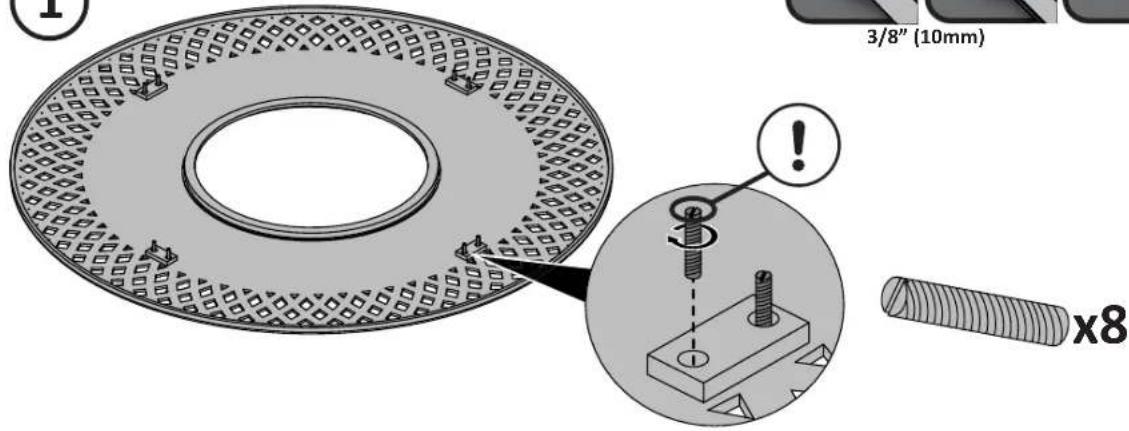
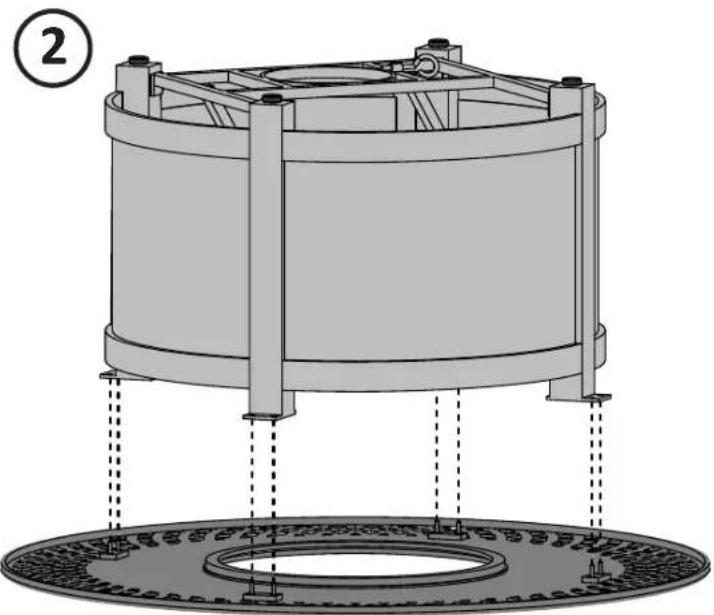
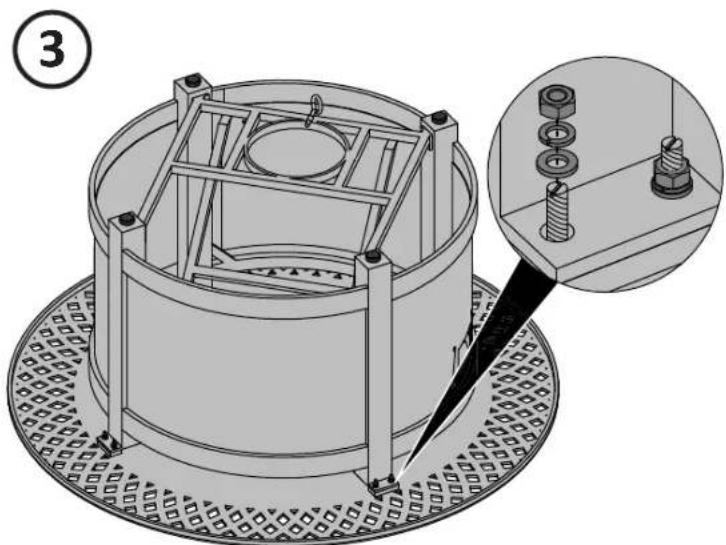
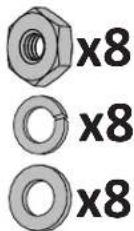
EN
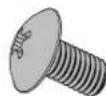
x4
N570-0094 (M5 x 10mm)
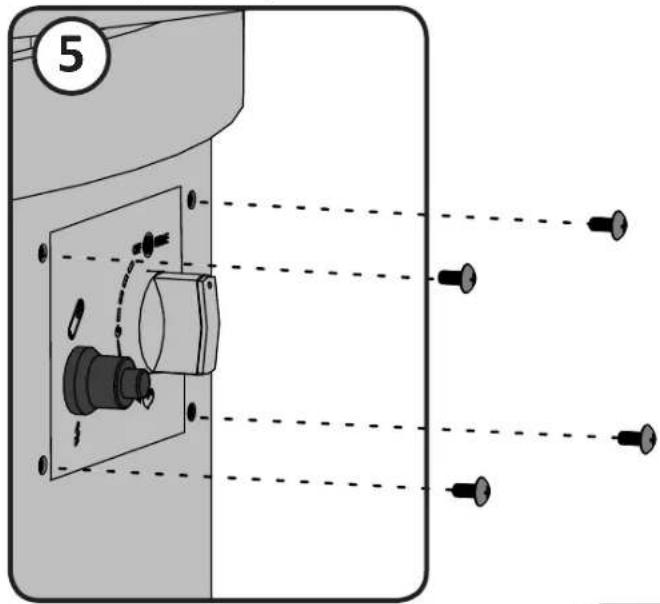
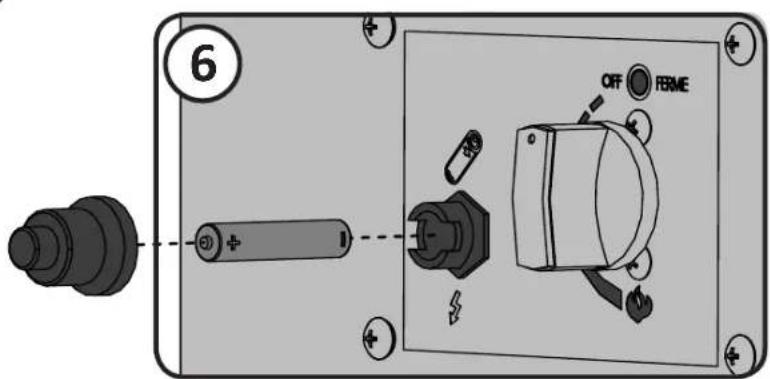
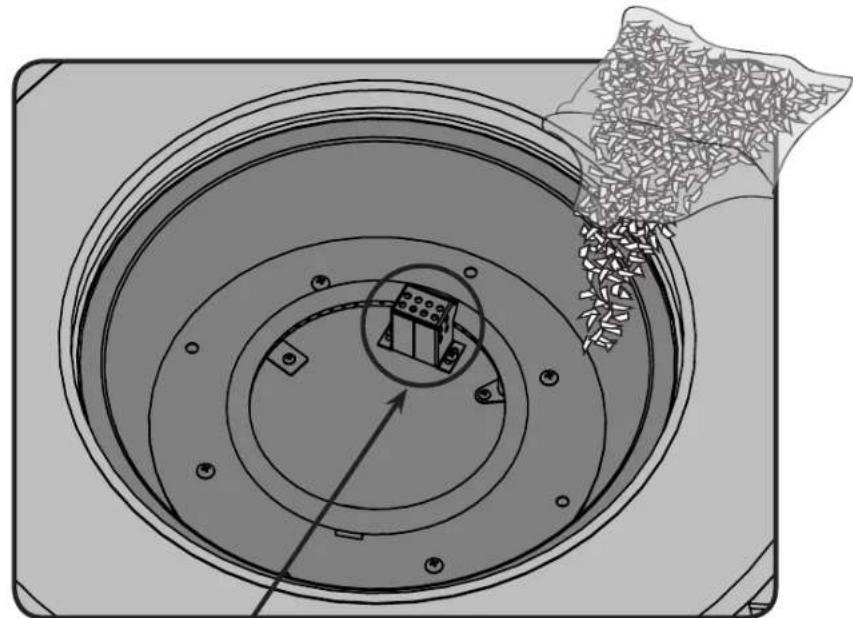

ENSURE NO GLASS IS BLOCKING ANY OF THE OPEN PORTS ON THE IGNITION PORTION OF THE BURNER, DIFFICULTIES IN LIGHTING MAY RESULT.

WARNING! The cover must be removed when the burner is in operation. After use, wait until the unit cools before installing the cover.
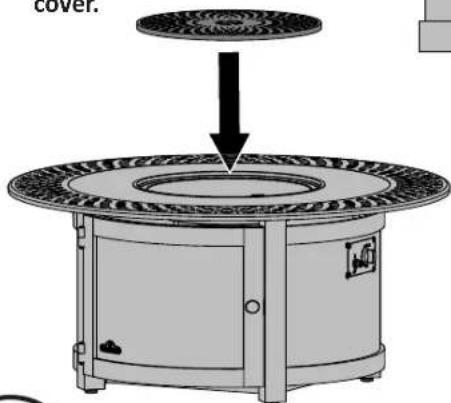
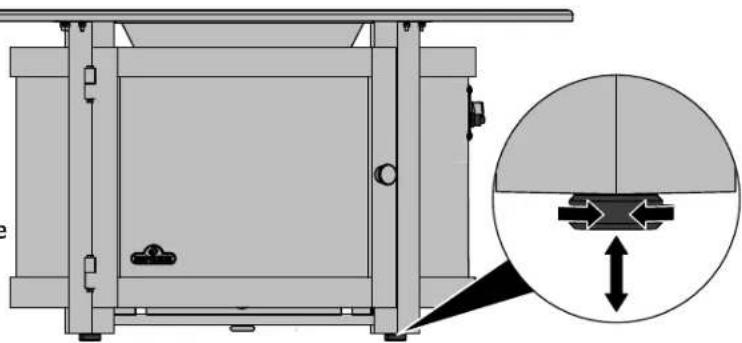

The table surfaces are hand painted. The variation in brush strokes enhances the natural beauty of the product.
PARTS LIST KENS1
| Item Part | # Description | ||
| 1 Z010-0034 burner base x | |||
| 2 Z475-0016 burner surround x | |||
| 3 Z585-0009 burner shield x | |||
| 4 N680-0001-SER thermocouple x | |||
| 5 Z565-0001 burner screen x | |||
| 6 Z240-0001 electrode x | |||
| 7 N570-0073 1/4-20 x 3/8 screw x | |||
| 8 N450-0025 1/4-20 nut x | |||
| 9 N570-0008 #8 x 1/2 screw x | |||
| 10 | N725-0056 valve | x | |
| W455-0076 | orifice #43 | p | |
| N455-0066 orifice #25 | n | ||
| 11 | N043-0002 battery | x | |
| 12 | W175-0227 | flex connector | x |
| 13 | N530-0003 regulator | x | |
| 14 | Z475-0022 control panel | x | |
| 15 | N357-0013 igniter | x | |
| 16 | N380-0020-RD | control knob | x |
| 17 | Z570-0033 10-24 x 1/2" screw x | ||
| 18 | Z585-0011 burner shield x | ||
| 19 | Z585-0012 tank heat shield | x | |
| 20 | N335-0089-BZ4AQ | lid | x |
| 21 | N705-0039-BZ4AQ | table top | x |
| 22 | N035-0146-BZ4AQ | base | x |
| 23 | N225-0059-BZ4AQ | door | x |
| 24 | N325-0096 handle door | x | |
| 25 | N385-0307-SER napoleon logo | x | |
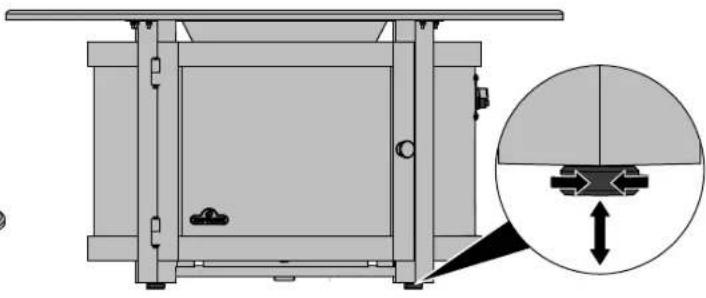
| 26 | N570-0119 leveling foot | x | |
| 27 | GPFR | burner assembly | x |
| N020-0175 fastener kit | x | ||
| N300-0002 glass embers topaz | x | ||
| mega | glass embers - amber 1lb | ac | |
| megb | glass embers - blue 1lb | ac | |
| megk | glass embers - black 1lb | ac | |
| megr | glass embers - red 1lb | ac | |
| mkga | glass embers - amber 5lb | ac | |
| mkgc | glass embers - clear 5lb | ac | |
| mkgk | glass embers - black 5lb | ac | |
| mkgb | glass embers - blue 5lb | ac | |
| mkgr | glass embers - red 5lb | ac | |
| 68851 | optional table cover | ac | |
| GPFRE-WNDSCRN | kit, windscreen | ac | |
x - standard
n - natural gas units only
p - propane units only
ac - accessory
PARTS DIAGRAM KENS1
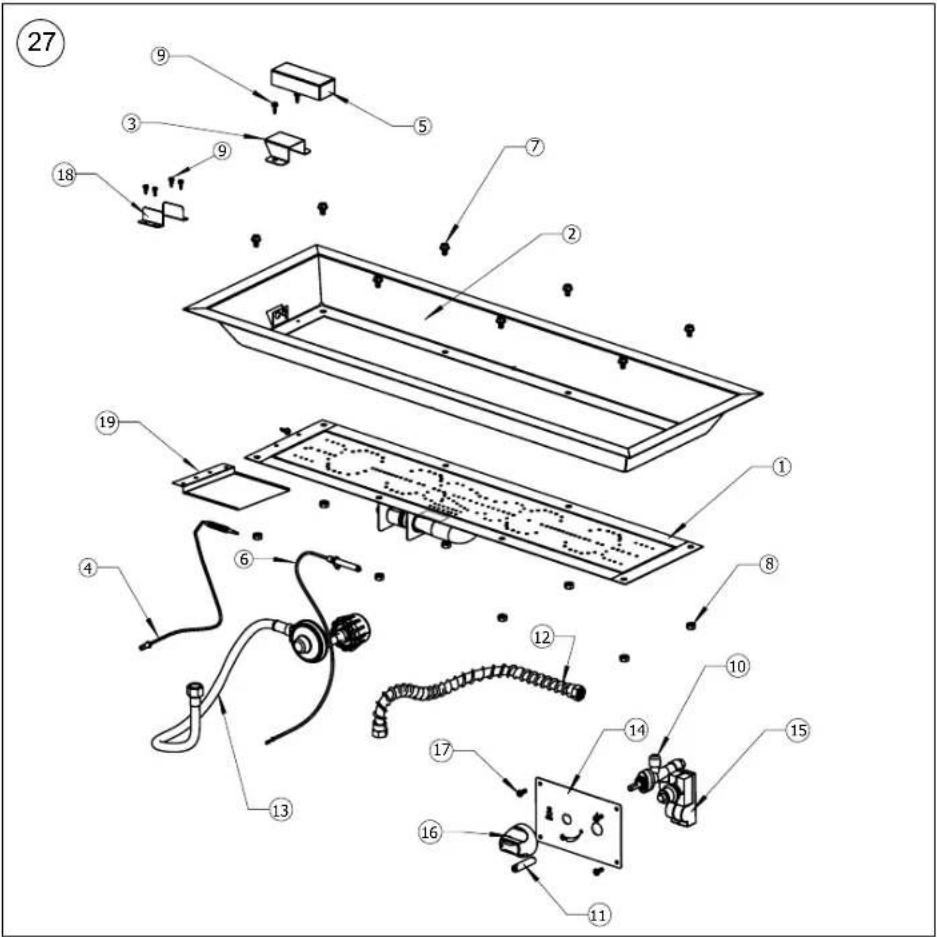
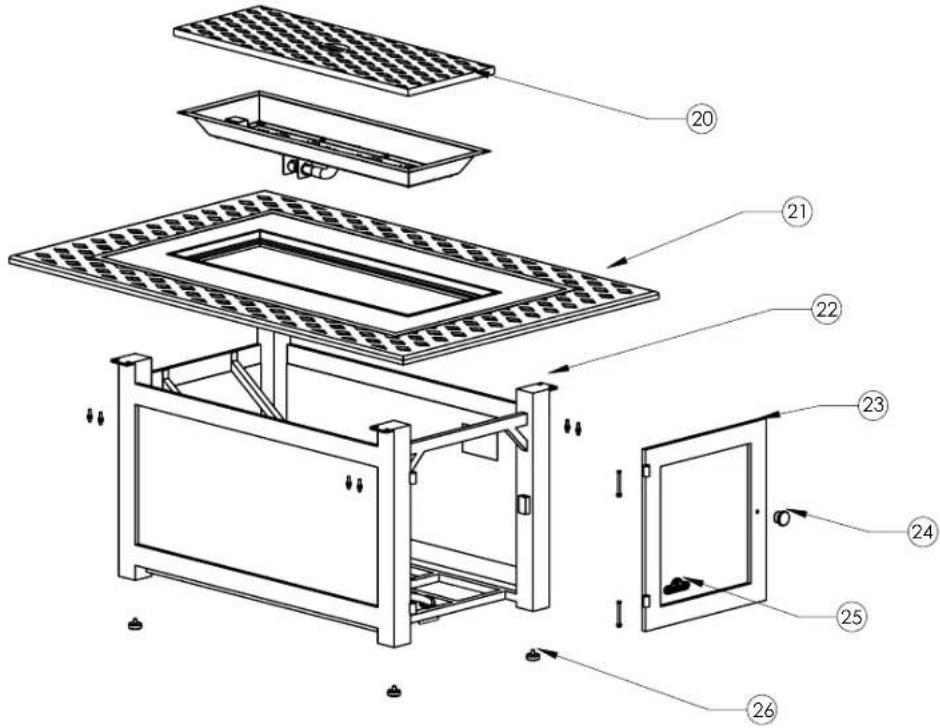
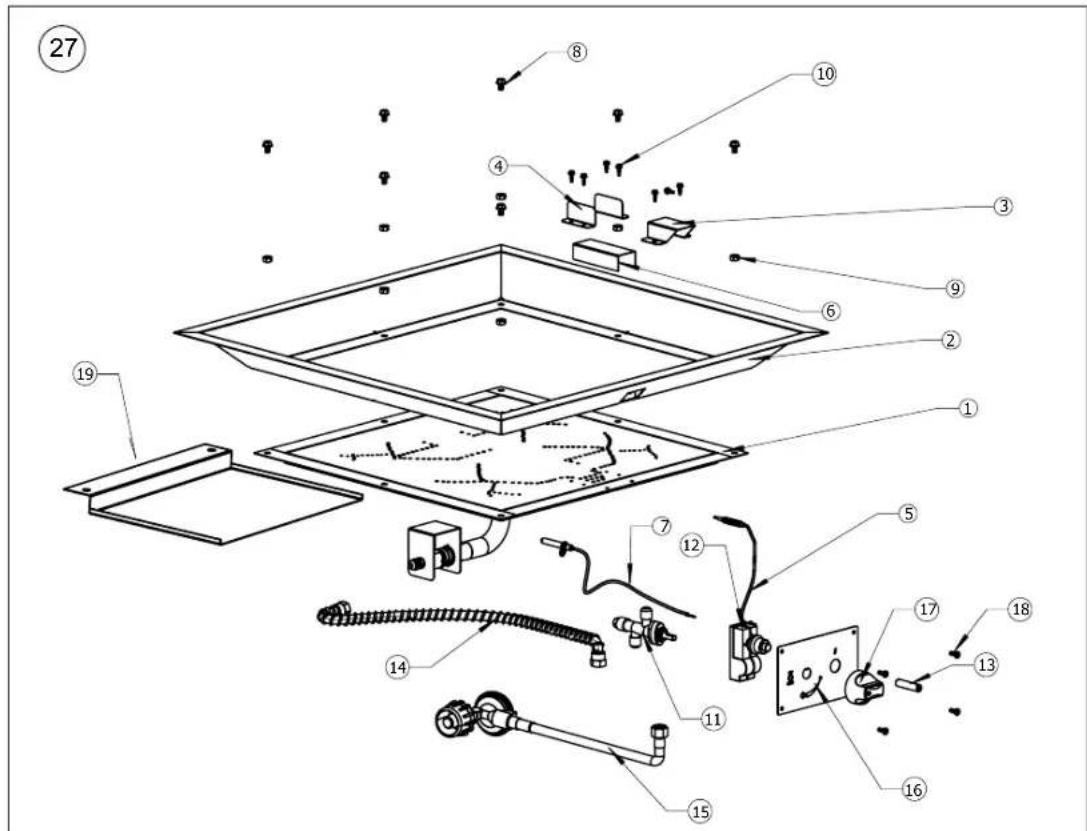
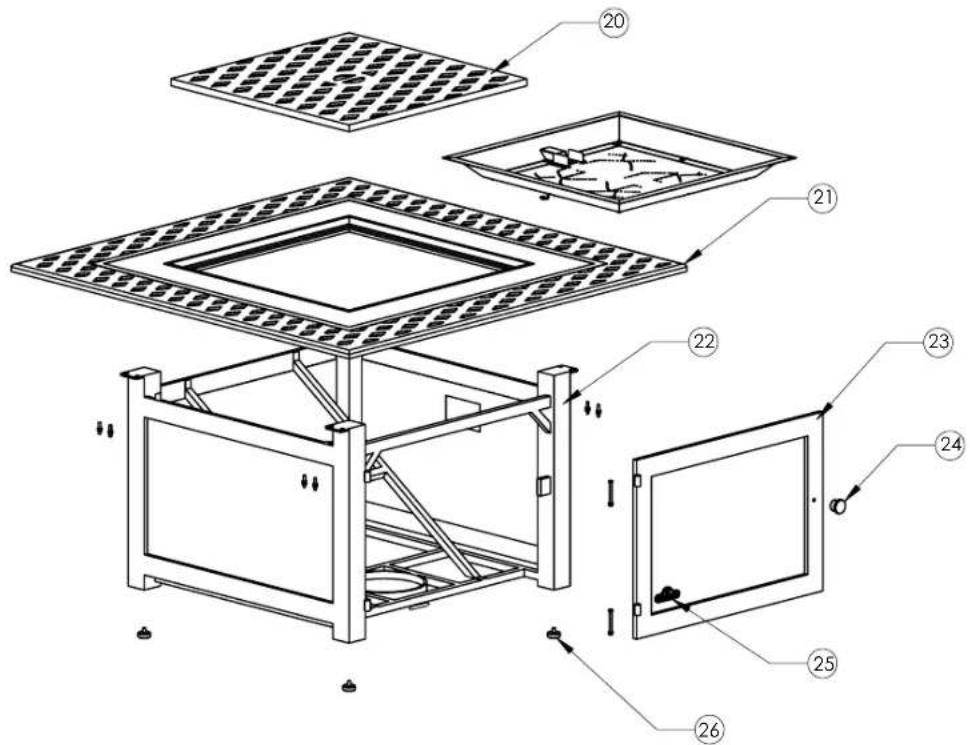
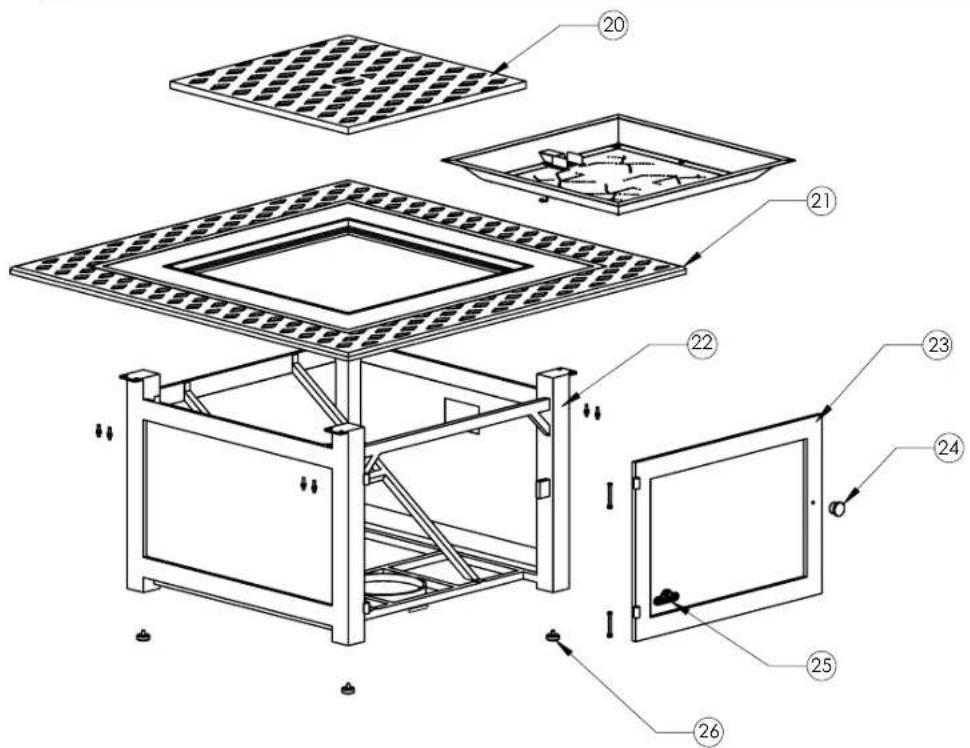
PARTS LIST KENS2
| Item Part | # Description | ||
| 1 Z010-0036 burner base x | |||
| 2 Z475-0019 burner surround x | |||
| 3 Z585-0010 burner shield x | |||
| 4 Z585-0011 burner wind shield x | |||
| 5 N680-0001-SER thermocouple x | |||
| 6 Z565-0001 burner screen | x | ||
| 7 Z240-0001 electrode | x | ||
| 8 N570-0073 | 1/4-20 | x 3/8 screw x | |
| 9 N450-0025 | 1/4-20 | nut | x |
| 10 | N570-0008 | #8 x 1/2 screw | x |
| W455-0076 | orifice #43 | p | |
| N455-0066 | orifice #25 | n | |
| 11 | N725-0056 | valve | x |
| 12 | N357-0013 | igniter | x |
| 13 | N043-0002 | battery | x |
| 14 | W175-0227 | flex connector | x |
| 15 | N530-0003 | regulator | x |
| 16 | Z475-0022 control panel | x | |
| 17 | N380-0020-RD | control knob | x |
| 18 | Z570-0033 10-24 x 1/2" screw x | ||
| 19 | Z585-0013 heat shield | x | |
| 20 | N335-0087-BZ4AQ | lid | x |
| 21 | N705-0037-BZ4AQ | table top | x |
| 22 | N035-0144-BZ4AQ | base | x |
| 23 | N225-0057-BZ4AQ | door | x |
| 24 | N325-0096 | handle door | x |
| 25 | N385-0307-SER napoleon logo | x | |
| 26 | N570-0119 | leveling foot | x |
| 27 | GPFS | burner assembly | x |
| N020-0175 | fastener kit | x | |
| N300-0002 | glass embers topaz (2 per) | x | |
| mega | glass embers - amber 1lb | ac | |
| megb | glass embers - blue 1lb | ac | |
| megk | glass embers - black 1lb | ac | |
| megr | glass embers - red 1lb | ac | |
| mkga | glass embers - amber 5lb | ac | |
| mkgc | glass embers - clear 5lb | ac | |
| mkgk | glass embers - black 5lb | ac | |
| mkgb | glass embers - blue 5lb | ac | |
| mkgr | glass embers - red 5lb | ac | |
| 68850 | optional table cover | ac | |
| GPFSE-WNDSCRN | kit windscreen | ac | |
x - standard p - propane units only
n - natural gas units only ac - accessory
PARTS DIAGRAM KENS2
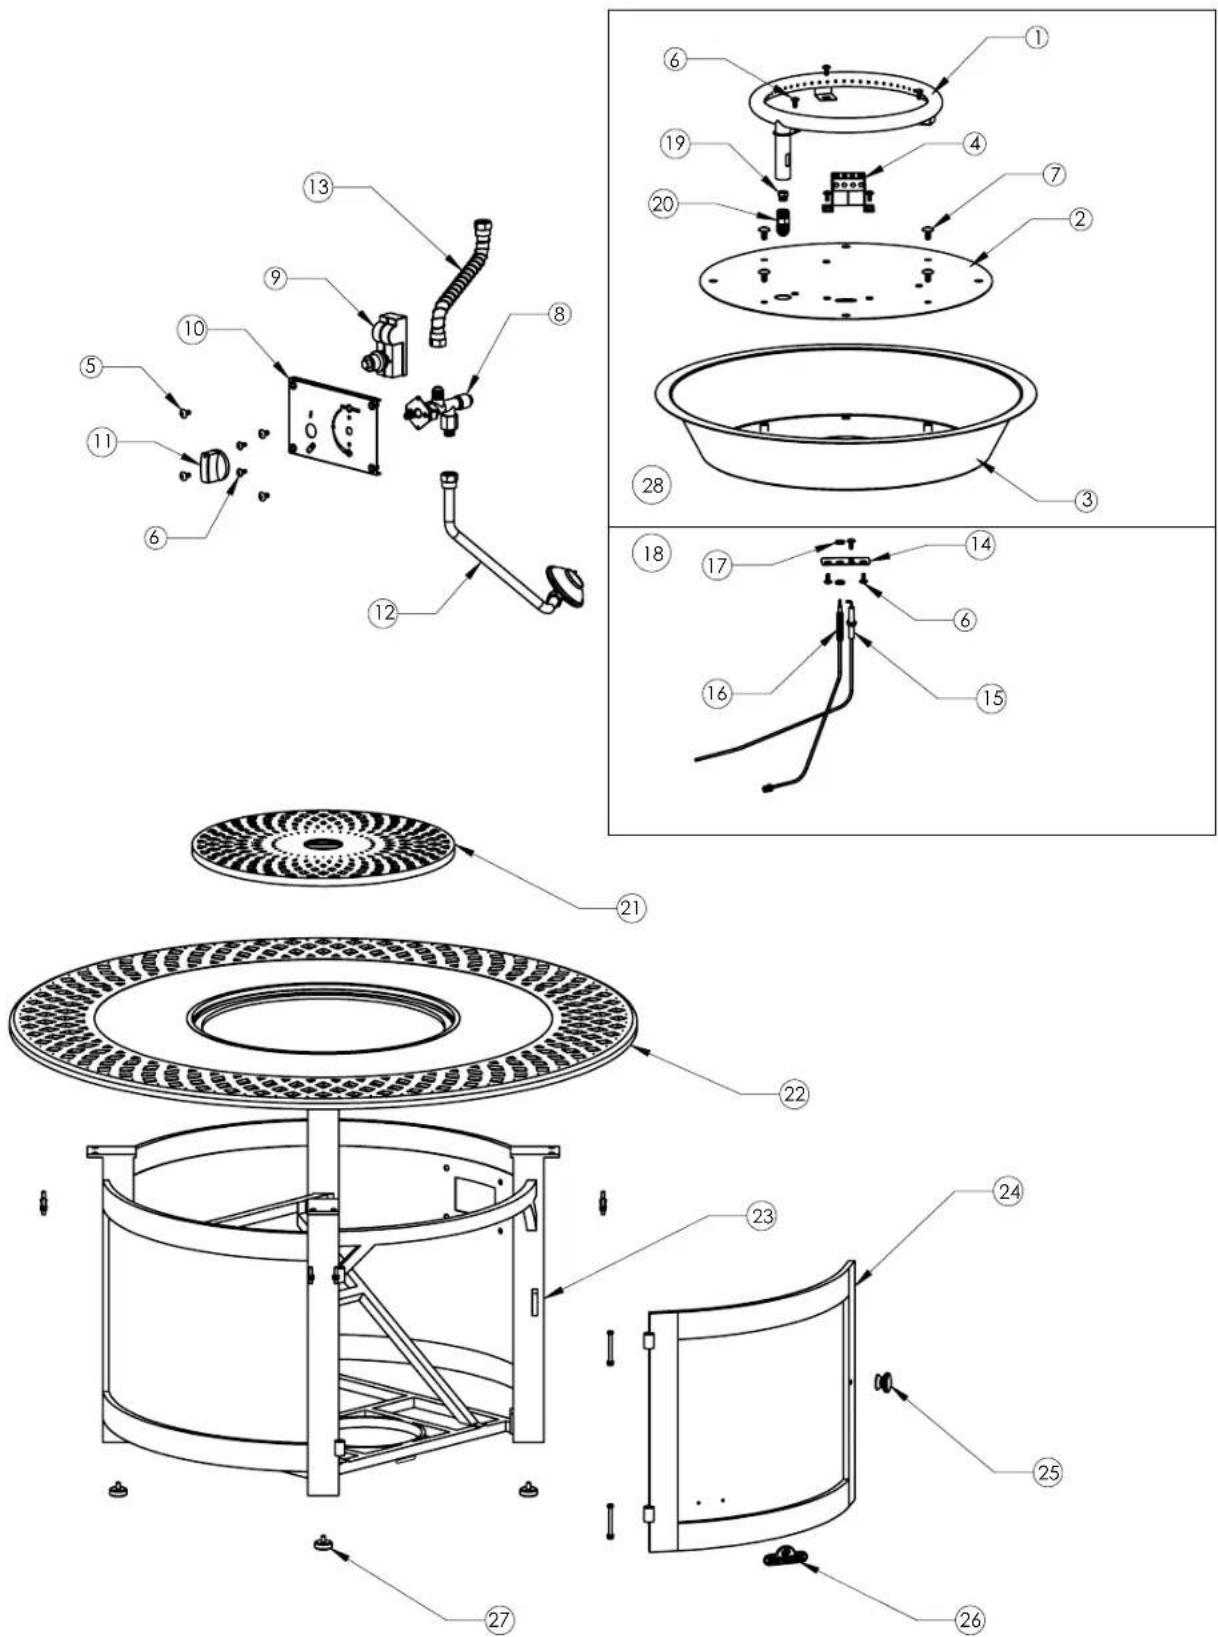
PARTS LIST KENS3
| Item Part | # Description x | ||
| 1 N100-0 | 054 burner x | ||
| 2 N500-0 | 060 burner plate x | ||
| 3 N710-0 | 097 burner pan x | ||
| 4 N585-0 | 109 burner shield x | ||
| 5 N570-0 | 094 M5 x 10mm screw x | ||
| 6 Z570-0 | 032 M4 x 10mm screw x | ||
| 7 Z570-0 | 024 M6 x 12mm screw x | ||
| 8 N725-0 | 061 valve x | ||
| 9 N357-0 | 013 igniter x | ||
| 10 N500-0 | 0061 control panel | x | |
| 11 N380-0 | 0033 control knob | x | |
| 12 N530-0 | 0005 regulator | x | |
| 13 N720-0 | 0076 flex connector | x | |
| 14 N500-0 | 0062 bracket electrode | x | |
| 15 N240-0 | 0038 electrode | x | |
| 16 N680-0 | 0001-SER thermocouple | x | |
| 17 N735-0 | 0024 washer M4 x | ||
| 18 N010-0 | 0898 electrode assembly | x | |
| 19 N455-0 | 0086 orifice 1.95mm | p | |
| N455-0087 orifice #32 | n | ||
| 20 N255-0 | 0065 fitting | x | |
| 21 N335-0 | 0088-BZ4AQ lid | x | |
| 22 N705-0 | 0038-BZ4AQ table top | x | |
| 23 N035-0 | 0145-BZ4AQ base | x | |
| 24 N225-0 | 0058-BZ4AQ door | x | |
| 25 N325-0 | 0096 handle door | x | |
| 26 N385-0 | 0307-SER napoleon logo | x | |
| 27 N570-0 | 0119 leveling foot | x | |
| 28 GPFC | burner assembly | x | |
| N020-0175 fastener kit | x | ||
| N300-0002 glass embers to paz (2per) | x | ||
| mega | glass embers - amber 1lb | ac | |
| megb | glass embers - blue 1lb | ac | |
| megk | glass embers - black 1lb | ac | |
| megr | glass embers - red 1lb | ac | |
| mkga | glass embers - amber 5lb | ac | |
| mkgc | glass embers - clear 5lb | ac | |
| mkgk | glass embers - black 5lb | ac | |
| mkgb | glass embers - blue 5lb | ac | |
| mkgr | glass embers - red 5lb | ac | |
| 68855 | optional table cover | ac | |
| GPFCE-WNDSCRN | kit windscreen | ac |
x - standard
p - propane units only
n - natural gas units only
ac - accessory
PARTS DIAGRAM KENS3
EN
DANGER! RISQUE D'EMPOISONNEMENT AU MONOXYDE DE CARBONE
napoleongrills.com

NATIONAL FIREPLACE INSTITUTE

CERTIFIED www.nficertified.org
KENS3

| DÉBIT | ||
| MODELE COMBUSTIBLE DÉBIT MAX. Btu/h | ||
| KENS1KENS2 | Gaz naturel 60 | 000 |
| KENS1KENS2 | Propane 60 | 000 |
| KENS3 | Gaz naturel 40 | 000 |
| KENS3 | Propane 40 | 000 |
| PRESSIONS D'ALIMENTATION EN GAZ | |
| NATUREL PROPANE | |
| Pression d'alimentation maximale 7,0" c.e. 11,0" c.e. | |
LA TABLE EST APPROUVÉ POUR UTILISATION SUR DES PLANCHÉS COMBUSTIBLE

Branchement Au Gaz
FR
N415-0500 JUN 25.18
www.napoleongrills.com


ASSUREZ-VOUS QU'AUCUN MORCEAUX DE BRAISES VITRIFEÉS N'OBSTRUE L'OUVERTURE DES PORTS DE L'ALLUMEUR ET D'IGNITION DU BRÛLEUR, PEUT CAUSER DES DIFFICULTÉS LORS DE L'ALLUMAGE.
Instruction D'allumage
KENS1 (GPFR) / KENS2 (GPFS)
ABNORMAL
x4
Z570-0033 (10-24 x 1/2")
FR

ASSUREZ-VOUS QU'AUCUN MORCEAUX DE BRAISES VITRIFEÉS N'OBSTRUE L'OUVERTURE DES PORTS DE L'ALLUMEUR ET D'IGNITION DU BRÛLEUR, PEUT CAUSER DES DIFFICULTÉS LORS DE L'ALLUMAGE.


x4
Z570-0033 (10-24 x 1/2")


ASSUREZ-VOUS QU'AUCUN MORCEAUX DE BRAISES VITRIFEÉS N'OBSTRUE L'OUVERTURE DES PORTS DE L'ALLUMEUR ET D'IGNITION DU BRÛLEUR, PEUT CAUSER DES DIFFICULTÉS LORS DE L'ALLUMAGE.


FR


ASSUREZ-VOUS QU'AUCUN MORCEAUX DE BRAISES VITRIFEÉS N'OBSTRUE L'OUVERTURE DES PORTS DE L'ALLUMEUR ET D'IGNITION DU BRÛLEUR, PEUT CAUSER DES DIFFICULTÉS LORS DE L'ALLUMAGE.

LISTE DES PIÈCES KENS2
LISTE DES PIÈCES KENS3
Notes
Notes
FR
Notes
FR

Napoleon products are protected by one or more U.S. and Canadian and/or foreign patents or patents pending.
- NAPOLEON
- PATIOFLAME
- DANGER! CARBON MONOXIDE HAZARD
- DANGER
- IF YOU SMELL GAS
- WARNING
- NAPOLEON PRESIDENT'S 3 YEAR LIMITED WARRANTY
- WARNING! FOR OUTDOOR USE ONLY
- SAFE OPERATING PRACTICES
- GENERAL INFORMATION
- GETTING STARTED
- SPECIFICATIONS
- DIMENSIONS
- LOCATION
- LOCATING YOUR OUTDOOR APPLIANCE
- GAS HOOK-UP INSTRUCTIONS
- PROPANE CYLINDER SPECIFICATIONS
- LP (PROPANE) GAS CYLINDER MOUNTING
- CAUTION
- CONVERSION TO NATURAL GAS
- NATURAL GAS HOOK-UP
- FINISHING
- GLASS EMBER INSTALLATION
- LEAK TESTING INSTRUCTIONS
- LIGHTING INSTRUCTIONS
- OPERATING THE PATIO FLAME
- MAINTENANCE / CLEANING INSTRUCTIONS
- CAUTION! BEWARE OF SPIDERS
- KEEP YOUR RECEIPT AS PROOF OF PURCHASE TO VALIDATE YOUR WARRANTY
- ORDERING REPLACEMENT PARTS
- (RECORD INFORMATION HERE FOR EASY REFERENCE)
- KENS1
- KENS2
- KENS3
- PARTS DIAGRAM KENS3
- DANGER! RISQUE D'EMPOISONNEMENT AU MONOXYDE DE CARBONE
- BRANCHEMENT AU GAZ
- INSTRUCTION D'ALLUMAGE
- X4
- NOTES
Brand : Napoleon
Model : KENS2BZ1
Category : Cooker