
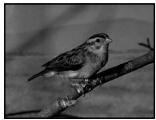
CCD-TR317E - Camcorder SONY - Free user manual and instructions
Find the device manual for free CCD-TR317E SONY in PDF.

User questions about CCD-TR317E SONY
0 question about this device. Answer the ones you know or ask your own.
Ask a new question about this device
Download the instructions for your Camcorder in PDF format for free! Find your manual CCD-TR317E - SONY and take your electronic device back in hand. On this page are published all the documents necessary for the use of your device. CCD-TR317E by SONY.
USER MANUAL CCD-TR317E SONY
Video Camera Recorder
Operating Instructions
Before operating the unit, please read this manual thoroughly, and retain it for future reference.
HCTPYKUINI NO 3KCNJYATAUNI
Ipeed 3Kcnpnyatauene annapaTa BnHmATEnbHO npOHTne, noXaJyncTta, daHHoe pyKOBOdCTBO n COxpaHNTe erO dJaJIbHeMIX CNpABOK.

Handycam

InfoLITHIUM

SERIES
Video8XR
CCD-TR317E
English
Welcome!
Congratulations on your purchase of this Sony Handycam® camcorder. With your Handycam, you can capture life's precious moments with superior picture and sound quality.
Your Handycam is loaded with advanced features, but at the same time it is very easy to use. You will soon be producing home video that you can enjoy for years to come.
WARNING
To prevent fire or shock hazard, do not expose the unit to rain or moisture.
To avoid electrical shock, do not open the cabinet.
Refer servicing to qualified personnel only.
Pysckm
Добpo пожаловать!
I03dpabJIeM BAc C npNo6peTeHHeM daHHoB BnDeokampeH Handycam@ pnpMb Syo. C nOmoIb BaSei BnDeokampeH Handycam Bc CMoKeTe 3aneaTneB DOpOrne Bam mHOBeHn JN3HN C npEBOCXoHbIM KaYeCTBOM N3O6paXeHn H 3Byka.
Baasa Bndeokamepa Handycam ochaeHa yCOBepheHCTBOBAHHbIMN cyHKUARMn, HO TO Xe BpMa ee OueHb JERKIO NCNOJb3OBA Tb.
Bckope Bby 6yTe Co3daBaTb cemeHbIe BnDeOpnpaMMbl, KOTOpbIMMOKeTe HacnaJdaTbCn NOcNe dyUOuine rOdbI.
PNEyPPEXDEHNE
Checking supplied accessories 5
Quick Start Guide 6
Getting started
Using this manual 10
Step 1 Preparing the power supply 12
Installing the battery pack. 12
Charging the battery pack. 13
Connecting to the mains 17
Step 2 Inserting a cassette. 18
Recording - Basics
Recording a picture 19
Shooting backlit subjects (BACK LIGHT) 23
Shooting in the dark (NightShot) 24
Superimposing the date and time on pictures 26
Checking the recording
- EDITSEARCH/Rec Review 27
Playback - Basics
Connections for playback 28
Playing back a tape 29
Advanced Recording Operations
Using the wide mode 31
Using the fader function 33
Using special effects -Picture effect 36
Using the PROGRAM AE function 38
Adjusting the exposure manually 41
Focusing manually 42
Superimposing a title 44
Making your own titles 46
Editing
Dubbing a tape 48
Customizing Your Camcorder
Changing the menu settings 49
Resetting the date and time. 58
Additional Information
Playback modes 60
Changing the lithium battery in your camcorder 62
Troubleshooting 64
Self-diagnosis display 67
Warning indicators and messages 68
Using your camcorder abroad 74
Maintenance information and precautions 75
Specifications 80
Quick Reference
Identifying the parts and controls. 82
Quick Function Guide 89
Index 91
IpoBepka npinlaraeMbIX npina,dJeXHoCTeI... 5
PykoBoDCTBO IO 6bIcTpOMy 3aNycky 8
IoproTOBka K 3KcnIyatauN
IcnoIb3OBAHne DaHHoro pyKOBoCTBa .. 10
IyHKT 1NoTOBOKa NCTOCHKA NTaHnA .. 12
UctaHOBka 6atapeHoro 6noka 12
3apnka 6aTapeHoro 6Joka. 13
IpoDCoeDINHeHne K ceTeBOu po3eTke 17
IyHKT 2 YcTaHOBKa Kaccetbl 18
3aHcB - OCHOBHbIe NOLOXeHnA
3ainncb n3o6paqehnna 19
CbeMa 06bEeKToB c 3aJHne IoDCBeTkoB (BACK LIGHT) 23
Cbemka B TemHote (Houhna Cbemka) .. 24
HaIIOXeHne DaTbI IN BpeMeHN Ha 1306paXeHnA 26
Поберка запис
-EDITSEARCH/Пюсмотр Запис................................27
Bocnpom3BeDeHne - OchOBHbIe IIOLOXeHn
Bocnpoun3BeDeHneJeHTbl 29
YcoBepWeHCTBOBaHHbIe Opeaun CbeMkn
IcnoIb3OBAHne IInpOKo-3KpaHHoro peXIMa 31
IcnoJb3OBAHne cyHKcnn cpeiepa... 33
IcnoB3OBAHHe CneuaJIbHbIX 3ΦΦeKTOB -3ΦΦeKT N3o6paKeHn .36
IcnoJIb3ObaHne yHKuIN PROGRAM AE.. 38
PerynipOBka 3Kcno3nBpyHyu ....41
ΦokycinpOBKa BpyHyu 42
Haioxehne TnTpa. 44
Co3daHHe CBOx Co6CTBeHHbIX TnTpoB ... 46
MONTAX
Ipeezanbc IeHTbl 48
BbINOJIHHeHne mHdINBnDyaJIbHbIX ycTaHOBOK Ha BnDeOKaMepe
U3MeHeHne yCTaHOBOK MeHIO 49
IpeyectaHOBKa DaTbI N BpeMeHH 58
DonoHnTeIbHa IHHopMaIaIa
Pexnmbi Bocnpou3BeJeHnA 60
3aMeHaJIITnEBoB 6aTapeKn B BaSei BInDeOkampe 62
Ponck uyctpaehne HencnpabHocTei ... 69
HdNkaqna cAmOdaHOctnK 72
PpeDynpexKaIOUne INHnKaTOpblI coo6ueHn7 73
IcnoIb3OBAHnE BaSei BnJeOkAmpBt 3a rpaHncei 74
HnfoMaunno yxOy3a annpaTOM mepbI npedocToPOKHOCTN 75
Texnueckne xapaKtepcntkn 81
OnepaTnBhBcnpaBOuHnK
O6o3naHHe YacTei nperyIaTOpOB..... 82
PykoBIOCTBO IO 6bICTpbIM yHKUAM .... 90
AilpaBnThbIykaaTeIb. 92
Checking supplied accessories
Make sure that the following accessories are supplied with your camcorder.
Y6eIntecb, YTO CNEyIOUe IpnHaIeXHocTn npnilaraIOTcK BaWei BIndeokampe.
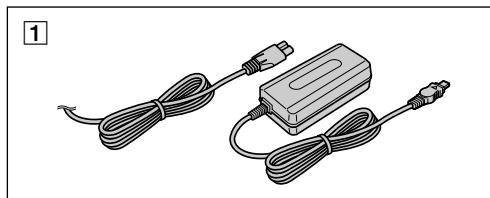
1 AC-L10A/L10B/L10C AC power adaptor (1), Mains lead (1) (p. 13)
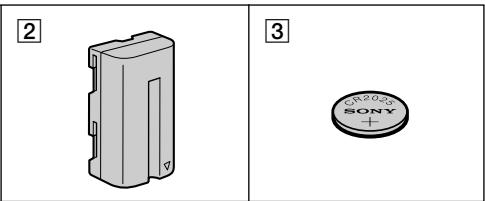
NP-F330 battery pack (1) (p. 12, 13)
3 CR2025 lithium battery (1) (p. 62) The lithium battery is already installed in your camcorder.
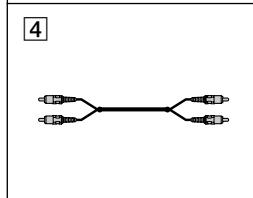
4 A/V connecting cable (1) (p. 28)
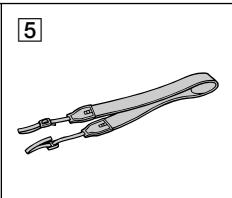
Shoulder strap (1) (p. 84)
Contents of the recording cannot be compensated if recording or playback is not made due to a malfunction of the camcorder, video tape, etc.
1 CeTeBoi aIaIaTep IepemEnHOro ToKa AC-L10A/L10B/L10C (1) (ctp. 13)
2 BaTapeHbIb 6JIoK NP-F330 (1) (cTp. 12,13)
3ЛитnevаяьаразейкаCR2025(1)(cTp.62)Литnevаяьаразейkaуcke yctaHOBNeHaВBaшew BnDEOKampe.
4 CoeHnHtBHyI Ka6bI ayDIO/BnDeo (1) (cTp. 28)
5Плевов ремь (1) (cTp.84)
CopejxHHe 3aIncn He MoXeT 6bITb KOMTeHCPOBaHO B Cnyuae,ecn 3aIncb NIN BOCPOn3BeDeHne He BblIOJIHeHbI n3-3a HEnCpPaBHOCTn BuJeOKaMepbl,BUJeOJIeHTbl I T.I.
This chapter introduces you to the basic features of your camcorder. See the page in parentheses "() for more information.
1 Connecting the mains lead (p. 17)
Use the battery pack when using your camcorder outdoors (p. 12).

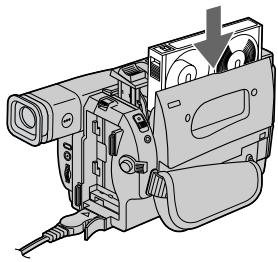
2 Inserting a cassette (p. 18)
Slide EJECT in the direction of the arrow while pressing the small blue button.

2 Insert a cassette into the cassette compartment with its window facing out.
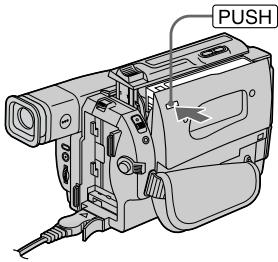
3 Close the cassette compartment by pressing the PUSH mark on the cassette compartment. The cassette compartment automatically goes down.
1 Set the POWER switch to CAMERA

POWER
CAMERA
OFF
- (CHARGE)
PLAYER
while pressing the small green button.

2 Turn STANDBY to STANDBY. The picture appears in the viewfinder.

START/STOP
Press the red button. Your camcorder starts recording. To stop recording, press the red button again.
START/STOP
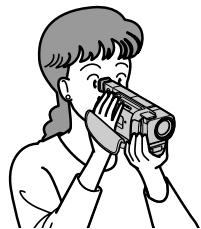
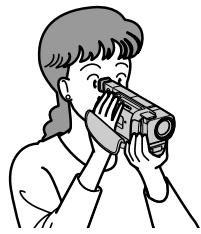
Viewfinder
Use the viewfinder placing your eye against its eyecup.
The picture in the viewfinder is black and white.
4
Monitoring the playback picture in the viewfinder (p. 29)
1 Set the POWER switch to

POWER
CAMERA
OFF
- (CHARGE)
PLAYER
PLAYER
while
pressing the
small green
button.
2
Press to rewind the tape.
REW

Press▶to start playback.

NOTE
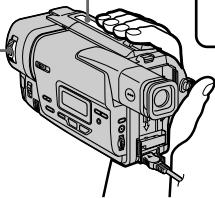
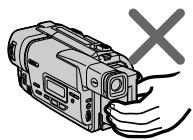
Do not pick up your camcorder by holding the viewfinder or the battery pack.

PykoBoDcTBo IIO 6bICTpOmy 3aIpycky
B daHnoI rnaBe npBbeHbIOcHbIe fynKmN Bauei BndeokampeI. IOpRo6HbIE cBeDeHnIcoepXaTcR npBbeHbHa CTpaHnIe B KpyrIbIX cKo6kax "( ).
1 IopdoeHHeHne npOBoDa 3JeKtpOnItaHnA (cTp. 17)
He noDnHMaTe BnDeOkaMepy, B3aBbUnCb 3a BnDoNcKaTeNb nIb 6aTapeHbI bJOk.


-Gettingstarted
Using this manual
As you read through this manual, buttons and settings on your camcorder are shown in capital letters.
e.g. Set the POWER switch to CAMERA.
When you carry out an operation, you can hear a beep sound to indicate that the operation is being carried out.
Note on TV colour systems
TV colour systems differ from country to country. To view your recordings on a TV, you need a PAL system-based TV.
Copyright precautions
Television programmes, films, video tapes, and other materials may be copyrighted.
Unauthorized recording of such materials may be contrary to the provision of the copyright laws.
Precautions on camcorder care
- The viewfinder is manufactured using high-precision technology.
However, there may be some tiny black points and/or bright points (red, blue, green or white) that constantly appear in the viewfinder.
These points occur normally in the manufacturing process and do not affect the recorded picture in any way.
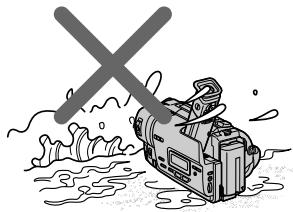
Effective ratio of pixels and/or screen are 99.99% or more. - Do not let your camcorder get wet. Keep your camcorder away from rain and sea water.
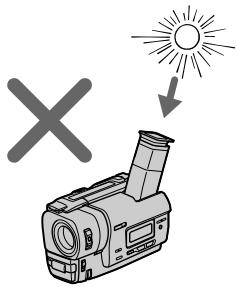
Letting your camcorder get wet may cause your camcorder to malfunction. Sometimes this malfunction cannot be repaired [a]. - Never leave your camcorder exposed to temperatures above 60^ (140^) , such as in a car parked in the sun or under direct sunlight [b].
- Do not place your camcorder so as to point the viewfinder toward the sun. The inside of the viewfinder may be damaged [c].
MepblnpedocTopoKHOCTn npu yxoJe 3a BndeokamepoJ
BnDOnCKaTeIb N3ROTOBHe C NOMOUsbOB BlicOKOpneu3NoHHO TexHOJOrnn.ODHaKo Ha 3KpaHe XKd n/nnn B BnDOckaTeIe MOrYT NOCTOARHO NOBtBCaYePbIe IIN npKHe CBETbIe ToKn (KpachIbe, CnHne IIN 3eJeHBe).POABLeHne 3Tx TOeK BnONHe HOpMaJIbHO DnI pOnceCa cBEmKn HNKoMn O6pa3OM He BnIeT Ha 3AnncbIAeMOe N3o6paXKeHne.CBbIwe 99,99% 3KpaHa npEdHa3NaHeo DnI 3ΦΦeKTHBHO IOcNOb3OBaHn.
He donyckaiaTe, YTo6bI BnDeokamepa CtaHOBnlaCb BnaJxHoi. IpeOxpanHraTe BnDeokamepy OTOdojN MOpCKo BObl.EcIN Bbl HAMOnHTe BnDeokamepy, TO 3TO MOKeT pInBecTN K HeNCnPabHocTn annapata, KOtopa He Bcerda MoKeT 6bITb yCTpaHeHa [a].
- HNKOrIa He OCTaBnIte BnIeOKaMepy B MeCTe C TeMnepaTpyo BbIe 60°C (140°F), KaK, HApIMep, B aTOMoBnIe, OCTaBJIeHHOM Ha COJHcE NII NOD IprMbIM COJIHeuHbIM CBETOM [b].
- He pacnojarate CBOU Bnndeokamepy TaKIM 6bpa30M, YTO6bl BNIOCKaTeJIb 6bln HAnpaBHeH Ha cOnHue. INaHuE MoXeT 6blTb NOBpeKJHeO BHyTpEnHHee yCTpoiCTBO BNIOCKaTeJIY INI KpHaNA KKd [c].
[a]

[b]
[c]
Step 1 Preparing the power supply
Installing the battery pack
Install the battery pack to use your camcorder outdoors.
Slide the battery pack down until it clicks.
YcTaHOBka 6aTapeHOro 6Ioka
YctaHOBtTe 6aTapeHbI 6JOK IJa TOrO, YTo6bl IcNoJIb3ObTaB BaSy BnDeOkamepy BHe NOMeUeHn.
IpeBnHbTe 6aTapeHbI 6JIOK Bn3, YTO6bl OH 3aueJIKNHeTcA.
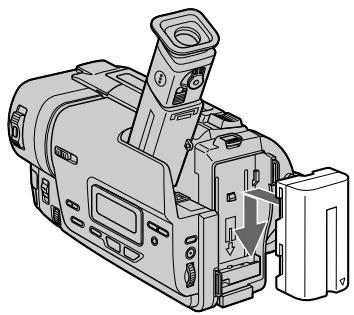
To remove the battery pack
Slide the battery pack out in the direction of the arrow while pressing BATT RELEASE down.
Afterinstalling thebattery pack
Do not carry your camcorder by holding the battery pack. If you do so, the battery pack may slide off your camcorder unintentionally, damaging your camcorder.
Iocne yctanOBKn 6aTapeHoro 6Joka
He nepenocnte cboIO BnDeokamepy, B3ABWncb 3a 6batapeHbI b6nK.EcnnBbTak cdeNaTe, 6batapeHbI b6nK MoKeT HnpOn3BOJbHO COckOJIb3HyTb C BaSeI BnDeokamepbI n NOBpeDNTb ee.
Charging the battery pack
Use the battery pack after charging it for your camcorder.
Your camcorder operates only with the "InfoLITHIUM" battery pack (L series).
(1) Open the DC IN jack cover and connect the AC power adaptor supplied with your camcorder to the DC IN jack with the plug's mark facing up.
(2) Connect the mains lead to the AC power adaptor.
(3) Connect the mains lead to the mains.
(4) Set the POWER switch to OFF (CHARGE). Charging begins. The remaining battery time is indicated in minutes on the display window.
When the remaining battery indicator changes to , normal charge is completed. To fully charge the battery (full charge), leave the battery pack attached for about 1 hour after normal charge is completed until FULL appears in the display window. Fully charging the battery allows you to use the battery longer than usual.
3apka 6aTaapeHoro 6loka
IcnoIb3yIte 6aTapeHbI 6nok IJNA BaSei BnDEOKaMepbl nOce erO 3apRKn. Ba7a BnDEOKaMepa pa6oTaET TOnbKO C 6aTapeHbIM 6nOkom "InfoLITHIUM" (cepN L).
Step 1 Preparing the power supply
- Prevent metallic objects from coming into contact with the metal parts of the DC plug of the AC power adaptor. This may cause a short-circuit, damaging the AC power adaptor.
- Keep the battery pack dry.
- When the battery pack is not to be used for a long time, charge the battery pack once fully and then use it until it fully discharges again. Keep the battery pack in a cool place.
Remainingbattery timeindicator
The remaining battery time indicator in the display window roughly indicates the recording time.
Batterypack
The battery pack is charged a little before it leaves the factory.
Until your camcorder calculates the actual remaining battery time
"----min" appears in the display window.
While charging the battery pack, no indicator appears or the indicator flashes in the display window in the following cases
- The battery pack is not installed correctly.
- The AC power adaptor is disconnected.
- Something is wrong with the battery pack.
Примеань.
- He donyckaaiTe KOHTaKta MeTaJIInueCeKIN
mpedMeTob C MeTaJIInueCeKIMN YactAIMU
WTEkepa NocToHnHO TOKa CeTeBOrO
aAdIaNTepa nepemehnHO TOKa. 3To MoKet
npiBecTu K KOPOTKOMy 3aMbikaHIO
IOBpeXdEHNIO CeTeBO aJaNTepa
nepemehnHO TOKA.
XpaHnTe 6aTapeHbI 6NoK B cyxOM COCTOAHIN. - EcIn 6aTapeiHbI 6NoK He 6yIeT NcNoJIb3OBAbTcA DnTIeJIbHOe BpeM, 3apJInTe erO OdIN Hpa3 NOnHocTbIO, a 3aTeM NcNoJIb3uTe erO, nOKa OH ChOBa He pa3pIaNTcR. XpaHInTe 6aTapeiHbI 6NoK B CyXOM MeCTe.
Инданков Врemeи OCTaBшeroCяразда 6batapeHoro 6Ioka
HnDnKaTOp BpeMeHN OCTaBWeOc 3apJa 6aTaPeHOro 6NoKA B OKoWKe DnCnIe npNbn3nteBHo yKa3bIbAet BpeMa 3annci.
BatapeiHbI 6JIOK
BaTapeHbI 6nok yXe HEMHOr 3apJxeh Ha npednpaHTIN-13ROTOBtTeJe.
Ido tex nop, noka Bawa Bndeokamepa onpeJeHIT DeHCTBNTbHe Bpemr octabweOc3apra 6aTapeHoro 6loka
Bokouke nncnep 6ydet oTo6paKaTbCnHdkaun“-min”
Bo Bpem 3apn6aTapeHoro 6noka HnKaKo INnKaTOp He NOJbReTc, nIn INnKaTOp 6ydet MrrB B OKoWe DnCnpe B CneDyUOxN CnyaX
- BaTapeiHbI bOcYcTaHOBnHe npaBnJIbHO.
-OTcoeINHeN CeTeBOI aIaITeP IepMeHHO TOka.
-уTo-To He B npaJke C 6aTaapeHbIM 6IOKOM.
Charging time/Bpem3apdKn
| Batterypack/БатAPEйный 6лOK | Fullcharge(Normalcharge)/Полная зарpenka (Hopmaльна зарpenka) |
| NP-F330(supplied)/(прилагается) | 150 (90) |
| NP-F530/F550 | 210(150) |
| NP-F730/F750 | 300(240) |
| NP-F930/F950 | 390(330) |
| NP-F960 | 420(360) |
Approximate number of minutes to charge an empty battery pack
Recording time/Bpema 3aunch
| Batterypack/Батуарейный 6лok | Continuous*/Неренья* | Typical**/ Тушина** |
| NP-F330(supplied)/(прилariaетс) | 140 (125) | 75 (70) |
| NP-F530 | 245(220) | 135(120) |
| NP-F550 | 280(250) | 155(135) |
| NP-F730 | 500(450) | 275(245) |
| NP-F750 | 580(525) | 320(290) |
| NP-F930 | 780(705) | 430(385) |
| NP-F950 | 900(790) | 495(435) |
| NP-F960 | 1035(930) | 570(510) |
Approximate number of minutes when you use a fully charged battery
Numbers in parentheses "( ) " indicate the time using a normally charged battery.
- Approximate continuous recording time at 25^ C( 77^ F) . The battery life will be shorter if you use your camcorder in a cold environment.
** Approximate number of minutes when recording while you repeat recording start/stop, zooming and turning the power on/off. The actual battery life may be shorter.
PnIbI3ntJIbHOe BpMaB MmHyTax PnI nCNoIb3OBAHmN NOJIHOCTbIO 3apJXeHHoro 6aTapeHOro 6loka
Yncla BCKo6kax()yka3blyaOTBpeM npnICnoIb3OBAHm6batapeHoro 6loka C HopMaIbHOJ 3apJKOJ.
* PnIbIeBHOe BpMa HnpepbHbOH 3aIcN pI rTeMepaType 25^ (77^) .Pnp IcNoJIb3OBAHN BInDeOKaMePbIB XoIOJNbIX ycNoBHX cPoK cnjX6bl 6aTapeHOrO 6noka 6yJeT KOpOe.
**PnIbIaIeJIbHOe BpeMgB MmHytax npn 3aIncn C HeOJHOKpaTHbIM NyCKOM/ OCTaHOBko 3aIncn, Hae3JOM BInDeOkamepbl N BkLIOUeHNem/BbIKLIOUeHNem PNTaHn. KaTtueckn cPoK cLyXkbI 3apJa 6aTaapeHoro 6Ioka MoKeT 6bITb KopoYe.
Playing time/BpemBAocnpon3BedeHn
| Batterypack/ Батуарейнный 6лok | |
| NP-F330 (supplied) /(прилагается) | 145 (130) |
| NP-F530 | 260(230) |
| NP-F550 | 295(260) |
| NP-F730 | 525(475) |
| NP-F750 | 610(550) |
| NP-F930 | 825(740) |
| NP-F950 | 930(830) |
| NP-F960 | 1090(980) |
Approximate number of minutes when you use a fully charged battery
Numbers in parentheses "( ) " indicate the time using an normally charged battery. The battery life will be shorter if you use your camcorder in a cold environment.
After charging the battery pack
Disconnect the AC power adaptor from the DC IN jack on your camcorder.
Note on the remaining battery time indicator during recording
The indicator may not be correct, depending on the conditions in which you are recording.
Whatis"InfoLITHIUM"?
The "InfoLITHIUM" is a lithium ion battery pack which can exchange data such as battery consumption with compatible electronic equipment. This unit is compatible with the "InfoLITHIUM" battery pack (L series). Your camcorder operates only with the "InfoLITHIUM" battery. "InfoLITHIUM" L series battery packs have the ① InfoLITHIUM ② mark. "InfoLITHIUM" is a trademark of Sony Corporation.
Pπi6n3nteHbHOe BpemB MmHytax npnNCIb3OBAHmN OJIHOCTbIO 3apJKeHHORo 6aTapeHoro 6loka
Yncla B cKo6kax()yka3bIbaOTBpeM npi nCnoIb3OBAHn 6bTaapeHoro 6loKa C HopMaIbHO 3apJko. Pnp IcNoJIb3OBAHn BNdeOkamepbI B XOIOhblx YcNOBmIx CpOK cnXkb6bI 6bTaapeHoro 6loKa 6ydet Kopoye.
Iocne 3apnKn 6aTapeHoro 6Joka
OTcoeHnHTe ceTeBoa aanTep nepemehnHOrToKa oT rHe3da DC IN ha Bauei BnDeokampe.
Connecting to the mains
When you use your camcorder for a long time, we recommend that you power it from the mains using the AC power adaptor.
(1) Open the DCIN jack cover, and connect the AC power adaptor to the DCIN jack on your camcorder with the plug's mark facing up.
(2) Connect the mains lead to the AC power adaptor.
(3) Connect the mains lead to the mains.
The set is not disconnected from the AC power source (mains) as long as it is connected to the mains, even if the set itself has been turned off.
Notes
- The AC power adaptor can supply power even if the battery pack is attached to your camcorder.
- The DC IN jack has "source priority". This means that the battery pack cannot supply any power if the mains lead is connected to the DC IN jack, even when the mains lead is not plugged into the mains.
Using a car battery
Use Sony DC Adaptor/Charger (not supplied).
MEPA IPEIOCTOPOXHOCTN
Annapat He OTKJIIOUcaETcA OT NCTOChnka nITaHnI nepemEHNO TOKa (3JeKTPNueCKoCetu) Do Tex nop, NOKa OH OCTaEtCn POIDCOeINHeHHbIM K 3JeKTPNueCKo CTeN, DaJKe ECNI cam annapaT N BbIKJIIOUeH.
PpimueaHn
Питане OT ceteBOrO aanTepa nepemEnHoro TOka MoKet nOdaBaTbCЯdxe BcIyae,ecn6baTapeiHyb6Iok npikpenJen K BaSei BIndeOkamepe.
ΓHe3do DC IN nIeET "PnOpntet nCTOuHnka". 3To 3NaHT, YTO nTahne OT 6aTapeHoro 6Loka He MoKTe IOnDaBaTbCra, ecIn npBOoD 3NeKTPoNtAHn IOnCOeDiHEn K rHe3dy DC IN, daJxe cCnI npBOoD 3NeKTPoNtAHn I He nOIOCoEINHen K CTeBOi po3eTke.
IcnoIb3ObaHne aBtOMoNbHOrO aKKyMnIaTopa
IcnoIb3yIte aIaantIeep/3apraIHoe yctpoICTBO nocToHHoro ToKa Sony (He npilaaraetca).
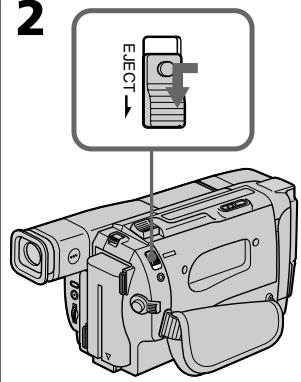
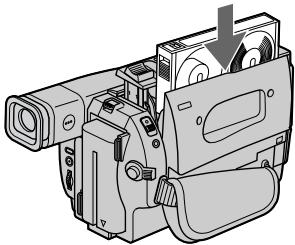
Step 2 Inserting a cassette
Пун=kТ 2 Yстановka kaccetbl
(1) Prepare the power supply (p. 12).
(2) Slide EJECT in the direction of the arrow while pressing the small blue button. The cassette compartment automatically lifts up and opens.
(3) Insert a cassette with its window facing out and the tab on the cassette up.
(4) Close the cassette compartment by pressing the PUSH mark on the cassette compartment. The cassette compartment automatically goes down.
(1)ПоДг罗TOBteИСТОчнКПИТанЯ(стр. 12).
(2)HaxkaMaIeHbKyIO CnHIO KhoNky, nepeBnHbTe nepeKluOaTeJI EJECT B HnpaBHeHm CTpeIKn. OTCek dIra KaCCetbl aBTOMaTIneCKn POnHMMeTCR BBepx n OTKpoETcR.
(3) BCTaBbTe KacceTy, TaK YTo6bI OKoUKy 6blNo obpaueHo HapyJy, a IeneCTOK Ha KaccTe BBepx.
(4)3aKpOTe OTCeK IJIa KAcCeTbI,HaJxAB MeTKy PUSH HaOTcKe.OTcEKNJIa KACCeTbI aBTOMaTHUeCKN ONyCTNTCA BHN3.
2
3
4
To eject a cassette
Slide EJECT in the direction of the arrow while pressing the small blue button.
Note
Donotpress the cassette compartment down.
Doing so may cause malfunction.
Topreventaccidentalerasure
Slide the write-protect tab on the cassette to expose the red mark.
ДлгИЗВLEЧЕНЯ KACCEТБI
Haxab MaIeHbKyIO CINHOIO KHOKNy, nepeBnHbTe nepeKJIouaTeIb EJECT B HapraBHeHIn CTpeJIKn.
Птумецни
He haximauTe Bn3 OTEk dIa Kaccetbl. 3To MOXKeT PnBecTu K HeNCnPabHOCTN.
Your camcorder automatically focuses for you.
(1) Install the power source and insert a cassette. See "Step 1" and "Step 2" for more information (p.12 to 18).
(2) Set the POWER switch to CAMERA while pressing the small green button. The lens covers opens.
(3)Turn STANDBY to STANDBY.
(4) Press START/STOP. Your camcorder starts recording. The "REC" indicator appears. The camera recording lamp located on the front of your camcorder lights up. To stop recording, press START/STOP again. The recording lamp lights up in the viewfinder.
3a\Pncb n3o6paXeHn
Baasa Bndeokamepa aBtOMaTHeCKN BbINOJIHReT fokcnpOBky 3a Bac.
(1) YctaHOBInTe NCTOCHNK IITaHIN IN BCTaBBte KACCETy. IIOpObHbIe CBeDeHNr IPNBEHeHbI B "PnyKTe 1" "PnyKTe 2" (Ctp. 12 - 18).
(2) Haxab MaJIeHbKyU 3eJIeHyU KHOIIKy, yCTaHOBITe nepeKJIIOuATeIb POWER B noJIOXeHne CAMERA. OTKpoEtca KpbIiKa o6bekTtBa.
(3)ПовернITEpbuharSTANDBYВпложен STANDBY.
(4)HaXMMTe KHONky START/STOP.BaWa BnDEOKamepa HaChET 3anncb. IoRbntc HnDnKaTOp“REC”.BbICBeNTcTaKke JAMNoCKa 3anncn Ha nepeJeHne nanei BNDeOKamepbl.ДЯ OCTaHOBKn 3anncn HaXMMTe KhONky START/STOP eue pa3. B BnDoNcKaTeNe 6yDet BbICBeuNbTaBCa JAMNoCKa 3anncn.
Note
Fasten the grip strap firmly. Don't touch the built-in microphone during recording.
Toenablesmooth transition
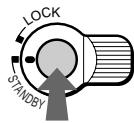
You can make the transition between the last scene you recorded and the next scene smooth as long as you don't eject the cassette. When you exchange the battery pack in the recording mode, set STANDBY to LOCK.
If you leave your camcorder in the standby mode for 5 minutes while the cassette is inserted
Your camcorder automatically turns off. This is to save battery power and to prevent battery and tape wear. To resume the standby mode, turn STANDBY down and up again. To start recording, press START/STOP.
Toset the counterto 0:00:00
Press COUNTER RESET (p. 85).
After recording
(1) Turn STANDBY down to LOCK.
(2) Eject the cassette.
(3) Set the POWER switch to OFF (CHARGE).
PpimueaHn
ПлOTH npICTeRHTe peMeH bIЯ 3axBaTa BnDEokamepbl. He pIrkacaiTecb K BCTpoEHOMy MkrofoHy BO BpEm 3aIncn.
ДлобесоченплавHoro nepexoda
BbMOxKeTe BbINONHtB NpAxBHy NpePExoM MEXyNocJIeHNIM 3aIncaHbIM 3nI3ODOM mCleMyOuIM 3nI3OOM Do TEX nop, NOKa He n3BLeHeTe Kaccety. Pn 3aMeHe 6bTaapeHoro 6JOKa B pexKIME 3aIncy yCTaHOBVte pbUar STANDBY B noLoXeHne LOCK.
EcIn Bbl octaBnTe BaUy BnuDeokamepy BpeKIMe roTOBHOCTn Ha 5 MNHyT npn BCTaBLeHHoN KACCete
Bndeokamepa BbIKIOHTcA ABTOMaTueckn. 3To npedotbpaaaet pacxOJ 3apJa 6aTapeHOro 6Ioka n N3HOC JeHtbl. JnB0306HOBHeHH pexkma roTOBHOCTN NOBepHnte pbUar STANDBY BHN3 n ChOBa BBepx. JnHauna 3aIncn HaxmTe KhoNky START/STOP.
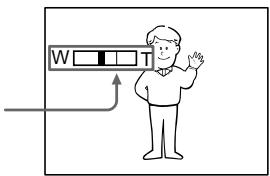
Using the zoom feature
Move the power zoom lever a little for a slower zoom. Move it further for a faster zoom.
Using the zoom function sparingly results in better-looking recordings.
"T" side: fortelephoto(subjectappearscloser)
"W" side: for wide-angle(subject appears farther away)
IcnoJIb3OBAHneФyHKcHn Hae3da BnDEOKaMepbl
IpeBnHbTe pblur npBOnHO Bapnoo6BeKtNa Cnerka DnOTHOCteJbHO MeJeHHoro Hae3da BnDeOKaMepbl.
IpeeBnHbTe ero CnilbHee dIy yckopeHHoro Hae3da BIndeOkamepbl.
IcnoJb3OBAHnE cyHKuHn Hae3da BnDeOkamepebl B He6oJbSOM KOJIyCtBe OBeCneUBaET HanJyUHne pe3yJbTaTbI.
CTopoha "T":ДЯТepefoTO (Obeekt npu6nkaeTcR)
Zoom greater than 20 × is performed digitally. To activate digital zoom, select the digital zoom power in D ZOOM in the menu settings. (p.49) The picture quality deteriorates as the picture is processed digitally.

Hae3d BnDEOKaMepb60nee 20X BbINoHReTcA UppOBbIM MeToDOM.
The right side of the bar shows the digital zooming zone.
The digital zooming zone appears when you select the digital zoom power in D ZOOM in the menu settings./
Празвая сторona полесь на закране пokaывает зону цфравов Трансфокачи.
EcIn BbI BbIbePte npINBOJHOIuΦpOBoB BapnOooBeKtNB D ZOOMByCTaHOBkax MeHIO,poABITc30HaUΦpOBoTpaHCΦOKaun.
When you shoot close to a subject
If you cannot get a sharp focus, move the power zoom lever to the "W" side until the focus is sharp. You can shoot a subject that is at least about 80 cm (about 2 feet 5/8 inch) away from the lens surface in the telephoto position, or about 1 cm (about 1/2 inch) away in the wide-angle position.
Notesondigitalzoom
- Digital zoom starts to function when zoom exceeds 20 ×
- The picture quality deteriorates as you go toward the "T" side. Set D ZOOM to OFF in the menu settings. Otherwise the digital zoom activates without notice(p.49).
To record pictures with the viewfinder - adjusting the viewfinder
Adjust the viewfinder lens to your eyesight so that the indicators in the viewfinder come into sharp focus.
Lift up the viewfinder and move the viewfinder lens adjustment lever.
Pn cbeMe oBeKaTc 6JIn3KOro noJoxHeH
EcIn BbI He MoXeTe NOnyUHTb YeTkoi
fokycnpoBKn, nepeDlnHbTe pblur gnPnBOdHoro
BapnooOBeKtNbA CTOpOHy "W" Do NOnyHeHHa
yeTkoi fokycnpOBKn. Bbl MoXeTe BblNOJHrTb
cbEMky o6bEkTa B NoJIOKeHHu TeteΦoTO,
KOTobI OTCONT IO KpaJHe Mpe Ha
pacCToAHm 80 CM OT NOBepxHOctN o6bEKTNa
UNI JIe OKONO 1 CM B NoJIOKeHHn
ShpOKoyrohBO Horo Bnda.
Примочаня К Наць Видахамеры Чебров IM MeTOdOM
LippboB Bapnoo6bekTINH HauHnaeCpa6aTbBaTb Bcnyae,ecnHae3D BIndeokamepbI npeBbIaet 20x.
KaueCTBO n3O6paXeHnYxUd7aEeTcNo Mepe npn6IJIeHNK CTOPOHe "T". YcTaHOBInTe fkyuio D ZOOM B yctAHOBkax MeIO B noIooXeHne OFF. B npOTnBHom clyuae uDpOBoi Bapnoo6bekTNB 6ydet cpaBaTbBaTb 6e3 yBeDMJeHHN (CTP.49).
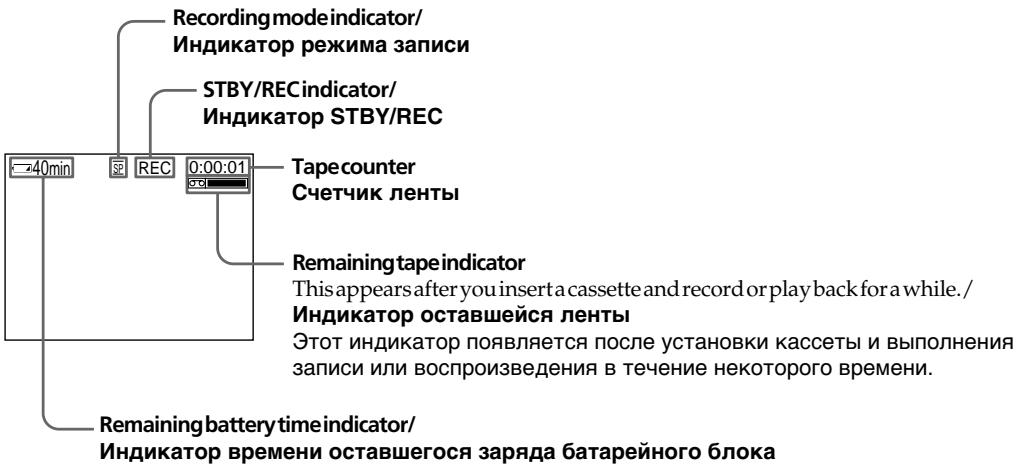
Indicators displayed in the recording mode
The indicators are not recorded on tape.
HndkaTopbl, oTo6paXaemble BpeXmte 3annc
INdkaTopbI He 3aancbiaHOTcHaJeHTy.
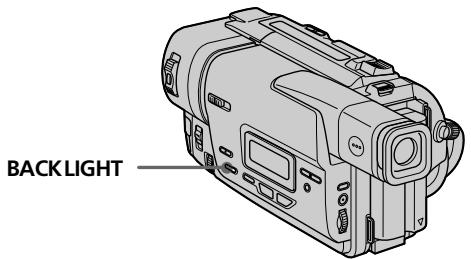
Shooting backlit subjects (BACK LIGHT)
When you shoot a subject with the light source behind the subject or a subject with a light background, use the backlight function.
Press BACK LIGHT in the recording or standby mode.
The indicator appears in the viewfinder. To cancel, press BACK LIGHT again.
CbeMa o6BeKToB c 3aHne nOcBcTeKoB (BACK LIGHT)
EcIn BbI BbIOJIHHeTe CbEMKy o6BeKTa c nCTOuHNKOM CBETA NO3aDi Hero NIIJ Xe o6BeKTA CO CBETNbIM FOHOM, INoNlb3yIte fynHKUIO 3aDHe NODCBETKn.
HaKmTe KhoNky BACK LIGHT B pexIme 3aIncn nn OxuJaHna.
B BINOIOCKaTeNe NOBNTcN HINKATOp ⅡIЯ OTMeHbI HaKMITE KHOKNy BACK LIGHT eue pa3.
If you press EXPOSURE when shooting backlit subjects
The backlight function will be canceled.
EcIn Bbl HaxMeTe KhoNky EXPOSURE npn BblONHeHm CbemKn ObkeKToB c 3aDHei NOcBeTko
Функцязднй посветкибудETOTMeHeHa.
Shooting in the dark (NightShot)
The NightShot function enables you to shoot a subject in a dark place. For example, you can satisfactorily record the environment of nocturnal animals for observation when you use this function.
While your camcorder is in the standby mode, slide NIGHTSHOT to ON.
and "NIGHTSHOT" indicators flash in the viewfinder. Tocancel the NightShot function, slide NIGHTSHOT to OFF.
Cbemka B TEMHOTE (Houhna cbemka)
Функцу Ночиьсьемкno3BOJAEr Bam BblONJIHbTcBemkyObeKTOBBTEmhIxMeCTax. Hanpimep, Bbl CMOxTeCycnexOM BblONJIHbTcBemky HOUHbIX JKNBOTbIXДЯHA6JIIODeHIN npuNCNoJIb3OBAHN daHHoФункциN.
BTo BpemK, KOrda BnDeokamepa HaxoDntcB
peXmme OxNdaHnA, nepeDbNbTe nepeKlIOuataIb NIGHTSHOT B noJIoKeHne ON.
INHdNkaTopbl n "NIGHTSHOT" NaHyT
MIRatb B VINOnc-KaTeIe. Ira OTMeHbI cyHKun
HOHOn CbeMkn nepeDbNbTe nepeKluOaTeIb
NIGHTSHOT B noJIoKeHn OFF.
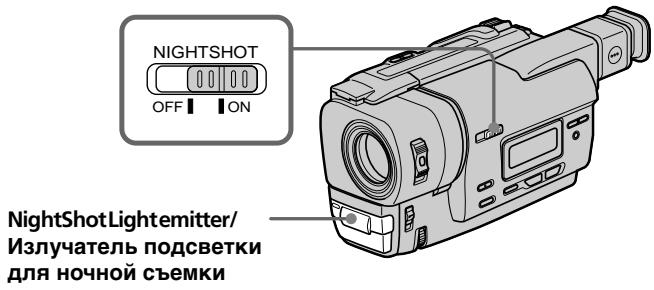
Using the NightShot Light
The picture will be clearer with the NightShot Light on. To enable NightShot Light, set N.S.LIGHT to ON in the menu settings (p. 49).
IcnoJb3OBAHne npDCBETKn dJa HocHoN CbeMK
- Donot use the NightShot function in bright places (ex. outdoors in the daytime). This may cause your camcorder to malfunction.
- When you keep NIGHTSHOT set to ON in normal recording, the picture may be recorded in incorrect or unnatural colours.
- If focusing is difficult with the autofocus mode when using the NightShot function, focus manually.
While using the NightShot function, you can not use the following functions:
- Exposure
-PROGRAM AE
NightShotLight
NightShot Light rays are infrared and so are invisible. The maximum shooting distance using the NightShot Light is about 3m (10 feet).
PpIMeuaHn
He nCnoJIb3yIte cyHKUIO HcHOn CbEMKn B npKnx MeCTax (HaNPmep, Ha yNtce B dHeBHOe Bpem). 3TO MOKeT pInBeCTn K HeNCnpaBHOCTn BaWe BNdeOKaMepbl.
-Пиудержани установки NIGHTSHOTВ положени ON пиHopмальон 3апси n3ображени мокет 6ытБЗпсано В НелразиьньхИЛIN HeeCTeCTBeHHbIX CBetax.
Ecnn fokycnpobka 3aTpndHeNA b aBTOMaTnuecckom pexime npu nCNOJb3OBaHn fynKcH NHOHcBEMKn, BblnoJIHnTe fokycnpobky BpyHyIO.
PnncnoIb3OBAHnnyHKcnn HocHoN CbeMkn Bbl He MoKeTe nCnoIb3OBaTb cJeDyUoJne yHKn:
-3Kcno3nua
-PROGRAM AE
Iopcbetka dna HOHcBemKu
JyHnIOCBETKNIJIH NOUHOHBEMKN ABJIOTc HnOpaKpaChbIMN IIO3TOMY HeBUNMbIM. MakcImaJIbHOe paCCToRHNIE IJIb CbeMkn npi NCIOJIb3OBaHmN IOCDBeTKIJIH OCHHO CBEMKn paBHO pnpimepHo 3 M.
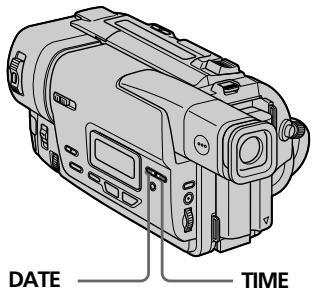
Superimposing the date and time on pictures
You can record the date or time displayed in the viewfinder superimposed on the picture. Carry out the following operations in the standby or recording mode.
Press DATE to record the date.
Press TIME to record the time.
Press DATE (or TIME), then press TIME (or DATE) to record the date and time.
Press DATE and/or TIME again. The date and/or time indicator disappears.
HaIoxKeHne DaTbI IN BpeMeHn Ha306paXeHn
BbMOKeTe 3aINcBbTaB DaTy INI INBpeM, OTObpaKaembIe BnDOnCKaTeNe, KOToPbIE 6yDyT HAnOKeHb Ha N3OBpaKHeHne. BbIOJIHInTe CneIyIoUe OnepaunB pexmE OxuDaHn INI 3aIncN.
Haxmte KhoNky DATE nla 3aInnc daTbI.
Haxmte KhoNky TIME nla 3aInnc daTbI.
Haxmte KhoNky DATE (nLI N TIME), 3atem
Haxmte KhoNky TIME (nLI N DATE) nla 3aInnc daTbI n BpeMeHH.
HaxmTe KhoNky DATE n/nn Time eue pa3. INdkaTop daTbI n/nn BpeMeHn Icche3HeT.
The default clock setting is set to Sydney time for Australia and New Zealand models, to Tokyo time for the models sold in Japan, and to Hong Kong time for other models. You can reset the clock in the menu settings (p.49).
Note
The date and time indicators recorded manually cannot be deleted.
If you do not record the date and time in the picture
Record the date and time in the black screen as the background for about 10 seconds, then erase the date and time indicators before starting actual recording.
YcTaHOBKa YacOB No yMOnHaHIO COOTBeTCTByET BpeMeHN CnDHeN dIy MoDeJe ABcTpAInu HObO3eJaHdN, Ha BpeMa ToKNo dIy MoDeJe, npoDaBaembIX B JnoHn, n Ha BpeMa TOnKoHra dIy Dpynx MoDeJe. Bbl MOKeTe nepeUcTaHOBtBu cAcbl B ycTaHOBkax MeHIO (cTp. 49).
PpmeaHne
HdkaTopb DaTbI BpemeH, 3aNcaHHbE BpyHyIO, He MOryT 6bITb ydaJeHbl.
EcnBbHe 3aIncsbIbaTe DaTy N BpeMa Ha n3o6paKeHnn
3aHnHTe DaTy N BpEmHa fohe YepHoro 3KpaHa B TeeyHe 10 cekyHd, 3aTeM COTpuTe HnDnKaTOpbI DaTbI N BpEmH npeed TEM, KaK HaayAdb DeNCTBnTeJbHyU 3aINCb.
Checking the recording - EDITSEARCH/Rec Review
Пюверka заимсн - EDITSEARCH/Пробмовп заимсн
You can use these buttons to check the recorded picture or shoot so that the transition between the last recorded scene and the next scene you record is smooth.
Bb moKeTe nCNoIb3ObaTb 3tN KHOIpKn IJI npOBepKn 3aIncaHOro n3o6paXeHnI nn CbeMkn, TaK YTo6bI nePexOJ MekJy NocJeDNHM 3aIncaHbIM 3n3Odom I CJIeDyUcIM 3aIncbIbAeMbIM 3n3Odom 6bl I PnaBbIM.
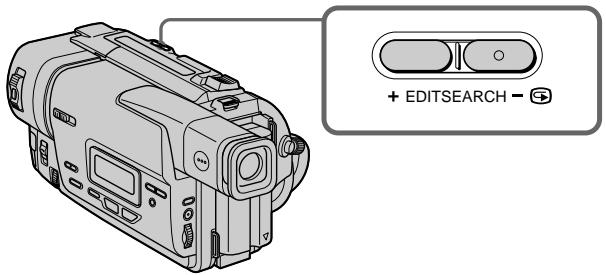
EDITSEARCH
You can search for the next recording start point.
Hold down the + / - (S) side of EDITSEARCH in the standby mode. The recorded section is played back.
:+to go forward
::togobackward
Release EDITSEARCH to stop playback. If you press START/STOP, re-recording begins from the point you released EDITSEARCH.
Rec Review
You can check the last recorded section.
Press the - ( ) side of EDITSEARCH
momentarily in the standby mode.
The last few seconds of the recorded section are played back.
EDITSEARCH
BbMOKTe BbIIOJIHrTb IONCK MeCTa HaçaIa cIeNyUoSeI 3aIcN.
Дерхи te haxkaToI CTOpOHy +/-(@) KhoNkN EDITSEARCH B pexmme oXnDaHn. Bydet BocnpOn3BedeHa 3aIncaHna YacTb.
+:ДлгпрдьхеняВпeр徳
:ДЯпpoДиЖенHa3aД
OTnyctnte KhoNky EDITSEARCH nIra octaHOBKn BocnpOn3BeDeHn. EcIn Bbl haxMeTe KhoNky START/STOP, hauHetcna nepe3anncb c toro MeCTa, rDe Bbl OTnyctnI IN KhoNky EDITSEARCH.
Ppocmpt3aHcN
BbMOxKeTIpOBePntbIocNeHIOO 3aNcCaHHyU YaCTb.
HaxmTe KpaTkoBpeMeHHo CTOpOHy-() KhoNkI EDITSEARCH B peXmE OxuHaHn. ByUyt BocPOn3BeDeHb IocJeHne HeckOJIbKO cekyHd 3aIncAHHOaCTn.
Connections for playback
Connect your camcorder to your TV or VCR with the A/V connecting cable supplied with your camcorder to watch the playback picture on the TV screen. When monitoring the playback picture on the TV screen, we recommend that you power your camcorder from the mains using the AC power adaptor (p. 17). Refer to the operating instructions of your TV or VCR.
Open the jack cover. Connect your camcorder to the TV using the A/V connecting cable. Then, set the TV/VCR selector on the TV to VCR.
If your TV is already connected to a VCR
Connect your camcorder to the LINE IN input on the VCR by using the A/V connecting cable supplied with your camcorder. Set the input selector on the VCR to LINE.
To connect to a TV or VCR without Video/Audio input jacks
Use a PAL system RFU adaptor (not supplied). Refer to the operating instructions of your TV or VCR and the RFU adaptor.
Ecni Baw TeIeBn3Op yXe npDoceDInHeN K KBM
IopocenHnTe Bauy Bndeokamepy K BXOHNOMY rhe3ny LINE IN ha KBM c nomooucoeHHnTeJbHoro Ka6eNa ayDNO/BnDeo, KOtOpB npnilaraetc Ka Baueh Bndeokamepe. YctahOBnTe ceneKTop BxOnHO CnHaHa KBM b noLoXeHne LINE.
IcnoIb3yIte B4-aIaITepe CnCTeMbI PAL (He npIaraeTc).
O6paTntecb K INHCTpyKuIM No 3KcNPyaTaUIM BaIero TeLeBn3opa IIN KBM u B4-aIaITepa.
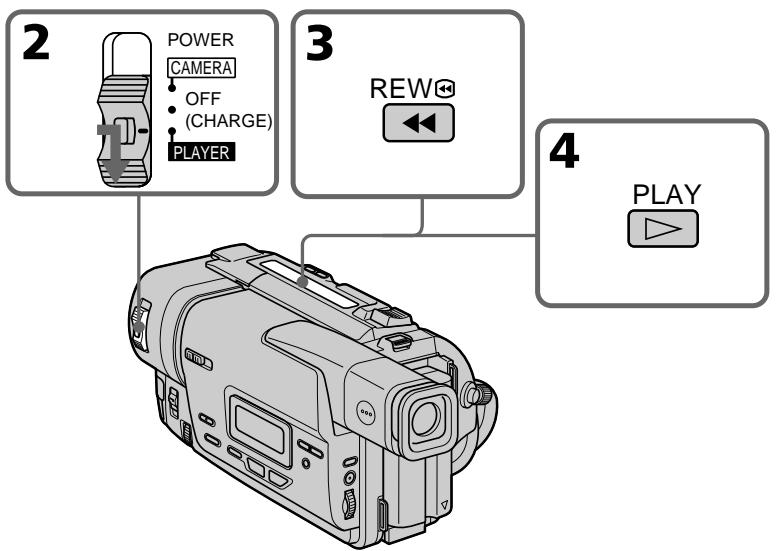
Playing back a tape
You can monitor the playback picture on a TV screen after connecting your camcorder to a TV or VCR. You can also monitor the picture in the viewfinder.
(1) Install the power source and insert the recorded tape.
(2) Set the POWER switch to PLAYER while pressing the small green button.
(3) Press to rewind the tape.
(4) Press tostart playback.
Bocnpon3BeDeHneJIeHTbl
Bb moxTe KOHTpOINPOBaT BOCpON3BOIDMOe
H3o6paXeHne Ha 3KpaHe TEleBn3opa nocLe
NoDCoeDInHeHna BaSei BnDeOkamepbI K
TeLEBn3opy nn KBM. Bb TaKxe MoxTe
KOHTpOINPOBaT H3o6paXeHne B
BnDOcKaTeJe.
(1) YctaHOBNTe NCTOUYHK NITaHnI N BCTaBBTe 3aINCAHHyIOJIeHTy.
(2) Haxab MaJIeHbKyIO 3eJIeHyIO KhoNkIy, ycTaHOBnTe nepeKJIIOuChaTeIb POWER B noJoxKeHne PLAYER.
(3)HaXMMTe KHOHKnY dIy yCKopeHHoI nepeMOTkn IeHTbI Ha3a.d.
(4)HaxmTe KhoNky ▷ДЯВКЛЮЧЕНЯ BOCnpoN3BeDEHЯ.
To stop playback Press
ДлЯ OCTaHOBKN BOCnpoN3BedeHnA HaxmTe KhONKy ■.
Various playback modes
To operate videocontrolbuttons, set the POWER switch to PLAYER.
To view a still picture (playback pause)
Press || during playback. To resume playback, press || or
To advance the tape
Press▶in the stop mode.To resumenormal playback,press
To rewind the tape
Press in the stop mode. To resume normal playback, press .
To locate a scene monitoring the picture (picture search)
Keep pressing or during playback. To resume normal playback, release the button.
To monitor the high-speed picture while advancing or rewinding the tape (skip scan)
Keep pressing while rewinding or while advancing the tape. To resume rewinding or advancing, release the button.
In the various playback modes
Sound is muted.
When the playback pause model lasts for 5 minutes
Your camcorder automatically enters the stop mode. To resume playback, press
When you play back a tape recorded
Noise may appear during playback pause mode or picture search.
When you play back a tape in reverse
Horizontal noise appears at the center or top and bottom of the screen. This is normal.
The tapes recorded in the Hi8 format
You can play back the tapes recorded in the Hi8 video system on your camcorder.
PnBocnpOn3BeDeHnn JeHTbI B 6paTHOM HaprabJeHHN
Ha 3kpahe MORYT NORBtBcR OROP3OHTaJIbHbIe NOMEXI NO CEHTpy IIN JKE BBEpy H BN3y 3KpaHA. 3TO RBNITcER HOPMaJIbHbIM.
Jenhtbl,3anHcHHbIeBΦopMaTe Hi8
Bb MojTe BoCpOnu3BODnTb JeHtbl, 3aIscAchNbIe B vDteOecntMe Hi8, Ha BaSeI BvDekOaMepe.
— Advanced Recording Operations —
Using the wide mode
You can record a cinema-like picture (CINEMA) or a 16:9 wide picture to watch on the 16:9 wide-screen TV (16:9FULL). Refer to the operating instructions of your TV.
CINEMA
Blackbands appear on the screen during recording in the CINEMA mode [a], playing back on a normal TV [b] or a wide-screen TV [c]. If you set the screen mode of the wide-screen TV to the zoom mode, a picture without black bands appears [d].
16:9FULL
The picture during recording in the 16:9FULL mode [e], or playing back on a normal TV [f] or a wide-screen TV [g] is horizontally compressed. If you set the screen mode of the wide-screen TV to the full mode, you can watch pictures of normal images [h].
- YcoBepueHcTBoBaHHbIe Opeaun CbeMkn -
In the standby mode, set 16:9WIDE to CINEMA or 16:9FULL in the menu settings (p.49).
IcnoJb3OBAHne IuPOKo3KpaHHOROpekima
To cancel the wide mode
Set 16:9WIDE to OFF in the menu settings.
In thewidemode
You cannot select the bounce function with FADER.
Dateortimeindicator
When you record in the 16:9FULL mode, the date or time indicator will be widened on wide-screen TVs.
Duringrecording
You cannot change or cancel the wide mode. When you cancel the wide mode, set your camcorder to the standby mode and then set 16:9WIDE to OFF.
Длг OTмны 施рOKэКраHHoropexmua
YcTaHOBnTe KOMaHny 16:9WIDE B noJIOxHeNc OFF By cTaHOBkax MeHIO.
B shpoko3kpaHHOM pexnme
BbHe MoKTe BbIbpaTb FyHKUIO nepeckaBaNHaC NOMOsbIO KOMaHdbI FADER.
HdkaTop DaTbI NIN BpeMeHN
Ecni Bbl BbInonHaeTe 3anncbBpeXnme 16:9FULL, INDnKaTOp DaTbI ININ BpeMeHH paCUnpNTcHa ⅢPOKO3KpaHOM TeJeBn3ope.
BoBpeMa 3aIncn
BbI He MoXKeTe N3MeHnITb INI NTMeHnITb ⅢPOKO3KpaHHbIpeXIM.
EcIn Bbl OTMeHnTe ⅢnpOKo3KpaHHbIpeKIM, yCTaHOBnTe BaWy BnDeOkaMepy B peXIM OxNdaHnA, a 3aTem yCTaHOBnTe KOMaHdy 16:9WIDE B noloxeHne OFF.
Using the fader function
IcnoJb3OBaHne cyHKunn feydepa
You can fade in or out to give your recording a professional appearance.
BbMOKeTe BbIOJNHTb PnABHO BBeDeHne N BbIEDeHne 306paXeHNA, YTO6bI PnJaTb BaWei CbEMKe IpoceccNoHaJIbHbI BN.D.

[a]
STBY
REC
FADER


M.FADER(mosaic) / (мозашиka)


STRIPE

BOUNCE* (Fadeinonly)/ (ToIbko BVeJeHne n3o6paXeHn)

[b]
STBY
REC
MONOTONE
When fading in, the picture gradually changes from black-and-white to colour.
When fading out the picture gradually changes from colour to black-and-white.
- You can use this function only when D ZOOM is set to OFF.
MONOTONE
Pn BBeDeHn N3O6paXeHne 6yDet nocTeenHNO
N3MeHrTbCn OT UePHo-6eNo DO uBETHO.
Pn BBBeDeHn N3O6paXeHne 6yDet
noCTeENHNO N3MeHrTbCn OT uBETHO Do UePHo-
6eNoRo.
In the standby mode, press FADER until the desired fader indicator flashes.
Whenfadingout[ b]
In the recording mode, press FADER until the desired fader indicator flashes.
The indicator changes as follows:
FADER M.FADER STRIPE
BOUNCE MONOTONE no indicator
The last selected fader mode is indicated first of all.
(2) Press START/STOP. The fader indicator stops flashing.
(1)При В蜱едени ИЗображени [a]
B pexime oKuandaHnaKImaTe KhoNkY FADER do tex nop, noka He hauhet MmraTb HxKhblnHdkatop feiepa.
PpN BbIBeHn n306paXeHn [b]
Bpekme 3aunci, haxkmaTe KhoNky
FADER IO Tex nop, noka He haunhet MmraTb hyxhbl mdkatop feepa.
INHdkatop6ydtN3MeHrTbCnEduOuIM 06pa30M:
FADER M.FADER STRIPE
BOUNCE MONOTONE 6e3
INHdkaTopa
IocneHnN 3Bb6paHHbIXpeXIMOB feiepaOTobpaKaetcnpBbIM.
(2)HaxMMTe KhoNkY START/STOP. INdikKaTOp Φeɪdepa nepeCTaHET MɪrətB.
![SONY CCD-TR317E - PpN BbIBeHn n306paXeHn [b] - 1](/content/2019/11/48400/images/0d0e3c7f95ea26c03d5e4111107758542272ba085f7a227570136bc2dfed72ae.jpg)
To cancel the fader function
After the fade in/out is carried out: Your camcorder automatically returns to the normal mode.
Before the fade in/out is carried out: Before pressing START/STOP, press FADER until the indicator disappears.
IIT OTMHebl FyHKUHneFeydepa
Посл致电у,кak ВьинHeо Вьe徴и/ bByeHneИЗБраженЯ:Ваа ВиdeOkamepa aBToMaTnueckn BepHeTcB ObivHbI peKIM.пepeД Tem,Кak ВьинНtB Вьe徴и/ bByeHneИЗБраженя:ПepeД Tem,Кak haxaTb KhONkY START/STOP,нхимаTe kHonky FADERdoTexnop,пoka He nCye3het nHdNKaTOp.
The date, time indicator and title don't fade in or fade out
Erase them before operating the fader function if they are not needed.
While using the bounce function, you cannot use the following functions:
-Focus
-Zoom
- Picture effect
Note on the bounce function
The BOUNCE indicator does not appear in the following mode or functions:
-D ZOOM is set to the mode other than OFF in themenusettings
-Widemode
- Picture effect
-PROGRAM AE
Инданахды, Врemeи THTP He BBOДТСИ И He BbIBOДТСВМECTe C n306paxKeHnEM
YdaJInte Ix npeI TeM, KaK BkIIOuHTb
fynHkUIO fepiDepa,ecnOHN He HuyXhbl.
Bo Bpem nCnoJb3ObaHn yHKcnn nepeckaunBaHn Bb He moKete nCnoJb3ObaTb cIeMyoUne yHKcnn:
-ФokucnpOBka
- TpaHcfoKaua
-3ΦΦΦeKTn3o6paXeHn
IpmeaHne no fynKu nnpeckakBaHn Hndkatop BOUNCE He nOABJIeTcB CNe dyUoX npexmMax IJN pRn NcNOJb3OBaHn CNe dyUoXn fynKu:
-Komahda D ZOOM yctaHOBJIeHa B noJIOXeHHe, OTJIuHoe ot OFF b yCTaHOBkax MeHIO
-ШпрокоэКраHHь ржим
-3ΦΦeKT n3o6paXeHn
-PROGRAM AE
Using special effects - Picture effect
You can digitally process images to obtain special effects like those in films or on the TV.
PASTEL[a]:
The contrast of the picture is emphasized, and the picture looks like an animated cartoon.
NEG.ART[b]:
The colour and brightness of the picture is reversed.
SEPIA :
The picture is sepia.
B&W:
The picture is monochrome (black-and-white).
SOLARIZE[c]:
The light intensity is clearer, and the picture looks like an illustration.
MOSAIC[d]:
The picture is mosaic.
SLIM[e]:
The picture expands vertically.
STRETCH[f]:
The picture expands horizontally.
IcnoB3OBAHne CneuNaJbHbIX 3ΦΦeKToB-3ΦΦeKTu3o6paXeHnA
BbMOKTe BblONHb6pa6Otky 1306paXeHNr cHpOBoBM MeToOM dIa IOnyHeHn CneuaJIbHbIX 3cEKeTOb, KaB KInHOOpMbMax NIN Ha 3KpaHax TeNeBu3OpOB.
PASTEL[a]:
(1) Press PICTURE EFFECT in the standby or recording mode.
The picture effect indicator appears.
(2) Turn the SEL/PUSH EXEC dial to select the desired picture effect mode.
The indicator changes as follows:
PASTEL NEG.ART SEPIA
B&W SOLARIZE MOSAIC
SLIM STRETCH
(1)HaXMMTe KHONky PICTURE EFFECT B pexkme OxuaHnI npexkme 3aIncI. IoBntcNnDnKatop 3cpfekTa n3o6paKeHH.
(2)ПовернITE ДИСК SEL/PUSH EXEC ДЯ
Быбopa рек immа hyж Horo 3ффekta
иЗобрахеня.
Индikatop 6удET ИзMeнгТьс RA CLEdYIOUIM
образим:
PASTEL NEG.ART SEPIA
B&W SOLARIZE MOSAIC
SLIM STRETCH
![SONY CCD-TR317E - PASTEL[a]: - 1](/content/2019/11/48400/images/6ceb8dac5df8e8d9f9c25905a8c3e86875921b56aec3c401869b80b82cbf4116.jpg)
1
PICTURE EFFECT
![SONY CCD-TR317E - PASTEL[a]: - 2](/content/2019/11/48400/images/2eb5d38d1264dbfd423d2956abeb44e2e192aa8dc1d5fce0c6af5307cff77902.jpg)
2
![SONY CCD-TR317E - PASTEL[a]: - 3](/content/2019/11/48400/images/b51bf5d96b7c06f201b1ff10728a3de30c9b8193e9dd502f6c0207f24c5f5444.jpg)
MOSAIC
To turn the picture effect function off
Press PICTURE EFFECT.
When you turn the power off
Your camcorder automatically returns to the normal mode.
Ecnn BblBbIKIOUHTe NITaHHe
BaSHA BnDEOKaMepa aBTOMaTNUeCKN BepHeTCB ObblHbI peXIM.
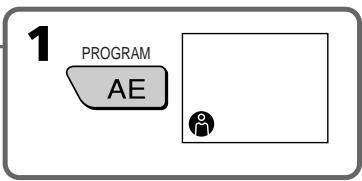
Using the PROGRAM AE function
You can select PROGRAM AE (Auto Exposure) mode to suit your specific shooting requirements.
Spotlightmode
This mode prevents people's faces, for example, from appearing excessively white when shooting subjects lit by strong light in the theatre.
Softportraitmode
This mode brings out the subject while creating a soft background for subjects such as people or flowers.
Sportslessonmode
This modemimizes shake on fast-moving subjects such as in tennis or golf.
Beach&skimode
This mode prevents people's faces from appearing dark in strong light or reflected light, such as at a beach in midsummer or on a ski slope.
Sunset&moonmode
This mode allows you to maintain atmosphere when you are recording sunsets, general night views, fireworks displays and neon signs.
Landscapemode
This mode is for when you are recording distant subjects such as mountains and prevents your camcorder from focusing on glass or metal mesh in windows when you are recording a subject behind glass or a screen.
Исpenьзоване функциng PROGRAM AE
BbMOxTe Bb6paTb peXm PROGRAM AE (aBTOMaTHueckKa CbEMka) B COOTBeTCTBm CO CnEuΦnueckMn TpeoBaHnAmK CbEmKe.
PexkIM npoxkeKTOPHOOCBeueHn
3TOT pexmIO3BOJnET BbIeJIITb OBeKT Ha
foHE MfKOrO fOHa, I IOXoJNT dJa CbEMKn,
HanpIMep, JIODeI INI UBeTOB.
PexkM cnoptnbHbIX COCTaHaHm
3TOT pexkIM N03BONJIeT MHNHMn3IPOBaTbДрoxaHHe npi CbeMKe 6bICTpo DnIXyUxxCnIpeDMeTOB, HAnpIMep, npi INrpe B TeHHnc IJIroIbΦ.
T PIIaXHbI N IbIXHbI pExHM
3TOT peKIM ppeDToBpaaaet NOBLeHne TEMbIX IINI JIODeB B 3OHe CnJIbHOro CBeta NIN OtpaKeHHORo CBeta, HApPIMep, Ha PJIaRke B pa3rap JeTa INI HA CHEXHOM CKIOHe.
Pekim 3axoJa coJHua n Lyhbl
3TOT pEKIM N03BOJRE T TOUHOCTN OTPaKaTb 6OCTaHOBKU pI r CBeMKe 3axoDB COHua, 06uHX HOHyBIX BIVOB, fneepBepKOB IN HEOHOBbIX peKlAm.
LanDwaΦTbIypeXIM
3TOT pexmI NO3BONAE T BYINOLHnTB CbEmKy OTdAneHHbIX O6BeKTOB, TaKNX KaK rOpbl, HAnpIMep, IN PpeDToBpaaaeT oKocPobky BnDeOkamepbHa CTekIO NIM MeTaNlUYeCKyO peWetKy Ha OKhax, KOrDa BbI BbINOHNHeTe 3aNNc b6BeKTOB n03aDN CTekNa NIN peWETKn.


Using the PROGRAM AE function
(1) Press PROGRAM AE in the standby mode. The PROGRAM AE indicator appears.
(2) Turn the SEL/PUSH EXEC dial to select the desired PROGRAM AE mode.
The indicator changes as follows:

IcnoJb3ObaHneФyHKcNIN PROGRAM AE
(1)HaKmTe KhoNky PROGRAM AE BpeXnme OxNdaHnY. IoBvTcH INDnKaTOp PROGRAM AE.
(2)ПовернITE ДИСК SEL/PUSH EXEC ДпьБбора hyжно рекиma PROGRAM AE.Индikatop 6удET ИзмeнЯтбсА СлЕДУОПИМобразим:


To turn the PROGRAM AE function off
Press PROGRAM AE.
- In the spotlight, sports lesson and beach & ski modes, you cannot take close-ups. This is because your camcorder is set to focus only on subjects in the middle to far distance.
- In the sunset & moon and landscape modes, your camcorder is set to focus only on distant subjects.
- The following functions do not work in the PROGRAM AE mode:
- Bounce
- If you press PROGRAM AE when using the NightShot function, the PROGRAM AE indicator flashes and the PROGRAM AE function does not work.
If you are recording under a discharge tube such as a fluorescent lamp, sodium lamp or mercury lamp
Flickering or changes in colour may occur in the following modes. If this happens, turn the PROGRAM AE function off.
- Softportraitmode
- Sportslessonmode
Приимейсаня
BpeKIMax npOKeKToPHorO oCBeUeHnI, cOpTnBbIX COCTa3AHn, a TaKxE B PJIaXHOM nIbXHom pexNMe Bbl MoKeTe BblOnHrTb CbEMky KpyINbIM PIIaHOM. 3To O6bAcHReTCr TEM, yTO Ba7a BInDeokamepa HacTpoHa dIra fOkycnOBKn TOnbKO Ha ObBeKtbl, hXoDraIeecra Ha cpeHem n daJIbHem pacCToRHNJx.
BpeXnme 3axoJa coJHua n LyHbI, a TaKxBe bIaHdwaΦTHOM pexnme Ba7a BIndeokamepa HacTpoEHa Ha φokycnpobky TOnbko Ha daJIbHne ObbeKTbl.
CneyuOuIe cyHKun He pa6oTaIO TpeXnme PROGRAM AE: -PepeKaKuBaHne
- Ecni Bbl haxMeTe KhoNky PROGRAM AE BO Bpemr nCNoJIb3OBAHnФyHKmN HcHNOB CbEMKn, NaHET MInaTb INHdNKaTOP PROGRAM AE, nФyHKmN PROGRAM AE He 6byet pa6oTaTb.
EcIn Bbl BbINOJIHReTe 3aIncb npn NCNoJIb3OBAHm ra3Opa3PdHOJ lambl, HaTpneBOJ lambl nIN pTyTHoJ lambl
B cneIyUOxN pexIMax MOKeT BO3HKnHyTb
MepaHne nIe HeCyTOuINBVe IpoCeCCbl. Ecnn
3To Ipn03oJDeT, BblKJIouHTe cyHKcIO
PROGRAM AE.
-MrKm npOpTeHbI pExMM
-PeKIM CnOPTNBbIX COCT3aHIN
Adjusting the exposure manually
You can manually adjust and set the exposure. Adjust the exposure manually in the following cases:
- Thessubjectisbacklit
- Bright subject and dark background
- Torecord dark pictures (e.g. nightscenes) faithfully
(1) Press EXPOSURE in the standby or recording mode. The exposure indicator appears.
(2) Turn the SEL/PUSH EXEC dial to adjust the brightness.
PerynpoBka 3Kcno3nCn BpyHyO
Bb moKeTe OtpereyInpoBaTb u yCTaHOBnTb 3Kcno3nUIO BpyHyIO.
Otpereynpyte3Kcno3nIO BpyHyIO BCJeDyUoX CnyuX:
- OБъekt Na соне 3аДнел поДсВЕТКИ
Aρκην Μόβεκτ Ḁν τέμιθους Φοῦ
ДлгЗдпс.TeMHbIXи3Oбрахен(Ha npIMep, HOUHbIX cUeH) C6OJIbwoIdoCTOBePHOCTbIO
(1)HaKmTe KhoNky EXPOSURE BpeXnme OxuDnHnIuIN 3aInCn.
IIOBNTcHINDKaTOp 3KcN03u.
To return to the automatic exposure mode
Press EXPOSURE again.
Note
When you adjust the exposure manually, the backlight function does not work.
Your camcorder automatically returns to the automaticexposuremode:
-if you change the PROGRAM AE mode
-if you slide NIGHTSHOT to ON
ДлЯ BO3ВpaTа В ржим авTomatнуecкой 3Кспо3ици НжмITE конky EXPOSURE[euple pa3.
PpimueaHne
You can gain better results by manually adjusting the focus in the following cases:
- The autofocus mode is not effective when shooting
- subjects through glasscoated with water droplets
-horizontalstripes
subjects with little contrast with backgrounds such as walls and sky - When you want to change the focus from a subject in the foreground to a subject in the background
- Shooting a stationary subject when using a tripod
ФokycnopoBka BpyHyu
BbMOxKeIOnyUHTbNyUHnepe3yNbTaTbI nyTemperyJnIPOBKn BpyHyIOBCJeDyUOxN CnyuaX:
-
PexMM aBOMaTnuecko fokycnpOBKn YBJIeTcR He3fkeKTnBbIM pN BblNOJIHeHm CbeMKN
-ObbeKToB Ype3 CTeKIO, POKpbIToe KaJIaMBOJbl
-ROPN3OHTaJIbHbIX NIOLOC
-ObbeKToB C MaIOn KOHTpaCTHO TaKOM FOHe, KAK CTeHa NIN He60 -
Ecnn Bby XOTNTe BbIOnJIHnTb 3MeHeHne ФOKycuPOBKc C obBeKt Ha NepeJHem ПlaHa Ha obBeKt Ha 3aJHem ПlaHa
-Прии Вьлпонгени Ссевки Статонарных объektов сисльбизовим Трehоги


(1) Set FOCUS to MANUAL in the standby or recordingmode. The indicator appears.
(2) Turn NEAR/FAR to sharpen focus.
To return to the autofocus mode
Set FOCUS to AUTO.
To record distant subjects
When you press FOCUS down to INFINITY, the lens focuses on infinity and indicator appears. When you release FOCUS, your camcorder returns to the manual focus mode. Use this mode when your camcorder focuses on near objects even though you are trying to shoot a distant object.
To focus precisely
Adjust the zoom by first focusing at the "T" (telephoto) position and then shooting at the "W" (wide-angle) position. This makes focusing easier.
When you shoot close to the subject
Focus at the end of the "W" (wide-angle) position.
changestothefollowingindicators:
when recording a distant subject.
when the subject is too close to focus on.
HnDnkaun H3MeHHTcaHa cIeNyUoune HnDnKaTopbl:
πpi 3aπicu ydaJIeHnHO o6beKtA.
ecnObeKT HaxoNTcCNIuKOM 6Nt3KO, TTo6bI BbInOnHnTb fokycnpOBky Ha Hero.
Superimposing a title
You can select one of eight preset titles and two custom titles(p.46). You can also select the language, colour, size and position of titles.
HanoxeHne TnTpa
BbMOKTe BbI6paTb OINH IN BOCbMn PpeBapNtBeHbO yCTaHOBJNEHbIX TnTPOB IN DaBcO3dAHHbIX BamTnTpa (Ctp. 46). BbMOKTe TaKke Bbl6paTb A3bIK, ZBET, pa3Mep IN NOJoxHeNe TnTPOB.

(1) Press TITLE in the standby mode.
(2) Turn the SEL/PUSH EXEC dial to select , then press the dial.
(3) Turn the SEL/PUSH EXEC dial to select the desired title, then press the dial. The titles are displayed in the language you selected.
(4) Change the colour, size, or position, if necessary.
① Turn the SEL/PUSH EXEC dial to select the colour, size, or position, then press the dial. The item appears.
② Turn the SEL/PUSH EXEC dial to select the desired item, then press the dial.
③ Repeat steps ① and ② until the title is laid out as desired.
(5) Press the SEL/PUSH EXEC dial again to complete the setting.
(6) Press START/STOP to start recording.
(7) When you want to stop recording the title, press TITLE.
To superimpose the title while you are recording
Press TITLE while you are recording, and carry out steps 2 to 5. When you press the SEL/PUSH EXEC dial at step 5, the title is superimposed.
To select the language of a preset title
If you want to change the language, select before step 2. Then select the desired language and return to step 2.
Note
Both the date and time or either of them may not be displayed depending on the size or position of the title.
If you display the menu or title menu while superimposing a title
The title is not recorded while the menu or title menu is displayed.
Touse the custom title
If you want to use the custom title, select in step2.
If you have not made any custom title,
"----..." appears on the display.
Titlesetting
- The title colour changes as follows: WHITE YELLOW VIOLET RED CYAN GREEN BLUE
- The title size changes as follows:
SMALL LARGE
You cannot input more than 13 characters in LARGE size. - The title position changes as follows: 1 2 3 4 5 6 7 8 9 . The larger the position number, the lower the title is positioned.
When you select the title size "LARGE", you cannot choose position 9.
When you select the title size "LARGE" in the CINEMA mode, you cannot choose position 8 nor 9.
When you are selecting and setting the title
You cannot superimpose the title displayed on the screen.
When you superimpose a title while you are recording
The beep does not sound.
3yMMepHoro cunHa na He 6yJeT.
Making your own titles
You can make up to two titles and store them in your camcorder. Each title can have up to 20 characters.
(1) Press TITLE in the standby or PLAYER mode.
(2) Turn the SEL/PUSH EXEC dial to select , then press the dial.
(3) Turn the SEL/PUSH EXEC dial to select the first line (CUSTOM1) or second line (CUSTOM2), then press the dial.
(4) Turn the SEL/PUSH EXEC dial to select the column of the desired character, then press the dial.
(5) Turn the SEL/PUSH EXEC dial to select the desired character, then press the dial.
(6) Repeat steps4 and 5 until you have selected all characters and completed the title.
(7) To finish making your own titles, turn the SEL/PUSH EXEC dial to select [SET], then press the dial. The title is stored in memory.
(8) Press TITLE to make the title menu disappear.
Co3dahne cBONX co6CTBeHHbIX TnTPOB
BbMOKTeCo3daTbDbCa6CTBeHHbIX TnTp a XpaHnTB IN B nAMrTN BuDeOkaMepbl. KaJbIy TnTp MOKET COCToRt b 20 CmBONOB.
(1)HaxmTe KhoNkTy TITLE B pexKIme OxndaHnI nnpeXmE PLAYER.
(2)ПовернITE ДИСК SEL/PUSH EXEC ДЯ
Выбopa ИнДикаги TФ, a 3aTeM нажмITE
ДИСК.
(3)ПовернITE ДИСК SEL/PUSH EXEC ДЯ
Выбoga певои стрки (CUSTOM1) Или
Втори стрки (CUSTOM2), a за tem
нажмITE ДИСК.
(4)ПовернITE ДИСК SEL/PUSH EXEC ДЛЯ Вьбopa КОJOHКИ C HYЖБIM CMMOJLOM, a 3aTeM HAXMITEДИСК.
(5)ПовернITE ДИСК SEL/PUSH EXEC HУЖНО CИМВOLA, a 3aTeM HAЖМТЕ ДИСК.
(6)Повторгий DeиCTBиpyнКТOB 4и 5doTexnop, nOKa He BblbepuTe BCE CnMbOJIи HeCOCTaBIne NOnHOCbIbTO THTp.
(7)ДЯЗавершени COЗданны CBОИX COбCTBEньх TINTPOВ NOБЕРНITE ДИСК SEL/ PUSH EXEC ДЯВ Вьбopa KOMaHДы [SET], a 3aTeM нажмITE ДИСК. TINTP 6уДET 3aHeceH B nAMRTb.
(8)Haxmnte KhoNkY TITLE, YTO6bl MeHIO TnTPOB nCHe3JIo.

To change a title you have stored
In step 3, select CUSTOM1 or CUSTOM2, depending on which title you want to change, then press the SEL/PUSH EXEC dial. Turn the SEL/PUSH EXEC dial to select [+], then press the dial to delete the title. The last character is erased. Enter thenew titleasdesired.
If you take 5 minutes or longer to enter characters in the standby mode while a cassette is in your camcorder
The power automatically goes off. The characters you have entered remain stored in memory. Turn STANDBY down once and then up again, then proceed from step 1.
We recommend setting the POWER switch to PLAYER or removing the cassette so that your camcorder does not automatically turn off while you are entering title characters.
If you select [ P2]
The menu for selecting alphabet and Russian characters appear. Select [ P1] to return to the previous screen.
To delete the title
Select[ ]. The last characteriserased.
ДяиИЗмени COхраehногВ namATn TITpa
BnyhKe 3,Bb6epnte KOMaHdy CUSTOM1 nnn
CUSTOM2 B 3aBncmocTn OT TORO, KaKo TnTp
Bby XOTne N3MeHNtB, a 3aTeM haxMnte DNCK
SEL/PUSH EXEC. NObepHnte DNck SEL/PUSH
EXEC nIy BB6opa HnDnKaUu [<], a 3aTeM
haxMnte DNck dny ydaJIeHn TnTpA.
IocneHn CmB0J 6ydt ydaen. BBeDHTe HObI HxKbI CmBOJ.
Ecn npB BBODe CmMBOJOB npoIeT 5 MnHyT nnn 60lee B pexnme OxuaHna npu BCTabJIeHHo KaccTe B Bauy Bndeokamepy PtntaHne aBTOMaTHueCKN bIKJIOHTCn.
BBeHeHbIe CmMbOJIb 6yDyT CoXpaHaHbIBnamrtn. NObepHIne Bn3, a 3aTeM ChOBa BBepxpepyJrAToP STANDBY, a 3aTeM BblOnJHIneDeiCTBnA, NaHHaC pynkTa 1.
PekomEnyetycYtaHOBnTbpeKJIIOuataIb POWER B noIOxKeHne PLAYER nIN BbHyTb kaccTeY, TaK YTO6bl Ba7a BInDeOKaMepa aBTOMatNueeCKn He BbIKIOUaJaCb Pn BBOde CmMBOJOB TITPOB.
EcnBbI Bbl6paJI KOMaHdy [→P2]
IIOABNTcMENIOIINBb6opaanpaBNTa npyCCKNX6yKB.Bb6epnteKOMaHdy[→P1],YTObI BepHyTbC KnpedblDyUeMy3KpaHy.
Диудаленгтра
BbIbepuTe KOMaHny [].PiocneDnHcMBOJ 6ydet ydaJIeN.
Using the A/V connecting cable
Connect your camcorder to the VCR using the A/V connecting cable supplied with your camcorder.
(1)Insert a blank tape (or a tape you want to record over) into the VCR, and insert the recorded tape into your camcorder.
(2) Set the input selector on the VCR to LINE. Refer to the operating instructions of your VCR for more information.
(3)Set the POWER switch to PLAYER.
(4)Play back the recorded tape on your camcorder.
(5)Start recording on the VCR. Refer to the operating instructions of your VCR for more information.
Параапсь Лentы
UcnOJIb3OBAHnE CoeINHITeIbHOro Ka6eJyauDIO/BuDeO
IopocenHte Bauy Bndeokamepy K KBMc nomoubcoeHNtelenho Kaebena ayno/ Bndeo, npnilaraemoro K Baewn Bndeokamepe.
(1)BcTaBbTe He3aIncaHHyIO JeHTy (IIINJeHTy, Ha KOTopyIO Bbl XOTnte BblIOJIHNITb 3aIncb) B KBM u BcTaBbTe 3aIncaHHyIO JeHTy B BaIy BuIeOKaMepy.
(2) YcTaHOBInTe CeJIeKTop BxOJHOro CnIHana Ha KBM B noIooKeHne LINE. IOpIObHbe CBeDEHnA npINBeHb B INHCTpyKuNn NO 3KcPnyaTauu N BaWero KBM.
(3)YctaHOBInTe npeKJIouaTeIb POWER B noJIOKeHne PLAYER.
(4)Haunite BoCpOn3BeJeHne 3aNcaHHoJIeHTbI Ha BaSei BnDeokampe.
(5)HaunTe 3anncb Ha Baem KBM. IoprohIe CBeDeHnI npBedeHb IB nHcTpyKuIN no 3kCnPyatauIN Baewo KBM.

When you have finished dubbing a tape
Press on both your camcorder and the VCR.
To prevent deterioration of pictures from dubbing
Set EDIT to ON in the menu settings before dubbing.
You can edit on VCRs that support the following systems
8 8 mm, Hi8 Hi8, Digital8, VHS VHS, SWS S-VHS, WHSC VHSC, WHSC S-VHSC, Betamax, Mini DV or DV
EcnBb3aKOHnJI nepe3aIncb IeHTbI Haxmnte KhoNky KaKa Ha BundeOkamepe, TaK n ha KBM.
Длпгелдьразецни ухшени нзбрахенни ри пеши.
IpepeBbIOpJIHeHEmpepe3aIcNycTaHOBtTe nepeKIOUaTeJIbEDITBnoJoxHeNe ON ByCTaHOBkax MeHIO.
Bbl moKTe BbINOJIHrTb MOHTaX Ha KBM, KOtOpbie noDdepxnBaIOT cNeyUoJne CnCTeMbI
8 MM, Hi8 Hi8, Digital8, VHS VHS, SVHS S-VHS, VISC VHSC, SVISC S-VHSC, Betamax, Mini DV mini DV
- Customizing Your Camcorder - Changing the menu settings
To change the mode settings in the menu settings, select the menu items with the SEL/PUSH EXEC dial. The default settings can be partially changed. First, select the icon, then the menu item and then the mode.
(1) In the standby or PLAYER mode, press MENU.
(2)Turn the SEL/PUSH EXEC dial to select the desired icon, then press the dial to set.
(3)Turn the SEL/PUSH EXEC dial to select the desired item, then press the dial to set.
(4)Turn the SEL/PUSH EXEC dial to select the desired mode, and press the dial to set.
(5) If you want to change other items, select RETURN and press the dial, then repeat steps from 2 to 4. For details, see "Selecting the mode setting of each item"(p. 50).
- BbINOJIHHeHne INIINBnDyaJIbHbIX yctaHOBOKHaBNdeOkaMepe -
N3MeHeHne yCTaHOBOK MeHIO
ДлгиИзмeнeнуycTaHOBOKpexIMaBycTaHOBkax MeHIO bYbeBPeITyNYKtBI MeHIO c NOMOJIbIOДNcKa SEL/ PUSH EXEC.YcTaHOBKnYo YMOLJIaHIO MOrT 6bIb YactuTHO ИзмeнeHbI.ChaJana bYbeBPeITe NIKTORpamMy,3aTEMpyHKTMeHIO,a3aTEMpeXIM.
(1) B pexkime oxindaanu nnn pexkime PLAYER haxmte tKHONKY MENU.
(2)ПовернITE диСК SEL/PUSH EXEC дя Вьбoga
нухк Hoи КИКТOrpaMMbI,а 3aTeM HabKMTe ДИСК дя
уCTAHOBKn.
(3)ПовернITE диСК SEL/PUSH EXEC ДЯ Вьбoga
НужCHOД ПИКТOrpaMMbI,а 3aTeM HabKMTe ДИСК ДЯ
YCTAHOBKn.
(4) ネlobeprHteДИСК SEL/PUSH EXEC ДЯ Вьбoga
НУЖΗОЛ NIKTORPаMbbla, aЗТЕМнТЕ ДИСК ДЯ
уCTAHOBKи.
(5) Ecπi BbI XOTnTE n3MeHnTB DpyrE nyHkTb, Bb6epITe KOMaHdy RETURN, a 3aTeM hakmTe IMCK, pOcNe Yero NOBtOpINE DeIeCTBnny HNKTOB co 2 no 4. IpoRo6HbIe CBeDEHHI npBVeDeHbI B pa3dene "Bb6op ycTaHOBOK pexima nO KaXDoMy nyHKTy" (ctp. 54)
Changing the menu settings
To make the menu display disappear
Press MENU.
Menu items are displayed as the following
icons:

CAMERA SET

PLAYER SET

TAPE SET

SETUP MENU

OTHERS
U3MeHeHne yCTaHOBOK MeHIO
Toro, T06bI NCye3na Hdkaun MEHIO
HaxmTe KhONkY MENU.
IyHKtbl MeHIO OTO6paXaHTcB BVdE npBVeDeHHbIX HNXe NIKTORpAMM:

CAMERA SET

PLAYER SET

TAPE SET

SETUP MENU

OTHERS
English
Selecting the mode setting of each item
is the default setting.
Menu items differ according to whether the POWER switch is set to PLAYER or CAMERA.
The viewfinder screen shows only the items you can operate at the moment.
| Icon/item | Mode | Meaning | POWER switch |
| D ZOOM | OFF | To deactivate digital zoom. Up to 20× zoom is carried out. | CAMERA |
| 40× | To activate digital zoom. More than 20× to 40× zoom is performed digitally. (p. 21) | ||
| ● 200× | To activate digital zoom. More than 20× to 200× zoom is performed digitally. (p. 21) | ||
| 16:9WIDE | ● OFF | — | CAMERA |
| CINEMA | To record in the CINEMA mode (p. 31) | ||
| 16:9FULL | To record in the 16:9FULL mode | ||
| N.S. LIGHT | ● ON | To use the NightShot Light function (p. 24) | CAMERA |
| OFF | To cancel the NightShot Light function | ||
| EDIT | ●OFF | — | PLAYER |
| ON | To minimize picture deterioration when editing | ||
| TBC | ●ON | To correct jitter | PLAYER |
| OFF | To not correct jitter. Set TBC to OFF when playing back a tape on which you have dubbed over and recorded the signal of a TV game or similar machine. | ||
| TBC stands for “Time Base Corrector”. | |||
| DNR | ●ON | To reduce picture noise | PLAYER |
| OFF | To reduce a conspicuous afterimage when the picture has a lot of movement | ||
| DNR stands for “Digital Noise Reduction”. | |||
| NTSC PB | ●ON PAL TV | To play back a tape recorded in the NTSC colour system on a PAL system TV | PLAYER |
| NTSC 4.43 | To play back a tape recorded in the NTSC colour system on a TV with the NTSC 4.43 mode | ||
Note on the playback of the NTSC tapes
You can play back tapes recorded in the NTSC video system.
When you play back a tape on a Multi System TV, select the best mode while viewing the picture on the TV.
In more than 5 minutes after removing the power source
The "EDIT" item is returned to its default setting.
The other menu items are held in memory even when the battery is removed, as long as the lithium battery is installed.
| Icon/item | Mode | Meaning | POWER switch |
| REC MODE | ●SP | To record in SP (Standard Play) mode | CAMERA |
| LP | To increase the recording time to twice the SP mode | ||
| ORC TO SET | To automatically adjust the recording condition to get the best possible recording. Press START/STOP to start adjustment. Your camcorder takes about 10 seconds to check the tape condition and then returns to the standby mode. | CAMERA | |
| ORC stands for “Optimizing the Recording Condition”. | |||
| ○REMAIN | ●AUTO | To display the remaining tape bar: •for about 8 seconds after your camcorder is turned on and calculates the remaining amount of tape •for about 8 seconds after a cassette is inserted and your camcorder calculates the remaining amount of tape •for about 8 seconds after ▲ is pressed in PLAYER mode •for the period of tape rewinding, forwarding or picture search in the PLAYER mode | PLAYER CAMERA |
| ON | To always display the remaining tape bar | ||
Notes on the LP mode
- When you record a tape in the LP mode on your camcorder, we recommend playing the tape on your camcorder. When you playback the tape on other camcorders or VCRs, noise may occur in pictures or sound.
- Noise may occur also when you play on your camcorder tapes recorded in the LP mode on other camcorders or VCRs.
Notes on ORCsetting
Each time you eject the cassette, the ORC setting will be canceled. If necessary, reset the setting.
- You cannot use this setting on a tape with the red mark on the cassette exposed.
(i.e. the tape is write-protected)
- When you setORCTOSET, a non-recorded section of about 0.1 seconds appears on the tape. However, note that this non-recorded section disappears from the tape when you continue recording from this section.
- To check if you have already set the ORC setting, select ORC TO SET in the menu settings. "ORC ON" is displayed if ORC TO SET is already set.
| Icon/item | Mode | Meaning | POWER switch |
| CLOCK SET | To reset the date or time (p. 58) | CAMERA | |
| AUTO DATE | ●ON | To record the date for 10 seconds after recording has started | CAMERA |
| OFF | To cancel the auto date function | ||
| LTR SIZE | ●NORMAL | To display selected menu items in normal size | PLAYER CAMERA |
| 2× | To display selected menu items at twice the normal size | ||
| DEMO MODE | ●ON | To make the demonstration appear | CAMERA |
| OFF | To cancel the demonstration mode |
Notes on DEMO MODE
- You cannot select DEMOMODE when a cassette is inserted in your camcorder.
- DEMOMODE is set to STBY (Standby) at the factory and the demonstration starts about 10 minutes after you have set the POWER switch to CAMERA without a cassette inserted.
To cancel the demonstration, insert a cassette, set the POWER switch to other than CAMERA, or set DEMO MODE to OFF.
- When NIGHTSHOT is set to ON, the NIGHTSHOT indicator appears in the viewfinder and you cannot select DEMOMODE in the menu settings.
| Icon/item | Mode | Meaning | POWER switch |
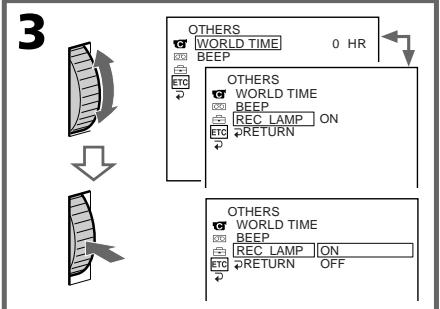
| ETC WORLD TIME | To set the clock to the local time. Turn the SEL/PUSH EXEC dial to set a time difference. The clock changes by the time difference you set here. If you set the time difference to 0, the clock returns to the originally set time. | CAMERA | |
| BEEP | ●MELODY | To output the melody when you start/stop recording or when an unusual condition occurs on your camcorder | PLAYER CAMERA |
| NORMAL | To output the beep sound instead of the melody | ||
| OFF | To cancel the melody and beep sound | ||
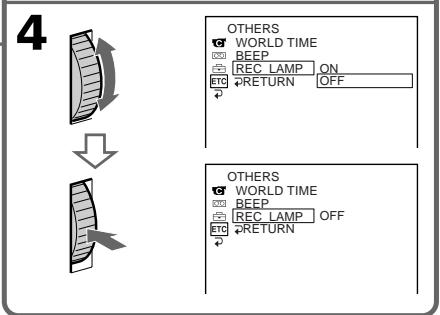
| REC LAMP | ●ON | To light up the camera recording lamp at the front of your camcorder | CAMERA |
| OFF | To turn the camera recording lamp off so that the subject is not aware of the recording |
Pycckn
Bb6op yctaHOBOK peKIma no KaXdOMy nyHKTy
yctaHOBka nO yMOJIaHnIO.
ПунковMeHIOOTJIUaHOTcB3aBcIMOCTnOTTOY,ycTaHOBJeHnepeKJIouaTeJBPOWER B noJoxeHNEPLAYERnnCAMERA.
Ha 3kpaHbVIOINCKaTeJIbNDbI TOJIbKO NyHKTbI, KOToPbIMN Bbl MoKeTe ynpabJIaTb B daHHbIMOMeHT BpeMeHI.
Resetting the date and time
IpeyectaHOBka DaTbI N BpemeHn
The default clock setting is set to Sydney time for Australia and New Zealand models, to Tokyo time for the models sold in Japan, and to Hong Kong time for other models.
The date and time are held in memory by the lithium battery. If you replace the lithium battery with the battery pack or other power source connected, you need not reset the date and time.
You must reset the date and time when the lithium battery becomes dead with no power source installed.
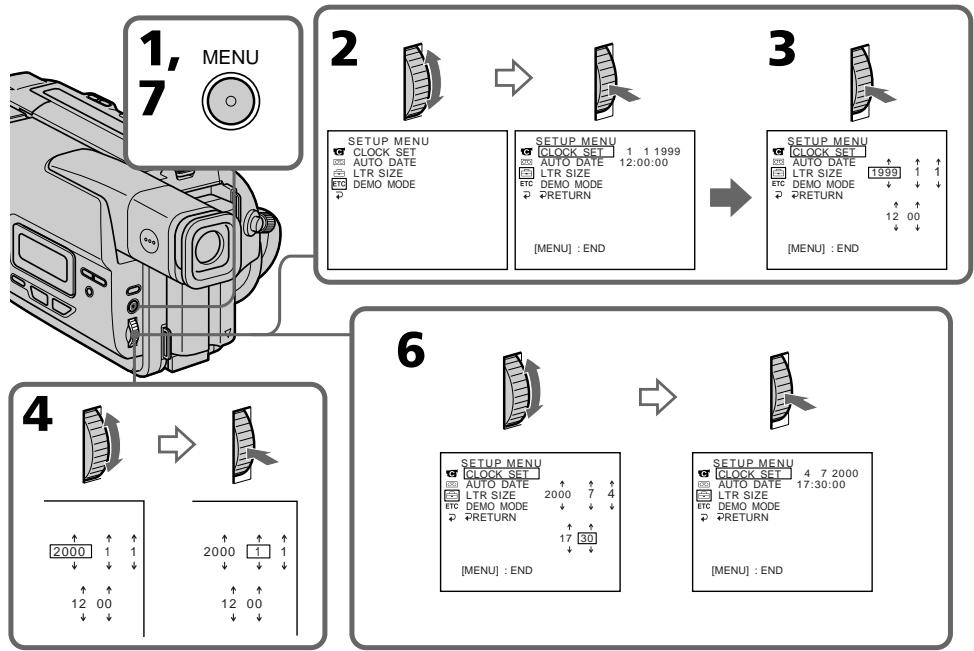
First, set the year, then the month, the day, the hour and then the minute.
(1) While your camcorder is in the standby mode, press MENU to display the menu.
(2)Turn the SEL/PUSH EXEC dial to select 三 then press the dial.
(3)Turn the SEL/PUSH EXEC dial to select CLOCK SET, then press the dial.
(4) Turn the SEL/PUSH EXEC dial to adjust the desired year, then press the dial.
(5) Set the month, day and hour by turning the SEL/PUSH EXEC dial and pressing the dial.
(6) Set the minute by turning the SEL/PUSH EXEC dial and pressing the dial by the time signal. The clock starts to move.
(7) Press MENU to make the menu disappear. The time indicator appears.
YcTaHOBKa YacOB No yMOJUaHNIO COOTBETCTByET BpEMeHN CuIHeN dA ABCTpaNNiCKo N HOB03eNaHnDCKo MoDeNe, BpEmeHN ToKNo dJa MODeNe, IpOdaBaembIX B JAnOHmN, n BpEmeHN TOnKOHra dJa Dpyrnx MoDeNe.
Дату и ВрмСохраиJOТСВЯМАТС
NOMOьLOПИТЕВОЛ 6БАРЕКИ.ЕСИ NBy OTO
ЛNTeBOI 6БАтApEуКИ NepeKIIQUHITe Na
6БАтApEнь 6БОК IINIpyRO NOJCOEHNHeHHbI
NUCTOCHNK NITaHnA, Bam HxHNo 6yET
NepeYCTAHOBInTB Datу И Врм. Bam HxHNo
TakKxe NepeYCTaHOBInTB Datу И Врм. KOrda
ЛNTeBAI 6БАтApEуKa pa3PraIHTcI N B 3TO
Врм He 6yET BCTaBJIeN INCTOuHnK ПITaHnI.
СЧаца у cystaHOBInTe rOd, 3aTeM MecrU, DeHb,
Yac n MNHyTu.
(1)В ржиме ож fundаима Баши вдебокамерьи.
нжмпг Кногку MENU за оторазхени
установоз мени.
(2)ПовернITE ДИСК SEL/PUSH EXEC ДЯ Вьбoga
ИндIKEДА, a 3aTeM нажмITE ДИСК.
(3)ПовернITE ДИСК SEL/PUSH EXEC ДЯ
Быбopa КOMAHДБI CLOCK SET, a 3aTeM
HAXMMITE ДИСК.
(4)ПовернITE ДИСК SEL/PUSH EXEC ДИВыбopa НУЖНOrO рога,a 3aTeM НЯЖМITE ДИСК.
(5)VCTaHOBInTe MeCraU, DeHb N ac nyTem BpaueHn DnCKa SEL/PUSH EXEC n HAKIMAHN DnCKa.
(6)YCTaHOBITE MNUHTy NytEM BpaUeHnI DnCKA SEL/PUSH EXEC n HaxkIMaHn I DaCKa B MOMHT nepeDaHu CnHra ToHOrO BpEmEH. Yacb HauHYt fynHKUHOHropoBaTb.
(7)HaxMMte KhoNky MENU DnToro, YTO6bI Hcye3JIn yCTaHOBKe MHeIO. IOnBaITcN HdNkAToP BpeMeHN.
To check the preset date and time
Press DATE to display the date indicator. Press TIME to display the time indicator. Press DATE (or TIME) and then press TIME (or DATE) to simultaneously display the date and time indicator. Press DATE and/or TIME again. The date and/or time indicator disappears.
The year changes as follows:
Дя npOBepkn npedBapntelbHo yCTaHOBLeHHbIX DaTbI BpemeHn
Haxmnte KhoNky DATE nIra oTo6paXeHn IHHdkaTopa daTbI. Haxmnte KhoNky TIME dIra oTo6paXeHn IHdkaTopa BpeMeHn. Haxmnte KhoNky DATE (uIN TIME), a 3atem Haxmnte KhoNky TIME (uIN DATE) dIra OndHOBpeMeHHoro oTo6paXeHn IHdkaTopa daTbI uBpeMeHn. Haxmnte eue pa3 KhoNky DATE u/nn Time. IHdkaTop daTbI u/nn BpeMeHn nCye3HeT.
Tod n3mehaetcnaeuyuOUM o6pa30M:

Auto date function
When you use your camcorder for the first time, turn it on and reset the date and time to your time before you start recording (p.58). The date is automatically recorded for 10 seconds after you start recording (Auto date function). This function works only once a day.
Note on the time indicator
The internal clock of your camcorder operates on a 24-hour cycle.
Note on the auto date function
You can change the AUTO DATE setting by selecting ON or OFF in the menu settings. The auto date function automatically displays the date once a day.
However, the date may automatically appear more than once a day if:
- you reset the date and time.
- you eject and insert the tape again.
- youstop recording within 10 seconds.
- you set AUTO DATE to OFF once and set it back ON in the menu settings.
Функца ABIOMATNueCKOДaTbI
EcIn BbI nCnOJ3yeTe BnDeOKaMepy nepBbI pa3,BKIOHHTe ee I nepeyctaHOBNTe DaTy IN BpEMR B COOTBETCTBN CO CBOIM YacOBbIM NORcOM, npExKeJe cHem NaHaTb 3aNcBc (CTp.58). DAtbI Byedet ABTomatUeCKn 3aNcBbATbc R TeueHne 10 cekynI nocNe hauJa 3annci (fynkun ABtomatUeCKo DaTbI). 3Ta fynKuIpa6OtaeT Odn Hpa3B DeHb.
PpmeaHne no HndkaTopy BpeMeHn
BCTpoeHHbIe YacBi BaWei BnDEokamepbl pa6oTaIO T 24-YacOBom pexmme.
PpmeaHne no yHKunn ABOMATuecko DaTbI
BbMoKTe N3MeHnTb ycTaHOBky AUTO DATE nyTem BbIbOpa nnoXeHn ON nn OFF B yCtHaOBkax MeHIO. FyHKnA aBTOMaTnuecko daTb aBTOMaTnueckn OT6paxKaet DaTy OdnH pa3 B DeHb.
OndaKo, daTa MoKet aBTOMaTnueCKINOBaTbC60JIbSe Ondoro pa3a npn:
-NepeyctaHOBKe DaTbI BpEmHeN.
-BbITaJIKNBaHmN yCTaHOBKe JIeHTbl O6paTHO Ha MecTo.
-oCTaHOBKe 3aIncn B npedeJax 10 cekyHd.
- yctaHOBKe KOMaHdbI AUTO DATE B
noJoxKeHne OFF n Bo3BpaUeHn B
noJoxKeHne ON b yctaHOBkax MeHIO.
Additional Information —Playback modes
What is Video 8X?
"Video8XR" is a function that further enhances the image quality of Video8. This function allows you to record and playback pictures with clearer details.
Video tapes recorded on a camcorder having the "XR" function show excellent picture quality when they are played back on an "XR" camcorder.
The playback quality will be the normal quality of the standard 8mm camcorder when video tapes recorded on an "XR" camcorder are played back by a conventional standard 8mm camcorder or when video tapes recorded on a conventional standard 8mm camcorder are played back on the "XR" camcorder.
- "XR" stands for "Extended Resolution."
-Донон'teьнэинфорmaць - PexmblBocnpo3BeDEHnA
4To takoe Video 8 XR?
"Video 8 XR" ABJIETcA yHKUnei, KOtopa eEe yLyuShaet KaueCTBO n3o6paXeHnra Video 8. 3TaФyHKUINIO3BOJReT Bam 3aINCbIBaTb IN BOCPON3BOJNTb N3o6paXeHnC yTOHYeHHbIMN DeTaJIAMN.
BndeOeHTbI,3aNcAHHbIe Ha BndeOKaMepe,
mMeoJeuFyHKuHIO *XR",0eocneuBaIOT
npEBOxCoJHOe KaeeCTBO I3OBpaXeHnI pRi
BOcPON3BeDeHn HA BnDEOKaMepe *XR".
KaeeCTBO BOCPON3BOIDMOrO I3OBpaXeHn
6yEt O6bUHNbIM KaeeCTBOM, COOTBeTCTBYIOUM
8-MM BnDEOKaMepe, pRi BOcPON3BeDeHn
BnDEOIENT, 3aNcAHbIX Ha BnDEOKaMepe *XR",
Ha b6UHNoBn DEOKaMepe nIi Xe npR
BOcPON3BeDeHn BnDEOIENT, 3aNcAHbIX Ha
0b6HuOH 8-MM CTAHdAPTHoB NnDEOKaMepe, Ha
BnDEOKaMepe *XR".
*“XR”03nauaet“ynyuweHHna pa3pewaouca cnoco6HocTb”.
When you play back
The playback mode (SP/LP) is automatically selected according to the recording system in which the tape has been recorded. The quality of the recorded picture in the LP mode, however, will not be as good as the SP mode.
Foreign 8 mm video
Because TV colour systems differ from country to country, you may not be able to play back foreign pre-recorded tapes. Refer to "Using your camcorder abroad" to check the TV colour systems used in foreign countries.
Playing back an NTSC-recorded tape
You can play back tapes recorded in the NTSC videosystem using the SP mode.
However, note that the following will occur during playback of an NTSC-recorded tape.
- When playing back a tape on a TV screen, you may not get the original colour depending on the TV. When you play back on a Multi System TV, set NTSC PB to the desired mode in the menu settings.
- During playback, a black band appears on the lower part of the viewfinder.
- You cannot play back a tape recorded in the NTSC video system with the LP mode on a TV screen.
- If a tape has portions recorded in PAL and NTSC video systems, the tape counter reading is not correct. This discrepancy is due to the difference between the counting cycle of the two videosystems.
- You cannot edit the NTSC-recorded tape onto another VCR.
PnBbINOJIHeHn BOCpON3BeJeHnA
Pexim Bocnpoun3BeDHeNn (SP/LP) Bb6npaetcABTOMaTHueeCKn B COOTBETCTBn CΦOpMaTOM, BKOTOPOM 6blJa BblONHeHa 3aIINcb Ha JeHte.
Ondako, KaueCTBO 3aIncaHnHO n3o6paKeHHBpejIMe LP He 6yDet TaKIM XopoWIM, KaK BpejIMe SP.
HIOCTpaHHbIe 8-MM BnIdeOJeHTbl
IockoJIbky CnCTeMbI ZBETHORO TeLEBnDEHnIOTJUaHTcOATCTpaHbIKCTpAHe,BO3MOxHO BbI He CMOxTe BOcPON3BODnTb INHOCTpaHHbI npEiBaPnteJbHO 3aNtcaHhIeJeHTbI.Cm. pa3dEn "UcnOJb3ObaHne BaueBnDeOKaMepbl 3a IraHnCe"DNI pOBePKCnCTeM ZBETHORo TELEBnDEHnI,NCnOJb3yEmbIX B Dpynx CTpaHax.
Bocnpon3BeDeHneJeHT,3aIncaHHbIX BCnCTeme NTSC
BbMOKeTe BOCpOu3BOUHTbJeHbI, 3aNcAHHbIe B BuDEoCnCTeMe NTSC, NcNoJIb3ypeKIMSP.OdHaKO,IMeHTe B BuNy, YTO BOBpEMRA BOCpOu3BeDeHnJLeHT,3aNcAHHbIX BCnCTeMe NTSC,6yDet Imetb MeCTOcNeDuOuee.
-ПиВОСПОИЗBEДЕНМЛЕТБИHAЗКРан
ТeLEBИЗОРABыMOЖTe He ПОЛЧИТь
прВОHачАльные CBeТaВ3aВИСMоCTNOT
ТИпаТeLEBИЗОр.ПиВОСПОИЗBEДЕНИ
Нa
МуЛьТиСИСТeMHOMТeLEBИЗОpeУСТАНБИТe
пeрEkЛIOUЧАteЛьNTSCPBHaHyЖБIйржIM
ВУCTAHOBKAXMeHIO.
- Bo Bpemr Bocnpn3BeDenHnB HnKHeuactn BuOnckatEn 6yDet NOBJIaTbCya UepHaononoCa.
BbI He MoKeTe BOCnPOn3BOoNtB JeHtY, 3aIncaHHyO B BuJeocNCTeMe NTSC,B peKIme LP,Ha 3kpaHe TeJIeBu3Opa.
- EcIn Ha JeHTe IMMeIOTcYuacTKn, 3aINcaHHbIe B BVdeocncTeMax PAL n NTSC, to ΦyHKUHOHnPOBaHne CteTnKa JENTbl 6yJeT HEnpaBnIbHbIM. 3To paCXoXJDeHne O6bRCHAEcra pa3HnCeM MeKdy CteTHbIMN UKNkAmn DByx BVdeocncTeM.
- BbI He MoXKeTe BblIOJIHrTb MOHTaK JIeHTbI, 3aIIncAHHO B CnCTeMe NTSC, Ha dpyroi KBM.
Changing the lithium battery in your camcorder
3aMeHa IHTNeBOI 6aTapeiKN B BaSei BnDeOKaMepe
When replacing the lithium battery, keep the battery pack or other power source attached. Otherwise, you will need to reset the date, time and other items in the menu settings hold in memory by the lithium battery.
Insert the battery with the positive (+) side facing out. When the battery becomes weak or dead, the indicator flashes in the viewfinder for about 5 seconds when you set the POWER switch to CAMERA. In this case, replace the battery with a Sony CR2025 or Duracell DL-2025 lithium battery. Use of any other battery may present a risk of fire or explosion. Discard used batteries according to the manufacturer's instructions.
Pn3aMeHe IInTneBO6bATEeKN6bATEeHbI 6JOK ININ DpyroINCTOCHNK NtAHNIOJONKeH 6bITb npIKpeJIENK BnDEOkamepe.B IpOTNBOM Clyuae Bam nOHaNoBcTc nepeycTaHaBnBaTaB DaTy, BpEmr nDpyrme NyHKtbl B yCTaHOBkax MeHIO, XpaHIMbIX B naMRTn BVNeOKaMEpbIC NOMOcBu IInTneBO 6bATapeeKn.
BcTaBbTe 6aTapeKy TaK, UTo6bl
noLoXnTeIbHbI (+) noIIOc 6bIb ObaueH
hApxu. EcnI 6aTapeKa cTaHET nII
pa3rJaNTcR, INDkaTOp 6yDeT MIRaTB B
BUNOnCKaTeNe OKO 5 cekYHd, ECNI
nepeKnUoateNb POWER yCTaHOBJIeN B
noLoXeHne CAMERA.B 3tOM cIyuae,
3aMeHIne 6aTapeKy Ha aHaJIoRnHyU
LIHTHeBvO 6aTapeKy Sony CR2025 nII
Duracell DL-2025. IcNoIb3ObaHne KaokI
JIbIoDPyroB 6aTapeKu Co3daet Pmck
BOCpJIaMeHEnH NII b3PbIBa. JIKBIVnpuyTe
ICNoIb3OBAHHBe 6aTapeKn B COOTBETCTBIM C
INHCTpyKUAMn PpeInpnAITNA-N3ROTOBNTeJIa.

WARNING
The battery may explode if mistreated. Donot recharge, disassemble, nor dispose of it in fire.
Lithium battery
- Keep the lithium battery out of the reach of children.
- Should the battery be swallowed, immediately consult a doctor.
- Wipe the battery with a dry cloth to ensure good contact.
Lithium battery installed at the factory
This battery may not last 1 year.
PNEyPPEKDEHNE
Ecni c 6aTaapeiKoHnepaBnIbHo 6paIaTbcra, OHa MoKeT B3OpBaTbcra. He nepe3apJkaIte, He pa3bnpaiTe n He 6pocaiTe B orOnb 6aTaapeiKy.
Литnevая 6атейka
XpaHnTe IInTneByo 6aTapeKy B MecTe, He DOCTYINOM dIa DeTei.
Bcnyae,ecnKTO-JIb6cnyaHNO npornoTn6baTapeiKy, cJeDyET HEmeJenHOb6paTntbcn Bbpa.
-ПлотрпгебатарейкусхонTKаньюднобесченихоршeroКо��тakta.
Changing the lithium battery in your camcorder
3aMeHa IITHeB0 6aTepeKn B BaSei BInDeokamepe
Changing the lithium battery
(1) Open the lid of the lithium battery compartment.
(2) Push the lithium battery down once and pull it out from the holder.
(3) Install a Sony CR2025 or Duracell DL-2025 lithium battery with the positive (+) side facing out.
(4) Close the lid.
3aMeHa NITneBOB 6aTapeKn
If you run into any problem using your camcorder, use the following table to troubleshoot the problem. If the problem persists, disconnect the power source and contact your Sony dealer or local authorized Sony service facility. If "C: ☐☐:☐☐" appears in the viewfinder, the self-diagnosis display function has worked. See page67.
In the recording mode
| Symptom | Cause and/or Corrective Actions |
| START/STOP does not operate. | ·The POWER switch is set to OFF (CHARGE) or PLAYER. →Set it to CAMERA. (p. 19) ·STANDBY is set to LOCK. →Turn STANDBY to STANDBY. (p. 19) ·The tape has run out. →Rewind the tape or insert a new one. (p. 18, 29) ·The write-protect tab is set to expose the red mark. →Use a new tape or slide the tab. (p. 18) ·The tape is stuck to the drum (moisture condensation). →Remove the cassette and leave your camcorder for at least 1 hour to acclimatize. (p. 75) |
| The power goes off. | ·While being operated in the CAMERA mode, your camcorder has been in the standby mode for more than 5 minutes. →Turn STANDBY down once and then up again. (p. 19) |
| The image on the viewfinder screen is not clear. | ·The viewfinder lens is not adjusted. →Adjust the viewfinder lens. (p. 22) |
| The autofocusing function does not work. | ·FOCUS is set to MANUAL. →Set it to AUTO. (p. 42) ·Shooting conditions are not suitable for autofocus. →Set FOCUS to MANUAL to focus manually. (p. 42) |
| The indicator flashes in the viewfinder. | ·The video heads may be dirty. →Clean the heads using the Sony V8-25CLD cleaning cassette (not supplied). (p. 76) |
| A vertical band appears when you shoot a subject such as lights or a candle flame against a dark background. | ·The contrast between the subject and background is too high. This is not a malfunction. |
| A vertical band appears when you shoot a very bright subject. | ·This is not a malfunction. |
| An unknown picture is displayed in the viewfinder. | ·If 10 minutes elapse after you set the POWER switch to CAMERA or DEMO MODE is set to ON in the menu settings without a cassette inserted, your camcorder automatically starts the demonstration. →Insert a cassette and the demonstration stops. You can also cancel DEMO MODE. (p. 53) |
| The picture is recorded in incorrect or unnatural colours. | ·NIGHTSHOT is set to ON. →Set it to OFF. (p. 24) |
| Picture appears too bright, and the subject does not appear in the viewfinder. | ·NIGHTSHOT is set to ON in a bright place. →Set it to OFF, or use the NightShot function in a dark place. (p. 24) |
In the playback mode
| Symptom | Cause and/or Corrective Actions |
| The tape does not move when a video control button is pressed. | · The POWER switch is set to CAMERA or OFF (CHARGE). → Set it to PLAYER. (p. 29) · The tape has run out. → Rewind the tape. (p. 29) |
| The playback picture is not clear or does not appear. | · The television's video channel is not adjusted correctly. → Adjust it. (p. 28) · EDIT is set to ON in the menu settings. → Set it to OFF. (p. 49) · The video head may be dirty. → Clean the heads using the Sony V8-25CLD cleaning cassette (not supplied). (p. 76) |
In the recording and playback modes
| Symptom | Cause and/or Corrective Actions |
| The power does not turn on. | ·The battery pack is not installed, or is dead or nearly dead. →Install a charged battery pack. (p. 12, 13) ·The AC power adaptor is not connected to the mains. →Connect the AC power adaptor to the mains. (p. 17) |
| The battery pack is quickly discharged. | ·The operating temperature is too low. ·The battery pack is not fully charged. →Charge the battery pack again. (p. 13) ·The battery pack is completely dead, and cannot be recharged. →Replace with a new battery pack. (p. 12) |
| The battery remaining indicator does not indicate the correct time. | ·You have used the battery pack in an extremely hot or cold environment for a long time. ·The battery pack is completely dead, and cannot be recharged. →Replace with a new battery pack. (p. 12) ·The battery is dead. →Use a charged battery pack. (p. 12, 13) |
(Continued on the following page)
| Symptom | Cause and/or Corrective Actions |
| The power goes off although the battery remaining indicator indicates that the battery pack has enough power to operate. | → Charge the battery pack fully again so that the indication on the battery remaining indicator is correct. |
| The cassette cannot be removed from the holder. | · The power source is disconnected. → Connect it firmly. (p. 12, 17) · The battery is dead. → Use a charged battery pack. (p. 12, 13) |
| The ⋅ and ⋅ indicators flash and no functions except for cassette ejection work. | · Moisture condensation has occurred. → Remove the cassette and leave your camcorder for at least 1 hour to acclimate. (p. 75) |
Others
| Symptom | Cause and/or Corrective Actions |
| The date or time indicator does not appear, and the bars“----:---” appear. | Reset the date and time. (p. 58) |
| The melody or beep sounds for 5 seconds. | Moisture condensation has occurred. →Remove the cassette and leave your camcorder for at least 1 hour to acclimate. (p. 75) →Some troubles has occurred in your camcorder. →Remove the cassette and insert it again, then operate your camcorder. |
| While charging the battery pack, no indicator appears or the indicator flashes in the display window. | The AC power adaptor is disconnected. →Connect it firmly. (p. 13) →Something is wrong with the battery pack. →Contact your Sony dealer or local authorized Sony service facility. |
Self-diagnosis display
Your camcorder has a self-diagnosis display function.
This function displays the current condition of your camcorder as a 5-digit code (a combination of a letter and figures) in the viewfinder or the display window. If a 5-digit code is displayed, check the following code chart. The last two digits (indicated by ) will differ depending on the state of your camcorder.
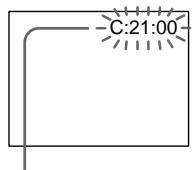
Viewfinder
Self-diagnosis display
C:□□:□□
You can service your camcorder yourself.
E:□□:□□
Contact your Sony dealer or local authorized Sony facility.
| Five-digit display | Cause and/or Corrective Actions |
| C:04:☐☐ | ·You are using a battery pack that is not an “InfoLITHIUM” battery pack. →Use an “InfoLITHIUM” battery pack. (p. 16) |
| C:21:☐☐ | ·Moisture condensation has occurred. →Remove the cassette and leave your camcorder for at least 1 hour to acclimate. (p. 75) |
| C:22:☐☐ | ·The video heads are dirty. →Clean the heads using the Sony V8-25CLD cleaning cassette (not supplied). (p. 76) |
| C:31:☐☐ | ·A malfunction other than the above that you can service has occurred. |
| C:32:☐☐ | ·Remove the cassette and insert it again, then operate your camcorder. →Disconnect the mains lead of the AC power adaptor or remove the battery pack. After reconnecting the power source, operate your camcorder. |
| E:61:☐☐ | ·A malfunction that you cannot service has occurred. |
| E:62:☐☐ | →Contact your Sony dealer or local authorized Sony service facility and inform them of the 5-digit code. (example: E:61:10) |
If you are unable to rectify the problem even if you try corrective actions a few times, contact your Sony dealer or local authorized Sony service facility.
If indicators and messages appear in the view finder or the display window, check the following: See the page in parentheses "( )" for more information.
Warning indicators
The video heads are dirty
Slow flashing:
- You need to clean the heads using the Sony V8-25CLD cleaning cassette (not supplied) (p.76).
The battery is dead or nearly dead Slow flashing:
- The battery is nearly dead.
Fast flashing:
The battery is dead (p.13). - The battery is completely dead, and cannot be recharged.
Depending on conditions, the indicator may flash, even if there are 5 to 10 minutes remaining.
Warning indicator as to tape Slow flashing:
- The tape is near the end.
- Notape is inserted (p.18).*
- The write-protect tab on the cassette is out (red)(p.18).*
Fast flashing:
- The tape has run out(p.18,29).*
The lithium battery is weak or is not installed (p. 62)
Self-diagnosis display (p.67)
Moisture condensation has occurred*
Fast flashing:
- Eject the cassette, turn off your camcorder, and leave it for about 1 hour with the cassette compartment open (p.75).
You need to eject the cassette
Slow flashing:
- The write-protect tab on the cassette is out (red) (p.18).*
Fast flashing:
- Moisture condensation has occurred (p.75).
The tape has run out (p.18,29).* - The self-diagnosis display function is activated (p.67).*
Warning messages
CLOCK SET
Reset the date and time (p.58).
- For "InfoLITHIUM" BATTERY ONLY
Use an "InfoLITHIUM" battery pack (p. 16).
CLEANING CASSETTE
The video heads are dirty (p.76).
- START/STOP KEY
Press the START/STOP button to activate the ORC setting. This message is displayed in white(p.52).
- ORC
The ORC setting is working. This message is displayed in white (p.52).
- You hear the melody or beep sound.
Понск и устараенье несправност
Ecni y Bac Bo3NKkna kakaJ-1n6 npo6Iema npi nCnoJIb3OBAHn BVideOKaMepbl, BOCNOJIb3yntecc cJeDyUoSeT TaBnueJ IaONtBIOH N UcTpaHEnH NpO6IeMb. EcNI npo6IeMa He yCTpaHHeTcR, TO CJeDyET OTCoeHNHTb NCTOHN K NTaHIN N O6paNTbC B CEPBNCbY CEHTp SONY INN B MeCTHOE yONHOMOeHHOE ppeINPNA Tne NO 6cnjXNBaHIO N3DeJIIN Sony. EcNI B BNDOINCKaTeNe NOBNTCR INNDKauNa "C:□□:□□", 3TO 3NaHT, YTO cpaBOTana fynKuJa DNcPIe CamODInarHOCTKN. CM. cTp. 72.
B pexkme 3ainnc
| Возможнай несsprавость | Вероградные рusesни и/и метор устра themselves |
| He是我国的大型计算机网络基础设施运营商,拥有全球最大的计算机网络。 | • Пушихлоча телов POWER устовли в поожения OFF (CHARGE) и р尘 PLAYERS. • Устовские erо в поожения CAMERA. (стр. 19) • Рычаг STANDBY устовlem в поожения LOCK. • Повершихе рычаг STANDBY в поожения STANDBY. (стр. 19) • Закончимась лесда. • Пушихлоча лесда. • Лучения зашилци запису наразы Восток. • Красанmetка. • Исплобухштей Новук касецу и п的事情. • Лучения зашилци восток. • Великий восток у составлеше Вideokамеру пrimерно на 1 ча ддд постор. • Ддд постор. • Ддд постор. • Ддд постор. • Ддд постор. • Ддд постор. • Ддд постор. • Ддд постор. • Ддд постор. • Ддд постор. • Ддд постор. • Ддд постор. • Ддд постор. • Ддд по_STANDBY. • Великий восток у составлеше Вideokамеру пrimерно на 1 ча ддд постор. • Ддд постор. • Ддд постор. • Ддд постор. • Ддд постор. • Ддд постор. • Ддд постор. • Ддд постор. • Ддд постOR. • Ддд постOR. • Ддд постOR. • Ддд постOR. • Ддд постOR. • Ддд постOR. • Ддд постOR. • Ддд постOR. • Ддд постOR. • Ддд постOR. • Ддд постOR. • Ддд постOR. • Ддд постOR. • Дdд постOR. • Дdд постOR. • Дdд постOR. • Дdд постOR. • Дdд постOR. • Дdд постOR. • Дdд постOR. • Дdд постOR. • Дdд постOR. • Дdд постOR. • Дdд постOR. • Дdд постOR. • Дdд постORA. • Дdд постOR. • Дdд постOR. • Дdд постOR. • Дdд постOR. • Дdд постOR. • Дdд постOR. • Дdд постOR. • Дdд постOR. • Дdд постOR. • Дdд постOR. • Дdд постOR. • Дdд постOR. • Ддд постOR. • Дdд постOR. • Дdд постOR. • Дdд постOR. • Дdд постOR. • Дdд постOR. • Дdд постOR. • Дdд постOR. • Дdд постOR. • Дdд постOR. • Дdд постOR. • Дdд постORA. • Дdд постORA. • Дdд постORA. • Дdд постORA. • Дdд постORA. • Дdд постORA. • Дdд постORA. • Дdд постORA. • Дdд постORA. • Дdд постORA. • Дdд постORA. • Дdд постORA. • Дdд постORA. • Ддд постORA. • Дdд постORA. • Дdд постORA. • Дdд постORA. • Дdд постORA. • Дdд постORA. • Дdд постORA. • Дdд постORA. • Дdд постORA. • Дdд постORA. • Дdд постORA. • Дdд постORA. • Дdд постURA. • Дdд постURA. • Дdд постURA. • Дdд постURA. • Дdд постURA. • Дdд постURA. • Дdд постURA. • Дdд постURA. • Дdд постURA. • Дdд постURA. • Дdд постURA. • Дdд постURA. • Дdд постURA. • Ддд постURA. • Дdд постURA. • Дdд постURA. • Дdд постURA. • Дdд постURA. • Дdд постURA. • Дdд постURA. • Дdд постURA. • Дdд постURA. • Дdд постURA. • Дdд постURA. • Дdд постURA. • Дdд постWA. • Дdд постWA. • Дdд постWA. • Дdд постWA. • Дdд постWA. • Дdд постWA. • Дdд постWA. • Дdд постWA. • Дdд постWA. • Дdд постWA. • Дdд постWA. • Дdд постWA. • Дdд постWA. • Ддд постWA. • Дdд постWA. • Дdд постWA. • Дdд постWA. • Дdд постWA. • Дdд постWA. • Дdд постWA. • Дdд постWA. • Дdд постWA. • Дdд постWA. • Дdд постWA. • Дdд постWA. • Дdд постURA. • Дdд постURA. • Дdд постURA. • Дdд постURA. • Дdд постURA. • Дdд постURA. • Дdд постURA. • Дdд постURA. • Дdд постURA. • Дdд постURA. • Дdд постURA. • Дdд постURA. • Дспсг. • Дспсг. • Дспсг. • Дспсг. • Дспсг. • Дспсг. • Дспсг. • Дспсг. • Дспсг. • Дспсг. • Дспсг. • Дспсг. • Дспсг. • Дспсг. • Дспсг. * 空洞性死人。 * 死人。 * 死人。 * 死人。 * 死人。 * 死人。 * 死人。 * 死人。 * 死人。 * 死人。 * 死人。 * 死人。 * 死人。 * 死人。 * 死人。 * 死人。 * 死人。 * 死人。 * 死人。 * 死人。 * 死人。 * 正人。 * 正人。 * 正人。 * 正人。 * 正人。 * 正人。 * 正人。 * 正人。 * 正人。 * 正人。 * 正人。 * 正人。 * 正人。 * 正人。 * 正人。 * 正人。 * 正人。 * 正人。 * 正人。 * 正人。 * 歟化 * 正化 * 正化 * 正化 * 正化 * 正化 * 正化 * 正化 * 正化 * 正化 * 正化 * 正化 * 正化 * 正化 * 正化 * 正化 * 正化 * 正化 * 正化 * 正化 * 正化 * 歌曲 * 歌曲 * 歌曲 * 歌曲 * 歌曲 * 歌曲 * 歌曲 * 歌曲 * 歌曲 * 歌曲 * 歌曲 * 歌曲 * 歌曲 * 歌曲 * 歌曲 * 歌曲 * 歌曲 * 歌曲 * 歌曲 * 歌曲 * 歌谱 * 歌谱 * 歌谱 * 歌谱 * 歌谱 * 歌谱 * 歌谱 * 歌谱 * 歌谱 * 歌谱 * 歌谱 * 歌谱 * 歌谱 * 歌谱 * 歌谱 * 歌谱 * 歌谱 * 歌谱 * 歌谱 * 歌谱 * 歌譜 * 歌谱 * 歌谱 * 歌谱 * 歌谱 * 歌谱 * 歌谱 * 歌谱 * 歌谱 * 歌谱 * 歌谱 * 歌谱 * 歌谱 * 歌谱 * 歌谱 * 歌谱 * 歌谱 * 歌谱 * 歌谱 * 歌谱 * 歌 * 歌谱 * 歌谱 * 歌谱 * 歌谱 * 歌谱 * 歌谱 * 歌谱 * 歌谱 * 歌谱 * 歌谱 * 歌谱 * 歌谱 * 歌谱 * 歌谱 * 歌谱 * 歌谱 * 歌谱 * 歌谱 * 歌谱 * 歌调 * 歌调 * 歌调 * 歌调 * 歌调 * 歌调 * 歌调 * 歌调 * 歌调 * 歌调 * 歌调 * 歌调 * 歌调 * 歌调 * 歌调 * 歌调 * 歌调 * 歌调 * 歌调 * 歌调 * 歌谱 * 歌谱 * 歌谱 * 歌谱 * 歌谱 * 歌谱 * 歌谱 * 歌谱 * 歌谱 * 歌谱 * 歌谱 * 歌谱 * 歌谱 * 歌谱 * 歌谱 * 歌谱 * 歌谱 * 歌谱 * 歌谱 * 歌道 * 歌谱 * 歌谱 * 歌谱 * 歌谱 * 歌谱 * 歌谱 * 歌谱 * 歌谱 * 歌谱 * 歌谱 * 歌谱 * 歌谱 * 歌谱 * 歌谱 * 歌谱 * 歌谱 * 歌谱 * 歌谱 * 歌谱 * 歌谐 * 歌谱 * 歌谱 * 歌谱 * 歌谱 * 歌谱 * 歌谱 * 歌谱 * 歌谱 * 歌谱 * 歌谱 * 歌谱 * 歌谱 * 歌谱 * 歌谱 * 歌谱 * 歌谱 * 歌谱 * 歌谱 * 歌谱 * 歌源 * 歌源 * 歌源 * 歌源 * 歌源 * 歌源 * 歌源 * 歌源 * 歌源 * 歌源 * 歌源 * 歌源 * 歌源 * 歌源 * 歌源 * 歌源 * 歌源 * 歌源 * 歌源 * 歌源 * 歌派 * 歌派 * 歌派 * 歌派 * 歌派 * 歌派 * 歌派 * 歌派 * 歌派 * 歌派 * 歌派 * 歌派 * 歌派 * 歌派 * 歌派 * 歌派 * 歌派 * 歌派 * 歌派 * 歌派 * 歌源 * 歌源 * 歌源 * 歌源 * 歌源 * 歌源 * 歌源 * 歌源 * 歌源 * 歌源 * 歌源 * 歌源 * 歌源 * 歌源 * 歌源 * 歌源 * 歌源 * 歌源 * 歌源 * 歌 * 歌 * 歌 * 歌 * 歌 * 歌 * 歌 * 歌 * 歌 * 歌 * 歌 * 歌 * 歌 * 歌 * 歌 * 歌 * 歌 * 歌 * 歌 * 歌 * 歌 * 歌 * 歌 * 歌 * 歌 * 武 * 武 * 武 * 武 * 武 * 武 * 武 * 武 * 武 * 武 * 武 * 武 * 武 * 武 * 武 * 武 * 武 * 武 * 武 * 武 * 武 * 武 * 武 * 武 * 武 * 此 * 此 * 此 * 此 * 此 * 此 * 此 * 此 * 此 * 此 * 此 * 此 * 此 * 此 * 此 * 此 * 此 * 此 * 此 * 此 * 此 * 此 * 此 * 此 * 此 * 武 * 武 * 武 * 武 * 武 * 武 * 武 * 武 * 武 * 武 * 武 * 武 * 武 * 武 * 武 * 武 * 武 * 武 * 武 * 武 * 武 * 武 * 武 * 武 * 死 * 死 * 死 * 死 * 死 * 死 * 死 * 死 * 死 * 死 * 死 * 死 * 死 * 死 * 死 * 死 * 死 * 死 * 死 * 死 * 死 * 死 * 死 * 死 * 死 * 歯 * 歿 * 歿 * 歿 * 歿 * 歿 * 歿 * 歿 * 歿 * 歿 * 歿 * 歿 * 歿 * 歿 * 歿 * 歿 * 歿 * 歿 * 歿 * 歿 * 歿 * 歿 * 歿 * 歿 * 歿 * 歿 * 歵 * 歵 * 歵 * 歵 * 歵 * 歵 * 歵 * 歵 * 歵 * 歵 * 歵 * 歵 * 歵 * 歵 * 歵 * 歵 * 歵 * 歵 * 歵 * 歵 * 歵 * 歵 * 歵 * 歵 * 歵 * 歿 * 歿 * 歿 * 歿 * 歿 * 歿 * 歿 * 歿 * 歿 * 歿 * 歿 * 歿 * 歿 * 歿 * 歿 * 歿 * 歿 * 歿 * 歿 * 歿 * 歿 * 歿 * 歿 * 歿 * 歱 * 歱 * 歱 * 歱 * 歱 * 歱 * 歱 * 歱 * 歱 * 歱 * 歱 * 歱 * 歱 * 歱 * 歱 * 歱 * 歱 * 歱 * 歱 * 歱 * 歱 * 歱 * 歱 * 歱 * 歱 * 歵 * 歵 * 歵 * 歵 * 歵 * 歵 * 歵 * 歵 * 歵 * 歵 * 歵 * 歵 * 歵 * 歵 * 歵 * 歵 * 歵 * 歵 * 歵 * 歵 * 歵 * 歵 * 歵 * 歵 * 歱 * 歱 * 歱 * 歱 * 歱 * 歱 * 歱 * 歱 * 歱 * 歱 * 歱 * 歱 * 歱 * 歱 * 歱 * 歱 * 歱 * 歱 * 歱 * 歱 * 歱 * 歱 * 歱 * 歱 * 歼 * 歼 * 歼 * 歼 * 歼 * 歼 * 歼 * 歼 * 歼 * 歼 * 歼 * 歼 * 歼 * 歼 * 歼 * 歼 * 歼 * 歼 * 歼 * 歼 * 歼 * 歼 * 歼 * 歼 * 歼 * 死 * 死 * 死 * 死 * 死 * 死 * 死 * 死 * 死 * 死 * 死 * 死 * 死 * 死 * 死 * 死 * 死 * 死 * 死 * 死 * 死 * 死 * 死 * 死 * 歿 * 歿 * 歿 * 歿 * 歿 * 歿 * 歿 * 歿 * 歿 * 歿 * 歿 * 歿 * 歿 * 歿 * 歿 * 歿 * 歿 * 歿 * 歿 * 歿 * 歿 * 歿 * 歿 * 歿 * 死 * 死 * 死 * 死 * 死 * 死 * 死 * 死 * 死 * 死 * 死 * 死 * 死 * 死 * 死 * 死 * 死 * 死 * 死 * 死 * 死 * 死 * 死 * 死 * 正 * 正 * 正 * 正 * 正 * 正 * 正 * 正 * 正 * 正 * 正 * 正 * 正 * 正 * 正 * 正 * 正 * 正 * 正 * 正 * 正 * 正 * 正 * 正 * 正 * 死 * 死 * 死 * 死 * 死 * 死 * 死 * 死 * 死 * 死 * 死 * 死 * 死 * 死 * 死 * 死 * 死 * 死 * 死 * 死 * 死 * 死 * 死 * 死 * 歪 * 歪 * 歪 * 歪 * 歪 * 歪 * 歪 * 歪 * 歪 * 歪 * 歪 * 歪 * 歪 * 歪 * 歪 * 歪 * 歪 * 歪 * 歪 * 歪 * 歪 * 歪 * 歪 * 歪 * 歪 * 歯 * 歯 * 歯 * 歯 * 歯 * 歯 * 歯 * 歯 * 歯 * 歯 * 歯 * 歯 * 歯 * 歯 * 歯 * 歯 * 歯 * 歯 * 歯 * 歯 * 歯 * 歯 * 歯 * 歯 * 歯 * 死 * 死 * 死 * 死 * 死 * 死 * 死 * 死 * 死 * 死 * 死 * 死 * 死 * 死 * 死 * 死 * 死 * 死 * 死 * 死 * 死 * 死 * 死 * 死 * 歬 * 歯 * 歯 * 歯 * 歯 * 歯 * 歯 * 歯 * 歯 * 歯 * 歯 * 歯 * 歯 * 歯 * 歯 * 歯 * 歯 * 歯 * 歯 * 歯 * 歯 * 歯 * 歯 * 歯 * 歯 * 歑 * 歯 * 歯 * 歯 * 歯 * 歯 * 歯 * 歯 * 歯 * 歯 * 歯 * 歯 * 歯 * 歯 * 歯 * 歯 * 歯 * 歯 * 歯 * 歯 * 歯 * 歯 * 歯 * 歯 * 歯 * 歭 - - - - - - - - - - - - - - - - - - - - - - - - - - - - - - - - - - - - - - - - - - - - - - - - - - - - - - - - - - - - - - - - - - - - - - - - - - - - - - - - - - - - - - - - - - - - - - - - - - - - - - • 育 • 育 • 育 • 育 • 育 • 育 • 育 • 育 • 育 • 育 • 育 • 育 • 育 • 育 • 育 • 育 • 育 • 育 • 育 • 育 • 育 |
| Возможнай рprочина | Вероград пprочина и/элmeю устраенья |
| В вдоиске лес OTобрахаетсу пебьчhoe Изобрахешиe. | •Еся поjet det 10 минут посne того, касы устовили пегеклочатуРower B поожене CAMERA ил Команду DEMO MODE устовили B поожене ON b установкax мени 6е 3B Вставленьи Касецы, Ваш Видевамера abTomатиески наочet demонстрацию. →Вставыte kассу, и димонстрация остановitsс. Бы тakже можete оtmehintь рechим DEMO MODE. (стр.57) |
| Изobрахение залесыветсу с нелразильные и небаTypальныецBetами. | •Команда NIGHTSHOT в поожене ON. →УстановITE ee B поожене OFF. (стр.24) |
| Изobрахение поочаетсу сл山水kom ярим, a объekt не постов�етсу b Вддосckateшиe. | •Команда NIGHTSHOT в поожене ON в ярков мостe. →УстановITE ee B поожене OFF ил IncплььштЕ функцию hochий сбемки в Т EMHOM мостe. (стр.24) |
BpeKIme BocnpOn3BeJeHnA
JIITHeBae 6aTaPeIka pa3paIJIacb Hn He yCTaHOBNeHa COBCem (Ctp.6
JIeNEcTOK 3aunTbI 3aINcN Ha KaccTe OTCyTCTByET (KpaChbI) (CTp.18).*
Быст Poe маганe:
-Пюизошлкондсаць ваги (ст. 75).
- JeHTa 3aKoHUnJaCb (cTp. 18, 29).
Cpa6oTaIaФyHKUINHДИKauuIN CaMOДиAΓHOCTUNKIN (cTp.72).
Ppeynpekdaioune coo6eHnA
CLOCK SET IpeyeuctaHOBuTe DaTy u BpeMa (cTp. 58).
- For "InfoLITHIUM" IcnoJIb3yIte 6aTapeIHyIbI 6LoK "InfoLITHIUM" (ctp. 16). BATTERY ONLY
CLEANING CASSETTE BnEOrOJOBKn 3aRpa3HeHbI (ctp.76).
- START/STOP KEY Haxmnte KhoNky START/STOP ДЯп риВeДень В ДяСТВе yCTaHOBKn ORC. 3To coO6UeHne OTObpaXaETcHa ДИсПЛee 6eIbIM UBeTOM (CTp. 56).
- ORC Φункциониует установka ORC. это сообшени отображаетсни диспeeбелыIMцBetOM (cTp. 56).
Using your camcorder abroad
Using your camcorder abroad
You can use your camcorder in any country or area with the AC power adaptor supplied with your camcorder within 100V to 240V AC, 50 / 60Hz .
Your camcorder is a PAL system based camcorder. If you want to view the playback picture on a TV, it must be a PAL system based TV with VIDEO/AUDIO input jack. The following shows TV colour systems used overseas.
PAL system
Australia, Austria, Belgium, China, Czech Republic, Denmark, Finland, Germany, Great Britain, Holland, Hong Kong, Italy, Kuwait, Malaysia, New Zealand, Norway, Portugal, Singapore, Slovak Republic, Spain, Sweden, Switzerland, Thailand, etc.
PAL-M system
Brazil
PAL-N system
Argentina, Paraguay, Uruguay
NTSC system
Bahama Islands, Bolivia, Canada, Central America, Chile, Colombia, Ecuador, Jamaica, Japan, Korea, Mexico, Peru, Surinam, Taiwan, the Philippines, the U.S.A., Venezuela, etc.
SECAM system
Bulgaria, France, Guyana, Hungary, Iran, Iraq, Monaco, Poland, Russia, Ukraine, etc.
Simple setting of clock by time difference
You can easily set the clock to the local time by setting a time difference. Select WORLD TIME in the menu settings. See page 53 for more information.
IcnoJb3OBaHne BaSei BnDeOkaMepbl 3a rpaHncei
IcnojIb3OBAHne BaSei BnDeOKaMepbl 3a rpaHncei
BbMOKeTe nCnOJIb3OBAb TaUy BnDEOKaMepy B IIO6oI CTpaHne IIN ObIacTn C NOMOuHO cTeBOrO aAnTepe nepemehHoro ToKa, npInlaeraMoro K BaWei BnDEOKaMepe, KOtOpbl MoXHO nCnOJIb3OBAb Tb NpeJenax OT 100 B Do 240 B nepemehHoro ToKa c YacToToi 50/60 Tc.
BaWbBnDeOkamepa OCHOBaHa Ha CnCTeMe PAL. EcN BbXOTNTe NpOCMOTpeTB BocPOn3BOIDMOE N3O6paXeHne Ha TeNEBn3OpE,TO 3TO DOLJKeH 6bIT TeLEBn3Op, OCHOBaHNbHa CnCTeMe PAL,C BXoDhIMn rHe3dAMn VIDEO/AUDIO. HnKe npINBeDEHb CnCTeMbI CBEtHoro TNeBnDEHn,NCNOB3yEmbIe 3a py6exOM.
Cnctema PAL
Abctpann,AbctpnBebn, BeNko6pntanH,FepMaHn,TolnaHn, TOnKoH,DaHn,UcnaHn,VtaHn,KnTaI, KyBeiT,Mana3nH,HOBa 3eHaHn, HopBerHn,PoptyraHn,CInrAnyp,CNoBaucka PecnybniKa,TaNanD,ΦHHnDn,YeSzcka PecnybniKa,WBeuapn,WBeunT.
CnCTema PAL-M
Бразния
Cnctema PAL-N
Aprentina, Naparbai, Upyrbai
CnCTema NTSC
Baramckne octpoBa, BoJnBn, BeHecy3na, KaHaJa, Konym6n, Kopa, MekCnka, Nepy, CypnAm, CUSA, TaBaNb, FInnnPiNbI, LcHTpaBHaA MepnKa, YnI, 3KbaOp, RaMaKa, JnoHnI n T.I.
CucTema SECAM
Bolrnap, BeHrpna, TbnaHa, IpaK, IpaH, Mohako, Poblsha, PocnHa, YkpanHa, Phaunu N T.D.
Пюстая устаяновka pa3нць BOВремен Ha уacax
BbMOxTeJeKo yCTaHOBnTb Yacbl Ha MeCTHoe BpemIyTEM yCTaHOBKn pa3HnCbI BO BpeMeHn. Bb6epnte KOMaHdy WORLD TIME b yCTaHOBkax MeHIO. PoJpO6HbIe CBeDeHn npuBeHebl Na cTp. 57.
Maintenance information and precautions
Moisture condensation
If your camcorder is brought directly from a cold place to a warm place, moisture may condense inside your camcorder, on the surface of the tape, or on the lens. In this condition, the tape may stick to the head drum and be damaged or your camcorder may not operate correctly. If there is moisture inside your camcorder, the beep sounds and the indicator flashes. When the indicator flashes at the same time, the cassette is inserted in your camcorder. If moisture condenses on the lens, the indicator will not appear.
If moisture condensation occurred
None of the functions except cassette ejection will work. Eject the cassette, turn off your camcorder, and leave it for about 1 hour with the cassette compartment open. Your camcorder can be used again if the indicator does not appear when the power is turned on again.
Note on moisture condensation
Moisture may condense when you bring your camcorder from a cold place into a warm place (or vice versa) or when you use your camcorder in a hot place as follows:
- You bring your camcorder from a ski slope into a place warmed up by a heating device
- You bring your camcorder from an air-conditioned car or room into a hot place outside
- You use your camcorder after a squall or a shower
- You use your camcorder in a high temperature and humidity place
How to prevent moisture condensation
When you bring your camcorder from a cold place into a warm place, put your camcorder in a plastic bag and tightly seal it. Remove the bag when the air temperature inside the plastic bag has reached the surrounding temperature (after about 1 hour).
Hn Onda H3 cyHKcH, KpOme BbITaIKBaHnKacCtBt, He 6yDyT pa6oTaB. N3BNeKeNtekacCteY, BbIKJIOUHTe BNDeOKaMEpy N OCTaBBTe ee np6JIIN3IeNbHO Ha 1 Yac C OTkpblIMOTCEkOM DnI KACCTbI. EcI IN pI ni NOBTOPHBMKJIIOUHeHHNTaHn INdIKaTOP He NOABNTCAHa DnCIIpe, Bbl MoXeTe CHOba NOnb3OBaTbcRBNDeOKaMepoi.
Ppimcayne no KOHdeHcaun Bnarn
Bnara moKET o6pa3oBaTbC, ecIn Bbl npHecTe BaUy BnDeokamepy n3 xOIoNHO MeCTa B TEnIoe (nnn Hao6OpOT) nn KOrJa Bbl nCNoIb3yTe BaUy BnDeokamepy B JkapKom MeCTe B cIeNyUoXn CnyuAx:
BbI npHeCn BAsy BuTeOkamepy C JbIXHOrO cKIOHa B NOMEeHne, rIe FyHKUoHpyet 06OrpeBaTeIb
BbI npHecn BAsy BuJeokamepy n3 abTOMo6nJI uINu IN3 KOMHaTbIC BO3dyHbIM KOHNIOHINPOBaHmE B JxapKoe MeTo Ha yNlue
BbI nCpOJIb3yeTe BnDeoKamepy nocne rpo3blnndoxnd
- Bby nCnoJIb3yTe BaUy BnIeOkaMepy B OueHb Kapkom IN BnaJxHOM MecTe.
Kak npedotbpaTb KOHdEHCauHb Blan EcInn BnDeOKaMepa npinHeceHa n3 xOJNOHoro MeCTa BTeJIIOe,TO nOLOXHTe BnDEOKaMepy B nOIN3TNJeHOBb NAKETIPOLTHO 3aKLeIeero. BbInbTe BnDEOKaMepy n3 nONIN3TNJeHOBO r naKeTa, KOrJa TEMpePaTypa BO3Dyxa BHyTpnaKeTa DOCTNRHET TMNEpApTybl OkpykaHoUeRo BO3Dyxa (Pn6bn3NtJIbHo uepe3 1 vac).
Maintenance information
Cleaning the video head
To ensure normal recording and clear pictures, clean the video heads. The video head may be dirty when:
- The × indicator and "CLEANING
CASSETTE" message appear one after another or the × indicator flashes in the viewfinder. - Playback pictures contain noise.
- Playback pictures are hardly visible.
- Playback pictures do not appear.
If this happens, clean the video heads with the Sony V8-25CLD cleaning cassette (not supplied).
HnΦopMaunno yxody 3a annapatom
UcTka BundeorOLOBOK
ДяобспесеняHopmaльноЗаичteTKOrO n3o6paKeHnCneIyET nepIOdNuecknUcHTb BnDeorOroBKn. BnDeorOroBKnBO3MOxHO 3aRpa3HeHbl,ecJIN:
B BnDOnCKaTeIe NoRbLHOTc OdINH 3a DpyrIM INdNkATOp X n COo6UeHne “CLEANING CASSETTE" INJ Xe MIRat INdNkATOp X.
BOCPON3BOIDMOE IN3O6paXeHne COJepKNT NOMEXN.
BOCPON3BOIDMOE N3O6paJKeHne C Tpydop pa3NIuHMo.
- BOCPON3BOIDMOE N3O6paXeHne He NOBnRETCa Ha 3KpaHe.
EcnI 3To npOn3OuIIO, noUcNtTe BnDeoRoiBKn C nOMOJIbO OUnCTnTeJbHO KAcCeTbI Sony V8-25CLD (He npInararaetc).

[a]


[b]
[a] Slightly dirty
[b] Very dirty
Note on video heads
When the playback pictures are still contain noise even if you have cleaned the video heads with a cleaning cassette, the video heads may have worn down due to long use. If this is the case, they must be replaced with new heads. Contact your Sony dealer or local authorized Sony service facility.
[a] Cnierka 3arpa3HeHbI
[b] OueHb 3aŋp3HeHbI
PpmeHne no BndeorOJOBkam
EcIn BOCnPOn3BODnMoE n3O6paJxHne BCE eue
coDePcxNt NOMexn daXe nocNe TORo, KaK Bbl
OuNCNTIIN BVNEOEROBKn C NMOOcIbO
OuNCTIeNBHO KACCEtbl,TO,B03MOXHO,
BVNEOEROBKn yXe n3HOCINCb BCJeCDTBe
dJIteNBHO 3KcNpyataunn BVNEOKaMepbl.
3TOM cLnyae, IN cLeDyET zAmEtNb Ha HOBble.
O6paTnTeCb B cepBnchbl ueHTp Sony nnn B
MeCTHoe yNOJHnOMooHHe ne ppeJpnrTne no
06cLyXnBaHNIO n3deJnln Sony.
Removing dust from inside the viewfinder
(1) Remove the screw with a screwdriver (not supplied). Then, while holding the RELEASE knob up, turn the eyecup in a counterclockwise direction and pull it out.
(2) Clean the surface with a commercially available blower for a still camera.
(3) Turn the eyecup in a clockwise direction, then replace the screw.
YdaJIeHHe nbIIn n3HyTpN BnOncKaTeJIa
(1) 1OTBnHTNTe BnHT C NMOUbO OTBepTKn (He npJIraeTc). 23aTem, DepeKa haxkatoi KhoNky RELEASE, 3NoBepHnte OKyIap B HApBaJIeHm IpOTNb YacBOu CTpeKNI NOTAHnTe erO.
(2)Почистпг Роверхноctь сnomошь BO3dуходвкINДЯ ФOTOанnapaTOB, KOTOPAngno6peTaETCOnTDEJIbHO.
(3)ПовернITE okулар в Наразвileни потухасов CTpeKENI 3aBHTNTe BnHT o6paTHO Ha MeCTO.
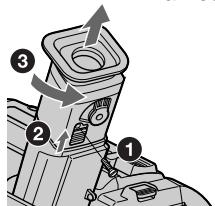
Caution
Do not remove any other screws. You may remove only the screw to remove the eyecup.
Precautions
Camcorder operation
- Operate your camcorder on 7.2V (battery pack) or 8.4V (AC power adaptor).
- For DC or AC operation, use the accessories recommended in this operating instructions.
- If any solid object or liquid get inside the casing, unplug your camcorder and have it checked by a Sony dealer before operating it any further.
- Avoid rough handling or mechanical shock. Be particularly careful of the lens.
- Keep the POWER switch set to OFF (CHARGE) when you are not using your camcorder.
- Do not wrap your camcorder with a towel, for example, and operate it. Doing so might cause heat to build up inside.
- Keep your camcorder away from strong magnetic fields or mechanical vibration.
BhimaHne
He OTBnHnuBaIe Dpyrne BnHTbI. Bbl MoKTe OTBnHnuBaTb TOJbKO BnHT dJIa CHrTna OKyIpa.
MepblnpedocTopoXHoctn
3KcnnyatazaBnDeokamepbI
3KcnpnyatnpyTe Bndeokamepy ot 7,2B (6aTaapeHbI b6nO) nIN 8,4 B (ceTeBOJ aDanTep nepemehHoro TOKa)
-чTo kacaetc3KcPnIyatauIMn BnDeOkaMepbI OT nocToaHHoro N IpeMeHHO TOKa, nCNoJIb3yIe PtnaIaJIeXHoCTN, peKOMeHNDyEmBIE B DaHHo INHCTpyKcIMn PO 3KcPnIyatauIM.
- Ecni KaKoi-Ni6yDb TBeRbI npEMeT nnJn KNDKoCTb NOnaJI BHyTpB KOpNycA, TO BbIKJIOUHTe BnDEOKaMEpy I npOBepbTe ee y dInIepa Sony nepe DaJIbNeHwe ee 3KcNpyaTaunie.
-Избегаитгрубогообразшенивдпебокамерил'mм мexанческх ударов.Будт ecobенocotopoxнblc obkektimbom.
- EcIn BnDeokamepa He nCnNoB3yeTcR, depKInTe BbIKNoUaTeIb POWER B noIOxehnn OFF (CHARGE).
- He 3abopauBaIte BaUy BnDeokamepy, Hanpimep, B noloteHne, n He 3KcNlyaTnpuyTe ee B TAKOM COCTOHN. B npOTNBOM Cnyae MOKeT npOn30Tu NOBbIeHne Tempeatypbl BHyTpNI BnDeOKaMepbl.
-ДерхитЕВашуВидаеКамерупадышоТ CильнБИХМагНИТьIXПОЕИМEXаHнчecков ВибрациN.
Maintenance information and precautions
On handling tapes
Do not insert anything into the small holes on the rear of the cassette. These holes are used to sense the type and thickness of the tape and if the recording tab is in or out.
Camcorder care
- When your camcorder is not to be used for a long time, remove the battery.
- Remove the tape, and periodically turn on the power, operate the CAMERA and PLAYER sections and play back a tape for about 5 minutes when your camcorder is not to be used for a long time.
- Clean the lens with a soft brush to remove dust. If there are fingerprints on the lens, remove them with a soft cloth.
- Clean the camcorder body with a dry soft cloth, or a soft cloth lightly moistened with a mild detergent solution. Do not use any type of solvent which may damage the finish.
- Do not let sand get into your camcorder. When you use your camcorder on a sandy beach or in a dusty place, protect it from the sand or dust. Sand or dust may cause your camcorder to malfunction, and sometimes this malfunction cannot be repaired.
AC power adaptor
- Unplug the unit from the mains when you are not using the unit for a long time. To disconnect the mains lead, pull it out by the plug. Never pull the mains lead itself.
- Do not operate the unit with a damaged cord or if the unit has been dropped or damaged.
- Do not bend the mains lead forcibly, or place a heavy object on it. This will damage the cord and may cause fire or electrical shock.
- Prevent metallic objects from coming into contact with the metal parts of the connecting section. If this happens, a short may occur and the unit may be damaged.
- Always keep metal contacts clean.
- Do not disassemble the unit.
- Do not apply mechanical shock or drop the unit.
HnΦopMaζη no yxOу 3a annapaTom mepbl npdeoctopoXHOCTN
OTHOCHTeJIbHO 6oBaueHnC JIeHTaMn
He BCTaBnIte HnUero B MaJIeHbKne OTBepCTnHa 3aIaHcSTOpOHe KAcCtbl. 3TN OTBepCTnNcTlNb3yOTcIa ONpeJeHnra TnPa NToIuHbI JeHtbl, a TaKxE INa ONpeJeHnHaJIuHnI INI OTCytCTBn JIeNecTka 3aunItbl 3aIncn HaJeHTe.
YxOД 3a BnDeOKamepoI
- Ecni BaWa BnDeOkamepa He 6yTeT IcNoIb3OBAtBcR B TeYeHne IInIeJIbHOr OepnoJa BpeMeHN, BbIHbTe 6aTapeHbHb 6IoK.
- BbHbTe kaccety n nepnoDnueckn BKJIOuayte nIITaHne, Oepnpuyte yctpoiCTBaMn CAMERA nPLAYER uBocponu3BOIDTe neHTy npraJa 5-x MHyT, KOrda BnDeOKaMepa He NCNoNb3yeTcA DnTeNbHoe BPema.
- UCTNE OBeKTHB C NOMOUBMOI KIKTOKN DnY ydaJIeHNAblIN. EcIn IMeOTCAOTNeAATKN nALbueH Ha OBeKTHBE, TO YdaJIte INC NOMOUBMOI KIKO TKAHN.
- UcTeKopNc BuDeOKaMepbI C NOMOJIbO cyXoM MArKoT KAnHn UIu MArKoT KAnH, cIeKa CMOueHHo pactBOPom yMepeHHoro MOUoJero cpeDCTBa. He IcNoJIb3yIte KaKnxIJI6O TINOB pactBOpHTeNei, KOtOpIbe MOrTy NOBpeDNTb OTdJIky.
- He donyckaTe nopaDaHnna necka B vBneOkaMepy. Ecln Bblncnol3yeTe Bndeokamepy Ha necyaHom pIaKe nIuB KAKOM-NbIoNbIbHOM MeCTe, IppeoXpaHnTe aannapat OT necka NpIbN. PecOK nIbMbORyt npIBeCTn K HEnCnpabHOCTn annapaTa, KOtOpaa HOrda MoKet 6bITb HEnCnpaBIMoJ.
Maintenance information and precautions
- While the unit is in use, particularly during charging, keep it away from AM receivers and video equipment. AM receivers and video equipment disturb AM reception and video operation.
- The unit becomes warm during use. This is not a malfunction.
- Do not place the unit in locations that are: - Extremely hot or cold
- Dusty or dirty
- Very humid
Vibrating
Battery pack
- Use only the specified charger or video equipment with the charging function.
- To prevent accident from a short circuit, do not allow metal objects to come into contact with the battery terminals.
- Keep the battery pack away from fire.
- Never expose the battery pack to temperatures above 60^ (140^) , such as in a car parked in the sun or under direct sunlight.
- Keep the battery pack dry.
- Do not expose the battery pack to any mechanical shock.
- Do not disassemble nor modify the battery pack.
- Attach the battery pack to the video equipment securely.
- Charging while some capacity remains does not affect the original battery capacity.
If any problem occurs, unplug your camcorder and contact your nearest Sony dealer.
HΦopMaunno yxOy 3a annapaTom m Mepbl npdeoctopoxkHOCTn
-Пи ИСПОЛБЗВОАнИ AnnapaТа,OCOБЕНо BO BpeM 3apIДКи,ДерЖNTe erO noДальшe OT npHemMHKOB AM-paDNOBeUAnHЯ n BnDEoANpapaTpybl.ПиHemMHKn AMpaDNOBeUAnHЯ n BnDEoANpapaTpya HapyuSAIOr AM-paDNOpnEМ pa60Tu BnDEoANpapaTpybl.
B npouecce 3kcnnyataun annapat HarppeBaetc. 3TO Rbnaertc BnolHe HOpMaIbHbIM.
- He pa3meaaine annapaT B mectax:
- Ype3mepHo JxapKnx IIN XOLONbIX
-ПьлбнБИХ ИИnpгЯЗ3нБИX
-OuehbBnaXhbIX
-ПоДВержЕнhhBи Вибраци
BatapeHbI 6Jok
- IcnoIb3yIe ToIbKO yKa3aHHbIe yCTpoIcTBO 3apIckn IIIN BnDeoannapaTypy cФyHKIuei 3apIckn.
-ДлгпрдOTВрашенн HeCuaTHorO cnyuHn3-3a KOpOTKOrO 3aMbIkaHn He IOnyckaIteKOHTaKtA MeTaJIInueCKNX PpeMTeOB CnoJIocAMn 6bataeHoro 6Joka.
XpaHnte 6atapeHbI 6lOK nOdaJIbSe oT orHa. - HnKOrJa He nOdBepraIe 6aTapeHbI 6JOk BO3DeIcTBnIO TempeaTyp BbIe 60°C, HAnpIMep, He oCTaBJIrTe 6aTapeHbI 6JOk B npInapKOBaHHOM aBTOMoBnIe IOD cOJIHcEM INIIN PnRbIM COJIHeuHbIM CBETOM.
-XpaHnte 6aTapeHbI 6JOK B CyXOM BnDe. - He noДberpaIte 6aTapeHbI 6Iok MexAHnuecknM yIapam.
- He pa3bnpaIte n He nepeJeIbIbaiTe 6bataeHbIbIOK.
-ПодсоeДинай Te 6aTapeHbI 6LoK K BndeoannapaType nIoTHO. - 3apnHaHnUHmOCTaBWecE MKOCTn He BnIeT Ha nepBOHaJaHbHyO EMKoCTb 6aTapeHOrO 6loka.
B clyaee Bo3HKnHOBeHn KaKnx-JI6o Ipo6Jem, OTKIOUHTe Bauy BInDeOKaMepy OT NCTOCHNk nITaHnI o6paTntEcB B 6LnXaIIuI cepBnChbl ueHtp Sony.
Video camera recorder
System
Video recording system
2 rotary heads
Helical scanning FM system
Audio recording system
Rotary heads, FM system
Video signal
PAL colour, CCIR standards
Usable cassette
8 mm video format cassette
Standard 8
Recording/playback time (using cassette P5-90)
SP mode: 1 hour and 30 minutes
LP mode: 3 hours
Fastforward/rewind time (using cassette P5-90)
Approx. 5 min.
Viewfinder
Electric viewfinder (monochrome)
Image device
1/6 inch CCD (Charge Coupled
Device)
Approx. 320,000 pixels
(Effective: Approx. 290,000 pixels)
Lens
Combined power zoom lens
Filter diameter 37mm (17/16 in.)
20× (Optical), 200× (Digital)
Focal length
3.6 - 72 mm (5/32 - 2 7/8 in.)
When converted to a 35mm still camera
51.8 - 1036 mm (2 - 40 6/8 in.)
Colour temperature
Auto
Minimum illumination
1 lux (F 1.4)
0 lux (in the NightShot mode)*
- Objects unable to be seen due to the dark can be shot with infrared lighting.
Input/output connectors
Video output
Phono jack, 1 Vp-p, 75 ohms
unbalanced
Audio output
Monaural, phone jack, 327mV
RFU DC OUT
Special minijack, DC 5V
LANC control jack
Stereo mini-minijack ( 2.5mm)
MIC jack
Monaural minijack ( 3.5mm)
General
Power requirements
7.2 V (battery pack)
8.4 V (AC power adaptor)
Average power consumption
(when using the battery pack)
During camera recording 2.3 W
Operating temperature
0^ to 40^ (32^ to 104^)
Storage temperature
-20^ to +60^ (-4^ to +140^)
Dimensions (approx.)
102× 106× 212mm
(41 / 8 × 41 / 4 × 83 / 8 in.) (w / h / d)
Mass (approx.)
740g (1 lb 10 oz)
excluding the battery pack, lithium battery, cassette and shoulder strap 880g (1 lb 15 oz)
including the battery pack
NP-F330, lithium battery CR2025, cassette P5-90 and shoulder strap
Supplied accessories
See page 5.
AC power adaptor
Power requirements
100 - 240 V AC, 50/60 Hz
Power consumption
23 W
Output voltage
DC OUT: 8.4V 1.5 A in operating mode
Operating temperature
0^ to 40^ (32^ to 104^)
Storage temperature
-20^ to +60^ (-4^ to +140^)
Dimensions (approx.)
125× 39× 62mm
(5× 19 / 16× 21 / 2 in.) (w / h / d)
excluding projecting parts
Mass (approx.)
280 g (9.8 oz)
excluding mains lead
Battery pack
Output voltage
DC 7.2 V
Capacity
5.0 Wh
Dimensions (approx.)
38× 21× 71mm
(19 / 16× 13 / 16× 27 / 8 in.) (w / h / d)
Mass (approx.)
95 g (3.4 oz)
Type
Lithium ion
Design and specifications are subject to change without notice.
Bvdeokamepa
CnCTema
Cnctema Bndeo3annc
2BpaaioiuecraTIOBKn
CnCTema NaKIOHHO
mexaHHuecko pa3BepTkU CM
CnCTema aydnno3anncn
Bpaaiouuee rOIOBKn, CnCTema
BudocnHa
LBeTobOu CnHan PAL, cTaHapr MKKP
UcnoJb3yeMbIe KacceTbl
KacceTbI 8-MM BnDeoΦopMaTa
CtAndapt 8
Bpem3aunC/
Bocnpon3BeDeHn(npn
NCNoIb3ObaHn KacCeTbP5-90)
PexmmSP:1cac30MmhyT
Pexim LP: 3 yaca
Bpemy yckopenno nepemotkn Bnepd/na3a
3NeKeTpnueckn BvDOnckaTeIb (MOHOxPOMaTnueckn)
ΦopMnpoBaTeIb 306paXeHn
1/6-ДюМOBьП3С (прборсзардовсCB3bO)
Pπü6n3.320000 3πeMéHToB n3o6paxēHnA (3ΦΦeKTHbHbI: npi6n. 290000 3πeMéHToB n3o6paxēHnA)
ObekTNB
KombHnpoBaHHo6bEaNTBc npNBOHbIM TpaHc0kaTopOM
DnametpΦnNbtpa 37 MM
20-KpaTbIy (OHTuYeCKn),
200-KpaTbHbI (uΦpOBoI)
ΦokychoepacctOarHne
3,6-72 MM
PnI pneo6pa3ObaHm B 35-MM
ΦoToKamepy
51,8-1036 MM
LBeTOBa TEMnepaTypa
ABTOperyIInpOBAHne
MnHmMaIbHaA OCBeUeHHoCTb
1 nK (F 1,4)
0 JIK (B pexkme HocHOn CbEmKn)
* CbEmky OboeKTOB, HEBNIMbIX B TEMHOTE, MOxHO BbIOJNHRTb C NOMOuBIOHΦpaKaPachORO OCBeueHnA.
Pa3beMbI BXoHbIX BblXoHbIX CnHaJIOB
BbIXoD BnDeocnHaHa
Фоногнздо,раимax сгнана1В, 75Om, HeCIMMepuHbI
BbIXoA yAnocnHaHa
MoHOpOHUHeCKn, pOHOrHe3do, 327 MB
RFU DC OUT
CneuaJIbHOe MmHrHe3do,5B NOCTOHHORTO TOKA
Tne3do ynpablenenLANC
CTepeofoHnueckoe MHNI-ΓHe3d0 (2,5 MM)
THe3doMIC
MOHOPOHUNHeCKOe MHNr-He3do (3,5 MM)
06uee
Tpe6obAHnK nntahnIO
7,2B(6aTapeeHbIb6JIOK)
8,4 B (ceTeBoi aanTep npeMeHHoro Toka)
CpeHnI npTe6pHemam MOUHOCTb
(npnncnojb3OBaHm
6aTapeHoro 6Ioka)
BoBpMa 3aIcN BnDeOkampeo 2,3Bt
Pa6o7a TEmpepaTpa
OTo 0^ do 40^
Tempepatypxpanen
OT-20°C dσ +60°C
Pa3mepbl (npn6n3.)
102× 106× 212MM (U/B/Γ)
Bec (npn6Jln3.)
740r
He BkIooJa 6aTaapeHOrO 6NoKa, NITneBoi 6batapeKn, Kaccetbl n IINBeBorpo pemhry 880 Kr
BkJIOUa 6aTapeHbI 6LoK
NP-F330, nntnebyo 6aTapeky
CR2025, kaccety P5-90 n pIeueBoPpeHb
PpInaraemble npHuaJeXhoCTn
CM. cTp. 5.
CetéBoi aáanTep nepemehHoro TOKa
Tpe6oBaHnK nntaHnIO
100-240B nepemehnHOToKa, 50/60 T
Noprpe6IeMaMoUHocTb 23Bt
BbIXoHoe HnpaXeHne
DC OUT: 8,4 B; 1,5 A B pa6o7em peXmme
Pa6o7a TemnepaTpa
OT 0^ do 40^
TemnepatypxaPahEnH
OT-20°C dσ +60°C
Pa3mepbl (npn6bn3.)
125× 39× 62MM (山/B/r)
He BkIIOUaB YbIcTpyNaIOUIne YAcTNI
Bec (npn6n3.)
280r
He BkIIOUaCeTeBOu shHyp
BaTapeHbI 6JIOK
BbIXoHoe HappXeHne
7,2B noct. Toka
EMKOCTb
5.0 B74
Pa3mepbl (npn6bn3.)
38× 21× 71MM (W/B/r)
Bec (npn6n3.)
95r
Tun
JIITNHEBO-NOHHbI
KOHCTPYKUINI INTEXNUCKNEXAPAKTEPNCNTMOKYMOBTbITNIMENHEE63B YEBDOMNEHIN.
Identifying the parts and controls
1 POWER switch (p. 19)
2FOCUS switch (p. 42)
NEAR/FAR dial (p. 42)
4 Eyecup (p. 77)
5 Eyecup RELEASE knob (p. 77)
Viewfinder lens adjustment lever (p. 22)
7 Power zoom lever (p. 21)
BATT RELEASE lever (p. 12)
9 STANDBY switch (p. 19)
10 START/STOP button (p. 19)
1 Hooks for shoulder strap (p. 84)
DCIN jack (p. 13, 17)
1 NpeekJIIOHaTeJIb POWE(BTp. 19)
2IpekeKJIIOHaTeJIbFOCUSTp.42)
3ДиCK NEAR/FArCTp.42)
4 Okynap(ctp.77)
5 Khonka okyjra RELEEtp. 77)
6 Pbyar peryunpoBkn obbeKTnBa BuDOnckaTeJIaCtp.22)
7 Pbyar npHBODHOro BapNo06bekTnBa (cTp. 21)
8 Pbyar BATT RELEASEctp.12)
9IpekeKJIIOHaTeJIb STANDBCTp.19)
10 Khonka START/STOPtp. 19)
11 KpOyOK dIa IJIeYeBOrOp eMHCTp. 84)
12 THe3do DC IN (cTp. 13, 17)

This mark indicates that this product is a genuine accessory for Sony video products. When purchasing Sony video products, Sony recommends that you purchase accessories with this "Genuine VIDEO ACCESSORIES" mark.

Video control buttons (p. 29, 30)
STOP (stop)
REW (rewind)
PLAY (playback)
FF (fastforward)
PAUSE (pause)
14 EDITSEARCH button (p. 27)
15 Lens cover (p. 19)
16 Camera recording lamp (p. 19)
17 Infrared rays emitter (p. 24)
18 Microphone
19 NIGHTSHOT switch (p. 24)
20 Display window (p. 87)
21 Tripod receptacle (base)
Make sure that the length of the tripod screw is less than 6.5mm (9/32 inch). Otherwise, you cannot attach the tripod securely and the screw may damage your camcorder.
13 Khonkn Bndeokohtp.29,30)
STOP (ocTaHOBka)
REW (yckopenhna nepemOTka Ha3a)
PLAY (Bocnpo3BeJeHne
FF (yckopeHnna nepemOTka Bnepei)
PAUSE (nay3a)
14 Khonka EDITSEARCHtp. 27)
15 Kpbioka oBekTeBap. 19)
16J lamnoka 3ann Cn Bundeokamepp.19)
17 ɪnʒnyaTeɪb nɪhɒpaɪkpaɪchbɪx Iŋyɛn (cɪtp. 24)
18 MmKpoΦoH
19 NpeeknouateNB NIGHTSHQcTp.24)
20 Okowko dincnlp.87)
21 THe3do DnI TpeHOrn (OCHOBaHHe) Y6eDInTeCb, yTO dINHa BInHTa TpeHOrn MeHee 6,5 MM. B nPoTnBHom Cnyuae BbI He cMOxKeTe HaJeXHO pNkPepNTb TpeHOry, a BnHT MoKcTe NOBpeDInTB BaUy BNDeOkamepy.
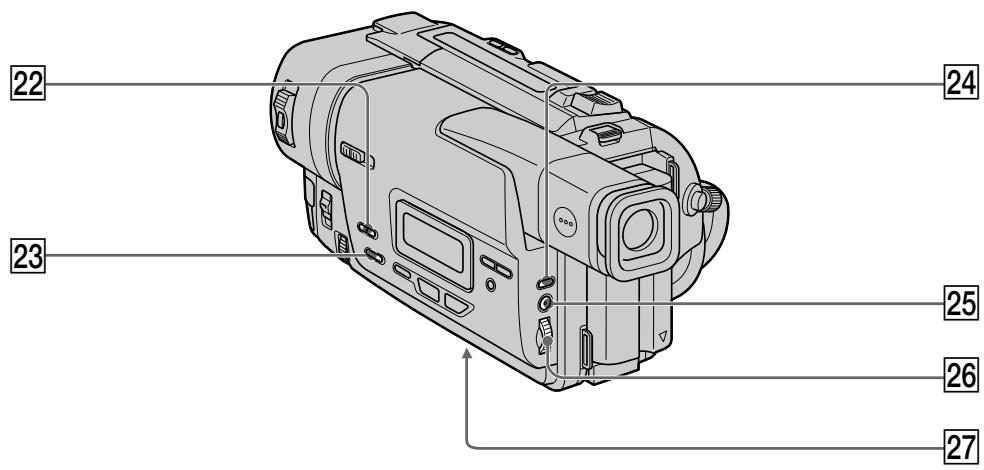
22 FADER button (p. 34)
23 BACK LIGHT button (p. 23)
24 EXPOSURE button (p. 41)
25 MENU button (p. 49)
26 SEL/PUSH EXEC dial (p. 32)
27 Lithium battery compartment (p. 62)
Attaching the shoulder strap
Attach the shoulder strap supplied with your camcorder to the hooks for the shoulder strap.
LANC stands for Local Application Control Bus System. The control jack is used for controlling the tape transport of video equipment and other peripherals connected to the video equipment. This jack has the same function as the jack indicated as CONTROL L or REMOTE.
37 Cassette compartment (p. 18)
38 Grip strap
RFU DC OUT (RFU adaptor DC output) jack (p. 28)
MIC jack (PLUG IN POWER)
Connect an external microphone (not supplied). This jack also accepts a "plug-in-power" microphone. If you connect a 2-pin microphone, supply power from DC OUT jack.
41 AUDIO/VIDEO jacks (p. 28)
Fastening the grip strap
34 BvDOnuCKaTeNb (cTp. 22)
35 BbIKHouaTeNb EJECT (cTp. 18)
36 THe3o yIpaBLeHnA LANC
LANC 03haaet CnCTemy KaHaJa MeCTHOrO ynpableny. He3do ynpableny I nCNoIb3yeTcIg KOnTPOJIra 3a nepMeIeHemJeHTb BInDeoAnnapaTypbI INepiFepinBHXvCTpoJcTB,IOKnIOUeHHbIX K He.I DaHHOe THe3Do IMeET TaKyo JKe fYHKUNIO,KaIK pa3bEMbl,060NaueHHbIe kak CONTROL L uIN REMOTE.
37 KaccetHbI b OTcE (ctp. 18)
38 PemehbДЯЗaxBaTa
39Гнэзdo RFU DC OUT (Выхов пост. Тokeda B4-aantera) (ст. 28)
40 THe3do MIC (PLUG IN POWER)
Длноюсоевинь Вьшиму МИкpoфona(He npinaraeTcH).3To rHe3do TaKxE no3BONHET NOkIIOUHTb MIKPOФОн C BbIKNQUaTeIeM NITAHNA).Пи nOLOCoEDINHEHIN 2-ISTbIPbKOBOrO MIKPOfOHa,NOBdOB nTahnA cIeDyET BbIOJHnTb Ype3r He3do DC OUT.
41 THe3da AUDIO/VIDEO (ctp. 28)
PpIKpeIeHne pemHn dIa3xAbaTa
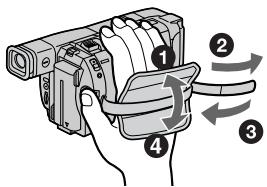
Operation indicators
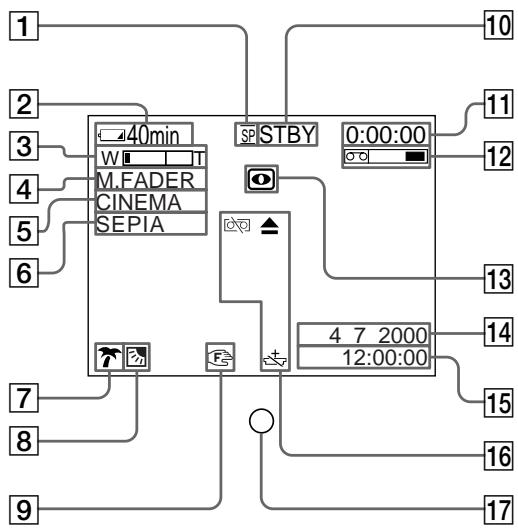
Viewfinder/BudonckaTeIb
Pa60ue nHdkaTopbI
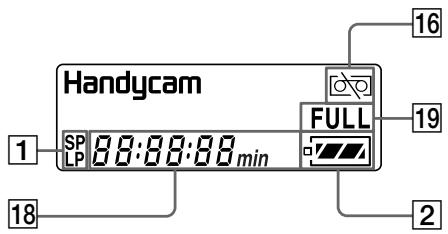
Display window / Okosko dinclner
1 Recording mode indicator (p. 52)
2 Remaining battery time indicator (p. 23)
3 Exposure indicator (p. 41)/Zoom indicator (p. 21)
4 Fader indicator (p. 34)
5 Wide mode indicator (p. 31)
6 Picture effect indicator (p. 37)
7 PROGRAM AE indicator (p. 38)
Backlight indicator (p. 23)
9 Manual focusing indicator (p. 42)
STBY/REC indicator (p. 23)/Video control mode indicator (p. 30)
11 Tape counter indicator (p. 23)/Self-diagnosis display indicator (p. 67)
12 Remaining tape indicator (p. 23)
13 NIGHTSHOT indicator (p. 24)
1HndkaToppeXnma3anKcnp.56)
2Индкатор octabweroc3apra6baTapeHoro 6nokatp.23)
3 INHdNkaTop 3Kcno3n41)/ INHdNkaTop BapNo06bekTn(Bap.21)
4 INHnKaTop feiepa(ctp. 34)
5 INHdNkaTOp shpOKoΦopMaTHoro peXKIMa (ctp.31)
6 INHdNkaTop 3ΦΦekTa n3o6paXeHnA (CTp. 37)
7 INHdNKaTOp PROGRAM AETp. 38)
8 INHdNkatOp 3aHHei NOcBETKrp.23)
9 INHdNKaTOp pyHoiΦokycnpoEKnP. 42)
10 INHdNkaTop STBY/REQCTp. 23)/ INHdNkaTop peXnMa BnDeOkoHTpoJIa (ctp. 30)
11Индкатор счетунка Л(TТР.23)/
Индкатор ФункцииCAMOD纳HOCTNKN
(ст.72)
12 INHdNkaTop ocTaBWeJcneHTp 23)
13 INHdNKatop NIGHTSHOTcTp. 24)
14 AUTO DATE indicator (p. 59)/Date indicator (p. 26, 59)
Time indicator (p. 26, 59)
16 Warning indicators (p. 68)
17 Recording lamp (p. 19)
18 Date or time indicator (p. 26, 59)/Tape counter indicator (p. 23)/Self-diagnosis display indicator (p. 67)/Remaining battery time indicator (p. 13)
19 FULL charge indicator (p. 13)
14 INdInKaTOp AUTO DATEtp.59)/ INdInKaTOp DaTp.26,59)
15ИнданkaTopВразим�н(ст.26,59)
16Ipeynpekkaioune HndkaTOpTeP.73)
17Jamnoyka3annCnp.19)
18 INHdNkATOp DaTbI HINBpeMeBnP.26, 59)/INHdNkATOp CteTnKa JEBTpI 23)/ INHdNkATOp FyHKcnn CaMOHaNRHOCTNK (ctp.72)/INHdNkATOp BpeMeHN octabweoC3apraDa 6aTaapeHoro 6loka (ctp.13)
19Инданкатор зардкн FULI(ctp. 13)
Functions to adjust exposure(in the recording mode)
In a dark place
NIGHTSHOT (p. 24)
- In dark environments such as sunset, fireworks, or general night views
Sunset & moon mode (p. 38)
- Shooting backlit subjects
BACK LIGHT (p. 23)
- In spotlight, such as at the theatre or a formal event
Spotlight mode (p. 38)
- In strong light or reflected light, such as at a beach in midsummer or on a ski slope
Beach & ski mode (p. 38)
Functions to give images more impact (in the recording mode)
- Smooth transition between scenes
FADER (p. 33)
Digital processing of images
PICTURE EFFECT (p. 36)
- Creating a soft background for subjects
Soft portrait mode (p. 38)
Superimposing a title
TITLE (p. 44)
Functions to give a natural appearance to your recordings (in the recording mode)
- Preventing deterioration of picture quality in digital zoom
D ZOOM [MENU] (p. 49)
- Focusing manually
Manual focus (p. 42)
- Shooting distant subjects
Landscape mode (p. 38)
- Recording fast-moving subjects
Sports lesson mode (p. 38)
Functions to use in editing (in the recording mode)
- Watching the picture on a wide-screen TV
Wide mode (p. 31)
- Recording with the date/time
Date and time (p. 26)
Enhancing old tapes
ORC [MENU] (p. 49)
Functions to use after recording (in the playback mode)
- Correcting jitter
TBC [MENU] (p. 49)
- Correcting colour noise
DNR [MENU] (p. 49)
PyuHaФokycnpoBka(cTp.42)
- Cběmka ydāJIeHHbIX oBékToB
JaHuaTbIy peXm (CTp. 38)
- 3aɪnɪc bɪctpɒ ἀνιχκuʒɪnxCə oʊbɛkTob
PéxkIM cnpTnBbIX COCTaHm (cTp. 38)
AC power adaptor. 13
Adjusting viewfinder 22
A/V connecting cable 28,48
BACK LIGHT 23
Battery pack 12
Beep 53
BOUNCE 33
C, D
Charging battery 13
Clock set 58
Connection (viewing on TV) 28
(dubbing a tape) 48
DEMO 53
DNR 51
Dubbing a tape 48
E
EDIT 51
EDITSEARCH 27
Exposure 41
External microphone (not supplied) 86
F, G, H
FADER 33
Fade in/out 33
FOCUS. 42
Full charge 13
Grip strap 86
Heads 76
I, J, K, L
"InfoLITHIUM" battery 16
Infrared rays emitter 24
LANC 86
LP mode 52
M, N
Manual focus 42
Menu settings 49
Moisture condensation 75
MONOTONE 33
Mosaic fader 33
NIGHTSHOT 24
Normal charge 13
O, P, Q
Operation indicators 87
ORC 52
PAL system 74
Picture effect 36
Picture search 30
Playback pause 30
Power sources
(mains) 17
(car battery) 17
(battery pack) 12
Power zoom 21
PROGRAM AE 38
R
Rec Review 27
Recording and playback systems 61
Recording mode 52
Recording time 15
Remaining tape indicator 23
Remaining battery time indicator 23
Remote control jack (LANC)....86
RFU adaptor 28
s
Self-diagnosis display 67
SEL/PUSH EXEC dial 84
Shoulder strap 84
Skip scan 30
Standard 8 mm system 60
STRIPE 33
Superimposing the date and time 26
T, U, V
Tape counter 23
TBC 51
Telephote 21
Title 44
Transition 27
TV colour systems 74
W, X, Y, Z
Warning indicators 68
Wide-angle 21
Wide mode 31
WORLD TIME 53
Write-protect tab 18
Zoom 21
AлфаВиТьи yka3aTeЛь
A,B,B,Γ
BaTapeiHbI 6Jok 12
БатAPEйьблOK
"InfoLITHIUM" 16
BapnoooBekeTINB 21
BVeDeHnE/BbVeBeHnE n3o6paXeHnA 33
BHeuHmMnKpOΦoH(He npnaaraetcra) 86
Bpem 3aHcN 15
B4-aanterp 28
Tolobkn 76
THe3IOnDInCTaHcUHOHHoR OyPbABeHnI (LANC) 86
D,E,X,3
Dnck SEL/PUSH EXEC 84
3apraKa 6aTapeHoro 6Ioka ... 13
3ymmepnbcnrhaJI 53
M, K, JI, M
I3nyatelb HnphpaKpaChbix nyuen 24
INHINKATOP octabweroC03apra6batapeuHoro6noka 23
INHnKaTop ocTbWeiCnJIeHTbl 23
HnDnkauncmaOuaarHocnKu 67
NCTOCHNIPIITAHINABTOMOJIbHbIANKYMJITOP) 17
(6aTapeHbI 6JIOK) 12
(3JIeKtpnuecka cetb) 17
KoHdEHCaunBlaarn 75
JenectOK 3aunTbI 3anncn ....18
Mo3aunHbI ΦeIdep 33
H, O
Haioxehne daTbI BpeMeHn ...26
HopmaJIbHa 3apIka 13
P
Pay3a Bocnpn3VeJeHn 30
Ppe3aIncb IeHTbl 48
IepexoI 27
PJIeueBoI pemeHb 84
ПодсоедиЕне
(пегеэдир лентbi) 48
(посмотр на зкран
Телевзора) 28
Ponck n306paXeHnA 30
Ponna 3apka 13
Ponck MeToDom nporoHa 30
IpeDynpexJaIoUne INHdkaTOpbl 68
PpmboHOBaPno06bekTnB..21
PpocMoTp 3aannn 27
Perynipobka BnDOnckaTeJr ... 22
PemeHbIa3axBaTa 86
Pexim 3ann.. 52
Pexm LP 52
PyuHaJΦokycnpoBka 42
C, T
Cetebon aanTep nepemehnoro Toka. 13
CoeHInTeIbHbI Ka6JIb ayDIO/ BnDeo 28,48
CnCTema 3aIncn n BocpOIN3BeDHeHn 61
CnCTemblcBETHOro TeIeBnDeneHn 74
Cnctema PAL 74
CTaHdapTHa8-MM CnCTema..60
CHTyNK JIeHTbl 23
Tepeoto 21
Tntp 44
y-
UcTaHObKa YacOB 58
YCTaHOBKn MeHIO 49
Функциональные
Индikatopbl................................... 87
UipokoyrolbHaCbEMKa ....21
山poko3kpanhbypexm.....31
3Kcno3nua 41
36
A,B,C,D
BACK LIGHT 23
BOUNCE 33
DEMO 53
DNR 51
E,F,G,H
EDIT 51
EDITSEARCH 27
FADER 33
FOCUS 42
1-0
LANC 86
MONOTONE 33
NIGHTSHOT 24
ORC 52
P-Z
PROGRAM AE 38
STRIPE 33
TBC 51
WORLD TIME 53